

Page 1
Copyright © 2001 Jaton Corporation, USA.
NOTICE
The information in this document is subject to change, as the
Company may make changes to product in order to improve
User’s Guide
version 4.00
-SR-SR
Page 2

SonicWave - SR
User’s Guide
Version 4.0
2
reliability, design, or function, without prior written notice. No
part of this manual may be reproduced or transmitted in any
form or by any means without the written permission of the
company.
IN NO EVENT WILL THE COMPANY BE LIABLE FOR SPECIAL
INCIDENTAL OR CONSEQUENTIAL DAMAGES, WHETHER
ARISING DIRECTLY OR INDIRECTLY, SUCH AS LOSS OF
PROFIT OR GOOD WILL, THAT MAY BE SUFFERED IN
CONNECTION WITH THE PURCHASE OF THIS PRODUCT OR
FROM THE BREACH OF ANY REPRESENTATION OR
WARRANTY.
July 2000, Rev A
LICENSE
The Company grants the customer a non-exclusive, nontransferable license to use the software, if any,
accompanying this product for internal use on a single
computer system. The end user may make a single copy
of the software solely for backup purposes; otherwise, no
copies may be made of the software or any part thereof.
No other license of any kind is granted to any part of the
product or any of the intellectual property therein.
TRADEMARK ACKNOWLEDGMENTS
SonicWave User's Guide, Jaton Corporation 1998. All rights
reserved.
FortéMedia, Inc. is a registered trademark of FortéMedia, Inc.
Direct3D, DirectX, DirectSound, DirectSound3D, DirectMusic, and
DirectInput are trademarks of Microsoft Corporation; Windows,
Windows 3.1, Windows 95, Windows 98, Windows Me, Windows
2000, Windows XP and Windows NT are registered trademarks of
Microsoft Corporation.
SoundBlaster and SoundBlaster Pro are trademarks of Creative Labs,
Inc.
All other product names or trademarks are the property of their
respective owners.
Copyright protection claimed includes all forms and matters of
copyright table material and information now allowed by statutory or
judicial law or hereinafter granted, including without limitation, material
generated from the software programs which are displayed on the screen
Page 3

SonicWave - SR
User’s Guide
Version 4.0
3
such as icons, screen display looks, etc. Reproduction or disassembly of
embedded computer programs or algorithms is prohibited.
Table of Contents
INTRODUCTION............................................................................6
WHY PCI SOUND CARD?.............................................................6
FEATURES: .....................................................................................7
ABOUT THIS DOCUMENT............................................................7
SYSTEM REQUIREMENTS...........................................................8
HARDWARE DESCRIPTION.......................................................9
SONICWAVE-SR2 PCBLAYOUT................................................9
SONICWAVE-SR4 PCBLAYOUT................................................9
SONICWAVE-SR6 PCBLAYOUT..............................................10
HARDWARE INSTALLATION..................................................10
4.1 INSTALLATION STEPS: ........................................................10
DRIVER INSTALLATION:.........................................................13
ÿÿ WINDOWS 98 DRIVER INSTALLATION..........................13
CD Autorun Setup.................................................................19
CD Manual Setup...................................................................21
V ERIFYING THE FM801 DRIVER INSTALLATION FOR
WINDOWS 98...............................................................................24
FORTÉMEDIA CONTROL PANEL FOR WINDOWS 98............26
ÿÿWINDOWS ME DRIVER INSTALLATION......................33
CD Autorun Setup.................................................................34
V ERIFYING THE FM801 DRIVER INSTALLATION FOR
WINDOWS ME..........................................................................35
ÿÿWINDOWS 2000/XP DRIVER INSTALLATION.................36
Page 4

SonicWave - SR
User’s Guide
Version 4.0
4
ÿÿWINDOWS NT4.0 DRIVER INSTALLATION.....................38
PCI Sound Card Driver install from Autorun.....................38
Manually Install PCI Sound Card Driver............................40
V ERIFYING THE FM801 INSTALLATION FOR WINDOWS
NT4.0.............................................................................................46
WINDOWS NT DRIVER UNINSTALL.........................................49
DOS DRIVER INSTALLATION (WITHOUT WINDOWS)..........51
FM801 PCI Sound Card Step by Step DOS Drive
Installation...............................................................................52
EZAUDIO™ SOFTWARE APPLICATION.............................56
INTRODUCTION...........................................................................56
ACTIVATING EZAUDIO™.........................................................57
EZAUDIO™ COMPONENT DESCRIPTION...............................58
PLAY EZAUDIO™.......................................................................59
EZAUDIO™ RECORDING...........................................................59
SELECTING CD, MIDI, OR WAVE TITLES ..............................60
THE CD PLAYLIST ......................................................................60
THE MIDI PLAYLIST ..................................................................61
THE WAVE PLAYLIST ...............................................................62
PLAY MIXER..............................................................................63
RECORD MIXER.........................................................................64
FREQUENTLY ASKED QUESTIONS &
TROUBLESHOOTING .................................................................67
WHAT ARE THE CONFIGURATION PROBLEMS?....................68
WHAT ARE DMA CHANNELS AND PCI? ................................69
WHAT SHOULD I DO IF I HAVE PROBLEMS WITH PLAYING
GAMES?.........................................................................................69
CAN I INSTALL TWO SOUND CARDS?......................................70
WHY ARE SOME OF THE WINDOWS MULTIMEDIA
COMPONENTS (I.E. MEDIA PLAYER) MISSING?.....................70
WHAT HAPPENED IF MY FM801 SOUND CARD AND DRIVER
ARE BOTH PROPERLY INSTALLED, YET, THERE IS STILL NO
SOUND?.........................................................................................70
Page 5

SonicWave - SR
User’s Guide
Version 4.0
5
HOW DO I CHANGE VOLUME AND BALANCE LEVELS IN
WINDOWS 9X?.............................................................................71
MY MICROPHONE RECORDS AT VERY LOW LEVELS, WITH
DISTORTION, OR NOT AT ALL?................................................71
WHY DOESN’T MY CD AUDIO WORK?....................................72
WHAT TO DO IF SOUND CARD IS NOT FOUND OR IRQ IS NOT
ASSIGNED TO FM801 PCI SOUND CARD?.................................73
HOW TO ADJUST SB IRQ/IO/DMA FOR SOME DOS GAMES?74
DOES FM801 SUPPORT LINUX OS?..........................................75
WHAT ARE THE 2-SPEAKER, 4-SPEAKER AND 6-SPEAKER
AUDIO OUTPUT OPTIONS USED THAT CAN BE FOUND IN
FORTÉMEDIA CONTROL PANEL?............................................75
WHY ARE TWO INTERRUPTS ALLOCATED FOR MY FM801
SOUND CARD?..............................................................................75
TECHNICAL SUPPORT................................................................76
LIMITED WARRANTY................................................................78
OTHER LIMITS.............................................................................78
EXCLUSIVE OBLIGATION...........................................................79
OTHER STATEMENTS................................................................79
TERMS AND CONDITIONS..........................................................79
SERVICES AGREEMENT: .............................................................80
ENTIRE OBLIGATION.................................................................80
REDUCING WARRANTY CLAIM REJECTIONS..................81
Page 6

SonicWave - SR
User’s Guide
Version 4.0
6
INTRODUCTION
Congratulations! You have purchased a Jaton PCI
Sound Card that will bring you endless enjoyment
in playing SoundBlaster games, computer music,
and many more features! With this Sound Card
you will experience the latest audio technology…..
so get ready to be impressed!
SonicWave-SR sound card is an advanced audio
controller for the PCI Bus. FortéMedia (chipset
maker), a leader in the PC Multimedia industry,
developed the FM801 technology. It is
compatible with Microsoft Windows, Microsoft
DirectX and Thousands of DOS games. Legacy
Audio block supports AdLib Music Synthesizer,
Sound Blaster Pro, MPU401 UART mode and
Joystick function in order to provide highest
hardware compatibility for numerous PC games on
real DOS environment.
SonicWave-SR PCI Sound card contains the result
of many years of experience in PC games, sound
and communication development. The sound can
be created with FM or wave-table synthesis and
held to a professional performance standard. Each
sound in the wave-table is derived from real
instrument sounds that have been carefully produced for inclusion in FortéMedia's extensive
sound library.
Why PCI Sound Card?
The PCI bus is far superior to the ISA bus. It is capable of
transferring data on a wider 32-bit bandwidth bus. This
Page 7

SonicWave - SR
User’s Guide
Version 4.0
7
allows much more data to pass from the PCI bus to the
host processor. The ISA bus is only capable of 16-bit
bandwidth transfers. Using the PCI bus will allow up to a
20 times increase in speed over much slower DMA
transfers on the ISA bus. This drastically reduces the
overhead on the host CPU. This tremendous processing
power opens up new possibilities for sound cards. Realtime software based sound fields are now possible without
bogging down the host CPU.
Features:
• PCI 2.1 Compliant
• Soft MPEG-II Support
• Microsoft DirectSound and MMSystem
Compliance
• 128-voice Software Wave-Table Synthesizer
support Available
• Superior 3D positional Audio Support
• Creative Environmental Audio (EAX) game
titles Compatible
• Native DOS Game Support without Software
Emulation
• Analog/Digital Joystick Interface
• Legacy Audio compatibility
• Hardware Sound Blaster Pro compatibility
• AdLib compatible Music Synthesizer
• MPU401 UART mode MIDI interface Joystick
About This Document
Many people don’t read manuals, however, an
ounce of caution is worth a pound of prevention,
so we do strongly recommended that you take a
few moments to go through these pages before
installing your SonicWave-SR hardware and
Page 8

SonicWave - SR
User’s Guide
Version 4.0
8
software.
This user’s guide contains Hardware and Software
Installation pilots to setup your SonicWave Sound
Card and its Driver Software for Windows9x/Me,
Windows2000/XP, Windows NT 4.0 and DOS
environment. It also provides the instructions on
how to use Audio Rack, an easy to use application
for playing digital MIDI music, wave sound and CD
audio on your PC. There is a "Setup" section in
this user’s guide, providing instructions on how to
recover, re-fresh and re-install SonicWave PCI
sound card drivers in a quick and convenient way.
Readers can also use the Setup program provided
to install or upgrade sound card drivers.
System Requirements
• Pentium CPU or equivalent*
• Windows 98, Windows Me, Windows 2000,
Windows XP, Windows NT4.0 or MS-DOS 6.0
or higher
• Microsoft DirectX version 6 or higher
• PCI Bus with one available Bus Master slot
• 16MB of RAM (32MB if you use software
Wave-table with 4MB sound library)
• Hard disk drive, 12MB free on your hard disk
• CD-ROM drive and Audio cable
• • Speakers
* Wavetable software bundled package recommends Pentium 166 or
higher.
Page 9

SonicWave - SR
User’s Guide
Version 4.0
9
HARDWARE DESCRIPTION
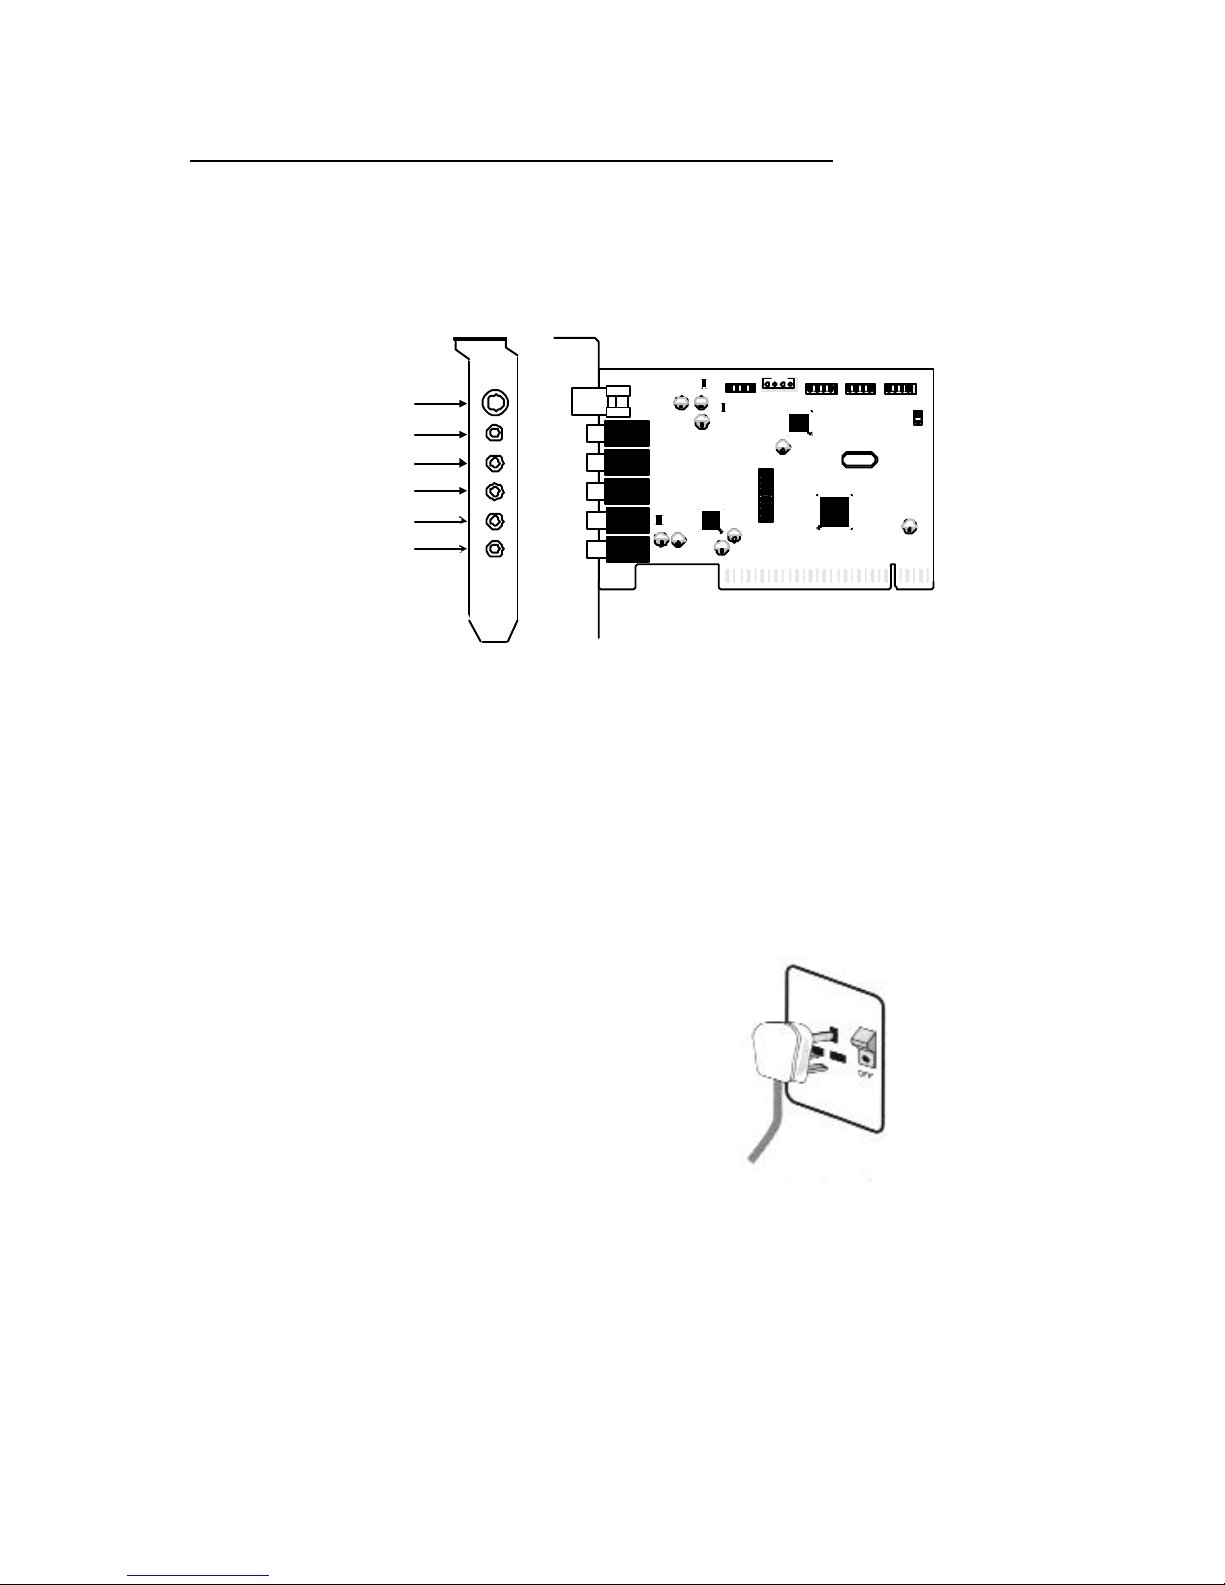
SonicWave-SR2 PCBLAYOUT
VIDEO AUX TAD
Plate
VIDEO 1
R G L G
PANASONIC 1
L G G R
SONY 1
MIC
LINE IN
SPEAKER
AUX 1
TAD 1
PC SPK
JP1
GAME 1
1
PCI Local Bus - -PnP
2 channel sound output
SonicWave-SR4 PCBLAYOUT
VIDEO AUX TAD
Plate
VIDEO 1
R G L G
PANASONIC 1
L G G R
SONY 1
MIC
LINE IN
FRONT SPEAKER
REAR SPEAKER
AUX 1
TAD 1
PC SPK
JP1
GAME 1
1
PCI Local Bus - -PnP
SPDIF OUT
4 channel sound output
* SPDIF OUT = 2 Channel sound output only.
Page 10
SonicWave - SR
User’s Guide
Version 4.0
10
SonicWave-SR6 PCBLAYOUT
VIDEO AUX TAD
Plate
VIDEO 1
R G L G
PANASONIC 1
L G G R
SONY 1
MIC
LINE IN
FRONT SPEAKER
REAR SPEAKER
CENTER & SUB
AUX 1
TAD 1
PC SPK
JP1
GAME 1
1
PCI Local Bus - PnP
SPDIF OUT
6 channel sound output
*SPDIF OUT = 2 Channel sound output only.
HARDWARE INSTALLATION
4.1 Installation Steps:
Ì Ì Turn your computer’s
power off.
Turn off the power to your
PC and any attached
peripheral devices such as
Printers, Scanner and
Monitor.
Page 11
SonicWave - SR
User’s Guide
Version 4.0
11
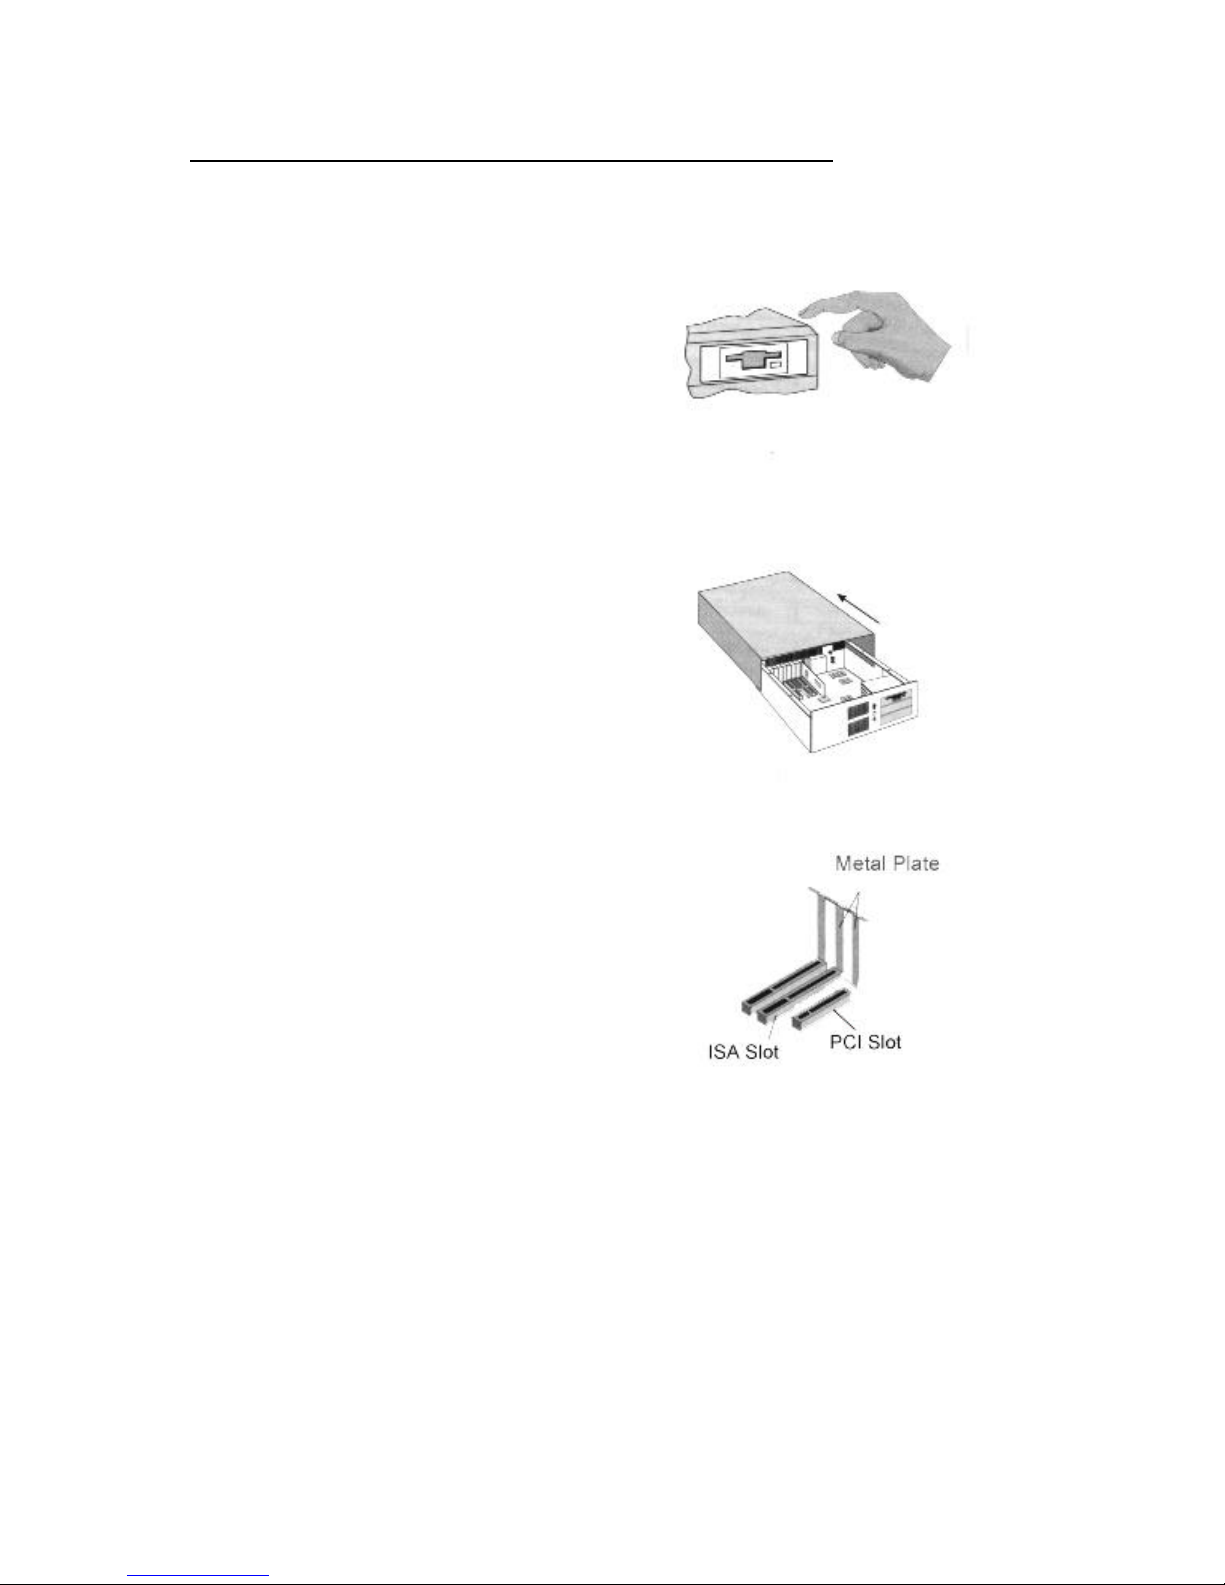
Ì Ì Discharge static
electricity.
Touch a metal plate on
your system to ground
yourself and discharge any
static electricity.
Ì Ì Remove the cover from
your PC.
Remove the computer’s
cover, retain the screws if
any.
Ì Ì Remove the silver
bracket on the back of
the PC.
Find an empty PCI slot
inside your computer.
Remove the silver bracket
behind the slot where you
want to install the sound
card. Save the screw.
Page 12
SonicWave - SR
User’s Guide
Version 4.0
12
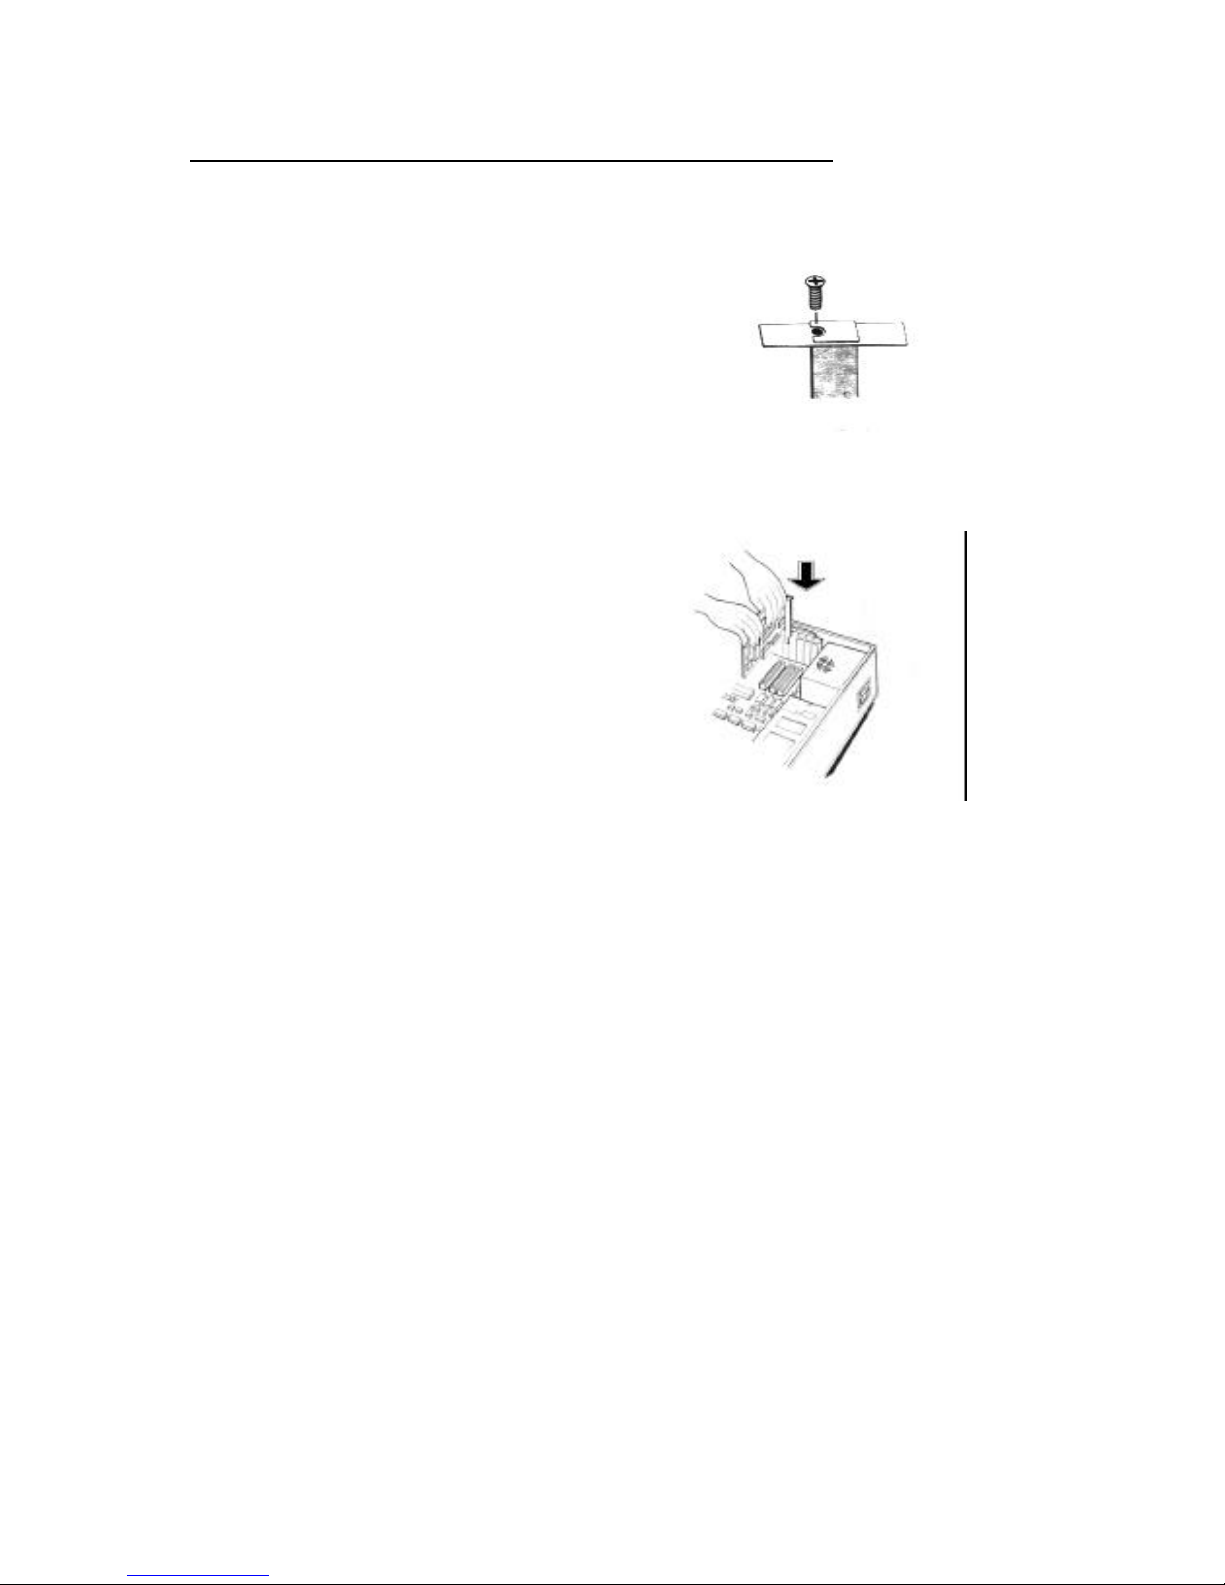
Ì Ì Loss the screw and
remove the bracket .
Remove the metal plate
from the slot you have
chosen and put the screw
aside.
Ì Ì Place the sound card
into an available PCI
slot.
[Before you remove the
sound card from its static
resistant bag, you must
discharge any static
electricity on your body
by touching a grounded
metal surface. When
handling this sound card,
hold it by its edges, and
avoid touching its
circuitry.]
Align the card to a PCI Bus expansion slot and gently
push down into. Secure the card to expansion slot
with the screw you removed from the metal plate.
Ì Ì Replace the cover on your PC.
Slide the cover back on your PC, and secure it with
the screws. Reconnect your power cord, and all
cables.
Page 13

SonicWave - SR
User’s Guide
Version 4.0
13
DRIVER INSTALLATION:
The FM801 PCI sound card has the following driver
support,
• Microsoft Windows 98/ME
• Microsoft Windows 2000/XP
• Microsoft NT 4.0
• Native DOS
The sound driver for Microsoft Windows operating
system are supported latest Microsoft compliance
and direct sound games, also supported the
legacy DOS SoundBlaster Pro compatible games as
well. The following sections and all steps on driver
installation are only describe mentioned above
operating systems.
Note:
• If you have not installed the PCI Sound Card, please
go back Section of Hardware Installation, for PCI
sound card install physically. We strongly
recommend you installing the hardware before
proceeding the driver installation.
• The driver set is in the CD which comes with your PCI
sound card.
ÿ Windows 98 Driver Installation
After power-up your computer, Windows 98 Plug-n-Play
will automatically detects your sound card and pops-up
the install wizard. Insert the software CD into your CD
ROM drive now. (Typically, D: or E: drive, etc.)
Page 14
SonicWave - SR
User’s Guide
Version 4.0
14
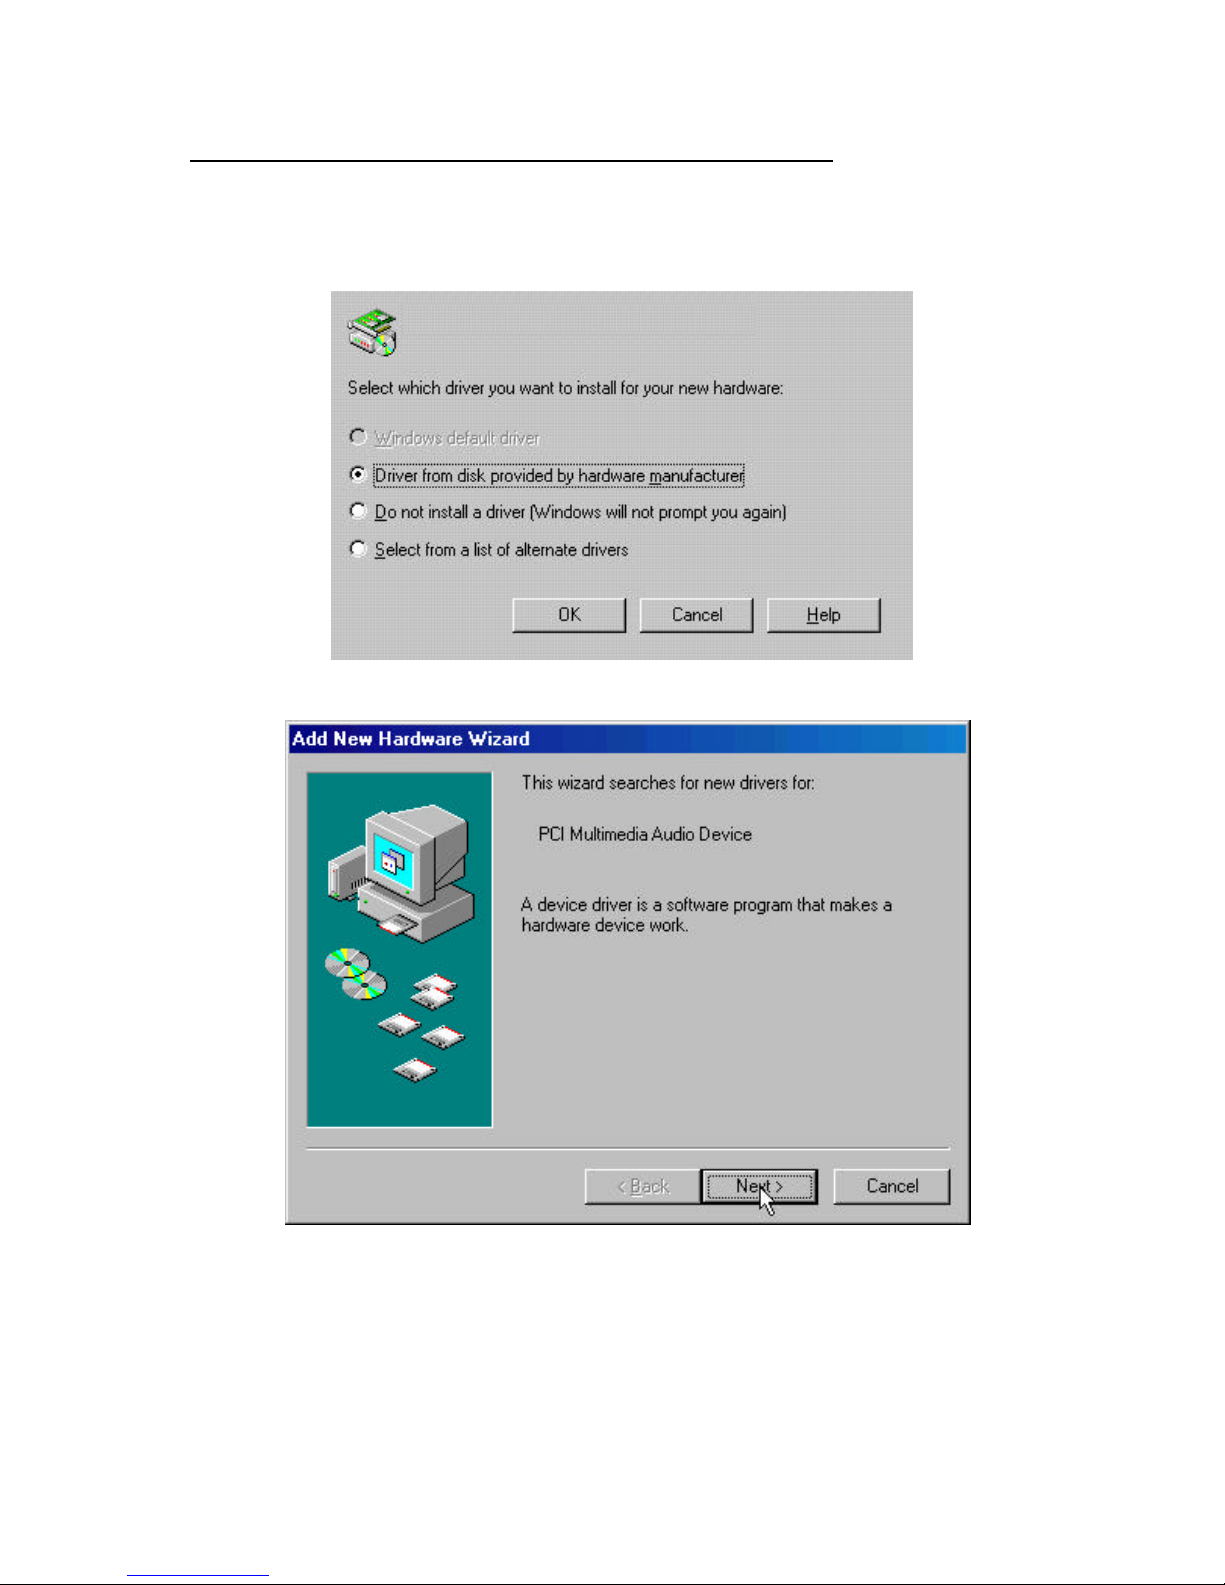
Installation Steps:
1. The Wizard will be guides you to begin the
installation.
2. Click “Next” to continue.
Page 15
SonicWave - SR
User’s Guide
Version 4.0
15
3. Follow the instruction on the Windows. Click “Next”
to continue.
Page 16
SonicWave - SR
User’s Guide
Version 4.0
16
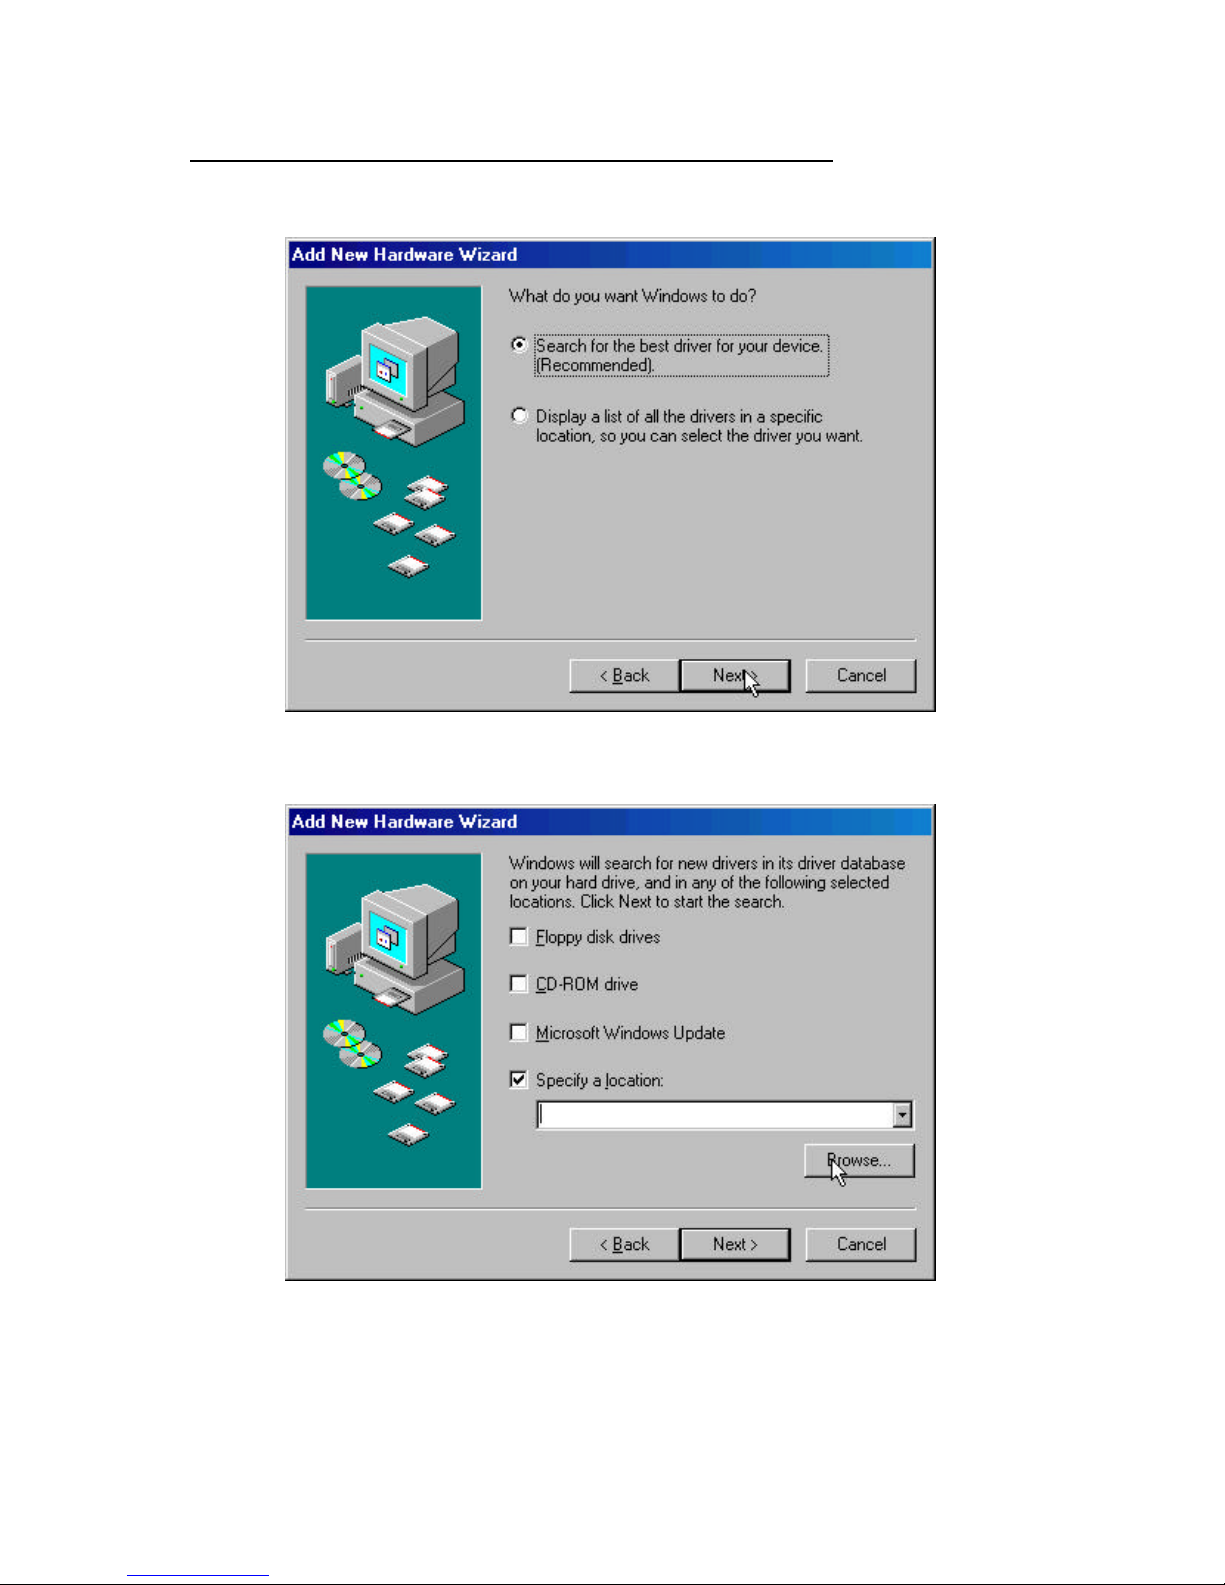
4. Check the “specify a location” box. Click the
“Browser” option to search for the location of the
driver.
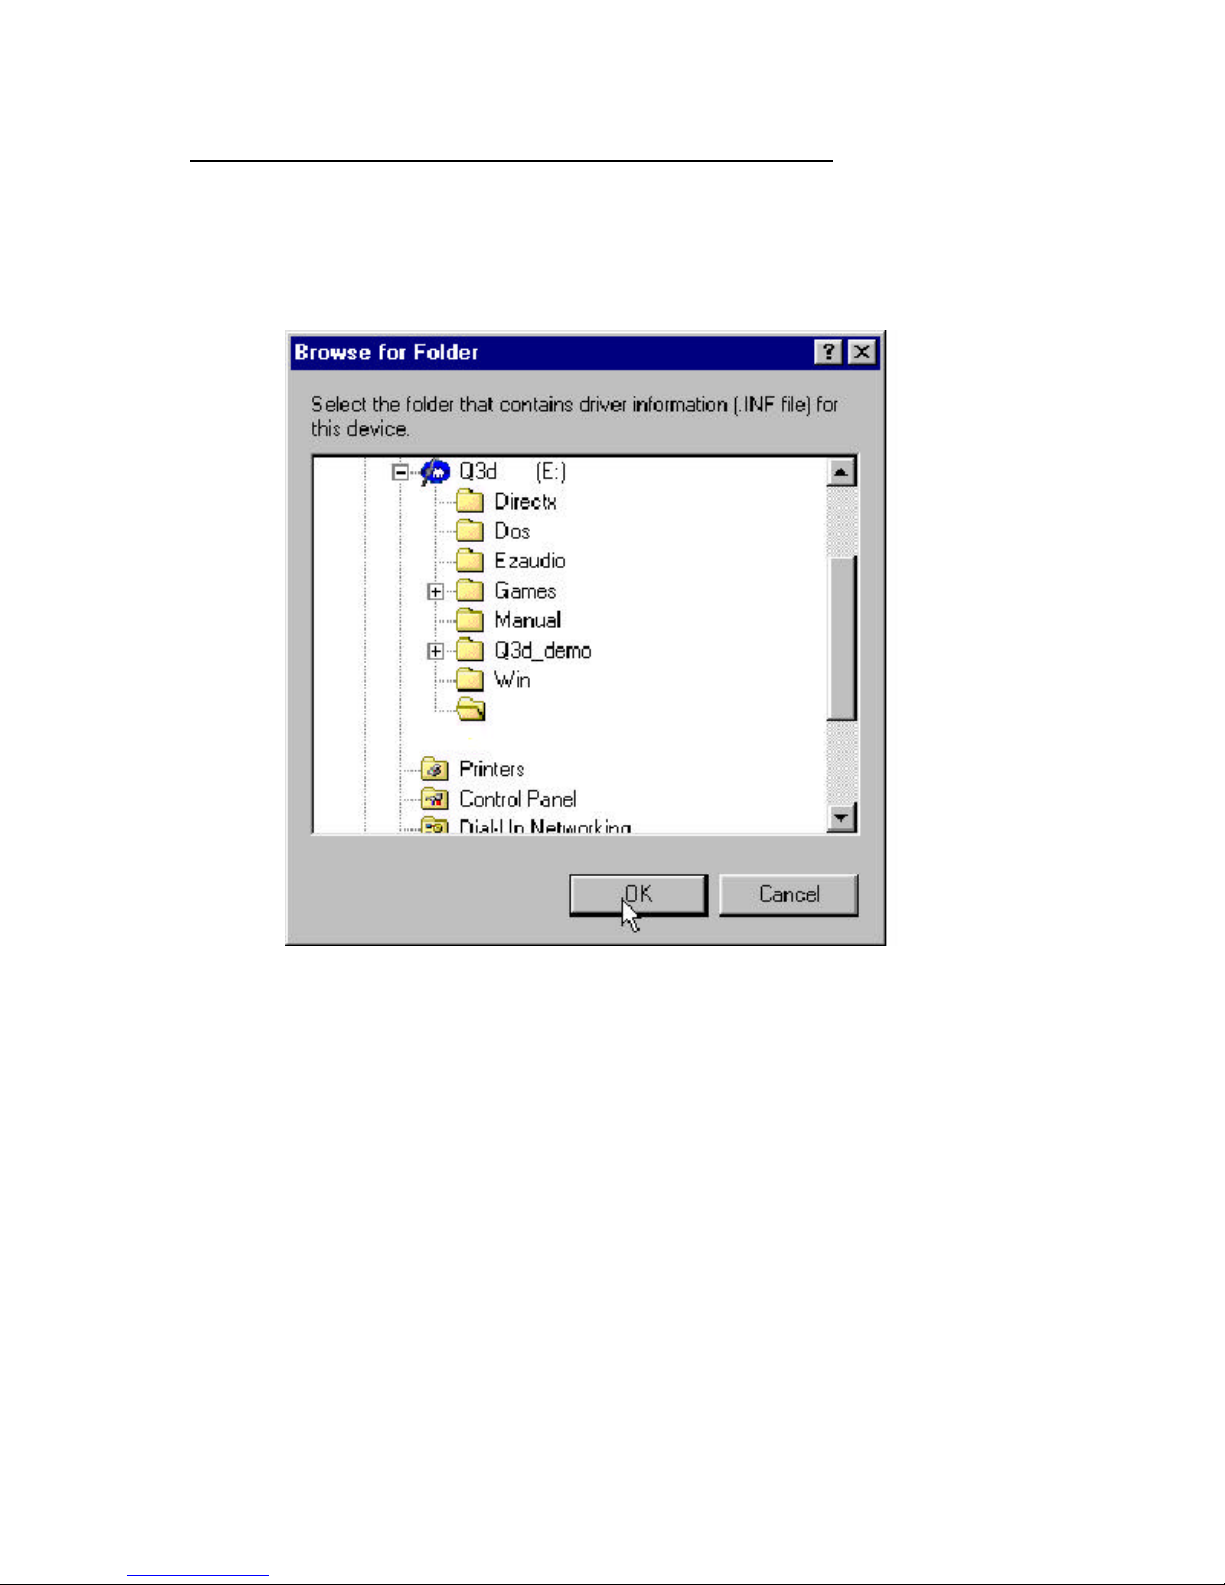
5. Open up the folder for the directory that contains the
driver and click “OK”.
Page 17

SonicWave - SR
User’s Guide
Version 4.0
17
6. Press “Next” when the location is specify.
7. Wizard shown the FM801 Audio/Game device when
the driver has been located properly. Press “Next”
again.
Page 18

SonicWave - SR
User’s Guide
Version 4.0
18
8. Windows now starts copying the files. Click “Finish”
to finish the Audio/Game Device installation.
Page 19

SonicWave - SR
User’s Guide
Version 4.0
19
9. FM801 Joystick Device should be found again. This is
second part of the installation. (Repeat the same
procedures indicated above from step 2-8).
The Setup utility can be run either through CD
Autorun feature implemented by Microsoft
Windows if properly activated, or one may run it
manually by executing the Setup program
provided in the driver disk or CD.
The utility will give users flexibility on driver
installation. It can be used for the following
purposes.
• Install driver before the hardware installation.
• One step driver installation
• Refresh installation when encountering difficulties in
manual installation of the sound card driver.
• Same utility will also be used for driver upgrading to
the newest sound card driver.
CD Autorun Setup
The Autorun setup feature can only run with CD.
When the Windows Plug-and-Play detection has
prompt the “Add hardware Wizard” to you, click
on “Cancel” to stop the . This utility will enable
you to install drivers for Windows only, and
DirectX 8.0 engine for the PCI sound card. As the
CD is inserted (assuming the auto-insertion
feature is enabled under your Windows operating
system) the PCI sound card driver setup menu will
appear on your screen.
1. Select using your pointing device (e.g. mouse) on the
correct operating system that you are currently
Page 20
SonicWave - SR
User’s Guide
Version 4.0
20
running. Your selection of operating system will be
highlighted once the pointing device is on top of it.
2. After that, the AUDIO SETUP program will pops-up for
its confirmation, click on Next button to continue the
installation.
Page 21

SonicWave - SR
User’s Guide
Version 4.0
21
3. Windows system has copying all files from CD to
your local hard disk, please wait until the process is
over. Latterly, driver install proceeding will be finished.
4. Congratulations!! The PCI sound card driver has been
successfully installed.
CD Manual Setup
The following steps are mainly for those who are
still using the old version of Windows 95.
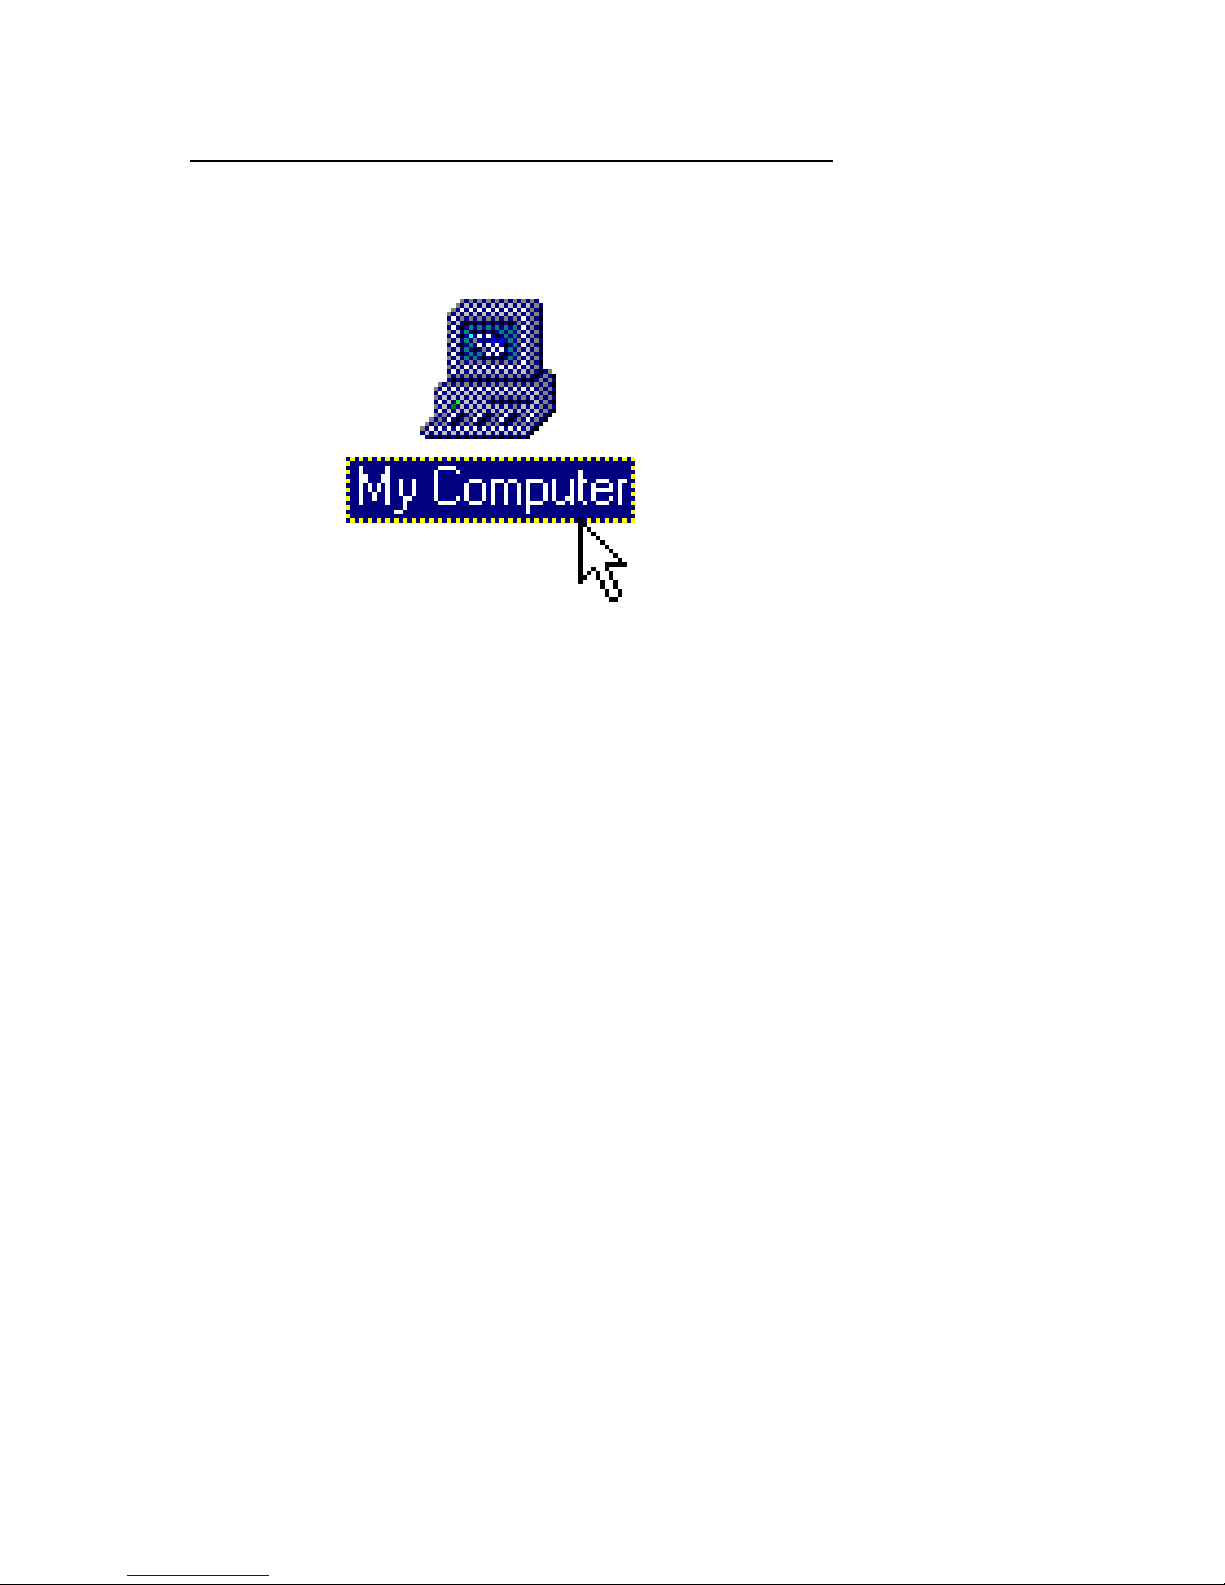
1. Double click on "My Computer” from your desktop.
Page 22
SonicWave - SR
User’s Guide
Version 4.0
22
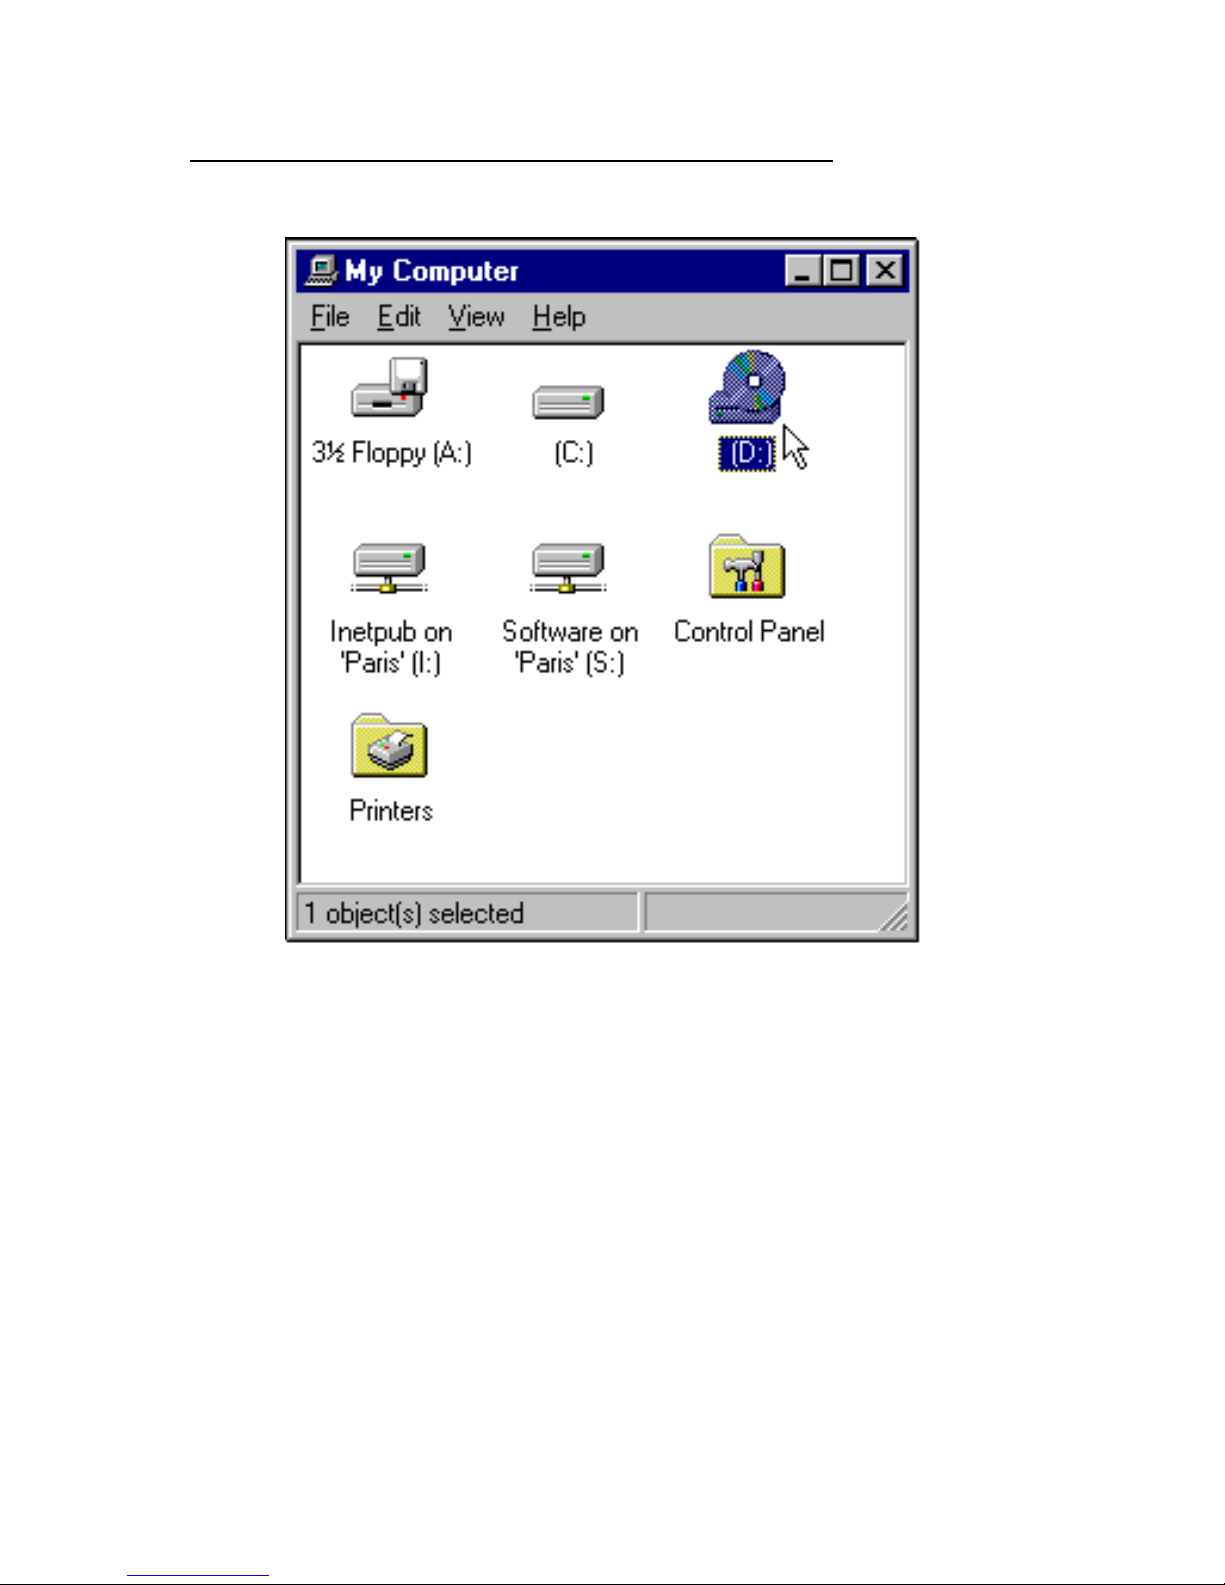
2. Double click on your CD-ROM drive. (Make sure the
driver’s CD is inserted.)
Page 23
SonicWave - SR
User’s Guide
Version 4.0
23
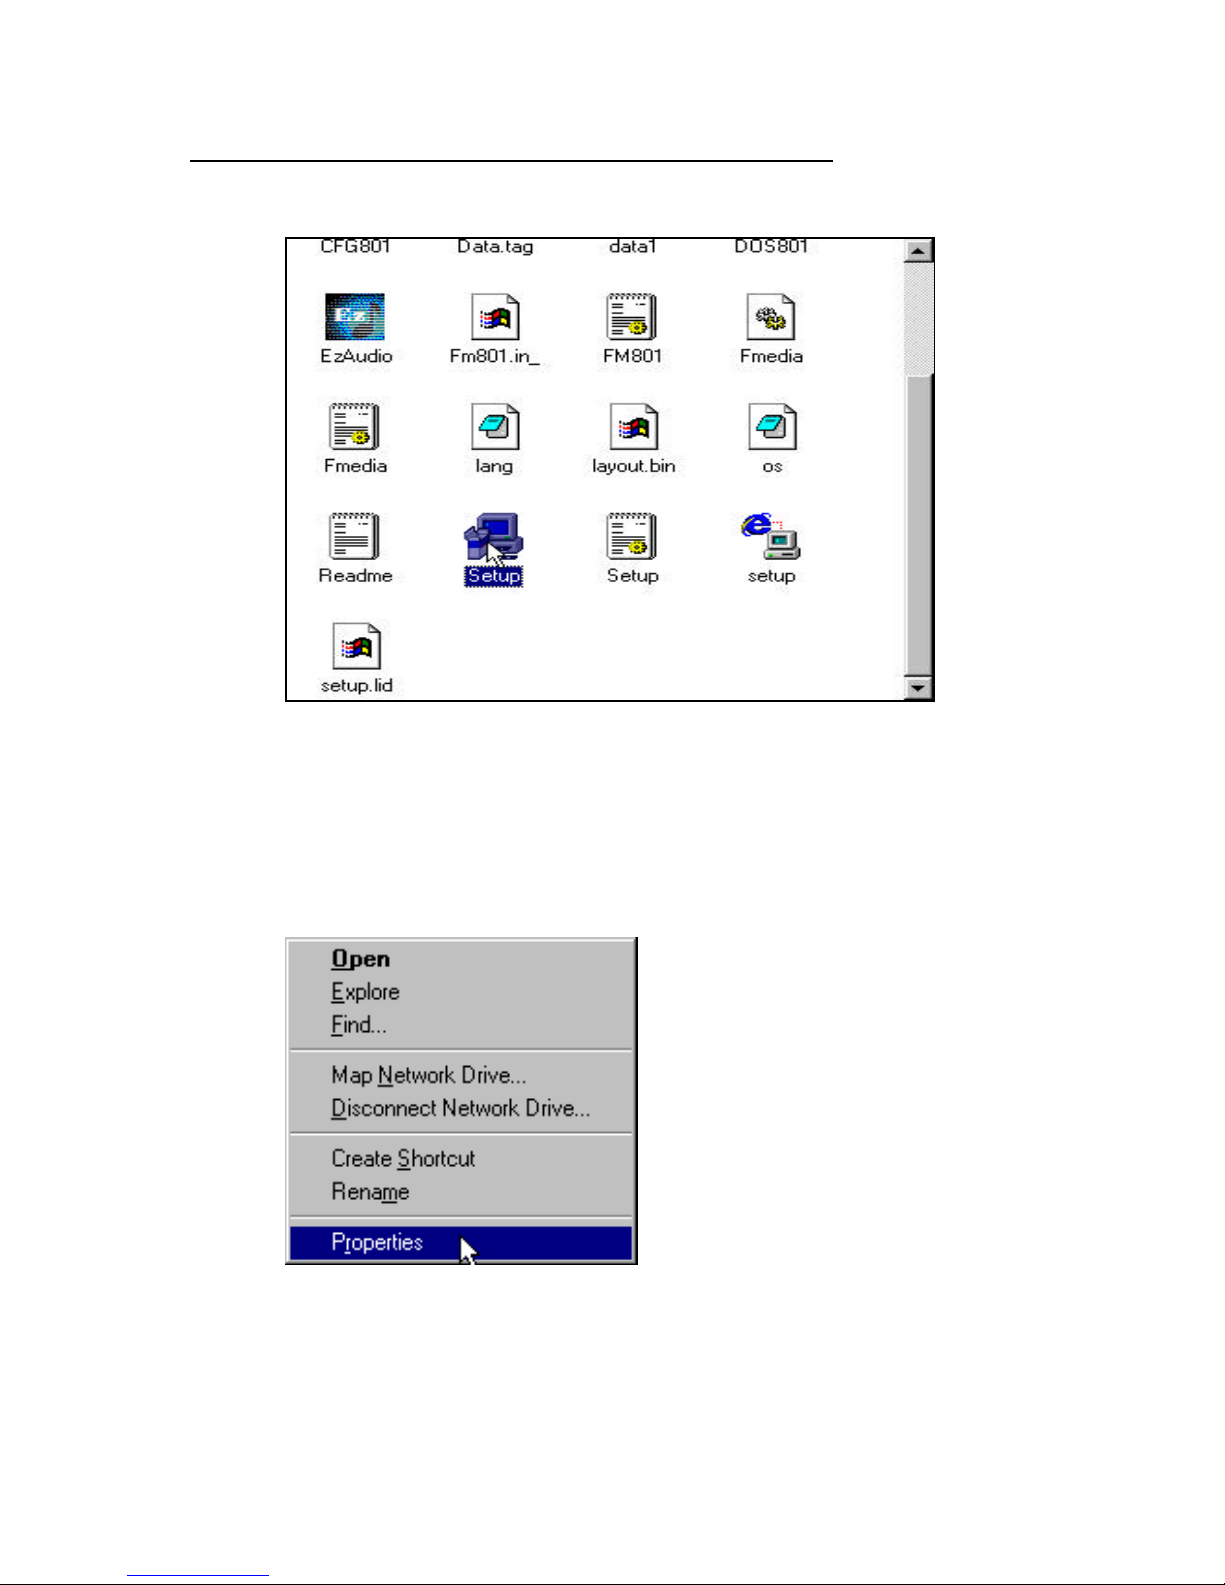
3. Double click on the Setup icon to start the driver
installation process.
Page 24
SonicWave - SR
User’s Guide
Version 4.0
24
4. Please refer to page 14-16 to complete the following
FM801 Audio Installation.
Verifying the FM801 Driver Installation for
Windows 98
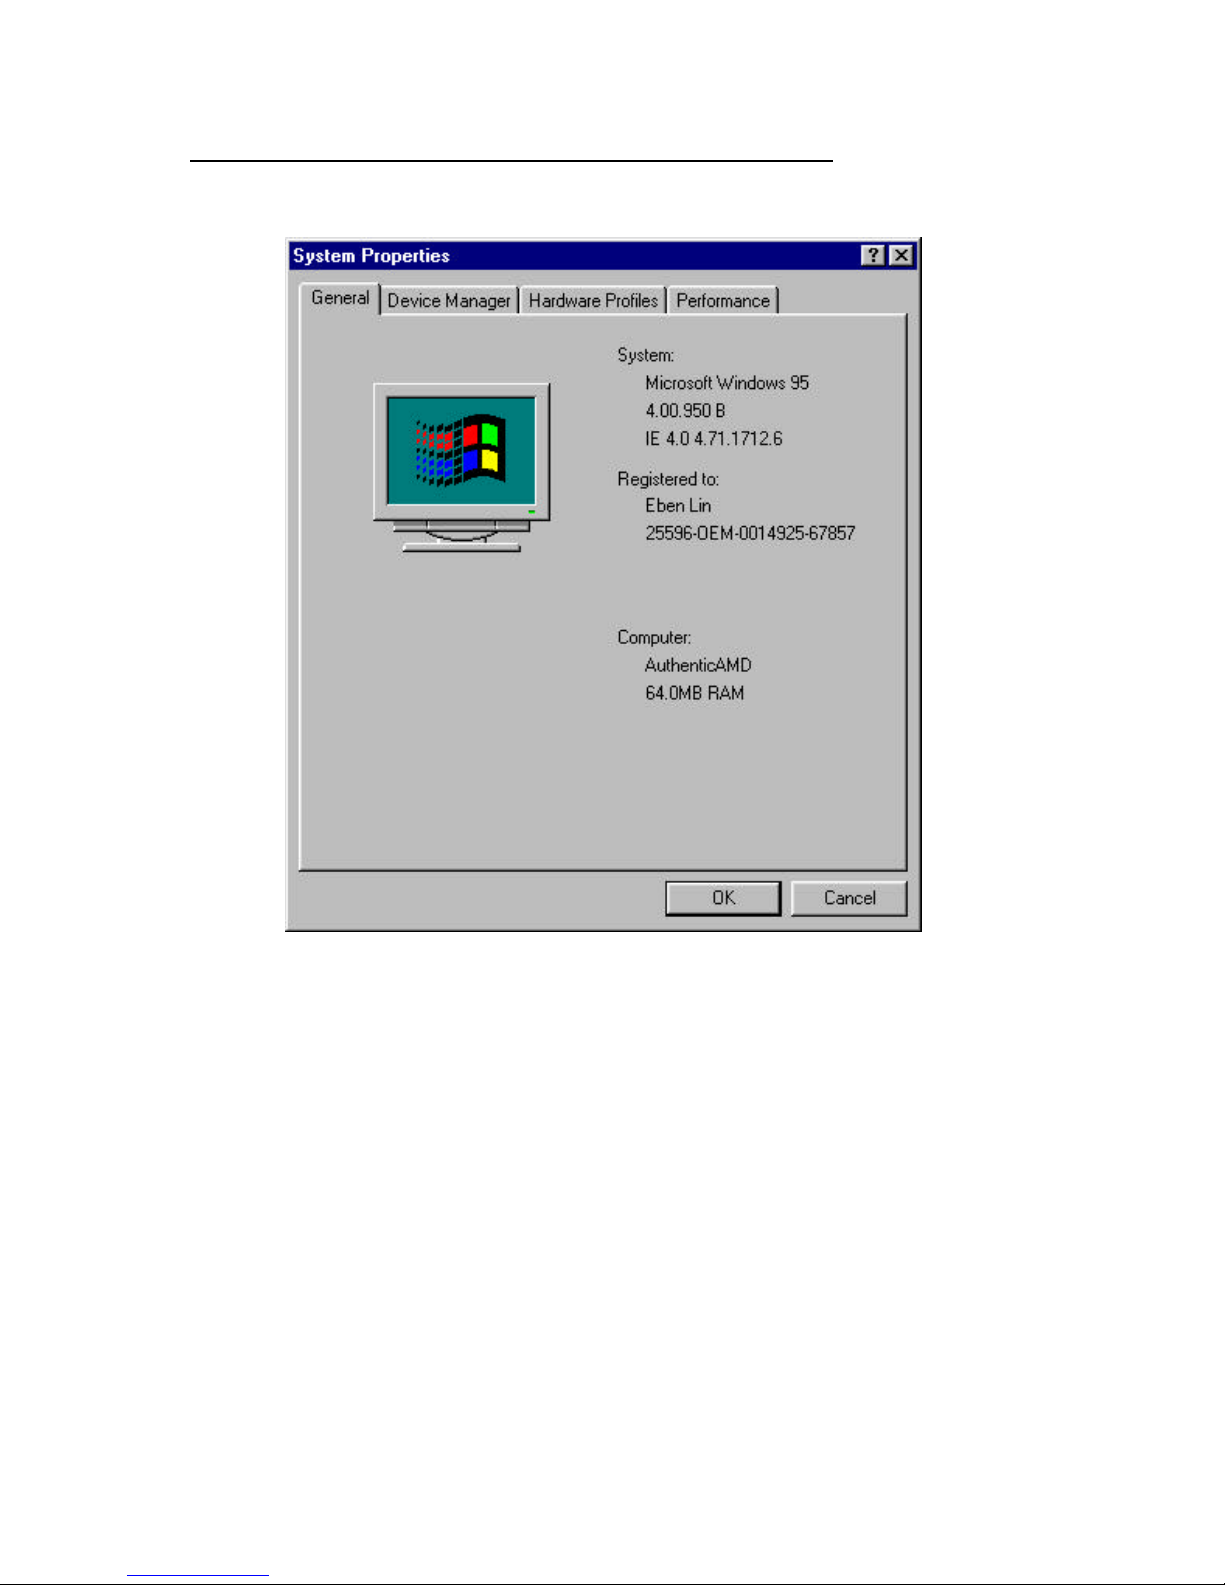
1. Open the system properties screen by right click on
“My Computer” and selecting “Properties”.
2. Click on the “Device Manager” tag.
Page 25
SonicWave - SR
User’s Guide
Version 4.0
25
3. Double click “Sound, video and game controllers” from
the hardware tree to verify the FM801 installation. You
should see at least these two entries: FM801
Multimedia WDM, and FM801 PCI Joystick Device.
Page 26

SonicWave - SR
User’s Guide
Version 4.0
26
FortéMedia Control Panel For Windows 98
This program should be installed automatically
upon the hardware installation.
Activating FortéMedia Control Panel on Windows 98
Page 27

SonicWave - SR
User’s Guide
Version 4.0
27
• Double click on FortéMedia icon locating at the
bottom-right corner of your screen.
• After double click on FM icon, FortéMedia Control
Panel window will be displayed. General allows the
user to select and test their speaker settings as well
as to remove the installed driver.
Note: To get Help on FortéMedia Control Panel, please
move your mouse pointer to where you need to get help.
Double click it to display the detail description.
• Effects allows users to configure the settings. CPU
Usage is a three-position slider that combines the
effects of Elevation and Sample Rate
Conversion(SRC). Low CPU Usage results as both
SRC and Elevation at off mode. Turning both SRC and
Page 28

SonicWave - SR
User’s Guide
Version 4.0
28
Elevation On will result high CPU usage. The center
position of CPU usage slider is an indication of turning
SRC on while Elevation mode is set at off.
• From different instruments. Playback Mixer allows
users to configure the mixer mode during music
playing.
Page 29

SonicWave - SR
User’s Guide
Version 4.0
29
• Record Mixer controls the mixer mode setting of
recording instruments.
Page 30

SonicWave - SR
User’s Guide
Version 4.0
30
Driver un-install, and Speaker Test
• To uninstall the FM801 PCI sound card driver, first go
to the task bar then clicking on Start button, scroll up
to Settings, and selecting on Control Panel.
Page 31

SonicWave - SR
User’s Guide
Version 4.0
31
• Double-click on FortéMedia icon in Control Panel.
Page 32

SonicWave - SR
User’s Guide
Version 4.0
32
• This brings up the FortéMedia Dialog Box. Click on
Uninstall button to remove the driver.
Page 33

SonicWave - SR
User’s Guide
Version 4.0
33
• To test if the speakers are installed properly, click on
“ Test All” button. Please watch carefully the
movement of the music note shown on the screen to
verify the correct placement of your speakers.
ÿWindows
Me Driver Installation
Since the PCI sound card is a Plug-n-Play device that
will detected by your operating system automatically
after your computer’s power turns on.
When the detecting process stops, press on
“Cancel” button to exit the hardware install wizard
screen.
Page 34

SonicWave - SR
User’s Guide
Version 4.0
34
CD Autorun Setup
The Autorun setup feature can only run with CD.
This feature will enable you to install drivers for
WindowsME, and DirectX 8.0 engine for the PCI
sound card. As the CD is inserted (assuming the
auto-insertion feature is enabled under your
Windows operating system) the PCI sound card
driver setup menu will appear on your screen.
To install audio driver that you may easily just click on “Install
PCI Audio Driver” access bar then the process starts
automatically. Following the on-screen instruction to complete
the driver installation, re-boot system is required when you
finish install.
Install DirectX 8.0 to your system as easy as the driver
placement, to initiated it just click on “Install DirectX” bar.
Page 35

SonicWave - SR
User’s Guide
Version 4.0
35
Verifying the FM801 Driver Installation for
Windows Me
Open the system properties screen by click on “My
Computer” and then selecting “Properties”. Tag to
“Device Manager” screen, and double click on
“Sound, video and game controllers” component
from list.
Page 36

SonicWave - SR
User’s Guide
Version 4.0
36
ÿWindows 2000/XP Driver Installation
Since the PCI sound card is a PnP device that will
detected by your operating system automatically
after your computer’s power turns on.
When the detecting process stops, press on
“Cancel” button to exit the hardware install wizard.
We do not recommended to install PCI sound card
manually, because the digital signature for Windows
2000/XP do not allow driver components to install
separately.
CD Autorun Setup
The Autorun setup feature can only run with CD.
This feature will enable you to install drivers for
Windows 98/ME/2000/XP, and DirectX engine
for the PCI sound card. As the CD is inserted
(assuming the auto-insertion feature is enabled under
your Windows operating system) the PCI sound card
driver setup menu will appear on your screen.
Page 37

SonicWave - SR
User’s Guide
Version 4.0
37
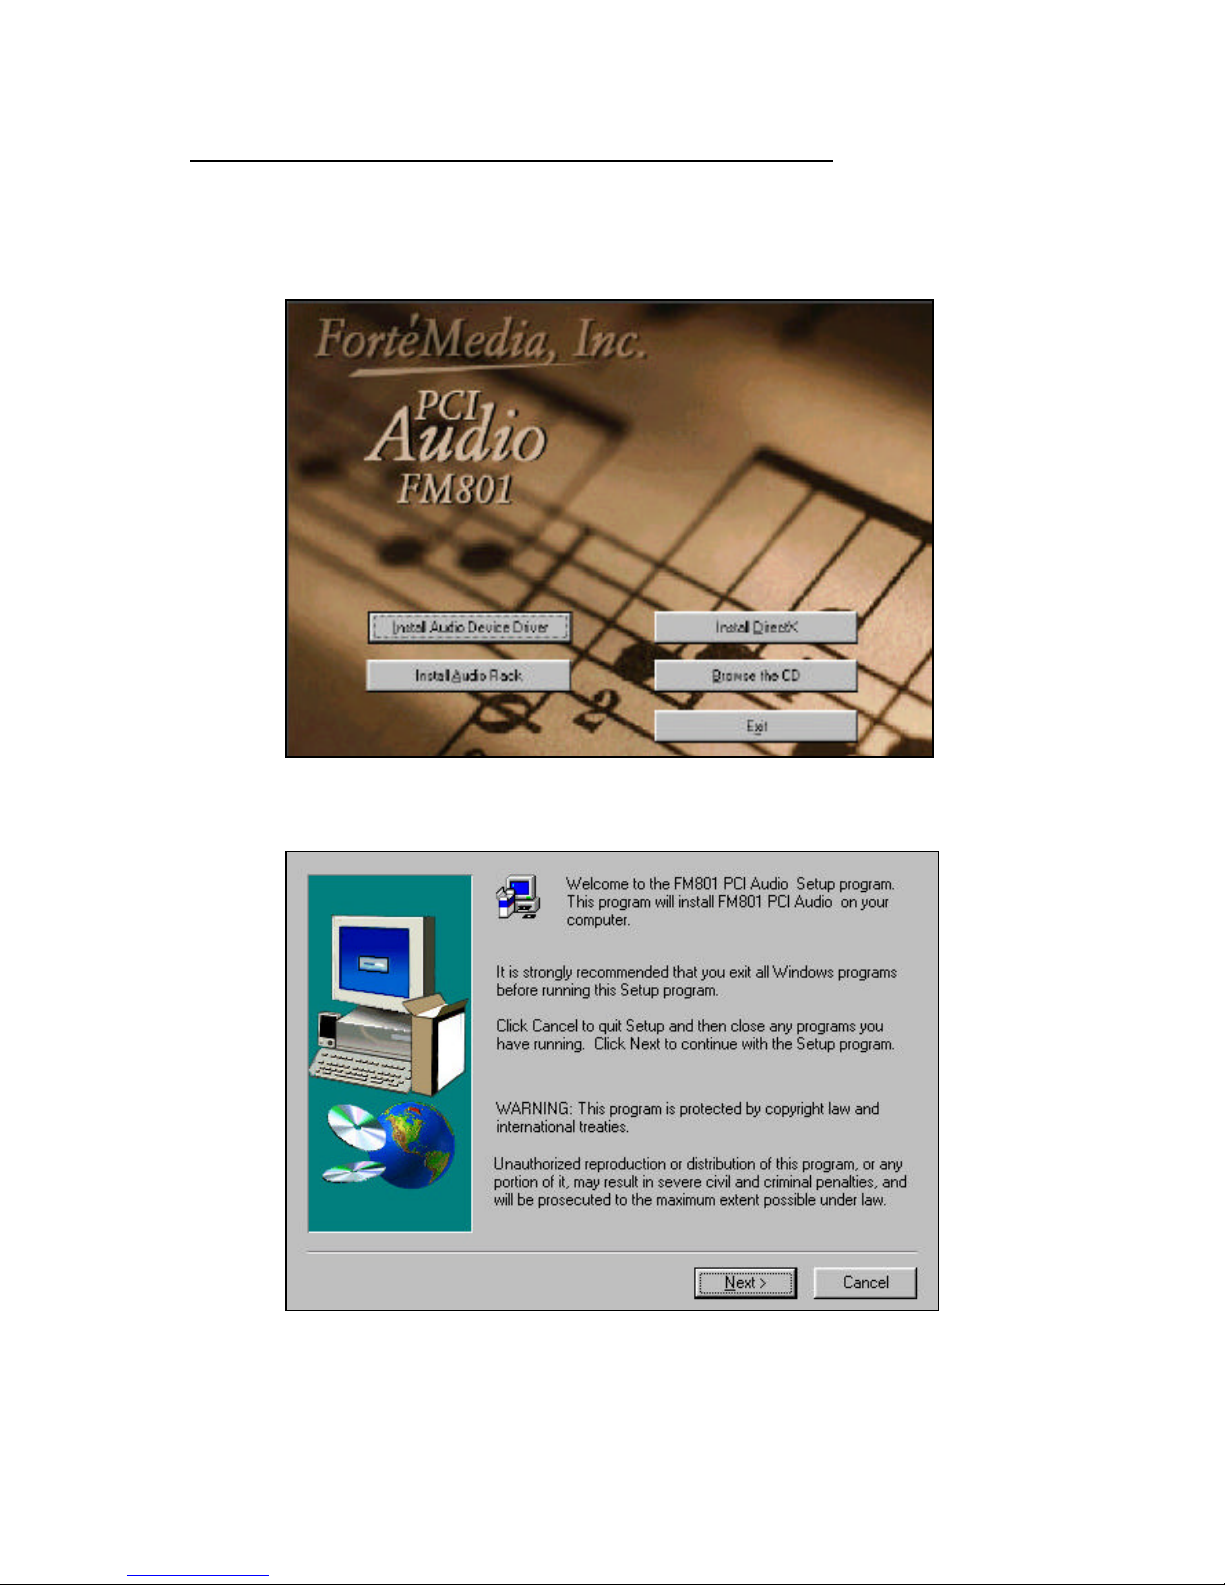
To install audio driver, just simply click on “Install
PCI Audio Driver“ button.
Click on “Next” to continue.
Page 38

SonicWave - SR
User’s Guide
Version 4.0
38
Microsoft InstallShield® program copying all driver
files from CD to your local hard disk, please wait
until the process is over. That is it, after all files have
been in placed, the driver installation is finished.
ÿWindows NT4.0 Driver Installation
PCI Sound Card Driver install from Autorun.
1. After the hardware has installed properly, turn on your
PC and insert the driver’s CD. The following screen
will prompt to start the installation. Select “ Install
PCI Audio Driver” to continue.
Page 39

SonicWave - SR
User’s Guide
Version 4.0
39
2. Select “Yes” if you wish to continue the installation.
Click “No” to quit.
3. Once the driver is installed, please press on “OK” to
re-boot the system to finish installation.
Page 40

SonicWave - SR
User’s Guide
Version 4.0
40
Manually Install PCI Sound Card Driver
1. To install the PCI sound card driver, first go to the
task bar then clicking on Start button, scroll up to
Settings, and selecting on Control Panel.
1. Double click on “Multimedia” icon.
Page 41

SonicWave - SR
User’s Guide
Version 4.0
41
2. Select “Device” tab.
Page 42

SonicWave - SR
User’s Guide
Version 4.0
42
3. Click “Add” button to add a new device into
multimedia properties.
Page 43

SonicWave - SR
User’s Guide
Version 4.0
43
4. An “Add” Dialogue box is displayed, and select the
“Unlisted or Update driver” item, then click the “OK”
button.
Page 44

SonicWave - SR
User’s Guide
Version 4.0
44
5. An “ Install Driver” dialogue box prompt. Insert the
driver’s CD into the CD-ROM drive, search the
directory in which the driver locates using “Browse”,
then click on “OK” to continue.
Page 45

SonicWave - SR
User’s Guide
Version 4.0
45
6. Select “Winnt4” sub directory for NT driver.
Page 46

SonicWave - SR
User’s Guide
Version 4.0
46
7. Select the “FM801 wave, mixer and FM-syn” then
press on “OK”.
8. “Restart Now” to re-boot your system to complete the
installation.
Verifying the FM801 installation for Windows
NT4.0
1. To verify the FM801 sound card driver installation, first
go to the task bar then clicking on Start button, scroll
up to Settings, and open the Control Panel.
Page 47

SonicWave - SR
User’s Guide
Version 4.0
47
1. Double-click on Multimedia icon.
Page 48

SonicWave - SR
User’s Guide
Version 4.0
48
2. Click on Device tab in Multimedia Properties. FM801
should have five components installed as followings:
• Audio for FM801 Wave, Mixer, and FM-Syn
• MIDI for FM801 MPU-401
• MIDI for FM801 Wave, Mixer, and FM-Syn
• Mixer for FM801 Wave, Mixer, and FM-Syn
• Line Input for FM801 Wave, Mixer, and FM-
Syn
Page 49

SonicWave - SR
User’s Guide
Version 4.0
49
If there is a yellow exclamation mark on one of the
component or a missing component, try Uninstalling and
then reinstall the drivers.
Windows NT Driver Uninstall
Use same procedure above path into Device tab
screen in Multimedia Properties, then click on
Page 50

SonicWave - SR
User’s Guide
Version 4.0
50
“Remove” button as below.
Windows will confirm your require for the driver removing,
click “Yes” if you decided to do so.
Page 51

SonicWave - SR
User’s Guide
Version 4.0
51
Click on “Restart Now” to finish the un-installation.
DOS Driver Installation (without Windows)
This package is intended for Machines running
DOS with Windows as its operating System.
There is DOS sub-directory in FM801 Software
Package containing tools for DOS support.
• Turn off your PC & Insert your PCI sound card
• Turn on PC and reboot system
• At DOS Prompt, type D:\DOS\INSTALL if it is from
CD and CD Drive is D Drive .
• Just follow the procedure of the INSTALL program to
finish the Installation
• Since DOS is not a Plug-n-Play OS, make sure you
select the IO/IRQ/DMA which are available and safe
for the DOS games.
Page 52

SonicWave - SR
User’s Guide
Version 4.0
52
FM801 PCI Sound Card Step by Step DOS
Drive Installation
STEP 1
Please Select SB I/O Port:
1. I/O 220
2. I/O 240
ESC. To quit
Please Enter (1~2 or ESC) :
I/O 220 is the recommended setting for this selection
STEP 2 *You may not see this step if your CMOS BIOS have IRQ
5,7,9,12 assigned to your Sound Card*
Please Select SB IRQ Channel:
1. IRQ 5
2. IRQ 7
3. IRQ 9
4. IRQ 12
ESC. To quit
Please Enter (1~3 or ESC):
IRQ 5 is the recommended setting for this selection
STEP 3
Please Select SB DMA Channel:
1. DMA 1
2. DMA 0
3. DMA 3
ESC. To quit
Please Enter (1~3 or ESC):
Page 53

SonicWave - SR
User’s Guide
Version 4.0
53
DMA 1 is the recommended setting for this selection.
STEP 4
You have selected:
I/O Port: 220
IRQ Channel: 5
DMA Channel: 1
Is this OK for your DOS games (y/n) ?
Answer YES if you are sure it’s OK.
STEP 5
System needs to reboot for the settings to take
effect.
Do you want to reboot [y/n]
YES is the recommended setting for this selection.
Troubleshooting
[1] Check list if Sound Card not found or IRQ not
assigned to FM801.
I. Change Slot: Insert the Audio Card into
another PCI Slot. Reboot.
II. if problem persists, please Adjust BIOS
Settings.
III. Adjust BIOS Settings:
a) Getting into BIOS (usually, hit”F1”,
“Del” or "F10" after Reboot)
b) Get into the Section with title
"PCI/PnP"
c) Make sure it reserves enough IRQ for
PCI devices
Page 54

SonicWave - SR
User’s Guide
Version 4.0
54
d) If there is "Reset Configuration"
option, change it to "Yes/Enable".
e) If there is "PnP OS" option, change it
to "NO".
f) Reboot.
[2] Check list if a SB Game is not working
For the best result of DOS game play and to
reduce potential problem(s) of the additional layer
of routing. Please change BIOS Setting to reserve
PCI IRQ 5/7/9 for PCI Devices.
[3] Adjust SB IRQ/IO/DMA for some DOS Games
I. Some DOS games may need certain fixed
resource (IO, IRQ and DMA)
II. This adjustment can be achieved through the
INSTALL program.
III. Make sure that IRQ/IO/DMA resource is
available, then choose that IRQ/IO/DMA
which is good for that games by running the
INSTALL again.
Glossary:
CPU Usage: Low CPU Usage results as both SRC
and Elevation modes are turned off. Turning both
SRC and Elevation in will result high CPU usage.
The center position of CPU Usage slider is an
indication of turning SRC on while Elevation mode
is set at off.
Elevation: Elevation, especially over speakers, is
a fairly subtle audio cue, so that the option of
turning elevation processing off to save cycles. It
is ONLY relevant to DirectSound 3D games. If
Page 55

SonicWave - SR
User’s Guide
Version 4.0
55
Elevation is selected, CPU cycles will be required
more, but results in a better audio effect.
Interpolated Sample Rate Conversion(SRC):
This improves the quality of sounds that are
converted to different sample rates and Doppler
effects.
Reverberate: The effect that occurs when sound
in an enclosed space reflects back to the listener
from the surfaces of the room or other enclosure.
If the space is large, the initial reflections may be
heard as discrete (separate) echoes. In smaller
spaces, the initial reflections arrive too quickly to
be heard as separate from the original sound, and
are heard as a continuation of it. Turning on the
reverberation adds ambient reverberation effects
to the processing. Note that this option uses a lot
of CPU cycles.
Default Environment: Selects default
environment when reverberation effect is turned
on.
Enable Stereo Expansion: Turn on QXpander, a
kind of surround sound. The aural space of stereo
audio will be enhanced if this option is turned on.
Stereo expansion is available on DirectSound
streams only, or can be made available on
waveOut streams as well if the driver implements
a redirection of waveOut to DirectSound.
Spread: Adjusts the degree of expansion from
very subtle to maximum. At the "very subtle"
setting (far left) the effect is almost completely
bypassed.
Page 56

SonicWave - SR
User’s Guide
Version 4.0
56
Center: Provides adjustment over the perceived
volume ratio between elements of the stereo
image that appears in the middle of the stereo
image between the speakers, and widely-placed
elements. Adjusts the strength of the mono
center signal. Less center gives better separation,
but with poorer mono response. For music
listening, leaving the Center control at maximum is
recommended to avoid attenuating critical
elements such as the lead vocal which is almost
always located in the center of the mix.
Low Frequency Enhancement (LFE): A "3D
bypass" for low frequencies only which are passed
directly through to the output without being
subjected to 3D processing. LFE is very useful for
subwoofer, but for systems without subwoofer, it
should be turned off for best positional 3D
effects.
EzAudio™ Software Application
Introduction
FortéMedia’s EzAudio™ is a software application
developed for the PC music lover through CD,
MIDI, and Wavetable features. EzAudio™
provides the overall application-driven capacity in
music listening.
EzAudio™ consists of Power ON/OFF controller,
CD player, MIDI player, and Wave (digital
sound)player and recorder. It also linked with
Microsoft Mixer for easy access of volume control.
Page 57

SonicWave - SR
User’s Guide
Version 4.0
57
Activating EzAudio™
The proper way to activate EzAudio™ is:
1. Double click the EZ Audio icon in the task bar.
2. You will then see the whole appearance of EzAudio™
.
Page 58

SonicWave - SR
User’s Guide
Version 4.0
58
EzAudio™ Component Description
• POWER ON/OFF Control
Located at the upper-left corner, this component
manages and launches the other components. The
“Power” button acts as a power switch, when
clicked, the EzAudio™ application will close itself.
EzAudio™ also supports the application
minimization, so you may shrink it to the bottom of
your screen.
• CD PLAYER
This component plays audio CDs. The window
display shows the track and time.
• MIDI PLAYER
This component play General MIDI files (a computer
music format). The display window shows the file
name it plays and times it plays.
• WAVE PLAYER
This component plays and records WAVE (digital
PCM format) files. The recording source can be CD
(AUX), MIC, MIDI or LINE.
• MIXER
This component controls all sources volume input &
output for playback & recording.
The playback source can be AUX, WAVE, FM, CD,
MIC, LINE IN, VIDEO, I2S.
The recording source can be AUX, MIC, CD, LINE
Page 59

SonicWave - SR
User’s Guide
Version 4.0
59
IN, MIX or VIDEO.
Play EzAudio™
The following are the common operations of CD,
MIDI, and SOUND. Each component has the
following basic functions: Play, Stop, Pause, Fast
Forward, Rewind. The CD player also has Next
and Previous functions.
Component buttons are marked with symbols
commonly found on consumer audio players. So, if
you have used an audio player before, you will find
EzAudio™ operation straightforward.
Stop
Pause
Play
Scan backward
Scan forward
Go to beginning of previous song
Go to beginning of next song
EzAudio™ Recording
Clicking on the record button on the WAVE
Page 60

SonicWave - SR
User’s Guide
Version 4.0
60
component and EzAudio™ will start to record your
favorite sound or song. To stop recording simply
press the stop button.
Selecting CD, MIDI, Or Wave Titles
The Playlist allows you to arrange CD tracks, MIDI
songs, and WAVE sound files into a program of your
choice. Playback starts with the first item in the
Playlist and continues until all items have been
played.
The CD Playlist
• Place the mouse pointer at the CD Disc tray and click
on the icon to access the CD Playlist.
• This allows you to access the Name CD dialog box
shown below to enter the CD title and track number.
Page 61

SonicWave - SR
User’s Guide
Version 4.0
61
The MIDI Playlist
• Place the mouse pointer at the floppy-drive icon. Click
on the icon to access MIDI Playlist.
• This allows you to accesses the Name MIDI dialogs
box shown below. The dialog box allows you to enter
the MIDI title and track number.
Page 62

SonicWave - SR
User’s Guide
Version 4.0
62
The WAVE Playlist
• Move the mouse pointer to the audio-tape door and
click on it to access the Sound Playlist.
• To play a .WAV digital audio file you must first insert
the files you wish to hear in the Playlist. Once you
have created a Playlist, press OK to close the
Playlist. Press Play to hear the files in the Playlist.
Page 63

SonicWave - SR
User’s Guide
Version 4.0
63
PLAY MIXER
• For volume control, click the MIXER button to bring
out the Volume Control window.
• To adjust the Volume Control, or the applicable
Wave/DS, FM-Syn, CD and Mic:
• Move the corresponding Balance dial left and
right
•
Move the corresponding Volume dial up and
down
• If mute is preferred on particular channel, click inside
the corresponding Mute Box . To re-activate sound,
click inside Mute Box again
Page 64

SonicWave - SR
User’s Guide
Version 4.0
64
RECORD MIXER
• The recording mixer is inside MIXER component. To
activate, first click on MIXER.
• Select Options from the Volume Control Panel.
Page 65

SonicWave - SR
User’s Guide
Version 4.0
65
• • From pull down menu to select the Properties.
Page 66

SonicWave - SR
User’s Guide
Version 4.0
66
• From Properties control panel, highlight the
“Recording” box in the “Adjust volume for”
windows. Choose the input source then press “OK”.
• Check the "Select Box" for the recording channels. If
one prefers to record the entire source at the same
time, then the "Mix Balance" should be chosen.
Page 67

SonicWave - SR
User’s Guide
Version 4.0
67
Frequently Asked Questions &
Troubleshooting
The tip for troubleshooting is to examine
the evidence you have, gain as much
information as you can, and eliminate
possibilities one by one. In most cases,
the source of the problem will soon
become clear. For example, if FM801 PCI
sound card works fine when you remove
all other cards from your computer, but it
stops working when you replace your faxmodem, there maybe a conflict between
the sound card and the fax-modem (such
as port address or IRQ). Often, problems
are extremely simple: cable not plugged in
or turned on, etc. Check the obvious first,
not last.
Page 68

SonicWave - SR
User’s Guide
Version 4.0
68
What are the configuration problems?
Adding new hardware and software to your computer
requires ensuring that there are no conflicts with
your existing system. If you have difficulty with the
installation procedure or are unable to make the card
work, a conflict may be present. There are three
major configuration settings to consider: I/O Port
Address, Interrupt Request lines (IRQ), and Direct
Memory Access channels (DMA).
Even though the FM801 PCI sound card is a plug
and play card, the presence of other legacy cards can
still cause resource conflicts. To resolve such
conflicts, it is important to know the settings of
other cards (it is best to remove other sound cards)
and peripherals currently in your system, including
the mouse, fax-modem, video accelerators, etc.
Many peripherals come with setup software similar
to FM801 PCI sound card that lets you see and
change the current configuration. There are also
utility programs that investigate and report on the
configuration of your system and its peripherals. In
either event, make a record of the settings used by all
the peripherals in your system for reference when
installing new hardware and software or trouble
shooting problems.
Generally, you will only have a DMA conflict if your
system contains another sound card or an external
CD-ROM drive.
Page 69

SonicWave - SR
User’s Guide
Version 4.0
69
What are DMA Channels and PCI?
Under Windows 9x, the FM801 PCI sound card is
capable of full duplex. This means that the card can
playback one .WAV file while recording another.
With the PCI bus full duplex is possible without any
DMA channels.
There is no microphone support in the MS-DOS
Mode and therefore only a single DMA is required
for legacy emulation.
What should I do if I have problems with
playing games?
Make sure that you have the game set up in a music
option that the FM801 PCI sound card supports. If
the game takes advantage of DirectX or DirectSound
be sure that you have the latest DirectX drivers from
Microsoft. If you are having a problem with external
joystick or gamepad, make sure that the Joystick is
enabled and the Windows 9x/Me Gameport Joystick
drivers are loaded and working properly in the
Device Manager.
In order to use two joysticks, you will need to use a
SoundBlaster-compatible Y-connector (such as
Radio Shack part # 26-380), or use an industrystandard MIDI Joystick kit. This will make
allowances for the proper direct connections for dual
joysticks.
Page 70

SonicWave - SR
User’s Guide
Version 4.0
70
Can I install two sound cards?
Having another sound card in your system in
addition to the FM801 PCI sound card will greatly
increase the chances of having system conflicts. We
highly recommend that any other sound devices and
their associated Windows drivers be removed before
installing the FM801 sound card.
Why are some of the Windows Multimedia
Components (i.e. Media Player) missing?
If you install the FM801 PCI sound card after
Windows 9x is installed Windows will not install the
sound utilities that you would expect to find.
Features such as the Audio CODEC, the Media
Player, and the Microsoft Mixer may not be present.
This may cause your sound card to not function
properly, even when our drivers are installed. If this
is the case, these applications must be installed onto
the system from the Windows 9x installation media.
What happened if my FM801 sound card and
driver are both properly installed, yet, there
is still no sound?
If the FM801 PCI sound card and drivers are
properly installed with no conflicts, yet there is no
sound, the problem may be with your audio
connections. Here are some suggestions:
Try playing both a .WAV file and a .MID file to
ascertain that there is no sound at all coming from
Page 71

SonicWave - SR
User’s Guide
Version 4.0
71
the speakers. If you hear one and not the other, the
problem is internal and has nothing to do with your
audio system.
Be sure that your monitoring system is properly set
up. Try connecting a sound source other than
FM801, such as an audio CD player, and establishing
whether or not you can hear it.
Be sure that the sound card is properly connected to
the monitoring system (a 1/8-inch mini-phone cable
should be running from FM801 PCI sound card Line
Out connector to a line input on the monitoring
system). To eliminate the possibility of a bad cable,
try plugging a pair of high-impedance headphones to
the FM801 PCI sound card Line Out jack and see if
you hear any sound.
How do I change volume and balance levels
in Windows 9x?
To make adjustments to FM801 PCI sound card
volume settings and balance levels, use the
FortéMedia EzAudio Mixer. The Install Wizard adds
the EzAudio icon to your taskbar. The EzAudio
Mixer can be invoked by double clicking on its icon
located on the right side of the taskbar.
My microphone records at very low levels,
with distortion, or not at all?
For ease of installation, we recommend that you use
a dynamic microphone. These require the least
Page 72

SonicWave - SR
User’s Guide
Version 4.0
72
amount of setup. Do the following steps to be sure
that your software is set up correctly for MIC input:
In your toolbar, next to the clock, double-click on
the EzAudio icon.
Under the Recording panel of Mixer make sure MIC
is checked.
Make sure the MIC slider is all the way up, the mute
box is not checked and the Boost box is checked.
If you experience distortion with a dynamic
microphone adjust the volume levels of the
Microphone and Master audio devices.
Why doesn’t my CD audio work?
First, be sure that your CD volume is turned up to
the maximum in the Mixer. If you still aren’t getting
music, you will need to verify that the internal patch
cable is connected between your CD ROM drive and
the sound card’s CD Input. This is typically a small
connector with four wires coming out of it.
Another tip is to obtain a 1/8” stereo patch cord and
connect one end to the “headphone out” on the front
of the CD-ROM drive, and the other end to the Line
Input on the back of the sound card. Make sure the
headphone volume dial on the CD-ROM drive is at
maximum, and try playing a CD. You should hear
the music playing. If your internal patch cable is
missing or defective, contact your CD-ROM
manufacturer for information on how to obtain
another cable.
Page 73

SonicWave - SR
User’s Guide
Version 4.0
73
My DOS games do not work properly with FM801
based sound card and the system pops up the
message "Can't find PCI Chipset Device!" during
system boot-up.
If your sound card does not work properly with your
DOS games, and you see the message "Can't find
PCI Chipset Device!" when the system is executing
G801.EXE in AUTOEXEC.BAT, that means your
system is using very old generation chipsets. Please
open the file C:\AUTOEXEC.BAT to check if there
is one line as following: "C:\CFG801". If this line
does not exist, it means the driver is not installed
properly. Please re-install the FM801 driver again. If
this line exists, please change it to "C:\CFG801 /1
/t". In Windows 95 or Windows 98, use "Regedit"
under C:\Windows to find one string called
'DOSMODE' and change the value from 00 to 01.
What to do if sound card is not found or IRQ
is not assigned to FM801 PCI sound card?
Change slot: insert the PCI audio card into another
PCI slot. (Do so by first shutting down the
computer. Remove the sound card and insert it into
another PCI slot.) If the problem persists: if you are a
new user, uninstall the driver and re-install it from
the beginning. (For Uninstalling instructions, see
“UN-installing the FM801 driver” section below.)
Adjust BIOS settings: get into BIOS (usually, hit
"F1", "Del" or "F10" after Reboot), get into the
Page 74

SonicWave - SR
User’s Guide
Version 4.0
74
Section with title "PCI/PnP", make sure it reserves
enough IRQ for PCI devices. If there is a "Reset
Configuration" option, change it to "Yes/Enable", if
there is a "PnP OS" option, change it to "NO"
The SB Games are not working properly...
DOS games run best with PCI IRQ 5/7/9 assigned
to sound card. This can be verified through "Control
Panel"/"Device Manager"/"Sound, Video, and
Games"/"FM801 PCI Audio".
For the best results of DOS game play and to reduce
potential problem(s) of the additional layer of
routing, change BIOS setting to reserve PCI IRQ
5/7/9/10 for PCI Devices.
Some old DOS games may not work in a Windows
DOS Box. If this is the case, shut down the system
to MS-DOS mode and play the game in Real DOS
mode.
How to adjust SB IRQ/IO/DMA for some DOS
Games?
Some DOS games may need certain fixed resource
(IRQ and DMA) This adjustment can be achieved by
selecting the following path: Control Panel (from the
Windows Main Menu, click the Start button located at the
lower left hand corner, select Control Panel from Settings) /
System / Device Manager / Sound, Video, and
Games / Legacy Audio Device
Click “Resource” Tab to change the Legacy Audio
Device I/O, IRQ, and DMA
Page 75

SonicWave - SR
User’s Guide
Version 4.0
75
Does FM801 support Linux OS?
FM801 supports Windows 98, Windows Me,
Windows 2000, Windows NT 4.0, Windows XP and
DOS. Linux is not supported by FM801 in the
current driver set.
What are the 2-speaker, 4-speaker and 6speaker Audio Output Options used that can
be found in FortéMedia Control Panel?
These buttons are designed for the end users to
configure how many speakers have been connected
to your sound card. For example, If your sound card
is a 4-channel sound card, then you can choose to
connect 2 speakers or 4 speakers to your system. The
default will be set to 4 speakers. However if you
choose to connect to 2 speakers, FM801 sound
driver will not allow you to select Quad mode in
your QSound Control Panel(for the driver bundled
with Q3D only) or in some of the software DVD
player setup menu.
Why are two interrupts allocated for my
FM801 sound card?
Page 76

SonicWave - SR
User’s Guide
Version 4.0
76
The PCI audio uses one PCI interrupt for operation.
Additional IRQ is used for ISA legacy support, an
additional to the PCI IRQ.
One PCI IRQ is needed for the audio to function
under a PnP operating systems such as Windows 9x.
One additional ISA IRQ is dedicated for legacy
audio support. Legacy audio support is used for DOS
based applications and games that are SoundBlaster
compatible. Most DOS based applications and
games only use SoundBlaster compatible legacy
audio
requiring the use of a ISA IRQ. By disabling the ISA
legacy audio support in the operating system the
dedicated ISA IRQ is freed, thus using only one PCI
IRQ. DOS Applications and games that require
SoundBlaster Audio support will have no audio
output if ISA legacy audio is disabled.
Another way to save one IRQ is to make the BIOS
assign IRQ5 or IRQ7 or IRQ9 to FM801 PCI Audio.
In this way, ISA legacy audio can also be supported
via FM801 PCI Audio. Please refer to BIOS user
manual to see the details of how to allocate the IRQ
to PCI slots.
Technical Support
In the event you have a technical problem with this
product, please read the README files in the
software CD_ROM. Updated drivers are available
Page 77

SonicWave - SR
User’s Guide
Version 4.0
77
through Jaton Web site. Have following information
handy when you contact technical support:
þ Name of the product.
þ Software Driver and Version.
þ System Information, such as CPU speed, BIOS
version, Monitor Specification, etc.
þ Description of the problems including any error
messages.
Telephone: (408) 934-9369 9-5 PST Mon. - Fri.
FAX: (408) 942-6699
email: techsupport@jaton.com
WEBsite: www.jaton.com
Page 78

SonicWave - SR
User’s Guide
Version 4.0
78
Limited Warranty.
Manufacturer warrants that the products sold
hereunder are free from defects in material and
workmanship for a period of two (2) years from
manufacturing date. This limited warranty applies
only to the original purchaser of Jaton Product
and is not transferable. This limited warranty does
not apply if failure to the Product Registration, or
over thirty (30) days from purchase (original
invoice date). This Limited Warranty does not
cover any incompatibilities due to the user’s
computer, hardware, software or any related
system configuration in which the Jaton Products
interfaces. Proof of purchase will be requiring
before any consideration by Manufacturer occurs.
Other Limits.
The forgoing is in lieu of all other warranties,
expressed or implied. Including but not
limited to the implied warranties of
merchantability and fitness for a particular
purpose. Manufacturer does not warrant against
damages or defects arising out of improper or
abnormal use of handling of the products; against
defects or damages arising from improper
installation (where installation is by persons other
than Manufacturer), against defects in products
or components not manufactured or installed by
Manufacturer, or against damages result from
non-manufacturer made products or components.
This warranty does not apply if the Product has
been damaged by accident, abuse, nor misuse.
This warranty also does not apply to products
Page 79

SonicWave - SR
User’s Guide
Version 4.0
79
upon which repairs have been affected or
attempted by persons other than pursuant to
written authorization by Manufacturer.
Exclusive Obligation.
This warranty is exclusive. The sole and
exclusive obligation of Manufacturer shall repair or
replace the defective products in the manner and
for the period provided above. Manufacturer shall
not have any other obligation with respect to the
Products or any part thereof, whether based on
contract, tort, strict liability or otherwise. Under
no circumstances, whether based on this Limited
Warranty or otherwise, Manufacturer shall not be
liable for incidental, special, or consequential
damage.
Other Statements.
Manufacturer’s employees or representatives’
ORAL OR OTHER WRITTEN STATEMENTS DO NOT
CONSTITUE WARRANTIES, shall not be relied
upon by Buyer, and are not a part of the contract
for sale or this Limited Warranty.
Terms and Conditions.
Direct Jaton Customer: This warranty applies
only for a period of two (2) years from purchase
date of Jaton original invoice.
Reseller/ Vendor: This warranty applies only
for a period of two (2) years from manufacturing
Page 80

SonicWave - SR
User’s Guide
Version 4.0
80
date.
Registered User: This warranty applies only
for a period of two (2) years from purchase date
and register within 30 days of purchase date
from legal reseller.
Others: If the products do not conform to
this Limited Warranty (as herein above described),
Manufacturer should charge services such as
repair, replacement whether based on its costs.
Shipping and installation of the replacement
Products or replacement parts shall be at User’s
expanse.
Services agreement:
þ All applicants shall completed service request
form from Manufacturer.
þ All returned checks will be charged a $20.00
fee by Manufacturer.
þ All repair and replacement services allow 4-6
weeks from the date of receiving by
Manufacturer.
þ All products without warranties require service
processing fee $20 (payment in advance),
which is not refundable.
Entire Obligation.
This Limited Warranty states the entire obligation
of Manufacturer with respect to the Products. If
Page 81

SonicWave - SR
User’s Guide
Version 4.0
81
any part of this Limited Warranty is determined to
be void or illegal, the remainder shall remain in
force and effect. Some states do not allow
limitation of implied warranties, or exclusive or
limitation on product incidental or consequential
damages, so above limitation may not apply to
you. This warranty gives you specific legal rights.
You may have other rights which may vary from
state to state.
This warranty applies only to this product, and is
governed by the law of the State of California.
Reducing Warranty Claim
Rejections.
To reduce the potential of incurring damages not
covered by Manufacturers warranties, we strongly
recommend the following:
• Read your manuals before installing
peripherals and/or before making changes to
the machine’s configuration;
• Ask your dealer if there are any known
problems with the system requirements or
installation procedures for any add-on
products that your are purchasing;
• Buy industry standard products where
compatibility issue are more likely to surface;
• If you are unsure about installation for a new
product, contact your dealer’s service
department.
Page 82

SonicWave - SR
User’s Guide
Version 4.0
82
We believe it is important for you to know and
understand what your warranty coverage provides
and what it does not.
We also want you to be aware that most
hardware warranties only relate to the function of
the hardware. In most cases, no assurances are
given by the manufacturer that the hardware item
will work in conjunction with any other hardware
item. If a computer product is not working
because it is not compatible with another
product, or because it has not been properly
installed and set-up, the manufacturer does not
pay for the service time. To help avoid these
inconveniences, contact a professional consultant
that one can help you determine the possibility of
incompatibility issue before you purchase add-on
or accessories.
Warranty Service Use Only
XXXX XX XXXXXX00.0xxxx/xxxx
XXXXX-XXX-XX S/N: A008000015
Product Label and Manufactured Date Code
Serial Number - ten or eleven digit code, the serial number consists of the following parts:
Packaging Type Manufactured Date Code Production Numerical Code
A 00 8 000015
Year Month
Page 83

SonicWave - SR
User’s Guide
Version 4.0
83
 Loading...