

Page 1

MODEL RI-2031
INTELLIGENT REFRACTIVE INDEX
DETECTOR
INSTRUCTION MANUAL
P/N: 0302-0555A
Page 2

Safety Considerations
To ensure operation safety, this instrument must be operated correctly and
maintained regularly according to schedule. Carefully read to fully understand
all safety precautions in this manual before operating the instrument. This
manual denotes precautions against actions that can result in hazardous
situations or equipment damage by using the signal words WARNING,
CAUTION, and Note.
(1) Safety symbols
Instruction manual symbol. If the product is marked with this
symbol, refer to the instrument manuals to protect the
instrument against damage.
WARNING A WARNING indicates a potentially hazardous situation which,
if not avoided, could result in death or serious injury.
CAUTION A CAUTION indicates a potentially hazardous situation which, if
not avoided, may result in minor or moderate injury. It may also
be used to alert against unsafe practices.
Do not proceed beyond a WARNING or CAUTION notice until
you understand the hazardous conditions and have taken the
appropriate steps.
Note A Note provides additional information to aid the operator in
obtaining optimal instrument performance.
Pressurized, hazardous solvents are used in high-performance liquid
chromatography. Always follow the proper laboratory procedures to ensure
operator safety. Always wear goggles, gloves and protective clothing when
operating the instrument, especially when injecting a sample and opening
valves.
i
Page 3

(2) Warning Labels
Warning labels are attached at several locations on this instrument. Do not
remove, deface or damage the warning labels. If a warning label peels off the
instrument or becomes illegible, contact your local JASCO distributor for a
replacement label. Be sure to indicate the part number (P/N) on the label.
(1) Fuse and Ground Warning Label (P/N: 0822-0163A)
Figure 1 Figure of the side view
ii
Page 4

o
Regulatory Statements
CE Notice
Marking by the symbol indicates compliance of this JASCO system to the
EMC (Electromagnetic Compatibility) and Low Voltage Directives of the
European Community. This symbol indicates that this JASCO system meets
the relevant basic safety and health requirements of the EC Directive based on
the following technical standards:
• EN55011 -- ”Limits and Methods of Measurement of Radio Interference
Characteristics of Information Technology Equipment.” -- Group 1, Class A.
Warning
This is a Class A product. In a domestic environment this product may cause radi
interference, in which case the user may be required to take adequate measures.
• EN61000-6-1 -- "Electromagnetic compatibility (EMC) Part 6-1:Generic
standards – Immunity for residential, commercial and light-industrial
environments"
• IEC61000-3-2 -- "Electromagnetic compatibility (EMC) Part 3-2:Limits –
Limits for harmonic current emissions (equipment input current up to and
including 16A per phase) "
• IEC61010-1 -- "Safety requirements for electrical equipment for
measurement, control and laboratory use – Part 1:General requirements"
• A "Declaration of Conformity" in accordance with the above standards has
been made and is on file at JASCO EUROPE srl, Via Confalonieri 25, 22060
CREMELLA (LC), Italy.
FCC Statement (for USA only)
Federal Communications Commission Radio Frequency Interference
Statement
Warning
This equipment generates, uses, and can radiate radio frequency energy. If it is not
installed and used in accordance with the instruction manual, it may cause
interference to radio communications. It has been tested and found to comply with the
limits for a Class A computing device pursuant to Part 15 of FCC Rules, which are
designed to provide reasonable protection against such interference when operated in
a commercial environment. Operation of this equipment in a residential area is likely to
cause interference, in which case the user at his own expense will be required to take
whatever measures may be required to correct the interference.
iii
Page 5

Preface
This instruction manual serves as a guidebook for using this instrument. It is
intended to instruct first-time users on how to properly use the instrument, and
to serve as a reference for experienced users.
Before using the instrument, please read this instruction manual carefully, and
make sure that the contents are fully understood. This manual should be easily
accessible to the operator at all times during instrument operation. When not using
the instrument, keep this manual stored in a safe place. Should this instruction
manual be lost, order a replacement from your local JASCO distributor.
iv
Page 6

Installation Conditions
To ensure safe operation, the following recommendations should be observed:
(1) Do not operate the instrument under voltage fluctuations exceeding
10% of the recommended line voltage. Large fluctuations may cause
the instrument to fail.
(2) Use a three-pronged electrical outlet with a ground. When only a
two-pronged socket is available, use an adapter and be sure to
connect the ground wire of the adapter.
(3) Operate the instrument under a temperature range of 10 ∼ 30°C.
(4) Operate the instrument under a humidity range of 35 ∼ 85% (RH).
If ambient humidity exceeds 85% (RH), water vapor may deteriorate
optical components. If possible, install the instrument in a location
having a humidity of 60% or lower.
(5) Operate the instrument under an atmospheric pressure of 750 ∼
1060 hPa.
(6) Avoid strong magnetic fields and sources of high-frequency waves.
The instrument may not function properly when near strong
magnetic fields or high-frequency wave sources.
(7) Avoid vibrations caused by vacuum pumps, electric motors,
processing equipment and machine tools.
(8) Avoid dust and corrosive gas. Do not install the instrument in a
location where it may be exposed to dust, especially in locations
exposed to outside air or ventilation outlets that discharge dust
particles.
(9) Do not install the instrument in a location where it may be exposed to
direct sunlight.
(10) Do not install the instrument in a location where it may be directly
exposed to the air current from an air conditioner or heater, as such
a location may inhibit stable measurement.
Note: The above conditions do not ensure optimal performance of this
instrument.
v
Page 7

Maintenance
Consult your local JASCO distributor regarding maintenance. In addition,
contact your local JASCO distributor when transporting the instrument.
Replacement parts can be ordered according to part number from your local
JASCO distributor. When the part number is not known, inform your local
JASCO distributor of the part name, instrument model name and its serial
number.
Notices
(1) Jasco shall not be held liable, either directly or indirectly, for any
consequential damage incurred as a result of product use.
(2) Software prohibitions:
y Copying of software or related materials for purposes other than
backup is prohibited.
y Transfer or authorization of the use of Jasco software to or by a third
party is prohibited.
y Disclosure of confidential information related to Jasco software is
prohibited.
y Modification of Jasco software is prohibited.
y Use of Jasco software on multiple workstations or terminals, through
a network or through any other means, is strictly prohibited. (This
does not apply to entities with the network license contract)
(3) The content of this manual is subject to change without notice in
accordance with product improvements.
(4) Unauthorized copying of this manual is prohibited.
(5) This manual shall not be used to guarantee or copyright industrial rights or
other rights.
(6) Company and product names listed herein are trademarks or registered
trademarks of their respective owner.
vi
Page 8

Warranty
This product is warranted for a period of one year from the date of delivery. If
any defects should occur in the product during this period of warranty, JASCO
will repair or replace the defective part(s) or product free of charge.
This warranty does not apply to defects as a result of the following:
(1) USE FOLLOWING IMPROPER OR INADEQUATE INSTALLATION.
(2) IMPROPER OPERATION.
(3) MOVEMENT, MODIFICATION, OR REPAIR BY PERSONS OTHER
THAN AUTHORIZED JASCO PERSONNEL.
(4) USE OF PARTS OTHER THAN THOSE THAT ARE AUTHORIZED BY
JASCO.
(5) INORDINATELY RAPID DETERIORATION DUE TO THE USE OF
CORROSIVE SOLVENTS OR SAMPLES.
(6) NATURAL DISASTERS SUCH AS FIRES, WATER DAMAGE, OR
EARTHQUAKES.
In addition, this warranty does not cover:
(7) CONSUMABLE PARTS OR PARTS THAT HAVE A SEPARATE
WARRANTY OR A WARRANTY PERIOD THAT IS DIFFERENT THAN
THAT SPECIFIED ABOVE.
The warranty period for all parts and repairs supplied under this warranty
expires with the warranty period of the original product.
Jasco Corporation
vii
Page 9

viii ix
Page 10

Table of Contents
Safety Considerations ...................................................................i
Regulatory Statements ................................................................iii
Preface..........................................................................................iv
Installation Conditions .................................................................v
Maintenance.................................................................................vi
Warranty......................................................................................vii
Table of Contents.........................................................................ix
1. Outline and Specifications...................................................1
1.1 Outline .................................................................................................... 1
1.2 Specifications ........................................................................................ 2
2. Part Names and Functions ..................................................4
2.1 Front panel ............................................................................................. 4
2.2 Operation panel ..................................................................................... 7
2.3 Back panel.............................................................................................. 8
3. Power On/Off and Self-diagnostics...................................10
3.1 Power on and self-diagnostics........................................................... 10
3.2 Power off .............................................................................................. 11
4. Operations in Normal Operation Mode .............................12
4.1 Parameter changes.............................................................................. 12
4.1.1 Range and response changes..................................................... 12
4.1.2 Temperature control ON/OFF and temperature setting ............ 15
4.1.3 Output polarity change method ([SHIFT][6]).............................. 15
4.2 Purge valve open/close (Solvent replacement in the reference cell)
............................................................................................................. 17
4.3 Auto-zero operations........................................................................... 18
4.4 Error and warning messages during monitoring .............................. 18
Page 11

4.5 Measurement of concentrated sample (Refractive index range
shifting................................................................................................. 19
5. [SHIFT] Key Operations .....................................................21
5.1 Operation summary............................................................................. 21
5.2 Preamplified output display ([SHIFT][1]) ........................................... 22
5.3 Auto-zero operation setting ([SHIFT][3])............................................ 23
5.4 Zero point shift for integrator output ([SHIFT][4])............................. 24
5.5 Lamp operation time ([SHIFT][5])....................................................... 26
5.6 Signal filtering mode ([SHIFT][7]) ....................................................... 27
5.7 Other settings ([SHIFT][MARK]) ......................................................... 27
5.7.1 Marker voltage/polarity changes................................................. 29
5.7.2 Setting to continue/stop self-diagnostics when an error occurs
................................................................................................................ 30
6. Program Mode Operations.................................................32
6.1 Operation summary............................................................................. 32
6.2 Switching between normal operation mode and program mode .... 32
6.3 File number setting (file loading) ....................................................... 33
6.4 Program editing ................................................................................... 34
6.4.1 Initial parameter editing............................................................... 34
6.4.2 Time program editing................................................................... 35
6.5 Time program operation...................................................................... 40
6.5.1 Time program execution.............................................................. 40
7. MEASURE RANGE Setting.................................................41
8. Maximum Flow Rate Changing at the Front Panel...........43
8.1 “ ~ 10mL/min” tubing arrangement and solvent replacement method
for reference cell................................................................................. 43
8.2 “10 ~ 50mL/min” tubing arrangement and solvent replacement
method for reference cell................................................................... 44
x
Page 12

9. Maintenance........................................................................45
9.1 Error messages and countermeasures.............................................. 45
9.1.1 Errors during self-diagnostics after power on........................... 45
9.1.2 Self-diagnostics during operation .............................................. 46
9.1.3 Error message meanings and countermeasures....................... 46
9.2 Flow cell bubble removal .................................................................... 48
9.2.1 Baselines when bubbles are generated ..................................... 48
9.2.2 Bubble removal method 1 (high flow rate fluid pump).............. 50
9.2.3 Bubble removal method 2 (syringe fluid injection) ................... 50
9.2.4 Bubble removal method 3 (covering tubing outlet)................... 50
9.2.5 Bubble prevention method .......................................................... 50
9.3 Flow cell cleaning method .................................................................. 51
9.4 Calibration method .............................................................................. 52
9.4.1 Tubing ........................................................................................... 53
9.4.2 Standard solution......................................................................... 53
9.4.3 Replacement of tubing system solvent with water.................... 54
9.4.4 Calibration method....................................................................... 54
9.4.5 Calibration constant confirmation and setting .......................... 56
9.4.6 Alternative calibration method .................................................... 57
9.5 Lamp maintenance time setting ......................................................... 58
9.6 Serial number setting .......................................................................... 59
9.7 Power Fuse replacement..................................................................... 60
10. Appendix.............................................................................62
10.1 Operation Theory............................................................................... 62
10.1.1 Operation theory of deflection differential refractometers ..... 62
10.1.2 Optical system ............................................................................ 63
10.1.3 Signal processing method......................................................... 65
10.1.4 Flow line ...................................................................................... 66
10.1.5 Internal volume of tubing........................................................... 68
xi
Page 13

xii
Page 14

1. Outline and Specifications
1.1 Outline
The JASCO RI-2031 Intelligent Refractive Index Detector is an HPLC detector
which offers unprecedented versatility, performance, and stability. The RI-2031
features the following:
High stability
High stability is obtained through an optical system that is not easily influenced
by temperature, an efficient thermal exchanger, and a digital signal processing
system.
Wide dynamic range
10 times larger dynamic range than an ordinary HPLC refractive index
detector.
Maximum flow rate of 50mL/min.
Maximum flow rate is 50mL/min. (Solvent: H2O) Wide dynamic range and
Extended Maximum flow rate are applied to the semi-preparation.
Easy operation
Parameters can be easily set using the LCD display, function keys, and
numeric keys. Self-diagnostics results and warning messages are also
displayed, which allows the condition of the instrument to be accurately
monitored. Optical Zero can be performed precisely using the easy key
operation.
Automatic analysis capability
The internal time program allows automatic switching of sensitivity range,
response and other functions. Using LC-Net, parameters can be set from the
Model HSS-2000 System without an interface.
Compact design
The front panel dimensions are the same as other JASCO 2000 series HPLC
equipment (pump, UV detector), which facilitates a neat stacking arrangement.
Safety measures
An internal fluid leak sensor is installed. When a leak from the flow cell occurs,
a signal is output and the pump can be stopped.
1
Page 15

1.2 Specifications
Model name: RI-2031 Intelligent Refractive Index Detector
Measurement system: Deflection type
Refractive index range: 1.00 ~ 1.75
Measurement range settings: 1/4, 1/2, 1, 2, 4, 8, 16, 32, 64, 128, 256, 512 x
10-6RIU/full scale (“MEASURE RANGE”: STD)
1/4, 1/2, 1, 2, 4, 8, 16, 32, 64, 128, 256, 512 x
10-5RIU/full scale (“MEASURE RANGE”:
WIDE)
Linearity: 5.0 x 10
5.0 x 10
-4
RIU (“MEASURE RANGE”: STD)
-3
RIU (“MEASURE RANGE”: WIDE)
<Condition> H2O
Noise: 0.2 x 10⁻⁸RIU
<Condition> H2O, Flow stopped
Cell capacity: 10µL
Maximum usable flow rate: 10mL/min. (“ ~ 10mL/min.” tubing)
50mL/min. (“10 ~ 50mL/min.” tubing)
<Solvent> H
2
O
Maximum pressure: 0.1MPa. (“ ~ 10mL/min.” tubing)
0.3MPa. (“10 ~ 50mL/min.” tubing)
Temperature control: PID control by heater,
Setting range: 0 ~ 45°C in 1°C increments.
Control range: Room temperature +10°C ~
Room temperature +25°C
Zero adjustment: Automatic Optical and electronic auto-zero
functions.
Integrator output zero positioning
Reference selection: Electromagnetic valve control
(“ ~ 10mL/min.” tubing)
2
Page 16

Time program: Parameters that can be set are PURGE
ON/OFF, AUTO ZERO, RANGE, and
RESPONSE. Range from 0.1 to 999.9min.
Response FAST, STD, SLOW (TIME ACCUME, DIGITAL
FICTER)
Input and output signals: Recorder output: 10mV/FS
Integrator output: 5.0 x 10⁻⁴RIU/1V(SID)
5.0 x 10⁻³RIU/1V(WIDE)
Marker and leak output: 1 circuit each
Marker, auto-zero, program reset/start: 1
circuit each
LC-Net control: 1 circuit
Liquid wetted material: Quartz, fluoride resin, stainless steel
(SUS316)
Dimensions and weight: 150(W) x 470(D) x 150(H) mm, excluding
Protrusions.
Approximately 13kg
Power requirements: AC100 ~ 240V, AC, 50/60Hz, 50VA max.
Ambient temperature: +10 ~ +35°C for operation
-30 ~ +60°C for storage
* Specifications are subject to change without notice.
3
Page 17
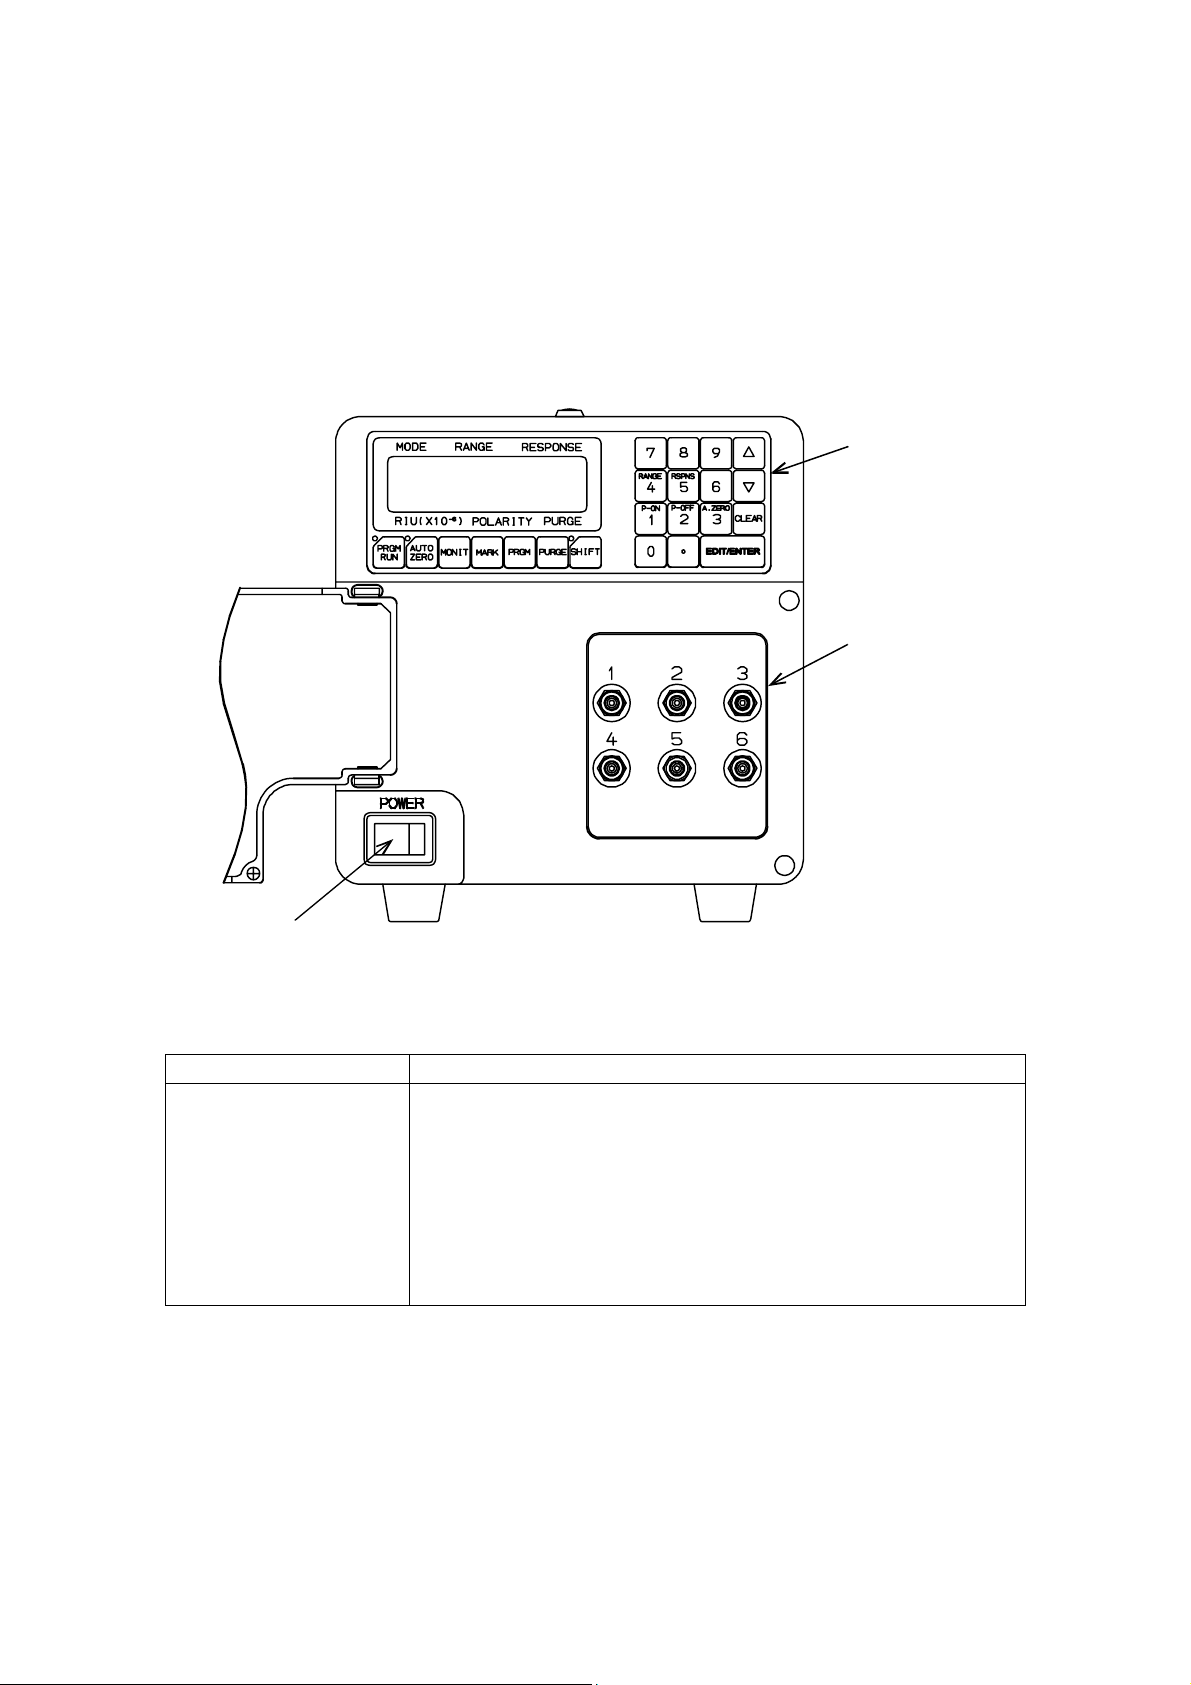
2. Part Names and Functions
2.1 Front panel
Operation Panel
Solvent Inlet and Outlet
POWER Switch
Figure 2.1 Front Panel
Name Function
Solvent Inlet and
Outlet
“1” ~ “6”
Operation panel
POWER switch
Sample and Reference In and out connections
Refer to Figure 2.2 and Figure 2.3.
Panel containing control keys, parameter edit keys, and
LCD display showing operating conditions, parameters
and various messages. Refer to Section 4 and 5.
Power switch for the instrument
Note: Suitable tubing for the Solvent Inlet and Outlet connections must be
selected according to maximum flow rate. Before connecting tubing,
refer to Figure 2.2. and Figure 2.3. “ ~ 10mL/min”. tubing is supplied
with the instrument.
4
Page 18

Note: For a “10 ~ 50mL/min” tubing arrangement, the refractive index signal
output (and display) polarity becomes negative. Change the polarity setting
from plus (+) to minus (-) using the polarity setting function. (Refer to 4.1.3
polarity setting.)
Tubing with
OD=1.6mm
ID= 0.8mm
1
4
5
2
3
6
Sample Out (waste)
Flow rate: ~ 10mL/min.
Sample IN (from column)
Figure 2.2 “ ~ 10mL/min” flow rate tubing connections
5
Page 19

g
6
6
Tubing
OD=1.6mm
ID=0.8mm
(Same tubing as used
to connect ports
No.1-2 or ports
Sample Out
1
2
4 5
Reference IN
3
Flow rate: 10 ~ 50mL/min.
No.4-5. for the “
10mL/min” tubing
arran
ement.
Tubing
OD=1.6mm
ID=0.8mm
~
Sample Out
1
4
2 3
5
Sample IN
Reference Out
Tubing OD=1.6mm, ID=0.8mm
Mobile phase
Flow rate: 10 ~ 50mL/min.
Sample IN
Replace solvent in the reference cell
by sucking the mobile phase solvent.
Keep the syringe connected during
analysis in order to maintain solvent
in the reference cell and to facilitate
solvent replacement.
Figure 2.3 “10 ~ 50mL/min” flow rate tubing connections
6
Page 20
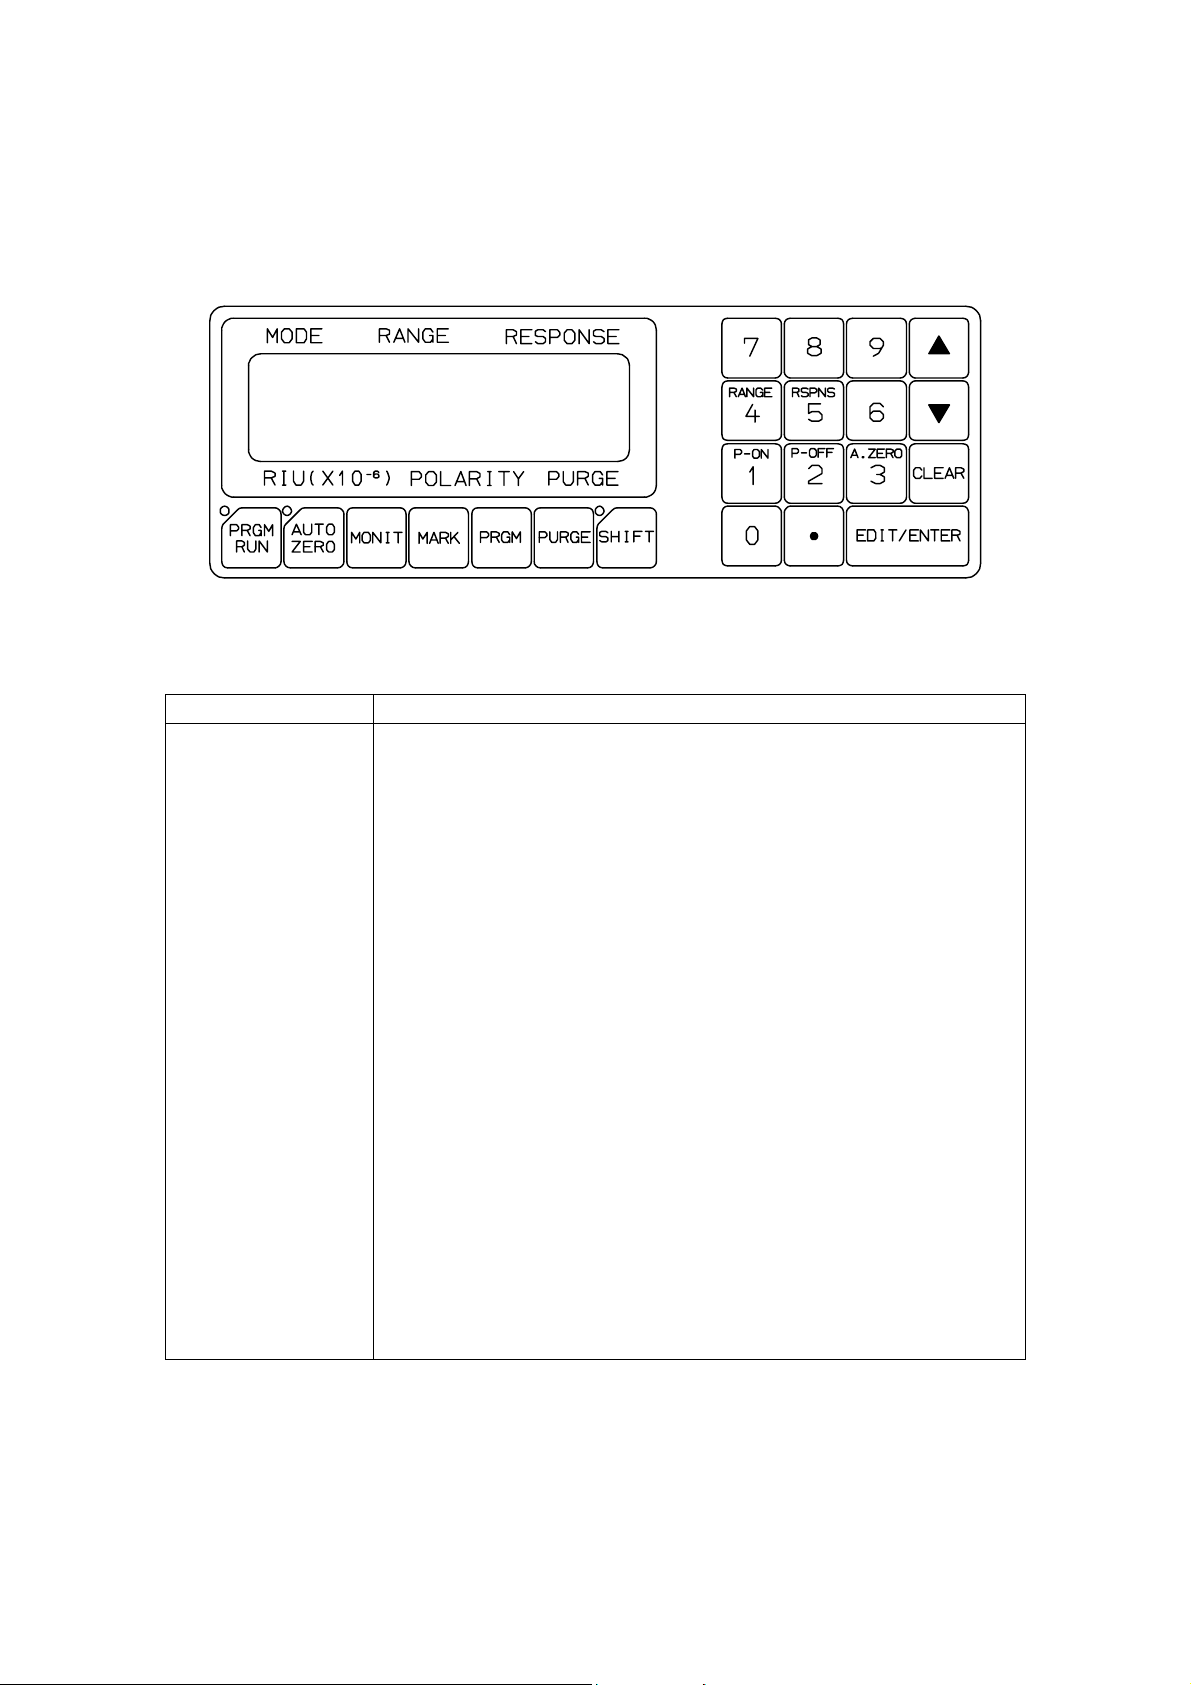
2.2 Operation panel
Figure 2.4 Operation Panel
Name Function
LCD screen Displays operation conditions, setting values, error
messages and other information.
[PRGM RUN] Used to start and stop the time program. Operation status
is indicated by the lamp to the upper left of the button. The
lamp is lit during program operation.
[AUTO ZERO] Sets the refractive index unit value (RIU) to zero.
[MARK] Outputs a marker signal from the recorder output terminal.
[MONIT] Used to return to the monitor screen from other screens
and to switch between monitor screens.
[SHIFT] Used in combination with other keys to set parameters that
are not frequently changed.
[PURGE] Executes solvent replacement (ON/OFF) for the reference
cell.
[PRGM] Switches between normal and time program mode.
[0] ~ [9], [.] Numeric keys. Keys 1 ~ 5 are used for special functions in
addition to their numeric function. The letters on these keys
describe the special functions. In other words, when editing
parameters, these keys are used to call up the relevant
functions. Refer to sections 4.1.1 and 6.4.2 for details.
[][] keys Used to edit parameters and change screens.
[CLEAR] Used to erase incorrect parameter input and clear error
messages.
[EDIT/ENTER] Used to edit parameters.
7
Page 21

2.3 Back panel
Input/Output Terminals
LC-Net Connectors
RS-232C Terminal
Fuses
AC input
Ground Terminal
Figure 2.5 Back Panel
8
Page 22

Name Function
Input and output terminals
Signal output terminals
REC+/G(GND)INT+/G(GND)
MARK OUT +/-
LEAK OUT +/-
Signal input terminals
MARK IN+
GNDA/Z IN+
GND-
PRGM RST/ST+
GND-
Cooling fan
AC input
Power fuses
Ground terminal
LC-Net connector
RS-232C terminal
Recorder output terminal (Output level
determined by RANGE setting)
Integrator output terminal (Fixed scale of
5x10⁻⁴RIU/1V(“MEASURE RANGE”: STD),
5x10⁻³RIU/1V(“MEASURE RANGE”: WIDE).
Marker output terminal (Normally open, contact
type output is closed when [MARK] key is pressed
or MARK IN is input)
Fluid leak warning output terminal (Normally open,
contact type output is closed when a fluid leak
from the flow cell occurs)
(Note) The internal fluid leak sensor can only
detect a leak of buffer solution.
Marker input terminal (Marker is added on the
recorder output when the contact point is closed)
Auto-zero input terminal (Recorder and integrator
outputs are zeroed when contact type input is
closed)
Time program input terminal (Time program is
reset and immediately started when contact type
input is closed)
Used for cooling the internal components of the
instrument
Accepts the power cable.
Protects the instrument from excessive currents.
Grounds the instrument. This is not the ground
terminal for input and output signals.
Input and output terminal for the LC-Net.
Used when controlling the instrument via a
RS-232C cable (optional).
9
Page 23

3. Power On/Off and Self-diagnostics
3.1 Power on and self-diagnostics
Turn the power switch, located at the lower left of the front panel, to the ON
position. The self-diagnostics program is automatically executed. The program
examines the following items:
ROM CHECK (Memory)
RAM CHECK (Memory)
DC POWER (Direct current power source)
BACK UP (Memory backed up by battery)
TEMP SENSOR (Temperature sensor)
LAMP CHECK (Lamp energy)
LAMP O.P TIME (Lamp operating time)
ZERO GLASS DRV. (Optical zero glass driver)
An error message will appear if a problem is detected.
Note: When an error occurs, diagnostics will either stop immediately or
continue to the next item depending on the instrument settings (refer to
section 5.7.2).
The screen on the left in Figure 3.1 will appear when diagnostic tests are
complete. Press the [MONIT] key to switch to the screen on the right in Figure
3.1. The heater temperature is displayed in the screen on the right. When the
[MONIT] key is pressed again, the display will return to the screen on the left.
Normal operation mode consists of these two screens.
10
Page 24

Mode display
(Normal operation mode)
MODE RANGE RESPONSE
Sensitivity
(64)
NORM 64 STD
-0.1 + ON
RIU(x10 ) POLARITY PURGE
Current
refractive index
(-0.1)
-6
Polarity
(Positive)
Normal operation mode monitor screen(1)
Figure 3.1 Normal Operation Mode Screens
3.2 Power off
Response
(standard)
[MONIT]
Purge valve status
(ON)
Current Optical bench
temperature/setting
temperature
MODE RANGE RESPONSE
Temperature
TEMP: xx.x/yy
-0.1 + ON
RIU(x10 ) POLARITY PURGE
-6
°C
control mark
blinks
when heating
Normal operation mode monitor screen(2)
Turn the power switch, located at the lower left of the front panel, to the OFF
position. The range, response, polarity, temperature, and time program set at
this time will be recorded in C-MOS RAM (memory backed up by battery).
These values will be restored when the power is turned on again.
11
Page 25

4. Operations in Normal Operation Mode
The dynamic measurement range of the RI-2031 is 10 times larger than
ordinary HPLC refractive index detectors. The dynamic measurement range of
the RI-2031 depends on the “MEASURE RANGE” setting. When a highly
concentrated sample is analyzed, set the “MEASURE RANGE” to WIDE. Refer
to section 7.
The maximum flow rate of the RI-2031 depends on the tubing connections of
the front cell panel. The “ ~ 10mL/min.” tubing connections are for conventional
analysis and the “10 ~ 50mL/min” tubing connections are for semi-preparative
analysis. Tubing connection configurations are described in section 8.
4.1 Parameter changes
4.1.1 Range and response changes
After the power is turned on and the self-diagnostic tests are complete, the
normal operation mode monitor screen (1) (left in Figure 4.1) will appear.
Range and response settings can be changed here.
Note: Use the [MONIT] key to switch between monitor screens.
Mode display
(Normal operation mode)
MODE RANGE RESPONSE
NORM 64 STD
-0.1 + ON
RIU(x10 ) POLARITY PURGE
Current
refractive index
(-0.1)
-6
Polarity
(Positive)
Sensitivity
(64)
Purge valve status
(ON)
Response
(standard)
[MONIT]
Current optical bench
temperature/setting
temperature
MODE RANGE RESPONSE
TEMP: xx.x/yy
-0.1 + ON
RIU(x10 ) POLARITY PURGE
-6
°C
Temperature
control mark
blinks
when heating
Normal operation mode monitor screen(1)
Normal operation mode monitor screen(2)
Figure 4.1 Normal Operation Mode Screens
12
Page 26

Input range:
1/4, 1/2, 1, 2, 4, 8, 16, 32, 64, 128, 256, 512, S (Short) x10-6RIU /10mV
(“MEASURE RANGE”: STD)
1/4, 1/2, 1, 2, 4, 8, 16, 32, 64, 128, 256, 512, S (Short) x10-5RIU /10mV
(“MEASURE RANGE”: WIDE)
Response input range: FAST, STD, SLOW
(1) Change method 1
NORM 64(16) STD(FAST)
-0.000 + ON
[MONIT]
NORM 64 STD
-0.000 + ON
NORM 16 STD
-0.000 + ON
[EDIT/ENTER]
[ ][ ][EDIT/ENTER]
[ ][ ][EDIT/ENTER]
Normal operation mode monitor screen(1)
Values in parentheses are after changes.
Flashes
Sensitivity input screen
Display the desired value
Flashes
Response rate input screen
Display the desired value
Figure 4.2 Change Method (1)
Note: If an incorrect value is entered accidentally, press the [CLEAR] key
before pressing the [EDIT/ENTER] key then enter the value again.
Change method 2
When the [RANGE/4] (range) key or the [RSPNS/5] (response) key are
pressed, the corresponding parameter will flash and the value can be changed
directly.
13
Page 27

NORM 64(16) STD
-0.000 + ON
[RANGE/4] [ ][ ][EDIT/ENTER]
NORM 64 STD
-0.000 + ON
Sensitivity change
Sensitivity flashes
Figure 4.3 Change Method (2)
[RSPNS/5]
NORM 64 STD(FAST)
-0.000 + ON
[ ][ ][EDIT/ENTER]
NORM 64 STD
-0.000 + ON
Response change
Response flashes
14
Page 28

4.1.2 Temperature control ON/OFF and temperature setting
When the normal operation monitor screen (2) (right in Figure 4.1) is displayed,
temperature control can be turned ON/OFF and temperature can be set as
shown the operations in Figure 4.4.
Input range: 0 ~ 45°C (Operating temperature range: Room temperature +
10°C ~ Room temperature +25°C)
0: OFF (Temperature control not active)
Note: During heating operation, the mark at the top right of the monitor
screen will blink. Blinking speed is related to heater power. When 0 is
set (control OFF), the mark belong to stop moving.
TEMP: xx.x/yy(zz) °C
-0.0 + ON
[EDIT/ENTER][MONIT]
TEMP: xx.x/yy °C
-0.0 + ON
Note:Temperature control will be turned off
Normal operation mode monitor screen(2)
Flashes
Temperature input screen
when 0 is input
Values in parentheses are after changes.
Values input[zz][EDIT/ENTER]
Figure 4.4 Temperature Control ON/OFF and Temperature Setting
4.1.3 Output polarity change method ([SHIFT][6])
This operation changes the output polarity of the signal. When “10 ~
50mL/min.” tubing is used, or negative peak heights exceed the integrator
input range, polarity should be set to negative (-).
4.1.3.1 “10 ~ 50mL/min.” tubing arrangement
When “10 ~ 50mL/min.” tubing is used, because of the optical arrangement,
the refractive index signal output decreases when the actual refractive index
increases. Therefore, the polarity should be set to negative (-) in order to
correct the relation between the actual refractive index and the refractive index
signal output (for both the recorder and the integrator).
15
Page 29

When the actual negative peak signal exceeds -5.0x10⁻⁴RIU, polarity should be
set to positive (+). Refer to Table 4.2 (“10 ~ 50mL/min.” tubing connections)
4.1.3.2 Negative peak signal exceeds the integrator input range
The allowable input voltage range of a current integrator is, in general, -10mV
~ +1V. When the negative peak signal is within 5x10
RANGE”: STD) or 5x10
-4
RIU (“MEASURE RANGE”: WIDE), integrator output
-5
RIU (“MEASURE
can be prevented from falling below –10mV using the zero point shift function.
Refer to section 5.4.
When the negative peak signal exceeds this range, polarity should be changed.
The actual allowable refractive index range is shown in Table 4.1 and Table 4.2.
Change polarity settings, according to these tables.
Table 4.1 “ ~ 10mL/min.” tubing arrangement (*shifted by 100mV)
MEASURE RANGE polarity without zero point shift* with zero point shift*
STD
STD
WIDE
WIDE
+ -5.0×10
- -5.0×10
+ -5.0×10
- -5.0×10
-6
~+5.0×10⁻⁴ RIU -5.0×10⁻⁵~+4.5×10
-4
~+5.0×10
-5
~+5.0×10
-3
~+5.0×10
-6
RIU -4.5×10
-3
RIU -5.0×10
-5
RIU -4.5×10
-4
~+5.0×10
-4
~+4.5×10
-3
~+5.0×10
-4
RIU
-5
RIU
-3
RIU
-4
RIU
Table 4.2 “10 ~ 50mL/min.” tubing arrangement (*shifted by 100mV)
MEASURE RANGE polarity without zero point shift* with zero point shift*
STD
STD
WIDE
WIDE
- -5.0×10
+ -5.0×10
- -5.0×10
+ -5.0×10
-6
~+5.0×10⁻⁴ RIU -5.0×10⁻⁵~+4.5×10
-4
~+5.0×10⁻⁶ RIU -4.5×10
-5
~+5.0×10
-3
~+5.0×10
-3
RIU -5.0×10
-5
RIU -4.5×10
-4
~+5.0×10
-4
~+4.5×10
-3
~+5.0×10
-4
RIU
-5
RIU
-3
RIU
-4
RIU
When polarity is set to negative (-) with a “ ~ 10mL/min” tubing arrangement,
the screen display and output (for both the recorder and the integrator) will
change as shown in Figure 4.5. When the actual refractive index decreases,
the index (RIU) value on the screen will increase and so will output. Changes
in peak appearance and display values caused by polarity differences are
shown in Figure 4.5 and key operations are shown in Figure 4.6.
16
Page 30

+
0
−
Actual refractive index change
RIU:10.0
0
RIU:-20.0
Polarity:Positive
RIU:20.0
0
RIU:-10.0
Polarity:Negative
Figure 4.5 Changes in Peak Appearance and Display Values Caused by
Polarity Differences
NORM 64 STD
-0.0 + ON
[MONIT]
POLARITY
+(-)
(-)is the value after the change.
Output polarity change screen
[SHIFT] [5]
Normal operation mode monitor screen(1)
[EDIT/ENTER]
[ ][ ][EDIT/ENTER]
POLARITY
+
Flashes
Input screen
Figure 4.6 Output Polarity Change
Note: The marker output polarity can also be changed (refer to section
5.7.1).
4.2 Purge valve open/close (Solvent replacement in the reference cell)
This section explains the procedures to open and close the purge valve. When
the valve is opened during fluid pumping (Screen display: ON), solvent flows to
the cells on both the sample and reference side. When the valve is closed
(Screen display: OFF), solvent only flows to the sample side. When replacing
solvent or removing air bubbles in the flow cell, open the valve to pass solvent
through the reference cell. Close the valve during analysis. The operations are
shown in Figure 4.7.
17
Page 31

Normal operation mode monitor screen
NORM 64 STD
-0.0 + ON(OFF)
[MONIT]
[MONIT]
PURGE ON
1:ON 0:OFF
[1]
:Opens the purge valve and changes the status to ON.
[0]
:Closes the purge valve and changes the status to OFF.
TEMP: xx.x/yy °C
-0.0 + ON(OFF)
[PURGE]
Current purge valve status
Purge valve open/close screen
Figure 4.7 Purge Valve Open/Close Operations
Note: When using “10 ~ 50mL/min” tubing connections, draw up the mobile
phase solvent using a syringe in order to replace solvent in the
reference cell. Replacement of solvent in the reference cell can be
performed regardless of the PURGE VALVE setting.
4.3 Auto-zero operations
When the [AUTO ZERO] key is pressed, the current refractive index value is
set as 0. In other words, the recorder and integrator output are set to 0.
Note: When a signal is input into MARK IN on the back panel, the auto-zero
operation can be set to occur automatically. (Refer to section 5.3)
Note: When executing optical auto zero, press the [SHIFT][AUTOZERO] key.
(Refer to section 5.2)
4.4 Error and warning messages during monitoring
The error and warning messages that may occur during monitoring are shown
in Table 4.3.
When an error message is displayed, press the [CLEAR] key to return to the
18
Page 32

monitor screen. If the problem continues, the same message will appear again
after approximately 20 seconds. Refer to section 9.1 for countermeasures.
Table 4.3 Error Messages and Their Meanings
Error message Meaning
TROUBLE LEAK IN CELL
TROUBLE OVER TEMP
TROUBLE ZERO GLASS DRV
WARNING INTENSITY POOR
WARNING OUT OF RANGE
WARNING LAMP MAINT TIME
4.5 Measurement of concentrated sample (Refractive index range shifting
Fluid is leaking from the flow cell
Heater is overheating
Zero glass drive not move
Light intensity has deteriorated
Optical zero adjustment is not correct
Lamp maintenance time has been
exceeded
when the “MEASURE RANGE” setting is STD)
When “MEASURE RANGE” is set to STD, the linear dynamic range of
refractive index, with properly adjusted optical zero, is +/-5.0x10-4RIU. Although
this range cannot be expanded, it can be shifted in one direction. For example,
the allowable refractive index range can be shifted to -3.0x10⁻⁴ ~ +7.0x10⁻⁴RIU.
The method for shifting the range is described below.
(1) Display the preamplified output screen (refer to section 5.2) and press the
[][] keys so that DIFF is within 0±0.03
(2) Return to the monitor screen.
(3) Press the [AUTO ZERO] key to set the RIU value to 0.
(4) Display the preamplified output screen and press the [][] keys until the
RIU value reaches -300.0±30(x10-6RIU) (this assumes the output polarity
is set to positive).
(5) Again press the [AUTO ZERO] key to set the RIU value to 0. As long as
optical zero adjustment is not executed, the allowable refractive index
range will be -3.0x10⁻⁴ ~ 7.0x10⁻⁴RIU.
Note: The refractive index range resulting in proper integrator output is
+/-5.0x10-4RIU, taking into consideration the polarity setting. When this
19
Page 33

range is exceeded, use the recorder output. The refractive index range
resulting in proper recorder output is +/-9.9x10-4RIU (with a range
setting of 512). However, signal linearity is lowered when above +/- 5.0
X 10-4 RIU.
Note: When the “MEASURE RANGE” is set to WIDE, this refractive index
range shifting method is invalid.
20
Page 34

5. [SHIFT] Key Operations
5.1 Operation summary
The operations executed using the [SHIFT] key are summarized in Table 5.1.
Table 5.1 [Shift] Key Operations and their Functions
Key operation Function
[SHIFT][1] Preamplified output display (refer to section 5.2).
Used to check for bubbles in the cell and when adjusting
optical zero.
[SHIFT][3] Auto-zeroing operation (AUTO and MANUAL) (refer to
section 5.3)
AUTO: When a signal is input into MARK IN on the back
panel, the autozeroing operation is executed automatically.
MANUAL: Auto-zeroing is executed only when the [AUTO
ZERO] key is pressed.
[SHIFT][4]
[SHIFT][5] Lamp operation time (refer to section 5.5)
[SHIFT][6] Output polarity change (refer to section 4.1.3)
[SHIFT][7] Signal filtering selection (refer to section 5.6)
[SHIFT][AUTO
ZERO]
[SHIFT][MARK] Allows the following parameters to be changed.
Zero point shift for integrator output (refer to section 5.4)
The allowable input voltage for the integrator is normally
within the range -10mV ~ +1V. The dynamic range on the
negative side is therefore small compared to that on the
positive side. When the output level is shifted beforehand to
the positive side using the zero point shift function, integrator
output can be prevented from falling below -10mV.
Used to execute optical auto zero
・”MEASURE RANGE” (refer to chapter 7)
・Constant K1 (for STD side optics calibration constant)
setting (refer to section 9.4.5)
・Constant K2 (for WIDE side optics calibration constant)
setting (refer to section 9.4.5)
・Calibration (refer to section 9.4)
・Lamp maintenance time setting (refer to 9.5)
21
Page 35

・Marker voltage/polarity change (refer to section 5.7.1)
・Setting to continue/stop self-diagnostics when an error
occurs (refer to section 5.7.2)
・Serial number setting (refer to section 9.6)
5.2 Preamplified output display ([SHIFT][1])
Preamplified output is used to check for bubbles in the cell and when adjusting
optical zero.
Normal operation mode monitor screen
NORM 64 STD
-0.0 + ON(OFF)
[MONIT]
[MONIT]
TEMP: xx.x/yy °C
-0.0 + ON(OFF)
[SHIFT] [1]
DIFF: -0.0200 V (*)
SAM : 1.5000 V
Figure 5.1 Preamplified Output Screen
(1) Checking for bubbles in the cell
The existence of bubbles in the cell is evaluated by monitoring fluctuation of
the SUM value. When the third digit after the decimal place is fluctuating,
bubbles remain in the cell. When no fluctuation is found, no bubbles are
thought to be present. However, final judgement should be made by recording
and inspecting the baseline.
For example, when a problem is found with the baseline, check the SUM value.
If the value has decreased, it can be assumed that bubbles have been
generated. In addition, when the SUM value increases (decreases) while
pumping solvent, bubbles are being eliminated (generated).
Note: The SUM value is proportional to the total light intensity detected by
two photodiodes installed in the instrument. Therefore, the greatest
value is restored when the cells are free of bubbles. If bubbles are
22
Page 36

present, transparency is reduced and the value decreases. If the value
falls below 0.1V, the INTENSITY POOR message appears.
(2) Optical zero-adjustment
When “MEASURE RANGE ” is set to STD, be sure to execute optical zero
adjustment after solvent replacement. Even when using the same solvent,
readjust whenever new solvent is replaced.
Note: When “MEASURE RANGE” is set to WIDE, dynamic measurement
range is large. Therefore, the optical zero adjustment function is not
equipped in this unit.
(3) Automatic optical zero adjustment
When “MEASURE RANGE ” is set to STD, optical zero can be automatically
adjusted by pressing [SHIFT][AUTOZERO]. This key operation causes the
DIFF value to fall zero within –0.01xx ~ +0.01xx. When DIFF value is not within
–0.01xx ~ +0.01xx, refer to (4) below.
(4) Optical zero adjustment using [][] keys
When “MEASURE RANGE ” is set to STD, optical zero can also be adjust by
[][] key operations. To increase (decrease) the DIFF value, press [] ([])
key. Adjustment is satisfactory if the value is within –0.01xx~+0.01xx. When (*)
is displayed in the right side of the LCD display, the optical zero adjustment
range is limited. In this case, bubbles may exist in the flow cell or replacement
of solvent in the flow cell may not be enough.
Note: The value displayed for DIFF is proportional to the difference in the
light intensity detected by two photodiodes. The sign of this value may
be positive or negative. When the absolute value of DIFF/SUM is
greater than 0.8, the instrument will cease to operate normally and the
OUT OF RANGE message will appear.
5.3 Auto-zero operation setting ([SHIFT][3])
This setting determines whether or not the auto-zeroing operation will be
executed automatically when a marker signal is input into the MARK IN
terminal on the back panel.
23
Page 37

AUTO
When analyzing samples using an autosampler, the MARK IN signal, input to
the detector from the autosampler at the time of sample injection, causes a
marker to be overlayed on the chromatogram and auto-zero to be executed.
The chromatogram base is therefore set to zero.
MANUAL
Auto-zeroing is not executed when a signal is input into the MARK IN terminal.
The auto-zeroing operation is only executed when the [AUTO ZERO] key is
pressed.
Note: The [MARK] key function on the front panel causes a marker
regardless of this setting.
Normal operation mode monitor screen
NORM 64 STD
-0.0 + OFF
[MONIT]
AUTO ZERO
AUTO(MANUAL)
(MANUAL)is the setting after the change.
Auto-zero setting screen
[SHIFT] [3]
[MONIT]
[EDIT/ENTER]
[ ][ ][EDIT/ENTER]
TEMP: xx.x/yy °C
-0.0 + OFF
(AUTO or MANUAL can be selected)
AUTO ZERO
AUTO
Flashes
Input screen
Figure 5.2 Setting for Automatic or Manual Auto-zero Execution
Note: The AUTO setting is convenient for analysis, whereas the MANUAL
setting is convenient for fractioning.
5.4 Zero point shift for integrator output ([SHIFT][4])
The allowable input voltage range of a current integrator is, in general, -10mV
~ +1V. The dynamic range on the negative side is therefore small compared to
that on the positive side. When the output level is shifted beforehand to the
positive side using the zero point shift function, integrator output can be
prevented from falling below -10mV.
When [AUTO ZERO] is operating or when a signal is input into A/Z IN on the
back panel, integrator output size of 0, 5, 10, 50, or 100mV can be selected.
24
Page 38

Note 1: The zero point shift setting has no affect on recorder output.
Note 2: The extent of integrator output noise is not changed by the zero point
shift setting. However, as the input voltage increases, the signal
resolution of the integrator decreases and visible baseline noise
increases. Therefore, do not use values that are larger than necessary
(1) Setting of integrator output zero point shift
Normal operation mode monitor screen
NORM 64 STD
-0.0 + OFF
[MONIT]
A. Z POSITION
[SHIFT] [4]
0(50)mV
(50) is the value after the change
Zero point shift setting screen
[MONIT]
TEMP: xx.x/yy °C
-0.0 + OFF
[EDIT/ENTER]
[ ][ ][EDIT/ENTER]
A. Z POSITION
0 mV
Flashes
Input screen
Figure 5.3 Integrator Output Zero Point Shift Setting
(2) Example
When the baseline drifts to the negative during a long analysis
25
Page 39

Integrator o utput
0 V
-10 m V
Integrator o utput
Zero point shift:0m V
Integrator p roc ess ing n ot possible
0 V
Figure 5.4 Example when Baseline Drifts in Negative Direction
5.5 Lamp operation time ([SHIFT][5])
This function displays the lamp operation time.
Normal operation mode monitor screen
NORM 64 STD
-0.0 + OFF
[MONIT]
LAMP OPERAT . TIME
[MONIT]
[SHIFT] [5]
* 3456.7 H
Zero point shift:+5 0m V
TEMP: xx.x/yy °C
-0.0 + OFF
Lamp operation time screen
Figure 5.5 Lamp Operation Time Display
26
Page 40

5.6 Signal filtering mode ([SHIFT][7])
The signal filtering method is normally set to “TIME ACCUME”. If a high noise
level makes analysis using the “TIME ACCUME” method difficult, switch to the
“DIGITAL FILTER” method. Generally, the “DIGITAL FILTER” method
decreases noise, but peak shape may be broad. Select the adequate filtering
method and response setting in relation to the chromatogram characteristics.
Normal operation mode monitor screen
NORM 64 STD
-0.0 + ON(OFF)
[MONIT]
FILTER MODE
TIME ACCUME
(values in parenthesis are after changes)
[SHIFT] [7]
[MONIT]
[EDIT/ENTER]
[ ][ ][EDIT/ENTER]
TEMP: xx.x/yy °C
-0.0 + ON(OFF)
FILTER MODE
TIME ACCU ME
Flashes
Figure 5.6 Setting for signal filtering
Note: The digital filtering method is efficient when the full width half maximum
value of the peak is wider than 5 seconds. However, when using the
digital filtering method, the retention time delay becomes significant.
The delay time of a peak for which the full width half maximum value is
10 seconds is described in Table 5.2.
Table 5.2 Retention time delay
Response setting Fast STD SLOW
Delay time ca. 4 sec. ca. 7 sec. ca. 13 sec.
5.7 Other settings ([SHIFT][MARK])
Pressing [SHIFT][MARK] allows the following parameters to be changed.
・”MEASURE RANGE” (refer to chapter 7)
27
Page 41

・Constant K1 (for STD side optics calibration constant) setting (refer to
section 9.4.5)
・Constant K2 (for WIDE side optics calibration constant) setting (refer to
section 9.4.5)
・Calibration (refer to section 9.4)
・Lamp maintenance time setting (refer to section 9.5)
・Marker voltage/polarity change (refer to section 5.7.1)
・Setting to continue/stop self-diagnostics when an error occurs (refer to
section 5.7.2)
・Serial number setting (refer to section 9.6)
The calibration constants K1 and K2 must be input when the BACK UP
ERROR message appears. Calibration must be performed when a light source,
photodiode, or flow cell is replaced. Other items may be input as required. In
this section, the marker voltage/polarity change item and the setting to
continue/stop self-diagnostics when an error occurs are described. For
descriptions of the other items, refer to chapter 9.
When [SHIFT][MARK] is pressed, the “MEASURE RANGE” selection menu
screen appears. Press the [][] keys to scroll between the menu screens as
shown in Figure 5.7.
28
Page 42

Normal operation mode monitor screen
NORM 64 STD
-0.0 + OFF
PARAMETER MODE
1:MEASURE RANGE
[ ]
PARAMETER MODE
2:SET K1 VALUE
[ ] [ ]
PARAMETER MODE
3:SET K2 VALUE
[ ]
PARAMETER MODE
4:CALIB. K
[ ]
[SHIFT] [MARK][MONIT]
[ ]
[ ]
[ ]
[MONIT]
Measurement range setting menu
Constant K1 setting
Constant K2 setting
K1, K2 Calibration
TEMP: xx.x/yy °C
-0.0 + OFF
PARAMETER MODE
5:L. MAINTE. TIME
[ ]
PARAMETER M ODE
6:MARK OUT MODE
[ ]
PARAMETER MODE
7:DIAG. MODE
[ ]
PARAMETER MODE
8:SERIAL NO.
[ ]
[ ]
[ ]
Lamp maintenance time menu
Marker voltage/polarity menu
Menu to continue/stop
self-diagnostics when an
error occurs
Serial number menu
Figure 5.7 Other Menus
5.7.1 Marker voltage/polarity changes
These operations are used to change the marker output voltage and polarity of
Recorder output.
29
Page 43

The procedures required to change the settings outlined in Figure 5.8.
Marker voltage input range: 0, 0.5, 1, 2mV
Normal operation mode monitor screen
NORM 64 STD
-0.0 + ON(OFF)
[MONIT]
TEMP: xx.x/yy °C
-0.0 + ON(OFF)
[SHIFT] [MARK] [MONIT]
(Display the menu below by pressing the key twice)
[ ]
Marker voltage/polarity menu
PARAMETER MODE
3:MARK OUT MODE
[MONIT]
MARK OU T MO DE
V:(1)2mV P: +(-)
[EDIT/ENTER]
[EDIT/ENTER]
Marker voltage/polarity screen
(values in parenthesis are
after changes)
MARK OUT MODE
V: 1mV P: +
Flashes
MARK OUT MODE
V: 2mV P: +
Voltage input screen
[ ][ ][EDIT/ENTER]
Polarity input screen
Flashes
Figure 5.8 Marker Voltage/Polarity Changes
5.7.2 Setting to continue/stop self-diagnostics when an error occurs
This setting is used to determine whether power on self-diagnostics will stop or
continue when an error is detected and displayed. The default setting stops
self-diagnostics when an error occurs. When diagnostics is set to continue and
an error is detected the error message is displayed for 3 seconds then the
instrument continues on to the next test.
The procedure for changing the setting to continue/stop self-diagnostics when
an error occurs is outlined in Figure 5.9.
30
Page 44

Input range: CONFIRM (Stop), SKIP (Continue)
Normal operation mode monitor screen
NORM 64 STD
[MONIT]
-0.0 + ON(OFF)
[MONIT]
(Use the
[ ]
[SHIFT] [MARK]
[ ]
keys to display the menu below)
/
Menu to continue/stop selfdiagnostics when an error occurs.
PARAMETER MODE
4:DIAG. MODE
[MONIT]
DIAG MODE
CONFIRM(SKIP)
[EDIT/ENTER]
[EDIT/ENTER]
[ ][ ][EDIT/ENTER]
(values in parenthesis are after changes)
TEMP: xx.x/yy °C
-0.0 + ON(OFF)
DIAG MODE
CONFIRM
Flashes
Figure 5.9 Setting to Continue/stop Self-diagnostics when an Error Occurs
31
Page 45

6. Program Mode Operations
6.1 Operation summary
In program mode the range, response, valve opening and closing, and
auto-zero operations can be changed according to a time program. The
maximum number of steps in the time program is 64 and the maximum number
of program files that can be stored is 10.
The time program operations are described in the following sections.
Switch to program mode Refer to section 6.2
Set file number Refer to section 6.3
Edit initial parameters Refer to section 6.4.1
Edit time program Refer to section 6.4.2
Execute Refer to section 6.5
6.2 Switching between normal operation mode and program mode
Press the [PRGM] key while in the normal operation mode monitor screen. The
program mode monitor screen (Figure 6.1) will appear. Press the key again to
return to normal mode. The program mode monitor screen consists of three
screens. Switch between screens using the [MONIT] key.
32
Page 46

Normal operation mode monitor screen
NORM 64 STD
-0.0 + OFF
PRG2 T:0.0
-0.0 + OFF
[MONIT]
[MONIT]
[PRGM]
PRG2 64 STD
-0.0 + OFF
TEMP: xx.x/yy °C
-0.0 + OFF
[MONIT]
TEMP: xx.x/yy °C
-0.0 + OFF
Program mode monitor screen
Figure 6.1 Switching between Normal Operation Mode and Program Mode
The contents of each screen are described in Figure 6.2.
Current heater temperature/setting temperature
Temperature control mark
[MONIT]
TEMP: xx.x/yy°C
-0.0 + OFF
(off)
Program mode
(file number 2)
PRG2 T:12.3
-0.0 + OFF
Current time
(12.3 min)
[MONIT]
Current refractive
index value
Sensitivity
(64)
Response
(standard)
PRG2 64 STD
-0.0 + OFF
Polarity
(positive)
Purge valve
blinks when heating
Figure 6.2 Meanings of Items in the Program Mode Monitor Screen
6.3 File number setting (file loading)
A maximum of 10 files (0 ~ 9) can be stored. The file number can be changed
from the normal operation mode or program mode monitor screen using the
following operations.
Input number range: 0 ~ 9
33
Page 47

Normal operation
mode monitor screen
[MONIT]
RPOGRAM FILE NO.
y(x)
(X) is the value after the change
File number screen
[SHIFT] [PRGM]
[PRGM]
[x][EDIT/ENTER]
[EDIT/ENTER]
Program mode monitor
screen
RPOGRAM FILE NO.
y
Flashes
Input screen
Figure 6.3 File Number Change
Note 1: If an incorrect value is entered accidentally, press the [CLEAR] key
before pressing the [EDIT/ENTER] key then enter the value again.
Note 2: When a file number already stored in memory is designated, the stored
program will be loaded. After the file number is set and the time
program is edited, the file is automatically saved. Since time programs
are stored in C-MOS RAM (the memory backed up by battery), they
are not erased when the power is turned off.
6.4 Program editing
6.4.1 Initial parameter editing
Range and purge valve open/close (ON/OFF) are set as initial parameters. The
setting method is shown in Figure 6.4.
Note: The settings in normal operation mode for response, polarity, and
temperature will remain in effect in program mode.
Note: When using a “10 ~ 50mL/min.” tubing arrangement, the solvent
replacement in the reference cell is performed by drawing up the
mobile phase solvent using a syringe. Solvent replacement is possible
regardless of whether the purge value is ON or OFF.
34
Page 48

Program mode monitor screen
PRG2 T:0.0
-0.0 + OFF
[ ]
PRG2 INITIAL
R:64(16) PURGE:OFF(ON)
Sensitivity
[EDIT/ENTER]
PRG2 INITIAL
R:64 PURGE:OFF
Sensitivity
flashes
[EDIT/ENTER]
PRG2 INITIAL
R:16 PURGE: OFF
[MONIT]
[ ]
Purge valve
[ ]
PRG2 64 STD
[MONIT]
-0.0 + OFF
[MONIT]
Initial parameter screen
Note: Values in parentheses are
after changes
Sensitivity input screen
[ ]
Purge valve open/close screen
Purge valve flashes
TEMP: xx.x/yy°C
-0.0 + OFF
[EDIT/ENTER] [ ] [ ]
Figure 6.4 Initial Parameter Editing
6.4.2 Time program editing
6.4.2.1 Time program input
(1) Input example
As an example, a time program will be created with the initial parameters
(range: 16, response: STD) held for 1 minute. The range will then be changed
to 8 and, after 2 minutes, the response will be changed to FAST.
In the initial parameter screen, press the down key. The step 1 screen will
appear. Follow the procedure in Figure 6.5 for subsequent operations.
35
Page 49

PRG2 INITIAL
R:16 PURGE:OFF
[ ]
[ ]
PRG2 ST 1 T:0.0
[EDIT/ENTER]
P2 ST 1 T:0.0
[1][EDIT/ENTER]
P2 ST 1 T:1.0
1: PURGE ON
Call up sensitivity
[RANGE/4][EDIT/ENTER]
three times [EDIT/ENTER]
or [ ]
P2 ST 1 T:1.0
RANGE:16
Initial parameter screen
Step 1 screen
Time flashes
(waiting for input)
Input 1 minute
Function flashes
(waiting for input)
Value flashes
(waiting for input)
[ ]
▼
P2 ST2 T:0.0
[EDIT/ENTER]
P2 ST 2 T:0.0
[2][EDIT/ENTER]
P2 ST 2 T:2.0
1: PURGE ON
Call up response
[RSPNS/5][EDIT/ENTER]
[ ]
or
four times [EDIT/ENTER]
P2 ST 2 T:2.0
RESPONSE STD
Step 2 screen
Tim e flas h e s
(waiting for input)
Input 2 minutes
Function flashes
(waiting for input)
Value flashes
(waiting for input)
Inp ut 8
[ ]
[EDIT/ENTER]
P2 ST 1 T:1.0
RANGE:8
[ ]
Step 1 input
complete
[ ][ ]
[EDIT/ENTER]
P2 ST 2 T:2.0
RESPONSE FAST
Input FAST
Step 2 input
complete
: Shaded values are flashing
Figure 6.5 Time Program Key Operation Example
(2) Time program input method
Set the time, function, and value in sequence for each step.
a) Press the [] key while in the initial parameter screen (displays step 1).
b) Press [EDIT/ENTER] (the time value flashes).
c) Input the time in minutes (0.1min step).
36
Page 50

[xx][EDIT/ENTER]
Function will flash next.
d) Input the function. Select a function from Table 6.1.
For example [RANGE/4][EDIT/ENTER]
The input function will appear and the value will flash.
e) Input a value.
[][][EDIT/ENTER]
When input is complete, press the [] key to move to the next step.
Repeat the operations in steps a) ~ e) to edit the time program. Functions that
can be controlled by the time program and the relevant keys for the functions
are shown in Table 6.1.
Note: Steps do not have to be input sequentially in respect to time. Even
when steps are out of time sequence, they will be rearranged in
chronological order once the [MONIT] key is pressed to return to the monitor
screen.
Table 6.1 Function Input Keys and Input Range
Function Key Change keys Setting range
Purge valve open [P-ON/1]
Purge valve close [P-OFF/2]
Auto-zero
Range
Response [RSPNS/5] [][] FAST, STD, SLOW
[A.ZERO/3]
[RANGE/4] [][] 1/4,1/2,1,2,4,8,16,32,64,
128,256,512,S
Movement among steps
[]: Moves to the next step
[]: Moves to the previous step
37
Page 51

[SHIFT][]: Moves to the last step in the program
[SHIFT][]: Moves to the first step in the program
6.4.2.2 Corrections
When time and functions do not agree
1) Use the [] key to display the incorrect step.
2) Re-input the step values starting from time.
When only a value, and not time and function, requires changing
1) Use the [] key to display the incorrect step.
2) Skip parts that do not require changes by pressing [EDIT/ENTER] until the
value input screen is displayed.
3) Change the value.
For example, when changing only the range value, use the operations shown
on the left in Figure 6.6. However, when input is corrected starting with time,
the function selection screen, shown on the right in the figure, will appear.
38
Page 52

PRG2 ST 3 T:1.0
RANGE : 16
[EDIT/ENTER]
PRG2 ST 3 T:1.0
RANGE : 16
[EDIT/ENTE R]
PRG2 ST 3 T:1.0
RANGE : 16
[ ][ ][EDIT/ENTER]
PRG2 ST 3 T:1.0
RANGE : 32
Figure 6.6 Correcting a Time Program
Tim e fl as h es
(waiting for input)
[1][EDIT/ENTER]
P5 ST 3 T:1.0
1: PURGE OFF
[RANGE/4][EDIT/ENTER]
Value flashes
(Change the value here)
Time inp u t
Function flashes
(waiting for input)
Sensitivity call up
6.4.2.3 Deletion
Single step deletion
1) Display the step to be deleted using the [] key.
2) Set the time in the step to 0 ([EDIT/ENTER][0][EDIT/ENTER]).
3) Press the [MONIT] key to return to the monitor screen. Steps will be
rearranged in chronological order and the 0 time step will be deleted.
Deletion of a step and all subsequent steps
1) Display the first step to be deleted using the [] key.
2) Press [SHIFT][CLEAR]. The designated step and all subsequent steps will
be deleted.
39
Page 53

3) Press the [MONIT] key to return to the monitor screen.
6.4.2.4 Insertion
1) Display the final step in the program using [SHIFT][].
2) Display a new step using the [] key.
3) Follow the procedure described in section 6.4.2.1 and input desired values.
4) Press the [MONIT] key to return to the monitor screen. Steps will be
rearranged in chronological order.
6.5 Time program operation
6.5.1 Time program execution
Start the program while the program monitor screen is displayed.
(1) Start
After the baseline has stabilized, press the [PRGM RUN] key. The time
program will start. The [PRGM RUN] key lamp will light, indicating a time
program is in progress.
When the time program reaches the final step, the parameters at that point are
maintained and only time advances.
(2) Stop
Press the [PRGM RUN] key during program execution. The [PRGM RUN] key
lamp will go out and the time program will stop.
Note: During time program, execution parameters can be freely changed.
The changed values will remain in effect until the next setting value is
reached in the time program.
(3) Time program execution by external signal
The time program can be started by shorting the rear panel terminal PRGM
RST/ST and GND. If the rear panel terminal PRGM RST/ST and GND are
shorted while the time program is running, the time program will reset and start
again immediately. When using an autosampler, the injection signal should be
connected to these terminals.
40
Page 54

7. MEASURE RANGE Setting
One of the major features of the RI-2031 is that the dynamic measurement
range is 10 times wider than an ordinary RI detector. The “MEASURE RANGE”
setting is normally set to STD, however when measuring a high concentration
sample, “MEASURE RANGE” should be set to WIDE, using the procedure
shown in Figure 7.1. The recorder scale and integrator output scale are
automatically changed according to the “MEASURE RANGE” setting.
Table 7.1 “MEASURE RANGE” and output scale
“MEASURE RANGE” Dynamic range RANGE Inte. output
STD ~ 5x10⁻⁴RIU 1/4~512x10-6RIU 5x10⁻⁴RIU/1.0V
WIDE ~ 5x10⁻³RIU 1/4~512x10-5RIU 5x10⁻³RIU/1.0V
Note: The baseline noise and drift when set to WIDE is larger than when set to
STD. Set “MEASURE RANGE” to WIDE only when the STD dynamic
range makes analysis difficult.
Normal operation mode monitor screen
NORM 64 STD
-0.000 + ON(OFF)
[MONIT]
PARA METE R SET
1:MEASURE RANGE
[MONIT]
MEASURE RANGE
[EDIT/ENTER]
STD(WIDE)
[MONIT]
[SHIFT] [MARK]
[EDIT/ENTE R]
[ ][ ][EDIT/ENTER]
TEMP: xx.x/yy °C
-0.000 + ON(OFF)
MEASURE RANGE
STD
Flashes
(WIDE) is the setting after the change. (STD or WIDE can be selected)
MEASURE RANGE setting screen
Input screen
Figure 7.1 “MEASURE RANGE” setting
41
Page 55

Note: Although signal linearity is reduced gradually when the refractive index
value exceeds 5x10⁻⁴RIU (“MEASURE RANGE”: STD) or 5x10
RIU(“MEAUSRE RANGE”: WIDE), the measurable range is ~ 7x10
-3
-4
RIU/1.0V (“MEASURE RANGE”: STD ), and ~ 9.9x10⁻³RIU/1.0V
(“MEASURE RANGE”: WIDE). When exceeding the linear range,
connect to the recorder output terminal instead of the integrator output
terminal. For example, when the RANGE setting is 128, the
measurable range is 12.8x10
STD), and 12.8x10
-3
RIU/100mV (“MEASURE RANGE”: WIDE).
-4
RIU/100mV (“MEASURE RANGE”:
42
Page 56

8. Maximum Flow Rate Changing at the Front Panel
The maximum flow rate depends on the front panel tubing arrangement. The
following subsections describe tubing arrangements and the method for
replacing solvent in the reference cell.
8.1 “ ~ 10mL/min” tubing arrangement and solvent replacement method
for reference cell
Connects ports No.1 and No.2 with outer diameter: 1.6mm, internal
diameter:0.8mm tubing and ports No.4 and No.5 with outer diameter:1.6mm,
internal diameter:0.8mm tubing. Connect the tubing from the column to port
No.6, and connect the tubing for waste to port No.3. To replace solvent in the
reference cell, operate purge valve. When replacing the reference cell solvent,
set the valve to ON. During analysis, set the valve to OFF. (Refer to section
4.2)
1
2
3
Sample Out (waste)
Tubing
OD=1.6mm
4
Flow rate: ~ 10mL/min.
ID= 0.8mm
Sample IN (from column)
Figure 8.1 “ ~ 10mL/min” tubing arrangement
43
Page 57

6
6
8.2 “10 ~ 50mL/min” tubing arrangement and solvent replacement
method for reference cell
Connect the tubing from the mobile phase solvent bottle to port No3. Use
tubing with an internal diameter of 0.8mm and an outer diameter of 1.6mm.
Connect the syringe to port No.6. To replace solvent in the reference cell, draw
up mobile phase solvent by pulling the syringe plunger. Make sure the syringe
is connected during analysis. Connect the tubing from the column to port No.5,
and connect the tubing for waste to port No.2. The refractive index output
signal is reversed. Change the Polarity setting. (Refer to section 4.1.3)
Tubing
OD=1.6mm
ID=0.8mm
(Same tubing as used to
connect ports No.1-2 or
ports No.4-5. for the
“
~10mL/min” tubing
arrangement.
Sample Out
1
Tubing
OD=1.6mm
ID=0.8mm
4
2
5
Sample
1
4
Sample IN
Tubing OD=1.6mm, ID=0.8mm
Reference IN
2
3
5
Reference Out
Mobile phase
Sample IN
Replace solvent in the reference cell
by sucking the mobile phase solvent.
Keep the syringe connected during
analysis in order to maintain solvent in
the reference cell and to facilitate
solvent replacement.
Figure 8.2 “10 ~ 50mL/min” tubing arrangement
44
Page 58

9. Maintenance
9.1 Error messages and countermeasures
9.1.1 Errors during self-diagnostics after power on
The self-diagnostics program is automatically executed when the power switch
is turned on. The items in Table 9.1 are checked during self-diagnostics. When
a problem is found, an error message is displayed on the screen.
When an error message appears, turn the power off, wait 30 seconds, and turn
the power on again. If the error message appears again, a problem exists with
the instrument and the user should contact your local JASCO distributor.
Note: When the power is turned off then on quickly, a ROM CHECK ERROR
or RAM CHECK ERROR may appear.
When an error message appears and self-diagnostics stop, press [SHIFT][]
to advance to the next item and continue with the self-diagnostics program.
When self-diagnostics have been advanced in this way, check that
chromatograms (including baselines) are the same as previously obtained
results. In particular, when BACK UP ERROR has been skipped in this way,
check the following points.
(1) Have the RANGE and other setting values, including Time Program setting,
changed?
(2) Have the setting values followed [SHIFT] key operation changed?
(3) Has the K1 value changed to 1.00? (Refer to Figure 9.8 in section 9.4.5)
If setting values have changed or the K1 value has reverted to 1.00,
re-input the setting values, turn the power off, wait at least 3 minutes, and
turn the power on again. If the re-input values have changed again, the
backup battery is dead and the user should contact your local JASCO
distributor.
45
Page 59

Table 9.1 Self-diagnostics Items and Corresponding Error Messages after
Power On
Check item Error message
ROM operation
RAM operation
C-MOS RAM backup
Temperature sensor
Zero glass driver
Lamp operation time
9.1.2 Self-diagnostics during operation
The instrument checks the following items during operation (Table 9.2). When
a problem is detected, an error message is displayed on the screen. Refer to
section 9.1.3 for countermeasures.
Table 9.2 Self-diagnostics Items and Corresponding Error Messages
ROM CHECK ERROR
RAM CHECK ERROR
BACK UP ERROR
TEMP SENSOR NG
Z. GLASS ERROR
WARNING LAMP MAINTE.
TIME
Check item Error message
Fluid leak in cell
Heater overheating
Light intensity deterioration
Optical zero adjustment
Lamp operation time
9.1.3 Error message meanings and countermeasures
9.1.3.1 TROUBLE LEAK IN CELL
This message appears when fluid is leaking from the flow cell. Immediately
stop the pump, turn the power off, and contact your local JASCO distributor.
TROUBLE LEAK IN CELL
TROUBLE OVER TEMP
WARNING INTENSITY POOR
WARNING OUT OF RANGE
WARNING LAMP MAINTE TIME
46
Page 60

9.1.3.2 TROUBLE OVER TEMP
This message appears when overheating occurs due to a problem with the
temperature control system. The message may also appear when misjudgment
happens due to a problem with the temperature detection system. Immediately
turn the power off and contact your local JASCO distributor.
9.1.3.3 WARNING INTENSITY POOR
This message appears when the light intensity incident on the photodiodes is
insufficient. Specifically, the message appears when the absolute value of the
SUM of preamplified outputs falls below 0.1V.
When this message appears, press the [CLEAR] key to clear the message
(see note), display the preamplified output screen, and check the SUM value
(refer to section 5.2). When the value is smaller than 0.5V, the following
problems are possible.
Note: The message will reappear every 20 seconds, until the problem is
fixed.
(1) The solvent on the sample side is different from the solvent on the
reference side -> Open the purge valve (ON) and pump fluid (refer to
section 4.2).
(2) Large bubbles remain in the cell -> Remove the bubbles (refer to section
9.2).
(3) The cell is broken.
When the SUM value is only slightly smaller than normal, the following
problems are possible.
(1) Small bubbles remain in the cell -> Remove the bubbles (refer to section
9.2).
(2) The cell is contaminated -> Clean the cell (refer to section 9.3).
9.1.3.4 WARNING OUT OF RANGE
This message appears when the light incident on the photodiodes is shifted to
one end. Specifically, the message appears when the DIFF value of
preamplified output divided by the SUM value is greater than 0.8 in absolute
47
Page 61

value. The following problems are possible when the message appears.
(1) The solvent on the sample side is different from the solvent on the
reference side.
(2) Large bubbles remain in the cell -> Remove the bubbles (refer to section
9.2).
(3) Optical zero is not properly adjusted.
When this message appears, press the [CLEAR] key to clear the message
(see note), display the preamplifed output screen, and check the DIFF value
(refer to section 5.2).
Note: The message will reappear every 20 seconds, until the problem is
fixed.
Replace solvent in the reference and sample cell according to the tubing
arrangement. (Refer to chapter 8 and section 4.2) Once the DIFF and SUM
values in the preamplified output screen have stabilized, press
[SHIFT]+[AUTOZERO] key. Adjustment is satisfactory if the DIFF value falls to
zero within +/-0.01xx.
9.1.3.5 WARNING LAMP MAINTE TIME
This message appears when the lamp operation time reaches the set
maintenance time. Press the [CLEAR] key to clear the message. The
instrument may continue to be used.
Note: Refer to section 9.5 for details regarding how to set the lamp
maintenance time.
9.2 Flow cell bubble removal
9.2.1 Baselines when bubbles are generated
The following baseline phenomena occur when bubbles are generated in the
flow cell.
48
Page 62

(1) Irregular noise (Figure 9.1)
(2) Increased drift (Figure 9.2)
(3) Irregular ghost peaks (Figure 9.3)
When the above phenomena occur, display the preamplified output screen and
check the SUM value (refer to section 5.2). If the third digit after the decimal
point of the SUM value is fluctuating, it is possible that bubbles exist in the flow
cell. If third digit after the decimal point is within ±1, the bubbles are considered
to have been removed.
Characteristics: No periodicity, Reference: Normal noise
irregular widths
Figure 9.1 Irregular Noise Caused by Bubbles
Returns to base when bubbles are removed
Figure 9.2 Baseline Drift Caused by Bubbles
Figure 9.3 Ghost Peaks Caused by Bubbles
49
Page 63

9.2.2 Bubble removal method 1 (high flow rate fluid pump)
Note: (1) When pumping fluid at a high flow rate, do not connect other
detectors to the OUTLET of the RI-2031.
Note: (2) Be sure to connect a line filter to the pump outlet in order to prevent
contaminants from entering the flow cell.
When using a “ ~ 10mL/min.” tubing arrangement, connect the pump directly to
the RI-2031, then open and close the purge valve (ON/OFF) (refer to section
4.2) while pumping fluid at a high flow rate (up to 10mL/min is possible).
9.2.3 Bubble removal method 2 (syringe fluid injection)
Remove the INLET and OUTLET tubing of the flow cell, connect a syringe to
the INLET (or OUTLET), and push solvent in (or pull solvent out).
Note: Do not move the syringe plunger too quickly. For example, if the
plunger of a 20mL syringe is depressed for a full stroke in 10 seconds,
the internal solvent will be flushed at a rate of 120mL/min. This greatly
exceeds the maximum flow rate of the instrument and may damage
the flow cell or cause fluid leaks from the electromagnetic valve.
9.2.4 Bubble removal method 3 (covering tubing outlet)
Note: Use a flow rate of 2mL/min or less with this method. If this method is
used with a high flow rate, the flow cell may be damaged or fluid leaks
may occur from the electromagnetic valve.
Repeatedly cover (for 2 seconds at most) and release the outlet of the
OUTLET tubing. When the solvent being used is dangerous to touch,
repeatedly pinch (for 2 seconds at most) and release the OUTLET tubing
(Teflon tube).
9.2.5 Bubble prevention method
Follow the guidelines below (particularly when using aqueous solvents) to
prevent bubble generation.
50
Page 64

(1) Use a degasser.
(2) Sufficiently check for clogs in the pump inlet filter. When the inlet filter is
clogged, bubbles easily enter the flow cell.
(3) Place the waste fluid bottle in a position higher than the instrument.
9.3 Flow cell cleaning method
Note1: Reversing the fluid flow direction is prohibited. Be sure to pump fluid
into port No.6.
Note2: Be sure to place a line filter between the pump and the instrument.
Note3: When the inlet filter of the pump is clogged, bubbles may be
introduced. This is particularly troublesome when pumping nitric acid
and aqueous solutions.
When contaminants adhered to the internal cell wall are known, flush with a
solvent that will dissolve the contaminants. Solvents other than the mobile
phase solvent are effective.
When contaminants adhered to the internal cell wall are unknown, flush with
the following solvents. Use the pump for cleaning and pump fluid at a high rate
for at least 12 hours. Prepare 200mL or more of the solvents and recycle the
solvents.
(1) When the mobile phase solvent is aqueous,
wash with nitric acid.
(2) When the mobile phase solvent is organic,
wash with THF (tetrahydrofurane).
51
Page 65

6
Port No.3
RI-2031
Pump
Wash fluid
Port No.
Figure 9.4 Flow Cell Cleaning Method
9.4 Calibration method
A sophisticated signal processing system incorporated into the RI-2031 is able
to measure refractive index accurately without being affected by variations or
fluctuations in lamp emission, or by the light absorption caused by a mobile
phase solvent or a sample solute. (For details, refer to section 10.1.2.)
However, in the following cases, recalibration is necessary because of the
optical characteristics of the detector changing. This requires resetting the
constant K1 and K2. The K1 value is used when “MEASURE RANGE” is set to
STD and the K2 value is used when “MEASURE RANGE” is set to WIDE.
(1) After light source replacement
(2) After photodiode replacement
(3) After flow cell replacement
Note: The K1 and K2 values are recorded in RAM. When the backup battery
has deteriorated, these values will be lost and the instrument will revert
to the default values. The K1 and K2 values are written on a label
inside the instrument. Therefore, when the values have been lost,
check the K1 and K2 values on the label and re-input. (refer to section
9.4.4.)
52
Page 66

9.4.1 Tubing
Figure 9.5 shows the tubing and wiring arrangement used for calibration. An
injector loop with a capacity of 1mL or more is required. However, the capacity
of the injector loop does not need to be precise. When an appropriate loop is
not available, prepare a loop using tubing 2m or more in length with an internal
diameter of 0.8mm. Alternatively, prepare a loop using tubing 1.3m or more in
length with internal diameter of 1.0mm. Change to the “ ~ 10mL/min.” tubing
configuration. (refer to section 8)
Integrator or
recorder
Port No.3
1mL loop
RI-2031
Pump
Injector
Internal diameter of 0.25mm or less
Port No.6
Water
Figure 9.5 Tubing and Wiring Arrangement for Calibration
9.4.2 Standard solution
(1) Prepare approximately 1000mL of water. Sufficiently degas the water to
prevent generation of bubbles during calibration.
(2) Dissolve 106.6mg of saccharose in a 100mL volumetric flask using the
water prepared in (1) above. The refractive index of this aqueous
-6
saccharose solution is 160x10
RIU greater than the refractive index of the
water.
Note: Use the same water for the mobile phase and to dissovle the
saccharose. If different water is used, the correct refractive index may
not be obtained.
53
Page 67

9.4.3 Replacement of tubing system solvent with water
Note: When the solvent in the cell is not miscible with water, first replace with
an intermediate solvent then replace with water. For example, when
the solvent in the cell is chloroform or THF (oxidation inhibitor is
insoluble in water), first replace with acetone then replace with water.
(1) Pump the water prepared in section 9.4.2 (1) until the solvent in the system
is sufficiently replaced.
Note: If the tubing shown in Figure 9.5 is used, since no other detectors are
connected to the system, a flow rate of 10mL/min may be used
(2) Set “MEASURE RANGE” to STD. (refer to chapter 7)
(3) Wait for the drift to decrease to 1.0x10
-7
RIU/min or less.
Note: On the LCD display, 0.1x10⁻⁶RIU/min or less corresponds to a 0.1 RIU
value per minute. When a recorder is used, this corresponds to
approximately 1% or less during a 10 minutes period with a range of
64 (x10-6).
(4) Pump solvent at a flow rate of 1.0mL/min and confirm that the drift is within
the limit described in (3) above. In addition, confirm that the fluctuation in
the RIU value on the LCD display is less than 0.2.
9.4.4 Calibration method
(1) Following the procedure described in Figure 5.7(refer to section 5.7),
display the K1 and K2 Calibration menu screen and press the
[EDIT/ENTER] key. The K1 and K2 calibration screen is displayed.
54
Page 68

Normal operation mode monitor screen
NORM 64 STD
-0.000 + ON(OFF)
[MONIT]
PAR A METE R S E T
4:CALIB K
[MONIT]
K CALIB: xxxx.x
PRESS RUN KEY
K CALIB: 0.X
PRESS RUN KEY
[MONIT]
[SHIFT] [MARK]
[ ][ ][EDIT/ENTER]
[EDIT/ENTER]
Calibration screen
Once the baseline has stabilized, press
the [AUTOZERO] key.
Inject standard solution
TEMP: xx.x/yy °C
-0.000 + ON(OFF)
Read the RIU value shown on the screen
K CALIB: 160.0
PRESS RUN KEY
for the plateau of the peak. Press the
[PRGM RUN] key to execute the built in
calibration program. The RIU value will
be 160±1 RIU.
Figure 9.6 Calibration screen
(2) In the calibration screen, once the baseline has stabilized, press the [AUTO
ZERO] key to set the RIU value to zero. Set the chart speed to 10mm/min.
(3) Inject standard solution.
(4) If the RIU value on the plateau of peak is within 160.0 ± 1.6 x 10
-6
RIU, the
instrument is already correctly calibrated. If the value is not within 160.0 ±
-6
1.6 x 10
program. The RIU value will automatically be set to 160.0 ± 1.6 x 10
RIU, press the [PRGM RUN] key to execute build-in calibration
-6
RIU.
55
Page 69

Plateau
Figure 9.7 Peak Shape
Note: When the peak dose not contain a plateau, inspect the internal
diameter of the tubing from the injector to the detector. When the
plateau is short, decrease the flow rate.
(5) Repeat the operations in steps (2) ~ (4) and confirm that the RIU value is
-6
within 160.0 ± 1.6 x 10
Note: Adjustment of the integrator or recorder output is not necessary. The
outputs will automatically be adjusted when the K1 and K2 values are
calibrated.
Note: Calibration of constants K1 and K2 is performed by executing build-in
calibration program at the same time.
9.4.5 Calibration constant confirmation and setting
After performing calibration (outlined in previous section), the calibration
constants, K1 and K2 obtained should be recorded. These values should be
written on a piece of paper and attached inside the instrument. This way, the
recorded values can then be re-input in the following situations, and
RIU without pressing the [PRGM RUN] key.
troublesome calibration operations can be avoided. When confirming and
setting the calibration constant, follow the procedure shown in Figure 9.8 and
re-input the calibration constants.
(1) When the K1 or K2 values have been changed by mistake
56
Page 70

(2) When the backup battery has deteriorated and the K1 value has reverted
to 1.00.
(3) When the PCB (CPU board) has been replaced
Note: At the time of shipping, the K1 and K2 values are recorded on a label
attached inside the instrument. This label can be seen when the case is
removed.
Normal operation mode monitor screen
NORM 64 STD
-0.000 + ON(OFF)
[MONIT]
PAR A METE R S E T
2:SET K1 VALUE
[MONIT]
K1 VALUE: x.xxx
RIU: xxxx.x
[MONIT]
K1 VALUE: x.xxx
RIU: xxxx.x
[MONIT]
[SHIFT] [MARK]
[ ][ ]
[ ][ ]
[EDIT/ENTER]
[EDIT/ENTER]
TEMP: xx.x/yy°C
-0.000 + ON(OFF)
PARAMETER SET
3:SET K2 VALUE
[EDIT/ENTER] [MONIT]
K2 VALUE: x.xxx
RIU: xxxx.x
[MONIT]
[EDIT/ENTER]
K2 VALUE: x.xxx
RIU: xxxx.x
Figure 9.8 Confirming and setting calibration constant
9.4.6 Alternative calibration method
The method described in sections 9.4.1 ~ 9.4.4 is the most accurate method of
calibration.
However, since the entire flow line, including the pump, must be replaced with
57
Page 71

water, the operations are troublesome when non-aqueous mobile phases
(chloroform for example) are being used. It may be possible to replace the
solution in the detector using only a syringe.
A detailed description of the procedure will not be given, however, points of
caution when using syringe injection are listed below.
(1) Do not move the syringe plunger too quickly. For example, if the plunger of
a 20mL syringe is depressed for a full stroke in 10 seconds, the internal
solvent will be flushed at a rate of 120mL/min. This greatly exceeds the
maximum flow rate of the instrument and may damage the flow cell or
cause fluid leaks from the electromagnetic valve.
(2) When a syringe is used to inject fluid, there is a tendency to introduce
bubbles into the flow cell. Although this will not cause a problem during
solvent replacement, proper calibration is not possible if bubbles are
introduced immediately before or after standard solution injection. Display
the preamplified output on the screen and confirm that no bubbles are
present while performing calibration (refer to section 5.2).
9.5 Lamp maintenance time setting
Lamp maintenance time can be set to inform the operator of the number of
hours the lamp has been in use. When the lamp operation time exceeds the
lamp maintenance time, the LAMP MAINTENANCE warning will be displayed.
Since lamp replacement is done by service engineer, contact your local
JASCO distributor when this is required.
When the lamp maintenance time is set to 0, the warning is not displayed. In
addition, when BACKUP ERROR is displayed due to deterioration of the
battery, the lamp maintenance time recorded in RAM will be lost. When this
occurs, follow the procedure in Figure 9.9 and re-input the lamp maintenance
time.
58
Page 72

Normal operation mode monitor screen
NORM 64 STD
[MONIT]
-0.0 + ON(OFF)
[ ]
[SHIFT] [MARK]
[MONIT]
[ ]
(Use the / keys to display the menu below)
TEMP: xx.x/yy °C
-0.0 + ON(OFF)
Lamp maintenance time menu
PARAMETER MODE
2:L. MAINTE. TIME
[MONIT]
LAMP MAINTE TIMER
10000 H
[EDIT/ENTER]
[EDIT/ENTER]
[xxxxxx] [EDIT/ENTER]
LAMP MAINTE TIMER
10000 H
Flashes
Figure 9.9 Lamp Maintenance Time Input Method
9.6 Serial number setting
The serial number of the instrument is recorded on the label on the right side of
the instrument case. When BACKUP ERROR is displayed due to deterioration
of the battery, the serial number recorded in RAM will be lost. When this occurs,
use the procedure outlined in Figure 9.10 to re-input the serial number. When
connecting to a JASCO system controller via LC-Net, the serial number is
displayed on the HPLC system configuration screen.
59
Page 73

Normal operation mode monitor screen
NORM 64 STD
-0.0 + OFF
[ ]
[ ]
(Use the /
Serial number menu
PARAMETER MODE
6:SERIAL NO.
[MONIT]
SERIAL NO
1234567890
Figure 9.10 Serial Number Input Method
[MONIT]
[SHIFT] [MARK] [MONIT]
keys to display
[EDIT/ENTE R]
[xxxxxxxxxx] [EDIT/ENTER]
TEMP: xx.x/yy°C
-0.0 + OFF
the menu below)
[EDIT/ENTE R]
SERIAL NO
1234567890
Flashes
9.7 Power Fuse replacement
Warning: When changing the power fuses, be sure to disconnect the
power cable from the power cable inlet (refer to Figure 2.5).
Warning: For continued protection against risk of fire, replace only with
fuses of the specified type and current ratings.
Note: When one fuse is blown, replace both fuses.
60
Page 74

Insert finger under the fuse holder, pinch the holder, and pull forward. The
fuses and the fuse holder will come out together. (Figure 9.11)
(1) Pull the old fuses out from fuse holder, insert new fuses, and insert the
fuse holder back into its original position.
If the replaced fuses immediately blow out again, an instrument problem is
possible. Contact your local JASCO distributor.
Fuse Holder
Figure 9.11 Fuse Holder
61
Page 75

10. Appendix
10.1 Operation Theory
10.1.1 Operation theory of deflection differential refractometers
With deflection differential refractometers, light refracted inside the prism flow
cell is used to detect the difference in refractive indices between the reference
(solvent) and the sample.
The flow cell structure and light path are shown in Figure 10.1.
n
S
i
i
r
n
R
θ
Figure 10.1 Horizontal Cross-section of Flow Cell and Light Path
The area to the left of the center partition is called the sample cell and the area
to the right is called the reference cell.
n
: Refractive index of sample
s
n
: Refractive index of reference (solvent)
R
θ: Angle of deflection (exaggerated in the figure: actual value is <10
-2
degree.)
i: Angle of partition (determined by cell shape)
Applying the law of refraction to this light path and assuming θ << 1 (since the
-2
actual value is 10
or less), θ can be expressed as follows:
θ = tan i x(n
S-nR
)/nR... (1)
From this equation, the angle of deflection is proportional to the difference in
refractive indices between the reference solvent and the sample. In other
words, it is possible to determine the difference in refractive indices between
the reference solvent and sample by measuring the angle of deflection.
62
Page 76

10.1.2 Optical system
Collimator lens
Flow cell
Second photodiode
Half mirror
Light source
Slit
First photodiode
Zero glass
(motor driven)
Figure 10.2 Optical System
Light from the light source passes through a slit and into the collimator lens
where it is made into a parallel beam. The parallel light then passes through
and is refracted by the flow cell. Part of the light is reflected by a half mirror,
passes through the cell again, and strikes the first photodiode. The remainder
of the light passes through the half mirror and strikes the second photodiode.
If the concentration of the sample in the cell changes, then the refractive index
changes, thereby changing the angle of deflection in accordance with equation
(1). The light image striking the primary photodiode will therefore shift in the
horizontal plane (direction perpendicular to the plane of this paper).
The amount of shift is proportional to the angle of deflection and the focal
length of the lens. When s is the amount of shift and f is the focal length of the
lens, the following equation can be expressed.
s = 2f x θ... (2)
The coefficient of 2 is required in the equation to account for the fact that the
light passes through the flow cell twice and is therefore refracted twice.
The method for detecting the amount of shift is described below.
The first and second photodiodes contain identical photo-sensitive surfaces
and are referred to as PD1 and PD2, respectively.
63
Page 77

PD1 output
No difference between refractive indices
PD1 output
Difference between refractive indices
PD2 output
PD2 output
Figure 10.3 Light Image on Photodiodes
First, when there is no difference between the refractive indices of the
reference (solvent) and the sample, the light image overlaps PD1 and PD2
equally as shown in the top half of Figure 10.3. Since the electrical output from
a photodiode is proportional to the surface area receiving light, the difference
between the output of PD1 and the output of PD2 is zero and so DIFF is zero.
Next, when there is a difference between the refractive indices, the image is
shifted, as shown in the bottom half of Figure 10.3, and a difference between
the output of PD1 and the output of PD2 is generated. Since the output is
proportional to the surface area receiving light, the output difference is
proportional to the amount of shift s.
DIFF = A x s...(3)
In this equation, A is a constant determined by the light source intensity,
photodiode measurable range, flow cell transmittance, and amplification of the
amplifier. Equations (1) ~ (3) can be combined to give the following.
= B x DIFF...(4)
n
S-nR
where B = 1/2f tan i x (n
R
/A)
In other words, the difference between the refractive indices of the reference
solvent and sample is proportional to DIFF, that is the difference between the
outputs from PD1 and PD2. Therefore, the difference between the refractive
indices can be calculated by measuring the difference between the outputs of
PD1 and PD2.
64
Page 78

In the case of an optical system with a second photodiode, the distance
between the flow cell and second photodiode is shorter than that of an optical
system with first photodiode. This means that for the optical arrangement
shown in Figure 10.2, 2f in equation (2) is 10 times smaller and, therefore, the
dynamic range is 10 times larger.
10.1.3 Signal processing method
Theoretically, the difference between refractive indices can be found by
measuring DIFF, as shown in equation (4). Although A in equation (4) is
proportional to light source intensity and flow cell transmittance, and both of
these factors can change over time.
On the other hand, the sum of the outputs from PD1 and PD2 (hereafter called
SUM) is proportional to the light source intensity and flow cell transmittance
regardless of the value of the refractive index.
SUM = A x k...(5)
The following can then be obtained using equations (4) and (5).
- nR - K x DIFF/SUM
n
S
where K = kn
/(2f tan i)
R
DIFF/SUM is proportional only to the difference between refractive indices and
does not change over time. Therefore, the value is not affected by light source
deterioration or flow cell contamination.
The RI-2031 measurement system uses two calibration constants (K1 and K2).
K1 value is for analytical measurement (first photodiode) and K2 value is for
preparative measurement (second photodiode).
65
Page 79

r
10.1.4 Flow line
A flow line diagram for the “ ~ 10mL/min.” tubing arrangement, is shown in
Figure 10.4. Effluent form the column is introduced from the port No.6 and
waste is discharged from the port No.3. Flow lines are changed using the
purge valve.
When the purge valve is ON, the instrument is switched to the flow line
indicated by the dotted arrow in Figure 10.4. In this case, the effluent passes
through the sample cell and then through the reference cell before being
discharged.
When the purge valve is OFF, the instrument is switched to the flow line
indicated by the solid arrow in Figure 10.4. In this case, the effluent passes
through the sample cell only before being discharged and the reference cell is
completely sealed.
Heat exchanger
Sam.
Ref.
Flow cell
Heat exchange
6
Purge OFF
3
Purge
valve
Purge ON
1
4
5
2
During analysis (PURGE OFF)
When replacing solvent in the reference cell (PURGE ON)
IN
OUT
Figure 10.4 Flow Line (“ ~ 10mL/min.” tubing arrangement)
66
Page 80

A flow line diagram for the “10 ~ 50mL/min.” tubing arrangement, is shown in
Figure 10.5. Effluent from the column is introduced from the port No.5 (Sample
IN) and waste is discharged from the port No.2 (Sample OUT). The mobile
phase solvent is introduced from the port No.3 (Reference IN) and is drawn
using the syringe, from the port No.6 (Reference OUT). The sample and
reference flow lines are independent.
The sample side flow line is indicated by the solid arrow in Figure 10.5. The
solvent from the column passes through the heat exchanger and then through
the sample cell.
The reference side flow line is indicated by the dotted arrow in Figure 10.5.
When replacing the solvent in the reference cell, draw up the mobile phase
solvent using a syringe connected to the No.6 port. The mobile phase passes
through the reference cell and then through heat exchanger.
Note: The tubing connection between ports No.1 and No.4 avoids introducing
air into the reference cell.
Heat exchanger
Purge OFF
Ref.
Flow cell
Sam.
Heat exchanger
Purge
valve
Purge ON
6
Reference OUT
3
Reference IN
1
4
5
Sample IN
2
Sample OUT
Sample side flow line
Reference side flow line
Figure 10.5 Flow Line (“10 ~ 50mL/min.” tubing arrangement)
67
Page 81

10.1.5 Internal volume of tubing
Internal volume of tubing is described in Table 10.1 and Table 10.2.
Table 10.1 Internal volume using “ ~ 10mL/min.” tubing
Flow line Volume
Port No6 -> Sample cell ca. 70 µL
Sample cell -> Port No3 ca. 300µL
Table 10.2 Internal volume using “10 ~ 50mL/min.” tubing
Flow line Volume
Port No5 -> Sample cell ca. 500 µL
Sample cell -> Port No2 ca. 200 µL
68
 Loading...