

Page 1

HO97864
“Executive Series” USB 2.0
4-Port Hub
I N S T R U C T I O N M A N U A L
www.jascoproducts.com
Page 2

Table of Contents
I. INTRODUCTION ...................................3
II. OVERVIEW ...........................................4
III. SAFETY INSTRUCTIONS ....................5
IV. POWER MODE SETTING ....................6
V. MOUNTING YOUR HUB .......................7
VI. HARDWARE INSTALLATION ...............8
VII. SOFTWARE INSTALLATION ..............10
VIII. TROUBLESHOOTING ........................11
IX. TECHNICAL SPECIFICATIONS .........12
X. FCC COMPLIANCE STATEMENT ......13
XI. LIMITED LIFETIME WARRANTY .......14
2
Page 3

I. Introduction
Congratulations on the purchase of your GE
‘Executive Series’ USB 2.0 4-port Hub! This
GE “Executive Series” Hub will allow you to
receive the maximum possible bandwidth for
all of your USB 2.0 and 1.1 devices!
Please read this entire manual carefully before
using your “Executive Series” Hub. Follow
the instructions to prevent damage to the
“Executive Series” Hub and/or the connecting
devices.
THIS PACKAGE INCLUDES:
• USB 2.0 4-Port Hub
• AC Power Adapter
• USB 2.0 Extension Cable (6 feet)
• Aluminum mounting bracket/stand and
spacer card
• User’s Manual
• Mounting Screws
3
Page 4

II. Overview
GE Hub technology gives you the best of USB 1.1
and 2.0 in one Hi-Speed USB 2.0 Hub. Connect
USB 2.0 devices for data transfer rates of up to 480
Mbps. At the same time connect USB 1.1 devices
for a guaranteed 12 Mbps of bandwidth per device.
Use any combination of USB 1.1 and 2.0 devices
– this GE USB Hub will adapt to give you the
greatest bandwidth possible for each device!
FEATURES
• USB 1.1 and 2.0 compatible
• Full speed guaranteed for each USB 1.1
device
• AC adapter supports all high power USB
devices
• LED to indicate power
• Mountable with the included bracket
• Plug and Play
• Bus fault detection and recovery
• Per port over-current detection and protection
• All downstream ports support high-speed (480
Mbps), full-speed (12 Mbps) and low-speed
(1.5 Mbps) operations.
4
Page 5

III. Safety Instructions
Always read the Safety Instructions carefully.
➢ Keep this user’s manual for future
reference.
➢ Keep this equipment away from humidity.
➢ Do not expose to moisture.
➢ Replace if dropped and damaged.
➢ Replace if you see obvious signs of
breakage.
➢ If you cannot get it to work according
to this User’s Manual refer to the
Troubleshooting section of this manual
(VIII) or contact technical support at
www.jascoproducts.com
5
Page 6

IV. Power Mode Setting
There are two power mode options for the GE
“Executive Series” USB 2.0 4-Port Hub.
The rst is self-power mode (recommended),
which requires the use of the AC power
adapter. In this mode, each port is provided
with 500 milliamps, allowing for additional
hubs, cameras and other high-powered
devices.
The second is bus-power mode, which does
NOT require the use of the AC power adapter.
In this mode, the hub is provided with 500
milliamps for all 4 ports. This should be
adequate for mice, keyboards, and other low
power devices. If you are not sure or if device
performance is poor, use the AC adapter.
When using the AC power adapter, make
sure the plug is properly connected to the hub
and to a standard electrical outlet. GE Surge
protection is recommended.
6
Page 7

V. Mounting Your Hub
An aluminum mounting bracket/base is
provided for mounting your hub. To begin,
choose where you would like the hub located
Mount the bracket/base using the supplied
screws, slide the spacer insert into the bracket/
base and then slide on the hub for a snug t.
7
Page 8
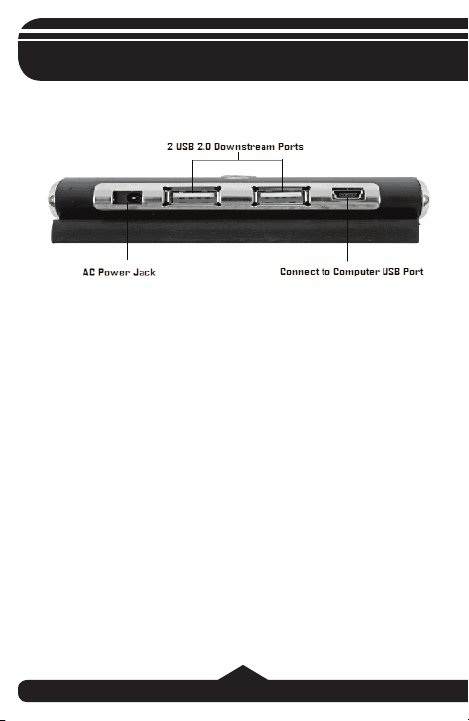
VI. Hardware Installation
Make sure your computer has all the necessary updates required to support USB. These
can be found on Microsoft’s website.
1. (Optional) Position the Hub as desired
using the directions in Section V.
2. (Optional) Plug the included AC power
adapter into the Power Jack on the side of the
USB 2.0 4-Port Hub. Note: Refer to Section IV
for more details on AC power adapter use.
8
Page 9

3. (Optional) Plug the AC power adapter
into a standard electrical outlet or GE Surge
Protector (recommended). The power LED
should illuminate. Note: Refer to Section IV for
more details.
4. Plug the A-type connector of the USB 2.0
device cable into the USB port of your computer. Plug the mini (B) type connector of the
USB cable into the hub.
5. Connect your USB devices to any of the
4 available downstream Ports.
Note: If you connect the hub to a USB 1.1 Port,
your computer may warn you that a high-speed
device has been connected to a non-high speed
port. Your hub will function properly, however it will
function at the USB 1.1 speed of your USB port.
9
Page 10

VII. Software Installation
Software installation is only required for
Windows® 98 and 98 SE users. Users of all
other Operating Systems, including Windows®
NT, ME, 2000, VISTA, XP and any Mac® OS,
may skip this section.
1) Connect the hub to your computer.
2) Windows® 98 and 98 SE will detect the hub
and automatically run the “Add New Hardware
Wizard”.
3) When the initial screen appears introducing
the “Add New Hardware Wizard”, click Next.
4) Select “Search for the best driver for your
device (Recommended): and click Next.
5) When asked to select a location to search for
the drivers, use the default selection. Do not
change the location. Click Next.
6) Click Next to accept the location the driver will
be installed in.
7) On the nal screen notifying you that the
driver has been installed, click Finish.
10
Page 11

VIII. Troubleshooting
• Hub Not Seen
Make sure you have installed all
Windows® updates and patches
pertaining to USB. These are available
on Microsoft’s® website. Make sure all
cables are properly connected.
• Hub Not Working After Reboot
Unplug the uplink cable (and the AC
adapter cable if it is connected) from the
hub. The uplink cable is plugged into the
“Upstream Port” shown in section VI. Wait
2 seconds. Plug the cable(s) back in.
• Hub Not Seen on a laptop
USB 2.0 Hubs may not work on all
laptops. Try the hub on a desktop
computer to conrm functionality of the
hub. If this works, contact your computer
dealer.
If you continue to experience problems contact
customer support at www.jascoproducts.com.
11
Page 12

IX. Technical Specications
USB Hub: 4 Ports
Standards: USB 1.1 and 2.0 Compatible
Operating Systems: Windows
2000, VISTA & XP
Mac® OS X and above
Data Speed: High: 480 Mbps Full: 12 Mbps
Low: 1.5 Mbps
Upstream Ports: Series A plug x 1
Downstream Ports: Series A receptacle port x 4
LEDs: 1 Power Indicator
Power: Self-Power (AC Adapter): 500
milliamps
Bus Power (No Adapter): 100
milliamps
*A maximum of 1 high-pow-
ered device may be used
without the AC power adapter.
Dimension (LxWxH): 100 mm x 40 mm x 25 mm
Operation Temp.: 0°C ~ 40°C
Humidity: 5-90% RH non-condensing
External Power: DC +5V / 2.5A
®
98, 98 SE, ME,
12
Page 13

X. FCC Compliance Statement
This equipment has been tested and found to comply
with the limits for a Class B digital device, pursuant to
Part 15 of the FCC Rules. These limits are designed
to provide reasonable protection against harmful
interference in a residential installation. This equipment
generates, uses and can radiate radio frequency energy
and, if not installed or used in accordance with the
instructions, may cause harmful interference to radio
communications. However, there is no guarantee that
interference will not occur in television reception, which
can be determined by turning the equipment off and on,
the user is encouraged to try and correct the interference
by one or more of the following measures:
(1) Reorient or relocate the receiving antenna.
(2) Increase the separation between the equipment
and the receiver.
(3) Connect the equipment into an outlet on a circuit
different from that to which the receiver is connected.
(4) Consult the dealer or an experienced radio/TV
technician for help.
FCC WARNING:
Changes or modications not expressly approved by the
party responsible for
13
Page 14

XI. Limited Lifetime Warranty
Jasco Products Co., Inc. warrants this product to
be free from manufacturing defects regardless of
how long you own it. This warranty is limited to
the replacement of this product only and does not
extend to consequential or incidental damage to
other products that may be used with this unit. This
warranty is in lieu of all other warranties express
or implied. Some states do not allow limitations on
how long an implied warranty lasts or permit the
exclusion or limitation of incidental or consequential
damages, so the above limitations may not apply
to you. This warranty gives you specic rights, and
you may also have other rights which vary from
state to state. Simply return to the address below
for a replacement:
Jasco Products Company
311 N.W. 122nd St
Oklahoma City, OK 73114
Distributed for GE
311 N.W. 122nd Street, Oklahoma City, Oklahoma 73114
by Jasco Products Company,
www.jascoproducts.com
97864-1 - 1/07
14
Page 15

HO97864
Hub USB 2.0 de 4 puertos
“Serie ejecutiva”
MANUAL DE INSTRUCCIONES
www.jascoproducts.com
Page 16

Contenido
I. INTRODUCCIÓN ............................................ 3
II. GENERALIDADES ......................................... 4
III. INSTRUCCIONES SOBRE SEGURIDAD ...... 5
IV. CONFIGURACIÓN DE LA ENTRADA DE
CORRIENTE .................................................. 6
V. INSTALACIÓN DEL HUB ............................... 7
VI. INSTALACIÓN DEL HARDWARE .................. 8
VII. INSTALACIÓN DEL SOFTWARE ................. 10
VIII. SOLUCIÓN DE PROBLEMAS ......................11
IX. ESPECIFICACIONES TÉCNICAS ............... 12
X. DECLARACIÓN DE CONFORMIDAD DE LA
FCC ............................................................. 13
XI. GARANTÍA LIMITADA DE POR VIDA .......... 14
2
Page 17

I. Introducción
¡Felicitaciones por su compra del Hub USB
2.0 de 4 puertos ‘Serie ejecutiva’ de GE!
¡Este Hub de la “Serie ejecutiva” de GE le permitirá recibir el mayor ancho de banda posible
con todos sus aparatos 2.0 y 1.1!
Antes de usar su Hub de la “Serie ejecutiva”,
lea cuidadosamente todo el manual. Para
evitar dañar el Hub de la “Serie ejecutiva” o
cualquier otro aparato que vaya a conectar,
siga las instrucciones.
EL PAQUETE INCLUYE:
• Hub USB 2.0 de 4 puertos
• Adaptador de corriente alterna
• Cable de extensión USB 2.0 (2 metros)
• Soporte de aluminio para montaje /
pedestal y tarjeta espaciadora
• Manual del usuario
• Tornillos para montaje
3
Page 18

II. Generalidades
La tecnología del Hub GE le permite usar lo mejor
del USB 1.1 y 2.0 con un sólo Hub USB 2.0 de
alta velocidad. Conecte sus aparatos USB 2.0 y
transera sus datos a velocidades de hasta 480
Mbps. Y al mismo tiempo conecte sus aparatos
USB 1.1 y obtenga un ancho de banda de 12 Mbps
en cada aparato. Podrá usar sus aparatos USB 1.1
y USB 2.0 al mismo tiempo. ¡El Hub USB GE se
puede adaptar para darle el mejor ancho de banda
posible con cada uno de sus aparatos!
CARACTERÍSTICAS
• Compatible con USB 1.1 y 2.0
• Velocidad máxima garantizada con los aparatos
USB 1.1
• El adaptador de corriente alterna funciona con aparatos
USB de alta potencia
• Luz indicadora de energía
• Se puede instalar con el soporte incluido
• Sólo conéctelo y empiece a usarlo
• Detección y reparación de fallas del bus
• Detección y protección de sobrecargas en cada puerto
• Todas las salidas de los puertos pueden hacer
operaciones de alta velocidad (480 Mbps), velocidad
total (12 Mbps) y baja velocidad (1.5 Mbps).
4
Page 19

III. Instrucciones sobre seguridad
Siempre lea con cuidado las instrucciones
sobre seguridad.
➢ Guarde este manual para poder
consultarlo en el futuro.
➢ Mantenga el equipo lejos de la humedad.
➢ No lo exponga al agua.
➢ Si el equipo se cae y se daña,
reemplácelo.
➢ Si nota que el equipo está obviamente
roto, reemplácelo.
➢ Si el equipo no funciona como lo indica el
manual, consulte la sección de Solución
de problemas en este manual (VIII) o
comuníquese con el servicio técnico en
www.jascoproducts.com.
5
Page 20

IV. Configuración de la entrada de corriente
El Hub USB 2.0 de 4 puertos “Serie ejecutiva”
de GE tiene dos tipos de entradas de corriente.
En el primer modo (recomendado), autoalimentado, el Hub necesita el adaptador de corriente.
En este modo, cada puerto cuenta con 500
miliamperios, lo que permite que se puedan usar
Hubs, cámaras y otros aparatos adicionales de
alta potencia.
En el segundo modo, el Hub funciona con la
energía del bus y NO necesita el adaptador de
corriente alterna. En este modo, el Hub cuenta
con 500 miliamperios para los 4 puertos. Esto
es suciente para ratones, teclados y otros
aparatos de baja potencia. Si no está seguro o
si el aparato no funciona como es debido, use
el adaptador de corriente alterna. Cuando use
el adaptador de corriente alterna, asegúrese
de que enchufe esté conectado al Hub y a una
salida estándar de corriente. Se recomienda
usar el Protector de sobrecargas GE.
6
Page 21

V. Instalación del Hub
Se ha incluido un soporte/base de montaje
para instalar el Hub. Para empezar, escoja el
lugar donde colocará el Hub.
Se ha incluido un soporte/base de montaje
para instalar el Hub. Para empezar, escoja el
lugar donde colocará el Hub.
7
Page 22

VI. Instalación del Hardware
Asegúrese de que su computadora tenga todas las actualizaciones necesarias para poder
usar aparatos USB. Las podrá encontrar en la
página web de Microsoft.
1. (Opcional) Coloque el Hub donde lo
desee siguiendo las instrucciones en la
Sección V.
2. (Opcional) Conecte el adaptador de
corriente alterna (incluido) a la toma de
corriente que está a un lado del Hub
USB 2.0 de 4 puertos. Nota: Para más
detalles sobre cómo usar el adaptador de
corriente, consulte la Sección IV.
8
Page 23

3. (Opcional) Conecte el adaptador de
corriente alterna a un enchufe estándar o al Protector de sobrecargas GE
(se recomienda). La luz indicadora de
poder se prenderá. Nota: Para más
detalles consulte la Sección IV.
4. Conecte el conector tipo A del cable
del aparato USB 2.0, al puerto USB
de su computadora. Conecte el mini
conector tipo B del cable USB al Hub.
5. Conecte los aparatos USB a cualquiera de las 4 salidas de los puertos.
Nota: Si conecta el Hub a un puerto USB 1.1,
su computadora le puede avisar que un aparato
de alta velocidad se ha conectado a un puerto
que no es de alta velocidad. Su Hub funcionará
adecuadamente; sin embargo, sólo funcionará a
la velocidad USB 1.1 del puerto USB.
9
Page 24

VII. Instalación del software
Sólo deberá instalar el software si tiene instalado
Windows® 98 ó 98 SE. Si tiene otro Sistema Operativo como Windows® NT, ME, 2000, VISTA, XP
o un Sistema Operativo para Mac®, puede ignorar
esta sección.
1) Conecte el Hub a su computadora.
2) Windows
tomáticamente iniciará el “Asistente para agregar
un nuevo hardware”.
3) Cuando aparezca la pantalla inicial del “Asistente
para agregar un nuevo hardware”, haga clic en
Siguiente (Next).
4) Escoja “Buscar el mejor controlador para su
dispositivo” (Recomendado): y haga clic en
Siguiente.
5) Cuando se le pida que escoja la ubicación dónde
buscar los dispositivos, use la opción predeterminada. No cambie la ubicación. Haga clic en
Siguiente.
6) Haga clic en Siguiente para aceptar la ubicación
donde se instalará el controlador.
7) En la última pantalla que le
®
98 ó 98 SE detectará el Hub y au-
10
Page 25

VIII. Solución de problemas
• La computadora no reconoce el Hub
Asegúrese de que haya instalado todas
las actualizaciones y parches de Windows
correspondientes a los puertos USB. Los podrá
encontrar en la página web de Microsoft®.
Asegúrese de que todos los cables estén
conectados adecuadamente.
• El Hub no funciona después de haber
reiniciado la computadora
Desconecte el cable de transmisión (y el
adaptador de corriente alterna si estuviese
conectado) del Hub. El cable de transmisión
está conectado a la “Entrada del puerto” que se
muestra en la sección VI. Espere 2 segundos.
Vuelva a conectar el (los) cable(s).
• La computadora portátil no reconoce el Hub
Los Hubs USB 2.0 no funcionan en todas las
computadoras portátiles. Use una computadora
de escritorio para vericar si el Hub funciona. Si
funciona, contáctese con el distribuidor de su
computadora.
Si sigue teniendo problemas, comuníquese con
ayuda al cliente en www.jascoproducts.com.
11
Page 26

IX. Especicaciones técnicas
Hub USB: 4 puertos
Estándares: Compatible con USB 1.1 y 2.0
Sistemas operativos: Windows® 98, 98 SE, ME,
2000, VISTA, XP, Mac® OS X y
ediciones posteriores.
Velocidad de transferencia de datos:
lta: 480 Mbps Total: 12 Mbps
Baja: 1.5 Mbps
Entrada de puertos: Conector de Serie A (1)
Salidas de puertos: Conexión de puerto Serie A (4)
Luz indicadora: 1 Indicador de poder
Fuente de poder: Autoalimentado (Adaptador
de corriente alterna): 500
miliamperios, Energía de
Bus (Sin adaptador): 100
miliamperios
• Sin el adaptador de corriente,
se puede usar 1 dispositivo de
alta potencia como máximo.
Tamaño (LxAxA): 100 mm x 40 mm x 25 mm
Temperatura operacional: 0°C ~ 40°C
Humedad: 5-90% RH sin condensación
Alimentación externa: CC +5V / 2.5A
12
Page 27

X. Declaración de conformidad de la FCC
Este equipo ha sido probado y se ha encontrado que
cumple con los límites para aparatos digitales Clase
B, de acuerdo a la sección 15 de las Reglas de la
FCC. Estos límites están diseñados para brindar una
protección razonable sobre interferencias perjudiciales
en instalaciones residenciales. Este equipo genera, usa
y puede transmitir energía de radio frecuencia. Si no
se instala o usa de acuerdo a las instrucciones, puede
causar interferencias perjudiciales a las comunicaciones
de radio. Sin embargo, no se garantiza que interferencias
de este tipo no vayan a ocurrir en la recepción de los
televisores, cosa que se puede determinar prendiendo y
apagando el equipo; el usuario debe intentar corregir la
interferencia siguiendo una de las siguientes medidas:
(1) Reorientar o mover la antena receptora.
(2) Alejar el equipo del receptor.
(3) Conectar el equipo a un tomacorriente distinto a
donde está conectado el receptor.
(4) Contactar al distribuidor o a un técnico experto en
radio y TV.
ADVERTENCIAS DE LA FCC:
Cualquier cambio o modicación que no está expresamente aprobada por la parte responsable del cumplimiento, puede invalidar la autoridad del usuario para manejar
este equipo.
13
Page 28

XI. Garantía limitada de por vida
Jasco Products Co. Inc. garantiza que este producto
no presenta ningún defecto de fábrica independientemente del tiempo que lo haya tenido. Esta garantía
está limitada sólo al reemplazo del producto y no
se extiende al daño resultante o incidental de otros
productos que se han usado con esta unidad. Esta
garantía remplaza a cualquier otra garantía expresa
o implícita. Algunos estados no reconocen límites de
tiempo en las garantías implícitas y tampoco permiten
la exclusión o limitación de daños incidentales o
resultantes; por lo tanto, las limitaciones mencionadas
pueden no ser aplicables en su caso. Esta garantía
le proporciona derechos especícos; pero dependiendo del estado, también puede tener otros derechos.
Para que lo remplacen, sólo devuélvalo a la dirección
siguiente:
Jasco Products Company
311 N.W. 122nd St
Oklahoma City, OK 73114
Distribuido para GE
311 N.W. 122nd Street, Oklahoma City, Oklahoma 73114
por Jasco Products Company,
www.jascoproducts.com
97864-1 - 1/07
14
 Loading...