

Page 1
MULMUL
TI-CHANNEL IN-OUTTI-CHANNEL IN-OUT
MUL
TI-CHANNEL IN-OUT
MULMUL
TI-CHANNEL IN-OUTTI-CHANNEL IN-OUT
THERMO-HYGRTHERMO-HYGR
THERMO-HYGR
THERMO-HYGRTHERMO-HYGR
WITH CABLE FREE SENSOR WITH CABLE FREE SENSOR
WITH CABLE FREE SENSOR
WITH CABLE FREE SENSOR WITH CABLE FREE SENSOR
CLOCKCLOCK
CLOCK
CLOCKCLOCK
MODEL: GE5805WS6MODEL: GE5805WS6
MODEL: GE5805WS6
MODEL: GE5805WS6MODEL: GE5805WS6
USER'S MANUAL
INTRINTR
ODUCTIONODUCTION
INTR
ODUCTION
INTRINTR
ODUCTIONODUCTION
Congratulations on your purchase of the GE5805WS6 Multi-Channel In-Out Thermo-Hygrometer with 433MHz cable free sensor
and calendar clock.
The basic package comes with a main unit, which is the
temperature, humidity and calendar clock station, and a remote
unit, the thermo-hygro sensor.
The main unit has large read-outs for In-Out temperature and
humidity which are collected and transmitted by the remote unit.
The main unit can support up to three remote units.
As for the calendar clock, it includes five-language display and
2-minutes crescendo single alarm. It is also equipped with a moon
phase scanner, which lets you check the moon phase of any day
between 2000 to 2099.
OMETEROMETER
OMETER
OMETEROMETER
ANDAND
AND
ANDAND
GB
MAIN FEAMAIN FEA
MAIN FEA
MAIN FEAMAIN FEA
1
TURESTURES
TURES
TURESTURES
RAR286HG-e.p65 2003/11/5, AM 10:501
Page 2

GB
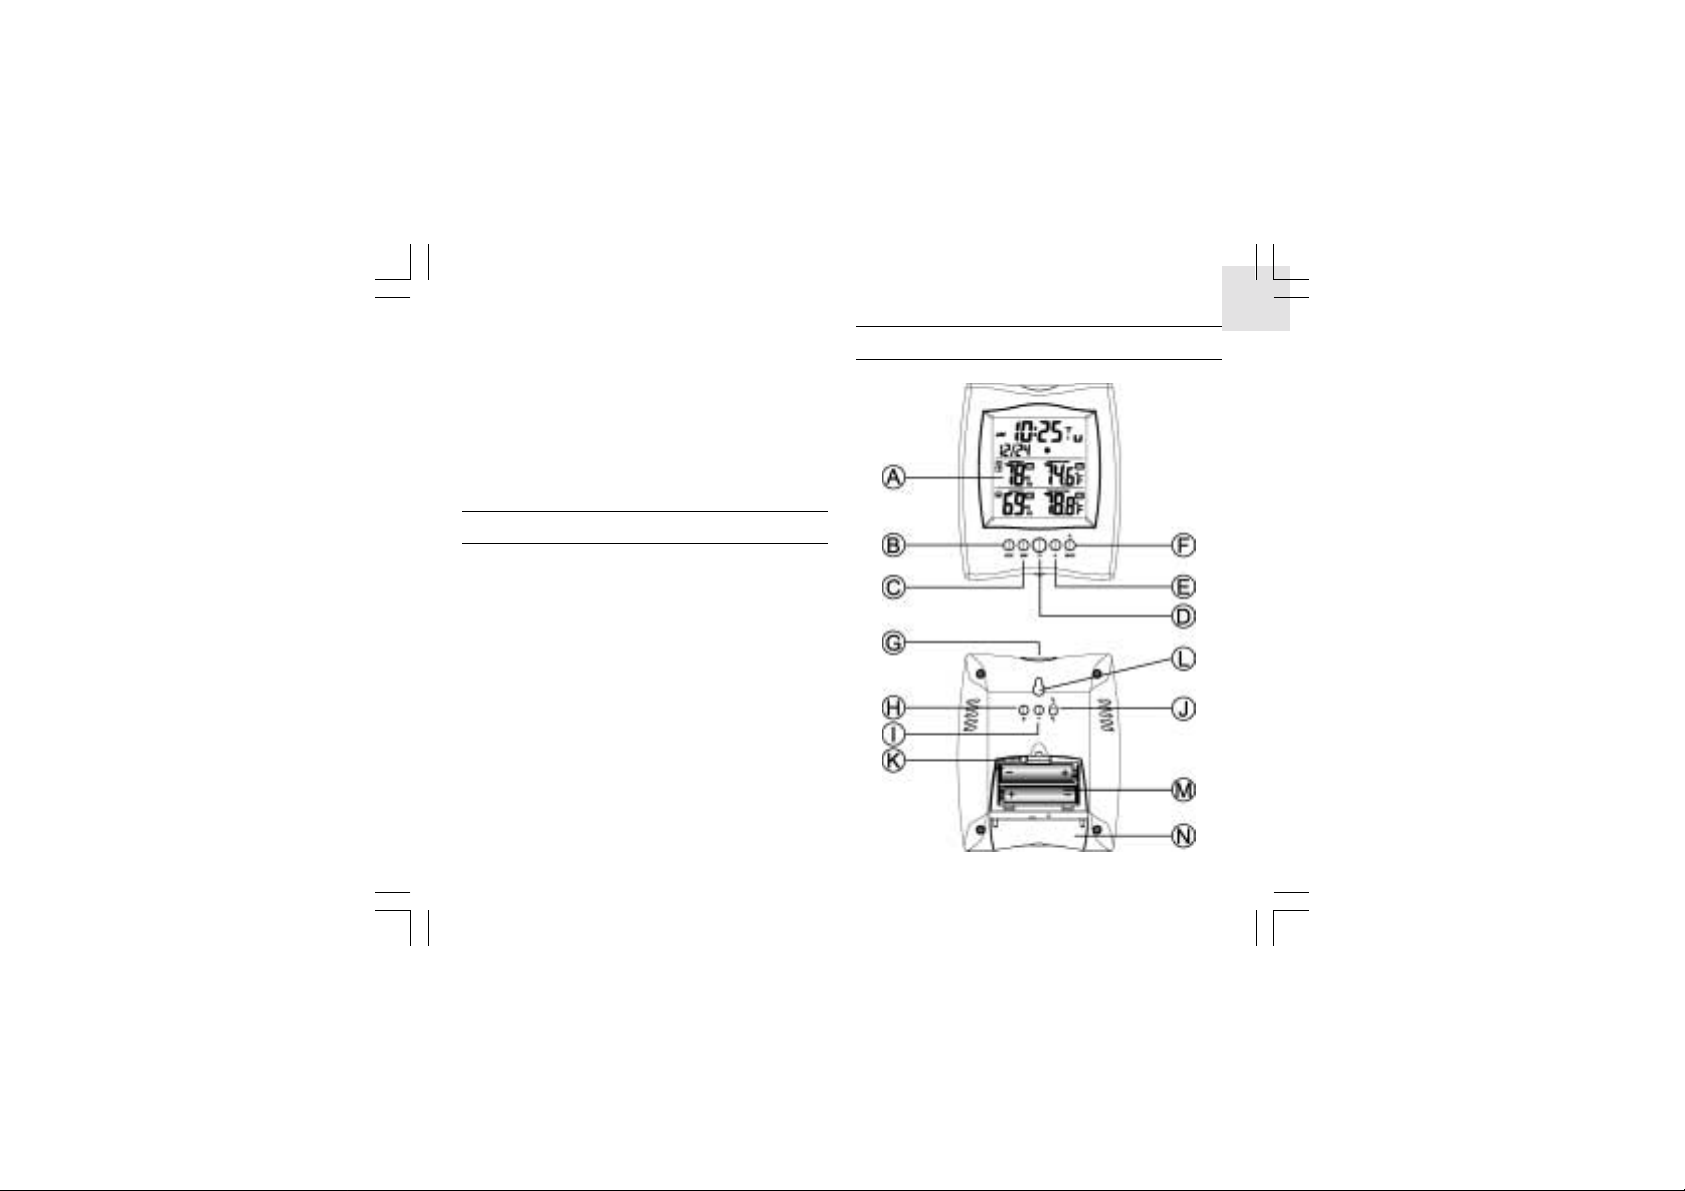
A.A.
THREE-LINE DISPLATHREE-LINE DISPLA
A.
THREE-LINE DISPLA
A.A.
THREE-LINE DISPLATHREE-LINE DISPLA
Facilitates easy reading of remote and indoors temperatures
and humidities and calendar clock with moon phase
B.B.
MODE BMODE B
B.
B.B.
C.C.
C.
C.C.
D.D.
D.
D.D.
E.E.
E.
E.E.
F.F.
F.
F.F.
G.G.
G.
G.G.
H.H.
H.
H.H.
I.I.
I.
I.I.
J.J.
J.
J.J.
UTTUTT
MODE B
UTT
MODE BMODE B
UTTUTT
Tog gles the display modes and set the time for calendar clock
MEM BMEM B
UTTUTT
UTT
UTTUTT
UTTUTT
ONON
UTT
ON
UTTUTT
ONON
UTTUTT
ONON
UTT
ON
UTTUTT
ONON
UTTUTT
UTT
UTTUTT
WN ( - ) BWN ( - ) B
WN ( - ) B
WN ( - ) BWN ( - ) B
ONON
ON
ONON
UTTUTT
UTT
UTTUTT
MEM B
MEM BMEM B
Recalls the maximum or minimum temperature of individual
channels
CH BCH B
CH B
CH BCH B
Selects among different channels
AL BAL B
AL B
AL BAL B
Sets and displays the time for the alarms
ALARM [AL ON/OFF] BALARM [AL ON/OFF] B
ALARM [AL ON/OFF] B
ALARM [AL ON/OFF] BALARM [AL ON/OFF] B
Enables or disables the alarms
SNOOZE BSNOOZE B
SNOOZE B
SNOOZE BSNOOZE B
Activates 8 minutes snooze function when alarm is sounding
UP ( + ) BUP ( + ) B
UP ( + ) B
UP ( + ) BUP ( + ) B
Advances the value of a setting or scan the moonphase status
DODO
DO
DODO
Decreases the value of a setting or scan the moonphase status
°C/°F SLIDE SWITCH°C/°F SLIDE SWITCH
°C/°F SLIDE SWITCH
°C/°F SLIDE SWITCH°C/°F SLIDE SWITCH
Selects between degree Centigrade (°C) and Fahrenheit (°F)
ONON
ON
ONON
ONON
ON
ONON
UTTUTT
UTT
UTTUTT
ONON
ON
ONON
ONON
ON
ONON
YY
Y
YY
UTTUTT
ONON
UTT
ON
UTTUTT
ONON
K.K.
RESET BRESET B
UTTUTT
K.
RESET B
K.K.
RESET BRESET B
Returns all settings to default values
L.L.
WW
ALL-MOUNT RECESSED HOLEALL-MOUNT RECESSED HOLE
L.
W
ALL-MOUNT RECESSED HOLE
L.L.
WW
ALL-MOUNT RECESSED HOLEALL-MOUNT RECESSED HOLE
For mounting the main unit on a wall
M.M.
BB
AA
TTERTTER
M.
B
A
TTER
M.M.
BB
AA
TTERTTER
Accommodates two UM-3 or “AA” size 1.5V batteries
N.N.
TT
ABLE STABLE ST
N.
T
ABLE ST
N.N.
TT
ABLE STABLE ST
For standing the main unit on a flat surface
MAIN FEAMAIN FEA
MAIN FEA
MAIN FEAMAIN FEA
2
ONON
UTT
ON
UTTUTT
ONON
Y COMPY COMP
Y COMP
Y COMPY COMP
ANDAND
AND
ANDAND
ARAR
TMENTSTMENTS
AR
TMENTS
ARAR
TMENTSTMENTS
TURES:TURES:
TURES:
TURES:TURES:
REMO REMO
REMO
REMO REMO
TE UNITTE UNIT
TE UNIT
TE UNITTE UNIT
RAR286HG-e.p65 2003/11/5, AM 10:502
Page 3

A.A.
TWTW
O-LINE DISPLAO-LINE DISPLA
A.
TW
O-LINE DISPLA
A.A.
TWTW
O-LINE DISPLAO-LINE DISPLA
Facilitates easy reading of outdoor temperature and humidity.
B.B.
LED INDICALED INDICA
B.
LED INDICA
B.B.
LED INDICALED INDICA
Flashes when the remote unit transmits a reading
C.C.
CHANNEL SLIDE SWITCHCHANNEL SLIDE SWITCH
C.
CHANNEL SLIDE SWITCH
C.C.
CHANNEL SLIDE SWITCHCHANNEL SLIDE SWITCH
Designates the remote unit Channel 1, Channel 2 or Channel 3
D.D.
°C/°F SLIDE SWITCH°C/°F SLIDE SWITCH
D.
°C/°F SLIDE SWITCH
D.D.
°C/°F SLIDE SWITCH°C/°F SLIDE SWITCH
Selects between degree Centigrade (°C) and Fahrenheit (°F)
E.E.
RESET BRESET B
E.
RESET B
E.E.
RESET BRESET B
Returns all settings to default values
F.F.
BB
F.
B
F.F.
BB
Accommodates two AA-size batteries
G.G.
BB
G.
B
G.G.
BB
HH
..
WW
H
.
W
HH
..
WW
For mounting the remote unit on a wall
UTTUTT
UTT
UTTUTT
AA
TTERTTER
Y COMPY COMP
A
TTER
Y COMP
AA
TTERTTER
Y COMPY COMP
AA
TTERTTER
Y DOORY DOOR
A
TTER
Y DOOR
AA
TTERTTER
Y DOORY DOOR
ALL-MOUNT RECESSED HOLEALL-MOUNT RECESSED HOLE
ALL-MOUNT RECESSED HOLE
ALL-MOUNT RECESSED HOLEALL-MOUNT RECESSED HOLE
YY
Y
YY
TT
OROR
T
OR
TT
OROR
ONON
ON
ONON
ARAR
TMENTTMENT
AR
TMENT
ARAR
TMENTTMENT
4. Position the remote unit and main unit within effective
transmission range, which, in usual circumstances, is 20 to 30
meters.
Note that the effective range is vastly affected by the building
materials and where the main and remote units are positioned. Try
various set-ups for best result.
Though the remote units are weather proof, they should be placed
away from direct sunlight, rain or snow.
BB
AA
TTERTTER
Y Y
B
A
TTER
BB
AA
TTERTTER
INSTINST
ALLAALLA
INST
ALLA
INSTINST
ALLAALLA
1. Remove the screws on the battery compartment.
2. Select the channel number on the CHANNEL slide switch.
AND CHANNELAND CHANNEL
Y
AND CHANNEL
Y Y
AND CHANNELAND CHANNEL
TION:TION:
REMO REMO
TION:
REMO
TION:TION:
REMO REMO
TE UNITTE UNIT
TE UNIT
TE UNITTE UNIT
GB
BEFORE BEFORE
BEFORE
BEFORE BEFORE
For best operation,
1. Assign different channels to different remote units.
2. Insert batteries for remote units before doing so for the main
unit.
3. Place the main unit as close as possible next to the remote unit,
reset the main unit after installing batteries. This will ensure
easier synchronization between the transmission and reception
of signals.
RAR286HG-e.p65 2003/11/5, AM 10:513
YY
OU BEGINOU BEGIN
Y
OU BEGIN
YY
OU BEGINOU BEGIN
3. Select °C or °F with the °C/°F slide switch.
4. Install 2
according to the polarities shown.
5. Replace the battery compartment door and secure its screws.
Note that once a channel is assigned to a remote unit, you can only
change it by removing the batteries or resetting the unit.
3
alkaline
batteries (UM-3 or “AA” size 1.5V) strictly
Page 4

GB
BB
AA
TTERTTER
Y INSTY INST
ALLAALLA
TION:TION:
B
A
TTER
Y INST
BB
AA
TTERTTER
1. Open the battery compartment door.
2. Install 2 alkaline batteries (UM-3 or “AA” size 1.5V) strictly
according to the polarities shown.
3. Replace the battery compartment door.
LOLO
LO
LOLO
When it is time to replace batteries, the respective low-battery
indicator will show up when the respective channel is selected.
The battery level of the main unit will be shown on the indoor
temperature and humidity display when it is running low.
Y INSTY INST
W BW B
W B
W BW B
ALLA
ALLAALLA
AA
TTERTTER
A
TTER
AA
TTERTTER
TION:
TION:TION:
Y Y
WW
Y
W
Y Y
WW
ARNINGARNING
ARNING
ARNINGARNING
MAIN UNIT MAIN UNIT
MAIN UNIT
MAIN UNIT MAIN UNIT
HOHO
W W
TT
O USE O USE
THE THE
TT
HO
W
T
W W
O USE
TT
O USE O USE
OR OR
WW
ALL MOUNTINGALL MOUNTING
OR
W
ALL MOUNTING
OR OR
WW
ALL MOUNTINGALL MOUNTING
HOHO
Flip open the table stand for standing the main unit on a flat
surface or you can mount the unit on a wall using the recessed
screw hole.
As for the remote unit, you can mount the unit on a wall using the
recessed screw hole.
Main unitMain unit
Main unit
Main unitMain unit
Wall-mount Table Stand
Wall-mount
4
THE
THE THE
ABLE STABLE ST
T
ABLE ST
TT
ABLE STABLE ST
ANDAND
AND
ANDAND
RAR286HG-e.p65 2003/11/5, AM 10:514
Page 5

THE RESET BTHE RESET B
THE RESET B
THE RESET BTHE RESET B
This button is only used when the unit is operating in an
unfavourable way or malfunctioning. Use a blunt stylus to hold
down the button. All settings will return to their default values.
GETTING STGETTING ST
GETTING ST
GETTING STGETTING ST
Once batteries are in place for the remote units, they will start transmitting temperature and humidity readings at around 41-second intervals.
The main unit will also start searching for signals for about a minute
once batteries are installed. Upon successful reception, the individual channel temperatures and humidities will be displayed on
the second line and the indoor measurements on the bottom line.
The main unit will automatically update its readings at about 41second intervals.
UTTUTT
UTT
UTTUTT
ARAR
AR
ARAR
ONON
ON
ONON
TEDTED
TED
TEDTED
HOHO
W W
TT
HO
HOHO
The indoor temperature and humidity are shown on the bottom
line of the display.
As for the remote sites or channels, press
nel to another. The kinetic wave display on the channel number
indicates the reception of that particular channel is in good order.
If the temperature or humidity goes above or below than the
measuring range of the main unit or the remote unit (stated in
specification), the display will show
The temperature and humidity trend indicator on the screen shows
the trend of samplings collected at that particular remote or indoor
site. Three trends, rising, steady and falling, will be shown.
O CHECK REMOO CHECK REMO
W
T
O CHECK REMO
W W
TT
O CHECK REMOO CHECK REMO
TEMPERATEMPERA
TEMPERA
TEMPERATEMPERA
Arrow indicator
INDOOR READINGSINDOOR READINGS
INDOOR READINGS
INDOOR READINGSINDOOR READINGS
TURE TURE
AND HUMIDITY AND HUMIDITY
TURE
AND HUMIDITY
TURE TURE
AND HUMIDITY AND HUMIDITY
TE REMOTE REMO
TE REMO
TE REMOTE REMO
CH CH
CH to go from one chan-
CH CH
“HHH”“HHH”
“HHH” or
“HHH”“HHH”
TE TE
TE
TE TE
“LLL“LLL
“LLL
“LLL“LLL
TRENDTREND
TREND
TRENDTREND
””
”.
””
ANDAND
AND
ANDAND
GB
If no signals are received, blanks "
kinetic wave icon will show "
simultaneously to enforce another search for about 3 minutes. This
is useful in synchronizing the transmission and reception of the
remote and main units.
Repeat this step whenever you find discrepancies between the reading
shown on the main unit and that on the respective remote unit.
RAR286HG-e.p65 2003/11/5, AM 10:515
--------
----" will be displayed and the
------- ". Press
CH CH
CH and
CH CH
MEMMEM
MEM
MEMMEM
Trend Rising Steady Falling
CHANNEL SCAN FUNCTIONCHANNEL SCAN FUNCTION
CHANNEL SCAN FUNCTION
CHANNEL SCAN FUNCTIONCHANNEL SCAN FUNCTION
Press and hold
function. The readings of each channel will be displayed one by one
for 4 seconds automatically. Press
5
CHCH
CH button for 3 seconds to enter channel scan
CHCH
CHCH
CH again to stop the scan function.
CHCH
Page 6

GB
HOHO
W W
TT
W
W W
T
TT
O READ O READ
O READ
O READ O READ
HO
HOHO
The kinetic wave display shows the signal receiving status of the
main unit. There are three possible forms:
The unit is in searching mode.
Temperature and humidity
readings are securely registered.
No signals.
THE KINETIC THE KINETIC
THE KINETIC
THE KINETIC THE KINETIC
DISPLADISPLA
DISPLA
DISPLADISPLA
YY
Y
YY
WW
W
WW
AA
VEVE
A
VE
AA
VEVE
DISCONNECTED SIGNDISCONNECTED SIGN
DISCONNECTED SIGN
DISCONNECTED SIGNDISCONNECTED SIGN
If without obvious reasons the display for a particular channel goes
blank, press
fails, check:
1. The remote unit of that channel is still in place.
2. The batteries of both the remote unit and main unit. Replace as
Note:Note:
Note: When the temperature falls below freezing point, the
Note:Note:
3. The transmission is within range and path is clear of obstacles
CH CH
MEMMEM
CH and
MEM to enforce an immediate search. If that
CH CH
MEMMEM
necessary.
batteries of outdoor units will freeze, lowering their voltage
supply and the effective range.
and interference. Shorten the distance when necessary.
ALSALS
ALS
ALSALS
MAXIMUM MAXIMUM
MAXIMUM
MAXIMUM MAXIMUM
TEMPERATEMPERA
TEMPERA
TEMPERATEMPERA
The maximum and minimum recorded indoor temperatures and
humidities and those of each channel will be automatically stored
in memory. To display them,
1. Select the channel to be checked.
MEMMEM
2. Press
MEM once to display the maximum readings and again
MEMMEM
the minimum readings. The respective indicators,
will be displayed.
To clear the memory, hold down
maximum and minimum readings will be erased. If you press
now, the maximum and minimum readings will have the same
values as the current ones until different readings are recorded.
RAR286HG-e.p65 2003/11/5, AM 10:516
AND MINIMUMAND MINIMUM
AND MINIMUM
AND MINIMUMAND MINIMUM
TURES TURES
TURES
TURES TURES
AND HUMIDITESAND HUMIDITES
AND HUMIDITES
AND HUMIDITESAND HUMIDITES
MAXMAX
MAX or
MAXMAX
MEMMEM
MEM for two seconds. The
MEMMEM
MEMMEM
MEM
MEMMEM
TRANSMISSION COLLISIONTRANSMISSION COLLISION
TRANSMISSION COLLISION
TRANSMISSION COLLISIONTRANSMISSION COLLISION
Signals from other household devices, such as door bells, home
security systems, wireless speakers and headphones as well as
entry controls, may interfere with those of this product and cause
temporarily reception failure. This is normal and does not affect
the general performance of the product. The transmission and reception of temperature readings will resume once the interference
recedes.
MINMIN
MIN
MINMIN
NONO
TE ON °C TE ON °C
NO
TE ON °C
NONO
TE ON °C TE ON °C
The unit of temperature display is selected on the °C/°F slide switch.
Select °C for Centigrade or °F for Fahrenheit.
6
AND °FAND °F
AND °F
AND °FAND °F
Page 7

CALENDCALEND
CALEND
CALENDCALEND
Each press on the
MODE 1. Hour-Minute-Second
MODE 2. Hour-Minute-Day of the Week
HOHO
HO
HOHO
To set the clock manually, hold
hour digits will blink.
Use
increase or decrease the value rapidly.
MODEMODE
Press
MODE to confirm. The minute digits will blink. Repeat the
MODEMODE
same procedure to set the minutes, then the year, month, day-ofmonth and display language for weekday.
AR CLOCK DISPLAAR CLOCK DISPLA
AR CLOCK DISPLA
AR CLOCK DISPLAAR CLOCK DISPLA
MODE MODE
MODE button will toggle the display as below.
MODE MODE
Y MODESY MODES
Y MODES
Y MODESY MODES
| Month-Day
| Month-Day
W W
TT
O SET O SET
W
T
W W
TT
or to select the hour. Keep pressing the button will
THE CLOCK MANUTHE CLOCK MANU
O SET
THE CLOCK MANU
O SET O SET
THE CLOCK MANUTHE CLOCK MANU
MODEMODE
MODE for three seconds. The
MODEMODE
ALLALL
ALL
ALLALL
YY
Y
YY
For display language, you can choose among English (E), German (D), French (F), Italian (I) and Spanish (S) - in that order.
Day-of-week is the usual sequence of Monday through Sunday.
If there is an item you do not wish to change, simply press
to bypass the item.
When you are done, press
to the mode last chosen.
HOHO
W W
TT
HO
HOHO
The GE5805WS6 has a single alarm.
To set an alarm,
1. Press
2. Press
3. Enter the hour using
4. Press
5. Enter the minutes using
6. Press
The alarm-on icon
armed.
You can also arm or disarm an alarm by pressing the
[AL ON/OFF][AL ON/OFF]
[AL ON/OFF] button.
[AL ON/OFF][AL ON/OFF]
7
O SET O SET
W
T
O SET
W W
TT
O SET O SET
[ [
AL ] AL ]
[
AL ] once to display the alarm time.
[ [
AL ] AL ]
[ [
AL ] AL ]
[
AL ] for three seconds. The hour digits will blink.
[ [
AL ] AL ]
[ [
AL ]AL ]
[
AL ]. The minute digits will blink.
[ [
AL ]AL ]
[ [
AL ] AL ]
[
AL ] to exit.
[ [
AL ] AL ]
MODEMODE
MODE to exit. The display will return
MODEMODE
AND AND
ARM ARM
THE THE
AND
ARM
AND AND
ARM ARM
or .
or .
will be displayed indicating the alarm is now
THE
THE THE
ALARMSALARMS
ALARMS
ALARMSALARMS
MODEMODE
MODE
MODEMODE
GB
RAR286HG-e.p65 2003/11/5, AM 10:517
Page 8

GB
ALARM ALARM
ALARM
ALARM ALARM
When the alarm is set, it will activate at the set time with the
alarm-on icon
tivate for 2 minutes.
To stop the alarm, press
[ SNOOZE ] [ SNOOZE ]
[ SNOOZE ] button is pressed, the snooze function will be
[ SNOOZE ] [ SNOOZE ]
triggered. The alarm will stop for eight minutes before activating
again.
GE5805WS6 is equipped with a moon phase display. The moon
phase of the current day is displayed in the clock or alarm time
mode.
The eight phased are:
AND SNOOZE FUNCTIONAND SNOOZE FUNCTION
AND SNOOZE FUNCTION
AND SNOOZE FUNCTIONAND SNOOZE FUNCTION
flashing. Without interruption, the alarm will ac-
[ [
AL ] AL ]
[ [
[
[ [
HOHO
W W
TT
O USE O USE
HO
W
T
O USE
HOHO
W W
TT
O USE O USE
THE MOON PHASETHE MOON PHASE
THE MOON PHASE
THE MOON PHASETHE MOON PHASE
New Moon
Waxing Cresent
First Quarter
Waxing Gibbous
Full Moon
Waning Gibbous
Last Quarter
Waning Crescent
AL ON/OFF ]AL ON/OFF ]
AL ] or
[
AL ON/OFF ] key. If the
AL ] AL ]
[ [
AL ON/OFF ]AL ON/OFF ]
AND SCANAND SCAN
AND SCAN
AND SCANAND SCAN
To check the moon phase for a particular day, press the
DODO
WNWN
DO
WN button once. The clock will enter moon phase scanning
DODO
WNWN
mode.
UP UP
DODO
Use the
The calendar will be day-driven in this mode.
You can go back in time or travel to the future, any day between
2000 to 2099. The correcponding moon phase will appear
immediately on the screen.
The unit will return to the last display mode when the
DODO
WNWN
DO
WN buttons are left idle for 10 seconds.
DODO
WNWN
This product is engineered to give you years of satisfactory
service if you handle it carefully. Here are a few precautions:
1. Do not immerse the unit in water.
2. Do not clean the unit with abrasive or corrosive ma terials. The y
may scratch the plastic parts and corrode the electronic circuit.
3. Do not subject the unit to excessive force, shock, dust,
temperature or humidity, which may result in malfunction,
shorter electronic life span, damaged battery and distorted parts.
4. Do not tamper with the unit's internal components. Doing so
will invalidate the warranty on the unit and may cause
unnecessary damage. The unit contains no user-serviceable
parts.
5. Only use fresh batteries as specified in the user's manual. Do
not mix new and old batteries as the old ones may leak.
6. Always read the user's manual thoroughly before operating the
unit.
8
WN WN
UP or
DO
WN button to locate the date you want to check.
UP UP
DODO
WN WN
PRECAPRECA
UTIONSUTIONS
PRECA
UTIONS
PRECAPRECA
UTIONSUTIONS
UP UP
UP or
UP UP
UP UP
UP and
UP UP
RAR286HG-e.p65 2003/11/5, AM 10:518
Page 9

SPECIFICASPECIFICA
SPECIFICA
SPECIFICASPECIFICA
TT
emperemper
aa
turtur
e Measure Measur
T
emper
a
tur
TT
emperemper
aa
turtur
Main unitMain unit
Main unit
Main unitMain unit
Indoor Temperature measurement
Proposed operating range : -5.0°C to +50.0°C
Temperature resolution : 0.1°C
Remote unitRemote unit
Remote unit
Remote unitRemote unit
Proposed operating range : -20.0°C to +60.0°C
RF Transmission Frequency : 433 MHz
No. of Remote unit : Maximum of 3
RF Transmission Range : Maximum 30 meters
Sensing cycle : around 41 seconds
RelaRela
titi
vv
e Humidity Measure Humidity Measur
Rela
ti
v
e Humidity Measur
RelaRela
titi
vv
e Humidity Measure Humidity Measur
Relavive humidity measurement range: 25%RH to 95%RH
Resolution : 1%
Calendar ClocCalendar Cloc
Calendar Cloc
Calendar ClocCalendar Cloc
12 h display with hh : mm ss
Date Format : Month . Day
Day of week selectable in 5 language (E, F, D, I, S)
2-minute single alarm
e Measur
e Measure Measur
kk
k
kk
ementement
ement
ementement
TIONSTIONS
TIONS
TIONSTIONS
23.0°F to 122.0°F
0.2°F
-4.0°F to 140.0°F
ement fement f
or Main and Remote Unitor Main and Remote Unit
ement f
or Main and Remote Unit
ement fement f
or Main and Remote Unitor Main and Remote Unit
Moon Phase FunctionMoon Phase Function
Moon Phase Function
Moon Phase FunctionMoon Phase Function
Moon Phase scanner Range : From 2000 to 2099
PP
oo
ww
erer
P
o
w
er
PP
oo
ww
erer
Main unit : use 2 pcs UM-3 or “ AA ”
Remote sensing unit : use 2 pcs UM-3 or “ AA ”
WW
eighteight
W
eight
WW
eighteight
Main unit : 172g (without battery)
Remote sensing unit : 68g (without battery)
DimensionDimension
Dimension
DimensionDimension
Main unit : 136 x 111 x 34 mm
Remote sensing unit : 80 x 70 x 33.5 mm
NONO
TE ON COMPLIANCETE ON COMPLIANCE
NO
TE ON COMPLIANCE
NONO
TE ON COMPLIANCETE ON COMPLIANCE
This device complies with Part 15 of the FCC Rules. Operation is
subject to the following two conditions: (1) This device may not
cause harmful interference, and (2) This device must accept any
interference received, including interference that may cause undesired operations.
WW
arar
ning:ning:
W
ar
ning:
Changes or modifications to this unit not expressly ap-
WW
arar
ning:ning:
proved by the party responsible for compliance could void the
user’s authority to operate the equipment.
9
1.5V battery
1.5V battery
(L x W x T)
(L x W x T)
GB
RAR286HG-e.p65 2003/11/5, AM 10:519
Page 10

GB
FCC :FCC :
FCC :
FCC :FCC :
NONO
TE:TE:
NO
TE: This equipment has been tested and found to comply with
NONO
TE:TE:
the limits for a Class B digital device, pursuant to Part 15 of the
FCC Rules. These limits are designed to provide reasonable protection against harmful interference in a residential installation.
This equipment generates, uses and can radiate radio frequency
energy and, if not installed and used in accordance with the instructions, may cause harmful interference to radio communications.
However, there is no guarantee that interference will not occur in
a particular installation. If this equipment does cause harmful interference to radio or television reception, which can be determined
by turning the equipment off and on, the user is encouraged to try
to correct the interference by one or more of the following
measures:
Reorient or relocate the receiving antenna.
Increase the separation between the equipment and receiver.
Connect the equipment into an outlet on a circuit different from
that to which the receiver is connected.
Consult the dealer of an experienced radio/TV technician for
help.
CompanCompan
y Name:y Name:
Compan
y Name: GE Wiring Devices & Specialty Products, Inc.
CompanCompan
y Name:y Name:
(d/b/a GE Home Electric Products, Inc.)
AdAd
drdr
ess:ess:
Ad
dr
ess:
1975 Noble Rd, Cleveland, OH 44112 USA
AdAd
drdr
ess:ess:
Contact PContact P
erer
Contact P
Contact PContact P
TT
eleele
T
ele
TT
eleele
Name and model nName and model n
Name and model n
Name and model nName and model n
DIGITAL WIRELESS THERMO-HYGROMETER
GE5805WS6
sonson
er
son: Beth Eskra
erer
sonson
phone Number:phone Number:
phone Number: 216-266-3188
phone Number:phone Number:
umber of the prumber of the pr
umber of the pr
umber of the prumber of the pr
oduct:oduct:
oduct:
oduct:oduct:
CACA
UTIONUTION
CA
UTION
CACA
- The content of this manual is subject to change with-
UTIONUTION
out further notice.
- Due to printing limitation, the displays shown in this
manual may differ from the actual display.
- The contents of this manual may not be reproduced
without the permission of the manufacturer.
10
RAR286HG-e.p65 2003/11/5, AM 10:5110
 Loading...