

Page 1
Bluetooth Headset
Model 86712
Page 2
Getting to Know Your GE Bluetooth Headset
Thank you for purchasing the GE 86712
Bluetooth Headset. The GE 86712 headset
offers wireless freedom based on the
latest Bluetooth technology which propels
you into a new dimension of wireless
connectivity. Bluetooth technology offers
fast and reliable transmission of voice
and data information between compatible
Bluetooth devices. Please read the
owners manual before using your new GE
Bluetooth headset.
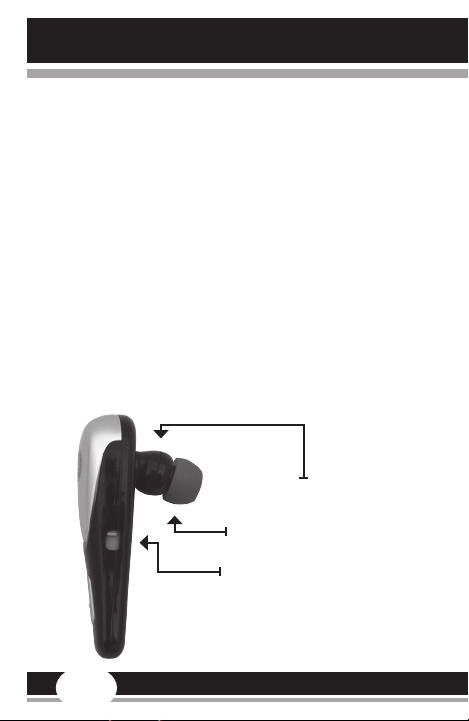
Earphone
Changeable Ear Cushion
DC Port with Sliding Cover
2
Page 3
Features of your GE Bluetooth Headset
• Your GE Bluetooth Headset comes
with interchangeable cover plate.
This allows you to customize your
headset.
• Your GE Bluetooth Headset also
comes with 3 interchangeable rubber
ear plugs. This allows you to choose
the best fit for your ear.
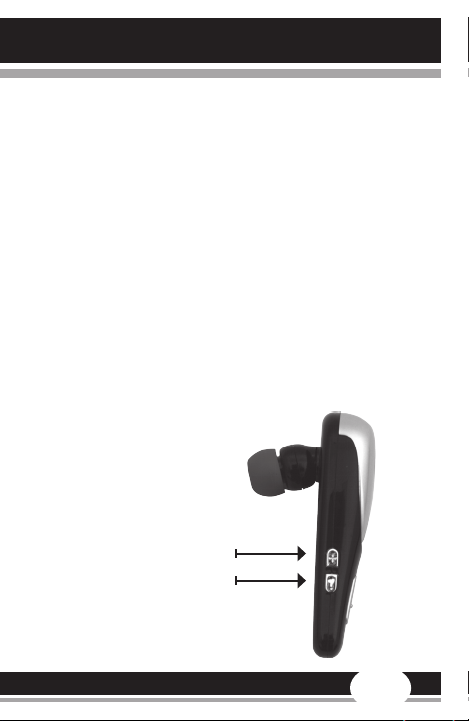
• Your GE Bluetooth headset has a built in
sliding cover to protect the DC port from
getting dirty when the headset is not
being charged.
Volume Up
Volume Down
3
Page 4
Changing your Cover Plate:
1. Place the headset in your left hand
between thumb and index finger. The
microphone should be pointed inwards
towards your palm.
2. Using your right hand, place your
thumb on the pointed end of the face
cover and press down while pulling
backwards until the face cover snaps
out of place. Remove cover. This takes
a little bit of pressure.
3. Install the new face cover by inserting
the pointed end in a slight angle first and
then snap into place by pushing inward
towards your left hand at the wide end of
the face cover.
4. After the front has snapped into place,
press downwards on the wide end to
snap it into place.
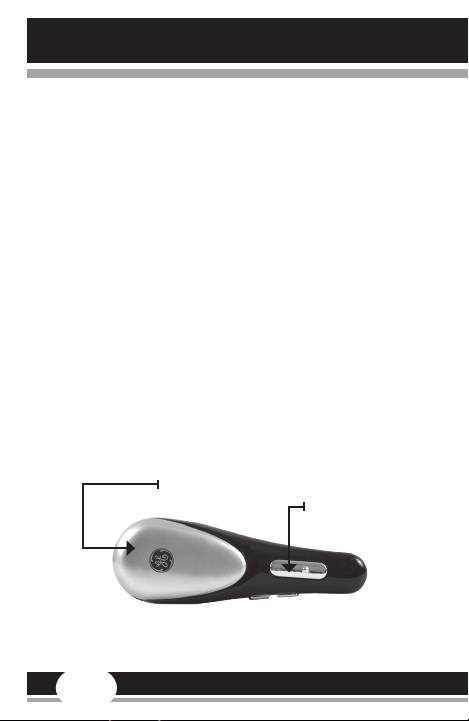
Changeable Face Plate
Function Button
4
Page 5

Charging your Bluetooth Headset:
Your GE 86712 Bluetooth headset comes
with a built-in rechargeable Lithium Ion
battery and a low battery indicator. When the
battery charge becomes low, the indicator
light will begin to flash slowly; at this time
you will need to recharge the battery. During
charging, the indicator light will illuminate
red and will turn off when the battery has
become fully charged.
While the battery is being charged, the status
of the headset will be in the off position.
(Note) We recommend that you fully charge your
Bluetooth Headset for 16 hours before using the headset
for the first time.
1. Plug the round barrel of the AC charger into the DC port of the headset.
2. Plug the AC adapter into a standard
AC outlet (120V).
3. Charge until the red indicator light
goes off.
4. Disconnect from charger when fully
charged.
5
Page 6

Pairing the headset to your phone:
(Note) Before you use your headset, it must
be paired to your phone. First of all make
sure your phone and headset are fully
charged and when pairing, make sure the
phone is within a foot of the headset for error
free pairing.
1. Turn on your phone.
2. Enable the Bluetooth function of the
mobile phone in accordance to the
user manual of the phone.
3. With the headset in the off position,
press and hold the Function Button
for approximately ten seconds or
until the indicator light begins to
flash blue and red. The headset is
now ready to be paired to the mobile
phone.
4. When prompted by the phone to
enter a pin code, enter 1234.
5. When the pairing is successful, the
indicator light will flash blue.
6
Page 7

(Note) You do not have to pair the headset
to the phone again once it is paired. Some
phone models may require reconnecting the
phone to the headset; refer to the phone’s
manufacturer’s instructions. If you wish to
pair the headset to another phone, turn off
the phone the headset was originally paired
with and follow the pairing instructions
according to the new phone’s manufacturer’s
instructions. When prompted for the pin
number, use the same number (1234) as in
step 4.
7
Page 8

Turning On/Off your Headset:
On:
Press and hold the Function Button until
you hear a short low beep. The indicator
light will begin to flash blue.
Off:
Press and hold the Function Button until
you hear a short high beep followed by a
short low beep. The indicator light will no
longer be illuminated. The headset is now
off.
Answering a Call & Rejecting Calls:
• When you are receiving a call press
and release the Function Button on
the headset.
• You should be able to talk to the caller.
• Note: If you answer the call by the
phone and not through the headset,
the call can not be transferred to the
headset once the call has been answered.
• If you want to reject the call, press and
hold the Function Button for about 2
to 3 seconds
8
Page 9

Placing Calls
• Press and release the Function
Button on the headset.
• Dial the number on the phone; once
the number has been dialed, you
should be able to hear the ringing of
the number dialed.
• If your phone has voice dialing feature, you can use this headset with
the voice dialing feature. For voice
dialing follow the steps below.
• Make sure the headset is connected
to the phone
• Press the Function Button once on
the headset; you should hear a short
tone.
• After the tone, use the voice dialing
as normal.
• Follow the phone’s manufacturer’s
instructions for voice dialing.
• Note: This headset may not work
with certain models of phones using
the voice dialing feature.
• Note: If you place the call before
turning on your headset, the call can
not be transferred to the headset.
9
Page 10

Adjusting the Volume
• You can adjust the volume anytime during
the conversation by pressing and releasing the top button for volume up.
• To adjust the volume down, press and
release the bottom button.
• It is recommended that you do not turn
the volume all the way up for your safety
and to prevent hearing loss.
Transferring Calls
You may transfer calls from your headset
to your mobile phone or from your mobile
phone to your headset.
Note: Not all mobile phones may support this feature;
please refer to the mobile phone users manual.
• To transfer calls to your headset from
your mobile phone, press and hold the
volume up button until you hear a beep;
you should now be able to converse using
your mobile phone.
• To transfer calls from your mobile phone
to your headset, press and release the
(function button) once and you should
now be able to converse using your headset.
10
Page 11

Using the SecuEar Clip
The optional SecuEar clip is included for
those who want additional security or
stability of the headset within the ear. Many
users may find it necessary.
To attach the SecuEar clip carefully place it
around the base of the ear phone portion of
the headset.
Cushioned Tip
Spring
Mechanism
To remove, position clip
this way first
The SecuEar has a spring mechanism which
allows it to fit snugly within the contours of
the user’s ear.
To remove the SecuEar clip it works best to
reposition it in the opposite direction from
above. Then carefully pull downward from
the base clip.
11
Page 12

Audífono Bluetooth
Modelo 86712
Page 13

Conociendo su Audífono Bluetooth GE:
Gracias por comprar el Audífono Bluetooth
de GE 86712. El audífono GE 86712 le ofrece
libertad inalámbrica con la más avanzada
tecnología Bluetooth, que lo lleva a una nueva
dimensión de conectividad inalámbrica.
La tecnología Bluetooth permite transmitir
voz y datos de forma rápida y segura entre
aparatos compatibles con Bluetooth. Antes
de usar su Audífono Bluetooth GE, lea el
manual de instrucciones.
Audífono
Auriculares
intercambiables
Entrada de CC con cubierta
deslizable
2
Page 14

Funciones del Audífono Bluetooth GE:
• Su Audífono Bluetooth GE viene con una
cubierta protectora intercambiable. Así
podrá personalizar su audífono.
• Su Audífono Bluetooth GE también viene
con 3 auriculares de goma intercambiables. Con cualquiera de ellas podrá
usar el audífono de forma segura cuando
esté haciendo diversas actividades. Los
auriculares están hechos con material
“Silver Nano” que elimina las bacterias.
• El Audífono Bluetooth GE tiene una cu
bierta deslizable incorporada para evitar
que la entrada de CC se ensucie cuando
no esté usando el audífono.
Subir
Bajar volumen
-
3
Page 15

Cambio de la Cubierta protectora:
1. Sujete el audífono con su mano izquierda
entre su pulgar e índice. El micrófono
deberá estar apuntando hacia adentro y
hacia su palma.
2. Con su mano derecha, coloque su pulgar
en el extremo más delgado de la chapa
frontal y presione hacia abajo mientras
la jala hacia atrás, hasta que la cubierta
se salga. Saque la cubierta. Necesitará
hacer un poco de presión.
3. Para poner la nueva chapa frontal, inserte
el extremo más delgado en un ángulo no
muy pronunciado y empújelo hacia adentro con su mano izquierda, siempre por el
lado más delgado de la chapa, hasta que
escuche que haya entrado en su sitio.
4. Después de colocar la parte frontal en
su sitio, presione el lado más ancho de
la chapa hasta que escuche que haya
entrado en su sitio.
Chapa frontal intercambiable
Botón de
función
4
Page 16

Recarga del Audífono Bluetooth:
El Audífono Bluetooth GE 86712 viene con
una batería recargable de Iones de Litio
incorporada y un indicador de batería baja.
Cuando la batería se baje, la luz indicadora
empezará a parpadear lentamente; así
sabrá que deberá recargarla. Mientras se
esté cargando, la luz indicadora roja se
encenderá y cuando la carga esté completa,
se apagará.
Mientras la batería se esté cargando, el
audífono estará en la posición de apagado.
(Nota) Antes de usar su audífono por primera vez,
recomendamos que cargue el Audífono Bluetooth
completamente.
1. Conecte el tambor redondo del cargador
de CA a la entrada de CC del audífono.
2. Conecte el adaptador de CA en un en
chufe de CA (120V).
3. Cárguelo hasta que la luz roja indicadora
se apague.
4. Cuando esté completamente cargado,
desconéctelo del cargador.
-
5
Page 17

Sincronización del audífono con el teléfono:
(Nota) Antes de usar su audífono, deberá sincronizarlo
con su teléfono. Antes que nada, asegúrese de que
tanto el teléfono como el audífono estén completamente
cargados cuando los vaya a sincronizar; para evitar
cualquier error con la sincronización, el teléfono y el
audífono deberán estar a menos de 30 cm. de distancia.
1. Encienda su teléfono.
2. Active la función Bluetooth de
su teléfono celular de acuerdo al
manual de su teléfono.
3. Con el audífono apagado, presione
y mantenga el botón de función por
unos diez segundos o hasta que la
luz indicadora comience a parpadear
entre azul y roja. El audífono está
listo para sincronizarse con el teléfono celular.
4. Cuando el teléfono le pida el código,
ingrese 1234.
5. Cuando la sincronización haya
terminado, la luz indicadora azul
parpadeará.
6
Page 18

(Nota) Una vez que el audífono y el teléfono
estén sincronizados, ya no tendrá que volver
a sincronizarlos. Con algunos modelos de
teléfono tendrá que reconectar el teléfono y el
audífono; siga las instrucciones del fabricante
del teléfono. Para sincronizar el audífono
con otro teléfono, apague el teléfono que
sincronizó primero con el audífono y siga las
instrucciones de sincronización de acuerdo
a las instrucciones del fabricante del nuevo
teléfono. Cuando le pida el número clave,
use el mismo número (1234) que usó en el
paso 5.
7
Page 19

Encendido/Apagado de su Audífono:
Encendido:
Presione y mantenga el botón de función
hasta que escuche un pitido corto. La luz
indicadora azul empezará a parpadear.
Apagado:
Presione y mantenga el botón de función
hasta que escuche un pitido agudo corto
y luego uno grave. La luz indicadora se
apagará. El audífono está apagado.
Contestar y Rechazar llamadas:
• Cuando reciba una llamada, presione
y suelte el (Botón de Función) del
audífono.
• Ya puede hablar con la otra parte.
• Nota: Si contesta por el teléfono y
no con el audífono, más adelante no
podrá transferir esa llamada al audífono.
• Si quiere rechazar la llamada, presione y mantenga el (Botón de Función)
por unos 2 ó 3 segundos.
8
Page 20

Hacer llamadas
• Presione y suelte el (Botón de Función)
del audífono.
• Marque el número con el teléfono; una
vez que haya marcado, escuchará que
el número marcado está timbrando.
• Si su teléfono tiene la función de marcación por voz, podrá usar esta función
con este audífono. Para marcar por
voz, siga los siguientes pasos.
• Asegúrese de que el audífono está
conectado al teléfono.
• Presione una vez el (Botón de Función)
del audífono; escuchará un tono corto.
• Luego del tono, marque el número con
su voz de forma normal.
• Siga las instrucciones de la marcación
por voz del fabricante del teléfono.
• Nota: La función de marcación por voz
con este audífono puede no funcionar
con algunos modelos de teléfono.
• Nota: Si marca el número antes de
encender el audífono, la llamada no se
podrá transferir al audífono.
9
Page 21

Ajuste del volumen
• En cualquier momento puede ajustar el
volumen mientras esté conversando; para
subir el volumen, presione y suelte el
botón superior.
• Para bajar el volumen, presione y suelte
el botón inferior.
• Por su seguridad y para evitar daño al
oído, se recomienda que no suba el volumen al máximo.
Transferencia de llamadas
Puede transferir las llamadas del audífono
al teléfono celular o del teléfono celular al
audífono.
Nota: Con algunos teléfonos celulares no podrá usar esta
función; consulte el manual de su teléfono celular.
• Para transferir las llamadas del audífono
al teléfono celular, presione y mantenga
el botón para subir el volumen hasta que
escuche un pitido; de esta forma podrá
conversar a través de su teléfono celular.
• Para transferir las llamadas de su teléfono
celular al audífono, presione y suelte una
vez el (Botón de Función); de esta forma
podrá conversar por el audífono.
10
Page 22

Uso del Clip SecuEar
Se ha incluido el clip opcional SecuEar para
los que quieran que el audífono tenga mayor
seguridad y estabilidad dentro del oído. Muy
útil para muchos usuarios.
Para asegurar el clip SecuEar, colóquelo con
cuidado alrededor de la base del auricular
del audífono.
Punta acolchada
Mecanismo de
resorte
Para sacarse el clip,
primero colóquelo de esta
El SecuEar tiene un mecanismo de resorte
para que se ajuste cómodamente a la forma
de su oído.
Para sacarse el clip SecuEar, lo mejor es que
vuelva a colocarlo de forma opuesta a como
se indicó anteriormente. Luego, con cuidado
jálelo hacia abajo desde la base del clip.
manera
11
Page 23

 Loading...