

Page 1
Bluetooth® Headset
GE Model 86707
User Guide
Declaration of Conformity.
We declare that product NHSTH4C2XXX
conforms to the R&TTE Directive 1999/5/EC
TNZNHSTH4C2XXX
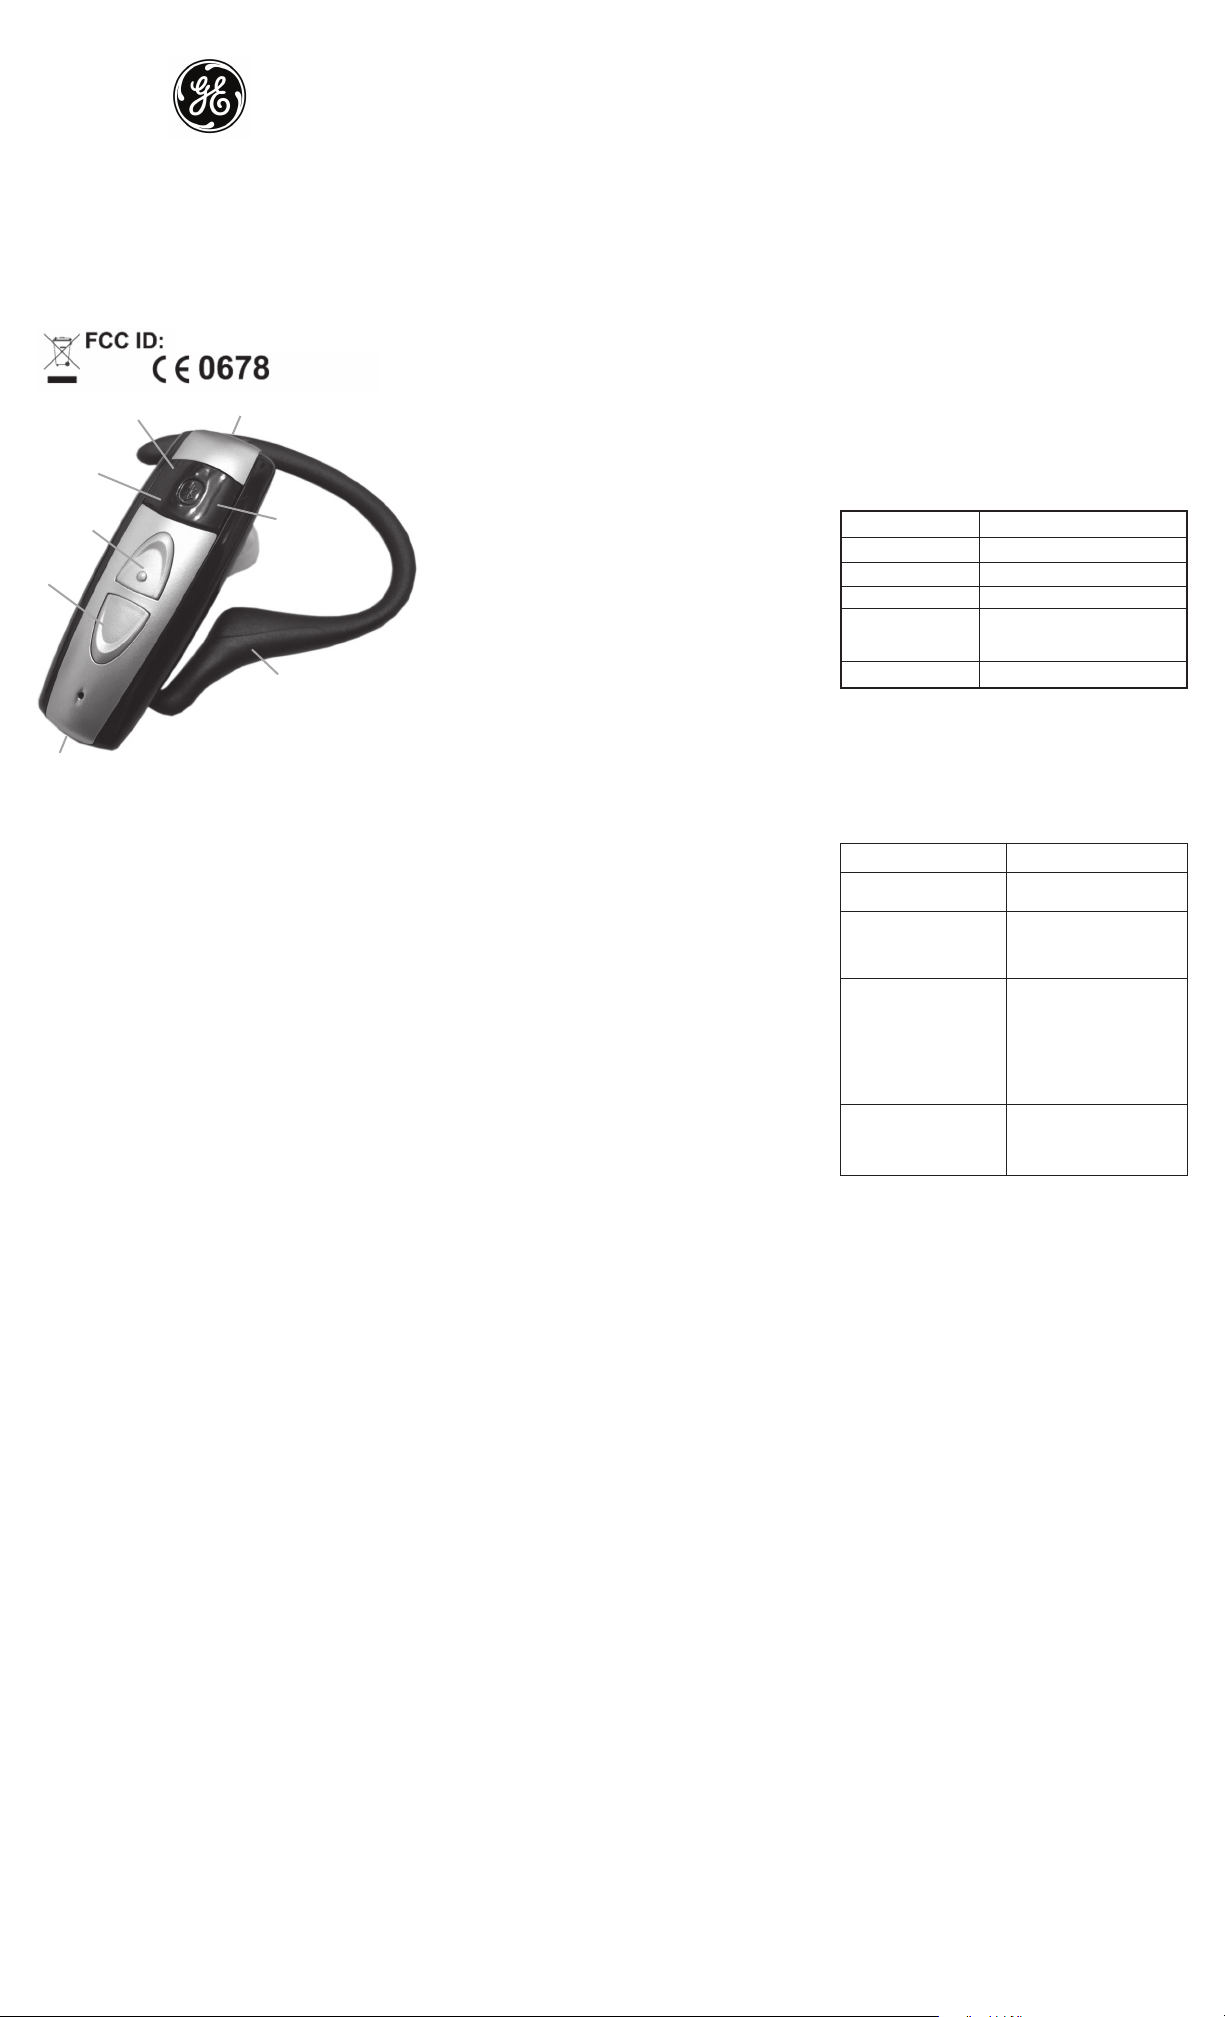
Blue LED
Talk Button
Volume UP+
Volume
DOWN –
Microphone
GETTING STARTED
Remove all components from the package. Items in the
pack include: Bluetooth headset with Ear Hook, Ear Cap,
User Guide and AC Charger. Please check the contents
carefully and contact your local dealer immediately if there
are any shortages.
GETTING TO KNOW YOUR HEADSET
See image above. Please note some models of headset will
differ slightly in style, color and the functionality may vary
according to their specifications.
CHARGING YOUR HEADSET
Before using the headset, you must charge it for at least
two hours. When fully charged, the battery provides up
to 8 hours of talk time and up to 150 hours of standby
time. Please note that talk time is also a function of the
mobile phone and factory determined settings of the
phone, so you may find this figure is reduced under certain
conditions. To charge the headset
1. Plug the AC charger into the headset.
2. Plug the AC charger into a wall outlet. When the headset
is charging, the amber LED will light up.
3. When charging has finished, the amber LED will turn off
or be dim. Unplug the charger cable from both the wall
outlet and also from the headset.
Battery Indication: The amber LED can turn off after less
than 2 hours charging; this normally indicates that the
headset can be used. However, for the initial charge, it is
recommended that you charge the headset for at least
2 hours in order to fully prepare the battery for normal
operation.
PAIRING THE HEADSET WITH YOUR MOBILE PHONE
Pairing is the process of linking the headset with your
Bluetooth mobile phone. Before you use the headset with
your mobile phone you must pair the devices.
Please refer to your phone’s user manual for further
information on ‘How to Pair’. Typically, you need to make
your phone ‘Discover’ the headset by using a “Bluetooth”,
“Connect” or “Setup” menu then selecting an option to
“Discover” your headset .
To pair your headset and mobile phone
1. Before you pair the headset, ensure that the battery is
fully charged. If the headset battery is low then the amber
LED will flash.
2. If you want to pair your headset with a second mobile
phone then switch off the phone you last paired with.
3. With the headset turned off, press and hold the Talk
button for about 10 seconds until both the blue and amber
LEDs flash alternately or until you will hear the “ON” tone
followed by the “PAIR” tone (low/high beep).
4. Release the Talk button. The headset is now in Pairing Mode.
5. Initiate the device discovery feature on the mobile
phone. After a few seconds your phone will display the
headset’s Bluetooth name “BTHS”. (Refer to the mobile
phone user guide for instructions for initiating this feature).
6. When prompted by the mobile phone, enter the headset
pin code which is 0000. When pairing is complete, the blue
LED on the headset will flash at three-second intervals and
the headset will be placed in standby mode, ready to make
and receive calls.
Charging Socket
Amber LED
Ear Hook
To cancel pairing mode - While the headset is in pairing
mode, you can cancel the pairing process and turn off
the headset. Press and hold the Talk button for about 5
seconds. You will hear an “OFF” tone, the Amber LED will
flash several times and the headset will turn off. Release
the Talk button.
Tips:
* The headset, in normal operation, should maintain a
link with the mobile phone at all times once pairing has
been successful and a connection has been established
between the two devices.
* If you find that you cannot put the headset into pairing
mode then try temporarily switching off (or disabling
Bluetooth) the last phone used with the headset .
* If disconnection or a lost link occurs, it may be due to the
following reasons:
a) The range is over 33 feet between the headset and the
mobile phone.
b) The mobile phone disconnected the link to conserve
power or enable another function.
c) Either device has been switched off.
FITTING THE HEADSET ON YOUR EAR
The Headset is designed to fit comfortably in your ear. The
ear hook can be fixed into the headset from both sides,
allowing you to position on right or left ear. The ear hook
can be separated from the Headset by simply pulling the
base of the ear hook away from the main body of the
Headset. The ear hook can then be reinserted in the other
direction for positioning on the opposite ear. The ear hook
is flexible and can be bent to adjust the fit that is best for
the individual user. To replace the ear cap - Stretch the
rubber ear cap around the end of the speaker until secure.
To place the headset on your ear - Place the headset
speaker in your ear with the microphone angled towards
your mouth. The headset should fit snugly in your ear.
SWITCHING ON YOUR HEADSET
To turn on the headset - With the headset turned off, press
and hold the Talk button for several seconds until you
hear the “ON” tone (four ascending “beeps”) or until you
see the Blue LED start to flash. Release the Talk button.
The headset will turn on and enter standby mode, ready
to make and receive calls. After turning on the headset,
the headset will try to connect to the last used phone
automatically.
To turn off the headset - With the headset turned on, press
and hold the Talk button for about 5 seconds. You will hear
an “OFF” tone (four descending “beeps”) and the Amber
LED will flash quickly several times and the headset will
turn off. Release the Talk button.
MAKING CALLS
You can make calls from your mobile phone, or directly
from the headset using voice dialing and last number
redial commands (if these features are supported by your
mobile phone).
To make calls from your mobile phone - Dial the call from
your mobile phone. Dependent on your mobile phone
settings the call is automatically connected to your
headset.
To make calls using VOICE DIALING (if supported by your
mobile phone) - Click the Talk button on your headset. You
will hear a Voice Dial tone possibly followed by the voicedial prompt tone from your mobile phone. Speak the name
of the person you wish to call. The call is automatically
connected to your headset.
To make calls using LAST NUMBER REDIAL (if supported
by your mobile phone) - While in standby mode, press and
hold the Volume DOWN “-” or Volume UP “+” button for
about 2 seconds, and you will hear a “Last Number Redial”
tone (four ascending beeps); Release the Volume button,
the call is automatically connected to your mobile phone.
(You can also double-click the Talk button to activate this
feature)
RECEIVING CALLS
You must configure your mobile phone to answer calls
directly on your Bluetooth headset. Refer to the mobile
phone user guide for instructions on initiating this feature.
When you hear your headset ring, click the Talk button on
the headset. The call is automatically connected to your
headset.
Reject calls (if supported by your mobile phone) You can
also reject calls by pressing and holding the Talk button
for about 3 seconds. You will hear a beep in addition to the
incoming ringing when the call reject is about to occur.
ENDING CALLS
When you have finished your call, click the Talk button on
your headset or end the call on your phone. The call will be
disconnected.
TRANSFERRING CALLS (if supported by your mobile
phone)
You can transfer calls connected to your headset back
to your mobile phone, or from your mobile phone to your
headset.
To transfer calls from your headset to the phone doubleclick the Talk button. To transfer from phone to headset
simply click the Talk button once.
ADJUSTING THE VOLUME
To increase the volume - While on a call, press and release
(click) the Volume UP button “+” to increase volume by 1
step. Repeat this procedure until you have reached the
desired level. To decrease the volume - While on a call,
press and release (click) the Volume DOWN button “-“ to
decrease volume by 1 step. Repeat this procedure until you
have reached the desired level.
You can also press and hold the volume buttons for
automatic, step by step adjustment .
MUTING THE HEADSET
You can mute and un-mute the microphone temporarily so
that you cannot be heard by the connected party.
To mute the headset – While on a call, press and hold
the Talk button until you hear the MUTE tone (two rising
scales), the microphone is muted. The headset will beep
periodically to remind you that it is muted. To un-mute the
headset - When the microphone is muted click either of
the Volume buttons to activate the microphone again.
VISUAL INDICATORS
Visual Indicators - 2 LEDs (blue and amber) indicate the
status of the headset:
Status Indication
Battery full Amber LED is off or dim
Battery low Amber LED fkashes instead of Blue LED
Headset off All LEDs are off
Headset in standby
mode; ready to make Blue LED flashes at 3 second intervals
or receive calls
Headset in pairing mode Blue and amber LEDs flash alternately
TROUBLE SHOOTING
Please note that you should also be familiar with the
operation of your mobile phone or other connecting
Bluetooth device. Please read the user guide for your
device carefully. For operation with a PC or laptop please
note that these devices should also be Bluetooth enabled
with appropriate third party software in order to enable
correct operation.
Symptom/Problem Solution
When talk button is pressed, • Unit not charged
no LED indicator • Consult authorized dealer
Headset will not enter • Disable Bluetooth on the last
pairing mode phone that was connected to
the headset or try switching
that phone off
Headset powers on with • Check unit is paired to phone.
blue LED flashing but no Check settings in phone.
connection to mobile phone Headset default name is BTHS.
• Check phone is switched on
• Check handsfree settings for
phone
• Ensure headset & phone are
within range
Headset does not charge • Check mains charger adapter
is connected to the headset
securely and is switched on.
• Consult authorized dealer
CUSTOMER SERVICE INFORMATION In addition to the
troubleshooting table on this page you can email help at:
support@jascoproducts.com or call 800 654-8483.
For other Bluetooth products or support, please view our
website www.jascoproducts.com
90 Day Limited Warranty
Jasco Products Company warrants this product to be
free from manufacturing defects for a period of ninety
days from the original date of consumer purchase. This
warranty is limited to the repair or replacement of the
product only and does not extend to consequential or
incidental damage to other products that may be used
with this unit. This warranty is in lieu of all other warranties
express or implied. Some states do not allow limitations on
how long an implied warranty lasts or permit the exclusion
or limitation of incidental or consequential damages, so
the above limitations may not apply to you. This warranty
gives you specific rights, and you may also have other
rights which vary from state to state. If unit should prove
defective within the warranty period, return prepaid with
dated proof of purchase to: Jasco Products Company,
311 N.W. 122nd St., Oklahoma City, OK 73114
ENVIRONMENT
Do not throw this electrical device away with the normal
household waste at the end of its life, but hand it in at an
official collection point for recycling. By doing this you will
help to preserve the environment.
DISCLAIMER
While every effort has been made to ensure that the
information in this manual is accurate and complete, no
liability will be accepted for any errors and/or omissions
made. The manufacturer reserves the right to make
changes and improvements to the specifications and
features of the hardware and firmware of the products
described in this document without prior notice.
Reproduction, transfer, distribution or storage of part
or all of the contents in this document in any form is
prohibited without prior permission of the manufacturer.
All trademarks acknowledged. The product is Bluetooth
qualified by Nolan Systems.
86707-3 vers. 2 9/06
Page 2
Audífono inalámbrico Bluetooth
®
Modelo GE 86707
GUÍA DEL USUARIO
Declaramos que el producto NHSTH4C2XXX se ajusta a la
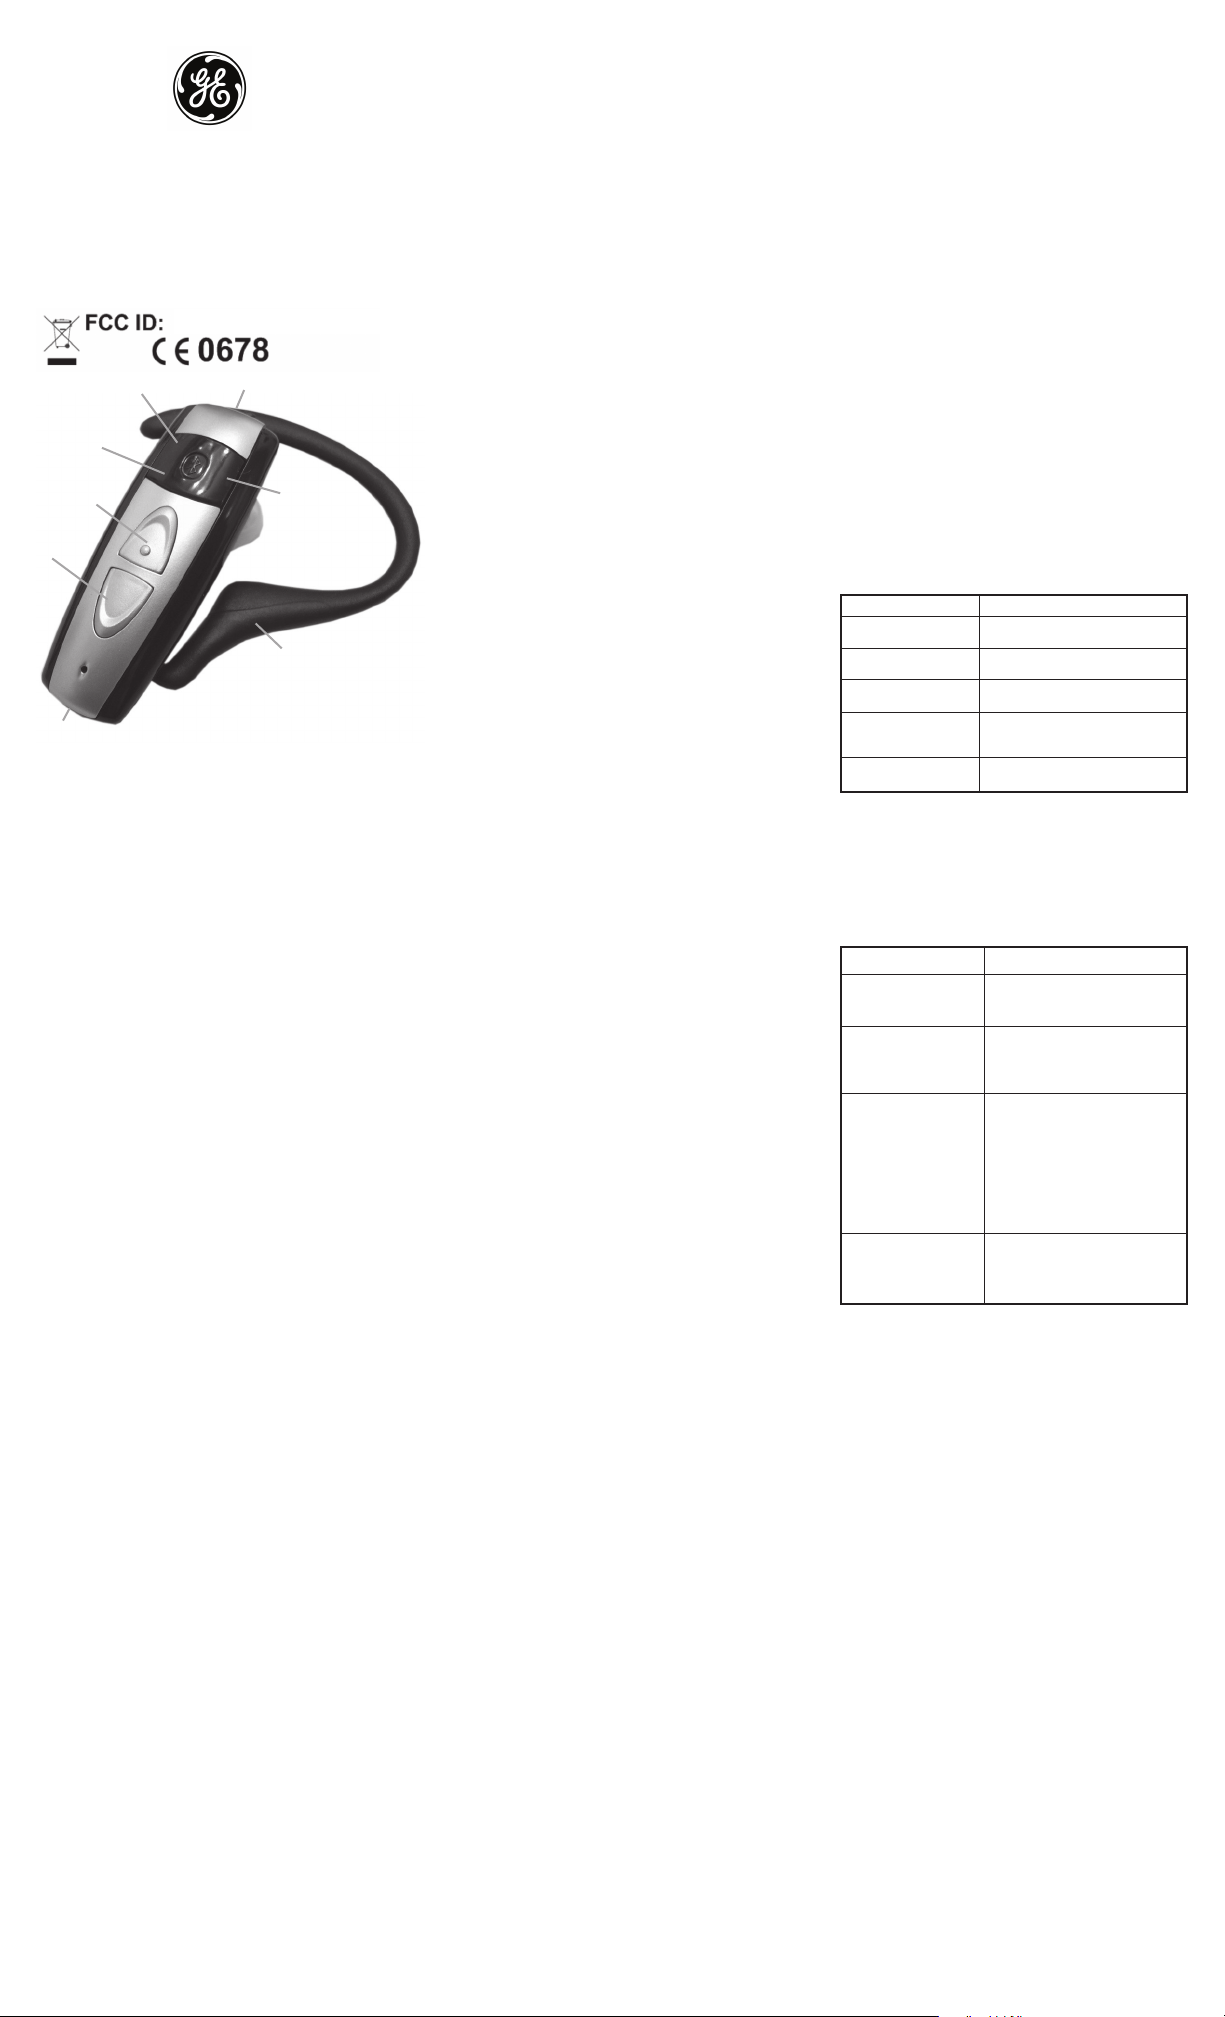
Botón de Hablar
SUBIR
Volumen +
BAJAR
Volumen -
Micrófono
INTRODUCCIÓN BÁSICA
Saque todos los componentes de la caja. Los artículos que vienen en la caja son: Audífono Bluetooth con
Gancho auricular, Protector del audífono, Guía del usuario
y Cargador de corriente alterna. Revise el contenido con
cuidado y contacte a su distribuidor local inmediatamente
si algo falta.
CONOCIENDO SU AUDÍFONO
Vea la imagen de arriba. Tome en cuenta que algunos
modelos de audífonos pueden ser ligeramente distintos en
estilo y color, y que las funciones pueden variar según sus
especificaciones.
RECARGA DEL AUDÍFONO
Antes de usar el audífono, debe recargarlo por dos horas
como mínimo. Una pila totalmente cargada le dará hasta
8 horas de tiempo de conversación y hasta 150 horas
de tiempo de espera. Tenga en cuenta que el tiempo de
conversación también es una función del teléfono celular
y viene pre-configurado desde la fábrica, por lo tanto debe
averiguar si el tiempo se reduce bajo algunas circunstancias. Para cargar el audífono
1.Conecte el cargador de corriente alterna al audífono.
2.Conecte el cargador a un enchufe de pared. La luz
indicadora color ámbar se prende mientras el audífono se
está cargando.
3.Cuando la carga está completa, la luz indicadora ámbar
se apaga o baja de intensidad. Desconecte el cable del
cargador del enchufe de pared y del audífono.
Indicador de batería: La luz indicadora ámbar se apaga al
cabo de 2 horas; por lo general, esto indica que el audífono
está listo para usar. Sin embargo, recomendamos que la
primera vez que cargue el audífono lo haga por al menos
2 horas para poder prepararlo completamente para su
uso normal.
SINCRONIZANDO EL AUDÍFONO CON EL TELÉFONO
CELULAR
La sincronización es el proceso de conexión entre el
audífono y el teléfono celular con Bluetooth. Antes de usar
el audífono con su teléfono celular, deberá sincronizar los
aparatos.
Consulte el manual de su teléfono para más información
sobre ‘Cómo sincronizar’. Normalmente, tiene que hacer
que su teléfono ‘Reconozca’ el audífono mediante el menú
“Bluetooth”, “Conectar” o “Configuración”, y luego escoger
la opción de “Reconocimiento” del audífono.
Para sincronizar el audífono con el teléfono celular
1. Antes de sincronizar el audífono, asegúrese de que la
batería esté totalmente cargada. Si la pila del audífono
está baja, la luz indicadora ámbar parpadeará.
2. Si quiere sincronizar el audífono con un teléfono celular
adicional, primero tiene que apagar el último teléfono que
ha sincronizado.
3. Con el audífono apagado, presione y mantenga el botón
de Hablar por unos 10 segundos hasta que las luces
indicadoras azul y ámbar empiecen a parpadear alternamente o hasta que escuche el tono de “ENCENDIDO”,
seguido por el de “SINCRONIZACIÓN” (tonos grave/agudo).
4. Suelte el botón de Hablar. El audífono estará en Modo
de Sincronización.
5. Inicie la función de reconocimiento de aparatos en el
teléfono celular. Después de unos segundos, el nombre
Bluetooth del audífono (“BTHS”) aparecerá en la pantalla
del teléfono. (Consulte la guía del teléfono celular para leer
las instrucciones sobre cómo iniciar esta función).
Declaración de conformidad.
Directiva R&TTE 1999/5/EC.
TNZNHSTH4C2XXX
Luz indicadora
azul
Toma del adaptador
Luz indicadora
ámbar
Gancho
auricular
6. Cuando el celular se lo pida, ingrese el código de autorización del audífono (0000). Cuando la sincronización haya
terminado, la luz indicadora azul del audífono parpadeará
en intervalos de tres segundos y el audífono entrará en
modo de espera, listo para hacer y recibir llamadas.
Para cancelar el modo de sincronización - Cuando el
audífono está en modo de sincronización, puede cancelar
el proceso y apagar el audífono. Presione y mantenga el
botón de Hablar por unos 5 segundos. Escuchará el tono
de “APAGADO”, la luz indicadora ámbar parpadeará varias
veces y el audífono se apagará. Suelte el botón de Hablar.
Consejos:
∗Si se utiliza de forma normal, después de que la sincronización se ha realizado correctamente y la conexión entre
ambos aparatos se haya establecido, el audífono deberá
mantener la conexión con el teléfono celular en todo
momento.
∗
Si no puede activar el modo de sincronización del audífono, intente apagar temporalmente el último teléfono
que ha sincronizado con el audífono (o desactive el modo
Bluetooth).
∗Si se desconecta o la conexión se pierde, puede ser por
las siguientes razones:
a) Hay una distancia de más de 10 m o 33 pies entre el
audífono y el teléfono celular.
b) El teléfono celular cortó la conexión para ahorrar
energía o activar otra función.
c) Uno de los aparatos se ha apagado.
PARA COLOCAR EL AUDÍFONO EN EL OÍDO
El Audífono se ha diseñado para que se ajuste cómodamente en el oído. Puede colocar el gancho auricular en el
audífono por ambos lados, así podrá ponérselo en el oído
derecho o izquierdo. Para sacar el gancho del Audífono,
simplemente jale la base del gancho del Audífono. Luego
puede volver a colocar el gancho auricular en el otro
sentido para poder colocarlo en el oído opuesto. El gancho
auricular es flexible y se puede doblar para adaptarlo a la
forma más cómoda para cada usuario. Para poner el protector del audífono - Estire el protector de goma alrededor
del extremo del audífono hasta que esté seguro.
Para colocar el audífono en el oído - Coloque el parlante
del audífono en su oído con el micrófono apuntando en
ángulo hacia su boca. El audífono deberá sentirse cómodo
en el oído.
ENCENDIENDO EL AUDÍFONO
Para encender el audífono - Con el micrófono apagado,
presione y mantenga el botón de Hablar por varios
segundos hasta que escuche un tono de “ENCENDIDO”
(cuatro “pitidos” en subida) o hasta que la luz indicadora
azul empiece a parpadear. Suelte el botón de Hablar. El
audífono se encenderá y entrará en modo de espera, listo
para hacer y recibir llamadas. Después de encenderlo, el
audífono intentará conectarse automáticamente con el
último teléfono que se ha usado.
Para apagar el audífono - Con el micrófono encendido,
presione y mantenga el botón de Hablar por unos 5 segundos. Escuchará un tono de “APAGADO” (cuatro “pitidos”
en bajada) y la luz indicadora parpadeará varias veces
rápidamente, el audífono se apagará. Suelte el botón de
Hablar.
PARA HACER LLAMADAS
Puede hacer llamadas desde su celular o directamente
desde el audífono usando los comandos de marcación por
voz o de rellamada del último número (si su teléfono tiene
estas funciones).
Para hacer llamadas desde el teléfono celular - Marque el
número desde el celular. Dependiendo de la configuración
del teléfono celular, la llamada se conecta directamente
al teléfono.
Para hacer llamadas usando MARCACIÓN POR VOZ (si su
teléfono tiene esta función) - Presione el botón de Hablar
del audífono. Escuchará el tono de Llamada activada
por voz, seguido posiblemente por el tono que le indicará
cuándo marcar por voz desde su teléfono. Diga el nombre
de la persona con quien quiere hablar. La llamada se
conectará automáticamente al audífono.
Para hacer llamadas usando RELLAMADA DEL ÚLTIMO
NÚMERO (si su teléfono tiene esta función) - En modo
de espera, presione y mantenga el botón para BAJAR
“-” o SUBIR “+” el Volumen por unos 2 segundos hasta
que escuche el tono de “Rellamada del último número”
(cuatro pitidos “en subida”); suelte el botón del volumen y la
llamada se conectará directamente a su celular. (También
puede presionar dos veces el botón de Hablar para activar
esta función).
PARA RECIBIR LLAMADAS
Para contestar las llamadas directamente desde el
audífono Bluetooth, primero deberá configurar el teléfono
celular. Consulte la guía del teléfono celular para leer las
instrucciones sobre como iniciar esta función.
Cuando escuche que el audífono está timbrando, presione
el botón de Hablar del audífono. La llamada se conectará
automáticamente al audífono.
Rechazar llamadas (si el celular tiene esa función) También
puede rechazar una llamada si presiona y mantiene el
botón de Hablar por unos 3 segundos. Además del timbre
del teléfono, escuchará un pitido cuando la llamada está a
punto de ser rechazada.
PARA CORTAR LAS LLAMADAS
Cuando haya terminado con la llamada, presione el botón
de Hablar del audífono o corte la llamada desde el teléfono. La llamada se desconectará. RECHAZAR LLAMADAS
(si el celular tiene esa función)
Puede transferir las llamadas conectadas al audífono de
regreso al teléfono celular, o desde el celular al audífono.
Para transferir las llamadas del audífono al teléfono,
presione el botón de Hablar dos veces. Para transferirlas
del teléfono al audífono, simplemente presione el botón de
Hablar una vez.
AJUSTE DEL VOLUMEN
Para subir el volumen - En medio de una llamada, presione
y suelte el botón para SUBIR el Volumen “+” para subirlo
1 nivel. Repita este proceso hasta que llegue al nivel deseado. Para bajar el volumen - En medio de una llamada,
presione y suelte el botón para BAJAR el Volumen “-” para
bajarlo 1 nivel. Repita este proceso hasta que llegue al
nivel deseado.
También puede presionar y soltar los botones de volumen
para cambiarlo de forma automática y paso a paso.
PARA SILENCIAR EL AUDÍFONO
Puede activar y desactivar el sonido del micrófono de
forma temporal para que la otra persona no pueda
escucharlo.
Para activar el modo silencio - En medio de una llamada,
presione y mantenga el botón de Hablar hasta que
escuche el tono de SILENCIO (dos tonos ascendentes), el
micrófono entrará en modo silencio. El audífono emitirá
un pitido intermitente para recordarle que está en modo
silencio.
Para desactivar el modo silencio - Con el micrófono en
modo silencio, presione una vez cualquiera de los botones
de Volumen para activar el micrófono nuevamente.
INDICADORES VISUALES
2 luces (azul y ámbar) indican el estado del audífono:
Estado Indicador
Batería cargada Luz indicadora ámbar apagada o de
completamente baja intensidad
Pila baja Luz indicadora ámbar parpadeará en
vez de la azul
Audífono apagado Todas las luces indicadoras están
apagadas
Audífono en modo de Luz indicadora azul parpadea en
espera, listo para hacer intervalos de 3 segundos
y recibir llamadas
Audífono en modo de Luces indicadoras azul y ámbar
sincronización parpadean alternamente
SOLUCIÓN DE PROBLEMAS
Tome en cuenta que también debe estar familiarizado con
el manejo de su teléfono celular o cualquier otro aparato
conectado vía Bluetooth. Lea el manual cuidadosamente.
Para usarlo con una PC o computadora portátil e iniciar
una correcta operación, tenga en cuenta que estos aparatos también deben estar habilitados con Bluetooth y tener
el software de terceros correspondiente.
Síntoma/Problema
Cuando se presiona el botón
de Hablar, la luz indicadora
no se prende
El receptor de cabeza
no incorporará emparejar
modo
El audífono se enciende y la
luz indicadora azul parpadea
pero no se conecta al celular
El audífono no carga
INFORMACIÓN SOBRE SERVICIO AL CLIENTE
Además de la tabla de solución de problemas en esta
página, también puede enviar un correo electrónico a:
support@jascoproducts.com o llamar al 800 654-8483.
Para otros productos con Bluetooth o ayuda, visite nuestra
página web www.jascoproducts.com
90 Días de Garantía limitada
Jasco Products Company garantiza por un periodo de 90
días desde la fecha original de la compra, que este producto
no presenta ningún defecto de fábrica. Esta garantía está
limitada sólo a la reparación o reemplazo del producto
y no se extiende al daño resultante o incidental de otros
productos que se han sido usados con esta unidad. Esta
garantía remplaza a cualquier otra garantía expresa o
implícita. Algunos estados no reconocen límites de tiempo
en las garantías implícitas y tampoco permiten la exclusión
o limitación de daños incidentales o resultantes; por lo tanto,
las limitaciones mencionadas pueden no ser aplicables en
su caso. Esta garantía le proporciona derechos específicos;
pero dependiendo del estado, también puede tener otros
derechos. Si la unidad presenta algún defecto dentro del
periodo de garantía, devuélvala junto con el costo del envío y
la prueba de compra, a:
Jasco Products Company, 311 N.W. 122nd St., Oklahoma
City, OK 73114
MEDIO AMBIENTE
Cuando la vida útil de este aparato electrónico termine, no
lo tire junto con la basura de normal de su casa, llévelo a un
centro oficial de recolección para que se recicle. De esta
forma, ayudará a cuidar el medio ambiente.
DESCARGO DE REPONSABILIDAD
Si bien se ha realizado todo esfuerzo para asegurar que la
información de este manual sea precisa y completa, no se
aceptará ninguna responsabilidad por errores u omisiones
hechas. El fabricante se reserva el derecho de hacer, sin
previo aviso, cambios y mejoras a las especificaciones y funciones del equipo físico o lógico de los productos descritos en
este documento. Se prohíbe la reproducción, transferencia,
distribución o almacenamiento de parte o de todos los
contenidos de este documento, en cualquier forma, sin el
consentimiento del fabricante. Todas las marcas registradas
están reconocidas. Este producto es Bluetooth, calificado
por Nolan Systems.
Solución
• La unidad no está cargada
• Consulte al distribuidor autorizado
• Invalide Bluetooth en el teléfono
pasado que fue conectado con la
commutación del receptor de
cabeza o del intento ese teléfono
• Revise si la unidad está sincronizada
con el teléfono Revise la configuración
del teléfono El nombre predeterminado
del audífono es BTHS
• Revise si el teléfono está encendido
• Revise la configuración manos libres
del teléfono
• El audífono y el teléfono deben estar
dentro del mismo rango
• Revise que el adaptador principal del
cargador esté conectado correct
mente al audífono y que esté encendido
• Consulte al distribuidor autorizado
86707-3 vers. 2 9/06
 Loading...