

Page 1
GE Model 19210/19211
www.jascoproducts.com
Wireless Pushbutton
Pushbutton Models:
19210: Standard Pushbutton using
one MS21/MN21 12V battery.
19211: Lighted Pushbutton using two
CR2032 batteries.
Required Tools: Small flat blade
screwdriver, drill, drill bit, and phillips
screwdriver.
Included Hardware:
(1) 3x20mm screws
(2) Double sided adhesive pads
Required Tools: Small flat blade
screwdriver, drill, drill bit, and phillips
screwdriver.
Chime Tune Setting
All wireless chimes may have more than
one push button. The chime tune for
each push button is set with jumpers
7-9.
Single Push Button Kit: If you
purchased a kit with a single push
button, the chime tune will be set to Ding
Dong from the factory.
Dual Push Button Kit: If you
purchased a kit with two push buttons,
one push button will be set to Ding Dong
and the other push button will be set to
Westminster from the factory.
The following instructions explain how to
change the tune on any wireless push
button.
1. Remove the battery from the push
button transmitter.
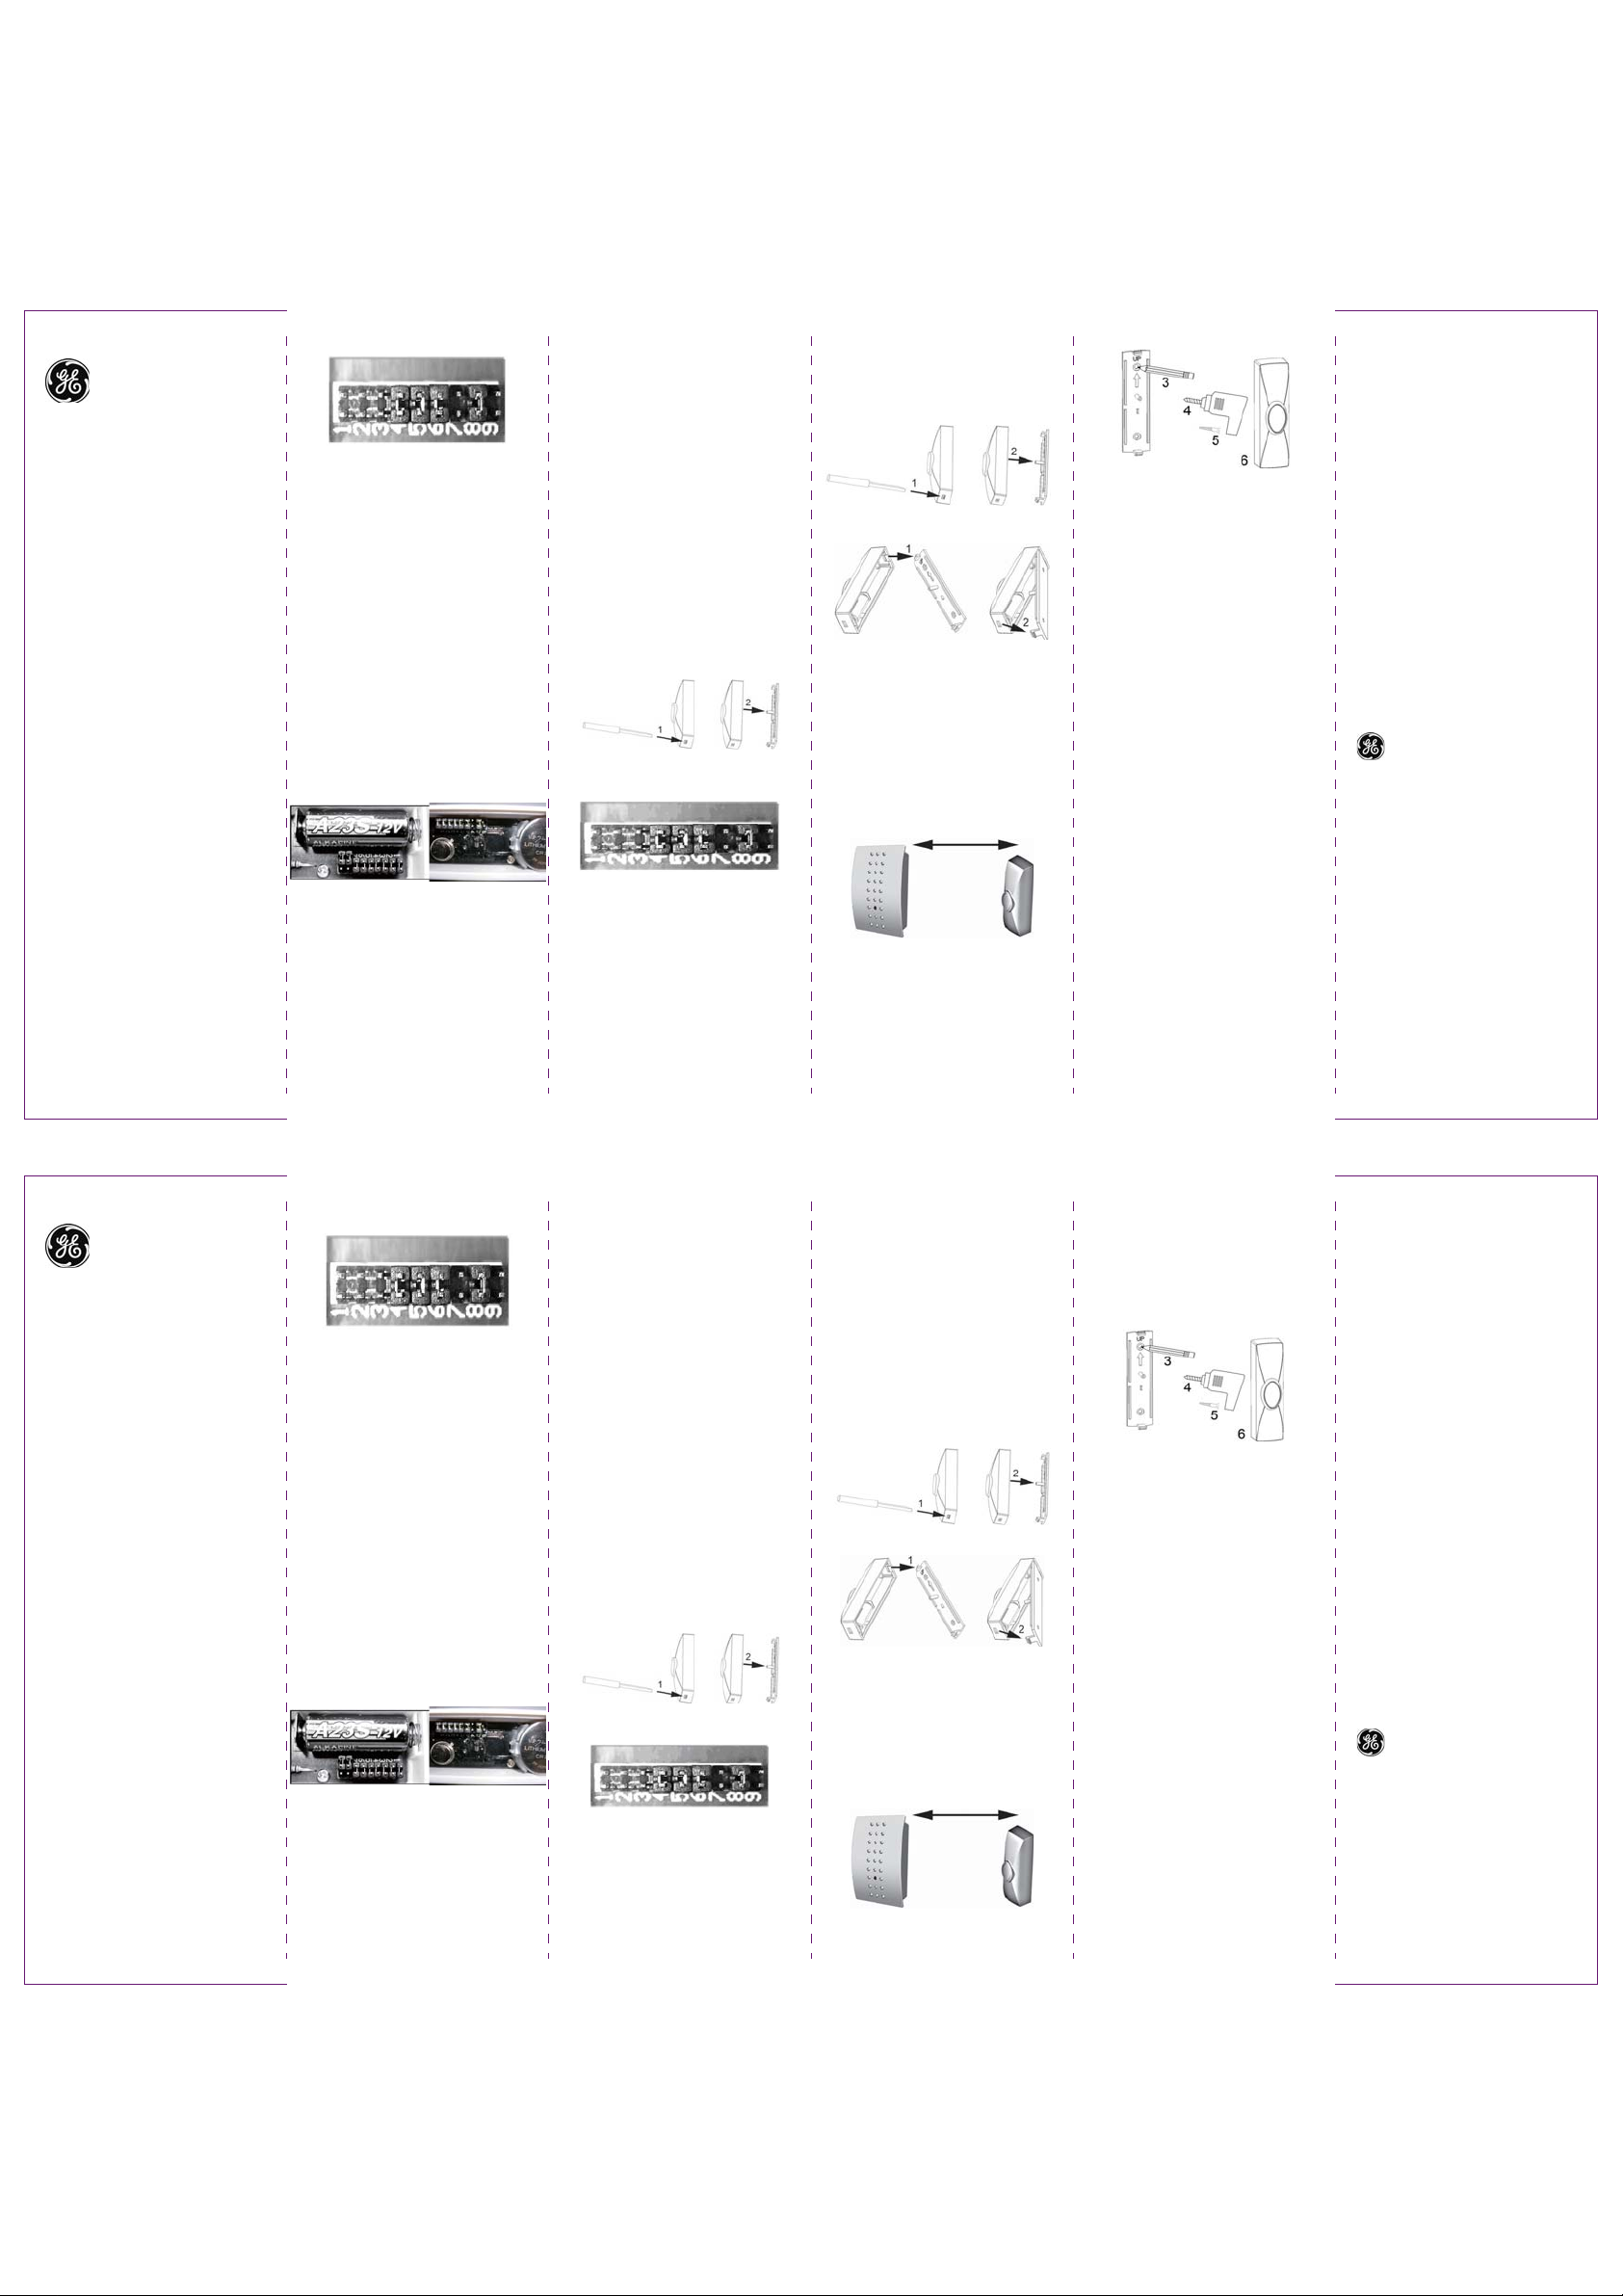
2. Locate the 9 position jumper shown
below.
9 position jumper (This pushbutton is set
for Ding Dong Chime since 7=off, 8=on,
and 9=off.)
3. Select the desired chime sound from
the table below.
Chime Sound Table
Position 7 8 9
Westminster ON OFF OFF
Ding Dong OFF ON OFF
Knock OFF OFF ON
Bronze Chime ON ON OFF
Cuckoo Clock ON OFF ON
Foghorn OFF ON ON
Gong ON ON ON
ON: Add a jumper to a location
OFF: Remove jumper from a location.
4. Remove or add the jumpers to match
the table.
5. Store unused jumpers as shown.
19210 19211
Parking the jumper on an open set of
pins. The two jumpers on the left are in
the parked position.
Setting The House Security Code
Each chime component has jumpers for
setting the house security code.
In most cases you will not need to
change the factory settings for the
security code. If your chime activates
intermittently or does not work at all,
you may be able to solve the problem by
changing your security code.
Adding Additional Buttons
When adding a pushbutton to an existing
system, you need to check the security
code on the existing chime and match
the new pushbutton to that code.
The chime and pushbutton must be set
to the same house security code for the
combination to operate together.
Note: The push button has 3 additional
jumpers that are used to set the chime
tune that will play. The chime tune
jumpers do not affect the house security
code.
1. Remove batteries from the pushbutton
by opening the case as shown below.
2. Locate the pushbutton jumpers shown
below.
Push Button Jumpers
3. Jumpers 1-6 are used to select 1 of
64 possible home security codes.
4. To change the house code, add or
remove jumpers as needed. After
matching the existing security code,
test the system for proper operation.
Positions 1-6 on the chime and
pushbutton must match exactly.
Push Button Mounting Instructions
Note: Avoid mounting the push button on
metal surfaces, as it may result in a
reduced range of transmission. Do not
mount in an area of rain (direct weather.)
a. Removing the back cover
b. Replacing the back cover
1. Push buttons are typically mounted at
the same height as the door knob or
handle (between 36" and 44" above
the floor).
2. Before mounting, choose a mounting
location that is not farther than 150
feet from the chime unit location.
Not farther than 150 feet
3. Place the push button where you
would like to mount it and with the
chime as close to its final position as
possible and test operation. If it
works,mount the button. If it does not
work, see TROUBLESHOOTING.
4. Use back cover of push button as a
template to mark two screw holes.
5. Drill two holes with 3/32” size drill in
marked locations.
6. Secure back cover to the mounting
surface with two supplied mounting
screws.
7. Press front housing onto back cover.
8. Test operation. If the chime does not
work, see TROUBLESHOOTING.
Operation
1. Turn on the chime.
2. Gently press transmitter button to
sound chime.
Troubleshooting
Chime doesn't work:
1. Make sure push button switch is
depressed and held for at least 1
second.
2. Make sure plastic tag is removed from
battery.
Make sure house code switches 1-6
3.
on chime and push button match exactly.
4. Verify battery orientation in push
button.
5. Try fresh batteries.
6. Make sure chime is not farther than
150 feet away from push button.
7. Ensure push button is not mounted on
metal, near metal studs, or near the
floor.
8. Try a new location for the chime.
Functional range may be adversely
affected by one or more of the following
factors: weather, radio frequency
interference, low transmitter battery and
obstructions between the transmitter and
receiver.
This device complies with Part 15 of the
FCC rules. Operation is subject to the
following conditions:
1. This device may not cause harmful
interference, and
2. This device must accept interference
received, including any interference that
may cause undesired operation.
For technical support contact Jasco
Products Company at 1-800-654-8483
or www.jascoproducts.com
Made in China
is a trademark of
General Electric Company
and is used under license to
Jasco Products Company LLC,
311 N.W. 122nd Street,
Oklahoma City, OK 73114.
www.jascoproducts.com
Rev. 1-07
19210/19211
Modelo GE 19210/19211
www.jascoproducts.com
Equipo de timbre
inalámbrico para puertas
El pulsador Modela:
19210: El Pulsador uniforme que
utiliza una batería MS21/MN21 12V.
19211: Encendió utilizar de Pulsador
dos baterías CR2032.
Instrucciones del botón de timbre
inalámbrico
El Hardware incluido:
(1) los tornillos 3x20mm
(2) Duplica almohadillas de lados de
adhesivo
Los Instrumentos requeridos:
Pequeño destornillador plano de la
hoja, el taladro, el taladro mordió, y el
destornillador de phillips.
Configuración del tono del timbre
Todos los timbres inalámbricos pueden
tener más de un botón. Con los jumpers
7-9 puede configurar los tonos de cada
uno de los botones.
Equipo de un botón de timbre individual:
Si ha comprado un equipo con un solo
botón de timbre, el tono del timbre
configurado en la fábrica será Din Don.
Equipo de dos botones de timbre: SI
ha comprado un equipo con dos botones
de timbre, un botón tendrá el tono Din
Don desde la fábrica y el otro botón será
Westminster desde la fábrica.
Las siguientes instrucciones explican
cómo cambiar el tono de cualquier botón
inalámbrico.
1. Saque la pila del botón del timbre
transmisor.
2. Ubique el jumper número 9 como se
muestra a continuación.
Jumper número 9 (Este Botón del timbre
está configurado con el timbre Din Don
ya que 7=apagado, 8=encendido y
9=apagado).
3. Escoja el sonido del timbre que desea
de la siguiente tabla.
Tabla de sonidos del timbre
Posición 7 8 9
Westminster ENCENDIDO APAGADO APAGADO
Din Don APAGADO ENCENDIDO APAGADO
Golpe de puerta
Campana ENCENDIDO ENCENDIDO APAGADO
Reloj cucú ENCENDIDO APAGADO ENCENDIDO
Sirena APAGADO ENCENDIDO ENCENDIDO
Gong ENCENDIDO ENCENDIDO ENCENDIDO
APAGADO APAGADO ENCENDIDO
ENCENDIDO: Agregar un jumper
APAGADO: Sacar un jumper.
4. Saque o agregue los jumpers para
coincidir con la tabla.
5. Guarde los jumpers que no use, tal
como se muestra:
19210 19211
Acoplar el jumper en un par de clavijas
que no estén en uso. Los dos jumpers
de la izquierda están “acoplados”.
Configuración del Código de
seguridad de la casa
Ambos timbres cuentan con jumpers
para configurar el código de seguridad
de la casa.
En la mayoría de casos, no necesitará
cambiar la configuración del la fábrica
del código de seguridad. Si el timbre se
activa de forma intermitente o no
funciona en absoluto, quizá tenga que
cambiar el código de seguridad para
solucionar el problema.
Agregando botones adicionales
Cuando añada botones adicionales a un
sistema ya instalado, tendrá que revisar
el código de seguridad del timbre
existente y hacer que el nuevo botón de
timbre coincida con ese código.
Para que el funcionen juntos, el timbre y
el botón del timbre deben tener el mismo
código de seguridad de la casa.
Nota: El botón de timbre tiene 3
jumpers adicionales para programar el
tono del Timbre que sonará. Los
jumpers del tono del timbre no afectan el
código de seguridad de la casa.
1. Para sacar las pilas del timbre, abra la
caja del timbre como se muestra a
continuación.
2. Ubique los jumpers del botón del
timbre, tal como se muestra.
Jumpers del botón de timbre
3. Con los jumpers del 1-6 puede
seleccionar 1 de los 64 códigos de
seguridad para la casa posibles.
4. Para cambiar el código de la casa,
agregue o quite los jumpers según los
necesite. Después de programar el
código de seguridad actual, pruebe si
el sistema funciona adecuadamente.
Las posiciones del 1-6 en los jumpers
del timbre y del botón deben coincidir
exactamente.
Instrucciones para la instalación del
Botón de timbre
Nota: Evite instalar el botón de timbre
sobre superficies de metal ya que
puede ocasionar que se reduzca el
rango de transmisión. No lo instale
en un área donde le caerá la lluvia
directamente (clima severo).
a. Sacar la tapa posterior
b. Volver a poner la tapa posterior
1. Los botones de timbre generalmente
están instalados a la misma altura de
la perrilla o picaporte, a unos 90 ó 110
cm sobre el suelo).
2. Antes de la instalación, escoja un
lugar donde instalarlo que no esté a
más de 45 m de distancia de donde
está el timbre.
No más de 45 m de distancia
3. Coloque el botón de timbre donde lo
va a instalar y el timbre lo más cerca
al lugar donde irá, para así probarlos.
Si funciona, instale el botón. Si no
funciona, consulte la SOLUCIÓN DE
PROBLEMAS.
4. Use la cubierta posterior del botón de
timbre como plantilla para marcar dos
agujeros para los tornillos.
5. Taladre dos agujeros con la broca
tamaño N en los lugares que ha
marcado.
6. Con los dos tornillos de montaje
incluidos, instale la tapa posterior en
la superficie donde la va a instalar.
7. Presione el compartimiento frontal
sobre la cubierta posterior.
8. Pruebe si funciona. Si el timbre no
funciona, consulte la SOLUCIÓN DE
PROBLEMAS.
Operación
1. Encienda el timbre.
2. Presione suavemente el botón del
transmisor para hacer sonar el timbre.
Solución de problemas
El timbre no funciona:
1. Asegúrese de presionar y mantener el
interruptor del botón de
timbre por un segundo como mínimo.
2. Asegúrese de que la etiqueta de
plástico no esté en la batería.
3. Asegure de que los interruptores de
los códigos de casa del 1-6 del timbre
y del botón de timbre coincidan
exactamente.
4. Revise la orientación de la pila en el
botón de timbre.
5. Use baterías nuevas.
6. Asegúrese de que no haya más de
45 m de distancia ente el timbre y el
botón.
7. Cerciórese de que el botón de timbre
no esté instalado sobre metal, cerca a
tachuelas metálicas o cerca al suelo.
8. Instale el timbre en un lugar nuevo.
El rango de funcionamiento puede verse
afectado por cualquiera de los
siguientes factores: clima, interferencia
de radiofrecuencia, transmisores con
baterías bajas y obstrucciones entre los
transmisores y receptores.
Este aparato cumple con la sección 15
de las reglas de la FCC. Su manejo está
sujeto a las siguientes condiciones:
1. Este aparato puede no causar
interferencia negativa; y,
2. Este aparato debe aceptar cualquier
interferencia que capte, incluyendo
aquellas que puedan causar un
funcionamiento indeseado.
Para la Compañía técnica de
Productos de contacto de apoyo
Jasco en 1-800-654-8483 o
www.jascoproducts.com
Made in China
is a trademark of
General Electric Company
and is used under license to
Jasco Products Company LLC,
311 N.W. 122nd Street,
Oklahoma City, OK 73114.
www.jascoproducts.com
Rev. 1-07
19210/19211
 Loading...