

Page 1
Digital Timer
Models: 15042, 15089, and 15079
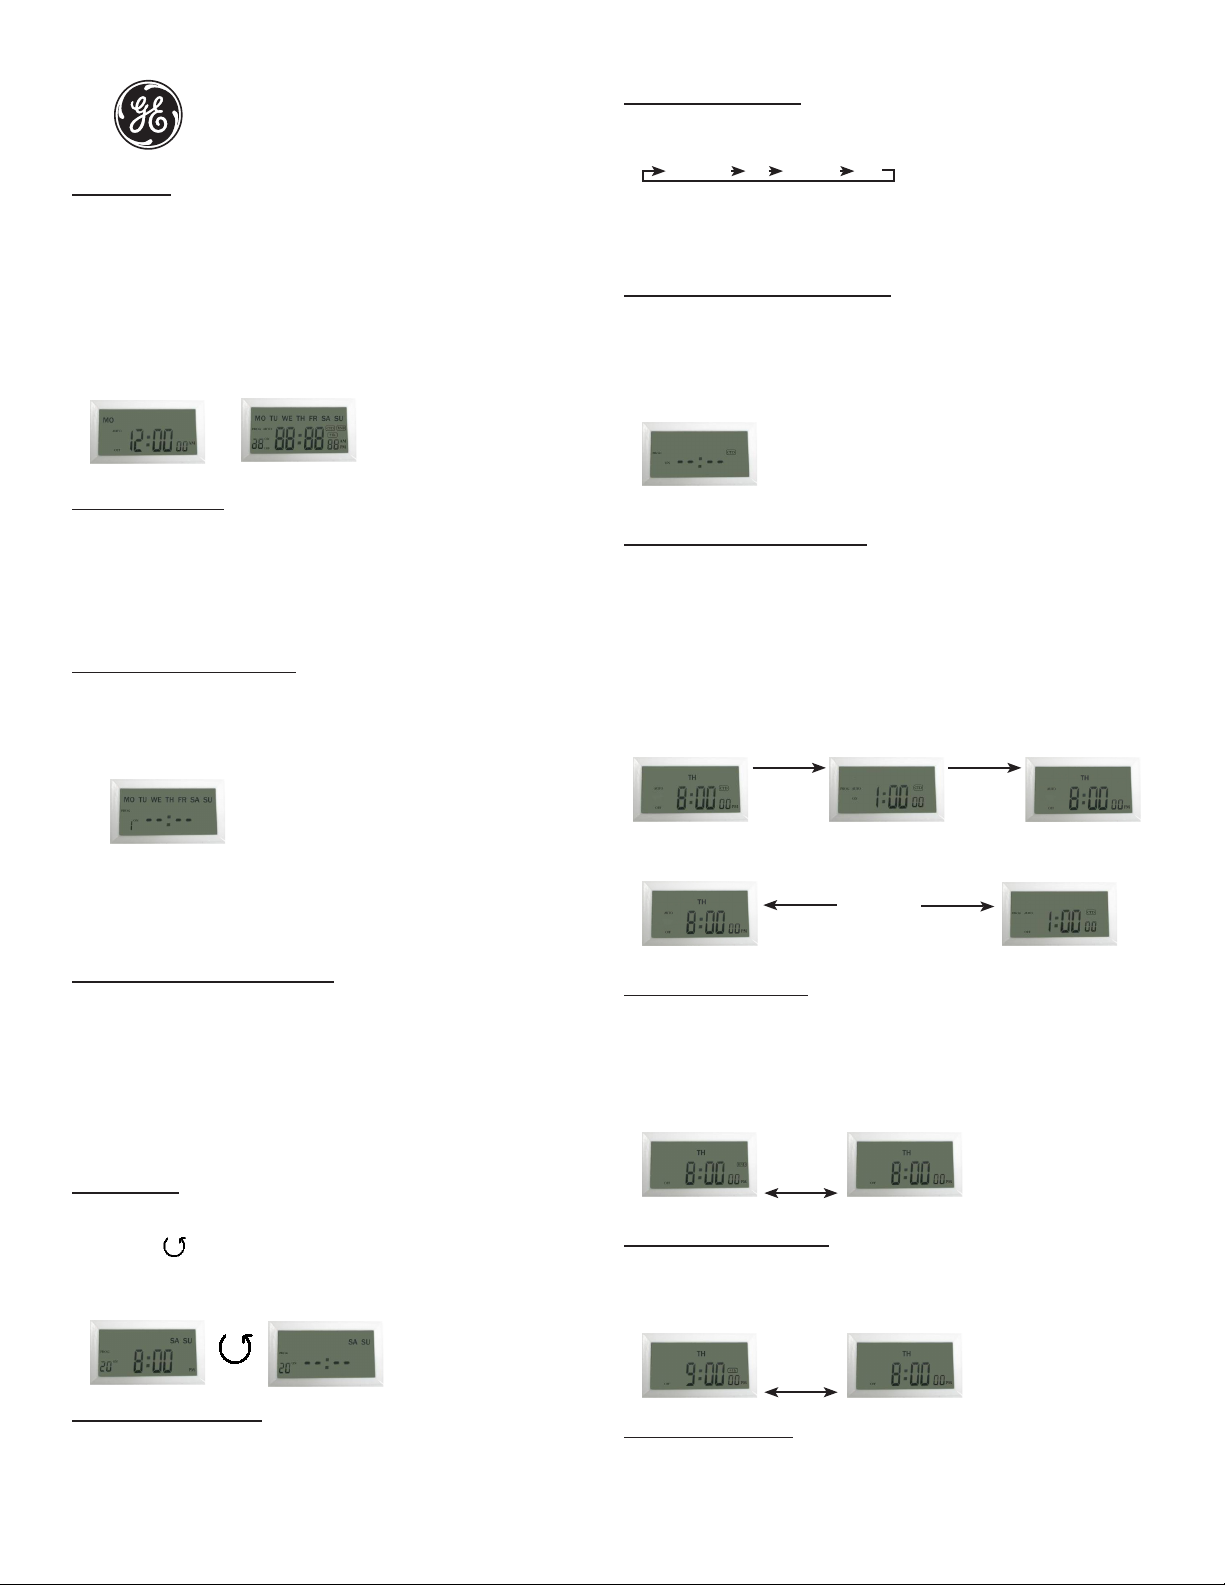
Install Set Up:
If the time screen is completely blank it will need to be plugged into an outlet
1.
before programming can begin. If the screen is displaying numbers, it can be
programmed and plugged into the wall afterwards.
Before programming, all settings should be reset. The reset button is located
2.
just below the “HOUR” button and is identied by an “R”. Use a paper clip or
ball point pen to push the “R” button. Once pushed the screen will show the
display below on the screen. See Diagram A
Diagram A After few seconds
Manual Override Option:
Independent of the programming, it is possible at any given time to advance to
the next switching command by continuously pressing the key “MANUAL” ,asas
shown below:
ON = Always ON; = Always ON; ON;ON;;
OFF = Always OFF; Always OFF;Always OFF; OFF;OFF;;
AUTO ON Timer is ON and ON/OFF program is activated. Timer is ON and ON/OFF program is activated. and ON/OFF program is activated.ON/OFF program is activated./OFF program is activated.OFF program is activated. program is activated.is activated.
AUTO OFF Timer is OFF and ON/OFF program is activated. Timer is OFF and ON/OFF program is activated. OFF and ON/OFF program is activated.OFF and ON/OFF program is activated. and ON/OFF program is activated.ON/OFF program is activated./OFF program is activated.OFF program is activated. program is activated.is activated.
Programming the Countdown Feature:
Press the “SET” button repeatedly until the CTD icon appears on the display.
1.
Refer to Diagram D
Press the “HOUR”, “MIN” buttons to set the amount of time desired for the
2.
device to be on before turning off.
Press the “CLOCK” button to store the setting and return to the main display.
3.
OFFAUTO ONONAUTO OFF
Diagram D
Current Time Setting:
Keep the “CLOCK” button pressed during the entire setting operation.
1.
Press the “HOUR” button to set the hours.
2.
Press the “MIN” button to set the minutes.
3.
Press the “DAY” button to select the correct day of the week.
4.
Release the “CLOCK” button. The time will now be set!
5.
Programming the On/Off Times:
Press the “SET” button once. Diagram B should appear.
1.
1 ON --:-- Should be the rst setting. There are a total of 20 On/Off settings.
2.
Diagram B
Press the “HOUR” and MIN” buttons to set the ON time.
3.
Press the “DAY” button to select the day(s) that this setting is relevant.
4.
Press the “SET” button to save and proceed to the 1 OFF --:-- screen.
5.
Repeat steps 3, 4, and 5 to set the OFF time. Pressing the “SET” button again
6.
will take you through the other 19 ON/OFF settings.
Multiple Weekday Switching Groups:
Apart from individual week days, pressing the “DAY” button also selects multiple
day combinations such as:
‧Monday thru Friday ‧‧Tuesday & Thursday & Saturday
‧Saturday & Sunday ‧Monday thru Wednesday.
‧Monday thru Saturday ‧Thursday thru Saturday.
‧Monday & Wednesday & Friday ‧Monday thru Sunday.
After selecting a particular day combination, the ON/OFF selection will be in
effect on the day conguration selected from above.
Restart Button:
Activating the Countdown Feature:
Press the “HOUR” and “MIN” button simultaneously to activate the
1.
countdown feature. Refer to Diagram E for more details
Other Features of the Countdown
2.
Press the “MANUAL” button to pause or continue the countdown.
a.
Press the “CLOCK” button to switch between the clock and countdown
b.
display.
Press “HOUR” and “MIN” button simultaneously to deactivate the
c.
countdown.
Diagram E
Current time display
Countdown pause
Random, ON/OFF Setting:
Press the “HOUR” button for 3 seconds to activate the random feature. The
1.
display will show the RND icon. See Diagram F.
Press the “HOUR” button for 3 seconds to deactivate the random feature. The
2.
display will not show the RND icon.
Diagram F
HOUR + MINMINHOUR + MINMIN
MANUAL MANUAL
HourHour
HOUR + MINMINHOUR + MINMIN
End of countdown ON
CLOCKCLOCK
Show current time
Press the “S�T” button to select the ON/OFF setting that needs to be changedS�T” button to select the ON/OFF setting that needs to be changed” button to select the ON/OFF setting that needs to be changed
1.
Press the “ ” button to reset the current ON/OFF setting seen in Diagram C
2.
without having to scroll through all the hours.
Diagram C Current time display
Switching Mode Indication:
The actual mode is shown in the display as “ON”, “AUTO ON”, “OFF” or, “AUTO ON”, “OFF” or “AUTO ON”, “OFF” orAUTO ON”, “OFF” orON”, “OFF” oror
“AUTO OFF” together with the time of day. Use the “MANUAL” button to adjustAUTO OFF” together with the time of day. Use the “MANUAL” button to adjust” together with the time of day. Use the “MANUAL” button to adjust together with the time of day. Use the “MANUAL” button to adjusttogether with the time of day. Use the “MANUAL” button to adjust
this to the desired setting. This can be used to override the timer as explained
below.
Summer Time Feature (DST):
Push the “CLOCK” button for 3 seconds to advance the current time 1 hour, +1h
icon should appear on the display. Repeating this process will decrease the time
by 1 hour and the +1h icon will disappear. Refer to Diagram G
Diagram G
Clock
Power Back Up Feature:
In the event of a power failure, the timer will retain its settings for an estimated 3
months assuming the power back up is fully charged.
Page 2

Temporizador Digital
Models: 15042, 15089, y 15079
Instalación:
Si la pantalla de tiempo está completamente en blanco, será necesario conectar
1.
la unidad a cualquier toma de corriente de 125 V, antes de comenzar la
programación. Si la pantalla muestra números, puede programar y después
conectar a la pared.
Antes de programar, todos los valores deben reinicializarse. �l botón de
2.
reinicio se encuentra justo debajo del botón “HOUR” (hora) y se identica con
la letra “R”. Utilice un clip para papel o un bolígrafo para presionar el botón
“R”. Una vez presionado, aparecerá la siguiente pantalla. Ver diagrama A.
Diagrama A Después de unos cuantos segundos
Conguración de la hora actual:
Mantenga presionado el botón “CLOCK” (reloj) durante toda la operación de
1.
conguración.
Presione el botón “HOUR” (hora) para jar las horas.
2.
Presione el botón “MIN” (minutos) para jar los minutos.
3.
Presione el botón “DAY” (día) para seleccionar el día correcto de la semana.
4.
Suelte el botón “CLOCK”. ¡Ya está jada la hora!
5.
Programación de las horas de encendido/apagado:
Presione una vez el botón “S�T” (congurar). Debe aparecer el diagrama B.
1 ON --:-- Debe ser la primera conguración. Hay un total de 20
1.
conguraciones de encendido/apagado.
Diagrama B
Opción de anulación manual:
Independientemente de la programación, es posible en cualquier momento dado
avanzar al siguiente comando de cambio presionando continuamente el botón
“MANUAL”, como se muestra enseguida:
ON = Siempre encendido;
OFF = Siempre apagado;
AUTO ON �l temporizador está �NC�NDIDO y está activado el programa
de encendido/apagado.
AUTO OFF �l temporizador está APAGADO y está activado el programa
de encendido/apagado.
Programación de la función de cuenta regresiva:
Presione el botón “S�T” varias veces hasta que aparezca el ícono CTD en la
1.
pantalla. Consulte el diagrama D.
Presione los botones “HOUR” y “MIN” para congurar la cantidad de tiempo
2.
deseada para que el aparato permanezca encendido antes de apagarse.
Presione el botón “CLOCK” para guardar la conguración y regresar a la
3.
pantalla principal.
OFFAUTO ONONAUTO OFF
Diagrama D
Activación de la función de cuenta regresiva:
Presione los botones “HOUR” y “MIN” simultáneamente para activar la
1.
función de cuenta regresiva. Consulte más detalles en el diagrama E.
Otras características de la cuenta regresiva:
2.
Presione el botón “MANUAL” para pausar o continuar la cuenta
a.
regresiva..
Presione el botón “CLOCK” para cambiar entre la pantalla de reloj y
b.
cuenta regresiva.
Presione los botones “HOUR” y “MIN” simultáneamente para desactivar
c.
la cuenta regresiva.
Presione los botones “HOUR” (hora) y “MIN” (minutos) para congurar la
2.
hora ENCENDIDO.
Presione el botón “DAY” (día) para seleccionar el día o días en que esta
3.
conguración es relevante.
Presione el botón “SET” para guardar y continuar con la pantalla 1 OFF --:--.
4.
Repita los pasos 3, 4 y 5 para congurar la hora de APAGADO. Al presionar
5.
el botón “S�T” de Nuevo, pasará a través de las otras 19 conguraciones
reestantes de encendidio/apagado.
Grupos de cambio para varios días laborables:
Aparte de los días laborables individualmente, al presionar el botón “DAY” (día)
también se selecciona combinaciones de varios días, como:
‧Lunes a viernes ‧Martes y jueves y sábado
‧Sábado y domingo ‧Lunes a miércoles
‧Lunes a sábado ‧Jueves a sábado
‧Lunes y miércoles y viernes ‧Lunes a domingo
Después de seleccionar una combinación de días en particular, la selección de
encendido/apagado entrará en efecto en la conguración del día seleccionado
previamente.
Botón de reinicio:
Presione el botón “S�T” para seleccionar la conguración de encendido/apagado
1.
que necesita cambiarse.
Presione el botón “ ”para reiniciar la actual conguración de encendido/apagado
2.
que se ve en el diagrama C, sin tener que desplazarse por todas las horas.
Diagrama C
Diagrama E
Current time display
Countdown pause
Conguración de encendido/apagado aleatorio:
Para activar la función aleatoria, presione el botón “HOUR” durante 3 segundos.
Aparecerá el ícono RND en la pantalla. Ver diagrama F.
Para desactivar la función aleatoria, presione el botón “HOUR” durante 3
1.
segundos. No aparecerá el ícono RND en la pantalla.
Diagrama F
Función de horario de verano (DST):
Presione el botón “CLOCK” durante 3 segundos para avanzar 1 hora la hora actual;
aparecerá el ícono +1h en la pantalla. Repita este proceso para reducir el tiempo en 1
hora; desaparecerá el ícono +1h de la pantalla. Consulte el diagrama G.
Diagrama G
HOUR + MINMINHOUR + MINMIN
MANUAL MANUAL
Hour
HOUR + MINMINHOUR + MINMIN
End of countdown ON
CLOCKCLOCK
Show current time
Cambio de modo:
El modo actual aparece en la pantalla como: “ON”, “AUTO ON”, “OFF” o
“AUTO OFF”, junto con la hora del día. Utilice el botón “MANUAL” para
ajustar en la conguración deseada. Puede usarse para anular el temporizador, tal
como se explica a continuación.
Clock
Función de reserva de energía:
�n caso de fallo del suministro eléctrico, el temporizador mantendrá sus
conguraciones durante un periodo estimado de 3 meses suponiendo que la
reserva de energía esté totalmente cargada.
 Loading...