

Page 1

Fast Ethernet
7100e
+
User Manual
Page 2

To start
FCC ST A TEMENT
Thank you for purchasing the Fast EtherNet. This manual
explains how to set up the Fast EtherNet and connect it to the
computer. Please use in conjunction with the User Manual.
Voluntary control on interference to radio communications
This equipment is a Class A information technology
equipment, which complies with the standards of
VCCI. Interference to radio communications may
occur if this equipment is used in a residential
envir onment. If this is the case, the user is encouraged
to use the appropriate measures [to correct the
interference].
This equipment has been tested and found to comply with the
limits for a Class B digital device, pursuant to Part 15 of the
FCC Rules. These limits are designed to provide reasonable
protection against harmful interference in a residential
installation. This equipment generates, uses and can radiate
radio frequency energy and, if not installed and used in
accordance with the instructions, may cause harmful interference
to radio communications. However, there is no guarantee that
interference will not occur in a particular installation. If this
equipment does cause harmful interference to radio or television
reception, which can be determined by turning the equipment
off and on, the user is encouraged to try to correct the interference
by one or more of the following measures:
- Reorient or relocate the receiving antenna.
- Increase the separation between the equipment and the
receiver.
- Connect the equipment into an outlet on a circuit different
from that to which the receiver is connected.
- Consult the dealer or an experienced radio/television
technician for help.
2
Fast Ethernet
7100e+
Page 3

Copyrights of this manual
Concerning trademarks
All the copyrights belong to Oki Data Corporation.
Unauthorized duplication, copying, translation or the like are
strictly forbidden. Written approval must be obtained from Oki
Data Corporation.
1. Unauthorized reproduction of some or all of the contents of
this manual is strictly prohibited.
2. The contents of this manual may be modified without prior
notice.
3. The contents of this manual are supposed to be free of errors.
In the unlikely event that questionable points, errors,
omissions or the like are found in the manual, please contact
your dealer.
4. With reg ard to the contents of this manual, please note that,
notwithstanding the above three clauses, the responsibility
for any effect on the use of the product falls on the user.
Copyright © 1999 Oki Data Corporation
Copyright © 1999 Japan Computer Industry Inc.
OKIP A GE are trademarks of Oki Data Corporation.
UNIX is a registered trademark in the USA and other countries,
licensed by X/Open Company Limited.
Ethernet is a registered trademark of Xerox, USA.
MS-DOS, Windo ws and W indowsNT are re gistered trademarks,
trademarks or brand names in the USA and other countries of
Microsoft Corporation, USA.
Sun OS and Sun Solaris are trademarks of Sun Microsystems.
NetW are is a registered trademark of Nov ell, Inc., USA.
IBM and AIX are trademarks of IBM, USA.
HP-UX is a trademark of Hewlett-Packard, USA.
Apple is a name and a logo mark, AppleTalk, EtherTalk,
KanjiT alk and MacOS are names and logo marks, and Macintosh
is registered trademark, trademark or brand name in the USA
and in other countries of Apple Computers, USA.
PostScript is a registered trademark or a trademark in various
countries of Adobe Systems Incorporated.
Other product names or brand names are registered trademarks
or trademarks of their proprietor.
English
User Manual 3
Page 4

Explanation of symbols in this manual
Notes and restrictions concerning the correct
operation of the Fast EtherNet. Make sure to read
them in order to avoid incorrect operation.
Useful tips and references for the operation of the
Fast EtherNet. Recommended to read.
User License Agreement
The software and documentation attached to the Fast EtherNet
are supplied by Oki Data Corporation. By using this software,
the customer establishes a contract with Oki Data Corporation
and accepts the restrictions described in the following clauses
of this agreement.
1. The customer may use the software only if they posses the
Fast EtherNet corresponding to this software.
2. The copyrights and proprietary rights of this software and
documentation, as well as copies thereof, belong to Oki Data
Corporation or to a licenser that provided a user license to
Oki Data Corporation. Duplication of part or all of the
software or documentation, or giving them to a third party
for duplication purposes, giving permission to duplicate or
commercial transaction thereof is forbidden. The customer
agrees not to correct, modify, translate, perform reverse
engineer, decompile or deassemble this software. In
addition, with the exception of the clauses approved in this
agreement, no intellectual proprietary rights are given in
relation to this software and documentation.
3. The customer may transfer the software to a third party by
fulfilling all of the following clauses.
(1) The software is transferred together with the Oki Data
Fast EtherNet corresponding to this software.
(2) All the copies of the software and documentation are
transferred to the above-mentioned third party, or all
the copies which were not transferred are destroyed.
(3) The above-mentioned third party agrees with the
restrictions of this agreement.
In addition, it is forbidden to rent, lease, distribute, reproduce
or transfer the software.
The customer agrees not to ship, transfer, export or re-export
the software out of Japan and not to use it in any illegal way.
4. If the customer breached the clauses of this agreement, Oki
Data Corporation may discontinue the use of the software
4
Fast Ethernet
7100e+
Page 5

and documentation of the customer and cancel the license
agreement. If such cancellation took place, the customer
will destroy the software and documentation and all copies
thereof and will stop using the trademark.
5. Oki Data Corporation and the licensers of Oki Data
Corporation do not give any guarantees, including the
following, in relation to the software or documentation.
(1) That by using this software, the customer will achieve
the performance or results they wish to achieve.
(2) That the software or documentation are free of flaws.
(3) That the rights of a third party will not be violated.
(4) That the software or documentation are suitable for
specific purposes.
In addition, the software or documentation may be improved
or modified without prior notice.
6. Oki Data Corporation and the licensers of Oki Data
Corporation are not responsible, in any way, for any direct,
indirect or secondary damage or loss caused by the software
or documentation.
This product complies with the requirements
of the Council Directives 89/336/EEC and 73/
23/EEC amended by 93/68/EEC on the
approximation of the laws of the member states
relating to electromagnetic compatibility and
low voltage.
English
User Manual 5
Page 6

Contents
To start ........................................................................2
FCC ST ATEMENT...................................................... 2
Copyrights of this manual ..........................................3
Concerning trademarks ............................................... 3
Explanation of symbols in this manual......................4
User License Ag reement .............................................4
Chapter 1
Installing the Fast EtherNet ....................................................9
Major features of the board 7100e+ .........................10
Product identification ............................................... 10
Part names of the Fast EtherNet ................................11
Mounting on a printer .............................................. 12
Connecting to a network ..........................................12
Verification of the “print menu” of the printer .........14
Functions of the DIP Switches..................................15
Initialization of the Fast EtherNet ............................15
Verification of the settings contents .........................16
Self-diagnosis test.....................................................17
Chapter 2
Printing from Windows98/95 .................................................18
OKI LPR Utility Operating Environment .................19
With the NetBUEI protocol ......................................30
Chapter 3
Printing From WindowsNT 4.0 ..............................................35
With the TCP/IP protocol .........................................36
With the NetBEUI protocol ......................................45
Chapter 4
Using with the Macintosh .....................................................48
Configuring Macintosh ............................................ 50
Installing the Printer Driver ......................................51
6
Fast Ethernet
7100e+
Page 7

Contents (Contd.)
Chapter 5
English
Using with UNIX...................................................................... 52
Configuring the IP address in the Fast EtherNet ......53
Configuring the SunOS 4.x.x ...................................5 6
Configuring the Sun Solaris 2.x ............................... 58
Configuring the HP-UX9.x .......................................60
Configuring the AIX4.1.5 .........................................62
Printing with LPD .....................................................64
BSD-based UNIX ......................................................65
SystemV -based UNIX................................................66
Printing with FTP......................................................67
Chapter 6
Using with NetWare................................................................71
About NetW are..........................................................72
NetW are 4.1 Print Server Mode (NDS)......................74
NetW are 4.1 Print Server Mode (Bindery)................80
NetW are 4.1 Remote Printer Mode...........................89
NetW are 3.1 En vironment.........................................95
Chapter 7
Management of the Fast EtherNet .......................................99
Using a Web Browser ............................................. 100
Using TELNET ...................................................... 109
Using standard setup utility (Windows) ................ 1 1 7
Environment setup ................................................. 12 9
Using quick setup utility (Windows) ..................... 13 0
Using setup utility (Macintosh) ............................ 1 33
Using JetAdmin ..................................................... 139
Using SNMP .......................................................... 140
Fast EtherNet settings ............................................ 140
User Manual 7
Page 8

Contents (Contd.)
Chapter 8
Troubleshooting ................................................................... 144
Trouble during the self-diagnosis test and
while printing the configuration contents ............ 14 5
Trouble while using TCP/IP .................................. 146
Trouble while using NetWare ................................ 147
Trouble while using EtherTalk .............................. 14 8
Trouble while using NetBEUI ............................... 149
Others ..................................................................... 149
Appendices ...........................................................................150
Main Specifications ............................................... 151
IP Ad dress Configuration Using DHCP,
BOO TP, RARP ....................................................... 151
Configuration from TELNET ................................ 154
Setting through DHCP........................................... 15 5
Setting from BOOTP .............................................. 158
Setting through RARP........................................... 15 9
8
Fast Ethernet
7100e+
Page 9

Chapter
Chapter 1
Installing the Fast EtherNet
Major features of the board 7100e+ .........................10
Product identification ............................................... 10
Part names of the Fast EtherNet ................................11
1
Mounting on a printer .............................................. 12
Connecting to a network ..........................................12
Verification of the “print menu” of the printer .........14
Functions of the DIP Switches ..................................15
Initialization of the Fast EtherNet ............................15
Verification of the settings contents .........................16
Self-diagnosis test.....................................................17
Fast Ethernet
7100e
+
Page 10

Installing the Fast EtherNet
Product identification
Major features of the board 7100e+
Compatible with multiple protocols
• Compatible with the four network protocols – EtherTalk,
TCP/IP , IPX/SPX and NetBEUI.
Dedicated network utility included
• The Fast EtherNet can be configured from Windows98/95,
NT4.0 and Macintosh.
Manageable from a Web Browser
• If it is connected with TCP/IP, the Fast EtherNet and the
printer menu can be configured from a Web Browser such
as Microsoft Internet Explorer or Netscape Navigator.
Compatible with SNMP
• Packages an SNMP agent which operates in UDP
The 7100e+ is a general-purpose Fast EtherNet.
Please note that, depending on the printer installed,
some functions may become unusable.
Please check that the following products are all present.
The Fast EtherNet itself Mounting screws (2)
Fast EtherNet Network softwar e CD-R OM
User Manual (booklet)
Warranty
10
Fast Ethernet
7100e+
Page 11

Part names of the Fast EtherNet
➋
➎
➍
➌
➊
➊ Connector for 100BASE-TX/10BASE-T
Connected with a twisted pair cable.
Automatically switches over between 100BASE-TX
and 10BASE-T
➋ DIP switches
For initialization of the Fast EtherNet, verification of the settings
contents and the self-diagnosis test. Refer to Page 14 for the
function of each switch.
➌➌
➌ STAT LED (orange lamp)
➌➌
Flashes during data reception. In the case that abnormality of
the Fast EtherNet was detected, performs one of the following.
· Flashes at set intervals
· Stays switched on
· Stays switched off
➍ LINK 100M LED (green lamp, center)
Lit during connection with 100BASE-TX.
➎ LINK 10M LEED (green lamp, from cable)
Lit during connection with 10BASE-T.
English
User Manual 11
Page 12

Mounting on a printer
The method of mounting the Fast EtherNet differs from one
printer to another. F or details refer to your printer’ s User Manual.
Connecting to a network
Needed for the connection
The following products are needed in order to connect the Fast
EtherNet to a network. If needed, these products can be
purchased from a network product supplier.
Hub/Switch wall socket T wisted pair cable
(Category 5 Straight)
12
Fast Ethernet
7100e+
Page 13

The connection process
1. Turn OFF the printer’ s po wer switch
2. Insert the twisted pair cable into the Fast EtherNet connector.
3. Insert the other end of the twisted pair cable into the hub/
switch wall socket.
4. Turn ON the printer’ s power switch.
In the case that the network used includes a router
and a server, start the router and the server and only
then turn ON the printer’s power switch. If the
printer’s power switch is turned ON before the r outer
and the server , the network may not function normally .
English
User Manual 13
Page 14
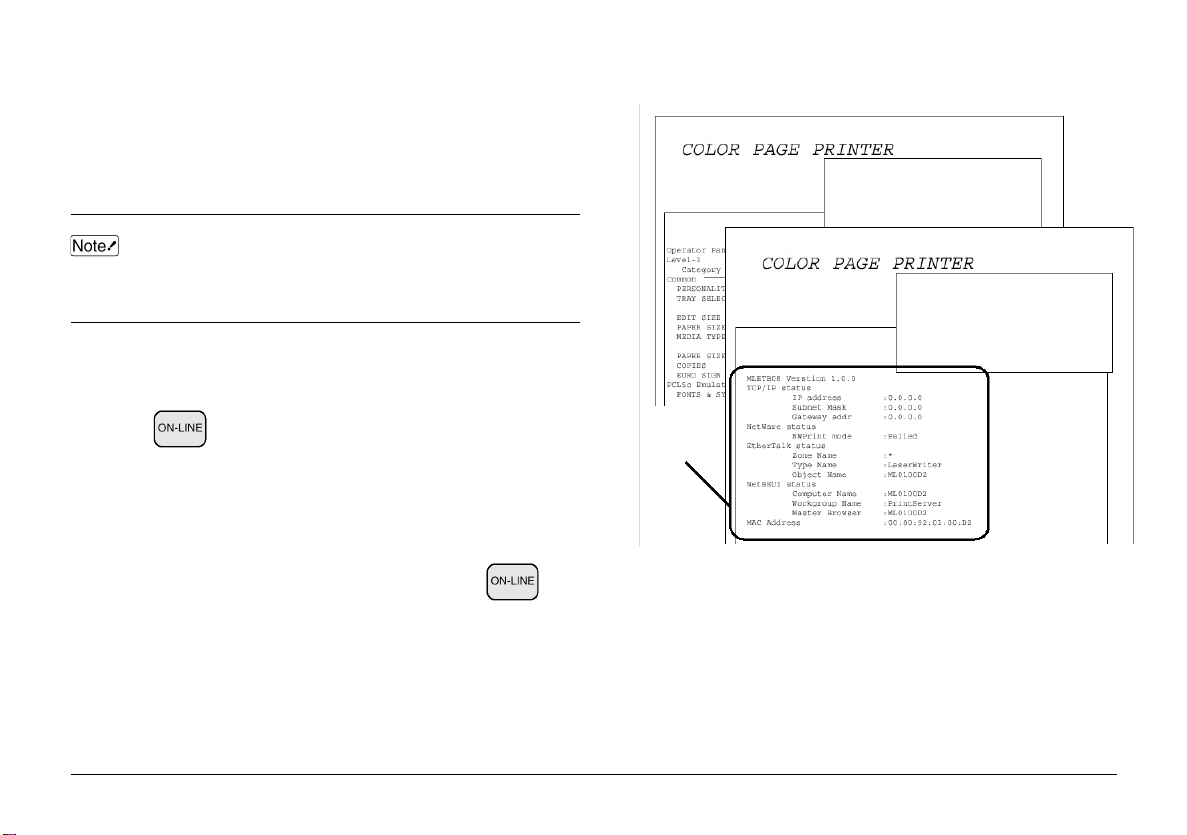
V erification of the “print men u” of the printer
In order to use the Fast EtherNet, the Fast EtherNet settings must
first be verified. You can verify these settings by using the
“print menu” of the printer.
The method of menu printing differs fr om one printer
to another. For details refer to the your printer’s
user manual.
In the following explanation, OKIP A GE 8c is used as an example.
1. Press , the printer switches to “Online”.
2. Hold down “print menu”” for more than 2 seconds, the printer
switches to “menu printing”
Menu printing begins.
3. After the menu printing is completed, press , the
printer switches to “Online”.
OKIPAGE 8C
OKIPAGE 8C
Fast
EtherNet
settings
14
Fast Ethernet
7100e+
Page 15

Functions of the DIP Switches
Initialization of the Fast EtherNet
By using the DIP Switches of the Fast EtherNet, initialization of
the Fast EtherNet, verification of its settings and the selfdiagnosis test can be performed.
ON 1 2 3 4
DIP Switches behind plate
During normal operation, all the DIP Switches should
be switched OFF. In order to change the settings of
the DIP Switches, turn the printer’s power switch
OFF. DIP Switch No. 1 is normally OFF.
1. Turn the printer’ s power switch OFF.
2. Turn DIP Switch No. 2 ON.
3. Turn the printer’ s power switch ON.
The Fast EtherNet is initialized.
4. Make sure that the printer is fully operative and turn the
printer’s po wer switch OFF .
5. Turn DIP Switch No. 2 OFF .
If the Fast EtherNet was used even once with a
different network, it has to be initialized before it
can be used.
English
User Manual 15
Page 16

V erification of the settings contents
1. Turn the printer’ s power s witch OFF .
2. Turn DIP Switch No. 3 ON.
3. Turn the printer’ s po wer switch ON.
The current settings contents are printed.
4. Turn the printer’ s power s witch OFF .
5. Turn DIP Switch No. 3 OFF .
<Example of printing the settings contents>
16
Fast Ethernet
7100e+
Page 17

Self-diagnosis test
1. Turn the printer’ s power s witch OFF .
2. Turn DIP Switch No. 4 ON.
3. Turn the printer’ s po wer switch ON.
The results of the self-diagnosis are printed.
4. Turn the printer’ s power s witch OFF .
5. Turn DIP Switch No. 4 OFF .
<Example of printing the self-diagnosis test>
EtherNet address
If “NG” is indicated, refer to “Chapter 8 Trouble
Shooting”.
English
User Manual 17
Page 18

Chapter
Chapter 2
Printing from Windows98/95
OKI LPR Utility Operating Environment .................19
With the NetBUEI protocol ......................................30
2
Fast Ethernet
7100e
+
Page 19

Printing from Windows 95/98
Configuring Windows98/95
In order to print from W indows 95/98 via TCP/IP , it is necessary
to set up the Fast EtherNet and Windows 95/98. Windows 95/
98 does not include a LPR printing function, so you must use
the OKI LPR utility. This utility can be found on the
accompanying CDROM.
OKI LPR Utility Operating Envir onment
• A computer which runs Windows 95/98 and which has a
network adapter supporting TCP/IP.
• A compatible printer such as;
• OKIP A GE 16n
• OKIP AGE 20 series
• OKIP AGE 24 series
• OKIP AGE 8c
• OKIP AGE 8c+
The operation of this LPR utility cannot be guaranteed
with any printer other than those specified above..
Install “TCP/IP” protocol in Windows98/95 and configure the
IP address, subnet and gateway.
If you type in a wrong IP addr ess, the network may go
down or other severe damage ma y occur. Make sure
to check with the network manager and to determine
the appropriate address.
In the case that a small-scale LAN is included, such as a network
connecting one printer and one computer, refer to Page 22 for
the settings.
In the following explanation, Window98 is used as an example.
The screen display and part of the contents of the selected
directory may differ, depending on the OS version and the system
structure.
Please have ready the “Windows98/95 System Software CDROM”.
English
User Manual 19
Page 20

1. Start the “Network” control panel.
2. Open the “Network configurations” tab and confirm that
“TCP/IPàXXX” is displayed.
If “TCP/IPàXXX” is not displayed, click on “ Add”.
3. Select “Protocol” and click on “Add”.
4. Select “Microsoft” and “TCP/IP”, click on “OK”.
5. Select “TCP/IPàXXX”, click on “Properties”.
20
Fast Ethernet
7100e+
Page 21

6. Configure each of the “IP address, Subnet Mask, Gateway,
DNS Settings”.
7. Restart Windows 98/95.
English
User Manual 21
Page 22
Configuring the IP address for the Fast EtherNet
Use the Standard Setup Utility (Window) attached to the Fast
EtherNet and configure the IP address of the Fast EtherNet, the
subnet mask and the gateway.
For the details of the Standard Setup Utility , refer to “Chapter 7
Management of the Fast EtherNet”.
2. Configure the computer to the “Fast EtherNet’s companion
Network Software CD-ROM”.
The Setup Utility starts automatically.
Please have ready the “Fast EtherNet’s companion CD-ROM”.
If you type in the wrong IP address, subnet mask or
gateway, the network may go do wn or other severe
damage may occur. Make sure to check with the
network manager and to determine the appropriate
address.
1. Connect the Fast EtherNet to the network and turn ON the
printer’s po wer switch.
22
If the Setup Utility does not start automatically,
double-click on “Autorun.exe” in the “Windows”
folder of the CD-ROM.
3. Click on “English”.
The “Setup Utility” screen is displayed.
4. Click on “OKI Device Standard Setup”.
5. Select “Execute from CD-ROM” and click on “Next”.
Fast Ethernet
7100e+
Page 23

6. If you agree to the User License Agreement, clic k on “Y es”.
Starts the “AdminManager”.
The EtherNet address (MAC
address) appears in the
“print menu” of the printer.
7. Look up the EtherNet address in the list and select the Fast
EtherNet to setup.
English
OKIPAGE 8C
User Manual 23
Page 24

8. Choose the “OKI Device Setup” in the “Setup” menu.
<In case that TCP/IP protocol is the only working protocol>
(1) When the next message is displayed, click on “Yes”.
(2) Type in the EtherNet address and the “IP address”
which configured it, and click on “OK”.
(3) Click on “Yes” in order to validate the values set.
(4) After a while, the Fast EtherNet is displayed in the list.
Select the F ast EtherNet displayed and choose the “OKI
Device Setup” in the “Setup” menu.
If the Fast EtherNet is not displayed, click on the “OKI
Device search” button.
24
Fast Ethernet
7100e+
Page 25

9. Configure the TCP/IP Tab item and make the following
“Settings”.
➊
➋
➌
10. If the settings are all correct, click on “Setup”. The values
set are transmitted to the Fast EtherNet after clicking on
“Yes”.
English
At this point, however, the Fast EtherNet oper ates on
the pre-transmission values set.
➎
➊ Check the “Use the TCP/IP protocol”.
➋ Type in the “IP address”.
➌ Uncheck the “Use RAPP” and “Use DHCP/BOOTP”.
In the case that the IP address is obtained from the
RARP server, DHCP server or BOOTP server, check
in accordance with the network environment.
In the case that no server exists, you must uncheck or
severe damage may be caused to the network
➍ Type in the “Subnet mask”.
➎ Type in the “Gateway address”.
➍
11. In order to validate the values set, click on “Yes”.
12. Select “Exit” in the “File” menu and close the
AdminManager. Next, click on “Exit” in the Setup Utility
to quit the Setup Utility.
User Manual 25
Page 26

In case a small-scale LAN is included, such as a
network connecting one printer and one computer,
configure as follows (using “RFC1918”). For the
computer settings please refer to Page 18 and for the
printer settings please refer to Page 21.
<Computer> <Printer>
➊
Please make sure that no other networks are linked. If other
network are linked, severe damage may be caused to the network
if the following settings are used.
➊ IP address: The top 3 numbers 192.168.0 fixed
The 4th number Between 1 and 254
If necessary , use a different [IP address] for
the computer and printer
(example) Computer : 192.168.0.1
Printer : 192.168.0.2
➋ Subnet mask: 255.255.255.0 fixed
➌ Gateway: 0.0.0.0 fixed
➍ DNS: Disable DNS
26
➊
➋
➋
➌
➍
Fast Ethernet
➌
7100e+
Page 27

Setting up the printer software
Next, set up the printer software. After adding the printer driv er
in Windows98/95 as the “Default local printer”, perform the
setup.
Set up the OKI LPR utility on a hard disc drive with
ample free space. If there is insufficient free space
on the hard disc, attempting to print a large volume
of data or too many print jobs may cause failure of
the data spool and the printer may fail to print.
1. Set up the printer driver as the “Default local printer”.
Please refer to the your printer’s user manual f or instructions
on how to set up your printer driver.
English
In the following explanation, setting up OKIPAGE 8c(PS) as the
printer in Windows98 is used as an example.
Please have ready the “Fast EtherNet’s companion network
software CD-ROM”.
User Manual 27
2. Insert the “Fast EtherNet’s companion network softw are CDROM” into the computer.
The Setup Utility starts automatically and is exited by
clicking on “Exit”.
3. Click on the “Start” button and select “Run”.
Page 28

4. In “Name” type in “D:\OKILPR\SETUP” (when the CD-ROM
drive is D:) and click on “OK”.
The setup program starts. Proceed with the setup following
the instructions on the screen.
5. After completing the setup, double-click on the “OKI LPR
utility”.
6. Select “ Add printer” from the “Remote printer” menu.
7. Among the “Printers”, select the printer added in process 1
and type in the IP address of the Fast EtherNet under “IP
address”. If the printer and the IP address are correct, click
on “OK”.
8. The printer is added in the main window.
28
The setup is then completed.
While the OKI LPR utility is operating, printing is from the
application software.
Fast Ethernet
7100e+
Page 29

· The OKI LPR utility is capable of registering up to 10
printers.
· If the OKI LPR utility directory or the spool directory
contains any files that have been added after the
installation of the utility, you will not be able to delete
the directory. In order to uninstall the OKI LPR utility
fully, please delete any additional files in these
directories first.
· Please do not change the “Spool settings” of the
“Details” tab of the printer driver properties fr om “No
support of bidirectional transmission of this printer”.
If you do, errors may occur during printing.
· In the case that a postscript printer is used, although
“Data format” can be selected in the “Detail setting”
of the “PostScript” tab of the printer driver
“Properties”, only “ASCII data” should be selected
here. In the case that anything other than “ASCII data”
is selected, a postscript error may occur.
In addition, in applications capable of specifying the
data format in the printing options (Adobe Photoshop,
QuarkXpress, etc.), please make sure to select “ASCII”.
If anything other than “ASCII” is selected, a postscript
error may occur.
English
User Manual 29
Page 30

With the NetBUEI protocol
Configuring Windows98/95
In the following explanation, Window98 is used as an example.
The screen display and part of the contents of the selected branch
may differ , depending on the OS version and the system structure.
Please have ready the “W indows98/95 System Software CD-R OM”.
1. Start the “Network” control panel.
2. Confirm that “Microsoft network client” and
“NetBEUIàXXX” are displayed.
If “NetBEUIàXXX” is not displayed, click on “Add”.
3. In the case that “Microsoft network client” is not displayed,
select “Client” and click on “Add”.
4. Select “Microsoft” and “Microsoft network client”, click
on “OK”.
30
Fast Ethernet
7100e+
Page 31

5. In the case that “NetBEUIàXXX” is not displayed, select
“Protocol” and click on “Add”.
6. Select “Microsoft” and “NetBEUI”, click on “OK”.
English
7. Restart Windows 98/95.
User Manual 31
Page 32

Setting up the printer software
Next, set up the printer software. After adding the printer driv er
in Windows98/95 as the “Default local printer”, perform the
setup.
In the following explanation, setting up OKIPAGE 8c(PS) as the
printer in Windows98 is used as an example.
1. Set up the printer driver as the “Default local printer”.
Please refer to the your printer’s user manual for instructions
on how to set up your printer driver.
3. Click on “Add port”.
4. Select “Network” and click on “Browse”.
2. Open the “Details” tab of the printer driver.
32
Fast Ethernet
7100e+
Page 33

5. Double-click on “Entire Network”, “PrintServer”,
“MLxxxxxx”.
OKIPAGE 8C
The “PrintServer” is the “Workgroup Name”
displayed in the “print menu” of the printer.·
“MLxxxxxx” is the “Computer Name” displayed in
the “print menu” of the printer.
6. Select “Prn1” and click on “OK”.
English
7. Confirm that “Network path to the printer” is indicated and
click on “OK”. Close the Properties box by clicking on
“ Appl y” and “OK”.
The setup is completed.
Printing is from the application software.
User Manual 33
Page 34

· The “Computer name” name and “Workgroup” name
can be changed using a Web Browser, , etc.
· The Master Browser function manages the machine
information which exists within the same Workgroup,
and replies to summary r equests from other W orkgr oups.
· The Master Browser function of this Fast EtherNet
operates only if the Workgr oup name is “PrintServer”.
· The Master Browser function cannot manage anything
other than this Fast EtherNet. If the “PrintServer”
name is put into another Workgr oup, the Fast EtherNet
will not be able to find it in the network.
· A maximum of 8 F ast EtherNets can be managed by the
3
Master Browser function.
34
Fast Ethernet
7100e+
Page 35

Chapter
Chapter 3
Printing From WindowsNT 4.0
With the TCP/IP protocol .........................................36
With the NetBEUI protocol ......................................45
3
Fast Ethernet
7100e
+
Page 36

Printing From WindowsNT 4.0
With the TCP/IP protocol
In order to print from WindowsNT Server 4.0 or WindowsNT
Workstations 4.0, WindowsNT 4.0 and the Fast EtherNet have
to be set up. The TCP/IP protocol and NetBEUI protocol can be
used from W indowsNT 4.0.
The “AppleTalk Printing Devices” output port of
WindowsNT 4.0 is dedicated to postscript printers.
It cannot be used for printers other than postscript
printers.
Configuring the WindowsNT 4.0
Adds the “TCP/IP protocol” and “Microsoft TCP/IP printing”
services to WindowsNT 4.0, sets the IP address, subnet mask
and gateway.
· If you type in a wrong IP address, the network may go
down or other severe damage may occur. Mak e sur e to
check with the network manager and to determine the
appropriate address.
· In the case that a small-scale LAN is included, such as
a network connecting one printer and one computer,
refer to Page 22 for the settings.
· If WindowsNT 4.0 is set, login must be done with the
Administrator’s authorization.
In the following explanation, WindowsNT Server 4.0 is used as
an example. The screen display and part of the contents of the
selected branch may differ, depending on the OS version and
the system structure.
Please have ready the “WindowsNT 4.0 System Software CDROM”.
36
Fast Ethernet
7100e+
Page 37

1. Start the “Network” control panel.
2. Open the “Protocol” tab and confirm that “TCP/IP protocol”
is displayed.
If “TCP/IP protocol” is not displayed, click on “Add”.
3. Select “TCP/IP protocol” and click on “OK”.
4. Select “TCP/IP protocol” and click on “Properties”.
English
5. Configure each of the “IP address, Subnet Mask, Gateway,
DNS Settings”.
User Manual 37
Page 38

6. Open the “Service” tab and confirm that “Microsoft TCP/IP
printing” is displayed.
7. Select the “Microsoft TCP/IP printing” and click on “OK”.
8. Restart WindowsNT 4.0.
38
Fast Ethernet
7100e+
Page 39

Configuring the IP address for the Fast EtherNet
Use the Standard Setup Utility (Window) attached to the Fast
EtherNet and configure the IP address of the Fast EtherNet, the
subnet mask and the gateway.
For the details of the Standard Setup Utility , refer to “Chapter 7
Management of the Fast EtherNet”.
Please have ready the “Fast EtherNet’s companion CD-ROM”.
If you type in the wrong IP address, subnet mask or
gateway, the network may go do wn or other severe
damage may occur. Make sure to check with the
network manager and to determine the appropriate
address.
1. Connect the Fast EtherNet to the network and turn ON the
printer’s po wer switch.
2. Configure the computer to the “Fast EtherNet’s companion
Network Software CD-ROM”.
The Setup Utility starts automatically.
If the Setup Utility does not start automatically,
double-click on “Autorun.exe” in the “Windows”
folder of the CD-ROM.
3. Click on “English”.
The “Setup Utility” screen is displayed.
4. Click on “OKI Device Standard Setup”.
5. Select “Execute from the CD-ROM” and click on “Next”.
English
User Manual 39
Page 40

6. If you agree to the User License Agreement, clic k on “Y es”.
Starts the “AdminManager”.
The EtherNet address (MAC
address) appears in the
“print menu” of the printer.
7. Look up the EtherNet address in the list and select the Fast
EtherNet performing to set up.
OKIPAGE 8C
40
Fast Ethernet
7100e+
Page 41

8. Choose the “OKI Device Setup” in the “Setup” menu.
(3) Click on “Yes” in order to validate the values set.
English
(4) After a while, the Fast EtherNet is displayed in the list.
Select the F ast EtherNet displayed and choose the “OKI
Device Setup” in the “Setup” menu.
<In case that TCP/IP protocol is the only working protocol>
(1) When the next message is displayed, click on “Yes”.
(2) Type in the EtherNet address and the “IP address”
which configured it, and click on “OK”.
User Manual 41
If the Fast EtherNet is not displayed, click on the “OKI
Device search” button.
Page 42

9. Configure the TCP/IP Tab item and make the following
“Settings”.
➊
10. If the settings are all correct, click on “Setup”. The values
set are transmitted to the Fast EtherNet after clicking on
“Yes”.
➎
➊ Check the “Use the TCP/IP protocol”.
➋ Type in the “IP address”.
➌ Uncheck the “Use RAPP” and “Use DHCP/BOOTP”.
In the case that the IP address is obtained from the
RARP server, DHCP server or BOOTP server, check
in accordance with the network environment.
In the case that no server exists, you must uncheck or
severe damage may be caused to the network
➍ Type in the “Subnet mask”.
➎ Type in the “Gateway address”.
➍
➋
➌
At this point, however, the Fast EtherNet oper ates on
the pre-transmission values set.
11. In order to validate the values set, click on “Yes”.
12. Select “Exit” in the “File” menu and close the
AdminManager. Next, click on “Exit” in the Setup Utility
to quit the Setup Utility. Utility to exit the Setup Utility.
42
Fast Ethernet
7100e+
Page 43

Setting up the Printer Driver
Set up the Printer Driver for Windows NT4.0. The following
procedure uses an OKIPAGE 8c(PS) as an example. The IBM
PC/AT compatible PC running Windo wsNT Serv er has the CDROM as driv e D:
To complete these changes you will also need the “Printer
Software CD-ROM”.
This set-up requires you to login as administrator.
1 Install the Printer Software CD-Rom which will autorun.
The set-up program will start. Now continue with the Set-up
process by following the on-screen instructions.
The set-up procedur e varies depending on the printer
you use. See the User’s Manual supplied with the
printer for details.
2 Click “Start” from Windows taste bar , “Settings”, “Printers”,
double click on “Add Printer”
[Printer Add Wizard] will be display ed. Tick [My computer]
and click [Next].
Be sure to select [My Computer].
3 Click [Add Port].
English
User Manual 43
Page 44

4 Select [LPR Port] and click [New Port].
6 Press “Cancel” on the printer driver has already been
installed.
• Do not select any port other than [LPR Port].
• [Apple Talk Printing Device] is available only for
PostScript. It cannot be used for any other than a
PostScript driver.
5 Enter [Printer IP Address] and [Printer Queue Name].
Enter [Ip] for the printer queue name. W ith an y other name,
printing will not be carried out properly.
7 Select a printer model, right mouse click, and then click on
“Properties”.
8 Click on the “Ports” tab.
9 Check the box next to the port that was added previously.
Click “OK”
Print from the added printer via application software.
Click [OK] and [Close] to return to the Printer W izard window ,
then click [Next].
44
Fast Ethernet
7100e+
Page 45

With the NetBEUI protocol
Setting the WindowsNT 4.0
Adds the “NetBEUI protocol” to WindowsNT 4.0.
If WindowsNT 4.0 is set, login must be done with the
Administrator’s authorization.
English
In the following explanation, WindowsNT Server 4.0 is used as
an example. The screen display and part of the contents of the
selected branch may differ, depending on the OS version and
the system structure.
Please have ready the “WindowsNT 4.0 System Software CDROM”.
1. Start the “Network” control panel.
2. Open the “Protocol” tab and confirm that “NetBEUI
protocol” is displayed.
If “NetBEUI protocol” is not displayed, click on “Add”.
User Manual 45
3. Select “NetBEUI protocol” and click on “OK”.
4. Restart WindowsNT 4.0.
Page 46

Setting up the printer driver
Next, set up the printer software. After adding the printer driv er
in WindowsNT 4.0 as the “Default local printer”, perform the
setup.
In the following explanation, setting up OKIPAGE 8c(PS) as the
printer in W indowsNT Server 4.0 is used as an example.
Please have ready the “Printer software CD-R OM”.
Please login with the Administrator’s authorization
and then conduct the setup.
1. Set up the printer driver as the “Default local printer”.
Please refer to the your printer’s user manual for instructions
on how to set up your printer driver.
2. Open the Properties “Port” of the printer driver.
3. Click on “Add port”.
4. Select the “Local Port” and click on “New port”.
Do not select any port other than the “Local Port”.
46
Fast Ethernet
7100e+
Page 47

5. T ype in “\\MLxxxxxx\PRN1” in the “T ype in the port name”
and click on “OK”.
· The “Computer name” name
and “Workgroup” name can be
changed using a Web Browser,
Telnet, etc.
English
OKIPAGE 8C
“MLxxxxxx” is the
“Computer Name”
displayed in the “print
menu” of the printer.
This completes the printer driver setup.
Printing may now be done from the application software.
User Manual 47
· The Master Browser function
manages the machine
information which exists within
the same W o rkgroup, and r eplies
to summary requests from other
Workgroups.
· The Master Browser function of
this F ast EtherNet oper ates onl y
if the Workgroup name is
“PrintServer”.
· The Master Browser function
cannot manage anything other
than this Fast EtherNet. If the
“PrintServer” name is put into
another Workgroup, the Fast
EtherNet will not be able to find
it in the network.
· A maximum of 8 EtherNet
Page 48

Chapter
Chapter 4
Using with the Macintosh
Configuring Macintosh ............................................ 50
Installing the Printer Driver ......................................51
4
Fast Ethernet
7100e
+
Page 49

Printing From Macintosh
In order to print from Macintosh via an EtherT alk netw ork, it is
necessary to set up the Fast EtherNet and the Macintosh.
To print from Macintosh, you need to have a
PostScript printer. If your printer does not include
PostScript, you cannot use it.
Confirming the configuration of your printer
If you use an EtherTalk network from Macintosh, it is not
necessary to change the Fast EtherNet settings.
• The menu printing procedure varies depending on the
printer you use. See the User’s Manual supplied with your
printer for details.
• For printers whose settings cannot be checked using menu
print, see “Checking the Configuration” under “Printing a
Test Page” in Chapter 1.
The following description uses OKIPAGE 8c as an example.
Print the menu of your printer to confirm the current settings.
1 Press ON-LINE to place the printer “Off-line”.
2 Hold down Print Menu for 2 seconds or more to select “Print
Menu”. Menu printing starts.
3 After the completion of menu printing, press ON-LINE to
place the printer on-line.
<Example of Menu Print>
English
Check that the settings (in bold) are correct.
• If “OKI HSP” of “HOST INTERF A CE” in “Common”
is set at “DISABLE”, switch “OKI HSP” of “HOST
INTERF A CE” in Level 1 Menu to “ENABLE”, referring
to the User’s Manual of the printer.
• “Zone Name” and ”Object Name” in “EtherTalk
status” vary depending on the user environment.(See
network administrator.)
User Manual 49
Page 50

Configuring Macintosh
Change the route for Macintosh AppleTalk to Ethernet.
The following example uses MacOS8.5. The screen shots and
options may vary depending on the OS version and system
configuration.
1 Select [AppleTalk] in [Control Panels] in the Apple menu.
Some OS versions have [Network ] instead of [ AppleT alk ].
2 Under ‘Connect Via:’ Select [Ethernet], then close
[AppleTalk].
For [Network], select [EtherTalk]. Ask your network
administrator about the zone and the AppleTalk address.
3 When the dialogue is displayed, click [Save].
The message varies according to the details of your
modifications.
If the AppleTalk settings on the control panels are
switched to [Ethernet], you will not be able to
connect to any other printers and Macintoshes on
LocalTalk. To connect to LocalTalk, change the
[AppleTalk] settings back to [Printer Port].
50
Fast Ethernet
7100e+
Page 51

Installing the Printer Driver
Install the printer driver onto the Macintosh. See the User’s
Manual of your printer for details.
• EtherTalk is divided into several zones. If you want to
change your printer to another zone, use “Setup Utility
(Macintosh)”. See “Using Setup Utility (Macintosh)”
in Chapter 7 for details.
• Use “Setup Utility (Macintosh)” to change your printer
name.
English
User Manual 51
Page 52

Chapter
Chapter 5
Using with UNIX
Configuring the IP address in the Fast EtherNet ......53
Configuring the SunOS 4.x.x ...................................5 6
Configuring the Sun Solaris 2.x ...............................58
5
Configuring the HP-UX9.x .......................................60
Configuring the AIX4.1.5 .........................................62
Printing with LPD .....................................................64
BSD-based UNIX ......................................................65
SystemV -based UNIX................................................66
Printing with FTP......................................................67
Fast Ethernet
7100e
+
Page 53

Printing From UNIX
In order to print from a UNIX workstation using TCP/IP, the
Fast EtherNet and UNIX workstations must be configured.
Configuring the IP address in the Fast EtherNet
The first step is to configure the Fast EtherNet with an IP address,
subnet mask and gateway address. This can be done from the
UNIX workstation.
· To change the configuration of the Fast EtherNet, you
must log into the card and username”root”, the initial
value of the “root” user password is <none>.
· If you type in a wrong IP address, subnet mask or
gateway, the network may go down or other severe
damage may occur. Please set the configuration only
after consulting your network manager.
In the following explanation, Sun Solaris2.4 is used as an
example. The method of configuring each command etc. may
differ from one workstation to another . Please refer to the manual
of the UNIX workstation used.
English
User Manual 53
Page 54

1. Log in as root on the workstation.
If it is not possible to log in with super-user
authorization, leave the configuration to the network
manager.
2. Using the APR command, set a temporary IP address on the
Fast EtherNet.
Example: In the case that the IP address is “192.168.20.127”,
the Fast EtherNet address is “00:80:92:01:00:D2”
# arp s 192.168.20.127 00:80:92:01:00:D2 temp
The EtherNet address (MAC
Address) is displayed in the
print menu of the printer.
OKIPAGE 8C
3 Use the ping command to confirm the connection with the
Fast EtherNet.
Example: If the IP address is “192.168.20.127”, [type]
#ping 192.168.20.127
If there is no reply, then there is a problem with the
configuration of the Procedure 2 IP address or with
the condition of the network. Please consult your
network manager.
54
Fast Ethernet
7100e+
Page 55

4 Log in the Fast EtherNet using TELNET.
Example: Logging in the Fast EtherNet in the case that the
IP address is “192.168.20.127”
telnet 192.168.20.127
Trying 192.168.20.127
Connected to 192.168.20.127
Escape character is ^].
Fast EtherNet 7100e+ Ver 1.0.2. TELNET server.
Copyright 1999 (c) Oki Data Corporation
Copyright 1999 (c) Japan Computer Industry
Inc.
login: root
root user needs password to login.
password: <CR>
User root logged in.
No. Message Value (level .1)
1 : Setup TCP/IP
2 : Setup SNMP
3 : Setup NetWare
4 : Setup EtherTalk
5 : Setup NetBEUI
6 : Setup printer port
7 : Display Status
8 : Setup printer trap
96 : Reset to factory set
97 : Reboot
98 : Quit setup
99 : Exit setup
Please select (1-99)?
5. T ype in “1” and press the Enter key . Carry out the follo wing
settings.
English
Please select (1-99)? _1
No. Message Value
1:TCP/IP protocol : ENABLE
2:IP address : 192.168.20.127
3:Subnet Mask : 255.255.255.0
4:Gateway address : 192.168.20.254
5:RARP protocol : DISABLE
6:DHCP/BOOTP protocol : DIDABLE
7:root password :
99:Back to prior menu
Please select (1-99)?
6. Logout from the Fast EtherNet.
In order to enable new settings, turn the printer OFF/ON.
If the printer is not turned OFF/ON, the F ast EtherNet
will continue to use the previous values. Please make
sure to turn the printer OFF/ON.
User Manual 55
Page 56

Configuring the SunOS 4.x.x
Method of configuring
Configuring to print from a SunOS 4.x.x BSD system UNIX.
If you type in a wrong IP address, subnet mask or
gateway, the network may go do wn or other severe
damage may occur. Please set the configuration only
after consulting your network manager.
In the following explanation, OKIPAGE 8c as the printer and
SunOS4.1.3 are used as an example. The absolute path of the
commands and the method of configuring may differ , depending
on the OS version. Please refer to your workstation’s manual.
1. Log in as the root on the workstation.
In the case that there is no super user authorization,
leave the configuration to the network manager.
2. Register the IP address of the Fast EtherNet and the host
name in the /etc/hosts file.
Example: In the case that the IP address is “192.168.20.127”
and the host name is “OP8c”
192.168.20.127 OP8c
3. Use the ping command to confirm a connection with the
Fast EtherNet.
Example: In the case that the host name is “OP8c”
#ping OP8c
In the case that there is no reply, there is a problem
with the registration of the Procedure 2 IP address
and the host name, or with the condition of the
network. Please consult your network manager.
56
Fast Ethernet
7100e+
Page 57

4. Register the printer in the /etc/printcap file.
Example: In the case that the printer name “OP8c_lp” is
registered in the direct output port (lp)
➊ OP8c_lp:\
➋ :lp=:rm=OP8c:rp=lp:\
➌ :sd=/usr/spool/OP8c_lp:\
➍ lf=/usr/spool/OP8c_lp/OP8c_lp_errs:
<The meaning of each argument>
➊ Indicates the name of the printer.
➋ l p : The name of the device connecting the printer
Does not have to be indicated.
rm: The name of the host of the remote printer.
T ype in the name of the host which w as registered
in the /etc/hosts file in Procedure 2.
rp : The name of the printer of the remote printer
Select either lp, sjis or euc in the logical printer
name of the Fast EtherNet.
(Please refer to Page 64 for the logical printer name)
5. Create the Spool Directory and Error Log File that were
registered in the /etc/printcap file in Procedure 4.
Example: T o create a Spool Directory “OP8c_lp” and Error
Log File “OP8c_lp_errs”
# mkdir /usr/spool/OP8c_lp ß Spool Directory
creation
# touch /usr/spool/OP8c_lp/OP8c_lp_errs ßError Log File
creation
# chown R daemon /usr/spool/OP8c_lp ß Changes the owner
to daemon
# chgrp R daemon /usr/spool/OP8c_lp ß Changes the group
to daemon
6 Examine if the lpd (printer daemon) is activated or not.
# PS aux | grep lpd
If lpd is not operating, please perform the following
command [while logged in] as the super-user.
# /usr/lib/lpd&
English
➌ sd: Spool Directory indicate in the absolute path.
➍ lf : Error Log File indicate in the absolute path.
User Manual 57
Page 58

Configuring the Sun Solaris 2.x
Method of configuring
Configuring in order to print from Solaris2.x of Sun
Microsystems.
· Admintool is normally used to register r emote printer s
on Open Windows. However, it cannot be used here, as
the data recipient and queue have the same name. The
procedur e described below must be used for re gistering
a remote printer.
· If Solaris2.x is connected with the remote printer for a
long period according to the system specifications,
errors appear and forced disconnections may occur.
Therefore, if paper tearing, offline and other errors
produce a waiting time during printing, printing may
have to be aborted.
· If you type in a wrong IP address, the network may go
down or other severe damag e may occur. Please set the
configuration only after consulting your network
manager.
The following explanation relates to an example in which the
Fast EtherNet is configured to work with OKIPAGE 8c(PS) as
the printer under Sun Solaris 2.4. The absolute path and method
of configuring the command may differ from one OS version to
another. Please refer to your w orkstation’s manual.
1. Log in as root on the workstation.
In the case that there is no super user authorization,
leave the configuration to your network manager.
2. Register the IP address of the Fast EtherNet and the host
name in the /etc/hosts file.
Example: In the case that the IP address is “192.168.20.127”
and the host name is “OP8c”
192.168.20.127 OP8c
3 Use the ping command to confirm the connection with the
Fast EtherNet.
Example: In the case that the host name is “OP8c”
# ping OP8c
In the event that there is no reply, there is a problem
with the configuration of the IP address of the Fast
EtherNet, with the registration of the IP address and
host name from Procedure 2 or with the condition of
the network. Please consult your network manager.
58
Fast Ethernet
7100e+
Page 59

4. Register the host which was registered in Procedure 2 as the
printer server .
Example: If “OP8c” is registered as the printer server
1. Stop the print scheduler
# /usr/sbin/lpshut
2. Register the print server
# /usr/sbin/lpsystem t bsd OP8c
5. Set and enable the print queue.
Example: To set the direct output port “lp” with the print
queue “OP8c_lp” and the host “OP8c”,
1. Create the print queue
#/usr/sbin/lpadmin p OP8c_lp s OP8c!lp I any
If you are using csh, type in “\!” or “\” instead of “!”.
2. Start the print scheduler
#/usr/bin/sh /etc/init.d/lp start
3. Activate the print queue
#/usr/sbin/accept OP8c_lp
4. Validate the print queue
English
#/usr/bin/enable OP8c_lp
User Manual 59
Page 60

Configuring the HP-UX9.x
Method of configuring
Configuring in order to print from the HP-UX of Hewlett-Packard.
If you type in a wrong IP address, subnet mask or
gateway, the network may go do wn or other severe
damage may occur. Please set the configuration only
after consulting your network manager.
The following explanation relates to an example in which [the
Fast EtherNet is configured to work with] OKIPAGE 8c(PS) as
the printer under HP-UX9.03. The absolute path of the
commands and the method of configuring may differ , depending
on the OS version. Please refer to your workstation’s manual.
1. Log in as the root on the workstation.
In the case that there is no super user authorization,
leave the configuration to the network manager.
2. The IP address of the Fast EtherNet and the host name are
registered in the /etc/hosts file.
Example: In the case that the IP address is “192.168.20.127”
and the host name is “OP8c”
192.168.20.127 OP8c
3. Use the ping command to confirm a connection with the
Fast EtherNet.
Example: In the case that the host name is “OP8c”
# ping OP8c
In the case that there is no reply, there is a problem
with the registration of the Procedure 2 IP address
and the host name, or with the condition of the
network. Please consult your network manager.
60
Fast Ethernet
7100e+
Page 61

4. When no remote spool is set in the HP-UX machine used, set
the following configuration.
1. Stop the printer spooler
#/usr/lib/lpshut
5. Register the remote printer
Example: To set the direct output port “lp” with the print
queue “OP8c_lp” and the host “OP8c”
1. Register the remote printer
English
2. Add the following line to the /etc/inetd/conf file and
register the remote spooler
Printer stream tcp nowait root /user/lip/rlpdaemon –I
3. Restart inetd
#/etc/inetd c
#/usr/lib/lpadmin pOP8c_lp mrmodel ormOP8c
-orplp ocmrcmodel osmrsmodel ob3 v/dev/
null
2. Activate the print queue
#/usr/lib/accept OP8c_lp
3. Validate the print queue
#/usr/bin/enable OP8c_lp
4. Enable the printer spooler
#/usr/lib/lpsched
User Manual 61
Page 62

Configuring the AIX4.1.5
Method of configuring
Configuring in order to print from the AIX of IBM.
If you type in a wrong IP addr ess, the network may go
down or other severe damage may occur. Please set
the configuration only after consulting your network
manager.
The following explanation relates to an example in which [the
Fast EtherNet is configured to work with] OKIPAGE 8c(PS) as
the printer under HP-UX9.03. The absolute path of the
commands and the method of configuring may differ , depending
on the OS version. Please refer to your workstation’s manual.
1. Log in as the root on the workstation.
In the case that there is no super user authorization,
leave the configuration to the network manager.
2. Register the IP address of the Fast EtherNet and the host
name in the /etc/hosts file.
Example: In the case that the IP address is “192.168.20.127”
and the host name is “OP8c”
192.168.20.127 OP8c
3. Use the ping command to confirm a connection with the
Fast EtherNet.
Example: If the host name is “OP8c”
# ping OP8c
In the event that there is no reply, there is a problem
with the registration of the Procedure 2 IP address
and the host name, or with the condition of the
network. Please consult your network manager.
62
Fast Ethernet
7100e+
Page 63

4. Register the host which was registered in Procedure 2 as the
print server.
Example: To set the direct output port “lp” with the print
queue “OP8c_lp” and the print server “OP8c”
Example: In he case that “OP8c” is registered as the print
server
1. Add the print server
# ruser a p OP8c
2. Activate the remote perinter daemon
# startsrc s lpd
# mkitab lpd:2:once:startsrc s lpd
5. Add the print queue using the smit command
1. Activate the smit command and convert to the item “Add
print queue”
# smit mkrque
2. Select “remote” (the printer connected to the remote
host) from “Type of connection”.
3. Select “Standard procedure” from “Type of remote
print”.
4. Set the following items in “Add a standard remote print
queue” (change configuration other than those
indicated below according to the utilization
environment)
English
Queue to be added OP8c_lp
Host name of the remote server OP8c
Queue name of the remote server lp
Type of print spooler of the
remote server BSD
Description of printer name
of the remote server Optional
comment
User Manual 63
Page 64

Printing via LPD
The following describes how to print using TCP/IP’s LPD
protocol (lpr, lp commands). Please refer to your workstation’s
manual for the details of the lpr and lp commands. In the
following explanation, printing of a print file “test.prn” using
the printer name “OP8c_lp” is used as an example.
About LPD
LPD (Line Printer Daemon) is the protocol most commonly used
for printing over TCP/IP to a network printer.
About logical printers
The Fast EtherNet includes three logical printers.
In order to print a file created using the printer driver, an “lp”
logical printer must be used for printing.
In order to print a text file of the Shift JIS Kanji code, an “sjis”
logical printer must be used for printing.
In order to print a text file of the EUC Kanji code, an “euc”
logical printer must be used for the printing.
Logic Printer function
lp For direct output
sjis For Shift JIS Kanji converted output
euc For EUC Kanji converted output
“sjis” and “euc” function only as postscript printers.
They cannot be used with other printers.
64
Fast Ethernet
7100e+
Page 65

BSD-based UNIX
Printing
Print using the “lpr” command.
# lpr POP8c_lp test.prn
Canceling the printing requirement
If the “lprm” command is used, the print job is cancelled.
Example: In the case of a print job to “OP8c_lp”, deletion
of 123.
# lprm POP8c_lp 123
Verification of the printer status
Verify the printer status using the “lpq” command.
· In some cases the UNIX specifications may prevent
accurate display.
· While the short format of lpq is a UNIXinterchangeable format, the long format is a format
unique to the Fast EtherNet, which shows the printer
status.
Example: For the short format
# lpq POP8c_lp
Example: For the long format
# lpq 1 POP8c_lp
English
User Manual 65
Page 66

SystemV -based UNIX
Printing
Print using the “lp” command.
# lp d POP8c_lp test.prn
Canceling the print request
If the “cancel” command is used, the printing job is cancelled.
Example: In the case of a print job to “OP8c_lp”, deletion of
456.
# cancel POP8c_lp -456
Verification of the printer status
Verify the printer status using the “ipstat” command.
In some cases the Solaris2.x or UNIX specifications
may prevent accurate display.
66
# lpstat pOP8c_lp
Fast Ethernet
7100e+
Page 67

Printing via FTP
Printing with the TCP/IP FTP protocol (ftp command) will now
be explained. Please refer to your workstation’s manual for the
details of the ftp command. In the following explanation,
printing of a print file “test.prn” using the printer name
“OP8c_lp” is used as an example.
About FTP
FTP (File Transfer Protocol) is a protocol used for transferring a
file with TCP/IP. If the print data is sent to a logical printer on
this Fast EtherNet via FTP then it will be printed out.
Regarding the logical printer
The Fast EtherNet includes three logical printers.
In order to print a file created using the printer driver, use the
“lp” logical printer for printing.
In order to print a text file of the Shift JIS Kanji code, use the
“sjis” logical printer for printing.
In order to print a text file of the EUC Kanji code, use the “euc”
logical printer for printing.
/ Root (printing not possible)
lp For direct output
sjis For Shift JIS Kanji converted output
euc For EUC Kanji converted output
“sjis” and “euc” function only as postscript printers.
They cannot be used with other printers.
English
User Manual 67
Page 68

Printing
1. Log into the Fast EtherNet.
When printing with ftp, you can use any values for
“Name” and “P ass-word”. Ho wever , if the user name is
“root”, the “P asswo rd” set under TELNET or the utility
(see “Using telnet” in Chapter 7) will be required..
Example: Logging in the Fast EtherNet with a host name “OP8c”
(or an IP address “192.168.20.127”).
#ftp OP8c (or ftp 192.168.20.127)
Connected to OP8c
220 Fast EtherNet 7100e+ Ver 1.0.0 FTP server
Name (OP8c:root) : root
331 Password required.
Password:
230 User Logged in
ftp>
2. Move to the transfer directory using the cd command.
In the Fast EtherNet the transfer directory has a
hierarchical structure. Please make sure to move to
the transfer directory . It is not possible to output the
print data to the root directory.
Example: Moving to the lp directory and confirming the current
directory .
ftp>cd /lp
250 Command OK.
ftp>pwd
257/lp is current directory
ftp>
68
Fast Ethernet
7100e+
Page 69

3. Configure the transfer mode.
There are two types of transfer mode, the “BINARY
mode” in which the file contents is output as it is and
the “ASCII mode” which converts the LF code to the
CR+LF code. If a binary file, con verted by the printer
driver, is transferred, the transfer mode has to be the
“BINARY mode”.
4. Using the put command, transfer the print data to the Fast
EtherNet.
There are two modes of file transfer using the put command.
Example: Transferring the print data “test.prn”.
ftp> put test.prn
Example: Transferring the print data specified by an absolute
path “/users/tes/test.prn”.
English
Example: Changing the transfer mode to the BINARY mode
and verifying the current mode.
ftp> type binary
200 Type set to I.
ftp> type
Using binary mode to transfer files.
ftp>
ftp> put /users/test/test.prn /lp
If the print data is specified by an absolute path,
specify the transfer logical directory. There is no
need to switch directories with the cd command.
5. Log out from the Fast EtherNet using the quit command.
ftp> quit
User Manual 69
Page 70

Verification of the printer status
Three states, i.e., the IP address, login user name and transfer
mode, can be verified using the quote command “stat”.
In addition, by specifying the directory after the stat (lp, sjis,
euc), the printer status can be verified.
Example: Displaying the Fast EtherNet status.
ftp> quote stat
211-FTP server status:
Connected to: 192.9.200.82.128.30
User logged in: guest
Transfer type: BINARY
Data connection: Closed.
211 End of status.
ftp>
Example: Displaying the Fast EtherNet status (directory name:
lp)
ftp: quote stat /lp
211-FTP directory status:
Ready
211 End of status
ftp>
70
Fast Ethernet
7100e+
Page 71

Chapter
Chapter 6
Using with NetWare
About NetW are..........................................................72
NetW are 4.1 Print Server Mode (NDS)......................74
NetW are 4.1 Print Server Mode (Bindery)................80
6
NetW are 4.1 Remote Printer Mode...........................89
NetW are 3.1 En vironment.........................................95
Fast Ethernet
7100e
+
Page 72

Printing from NetW are
In order to print using a Novell Netware4.1 or
NetWare3.1network environment, it is necessary to set up the
NetW are server and the Fast EtherNet.
To make the configuration changes it is necessary to have file
server administrator and supervisor authorization. This guide is
intended for NetWare administrators with a basic knowledge of
NetW are and its operating procedures. We suggest you read this
in conjunction with the Novell NetWare manual.
About NetWare
You can print with the printer connected directly to a Novell
NetWare network. For printing using NetWare4.1(NDS mode
and bindery mode) or NetWare 3.1, the Fast EtherNet supports
the following modes.
Print Server Mode
In print server mode: [1] a print job is stored in a print queue on
the file server, [2] a printer running in print server mode will
directly access the print queue and take the job, [3] the printing
process is performed immediately. You do not need to have any
other print server, whether on the file server or in the form of a
workstation, because the printer acts as a print server.
72
Fast Ethernet
7100e+
Page 73

Remote Printer Mode
In remote printer mode: [1] a job is stored in a print queue on the
file server, [2] the print server (either on the file server or a
dedicated workstation) takes the job, and [3] transfers it to the
printer allocated to the print queue. [4] The printer receives the
job and the printing operation is performed. This mode uses the
standard NetWare print function (PSERVER.NLM/EXE). The
existing print server can be used.
<For PSER VER.NLM>
The file server functions as a print server.
<For PSER VER.EXE>
A personal computer is used as a dedicated print server unit.
English
User Manual 73
Page 74

NetW are 4.1 Print Server Mode (NDS)
NetW are4.1 has an NDS network and a bindery network.
NDS Network
In order to use Netware4.1 print server mode via the NDS network,
it is necessary to set up the file server and Fast EtherNet.
See later in this chapter for:
• using NetWare4.1 print server mode via the bindery
network;
• using NetWare4.1 remote print server mode;
• using Netware3.1.
The following example uses NetWare4. Some of the on-screen
instructions and options may vary depending on the OS version
and system configuration.
In this example, the Fast EtherNet is connected to the NetWare
NDS tree “ODCSOFT”, the admin user context “ENG7”, the
context “SOFT22.ENG7” for creating a print server, and the f ile
server “SOFT22-NW44”.
Starting PCONSOLE through NDS
For the purpose of this example we will use F: as the network
drive name for logging in to the NetWare server.
1 Go to the context where admin exists ([ENG7] in this
example), using the CX command.
F:\>cx ENG7
2 Log in from the client to the file server ([SOFT22-NW4] in
this example) using the admin authority.
After entering Login, input your password.
F:\>Login SOFT22-NW4/admin
3 Using the CX command, go to the directory in which a print
server, a printer and a print queue is generated ([SOFT22]).
F:\>cx SOFT22
74
Fast Ethernet
7100e+
Page 75

4 Activate PCONSOLE.
F:\>pconsole
[Available Options] is displayed.
Available Options
Print Queues
Printers
Print Servers
Quick Setup
Change context
Print Service Quick Setup
Print Server: 8C-PSERVER
New Printer: P1
New Print Queue: Q1-PS
Print Queue Volume: SOFT22-NW4_SYS
Banner Type: PostScript
Printer Type: Parallel
Location: Manual Load
Interruption: Unavailable
(Polling Mode)
Port: LPT1
English
Generating Print Server, Printer and Print Queue
3 Press the ESC key until [Save changes?] is displayed, select
[Yes], and press the Enter key.
1 Select [Quick Setup] and then press the Enter key.
Available Options
Print Queues
Printers
Print Servers
Quick Setup
Change context
Closing PCONSOLE
1 Press the ESC key until the display shows [Exit?], select
Save changes?
No
Yes
[Yes] and press the Enter key .
2 The print server name, printer name and print queue name
are automatically generated. Change them as necessary.
Input the print server name [8c-PSERVER], printer name
[P1] and print queue name [Q1-PS].
Set a banner type to suit the printer.
2 Log out from the file server.
Available Options
Exit?
No
Yes
F:\>Logout
User Manual 75
Page 76

Configuring the Fast EtherNet
This section explains how to use the Standard Setup Utility for
Windows. You can also make these changes using the Setup
Utility on a Macintosh or via TELNET. Read the following
description and choose the appropriate utility for your network
environment.
• Use the utility when the NetWare file server and the
print server are running normally.
• Ensure that the printer is switched on as the Fast
EtherNet cannot be configured when the printer is off.
This procedure assumes that the Standard Setup Utility has
already been installed. For information on installing the utility,
see “CHAPTER 7 Control of Fast EtherNet”.
1 Select the Fast EtherNet to be configured from the list.
The Ethernet address is displayed on the Fast EtherNet
self-diagnostics test. If there ar e many NetW ar e file servers,
there may be cases where the list is not displayed. In that
case, select [Environment Settings] in the [Options] menu
and click the [NetWare] tab. Select [Specify network to be
searched], enter the NetWare address where the Fast
EtherNet exists, then click [Add]. If you click [Search for
OKI Devices] in the [File] menu on the main screen, only
the NetW are addr esses you have specified will be sear ched.
76
Fast Ethernet
7100e+
Page 77

2 Select [OKI Device Setup] in the [Setup] menu.
3 Click [NetWare] tab .
4 Enter the following items on the NetWare setup screen.
English
Input the print server name. This must match the “Print server
name” you created earlier (8C-PSERVER in this example).
Match this to the network type you use (802.3 in this example).
Select “Print Server” (PSERVER Mode).
Input “Printer Name” (P1 in this example). This must match the
“Printer Name “ you created earlier .
User Manual 77
Page 78

5 Click [Print Server Details…] on the NetWare setup screen,
enter the following items, and click [OK].
6 Click [NDS Settings] on the NetWare Setup screen, enter
the following items, then click [OK].
Determine whether or not to enable the bindery mode. When
you print only with NetW are 4.1 NDS, uncheck this. Unchecking
this means the device cannot be used from NetWare4.1 bindery
or NetW are3.1.
Input the “File Server Name” controlling the printer (SOFT22-
NW4 in this example). This must match “File Server” you logged
in on earlier.
Set a password by which you log in to the file serve r. Enter this
if you have set a password for the print server.
Specify the queue poll rate in seconds. 4 seconds should
normally be used (default setting).
78
Enter the tree name in which the file server exists.
This must match “Tree Name” where the file server to which
you logged in exists.
Specify the context in which the file server has been generated.
This must match “Context Name” where you generated the print
server, printer and print queue.
Fast Ethernet
7100e+
Page 79

7 After all the settings are completed, click [Setup] on the
NetW are Setup screen.
8 If the settings are correct, click [Yes]. The settings will be
transmitted to the Fast EtherNet.
<NetWare4.1 Console Monitor>
NetWare 4.10 Console Monitor 4.12
Directory Tree ODCSOFT Server Name: SOFT22-NW4
Server Version: NetWare4.10-1998 March 31
English
At this point, however, the Fast EtherNet is still operated
using the previous settings.
9 Click [Yes] to reset the device.
If you select [No], the settings will become valid when the
printer is next power cycled. Depending on the printer model
used, you may need to power cycle it.
10 If the print server name you set is displayed on the
[NetW are 4.1 console monitor] of the file server, connection
to the file server is completed.
If it does not appear, try again to set the file server and Fast
EtherNet from the beginning.
General Information
Server Operating Hours: 30:09:47:40
Status of Use: 0%
Active Connections
4 8C-PSERVER
1 SUPERVISOR
3 MIYAMOTO
“Information on Connection” screen from “Available Options”
User Manual 79
Page 80

NetWare 4.1 Print Server Mode (Bindery)
NetW are 4.1 has a NDS netw ork and a bindery network.
Bindery Network
In order to use NetW are 4.1 print serv er mode with bindery , it is
necessary to set up the file server and Fast EtherNet.
• To use the bindery service, it is essential to specify the
bindery context in the file server. Make the following
settings from the server console in advance:
For Bindery Context OU=SOFT22.O=ENG7
set Bindery Context = OU=SOFT22.O=ENG7
• For using the NetWare4.1 print server mode via the
NDS network, see “Starting PCONSOLE through NDS”
earlier in this chapter.
• F or the NetW ar e 4.1 remote printer mode , see “NetW ar e
4.1 remote printer mode” later in this chapter.
• For using NetWare 3.1, see NetWare 3.1 environment
later in this chapter.
The following description uses NetW are 4.1 as an e xample. Some
of the screen shots and options may vary depending on the OS
version and system configuration.
In this example, the Fast EtherNet is connected to the NetWare
NDS tree “ODCSOFT”, the admin user context “ENG7”, the
context “SOFT22.ENG7” for creating a print server, and the file
server “SOFT22-NW4”.
Starting PCONSOLE on Bindery
For the purpose of this example we will use F: as the network
drive name for logging in to the NetWare server.
1 Log in to the file server from the client using the bindery
mode supervisor.
Log in to the file server “SOFT22-NW4” here.
After entering Login, input your password.
F:\>LoginSOFT22-NW4/supervisor/B
2 Start PCONSOLE.
F:\> pconsole
[Available Options] is displayed.
Available Options
Print Queues
Print Servers
Quick Setup
Change NetWare Server
80
Fast Ethernet
7100e+
Page 81

Creating a Print Queue
Registering Print Server
1 Select [Print Queues] and press the Enter key.
Available Options
Print Queues
Print Servers
Quick Setup
Change NetWare Server
2 Press the Ins key to input a print queue name to be newly
created (“Q-8C” in this example), then press Enter.
Print Queues
Q-8C
New Print Queue Name: Q8c
A print queue “Q8c” is generated.
1 Choose [Print Servers] and press the Enter key .
Available Options
Print Queues
Print Servers
Quick Setup
Change NetWare Server
2 The following message is displayed on the screen. Press the
Enter key to proceed.
You are using bindery emulation on a NetWare 4
server. A DS print server will not be able to
access any configuration done here. If you
intend to run a NetWare 4 print Server on a
NetWare 4 Server, it should be created and
configured in DS mode.
Press <Enter> to continue.
3 Press the Ins key and input a print server name to be newly
generated (“8C-PSERVER” in this example), then press
Enter.
New Print Server Name: 8C-PSERVER
The print server “8C-PSERVER” is registered.
English
User Manual 81
Page 82

Creating a printer controlled by the Printer Server
Allocating Print Queues to Printers
1 Select the print server you generated (“8C-PSERVER”) and
press the Enter key.
Print Servers
8C-PSERVER
2 Select [Printers] and press the Enter key.
Print Server Information
Printers
Information and Status
User
Operator
Service Network Server
Description
Password
Monitor
3 Press the Ins key to input the printer name to be created
(“OP8C” in this example), then press the Enter key.
Printer Name: OP8C
“OP 8C” is created.
1 Select the printer you have created (“OP8C”)and press the
Enter key.
Pre-defined Printers No. Status
OP8C 0 [c]
2 Select [Banner Type], then press the Enter key.
3 Choose [Text] or [PostScript] and press the Enter key.
Available Banner Types
Text
PostScript
4 Select [Print Queues Assigned], then press the Enter key.
5 Press the Ins key, select the print queue you have created
(“Q-8C”) from [Av ailable Print Queues], then press Enter .
6 Input a priority value of “1” for the print queue and press the
Enter key.
NetWare Server\Print Queue Priority Status
SOFT22-NW4Q-8C 1 [c]
The print queue is allocated.
7 Press the ESC key until [Save changes?] is displayed. Select
[Yes], then press the Enter key .
82
Fast Ethernet
7100e+
Page 83

Restarting PCONSOLE on NDS Mode
The following configuration is required in order to make the
queue generated in bindery mode available to other context
users in NDS mode.
If other NDS context users do not need to use the device then
the following configuration is not required. Proceed to “Setting
Fast EtherNet”.
1 Press the ESC key until [Exit?] is displayed on the screen,
then select [Yes] and press Enter.
2 Log out from the file server.
F:\> Logout
3 Using the CX command, go to the directory where admin is
to be found (“ENG7” in this example).
F:\> cx ENG7
4 Log in again to the file server (“SOFT22-NW4”) in NDS
mode as admin.
After entering Login, input your password.
F: >\Login SOFT22-NW4/admin
5 Using the CX command, go to the directory you specified in
the bindery context (“SOFT22”).
F:\>cx SOFT22
6 Start PCONSOLE
F:\>pconsole
[Available Options] is displayed.
Creating a Printer
1 Select [Printer] and press the Enter key.
2 Press the Ins key and input the printer name you created in
bindery mode (“OP8C” in this example), then press the Enter
key.
Printer: OP8C
“OP8C” is created.
Allocating Print Queue to Printer
1 Select the printer you created (“OP8C”) and press the Enter key.
2 Select [Banner Type] and then press the Enter key.
3 Select [Text] or [PostScript] and press the Enter ke y.
4 Select [Allocate Print Queue] and press the Enter key.
5 Press the Ins key, select the print queue you created in the
bindery mode(“Q-8C”in this example) from the [Object,
Class] and press the Enter key.
Object, Class
....* (Parent)
Q-8C (Print Queue)
The print queue is allocated.
6 Press the ESC key until [Save changes?] appears on the
screen, select [Yes], then press the Enter key .
English
User Manual 83
Page 84

Specifying Directory Users or Groups that can use the Print
Closing PCONSOLE
Queue
1 Press the ESC key until [Exit?] is displayed, then select
1 Select [Print Queues] from [Available Options] and pr ess the
Enter key.
Available Options
Print Queues
Printers
Print Servers
Quick Setup
Change Context
2 Select the print queue you created in the bindery mode
(“Q8C” in this example), then press the Enter key.
3 Select [User] from [Print Queue Information] and then press
the Enter key.
4 On the [Print Queue User] screen, press the Ins key. Select a
User or a Group from [Object, Class] and press the Enter key .
Object, Class
... (Parent)
* (Current Context)
+NETWORK_G (Group)
+SOFT22 (Group)
Admin (User)
miyamoto (Administrator)
[Yes]and press the Enter key .
2 Log out from the file server.
F:\>Logout
The user or group is registered.
84
Fast Ethernet
7100e+
Page 85

Configuring the Fast EtherNet
This section explains how to use the Standard Setup Utility for
Windo ws. You can also make these changes using the Setup
Utility on a Macintosh or via TELNET. Read the following
description and choose the appropriate utility for your
network environment.
• Use the utility when the NetWare file server and the
print server are running normally.
• Ensure that the printer is switched on as the Fast
EtherNet cannot be configured when the printer is off.
This procedure assumes that the Standard Setup Utility has
already been installed. For information on installing the utility,
see “CHAPTER 7 Control of Fast EtherNet”.
1 Select the Fast EtherNet to be configured from the list.
The Ethernet address is displayed on the Fast EtherNet
self-diagnostics test. If there ar e many NetW ar e file servers,
there may be cases where the list is not displayed. In that
case, select [Environment Settings] in the [Options] menu
and click the [NetWare] tab. Select [Specify network to be
searched], enter the NetWare address where the Fast
EtherNet exists, then click [Add]. If you click [Search for
OKI Devices] in the [File] menu on the main screen, only
the NetW are addr esses you have specified will be sear ched.
English
User Manual 85
Page 86

2 Select [OKI Device Settings] in the [Setup] menu.
3 Click [NetWare] tab .
4 Enter the following items on the NetWare setup screen.
5 Click [Print Server Details…] on the NetWare setup screen,
enter the following items, and click [OK].
Input the print server name (8CPSERVER in this example). This
must match the “Print server name” you created earlier.
Select the network type you use (802.3 in this example).
Select “Print Server” (PSERVER Mode).
Input “Printer Name” (08PC in this example). This must match
the “Printer Name” you created earlier .
86
Input the “File Server Name” controlling the printer (SOFT22NW4 in this example). This must match “File Server” you logged
in on earlier. Set a password by which you log in to the file
server. Enter this if you ha v e set a passw ord for the print serv er.
Specify the queue poll rate in seconds. 4 seconds should
normally be used (default setting).
Fast Ethernet
7100e+
Page 87

6 Click [NDS Settings] on the NetWare Setup screen, enter the
following items, then click [OK].
Determine whether or not to enable the bindery mode. When
you print only with NetW are 4.1 NDS, uncheck this. Unchecking
this means the device cannot be used from NetW are 4.1 bindery
or NetW are 3.1.
Enter the tree name in which the file server exists (ODCSOFT in
this example). This must match “Tree Name” where the file server
to which you logged in exists.
Specify the context in which the file server has been generated
(SOFT22. ENG7 in this example). This must match “Context
Name” where you generated the print server, printer and print
queue earlier.
7 After all the settings are completed, click [Setup] on the
NetW are Setup screen.
8 If the settings are correct, click [Yes]. The settings will be
transmitted to the Fast EtherNet. At this point, however, the
Fast EtherNet is still operated using the previous settings.
9 Click [Yes] to reset the device.
If you select [No], the settings will become valid when
the printer is next power cycled. Depending on the
printer model used, you may need to power cycle it.
English
User Manual 87
Page 88

10 If the print server name you set is displayed on the [NetW are
4.1 console monitor] of the file server , connection to the f ile
server is completed.
If it does not appear, try again to set the file server and Fast
EtherNet from the beginning.
<NetWare4.1 Console Monitor>
NetWare 4.10 Console Monitor 4.12
Directory Tree ODCSOFT Server Name: SOFT22-NW4
Server Version: NetWare4.10-1998 March 31
General Information
Server Operating Hours: 30:09:47:40
Status of Use: 0%
Active Connections
4 8C-PSERVER
1 SUPERVISOR
3 MIYAMOTO
“Information on Connection” screen from “Available Options”
88
Fast Ethernet
7100e+
Page 89

NetWare 4.1 Remote Printer Mode
In order to use the NetWare 4.1 remote printer mode, it is
necessary to set up the file server and the Fast EtherNet.
See other relevant topics in this chapter for:
• printing on the NetW are 4.1 print server mode through
via NDS network;
• printing on the NetWare 4.1 print server mode via the
bindery network;
• using NetWare 3.1.
The following description uses NetW are 4.1 as an e xample. Some
of the on-screen indications or options may vary according to
the OS version and system configuration.
In this example, the Fast EtherNet is connected to the NetWare
NDS tree “ODCSOFT”, the admin user context “ENG7”, the
context “SOFT22.ENG7” for creating a print server, and the f ile
server “SOFT22NW4”.
Starting PCONSOLE through NDS
For the purpose of this example we will use F: as the network
drive name for logging in to the NetWare server.
1 On the client, go to the context where admin exists (“ENG7”
in this example), using the CX command. After entering
Login, input your password.
F:\>cx ENG7
2 Log in to the file server (“SOFT22-NW4” in this example)
by using the admin authority. After entering log-in, input
your password.
F:\>Login SOFT22-NW4/admin
3 Using the CX command, go to the directory where you
generate the print server, printer and print queue (“SOFT22”
in this example).
F:\>cx SOFT22
4 Start PCONSOLE.
F:\>pconsole
[Available Options] is displayed.
English
User Manual 89
Page 90

Generating Print Server, Printer and Print Queue
Closing PCONSOLE
1 Select [Quick Setup] and press the Enter key.
2 The print server name, printer name and print queue name
are generated automatically. Change them as required.
Input the print server name “8c-PSERVER”, printer name
“P1” and print queue name “Q1-PS” in this example.
The banner type is generated accor ding to the printer.
Print Service Quick Setup
Print Server: 8C-PSERVER
New Printer: P1
New Print Queue: Q1-PS
Print Queue Volume: SOFT22-NW4_SYS
Banner Type: PostScript
Printer Type: Parallel
Location: Manual Load
Interruption: Unavailable
(Polling Mode)
Port: LPT1
3 Press the ESC key until [Save changes?] is on the screen,
then select [Yes] and press the Enter key.
1 Press the ESC key until [Exit?] is displayed. Select [Yes],
then press the Enter key.
2 Log out from the file server.
F:\>Logout
Starting the Print Server on File Server
1 Use the file server console to start the print server .
If the print server has already been running, check that noone is using it before restart it.
: LOAD PSERVER
2 On the [Input Print Server Name] screen, press the Enter key
to select the print server name you generated (previous page)
from [Details of current context] and then press the Enter
key. In this example, select “8C-PSERVER” from context
“SOFT22.ENG7”.
Current Context
SOFT22.ENG7
Details of Current Context
.
..
8C-PSERVER
90
Fast Ethernet
7100e+
Page 91

3 The print server is started.
Select [Printer Status] in [Available Options] and press the
Enter key.
Available Options
Printer Status
Print Server Information
4 Choose the printer name you generated earlier
(“P1.SOFT22.ENG7” in this example) is chosen from [Printer
List]. Press the Enter key .
Printer Status is displayed. Here, the [Current Status] should
be [Printer Not Connected].
Printer:FP1.SOFT22.ENG7
Type: F Manual Load (Remote), LPT1
Current Status: Printer Not Connected
Check the status of printer connection
English
User Manual 91
Page 92

Configuring the Fast EtherNet
This section explains how to use the Standard Setup Utility for
Windo ws. You can also mak e these changes using the Setup Utility
on a Macintosh or via TELNET. Read the following description
and choose the appropriate utility for your network environment.
• Use the utility when the NetWare file server and the
print server are running normally.
• Ensure that the printer is switched on as the Fast
EtherNet cannot be configured when the printer is off.
This procedure assumes that the Standard Setup Utility has
already been installed. For information on installing the utility,
see “CHAPTER 7 Control of Fast EtherNet”.
1 Select the Fast EtherNet to be configured from the list.
The Ethernet address is displayed on the Fast EtherNet
self-diagnostics test. If there are many NetWare file
servers, there may be cases where the list is not displayed.
In that case, select [Environment Settings] in the
[Options] menu and click the [NetWare] tab. Select
[Specify network to be searched], enter the NetWare
address wher e the F ast EtherNet exists, then click [Add].
If you click [Searc h for OKI Devices] in the [F ile] menu
on the main screen, only the NetWare addresses you
have specified will be searched.
92
Fast Ethernet
7100e+
Page 93

2 Select [OKI Device Settings] in the [Setup] menu.
3 Click [NetWare] tab .
5 Click [Remote Printer Details] on NetWare setting screen,
enter the following items, then click [OK].
4 Enter the following items on the NetWare setup screen.
Input the print server name (8CPSERVER in this example). This
must match the “Print server name” you created earlier
Enter the network type you use (802.3 in this example).
Select “Print Server” (RPRINTER).
Input “Printer Name” (P1 in this example). This must match the
“Printer Name “ you created on earlier.
English
Enter the “Print Server Name” controlling the printer (8C-PSERVER).
This must match the “Print Server Name” you gener ated earlier.
Enter the timeout setting for the release of the printer port. This
should normally be 10 seconds (default).
6 When all the settings are finished, click [Setup] on the
NetW are setup screen.
User Manual 93
Page 94

7 If the settings are correct, click [Yes]. The settings are
transmitted to Fast EtherNet. At this point, howe v er , Fast
EtherNet is still operating according to the previous
settings.
8 Click [Yes] to reset the F ast EtherNet.
• If you select [No], the new settings will take effect after
the printer is power cycled.
• Y ou may have to power cycle (switch of f, then on again)
the printer depending on the model.
9 When [Current Status] changes to [Waiting for Print Job],
the printer is ready.
If the status does not change to [Waiting for Print Job], set
the file server and Fast EtherNet again from the beginning.
<Print Server Status>
Printer: P1.SOFT22.ENG7
Type: Manual Load (Remote), LPT1
Current Status: Waiting for Print Job
Check the status of printer connection
94
Fast Ethernet
7100e+
Page 95

NetW are 3.1 Environment
Starting PCONSOLE
Under NetWare 3.1, both print server mode and remote printer
mode are supported. Although the procedures for setting the file
servers are the same, there is a difference in the configuration of
the Fast EtherNet. This section describes the settings for the file
server and Fast EtherNet required to print in the NetWare3.1
environment.
See earlier in this chapter for:
• using the NetWare 4.1 print server mode via the NDS
network;
• using the NetW are 4.1 print server mode via the bindery
network;
• NetWare 4.1 remote printer mode.
In the following description, NetW are 3.1 is used as an example.
Some of the on-screen indications and options may vary
according to the OS version and system configuration.
In this example, the Fast EtherNet is connected to the file server
“SOFT22-NW312”.
For the purpose of this example we will use F: as the network
drive name for logging in to the NetWare server.
1 On the client machine, log in to the file server (“SOFT22-
NW312”) as supervisor.
F:\>LOGIN SOFT22-NW312/supervisor
2 Start PCONSOLE
F:\>pconsole
[Available Options] is displayed
Available Options
Change File Server
Print Queue Information
Print Server Information
English
User Manual 95
Page 96

Generating Print Queue
Generating Printer controlled by Print Server
1 From the [Available Options], select [Print Queue
Information] and press the Enter key.
2 Press the Ins key. Enter the new print queue name to be
generated (“Q8C” in this example), then press the Enter key.
New Print Queue Name: Q8C
The print queue “Q8C” is generated.
Generating Printer Server
If you use an existing print server , the following settings are not
required. Proceed to “Generate Printer controlled by Print server”.
1 From the [Available Options], select [Printer Server
Information] and press the Enter key.
2 Press the Ins key to enter a new print server name to be
generated (“8C-PSERVER” in this example), and press the
Enter key.
New Print Server Name: 8C-PSERVER
The print server name “8C-PSERVER” is registered.
1 From the [Available Options], select [Printer Server
Information] and press the enter key.
2 Select the print server you generated (“8C-PSERVER”), then
press the enter key.
3 Select [Print Server Configuration] and press the Enter key.
4 Select [Printer Configuration], then press the Enter key.
5 Select a printer number to which no printer is installed, and
press the Enter key. In this example [Not Installed 0] is
selected.
Configured Printers
Not Installed 0
Not Installed 1
Not Installed 2
Not Installed 3
Not Installed 4
Not Installed 5
96
Fast Ethernet
7100e+
Page 97

6 Enter the remote printer name (“OP8C”) in the [Name]
column.
Environment Settings for Printer 0
Name: OP8C
Type: Pre-defined
Identifier by Company:
IRQ:
Buffer Size (K bytes):
Paper for Starting:
Queue Service Mode:
Baud Rate:
Data Bit:
Stop Bit:
Parity:
X-On/X-Off Worked or Not Worked
7 Select [Type] and press the Enter key. [Printer Type] is
displayed. Select [Remote Parallel, LPT1], then press the
Enter key.
Printer Type
Local Parallel, LPT1
Local Parallel, LPT2 Local Parallel, LPT3
Local Serial, COM1
Local Serial, COM2
Local Serial, COM3
Local Serial, COM4
Remote Parallel, LPT1
Remote Parallel, LPT2
Remote Parallel, LPT3
8 Press the Esc key until [Save changes?] is displayed, then
select [Yes] and press the Enter key .
The printer “OP8C” is generated on printer no. 0.
English
User Manual 97
Page 98

Allocating Print Queue to Printer
Printing in Print Server Mode
1 Select “Queues Serviced by Printer” and press the Enter key.
Print Server Configuration Menu
File Server Assigned
Printer Notification List
Queues Serviced by Printer
Printer Configuration
2 Select from “Pre-defined Printers” the printer to which a
print queue is to be allocated (“OP8C”). Press the Enter key .
3 Press the Ins key to select the print queue to be allocated to
the printer (“Q8C”). Press the Enter key .
4 Enter the priority for the print queue.
The print queue and its priority is assigned.
For allocating several print queues, repeat steps 3 and 4.
File Server Queue Priority
SOFT22-NW312 Q8C 1
Closing PCONSOLE
Press the Esc key until [Exit?] appears on the screen, then
select [Y es].
1 Use the utility to set the Fast EtherNet.
2 Follow the procedure for “Setting Fast EtherNet” via the
bindery network in NetW are 4.1 print server mode earlier in
this chapter.
Printing in Remote Print Mode
1 Start the print server (“8C-PSERVER” in this example) on
the file server console.
:LOAD PSERVER 8C-PSERVER
If the print server has already been running, check that no-
one is using it before restart it.
:UNLOAD PSERVER :LOAD PSERVER 8C-PSERVER
2 Set the Fast EtherNet using the utility.
Follow the procedure for “Setting F ast EtherNet” in NetW are
4.1 remote printer mode earlier in this chapter.
98
Fast Ethernet
7100e+
Page 99

Chapter
Chapter 7
Management of the Fast EtherNet
Using a Web Browser ............................................. 100
Using TELNET ...................................................... 109
Using standard setup utility (Windows) ................ 1 1 7
7
Environment setup ................................................. 12 9
Using quick setup utility (Windows) ..................... 13 0
Using setup utility (Macintosh) ............................ 1 33
Using JetAdmin ..................................................... 139
Using SNMP .......................................................... 140
Fast EtherNet settings ............................................ 140
Fast Ethernet
7100e
+
Page 100

Management of the Fast EtherNet
The Fast EtherNet can be configured from a computer on the
network. This procedure will now be explained.
Using a W eb Bro wser
If [the Fast EtherNet] is connected to the network with TCP/IP,
the Fast EtherNet settings and the printer menu settings can be
configured using a Web Browser such as Microsoft Internet
Explorer or Netscape Navigator.
Use a Web Browser which meets the following conditions:
· Microsoft Internet Explorer Ver.3.0. or higher
· Netscape Navigator Ver.3.0. or higher
Refer to the specific Web Browser manual on how to launch the
W eb Browser .
· There is no operation assurance on other Web Browser
than those mentioned above.
· The Fast EtherNet has to be connected to the network
with TCP/IP.
· In order to change the configuration, the user must
login as “root”.
· The password of the “r oot” user when the W eb Br owser
is used is the last 6 digits of the EtherNet address. This
password cannot be changed.
The following explanation relates to an example in which the
printer is OKIP A GE 8c(PS), W indows98 and Microsoft Internet
Explorer V er.4.0 are used.
1. Configure the IP address, subnet mask and gateway in the
Fast EtherNet.
For details, refer to “Configuring the IP address in the Fast
EtherNet” (Page 14).
2. Launch the Web Browser, type in the IP address of the Fast
EtherNet in the “Address (Location / Position)” and press
the Enter key.
<If the IP address is 192.168.20.127>
http:// 192.168.20.127
The Printer Status screen is displayed.
100
Fast Ethernet
7100e+
 Loading...