

Page 1

USERĜS MANUAL
Rev 1.0
Page 2
2
JANUS HD
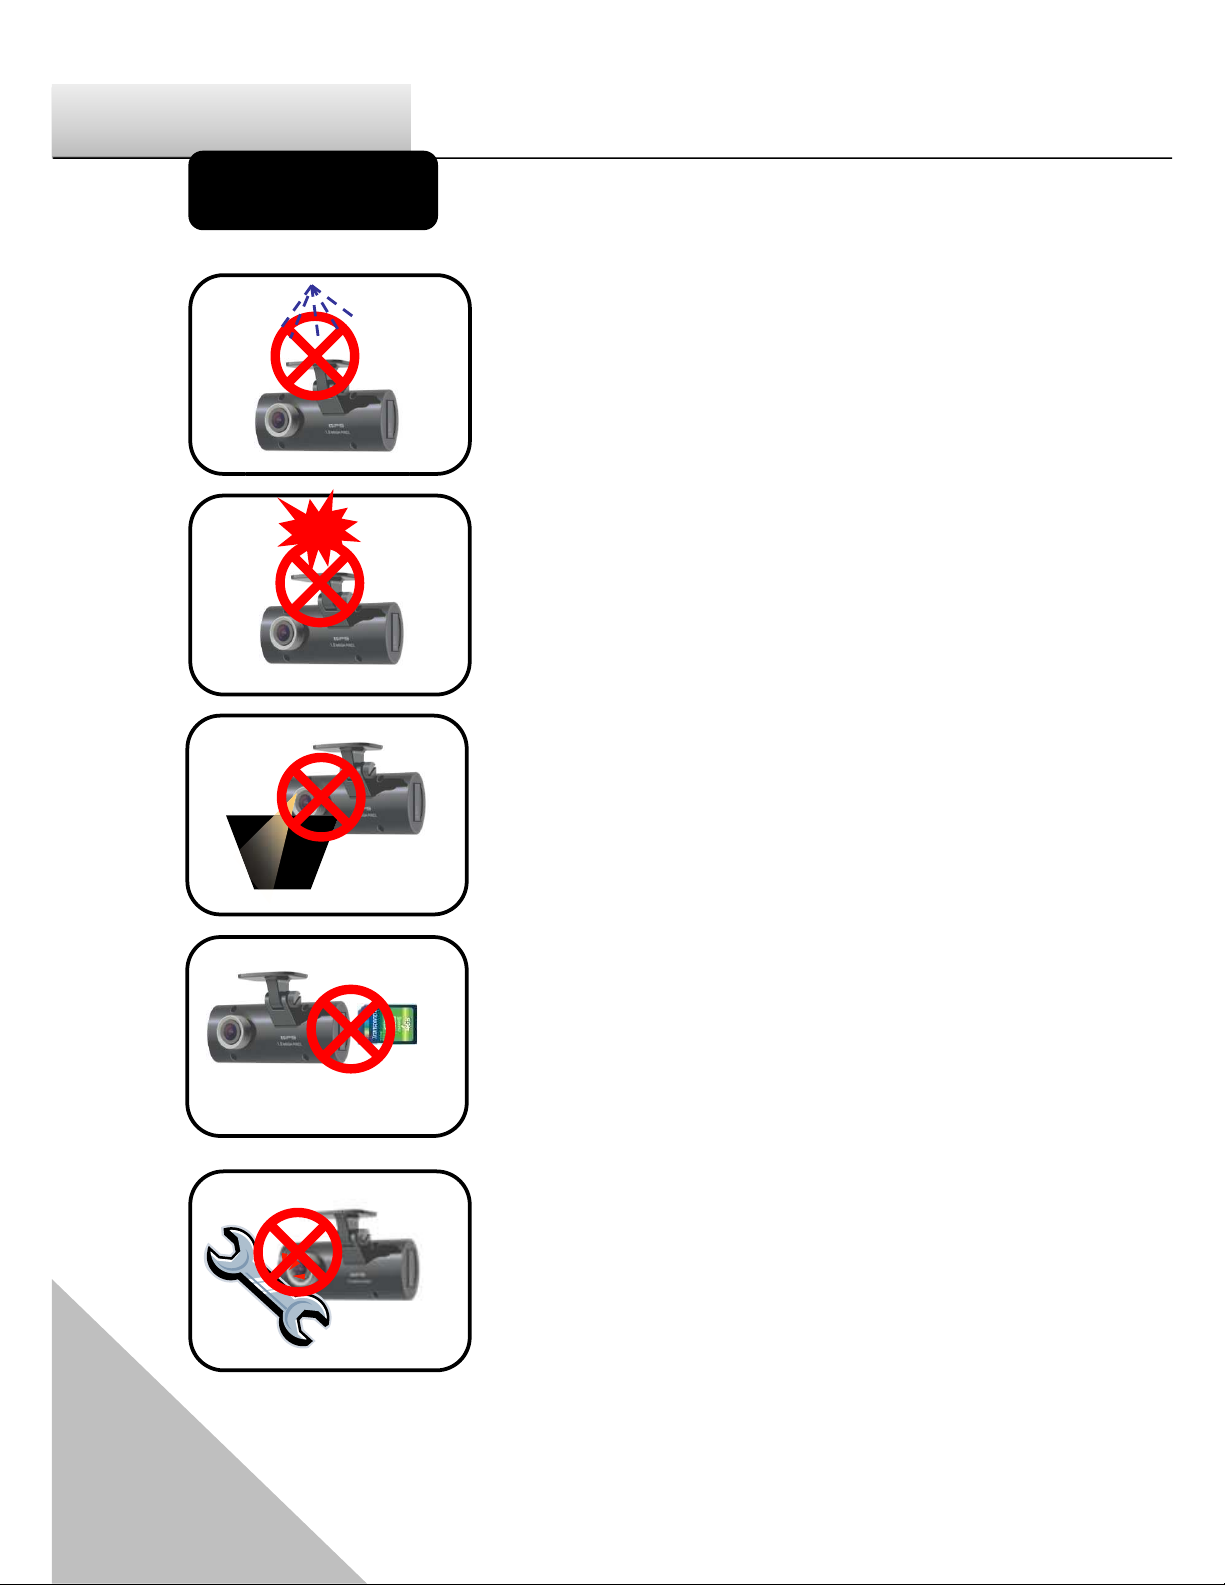
Caution
Do not clean the product with the liquid
or the volatility chemical. (it may damage
on the product. And it might cause a fire
or an electric shock.)
Do not insert something into the product
and let the product be heavily attacked.
(It causes the defectiveness and a fire and
an electric shock might happen.)
Do not overcoat on the windshield.
(it may distort and dim the video data.)
Make sure to pull out the SDHC card
after turning off the product. (It might
cause the damage on the SDHC card.)
Do not disassemble, repair or modify the
product. It causes the defectiveness. It
will void the warranty.
Page 3

3
Userğs Manual
About the product
Thank you for purchasing Janus HD. Janus HD features a built-in GPS antenna,
h.264 video compression for ultra-clear video, and intuitive playback
software for you to archive and view your recorded videos. Janus HD is
designed to record daily driving events inside your vehicle, and from the
driverĜV view. To play back the events, please use the included Janus HD
software.
Continuous recording
During driving, the product can keep recording the road view, audio and
GPS coordinates.
Record Speed ė MAX. 30 fps
Resolution ė 720P(1280 x 720), HVGAW (640 x 384)
Event Record
If some events happens while keep the continuous recording, the event
record automatically performs(a user can change the setting menu).
Emergency ( By pressing the emergency button)
Impact (By physical impact on the vehicle)
Over speed (for the case that the speed exceeds the one user set)
Analyze the data for video, audio, speed and GPS coordinates
Recorded data in SDHC card can be easily played back and analyzed in
the exclusive Janus HD viewer program. The recorded video/audio/GPS
coordinates/Speed are to be shown in the Janus HD viewer.
Page 4

4
JANUS HD
Contents
ࢿ૽˱۽ 5
ࢿ૽ָঢ় 6
ࢿ૽یߦ 7
ɾЯ۶ܻ۰ 8
ࢿ૽۶ 9
ֻТ ࠉʼ 13
ԻԒ ۶ 14
ԻԒ ۶ָ 15
ࢢۢ؏ئ 16
ࢢۢTip 17
ࠒۘؒ߶؏ئ 18
ݤݛ۶ࢽ 19
ࢇجઝ۶ࢽ 20
یࡈ۶ࢽ 21
ࢇѰݥҡݛ 22
؟ࢷ 23
߶ԦࢇҖ؏ئ 24
ˈࢠ ɼЯ 25
ˈیତ 26
ܕٸٗࢪଥʼࣱ 27
ࢿ૽ؿ۰ 28
Page 5
5
Userğs Manual
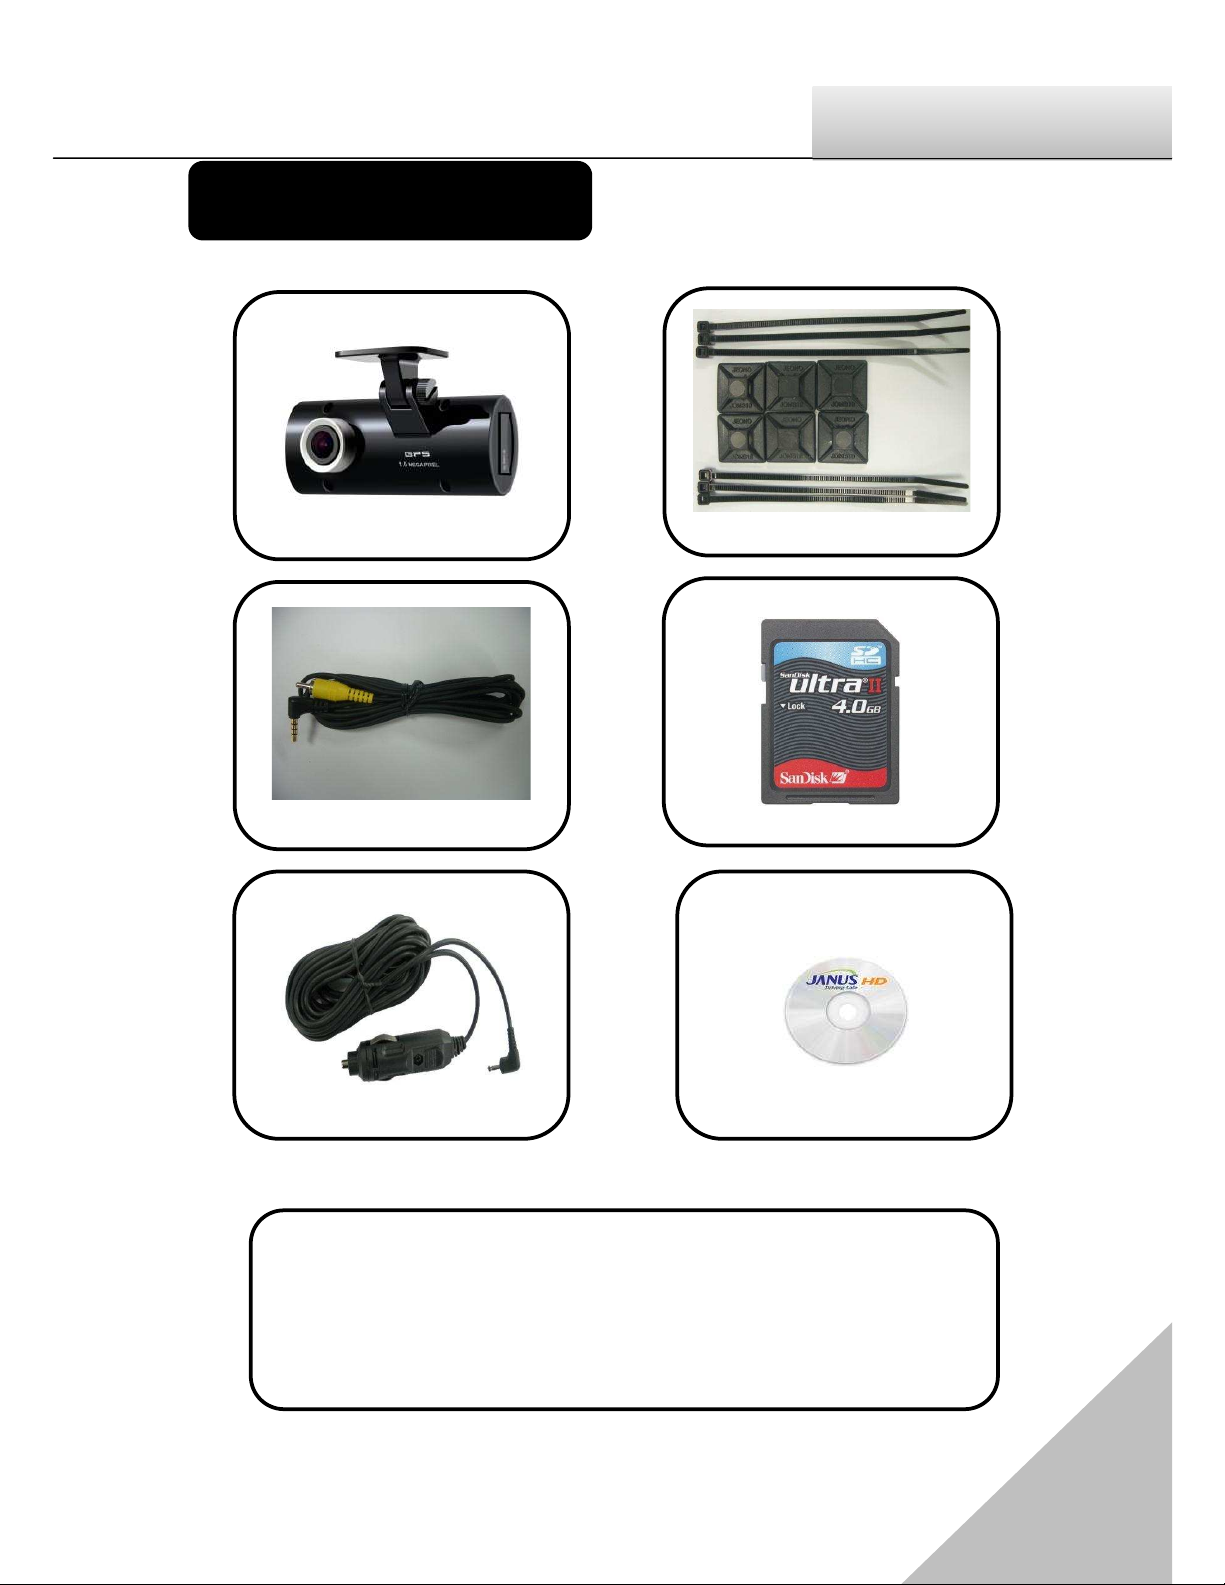
Contents of the package
JANUS HD & Bracket
Cable Holder
AV out cable
SDHC card
Cigar jack cable
CD
CD
Page 6
6
JANUS HD
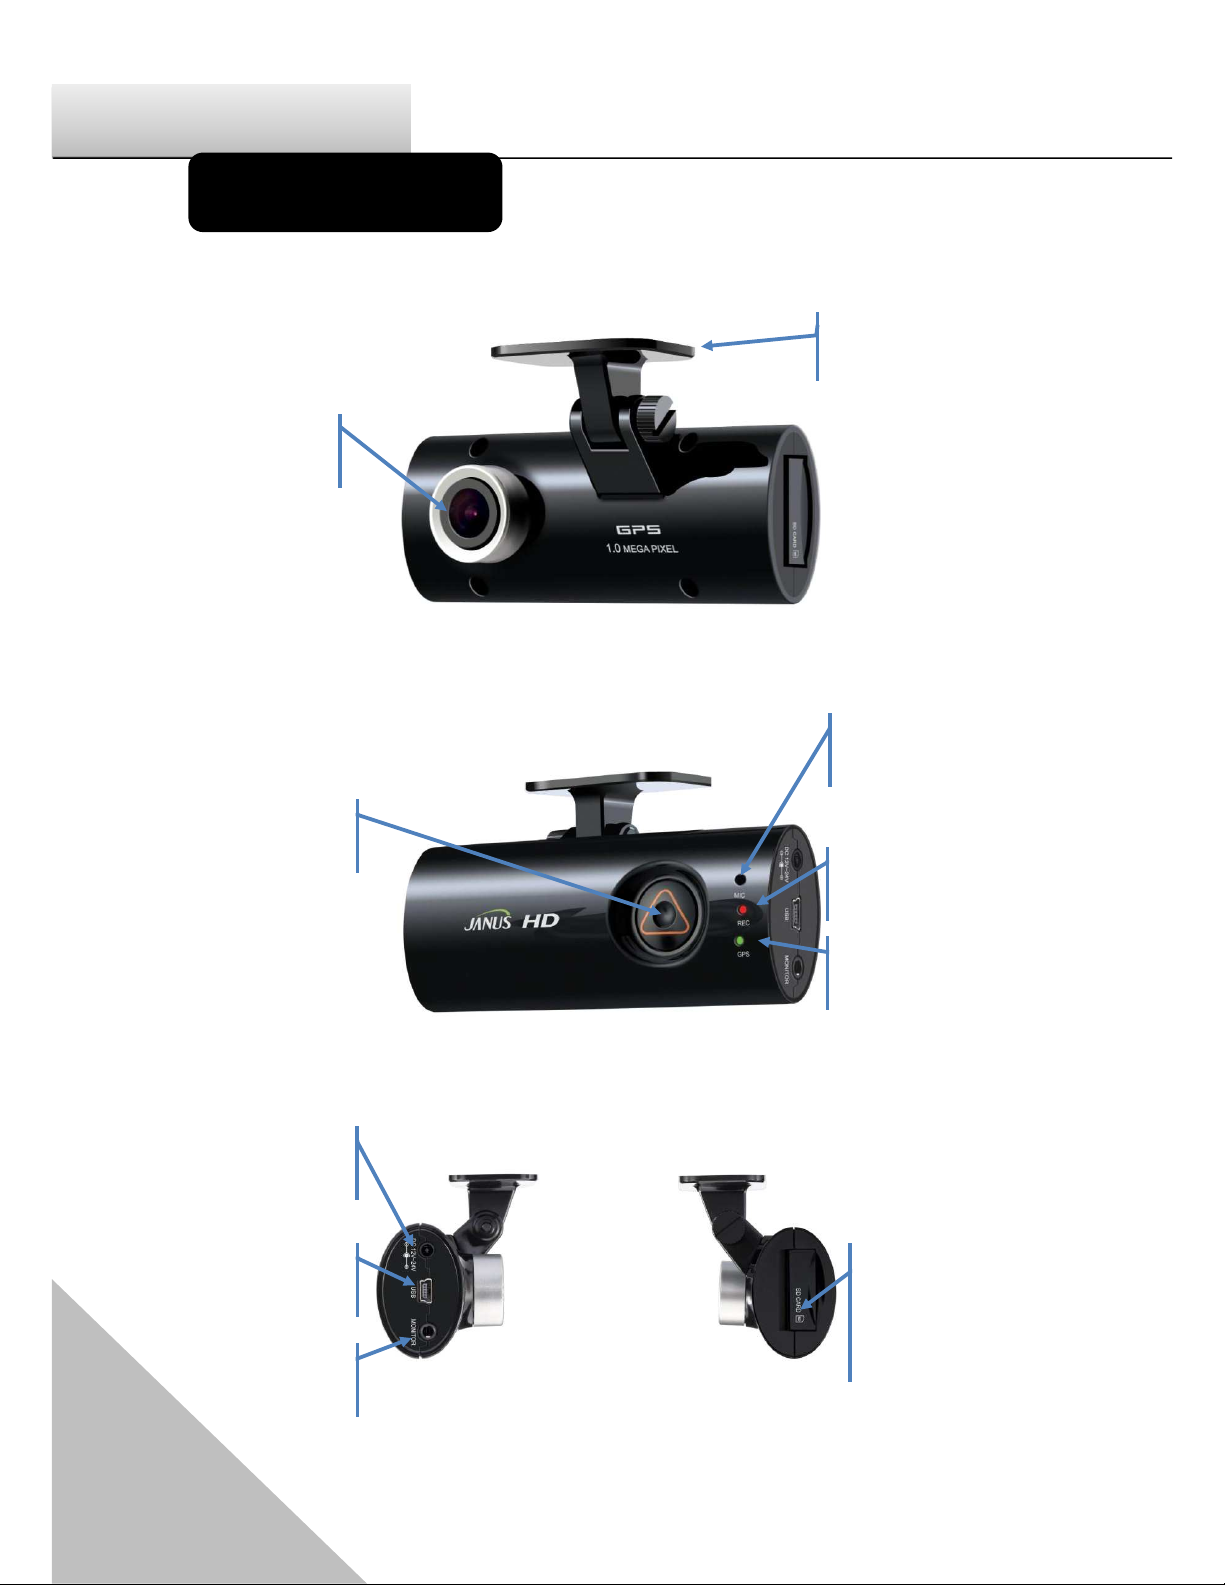
Name of Each part
Front
Rear
Left
Right
Lens
Bracket
EMG button
Mic
REC LED
GPS LED
Power Jack
Mini USB
Monitor port
SD card
Slot
Ȅ Mini USB is only for factoryğs debugging use. It cannot be used for the other
purpose. It cannot be connected with PC.
Page 7

7
Userğs Manual
JANUS HD
Image Sensor
1M CMOS sensor
Audio input
MIC Built In
Video Compression
H.264
Audio Compression
ADPCM
Record resolution
720P(1280*720), HVGAW(640*384)
Record Speed
Max.30fps
Emergence button
Event record by the emergency button
G-Sensor
Event record by the outside impact
GPS sensor
Event record by the userĜs set about over speed
Record Media
SDHC card (Max: 32GB, Default 8GB)
Recommendation type: over Class 6
Lens
120 wide lens
Viewer
Windows XP/ VISTA/ 7
Power
DC 7V~26V (enable Car Battery)
Operation
temperature
-5a0& (Storage temperature: -20a0&
Humidity
10~95%
Weight
100g(Except SDHC card)
Size (W x D x H)
100(W) x 42(D) x 39(H)mm
Ȅ As our products are subject to continuous improvement, we and our
subsidiaries reserve the right to modify product design, specifications,
and prices without notice and without incurring any obligation
Features
Page 8

8
JANUS HD
1. Please insert the SDHC card into the product.
2. Please combine the Janus HD main body and the bracket.
3. Please assign the proper place of the windshield behind the room mirror
and clean up the humidity and dirty on it with the dry fabric.
4. Please remove the protection cover the adhesive tape of the bracket.
5. After attaching the bracket on the windshield and fix the screw of the
bracket with the coin.
6. Please connect the power cable with JANUS HD and tie up the power cable.
7. Please start the drive and use the product(Keeping REC LED light on means
the normal operation).
8. Please remove SDHC card after turning off the product and check the
recorded data in the exclusive viewer in PC.
Easy Installation
Caution
When you install the product, please stop driving and park the
vehicle at the safe place
First connect the product to the power outlet then turn on it.
Only use the supplied power cable(DC 12V~24V).
Please clean up the windshield where the product is attached on
Janus HD. The dirty and the humidity can make the product dropped
from the windshield.
Page 9

9
Userğs Manual
Installation
Insert the SDHC card into the SD
card slot like the left image. In case
that the SDHC card is compulsorily
inserted unlike the left image,
damages will happen in SDHC card
and the product.
Assemble the bracket with the main
body.
The screw of bracket locates in the left
side from the over view.
Assign the place on the windshield, on
which the product is installed. Before
the installation, please clean off the
dirty and the humidity on the
windshield.
If possible, please install the product
behind the middle position of the
rear-view mirror to protect from
interfering with a driverĜs sight view.
Page 10

10
JANUS HD
Remove the protection cover from the
adhesive bracket and loosen the screw
of the mounting bracket slightly
loosen to adjust the mounting angle.
Firmly press the mounting bracket
combined with the product onto the
suitable place of the windshield.
Hold for 3 seconds to secure
Page 11

11
Userğs Manual
Tighten the screw of the mounting
bracket with the coin. Tighten screw
to secure mounting position, Road
view cameraĜs angle should be
adjusted in accordance with the
windshieldĜs tilt.
Put the power cable in order with the cable fix holder.
Page 12

12
JANUS HD
Plug in the car adapter to the product
and into the cigarette lighter to power
up.
Product takes 30 seconds to start up. It starts recording
with a beep.
During normal operation, REC LED will always be on.
Page 13

13
Userğs Manual
Connect the mini-jack from the video
cable into the Monitor port on the
side of the unit..
Connect the video cable into the
ěvideo inputĜ of the portable
display(not included).
Only use the supplied video cable. ė
Not support.
Monitor Connection
Page 14

14
JANUS HD
Install the viewer
Run ę-$186_HD(1.x.x).exeĚ
file from the installation CD.
(If the OS is windows
VIST/7, click the right
button of mouse and install
with userĜs authorization.
Foreign languages are
provided and the program
will be translated according
to the PCĜs OS
Select ęGeneral installationĚ
then click ęNextĚ button.
After clicking ęFinish InstallationĚ, the viewer program automatically
runs and the ICON creates.
Page 15

15
Userğs Manual
Backward play, Play
Volume up/down
1 frame playback
Explore events
Repeat a event
GPS signal window
Pause
Print
Next Event
Back up
Playback speed
Set up
Speed
Open a file
E-google map
(Under the
conditions that the
internet is
connected)
GPS Signal Bar
Viewer Guide
Page 16

16
JANUS HD
How to playback
After turning off the
product and take SDHC
card. Insert SDHC card
into PC and click the
viewer program Icon to
execute the program.
On the main menu,
select the time data you
want play and click the
play button to watch
the recorded data.
Page 17

17
Userğs Manual
Playback
Double click the left button of the mouse to convert the full screen from the
main screen. To return the main screen, click the left button of mouse again.
On the play screen, click the right button of the mouse on the position to make
the zoom. You can move everywhere for the zoom after pressing the button of
the mouse. Press the right mouse to remove the zoom function.
Page 18

18
JANUS HD
Back-up
There are
Image back up - JPEG, BMP,
AVI Back up, JDR Back up,
G-SENSOR Back-up.
-Back up for Image, AVI and JDR-
Select the time of the recorded data to
be back up and press the back-up
button.
In case of backing up the audio together
with video, check ęAudioĚ and nominate
the path of data then press ęNextĚ
button to make progress of the back-up.
1. AVI back-up file can be played back
in Windows Media Player or
other AV players.
2. JDR back-up file can be played
back in only JANUS HD viewer
program.
3. Image back-up file can be shown in
an image viewer or ęPaintĚ of
Window OS.
Page 19

19
Userğs Manual
System Set-up
Resolution- Select one among 720P or HVGAW.
Camera- Adjust the frame/sec.
Quality- Video quality can be set to one among 5 levels like ęVery
high/high/normal/low/very lowĚ.
Above setting are to make the influence on the data size and the SD card storage
space.
Audio : Recorded with voice or not.
Overwrite- In checking ęuseĚ, when the SD memory card is full, it will automatically
overwrite only the normal mode data saved on to the SD card from the beginning.
In checking ęNot useĚ, it will not record after writing the last data in SD card.
Standard time zone : Setting the appropriate time for each country
Auto Reboot - Set the auto reboot once daily for keeping the stable operation.
Km/Miles- Choose Kilometers or Miles on viewer.
Page 20

20
JANUS HD
Event- Emergency/Impact /Over speed /Sudden deceleration /Sudden acceleration
Frame :
Pre-alarm: 2~6 seconds recording before event occurs.
Post-alarm:2 ~30 seconds recording after event occurs.
Over speed- Set up the over speed monitoring system. Once the over speed limit has
been exceeded, the device will begin recording. Km or Miles will be shown according to
your chosen on System.
Impact : Applying G-6HQVRUĜVVHQVLELOLW\
Event Set-up
Page 21

21
Userğs Manual
User Settings
Car Info- Input the license number of the vehicle.
Driver Info- DriverĜs name.
Serial No- 7KHSURGXFWĜs serial no.
UserĜs Info
User ID- Input ID to log in the main screen(Default : admin).
Password- Input the password to log i(Default- No password).
Caution
This menu is for the private information. Please keep this
information from the disclosure.
In case of forgetting the password, you never log and
watch the recorded data at all in the viewer program.
Page 22

22
JANUS HD
Removal Disk
In case that some errors happen in SD card, this function is for restoring or
formatting the data of SD card. Before this work, please back up the recorded data
in SD card in preparation for the worst case to lose the recorded data.
Select the drive where is installed with the SD card.
Select one among ęDrive FormatĚ and ęRestorationĚ.
ęDrive formatĚ makes all recorded data removed. Please make sure to back up
all data before performing ęDrive formatĚ.
Caution
The speed of the SC card declines significantly when used for a long
period of time.
The management of SD card is important
Check and format the SD card every a week.
Page 23

23
Userğs Manual
Version
KERNEL- Show the information about KERNEL.
RAMDISK- Show the information about RAMDISK.
S/W VER- Shoe the information about the software.
VIEWER- Show the viewer version.
Page 24

24
JANUS HD
How to upgrade
1. Please download the firmware for upgrading the product.
Visit http://www.januspage.com and download the latest firmware.
2. Turn off the product.
3. Remove SD card.
4. Connect SD card to PC and copy the downloaded latest firmware in the
ęupdateĚ folder of SD card.
5. After copying the latest firmware in the SD card, insert it in the product. At
this point, the product should be in the power-off status.
6. Please turn on the product and make sure to keep supplying with the power.
7. The product will reboot with beep sound. Every LED will be flickering.
8. After the produce is successfully upgraded, it will normally operate after
rebooting.
To check the normal operation after upgrading the product, please press the
emergency button. If REC LED flickers, the normal operation is on.
Page 25

25
Userğs Manual
Troubleshooting
Phenomenon
Check point
The product does not turn on
Check if it is connected to a power supply
Check whether the correct voltage is being used.
Contact the nearest service center if the device doesnĜt
turn on even if it is connected to a power properly.
Check the fuse of the Cigar lighter . (more than 250V/3A)
Cannot find the recorded video
During search, make sure the recorded video is present
Does not record
Make sure if the SD card is not faulty
Try again after formatting the SD card
If the device beeps every 2 seconds, remount the SD card.
If still having the problems, contact the service center.
Cannot reply the recorded video.
Make sure if the SD card is not faulty.
Use the SD card recovery feature in the removable disk
category of the viewer program.
If still having the problems, contact the service center.
The objects are not clear in the video.
Try again after cleaning the lens with soft cloth
Always keep the camera clean.
If still having problems, contact the service center.
Cannot record at night.
Request the service from the retailer where the produce
was purchased.
Cannot connect to EMAP
Check if connected to the network.
Cannot install the viewer program.
If using Window Vista and Vista 7, you need to install the
viewer program with the authorized installation..
Parts of audio or video data is lost
. Recommend using Class 6 or higher SD card.
PC does not recognize the SD card
Check if the SD card reader supports SDHC.
The time stamp of the data in the SD
card is not correct
Once the GPS starts to operate, the time will set to correct
value automatically. Check the selected time zone in the
configuration settings stored in the SD card.
The audio playback is normal, but the
video playback is black
Compatibility problem with graphic card driver. Please
update with the latest version driver.
Page 26

26
JANUS HD
Reference
The scope of warranties and liability
We are not responsible for the harm caused by product failure, damage due
to loss of data, and other damage caused by using the product.
This deviceĜs purpose is for recording the vehicle accidents but all the
accidents that video recording is not guaranteed.
If the power failure happens by the accident, the product might not keep
recording the data.
Tip for GPS
GPS connection time will vary depending on the vehicleĜs location and/or
surrounding environment.
Caution for the installation
Install the product far from other devices in the vehicle. The Metallic coated
windshield causes the bad GPS reception.
Recalculation Guideline
GPS calculates the location based on the signal from the satellite so, it will
take the time to recalculate due to the constant movement of the satellite.
Depending on the amount of elapsed time after GPS, it takes will be
different the GPS works correctly all the time. Namely, in case that there
would be the big difference between the last position stored in GPS and GPS
re-starting position, it will take the long time.
Compatibility table for SDHC
SDHC Class 6 Type(SLC,MLC)
FAT32
Transcend Class6- 4G/ 8G/ 16G
Sandisk Ultra Class4- 4G/ 8G/ 16G/ 32G
Page 27

27
Userğs Manual
Guarantee card
 Loading...