

Janam XG3 User Manual

XG3 User Manual
Technology at Work ®.
© 2015 Janam Technologies LLC. All rights reserved.

XG3 User Manual
Contents
Introduction
1
Introduction 1–1
Key Features 1-1
Hardware Overview 1–2
Getting Started
2
Recommended Host Computer
Requirements 2–1
Janam XG3 SDK 2–1
Update Your Desktop PC Software 2–1
Install the Battery 2–2
Charge the Batteries 2–2
Battery Disposal 2–5
Turn the XG3 Device On 2–7
Screen Alignment 2–8
Fundamental Navigation 2–10
Status Icons and Controls 2–10
Indicator Icons 2–11
Battery Charging and Power Alert Info 2–12
Setting Up the XG3 Device
3
Locating Key Controls and Components 3–1
XG3 Connector 3–1
Keyboard-Controlled Screen Navigation 3–2
microSD Removable Memory 3–3
microSD Card Slots 3–3
LCD Screen Options and Calibration 3–4
Setting Basic User Preferences 3–5
Device Password 3–6
Screen/Keyboard Lock 3–7
Regional Settings 3–8
Owner Information 3–9
Screen Orientation 3–10
Changing the Device Name 3–11
Volume Adjustments 3-13
Sounds and Notifications 3-14
Battery Power 3-15
Conserving Battery Power 3-15
Keylight Enable and Duration Function 3-18
Disabling Connectivity 3-18
Opening Applications 3-19
Removing Programs 3-19
Communication Ports 3-19
Program Buttons 3-20
CH–PG
CH–PG
CH–PG
Resetting the XG3 Device
4
Entering Information 5–1
Typing 5–1
Changing On-Screen Keyboards 5–2
Keyboard Shortcuts 5-2
Enabling ClearType Text 5-3
Text Size 5-3
Drawing and Writing 5-3
Voice Notes 5-4
Introduction 6–1
Barcode Scanning System 6–1
Laser-Based Configurations 6-2
Activating the Barcode Scanner 6–2
2D Imager-based Configurations 6-3
Decode a Bar Code 6-3
Activating the Imager Scanner 6-4
Using ScanWedge 6-4
Create a User Profile 7–1
Setting Up and Deleting Partnerships 7–1
Adding and Removing Files 7-1
Partnership (Connection) Settings 7–2
End a Partnership 7–2
Introduction 8–1
Configuring the WLAN Radio 8-1
Reset (reboot) the XG3 Device
Soft Reset (Warm Boot)
Hard Reset (Cold Boot)
Master Reset (Clean Boot)
Data Entry—Alpha, Numeric
5
and Importing
Data Capture—Barcode Scanning
6
Synchronizing the XG3 Device
7
Wireless Local Area Network
8
(WLAN)
CH–PG
4–1
4-1
4-2
4-2
CH–PG
CH–PG
CH–PG
CH–PG
Janam Technologies LLC

L
LC
9
10
Bluetooth CH–PG
Overview 9–1
Enabling the Bluetooth Radio 9–2
Pairing Bluetooth Devices 9–2
Regulatory CH–PG
XG3 User Manual
XG3 Regulatory Information 10-1
Trademarks 10–1
Symbols 10-1
Power Supply 10-2
Laser Safety 10-2
FCC/EU RF Exposure 10-3
CB Scheme 10-3
Canadian Compliance 10-4
Radio Compliance 10-4
WEEE Compliance 10-5
Janam Technologies

L
LC
XG3 User Manual
1
The XG3 is Janam’s next-generation, gun-shaped, rugged mobile computer designed to excel in the most
challenging environments. Eliminating the weight and bulk associated with competitive devices, Janam’s XG3 is
the lightest industrial-grade mobile computer in its class.
Built to withstand the rigors of all-day, every-day use in manufacturing facilities, distribution centers, plant
floors, loading docks, ports and other demanding workspaces, the XG3 pairs breakthrough ergonomic design
with the latest technological advancements, enabling mobile workers to increase productivity and improve
operational efficiencies. With its pistol grip optimized for user comfort and a choice between Honeywell’s
Adaptus® imaging technology and Motorola’s SE965 extended-range 1D laser scan engine, the XG3 is
optimized for scan-intensive, extended shift use. Features include a 3.5-inch color display with hardened glass,
ARM Cortex-A8 CPU @1GHz and choice of keypads to provide the performance, power efficiency and flexibility
that enterprise and government customers require. The XG3 also delivers exceptional battery life with a
standard 5200mAh hot-swappable Li-ion battery.
Janam’s XG3 rugged mobile computer is sealed to IP65 standards and survives repeated 6’ drops to concrete.
It’s technology at work.
Key Features
― Lightest industrial-grade mobile computer in its class
― Largest standard battery capacity in the industry
― Multiple 6’ drops to concrete
― Sealed to IP65 standards
― High-performance barcode scanning
― Microsoft WEH 6.5 OS
― ARM Cortex-A8 CPU @1GHz
― Brilliant 3.5” VGA display
― Storage memory expansion capability
― 802.11a/b/g/n Wifi and Bluetooth
Janam Technologies
Introduction
1-1
L
LC
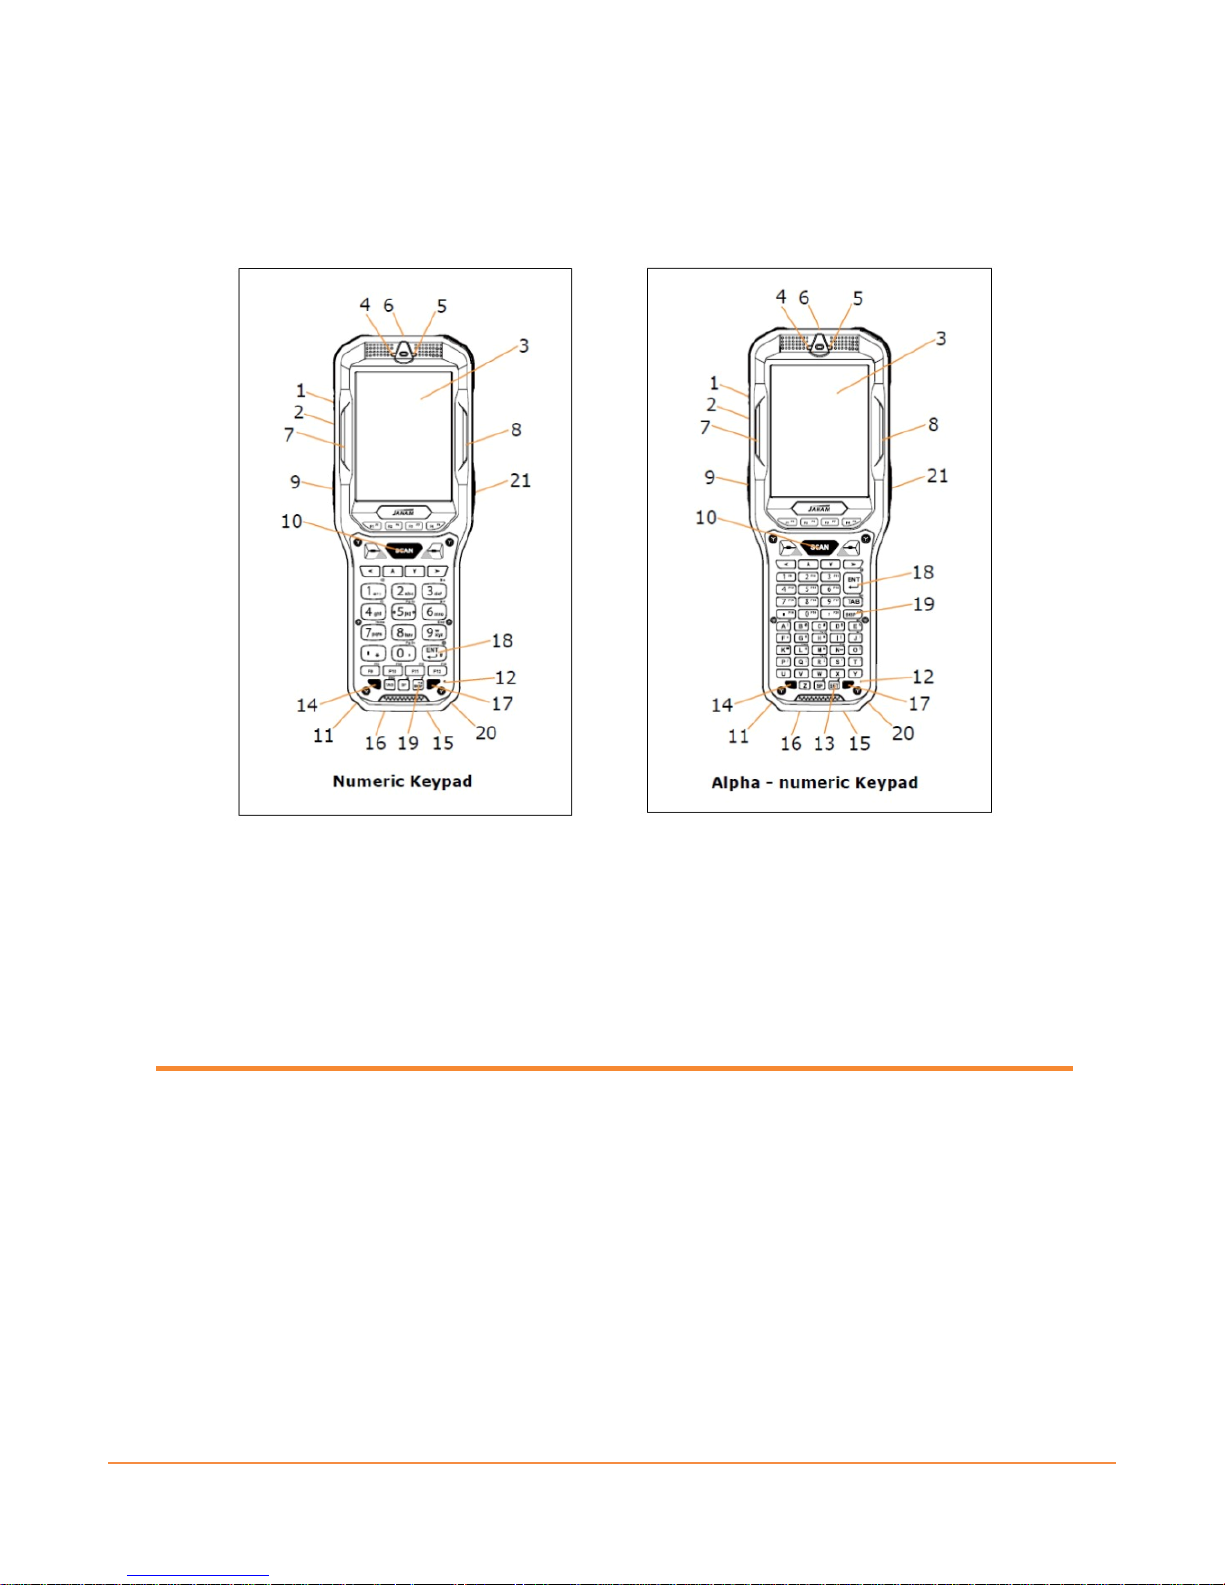
Hardware Overview
Janam Technologies
1. PowerButton 12. Microphone
2. HeadsetwithMicrophone 13. ShiftKey
3. LCD 14. YellowFunctionKey
4. IndicatorLED 15. DCJack
5. NotificationLED 16. Connector
6. ScanWindow 17. BlueFunctionKey
7. LeftScanLED 18. EnterKey
8. RightScanLED
9. LeftTrigger 20. RightBottomScanLED
10. ScanTrigger 21. RightTrigger
11. LeftBottomScanLED
XG3 User Manual
19. BackSpaceKey
1-2

L
LC
1. Battery 7. Speaker
2. BatteryLockSwitch 8. microSDCardCover/Slot
3. StylusSlot 9. HandstrapBar
4. Stylus 10. ScanTrigger
5. LanyardConnector 11. HandstrapHole
6. ScanWindow
Janam Technologies
XG3 User Manual
1-3

Getting Started XG3 User Manual
2
Getting Started
Unpack Your XG3 Device
Make sure you have the following:
― Janam XG3 Series mobile computer
― Handstrap
― Stylus
― Documentation (Quick Start Guide, License Agreement and Regulatory Guide)
― Charging accessory (one or more of the following power/connection kits
ordered/packaged separately):
― Janam AC/DC wall mount adapter with barrel connector
― Janam mobile communication cable with AC adapter (CAB-J-003U)
― Janam 1-Slot or 4-Slot Cradle with AC adapter
Recommended Host Computer Requirements
― Windows-compatible host computer
― Microsoft
― 100 MB of available hard disk space
― One available serial or USB port
®
Windows® 8, Windows 7, Windows XP or Windows 2000 operating system
Janam XG3 SDK
The Janam XG3 Software Development Kit enables programmers to develop applications for Janam XG
Series rugged mobile computers running the Microsoft Windows Embedded Handheld operating system.
It contains details and instructions for developing applications that access the Janam XG3 libraries,
including scanning, imaging and hardware utilities.
The development kit, which can be downloaded from Janam’s Product Zone site (login required), is
designed for use with Microsoft Windows Embedded Handheld and Visual Studio 2005/2008
development environment.
Update Your Desktop PC Software
Confirm that the host computer has the latest version of Microsoft ActiveSync (version 4.5 or higher) or
Windows Mobile Device Center (version 6.1 or higher) software intended for use with the host
computer’s operating system, e.g. Windows Vista, XP or 2000. For additional ActiveSync information and
downloads, please visit the Microsoft website at http://www.microsoft.com.
Janam Technologies LLC 2―1
Getting Started XG3 User Manual
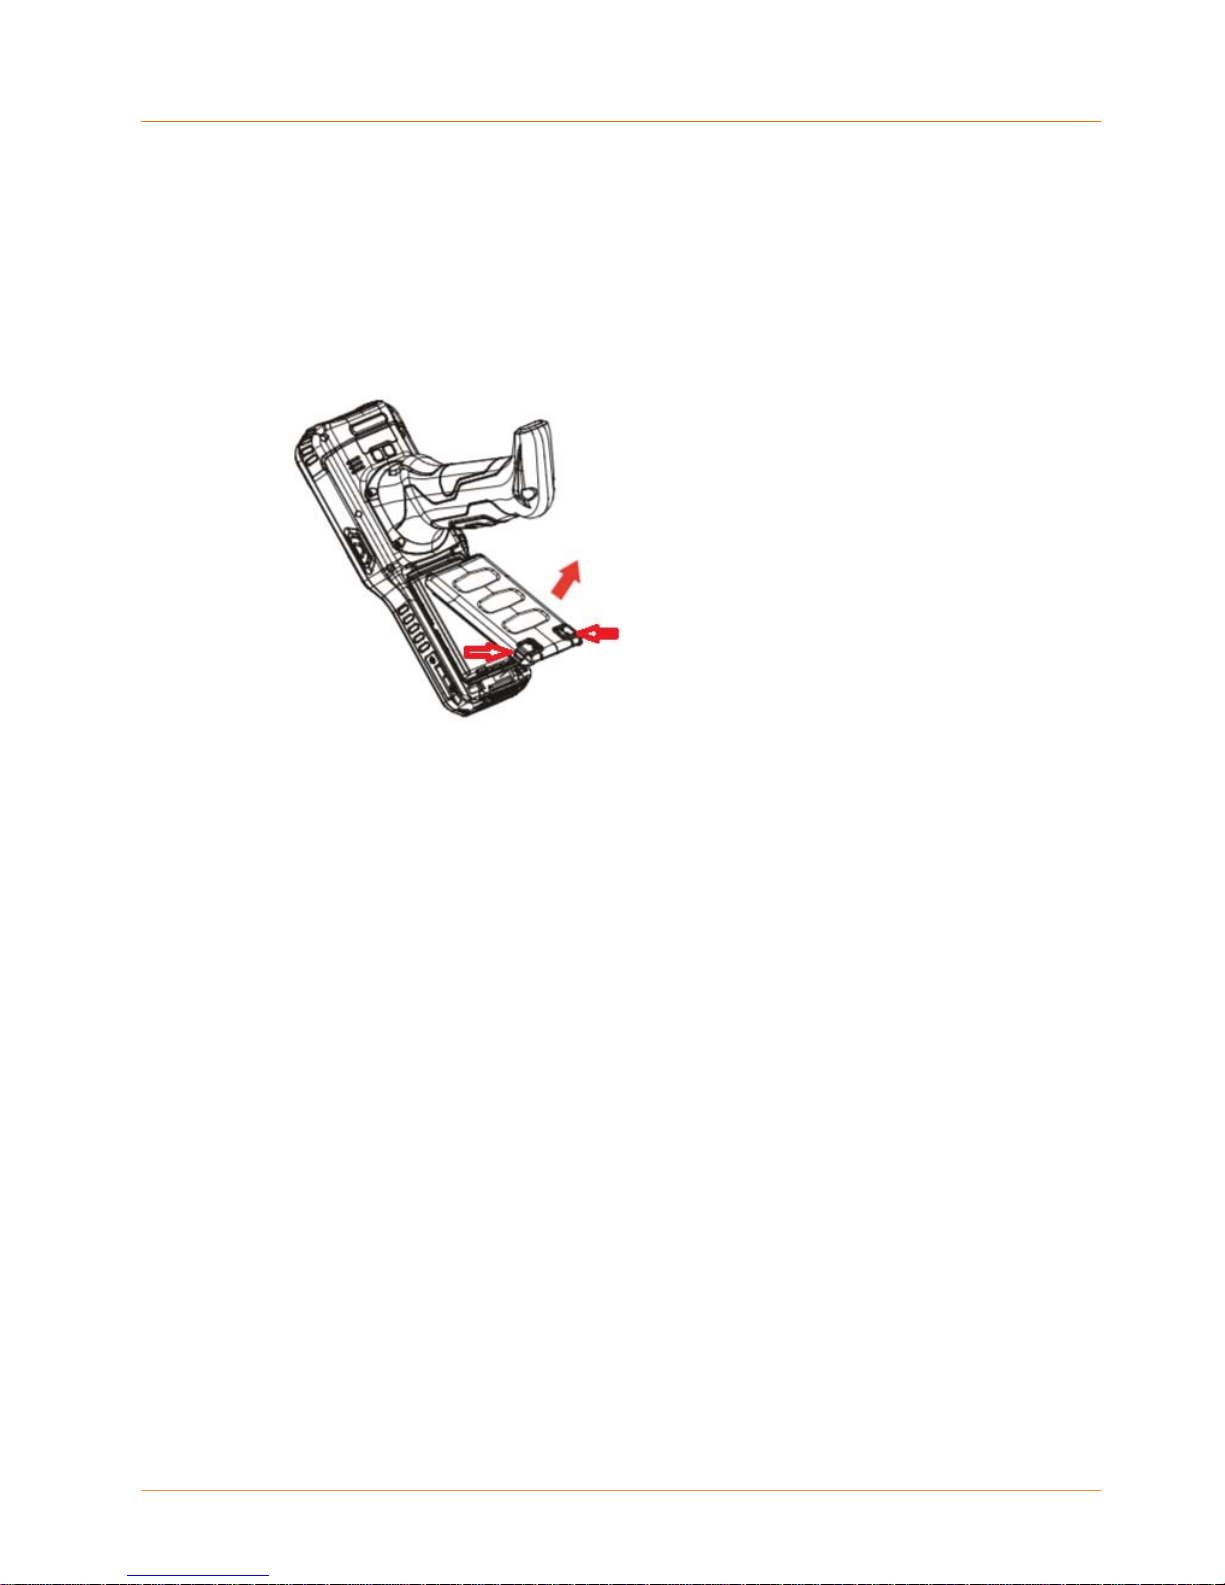
Install the Battery
The XG3 mobile computer is shipped with the battery packaged separate from the unit. Follow the steps
below to install the battery.
1. Remove the battery compartment door by moving the battery door’s metal locks to the up
position. With the locks in the up position, pull door away from device housing.
Insert the battery with the batteries flat surface facing down.
2. Replace the battery door by inserting battery door tabs into guides near the handle, then press
down on the battery door locks.
☞
NOTE: The battery door must be installed in order to power the device on.
WARNING: Use only Janam approved Li - Ion battery packs. Unauthorized batteries may result in
damage not covered by the warranty.
Changing the Main Battery Pack
Before removing a battery pack, press the Power key to put the terminal in Suspend Mode so that
operations are suspended before removing the main power source. Always put the terminal in Suspend
Mode prior to changing the battery.
☞
NOTE: The battery door must be installed prior to booting the unit.
Charge the Batteries
The XG3 ships with only the main battery pack significantly charged. Charge the main battery pack with
the XG3 charging cable for a minimum of 4 or 6 hours before initial use.
Charging with DC Adaptor
a. Attach the appropriate plug adapter to the plug of the power cable.
b. Insert the plug into the appropriate power source. Plug the XG3 power cable into
the DC Jack at the bottom of the unit.
Janam Technologies LLC 2―2
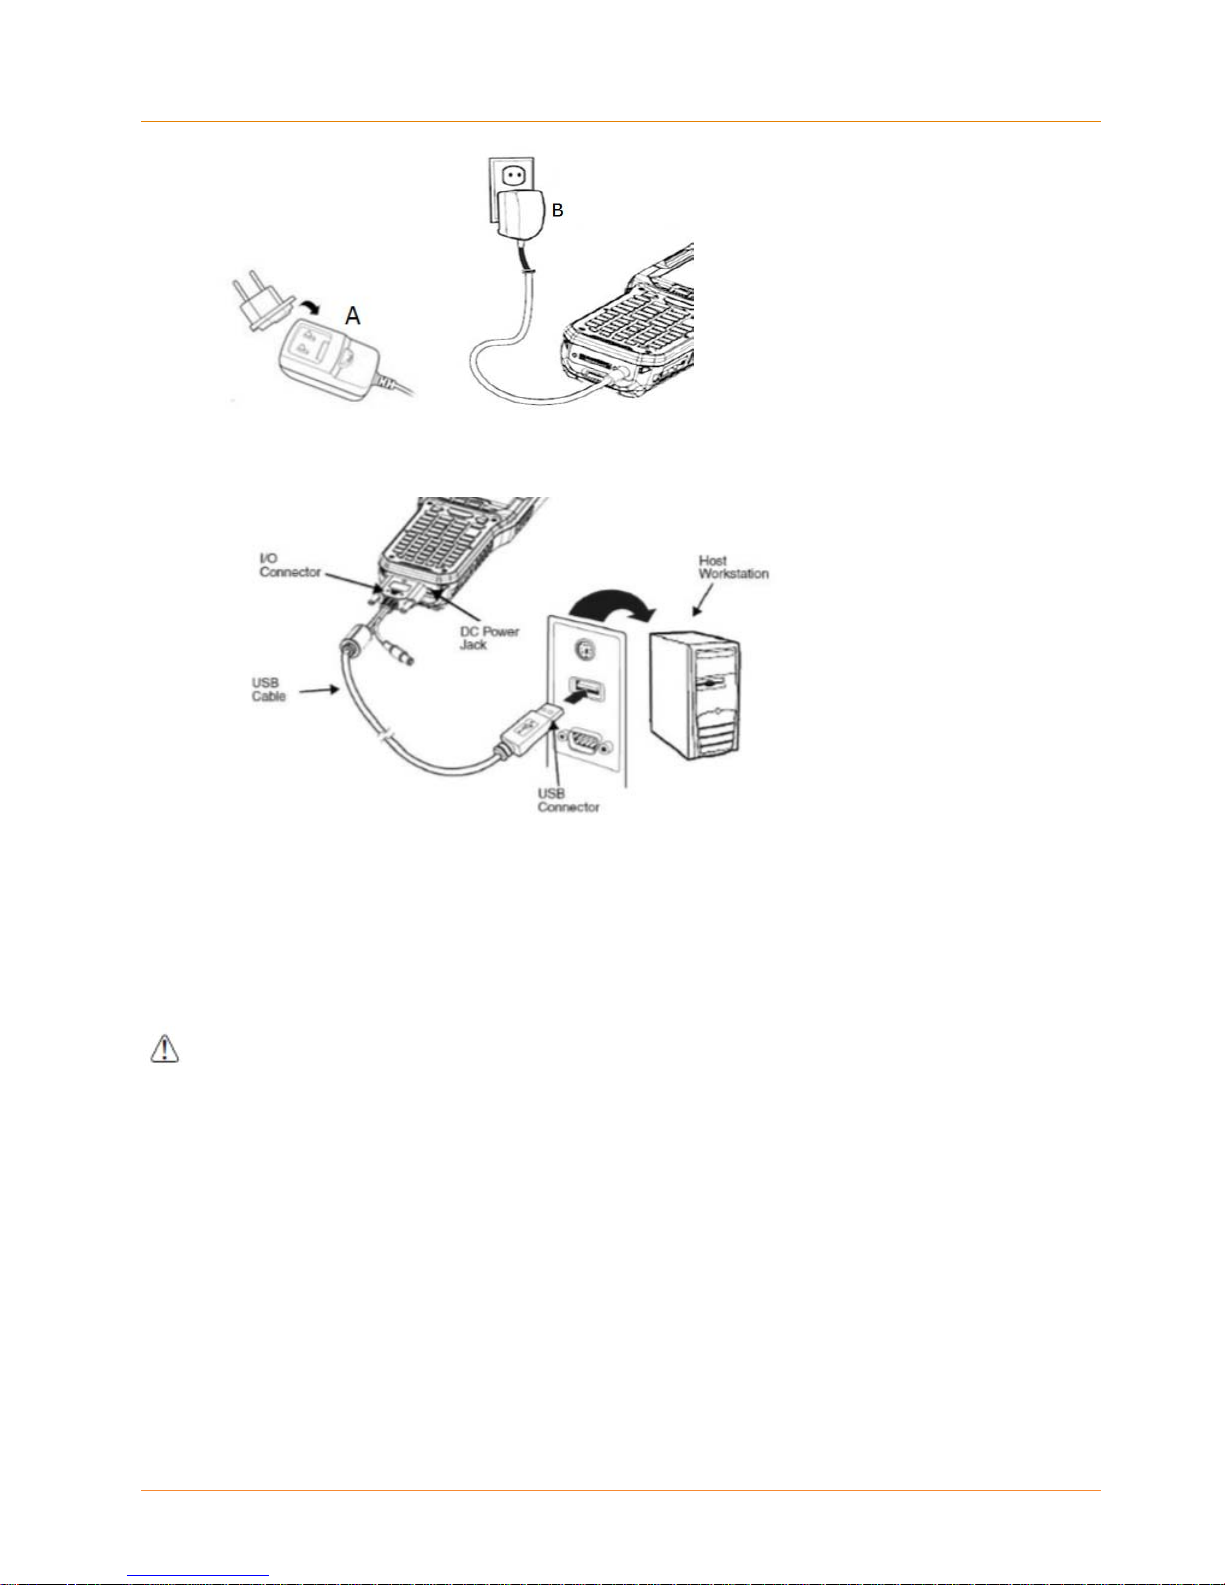
Getting Started XG3 User Manual
Charging with I/O connector
Charging Time
The 5200mAh Li-ion battery pack requires six hours to charge to full capacity.
WARNING: Use only Janam-approved peripherals, power cables, and power adapters.
Unauthorized peripherals, cables, or power adapters may cause batteries to explode or damage
your device.
DO NOT attempt to charge damp/wet Mobile Computers or batteries. All components must be dry
before connecting to an external power source.
☞
NOTE: If you remove the battery pack, you have 30 minutes of backup power.
Managing Main Battery Power
Data and files saved on the Mobile Computer may be stored in RAM memory; therefore, maintain a
continuous power supply to the terminal to help prevent data loss. When you remove a battery pack,
insert another charged battery pack in the Mobile Computer. If the main battery pack is low, insert the
terminal into a charging peripheral to power the terminal and begin recharging the battery.
Janam Technologies LLC
2―3
Getting Started XG3 User Manual
☞
NOTE: If the main battery is low and the terminal is in Suspend Mode, pressing the Power
button does not wake the MOBILE COMPUTER; you must replace the discharged battery with a
fully charged battery or apply AC power to the terminal.
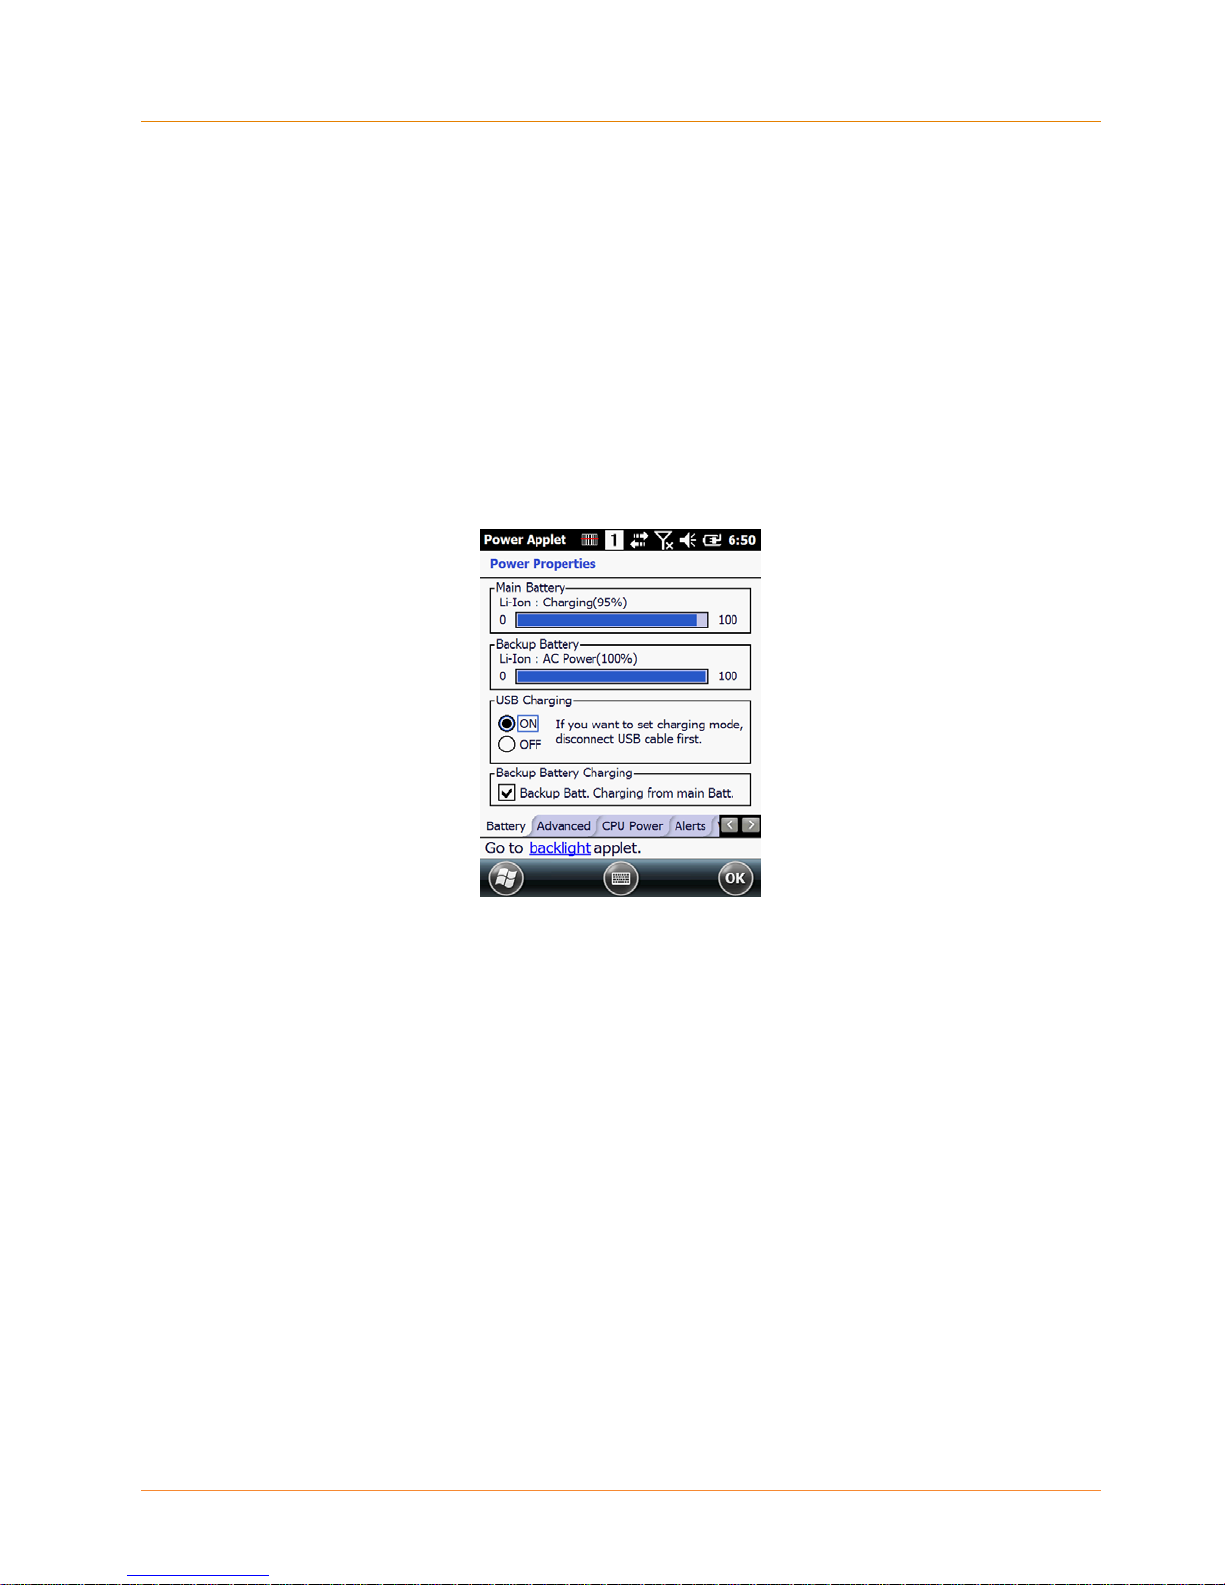
Checking Battery Power
Tap the battery icon to open the Power Properties. The Battery tab opens displaying the charge status of
the main and backup battery.
☞
NOTE: You can also check battery power by tapping Start > Settings > System > Power.
LED Indicators
LED Color Meaning
Red Lights when main battery is charging.
Blinks, when the battery is very low (<10%),
Lights when the battery is low (<20%),
Janam Technologies LLC 2―4

Getting Started XG3 User Manual
Green Lights, when the PDA resets
Lights when main battery charging has completed.
Blue Lights when PDA wakes up
Red Lights when PDA suspends
Guidelines for Battery Pack Use and Disposal
The following are general guidelines for the safe use and disposal of batteries:
Store the terminal and the spare batteries between 20 to 30 ºC (68 to 86 ºF) in order to maintain
optimal battery performance.
Standard batteries must be charged at a temperature ranging from 0 to 45 ºC (32 to 113 ºF)
The XG3 gets warm during charging. This is normal and does not mean a malfunction.
To achieve the best battery life, turn off the radios not in use.
Annual replacement of rechargeable battery pack avoids possible risks or abnormalities and
ensures maximum performance.
WARNING:
components must be dry before connecting to an external power source.
DO NOT attempt to charge damp/wet Mobile Computers or batteries. All
WARNING:
recycled according to local guidelines.
WARNING:
and following this manual.
The battery pack may get hot, explode, ignite, and/or cause serious injury if exposed to abusive
conditions.
If the battery pack is replaced with an improper type, there is risk of explosion.
Do not place the battery pack in or near a fire or heat; do not place the battery pack in direct
sunlight, or use or store the battery pack inside unventilated areas in hot weather; do not place
the battery pack in microwave ovens, dryer, high pressure containers, on induction cookware or
similar device. Doing so may cause the battery pack to generate heat, explode or ignite. Using
the battery pack in this manner may also result in a loss of performance and a shortened life
expectancy.
Use only a Janam approved power supply. The use of an alternative power supply will void the
product warranty, may cause product damage and may cause heat, explode or ignite.
The area in which the units are charged should be clear of debris and combustible materials or
chemicals.
Never throw a used battery in the trash. It contains heavy metals and should be
Installing, charging and/or any other action should be done by authorized personnel
Janam Technologies LLC
2―5

Getting Started XG3 User Manual
WARNING:
Do not short-circuit the battery pack contacts connecting the positive terminal and negative
terminal. This might happen, for example, when you carry a spare battery pack in your pocket
or purse; accidental short–circuiting can occur when a metallic object such as a coin, clip, or pen
causes direct connection of the contacts of the battery pack (these look like metal strips on the
battery pack). Short–circuiting the terminals may damage the battery pack or the connecting
object.
Do not apply voltages to the battery pack contacts.
Do not pierce the battery pack with nails, strike it with a hammer, step on it or otherwise
subject it to strong impacts or shocks.
Do not disassemble or modify (i.e. bend, crush or deform) the battery pack. The battery pack
contains safety and protection devices, which, if damaged, may cause the battery pack to
generate heat, explode or ignite.
In case of leakage of liquid from the battery, avoid contact with liquid the skin or eyes. If the
contact occurs, immediately wash the affected area with water and consult a doctor.
Do not solder directly onto the battery pack.
Do not expose the battery pack to liquids.
Do not replace the battery pack when the device is turned on.
Do not remove or damage the battery pack’s label.
Do not use the battery pack if it is damaged.
Battery pack usage by children should be supervised.
Collect and recycle waste batteries separately from the device and comply with European
Directive 2006/66/EC, 2011/65/EU, 2012/19/EU and subsequent modifications, US and China
regulatory and others laws and regulations about environment.
Janam Technologies LLC
2―6
Getting Started XG3 User Manual
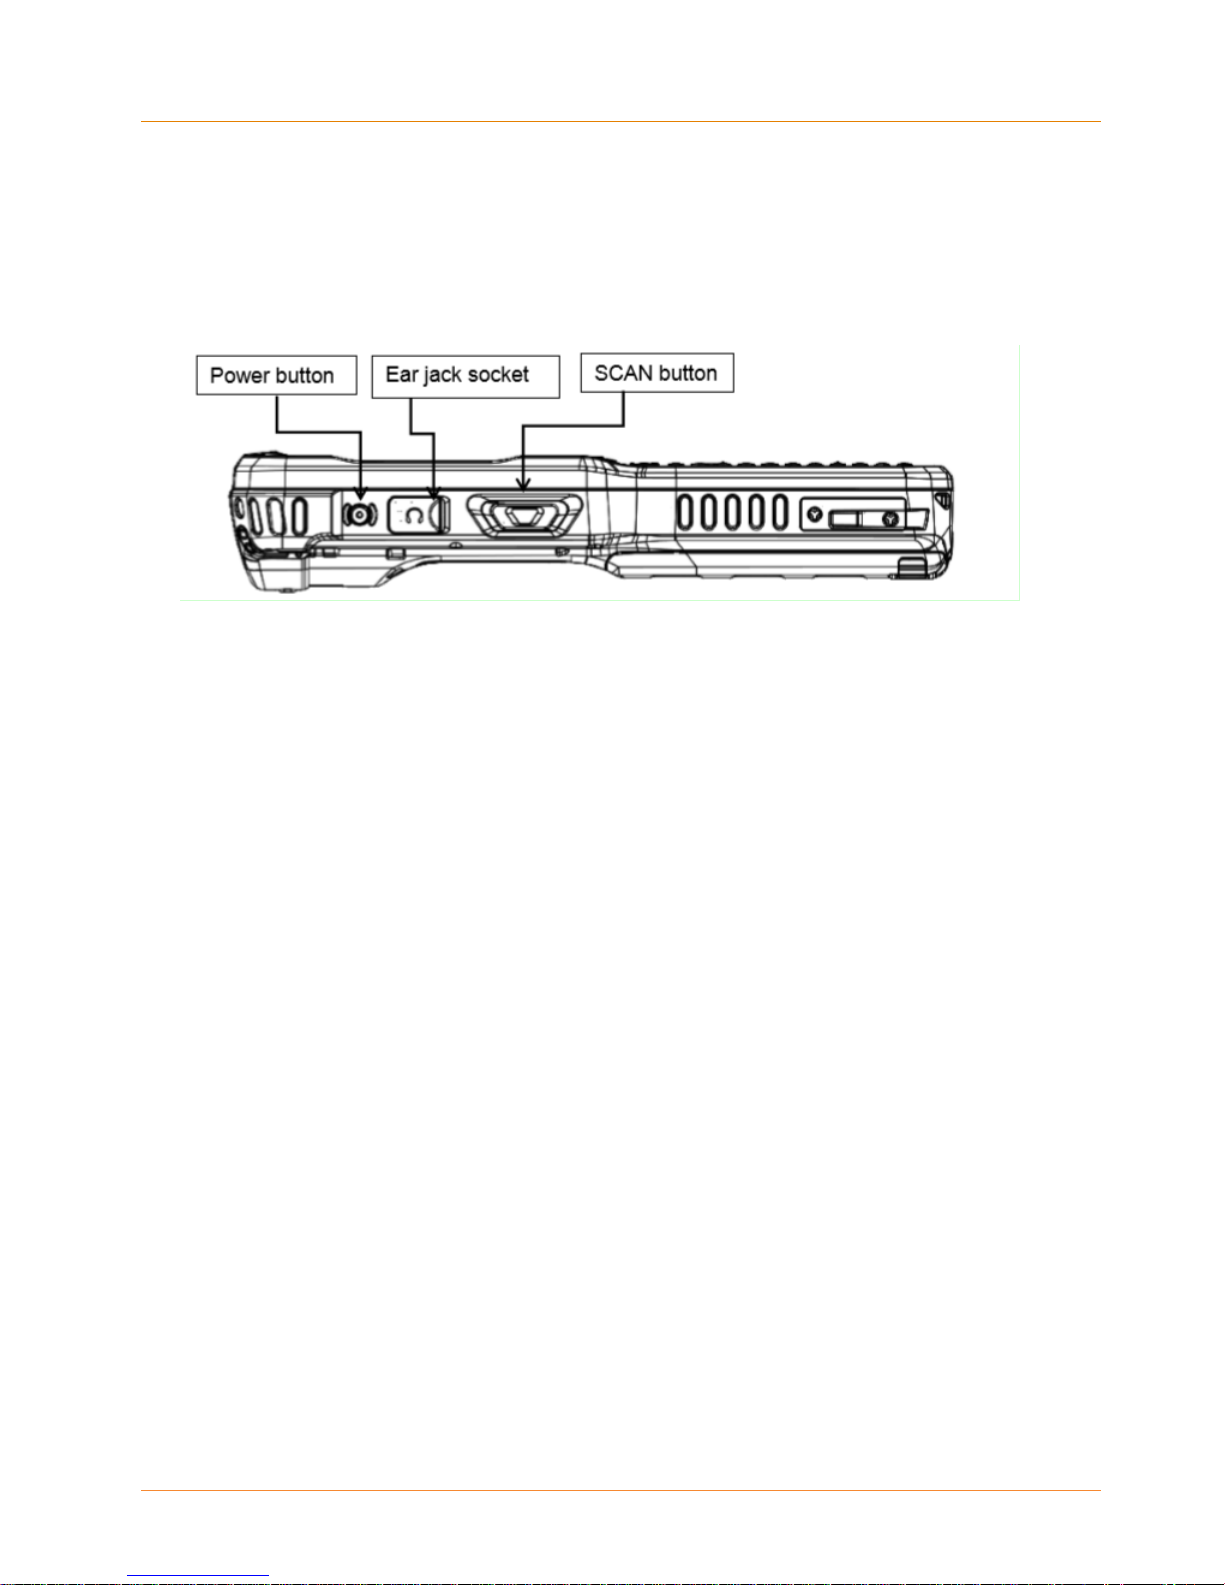
Turn the XG3 Device On
With a fully charged battery installed, press and release
the Power button on the left side above the speaker jack.
Pressing the power button again will suspend the XG3
device’s operation. Holding the power button for an extended
time will invoke the boot option screen.
See Chapter 4 for additional information about reset
functions.
IMPORTANT NOTE!
lways use the supplied stylus for tapping or making strokes on the screen.
O NOT use a pen, pencil or any other object on the touch screen.
Janam Technologies LLC 2―7
Getting Started XG3 User Manual
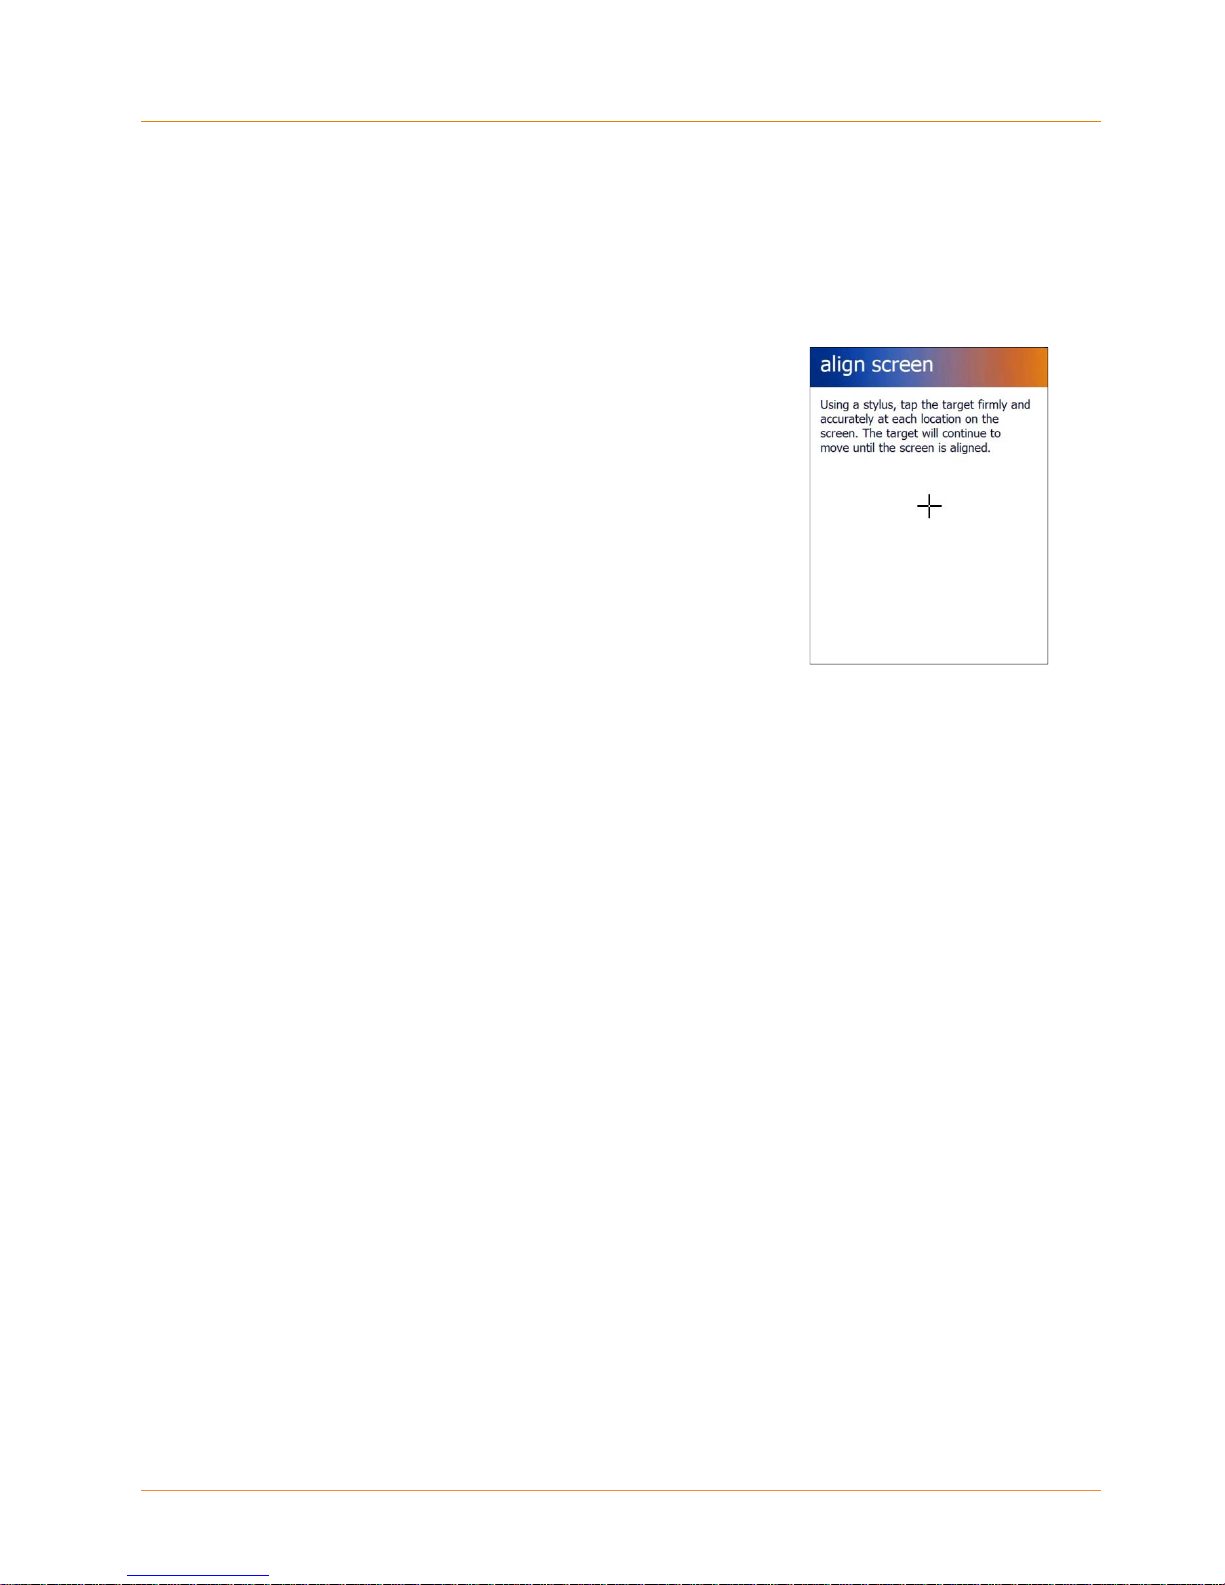
Screen Alignment
Initial startup of the XG3 device and/or after a clean boot, the
device will launch the on-screen align screen instructions.
Aligning the screen calibrates the device’s internal circuitry with its
touch-sensitive screen, optimizing stylus-to-screen detection.
To align the screen:
1. Tap the screen when automatically instructed to do so during
initial setup or after a clean boot.
2. Follow the on-screen instructions, tapping the screen where
indicated by the crosshair symbol.
instructions. Continue to tap each changing crosshair position
with the stylus until the screen exits the align screen function
and returns automatically to the Screen Orientation screen.
If, during use, there is a noticeable decrease in stylus
response accuracy, the unit may be easily recalibrated from
the Start > Settings > System > Screen Icon.
Follow the on-screen
Janam Technologies LLC 2―8
Getting Started XG3 User Manual
T
r
S
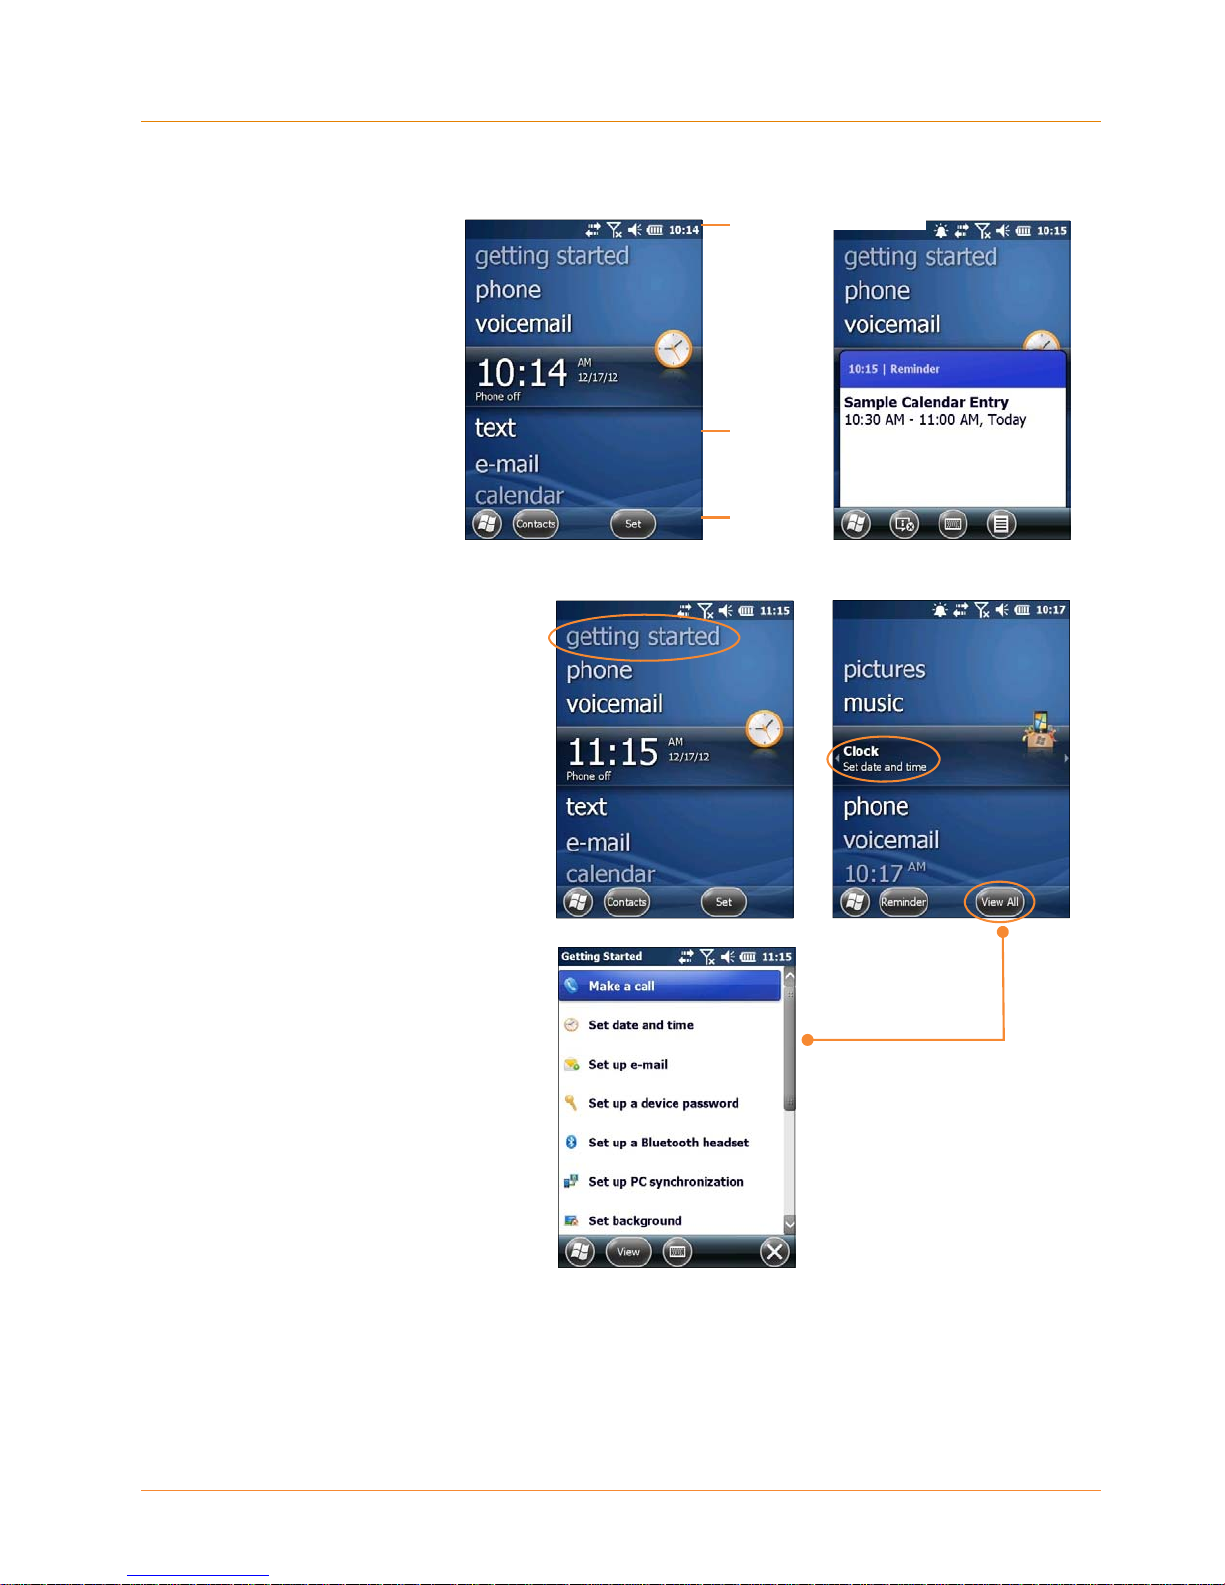
Startup Screen
The XG3 mobile computer
HomeScreen
displays the Home screen
at startup, providing quick
access to key functions,
device setup tools and easy
navigation to additional
functions and applications.
When enabled, calendar
reminders will be displayed
on the Home screen at
startup.
Getting Started
Begin by tapping getting started
which will present the Clock menu.
From the Clock menu you can take
the minimally required action of
setting the date and time or tap
View All to review all Getting
Started options, including:
Status
Toolbar
Main
Screen
Tile
oolba
tartScreen
― Make a call
― Set date and time
― Set up a device password
― Set up a Bluetooth headset
― Setup PC synchronization
― Set background
― Set ring tone
― Transfer music
― Online Help & how-to
― Add/remove Getting Started
Once these XG3 device options are set
as desired, the Add/remove Getting
Started function allows the removal of
the Getting Started tab from the
home screen menu.
Janam Technologies LLC 2―9
Getting Started XG3 User Manual
p
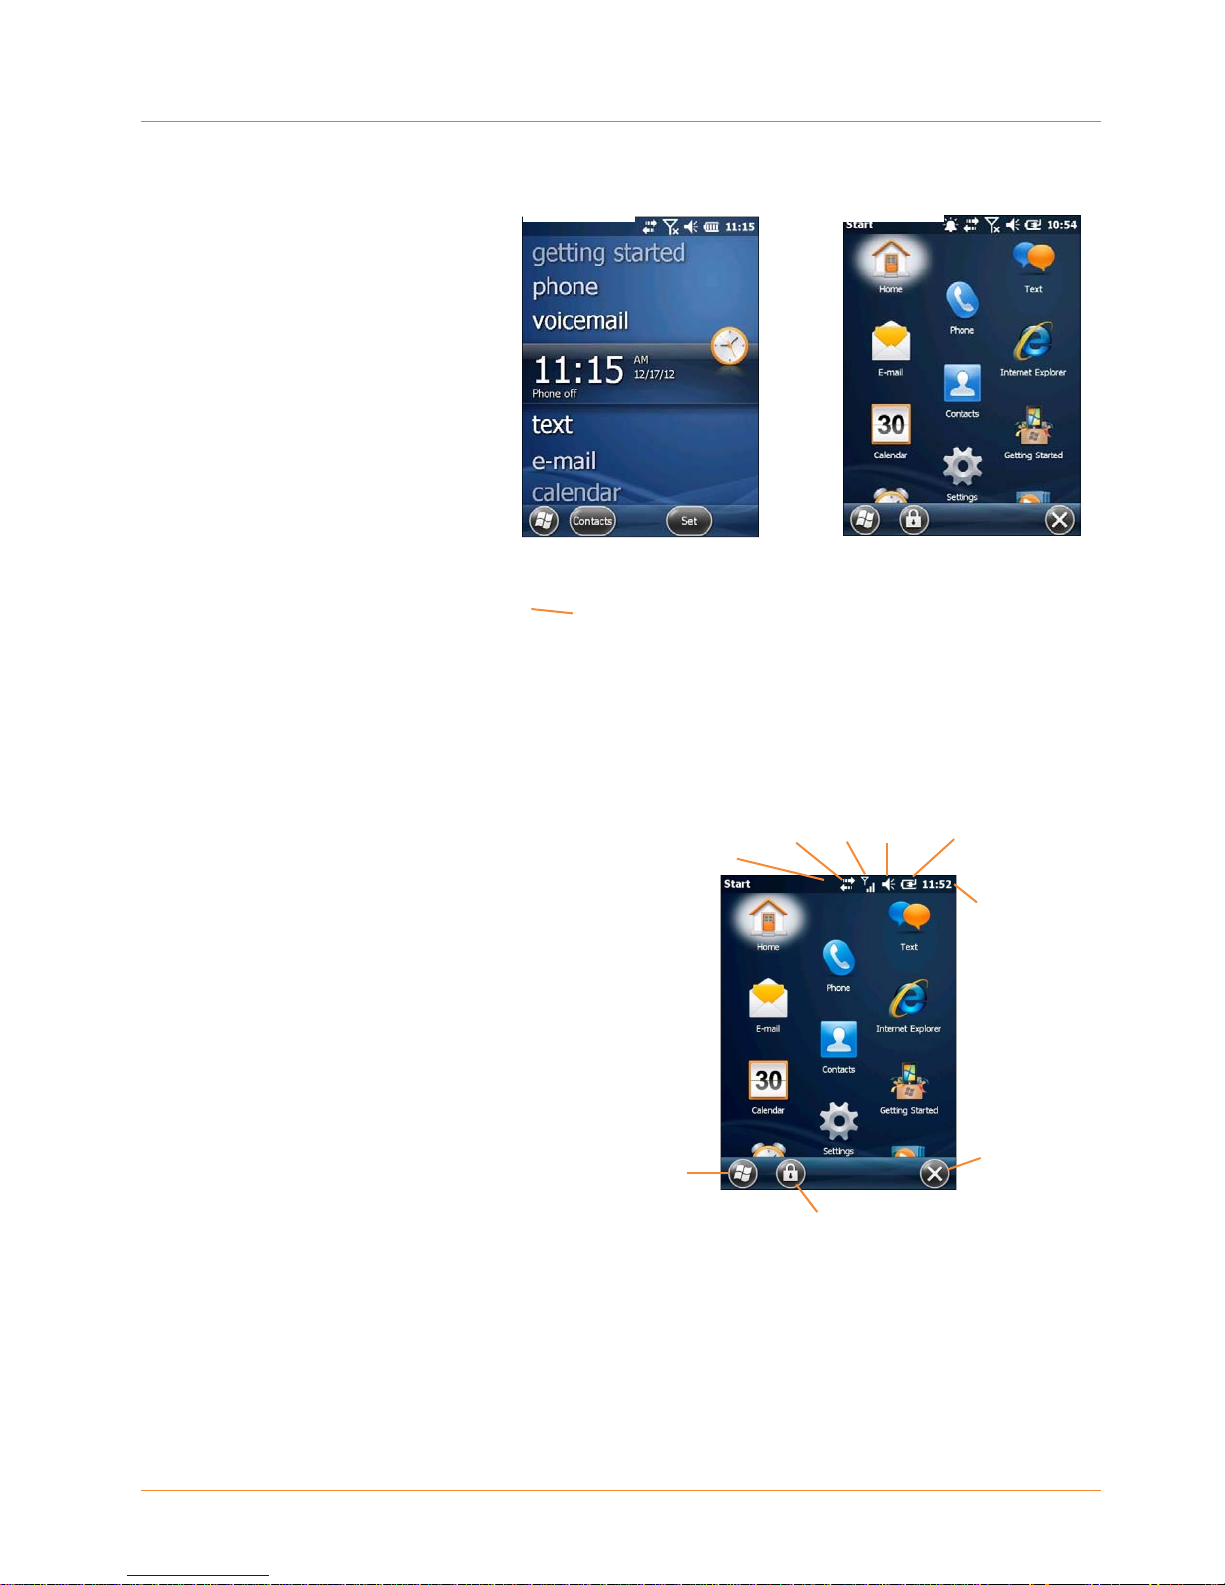
Fundamental Navigation
Basics
HomeScreen
Start Screen
― Tap the Windows icon from
the Home screen to access
the Start screen of the
Windows Embedded
Handheld Desktop.
― Tap the Home icon on the
Windows Embedded
Handheld Desktop to access
the Home screen.
― Tapping the Windows icon
from the Windows
Embedded Handheld
Desktop provides alternative
access to the Getting
Started menu.
IMPORTANT NOTE!
WindowsIcon
Always use the supplied stylus for tapping or making strokes on the screen.
DO NOT use a pen, pencil or any other object on the touch screen.
Key Status Icons and Controls
Connectivity
Notifications
Audio Signal
Battery
Time
Toggle,WindowsEmbedded
Handheld Deskto
/Home
WindowsEmbeddedHandheldDesktop
Stop, Home
Screen
Lock
Janam Technologies LLC 2―10
Getting Started XG3 User Manual
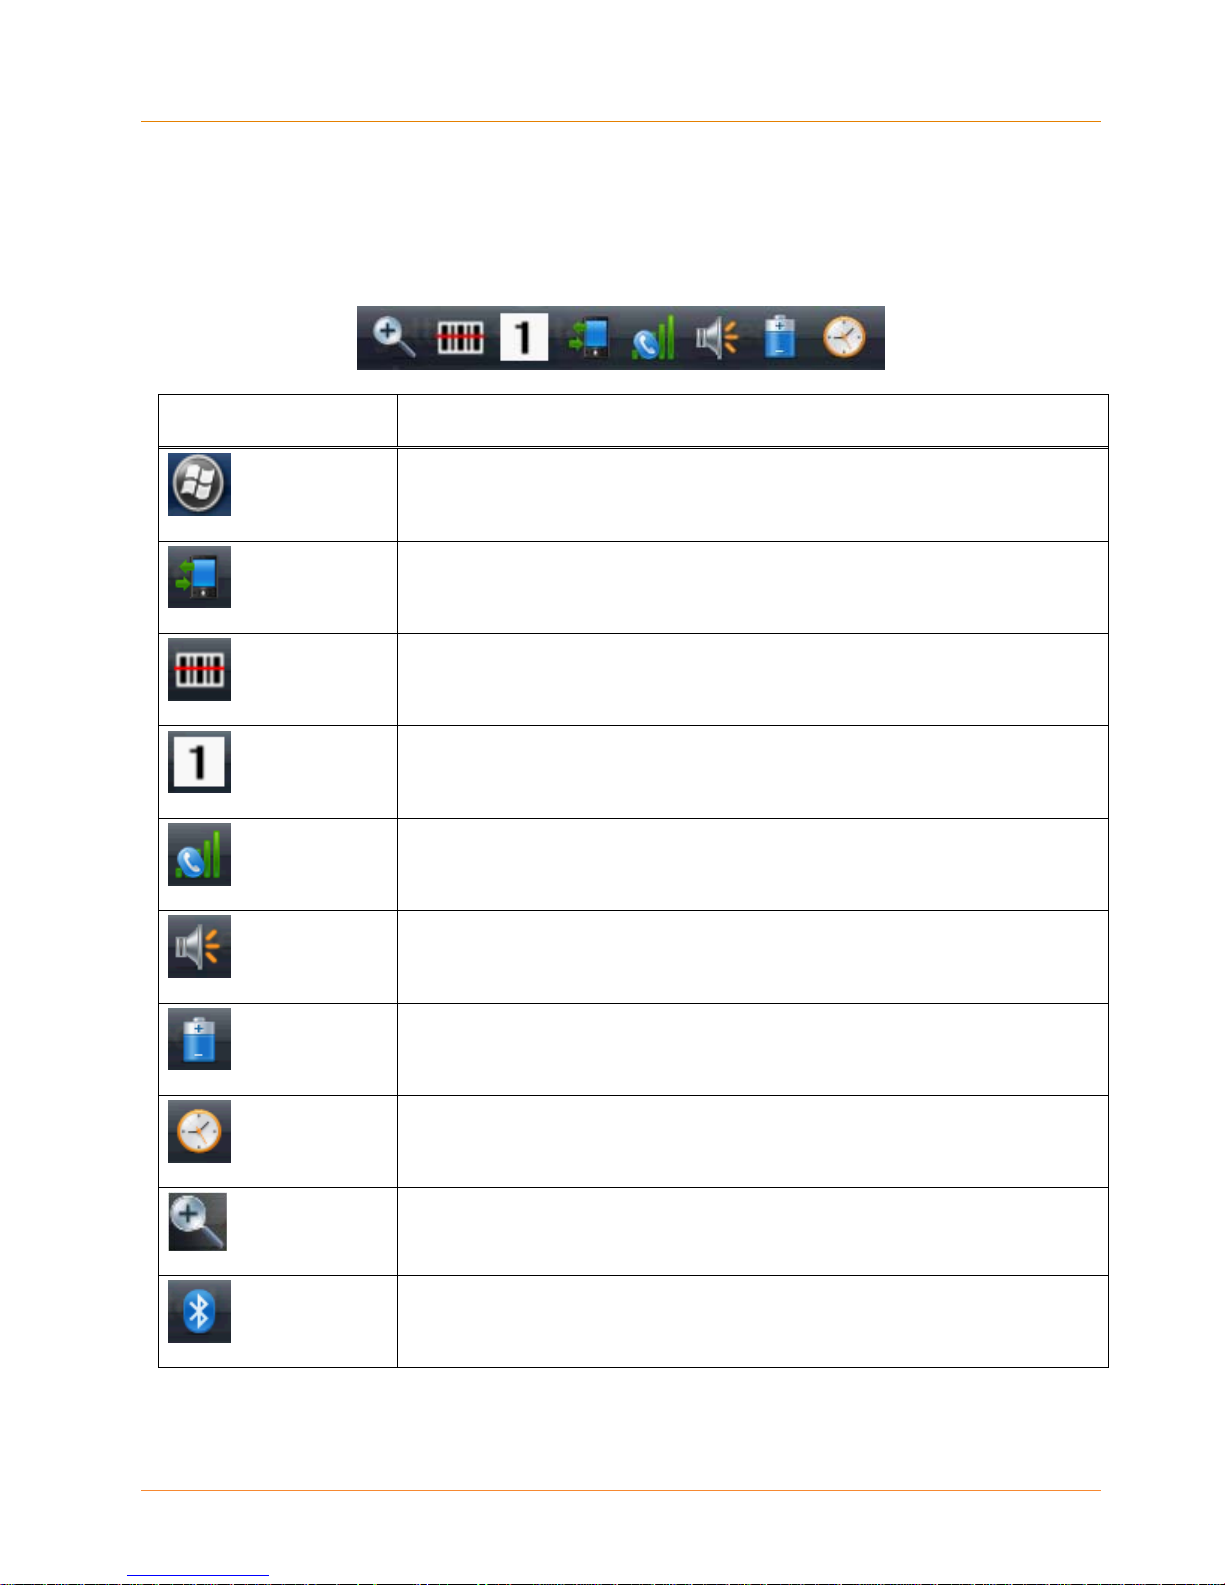
Indicator Icons
The command bar, located at the top of the display, provides access to many system functions and
programs. The left and right arrows are used to scroll through additional icons.
Icons Meaning
Open the start menu
Access the Wireless Manager
Open the Scanner option menu
Indicates the Keypad value
Shows phone signal mode
Shows the volume
Indicates the Battery Control Panel (CPL)
Indicates Clock & Alarm CPL
Zoom in/out
Access the Bluetooth radio
Janam Technologies LLC
2―11
Getting Started XG3 User Manual
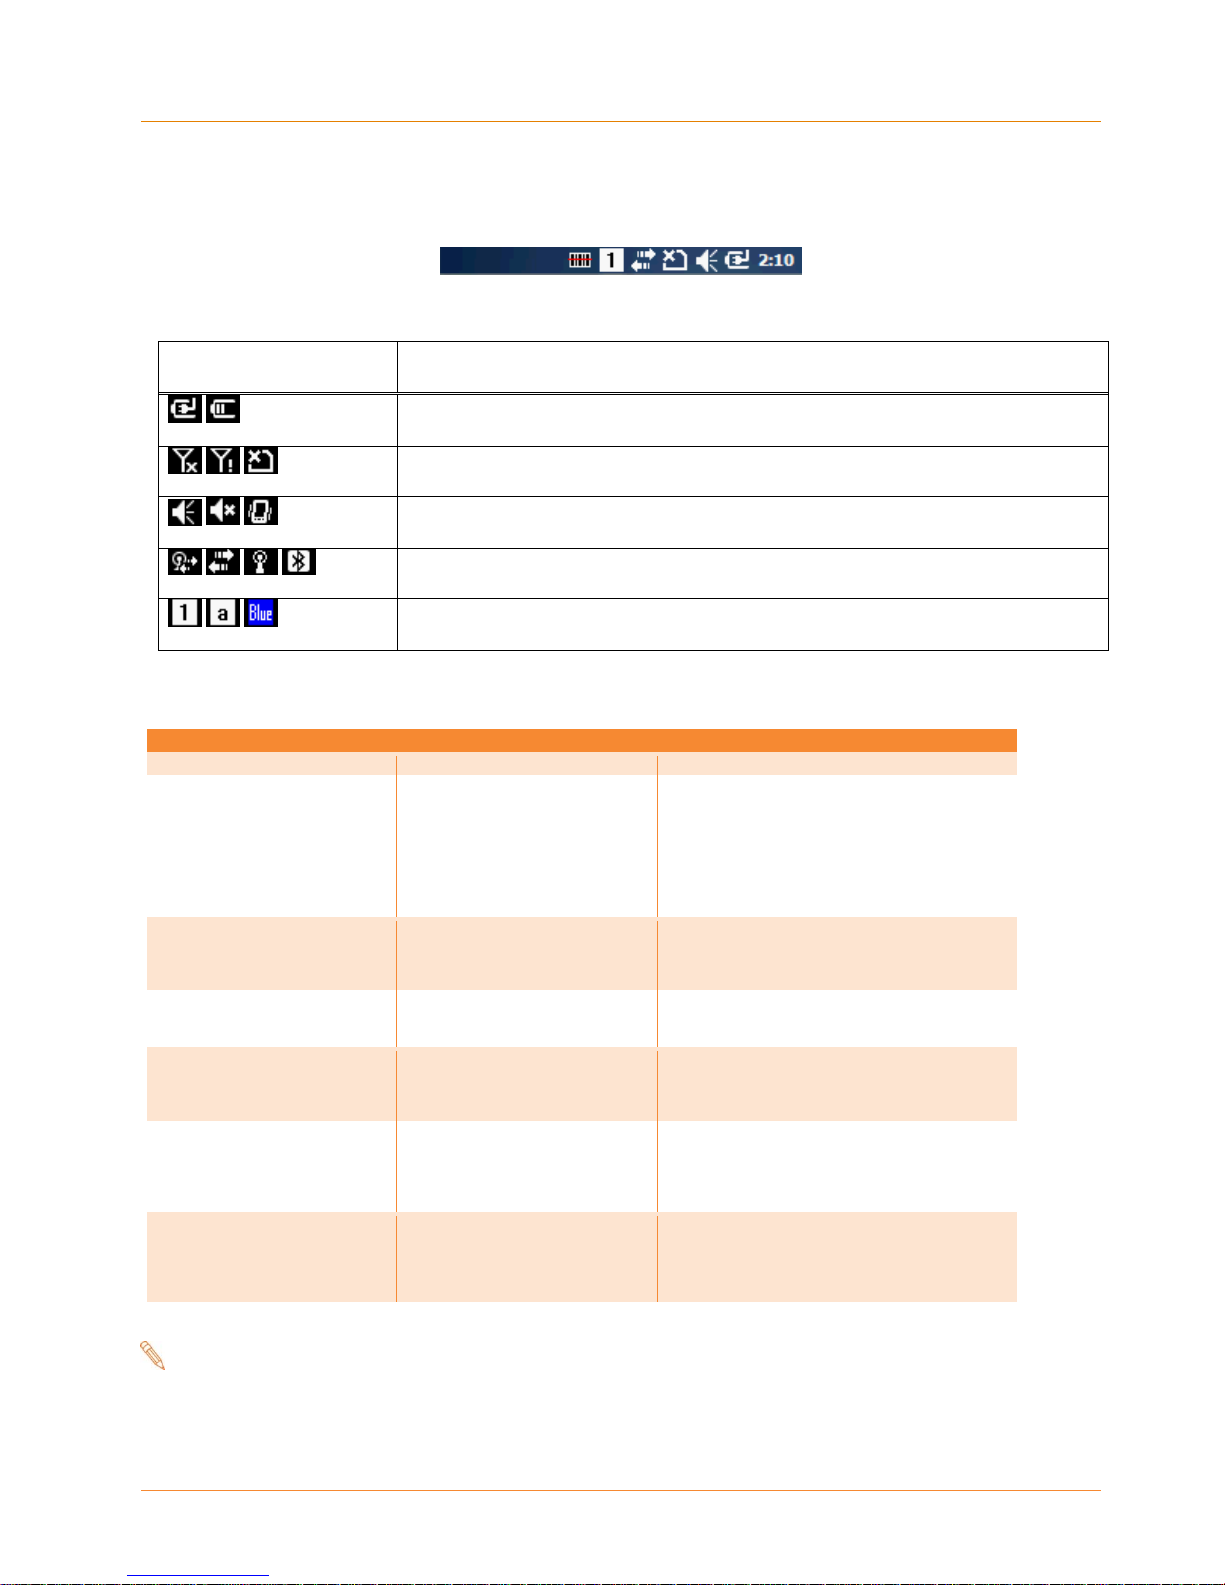
“
1
Indicator Icons (Cont)
Icon Meaning
Indicates AC connection mode
Indicates WAN (Phone) connection mode
Indicates Sound connection mode
Indicates LAN / Bluetooth mode
Indicates Keypad mode
XG3 Device Battery Charging and Power Alert Information
Battery Charging and Power Alert Information
Question Battery / Power Supply
When will Low Battery
Warnings first appear?
(Without external power
source connected)
How often will the Low
Battery Warning reappear
when first alert is dismissed
by the user?
At what Main Battery capacity
will the XG3 device force itself
to suspend?
How long does it take to
charge the Main Battery?
How long does it take to
charge the Backup Battery?
How long will a fully charged
Backup Battery supply power
to retain user data with the
Main Battery discharged or
removed?
Main Battery:
Backup Battery:
Main Battery:
Main Battery:
Cradle Accessories
5200 mAh battery
.
Backup Battery:
Backup Battery:
Alert Threshold / Charge Time
Main Battery Low” appears with approx.
20% of battery power remaining.
“Main Battery Very Low” appears with
approx. 10% of battery power remaining.
“Backup Battery Very Low” appears with
approx. 20% of backup battery power
remaining.
One additional warning “Main Battery Very
Low” appears before a critically low condition
forces suspension of XG3 device operation.
A critically low condition forces suspension of
XG3 device operation when battery’s capacity
reaches approx. 5%.
Approx. 6 hours from a fully discharged state.
When discharged, the Backup Battery
requires approx. 1.5 hours to recharge with
(and from) a fully charged Main Battery. An
external power source is not required to
charge the Backup Battery.
Approx. 30 minutes.
Note:
All times reflect suspension of terminal operation while charging.
Janam Technologies LLC 2―12

Setting Up the XG3 Device XG3 User Manual
3
SettingUptheXG3 Device
Locating Key Controls and Components
XG3 Connector
The XG3 I/O connector powers the terminal, charges the main battery, and facilitates communication.
This connector supports High speed USB 2.0 communication (up to 480 Mbps). Through this connector,
you can communicate with a host workstation via Microsoft ActiveSync or Windows Mobile Device
Center.
Bottom Panel Layout
Janam Technologies LLC 3―1
 Loading...