

Page 1
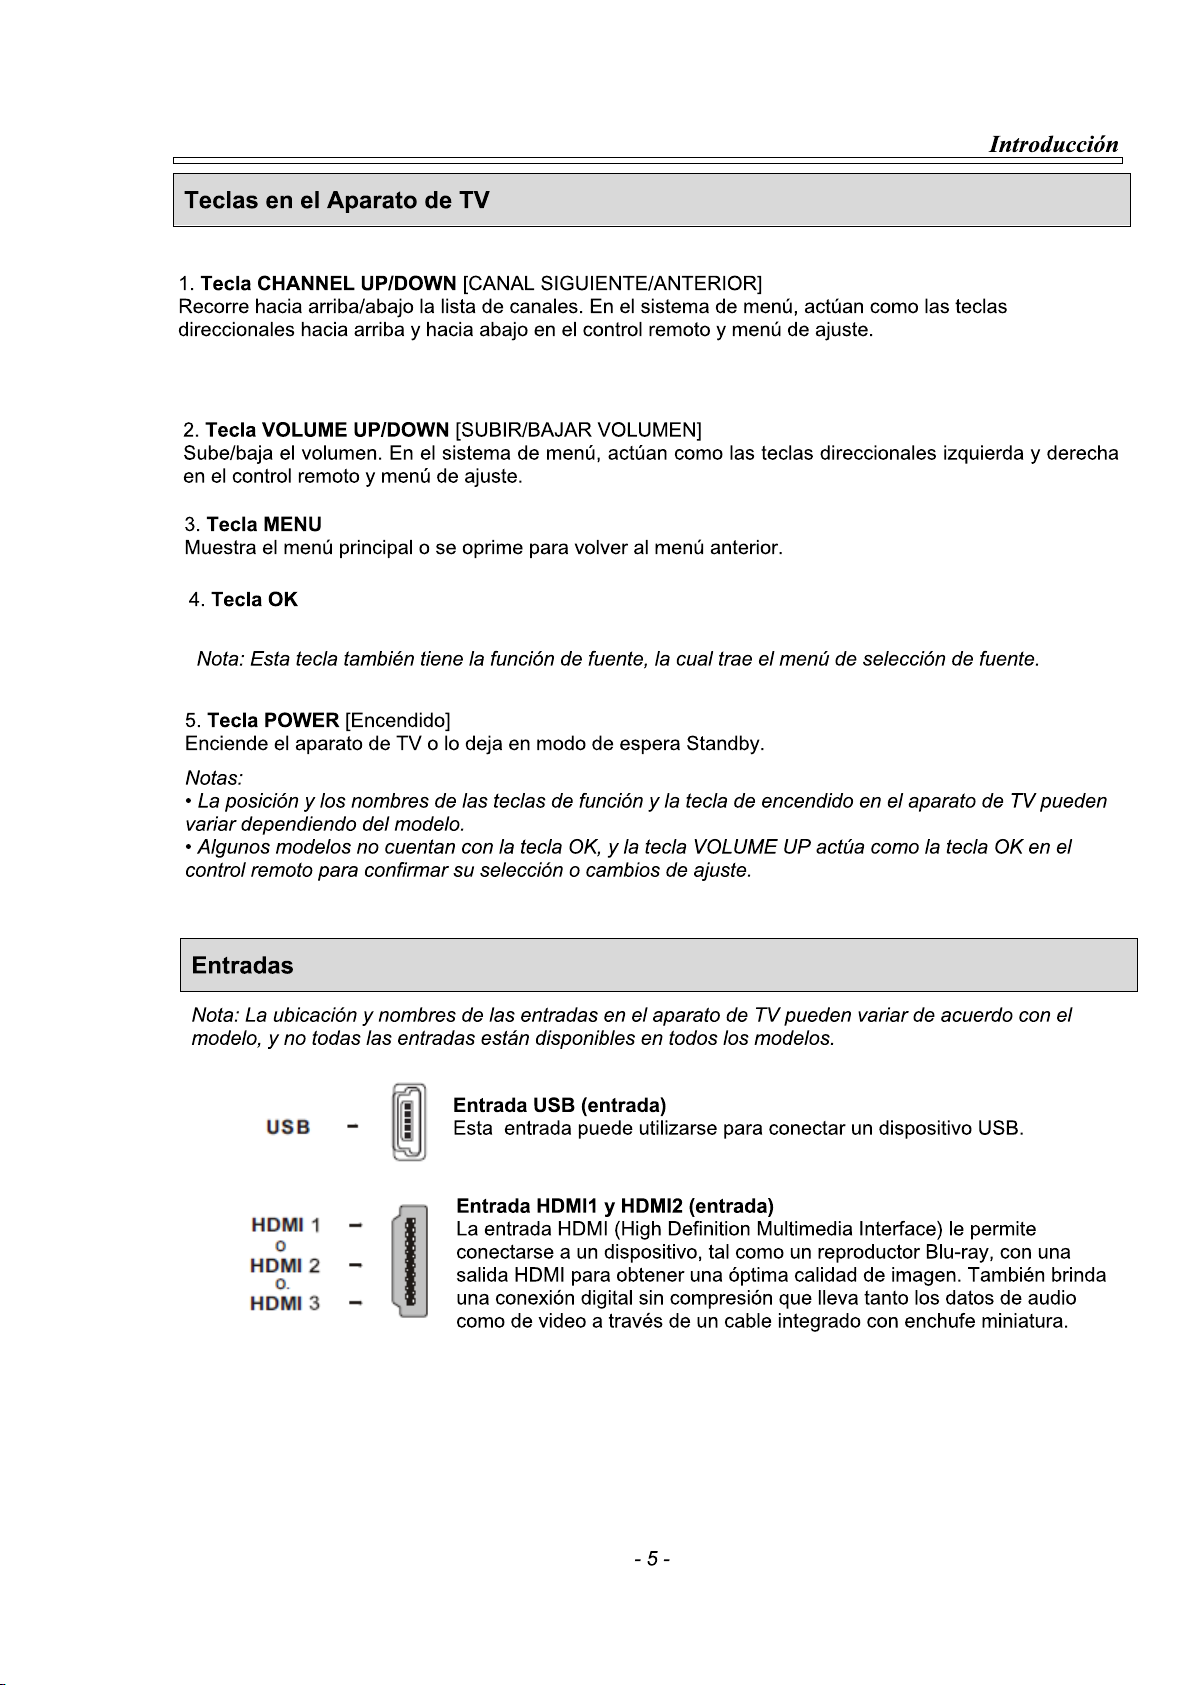
TVJ LED 39 F3300F
39
Page 2
AVISO:
Llevar a cabo procedimientos o el uso de los controles o ajustes que no sean los especificados
en este manual puede resultar en una peligrosa exposición a la radiación.
El símbolo de relámpago con extremo en forma de flecha dentro de un
triángulo alerta al usuario de “voltaje peligroso” dentro del producto de tal
magnitud que podría constituir un riesgo de choque eléctrico a una persona.
El símbolo de exclamación dentro de un triángulo indica al usuario que lea las
instrucciones de funcionamiento y mantenimiento importantes en el manual
que acompaña la unidad.
AVISO: PARA REDUCIR EL RIESGO DE
DESCARGA ELÉCTRICA, NO RETIRE LA
CUBIERTA (O TAPA). NO CONTIENE
PARTES QUE PUEDAN SER REPARADAS
POR EL USUARIO.
El equipo no se deberá exponer a goteos o salpicaduras, y no se deberán
colocar objetos que contengan líquido sobre el mismo, como por ejemplo
floreros.
ADVERTENCIA: PARA REDUCIR EL RIESGO DE INCENDIO O
DESCARGA ELÉCTRICA, NO EXPONGA ESTE
APARATO A LA LLUVIA O HUMEDAD.
Page 3

CONTENIDO
A
p
INSTRUCCIONES DE SEGURIDAD IMPORTANTES ........................................................ 1
Capítulo 1: Introducción
Precauciones .............................................................................................................................. 3
Producto ....................................................................................................................................... 3
Energía y Enchufe ........................................................................................................................ 3
Cable Eléctrico y Cable de Señal ................................................................................................. 3
mbiente de Uso .......................................................................................................................... 3
Limpieza ....................................................................................................................................... 4
Cómo Colocar el Aparato de TV en la Pared ............................................................................... 4
Teclas en el Aparato de TV ........................................................................................................ 5
Entradas ...................................................................................................................................... 5
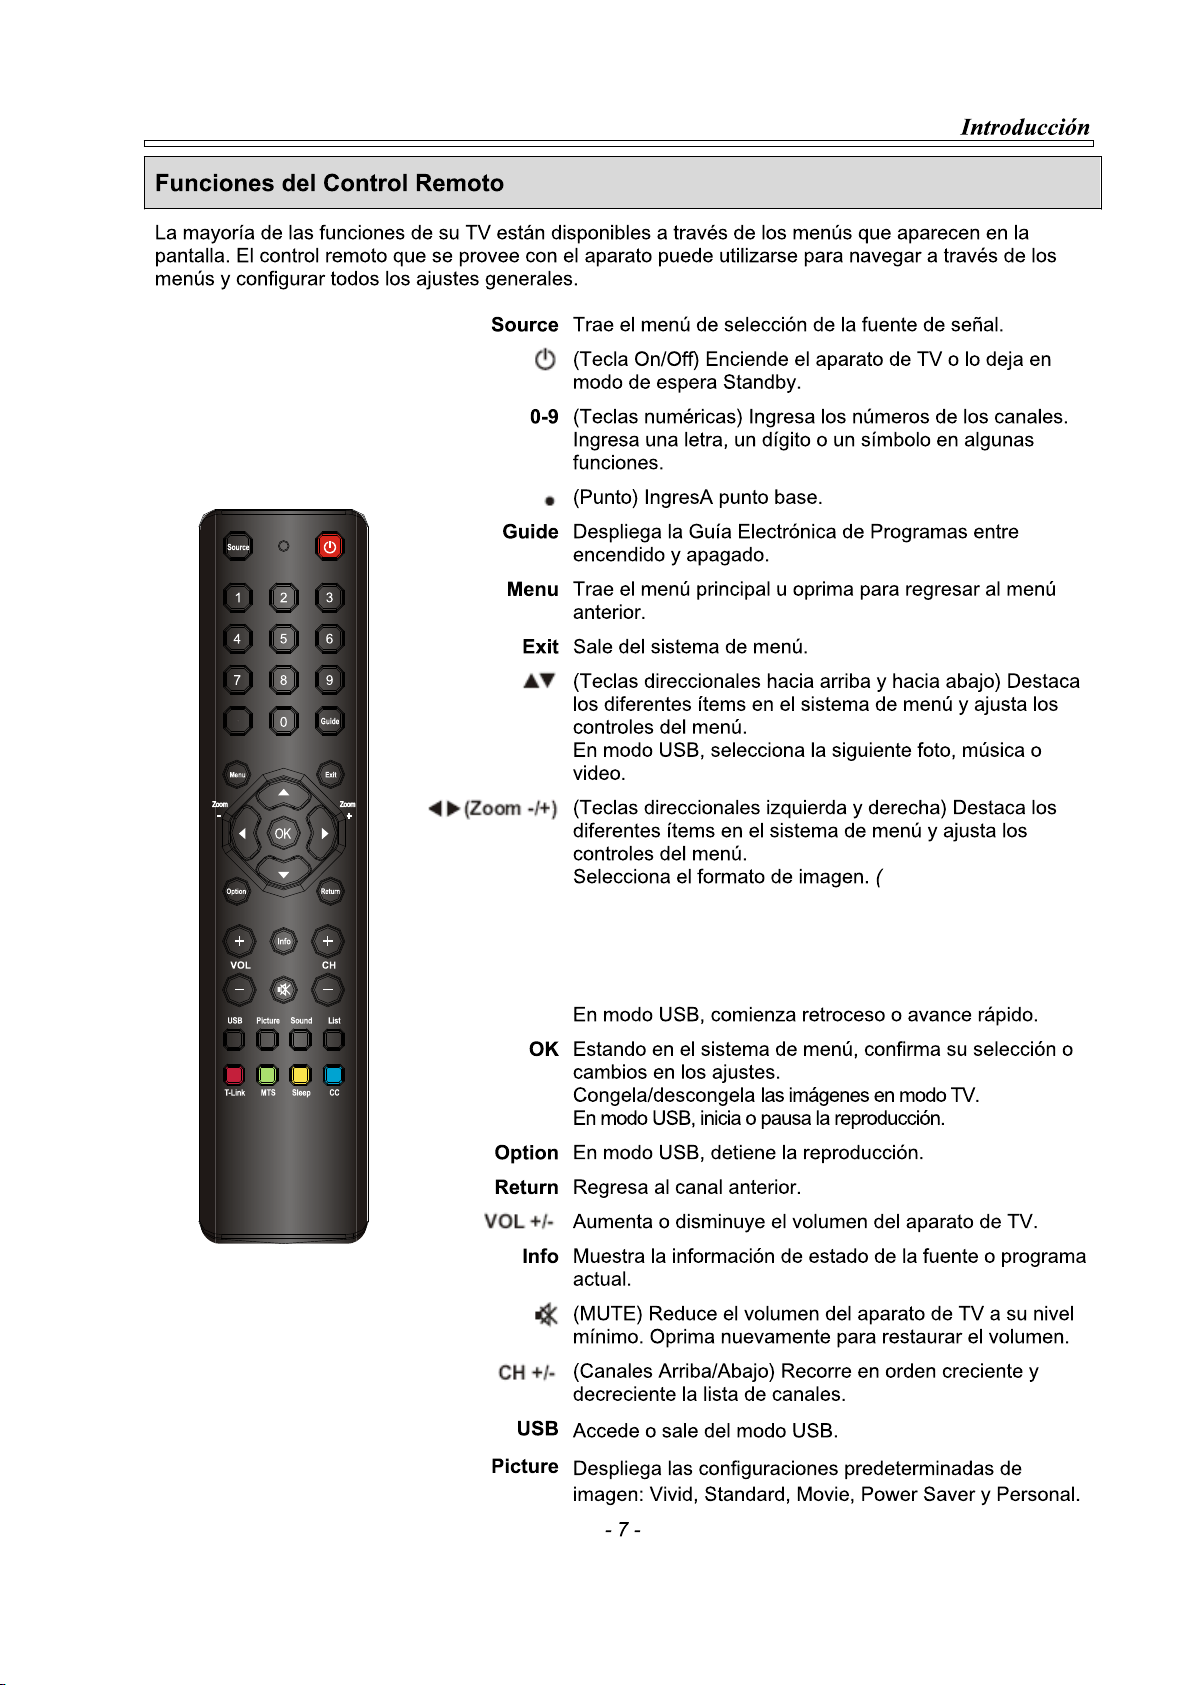
Funciones del Control Remoto ................................................................................................. 7
Capítulo 2: Operación General
Encendido ...................................................................................................................................
Apagado ......................................................................................................................................
Ajuste Inicial ................................................................................................................................
Cómo Usar el Sistema de Menú ................................................................................................
Cómo Usar el Menú de TV .........................................................................................................
Búsqueda de Canales ................................................................................................................
Búsqueda de Actualización........................................................................................................
Cómo Saltar un Canal ................................................................................................................
Cómo Editar Canales ..................................................................................................................
Sintonización de Canales Análogos .........................................................................................
Cómo Usar Menú de Configuración ..........................................................................................
Capítulo 3: Funciones Avanzadas
Cómo Usar Menú de Video ........................................................................................................
Video Avanzado ..........................................................................................................................
Cómo Usar Menú de Audio ........................................................................................................
Cómo Ajustar la Hora .................................................................................................................
9
9
10
10
10
11
11
11
11
12
12
14
14
15
17
Cómo Usar la Función de Bloqueo ...........................................................................................
Cómo Usar el Menú de Opciones ..............................................................................................
Cómo Usar la Guía Electrónica de Programas.........................................................................
Funciones USB ...........................................................................................................................
17
18
18
19
Capítulo 4: Otra Información
Solución de Problemas .............................................................................................................. 20
Ca
ítulo 5: Instalación del Soporte de Mesa
Instalación del Soporte de Mesa ............................................................................................... 23
22
Page 4

INSTRUCCIONES DE SEGURIDAD IMPORTANTES
Lea antes de poner en funcionamiento la unidad:
1. Lea estas instrucciones.
2. Guarde estas instrucciones.
3. Respete todas las advertencias.
4. Siga todas las instrucciones.
5. No use este aparato cerca del agua.
6. Límpielo solo con un trapo seco.
7. No bloquee ninguna de las aberturas de ventilación. Instálelo según las instrucciones del fabricante.
8. No lo instale cerca de ninguna fuente de calor como radiadores, rejillas de aire caliente, hornos u otros
aparatos (incluso amplificadores) que produzcan calor.
9. No anule el objetivo de seguridad del enchufe polarizado o con descarga a tierra. Un enchufe
polarizado tiene dos clavijas, una más ancha que la otra. Un enchufe con descarga a tierra tiene dos
clavijas y un tercer diente de tierra. La clavija ancha o el tercer diente se proporcionan para su seguridad.
Cuando el enchufe proporcionado no calza en el tomacorriente, consulte con un electricista para
reemplazar el tomacorriente obsoleto.
10. Proteja el cable eléctrico para que no se camine por encima o se enganche, especialmente los
enchufes, los receptáculos para sostener el cable y el punto donde sale del aparato.
11. Use solamente complementos y accesorios especificados por el fabricante.
12. Use solamente un carro, soporte, trípode, soporte de pared o mesa especificados
por el fabricante o vendidos con el aparato. Cuando se usa un carro, tenga cuidado al
mover el carro/aparato para evitar lesiones por la inclinación.
13. Desenchufe el aparato durante tormentas eléctricas o cuando no se use por un largo período de tiempo.
14. Deje todo servicio en manos de personal de servicio calificado. El servicio es necesario cuando el
aparato se daña de cualquier manera, por ejemplo si se daña el cable o enchufe de suministro eléctrico,
se derrama líquido o han caído objetos dentro del aparato, o si el aparato ha estado expuesto a la lluvia
o a la humedad, no funciona correctamente o se ha caído.
15. Este producto puede contener plomo o mercurio. La disposición de estos materiales está regulada
debido a consideraciones ambientales. Por información sobre reciclaje y desechos, por favor póngase en
contacto con las autoridades locales o la Alianza de Industrias Electrónicas (www.eiae.org
16. Daños que Requieren Servicio. El aparato deberá revisarlo un técnico de servicio calificado cuando:
A. Se ha dañado el cable de corriente o el enchufe;
B. Han caído objetos o se ha derramado líquido en el aparato;
C. Se ha expuesto la unidad a la lluvia;
D. El aparato no parece estar funcionando normalmente o muestra un marcado cambio en el desempeño;
E. Se ha caído el aparato o se ha dañado la cubierta de protección.
17. Inclinación/Estabilidad. Todos los televisores deben cumplir con normas de seguridad globales
internacionales recomendadas para la inclinación y estabilidad de su diseño de gabinete.
· No comprometa estas normas de diseño aplicando fuerza excesiva sobre la parte frontal o superior del
gabinete, lo que eventualmente podría hacer que el producto se vuelque.
· Asimismo, no se ponga en peligro usted o a niños colocando juguetes/equipos electrónicos en la parte
superior del gabinete. Estos ítems podrían caerse repentinamente desde la parte superior del aparato y
dañar el producto u ocasionar daños personales.
18. Montaje en la Pared o el Techo. Podrá montarse el aparato a la pared o al techo solamente
siguiendo las recomendaciones del fabricante.
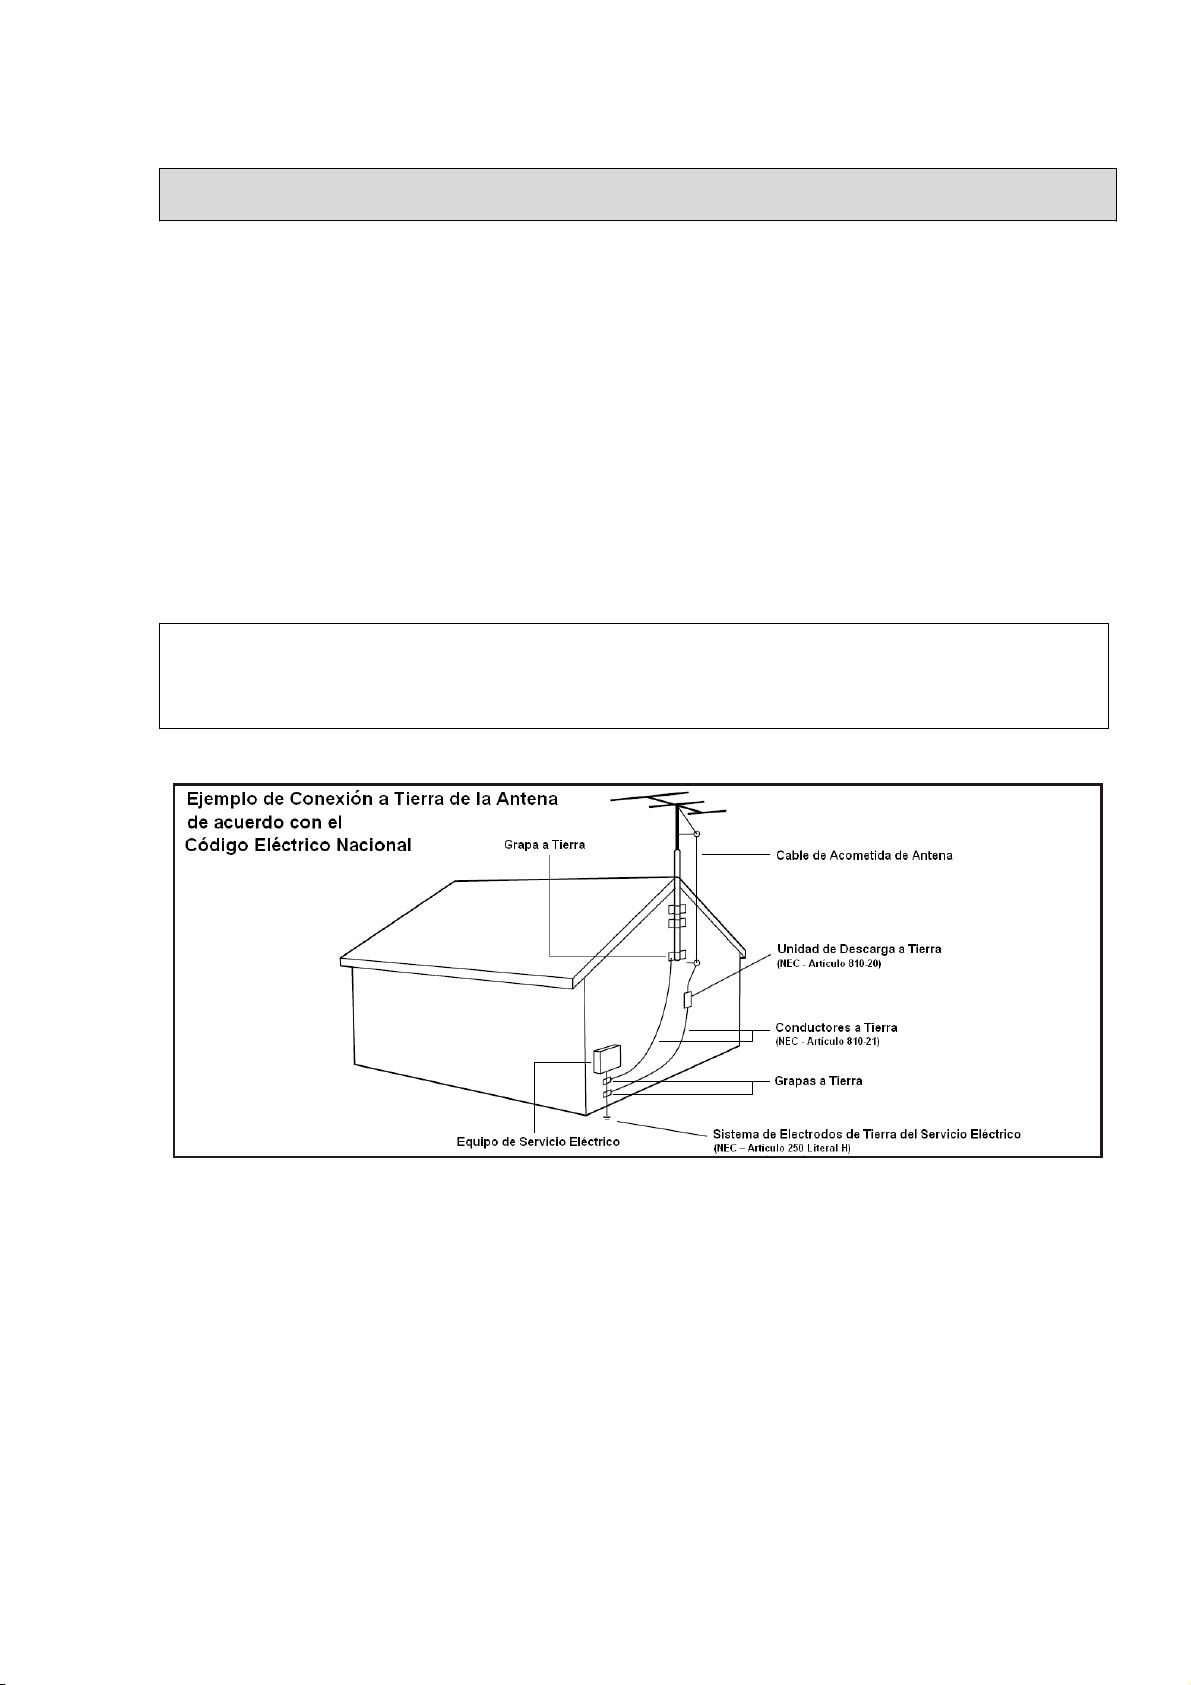
19. Cables de Alta Tensión. Una antena exterior deberá colocarse alejada de los cables de alta tensión.
20. Conexión a Tierra de la Antena Exterior. Si se conecta una antena externa o sistema de cable al
receptor, asegúrese que el sistema de la antena o de cable esté conectado a tierra para proporcionar
alguna protección contra subidas de tensión y cargas estáticas acumuladas.
).
- 1 -
Page 5
INSTRUCCIONES DE SEGURIDAD IMPORTANTES (Continúa)
El artículo 810 del Código Eléctrico Nacional [NEC, por sus siglas en inglés: National Electric Code],
ANSI/NFPA No. 70-1984 proporciona información con respecto a la correcta conexión a tierra del poste y
la estructura de soporte, la conexión a tierra del cable de acometida a una unidad de descarga de la
antena, el tamaño de los conectores a tierra, la ubicación de la unidad de descarga de la antena,
conexión de electrodos a tierra, y requerimientos para el electrodo a tierra. Vea la siguiente Figura.
21. Entrada de Líquidos y Objetos. Deberá prestarse especial atención para que no caigan objetos o
se derrame líquido en la cubierta a través de las aberturas.
22. PRECAUCIONES de uso de pilas. Para evitar pérdidas en las pilas que puedan ocasionar daños
físicos, daños en la propiedad, o daños en la unidad:
· Coloque las pilas en forma correcta, con + y – alineados como se indica en la unidad.
· No mezcle las pilas (nuevas y viejas o comunes y alcalinas, etc.)
· Retire las pilas de la unidad cuando no la va a usar por un período prolongado.
23. El aparato no debe estar expuesto a gotas o salpicaduras y no se debe colocar ningún objeto lleno
de líquido, como floreros, encima del aparato.
Nota para el instalador del sistema de TV por cable: Este recordatorio se agrega para llamar la atención del
instalador del sistema de TV por cable sobre el Artículo 820-40 del Código Eléctrico Nacional que establece pautas
para la adecuada conexión a tierra, en particular especifica que el cableado a tierra deberá estar conectado al
sistema de puesta a tierra del edificio, tan cerca del punto de la entrada de cable como sea posible.
- 2 -
Page 6

Capítulo 1 Introducción
PRECAUCIONES
Lea estas instrucciones cuidadosamente antes de utilizar la unidad, y guárdelas en un lugar seguro para
futuras referencias.
Producto
• No bloquee ni cubra las aberturas de ventilación de la cubierta posterior.
• No introduzca objetos de ningún tipo en la unidad a través de las ranuras de la caja porque podrían
tocar las piezas que transportan corriente o producir un cortocircuito en las piezas, y causar un incendio,
descarga eléctrica o daño a la unidad.
• No intente abrir el gabinete ya que podría ocasionar daños. No contiene partes que puedan ser
reparadas por el usuario. Toda reparación deberá ser realizada por un técnico capacitado.
• No toque la superficie de la pantalla con los dedos porque puede rayar o estropear la pantalla de TV.
• No impacte la pantalla del aparato de TV con alta presión porque puede dañarla severamente.
• Esta unidad no debe ser utilizada por niños o personas con capacidad física, sensorial o mental
reducida sin la debida supervisión. Los niños deberían ser supervisados para asegurarse que no jueguen
con el equipo.
Energía y Enchufe
• Desenchufe el equipo en los siguientes casos:
- Si el equipo no se va a usar por mucho tiempo.
- Si el cable eléctrico o el tomacorriente/enchufe se dañan.
- Siga las instrucciones para instalar y ajustar el producto. Ajuste los controles según estas instrucciones
de operación dado que el ajuste incorrecto de otros controles puede producir daños. Si esto ocurre,
desenchufe el equipo y envíelo a personal de servicio.
- Si el equipo sufre un impacto o se cae y se daña la caja.
• Cuando se utiliza el enchufe principal o el acoplador de la unidad como el dispositivo de desconexión,
el interruptor permanecerá fácilmente operable.
Cable Eléctrico y Cable de Señal
• No permita que nada se apoye o pase por encima del cable eléctrico o del cable de señal.
• Proteja el cable eléctrico y el cable de señal para evitar tropezar con ellos.
• No sobrecargue el cable eléctrico o el tomacorriente.
• No exponga el cable eléctrico ni el cable de señal a la humedad.
Ambiente de Uso
• No coloque el equipo encima de un carro, soporte o mesa inestables.
• Coloque el equipo en un lugar bien ventilado.
• No use el equipo cerca de zonas húmedas o frías. Proteja el equipo del sobrecalentamiento.
• Mantenga al equipo alejado de la luz solar directa.
• El aparato no debe estar expuesto a gotas o salpicaduras y no se debe colocar ningún objeto lleno de
líquido, como floreros, encima del aparato.
• No use el equipo cerca de un lugar polvoriento.
- 3 -
Page 7
Page 8
Botón para subir y ba jar de can al
En modo TV, cuando esté seleccionado el canal máximo o mínimo, los botones CH+/CHmostrarán las diferentes fuentes de señal
En el menú del sistema, confirma su selección o sus cambios de configuración
Page 9
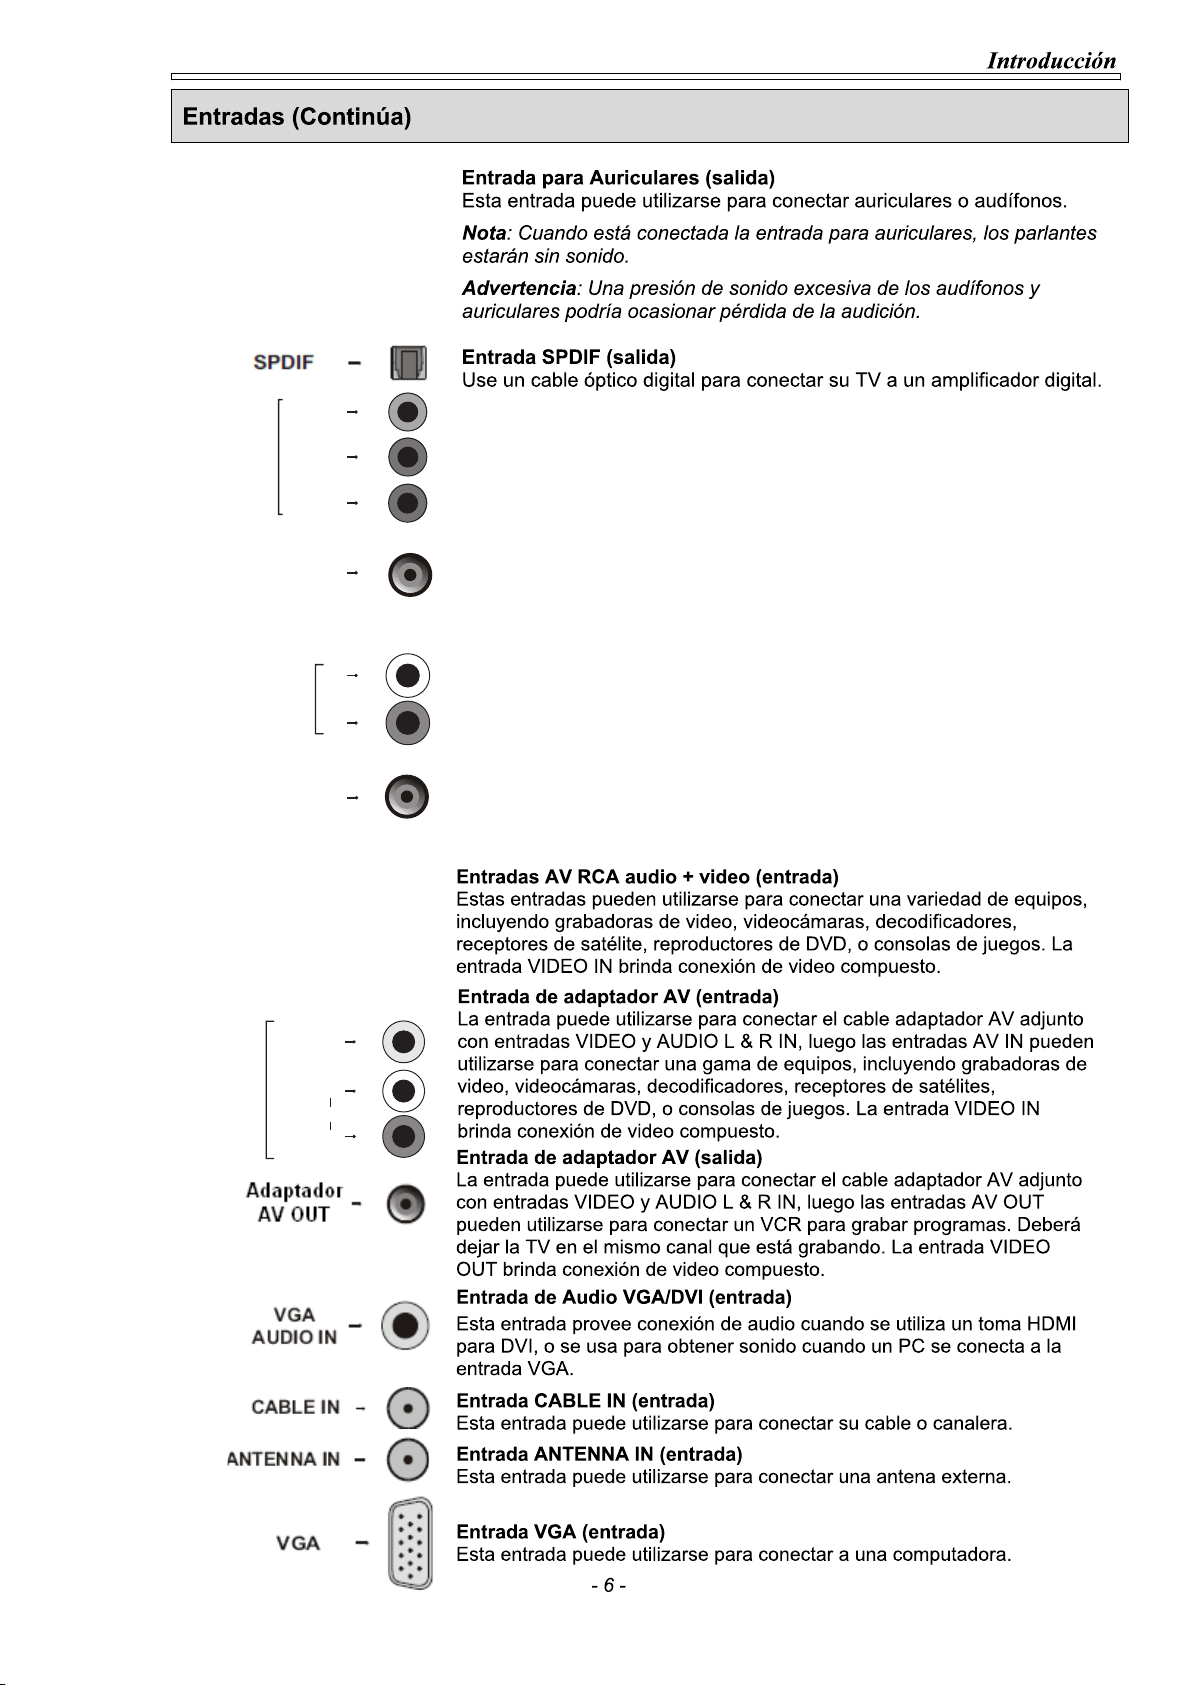
COMPONENT
IN
Pb/Cb
Pr/Cr
CMP IN
adapter
Y
Entradas YPbPr componente o CMP
Nota: el adaptador CMP se puede usar para conectar señales
CMP a componente
Las entradas de componente YPbPr se pueden usar para conectar
or
equipos que
DVD.
La entrada componente
tengan salida de componente, como reproductores de
reconoce automáticamente
si la señal de la fuente es YPbPr o YCbCr
La entrada de componente produce excelente calidad de
imagen porque separa la señal
de video en tres partes
COMPONENT
AUDIO IN
CMP
AUDIO IN
adapter
AV OUT
VIDEO
AUDIO
L
R
or
Entrada de audio componente o audio CMP
Nota: la entrada CMP audio in-adapter se puede usar para
conectar equipos con salida
CMP
Las entradas L&R de audio se pueden utilizar para
conectar DVD, filmadoras, videojuegos
L
R
or
Page 10
Nota: se recomienda usar
el modo de pa ntalla comple ta. No use el modo de pantalla
con listo nes negros a los la dos por tiempo pr olongado,
porque pu ede dañar el tele visor.negros a l os lados
por tiempo prolongado, p orque puede dañ ar el
televis or.
Page 11
Cambia entre los diferentes modos de sonido: off, rock,
pop, live, dance, techno,
Muestra la lista de canales favoritos
Page 12
Capítulo 2 Operación General
ENCENDIDO
Siga las instrucciones de esta página sobre cómo encender su aparato de TV y el control remoto antes
de leer las siguientes páginas donde se describe el proceso de ajuste de canales.
1. Inserte dos pilas AAA en el control remoto.
Precauciones al usar las pilas:
- Solamente utilice el tipo de pilas que se especifica.
- Asegúrese de usar la polaridad correcta.
- No mezcle pilas nuevas y pilas viejas.
- No utilice pilas recargables.
- No exponga las pilas a calor excesivo como luz solar, fuego o similares, ni las tire al fuego, recargue o
intente abrirlas, ya que esto podría causar pérdidas o que explote.
- Retire las pilas del control remoto si no lo va a usar por un período prolongado de tiempo.
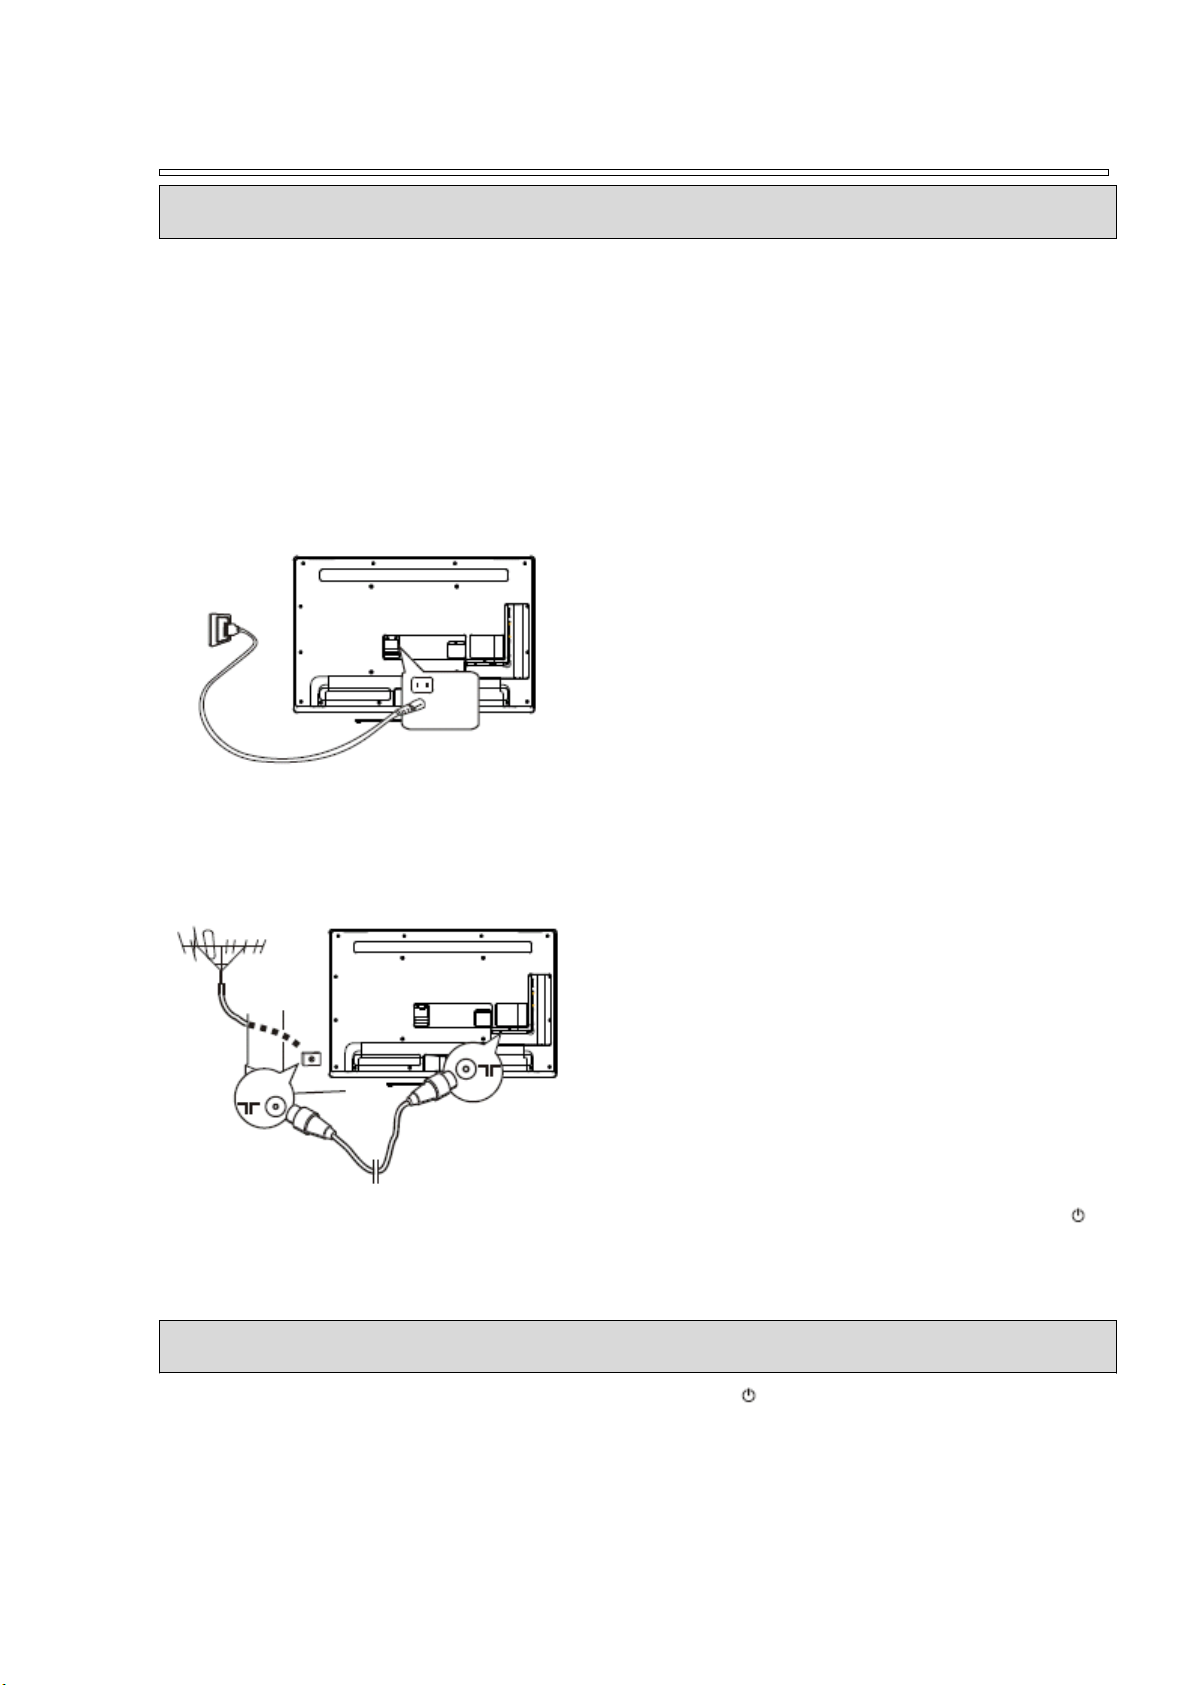
2. Conecte PRIMERO el cable de corriente a la TV,
LUEGO al tomacorrientes principal.
Su aparato de TV deberá conectarse solamente a
suministro de corriente alterna. No deberá conectarse a
corriente directa. Si el enchufe se separa del cable, no
deberá bajo ninguna circunstancia conectarlo al
tomacorrientes principal, ya que existe riesgo de descarga
eléctrica.
APAGADO
Nota: Las figuras son meramente ilustrativas. La ubicación
del tomacorrientes en la parte posterior del televisor podrá
diferir dependiendo del modelo.
3. Conecte la antena externa en la entrada ANTENNA IN
en la parte posterior del aparato de TV.
El toma de antena (75 OHM – VHF / UHF / cable) puede
utilizarse para conectar una antena externa u otro equipo
adecuado.
Nota: Si desea recibir la señal de su cable o canalera por
favor conecte un cable coaxial a la entrada CABLE IN en
la parte posterior del aparato de TV.
4. Cuando esté enchufado, podrá encender el televisor
directamente o estar en modo de espera Standby.
Si la luz indicadora de corriente está encendida, el
aparato de TV está en modo de espera. Pulse la tecla
en el control remoto o en el aparato de TV para encender
el televisor.
• Para dejar el aparato de TV en modo de espera, pulse la tecla en el control remoto o en el aparato
de TV. El aparato de TV permanece encendido, pero con consumo bajo de energía.
• Para apagar el aparato de TV, desconecte del tomacorrientes principal.
- 9 -
Page 13
Operación General
Ajuste Inicial
Initial setup
Initial setup
Welcome
Welcome
El ajuste inicial incluye seleccionar todas las configuraciones
Video
requeridas para poder buscar y guardar todos los canales que
Audio
PAP
Option
pueda recibir. Asegúrese que el televisor esté encendido y
Welcome
Welcome to use the Wizard for Initial Setup !!
Please press [OK] to start the Wizard.
I
] to start rd.
siga los pasos en el orden que se especifican a continuación:
USB
1. La primera vez que encienda la unidad aparecerá el menú
Time Setup
Lock
Setup
de Ajuste Inicial. Oprima la tecla OK para pasar al siguiente
paso.
2. Oprima las teclas direccionales hacia arriba y hacia abajo
para seleccionar el idioma y oprima la tecla direccional
derecha o la tecla OK para pasar al siguiente paso, luego seleccione Antenna o Cable y oprima la tecla
direccional derecha o la tecla OK para pasar al siguiente paso.
3. Oprima las teclas direccionales hacia arriba o hacia abajo para seleccionar Scan y oprima la tecla
direccional derecha o la tecla OK para iniciar la búsqueda automáticamente. Todos los programas de TV
disponibles se guardarán. Esta operación lleva unos minutos. El visor muestra el progreso de la
búsqueda y el número de programas encontrado.
Nota: Para evitar que el proceso de ajuste de canales se interrumpa, espere que aparezca el mensaje
que indica que el ajuste se completó.
En este paso, también puede seleccionar Skip Scan para saltar el progreso de ajuste inicial. Pero
cuando encienda la TV la próxima vez, el menú de Ajuste Inicial aún aparecerá.
4. Durante el ajuste, el usuario podrá seguir las pautas que aparecen en la parte inferior de la pantalla
para volver al último paso oprimiendo la tecla direccional izquierda, u oprima la tecla Exit para interrumpir
la búsqueda en proceso.
Welcome
5. Luego que se haya completado el ajuste, oprima la tecla OK para salir. Los canales se colocan en un
orden preconfigurado. Si desea saltar u organizar canales, seleccione la tecla TV y oprima la tecla
direccional derecha o la tecla OK para ingresar.
Cómo Usar El Sistema De Menú
Esta sección explora los menús de su TV. Cada menú está diseñado y contiene pautas para ayudarlo a
que obtenga lo máximo de su TV. Para acceder al sistema de menú:
1. Oprima la
2. Oprima las teclas direccionales hacia arriba/hacia
abajo/izquierda/derecha para seleccionar el ítem deseado,
Video
Video
Audio
Audio
PAP
Option
TV
Option
luego oprima la tecla OK para ingresar al submenú.
3. En los submenús, oprima las teclas direccionales hacia
USB
USB
Time Setup
Time Setup
Lock
Lock
Setup
Setup
arriba y hacia abajo para seleccionar las opciones de menú,
use las teclas direccionales izquierda y derecha para ajustar
las funciones o cambiar valores.
Use la tecla OK para activar un ajuste. Use la tecla OK o la tecla
direccional derecha para abrir el correspondiente submenú.
4. Oprima la tecla Menu para regresar al menú anterior u oprima la tecla Exit para cerrar el menú.
tecla Menu para mostrar el menú principal.
Cómo Usar el Menú de TV
Oprima la tecla Menu para mostrar el menú principal, y seleccione TV, luego oprima la tecla OK para
aceptar.
- 10 -
CEC
Page 14
Operación General
Cómo Usar el Menú de TV (Continúa)
CEC
Version Info
TV
Tuner Mode
Channel Setup
Cable
Tuner Mode [Modo de Sintonizador]: Esta opción por lo
general se ajusta en el proceso de Ajuste Inicial. Oprima la tecla
direccional izquierda o derecha para elegir Antenna o Cable.
Channel Setup [Ajuste de Canales]: Esta opción permite a la
Select
Back
Exit
TV buscar, encontrar y guardar todos los canales análogos y
digitales disponibles para la entrada de antena o cable
seleccionados. Siga todos los pasos en el orden que se
especifican más adelante.
Búsqueda de Canales
1. Oprima la tecla Menu para mostrar el menú principal, y seleccione TV > Channel Setup > Channel
Scan para realizar la búsqueda de canales, luego oprima la tecla OK o la tecla direccional derecha para
aceptar.
2. El proceso de búsqueda podría llevar unos minutos. Durante el proceso, puede oprimir la tecla Menu
o Exit para interrumpir la búsqueda en proceso.
3. Una vez que la búsqueda haya finalizado, oprima la tecla Menu para volver al último paso u oprima
la tecla OK para volver a iniciar la búsqueda de canales.
4. Luego de la búsqueda de canales, los mismos se colocan en un orden preconfigurado. Puede saltar
canales, modificar el orden preconfigurado o renombrar los canales.
Búsqueda de Actualización
Esto le permite actualizar todos los canales disponibles, sin alterar la clasificación de los canales
existentes.
1. Seleccione TV > Channel Setup > Channel Update y oprima la tecla OK o la tecla direccional
derecha para mostrar el menú Update Scan e iniciar la actualización de canales.
2. Para detener el proceso de actualización, oprima la tecla Menu o Exit.
Cómo Saltar un Canal
Si un canal fue almacenado dos veces o su recepción es pobre, puede simplemente saltarlo. Los canales
saltados no se seleccionan cuando pulsa las teclas CH+/-.
1. Seleccione TV > Channel Setup > Channel Skip y oprima la tecla OK o la tecla direccional derecha
para mostrar el menú Channel Skip.
2. Oprima las teclas direccionales hacia arriba o abajo para seleccionar un canal y oprima la tecla OK
para marcar la casilla.
Nota: Si quiere recuperar el canal, oprima la tecla OK nuevamente para desmarcar la casilla.
:
3. Oprima la tecla Menu para regresar o Exit para cerrar el menú.
Cómo Editar Canales
1. Seleccione TV > Channel Setup > Channel Edit y oprima la tecla OK o la tecla direccional derecha
para mostrar el menú Channel Edit.
- 11 -
Page 15

Operación General
Cómo Editar Canales (Continúa)
2. Oprima las teclas direccionales hacia arriba o abajo para seleccionar el canal que desee, luego
oprima la tecla OK para ingresar al menú de ajuste.
3. Oprima las teclas numéricas para ingresar el nombre del canal y oprima la tecla OK para guardar el
ajuste.
Nota: Después de ingresar el nombre del canal, si no oprime la tecla Ok para confirmar, el ajuste no se guardará.
4. Oprima la tecla Menu para regresar o Exit para cerrar el menú.
Sintonización de Canales Análogos
Si la imagen es clara puede sintonizar el canal.
Nota: Esta función es solamente para canales análogos.
1. Seleccione TV > Channel Setup > Analog Channel Fine Tune, luego oprima la tecla OK o la tecla
direccional derecha para aceptar.
2. Seleccione un canal y oprima la tecla OK para ingresar al menú de ajuste, luego oprima las teclas
direccionales izquierda o derecha para sintonizar.
Cómo Usar Menú de Configuración
OPTION
CEC
Language English
Version Info
Screen Mode
Clean Storage
Select
Back
Exit
Setup
Full Screen
Exit
Language [Idioma]: Use las teclas direccionales izquierda o
derecha para seleccionar el idioma de menú que desee.
Nota: Los idiomas disponibles podrán variar dependiendo del
modelo.
General Operation
Screen Mode [Modo de Pantalla]: Use las teclas direccionales
izquierda o derecha para seleccionar entre Full Screen [Pantalla
Completa], Normal, Zoom, Auto [Automático], Expand Screen
[Pantalla Expandida] y Panorama.
:
Caption Setup [Ajuste de Leyendas]: Oprima la tecla Menu para mostrar el menú principal, y seleccione
Setup > Caption Setup. Oprima la tecla OK para mostrar el menú Caption Setup.
OPTION
Caption Setup
CEC
Enable Caption
Version Info
Analog Closed Caption
Digital Closed Caption
Superimpose Setup
Select
Back
Exit
On mute
Off
Off
Language 1
Enable Caption [Habilitar Leyendas]:
direccionales izquierda y derecha para seleccionar un modo: On
Mute [Silenciado], Yes [Sí] o No.
On Mute: Muestra la información sobre leyendas, cuando está
disponible, cada vez que el sonido de la TV esté silenciado
oprimiendo la tecla MUTE. Las leyendas no se muestran
Use las teclas
cuando el sonido no está silenciado.
Yes [Sí]: Las leyendas siempre aparecen, cuando están disponibles.
No: No se muestran las leyendas.
Analog Closed Caption [Subtitulado Análogo]: Muchos programas están codificados con información
con subtitulado para personas con problemas de audición, lo que permite mostrar la porción de audio de
un programa como texto en la pantalla de TV. Las leyendas no están disponibles en todos los canales en
todo momento. Sólo se aplica a los programas codificados específicamente con información de leyendas.
Seleccione qué modo de leyenda se utilizará para visualizar las leyendas. El CC análogo está disponible
para los canales análogos. Seleccione los modos que desee, quizás prefiera dejar el modo de leyendas
configurado en CC1, que se muestra usando la tecla direccional izquierda o derecha. Las opciones de
leyendas son las siguientes:
- 12 -
Page 16

Operación General
Cómo Usar Menú de Configuración (Continúa)
CC · Muestra la información en cualquier posición de la pantalla. Superpone el texto en la parte superior
de la imagen a medida que se recibe.
Text [Texto] · Muestra la información en una posición en particular (tal como la parte inferior) de la
pantalla. No puede verse la imagen debajo del texto.
Off [Apagado] · No se muestran las leyendas.
CC1 y TEXT1 · Son las leyendas primarias y servicios de texto. Las leyendas o texto figuran en el mismo
idioma que el diálogo del programa.
CC3 y TEXT3 · Sirven como los canales de datos preferidos. Las leyendas y texto son a menudo una
traducción en idioma secundario, inglés simplificado, o se muestra a una velocidad más lenta.
CC2 y CC4, y TEXT2 y TEXT4 · Raramente están disponibles y las emisoras los usan solamente en
condiciones especiales, como por ejemplo cuando CC1 y CC3 no están disponibles, o TEXT1 y TEXT3
no están disponibles.
Digital Closed Caption [Subtitulado Digital]: Elija qué modo de subtítulos se utiliza para mostrar
información de leyendas. Seleccione esta opción y oprima las teclas direccionales izquierda o derecha
para seleccionar apagado o Idioma 1/2/3/4/5/6/7/8.
Superimpose Setup [Ajuste de Superposición]: Seleccione esta opción y oprima la tecla direccional
izquierda o derecha para optar entre Off [Apagado], Language 1 [Idioma 1] y Language 2 [Idioma 2].
Nota: Las opciones CC Digital y Superimpose Setup son ajustables solamente para canales digitales.
Clean Storage [Limpieza de Memoria]: Seleccione esta opción y oprima la tecla OK o la tecla
direccional derecha para aceptar, entonces aparecerá un cuadro de diálogo, seleccione Yes [Sí] y oprima
la tecla OK para borrar todos los ajustes, o seleccione la tecla Cancel u oprima OK para volver al menú
anterior.
- 13 -
Page 17

OPTION
Language
DPMS
Tuner mode
CEC
Channel instal l
Version Info
Select
Back
Exit
Color Temperature
Video
Picture Mode
Back Light
Brightness
Contrast
Saturation
Hue
Sharpness
Active BLC
Hi-Bright
50
50
50
50
0
4
Cool
Off
OPTION
Language
Advanced Video
DPMS
Tuner mode
CEC
Version Info
Select
Back
Exit
DNR
Channel insta ll
Cinema Mode
Blue Mute
juego está desconecta do. Presione los botones
Medium
Auto
On
:p r esi one lo s bo ton e s i z qu i erd a y d ere cha
pa r a s e le c cio na r e ntr e m e di o , f u ert e ,
au t omá tic o , o f f y b aj o .
Modo Cine
: ajustable cuando
izquierda y derecha
el modo
Blue mute - presione los botones izquierda y derecha para activar
o desactivar la luz azul de pantalla
Page 18

Funciones Avanzadas
Video Avanzado (Continúa)
Game Mode [Modo Juego]: Seleccione Off [Apagado] u On [Encendido] oprimiendo las teclas
direccionales izquierda o derecha.
Cinema Mode [Modo Cine]: Ajustable cuando el modo juego Game Mode está apagado; oprima las
teclas direccionales izquierda o derecha para seleccionar Auto [Automático] u Off [Apagado].
Color Management [Administración del Color]: Oprima las teclas direccionales izquierda o derecha para
seleccionar On [Encendido] u Off [Apagado]. Cuando se selecciona On aparece una opción (Col. Adjust)
[Ajustar Color].
Blue Mute [Silencio Azul]: Oprima las teclas direccionales izquierda o derecha para seleccionar On
[Encendido] u Off [Apagado] para encender o apagar la luz azul de la pantalla.
Cómo Usar Menú de Audio
OPTION
CEC
MTS
Version Info
Balance
Bass Boost
Sound Surround
Equalizer
Digital Audio Output
Select
SPDIF Delay
Back
Auto Volume Control
Exit
Audio
Stereo
PCM
0
Off
On
Off
140
Off
Visualice el menú principal pulsando la tecla Menu y
seleccione Audio, luego oprima la tecla OK para
confirmar.
El menú Audio aparece con las siguientes opciones:
MTS: Seleccione un tipo de la lista usando la tecla
direccional izquierda o derecha: Stereo, SAP, Mono.
Esta opción aparece solamente en modo TV. Para modo
AV/CMP aparece Sound Mode [Modo de Sonido].
Balance: Use las teclas direccionales derecha o izquierda para balancear el sonido entre los parlantes
izquierdo y derecho.
Bass Boost [Refuerzo de Agudos]: Disminuye o aumenta los graves en el aparato de TV usando las
teclas direccionales izquierda y derecha.
Sound Surround [Sonido Envolvente]: Use las teclas direccionales izquierda y derecha para encender y
apagar.
Equalizer [Ecualizador]: Use las teclas direccionales izquierda y derecha para seleccionar entre Off
[Apagado], Rock, Pop, Live, Dance, Techno, Classic y Soft.
Digital Auto Output [Salida Automática Digital]: Use las teclas direccionales izquierda y derecha para
seleccionar PCM, apagado o dolby digital.
Nota: Cuando la salida automática digital está apagada, la opción SPDIF Delay no está disponible.
SPDIF Delay [Retardo SPDIF]: Esta opción es utilizada para sincronizar el sonido con la imagen. Si el
sonido es más lento o más rápido que la acción de la imagen, puede utilizar las teclas direccionales
izquierda y derecha para disminuir o aumentar el valor numérico.
Auto Volume Control [Control de Volumen Automático]: Seleccione esta opción para mantener el
mismo nivel de sonido en todos los canales.
Cómo Ajustar la Hora
Este menú le permite ajustar la zona horaria en su aparato de TV para programar el temporizador de
apagado o encendido automático.
Visualice el menú principal oprimiendo la tecla Menu. Seleccione Time Setup y oprima la tecla OK para
confirmar.
- 15 -
Page 19

Funciones Avanzadas
Cómo Ajustar la Hora (Continúa)
Time Shifting Mode [Modo Pausa en Directo]: Le permite grabar el programa de TV de modo que no se
pierda su parte favorita aún cuando tenga que salir. Antes de usar la función, primero debe conectar el
dispositivo USB al aparato de TV. Cuando lo utilice por primera vez, deberá realizar la configuración del
disco para dispositivo USB.
1. Seleccione Time Setup > Time Shifting Mode.
2. Oprima la tecla direccional izquierda o derecha para seleccionar On para encender la función de
pausa en directo, luego oprima Exit para cerrar el menú.
3. Oprima Option en el control remoto y seleccione Time Shift, luego oprima Ok para confirmar.
4. Siga las indicaciones en la pantalla para realizar la configuración.
5. Una vez que la configuración del disco ha finalizado, oprima Option y seleccione Time Shift.
6. Oprima Ok para visualizar el menú de pausa en directo.
Æ
Oprima la tecla roja para pausar la imagen y comenzar la pausa en directo.
Æ
Oprima la tecla roja para reproducir la parte grabada.
Æ
Cuando el menú de pausa en directo desaparece y solamente el tiempo de la pausa en directo
permanece en la pantalla, puede oprimir la tecla roja o la tecla OK para volver a traer el menú de pausa
en directo.
Æ
Oprima la tecla verde para retroceder o la tecla amarilla para adelantar.
Æ
Oprima la tecla azul para detener la función de pausa en directo.
Notas:
Æ
Antes de conectar el dispositivo USB a su TV, asegúrese de haber respaldado los datos que tiene en
dicho dispositivo para evitar que en una eventualidad se pierdan datos importantes.
Æ
Se recomienda utilizar un dispositivo USB de un tamaño superior a 1Gb y una velocidad de disco
mayor a 5.0M/seg.
Æ
Cuanto mayor sea el tamaño del dispositivo para pausa en directo, más tiempo podrá grabar de
programa.
Æ
Si cambia de canal durante la pausa en directo, aparecerá un mensaje para que seleccione Yes [Sí]
o No. Puede seleccionar Yes para salir de la pausa en directo y cambiar de canal.
Time Setup [Ajuste de la Hora]: Seleccione la opción Time
Setup y oprima la tecla Ok para confirmar. Las opciones
son las siguientes:
Time Setup
Time Zone
Time
Sleep Timer
As broadcaster
20 minutes
Time Zone [Zona Horaria]: Use las teclas direccionales
izquierda o derecha para seleccionar la zona local.
Time [Hora]: Use las teclas direccionales izquierda o
Select
Back
Exit
derecha para visualizar las opciones de la hora:
Auto-synchronization [Sincronización Automática]: Use
las teclas direccionales izquierda o derecha para
seleccionar On [Encendi
do] u Off [Apagado]. Si selecciona On, el aparato de TV recibirá la hora
automáticamente de las señales DVT, y el ítem de hora Time no se podrá ajustar. Si selecciona Off,
debería ajustar la hora en el ítem de configuración de la hora Time. Marque Time, use las teclas
direccionales izquierda o derecha para seleccionar el espacio de entrada, e ingrese la hora actual
usando las teclas numéricas.
Nota: Si selecciona Off, el ajuste de la hora en la opción Time no se memorizará cuando encienda la TV
la próxima vez, y la hora de la TV será la predeterminada.
Power On Timer [Temporizador de Encendido]: Use las teclas direccionales izquierda o derecha para
seleccionar Once [Una Vez], Daily [Todos los Días] y Off [Apagado]. Si selecciona Once o Daily, en el
ítem Timer deberá ajustar un período de tiempo luego del cual la TV automáticamente se encenderá.
Marque Timer, use las teclas direccionales izquierda o derecha para seleccionar el espacio de entrada, e
ingrese la hora actual usando las teclas numéricas.
- 16 -
Page 20

Funciones Avanzadas
Cómo Ajustar la Hora (Continúa)
Power On Channel [Canal de Encendido]: Esta opción está disponible cuando en Power On Timer ha
seleccionado Once o Daily. Oprima la tecla Ok o la tecla direccional derecha para visualizar el submenú.
Marque Select Mode, use las teclas direccionales izquierda o derecha para seleccionar Last Status
[Último Estado], el canal de encendido será el último canal que miró antes que se apagara su TV, o
puede seleccionar User Select [Selección del Usuario], luego oprima las teclas direccionales hacia arriba
o abajo para seleccionar el canal que quiere mirar cuando la TV se encienda automáticamente la
próxima vez, y oprima Ok para confirmar.
Power Off Timer [Temporizador de Apagado]: Use las teclas direccionales izquierda o derecha para
seleccionar On [Encendido] u Off [Apagado]. Si selecciona On, en el ítem Time deberá ajustar un
período de tiempo luego del cual la TV automáticamente se apagará. Marque Time, use las teclas
direccionales izquierda o derecha para seleccionar el espacio de entrada, e ingrese la hora actual
usando las teclas numéricas.
Sleep Timer [Temporizador de Desconexión Automática]: Ajusta el periodo de tiempo después del cual
el aparato de TV pasa a modo de espera Standby. Pulse la tecla direccional izquierda o derecha para
configurar el periodo (120 minutos máximo). Para deshabilitar esta función, oprima Off.
Cómo Usar la Función de Bloqueo
Este menú puede controlar la función especial para los canales de TV.
Nota: Debe ingresar su código personal antes de acceder al menú de bloqueo Lock.
Visualice el menú principal oprimiendo la tecla Menu y
seleccione Lock, luego oprima la tecla Ok para confirmar.
Cada vez que ingrese al menú, se le solicitará la
contraseña para poder acceder. Ingrese la contraseña por
defecto “1234” para acceder al submenú. El menú de
bloqueo aparece con las siguientes opciones:
Enter
Select
Back
Exit
Parental
Channel Block
Program Block
Front panel lock
Installation lock
Input Block
Change Password
Reset private
Off
Off
Nota: Si se olvida de su contraseña, ingrese 0432 para
invalidar todos los códigos existentes.
Channel Block [Bloque
o de Canales]: Esta función le permite bloquear ciertos canales de TV. Marque
Channel Block, oprima la tecla Ok o la tecla direccional derecha para visualizar el menú de bloqueo de
canales Channel Block. Use las teclas direccionales izquierda o derecha para seleccionar el canal de
TV que desee bloquear, luego oprima la tecla Ok para bloquear. Para desbloquear, realice la misma
operación.
Program Block [Bloqueo de Programas]: Esta opción le permite bloquear programas de TV con
restricciones específicas. Marque Program Block, oprima la tecla Ok o la tecla direccional derecha para
visualizar el menú de bloqueo de programas Program Block. Seleccione el canal que desea bloquear y
oprima Ok, luego seleccione las opciones de restricciones que desea ajustar para usted o sus hijos y
oprima Ok para confirmar.
Front Panel Lock [Bloqueo del Panel Frontal]: Esta opción le permite bloquear las teclas del aparato de
TV, oprimiendo las teclas direccionales izquierda o derecha para seleccionar On y bloquear las teclas de
la unidad.
Installation Lock [Bloqueo de Instalación]: Oprima las teclas direccionales izquierda o derecha para
seleccionar On y prevenir el acceso al menú de instalación y evitar que se ajuste algún canal sin su
consentimiento.
Input Lock [Bloqueo de Entrada]: Esta opción le permite bloquear cierta fuente externa que desee
bloquear. Oprima la tecla Ok o la tecla direccional derecha para visualizar el menú Input Lock, luego
oprima las teclas direccionales hacia arriba o abajo para seleccionar la fuente externa que desea
bloquear, y oprima la tecla Ok para bloquear. Para desbloquear, realice la misma operación.
- 17 -
Page 21

Funciones Avanzadas
Cómo Usar la Función de Bloqueo (Continúa)
Nota: Cuando la entrada actual está bloqueada, puede oprimir Ok e ingresar la contraseña para poder
acceder.
Change Password [Cambio de Contraseña]: Esta opción le permite cambiar la contraseña. Oprima la
tecla Ok o la tecla direccional derecha para ingresar, luego oprima la tecla numérica para ingresar la
nueva contraseña dos veces.
Reset Private [Resetear Preferencias]: Esta opción le permite desbloquear todos los canales
bloqueados. Seleccione esta opción y oprima la tecla Ok o la tecla direccional derecha para ingresar al
submenú, luego seleccione la opción Ok y oprima la tecla Ok para desbloquear todos los canales
bloqueados.
Cómo Usar el Menú de Opciones
Visualice el menú principal oprimiendo Menu. Seleccione
OPTION y oprima Ok para confirmar.
CEC: Esto permite que el aparato de TV y su reproductor
de DVD sincrónicamente se enciendan/apaguen o pasen a
modo de espera Standby. Oprima la tecla Ok o la tecla
direccional derecha para visualizar el menú CEC. Marque
Enter
Select
Back
Exit
OPTION
CEC
Version Info
CEC y seleccione On, aparecerán las opciones TV Auto
Power [Encendido Automático del aparato de TV] y Auto
Standby [Modo de Espera Automático], y podrá seleccionar
On [Encendido] u Off [Apa
gado] acorde a sus necesidades.
Version Info [Información de la Versión]: Esta opción le brinda información de la versión del aparato de
TV. Puede oprimir la tecla Ok para verla.
Cómo Usar la Guía Electrónica de Programas
EPG es una guía en pantalla que visualiza programas de
TV programados. Puede navegar, seleccionar y ver
programas.
1. Oprima Guide en el control remoto y aparecerá el menú
Now and Next EPG, lo que le permite obtener la
información sobre el programa actual y siguiente emitido en
cada canal. Navegue por los diferentes programas usando
las teclas de navegación en el control remoto.
04/12/2009
4.1 SBT HD
Thursday, 4-December-2009 2:16:21
2:00a
TELE SERIADOS I
1:15 - 3:00 Fri, 4-Dec
EM NOME DA JUSTICA - 1 temp. A dedicada promotora Annabeth Chase tenta
Solucionar casos ocorridos em sua propria vizinhanca. Volta ao trabalho apos
Uma licenca descobre que a sua prompcao foi dada a colega.
3:00
TELE SERIADOS II TELE SERIADOS I
Series
OK
Type filterNext day Schedule List
0
1. Use las teclas de
color para ver 7 Days EPG [7 Días de EPG].
Prev day (Red) [Día previo (Rojo)]: Muestra una lista con el día previo a EPG.
Next day (Green) [Día posterior (Verde)]: Muestra una lista con el día siguiente a EPG.
Type Filter (Blue) [Filtro Tipo (Azul)]: Filtro de guía de programa para los programas de TV digital.
Æ Oprima la tecla azul para visualizar la lista de tipo y subtipo de programa.
Æ Navegue a través de los diferentes tipos y subtipos usando las teclas de navegación en el control
remoto.
Æ Seleccione uno o más tipos que desee marcar en la lista de Tipos de Programa, oprima Ok para
seleccionar (o deseleccionar). Una marca aparecerá a la izquierda del tipo que se seleccione. Cuando
selecciona un tipo, todos sus subtipos se seleccionarán en forma acorde.
- 18 -
Page 22

Funciones Avanzadas
Cómo Usar la Guía Electrónica de Programas (Continúa)
Æ Asimismo, el usuario puede seleccionar algunos subtipos que desee sin seleccionar ningún tipo
primero.
Æ Oprima la tecla azul para salir de la lista de tipo y subtipo.
Æ Después del filtrado, todos los programas de TV digital que desea estarán marcados.
Nota: Los consejos al final se aplican dependiendo del contenido de EPG.
Funciones USB
Su TV está equipada con un conector USB que le permite ver fotos, escuchar música o mirar videos que
están guardados en un dispositivo de almacenamiento USB.
Formatos de Archivos Compatibles:
Foto: JPG/JPEG
Música: Mp3
Formato de Codificación de Video: H.264/MPEG4/MPEG2/MPEG1/AV1
1. Cuando conecte un dispositivo USB, oprima la tecla USB para acceder al modo USB. El navegador
de contenido visualizará todas las carpetas y tipos de archivos compatibles guardados en el directorio
raíz del dispositivo USB con imágenes en miniatura.
2. Seleccione un archivo de música, video o foto en el navegador de contenido, o seleccione una
carpeta y oprima Ok para acceder a la misma, luego seleccione un archivo. Oprima Ok para comenzar la
reproducción.
Nota: Los tipos de archivos seleccionables dependen del tipo de medio que haya seleccionado.
3. Durante la reproducción, puede seguir las anotaciones en la parte inferior de la pantalla y oprimir las
teclas correspondientes en el control remoto para realizar ciertas operaciones: Oprima las teclas hacia
arriba o abajo, izquierda, derecha u Ok (si fuera aplicable) para controlar la reproducción, u oprima la
tecla Menu para visualizar el menú de funciones y seleccionar una opción del mismo para realizar ciertas
operaciones.
Nota: Oprima Menu para volver o Exit para salir del menú de funciones.
4. Oprima Return para volver al nivel superior o pulse USB para salir del modo USB.
- 19 -
Page 23

Page 24

Otra Información
SOLUCIÓN DE PROBLEMAS (Continúa)
n Si la antena está ubicada en la zona límite de una
señal de televisión en la que la señal es débil, la
imagen puede estar interferida por puntos. Cuando la
señal es extremadamente débil, puede ser necesario
PUNTOS DE NIEVE
E INTERFERENCIA
IGNICIÓN
@
@
instalar una antena especial para mejorar la
recepción.
Y Ajuste la posición y orientación de la antena interna
o externa.
Z Verifique la conexión de la antena.
[ Haga sintonía fina del canal.
\ Pruebe otro canal. Puede haber un fallo de emisión.
n Pueden aparecer puntos negros o rayas
horizontales, o la imagen tiembla o se mueve. Esto se
produce normalmente por interferencia del sistema de
ignición de un auto, lámparas de neón, taladros
eléctricos u otro aparato eléctrico.
n Los fantasmas se producen porque la señal de
televisión sigue dos caminos. Uno es el camino
FANTASMA
INTERFERENCIA DE
RADIOFRECUENCIAS
* El diseño y las especificaciones están sujetas a cambio sin aviso.
@
@
directo, el otro se refleja desde edificios altos, colinas
u otros objetos. Si se cambia la dirección o posición
de la antena puede mejorar la recepción.
n La interferencia produce ondas en movimiento o
rayas diagonales, y en algunos casos, pérdida de
contraste en la imagen. Encuentre y elimine la fuente
de interferencia de radiofrecuencias.
- 21 -
Page 25

instalación del soporte de mesa
instalación del soporte de mesa
notas:
1. S i el soporte de mesa se ha ensamblado, simplemente
ignore las instrucciones siguientes.
2. S iga las instrucciones de acuerdo con el soporte de mesa
suministrado a usted.
3. L os gráficos utilizados en esta publicación son sólo para
la presentación.
4. C uando el televisor se enfrenta abajo , no afecte la pantalla
con bordes afilados para evitar a rayarla.
5. S i desea montar el televisor en la pared , por favor compre
un soporte de pared apropiado.
Page 26

TVJ LED 39 F3300F
39
Page 27

CAUTION:
Use of controls, adjustments or procedures other than those specified herein may
result in
hazardous radiation
The lighting flash with arrowhead symbol, within an equilateral triangle is
intended to
voltage" within the product's
to constitute a risk of electric shock to
The exclamation point within an equilateral triangle is intended to alert the
user to the
instructions in the
CAUTION
RISK OF ELECTRIC
SHOCK DO NOT OPEN.
Apparatus shall not be exposed to dripping or splashing and no objects
filled with
WARNING: TO REDUCE RISK OF FIRE OR ELECTRIC SHOCK, DO NOT
exposure.
alert the user to the presence of uninsulated "dangerous
enclosure that may be of sufficient magnitude
the person.
presence of important operating and maintenance (servicing)
literature accompanying the appliance.
CAUTION: TO REDUCE THE
RISK OF ELECTRIC SHOCK, DO
NOT REMOVE
NO USER SERVICEABLE PARTS
INSIDE. REFER SERVICING TO
QUALIFIED SERVICE PERSONNEL.
liquids, such as vases, shall be placed on the apparatus.
EXPOSE THIS APPLIANCE TO RAIN OR MOISTURE.
COVER (OR BACK).
Page 28

IMPORTANT SAFETY INSTRUCTIONS
Read before operating equipment
1. Read these instructions.
2. Keep these instructions.
3. Heed all warnings.
4. Follow all instructions.
5. Do not use this apparatus near water.
6. Clean only with a dry cloth.
7. Do not block any of the ventilation openings.
install in accordance with the manufacturer's
instructions.
8. Do not install near any heat sources such as
radiators, heat registers, stoves, or other apparatus
(including amplifiers) that produce heat.
9. Do not defeat the safety purpose of the polarized
or grounding-type plug. A polarized plug has two
blades with one wider than the other. A grounding
type plug has two blades and a third groundingprong.
The wide blade or third prong are provided for your
safety. When the provided plug does not fit into your
outlet, consult anelectrician for replacement of the
obsolete outlet.
10.Protect the power cord from being walked on or
pinched, particularly at plugs, convenience re
-ceptacles, and the point where they exit from the
apparatus.
11.Only use attachments/accessories specified by
the manufacturer.
12.Use only with a cart, stand, tripod, bracket, or
table specified by the manufacturer or
sold with the apparatus. When a cart is
used, use caution when moving the
cart/apparatus combination to avoid
injury from tip-over.
13.Unplug this apparatus during lightning storms
or when unused for long periods of time.
14.Ref er all servicing to qualified service personnel.
Servicing is required when the apparatus has
been damaged in any way, such as if the power
-supply cord or plug is damaged, liquid has been
spilled or objects have fallen into the apparatus,
or if the apparatus has been exposed to rain or
moisture, does not operate normally, or has been
dropped.
15.
This product may contain lead and mercury.
Disposal of these materials may be regulated due
to environmental considerations. For disposal or
recycling information, please contact your local
authorities or the Electronic Industries Alliance
(www.eiae.org).
16.Damage Requiring Service - The appliance
should be serviced by qualified service personnel
when:
A. The power supply cord or the plug has been
damaged;
B.Objects have fallen or liquid has been spilled
into the appliance;
C.The appliance has been exposed to rain;
The appliance does not appear to operate
D.
normally or
exhibits a marked change in
performance;
E.The appliance has been dropped or the
enclosure damaged.
Tilt/Stability - All televisions must comply with
17.
recommended international global safety
standards for tilt and stability properties of its
cabinet design.
Do not compromise these design standards by
applying excessive pull force to the front, or top,
of the cabinet, which could ultimately overturn
•
the product.
Also, do not endanger yourself, or children, by
•
placing
electronic equipment/toys on th e top
Of the cabinet. Such items could unsuspectingly
fall from the top of the set and cause damage
and/or personal injury.
18.Wall or Ceiling Mounting - The appliance
should be mounted to a wall or ceiling only as
recommended by the manufacturer.
19.Power Lines - An outdoor antenna should be
located away from power lines.
20.Outdoor Antenna Grounding - If an outside
antenna is
the antenna system is grounded so as to provide
some protection against voltage surges and built
up static charges.
Section 810 of the National Electrical Code,
ANSI/NFPA No. 70-1984, provides information
with respect to proper grounding of the mast
and supporting structure, grounding of the leadIn wire to an antenna discharge unit, size of
grounding connectors, location of antennadischarge unit, connection to grounding electrodes,
and requirements for the grounding electrode.
See Figure below.
21.Object and Liquid Entry - Care should be
taken so that objects do not fall and liquids are
not spilled into the enclosure through openings.
22.Battery usage CAUTION - To prevent battery
leakage that may result in bodily injury, property
damage, or damage to the unit:
• Install all batteries correctly, with + and - aligned
•
•
23.Apparatus shall not be exposed to dripping or
splashing and no objects filled with liquids,
such as vases, shall be placed on the apparatus.
connected to the receiver, be sure
as marked on the unit.
Do not mix batteries (old and new or carbon and
alkaline, etc.).
Remove batteries when the unit is not used for
a long time.
1
Page 29

Note to the Cable TV system installer: This reminder is provided to call the Cable TV system installer's attention
to Article
820-40 of the NEC that provides guidelines for proper grounding and, in particular, specifies that the
cable ground shall be connected to the grounding system of the building, as close to the point of cable entry as
practical.
Example of Antenna Grounding
as per NEC - National Electrical Code
2
Page 30

Table of Contents
Chapter 1: Introduction
Precautions ...............................................................................................................................
Product ...................................................................................................................................
Power and Plug ......................................................................................................................
Power Cord and Signal Cable ................................................................................................
Use Environment ....................................................................................................................
Cleaning .................................................................................................................................
Hanging the TV Set on the Wall .............................................................................................
Buttons on the TV ....................................................................................................................
Sockets .....................................................................................................................................
Remote Control Functions ......................................................................................................
Chapter 2: General Operation
Switching on .............................................................................................................................
Switching off .............................................................................................................................
Initial Setup ...............................................................................................................................
Using Menu System .................................................................................................................
Using TV Menu .........................................................................................................................
Channel Scan ...........................................................................................................................
Update Scan .............................................................................................................................
Channel Skip ............................................................................................................................
Channel Edit .............................................................................................................................
Analog Channel Fine Tune ......................................................................................................
Using Setup Menu ....................................................................................................................
4
4
4
4
4
4
4
5
5
7
8
8
9
9
9
10
10
10
10
10
10
Chapter 3: Advanced Functions
Using Video Menu ....................................................................................................................
Advanced Video .......................................................................................................................
Using Audio Menu.. ..................................................................................................................
Time Setup.................................................................................................................................
Using the Lock Function..........................................................................................................
Using the Option Menu.............................................................................................................
Using Electronic Programme Guide........................................................................................
USB Function.............................................................................................................................
Chapter 4: Other Information
Troubleshooting .......................................................................................................................
3
12
12
12
13
14
15
15
15
16
Page 31

Chapter 1
Precautions
Read all of the instructions before operating the set.
Keep these instructions well for future use.
Product
Do not block or cover the ventilation openings on
the back cover.
Do not push objects of any kind into this unit
through the cabinet slots as they could touch the
current carrying parts or short-circuit parts, resulting
in fire, electric shock, or damage to the unit.
Do not attempt to open the cabinet as this may
cause damage. There are no parts inside you
can service by yourself. Refer all servicing to
qualified personnel.
Do not touch the screen surface with fingers as
this may scratch or mar the TV screen.
Do not impact the TV screen with hard pressure
as this may damage the TV screen severely.
The appliance is not intended for use by young
children or infirm persons without supervision.
Young children should be supervised to ensure
that they do not play with the appliance.
Power and Plug
Unplug the set under the following conditions:
- If the set will not be used for a long period of
time.
- If the power cord or the power outlet/plug is
damaged.
- Follow the instructions to install and adjust the
product. Adjust those controls that are covered in
this operating instructions as improper adjustment
of other controls may result in damage. If this
happens, unplug the set and refer to the service
personnel.
- If the set is subject to impact or has been dropped
to have the cabinet damaged.
Where the mains plug or an appliance coupler is
used as disconnect device, the disconnect device
shall remain readily operable.
Power Cord and Signal Cable
Do not allow anything to rest on or roll over the
power cord and the signal cable.
Protect the power cord and the signal cable from
being trampled.
Do not overload the power cord or the power outlet.
Do not expose the power cord and the signal cable
to moisture.
Introduction
Use Environment
Do not place the set on an unstable cart, stand,
or table.
Place the set on a place that allows good
ventilation.
Do not use the set near damp, and cold areas.
Protect the set from overheating.
Keep the set away from direct sunlight.
Apparatus shall not be exposed to dripping or
splashing and no objects filled with liquids, such
as vases, shall be placed on the apparatus.
Do not use the set near dust place.
Cleaning
Dust the set by wiping the screen and the cabinet
with a soft, clean cloth or some special liquid
cleaner.
Do not apply excessive force to the screen when
cleaning.
Do not use water or other chemical cleaner to
clean the screen as this may damage the surface
of the TV screen.
Hanging the TV Set on the Wall
Warning: This operation requires two people.
To ensure a safe installation, observe the following
safety notes:
Check that the wall can support the weight of the
set and wall mount assembly.
TV
Follow the mounting instructions provided with
the wall Mount.
The TV set must be installed on a vertical wall.
Make sure to use only screws suitable for the
of the wall.
material
Make sure that the TV set cables are placed so
that there is not danger of tripping over them.
All other safety instructions about our TV sets are
also applicable here.
Note
Graphics contained within this publication
are presentation only.
4
Page 32

Buttons on the TV
Introduction
1. CHANNEL UP/DOWN button
Scans up/down through the channel list. In the menu system, they act like the up/down direction buttons on
the remote and adjust menu controls; In TV mode, when the channel is switched to the max/min one, pressing
CH+/CH- will both pop out different signal sources. At this time CH+/CH- for you to select channels and external
input modes circularly.
2. VOLUME UP/DOWN button
Increases/decreases the volume. In the menu system, they act like the left/right direction buttons on the
remote and adjust menu controls
3
MENU button
Brings up the main menu or press to return to the previous menu.
4. OK button
Note: This button also has source function, which brings up the source selection menu.
5. POWER button
Turns the TV on or standby.
Notes:
The location and names of the function buttons and power button on the TV may vary according to TV model.
For some models, there is not the OK button, and the VOLUME UP button acts like the OK button on the
remote to confirms your selection or changes settings.
Sockets
Note: The location and names of the sockets on the TV may vary according
to TV model, and not all sockets available on all models.
USB socket (input)
This socket can be used to connect a USB device.
HDMI1/HDMI2/HDMI3 sockets(input)
T he HDMI (High-Definition Multimedia Interface) socket lets you connect a device,
such as a with a HDMI output for best picture quality It also
provides an uncompressed digital connection that carries both video and audio
data by way of an integrated mini plug cable
HDMI
HDMI
HDMI
USB
or
or
SPDIF
HEADPHONE
or
SPDIF socket output
Use a digital cable to connect your TV to a digital amplifier. optical
Headphone socket (output)
This socket can be used to connect headphones or stereo earphones.
Note: When the Headphone socket is connected, the speakers will be muted.
Warning: Excessive sound pressure from earphones and headphones can
cause hearing loss.
5
Page 33

Introduction
COMPONENT
IN
COMPONENT
AUDIO IN
AV IN
AV IN adapter
AV OUT
AUDIO IN
Pb/Cb
Pr/Cr
CMP IN
adapter
CMP
AUDIO IN
adapter
AUDIO
VIDEO
VIDEO
AUDIO
AV OUT
adapter
VGA
Y
L
R
R
L
L
R
YPbPr component sockets (input) or CMP adapter
Note: The socket can be used to connect the attached CMP
adapter cable with YPbPr component sockets.
These YPbPr sockets can be used to connect a device that has component
video sockets, such as a DVD player. The component sockets can recognize
if the device you're connecting to is Y Pb Pr compatible or Y Cb Cr compatible.
or
The component sockets provide excellent picture quality because the video is
separated into three separate parts.
COMPONENT CMP
Note: T AUDIO in adapter
AUDIO in adapter cable with audio L & R sockets, be used to obtain sound.
These AUDIO IN L & R sockets can be used to connect a range of equipment,
or
including video recorders, camcorders, satellite receivers, DVD players, or games
consoles. AUDIO IN sockets (or AUDIO in adapter) are shared by VGA and YPbPr
(or CMP adapter) sockets.
or
AUDIO/VIDEO sockets (output) or AV adapter (output) socket
Note: The AV OUT adapter socket can be used to connect the attached AV
adapter cable with VIDEO and AUDIO L & R OUT sockets.
These AV out socketscan be used to connect
must leave the TV on the same channel you are recording.
or
socket p rovides
CMP adapter
AUDIO IN or AUDIO IN adapter sockets (input)
he CMP socket can be used to connect the attached
AV RCA audio + video sockets (input) or AV IN adapter socket
Note: AV IN adapter
the socket can be used to connect the attached AV adapter
cable with VIDEO and AUDIO L & R IN sockets.
The AV IN sockets can be used to connect a range of equipment, including video
recorders, camcorders, decoders, satellite receivers, DVD players, or games
consoles. The VIDEO IN socket provides
composite video connection.
composite video connection.
socket input
and
a VCR to record programs. You
The VIDEO OUT
VGA/DVI AUDIO socket (input)
This socket provides audio connection when using the HDMI jack for
DVI, or used to obtain sound when a PC is connected to the VGA socket.
CABLE IN
ANTENNA IN
VGA
CABLE IN socket (input)
This socket can be used to connect to a cable or cable box.
ANTENNA IN socket (input)
This socket can be used to connect to an external antenna.
VGA socket (input)
This socket can be used to connect a computer.
6
Page 34

Source
Menu
ZoomZoom
- -
Option
VOL CH
USB
Picture
T-Link
MTS
Introduction
Remote Control Functions
Most of your television's functions are available via the menus that appear on
the screen. The remote control supplied with your set can be used to navigate
through the menus and to configure all the general settings.
Source
Guide
Exit
ZoomZoom
+ +
Return
Info
Sound
List
CC
Sleep
(Zoom -/+) (left and right direction buttons) Highlights different items in the
VOL +/-
Picture
Colored buttons
Brings up the signal source selection menu.
(On/Off button) Turns the TV on or standby.
0-9
(numeric buttons) Enters channel numbers.
Enters a letter, a digit or a symbol in some functions.
(Dot) Enters radix point.
Guide Toggles the Electronic Programme Guide between on and off.
Menu Brings up the main menu or press to return to the previous menu.
Exit Exits the menu system.
(up, down direction buttons) Highlights different items in the menu
system and adjusts the menu controls.
In USB mode, Selects the previous/next photo, music or video.
menu system and adjusts the menu controls.
Selects the picture format. (
the full screen mode. Do not use the display mode with black
bars on both sides of the picture for long time, otherwise the TV
screen may be damaged permanently.)
In USB mode,
OK When in the menu system, confirms your selection or changes
settings; To pop out Channel List menu.
starts fast reverse or forward.
Note: You are recommended to use
In USB mode, s tarts or pauses playback.
Option Shortcut to Antenna (or Cable), Freeze, Time Shift, PVR, and
Schedule List.
Return Returns you to the previous channel.
(VOLUME UP/DOWN) Increases or decreases the TV's volume.
Info Displays the status information of the current program or source.
(MUTE) Reduces the TV's volume to its minimum level. Press
again to restore the volume.
CH +/- (CHANNEL UP/DOWN) Scans up or down through the current
channel list.
USB Accesses or exits the USB mode.
Toggles through the picture modes: User, Cinema, Sport, Vivid,
and Hi-Bright.
Sound Toggles through the sound modes: Off, Rock, Pop, Live, Dance,
Techno, Classic and Soft.
List Displays the favourite channel list.
(Red/Green/Yellow/Blue) To select tasks.
T Link
Accesses the CEC menu.
MTS Toggles through the MTS settings.
Note: MTS is only available in TV mode and the available
options may depending on the channel's signal.
Sleep Repeatedly press to set the sleep timer from 10 to 120 minutes.
To cancel the sleep timer, press Sleep until "Off" appears.
CC Toggles through CC functions and off.
7
Page 35

Chapter 2
General Operation
Switching on
Follow the instructions on this page on how to switch on your TV set and
the remote control before going on to following pages describing how to
use the channel set-up procedure.
1. Insert two AAA batteries in the remote control.
Precautions on using batteries:
- Only use the battery types specified.
- Make sure you use the correct polarity.
- Do not mix new and used batteries.
- Do not use rechargeable batteries.
-
Do not expose batteries to excessive heat such as sunshine, fire or
the like, throw them in a fire, recharge them or try to open them, as
this could cause them to leak or explode.
- Remove the batteries from the remote control if you are not using it
for a long period of time.
2. Connect the power cable FIRST to the television, THEN to a mains
socket.
Your TV set should only be connected to an AC supply. It must not be
connected to a DC supply. If the plug is detached from the cable, do not,
under any circumstances, connect it to a mains socket, as there is a risk
of electric shock.
Note: The figures are for representation only. The location of the power
socket at the back of the television might differ depending on the model.
3. Connect an outside aerial to the ANTENNA IN socket at the back of
theTV set.
The aerial socket (75 OHM - VHF / UHF / cable) can be used for
connecting an external aerial or other equipment fitted.
Note: If you want to receive the signal from your cable or cable box,
please connect a coaxial cable to the CABLE IN socket at the back
of the TV set.
4. When powered on, the TV will be turned on directly or be in standby
mode.
If the power indicator lights up, the TV set is in standby mode. Press
the button on the remote control or on the TV set to turn on the TV.
Switching off
To put the TV set into standby mode, press the button on the remote
control or on the TV, the TV set remains powered up, but with low energy
consumption.
To switch off the TV set, unplug the mains socket from the mains outlet.
8
Page 36

Initial Setup
Initial set-up involves selecting all the settings
required to be able to search for and store all the
channels you can receive. Make sure that the
television is switched on and follow all the steps in
turn specified hereafter.
Initial setup
Initial setup
Welcome
Welcome
General Operation
Video
Video
Audio
Audio
PAP
TV
Option
Option
Welcome
Welcome to use the Wizard for Initial Setup !!
Please press [OK] to start the Wizard.
1.
The first time you switch the set on, the Initial
Setup menu appears.
step.
2. Press the up or down direction button to select
your language and press the right direction or OK
button to enter the next step, then select Antenna
or Cable and press the right direction or OK
button to enter the next step.
3. Press the up or down direction button to select
Scan and press the right direction or OK button to
start the search automatically. All available TV
programmes are stored. This operation takes a
few minutes. The display shows the progress of
the search and the number of programs found.
Note: To prevent the channel setup process from
being interrupted, wait for the message indicating
that the setup is complete.
In this step, you can also select Skip Scan to skip
the initial setup progress. But when you turn the
TV on next time, the Initial Setup menu will still
appear.
4. During the setup, user can follow the hints
available at the bottom of the screen to return to
the last step by pressing the left direction button,
or press Exit to interrupt the search halfway.
5. After initial setup is complete, press OK to exit.
The channels are arranged in a preset order. If
you wish to skip channels, or organise channels,
select and press the right direction or OK
TV
button to enter.
I
] to start rd.
Press OK to enter the next
Using Menu System
USB
USB
Time Setup
Time Setup
Lock
Lock
Setup
Setup
1. Press the Menu button to display the main menu.
2. Press the up/down/left/right direction buttons to
select the desired item, then press the OK button
to enter the submenu.
3. In submenus, use the up or down direction button
to select menu options, use the left or right
direction button to set functions or change values.
Use the OK button to activate a setting. Use the
OK or right direction button to open the
corresponding submenu.
4. Press Menu to return to the previous menu or
press Exit to close the menu.
Using TV menu
Press the Menu button to display the main menu,
and select the TV, then press the OK button to enter.
CEC
Version Info
Select
Back
Exit
Tuner Mode: this option is usually set up in the Initial
Setup process. Press the right or left direction button
to choose Antenna or Cable.
Channel Setup: this option allows the TV to search
for, find and store all the available analog and digital
channels for the antenna or cable input selected.
Follow all the steps in turn specified hereafter.
TV
Tuner Mode
Channel Setup
Cable
This section explores the menus of your TV. Each
menu is outlined and detailed to help you get the
most from your TV. To access the menu system:
9
Page 37

General Operation
Channel Setup
Channel Scan
Update Scan
Channel Skip
Channel Edit
Scan
Select
Back
Exit
Analog Channel Fine Tune
Channel Scan
1. Press the Menu button to display the main menu,
and select the TV > Channel Setup > Channel
Scan, then press the OK or right direction button
to enter.
2. The search process may take a few minutes.
During the process, you can press Menu or Exit
to abort halfway.
3. Once the scan ends, press the Menu button to
return to the last step or press OK to restart your
channel scan.
4. After the channel scan, channels are arranged in a
preset order. You can skip channels, modify the
preset order or rename channels.
Update Scan
this allows you update all available channels, without
altering the sorting of exiting channels.
1. Select TV > Channel Setup > Update Scan and
press the OK or right direction button to display
the Update Scan menu and start channel update.
2. To stop the update process, press Menu or Exit.
Channel Skip
If a channel was stored twice or its reception is poor,
you can simply skip it. The skipped channels cannot
be selected by pressing the CH+/- buttons.
1. Select TV > Channel Setup > Channel Skip and
press the OK or right direction button to display
Channel Skip menu.
2. Press the up or down direction button to select a
channel and press the OK button to check the box.
Note: If you want to recover the channel, press
OK again to uncheck the box.
3.
Press Menu to return or Exit to close the menu.
Channel Edit
1. Select TV > Channel Setup > Channel Edit
option and press the OK or right direction button
to display Channel Edit menu.
Press the up/down direction button to select the
2.
channel as your desired, then press the OK
button to enter the adjusting menu.
3. Press the numeric buttons to enter the channel
name and press OK to save the setting.
Note: After input the channel name, if you don't
press OK to confirm, the setting will not be
saved.
4. Press Menu to return or Exit to close the menu.
Analog Channel Fine Tune
If the picture is not clear you can fine tune the
channel.
Note: This function is only for analog channel.
1. Select TV > Channel Setup > Analog Channel
Fine Tune, then press the right direction or OK
button to enter.
2. Select a channel and press OK to enter the
adjusting menu, the press the left or right direction
button to fine tuning.
Using Setup menu
Setup
OPTION
CEC
Language English
Version Info
Screen Mode
Clean Storage
Select
Back
Exit
Language: using the left or right direction button to
select your desired menu language .
Note: The available languages might differ
depending on the model.
Full Screen
Exit
10
Page 38

General Operation
Screen Mode: Using the left or right direction button
to select among Full Screen, Normal, Zoom, Auto,
Expand Screen and Panorama.
Caption Setup: Press the Menu button to display
the main menu, and select Setup > Caption Setup.
Press OK button to display the Caption Setup menu.
OPTION
Caption Setup
CEC
Enable Caption
Version Info
Analog Closed Caption
Digital Closed Caption
Superimpose Setup
Select
Back
Exit
Enable Caption: using the left or right direction
button to select a mode: On mute, Yes or No.
On Mute:
when available, whenever the TV's sound is
muted by pressing the MUTE button. The
captioning information is not displayed when
the sound is not muted.
Yes: Captioning information always appears,
when available.
Displays captioning information,
On mute
Off
Off
Language 1
No: No captioning information displayed.
Analog Closed Caption:
encoded with closed-captioning information,
which lets you display the audio portion of a
program as text on the TV screen. Caption is not
available on all channels at all times. Only
specific programs encoded with closed-captioning
information are applicable.
Choose which captioning mode is used for
displaying captioning information. is
available for analog channels. S
modes, you may prefer to leave the closed captioned
mode set to CC1, which displays by using the left or
right direction button.
as below:
CC Displays information at any position on the
screen. It overlays the text on top of the picture
as it is received.
TEXT Displays information at one particular
position (such as the bottom third) on the screen.
You cannot see the picture underneath the text.
Off No captioning information displayed.
many programs are
Analog CC
elect your desired
The closed caption options are
CC1 and TEXT1 are the primary caption and
text services. The captioning or text is displayed
in the same language as the program's dialog.
CC3 and TEXT3 serve as the preferred data
channels. The captioning or text is often a
secondary language translation, simplified
English, or displayed at a slower rate.
CC2 and CC4, and TEXT2 and TEXT4 are
rarely available and broadcasters use them only
in special conditions, such as when CC1 and
CC3 are not available, or TEXT1 and TEXT3 are
not available.
Digital Closed Caption:
captioning mode is use for displaying captioning
information.
or right direction button to toggle between off or
Language 1/2/3/4/5/6/7/8.
Superimpose Setup: select this option and
press the left or right direction button to toggle
among Off, Language 1 or Language 2.
Note:
options are adjustable only for digital
channels.
Clean Storage: select this option and press the OK
or right direction button to enter, then a dialogue box
appears, select Yes and press OK to clean all the
settings, or select Cancel and press OK to return to
the previous menu.
Select this option and press the left
The Digital CC and Superimpose Setup
Choose which
11
Page 39

Chapter 3 Advanced Functions
Using Video Menu
The menus for adjusting the picture are used to
obtain the best picture settings according to your
preference, the type of program you are watching
and the ambient lighting.
Display the main menu by pressing Menu and select
Video, then press the OK button to confirm. The
Video options are as below:
Note: Some options may be not available for
certain signal sources.
Picture Mode: pressthe left or right direction button
to scroll through the picture mode settings: Hi-Bright,
User, Cinema, Sport and Vivid.
Back Light: this option can be used to adjust the
brightness of the back light, depending on room
lighting.
Note: This option is only available when both
Active BLC and Ambient Light Sensor is off.
Brightness: adjusts the brightness of the picture.
Contrast: adjusts the difference between light and
dark areas of the picture.
CEC
Version Info
Select
Back
Exit
OPTION
Language
Video
DPMS
Tuner mode
Picture Mode
Channel install
Back Light
Brightness
Contrast
Saturation
Hue
Sharpness
Color Temperature
Active BLC
Hi-Bright
Cool
Off
50
50
50
50
0
4
Saturation: adjusts the richness of colour.
Hue: adjusts the balance between the red and green
levels.
Sharpness: adjusts the crispness of the edges in
the picture.
Color Temperature: adjusts the color temperature
of the picture. Use the left or right direction button to
scroll through the color settings: Cool for a more blue
palette of picture colors; Normal; and Warm for a
more red palette of picture colors.
Note: For some models, the Color temperature
option cannot be available.
Active BLC:
the picture.
Ambient Light Sensor: auto adjusts the back light,
depending on room lighting. Use the left or right
direction button to select On or Off.
adjusts the crispness of the edges in
Note: If On is selected, the Back Light option is
not available.
Advanced Video
Display the main menu by pressing Menu and
select Video > Advanced Video, then press the
right direction or OK button to confirm. The
Advanced Video options are as below:
Note: Some options may be not available for
certain signal sources.
DNR: press the left or right direction button to toggle
among Medium, Strong, Auto, Off and Low.
Cinema Mode: adjustable when Game Mode is off;
press the left or right button to select Auto or Off.
Blue Mute: press the left or right button to select On
or Off to turn the screen blue light on or off.
OPTION
Language
Advanced Video
DPMS
Tuner mode
CEC
DNR
Channel install
Version Info
Cinema Mode
Blue Mute
Select
Back
Exit
Medium
Auto
On
Using Audio Menu
Display the main menu by pressing the Menu button
and select Audio, then press the OK button to
confirm.
The Audio menu appears with the following options:
OPTION
Audio
CEC
MTS
Version Info
Balance
Bass Boost
Sound Surround
Equalizer
Digital Audio Output
Select
SPDIF Delay
Back
Auto Volume Control
Exit
Stereo
PCM
0
Off
On
Off
140
Off
12
Page 40

MTS:
select a type from the list by using the left or
right direction button: Stereo, SAP, Mono.
appears only for TV mode. For AV/CMP mode,
Sound Mode appears.
Balance: use the left or right direction button to
balance the sound between the left and right
speakers.
Bass Boost:
TV using the left or right direction button.
Sound Surround: use the left or right direction
button to switch On or Off.
Equalizer: use the left and right direction button to
toggle among Off, Rock, Pop, Live, Dance, Techno,
Classic, and Soft.
Digital Auto Output: use the left and right direction
button to select PCM, off.
Note: When Digital Auto Output is off, SPDIF
Delay option is not available.
SPDIF Delay: this option is used to synchronize
sound with the picture of the set. If the sound is
slower/quicker than the action of the picture, you can
use left/right direction button to turn down/up the
numerical value.
Decreases or increases the bass of the
This option
Auto Volume Control turns on this option to keep
the same sound level for all channels
Advanced Functions
- Press the red button to pause the picture and
Begin the time shift.
- Press the red button to play the recorded part.
- When the time shift menu disappears and only
the timing of the time shift remains on the
screen, you can press the red button or OK to
call out the time shift Menu.
- Press the green button to fast backward or the
yellow button to fast forward.
- Press the blue button to quit the time shift
function.
Notes:
- Before you plug the USB device to TV, make
sure you have backed up the data in the device
to avoid the unusual performance make your
important data lost.
- We recommend you use a USB device with the
free file size bigger than 1Gb and disk speed
faster than 5.0M/sec.
- The bigger file size for time shift, the longer you
can record the programme.- If changing
channel in time shifting, a message prompts to
let you select Yes or No. You can select Yes to
exit the time shift function and execute the
channel change.
Time Setup: Select Time Setup option and press
the OK button to confirm. The options are as below:
Time Setup
Time Zone
Time
Sleep Timer
As broadcaster
20 minutes
Time Setup
This menu allows you to set the time zone on your
TV set, to programme an automatic turn-off or wakeup timer.
Display main menu by pressing Menu. Select Time
Setup and press the OK button to confirm.
Time Shifting Mode: Allows you to record the TV
programme so that you won't miss the favourite part
even if you go out. Before you use the function,
connect a USB device to the TV first. For the first
time, you should do the disk setup for the USB
device.
1. Select Time Setup > Time Shifting Mode .
2. Press the left or right direction button to select On
to switch on the time shift function, then press Exit
to close the menu.
3. Press Option on the remote control and select
Time shift, then press OK to confirm.
4. Follow the directions on the screen to do the setup.
5. After the disk setup is done, press Option and
select Time shift.
6. Press OK to display the time shift menu.
Select
Back
Exit
Time zone: use the left or right direction button to
select the local zone.
Time: press the OK or right direction button to
display time its options:
Auto-synchronization: use the left or right
direction button to select On or Off. If On
selected, the TV will get the time automatically
from DTV signals, and the Time item cannot be
adjusted. If you select Off, you should set time at
Time item. Highlight Time, use the left or right
direction button to select input space, enter the
current time using the digit keys.
Note: If Off selected, the time set in Time option
will not be memorized when turning on the
TV next time, and the TV 's time will start
from the default.
13
Page 41

Advanced Functions
Power on timer: use the left or right direction
button to select Once, Daily or Off. If you sele t
Once or Daily, you should set a time period after
which the TV automatically switches to on at
Timer below this item. Highlight Timer, use the
left or right direction button to select input space,
enter the current time using the digit keys.
Power on Channel: this option is available when
Power on timer is chosen to Once or Daily.
Press the OK or the right direction button to
display its submenu. Highlight Select mode, use
the left or right direction button to select Last
status, the power on channel will be the last
channel you watched before powered off, or you
can select User select, then press the up or
down direction button to select the channel you
want to watch when the TV is turned on
automatically next time, and press OK to confirm.
Power off timer: use the left or right direction
button to select On or Off. If you select On, you
should set a time period after which the TV
automatically switches to off at Time item.
Highlight Time, use the left or right direction
button to select input space, enter the current
time using the digit keys.
Sleep timer: sets a period of time after which the
TV set goes into standby mode. Use the left or
right direction button to set the period (120 minutes
maximum). To disable this function, select Off.
Using the Lock Function
This menu can control the special function for TV
channels.
Note: You must enter your personal code before
entering the Lock menu.
Display the main menu by pressing Menu and select
Lock, then press the OK button to confirm. Every
time you enter the menu, the password will be
requested to enter. Enter the default password
"1234” to access the submenu. The Lock menu
appears with the following options:
Parental
Channel Block
Program Block
Enter
Select
Back
Exit
Front panel lock
Installation lock
Input Block
Change Password
Reset private
Off
Off
Note: The super password is 0423. If you forget
your code, enter it to override any existing
codes.
Channel Block: this option allows you to block a
certain TV channel. Highlight Channel Block, press
the OK or right direction button to display Channel
Block menu. Use the up or down direction button to
select a certain TV channel you want to lock, then
press the OK button to lock. To unlock, use the same
operation.
Program Block: this option allows you to block TV
programs at specific ratings. Highlight Program
Block, press the OK or right direction button to
display Program Block menu. Select the channel
you want it to be blocked, and press the OK, then
select rating options you need to set for you or your
children and press the OK to confirm.
Front panel lock: this option allows you to lock the
set's buttons, press the left or right direction button to
select On to lock the set's buttons.
Installation Lock: press the left or right direction
button to select On to prevent access to the
installation menu to prevent any channels from being
set up without your consent.
Input lock: this option allows you to lock a certain
external source you want to lock. Press the OK or
right direction button to display Input lock menu,
then press the up or down direction button to select
a certain external source you want to Lock, and
press the OK button to lock. To unlock, use the same
operation.
Note: When the current input is locked, you can
press OK and enter the password to enter.
Change password: this option allows you to change
the password. Press the OK or right direction button
to enter, then press the numeric button to enter the
new password twice.
Reset Private: this option allows you to unlock all
locked channels. Select this option and press the
right direction or OK button to enter the submenu,
then select the OK option and press the OK button
to unlock all locked channels.
14
Page 42

Using the Option Menu
Display main menu by pressing Menu. Select
OPTION and press the OK button to confirm.
OPTION
CEC
Version Info
Enter
Select
Back
Exit
CEC: this enable the TV set and your DVD player to
turn on/off or auto standby synchronously. Press the
OK or right direction button to display CEC menu.
Highlight CEC and select On, options of TV Auto
Power and Auto Standby appear, and you could
choose Off or On as you need.
Version Info: this option provides you with the
version info of the TV set. You could press the OK
button to get to know it.
Using Electronic Programme Guide
EPG is an on-screen guide that displays scheduled
TV programmes. You can navigate, select and view
programmes.
04/12/2009
4.1 SBT HD
1. Press Guide on the remote control, the Now and
Next EPG menu will appear, which allows you to
get the knowledge about the current or next
program playing on each channel. Navigate
through the different programs using navigation
keys on the remote control.
2. Use the colour keys to view 7 Days EPG.
- Prev day(Red): List the previous day's EPG.
- Next day(Green): List the next day's EPG.
- Type filter(Blue): Program guide filter for digital
TV programs.
Press the blue button to display the programs's
type and subtype list.
Navigate through the different types and
subtypes using navigation keys on the remote
control.
Thursday, 4-December-2009 2:16:21
2:00a
TELE SERIADOS I
1:15 - 3:00 Fri, 4-Dec
EM NOME DA JUSTICA - 1 temp. A dedicada promotora Annabeth Chase tenta
Solucionar casos ocorridos em sua propria vizinhanca. Volta ao trabalho apos
Uma licenca descobre que a sua prompcao foi dada a colega.
3:00
TELE SERIADOS II TELE SERIADOS I
Series
OK
Type filterNext day Schedule List
0
Advanced Functions
Select one or more types which you want to
highlight from the Type list, press OK to select
(or unselect). A checkmark will appear to the
left of the type when selected. When you select
a type, all its subtypes will be selected
accordingly.
Also, user can select some desired subtypes
without selecting any type first.
Press the blue button to exit the type and
subtype list.
After filtering, all your desired digital TV
programs will be highlighted.
Note: The hints at the bottom are depending on
the content of EPG.
3. Press Guide/Exit to exit the EPG and switch to the
selected channel.
USB Function
Your TV is fitted with an USB connector that enables
you to view photos, listen to music or watch videos
that stored on an USB storage device.
Supported file formats:
Photo: JPG/JPEG
Music: Mp3
Video coding format:
H.264/MPEG4/MPEG2/MPEG1/AVI
1. When an USB device is connected, press the
USB button to access the USB mode. The content
browser will display all the folders and supported
file types that stored in the root directory of the
USB device with thumbnails.
2. Select a photo, music or video file in the content
browser, or select a folder and press OK to enter
it, then select a file. Press OK to start playback.
Note: The selectable file types depend on the
Media type that you have selected.
3. Duration the playback, you can follow the prompts
at the bottom of the screen and press the
corresponding buttons on the remote control to
perform certain operations, press the left, right, up
down, OK and Option buttons (if available) to
control the playback, or press the Menu button to
display the function menu and select an option
from it to perform certain operations.
Note: Press Menu to return or Exit to exit the
function menu.
4. Press Return to return to the upper level or press
USB to exit the USB mode.
15
Page 43

Chapter 4
Troubleshooting
Most problems you encounter with your TV can be
corrected by consulting the following troubleshooting
list.
No picture, no sound
1. Check if the fuse or circuit breaker is working.
2. Plug another electrical device into the outlet to
make sure it is working or turned on.
3. Power plug is in a bad contact with the outlet.
4. Check the signal source.
No color
1. Change the color system.
2. Adjust the saturation.
3. Try another channel. Black-white program may be
received.
Remote control does not work
1. Change the batteries.
2. Batteries are not installed correctly.
3. Main power is not connected.
No picture, normal sound
1. Adjust the brightness and contrast.
2. Broadcasting failure may happen.
Normal picture, no sound
1. Press the Vol+ button to increase volume.
2. Volume is set to mute, press the mute button to
restore sound.
3. Change the sound system.
4. Broadcasting failure may happen.
Unorderly ripples on the picture
It is usually caused by local interference, such as
cars, daylight lamps and hair driers. Adjust the
antenna to minimize the interference.
Blank screen in VGA mode
Perhaps the TV can not recognize the resolution set
by the PC. Suggest to change to the best resolution
or other standard resolutions of the Windows system.
Snowy dots and interference
If the antenna is located in the fringe area of a
television signal where the signal is weak, the picture
may be marred by dots. When the signal is
extremely weak, it may be necessary to install a
special antenna to improve the reception.
Other Information
1. Adjust the position and orientation of the indoor or
outdoor antenna.
2. Check the connection of antenna.
3. Fine tune the channel.
4. Try another channel. Broadcasting failure may
happen.
Ignition
Black spots or horizontal streaks appear, or the
picture flutters or drifts. This is usually caused by
interference from car ignition system, neon lamps,
electric drills, or other electrical appliance.
Ghost
Ghosts are caused by the television signal following
two paths. One is the direct path, the other is
reflected from tall buildings, hills, or other objects.
Changing the direction or position of the antenna
may improve the reception.
Radio frequency interference
This interference produces moving ripples or
diagonal streaks, and in some case, loss of contrast
in the picture. Find out and remove the radio
interference source.
* Design and specifications are subject to
change without notice.
16
Page 44

Table Stand Installation
Table Stand Installation
Notes:
If the table stand has been assembled, just ignore the following instructions.
Follow the instructions accordingly based on the table stand supplied to you.
Graphics contained within this publication are presentation only.
When the TV faced down, do not impact the screen with sharp edges to avoid
scratching the screen.
If you want to mount the TV to the wall, please purchase an appropriate wall mount
bracket.
A - 1 A - 2
2
A - 3
4/4x
3/3x
B - 1
4/4x
B - 2
Page 45

GARANTÍA JAMES
JAMES garantiza esta unidad por el término de UN AÑO a partir de la fecha de compra
contra todo defecto de fabricación.
Para que esta GARANTÍA sea válida, es imprescindible exhibir el PRESENTE
CERTIFICADO CON LA FACTURA DE COMPRA en donde debe constar el NOMBRE
DEL COMPRADOR, FECHA, MODELO Y NÚMERO DE SERIE DEL PRODUCTO.
La presente Garantía cubre los defectos de fabricación y/o piezas defectuosas
EXCLUYENDO los defectos producidos por mal trato o uso indebido, como así tampoco
cuando se verifique intervención ajena a nuestros servicios autorizados.
La intervención en el aparato por causas no imputables al producto (mala instalación, falta
de energía, etc.) significará cargo por la visita realizada por el técnico.
Esta Garantía excluye nuestra responsabilidad por daños y perjuicios directos o indirectos
que pudieren sufrir el adquirente, usuarios o terceros.
En aquellos casos en que la unidad esté destinada a usos no domésticos, esta Garantía
será de 6 meses a partir de la fecha de compra.
Vencido el plazo de la Garantía, la unidad continuará RESPALDADA por JAMES mediante
atención mecánica, mantenimiento y/o suministro de repuestos.
La Empresa se reserva el derecho de efectuar cualquier tipo de modificación a este
producto sin previo aviso.
PRODUCTO MODELO
NÚMERO DE SERIE
INSPECCIONADO POR FECHA
ADQUIRIDO A
FECHA DE COMPRA Nº DE FACTURA
NOMBRE DEL COMPRADOR
DOMICILIO LOCALIDAD
JAMES S.A.
Fraternidad 3949
Montevideo - Uruguay
E-mail: service@james.com.uy
Tel. SERVICE: 2 309 66 31*
Service Maldonado – Tel.: 4222 9897
JAMES PARAGUAY S.A.
Dr. E. López Moreira 6655 c/Avda. Boggiani
Asunción - Paraguay
Tel.: (595-21) 612 849 / 614 950
Fax: (595-21) 614 949
E-mail: jamespar@tigo.com.py
Page 46

72-MT10LA-XLAAV
 Loading...