

Jameco Electronics 487023U User Manual

Distributed by:
Jameco Part Number 487023UsersGuide
www.Jameco.com ✦ 1-800-831-4242
The content and copyrights of the attached
material are the property of its owner.

A Division of Cisco Systems, Inc.
®
2.4
Model No.
GHz
802.11g
WIRELESS
WPC54G
Wireless-G
Notebook Adapter
User Guide

Wireless-G Notebook Adapter
Copyright and Trademarks
Specifications are subject to change without notice. Linksys is a registered trademark or trademark of Cisco
Systems, Inc. and/or its affiliates in the U.S. and certain other countries. Copyright © 2004 Cisco Systems, Inc. All
rights reserved. Other brands and product names are trademarks or registered trademarks of their respective
holders.
This User Guide
The User Guide to the Wireless-G Notebook Adapter has been designed to make understanding networking easier
than ever. Look for the following items when reading this User Guide:
This checkmark means there is a note of interest and
is something you should pay special attention to while
using the Adapter.
This exclamation point means there is a caution or
warning and is something that could damage your
property or the Adapter.
This question mark provides you with a reminder about
something you might need to do while using the Adapter.
In addition to these symbols, there are definitions for technical terms that are presented like this:
word: definition.
Also, each figure (diagram, screenshot, or other image) is provided with a figure number and description, like
this:
Figure numbers and descriptions can also be found in the "List of Figures" section in the “Table of Contents”.
WPC54G-UG-40223D KL
Figure 0-1: Sample Figure Description

Wireless-G Notebook Adapter
Table of Contents
Chapter 1: Introduction 1
Welcome 1
What’s in this Guide? 2
Chapter 2: Planning your Wireless Network 4
Network Topology 4
Roaming 4
Network Layout 5
Chapter 3: Getting to Know the Wireless-G Notebook Adapter 6
The LED Indicators 6
Chapter 4: Software Installation and Configuration 7
The Installation Procedure 8
Chapter 5: Hardware Installation 12
Connecting the Adapter 12
Chapter 6: Using the Wireless Network Monitor 13
Accessing the Wireless Network Monitor 13
Link Information 13
Site Survey 16
Profiles 17
Creating a New Profile 18
Appendix A: Troubleshooting 28
Common Problems and Solutions 28
Frequently Asked Questions 29
Appendix B: Wireless Security 32
Security Precautions 32
Security Threats Facing Wireless Networks 32
Appendix C: Windows Help 35
Appendix D: Glossary 36
Appendix E: Specifications 40
Appendix F: Warranty Information 41
Appendix G: Regulatory Information 42
Appendix H: Contact Information 45

Wireless-G Notebook Adapter
List of Figures
Figure 3-1: Front Panel 6
Figure 4-1: The Setup Wizard’s Welcome Screen 7
Figure 4-2: The Setup Wizard’s License Agreement 8
Figure 4-3: The Setup Wizard’s Wireless Mode Screen 8
Figure 4-4: The Setup Wizard’s Ad-Hoc Mode Screen 9
Figure 4-5: The Setup Wizard’s WEP Screen 9
Figure 4-6: The Setup Wizard’s WPA-PSK Screen 10
Figure 4-7: The Setup Wizard’s Check Settings Screen 10
Figure 4-8: The Setup Wizard’s Congratulations Screen 11
Figure 5-1: Installing the Adapter into your notebook 12
Figure 6-1: Link Information 13
Figure 6-2: Wireless Network Status 14
Figure 6-3: Wireless Network Statistics 15
Figure 6-4: Site Survey 16
Figure 6-5: Profiles 17
Figure 6-6: Importing a Profile 17
Figure 6-7: Exporting a Profile 17
Figure 6-8: Creating a New Profile 18
Figure 6-9: Enter Profile Name 18
Figure 6-10: Wireless Mode for New Profile 19
Figure 6-11: Ad-Hoc Mode Settings 19
Figure 6-12: Network Settings 20
Figure 6-13: Wireless Security for New Profile 21
Figure 6-14: WEP Setting for New Profile 21
Figure 6-15: WPA-PSK Settings 22
Figure 6-16: TKIP Settings 22
Figure 6-17: WPA RADIUS Settings 23
Figure 6-18: Encryption Type 23
Figure 6-19: EAP-TLS Authentication 24
Figure 6-20: EAP-TTLS Authentication 24

Wireless-G Notebook Adapter
Figure 6-21: EAP-MD5 Authentication 24
Figure 6-22: EAP-PEAP Authentication 24
Figure 6-23: EAP-LEAP Authentication 24
Figure 6-24: RADIUS Settings 25
Figure 6-25: EAP-TLS Authentication 25
Figure 6-26: EAP-TTLS Authentication 25
Figure 6-27: EAP-MD5 Authentication 26
Figure 6-28: EAP-PEAP Authentication 26
Figure 6-29: LEAP Authentication 26
Figure 6-30: Confirm New Settings 27
Figure 6-31: The Congratulations Screen 27

Wireless-G Notebook Adapter
Chapter 1: Introduction
Welcome
Thank you for choosing the Wireless-G Notebook Adapter. With this Adapter, your wireless networking experience
will be faster and easier than ever.
Like all wireless products, the Adapter allows for greater range and mobility within your wireless network. This
adapter communicates over the 54Mbps 802.11g wireless standard, which is almost five times faster than
802.11b. But since they share the same 2.4GHz radio band, the Adapter can also communicate with the widely
used 11Mbps 802.11b standard.
PCs equipped with wireless cards and adapters can communicate without cumbersome cables. By sharing the
same wireless settings, within their transmission radius, they form a wireless network. For more information
about wireless networks, refer to Chapter 2: Planning Your Wireless Network.
The included Setup Wizard will walk you through configuring the adapter to your network's settings, step by step.
Then just slide it into your computer's PC Card slot and enjoy your wireless network. Future changes to your
network settings can be made with the Wireless Network Monitor, explained in Chapter 6.
Further information about the Adapter’s functions can be found in Appendix A: Troubleshooting. If you’re
concerned about wireless security, Appendix B shows you how to keep your network secure. Further appendices
provide more information about the Adapter and networking in general to help you get the most out of the
Wireless-G Notebook Adapter.
adapter: a device that adds network functionality
to your PC.
802.11g a wireless networking standard that
specifies a maximum data transfer rate of 54Mbps
and an operating frequency of 2.4GHz.
802.11b: a wireless networking standard that
specifies a maximum data transfer rate of 11Mbps
and an operating frequency of 2.4GHz.
network: a series of computers or devices
connected for the purpose of data sharing,
storage, and/or transmission between users.
Chapter 1: Introduction
Welcome
1

Wireless-G Notebook Adapter
What’s in this Guide?
This user guide covers the steps for setting up and using the Wireless-G Notebook Adapter.
• Chapter 1: Introduction
This chapter describes the Adapter’s applications and this User Guide.
• Chapter 2: Planning Your Wireless Network
This chapter discusses a few of the basics about wireless networking.
• Chapter 3: Getting to Know the Wireless-G Notebook Adapter
This chapter describes the physical features of the Adapter.
• Chapter 4: Software Installation and Configuration
This chapter instructs you on how to install the Adapter’s Setup Wizard and Configure the Adapter
• Chapter 5: Hardware Installation
This chapter shows you how to connect the Adapter to your PC.
• Chapter 6: Using the Wireless Network Monitor
This chapter show you how to use the Adapter’s Wireless Network Monitor.
• Appendix A: Troubleshooting
This appendix describes some problems and solutions, as well as frequently asked questions, regarding
installation and use of the Adapter.
• Appendix B: Wireless Security
This appendix discusses security issues regarding wireless networking and measures you can take to help
protect your wireless network.
• Appendix C: Windows Help
This appendix describes how you can use Windows Help for instructions about networking, such as installing
the TCP/IP protocol.
• Appendix D: Glossary
This appendix gives a brief glossary of terms frequently used in networking.
• Appendix E: Specifications
This appendix provides the Adapter’s technical specifications.
• Appendix F: Warranty Information
This appendix supplies the Adapter’s warranty information.
Chapter 1: Introduction
What’s in this Guide?
2

Wireless-G Notebook Adapter
• Appendix G: Regulatory Information
This appendix supplies the Adapter’s regulatory information.
• Appendix H: Contact Information
This appendix provides contact information for a variety of Linksys resources, including Technical Support.
Chapter 1: Introduction
What’s in this Guide?
3

Wireless-G Notebook Adapter
Chapter 2: Planning your Wireless Network
Network Topology
topology: the physical layout of a network.
A wireless network is a group of computers, each equipped with one wireless adapter. Computers in a wireless
network must be configured to share the same radio channel. Several PCs equipped with wireless cards or
adapters can communicate with one another to form an ad-hoc network.
Linksys wireless adapters also provide users access to a wired network when using an access point or wireless
router. An integrated wireless and wired network is called an infrastructure network. Each wireless PC in an
infrastructure network can talk to any computer in a wired network infrastructure via the access point or wireless
router.
An infrastructure configuration extends the accessibility of a wireless PC to a wired network, and can double the
effective wireless transmission range for two wireless adapter PCs. Since an access point is able to forward data
within a network, the effective transmission range in an infrastructure network can be doubled.
Roaming
Infrastructure mode also supports roaming capabilities for mobile users. Roaming means that you can move your
wireless PC within your network and the access points will pick up the wireless PC's signal, providing that they
both share the same channel and SSID.
access point: a device that allows wireless-equipped
computers and other devices to communicate with a wired
network. Also used to expand the range of a wireless network
ad-hoc: a group of wireless devices
communicating directly with each other (peerto-peer) without the use of an access point.
infrastructure: a wireless network that is
bridged to a wired network via an access point.
router: a networking device that
connects multiple networks together.
roaming: the ability to take a wireless device
from one access point's range to another without
losing the connection.
Before enabling you consider roaming, choose a feasible radio channel and optimum access point position.
Proper access point positioning combined with a clear radio signal will greatly enhance performance.
Chapter 2: Planning your Wireless Network
Network Topology
ssid: your wireless network's name.
4

Wireless-G Notebook Adapter
Network Layout
Linksys wireless access points and wireless routers have been designed for use with 802.11a, 802.11b, and
802.11g products. With 802.11g products communicating with the 802.11b standard and some products
incorporating both “a” and “g”, products using these standards can communicate with each other.
Access points and wireless routers are compatible with 802.11a, 802.11b and 802.11g adapters, such at the PC
Cards for your laptop computers, PCI Card for your desktop PC, and USB Adapters for when you want to enjoy USB
connectivity. Wireless products will also communicate with the wireless PrintServer.
When you wish to connect your wired network with your wireless network, network ports on access points and
wireless routers can be connected to any of Linksys's switches or routers.
With these, and many other, Linksys products, your networking options are limitless. Go to the Linksys website at
www.linksys.com for more information about wireless products.
802.11a: a wireless networking standard that
specifies a maximum data transfer rate of
54Mbps and an operating frequency of 5GHz.
switch: a data switch that connects computing
devices to host computers, allowing a large number of
devices to share a limited number of ports
Chapter 2: Planning your Wireless Network
Network Layout
5
Wireless-G Notebook Adapter
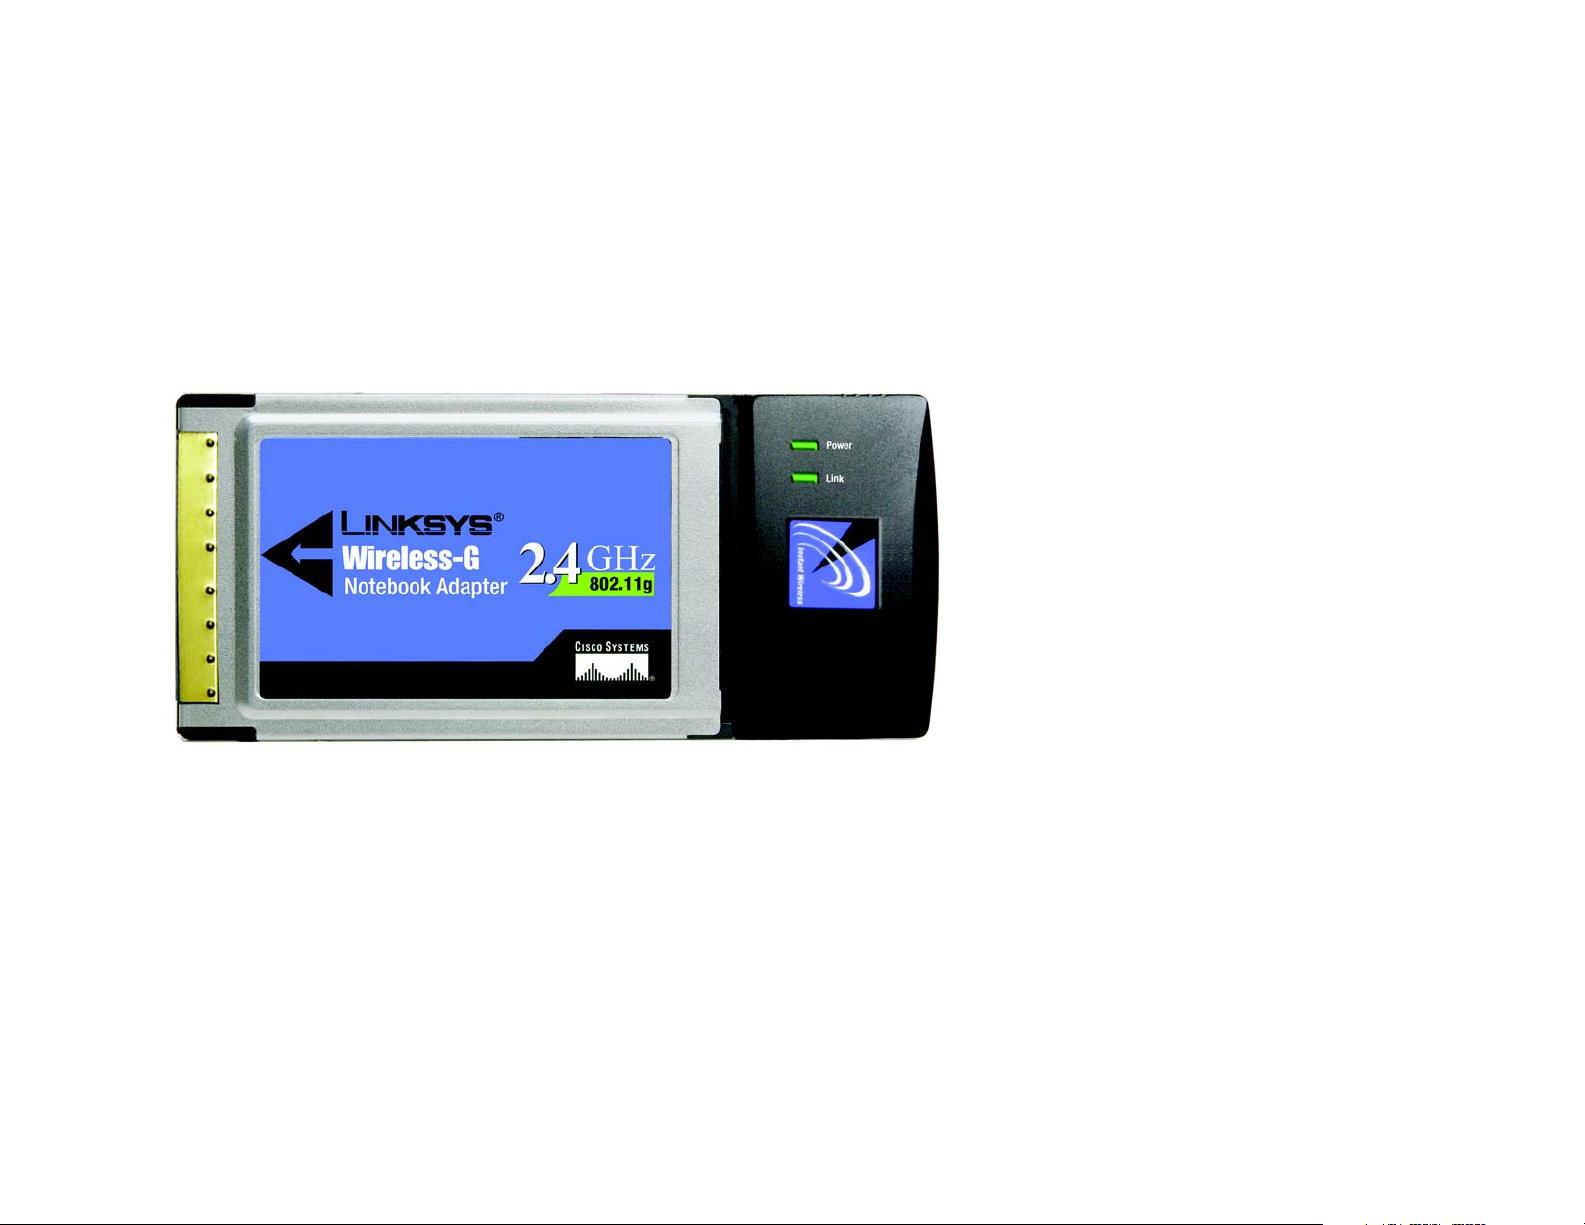
Chapter 3: Getting to Know the Wireless-G Notebook
Adapter
The LED Indicators
The Network Adapter's LEDs display information about network activity.
Figure 3-1: Front Panel
Power Green. The Power LED lights up when the Adapter is powered on.
Link Green. The Link LED lights up when the Adapter has an active connection.
Chapter 3: Getting to Know the Wireless-G Notebook Adapter
The LED Indicators
6
Wireless-G Notebook Adapter
Chapter 4: Software Installation and Configuration
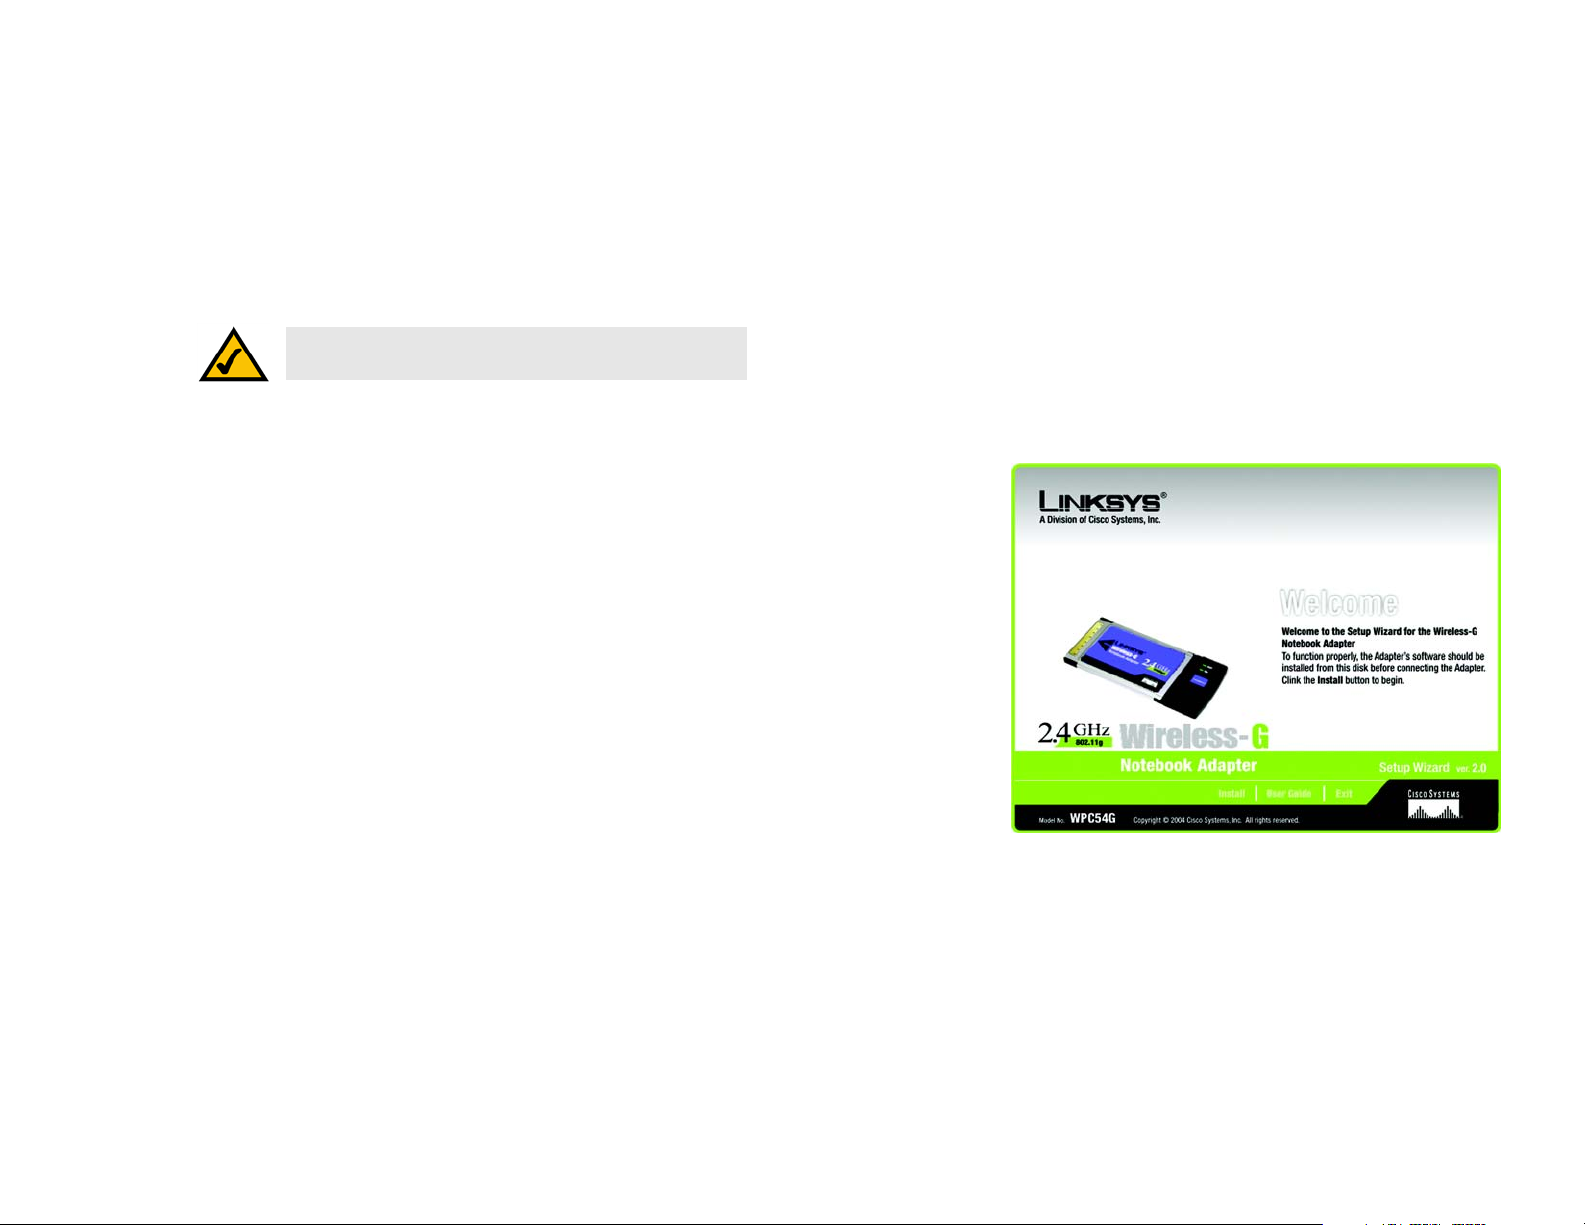
The Wireless-G Notebook Adapter Setup Wizard will guide you through the installation procedure. The Setup
Wizard will install the Wireless Network Monitor and driver, as well as configure the Adapter.
software: instructions for the computer
NOTE: You must run the Setup Wizard to install the software
before installing the hardware.
Insert the Setup Wizard CD-ROM into your CD-ROM drive. The Setup Wizard should run automatically, and the
Welcome screen should appear. If it does not, click the Start button and choose Run. In the field that appears,
enter D:\setup.exe (if “D” is the letter of your CD-ROM drive).
On the Welcome screen, you have the following choices:
Install - Click the Install button to begin the software installation process.
User Guide - Click the User Guide button to open the PDF file of this User Guide.
Exit - Click the Exit button to exit the Setup Wizard.
hardware: the physical aspect of computers,
telecommunications, and other information technology devices
Figure 4-1: The Setup Wizard’s Welcome Screen
Chapter 4: Software Installation and Configuration
7

Wireless-G Notebook Adapter
The Installation Procedure
1. To install the Adapter, click the Install button on the Welcome screen.
2. After reading the License Agreement, click the Next button if you agree, or click the Cancel button to end the
installation.
3. The Setup Wizard will ask you to choose a network mode. Click the Infrastructure Mode radio button if you
want your wireless computers to network with computers on your wired network using an access point or
wireless router. Click the Ad-Hoc Mode radio button if you want multiple wireless computers to network
directly with each other.
Figure 4-2: The Setup Wizard’s License Agreement
In the SSID field, enter your wireless network’s SSID. The SSID must be identical for all devices in the
network. The default setting is linksys (all lowercase). Click the Next button.
NOTE: Network SSIDs should be unique to your network
and identical for all devices within the network.
Chapter 4: Software Installation and Configuration
The Installation Procedure
Figure 4-3: The Setup Wizard’s Wireless Mode Screen
8

Wireless-G Notebook Adapter
4. If you chose Infrastructure Mode, go to Step 5 now. If you chose Ad-Hoc Mode, select the correct operating
channel for your network. Then, select the Network Mode from the drop-down menu. Click the Next button,
and go to Step 5. Click the Back button to change any settings.
Channel - The channel you choose should match the channel set on the other devices in your wireless
network. If you are unsure about which channel to use, select the default channel (Channel 6).
Network Mode - Select the type of network you have, mixed (Wireless-G and Wireless-B) or G-Only (only
Wireless-G). If you select Mixed Mode, both Wireless-G and Wireless-B computers will be allowed on the
network, which may reduce your speed. Select G-Only Mode for maximum speed, but no Wireless-B users
will be allowed on the network.
5. Select the type of security you want to use: 64-bit WEP, 128-bit WEP, or WPA-PSK. All devices in a network
must use the same type.
WEP
Security - To use WEP encryption, select 64-bits or 128-bit characters from the drop-down menu, and enter
a passphrase or WEP key.
Figure 4-4: The Setup Wizard’s Ad-Hoc Mode Screen
Passphrase - Instead of manually entering a WEP key, you can enter a passphrase in the Passphrase field, so
a WEP key is automatically generated. It is case-sensitive and should not be longer than 16 alphanumeric
characters. This passphrase must match the passphrase of your other wireless network devices and is
compatible with Linksys wireless products only. (If you have any non-Linksys wireless products, enter the
WEP key manually on those products.)
WEP Key - The WEP key you enter must match the WEP key of your wireless network. If you are using 64-bit
WEP encryption, then the key must consist of exactly 10 hexadecimal characters. If you are using 128-bit
WEP encryption, then the key must consist of exactly 26 hexadecimal characters. Valid hexadecimal
characters are “0” to “9” and “A” to “F”.
Transmit Key - The default transmit key number is 1. If your network’s access point or wireless router uses
transmit key number 2, 3, or 4, select the appropriate number from the Transmit Key drop-down box.
Authentication -The default is set to Auto, where it auto-detects for Shared Key or Open system. Shared
Key is when both the sender and the recipient share a WEP key for authentication. Open key is when the
sender and the recipient do not share a WEP key for authentication. All points on your network must use the
same authentication type.
Click the Next button to continue.s. Click the Back button to return to the previous screen. Click the Help
button for more information.
Chapter 4: Software Installation and Configuration
The Installation Procedure
bit: a binary digit
Figure 4-5: The Setup Wizard’s WEP Screen
9

Wireless-G Notebook Adapter
WPA-PSK
WPA-PSK offers the TKIP encryption method with dynamic encryption keys.
Select the type of algorithm, TKIP, from the Security drop-down menu. Enter a WPA Shared Key of 8-63
characters in the Passphrase field.
Click the Next button to continue. Click the Back button to return to the previous screen. Click the Help
button for more information.
6. The Setup Wizard will ask you to review and finalize your settings before it starts to install files. Click Next if
you are satisfied with your settings, or click Back to change any settings.
Figure 4-6: The Setup Wizard’s WPA-PSK Screen
Chapter 4: Software Installation and Configuration
The Installation Procedure
Figure 4-7: The Setup Wizard’s Check Settings Screen
10
 Loading...