

Page 1
No. 42 2023
DE - Gebrauchsanleitung
GB - Instruction
FR - Notice
IT - Istruzione
ES - Instrucciones
Korix 2,4 GHz
DE - Allgemeine Hinweise
Jamara e. K. übernimmt keine Haftung für Schäden, die an dem Produkt selbst oder durch dieses
entstehen, sofern diese auf falsche Bedienung oder Handhabungsfehler zurückzuführen sind. Der
Kunde allein trägt die volle Verantwortung für die richtige Bedienung und Handhabung; dies umfasst
insbesondere die Montage, den Ladevorgang, die Verwendung bis hin zur Wahl des Einsatzbereiches. Bitte beachten Sie hierzu die Bedienungs- und Gebrauchsanleitung, diese enthält wichtige
Informationen und Warnhinweise.
GB - General information
Jamara e.K. is not liable for any damage caused to the product itself or through this, provided this
is due to improper operation or handling errors. The Customer alone bears the full responsibility for
the proper use and handling, including without limitation, the assembly, the charging process, the
use and choice of the operation area. Please refer to the operating and user instructions, it contains
important information and warnings.
FR - Remarques générales
La société Jamara e. K. n’est pas responsable de dommages, que ce soit au niveau du modèle ou
causé par celui-ci, résultant d’une utilisation non appropriée. Seul le client est responsable concernant la mise en oeuvre et l’utilisation conforme du matériel; cela va de l’assemblage, en passant
par la charge des accus et allant jusqu’au domaine d’utilisation. Pour cela, veillez lire attentivement
la notice d’assemblage et d’utilisation, celle-ci contient d’importantes informations ainsi que les consignes de sécurités.
DE - Konformitätserklärung
Hiermit erklärt JAMARA e.K., dass sich das Modell‚ “Korix 2,4 GHz, No. 422023“ in Übereinstimmung mit den grundlegenden Anforderungen und den anderen relevanten Vorschriften der Richtlini-
en 2014/53/EU, 2011/65/EU und 2009/48/EG bendet.
Weitere Informationen nden Sie auch unter: www.jamara-shop.com/Konformitaet
GB - Certicate of Conformity
JAMARA e.K. hereb “Korix 2,4 GHz, No. 422023“ follow the regulations and requirements as well as
any ther relivant directives of the EEC directive 2014/53/EU, 2011/65/EU and 2009/48/EC.
Further information can also be found at: www.jamara-shop.com/Conformity
FR - Déclaration de conformité
Par la présente, la société Jamara e.K. déclare que ce modèle “Korix 2,4 GHz, No. 422023“ est
conforme en tous points avec les textes de la directive de l’union européenne sous les directives
2014/53/EU, 2011/65/EU et 2009/48/CE.
Vos pourrez également trouver des informations sur notre site Internet:
www.jamara-shop.com/Conformity
DE - Entsorgungshinweise
Bitte sorgen Sie für eine fachgerechte, den gesetzlichen Vorschriften entsprechende
Entsorgung der Batterien und/oder der Akkus. Bitte werfen Sie nur entladene Akkus in
die Sammelboxen beim Handel oder den Kommunen.
GB - Disposal restrictions
Please care for a environmental correct and legal way of disposing the batteries and/
or accus. Please, only throw away empty battery packs into the collect-boxes in your
FR - Consignes de recyclage
Veuillez respecter les consignes de recyclage des accus et/ou piles. Veuillez ne jeter que des piles/accus vides dans les bacs de ramassages que vous trouverez dans différents commerces ou au centre
de recyclage de votre commune.
local shops or commune.
IT - Informazioni generali
Jamara e. K. non e´responsabile per danni, sostenute al prodotto stesso o attraverso questo, dovuti
ad una gestione non corretta del articolo. Solo il cliente si assume la piena responsabilità per la
manutenzione e l´utilizzo corretto dello stesso; questo include il montaggio, la ricarica, l´utilizzo,
no alla scelta della aerea di applicazione. Si prega di notare e rispettare le istruzioni d´uso, questi
contengono informazioni e avvertimenti molto importanti.
ES - Información general
Jamara K. no se hace responsable de los daños causados al producto en sí o por medio de esto,
a menos que esto se debe al mal funcionamiento o errores de manejo. El cliente solo tiene la responsabilidad completa para el uso y manejo adecuado, incluyendo, sin limitaciones, el montaje,
el proceso de carga, el uso de hasta la elección de la zona de aplicación. Por favor, consulte las
instrucciones de uso y funcionamiento, contiene información y avisos importantes.
IT - Dichiarazione di conformita’
Jamara e. K. dichiara qui di seguito che il modello “Korix 2,4 GHz, No. 422023“ è in linea con le
norme ed altre rilevanti disposizioni comunitarie 2014/53/EU, 2011/65/EU e 2009/48/CE.
Piu informazioni: www.jamara-shop.com/Conformity
ES - Declaración de conformidad
Por medio de la presente, la empresa Jamara e. K. declara que el modelo “Korix 2,4 GHz, No.
422023“ de conformidad con los requisitos esenciales y otras disposiciones pertinentes de la Directiva 2014/53/EU, 2011/65/EU y 2009/48/CE se encuentra.
Encontrará más información en: www.jamara-shop.com/Conformity
IT - Istruzioni per lo smaltimento
Si prega di assicurarsi che le batterie (ricaricabili e non) siano smaltite a regola d‘arte, conformemente alla normativa vigente. Gettare soltanto batterie scariche negli appositi contenitori presso i rivenditori o gli enti comunali (in genere le batterie sono scariche quando il modello non funziona più).
ES - Notas sobre el reciclado
Respete la normativa vigente sobre la eliminación de residuos, especialmente sobre baterías y
pilas. Lleve a reciclar las baterías solo si están descargadas.
DE
Geeignet für Kinder ab 10 Jahren.
Achtung: Für Kinder unter 36 Monaten nicht geeignet. ERSTICKUNGSGEFAHR.
Enthält verschluckbare Kleinteile. Von Kleinkindern unbedingt fernhalten.
GB
Suitable for children over 10 years.
Warning: Not suitable for children under 36 months. RISK OF SUFFOCATION.
Contains small parts which can be swallowed. Keep away necessarily from children
FR
Adapté pour des enfants à partir de 10 ans.
Attention: Ne convient pas aux enfants de moins de 36 mois. DANGER D’ÉTOUFFEMENT.
Contient de petites pièces facilement avalables. Garder loin nécessairement enfants.
IT
Consigliato per bambini superiori ai 10 anni!
Attenzione: Non adattato ai bambini inferioti ai 36 mesi. PERICOLO DI SOFFOCAMENTO.
Contiene pezzi piccoli. Tenere lontano assolutamente dei bambini.
ES
Apto para niños mayores de 10 años.
Atención: No es recomendable para los niños menores de 36 meses. ASFIXIA.
Contiene piezas pequeñas. Mantenga necesariamente lejos de los niños.
51/16
Page 2
DE - Achtung!
4x AA
Vor dem Betrieb:
Erst das Modell und dann den Sender einschalten.
Bei Beendigung:
Erst das Modell und dann den Sender ausschalten.
● Betreiben Sie Ihr Modell niemals in Distanzen die
außerhalb Ihrer Sichtweite liegen. Sowohl die max.
Sichtweite als auch die max. Reichweite Ihres Modells
hängen von vielen Faktoren wie Witterung, Einsatzort
und vorhandenen Störfrequenzen ab. Führen Sie deshalb
vor jedem Einsatz mit einer zweiten Person, die das
Modell während des Tests sicher xiert hält, einen
Reichweitentest durch und prüfen Sie auch wie sich das
Modell während des Betriebs bei einem Signalausfall wie
z.B. bei leeren Senderbatterien oder ausgeschaltetem
bzw. ausgefallenem Sender verhält.
GB - Attention!
Before operating:
Switch the model on rst then the transmitter.
When nished:
First switch off the model then the transmitter.
● Never operate your model beyond sight. Both the
maximum visibility as well as the max. range of your
model will depend on many factors such as weather,
location and interfering frequencies. Therefore,
before each use perform a range test with a second person
securely holding the model and also check how the model
reacts if there is a signal failure e.g. when empty
transmitter batteries are installed.
FR - Attention!
Avant l’utilisation:
Allumez en premier modèle puis seulement votre l’émetteur.
Après utilisation:
Arrêtez le modèle en premier puis votre radiocommande.
● N’utilisez jamais le modèle à une distance hors de votre
visibilité. La visibilité maximale ainsi que la ortée
maximale dépendent de plusieurs facteurs tels
que le temps, le lieu d’utilisation et les présentes
fréquences perturbatrices. Pour cela, avant chaque
usage, veuillez effectuer un test de visibilité et de portée
avec une deuxième personne qui tient le modèle xé et
vériez les réactions du modèle en usage en cas de pertes
de signal due par exemple à des piles usées ou à un
émetteur éteint.
IT - Attenzione!
Prima dell‘uso:
Accendete prima il modello e poi la trasmittente.
Dopo l‘uso:
Spegnere prima il modello e poi la trasmittente.
● Non utilizzare il suo modello fuori della distanzia di vista.
Sia la visibilità come la portata massima del vostro
modello dipendono da molti fattori, come il tempo,
disturbo di frequenza e il luogo di utilizzo. Eseguire un
test prima di ogni utilizzo del modello con una seconda
persona che tiene ssato il modello. Con questa
procedura potete testare come reagisce il modello
durante la perdita del segnale causato per esempio da una
batterie scarica oppure la radio spenta.
ES - ¡Atención!
Antes del uso:
Encender primero el modelo, y después la emisora.
Después del uso:
Apagar primero el modelo, y después la emisora.
● No utilizar su modelo fuera de la distancias de visibilidad.
Tanto la visibilidad como la capacidad máxima de su
modelo depende de muchos factores, tales como el
tiempo, frecuencia de interferencia y el lugar de
utilización. Realice una prueba antes de cada uso del
modelo con una segunda persona que fija el modelo. Con
este procedimiento se puede comprobar cómo el modelo
reacciona durante la pérdida de señal causada por
ejemplo por una batería descargada o la emisora apagada.
1
2
12
11
10
9
8
7
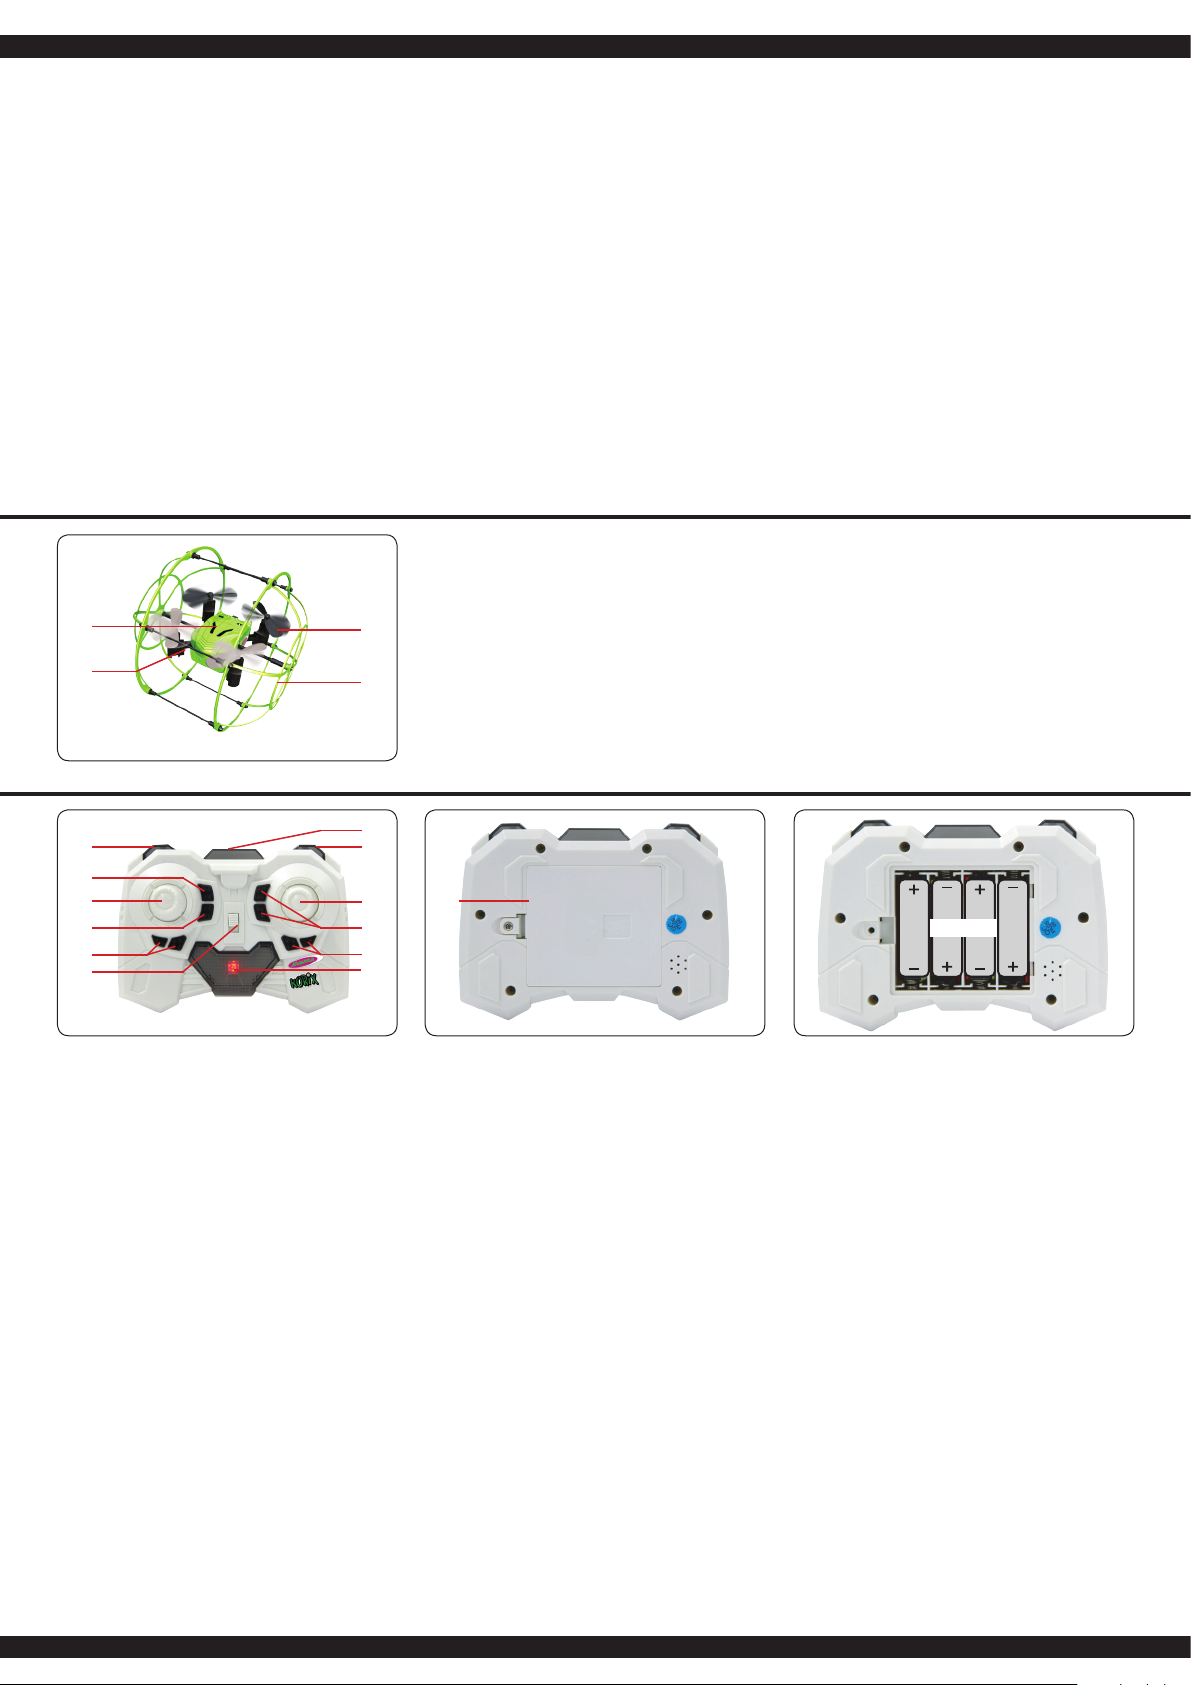
DE - Fernsteuerung
1. 2,4 GHz Antenne
2. Flipmodus
3. Steuerhebel Nick/Roll
(vorwärts/rückwärts,
links/rechts)
4. Trimmung Nick
5. Trimmung Roll
6. Power LED
7. AN-AUS
8. Trimmen der Drehung
9. Automatik Modus
10. Gasknüppel /Gieren
11. Geschwindigkeitseinstellung
12. Flug/Rollmodus
13. Batteriefach
Batterien einlegen
Auf Polarität achten
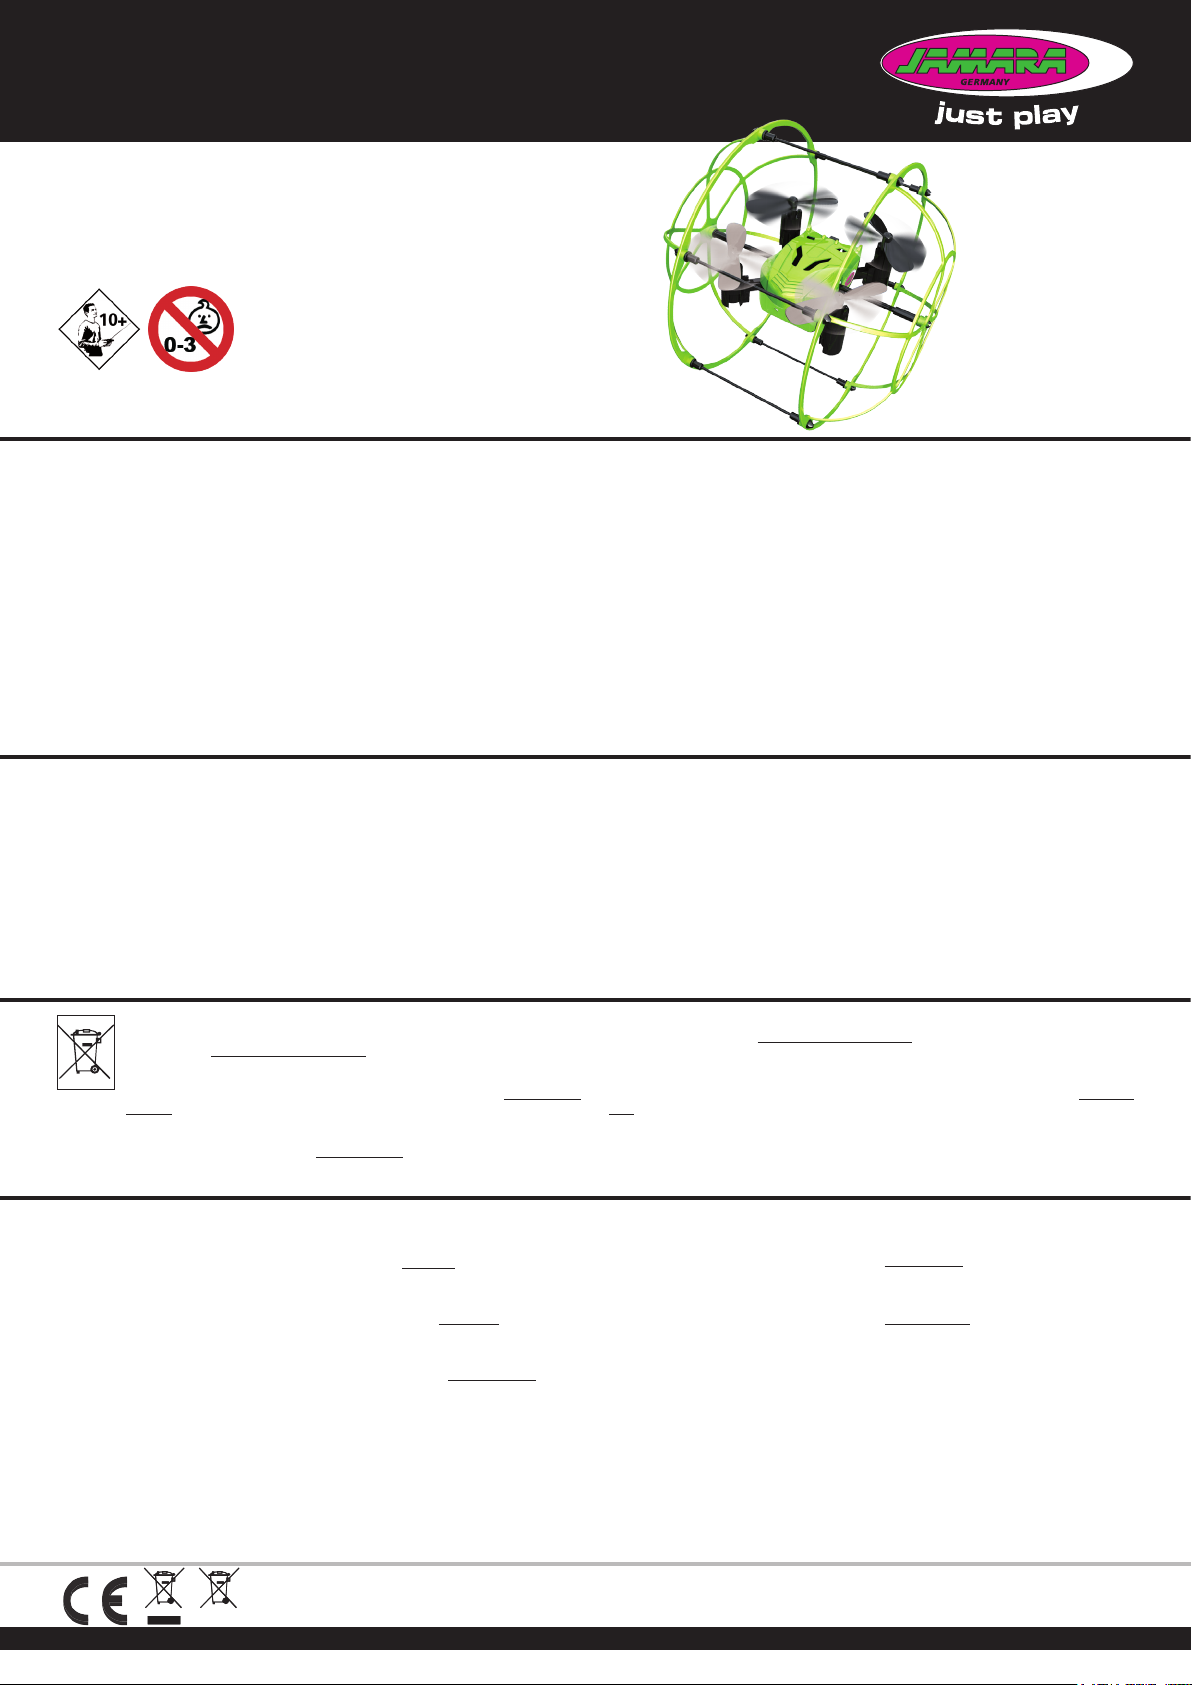
DE - Bezeichnung der Komponenten
1. Kabinenhaube
2. Hauptrahmen
3. Rotorblätter
4. Rollkäg
GB - Component Description
3
1. Canopy
2. Main frame
3. Rotor blades
4
4. Protective Cover
FR - Désignations des différentes pièces
1. Cabine
2. Cadre principal
3. Pales de rotor
4. Cage roulante
1
2
3
4
5
6
GB - Transmitter
1. 2,4 GHz Antenna
2. Flip Mode
3. Nick/Roll control stick
(left/right, forward/backward)
4. Nick trim
5. Roll trim
6. Power LED
7. ON/OFF Switch
8. Rudder trim
9. Automatic Mode
10. Speed control stick / Rudder
11. Speed setting
12. Flight / Roll Mode
13. Battery cover
Fitting the batteries
Observe the polarity.
IT - Denominazione dei componenti
1. Cappottina
2. Telaio
3. Pale principali
4. Gabbia di laminazione
ES - Descripción de las diferentes partes
1. Cabina
2. Chasis
3. Rotores
4. Jaula de laminado
13
FR - Radiocommande
1. Antenne 2,4 GHz
2. Mode ip
3. Manette de commande
tangage/roulis (avant/arrière,
droite/gauche)
4. Equilibrage du tangage
(avant/arrière)
5. Equilibrage du roulis
(droite/gauche)
6. LED d’alimentation
7. Interrupteur On/Off
8. Equilibrage de rotation
9. Mode automatique
10. Manette des gaz/lacets
11. Réglage de la vitesse
12. Mode vol/roulis
13. Compartiment pour piles
Mise en place des piles
Respecter la polarité.
IT - Trasmittente
1. Antenna 2,4 GHz
2. Flip mode
3. Leva Nick/Roll
(avanti/indietro, destra/sinistra)
4. Trim Nick (avanti/indietro)
5. Trim Roll (destra/sinistra)
6. Power LED
7. Interruttore ON/OFF
8. Trim Direzionale
9. Modalità automatica
10. Stick del gas/direzionale
11. Impostazione di velocità
12. Modalità Volo/Roll
13. Compartimento batteria
Montaggio delle pile
Rispettando la polarità.
ES - Emisora
1. Antena 2,4 GHz
2. Flip mode
3. Nick/Roll palanqua
(delante/atraz,
izquierda/derecha)
4. Equilibrio Nick (delante/atraz)
5. Equilibrio Roll
(izquierda/derecha)
6. Power LED
7. Interruptor On/Off
8. Equilibrio Dirección
(girar izquierda/derecha)
9. Modo automático
10. Palanca de gas / de cola
11. Ajuste de la velocidad
12. Modo de vuelo / rollo
13. Compartimento de la batería
Instalación de las pilas
Preste atención a la polaridad
2
Page 3
1 2 3
DE - Ladevorgang USB
1. Trennen Sie die Steckverbindung vom Modell zum Akku (aus
Sicherheitsgründen wird empfohlen, den Akku dem Modell zu
entnehmen).
2. Stecken Sie den USB-Stecker des Ladekabels in die USB Buchse ihres PC`s. Die LED leuchtet auf, sie zeigt
Ladebereitschaft an. Verbinden Sie den Akku mit dem USB Stecker.
Erlischt die LED, ist der Ladevorgang gestartet. Sobald die
LED leuchtet, ist der Ladevorgang abgeschlossen.
3. Nachdem der Akku vollständig geladen ist, legen Sie ihn in
das Modell ein und verbinden Sie den Akku mit dem Modell.
Nach etwa 60 min. ist der Ladevorgang abgeschlossen, die Flugzeit bei vollgeladenen Akku beträgt ca. 5 Min.
Wichtig!
Lassen Sie den Akku nach jedem Flug mindestens 10 min.
abkühlen bevor Sie mit dem Ladevorgang beginnen. Aus
Sicherheitsgründen sollte der Ladevorgang überwacht werden.
GB - Charging by USB
1. Disconnect the connector from the model to the battery. (for
safety it is recommended to remove the batteryfrom the
model).
2. Insert the USB plug from the USB cable into the USB socket
of your PC. The LED indicator will illuminate indicating that
the charger is ready. Connect the battery with USB charger.
The LED light is OFF whilst charging and turns ON when
charging complete.
3. Once the battery pack is fully charged, insert it into the
model and connect.
The charging process should take approx. 60 min. and should
give you approx. 5 min. ying time.
Important!
After each ight, let the battery pack cool down for at least
10 min. before charging it. For safety reasons, battery char-
ging must be done under supervision at all times.
FR - Processus de charge USB
1. Débranchez l’accu du modèle réduit (pour des raisons de
sécurité, il est recommandé d’enlever l’accu du modèle
réduit).
2. Mettez le connecteur USB du câble de charge dans la prise
USB de votre PC. La LED s’allume, elle indique que le
chargeur est prêt. Connectez l’accu au connecteur USB.
Le chargement commence quand la LED s’éteint. Dès que la
LED s’allume, le chargement est terminé.
3. Lorsque la batterie est complètement chargée, insérez-la
dans le modèle et connectez-la avec celui-ci.
La charge est complète après environ 60 minutes et la durée de
vol est alors de l’ordre de 5 minutes.
Important!
Laissez l’accu refroidir au moins 10 min après chaque vol.
Après ce temps, vous pouvez recharger l’accu. Pour des
raisons de sécurité, il faut toujours surveiller le processus
de charge.
IT - Caricamento attraverso USB
1. Sconnettere il collegamento tra la batteria e il modello (per
motivi di sicurezza)
2. Collegare il cavo USB al computer. Il LED (power) indica che
il caricabatteria è alimentato. Collegare il cavo USB con il
pacco batteria. Appena si accende la luce LED, la carica è
terminata.
3. Dopo che la batteria é completamente carica, inserirla nel
modello e collegare la batteria con il modello.
La ricarica é completata in 60 min‘ e la durata del volo é mediamente di 5 min.
Importante!
Lasciate raffreddare il pacco batterie per almeno 10 min
dopo avere effettuate il volo. Passato questo tempo, potete
ricaricare il pacco batteria. Per motivi di sicurezza consigliamo di sorvegliare la carica.
ES - Cargamiento a través de USB
1. Desconecte el conector desde modelo a la batería (por
razones de seguridad, se recomeinda de sacar la batería del
modelo).
2. Inserir el conector USB del cable de carga en el buje USB
de su ordenador. Le LED se iluminan, indicando que está
listo para cargar. Conectar la batería con el conector USB.
Quando el LED se apaga, se inicia el proceso de carga.
Quando el LED se brilla, la carga está completa.
3. Después de que la batería está completamente cargada,
inserta en el modelo y conectar la batería al modelo.
Tempo de carga: 60 min.
Tempo de vuelo: 5 min
Importante!
Nunca utilice pilas recargables en la emisora. Después de
cada vuelo, deje que la batería fría durante al menos 10 minutos antes de recargarla de nuevo. Por razones de seguridad conviene vigilar la/s batería/s mientras se cargan.
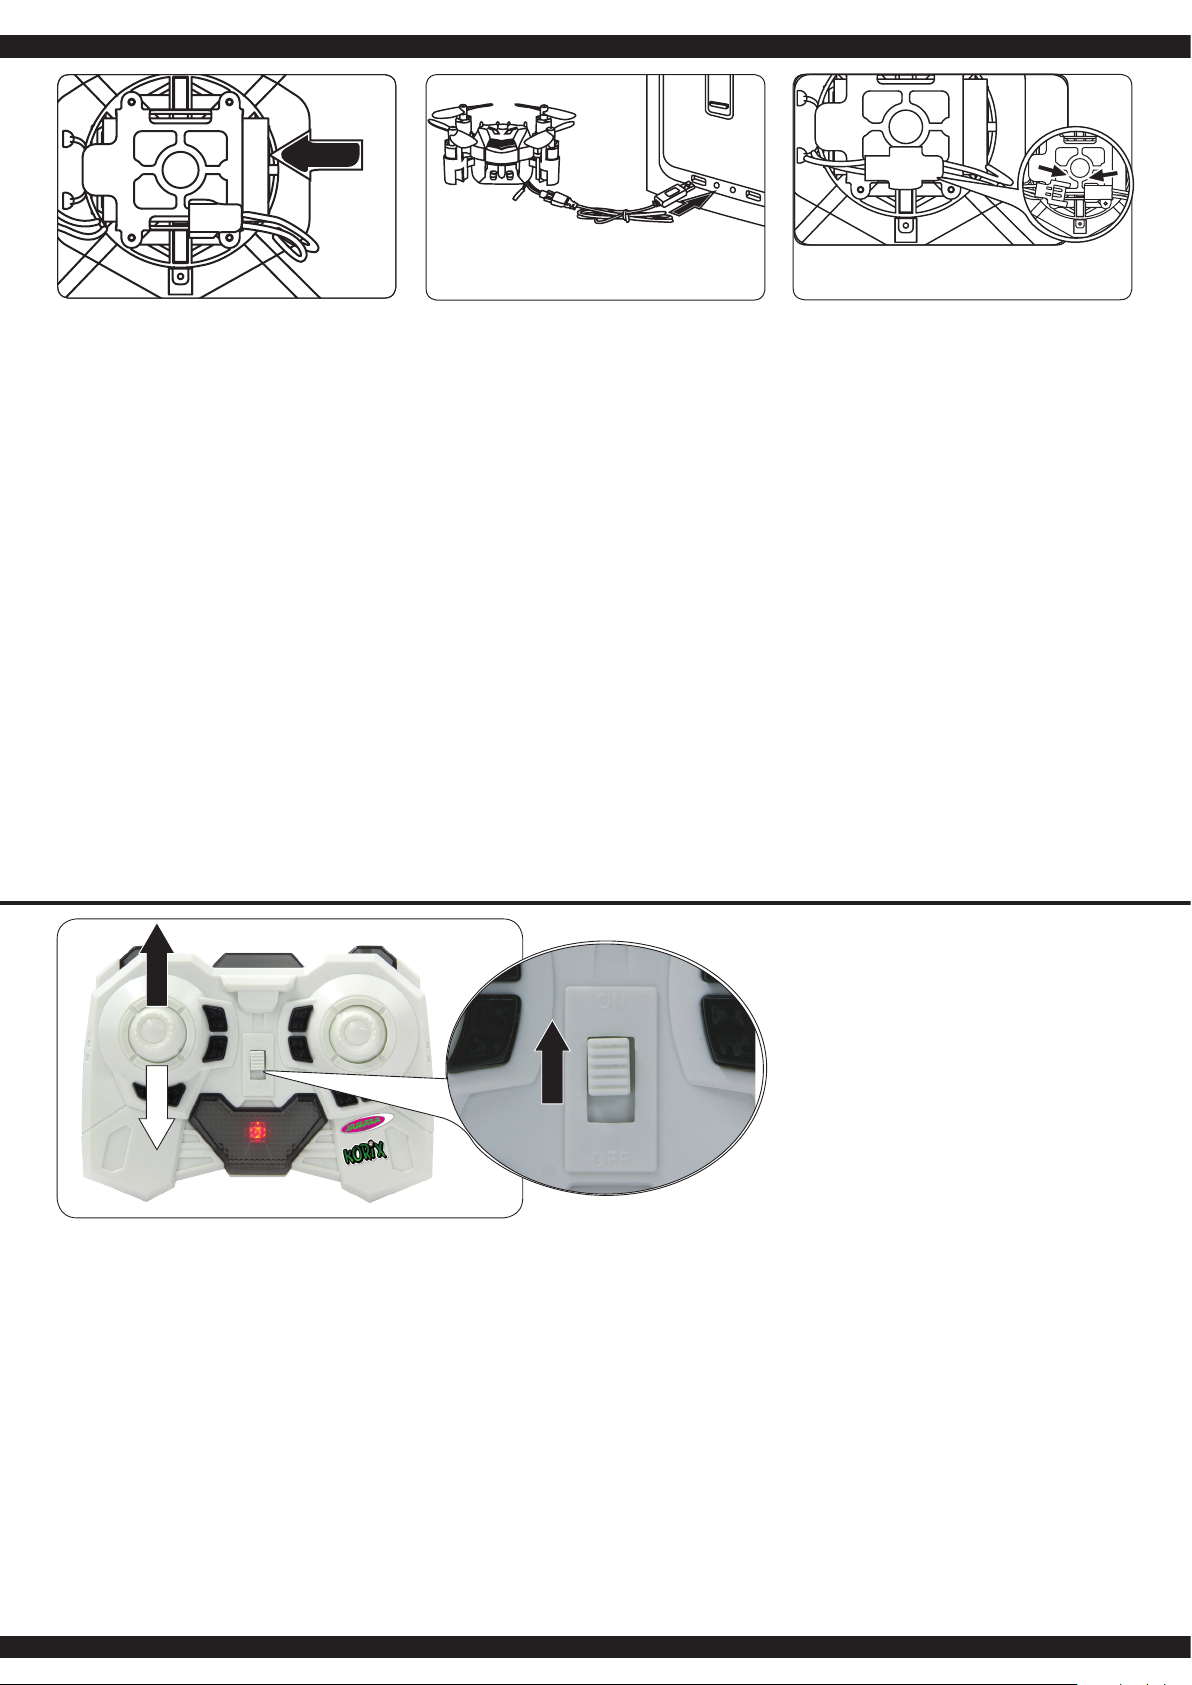
DE - Binden von Sender und Modell
Der Empfänger in Ihrem Modell ist mit einer Einschalt-Sicherheitsfunktion versehen. Das garantiert, dass das Modell nur bindet wenn es ein gültiges Sendersignal erhält.
Achtung! Erst das Modell und dann den Sender einschalten.
Die korrekte Vorgehensweise ist wie folgt:
1. Stellen Sie den Gashebel auf die unterste Position (kein
Gas). Der Sender ist ausgeschaltet!
2. Platzieren Sie das Modell auf einer geraden Oberäche.
Schieben Sie den Akku ein und verbinden Sie den Akku mit
dem Modell. Schalten Sie das Modell ein. Nun das Modell
nicht mehr bewegen, damit der Gyro sich einstellen kann.
Die LEDs am Modell beginnen zu blinken. Schalten Sie jetzt
den Sender ein.
3. Zum Initialisieren schieben Sie den Gashebel ganz nach
oben und wieder zurück, dabei ertönt ein akustisches Signal.
Damit sich das Gyrosystem während des Bindens initialisie ren kann, sollte das Modell auf einer ebenen Fläche stehen.
Wenn die LEDs am Modell dauerhaft brennen, ist der Binde vorgang abgeschlossen. Sollte es nicht funktionieren,
wiederholen Sie den Prozess.
GB - Binding of transmitter and model
Your RC model is tted with a Power-On safety mode. This is
designed to ensure that the model’s motor will not start unless it
detects a suitable radio-control signal.
Attention: Switch the model on rst then the transmitter.
The correct Start-Up sequence is as follows:
1. Make sure that the throttle stick is at the bottom (no throttle is
given)! The transmitter is off!
2. With the model placed on a level surface, insert the battery
pack and connect the battery pack and model. Turn on the
model. At this time avoid moving the model so the gyro
system can initialise. The LED on model starts ashing. Turn
on the transmitter.
3. For the initialisation process to be completed push the
throttle stick to the top and back; an acoustic signal sounds.
The model should stand on a level surface, so that the Gyro
can initialise during binding. Once the LED lights up
permanently, the binding process is completed.
If this does not work, repeat the process.
FR - Synchroniser le modèle réduit avec l’émetteur
Le récepteur de votre modèle réduit est équipé d’une fonction de
sécurité. Cela garantit que le modèle se connecte uniquement si
les signaux de l’émetteur sont valides.
Attention! Allumez en premier le modèle réduit puis seulement l’émetteur.
La procédure à suivre est la suivante:
1. Poussez la manette des gaz jusqu’ à la position la plus basse
(pas de gaz). L’émetteur est éteint!
2. Placez le modèle réduit sur une surface horizontale plane.
Glissez la batterie à l’intérieur puis connectez-la avec ce
dernier. Allumez le modèle. Ne bougez plus le modèle réduit
an que le gyroscope puisse se régler. Les LED
commencent à clignoter. Allumez maintenant l’émetteur.
3. Pour l’initialisation, poussez la manette des gaz
complètement vers l’avant puis revenez en arrière. Un signal
acoustique retentit. Pendant l’opération, le modèle réduit doit
se trouver sur une surface plane an que le gyroscope
puisse s’initialiser pendant la synchronisation. Si les LED
restent allumées en permanence, cela indique que la
synchronisation est terminée. Si la procédure a échoué,
recommencez l’opération.
3
Page 4
IT - Binding trasmettitore e modello
È importante di non toccare/sorare l’elicottero durante la fase
del binding.
Attenzione! Accendete prima il modello e poi la trasmittente.
Altrimenti il Gyro non si può inizializzare.
1. Portare l‘acceleratore nella posizione più bassa (gas a zero).
Il trasmettitore è spento!
2. Il Binding deve avvenire su un tavolo oppure per terra.
Collegare il pacco batteria. I LED del telaio cominciano a
lampeggiare. Accendere il trasmittente.
3. Per inizializzare premere la leva del gas no sopra e tutto il
tragitto indietro. Durante questa manovra si sente un
segnale acustico. Per permettere al sistema - giroscopio di
inizializzar si, il modello deve essere posato su una
supercie piana. Se i LED sono accesi sul modelo è
completato il processo di associazione. In caso che il LED
lampeggia, ripetete la procedura.
ES - Binding del modelo y la emisora
Si el proceso de combinar ambos se viera afectado por
interferencias, empieze de nuevo.
¡Atención! Encender primero el modelo, y después la
emisora.
La forma correcta de comenzar es la siguiente:
1. Baje el stick del acelerador del todo (ninguna aceleración).
El transmisor se apaga!
2. Ponga el modelo en una supercie plana. Meta la batería en
su sitio. Ahora no mueva mas el modelo, para que se pueda
inicializar el giróscopo. Los LEDs comienzan a parpadear.
Encienda la emisora.
3. Para iniciar, presione la palanca de gas hacia arriba y nueve
mente hacia atrás, te va a suenar un señal acústico. Para que
el sistema giroscópico durante el binding puede inicia lizar, el
modelo debe estar en una supercie plana. Si los LED del
modelo queman de forma permanente el proceso de unión es
completa. Si el LED vuelve a parpadear o sigue
parpadeando, repita el proceso de combinación.
1
3
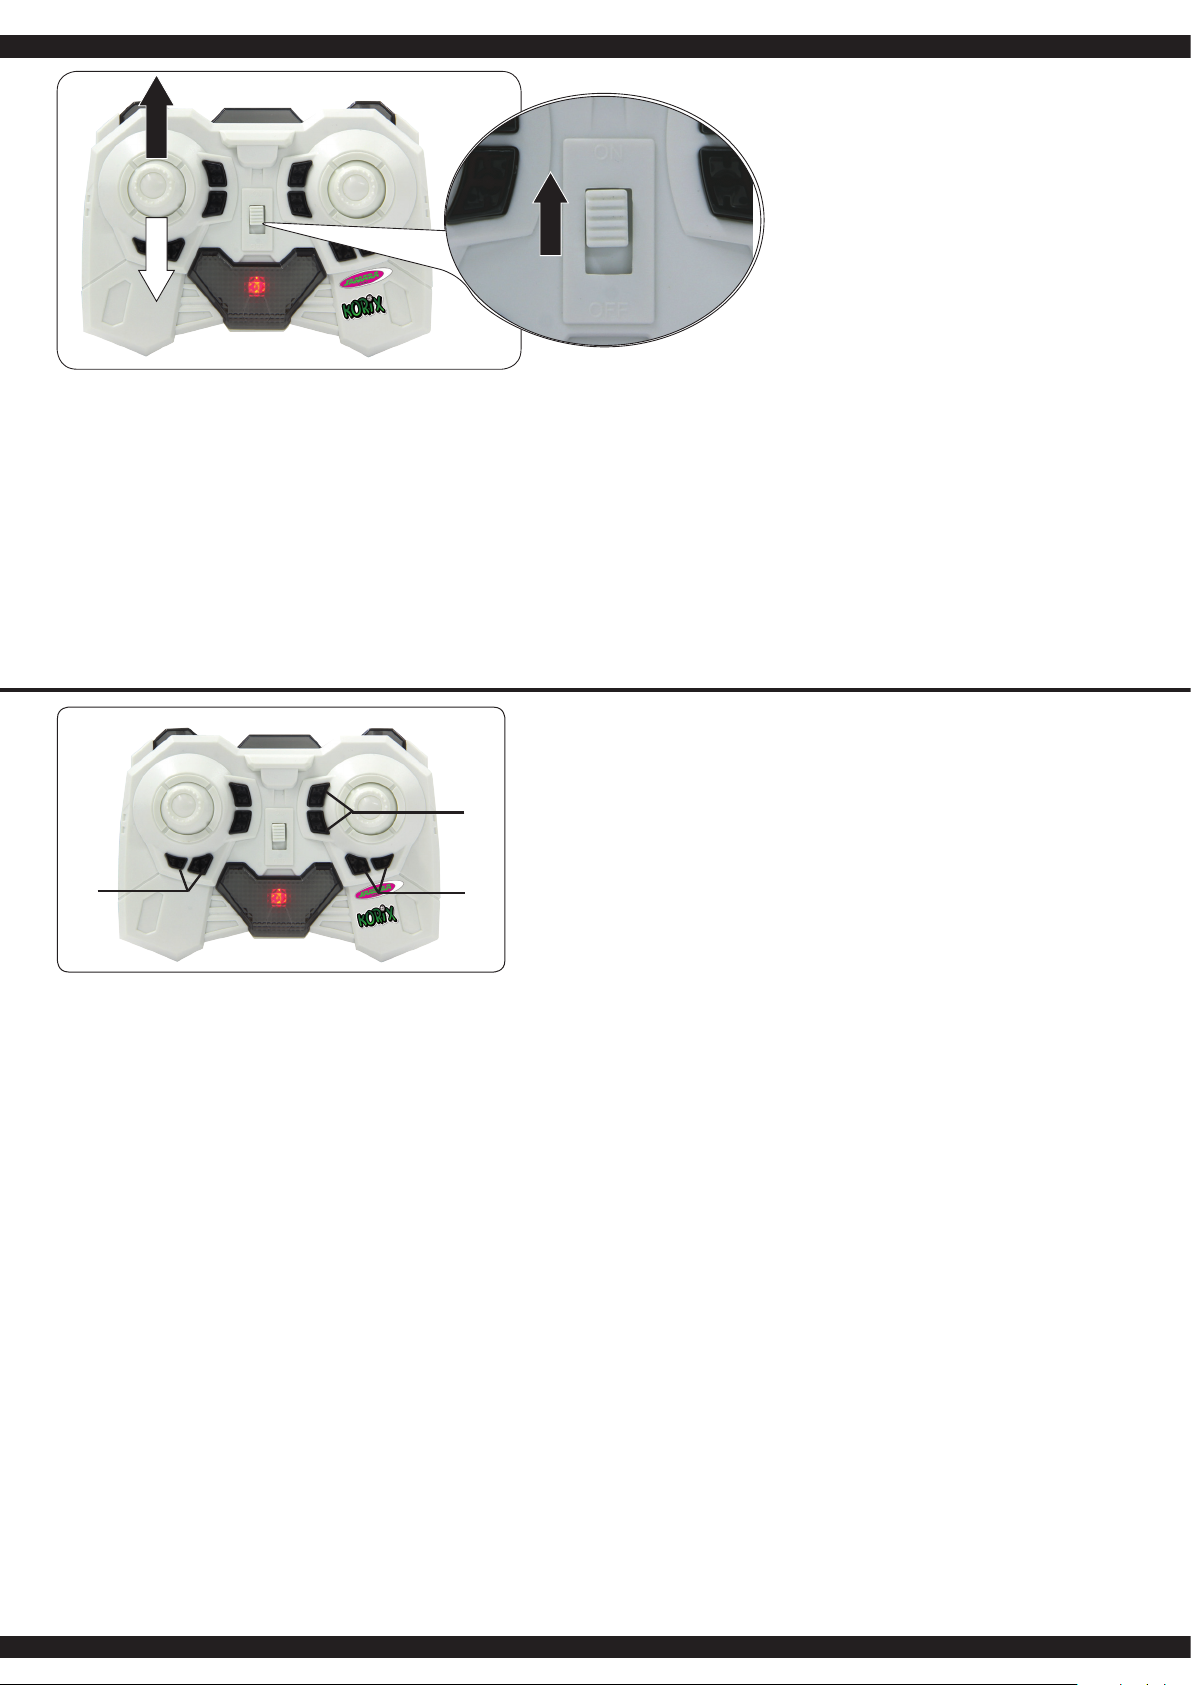
DE - Trimmen der Fluglage
Lassen Sie das Model ruhig auf einer Stelle schweben und beobachten Sie die Veränderungen beim Betätigen der jeweiligen
Trimmregler.
1. Trimmen der Nicklage
2. Trimmen der Roll-Lage
3. Trimmen der Drehung
Akkubedingt müssen Sie das Model regelmäßig je nach Akkustand austrimmen, um eine stabile Fluglage zu erhalten.
GB - Trimming the Model
Let the model hover in one spot and watch the changes
respectively by pressing the trim controls.
1. Trim the pitch
2. Trim the roll position
3. Trim the Rudder
Depending on the condition of the battery you need to get
the model regularly trimmed to get a stable ight.
2
FR - Equilibrage du vol
Laissez planer le modèle à une certaine hauteur et observez
les changements quand vous actionnez les régulateurs
d’équilibrage.
1. équilibrage du tangage
2. équilibrage du roulis
3. équilibrage de la rotation
Pour des raisons liées à la batterie, il faut régulièrement remettre le modèle dans une position stable en fonction du
niveau de charge de la batterie.
IT - Trim del modello
Fare volare il modello ad una certa altezza e osservare i cambiamenti quando si preme i regolatori dei trim.
1. Trim nick
2. Trim roll
3. Trim giare
Tramite i trim e anche possibile regolare il modello così, che
resta praticamente fermo durante il volo. Queste regolazione sono da effettuare ogni volta che si collega la batteria,
dato che si tratta di regolazioni dipendenti dalla tensione
della batteria.
ES - Trim del modelo
Flotar tranquilamente el modelo y observar los cambios mientras
pulses el regulador de trim.
1. Trim nick
2. Trim roll
3. Trim rotación
A través del trim es posible regular el modelo para obtener
un vuelo estable durante el vuelo. Esta regulación se tiene
que hacer cada vez que se conecta la batería, ya que esta
regulación depende de la tensión de la batería.
4
Page 5

DE - Flugübungen
Bevor Sie mit dem Modell iegen, informieren Sie sich zuerst
über seine Steuerfunktionen und führen einige Übungen durch.
Platzieren Sie das Modell mit der Hinterseite zu Ihnen zeigend
auf einer ebenen Fläche. Üben Sie zuerst den Schwebeug mit
dem Gasknüppel zu kontrollieren. Anschließend versuchen Sie
die Position des Modells mit Hilfe des rechten Steuerknüppels
zu verändern (vorwärts, rückwärts und seitwärts) und gegebenenfalls abzufangen. Zuletzt sollten Sie das Drehen des Modells
um die eigene Achse mit dem linken Steuerknüppel üben. Wenn
Sie die Grundfunktionen des Modells beherrschen, können Sie
sich an Ihren ersten kontrollierten Flug machen.
GB - Practice simulation ight
Before ying with the model check rst about its control functions and perform some exercises. Place the model with the back
facing to you on a at surface. Practice only to hover with the
throttle control. Then, you try to change the position of the model
using the right stick (forward, backward, sideways) and possibly
correct the ight. At last, you should practice turning the model
around its own axis with the left stick. If you have mastered the
basic functions of the model you can perform your rst controlled
ight.
1. 3.2.
FR - Voler dans la pratique
Avant de faire voler le modèle, informez-vous de toutes ses fonctions de commande et faites quelques essais. Placez le modèle
sur une surface plane et placez-vous derrière le modèle. Essayez de le faire planer en utilisant la manette des gaz. Ensuite,
essayez de changer la position du modèle à l’aide de la manette
droite (marche avant, marche arrière, sur les cotés), et éventuel-
lement de le redresser. Pour nir, exercez-vous à faire pivoter le
modèle autour de son axe avec la manette de gauche. Une fois
que vous maîtrisez toutes les fonctions de base du modèle, vous
pouvez effectuer vos premiers vols.
IT - La pratica
Prima di volare il modello, consigliamo fare conoscenza con tutte
le funzioni di controllo e di effettuare i primi voli di test. Posiziona-
re il modello su una supercie piatta, davanti al pilota. Le eliche
del modello devono essere in posizione posteriore. Per primo,
provare ad alzare il modello in volo, e tenerlo “fermo” in volo. Poi
provare a cambiare la posizione del modello utilizzando la levetta destra (per farlo andare in avanti/indietro e destra/sinistra).
Appena imparato le funzioni di base, procedere ad effettuare i
primi voli.
ES - Volando en la práctica
Antes de volar con el modelo, se recomienda conocer todas la
funciones de control y hacer el primero vuelo de prueba. Posi-
cionar el modelo en una supercie plana, en frente del pilota
(negro). Las palas del modelo deben estar en la posición trasera.
En primo lugar, pruebe a despegar el modelo en vuelo, y tener
jo en el vuelo. A continuación, intente a cambiar la posición del
modelo usando la palanca derecha (para que vas hacia adelante/atrás y izquierda/derecha). Cuando se ha aprendido las
funciones básico, proceda con los primero vuelos.
360° Flip
DE
1. Kombination von Gas, Gieren, Roll und Nick
Nach dem Sie sich mit den verschiedenen Steuermethoden
des Modells vertraut gemacht haben, versuchen Sie nun die
verschiedenen Steuerungen zu kombinieren.
2. Ändern der Flugperspektive
Nach dem Sie das Fliegen des Modells von der Sicht von
hinten auf das Modell beherrschen, ist es an der Zeit den
Flug aus der seitlich vom Modell stehenden Position und von
der vom Modell zugewandten Seite auszuüben. Denken Sie
daran, dass Sie zum Teil invertiert (umgekehrt) steuern
müssen.
3. 360° Flip Figur
Wenn Sie die Flipfunktion eingestellt haben, iegen Sie in
min. 2 Meter Höhe und bewegen den Steuerknüppel in die
jeweilige Richtung, in die das Modell den Flip ausführen soll.
GB
1. Combination of gas, rudder, roll and pitch
After you can manage the different control methods of the
model now you can try to combine the various controls.
2. Change of ight perspective
Once you have mastered ying the model from behind with it
facing away from you, it is time to practice ying the model
from the side and with the model facing towards you.
Remember, you may need to invert the controls (vice versa).
3. 360° ip gure
If you set the ip function, you y in 2 meters in height and
move the joystick in the appropriate direction in which the
model is to perform the ip.
FR
1. Combinaison entre l’accélération, les lacets, le roulis et
le tangage
Lorsque vous maîtrisez les différentes fonctions de
commande, vous pouvez combiner plusieurs fonctions
entre-elles.
2. Changement de l’angle du vol
Après avoir fait des essais de vol en voyant le modèle de
l’arrière, il est maintenant temps de s’exercer en ayant le
modèle sur le coté. Pensez que vous devez piloter le modèle
de manière inversée.
3. Figure ip à 360°
Après avoir actionné la fonction Flip, volez à au moins 2 m
de hauteur et déplacez la manette de commande dans la
direction, dans laquelle le modèle doit faire le ip.
IT
1. Combinazione dei comandi (gas, rotazione, roll e nick)
Appena imparato i singoli comandi, provate a combinarle
l’uno con l’altro.
2. Cambiare la perspettiva del volo
Dopo i test di volo, avete imparato di comandare il modello
visto da dietro. Adesso fate volare il modello vista dal lato,
oppure davanti. In questo caso cambia il senso di comando
ed anche il grado di dif coltà.
3. 360° Effettuare un Flip durante il volo
Attivando il Flip funzione , è mantenere almeno 2 m di
altezza, si possono effettuare dei Flip durante il volo. Basta
azionare la leva.
ES
1. Combinacion de los controles (gas, rotación, roll y nick)
Después de que haya familiarizado con los diferentes
métodos de control del modelo, probar ahora de combinar
los diversos controles
2. Cambio de la prespectiva de vuelo
Después de los vuelos de pruebas, has aprendido a
controlar el modelo de la vista desde atrás. Ahora hacer
volar de la vista desde el lado del modelo o delante. En esta
caso cambia el sentido de mando y tambien el grado de
dicultad.
3. 360° efectuar un Flip durante el vuelo
Activando el Flip función y mantener al modelo 2 m de
altura, se pueden efectuar Flips durante el vuelo.
Semplemente activar la palanca.
5
Page 6

DE
Automatischer Modus
Drücken Sie den Automatik-Modus-Knopf während des Flugs.
Das Modell wird nun automatisch im Kreis iegen.
GB
Automatic Mode
Press the automatic mode button during ight and the model will
automatically y in a circle.
FR
Mode automatique
Appuyez sur la touche mode automatique pendant le vol ; le modèle commence alors à voler en cercles.
IT
Modalità automatica
Premere il pulsante di modalità automatica durante il volo. Il modello volerà automaticamente in cerchio.
1. 2. 3.
ES
Modo automático
Presione el botón de modo automático durante el vuelo. El modelo va a volar automáticamente en círculos.
DE
1. Rollmodus
Legen Sie das Modell auf eine ebene Fläche. Drücken Sie
den „Flug/Rollmodus“ Knopf, damit Sie in den Rollmodus
gelangen, und schieben Sie den Gashebel nach vorne.
2. Links/rechts drehen
Wenn Sie den rechten Steuerhebel nach links drücken, dreht
sich das Modell nach links; wenn Sie ihn nach rechts
drücken, dreht sich das Modell nach rechts.
3. Vorwärts/rückwärts bewegen
Wenn Sie den rechten Steuerhebel nach oben drücken, rollt
das Modell vorwärts; wenn Sie Ihn zu sich ziehen, rollt das
Modell rückwärts.
GB
1. Roll Mode
Lay the model on a level surface. Press the „Fly/Roll Mode“
button to enter the roll mode and push the throttle stick
forward.
2. Turning left/ right
If you push the right stick to the left, the model will turn left. If
you push the right stick to the right the model will turn right.
3. Move forward/backward
The model will roll forward if you press the right steering stick
upwards. If you pull the stick towards you the model will
roll backwards.
FR
1. Mode roulis
Posez le modèle sur une surface horizontale. Appuyez sur la
touche «vol/mode roulis» pour accéder au mode roulis et
poussez la manette des gaz vers l’avant.
2. Tourner à gauche / à droite
Si vous poussez la manette de la droite vers la gauche, le
modèle tourne à gauche. Si vous la poussez vers la droite, le
modèle tourne vers la droite.
3. Avancer / reculer
Si vous poussez la manette de commande vers l’avant, le
modèle avance; Tirez la manette vers vous et le modèle va
reculer.
IT
1. Modalità rotolare
Posizionare il modello su una supercie piana. Premere il
tasto “modalità volo/rotolare”, per entrare in modalità rotolare
e spingere la leva di gas in avanti.
2. Girare a sinistra/destra
Se si preme la leva di controllo a sinistra, il modello gira
verso sinistra; quando si preme a destra, il modello gira
verso destra.
3. Muovere in avanti/indietro
Se si preme la lava di controllo destro in avanti, il modello
rotola in avanti; premere la leva verso il basso, il modello
rotola all’indietro.
ES
1. Modo rodar
Poner el modelo en una supercie plana. Presione el botón
„modo vuelo/rodar“, para entrar en modo rodar y empujar la
palanca de gas hacia adelante.
2. Girar a la izquierda/derecha
Si presiona la palanca de control derecha a la izquierda, el
modelo gira a la izquierda; cuando se presiona hacia la
derecha, el modelo gira a la derecha.
3. Mover hacia delante/atrás
Si pulse la palanca de control de la derecha hacia adelante,
el modelo va a rodar hacia adelante; presione la palanca
hacia abajo, el modelo va a rodar hacia atrás.
6
Page 7

Weiß
White
Blanc
Bianco
Blanco
Schwarz
Black
Noir
Nero
Negro
A
B
B
A
DE
Austauschen der Rotorblätter
Sollte ein Rotorblatt gewechselt werden, muss darauf
geachtet werden, das richtige Blatt an den richtigen
Rotor zu montieren. Orientieren Sie sich dabei an der
Abbildung. Bei falsch montierten Rotorblättern wird
das Modell unkontrollierbar! Zum Tausch der Blätter
ziehen Sie das Blatt vorsichtig ab und drücken Sie das
neue Blatt wieder vorsichtig auf.
GB
Changing the main blades
If you have to change a main blade you have to pay
attention of the rotor position of each main blade. Use
the illustration as an example. If you mount the main
blades in wrong position the model will get out of
control! To change the main blades pull off the main
blade carefully and press the new main blade on.
DE - Ersatzteile
GB - Spare parts
No. 42 3162
Rotorblätter
Rotor blades
Rotor principal
Pale principali
Rotores
No. 42 3164
Ladekabel
Charging lead
Cable de charge
Cavo di carica
Cable de carga
FR
Remplacer les pales de rotor
Quand une pale de rotor doit être remplacée, il faut
prendre soin de monter la bonne pale sur le bon rotor. Veuillez regardez attentivement l’image. En cas
de montage incorrect des pales de rotor, le modèle
deviendra incontrôlable. Pour remplacer les pales,
retirez délicatement la pale et montez délicatement la
nouvelle pale.
IT
Sostituzione de la pala rotore
Se deve cambiare una pala del rotore, si deve assicurare di montare la pala al rotore corretto. Orientarsi
all’immagine. Se si montano le pale del rotore non
correttamente, il modello sarà incontrollabile! Per
sostituire le pale tirare la pala con attenzione e premere
la nuova pala.
FR - Pièces détachées
IT - Pezzi di ricambio
No. 42 3163
Akku
ohne Abbildung
without picture
Battery
Accu
Batteria
Baterìa
ES
Sustitución de la pala del rotor
Si tiene que cambiar una pala de rotor, debe asegurarse de que montar la pala en el rotor correcto. Orientarse a la imagen. Al montar las palas del rotor de for-
ma incorrectamente, el modelo será incontrolable!
Para cambiar las palas tire la pala con cauta. Presione
la nueva pala con cauta.
ES - Lista de repuestos
No. 42 3164
Fernsteuerung
Transmitter
Radiocommande
Trasmittente
Emisora
DE - Problembehebung und Lösungen
Die Empfangselektronik blinkt.
1. Das Modell empfängt kein Signal.
- Überprüfen Sie ob das Modell gebunden ist und
der Sender eingeschaltet ist.
Das Modell reagiert nicht.
1. Sie sind außer Reichweite.
- Verringern Sie die Distanz zum Modell
2. Die Senderbatterien sind zu schwach.
- Erneuern Sie die Senderbatterien.
Die Rotoren machen ungewöhnliche Geräusche.
1. Ein Rotorblatt ist beschädigt.
- Wechseln Sie das Rotorblatt.
Nach dem Blatt-Tausch iegt das Modell nicht
richtig.
1. Die Blätter sind falsch montiert.
- Montieren Sie die Blätter richtig.
Nach dem Laden hebt das Modell nicht ab.
1. Akku ist defekt.
- Akku ersetzen.
2. Der Akku ist nicht voll aufgeladen.
- Laden Sie den Akku immer vollständig auf.
GB - Problems and solutions
The LED on the receiver is ashing.
1. The receiver does not have a signal.
- Check whether the model is connected and make
sure that the transmitter is turned on.
The model is not reacting.
1. You are out of range.
- Decrease the distance to the model.
2. The transmitter batteries are too low.
- Put new batteries into the transmitter.
The rotor is making strange noises.
1. The rotor blade is damaged.
- Replace the rotor blade.
After changing the blades the model does not y
properly.
1. The blades are not installed properly.
- Install the blades properly
The model does not rise up after charging.
1. Battery is damaged.
- Replace battery.
2. The battery was not charged enough.
- Always charge the battery till it is fully charged.
FR - Problèmes possibles et solutions
Le récepteur clignote.
1. Le modèle ne reçoit pas de signal
- Vériez que le modèle est connecté et que
l’émetteur est allumé.
Le modèle ne réagit pas.
1. Vous êtes hors de portée du modèle.
- Rapprochez-vous du modèle
2. Les piles de l’émetteur sont trop faibles
- Changez les piles de l’émetteur
Les rotors font des bruits inhabituels.
1. Un rotor est abîmé.
- Remplacez la pale.
Après le remplacement des pales, le modèle ne vole
pas correctement.
1. Les pales sont mal montées.
- Montez les pales correctement.
Le modèle ne décolle pas.
1. La batterie ou le chargeur sont en panne.
- Remplacez la batterie ou le chargeur.
2. La batterie n’est pas complètement chargée.
- Chargez toujours complètement la batterie.
7
Page 8

IT - Soluzione del problema
La ricevente elettronica lampeggia.
1. Il modello non riceve alcun segnale
- Vericare se il modello e stato fatto il binding e la
radio sia accesa.
Il modello non risponde.
1. Siete fuori della autonomia.
- Ridurre la distanza dal modello.
2. Le batterie della radio sono deboli.
- Cambiare le batterie della radio.
I rotori fanno rumori insoliti
1. Una pala e danneggiate.
- Cambiare la pala.
Dopo aver cambiato la pala, il modello non vola
correttamente.
1. Le pale sono montate non correttamente.
- Montare le pale correttamente.
Dopo la carica, il modello non decolla.
1. Batteria o caricatore sono difettosi.
- Sostituire la batteria o caricatore
2. La batteria non e completamente caricata.
- Caricare la batteria sempre completamente
ES - Solución de problemas y soluciones
La electrónica receptor parpadea.
1. El modelo no recibe ninguna senal.
- Comprobar si el modelo está echo el binding y la
emisora encendida.
El modelo no responde.
1. Usted está fuera de su alcance.
- Reduzca la distancia en su modelo.
2. La baterías son débiles.
- Reemplace las baterías de la emisora.
Los rotores hacen ruidos inusuales.
1. Una pala de rotor está dañada.
- Cambiar la pala.
Después de sustituir la pala, el modelo no vuela
correctamente.
1. Las palas no estan montado bien.
- Montar las palas correctamente.
Después de la carga, el modelo no esta despegando.
1. Batería o el cargador estan defectuoso.
- Cambiar la batería o el cargador.
2. La batería no esta cargada completamente.
- Cargar la batería siempre completamente.
DE
Sicherheitshinweise
• Der Flight Copter ist als iegendes Spielzeug für Kinder ab 10 Jahren
geeignet. Gebrauch nur unter Aufsicht Erwachsener!
• Bitte lesen Sie die Bedienungsanleitung und Sicherheitshinweise sorgfältig
durch bevor Sie das Modell in Betrieb nehmen.
• Dieses Gerät ist nicht dafür bestimmt, durch Personen (einschließlich Kinder) mit
eingeschränkten physischen, sensorischen oder geistigen Fähigkeiten oder
mangels Erfahrung und/oder mangels Wissen benutzt zu werden, es sei denn,
sie werden durch eine für ihre Sicherheit zuständige Person beaufsichtigt oder
erhielten Anweisungen, wie das Gerät zu benutzen ist.
• Der Benutzer ist im vollem Umfang für den richtigen Umgang mit dem Modell
verantwortlich.
• Jegliche Manipulation an der Struktur des Modells ist nicht erlaubt und führt zum
Verlust der Gewährleistung.
• Setzen Sie das Modell keiner direkten Sonneneinstrahlung, hoher Luftfeuchtig-
keit oder Staubeinwirkung aus.
Betrieb
• Benutzen Sie das Fluggerät niemals in der Nähe von Flughäfen, Bahnanlagen
oder Straßen. Halten Sie immer ausreichend Abstand von den gefahrenträchti gen und besonders geschützten Bereichen.
• Um Unfälle zu vermeiden, iegen Sie das Modell nie in der Nähe von Personen,
Tieren oder sonstigen Hindernissen. Hände, Haare und lose Kleidung vom Rotor
entfernt halten. Nicht in die Rotoren greifen!
• Setzen Sie Outdoor-Modelle nur bei gutem Wetter ein. Bei Regen, Sturm oder
gar Gewitter dürfen Sie diese Modelle nicht betreiben
• Suchen Sie ein Fluggelände, das den gesetzlichen Voraussetzungen entspricht
und frei von Hindernissen wie Bäumen, Häusern usw. ist.
Akkusicherheitshinweise
Durch die hohe Energiedichte (bis zu 150Wh/kg) sind die Zellen nicht ungefährlich
und bedürfen einer besonderen Sorgfalt!
• Akkus können bei Verschlucken lebensgefährlich sein. Wurde ein Akku ver-
schluckt, kann dies innerhalb von 2 Stunden zu schweren inneren Verätzungen
und zum Tode führen. Bewahren Sie deshalb sowohl neue als auch verbrauchte
Akkus und den Artikel für Kinder unerreichbar auf. Wenn Sie vermuten, ein Akku
könnte verschluckt oder anderweitig in den Körper gelangt sein, nehmen Sie
sofort medizinische Hilfe in Anspruch.
• Akkus (wiederauadbare Batterien) dürfen nur unter Aufsicht eines
Erwachsenen und mit einem geeigneten Ladegerät geladen werden. Sie
müssen zum Laden aus dem Artikel genommen werden. Die Akkus dürfen aus schließlich von Erwachsenen eingelegt oder ausgetauscht werden.
• Bei unsachgemäßer Verwendung des Akkus besteht Brand- oder Verätzungsge-
fahr.
• Überladen, zu hohe Ströme, oder Tiefentladen zerstört die Zelle.
• Vor mechanischer Belastung (Quetschen, Drücken, Biegen, Bohren) schützen.
• Akkus keinesfalls öffnen oder aufschneiden, nicht ins Feuer werfen, von Kindern
fernhalten.
• Behandeln Sie beschädigte oder auslaufende Akkus mit äußerster Vorsicht.
• Vor der Lagerung (z. B. im Winter) die Akkus laden - nicht im entladenen und
nicht im vollgeladenen Zustand lagern! Bei längerer Lagerzeit sollte der Lade zustand gelegentlich kontrolliert werden.
• Der Inhalt der Zelle ist schädlich für Haut und Auge.
Sollte die Zelle sich überhitzen, aufblähen, rauchen oder brennen, darf dieses
nicht mehr berührt werden. Halten Sie Sicherheitsabstand und stellen Sie geeignete Löschmittel bereit (kein Wasser Explosionsgefahr, gut trockener Sand,
Feuerlöscher, Löschdecken, Salzwasser).
GB
Safety instructions
• The Flight Copter is suitable as a ying toy for children from 10 years of
age. Use only under adult supervision!
• Read the instructions and safety instructions carefully before using the
model.
• This product is not intended for use by individuals (including children) with
reduced physical, sensory or mental capabilities or a lack of experience and / or
knowledge, unless they are supervised by a person responsible for their safety
and who is able to give instructions about how the product should be used.
• The User is fully responsible for the correct use of the model.
• The model should not be changed in any way, doing so will invalidate the
guarantee.
• Protect the model from strong sunlight, moisture and dust.
Operating
• Never use the model near an airport, railway or roads. Always keep a safe
distance from potentially hazardous and specially protected areas.
• It must be observed that neither persons or animals or other obstacles are within
the operating enviroment. Keep hands, hair and loose clothing away from the
rotor. Do not reach into the rotors!
• The Outdoor-model can only be own in good weather. Do not y it in wind, rain
or thunder storms.
• Find a place to y which complies with any laws, and is free from obstacles such
as trees, houses and / or other obstacles.
Safety precautions for the battery
Because of the high power compactivity (up to 150 Wh/kg) the cells are quite dangerous and need special care!
• Batteries can be fatal if swallowed. If a battery is swallowed, it may cause serious
internal chemical burns and death within 2 hours. Please retain both new and
used batteries and keep the products out of reach of children. If you suspect a
battery could have been swallowed or otherwise entered the body, immediately
seek medical help.
• Rechargeable batteries may only be charged under adult supervision and
with a suitable charger. They must be taken out of the product to be charged. The
battery may only be inserted or replaced by an adult.
• When using the battery incorrectly there is a risk of re or acid-related injuries.
• Overcharging, too high power, or discharging at low level destroys the cell.
• Protect from mechanical stress (squeezing, pushing, bending, drilling)
• Never open or cut batteries, do not throw into re, keep away from children.
• Handle a damaged or leaking battery with care.
• Before storing batteries (for example in the winter) charge the battery. Do not
store in fully charged or in non charged state! If stored for a long time, check the
charge status from time to time.
• The contents of the cell is harmful to skin and eyes.
If the cell overheats, swells, burns or smoke is coming from it, do not touch it
under any circumstances. Keep away in a safe distance and prepare adequate
extinguishing agents (No water - risk of explosion; well dry sand, re extinguishers, re blanket, salt water).
8
Page 9

FR
Consignes de sécurités
• Le Flight Copter est un jouet pouvant être piloté par les enfants à partir de
10 ans. Utilisation exclusivement sous la surveillance d´un adulte.
• Veuillez lire attentivement la notice et les consignes de sécurité avant
l’utilisation!
• Cet appareil n’est pas destiné à être utilisé par des personnes (y compris les
enfants) dont les capacités physiques, sensorielles ou intellectuelles ou le
manque d’expérience et/ou de connaissances ne leur permettent pas de l’utiliser
en toute sécurité, sauf s’ils sont surveillés par une personne responsable de leur
sécurité ou s’ils ont été formés à l’utilisation de l’appareil. Les enfants doivent
être surveillés pour s’assurer qu’ils ne jouent pas avec l’appareil.
• L’utilisateur assume l’entière responsabilité du maniement correct du modèle.
• Toute modication de la structure du modèle est rigoureusement interdite et
entraîne l‘annulation de la garantie.
• Placez le modèle à l’abri des rayons direct du soleil et de l’humidité et
protégez-le de la poussière.
Mise en marche
• Ne faites jamais voler votre modèle à proximité d’un aérodrome ou aéroport,
d’installations de chemins de fer ou de routes. Gardez toujours une distance
sufsante par rapport au zones de dangers ou protégées.
• Aucune personne, aucun animal ou autre obstacle ne doivent se trouver dans la
zone de fonctionnement du modèle. Gardez les mains, cheveux et vêtements à
bonne distance des parties en rotation. Ne pas les approcher des rotors!
• N’utilisez votre modèle à l’extérieur que par temps ensoleillé. Ne l’utilisez pas en
cas de pluie, de tempête ou d’orage.
• Choisissez un terrain répondant aux exigences des textes de lois en vigueur
pour faire voler votre modèle et libre de tout obstacle, comme par exemple des
arbres ou des maisons, etc.
Consignes de sécurité concernant les batteries
De part leur énorme densité énergétique (jusqu’à 150Wh/kg), les batteries ne sont
pas sans danger et nécessitent une attention particulière!
• En cas d´ingestion, les piles et batteries peuvent représenter des dangers
mortels. Une pile ou batterie avalée peut causer des brûlures internes graves et
causer dans les 2 heures susceptibles d’entraîner la mort. Veuillez conserver les
piles et batteries neuves et usagées ainsi que l’article hors de la portée des
enfants. Si vous soupçonnez qu´une batterie aurait été avalée ou introduit dans
le corps d’une façon quelconque, faites immédiatement appel à un médecin.
• Les batteries (piles rechargeable) ne doivent être rechargées que sous la
surveillance d´adultes et avec un chargeur compatible. Pour le rechargement,
vous devez retirer la batterie de l’article. Les batteries ne doivent être remises en
place ou remplacées que par un adulte.
• Une utilisation non conforme peut déclencher un incendie ou des brûlures
acides.
• Une surcharge, des courants trop élevés ou une décharge complète détruisent
les batteries.
• Protégez les batteries contre des chocs mécaniques (pincement, pression,
torsion,perçage).
• N’ouvrez ou ne découpez en aucun cas les batteries, ne les jetez pas dans le feu
et tenez-les à bonne distance des enfants.
• Manipulez les éléments endommagés ou les batteries qui coulent avec
énormément de précautions.
• Chargez les batteries avant stockage (par ex.: en hiver). Celles-ci ne doivent pas
être stockées dans un état entièrement, déchargé ni pleinement chargé.
• Le contenu des batteries est très dangereux pour les yeux et la peau.
Si les batteries venaient à surchauffer, goner ou prendre feu, il ne faut surtout
plus les toucher. Tenez-vous à bonne distance de celles-ci et cherchez un
extincteur adapté (pas d’eau (risque d’explosion), mais du sable sec, un extincteur, une couverture ignifuge, de l’eau salée).
IT
Istruzioni per la sicurezza
• Il Flight Copter é consigliato per bambini da 10 anni. Utilizzare solo sotto
supervisione di un adulto!
• Vi preghiamo di leggere attentamente le istruzioni e Istruzioni per la
sicurezza prima di usare il modello..
• Questo prodotto non è destinato ad essere utilizzato da persone (bambini
compresi) con capacità siche limitate, con limitazioni sensoriale o mentali
oppure mancanza di esperienza e/o di conoscenza. A meno che siano
sorvegliate da una persona responsabile della loro sicurezza o ricevano istruzioni
su come usare il prodotto in modo corretto. Bambini devono essere
supervisionati per assicurare che non giocano con l’apparecchio.
• L’utente é responsabile in pieno per il corretto utilizzo del modello.
• Ogni modica alle parti di un kit ne annulleranno la garanzia.
• Non usate il modello direttamente ai raggi solari, ambienti troppo umidi, polverosi
o troppo soleggiati.
Funzionamento
• Non utilizzare mai l´unita di volo nelle vicinanze di aeroporti, ferrovie o stazioni
ferroviarie e strade. Mantenere sempre una distanza di sicurezza adeguata dalle
zone potenzialmente pericolose o di alta protezione.
• Nel luogo di funzionamento non devono essere presenti persone o animali né
ostacoli di alcun tipo. Tenete mani, capelli e parti svolazzanti lontane dalle pale in
rotazione, non toccare i rotori.
• Evitate di volare con vento forte, pioggia o temporale.
• Volate sempre in aree libere legalmente autorizzate, lontane da case, alberi e/o
altri ostacoli.
Sicurezza della batteria
Dovuto al grande carico energetico (no a 150 KW/h le batterie Litio non vanno
sottovalutate e prese alla leggera, ma richiedono una particolare cura.
• Le batterie possono essere mortali in caso di ingestione. Se una batteria è stata
inghiottita, puo causare entro 2 ore gravi ustioni interne e portare alla morte. Si
prega di conservare entrambe le batterie nuove e usate e il prodotto via della
portata dei bambini. Se si sospetta che una batteria possa essere stata inghiottita
o in altro modo entrato nel corpo, prendere immediatamente assistenza medica.
• Batterie (batterie ricaricabili) possono essere caricate con un caricatore adatto
solo sotto supervisone di un adulto. Essi devono essere rimosse dal prodotto
per caricare. Le batterie possono essere inseriti o sostituiti solo da adulti.
• Un uso non appropiato di queste batterie può provocare incendi. E relative
ustioni.
• I sovraccarichi ad alta intensità o le scariche profonde possono danneggiarle.
• Evitate le sollecitazioni meccaniche (schiacciare, piegare, forare.)
• Non aprite, non gettate nel fuoco e non lasciate vicino ai bambini.
• Manipolate con molta attenzione le batterie danneggiate o con perdita di liquido.
• Prima di metterle via per una sosta nel loro impiego, caricatele solo a metà.
Non conservatele mai a pieno carico. Durante il periodo di conservazione
controllatele periodicamente.
• Il liquido contenuto nelle batterie é dannoso per la pelle e per gli occhi.
In caso che il pacco batterie si dovrebbe riscaldare troppo rapidamente,
gonarsi, fumare o prendere fuco non la prendete nelle mani e non toccatela.
Mantenete und distanza di sicurezza e in caso di incendio, spegnarla con polvere antifuoco oppure con sabbia (No, acqua, pericolo di esplosione, sabbia
asciutta, estintore, coperta anti incendio, acqua di mare).
9
Page 10

ES
Seguridad
• El Flight Copter es adecuado como un juguete volador para niños de
10 años. Usar sólo baja supervisión de un adulto!
• Lea atentamente las instrucciones y seguridad antes de poner el modelo
en funcionamiento!
• Es producto no es para personas (incluidos niños) con discapacidad física,
mental y sensonriais. O ninguna experiencia ni conocimiento, a menos que
vayan acompañados de un responsable o recibir instrucciones ¿Cómo se debe
usar. Los niños deben ser supervisados para asegurarse de que no te metas
con el producto.
• El usario es responsable en su totalidad para el uso correcto del modelo.
• Se prohíbe cualquier modicación de la estructura del modelo ya que anulará la
garantía inmediatamente.
• No exponga el modelo a los rayos solares directos, a altos índices de humedad
o entornos muy polvorientos.
Operación
• Nunca utilizar el aparato de vuelo cerca de los aeropuertos, ferrocarriles o
carreteras. Mantenga siempre una distancia segura de las áreas potencialmente
peligrosas y especialmente protegida.
• En el entorno de funcionamiento no deben haber personas, animales ni otros
obstáculos. Mantenga las manos y el cabello lejos del rotor, no introduzca las
manos en los rotores.
• Utilice el modelo outdoor solo cuando las condiciones atmosféricas sean
Buenas. No debería utilizar el modelo hay tormentas o se prevén malas
condiciones atmosféricas.
• Busque un espacio abierto, que cumpla con la normativa vigente, y libre de
obstáculos como árboles, edicios y/o otros obstáculos.
Seguridad de la batería
¡Debido a su densidad energética (hasta 150Kw/Kg.), los elementos no son inofensivos y necesitan de unos cuidados mínimos!.
• Las baterías pueden ser mortal en caso de ingestión. Si una batería se traga,
puede causar dentro de 2 horas a graves quemaduras internas y causar la
muerte. Por favor, conserva las dos baterías nuevas y usadas y el producto
alejado de los niños. Si sospecha que una batería puede ser ingerido o entró en
el cuerpo de otro modo, tomar la ayuda médica inmediata.
• Batería (pilas recargables) sólo pueden ser cargadas bajo la supervisión de
adultos y con un cargador adecuado.
• Una utilización inapropiada conlleva riesgo de lesiones y/o incendios
• Los elementos se dañarán por sobrecargas, corrientes muy altas, o descargas
profundas.
• Proteja las baterías de golpes, dobleces, perforaciones, tensiones, etc..
• Bajo ningún concepto las abra o corte, no las arroje al fuego, manténgalas lejos
del alcance de los niños.
• Si están oxidadas o pierden electrolitos, manéjelas con mucho cuidado.
• Cárguelas antes de guardarlas (p.ej., en invierno) - ¡No las guarde descargada
ni tampoco a plena carga! Controle regularmente el nivel de carga durante los
periodos de almacenamiento prolongados.
• El contenido de los elementos es dañino para la piel y los ojos.
En caso de sobrecalentamiento de la batería, o cuando se ina, humea o
empieza a quemarse, ya no debe tocarse de ningún modo. Por favor manténga
una distancia de seguridad y ponga a disposición agentes para extinción
adecuados (No hay peligro de explosión en el agua, arena seca, extintores,
mantas, agua salada).
10
Page 11

DE - Servicehändler
GB - Service centre
FR - Revendeur de service
IT - Centro assistenza
ES - Servicio asistencia
Reitter Modellbau Versand
Patricia Reitter
Degerfeldstrasse 11
72461 Albstadt
Tel 07432 9802700
Fax 07432 2009594
Mail info@modellbauversand.de
Web www.modellbauversand.de
Extra Trade
Rudolf Müller & Gerrit Müller GdbR
Lindenstraße 82
66787 Wadgassen
Tel 06834 9604952
Fax 06834 9604963
Mail info@extra-trade.de
Web www.extra-trade.de
Bay-Tec Modelltechnik
Martin Schaaf
Am Bahndamm 6
86650 Wemding
Tel 07151 5002192
Fax 07151 5002193
Mail info@bay-tec.de
Web www.bay-tec.de
DE DE
Modellbau Zentral
Peter Hofer
Bresteneggstrasse 2
CH -6460 Altdorf
Tel +41 794296225
Fax +41 418700213
Mail info@modellbau-zentral.ch
DE
Web www.modellbau-zentral.ch
CH
Sigi‘s Modellbau Shop
Siegfried Costa
Bundesstr. 30
AT -6923 Lauterach
Tel +43 557483657
Fax +43 557483657
Mail Sigi@playland-modellbau.at
Web www.playland-modellbau.at
Aigner Modellbau
Edmund Aigner
Graben 2
AT -3300 Amstetten
Tel +43 747224655
Fax +43 747223358
Mail ofce@modellbau-amstetten.at
Web www.modellbau-amstetten.at
AT AT
11
Page 12

Irrtum und technische Änderungen vorbehalten. Copyright JAMARA e.K. 2017
Kopie und Nachdruck, auch auszugsweise, nur mit Genehmigung von JAMARA e. K.
All rights reserved. Copyright JAMARA e.K. 2017
Copying or reproduction in whole or part, only with the expressed permission of JAMARA e.K.
Gutschein Coupon
Fordern Sie noch Heute den aktuellen Hauptkatalog mit
unserem gesamten Warensortiment an.
Name _______________________________
Vorname _______________________________
Straße _______________________________
Wohnort _______________________________
Telefon _______________________________
E-mail _______________________________
Bitte senden Sie den Katalog für mich an folgenden
Fachhändler:
Ihr Fachhändler
_______________________________________________
_______________________________________________
_______________________________________________
_______________________________________________
Der Katalog wird mit der nächsten Bestellung des Händlers auf Ihren Namen mitgeliefert.
Order the current catalogue with our complete
assortment of modelling goods today.
Name _______________________________
First name _______________________________
Street _______________________________
City _______________________________
Phone _______________________________
E-mail _______________________________
Please send the catalogue to the following specialist
dealer:
Your dealer
_______________________________________________
_______________________________________________
_______________________________________________
_______________________________________________
We will include a catalogue for your attention with the
next order placed by your dealer.
JAMARA e.K.
Inh. Manuel Natterer
Am Lauerbühl 5 - DE-88317 Aichstetten
Tel. +49 (0) 75 65/94 12-0 - Fax +49 (0) 75 65/94 12-23
info@jamara.com ● www.jamara.com
Service - Tel. +49 (0) 75 65/94 12-66
kundenservice@ jamara.com
 Loading...