

WARNING:
STRANGULATION HAZARD
Children have STRANGLED in cords. Keep this cord out of reach
of children (more than 3 ft (0.9m) away). Do not remove this tag.
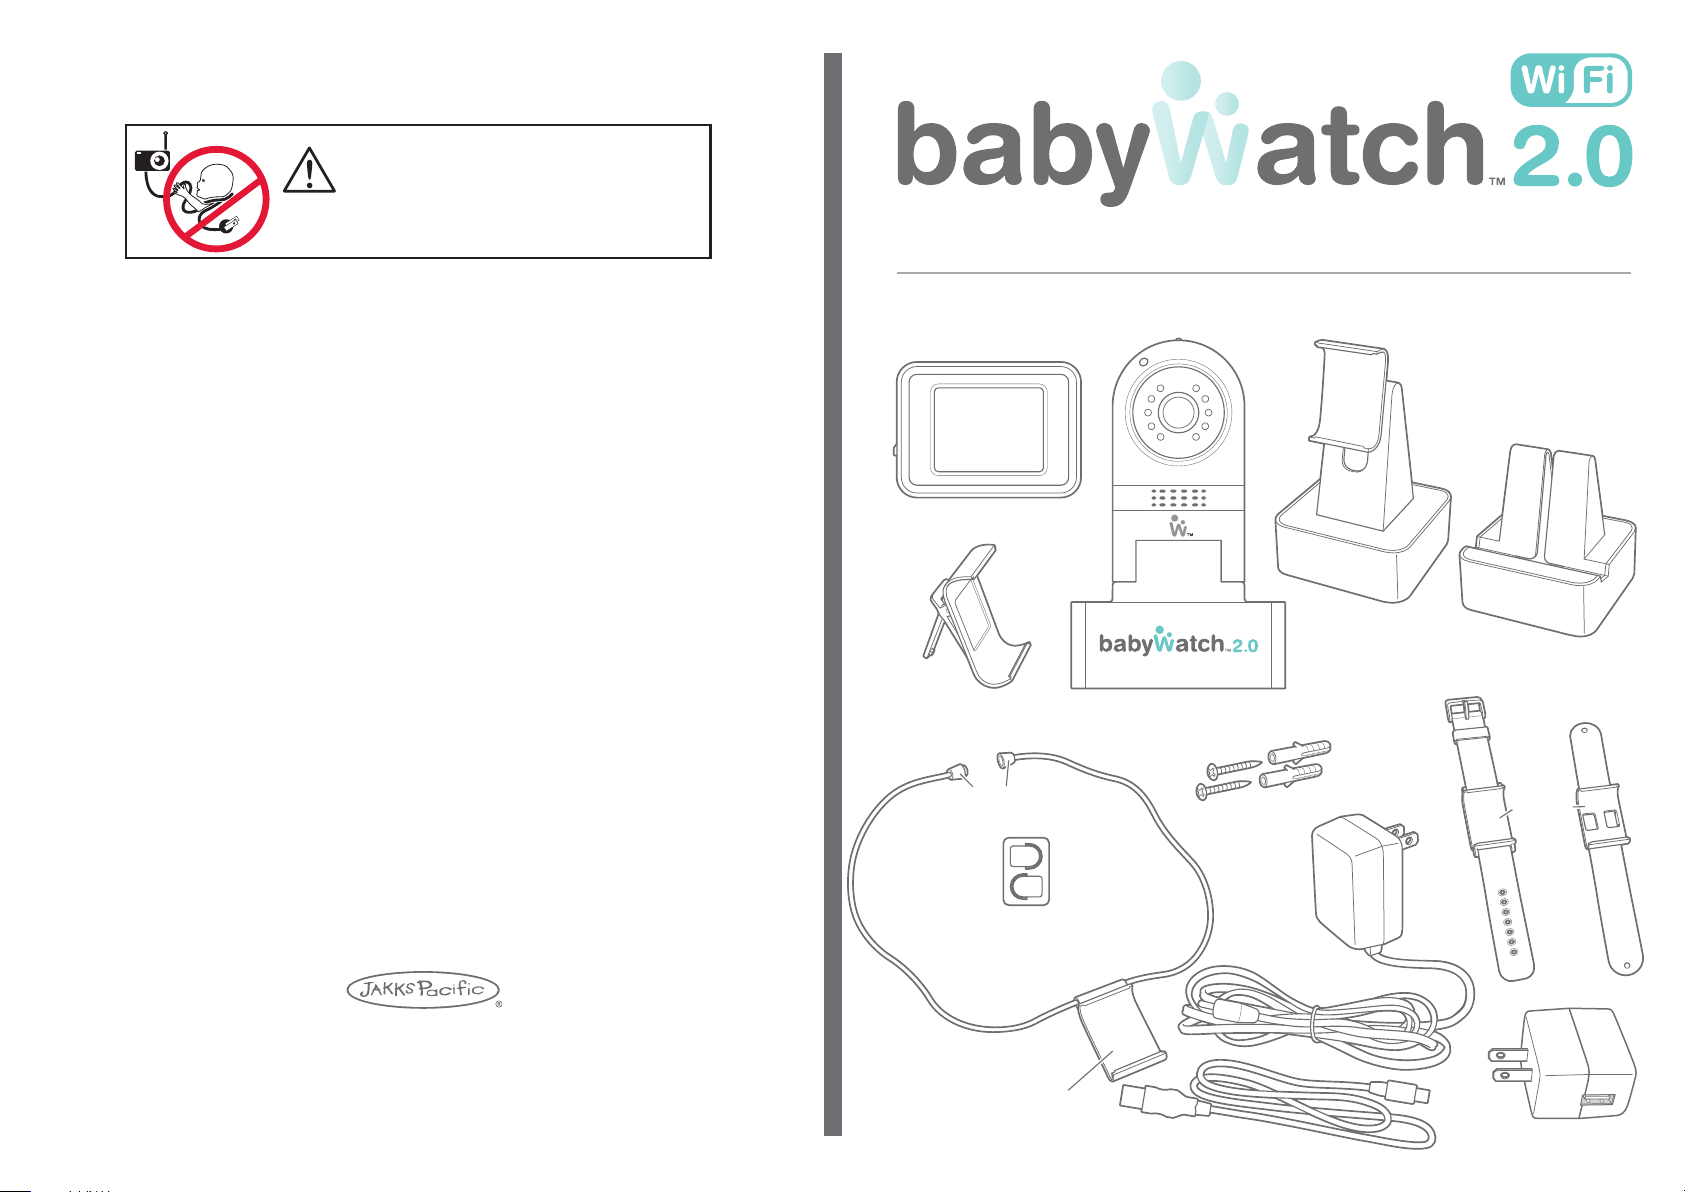
VIEWER
VIEWER
FRAME STAND
& BELT CLIP
CLASPS
INSTRUCTION GUIDE
BABYWATCH 2.0 CAMERA
CONTENTS
2X
MOUNTING
HARDWARE
VIEWER STAND
WRIST
WATCH BAND
2X
SMART DEVICE
STAND
SNAP
WRIST BAND
VIEWER
CLIP
16
TM & © 2013 MANUFACTURED BY JAKKS PACIFIC, INC., 22619 PCH, MALIBU,CA 90265 U.S.A.
MADE IN CHINA.
Contents may vary in style, color, shape and decoration from images shown on package
or in advertising. Questions or comments? www.jakks.com, consumers@jakks.com,
1-877-875-2557 in North America.
ELECTRICAL
CORD HOLDERS 6X
VIEWER NECKLACE
NECKLACE CLIP
AC/DC ADAPTOR
USB CABLE
USB ADAPTOR
SET UP
SET UP
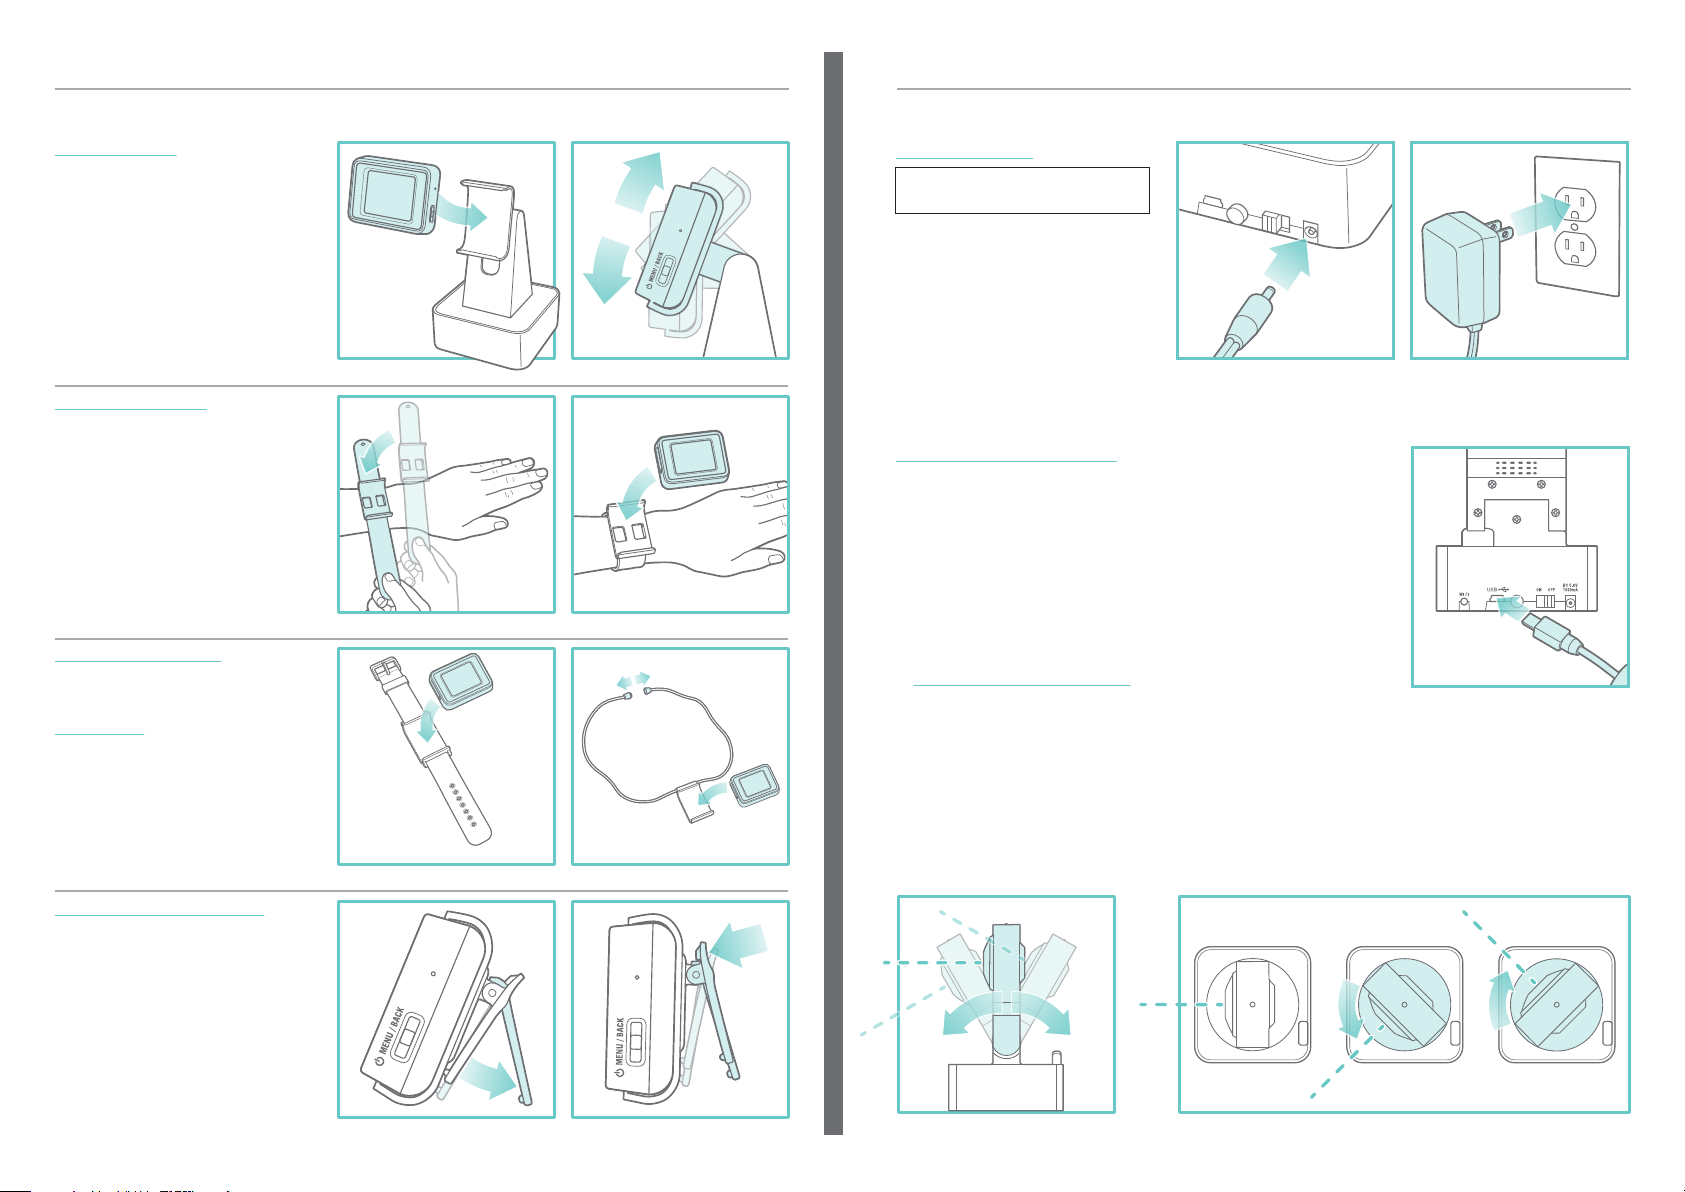
Select a method to hold the Viewer
VIEWER STAND
- Insert the VIEWER into the VIEWER
STAND. Viewing angle is adjustable.
VIEWER STAND
SNAP WRIST BAND
- Slap the SNAP WRIST BAND onto
your wrist. Insert the VIEWER into the
VIEWER CLIP.
SNAP WRIST BAND
WRIST WATCH BAND
- Insert the VIEWER into the VIEWER
CLIP.
NECKLACE
- Insert the VIEWER into the NECK
LACE CLIP.
- Open the CLASPS, place around
your neck and close the CLASPS.
WRIST WATCH BAND NECKLACE
FRAMESTAND / BELT CLIP
- Insert the VIEWER into the
FRAME/BELT CLIP.
- FRAME Open the FRAME STAND
and set unit on flat surface.
- BELT Open the BELT CLIP and
attach unit to BELT.
VIEWER
CLASPS
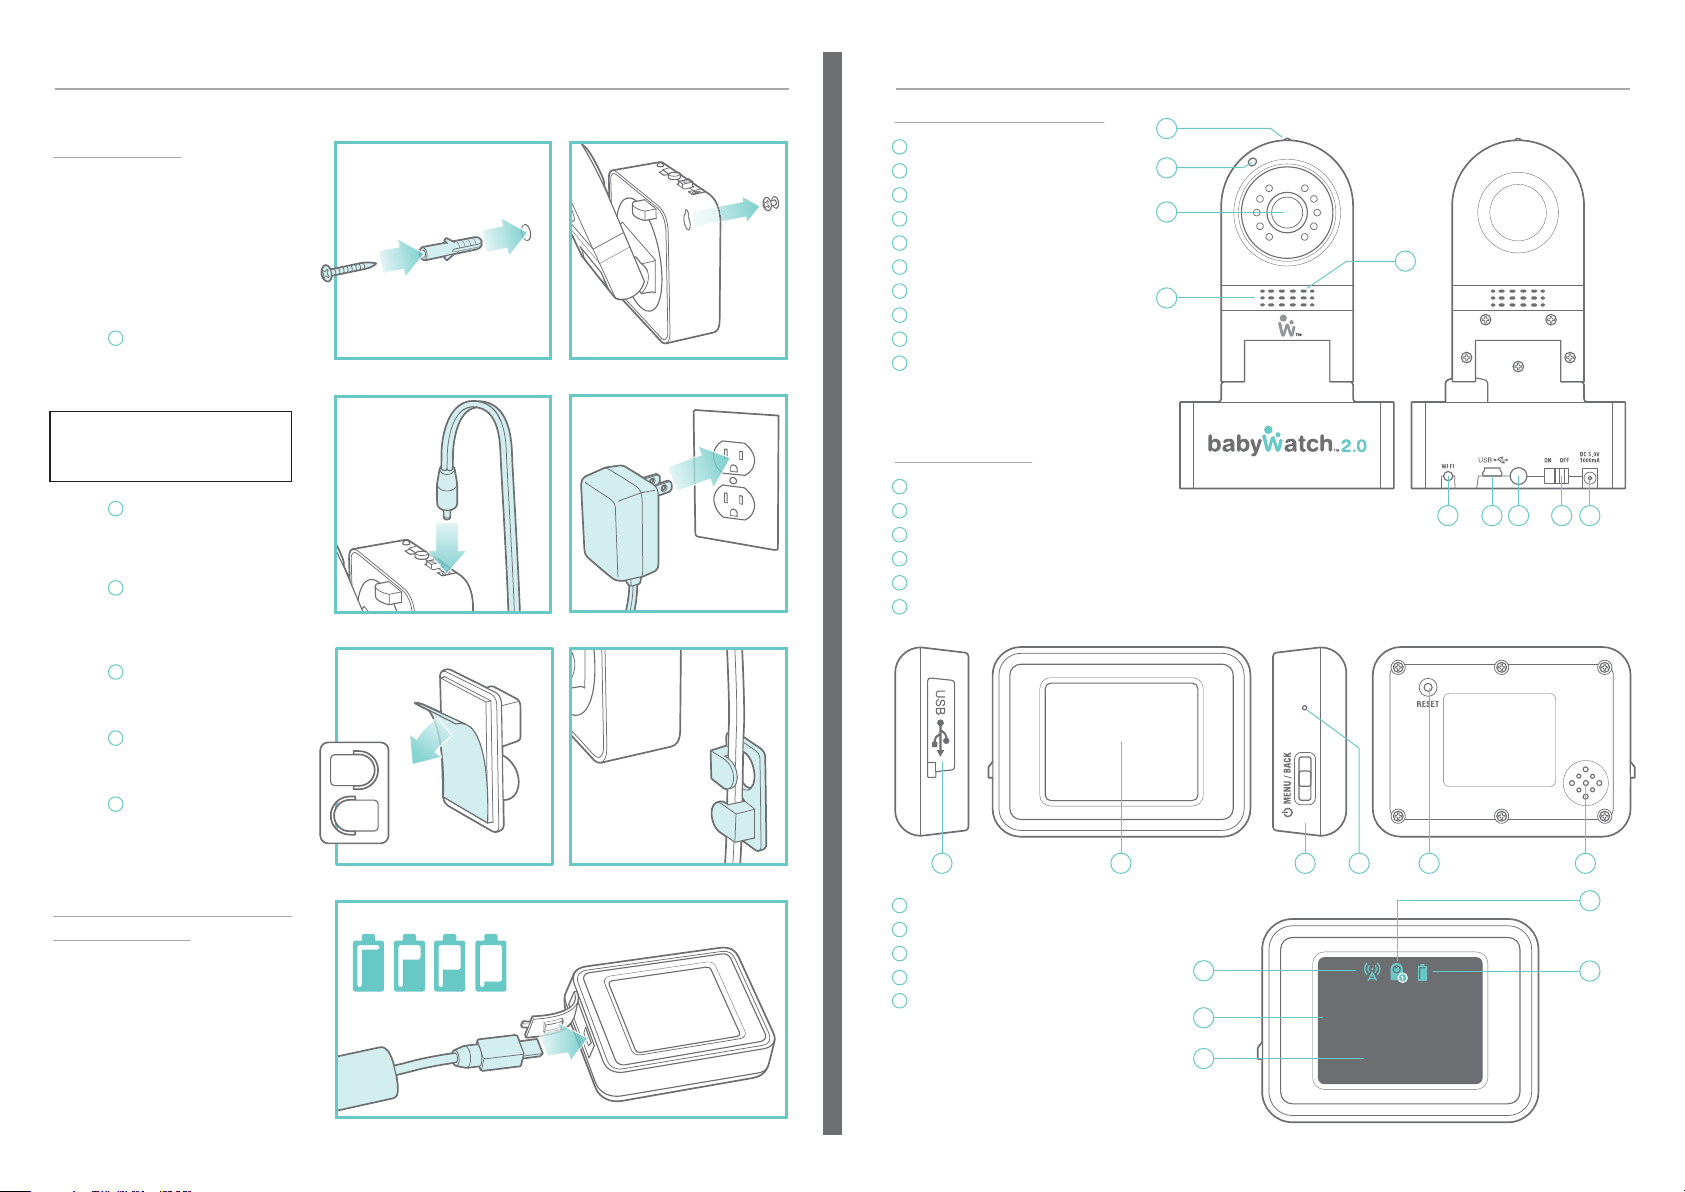
Set up the Babywatch 2.0 Camera
AC/DC ADAPTOR
WARNING Never place camera
or cords within 3 feet of the crib.
- Secure the cord to the wall using the 6
ELECTRICAL CORD HOLDER included
to keep cord away from the baby’s
reach.
- Plug the AC/DC ADAPTOR into the
back of the BABYWATCH CAMERA as
shown.
- Plug the other end into a 110V AC
outlet.
WI-FI AND WEBSITE SET UP
- Move the ON/OFF Switch on Babywatch camera to ON position.
- Plug the USB CABLE into the USB PORT on the back of the CAMERA.
- Plug the other end into your computer. Click on the FLASH DRIVE ICON.
- For Macintosh, Open the SET UP ICON in the MacOSX directory and
follow the directions.
- For Windows, Open the SET UP ICON in the MS Windows directory and
follow the directions.
- For more detail, please go to the website
“www.babywatchmonitor.com”.
(Unplug the USB cable after set up is completed.)
AC/DC ADAPTOR 110 V AC OUTLET
PAIRING
USB CABLE
REAR VIEW OF CAMERA
Flat Surface Mounting
- Set the Babywatch 2.0 Camera on a flat surface with an unobstructed view of your child.
- Once the camera is connected with either your computer or the VIEWER, you can TILT or ROTATE camera
through camera controls on the Viewer or website to get the best view. You may also use your compatible
iDevice, Smart Phone or Smart Tablet but requires download of the BABYWATCH APP.
- For the best performance, do not place the Viewer within 18 inch of the Babywatch Camera.
FRAME STAND BELT CLIP
2 3
TILT DOWN OR UP ROTATE LEFT OR RIGHT
SET UP
CONTROLS
Set up the Babywatch 2.0 Camera
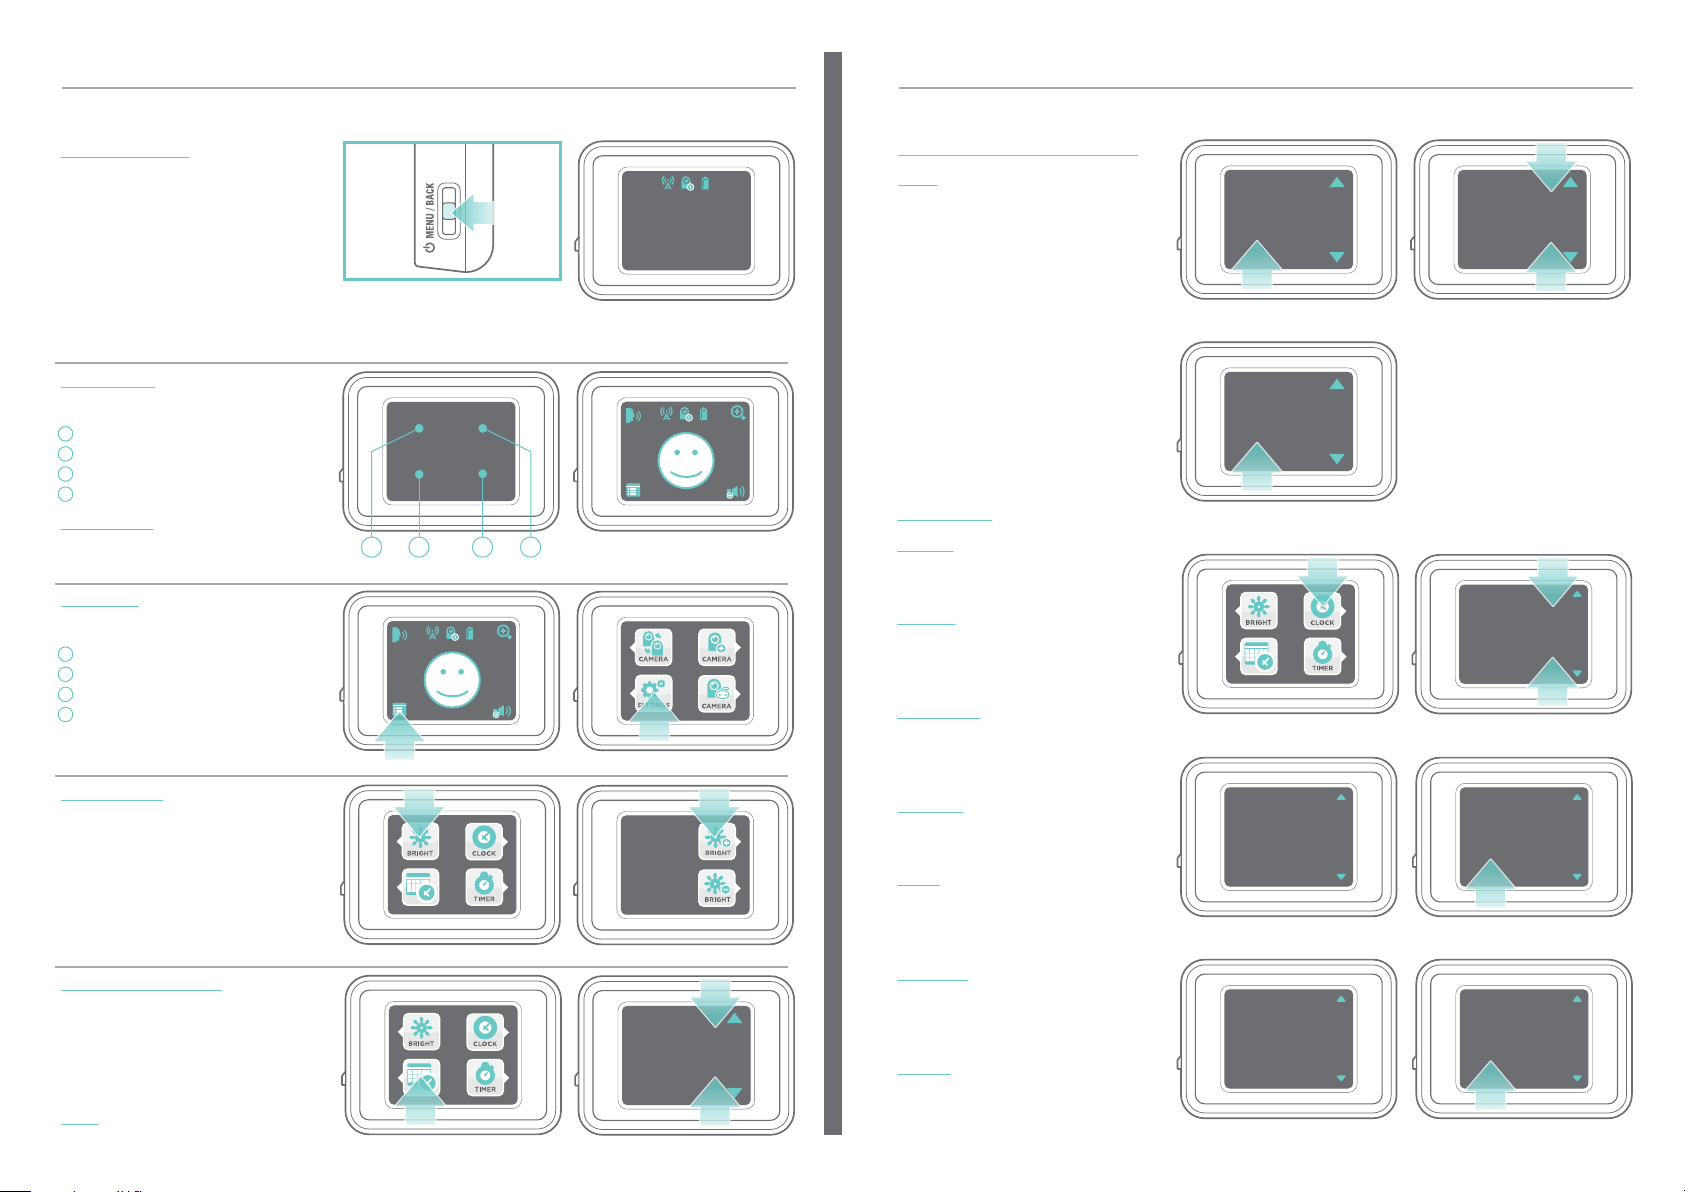
Wall Mounting
The Babywatch 2.0 Camera can be
mounted on a wall overlooking your
baby. Once the camera is connected
with your WI-FI system, you can TILT
or ROTATE camera through camera
controls on the Viewer, iDevice,
Smart phone or Website to get the
best view.
1
- STEP
DRILL a 1/4” HOLE in the wall.
Insert wall anchor into the hole.
1/4” HOLE
STEP 2STEP 1
Babywatch 2.0 Camera
1
LIGHT SENSOR
2
POWER ON LIGHT
3
CAMERA LENS
4
MICROPHONE
5
WI-FI INDICATOR
6
USB PORT
7
PAIRING BUTTON
8
ON/OFF SWITCH
9
AD/DC ADAPTOR PLUG
10
SPEAKER
1
2
3
10
4
Insert screw into the wall anchor.
ADULT ASSEMBLY ONLY
Always keep unattached screws away
from young children to avoid risk of
small component and sharp end.
2
- STEP
Place the BABYWATCH CAMERA
on the SCREW and LOWER slightly
to secure.
3
- STEP
Plug the AC/DC ADAPTOR into the
back of the BABYWATCH CAMERA
STEP 4STEP 3
Camera Viewer
1
USB PORT
2
VIEWING SCREEN
3
MENU / BACK
4
MICROPHONE
5
RESET BUTTON
6
SPEAKER
PAIRING
5 6 7 8 9
as shown.
4
- STEP
Plug the other end into a 110V AC
outlet.
5
- STEP
Remove the BACKING from the
ELECTRICAL CORD HOLDER.
6
- STEP
Use the ELECTRICAL CORD
HOLDERS to attach the AC/DC
ADAPTOR CORD to the wall.
STEP 5 STEP 6
Charge the Babywatch 2.0
Camera Viewer
- Plug the USB CORD into the side of
the CAMERA VIEWER as shown.
- Plug the other end into your computer
or a USB adaptor.
- BATTERY ICON in VIEWER SCREEN
will show when fully charged.
BATTERY ICONS
LOWFULL
1 2
7
2.4GHZ SIGNAL STRENGTH
8
TIME
9
DATE
10
CAMERA NUMBER
11
BATTERY LEVEL
3 4 5 6
10
7
8
9
00:00
01.01.2012
A
M
11
- Remove USB CORD. Battery charge
will last approximately 12 hours.
(Sleep mode)
*USB port on viewer is used for
charging purpose only.
4 5
VIEWER CHARGING

DOWNLOADING APP
PAIRING
Apple:
Go to the Appstore on your device
Search for BABYWATCH
Press the FREE button to the left of the app icon to begin download.
ANDROID:
Go to the Google Play market on your device
Search for BABYWATCH
Press the INSTALL button to the right of the app icon to begin download.
ANDROID APP ON
An additional cost may be incurred by download / going online check
your data charges with your network provider.
SMART DEVICES
Monitor your Baby with a Smart Device
Download the BABYWATCH APP from
the iTunes App Store or Google Play
market. Use the SMART DEVICE
STAND to hold your SMART DEVICE.
1
STEP
Be sure Babywatch 2.0 Camera is
plugged into AC adaptor and powered.
Insert the CHARGING CORD through
the bottom of the SMART DEVICE
STAND. (CHARGING CORD is not
included)
2
STEP
Plug the CHARGING CORD into your
SMART DEVICE and insert the DEVICE
into the STAND. Wind the cable under
the stand. Plug the other end of the
CHARGING CORD into a 110V AC
OUTLET.
STEP 1 STEP 2
Wind the cable
under the base.
Connect the Babywatch between Camera 2.0 and the Camera Viewer
OUT OF THE BOX:
Both units are factory PAIRED, but if
you have pressed the RESET BUTTON
on the VIEWER, or if they are not
paired:
1
STEP
Move the ON/OFF Switch on the
Babywatch Camera to the ON position.
Press and hold in the POWER
BUTTON on the VIEWER for 3
seconds.
2
STEP
Press menu button, then access the
VIEWER MENU (Touch Quadrant 3).
3
STEP
Select ADD CAMERA (Touch Quadrant
2). The VIEWER will display
“SCANNING”.
4
STEP
Press the PAIRING BUTTON on the
back of the Babywatch Camera for 3
seconds. The VIEWER will display
“Added”, if pairing is successful.
STEP 1 STEP 2
STEP 3 STEP 4
PAIRING
6 7
OPERATION
OPERATION
Live View, Main Menu, Settings, Brightness and Date/Time Format
LIVE VIEW MODE
- Move the ON/OFF Switch on the
Babywatch Camera to the ON position.
- Press the POWER BUTTON on the
VIEWER, the VIEWER will display in
CLOCK mode.
- Press BUTTON again, VIEWER will enter
LIVE VIEW, which displays what the
BABYWATCH CAMERA 2.0 is seeing.
STEP 1
(Press BUTTON can switch between LIVE
08:12
08.05.2012
CLOCK MODE SCREEN
A
M
Date/Time Format and Clock Settings
DATE / TIME FORMAT (continued)
DATE Touch quadrant 3 to access
the MONTH/DAY settings. Touch
quadrant 2 or 4 to toggle between
MM/DD or DD/MM. Touch quadrant
3 to SAVE settings.
Time
12h
Enter
DATE FORMAT
Date
MM/DD
Time
12h
Enter
SELECT DATE FORMAT
Date
MM/DD
VIEW screen & CLOCK mode.)
REFERENCE
Areas of the VIEWER SCREEN will be
referenced as QUADRANTS:
1
QUADRANT 1
2
QUADRANT 2
3
QUADRANT 3
4
QUADRANT 4
MAIN MENU
In LIVE MODE, Touch quadrant 3 to
access the MAIN MENU.
SETTINGS
Touch quadrant 3 again to access the
SETTINGS MENU.
1
QUADRANT 1: BRIGHTNESS
2
QUADRANT 2: CLOCK
3
QUADRANT 3: DATE/TIME
4
QUADRANT 4: TIMER
SCREEN QUADRANTS
LIVE VIEW SCREEN
21 3 4
SET CLOCK:
CLOCK
Touch quadrant 2 to set the current
DATE and TIME.
- HOUR The HOUR digits will start
blinking. Touch quadrant 2 to add an
hour, or 4 to subract an hour. Touch
quadrant 3 to SAVE.
- MINUTES
The MINUTES digits will
start blinking. Touch quadrant 2 to add
ACCESS MAIN MENU SELECT SETTINGS
BRIGHTNESS
Touch quadrant 1 to access the
BRIGHTNESS SETTINGS. The VIEWER
will go into LIVE MODE with 2
BRIGHTNESS ICONS overlaid. Touch
quadrant 2 to INCREASE brightness or
quadrant 4 to DECREASE brightness.
(Press Button back to the Previous
Menu.)
SETTING OPTIONS ADJUST BRIGHTNESS
DATE / TIME FORMAT
Touch quadrant 3 to select the
DATE/TIME FORMAT MENU. The DATE
settings can be displayed in
MONTH/DAY or DAY/MONTH digits.
The TIME can be displayed in 12 or 24
HOUR digits.
Time
12h
Enter
Date
MM/DD
TIME Touch quadrant 2 or 4 to toggle
between 12 or 24 HOUR digits.
8 9
DATE / TIME SELECT TIME FORMAT
a minute, or 4 to subract a minute.
Touch quadrant 3 to SAVE.
- AM/PM
The AM or PM will start
blinking, Touch quadrant 2 or 4 to
toggle. Touch quadrant 3 to SAVE.
- DAY The DAY digits will start
blinking. Touch quadrant 2 to add a
day, or 4 to subract a day. Touch
quadrant 3 to SAVE.
- MONTH The MONTH digits will
start blinking. Touch quadrant 2 to
add an month, or 4 to subract an
month. Touch Quadrant 3 to SAVE.
- YEAR The YEAR digits will start
blinking. Touch quadrant 2 to add a
year, or 4 to subract a year. Touch
quadrant 3 to SAVE.
Time
12h
Enter
SAVE SETTINGS
CLOCK SET THE HOUR
08:02
Enter
08:02
Enter
Date
MM/DD
01.05.2000
01.05.2000
08:00
01.01.2000
Enter
A
M
A
M
SET THE MONTHSET THE DAY
SAVE SETTINGSSET THE YEAR
08:02
01.05.2000
Enter
08:02
01.05.2000
Enter
A
M
A
M
A
M

OPERATION
OPERATION
Sleep Timer Mode, Wake up Mode Volume Settings
SLEEP TIMER MODE
- Touch quadrant 4 to access the
SLEEP Timer. Setting touch quadrant
2 to add or 4 to subract. The power
save can be set to 5, 10, 15 or 30
seconds.
- Touch quadrant 3 to SAVE setting.
The viewer will display sleep warning
before sleep.
SLEEP TIMER SETTINGS
GO TO SLEEP
SELECT POWER SAVE
SECOND
Power Save
Enter
10s
1 SEC
GO TO SLEEP AFTER 1 SECOND
WAKE UP MODE
- Touch any quadrant or press the
POWER BUTTON to wake up the
viewer. WAKE UP SCREEN will
display the Babywatch logo then go
to CLOCK MODE screen.
- Press the POWER BUTTON to go
LIVE VIEW MODE screen.
SOUND DETECTION WAKE UP
MODE
In the Camera, if higher sound level is
detected, the Viewer will wake up
automatically and go to LIVE VIEW
MODE screen.
LIVE VIEW MODE SCREEN
VOLUME SETTINGS
- In LIVE VIEW mode, touch quadrant
4 to access the volume settings.
- Touch quadrant 4 to add the volume
level. Touch quadrant 4 one time to
increase 1 Level, total 15 Levels.
After 15 Levels, volume will go back
to Level 0.
10 11
VOLUME SETTING
08:12
08.05.2012
CLOCK MODE SCREENWAKE UP SCREEN
A
M
Zoom, Push to Talk Settings
ZOOM
- In LIVE VIEW mode, touch quadrant 2
to Zoom in the VIEW.
- Touch quadrant 2 again to go back
the NORMAL VIEW.
NORMAL VIEW ZOOMED IN
PUSH TO TALK
- In LIVE MODE, TOUCH & HOLD
quadrant 1, the sound will go from
Viewer to Camera.
- RELEASE THE HOLD of quadrant 1,
the sound will go back from camera
to viewer.
LIVE VIEW SCREEN
Camera Control Mode and Add Additional Camera(s)
CAMERA CONTROL MODE
- In LIVE VIEW mode, Touch quadrant
3 to access the main menu.
- Touch quadrant 4 to access the
camera control mode.
- TOUCH & HOLD quadrant 2 or 4 to
control the camera to rotate left or
right.
- TOUCH & HOLD quadrant 1 or 3 to
control the camera to tilt up or
down.
- Press the button to go back the
Main Menu.
ACCESS MAIN MENU
CAMERA CONTROL
SELECT CAMERA CONTROL
MODE

OPERATION
OPERATION
ADD A NEW CAMERA
- In LIVE VIEW MODE, touch quadrant
3 to access the main menu.
- Touch quadrant 2 to access the ADD
NEW CAMERA MODE. The viewer
will scan the new camera.
- Press the Pairing Buttom on the back
of Babywatch Camera for 3 seconds.
The Viewer will display “ADDED” if
pairing is successful.
The maximum add 4 Cameras for 1
VIEWER.
(Additional Camera Need to Buy
Separately.)
Camera Selection
SELECT A CAMERA
- In LIVE VIEW mode, touch quadrant 3
to access the Main Menu.
- Touch quadrant 1 to access the
camera selection mode.
- Touch quadrant 1-4 to select different
camera to view.
ACCESS MAIN MENU SELECT ADD CAMERA MODE
Added
25s
Scanning
SCANNING A NEW CAMERA CAMERA ADDED
ACCESS MAIN MENU
SELECT CAMERA SELECTION
MODE
CAMERA OFF MODE SETTING
CAMERA OFF
- PRESS & HOLD the MENU/BACK
button for 3 seconds. The camera off
screen will display.
- Touch quadrant 3 to camera off.
MENU OFF BUTTON
BATTERY LEVEL
The Battery Level display at the top
right side. When Battery Low, the Low
Battery icon will display with BEEP
sound alarm.
BATTERY LEVEL BATTERY LOW
08:12
08.05.2012
CAMERA OFF
Ye s No
CAMERA OFF MODE
A
M
SIGNAL LEVEL
The Signal Level display at the top left
side.
CAMERA LIST
12 13
When signal is lost, the Lost Signal
icon will display with Beep sound
alarm.
08:12
08.05.2012
SIGNAL LEVEL LOST SIGNAL
A
M

This device complies with part 15 of the FCC Rules and Industry Canada license-exempt RSS standard(s).
Operation is subject to the following two conditions: (1) This device may not cause harmful interference, and
(2) this device must accept any interference received, including interference that may cause undesired
operation.
This Class B digital apparatus complies with Canadian ICES-003.
Warning: Changes or modifications to this equipment not expressly approved by the party responsible for
compliance could void the user’s authority to operate the equipment.
NOTE: This equipment has been tested and found to comply with the limits for a Class B digital device,
pursuant to Part 15 of the FCC Rules. These limits are designed to provide reasonable protection against
harmful interference in a residential installation. This equipment generates, uses and can radiate radio
frequency energy and, if not installed and used in accordance with the instructions, may cause harmful
interference to radio communications.
However, there is no guarantee that interference will not occur in a particular installation. If this equipment
does cause harmful interference to radio or television reception, which can be determined by turning the
equipment off and on, the user is encouraged to try to correct the interference by one or more of the
following measures:
• Reorient or relocate the receiving antenna.
• Increase the separation between the equipment and receiver.
• Connect the equipment into an outlet on a circuit different from that to which the receiver is connected.
• Consult the dealer or an experienced radio/TV technician for help.
TROUBLESHOOTING
Reset Button
If the BABYWATCH 2.0 CAMERA or
VIEWER begin to function erratically,
press the RESET BUTTON on the
back of the VIEWER.
Once the RESET BUTTON has been
activated, the units will no longer be
paired. For instructions on how to
establish PAIRING, go to page 7.
WARRANTY
JAKKS Pacific® Battery or Electrically-Operated Toy 90 DAY LIMITED WARRANTY
Thanks for purchasing a great JAKKS Pacific® product!
Please immediately register your product online at www.jakks.com/warranty.
Registration is not required for the effectiveness of this limited warranty.
IMPORTANT NOTICE TO CONSUMER:
This 90 DAY LIMITED WARRANTY applies to the original product purchaser, provided the product: 1) was purchased
from an authorized JAKKS™ distributor/dealer/retailer, and 2) is returned at your expense, postage pre-paid and
insured, along with the original dated sales receipt to the address noted below. Please save a copy of your original sales
receipt, as the original receipt will not be returned to you. If you return the product to us without the original dated sales
receipt, this warranty coverage will not apply. If the product is determined by JAKKS to be defective and returned to
JAKKS within the 90 day warranty period, we will (at our option) repair or replace it. Return shipment to you may take up
to 6 weeks, depending upon your location. If your product is repaired or replaced, it will be warranted for the longer of
the original warranty or for 30 days after warranty service.
SCOPE OF LIMITED WARRANTY: The product is warranted to be: a) tested and inspected before shipment, and b)
free of defects in material and workmanship for 90 days from date of purchase. If a covered defect occurs within the
warranty period, then at our sole option, we will repair or replace the product or provide you with another product of
equal value.
WHAT IS NOT COVERED BY LIMITED WARRANTY: THIS WARRANTY IS VOID IF THE PRODUCT HAS BEEN
MODIFIED OR REPAIRED BY USER OR OTHERS OR IF IT HAS BEEN DAMAGED AS A RESULT OF ACCIDENT,
IMMERSION IN WATER, NEGLECT, ABUSE, MISUSE, BATTERY LEAKAGE, IMPROPER BATTERY INSTALLATION,
UNAUTHORIZED SERVICE, LOSS OF PARTS, WEATHER, ACTS OF GOD, ANY ACTION OR OMISSION WHICH
CONSTITUTES A DEVIATION FROM THE OPERATING INSTRUCTIONS, OR ANY OTHER CAUSES NOT ARISING OUT
OF DEFECTS IN WORKMANSHIP OR MATERIALS. EXCLUSIONS FROM LIMITED WARRANTY: THIS WARRANTY IS
EXCLUSIVE OF AND IN LIEU OF ALL OTHER EXPRESS OR IMPLIED WARRANTIES RELATED TO THIS PRODUCT,
INCLUDING ANY IMPLIED WARRANTIES OF MERCHANTABILITY OR FITNESS FOR A PARTICULAR PURPOSE.
SPECIAL, INCIDENTAL AND CONSEQUENTIAL DAMAGES ARISNG FROM POSSESSION, USE, OR MALFUNCTION
OF THIS PRODUCT ARE EXCLUDED BOTH FOR PROPERTY DAMAGE AND PERSONAL INJURY TO THE EXTENT
LEGALLY PERMITTED.
ADDITIONAL LEGAL RIGHTS: This warranty provides specific legal rights. You may have other or different rights in
your state or country.
QUESTIONS OR COMMENTS: If you experience product difficulties or have questions or comments, you may contact
our Consumer Relations department as follows:
Phone: 877-875-2557 (toll-free, North America only) or 909-594-7771 x560 (Monday- Friday, 7:30AM-4:30PM
Pacific/GMT -8).
Mail: JAKKS Consumer Relations, 21749 Baker Parkway, Walnut, California USA 91789. Email: consumers@jakks.com
WHEN WRITING TO US: Please include: 1) product name; 2) item number; 3) purchase date; 4) description of the
problem being experienced; and 5) your name, address and phone number. Additionally, if eligible under the warranty
and so advised by JAKKS Consumer Relations, also include the defective product and the ORIGINAL dated sales
receipt evidencing product purchase. Please retain a copy of your receipt.
ADDITIONAL STATEMENT
Supplied USB cables with ferrite and adaptor with ferrite must be used with this device to ensure compliance with the Class B FCC limits.
To ensure safety of users, the FCC has established criteria for the amount of radio frequency energy that
can be safely absorbed by a user or bystander according to the intended usage of the product. This
product has been tested and found to comply with the FCC criteria. The baby unit shall be installed and
used such that parts of the user’s body are maintained at a distance of approximately 20 cm (8 inches) or
more.
14 15
 Loading...