

Page 1

10490
Rev. A
TS-2030EN/TS-2076EN Series Progressive Scan Cameras
See the possibilities
Page 2

Page ii
Page 3

Page iii
A
S
S
O
C
I
A
T
I
O
N
Notice
The material contained in this manual consists of information that is proprietary to JAI Inc., and may only be used by the purchasers of the product. JAI Inc. makes no warranty for the use of its product and assumes no responsibility for any errors
which may appear or for damages resulting from the use of the information contained herein. JAI Inc. reserves the right to
make changes without notice.
Microsoft, Windows XP, Windows 2000, Windows 98, Windows NT, and Windows Explorer are either registered trademarks
or trademarks of Microsoft Corporation in the United States and/or other countries.
Warranty
For information about the warranty, please contact your factory representative.
Certifications
CE Compliance
The TS-2030EN/TS-2076EN series of cameras have been certified to conform to the requirements of Council Directive 89/
336/EC for electromagnetic compatibility and to comply with the following European Standards:
Emissions: EN 55022A: 1998 + A1: 2000 + A2: 2003
Immunity: EN55024: 1998 + A1: 2001 + A2: 2003
All JAI Inc. products bearing the CE mark have been declared to be in conformance with the applicable EEC Council Directives. However, certain factory-installed options or customer-requested modifications may compromise electromagnetic compatibility and affect CE compliance. Please note that the use of interconnect cables that are not properly grounded and shielded
may affect CE compliance.
Contact JAI Inc. Applications Engineering Department for further information regarding CE compliance.
FCC
This equipment has been tested and found to comply with the limits for a Class A digital device, pursuant to Part 15 of the
FCC Rules. These limits are designed to provide reasonable protection against harmful interference when the equipment is
operated in a commercial environment. This equipment generates, uses and can radiate radio frequency energy and, if not
installed and used in accordance with the instruction manual, may cause harmful interference to radio communications. Operation of this equipment in a residential area may cause harmful interference, in which case the user will be required to correct
the interference at his own expense.
WARNING
Changes or modifications to this unit not expressly approved by the party responsible for
FCC compliance could void the user’s authority to operate the equipment.
TS-2030EN/TS-2076EN Series Operation Manual
JAI Inc.
625 River Oaks Parkway
San Jose, CA 95134
Tel:(408) 383-0300
Tel:(800) 445-5444
Fax:(408) 383-0301
E-mail: imaging@jai.com
www.jai.com
D
E
T
A
I
M
M
A
O
G
T
I
N
U
A
MEMBE
G
R
FILE #
A3942
R
E
G
U
I
S
T
JAI, INC.
ISO-9001
M
L
R
®
I
F
D
E
E
R
Page 4

Page iv
Page 5

Page v
Table of Contents
Table of Content . . . . . . . . . . . . . . . . . . . . . . . . . . . . . . . . . . . . . . . . . v
List of Figures. . . . . . . . . . . . . . . . . . . . . . . . . . . . . . . . . . . . . . . . . . . . ix
List of Tables . . . . . . . . . . . . . . . . . . . . . . . . . . . . . . . . . . . . . . . . . . . . xi
1 Introduction . . . . . . . . . . . . . . . . . . . . . . . . . . . . . . . . . . . . . . . . 1
2 Getting Started . . . . . . . . . . . . . . . . . . . . . . . . . . . . . . . . . . . . . 3
2.1 Required Equipment . . . . . . . . . . . . . . . . . . . . . . . . . . . . . . . . . . . . . .3
2.2 Network Settings . . . . . . . . . . . . . . . . . . . . . . . . . . . . . . . . . . . . . . . .3
2.2.1 Default Network Settings for the TS-2030EN/TS-2076EN Camera . . . . . . .3
2.2.2 Changing the IP Address of the TS-2030EN/TS-2076EN Camera . . . . . . . .4
2.3 Installing the Required Software . . . . . . . . . . . . . . . . . . . . . . . . . . . . 4
3 Tutorial . . . . . . . . . . . . . . . . . . . . . . . . . . . . . . . . . . . . . . . . . . . 6
3.1 Image Capturing . . . . . . . . . . . . . . . . . . . . . . . . . . . . . . . . . . . . . . . . . 6
3.1.1 Start Up the EN Setup Software . . . . . . . . . . . . . . . . . . . . . . . . . . . . . . . . . . .6
3.1.2 Camera Properties . . . . . . . . . . . . . . . . . . . . . . . . . . . . . . . . . . . . . . . . . . . . . .7
3.1.3 Live Image Capturing/Focusing . . . . . . . . . . . . . . . . . . . . . . . . . . . . . . . . . . .8
3.1.4 Image Properties . . . . . . . . . . . . . . . . . . . . . . . . . . . . . . . . . . . . . . . . . . . . . .14
3.2 Image Transfer . . . . . . . . . . . . . . . . . . . . . . . . . . . . . . . . . . . . . . . . .15
3.2.1 FTP Image Transfer . . . . . . . . . . . . . . . . . . . . . . . . . . . . . . . . . . . . . . . . . . .15
3.3 ADR (Automatic Dynamic Range) Control . . . . . . . . . . . . . . . . . . . 16
3.3.1 Light Sensor Connection . . . . . . . . . . . . . . . . . . . . . . . . . . . . . . . . . . . . . . .16
3.3.2 Flash Nighttime Light Control . . . . . . . . . . . . . . . . . . . . . . . . . . . . . . . . . . .18
3.4 Time Synchronization . . . . . . . . . . . . . . . . . . . . . . . . . . . . . . . . . . . . 19
3.5 Static IP Address Assignment . . . . . . . . . . . . . . . . . . . . . . . . . . . . .20
3.5.1 DHCP Client . . . . . . . . . . . . . . . . . . . . . . . . . . . . . . . . . . . . . . . . . . . . . . . . .21
3.6 Maintenance . . . . . . . . . . . . . . . . . . . . . . . . . . . . . . . . . . . . . . . . . . .22
3.6.1 Debug Counters . . . . . . . . . . . . . . . . . . . . . . . . . . . . . . . . . . . . . . . . . . . . . .22
3.6.2 Firmware Upgrade . . . . . . . . . . . . . . . . . . . . . . . . . . . . . . . . . . . . . . . . . . . .23
3.6.3 RS-232 PowerPC Debug Port . . . . . . . . . . . . . . . . . . . . . . . . . . . . . . . . . . . .24
4 Uploading the Firmware . . . . . . . . . . . . . . . . . . . . . . . . . . . . 29
4.1 To Verify Version Numbers for all Firmware . . . . . . . . . . . . . . . . . . 29
4.1.1 RS-232 PPC Debug Serial Port/Telnet . . . . . . . . . . . . . . . . . . . . . . . . . . . . .29
4.1.2 EN Setup Software . . . . . . . . . . . . . . . . . . . . . . . . . . . . . . . . . . . . . . . . . . . .29
4.2 Updating the EN Application Software . . . . . . . . . . . . . . . . . . . . . .30
4.3 Updating the FPGA Bitfile . . . . . . . . . . . . . . . . . . . . . . . . . . . . . . . .30
4.4 Updating the Lib/Drv File . . . . . . . . . . . . . . . . . . . . . . . . . . . . . . . .30
4.5 Updating the OS Image . . . . . . . . . . . . . . . . . . . . . . . . . . . . . . . . . .30
4.6 Updating the Camera’s H8 Firmware . . . . . . . . . . . . . . . . . . . . . . . .30
4.7 Updating the Firmware Manually When the Network is Down . . . .31
Table of Contents
Page 6

Page vi
5 Connectors and Cables . . . . . . . . . . . . . . . . . . . . . . . . . . . . . . 32
5.1 Connector Pin Configurations . . . . . . . . . . . . . . . . . . . . . . . . . . . . . 32
5.1.1 12-Pin Connector . . . . . . . . . . . . . . . . . . . . . . . . . . . . . . . . . . . . . . . . . . . . .32
5.1.2 High-Density 26-Pin D-Sub Connector . . . . . . . . . . . . . . . . . . . . . . . . . . . .32
5.1.3 10/100 BaseT Ethernet . . . . . . . . . . . . . . . . . . . . . . . . . . . . . . . . . . . . . . . . . 33
5.2 RS-232 Communication Cable . . . . . . . . . . . . . . . . . . . . . . . . . . . . . 33
5.3 Power Supplies and Power Cable Setup . . . . . . . . . . . . . . . . . . . . .34
5.3.1 Power Supplies . . . . . . . . . . . . . . . . . . . . . . . . . . . . . . . . . . . . . . . . . . . . . . .34
5.3.2 JAI Inc. Power Cables . . . . . . . . . . . . . . . . . . . . . . . . . . . . . . . . . . . . . . . . .34
5.3.3 Building Your Own Power Cable . . . . . . . . . . . . . . . . . . . . . . . . . . . . . . . . . 35
5.3.4 Attaching the Power Cable to the Connector . . . . . . . . . . . . . . . . . . . . . . . .35
5.4 Attaching the Camera Lens . . . . . . . . . . . . . . . . . . . . . . . . . . . . . . . 35
6 Camera Features . . . . . . . . . . . . . . . . . . . . . . . . . . . . . . . . . . . 36
6.1 Progressive Scanning . . . . . . . . . . . . . . . . . . . . . . . . . . . . . . . . . . . . 36
6.2 Asynchronous Reset . . . . . . . . . . . . . . . . . . . . . . . . . . . . . . . . . . . . . 36
6.3 ADR (Automatic Dynamic Range) Control . . . . . . . . . . . . . . . . . . . 38
6.3.1 Electronic Shutter . . . . . . . . . . . . . . . . . . . . . . . . . . . . . . . . . . . . . . . . . . . . .38
6.3.2 Video Amplifier Gain Control . . . . . . . . . . . . . . . . . . . . . . . . . . . . . . . . . . . 39
6.4 Flash/Nighttime Light Control . . . . . . . . . . . . . . . . . . . . . . . . . . . . . 40
6.5 External Control . . . . . . . . . . . . . . . . . . . . . . . . . . . . . . . . . . . . . . . . 40
6.5.1 RS-485 . . . . . . . . . . . . . . . . . . . . . . . . . . . . . . . . . . . . . . . . . . . . . . . . . . . . .40
6.5.2 Ethernet . . . . . . . . . . . . . . . . . . . . . . . . . . . . . . . . . . . . . . . . . . . . . . . . . . . . .41
6.6 Color Filter Array (Color Version) . . . . . . . . . . . . . . . . . . . . . . . . . . 41
6.7 Image Formats . . . . . . . . . . . . . . . . . . . . . . . . . . . . . . . . . . . . . . . . .42
6.7.1 TIF Format . . . . . . . . . . . . . . . . . . . . . . . . . . . . . . . . . . . . . . . . . . . . . . . . . .42
6.7.2 JPEG Format . . . . . . . . . . . . . . . . . . . . . . . . . . . . . . . . . . . . . . . . . . . . . . . . 42
6.8 Image Transfer . . . . . . . . . . . . . . . . . . . . . . . . . . . . . . . . . . . . . . . . . 43
6.8.1 UDP Image Transfer on Setup Channel . . . . . . . . . . . . . . . . . . . . . . . . . . . .43
6.8.2 TCP Message-Based Image Transfer on the Control Channel . . . . . . . . . . .43
6.9 Image Buffering . . . . . . . . . . . . . . . . . . . . . . . . . . . . . . . . . . . . . . . . 44
6.10 FTP . . . . . . . . . . . . . . . . . . . . . . . . . . . . . . . . . . . . . . . . . . . . . . . . . . 44
6.11 NTP (Network Time Protocol) . . . . . . . . . . . . . . . . . . . . . . . . . . . . . 45
7 Frequently Asked Questions and Troubleshooting . . . . . . . . 46
7.1 Problem 1: What Password Allows Login from a RS232 Debug Port or
Telnet Session to the EN Camera? 46
7.2 Problem 2: What is a Password to Start the EN Setup Software? . . 46
7.3 Problem 3: Does the EN Color Camera Produce a 24-bit Color
Image? . . . . . . . . . . . . . . . . . . . . . . . . . . . . . . . . . . . . . . . . . . . . . . . 46
7.4 Problem 4: EN Setup Software Does Not Find Any Camera in the
Network . . . . . . . . . . . . . . . . . . . . . . . . . . . . . . . . . . . . . . . . . . . . . . 46
7.5 Problem 5: EN Setup Software Found the Camera, But the Video Image
is too Dark or Just Black . . . . . . . . . . . . . . . . . . . . . . . . . . . . . . . . . 46
7.6 Problem 6: TTL Trigger/Ethernet Trigger/Serial RS-485 Trigger Does
not Generate Trigger . . . . . . . . . . . . . . . . . . . . . . . . . . . . . . . . . . . . 47
Table of Contents
Page 7

Page vii
7.7 Problem 7: JPEG Image is Either Corrupt or Not a Full-Size Image. . 47
7.8 Problem 8: EN Camera Does Not Send any FTP Image to the FTP
Server . . . . . . . . . . . . . . . . . . . . . . . . . . . . . . . . . . . . . . . . . . . . . . . . 47
7.9 Problem 9: FTP servers switch between primary server and second
server, even if the hard disk is not full. . . . . . . . . . . . . . . . . . . . . . . 48
7.10 Problem 10: The EN Camera Does not connect to light sensor. . . . 48
7.11 Problem 11: Light Sensor Connection is Not reliable. . . . . . . . . . . .48
7.12 Problem 12: IO Board Communication Error . . . . . . . . . . . . . . . . . 49
7.13 Problem 13: Night Time Image is Too Bright and License Plate is
Whited Out or Saturated 49
7.14 Problem 14: The Day Time Image is too Bright and Whites Out or Sat-
urates the License Plate . . . . . . . . . . . . . . . . . . . . . . . . . . . . . . . . . .50
7.15 Problem 15: Flash_Erorr Appears in the Error Register . . . . . . . . . 50
7.16 Problem 16: Timestamp is Not Set to Current Local Time . . . . . . .50
7.17 Information and Support Resources . . . . . . . . . . . . . . . . . . . . . . . . .50
8 Appendix . . . . . . . . . . . . . . . . . . . . . . . . . . . . . . . . . . . . . . . . 51
8.1 Specifications . . . . . . . . . . . . . . . . . . . . . . . . . . . . . . . . . . . . . . . . . .51
8.2 Physical Dimensions . . . . . . . . . . . . . . . . . . . . . . . . . . . . . . . . . . . .52
8.3 Spectral Response . . . . . . . . . . . . . . . . . . . . . . . . . . . . . . . . . . . . . . .52
Table of Contents
Page 8

Page viii
Table of Contents
Page 9

Page ix
List of Figures
FIGURE 1. Typical Equipment Setup. . . . . . . . . . . . . . . . . . . . . . . . . . . . . . . . . . . . . . . . . . . . . . .3
FIGURE 2. User Administration . . . . . . . . . . . . . . . . . . . . . . . . . . . . . . . . . . . . . . . . . . . . . . . . .6
FIGURE 3. Properties . . . . . . . . . . . . . . . . . . . . . . . . . . . . . . . . . . . . . . . . . . . . . . . . . . . . . . . . .7
FIGURE 4. Camera Properties . . . . . . . . . . . . . . . . . . . . . . . . . . . . . . . . . . . . . . . . . . . . . . . . .8
FIGURE 5. Live Image Capturing . . . . . . . . . . . . . . . . . . . . . . . . . . . . . . . . . . . . . . . . . . . . . . . 9
FIGURE 6. Focus Bar . . . . . . . . . . . . . . . . . . . . . . . . . . . . . . . . . . . . . . . . . . . . . . . . . . . . . . . .10
FIGURE 7. Measuring Box Position . . . . . . . . . . . . . . . . . . . . . . . . . . . . . . . . . . . . . . . . . . . . .11
FIGURE 8. Half Size Image Position . . . . . . . . . . . . . . . . . . . . . . . . . . . . . . . . . . . . . . . . . . . . 12
FIGURE 9. Quad Size Image Button . . . . . . . . . . . . . . . . . . . . . . . . . . . . . . . . . . . . . . . . . . . . .13
FIGURE 10. Hardware Trigger Sniffing Mode . . . . . . . . . . . . . . . . . . . . . . . . . . . . . . . . . . . . . .13
FIGURE 11. 12-Pin Connector . . . . . . . . . . . . . . . . . . . . . . . . . . . . . . . . . . . . . . . . . . . . . . . . . .32
FIGURE 12. 26-Pin HD-Sub Connector . . . . . . . . . . . . . . . . . . . . . . . . . . . . . . . . . . . . . . . . . . .32
FIGURE 13. Serial Communications Cable RS-232B-12 (JAI Inc. part number: 310 132 19) .33
FIGURE 14. 12P-02S Interface Cable (optional) . . . . . . . . . . . . . . . . . . . . . . . . . . . . . . . . . . . .35
FIGURE 15. Timing Chart 1 . . . . . . . . . . . . . . . . . . . . . . . . . . . . . . . . . . . . . . . . . . . . . . . . . . . .37
FIGURE 16. CFA Pattern . . . . . . . . . . . . . . . . . . . . . . . . . . . . . . . . . . . . . . . . . . . . . . . . . . . . . .41
FIGURE 17. Enable TCP Image . . . . . . . . . . . . . . . . . . . . . . . . . . . . . . . . . . . . . . . . . . . . . . . . .41
FIGURE 18. Physical Dimensions . . . . . . . . . . . . . . . . . . . . . . . . . . . . . . . . . . . . . . . . . . . . . . .52
FIGURE 19. Spectral Response (B/W CCD for TS-2030EN/TS-2076EN) . . . . . . . . . . . . . . . .52
FIGURE 20. Spectral Response (Color CCD for TSC-2030EN/TSC-2076EN) . . . . . . . . . . . . .53
List of Figures
Page 10

Page x
List of Figures
Page 11

Page xi
List of Tables
TABLE 1. Firmware Names and Descriptions . . . . . . . . . . . . . . . . . . . . . . . . . . . . . . . . . . . .24
TABLE 2. 12-Pin Connector . . . . . . . . . . . . . . . . . . . . . . . . . . . . . . . . . . . . . . . . . . . . . . . . .32
TABLE 3. D-Sub Connector Pinout Configuration (10226-6212 VC) . . . . . . . . . . . . . . . . . .32
TABLE 4. 10/100 BaseT Ethernet Pinout Configurationr . . . . . . . . . . . . . . . . . . . . . . . . . . .33
TABLE 5. TS-2030EN/TS-2076EN Exposure Times (55.0 ms x H + 28.7 ms): . . . . . . . . . .38
TABLE 6. Factory Default Settings of the ADR Shutter Min. and Max. . . . . . . . . . . . . . . . .39
TABLE 7. Gain Table (BW EN Camera) . . . . . . . . . . . . . . . . . . . . . . . . . . . . . . . . . . . . . . . .39
TABLE 8. Gain Table (Color EN Camera) . . . . . . . . . . . . . . . . . . . . . . . . . . . . . . . . . . . . . . .40
TABLE 9. Factory Default Storage Setup of Image Buffering . . . . . . . . . . . . . . . . . . . . . . . .44
TABLE 10. TS-2030EN/TS-2076EN Series Product Specifications Table . . . . . . . . . . . . . . .51
TABLE 11. TABLE 11. IR Cut Filter Optical Characteristics . . . . . . . . . . . . . . . . . . . . . . . .53
List of Tables
Page 12

Page xii
List of Tables
Page 13

April 24, 2007
TS-2030EN/TS-2076EN Series
Progressive Scan Cameras
Operation Manual
1 Introduction
1.1 Scope of this Manual
This manual covers the operation of the TS-2030EN/TSC-2030EN/TS-2076EN/ TSC-2076EN traffic
control camera. For information on how to operate the associated software, please see the software manual.
1.2 Related Documents
• Lane Controller to Ethernet Network Camera Interface Document, doc. number 69-1198
• Vehicle Imaging System 300/400 Installation Manual.
1.3 Key Functions of the TS-2030EN/TS-2076EN Camera
• Sensitive high-speed 1" progressive scan CCD camera
• 10/100 Mbit BaseT Ethernet interface
• Triggering capability using Ethernet, TTL or serial (RS-485)
• Built-in PowerPC processor running Linux O/S
• 64MB SDRAM for image buffering
•External event trigger function for full-frame single/multiple image capture
*. Unless specifically mentioned, all information in this manual is relevant to both the TS-2030EN/TS-
2076EN camera (monochrome) and the TSC-2030EN camera (color).
• Static/DHCP support for TCP/IP configuration
• Image transfer over Ethernet using FTP over TCP/IP
TS-2030EN/TS-2076EN Series Progressive Scan Cameras
Page 14

Page 2
TS-2030EN/TS-2076EN Series Progressive Scan Cameras
• Frame date/time stamp facility with user-definable text strings
• High quality JPEG encoding
• Automatic dynamic range control and maximum contrast images using the optional Smart Light Sensor
1.4 Product Description
The TS-2030EN/TS-2076EN camera is an all-in-one progressive scan and Ethernet CCD camera, with a
built in image capture/storage function, and image-processing software using a built-in PowerPC processor.
The TS-2030EN/TS-2076EN performs JPEG compression and automatic FTP transmission of captured
images to a file server.
Typical applications for the TS-2030EN/TS-2076EN include Automatic Number Plate Reader (ANPR/
LPR), vehicle fingerprints (vehicle matching technology), optical character recognition (OCR), and regionof-interest extraction (ROI), as used in the market for ITS (Intelligent Transportation Systems). The TS2030EN/TS-2076EN supports external event triggering, dynamic light sensor, and provides the best quality
and sensitivity images for ITS applications. Applications include machine vision, medical imaging,
intelligent transportation systems, high-definition graphics, on-line inspection, gauging, character reading,
archiving, and high-security surveillance.
Introduction
Page 15
2 Getting Started
2.1 Required Equipment
Page 3
TS-2030EN/TS-2076EN Series Progressive Scan Cameras
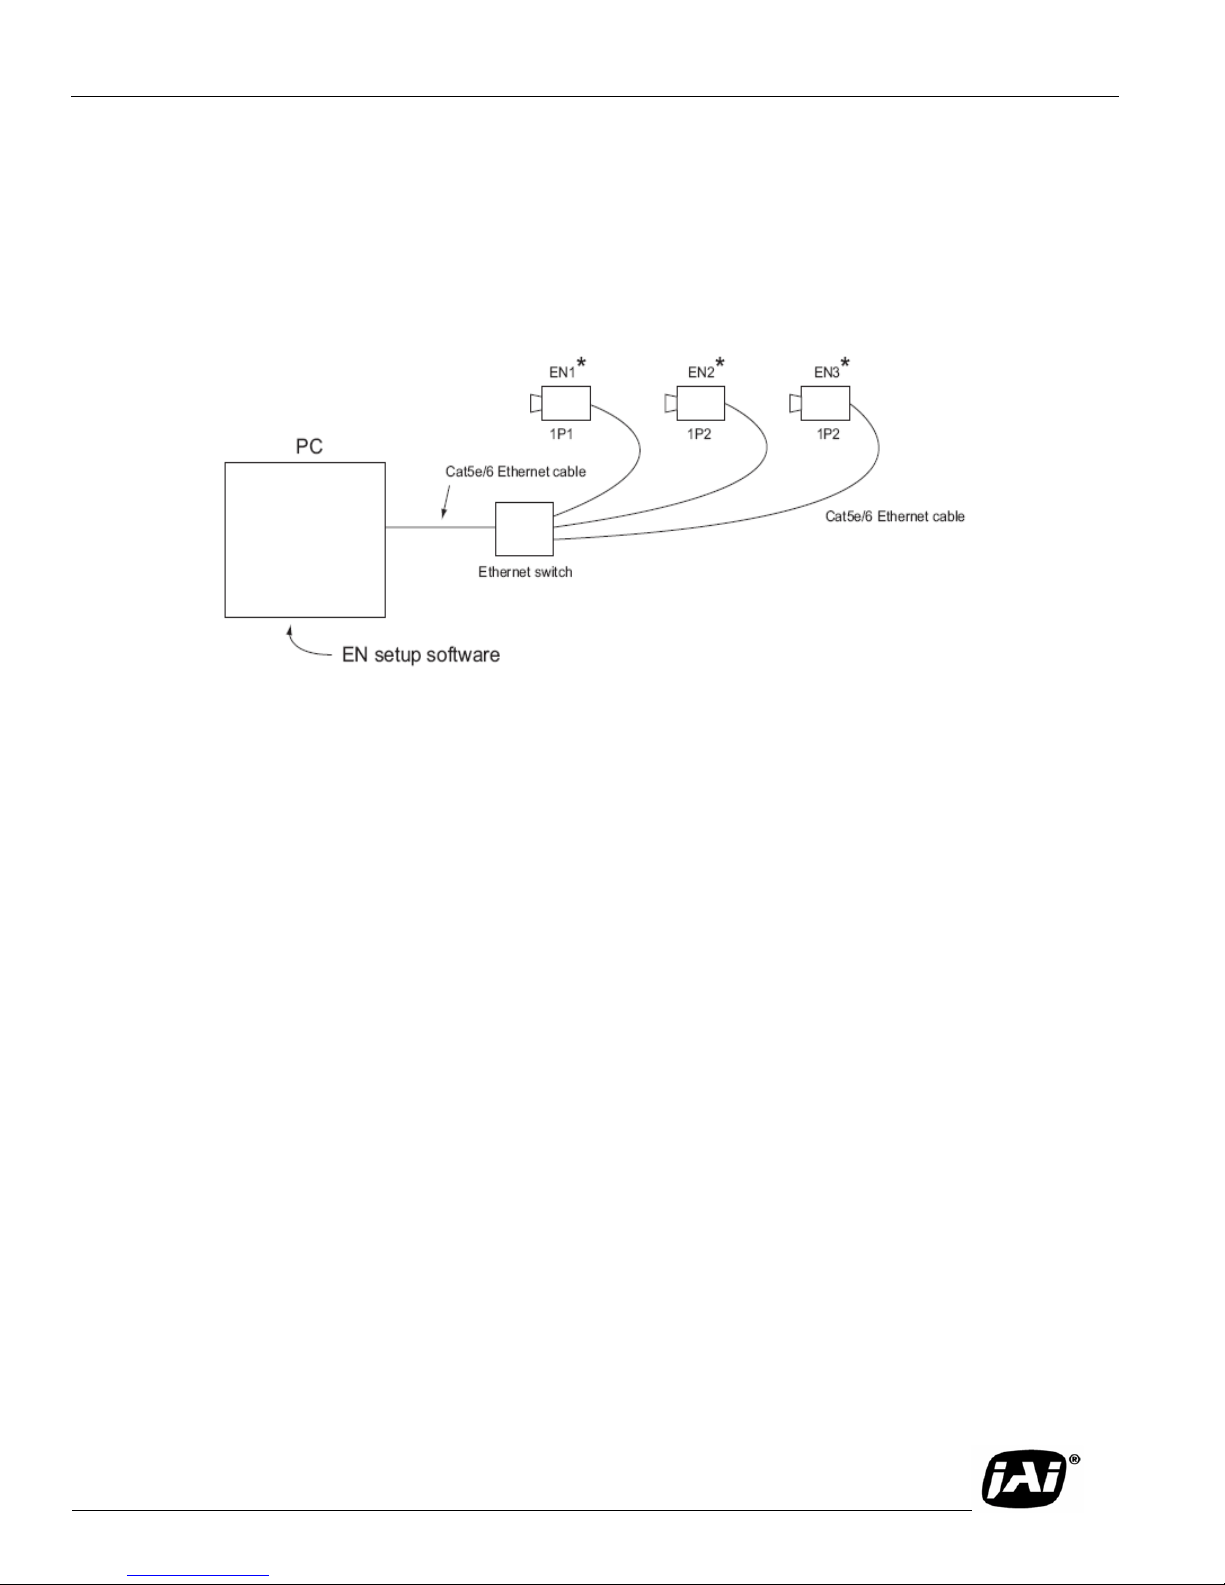
FIGURE 1.
Typical Equipment Setup
*Each camera requires a PD-12 12-V power supply.
For details, please see "Power Supplies and Cable Setup."
• PD-12 power supply
• Cat5e/6 Ethernet cable
• 10/100/1000 Ethernet switch
• Debug-232 serial/power cable (JAI Inc. part number 31013219)
2.2 Network Settings
2.2.1 Default Network Settings for the TS-2030EN/TS-2076EN Camera
The factory default network setting for the TS-2030EN/TS-2076EN is as follows::
IP address: 10.0.0.65
Subnet mask : 255.255.255.0
Default gateway : 255.255.255.255 (disabled)
You must set up your computer network properly in order to allow it to communicate with the TS-2030EN/TS2076EN camera. It is very important to that your PC NOT be assigned the same IP address as the camera. If you
need to change the IP address, follow the instructions in Section 2.2.2 on page 4.
Getting Started
Page 16

Page 4
TS-2030EN/TS-2076EN Series Progressive Scan Cameras
2.2.2 Changing the IP Address of the TS-2030EN/TS-2076EN Camera
If you need to change the IP address of your TS-2030EN/TS-2076EN camera, you can do so using either the EN
setup software or the debug RS-232 serial/power cable. Choose the method that is most appropriate for your
application, and follow the steps listed.
2.2.2 (a)
Changing the IP Address of the TS-2030EN/TS-2076EN Camera Using the EN Setup Software
You can use the EN setup software to change the IP address of the camera. Use the steps below.
1. First, set up your PC's network setting properly so that your PC has the 10.0.0.XX subnet.
However, XX must not be 65, because the host PC's IP address cannot be the same as that of the camera.
The subnet address must be 255.255.255.0.
2. Next, open the EN setup software. If you are starting this software for the first time, you will be asked to
type your password. Your case-sensitive user name and password are as follows:
User name: Administrator
Password: Password
3. Click the "Properties" button. You will see the EN cameras that are in the network.
4. Click the icon of the camera you want to change. Once it is selected, find the "IP address" register and
change the IP address of the camera.
5. Right-click on the camera icon and select "Reboot." This option will reboot the camera.
6. The camera will now start up with a new IP address.
2.2.2 (b)
Changing the TS-2030EN/TS-2076EN Camera IP Address Using the Debug RS-232 Serial/
Power Cable
You can use the debug RS-232 serial/power cable to access the BIOS menu and change the IP address of the
camera. To do so, follow the steps below.
1. First set up your hyperterminal as 9600-8-N-l. Start up the camera. You should now see the BIOS start-up
code.
2. Type "/" to stop the normal camera boot-up and to start the BIOS test mode.
3. Type "3" to select the "IP address change" setting.
4. Type "1" to select the first network interface, and then "1" again to change the local IP address.
5. Type the IP address you want to change.
6. Type "0" to return to the main menu, and then type "0" to start up the normal boot-up.
2.3 Installing the Required Software
The EN setup software is used to change the registers of the camera parameters, display live video images, and
sniff hardware/trigger Ethernet from the lane controller. To install the software required for the TS-2030EN/TS2076EN, run "Setup.exe" from the CD-ROM. This will guide you through the proper installation. Once the
software is loaded on your system, find the "EN Setup" software from the Start menu (Start -> EN Setup -> EN
Setup). If you are logging in for the first time, you must enter the following case-sensitive user name and
password:
User Name: Administrator
Getting Started
Page 17

Page 5
TS-2030EN/TS-2076EN Series Progressive Scan Cameras
Password: Password
Once you log in as Administrator, you can create a new user and set a custom password.
To set the properties of each camera connected to the network, follow the steps below:
1. 1. Click the "Properties" button. The software will automatically find all EN cameras currently on the net-
work.
2. Select the EN camera you want to see in the left window. All accessible registers are displayed in the right
window.
3. Click the "Video" button. You can select the cameras in the left window in order to display either a live
image, or a triggered image. You can display up to four cameras in a single screen.
4. Adjust the lens as needed.
Getting Started
Page 18

Page 6
TS-2030EN/TS-2076EN Series Progressive Scan Cameras
3 Tutorial
This section demonstrates typical operations of the EN camera that most applications will require. This
tutorial is intended for first-time users of the EN camera. Go through this section step-by-step to
familiarize yourself with the EN’s operations.
3.1 Image Capturing
3.1.1 Start Up the EN Setup Software
Find the “EN Setup” shortcut on your desktop or go to “Start” -> “All Programs” -> “EN Setup” -> “EN
Setup.” Start the “EN Setup” software.
Type the case-sensitive user name “Administrator” and password “Password.”
You can create a new user and password from User Administration option. From the “Tools” menu.
select “User Administration,” as shown in Figure 2 below.
FIGURE 2. User Administration
Click the “Properties” button to see all the EN cameras the software has located on the network.
Tutorial
Page 19

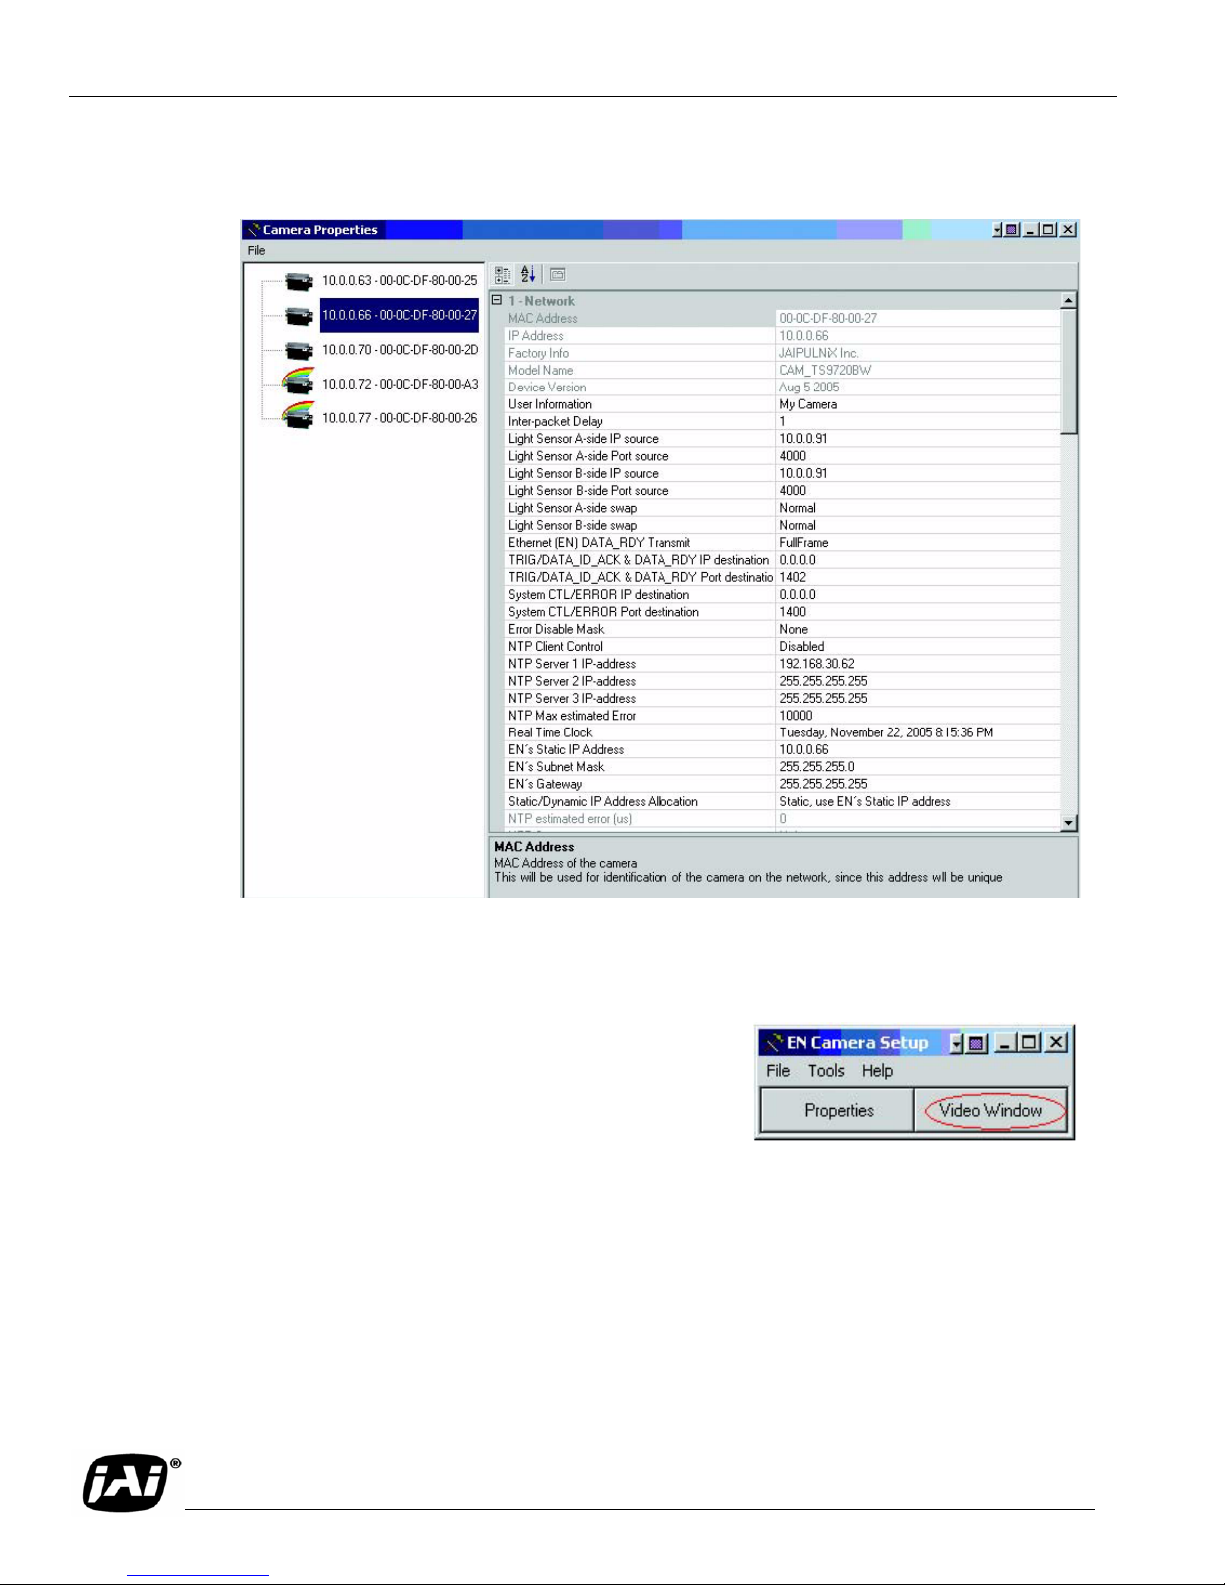
3.1.2 Camera Properties
FIGURE 3. Properties
BW EN Cameras
Color EN Cameras
Page 7
TS-2030EN/TS-2076EN Series Progressive Scan Cameras
Click the camera icon on the left side of the window to see all the accessible config/status registers.
Tut ori al
Page 20
Page 8
TS-2030EN/TS-2076EN Series Progressive Scan Cameras
FIGURE 4. Camera Properties
3.1.3 Live Image Capturing/Focusing
Click the “Video” button.
Highlight the icon of the camera you want to see. Click the
“Full Size” and “Live” video buttons. You will now see a
live video image. The live image is generated by an internal
trigger mechanism inside the EN camera. This internal
trigger is independent of either FTP or message-based TCP
image. Also, during live image display, Flash is disabled at nighttime.
The “Snap” button captures only a single video image. The “Freeze” button disables the “Live” image
option.
Use the “Live” or “Snap” buttons only while the camera is being set up, for those occasions you want to
see the maximum frame rate of the video image to focus the lens.
Tutorial
Page 21
TS-2030EN/TS-2076EN Series Progressive Scan Cameras
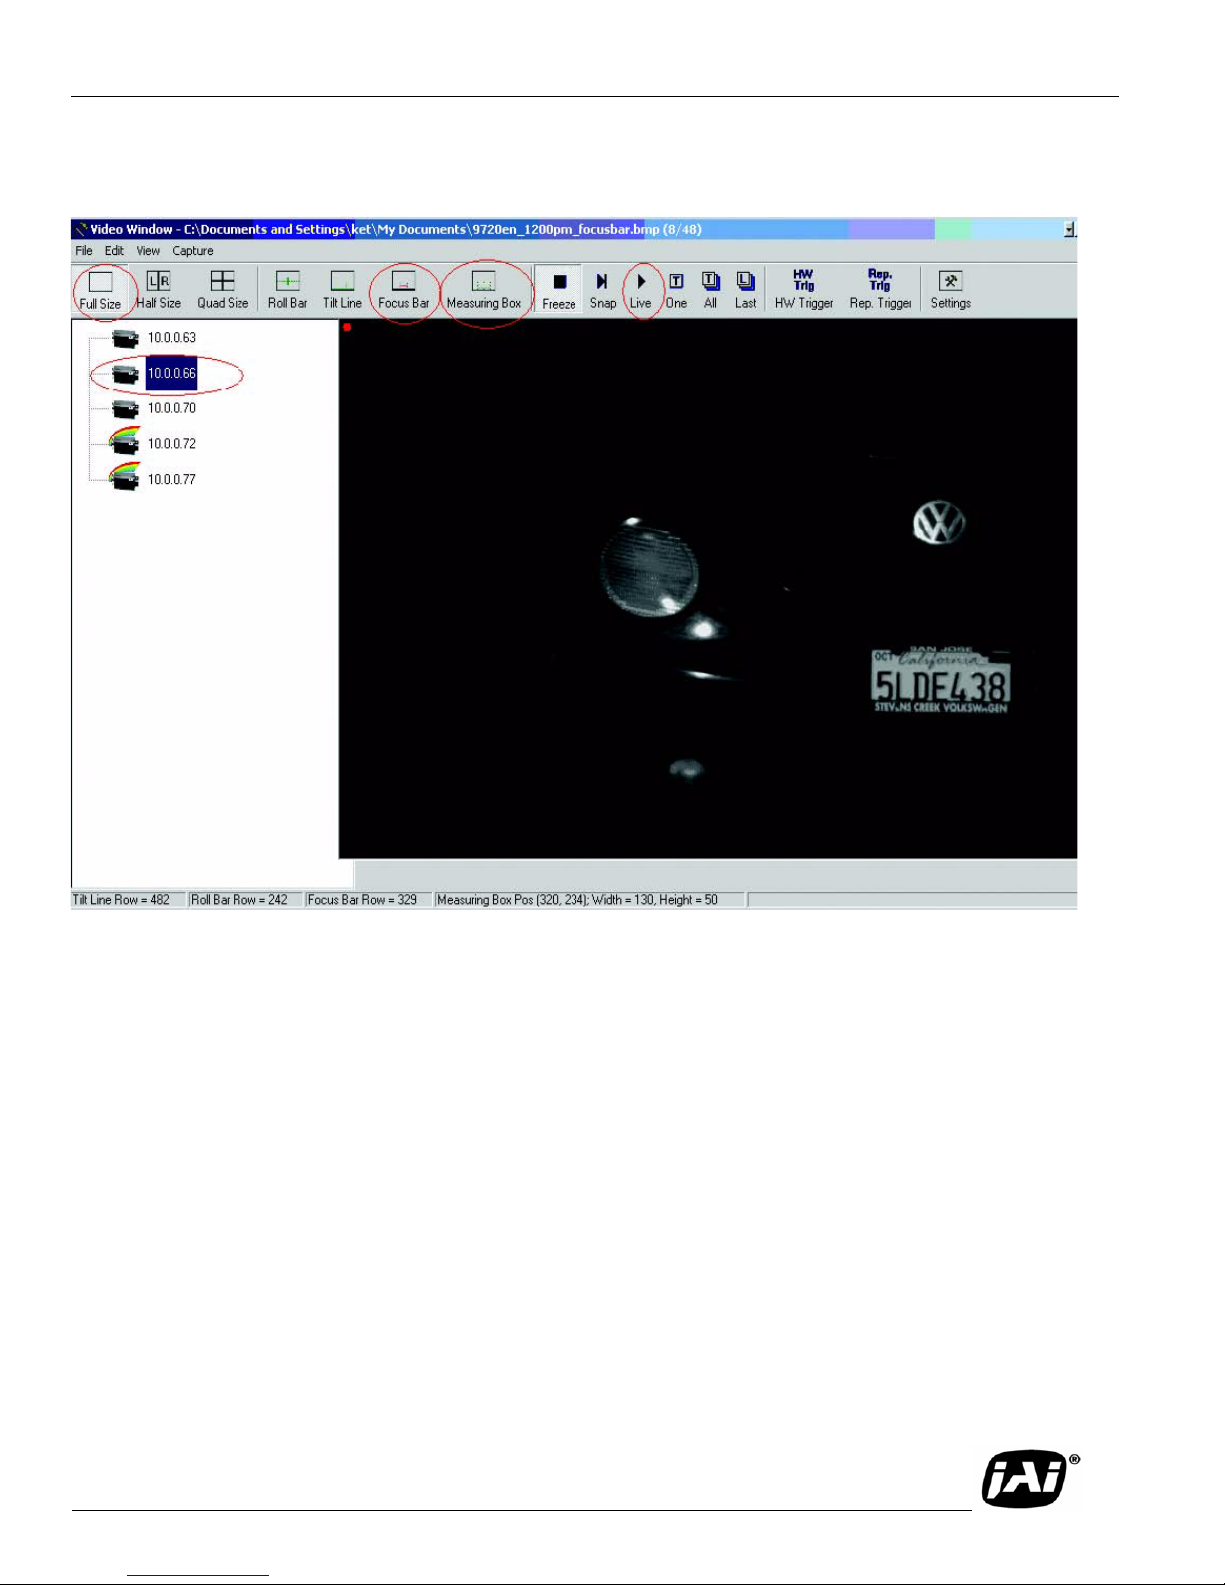
FIGURE 5. Live Image Capturing
Page 9
Tut ori al
Page 22

Page 10
TS-2030EN/TS-2076EN Series Progressive Scan Cameras
FIGURE 6. Focus Bar
Use the “Focus Bar” button to make precise adjustments to the lens focus.
Tutorial
Page 23

TS-2030EN/TS-2076EN Series Progressive Scan Cameras
FIGURE 7. Measuring Box Position
Page 11
Use the “Measuring Box” button to make sure the license plate or particular target is in the
correct side of the video field of view.
Tut ori al
Page 24

Page 12
TS-2030EN/TS-2076EN Series Progressive Scan Cameras
FIGURE 8. Half Size Image Position
The “Half Size” image button is useful for situations in which two EN cameras together cover a
single lane. Using the “Half Size” image button to capture two images: one on the left side of
camera1, the other on the right side of camera2. To activate “Half Size,” click on the camera icon
and drag it to either the left or right video frame. Click the “Live” button to see the live image.
Use the focus tool to make precise adjustments to the lens focus.
Tutorial
Page 25

TS-2030EN/TS-2076EN Series Progressive Scan Cameras
FIGURE 9. Quad Size Image Button
Page 13
Click the “Quad Size” image button to capture four images. Each image will then be reduced
from the full 1920 x 512 resolution to 960 x 256 resolution for the TS-2030EN. The image will be
reduced from 1920 x 768 resolution to 960 x 384 for the TS-2076EN. Click and drag the camera
icon to the desired quad image frame. Click the “Live” button to see a live image.
Three trigger-sniffing modes are available: “One,” “All,” and “Last.” “One” trigger mode is for when
you want the EN camera to take a single shot of video image, as soon as it receives a valid TTL trigger,
Ethernet trigger, or RS-485 serial trigger. “All” trigger mode is continuous trigger-sniffing mode.
Trigger sniffing is a mode of operation that allows the user to continuously and passively monitor
images captured by the external trigger without disturbing the trigger process. For every trigger input,
the EN camera will capture a new image. “Last” trigger mode is the same as “All” trigger mode, except
that the EN camera will send the last captured image when you select the “All” button. Flash is
activated when the trigger is received.
FIGURE 10. Hardware Trigger Sniffing Mode
Tut ori al
Page 26

Page 14
TS-2030EN/TS-2076EN Series Progressive Scan Cameras
The “HW Trigger” and “Rep. Trigger” buttons send the Ethernet trigger command to the EN camera.
“HW Trigger” button sends a single Ethernet trigger command. “Rep. Trigger” sends a continuous
Ethernet trigger command every second
.
3.1.4 Image Properties
You can monitor the image properties of captured images, whether it’s “Live,” “Snap,” or “Trigger Sniffing” mode. On the Video Window menu, select “Image Properties” under “View.” You can also
use the EN setup software to monitor the image properties of saved images and FTP images.
Tutorial
Page 27

3.2 Image Transfer
3.2.1 FTP Image Transfer
To transfer images via FTP, first make sure to set up the FTP server properly. Please check the
following items:
The username/password or anonymous login must be set for FTP server.
Set the permission of the read/write/create directory.
Page 15
TS-2030EN/TS-2076EN Series Progressive Scan Cameras
First, type the IP address of the FTP server (destination IP). If you have a second FTP server, enter that
IP address as well. If the EN camera detects that the first FTP server is down, then it will automatically
send images to the second FTP server.
Enter the User name and Password that the FTP server gives permission to.
Type image type (TIF or JPEG). “Image1 Data” is an image triggered by the first TTL trigger, Ethernet
trigger, or RS-485 serial trigger. If the second FPGA trigger is set (Config Address=28), then the FPGA
automatically generates the second hardware trigger predefined delay after the first hardware TTL
trigger. “Image 2 Data” defines image type of the second triggered image. Normally, you should ignore
the “Image 2 Data.”
“Subdirectories” is normally set to 1000. The EN creates subdirectories under a single Destination DIR.
When the number of files in the subdirectory reach 1000, then the EN automatically creates another
subdirectory. Naming conventions of the subdirectory can be found in the LC-to-EN interface
document.
“Destination DIR” is a name of the directory where all “Subdirectories” are located.
Please refer to Troubleshooting “Problem 9: FTP servers switch between primary server and second
server, even if the hard disk is not full.” on page 48
Tut ori al
Page 28

Page 16
TS-2030EN/TS-2076EN Series Progressive Scan Cameras
3.3 ADR (Automatic Dynamic Range) Control
3.3.1 Light Sensor Connection
ADR control is a process that runs inside the EN camera. It controls the camera every 1/10 second to
ensure that when the camera is triggered, it produces a high quality image of the license plate and the
vehicle it is mounted on, in all ambient lighting conditions. The ADR also decides when to turn on/off
auxiliary lighting as required to maintain proper plate illumination at night and during dawn/dusk
transitions. ADR uses an external light sensor to provide the information required to operate properly.
ADR operation can be enabled/disabled by the user at any time. Make sure to set up Moxa (RS-485 to
Ethernet converter) properly. See (VIS400 manual Appendix A).
In the camera’s “Properties” window, set up the light sensor’s IP address and Port number. These
numbers must be consistent with Moxa’s setting.
Tutorial
Page 29

Page 17
TS-2030EN/TS-2076EN Series Progressive Scan Cameras
You can connect up to two light sensors. If two IP addresses and port numbers are identical, then the
EN camera tries to connect only a single light sensor.
Set the ADR Control register from “Manual” to “ADR Control (Using the Light Sensor).” This will
activate the connection to the light sensor. If the connection is successful, you should see a live data
change in the ADR Debug side A/B registers. Also, you should see what camera parameters ADR
decides to set. In the above example, ADR sets to exposure time 4H (Dial 4 = 4H), Gain=255(max),
Vtop=0, and Vbot=0. If there is a connection error, then these register values will all remain zero.
Also, check the “Error Status” register. If there is a connection error, LS1_ERR or LS2_ERR is set. If a
light sensor is not required for your application, set the “Camera ADR Control” register to “Manual.”
Tut ori al
Page 30

Page 18
TS-2030EN/TS-2076EN Series Progressive Scan Cameras
3.3.2 Flash Nighttime Light Control
The strobe and continuous nighttime light can be manually turned on and off. Set “Flash Auto/Manual”
and “Night light Control” registers to Manual OFF or ON.
Generate an Ethernet trigger or input TTL trigger to see Flash. The “Live” or “Snap” button does not
generate Flash, because they are independent from normal trigger operation.
Normally, Flash and Night Light are controlled by ADR and a light sensor. To take advantage of this
feature, connect to the light sensor. Set the “Flash Auto/Manual” and “Night Light Control” registers as
shown below.
In this setting, in the evening when light sensor reading drops below 12, Flash and Night Light are
turned on. And in the morning when the light sensor reading rises above 17, Flash and Night Light are
turned off.
Tutorial
Page 31

3.4 Time Synchronization
The EN camera supports NTP (network time protocol) synchronization. If you disable NTP by clearing
the “NTP Client Control” register, then the internal clock will drift approximately 1.5 seconds per day.
To reset the clock, set the “Real Time Clock” register to your current local time.
Page 19
TS-2030EN/TS-2076EN Series Progressive Scan Cameras
If you decide to take advantage of the NTP feature, make sure to set up the NTP server, preferably with
GPS input. This guarantees that the clock drift is within 10ms. Set the NTP server IP-address registers
up to 3 NTP servers. Then, enable “NTP Client Control” register. Reboot the camera.
After rebooting the camera, check the “Real Time Clock” register to check if the current time is
properly set. Note that this time is GMT.
If the NTP drift file is empty, then the NTP will take about 1 hour to optimize the time. During the
initialization, “NTP Status” must show USYNC, and “NTP estimated error” is max. After 3-4 hours,
the time drift will become within 10ms. Check “NTP estimated error” and “NTP Status” registers again.
“NTP Status” must be showing “PLL.” This means that NTP is finally synchronized properly.
Tut ori al
Page 32

Page 20
TS-2030EN/TS-2076EN Series Progressive Scan Cameras
3.5 Static IP Address Assignment
The factory default IP assignment is static IP= 10.0.0.65. The user must change the IP address of the
camera. There are four methods to change the static IP address: EN setup software, Telnet,serial
terminal using the debug RS-232 serial/power cable, and BIOS/Monitor using the debug RS-232 serial/
power cable.
The first two options, EN setup software, and Telnet, require that the network settings of the EN camera
such as IP address and Subnet Mask be known, while the last two options do not. If Ethernet is not
available, then the last two options will be useful.
The EN setup software is the easiest way to change IP address. In the “Properties” window, change the
network setting registers. After changing these registers, reboot the camera. The new setting appears at
the next power-up.
• Telnet
If you know the current IP address of the camera, you can telnet directly to the EN camera. Login
as User name = root, Password = JAI PULNiX. If you want to assign a new IP address temporarily,
you can use the “ifconfig” utility. If you want to assign a new IP address permanently, you can use
the “test_libcamera” utility (See Section 3.6.3, “RS-232 PowerPC Debug Port,” on page 24).
• Serial terminal using the debug RS-232 serial/power cable. This is exactly the same as the
previous “Telnet” solution, except that you do not need an Ethernet connection. If Ethernet is
down, or if the IP of the camera is unknown, this method is useful. You can use “ifconfig” or
“test_libcamera” utility to assign new IP address temporarily or permanently
(See Section 3.6.3, “RS-232 PowerPC Debug Port,” on page 24).
• BIOS/monitor using Debug RS-232 Serial/Power cable. The BIOS/monitor is an even lower level
of software running underneath of OS and application code. By using the BIOS/monitor, you can
assign a new IP address permanently. See Section 3.6.3, “RS-232 PowerPC Debug Port,” on page
24 for detailed operation.
Tutorial
Page 33

TS-2030EN/TS-2076EN Series Progressive Scan Cameras
3.5.1 DHCP Client
Make sure that you have a DHCP server in your network.
Change the “Static/Dynamic IP Address Allocation” register from “Static” to “Dynamic.”
Reboot the camera. In the next power-up, the camera will get the IP address dynamically from the
DHCP server.
Page 21
Tut ori al
Page 34

Page 22
TS-2030EN/TS-2076EN Series Progressive Scan Cameras
3.6 Maintenance
3.6.1 Debug Counters
For debugging purposes, some status registers are available as debug counters.
Detailed information for each debugging counter is included in the LC-EN Interface document. This
tutorial covers the following debug counters.
Trigger Filter Noise count = number of hardware TTL triggers that failed trigger noise filter.
•
•
PRE Filter Noise count = number of hardware TTL triggers that failed PRE filter.
POST Filter Noise count = number of hardware TTL triggers that failed POST filter.
•
•
Valid Trigger count = number of hardware TTL triggers that passed noise filter, PRE filter, and POST
filter.
•
VINIT count = number of reset signals sent to CCD
• IRQ count = number of interrupt generated by FPGA to PowerPC
Tutorial
Page 35

Page 23
TS-2030EN/TS-2076EN Series Progressive Scan Cameras
By generating an Ethernet trigger (“All” and “HW Trigger” button on the EN setup video window), you
can see only VINIT and IRQ counters are incrementing. This is because the first four counters are only
for the hardware TTL trigger.
By feeding the hardware TTL trigger, you can see “Valid Trigger count,” “VINIT count” and “IRQ
count” register incrementing.
If you set 1ms to “Trigger Filter Noise” register and the hardware TTL trigger pulse is less than 1ms,
then the trigger is ignored as an invalid signal. Only “Trigger Filter Noise count” must be incremented.
However, all other counters remain the same.
If you set the PRE trigger filter to 10ms but the TTL trigger has only 9ms stable PRE condition, then
only “PRE Filter Noise count” must be incremented. However, all other counters remain the same.
If you set the POST trigger filter to 10ms but the TTL trigger has only 9ms stable POST condition, then
the “POST Filter Noise count” must be incremented. Unlike PRE trigger, “VINIT count” is also
incremented, because trigger pulse is sent to CCD anyway before finishing validation of POST
condition. Once FPGA invalidates the POST condition, FPGA does not generate IRQ to PowerPC.
Besides “POST Filter Noise count” and “VINIT count,” all other counters remain the same.
3.6.2 Firmware Upgrade
In the “Properties” window, right-click on the camera icon you want to upgrade. Select “Update
Firmware in Camera(s).”
You can update the five pieces of firmware inside the EN camera. Each piece of firmware has a
distinctive extension.
Tut ori al
Page 36

Page 24
TS-2030EN/TS-2076EN Series Progressive Scan Cameras
TABLE 1. Firmware Names and Descriptions
Firmware Name Description Filename conversion
EN Application Top-level application en_YYMMDDVR.app
FPGA Bit file EPGA firmware FPGA_YYMMDDVR.bit
OS Image Real-time Linux OS image vmlinux_YYMMDDVR.osi
Lib/Drv file Library and driver package libdrv_YYMMDDVR.drv
Camera Module H8 firmware 2030h8cpu_YYMMDDVR.
If you want to update multiple cameras at the same time, use the SHIFT key to highlight multiple
cameras. Then, right-click to select “Update Firmware in Camera(s).”
2030
3.6.3 RS-232 PowerPC Debug Port
If you have the debug RS-232 serial/power cable, you can debug EN cameras over the serial port. This
is useful when Ethernet is not available. In this tutorial, we suppose we have accidentally assigned an
invalid IP address to the EN camera, and now we cannot communicate with the EN camera over
Ethernet. When this happens, there are two recovery methods.
Tutorial
Page 37

Page 25
TS-2030EN/TS-2076EN Series Progressive Scan Cameras
The first method requires setting the Hyperterminal to the following setting (9600-8-N-1. No hardware
handshake).
Power up the EN camera. You should see the monitor message in the serial terminal. Type the “/” key
within three seconds.
Tut ori al
Page 38

Page 26
TS-2030EN/TS-2076EN Series Progressive Scan Cameras
After typing the “/” key, you should see the following monitor menu.
Enter “3” to select “Change IP addresses” mode.
Enter “1” to select Ethernet interface 1.
Enter “1” again to select “Change local address.
Enter the new IP address.
”
After setting the new IP address, type “0” to exit the monitor menu.
After the boot-up sequence, login to the serial terminal. (Username = root, Password = JAIPULNiX)
Tutorial
Page 39

Page 27
TS-2030EN/TS-2076EN Series Progressive Scan Cameras
Type “en -v > version.txt.” View the content of “version.txt” to see the firmware version
.
Enter the command “ps” to see what processes are running. If the “dhcpc” daemon is running, kill this
process. To do so, enter, for example, “kill <process_id>.”
Enter the command “ifconfig” to see if the network is up and running.
Eth0 is the network interface of the EN camera. In the above example, the EN’s network is set to the
following: IP address = 10.0.0.65. Subnet mask = 255.255.255.0.
If eth0 is not running or if you want to change to a different IP address, you can set the temporary
network setting just to enable a FTP, TELNET, or Ethernet connection
Tut ori al
Page 40

Page 28
TS-2030EN/TS-2076EN Series Progressive Scan Cameras
Enter the command “ifconfig eth0 <NEW IP ADDRESS> netmask <SUBNET MASK>.” This is a
temporary IP assignment because the EN camera will lose this setting once you restart it.
.
Now you should be able to telnet to the EN cameras.
If you want to assign the new IP address permanently, you can use the “test_libcamera” utility. The
“test_libcamera” utility allows access to EEPROM, where all network settings are saved. After starting
“test_libcamera,” you can use the following commands:
rc : read IP assignment (static or dhcp) wc : write IP assignment
rp : read IP address wp : write IP address
rs : read Subnet mask ws : write Subnet mask
rg : read Gateway wg : write Gateway
Change the IP assignment/IP address/SubnetMask/Gateway. Reboot the camera. The new IP address/
subnet mask are used at the next power-up.
Tutorial
Page 41

4 Uploading the Firmware
There are five pieces of firmware inside the EN camera that you can upload over the Ethernet. They are:
EN_APP: top-level application software.
OS_Image: Linux OS image and basic tile system
Lib/drV: library and driver file package
FPGA Bitfile: FPGA firmware
H8: H8 firmware. H8 is responsible for serial communication to the CCD camera module and Gamma
LUT.
4.1 To Verify Version Numbers for all Firmware
You can verify the version numbers of all firmware by using the RS-232 PPC debug serial port/telnet or
the EN setup software. Both methods are explained below.
Page 29
TS-2030EN/TS-2076EN Series Progressive Scan Cameras
4.1.1 RS-232 PPC Debug Serial Port/Telnet
To verify the version numbers of all firmware with the RS-232 PPC debug serial port/telnet, login to
EN camera as ROOT with the following user name and password:
user name: root
password: JAIPULNiX
Type “en-v” to see the version numbers for all firmware currently running.
Ex: #en-v > version.txt
#more version.txt
Welcome to JAI-PULNiX EN Camera
EN version : 050812A0
OS version : 050810A0
Lib/drv version : 050812A0
FPGA version : 050805C0
4.1.2 EN Setup Software
To verify version numbers for all firmware using the EN setup software, follow the steps below:
1. Start the EN setup software.
2. Click the “Properties” button.
3. Search for cameras in the network.
4. Left-mouse click on the camera you want.
5. Find the version numbers.
Uploading the Firmware
Page 42

Page 30
TS-2030EN/TS-2076EN Series Progressive Scan Cameras
4.2 Updating the EN Application Software
The EN setup software is used to update the EN application software. The method is described below.
Uploading the Firmware
TS-2030EN/TS-2076EN Series Progressive Scan Shutter Cameras
1. Start the EN setup software.
2. Click the “Properties” button.
3. Right-click on the camera, and select “Update Firmware.”
4. Select “Update EN Application.”
5. Reboot the EN camera for the updates to take effect.
Note: You cannot update the identical EN application version.
4.3 Updating the FPGA Bitfile
You can update the FPGA bitfile by using the EN setup software. To do so, follow the steps below.
1. Start the EN setup software.
2. Click the “Properties” button.
3. Right-click on the camera, and select “Update Firmware.”
4. Select “Update FPGA Bit-file.”
5. Reboot the EN camera.
4.4 Updating the Lib/Drv File
You can update the Lib/Drive file by using the EN setup software. To do so, follow the steps below.
1. Start the EN setup software.
2. Click the “Properties” button.
3. Right-click on the camera and select “Update Firmware.”
4. Select “Update Library/Driver.”
5. Reboot the EN camera.
4.5 Updating the OS Image
You can update the OS image by using the EN setup software. To do so, follow the steps below.
1. Start the EN setup software.
2. Click the “Properties” button.
3. Right-click on the camera and select “Update Firmware.”
4. Select “Update OS Image.”
5. Reboot the EN camera.
4.6 Updating the Camera’s H8 Firmware
You can update the camera’s firmware using the EN setup software. To do so, follow the steps below.
1. Start the EN setup software.
2. Click the “Properties” button.
3. Right-click on the camera, and select “Update Firmware.”
Uploading the Firmware
Page 43

TS-2030EN/TS-2076EN Series Progressive Scan Cameras
4. Select “Update H8.”
5. Reboot the EN camera for the changes to take effect.
4.7 Updating the Firmware Manually When the Network is Down
It is sometimes necessary to update the firmware by hand when you do not have access to the network.
This can happen, for example, if you have forgotten the IP address of the camera or when the update via
the network fails. To update the firmware by hand, follow the steps below. You will need to use the RS232 serial cable and the power/serial debug cable.
1. Log-in (user=root, password=JAIPULNiX) and change the directory to /usr/local/bin.
2. Type “ps” to see the process running. Kill the “dhcpcd” process, if it is running in the background.
3. Assign a static IP address to the network interface.
Example: To assign a static IP=10.0.0.65 and subnetmask =255.255.255.0, enter this command:
ifconfig eth0 10.0.0.65 netmask 255.255.255.0
4. Via FTP, manually send the firmware file to the /usr/local/bin directory of the EN camera.
5. Run test_bcs utility.
Ex. test_bcs –a en_YYMMDDVR.app Update EN App file
test_bcs -b FPGA_YYMMDDVR.bin Update FPGA bitfile
test_bcs -l libdrv_YYMMDDVR.drv Update Lib/Drv file
test_bcs -o vmlinuz_YYMMDDVR.osi Update OS image
6. Reboot the EN camera (command “reboot”). The new firmware is loaded at the next power-up.
Page 31
Uploading the Firmware
Page 44

Page 32
TS-2030EN/TS-2076EN Series Progressive Scan Cameras
5 Connectors and Cables
5.1 Connector Pin Configurations
5.1.1 12-Pin Connector
FIGURE 11. 12-Pin Connector
The TS-2030EN/TS-2076EN has a 12-pin Hirose connector for power input, serial communication, and
signal integration. Pin #1 is Ground and pin #2 is +12V DC. Other pins handle a number of input and
output functions, as shown in Table 2 on page 32.
TABLE 2. 12-Pin Connector
Pin Description Pin Description
1 GND 7 Reserved
3
1
9
2
10
11
12
8
7
2 +12V DC 8 Flash strobe output
3 GND (analog) 9 Reserved
4
5
6
4 Test point 10 RXD (RS-232) Power
PC debug port
5 GND (digital) 11 Reserved
6 Trigger input
*
12 TXD (RS-232) Pow-
erPC debug port
5.1.2 High-Density 26-Pin D-Sub Connector
The TM-2030CL has a 26-pin MDR26 connector (3M part number 10226-6212VC) on the rear panel.
The connector pin-out is shown in Table 3 on page 32
FIGURE 12. 26-Pin HD-Sub Connector
TABLE 3. D-Sub Connector Pinout Configuration (10226-6212 VC)
Camera Link Connector
Pin # Description I/O Pin # Description I/O
1 GND (Power) 14 Tamper Input In
2 +12V Input Out 15 Reserved Out
3 RxD for Laser Detector
(TTL)
4 TxD for Laser Detector
(TTL)
5 DIR Control for Laser
Detector (TTL)
Connectors and Cables
In 16 LVD / IO Selector Out
Out 17 Ethernet D+ (spare) -
Out 18 Ethernet A- Out
Page 45

TS-2030EN/TS-2076EN Series Progressive Scan Cameras
Camera Link Connector (Continued)
Pin # Description I/O Pin # Description I/O
6 Ethernet C+ (spare) - 19 GND (Analog) Out
7 Ethernet C- (spare) - 20 Test point Out
8 Ethernet B- In 21 Trigger Input Out
9 Ethernet B+ In 22 LC TxD (TTL) In
10 GND (Digital) Out 23 LC RxD (TTL) In
11 Flash Strobe Output Out 24 LC DIR Control (TTL) In
12 Flash Status Input In 25 Ethernet D- (Spare) -
13 IO Status Change In 26 Ethernet A+ Out
5.1.3 10/100 BaseT Ethernet
TABLE 4. 10/100 BaseT Ethernet Pinout Configurationr
Page 33
10/100 BaseT Ethernet Pinout Configuration
1 Ethernet TxD A+ 5 N/C
2 Ethernet TxD A- 6 Ethernet RxD B-
3 Ethernet RxD B+ 7 N/C
4N/C8 N/C
5.2 RS-232 Communication Cable
FIGURE 13. Serial Communications Cable RS-232B-12 (JAI Inc. part number:
310 132 19
The RS-232B-12 interface cable is used to debug the PowerPC processor. This debug port is
useful when the network is down and RS-232 is the only choice to connect with the EN camera.
See Section 3.6.3 on page 24 and Section 4.7 on page 31 for detailed information on how to use the
debug PowerPC port.
Connectors and Cables
Page 46

Page 34
TS-2030EN/TS-2076EN Series Progressive Scan Cameras
5.3 Power Supplies and Power Cable Setup
5.3.1 Power Supplies
The TS-2030EN/TS-2076EN camera requires 12V DC power that is obtained through the 12-pin
connector located on the rear panel of the camera. PULNiX recommends the following power supplies:
PD-12UU 100-240V AC/12V DC 1.2A universal voltage power supply with US Plug
PD-12UUP 100-240 V AC 1.2A universal voltage power supply, with US Plug and
12-pin connector
PD-12UE 100-240V AC/12V DC 1.2A universal power supply with European Plug
PD-12UEP 100-240V AC/12V DC 1.2A universal power supply with European Plug and
12-pin connector
If you are providing power through the 12-pin connector, the PD-12UUP and PD-12UEP power
supplies are available with the 12-pin mating connector already attached to the leads from the power
supply. The PD-12UU and PD-12UE power supply can be connected to the JAI Inc. power cable using
a terminal strip or directly.
When wiring the PD-12UU and PD-12UE power supplies directly, please note the following:
• The lead ends must be twisted together and tin-soldered for strength and electrical continuity.
• Shrink tubing or a similar insulator should be used to prevent exposed leads from touching and
shorting.
• The +12V lead is marked with a red stripe or white lettering; be sure not to reverse the leads.
• All connections must be properly insulated to prevent shorting.
5.3.2 JAI Inc. Power Cables
If you are using JAI Inc. power cables such as the 12P-02S, please refer to the 12-pin connector pin-out
diagram. The cable pin-out diagram is shown in Figure 14 below. The color-coded leads use Gray for
Ground and Yellow for +12V.
Connectors and Cables
Page 47

TS-2030EN/TS-2076EN Series Progressive Scan Cameras
FIGURE 14. 12P-02S Interface Cable (optional)
12P-02S Interface Cable
Pin# Lead Color Function Pin# Lead Color Function
1 Gray GND 7 Black coax Reserved
2 Yellow +12V DC 8 White coax shield Reserved
3 Red coax shield AGND 9 White coax Reserved
4 Red coax Video Out 10 Brown RxD
5 Orange coax shield GND 11 Blue Reserved
6 Orange coax VINIT IN 12 Black coax shield TXD
Page 35
Note: Make sure that the unused leads are not touching and that there is no possibility that
exposed wires could cause the leads to short.
5.3.3 Building Your Own Power Cable
Refer to the 12-pin connector pin-out in Figure 14 on page 35. Connect the Ground lead to pin #1, and
the +12V DC lead to pin #2 of the 12-pin connector. Power must be DC-regulated, and of sufficient
current to properly power the camera.
5.3.4 Attaching the Power Cable to the Connector
The 12-pin connector is keyed and will only fit in one orientation. Follow these directions to properly
attach the power cable to the camera connector:
1. Rotate the connector while applying slight pressure until the keyways line up.
2. Press the connector into place until firmly seated.
3. Plug the power cord into the 100V AC socket. This will power the camera up.
5.4 Attaching the Camera Lens
The TS-2030EN/TS-2076EN camera accepts 1" or larger format size C-mount lenses. To attach the Cmount lens to the camera, carefully engage the threads and rotate the lens clockwise until it firmly seats
on the mounting ring. Do not force the lens if it does not seat properly. Please note that some lenses
with extremely long flangebacks may exceed the mounting depth of the camera.
Connectors and Cables
Page 48

Page 36
TS-2030EN/TS-2076EN Series Progressive Scan Cameras
6 Camera Features
6.1 Progressive Scanning
Standard TV-system scanning is 525 lines interlace scanning as specified in the RS-170 protocol. Every
other horizontal line (odd lines and even lines) is scanned at a 60Hz rate per field, and the scanning is
completed with two fields (one frame) at 30Hz rate. Because of the interlace scanning, the vertical
resolution of CCD cameras is limited at 350 TV lines, regardless of the horizontal resolution. When
electronic shutter is applied, the CCD can hold only one field of charge at each exposure. This means
that the vertical resolution of the electronic-shutter camera is only 244 TV lines. The situation is the
same for an HDTV-format camera, since it has interlaced scanning and the vertical resolution of the
shuttered image is 500 lines.
The TS-2030EN uses a state-of-the-art progressive scanning interline transfer CCD which scans all
lines sequentially from top to bottom at one frame rate. Like a non-interlace computer screen, it
generates a stable, crisp image without alternating lines and provides full vertical resolution of 512
lines. The TS-2076EN provides a full vertical resolution of 768 lines.
The interline transfer architecture is also important to generate simultaneous shuttering. This is different
from full frame transfer architecture which requires a mechanical shutter or strobe light in order to
freeze the object motion.
The TS-2030EN model enables the 30Hz frame rate by scanning 512 lines out of the entire 1080 lines.
This technique significantly reduces smear and blooming, which tend to be significant problems in
daylight outdoor applications such as intelligent transportation systems (ITS).
The TS-2076EN model enables the 21Hz frame rate by scanning 768 lines. The TS-2076EN has higher
smear and blooming incidents than the TS-2030EN. However, for those applications that require more
vertical resolution, users will find that the slightly higher smear and blooming levels of the TS-2076EN
are a good trade-off and make it an excellent choice for red light violation or speed enforcement use.
6.2 Asynchronous Reset
The video signal starts with internal VD. When the external VINIT pulse is applied, internal VD is
latched to HD and the internal VD is delayed to set up the shutter speed period. The shutter speed is
controlled by the dial switch from “0” to “F.” Video output timing starts right after the internal VD and
single shots, FDV is output at the internal VD timing.
Camera Features
Page 49

FIGURE 15. Timing Chart 1
Page 37
TS-2030EN/TS-2076EN Series Progressive Scan Cameras
Camera Features
Page 50

Page 38
TS-2030EN/TS-2076EN Series Progressive Scan Cameras
6.3 ADR (Automatic Dynamic Range) Control
ADR (Automatic Dynamic Range) control is a key algorithm of EN cameras. The ADR algorithm
controls the EN camera parameters on a continuous basis to maintain the contrast-to-noise of the license
plates on passing vehicles to a suitable level required for automatic license plate reading algorithms.
The EN ADR algorithm is unique in that it requires no moving parts and can perform this contrast
maintenance function without having to take multiple images of a vehicle in order to achieve the
required plate contrast. The key to this ability is a separate smart light sensor. Each EN camera can
communicate with up to two smart light sensors. Using these smart light sensors, the EN cameras
automatically optimize Exposure time (or shutter speed), and Video Amplifier Gain (“Gain” in short).
Using EN setup software, user can turn on or off ADR control by accessing “Camera ADR Control”
config register (Address = 50).
6.3.1 Electronic Shutter
Normally, exposure time is controlled automatically by ADR (Automatic Dynamic Range) control
algorithm inside the EN, based on the output from light sensor. However during nighttime installations
it is often convenient to manually adjust the shutter time to a larger value so that the focusing targets and
vehicle used for setup are easily seen with the available road lighting. Manually adjusting shutter speed
can also be useful for certain types of debugging (See Section 7.2, “Problem 2: EN Setup Software
Found the Camera, But the Video Image is Too Dark or Just Black,” on page 47).
The following exposure times are supported
TABLE 5. TS-2030EN/TS-2076EN Exposure Times (55.0 μs x H + 28.7 μs):
Shutter Dial Exposure Time (H) Exposure Time (μs)
11 83.7
2 2 138.7
3 3 193.7
4 4 248.7
5 6 358.7
6 8 468.7
7 9 523.7
8 10 578.7
9 11 633.7
A 13 743.7
B 15 853.7
C 17 963.7
D 18 1,018.7
E 126 6,958.7
F 262 14,438.7
0 525 28,903.7
Camera Features
Page 51

Page 39
TS-2030EN/TS-2076EN Series Progressive Scan Cameras
When the EN camera is controlled by light sensor, user can monitor the shutter value in EN setup software by
accessing "Camera Shutter" status register (Address = 233). Note that this Shutter value is dial number and not
actual exposure time, (left side of the table above).
User needs to set appropriate "ADR Shutter Max" and "ADR Shutter Min" config registers (Address =53 and
58 respectively) to limit exposure time. In daytime, "ADR Shutter Min" limits the shortest exposure time (or
faster shutter speed). In night time, "ADR Shutter Max" limits the longest exposure time (or slowest shutter
speed). The factory default settings of "ADR Shutter Min" and "ADR Shutter Max" are as follows: Factory
Default Settings of the ADR Shutter Min. and Max.
TABLE 6. Factory Default Settings of the ADR Shutter Min. and Max.
Factory Default Settings of ADR Shutter Min. and Max.
BW Color
ADR Shutter Min Dial=l (1H) Dial=3 (3H)
ADR Shutter Max Dial=7 (9H) Dial=13 (18H)
6.3.2 Video Amplifier Gain Control
Normally, video amplifier gain is controlled automatically by an ADR (Automatic Dynamic Range) control
algorithm inside the EN, based on the output from the light sensor. However, the user can manually change gain
value by using the EN setup software (See Section 7.2 on page 47 for more information). Normally, gain would
be manually adjusted only when a different gain (and electronic shutter setting) is needed to see the vehicle and
focusing targets used for setup in whatever road lighting is available at the installation site.
The following table shows the gain setting against the actual gain (dB):
TABLE 7. Gain Table (BW EN Camera)
Gain Value
0 7.6
36 9.9
60 11.4
83 12.9
112 14.9
143 16.8
176 18.9
200 20.5
230 22.4
255 24.0
dB
Gain Table (BW EN Camera)
Note: Gain Value is Gain entry in camera LUT after calibration.
Camera Features
Page 52

Page 40
TS-2030EN/TS-2076EN Series Progressive Scan Cameras
TABLE 8. Gain Table (Color EN Camera)
Gain Value dB
0 11.8
22 13.4
46 15.1
74 17.0
105 19.2
140 21.7
165 23.4
192 25.5
226 27.8
255 27.7
Note: Gain Value is Gain entry in camera LUT after calibration.
When the EN camera is controlled by a light sensor, user can monitor the gain value in the EN setup software by
accessing "Camera Gain" status register (Address = 232). This Gain value is the Gain Table Entry in LUT after
calibration (left side of the table above).
6.4 Flash/Nighttime Light Control
The strobe and continuous nighttime light controls are critical at nighttime. ADR (Automatic Dynamic Range)
control inside the EN automatically turns on and off the strobe and night light based on the output from the light
sensor. The user can manually turn on and off the strobe and night light if necessary. You need to be able to
access the following registers by means of the EN setup software.
Register Address 10: Night Light Control
Register Address 11: Night Light ON threshold and Flash enable. Register Address 12: Night Light OFF
threshold and Flash enable. Register Address 50: Camera ADR Control
The distance and angle of the strobe unit toward the target is critical and must be optimized. Please refer to the
VIS400 Installation Manual for more information.
6.5 External Control
6.5.1 RS-485
The TS-2030EN/TS-2076EN has the ability to connect multiple cameras on the same RS-485 network. Each
camera has an individual ID number selectable via control registers; Camera RS-485 group register
Camera Features
Page 53

Page 41
TS-2030EN/TS-2076EN Series Progressive Scan Cameras
(address=107) and Camera RS-485 address registers (address=109). Thus it is possible to send a serial RS-485
trigger to any or all of the cameras. RS-485 communication is accessed vi a the 26-pin connector on the rear
panel of the camera.
RS-485 is typically used by the lane controller to send serial trigger or to send DatalD message to validate the
HW TTL trigger.
RS-485 is a differential signal communication for longer distance. Since RS-485 is not a common port for PCs,
a plug-in 485 board such as ULTRA-485 (Industrial Computer Source, San Diego, CA, 800-523-2320) or
compatible is required.
6.5.2 Ethernet
The primary benefit of Ethernet is the scalability of the system; you can add as many EN cameras as you want to
the system. For example, you can connect up to 255 Ethernet devices to one class A subnet. Command/Status
register access and image transfer are securely done over TCP/IP protocol. In addition to the message-based TCP
image transfer, sniffing image on UDP is also supported. Captured images are buffered inside EN camera, and
can be automatically transferred to FTP server. Ethernet trigger can be used for applications where time critical
response is not required as hardware TTL trigger.
All functions over Ethernet are accessible by EN setup software. Please refer to VIS300/400EN Setup User's
Guide (Doc Number 4087-72-005).
6.6 Color Filter Array (Color Version)
The color filter array requires software to interpolate color. If the proper interpolation software is not present the
camera provides an 8-bit monochrome image. The necessary DLL is available from JAI Inc.. The JAI Inc.
TSC-2030EN/TSC-2076EN cameras use the Bayer color mosaic filter pattern (see Figure 16 below). The CFA
contains 50% green photo sites and 25% red and 25% blue photo sites.
FIGURE 16.
CFA Pattern
Because the color filter array contains only a single R, G or B color in each pixel, the restored image has to fill in
colors in the missing pixel locations. The software uses neighboring pixel information to "guess" the missing
colors to make smooth, clear images. This is called "color interpolation."
Camera Features
Page 54

Page 42
TS-2030EN/TS-2076EN Series Progressive Scan Cameras
Because the TSC-2030EN/TSC-2076EN does not contain internal color-processing circuitry, viewer software
must perform color interpolation on host PC side. The EN setup software supports color interpolation.
After color interpolation, white balance must be properly done. Otherwise, gray or white objects cannot be seen
as gray or white. Each TSC-2030EN/TSC-2076EN (color) camera is calibrated in simulated daytime condition
and each image (TIF/JPEG) transferred to host PC contains Rgain and Bgain with regard to Green. By decoding
TIF/JPEG header, Viewer software can properly perform white balance. Please refer to "LC To EN Interface
Document" (Doc number 69-1198) for more information (color).
Please note that the factory default setting of the TSC-2030EN/TSC-2076EN (color) turns off Gamma correction,
because the non-linearity of the Gamma response curve degrades white balancing. Only linear LUT is used.
Also, it is important to keep in mind that a lossy JPEG encoding will cause color information loss. Viewer
software cannot reconstruct the color image properly after it has been encoded to JPEG format. In order to
reconstruct the color properly, users must use the raw TIF image format only.
6.7 Image Formats
Two image formats are supported; TIF and JPEG.
The TIF Format image is always ON, and users cannot turn it off. "Image Acquisition 1" and "Image
Acquisition 2" config registers (Address = 3 and 9, respectively) control which image format to choose. Multiple
image formats, such as both TIF and JPEG, can be selected.
Whether you choose TIF or JPEG format, images sent by the EN cameras contain additional information other
than just pixel information. TIF/JPEG header includes ADR information (shutter, gain, Vtop, Vbottom),
TimeStamps, Network setting (IP address, MAC address), Error status, and much more. Please refer to the "LC
to EN Interface" document for details concerning TIF tagging.
6.7.1 TIF Format
The uncompressed (or raw) TIF format is the best choice to maintain the accuracy of the pixel information for
further image analysis and processing.
For the TSC-2030EN/TSC-2076EN (color) model, the user should deal only with the TIF format image,
because detailed color pixel information will be lost in the JPEG format image.
Please refer to the "LC to EN Interface" document for the detailed TIF header.
6.7.2 JPEG Format
JPEG is the industry-standard format for lossy image compression. Output file size, quality and speed of the
encoding depends on the quality setting. The user can set the proper quality setting by accessing the "JPEG
Quality Factor" config register (Address = 46). The factory default is 85.
Access to “Image Acquisition 1” and “Image Acquisition 2” config registers (Address = 3 and 9,
respectively) and turn on JPEG format. Factory default setting is TIF format only.
Camera Features
Page 55

If JPEG quality factor is high (above 85) and image contains complex detail information, the output file
size of JPEG encoding becomes larger. JPEG image size must be properly defined in “Storage Setup”
of JPEG. If the output file size exceeds the pr defined JPEG image size, the result JPEG image will not
contain the full resolution of the image. Please refer to Section 6.9, “Image Buffering,” on page 44).
For the TSC-2030EN/TSC-2076EN (color) model, the user should not deal only with the JPEG format
image, because this format will not retain detailed color pixel information.
Please refer to the “LC to EN Interface” document for details about the JPEG header.
6.8 Image Transfer
6.8.1 UDP Image Transfer on Setup Channel
The EN camera can send video images over TCP (message-based) on the control channel, or UDP
(sniffing mode) on the setup channel, or both. Image transfer over UDP is intended for live video
display to focus lens or for sniffing external triggers (HW TTL trigger, Ethernet Trigger, or RS485
Serial Trigger) without disturbing continuous normal operation with Lane Controller. The “Live” or
“Snap” buttons on the UDP setup channel do not send images to the FTP server or the lane controller on
TCP (message-based) image transfer. Half image and quarter images are supported only on the UDP
setup channel. The raw image format is the only one supported by the UDP setup channel; JPEG is not
supported.
Page 43
TS-2030EN/TS-2076EN Series Progressive Scan Cameras
UDP setup images are easy to enable and disable. The user can access the “EN Setup Trigger Source”
register (Address = 111) and “EN Setup Image size” register (Address = 112) to change the trigger
source and image size. Live image transfer can be slowed down by setting “EN Setup UDP Inter-Packet
Delay” register (Address = 110). It is important to note that when multiple host PCs (clients) connect to
the EN camera, only the last client who changes the “EN Setup Trigger Source” register or “EN Setup
Image size” register will receive the UDP setup image.
6.8.2 TCP Message-Based Image Transfer on the Control Channel
Image transfer over TCP is intended for more secure image transfer. Even if the packet is corrupt, the
TCP/IP mechanism automatically resends the missing/corrupt packets. Full size, Odd field, or Even
field images are supported and both raw TIF images and compressed JPEG images are supported on
TCP control channel.
Unlike the setup channel that can send only one uni-cast UDP image to a single client (host PC), the
control channel can send the identical image to multiple host PCs (clients) over TCP. However, the host
PC has to respond to “DATA_RDY” message that the EN camera sends when an external trigger is
input (HW TTL trigger, Ethernet trigger, or RS-485 trigger). If the host PC sends a “SEND_DATA”
message to the EN camera, then the EN camera sends TCP image (TIF, or JPEG, or both) over the
Control channel.
For detailed register and interface information, please refer to the “EN to LC Interface” document.
Camera Features
Page 56

Page 44
TS-2030EN/TS-2076EN Series Progressive Scan Cameras
As a default, the EN setup software receives all images over UDP (setup channel). However, if you prefer to
switch to TCP images, you can do so by enabling the "Use TCP/IP" option. This is under the "View" menu on
the Video Window.
FIGURE 17.
An API (application program interface) for Windows is available. Using an API, the time required to develop
software for device discovery, command communication, and image transfer can be shortened. Please contact
JAI Inc. for further information.
Enable TCP Image
6.9 Image Buffering
Full size TIF images, JPEG images, and ODD/EVEN field images are independently managed in image buffers.
Each buffer is a sequential image queue. When the index reaches the last image, the user can select either to
overwrite the oldest image (or the first image), or to stop writing. Also, the user can set the depth of the queue
and the size of the JPEG image, while TIF, and ODD/EVEN field image sizes are fixed. These image queue
buffer operations are done using EN setup software by accessing the "Storage Setup" command.
As a factory default, the image size and queue depth are defined as the following;
TABLE 9. Factory Default Storage Setup of Image Buffering
Parameters 9720
TiF queue size 20 25 15 20 10 13
JPEG queue 20 0 15 0 10 0
Please refer to the "EN-to-LC Interface Document" for more information.
6.10 FTP
FTP (File Transfer Protocol) is the industry-standard file transfer protocol. TS-2030EN/TS-2076EN/
TSC-9720EN has an FTP client built-in. TIF image, JPEG image, or both can be transferred to the FTP
server automatically.
Camera Features
(BW)
9720
(Color)
2030
(BW)
2030
(Color)
2076
(BW)
2076
(Color)
Page 57

TS-2030EN/TS-2076EN Series Progressive Scan Cameras
FTP server's IP address, username, password, and subdirectory name must be properly set by FTP
command. Additionally, a 2nd FTP server is supported in case the 1st FTP server is accidentally down.
Please refer to the “EN-to-LC Interface” document for the FTP command.
Additionally, the FTP server must be properly set up. Make sure to create a username and password,
and to allow read/write/modify access so that the EN camera can write image files in the sub-directory
of the FTP server's hard disk. FTP server's hard disk must be regularly cleaned up, otherwise hard disk
capacity becomes full and EN camera cannot write image files.
The default FTP port is 21, but the user can change this port number. Please refer to the
Troubleshooting section for various FTP server performance tests.
6.11 NTP (Network Time Protocol)
TS-2030EN/TS-2076EN supports the NTP (Network Time Protocol) client. NTP is the industrystandard time synchronization mechanism over the network. For LAN, the synchronization accuracy
within a few milliseconds is achievable. Normally, the EN cameras can maintain the accuracy within
10ms as a worst-case scenario in LAN.
Page 45
All NTP setup can be done using the EN setup software.
Using the EN setup software, user can access to “NTP client enable” config register (address = 60) to
turn ON or OFF the NTP feature. EN camera supports up to 3 NTP servers’ IP addresses (Config
register address = 61, 62, and 63).
For the first time when the EN camera is set up for NTP, the EN camera optimizes the drift of the
internal clock with regard to the NTP server in your LAN. This takes approximately 1-2 hours to reach
within a few millisecond range of the estimated error. This Drift file is saved in non-volatile memory
and when power is recycled, the EN camera will read the saved NTP Drift file and the next settlement
will not take too long.
If NTP is still not synchronized with the NTP server(s), “NTP status” register (address=239) shows
“UNSYNC” status (=0x40). After NTP is finally synchronized with NTP servers(s), “NTP status”
register shows “PLL” status (=0x01) and “NTP Estimate Error” status register (address=238) shows the
estimated clock drift from the NTP server(s).
If the “NTP Estimate Error” exceeds the values predefined in the “NTP Max Estimate Error” config
register (address = 64), then the EN camera sends an error message to the lane controller or any client
connecting to EN camera. Please refer to the “LC-to-EN Interface” document for details about this error
message.
If you decided to turn OFF the NTP feature, please keep in mind that clock drift is approximately 1.5
second per day. Therefore, you need to send an Ethernet command to synchronize the clock from host
PC on a regular basis (twice a day, every day, or every few days). Write “Real Time Clock UTC”
register (Address = 102). Please note that the internal millisecond counter is reset to zero when you
write a new value to the “Real Time Clock UTC” register.
Camera Features
Page 58

Page 46
TS-2030EN/TS-2076EN Series Progressive Scan Cameras
7 Frequently Asked Questions and Troubleshooting
7.1 Problem 1: What Password Allows Login from a RS232 Debug Port or
Telnet Session to the EN Camera?
User name = root, password = JAIPULNiX
7.2 Problem 2: What is a Password to Start the EN Setup Software?
The factory default setting is, user name = Administrator; password = Password. Once you log in for the
first time, you can change the administrator’s password or create a new user. Find “User
Administration” under the “Tools” menu item. The program allows you to manage your password, user
management, and security level setting.
7.3 Problem 3: Does the EN Color Camera Produce a 24-bit Color Image?
1. The EN color camera outputs an 8-bit CFA (Color Filter Array) monochrome image. Color interpo-
lation and white balance software are required in the host PC side to display a color image. White
balance parameters (R gain and B gain) are calibrated at the factory, and then saved in the camera
registers.
2. Turn off JPEG encoding, or you will lose color information.
7.4 Problem 4: EN Setup Software Does Not Find Any Camera in the Network
1. Make sure that your host PC and EN cameras have the same subnet address, and that their IP
addresses are not identical. If the EN camera’s IP address is 192.168.30.65, then you should not set
the same IP address to the host PC.
2. If you have a firewall set up on your Windows computer, disable it. Also, be sure to enable network
data transfer of the EN setup software.
3. If the EN camera’s IP address is unknown, use the RS-232 debug cable. For more information,
please see Section 2.2.2 (b on page 4.
4. If the EN camera is set to DHCP client mode, then you need DHCP server in your network.
Otherwise, a valid IP address is not assigned to the EN camera.
7.5 Problem 5: EN Setup Software Found the Camera, But the Video Image is
too Dark or Just Black
1. Make sure that the iris of the lens is open. If the light sensor is connected, then it is controlling the
camera parameters such as shutter, and gain. If the light sensor is set up outdoors and the EN
camera is set up indoors in the daytime, then the image will look very dark, because the camera
parameter is probably set to the highest shutter (1H exposure time), and lowest gain (Gain=min).
Frequently Asked Questions and Troubleshooting
Page 59

TS-2030EN/TS-2076EN Series Progressive Scan Cameras
2. If you want to manually set camera parameters instead of light sensor control, you can do so by
using EN setup software. In Video control window, right-click on the camera icon. Select “Manual
Video Adjust.” Set appropriate camera parameters manually. See Figure 6.2, “Asynchronous
Reset,” on page 36 for details about the camera parameters.
7.6 Problem 6: TTL Trigger/Ethernet Trigger/Serial RS-485 Trigger Does not
Generate Trigger
1. Make sure that the “Trigger” register is set properly to enable TTL Trigger/Ethernet Trigger/Serial
RS-485 trigger. In the “Properties” window of the EN setup software, you can read/write “Trigger”
register.
2. If you choose dataID source to be RS-485 or Ethernet, make sure to send dataID within the pre/
post message time window defined in those registers. If there is no dataID or the dataID is sent after
or before the predefined window, then the trigger will be rejected as an invalid trigger. Make sure
that you set the appropriate time pre/post message time window. The factory default setting of
dataID source is self-generate mode.
Page 47
3. If the TTL trigger is noisy, then pre/post trigger condition filter may reject the trigger input to the
camera. TTL trigger must stay stable for a certain predefine pre-time before the trigger edge and
post-time after the trigger edge. If not, then the trigger will not be generated. The factory default of
pre- and post-time trigger is 1ms.
4. If TTL trigger pulse is noisy, then the trigger noise filter may reject the trigger input. TTL trigger
pulse width smaller than pre-defined trigger filter time is ignored automatically by the FPGA as
noise. The trigger noise filter factory default setting is 100us.
7.7 Problem 7: JPEG Image is Either Corrupt or Not a Full-Size Image
If the JPEG image size is set to be too small but the JPEG quality setting is too high, then the EN will
fail to save entire resolutions of JPEG. The user can either increase the size of JPEG image size (See the
Allocate Image Size section), or decrease JPEG Quality Setting. The factory default JPEG image size is
300Kbyte, and quality setting is 85.
7.8 Problem 8: EN Camera Does Not Send any FTP Image to the FTP Server
1. Make sure that the FTP server allows anonymous user for full-access operation (write/read/modify/
create directories).
2. If anonymous user is not used, make sure that the User Name, and Password on the FTP-client
register settings on the EN side match those of the FTP-server setting on the host side.
3. Make sure that the FTP-server has enough hard disk space to store TIF/JPEG images.
Frequently Asked Questions and Troubleshooting
Page 60

Page 48
TS-2030EN/TS-2076EN Series Progressive Scan Cameras
7.9 Problem 9: FTP servers switch between primary server and second server,
even if the hard disk is not full.
1. JAI has tested various FTP servers to compare performance differences. For Linux, we recommend
PureFTP server. We do not recommend vsFTP server. For Windows, we recommend Cerberus FTP
server. We do not recommend the IIS FTP server. Please contact JAIPULNiX for detail test data.
2. By increasing the time-out duration and retry count of FTP transfer, one can avoid accidentally
switching between FTP servers. However, if you move the time-out and retry count too high, the
TS-2030EN/TS-2076EN camera's image buffer (TIF or JPEG) may overflow and start losing
images, depending on the frequency of the incoming triggers. The factory default is (OpenTimeout,
DataPortTimeout, ControlPortTimeout, Max_Retry) = (1,1,1,3).
3. Make sure to turn off the logging feature of the FTP server. Logging decreases the host PC's system
memory.
4. Limit the number of files under the same subdirectory. The factory default setting is 1000 files. If
the system allows several thousand files in the same subdirectory, the FTP server performance
degrades significantly .
7.10 Problem 10: The EN Camera Does not connect to light sensor.
1. Make sure to set the proper IP address and port number for the light sensor in the EN registers.
2. Verify that the ADR register is set to "Auto" to connect to the light sensor.
7.11 Problem 11: Light Sensor Connection is Not reliable.
Inconsistent light sensor connection and communication can be solved with the following changes;
For UDP connection (Recommended. Max connection = 128):
1. Access to HTTP server of MOXA (RS-485 to Ethernet converter). Check the version of firmware.
Firmware must be 2.2 or later. If not, update the firmware.
2. Go to “Operating Settings” -> “Port 1” Change the following parameters.
3. Operation Mode UDP mode
4. Type the IP address of your EN cameras. Try to minimize the number of IP addresses, otherwise
MOXA will transmit multiple messages.
For example, if the IP address of your EN cameras are 0.0.0.60, 10.0.0.70, 10.0.0.80, then, do not
try to set the up as: "10.0.0.60 ~ 10.0.0.80". MOXA would transmit the same messages to 21 clients
in this scenario.
Instead, set up the up as: "10.0.0.60 ~ (none) 10.0.0.70~ (none), 10.0.0.80~(none)". This example transmits to only 3 clients.
Frequently Asked Questions and Troubleshooting
Page 61

Page 49
TS-2030EN/TS-2076EN Series Progressive Scan Cameras
5. Make sure to set UDP mode in EN LightSensor register.
6. If you want the EN camera to connect multiple MOXA devices (up to 2 MOXAs), do not assign
the same port number for performance reasons. Assign different port numbers.
For TCP connections (not recommended, but for customers who require TCP connections). The
maximum number of connections is four:
1. Access to HTTP server of MOXA (RS-485 to Ethernet converter). Check the version of firmware.
Firmware must be 2.2 or later. If not, update the firmware.
2. Go to “Operating Settings” -> “Port 1” Change the following parameters.
3. Operation Mode TCP Server mode
• TCP alive check time 1 min
• Ignore jammed IP YES
4. Repeat the same changes to "Operating Settings"-> "Port 2".
5. Make sure to add 120Ohm termination resistor to the very end of MOXA RS485 data port. See the
VIS-300 Installation Manual for diagram.
7.12 Problem 12: IO Board Communication Error
The IO board has a temperature sensor, a housing-open sensor, and other event sensors. When these
events occur, the IO board sends a warning to the EN camera through the 9600 bps UART. If you are
not using an IO board and a 26-pin HD-Sub cable, then you will have an IO board communication error
message. In this situation, you can simply ignore this message.
If you are using an IO board and a 26-pin HD-Sub cable and still see an IO board communication error,
then the baud rate of the EN camera may not match that of the IO board communication UART. In this
situation, you need to set the EN IO board rate register to 9600 bps, so that it matches the IO board
UART factory default (9600bps).
7.13 Problem 13: Night Time Image is Too Bright and License Plate is Whited
Out or Saturated
1. Make sure that the light sensor is connected to the EN camera (Set ADR register to Auto).
2. Add ADR A offset to reduce the gain at night time. ADR offset is used only when the night light is
turned on. When ADR A offset is high, the EN camera reduces the system gain and the brightness
of the license plate is reduced. Add only to ADR A offset.
Frequently Asked Questions and Troubleshooting
Page 62

Page 50
TS-2030EN/TS-2076EN Series Progressive Scan Cameras
7.14 Problem 14: The Day Time Image is too Bright and Whites Out or
Saturates the License Plate
1. Make sure that the light sensor is connected to the EN camera by setting the ADR register to Auto.
2. Add the ADR A side gain to reduce the gain at daytime. If B side is facing toward the same direc-
tion as the license plate, apply the ADR B side gain, instead.
3. The factory default setting is 1.00, but it can be changed up to 1.35 to reduce the camera's system
gain. The ADR A and B side gain are used only when the night light is turned off (only in daytime).
7.15 Problem 15: Flash_Erorr Appears in the Error Register
1. If you use an AC Flash Unit, enter 1 in the config register (address = 42 decimal) so that the flash
status is "Normally High. Goes Low at alarm."
2. If you use DC Flash Unit, enter 2 to config register (address = 42 decimal) so that flash status is
"Normally Low. Goes High at alarm."
3. After changing the register, save the setting to FlashROM.
7.16 Problem 16: Timestamp is Not Set to Current Local Time
1. Use the EN setup software to set local time. In the “Property” window, find the “Real Time Clock”
register. If NTP is OFF, then the displayed time is estimated to drift about 1.5 second per day.
2. If NTP is ON, then the time is automatically synchronized with the NTP server. However, the
timestamp inside the TIF/JPEG header is UTC in GMT time zone. The viewer’s software will need
to decode the UTC (GMT time zone) to sync appropriately with local time.
7.17 Information and Support Resources
For further information and support:
Phone: (408) 383-0300 (Request ITS technical support when the telephone call is answered.)
(800) 445-5444
Fax: (408) 383-0301
E-mail: imaging@jai.com
Mail: JAI Inc.
Sales Department
625 River Oaks Parkway
San Jose, CA 95134
ATTN: Video Applications
Web Site: www.jai.com
Frequently Asked Questions and Troubleshooting
Page 63

8 Appendix
8.1 Specifications
Model TS-2030EN TS-2076EN Series
Imager 1" progressive scan interline transfer CCD
Active Area
Active Pixels
Cell size 7.4um x 7.4um
Data Clock Output 40MHz
Resolution Digital: 1920 (H) x 512 (V)
S/N Ratio 50dB min (BW) 48dB min. (Color)
Video Output Digital output: JAI Inc. proprietary protocol over TCP/IP
Gamma Gamma 0.55 forBW Linear for Color
Lens Mount C-mount
Power Req. 12V DC±10%, 450 mA (typical at 25° C) (800mA required at power-up)
Operating Temp. - 10 °C t o5 5° C
Random Vibration 7 Grams (10Hz to 2000Hz)
Shock 7 0G
Weight 290 grams. 10.2 oz.
TS-2030EN/TS-2076EN Processor Module
CPU
SDRAM
0.S. Real-time Linux
External I/O Interfaces
Trigger Interface TTL. serial, or Ethernet input.
Ethernet Interface 10/100 BaseT Ethernet, TCP/IR UDP. and FTP
Serial Interfaces 2 UARTs and one RS-232 debug port
Page 51
TS-2030EN/TS-2076EN Series Progressive Scan Cameras
TABLE 10. TS-2030EN/TS-2076EN Series Product Specifications Table
14.2mm (H) x 3.8mm (V) 14.2mm(H) x 5.7mm(V)
1920 (H) x 512 (V) pixels with a 30 fps 1920 (H) x 768 (V) pixels with a 21 fps
1920 (H) x 768 (V)
Power PC 333MHz
64MB
Appendix
Page 64

Page 52
TS-2030EN/TS-2076EN Series Progressive Scan Cameras
8.2 Physical Dimensions
FIGURE 18. Physical Dimensions
8.3 Spectral Response
FIGURE 19. Spectral Response (B/W CCD for TS-2030EN/TS-2076EN)
Appendix
Page 65

TS-2030EN/TS-2076EN Series Progressive Scan Cameras
FIGURE 20. Spectral Response (Color CCD for TSC-2030EN/TSC-2076EN)
Page 53
TABLE 11. TABLE 11. IR Cut Filter Optical Characteristics
Wavelength Transmission
from 450 to 650 nm Average 80% above
730 ±20 am Average 50%
from 800 to 1,150 nm Average 10% below
Appendix
Page 66

Page 54
TS-2030EN/TS-2076EN Series Progressive Scan Cameras
Appendix
Page 67

Page 55
Page 68

See the possibilities
JAI Inc.
625 River Oaks Pkwy
Email: imaging@jai.com
www.jai.com
San Jose, CA 95134
Tel: 408 383 0300
Tel: 800 445 4444
www.jaipulnix.com
10490
Rev. A
 Loading...