

Page 1
GigE Vision
Update Procedure
Digital Monochrome/Color
RM/TM/RMC/TMC GE Camera
Document Version: A
Document P/N: 10701
Page 2

Page 3

GigE Vision Update Procedure
Disclaimer
The material contained in this manual consists of information that is proprietary to JAI Inc., and may only be
used by the purchasers of the product. JAI, Inc. makes no warranty for the use of its product and assumes no
responsibility for any errors which may appear or for damages resulting from the use of the information
contained herein. JAI, Inc. reserves the right to make changes without notice.
Microsoft, Windows 95, 98, NT, 2000, XP, and Windows Explorer are either registered trademarks or trademarks
of Microsoft Corporation in the United States and/or other countries.
JAI Inc.
625 River Oaks Parkway
San Jose, CA 95134
Tel:(408) 383-0300
Tel:(800) 445-5444
Fax:(408) 383-0301
www.jai.com
November 13, 2009
Disclaimer iii
Page 4

GigE Vision Update Procedure
iv Disclaimer
Page 5

GigE Vision Update Procedure
Table of Contents
Disclaimer Notice ................................................................................................... iii
Table of Contents ................................................................................................... v
List of Figures ....................................................................................................... vii
List of Tables ......................................................................................................... ix
Introduction ............................................................................................. 7
1
1.1 Process Overview ...................................................................................... 7
2 Uninstall Previous Drivers and Software ........................................................... 8
2.1 Uninstall network drivers ............................................................................. 8
2.2 Uninstalling versions of Cam2Net 2.2.x.x or older (Optional) ................................. 10
3 Install the JAI SDK. ................................................................................... 11
4 Perform the firmware update ...................................................................... 12
4.1 Download the update package ...................................................................... 12
4.2 Updating CPU Firmware ............................................................................. 12
4.3 Updating GEV firmware .............................................................................. 15
5 Firmware Restore ..................................................................................... 20
6 Troubleshooting: ...................................................................................... 22
Table of Contents v
Page 6

GigE Vision Update Procedure
List of Figures
Figure 1.
Figure 2. The Drivers tab displays all network drivers. ..................................................... 8
Figure 3. Changing Intel PRO/1000 Drivers .................................................................... 9
Figure 4. The Device Class becomes Ethernet. ............................................................... 9
Figure 5. Locating a Filter Driver ............................................................................... 9
Figure 6. Uninstall any Filter Drivers. .......................................................................... 9
Figure 7. Recording the NIC MAC address .................................................................... 10
Figure 8. Click the Remove button to uninstall Cam2Net .................................................. 10
Figure 9. Click "Yes” to uninstall all Cam2Net related software. ......................................... 10
The driver tool launch shortcut. .................................................................... 8
vi Table of Contents
Page 7
GigE Vision Update Procedure
1 Introduction
GigE Vision compliant cameras use an interface convention overseen by the Automated Imaging Association
(AIA). This interface is recognized by GigE compliant software regardless of who built the camera or wrote the
software. Some JAI Gigabit Ethernet cameras may be ordered with firmware that is not fully compliant with the
GigE Vision and GenICam standards. This is typically done to provide backwards compatibility with applications
and environments developed before the final standards were ratified. Should users of these cameras wish to
make them fully GigE Vision compliant, it is necessary that they update the firmware inside the camera. This
update process brings these cameras into compliance with the standard and allows proper access to GigE Vision
control software.
Note: Cameras labeled as JAI PULNiX and PULNiX are JAI, Inc. products. This update applies only to so-called
“Puli 3” cameras, which are defined as any JAI GigE cameras with model numbers beginning with TM,
TMC, RM, or RMC which were manufactured between November 1, 2007 and October 1, 2009, or were
manufactured after October 1, 2009 with the OP-iPORT option. For GigE cameras built prior to November
1, 2007 (Puli 2) a separate update procedure can be found on the jai.com website.
GigE Vision Software & Firmware Installation
1.1 Process Overview
Warning: This update process will cause all saved user settings to be re-initialized to the factory
defaults. This includes both GPIO settings and camera settings that may have been saved to
the camera’s memory pages. It is recommended that you write down any changes that you
have made to these settings before proceeding. You will be able to use this information to
re-configure your boot up settings and any other saved data sets after the camera is
updated.
JAI offers several models of Gigabit Ethernet cameras that were originally conceived before the final GigE
Vision and GenICam interface standards were ratified. Older versions of these cameras (shipped prior to
October 1, 2009) were originally shipped with firmware designed to provide backwards compatibility with
applications and environments (Cam2Net 2.X.X) developed before the final GigE Vision and GenICam standards
were ratified. Likewise, any JAI GigE camera that has been ordered with the OP-iPORT option has been shipped
with a GigE firmware engine that is not fully GigE Vision compliant.
This installation guide is for JAI customers with non-compliant GigE cameras who wish to update their cameras
to full GigE Vision/GenICam compliance. The guide provides instructions for configuring your TM, TMC, RM, or
RMC GigE camera in the manner that best meets your needs. The process is as follows:
• If your PC contains any previously-installed Cam2Net software:
• Uninstall all filter and high performance drivers and restore the GigE network interface card (NIC) to
its original Windows driver
• Obtain the MAC address of the GigE NIC
• If you have Cam2Net 2.2.0 or earlier, it will not recognize the new GEV protocol
• You can uninstall Cam2Net if you do not need it any longer
• Install the latest JAI GigE Vision SDK
• Download and run a camera-specific Updater package to update the camera firmware
Introduction 7
Page 8
GigE Vision Update Procedure
2 Uninstall Previous Drivers and Software
Note: This section applies if you are installing your new camera control software on a PC that contains a
previously-installed version of the Cam2Net software. If you are installing on a PC which contains no
previous Cam2Net software, skip directly to section 3.
2.1 Uninstall network drivers
If you have Cam2Net software installed on your system, you must uninstall the high performance driver and any
filter drivers associated with the iPORT firmware engine. Since the Driver Installation Tool is lost after the
newest Cam2Net installation, begin by checking current network drivers to be sure the desired software is in
place. After you uninstall Cam2Net 2.2.x.x it is more difficult to access these drivers. To begin the process:
• Disconnect all attached cameras.
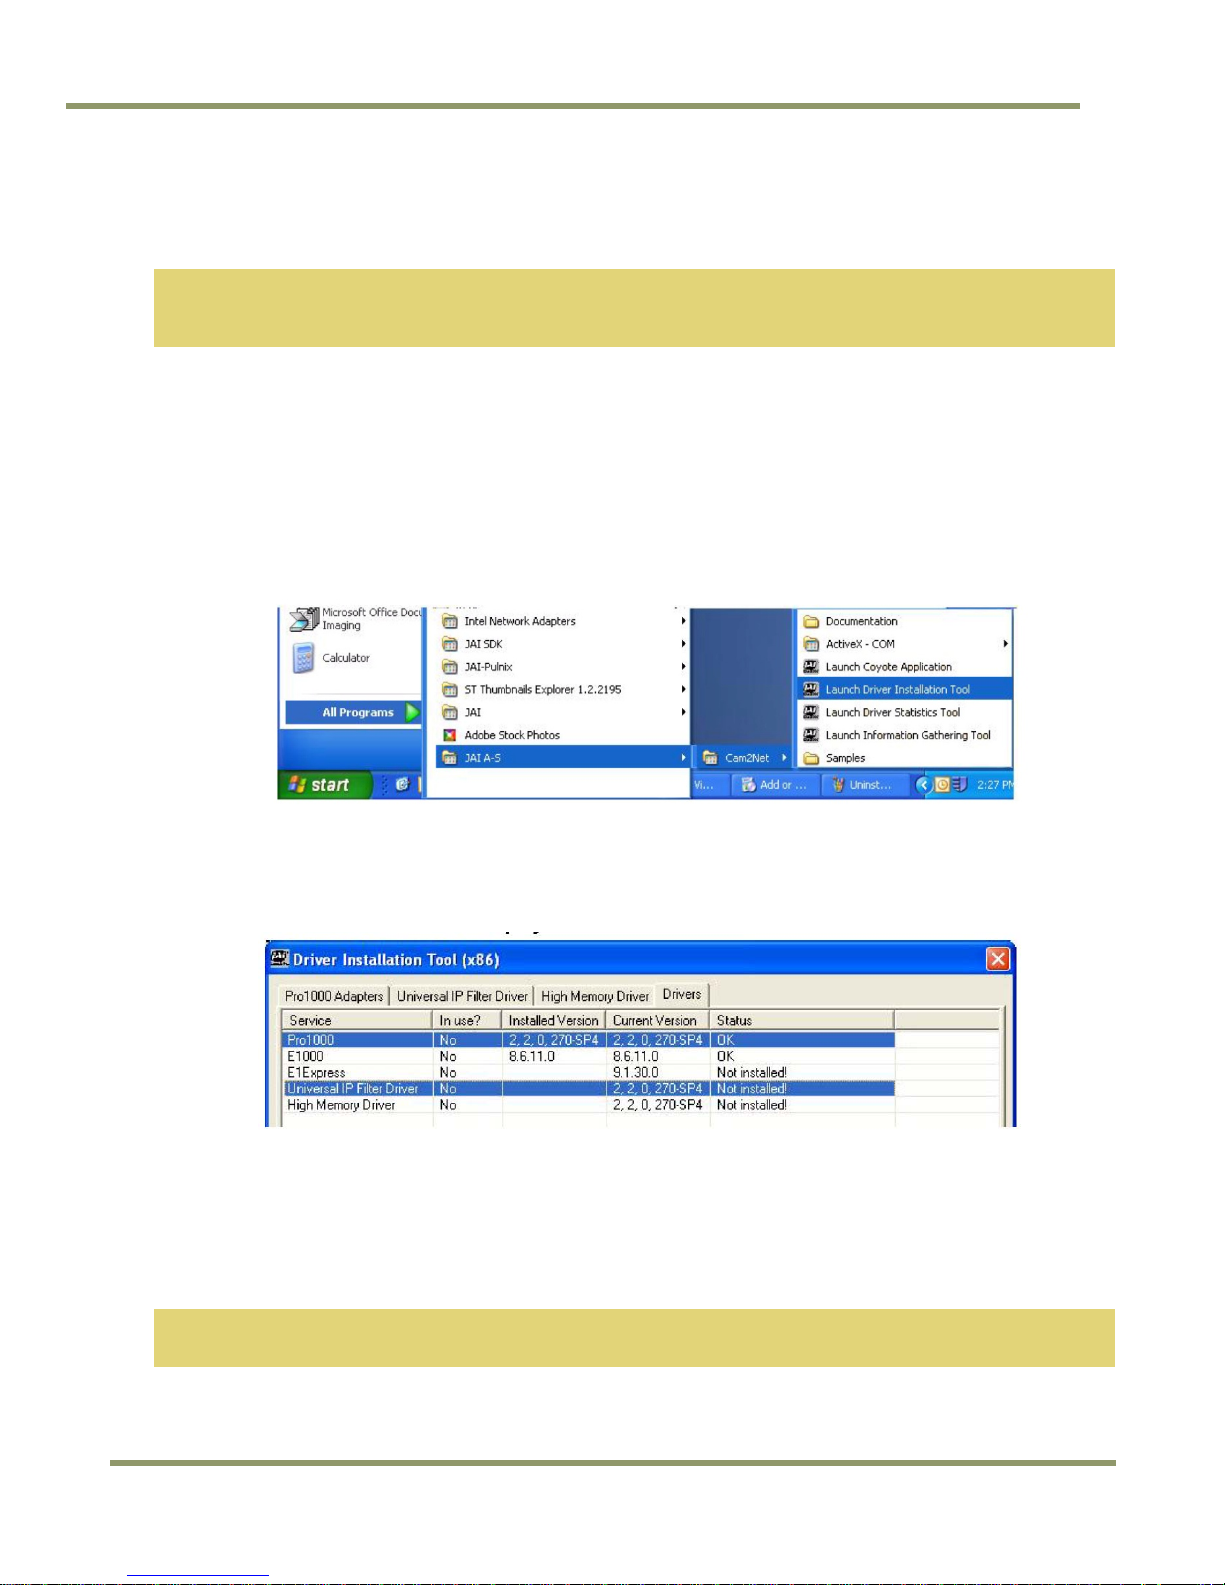
• Launch the Cam2Net Driver Installation Tool from the desktop
Figure 1. The driver tool launch shortcut.
• The Driver Installation Tool displays all network drivers installed on the computer system.
• Click on the Drivers tab to view the network driver listing.
Figure 2. The Drivers tab displays all network drivers.
The specialized tabs provide more options than the driver tab. Click on the “Pro1000 Adapters” tab where we
will uninstall the high performance driver and replace it with an Ethernet driver.
• Right click the adapter listing to open a replacement menu.
• Click on “Install Intel Network Driver.” This will both uninstall the high performance driver and replace it
with an Ethernet driver.
Note: Because we want to both Uninstall AND Replace the driver DO NOT click the “Uninstall Driver” selection.
Use the “Install Intel Network Driver” option instead.
8 Uninstall Previous Drivers & SW
Page 9

GigE Vision Update Procedure
Figure 3. Changing Intel PRO/1000 Drivers
• After the replacement completes the listing changes on the Driver Installation Tool. The Device Class goes
from Grabber Device to Ethernet.
Figure 4. The Device Class becomes Ethernet.
• The same Cam2Net Driver Installation Tool allows you to uninstall a Filter driver.
• Click on the Universal IP Filter Driver tab. This tab displays any filter drivers located on the system. In this
example the Broadcom filter driver is supplied.
Figure 5. Locating a Filter Driver
• Remove the filter driver by clicking on the “Uninstall Filter Driver” button at the bottom of the
window
Figure 6. Uninstall any Filter Drivers.
Uninstall Previous Drivers & SW 9
Page 10

GigE Vision Update Procedure
After restoring the Ethernet driver to the original network interface card manufacturer’s driver, find and write
down the MAC address of the GigE interface to which you will connect the camera.
Open a command window and type “ipconfig /all” to view the MAC addresses of NICs installed on the computer
system (see below). Locate the NIC card used to connect to GigE cameras (the Intel PRO card is shown below)
and write down the physical address of the card for reference later in the process.
Figure 7. Recording the NIC MAC address
2.2 Uninstalling versions of Cam2Net 2.2.x.x or older (Optional)
To remove the previous versions of the Cam2Net software from a Windows XP system, click on the Start button
and select the Control Panel. Inside the Control Panel double-click on Add or Remove Programs. Locate all
installations of Cam2Net (version 2.2.x.x or older) and click on the Remove button.
Figure 8. Click the Remove button to uninstall Cam2Net
• The uninstall process asks if all software should be removed. Select Yes.
Figure 9. Click "Yes” to uninstall all Cam2Net related software.
10 Uninstall Previous Drivers & SW
Page 11

GigE Vision Update Procedure
3 Install the JAI SDK.
Download and install the latest version of the JAI GigE Vision SDK and Control Tool software from the JAI
website. The instructions for this step are available on the download page in a document called “Getting
Started Guide”.
The latest version of the JAI GigE Vision SDK and Control Tool software, as well as the “Getting Started Guide”
can be downloaded from:
www.jai.com/EN/CameraSolutions/Download/Pages/JAI_SDK_and_control_tool.aspx
Install JAI SDK 11
Page 12

GigE Vision Update Procedure
4 Perform the firmware update
4.1 Download the update package
Download the firmware update package for your camera from the iPORT firmware page on the JAI website at
http://www.jai.com/EN/CameraSolutions/Download/Pages/Cam2NetSW.aspx. There is one package for each
camera series (e.g., TM-6740GE, RM-6740GE, TMC-6740GE, RMC-6740GE). The update package contains two
folders: CPU firmware and GEV firmware. It is necessary to update the CPU firmware before the GEV
firmware.
4.2 Updating CPU Firmware
1. Connect the camera you will be updating directly to the PC and power-up the camera
2. Go into the “1) CPU Firmware” folder. There should be 2 files:
a. The updater program: TMH8Update.exe
b. The firmware: TM[Model Number]GE_v[Version format: YYMMDDZZ].PAT
Example: TM6740GE_v09020900.PAT
3. Run the TMH8Update.exe by clicking on it.
12 Perform FW Upgrade
Page 13

GigE Vision Update Procedure
4. Click Connect and you will see the following window
5. Select the IP engine associated with the NIC that matches the MAC address you recorded at the end of
section 2.1. If you do not see any item in the “Available IP Engines” box make sure:
− The camera has finished acquiring IP Address
− A High Performance or Filter driver is not blocking communication.
− Firewall or 3rd party internet security software is disabled.
6. If you don’t see a yellow exclamation icon then proceed to step 8. Otherwise double click the yellow
exclamation mark. Enter a valid IP Address by copying the IP address from the NIC settings into the IP
Address field for the IP Engine, then change the last digit of the rightmost number to create a unique ID
(e.g., in the screen below, 72 has been changed to 75 in the IP Engine Settings). Click OK.
7. If the IP Address is valid, the form will close and the IP Engine Selection window will refresh to show the
IP Address following the MAC address of the selected IP Engine. If the message “Invalid IP address”
appears in the Warnings box, change the rightmost number again and Click OK until a valid number is
found.
Perform FW Upgrade 13
Page 14

GigE Vision Update Procedure
8. Click OK on the IP Engine Selection screen. A camera selection window pops up. Even though this is a
GigE camera, you can select “Standard CameraLink Camera” and click OK to continue the process. There
is no need to expand the JAI, Inc. listing to find your specific camera model.
9. The camera’s CPU version will now show up.
10. Click Select File button. Navigate to the folder where the PAT file is located (usually the same folder as
the TMH8Update.exe). Select the file and click Open.
14
Perform FW Upgrade
Page 15

GigE Vision Update Procedure
11. If the “CPU version” shown is the same or larger than the PAT filename indicated then you don’t need to
update. Click the X button to close and go to the GEV Update section.
12. If the “CPU version” shown is not in the “[CameraName]_v[yymmddvv].PAT” format then you should
update. Click the Update button.
Warning: Do not unplug the cables or power off the camera during the update.
13. The status bar will increment to show progress. When finished a DONE will show.
14. Power the camera off and then back on so the new CPU firmware will tak e effect and move on to the GEV
update section.
4.3 Updating GEV firmware
1. With the camera connected and the power on, go into the “2) GEV Firmware” folder.
2. Go into the folder with your camera model name.
Perform FW Upgrade 15
Page 16

GigE Vision Update Procedure
3. Click and run the JAIGEVUpdater_MFR.exe.
4. After the application loads, select the camera.
5. Click on Update and you will see a window similar to that shown below:
a. If you do not see any item in the “Available IP Engines” box make sure:
- The camera has finished acquiring IP Address
- A High Performance or Filter driver is not blocking communication.
- Firewall or 3rd party internet security software is disabled.
Note: Recycling the power to the camera at the end of the previous section may cause the camera to lose its IP
address as shown in the following screen. If so, an IP address can be reset in the following step.
16 Perform FW Upgrade
Page 17

GigE Vision Update Procedure
6. Select the IP engine associated with the NIC that matches the MAC address you recorded at the end of
section 2.1. If you don’t see a yellow exclamation icon then proceed to step 8. Otherwise double click the
yellow exclamation mark. Enter a valid IP Address by copying the IP address from the NIC settings into the
IP Address field for the IP Engine, then change the last digit of the rightmost number to create a un ique ID
(e.g., in the screen below, 72 has been changed to 75 in the IP Engine Settings). Click OK.
7. If the IP Address is valid, the form will close and the IP Engine Selection window will refresh to show the IP
Address following the MAC address of the selected IP Engine. If the message “Invalid IP address” appears in
the Warnings box, change the rightmost number again and Click OK until a valid number is found.
8. Click OK to update the camera:
Warning: Do not unplug the cables or power off the camera during the update.
Perform FW Upgrade 17
Page 18

GigE Vision Update Procedure
9. When updating is done the software will attempt to initialize the camera settings. Please wait about 30
seconds. This must be done.
10. After 30 seconds if the software cannot connect, it will ask to redo the search. Click Yes until the camera
can be connected.
11. You are now done with the updating process. Make sure you see a SUCCESS in the status box. Take note of
any ERROR message you see.
18 Perform FW Upgrade
Page 19

GigE Vision Update Procedure
Perform FW Upgrade 19
Page 20

5 Firmware Restore
An updated camera can be restored to the previous version of firmware by using the firmware restore package
available on the JAI website. Two restore packages are available, depending on the manufacturing date of the
camera (see the label on the bottom of the camera for the manufacturing date).
Once the proper package is downloaded, extract the zipped files to a folder on your PC. The directory contains
three files.
GigE Vision Update Procedure
• Connect the camera to be restored directly to the PC and power up the camera
• Double-click on RUN THIS – GIGE_UPDATER_378.exe to open the restore window
• Select the IP Engine line containing the MAC address. This will bring up more information about the
camera in the right frame.
• Review the information to verify that the proper action will occur (i.e., restore from an updated mode of
GEV Version 1.X to an “unknown” old mode).
• Click OK
20 Firmware Restore
Page 21

GigE Vision Update Procedure
A “camera type” window displays
• Select the camera number using the drop-down list
• Check the box if the camera is a color camera
• DO NOT enter the number of bits – they are automatically detected and a wrong entry could cause the
firmware restore to fail
• Click OK
After the restore completes, the operating system may report several incidences of “found new hardware”.
Ignore these reports from the operating system.
The software allows you to follow the status of the restore, and displays whether the installation succeeds or
fails.
Firmware Restore 21
Page 22

6 Troubleshooting:
In the event that the CPU update process fails:
Note: The update process after a failure can take longer than normal.
1. Do NOT power down the camera.
2. Run the CPU updater again. The CPU Version will show strange text because the CPU is in a different
state.
a. A message box may show up saying the camera reply with an error. Quit the CPU updater, wait a bit,
and rerun again.
3. After multiple tries of step 2, if you cannot complete an update, power off the camera and rerun the
updater.
GigE Vision Update Procedure
22 Troubleshooting
Page 23

Page 24

Europe, Middle East & Africa
Phone +45 4457 8888
Fax +45 4491 3252
Asia Pacific
Phone +81 45 440 0154
Fax +81 45 440 0166
Americas
Phone (Toll-Free) 1 800 445-5444
Phone +1 408 383-0301
www.jai.com
 Loading...