


esidential Jade Use
ua
R
r Man
l

General Safety Requirements
1. Proper installation is vital to the safe and
satisfactory operation of your Jade Range. In the
USA, installations should be made in accordance
with state and local codes and National Gas Fuel
Code ANSI-Z223.1. In Canada, installation should
be made in accordance with CAN/CGA-B149.1 and
CAN/CGA-B149.2 "Installation Code for Gas
Burning Appliances and Equipment", CSA
Standard C22.1-"Canadian Electrical Code Part 1",
and local codes.
2. Installation of appliances designed for
manufactured (mobile) home installation must
conform with the Manufactured Home Construction
and Safety Standard, Title 24 CFR, Part 3280
[formerly the Federal Standard for Mobile Home
Construction and Safety, Title 24, HUD (Part 280)]
or, when such standard is not applicable, the
Standard for Manufactured Home Installations,
ANSI A225.1 and Manufactured Home
Installations, Sites, and Communities ANSI/NFPA
501A, or with local codes.
3. If an external electrical source is utilized, the
appliance, when installed, must be electrically
grounded in accordance with local codes or, in the
absence of local codes, with the National Electrical
Code, ANSI/NFPA 70.
WARNINGS AND NOTICES
WARNING: If the information in this
manual is not followed exactly, a fire or
explosion may result causing property
damage, personal injury or death.
- Do not store or use gasoline or other
flammable vapors and liquids in the
vicinity of this or any other appliance.
- WHAT TO DO IF YOU SMELL GAS
•Do not try to light any appliance.
•Do not touch any electrical switch; do
not use any phone in your building.
•Immediately call your gas supplier from
a neighbor's phone. Follow the gas
supplier's instructions.
•If you cannot reach your gas supplier,
call the fire department.
- Installation and service must be
performed by a qualified installer, service
agency or the gas supplier.
safety
1

User Manual
Gas Ranges and Cooktops
SAFETY
Warnings and Notices
Safety Instructions
In the Event of a Power Failure
STEPS TO FOLLOW
Congratulations
Special Features
Model and Serial Number Location
Complete and Return Warranty Card
Warranty
OPERATION
Features o
RJCT Series
Features of Your Range
RJGR Series
Before Using Your Oven
Standard vs. Convection Oven
Standard Oven
Convection Oven
Infrared Broiling
Top Section Characteristics
Open Top Burners
Wok
Charbroiler
Griddle
..................................Back Cover
f Your Cooktop
...............................................8
......................……...............11
........................16-17, 22-23
.......................................................28
........................................29-30
..............................................31-33
..............................1
.................................6-7
...............13
........................................3
.......................................3
.........................12
...........14-15
....................18-19, 22-23
.......................20-21,24-25
....................26
..............................26-27
........4-5
........4
CLEANING & MAINTENANCE
Standard Oven
Convection Oven
Infrared Broiler
Exterior Surfaces
Open Top and Wok Burners
Charbroiler
Griddle
A Guide to the Perfect Flame
Checking the Flame
Lubricating the Oven Door
Replacing the Oven Bulbs
QUESTIONS
Use this Easy
Troubleshooting Guide
SUPPORT
Customer Service
Before Calling for Service
..................................34-36
...............................37-38
.......................................38
....................................39
.............................................42
...................................................43
...........................44-45
Models: RJGR
RJCT
..............40-41
......................46
.......................47
.......................48-49
.......................51
2

Congratulations,
You've Joined Our Family
Of State-Of-The-Art Ranges
And Discerning Owners
Incorporating numerous components from a widely
acclaimed line of Jade commercial ranges, with a host
of technologically advanced home convenience
features, your new Jade Range is designed to bring you
countless years of satisfaction and pride.
Jade offers its users the ability to create professional
looking and tasting meals with relative ease, from the
comfort and convenience of the home.
JADE SERIES
Equipped with numerous cooking, baking and broiling
options, Jade Ranges afford tremendous flexibility in
food creation and preparation. Jade broadens the
capability of a home kitchen the instant it arrives.
Jade Products Company, the manufacturer of Jade
Ranges, is recognized as a leader in state-of-the-art
ranges for the food service industry, as well as the
home. Jade ranges and other appliances are the choice
of gourmets across the nation.
Thank you for joining our Jade Family.
steps to
follow
Special Features Distinguish Our Jade
Ranges, And Promote Its Longevity.
Built to perform to the highest standards, and endure
for a generation, Jade Ranges are manufactured
through welded construction of aluminized steel and
stainless steel. Only the highest food grade, nonmagnetic stainless steel, Type #304, is used on our
ranges.
Many years of research and engineering have gone into
the manufacture of your new Jade Range. Truly a
professional quality appliance designed and
manufactured for home applications, your Jade Range
is equipped with special features not often found on
residential ranges, or even on ordinary commercial
ranges.
Your new Jade Range has been constructed with extra
care and attention to details:
• Stainless steel gas tubing assures maximum safety
and reliability.
• Constructed of stainless steel, the open burners are
equipped with electronic ignition, thus eliminating
the need for pilot lights.
• The wok burner features a conduction chamber
specially designed to produce optimum heat.
• The griddle operates with a U-shaped burner, which
affords superior heat distribution. (Ordinary domestic
griddles are equipped with a single straight tube
burner.)
• Jade charbroilers are simple to clean (unlike common
charbroilers which use lava rocks or bricks that
collect fat and grease).
• Oven racks are fabricated of heavy gauge wire,
welded and chrome plated with a "wraparound front"
to prevent the scratching of cooking utensils.
• The oven broiler features an infrared burner which
glows instantly, radiating infrared heat within a few
seconds of ignition. No preheating is necessary.
• To eliminate glare, oven lamps are mounted on the
sides, not on the rear of the ovens.
• Oven interior is constructed of heavy gauge stainless
steel.
3

steps to
follow
Keep handy for reference...
CONSUMER INFORMATION
This manual is intended to serve as a guide for the operation
and maintenance of your new Jade Range. Please read it
carefully, and keep it handy for reference.
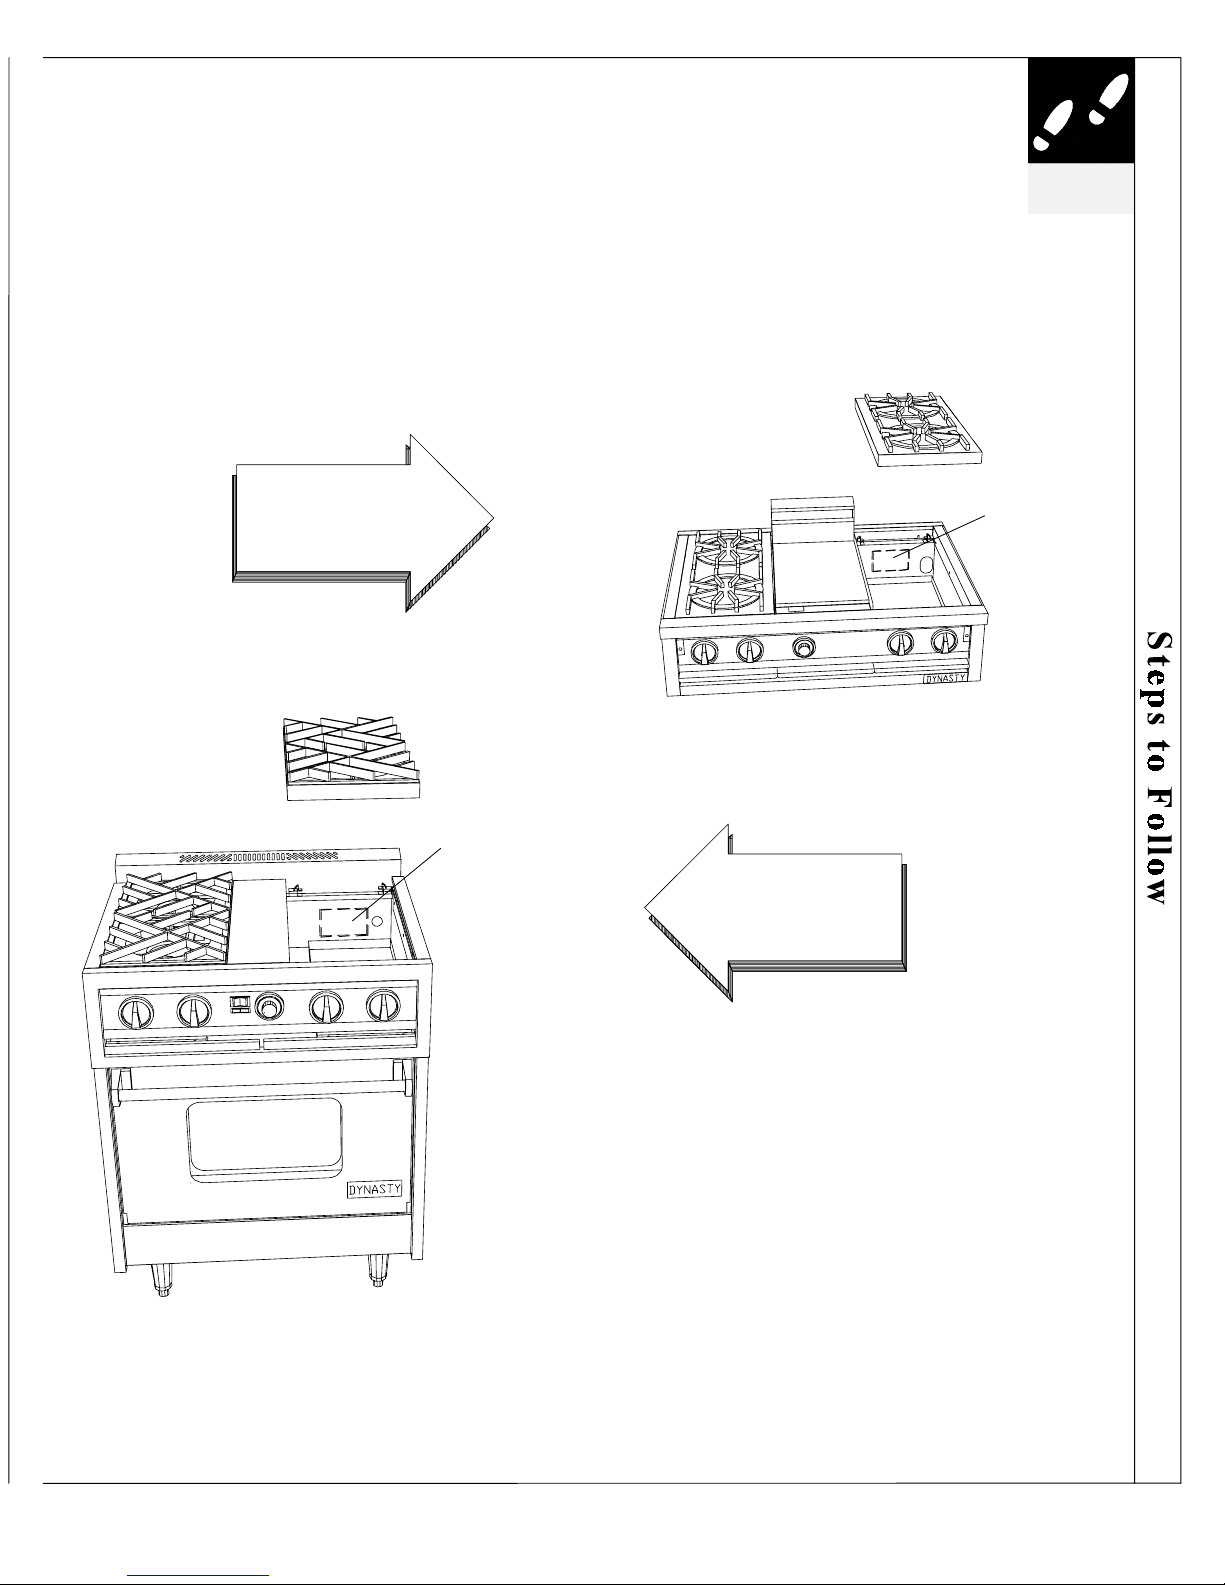
Locate the model and serial numbers.
Your New Appliance model and serial numbers are
included on a nameplate located under the cooktop area of
the range (see illustration on page 5). Grates and grate
supports must be removed in order to access the nameplate
label. Refer to instructions on page 40.
NOTE: When removing grates and grate supports, use care
to avoid scratching stainless steel surfaces.
Complete and return the warranty card.
Please take a moment to fill out and mail the Warranty Card
included with your Jade Range. Make sure you enter the
model and serial numbers of your new appliance on the
Warranty Card.
For future reference, record the following information and
refer to it when contacting the factory or an authorized
service agent.
____________________ _____________________
Model Number Serial Number
___________________________ ____________________________
Date Purchased Purchased From
___________________________ ____________________________
Installation Date Installed By
___________________________
Telephone Number
4
RECORD MODEL AND SERIAL NUMBER –
NAMEPLATE LABEL EASY TO FIND!
steps to
follow
RJCT SERIES
LABEL
LOCATION
RJGR SERIES
LABEL
LOCATION
5

Please read before operating your new Jade Range
SAFETY INSTRUCTIONS
safety
General Precautions
1. Your Jade Range should be installed and grounded
by a qualified technician. Ask the installer to show
you where the gas shut-off valve is located, and
how to operate it.
2. If the range is to be installed on an area covered
with linoleum or any other flooring, make sure that
°
the floor covering can withstand 90
above room temperature without warping, shrinking
or discoloring. Do not install the range over
carpeting.
3. Be sure your range is correctly adjusted by a
qualified service technician or installer for the type
of gas (Natural or LP) on which it is to be used.
Your range can be converted for either type of gas.
Refer to the Installation Manual for instructions.
4. If you smell gas, call a qualified service technician.
Do not try to fix the problem yourself. Follow the
instructions entitled "What To Do If You Smell
Gas" on page 2.
5. Caution: To prevent fire or smoke damage remove
all packing materials from the range before
operating it.
6. Before starting to cook, clean the range thoroughly
with hot, soapy water. This is necessary to remove
residuals and solvents used at the factory to clean
and remove dirt, oil and grease which may have
remained from the manufacturing process. The
griddle plates should also be thoroughly cleaned.
7. In the event a burner goes out and gas escapes, turn
off burner knobs, open a window or door and let the
room air out. Do not attempt to use the appliance
until the gas has had time to dissipate.
8. Do not attempt to repair or replace any part of this
appliance unless specifically recommended in this
manual. Service should only be performed by a
qualified technician. Warranty service must be
performed by an authorized service agency.
F (65
°
C)
9. Locate range out of the kitchen traffic path and out
of drafty locations to prevent poor air circulation. It
is important that neither the fresh air supply to the
appliance, nor the flue opening is obstructed. Your
kitchen must provide an adequate supply of fresh
air to assure proper combustion and ventilation.
10. Allow a minimum vertical distance of 30" between
the range top surface and any combustible cabinets
installed directly above the range. Overhead
cabinets should be no more than 13" deep.
11. We recommend a clearance of 30" between the
range top and the bottom of the ventilating hood.
To confirm clearance distances and assure
maximum performance, we recommend consulting
the hood manufacturer.
12. The front of your range must remain clear of any
obstruction. For proper operation and servicing, a
free area of at least 36" in front of the range is
recommended.
13. The area surrounding your Jade Range should be
kept clean, and free from flammable liquids and
other combustible materials such as mops, rags,
brooms, etc., as well as solvents, cleaning fluids,
and gasoline.
14. Caution: Do not attempt to operate the oven,
griddle or infrared broiler during a power failure.
Open top burners, the wok and the charbroiler can
be lit manually, with a match.
15. A risk of a tipover may exist if installation
instructions - including those relating to excessive
loading of the oven door, and abnormal use - are
not followed. See installation manual.
16. Never line surface burners with tin foil.
6

SAFETY INSTRUCTIONS SAFETY INSTRUCTIONS
Precautions Regarding Children
Precautions Regarding Children
1. Never leave children unattended in the kitchen
1. Never leave children unattended in the kitchen
while the range is in use.
while the range is in use.
2. Do not store items of interest to children above the
2. Do not store items of interest to children above the
range; climbing to reach those items could cause
range; climbing to reach those items could cause
serious injuries.
serious injuries.
3. Do not allow children to sit or stand on any part of
3. Do not allow children to sit or stand on any part of
the range.
the range.
Use Precautions Use Precautions
1. Never leave the cooking surface unattended while
1. Never leave the cooking surface unattended while
using high flame settings. Boilovers cause smoking,
using high flame settings. Boilovers cause smoking,
and greasy boilovers may ignite.
and greasy boilovers may ignite.
2. Do not use water on grease fires. Never pick up a
2. Do not use water on grease fires. Never pick up a
flaming pan. Turn appliance off and smother the
flaming pan. Turn appliance off and smother the
flaming pan with a tight-fitting lid, cookie sheet or
flaming pan with a tight-fitting lid, cookie sheet or
flat tray. For flaming grease outside of the pan,
flat tray. For flaming grease outside of the pan,
smother with baking soda, or use a dry chemical or
smother with baking soda, or use a dry chemical or
foam type fire extinguisher.
foam type fire extinguisher.
3. When "flaming" liquor or other spirits under an
3. When "flaming" liquor or other spirits under an
exhaust hood, turn the fan off. The draft could
exhaust hood, turn the fan off. The draft could
cause flames to rage out of control.
cause flames to rage out of control.
4. Your Jade Range is for cooking and baking only.
4. Your Jade Range is for cooking and baking only.
Safety considerations prevent its use for warming
Safety considerations prevent its use for warming
or heating a room.
or heating a room.
5. Do not use the range as a storage area. Do not use 5. Do not use the range as a storage area. Do not use
(continued) (continued)
the top burner section of the oven or the broiler
the top burner section of the oven or the broiler
6. Always use the proper size pan. Select utensils with
6. Always use the proper size pan. Select utensils with
7. Proper apparel is a safety consideration. Never wear
7. Proper apparel is a safety consideration. Never wear
8. Only use dry potholders - do not use a towel or
8. Only use dry potholders - do not use a towel or
9. Always position handles of utensils inward, so they
9. Always position handles of utensils inward, so they
10. Do not touch surface areas near burners until they
10. Do not touch surface areas near burners until they
safety
safety
section of the range as a storage area for flammable
section of the range as a storage area for flammable
or plastic items which may ignite.
or plastic items which may ignite.
flat bottoms large enough to cover the burner. The
flat bottoms large enough to cover the burner. The
use of undersized utensils exposes the sides of the
use of undersized utensils exposes the sides of the
utensils to direct contact with a portion of the
utensils to direct contact with a portion of the
flame. This can scorch the utensil, and hamper
flame. This can scorch the utensil, and hamper
cleanup. Excessive flames on large stainless steel
cleanup. Excessive flames on large stainless steel
pots can result in permanent discoloration. For best
pots can result in permanent discoloration. For best
results, we recommend commercial quality
results, we recommend commercial quality
aluminum pans and utensils. Cookware should not
aluminum pans and utensils. Cookware should not
be used on open top charbroilers.
be used on open top charbroilers.
loose-fitting or hanging garments while using your
loose-fitting or hanging garments while using your
Jade Range.
Jade Range.
other bulky cloth in place of potholders. Moist or
other bulky cloth in place of potholders. Moist or
damp potholders used on hot surfaces could cause
damp potholders used on hot surfaces could cause
burns from steam.
burns from steam.
do not extend over adjacent work areas or cooking
do not extend over adjacent work areas or cooking
areas. This reduces the risk of burns, ignition of
areas. This reduces the risk of burns, ignition of
flammable materials, and spillage due to accidental
flammable materials, and spillage due to accidental
contact with the utensil.
contact with the utensil.
have had sufficient time to cool. These areas can
have had sufficient time to cool. These areas can
become hot enough to cause burns.
become hot enough to cause burns.
SAVE THIS MANUAL
SAVE THIS MANUAL
FOR FUTURE
FOR FUTURE
REFERENCE
REFERENCE
77
operation
3
6
5
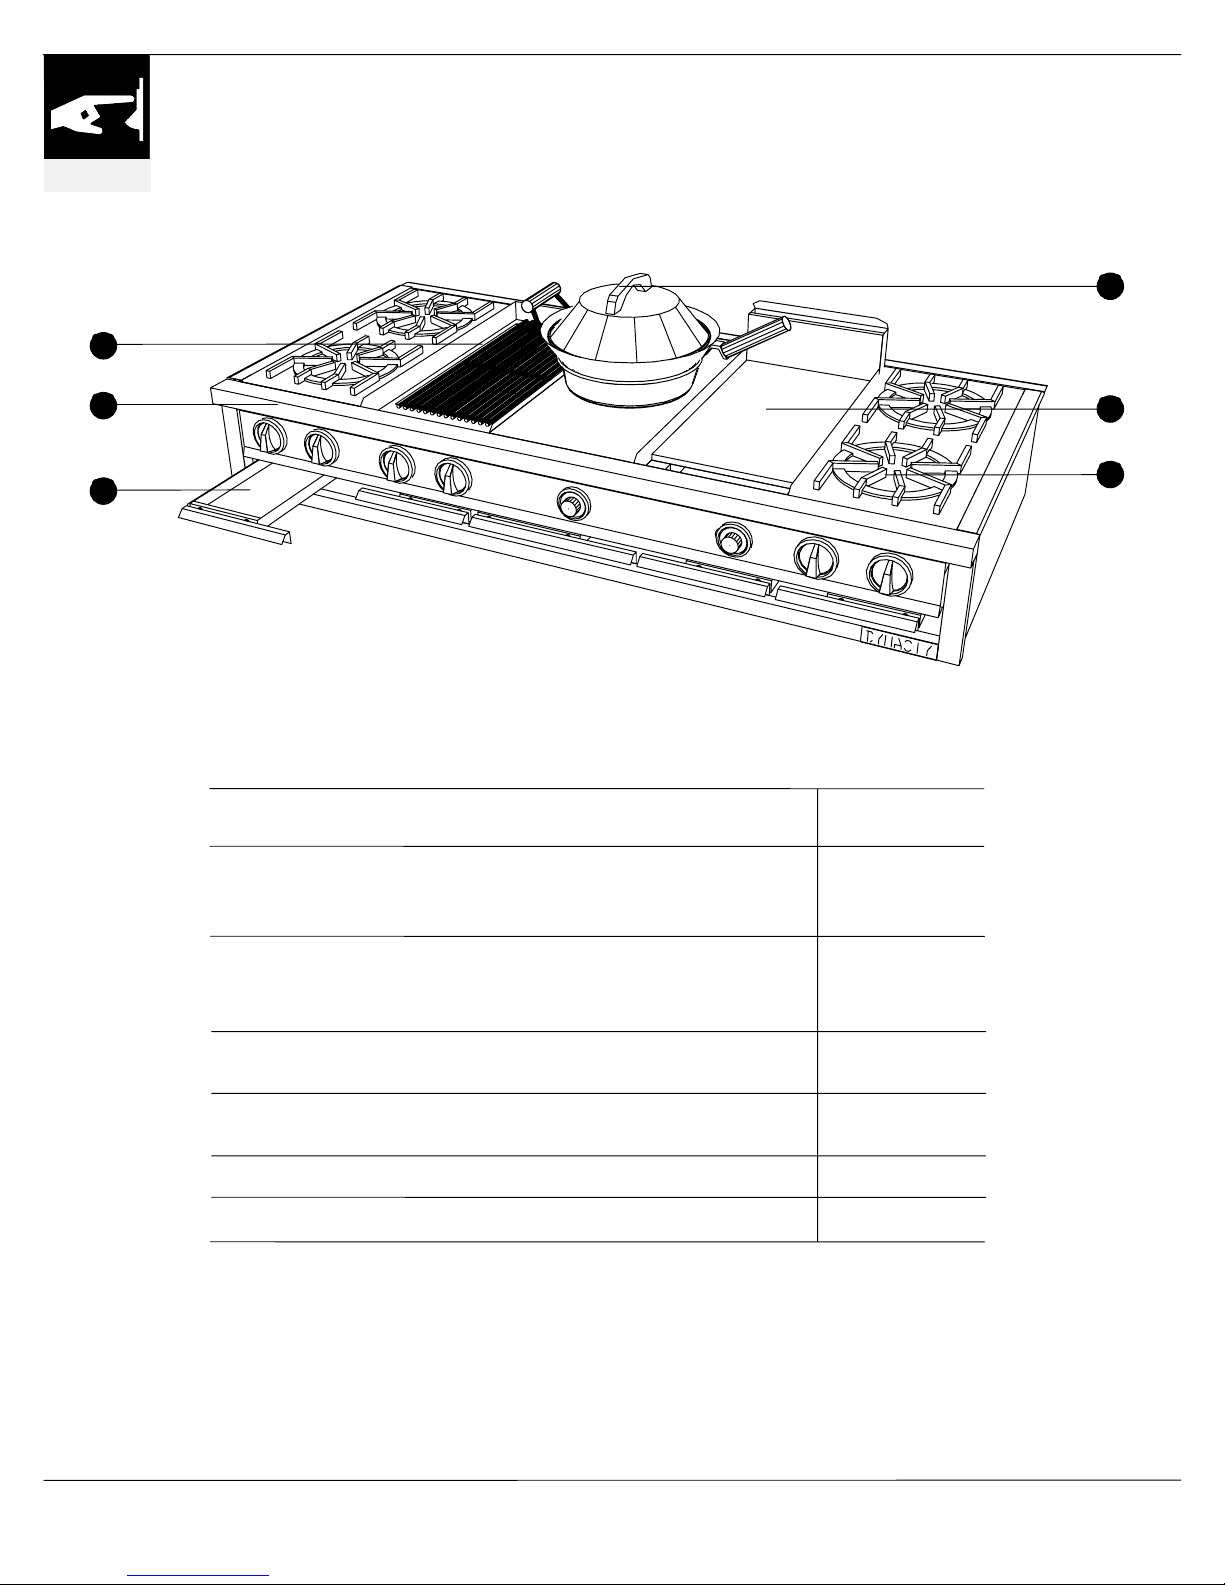
FEATURES OF YOUR COOKTOP
RJCT SERIES
2
4
1
Feature Index See page
1 Top Burners
2 Wok
3 Charbroiler
4 Griddle
5 Drip Tray
6 Exterior Surfaces
Operation
Cleaning
Checking The Flame
Operation
Cleaning
Checking The Flame
Operation
Cleaning
Operation
Cleaning
Cleaning
Cleaning
26-27
40-41
44-45
28
40-41
44-45
29-30
42
31-33
43
40
39
8

FEATURES OF YOUR RANGE
THIS PAGE LEFT INTENTIONALLY BLANK
operation
9

FEATURES OF YOUR RANGE
operation
THIS PAGE LEFT INTENTIONALLY BLANK
10

FEATURES OF YOUR RANGE
RJGR SERIES
2
4
5
Feature Index See page
1 Top Burners
Operation
Cleaning
Checking The Flame
2 Wok
Operation
Cleaning
Checking The Flame
26-27
40-41
44-45
28
40-41
44-45
operation
3
1
6
7
3 Charbroiler
Operation
Cleaning
4 Griddle
Operation
Cleaning
5 Drip Tray
6 Exterior Surfaces
7 Oven
Cleaning
Cleaning
Standard vs. Convection
Before Using...
Standard Oven
Convection Oven
Infrared Broiling
Lubricating The Oven Door
Replacing The Oven Bulbs
Operation
Cleaning
Operation
Cleaning
Operation
Cleaning
29-30
42
31-33
43
40
39
14-15
12
22-23
36
22-23
38
24-25
38
46
47
11
BEFORE USING YOUR OVEN...
operation
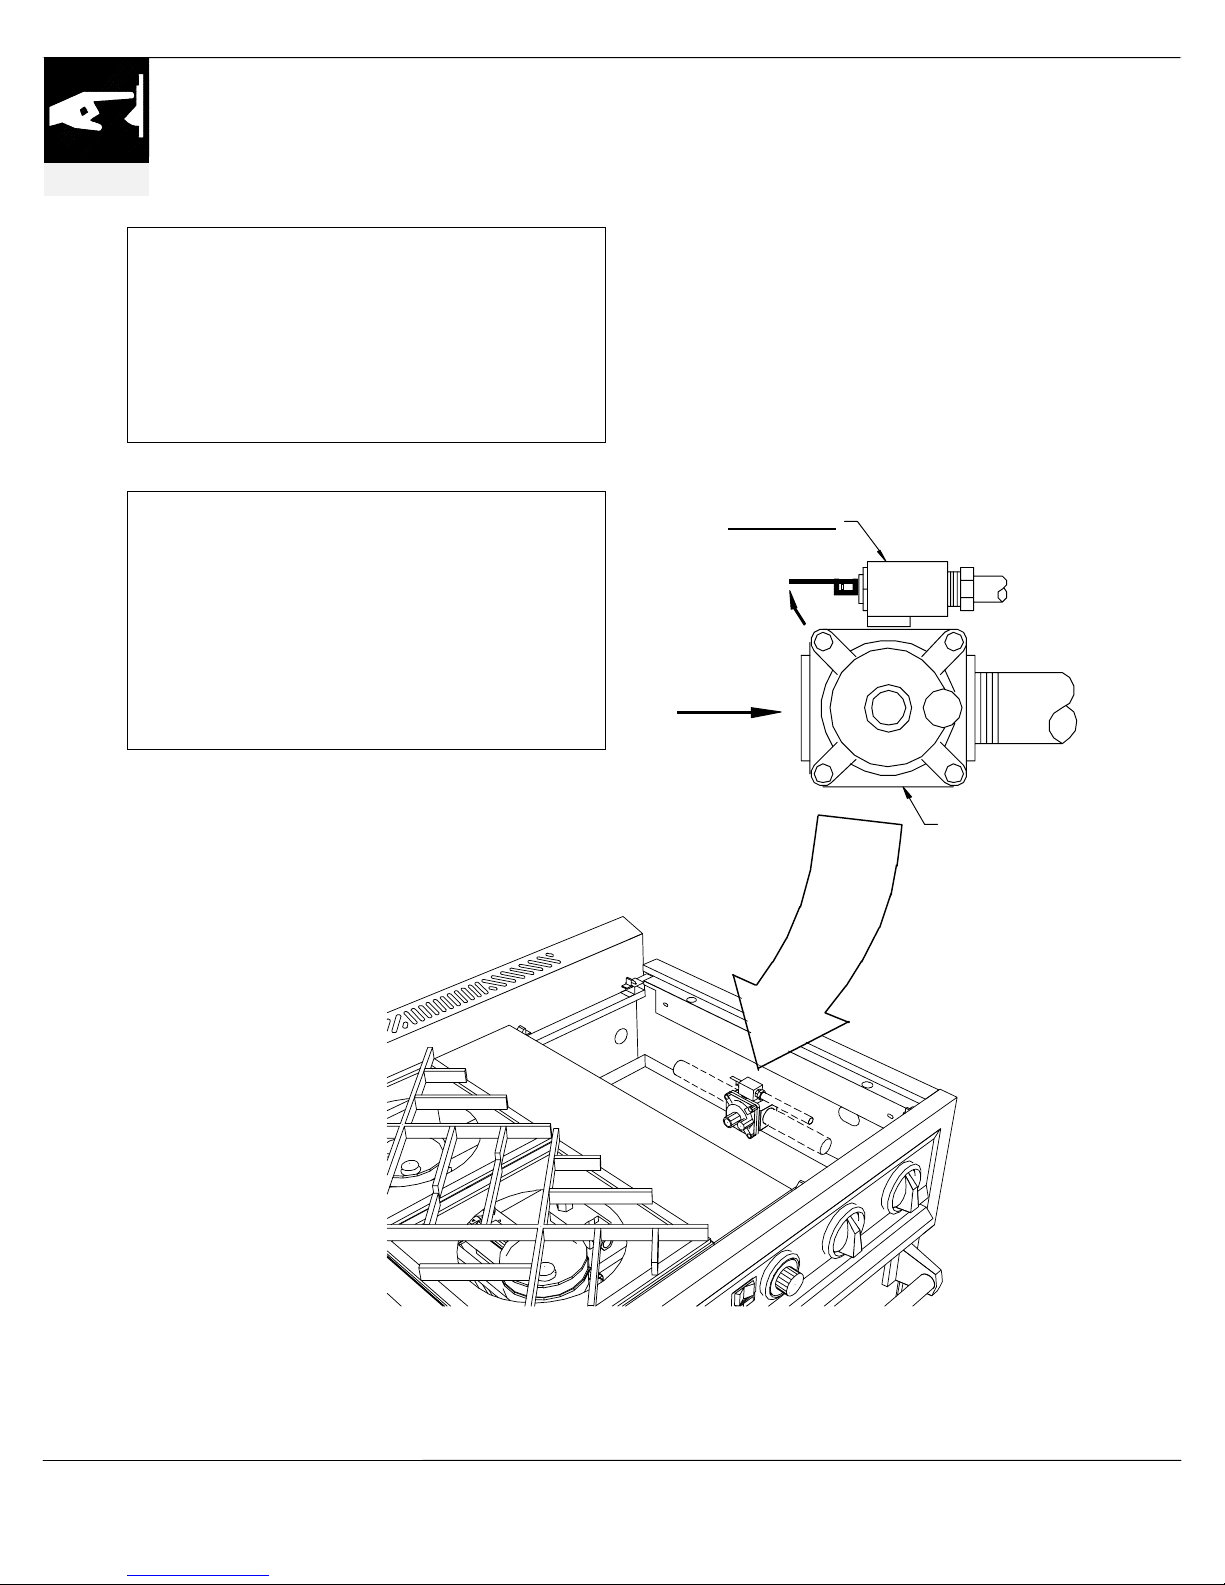
To prevent fire or smoke damage when
the oven is used for the first time:
Remove all packing materials and clean
thoroughly with hot, soapy water to remove
residuals left from the manufacturing process.
If your oven does not operate when
first started, please read the following:
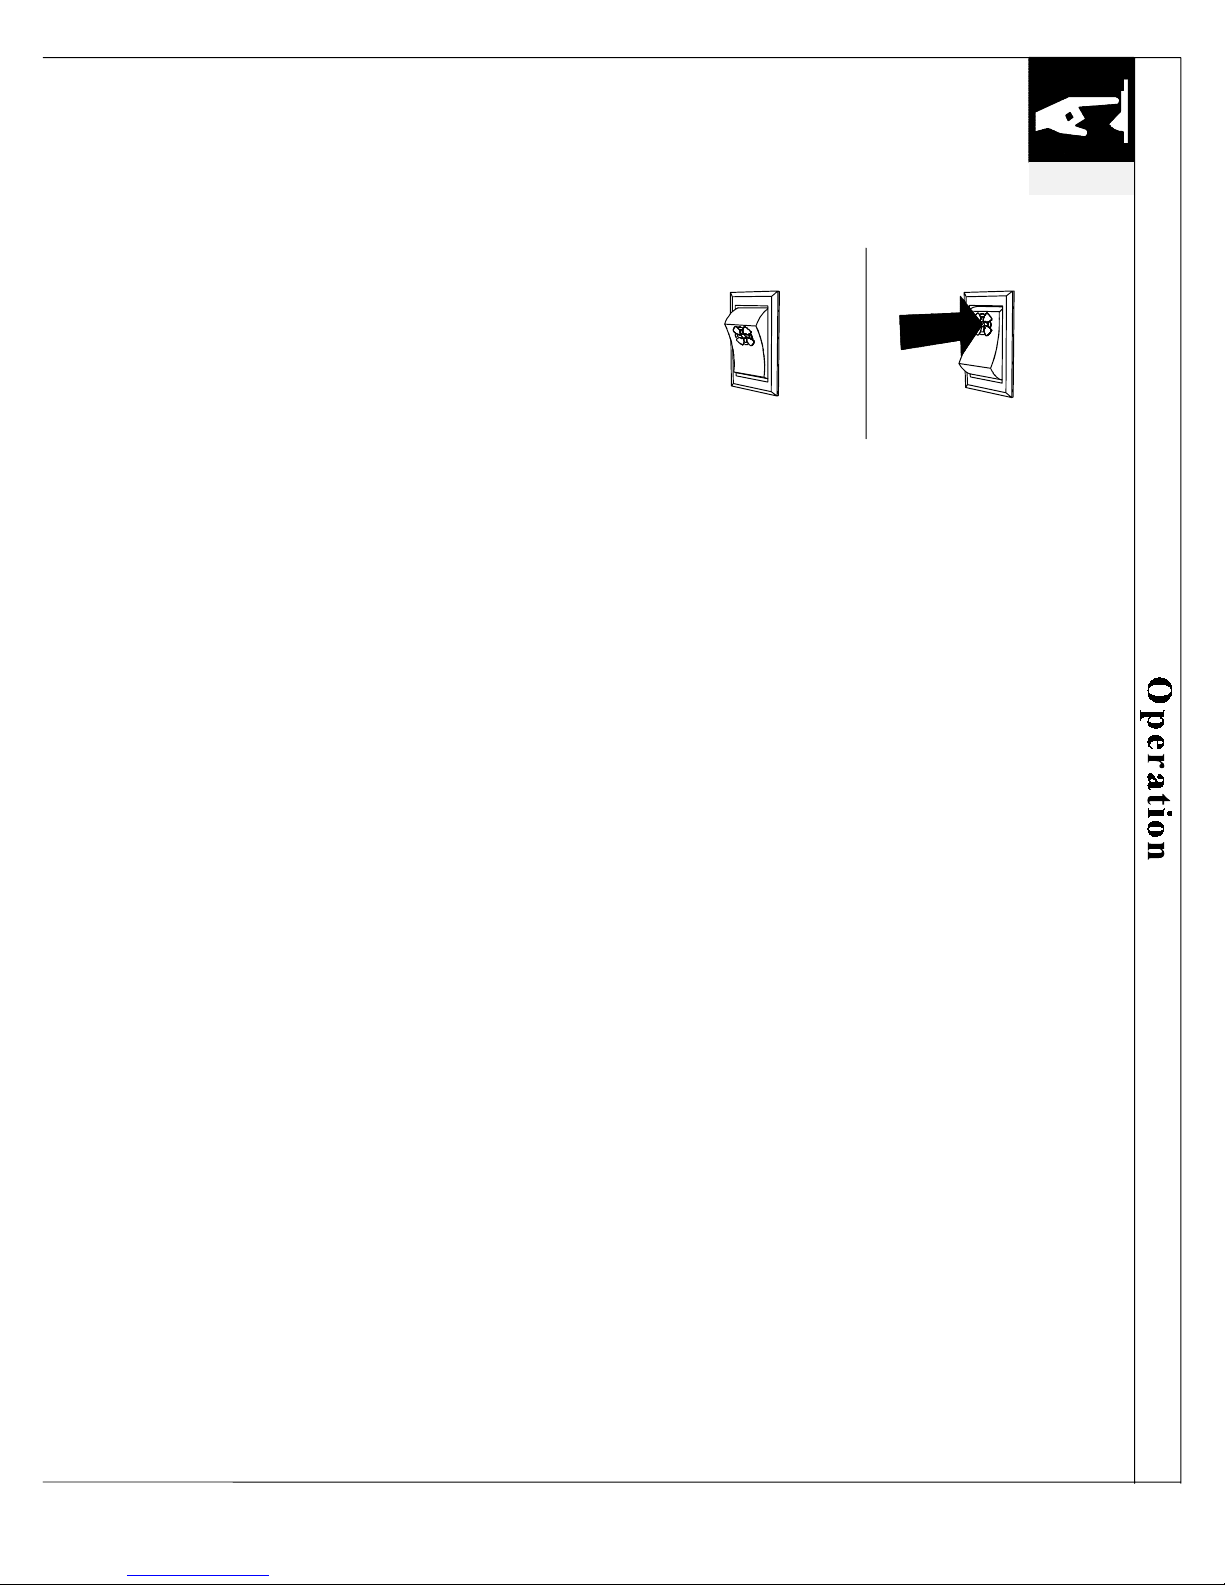
This oven is equipped with a service oven shutoff valve After installation or servicing this valve
MUST BE ON for the oven to operate.
RJGR MODELS ONLY
VALVE SHOWN
IN ON POSITION
ON
GAS INLET
GAS REGULATOR
LOCATION OF GAS REGULATOR TYPICAL FOR RJGR MODELS
12

IN THE EVENT OF A POWER FAILURE...
Since all Jade Ranges employ an electrical ignition system, an electrical power
Since all Jade Ranges employ an electrical ignition system, an electrical power
failure in the home will affect the operation of the appliance. The electric igniters
failure in the home will affect the operation of the appliance. The electric igniters
will not function during such an event, nor will the griddle, the infrared broiler,
will not function during such an event, nor will the griddle, the infrared broiler,
nor any of the ovens. However, the open top burners, the wok, and the charbroiler
nor any of the ovens. However, the open top burners, the wok, and the charbroiler
can be lit manually, with a match.
can be lit manually, with a match.
In the event of a power failure, the power switch, griddle and oven thermostat
In the event of a power failure, the power switch, griddle and oven thermostat
knobs MUST BE TURNED OFF. Do not attempt to operate these controls on the
knobs MUST BE TURNED OFF. Do not attempt to operate these controls on the
appliance until the electrical service is restored.
appliance until the electrical service is restored.
IN THE EVENT OF A POWER FAILURE...
safety
safety
13
13
f
operation
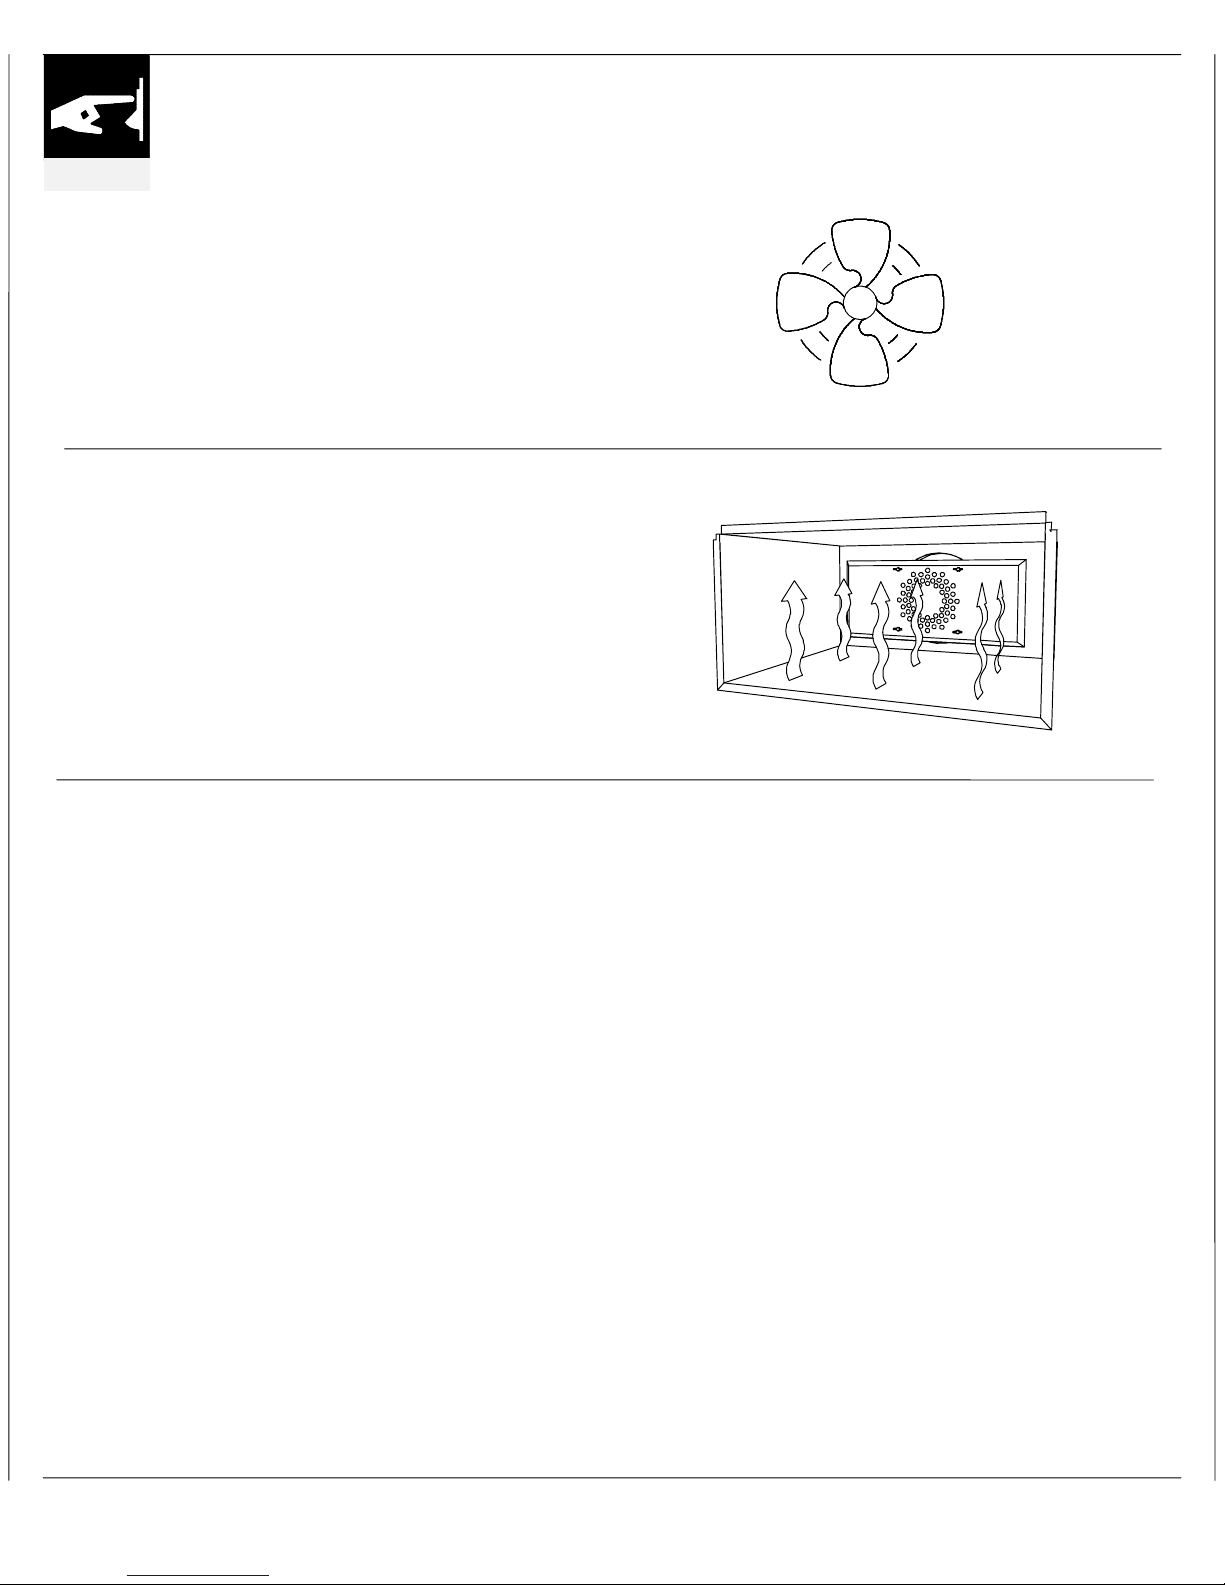
The basic difference between standard ovens and
convection ovens is the system they utilize to bring
about heat transfer. In other words, standard ovens
circulate heat through natural airflow, and convection
ovens employ a fan to circulate the heat throughout the
oven cavity. Convection ovens produce more even heat
distribution, and cook more rapidly.
STANDARD VS. CONVECTION OVENS...
A FAN MAKES THE DIFFERENCE
Standard Oven Cooking
In traditional baking in a standard oven, heat is emitted
from a burner located in the bottom of the oven cavity.
Natural airflow circulates the heat throughout the oven.
Standard Oven Tips
• Roasting is recommended for large tender cuts of beef, veal, pork or lamb.
• Allowing roasts to stand ten to fifteen minutes after cooking will make
carving easier. Meat continues to cook during this "standing time".
• There is no need to add water to the pan when roasting. This would produce a
steamed effect, and roasting is a dry heat cooking method.
• Less tender cuts of meats may require moist cooking techniques.
• Check roast for the desired degree of doneness. Always use a standard meat
thermometer to test for completion; never rely on appearance alone. The tip o
the thermometer should be inserted into the center of the thickest part of the
meat, and should not touch the bone or a fatty section.
14
b
Convection Oven Cooking
In a convection oven, a motorized fan positioned in the
rear of the oven circulates the heat generated from a
urner. This results in a more even distribution of heat,
and thus, an equalized temperature throughout the
oven cavity. Therefore, the hot and cold spots often
found in conventional ovens are eliminated.
Convection ovens can accommodate multiple rack use
even in the largest cooking projects. In roasting
situations, the oven quickly replaces cool air with hot
air. This promotes searing, which retains the juices and
natural flavor of meats, with less shrinkage.
operation
Advantages Of Convection Oven Cooking
• Roasts are evenly browned without basting or turning.
• Poultry has a light crispy skin.
• Breads are evenly textured with golden crusts.
• Oven racks may be filled to capacity without affecting cooking time.
• Cookies and other items are baked uniformly, regardless of their position in the oven.
Convection Oven Tips
• Reduce oven temperature by 25 degrees when
converting recipes from standard to convection
baking. This includes packaged mixes.
• Use convection mode for multiple rack baking.
Multiple rack baking may require one to five minutes
more than the time suggested in baking charts. Thin
items will require less additional baking time than
thick items.
• Always use a proper size pan. The pan should be
large enough to collect all the drippings, but not so
large as to block the convection air flow within the
oven.
• Do not cover food when roasting.
• Cook meats and poultry directly from the
refrigerator; there is no need for meats and poultry to
stand at room temperature.
• Place meat fat side up in the roasting tray, this will
allow it to baste itself. No manual basting is needed.
• Cooking will continue for ten to fifteen minutes after
removal from the oven. Therefore, wait ten to fifteen
minutes before carving.
• Less tender meats are not recommended for
convection cooking.
15

operation
USING YOUR STANDARD OVEN
RJGR48 SERIES
Jade ovens are thermostatically controlled, and are
equipped with electric ignition systems. This promotes
Oven Racks
Each Jade oven is equipped with two heavy duty
"wraparound" wire racks. The oven has guides for
three rack positions. When cooking with two racks,
place the racks in the top and bottom rack guides.
When cooking with only one rack, place the rack in the
middle position. The middle position is also ideal for
broiling (see infrared broiling section). When roasting
large items such as a turkey, additional space may be
gained by placing the rack on the bottom of the oven.
Operating The Standard Oven
RJGR48 SERIES
1. Make sure all thermostat knobs are in the off
position.
2. Before heating the oven, place the oven racks in the
desired position.
Warning: Use extreme caution when moving racks
while the oven is hot. We recommend the use of
oven mittens or potholders to prevent injury.
3. Turn the POWER SWITCH ON. The power switch
will illuminate, and will activate all the thermostats
not set in the OFF position.
4. Push in the oven thermostat and set to a desired
cooking temperature between 150
orange bake light will light to indicate the oven is
on. When the desired temperature has been reached,
the orange bake light will go off to indicate the
burner is off. The oven thermostat will cycle on and
off to maintain the desired temperature at a constant
level.
(continued next page)
-550ºF. The
º
accurate temperature control and economical ignition
operation.
OFF ON
POWER SWITCH
OVEN THERMOSTAT
16

Operating The Standard Oven
RJGR48 SERIES
(continued)
5. Preheat the oven at the desired setting for 20-30
minutes, or until the oven cycles on and off. Avoid
opening the oven door during preheating.
6. Place the food in the oven.
7. After cooking, turn the THERMOSTAT OFF.
8. If you are not using the griddle or any other ovens,
turn the POWER SWITCH OFF.
operation
Standard Oven Helpful Hints
• The oven interior is constructed of superior quality grade stainless steel. It is
normal for the oven interior to warp moderately and darken with use. The
stainless steel can be cleaned with a mild abrasive or a non-abrasive oven
cleaner to restore its luster.
• The oven bottom pan can be covered with aluminum foil to facilitate cleanup.
Make sure the foil does not extend beyond the width of the bottom pan and
does not interfere with the flow of the heat. Do not use aluminum foil to cover
the oven racks. This could result in uneven heat distribution.
• Avoid repeated openings of the oven door; heat escapes each time the door is
opened. The oven thermostat will sense the drop in the oven's temperature and
will activate the oven burner. This will cause hot spots to form in the oven and
could affect cooking results.
• Allow at least 1 inch clearance around the oven pans and the oven walls. When
using more than one pan per rack, position the pans evenly to maximize air
circulation.
Note: The welded construction of your Jade Range may cause expansion and
contraction of the metal, which produces a sound. This is perfectly normal and is
no cause for concern.
17

operation
Jade ovens are thermostatically controlled, and are
equipped with electric ignition systems. This promotes
USING YOUR CONVECTION OVEN
RJGR SERIES
accurate temperature control and economical ignition
operation.
Oven Racks
Each Jade oven is equipped with two heavy duty
"wraparound" wire racks. The oven has guides for
three rack positions. When cooking with two racks,
place the racks in the top and bottom rack guides.
When cooking with only one rack, place the rack in the
middle position. The middle position is also ideal for
broiling (see infrared broiling section). When roasting
large items such as a turkey, additional space may be
gained by placing the rack on the bottom of the oven.
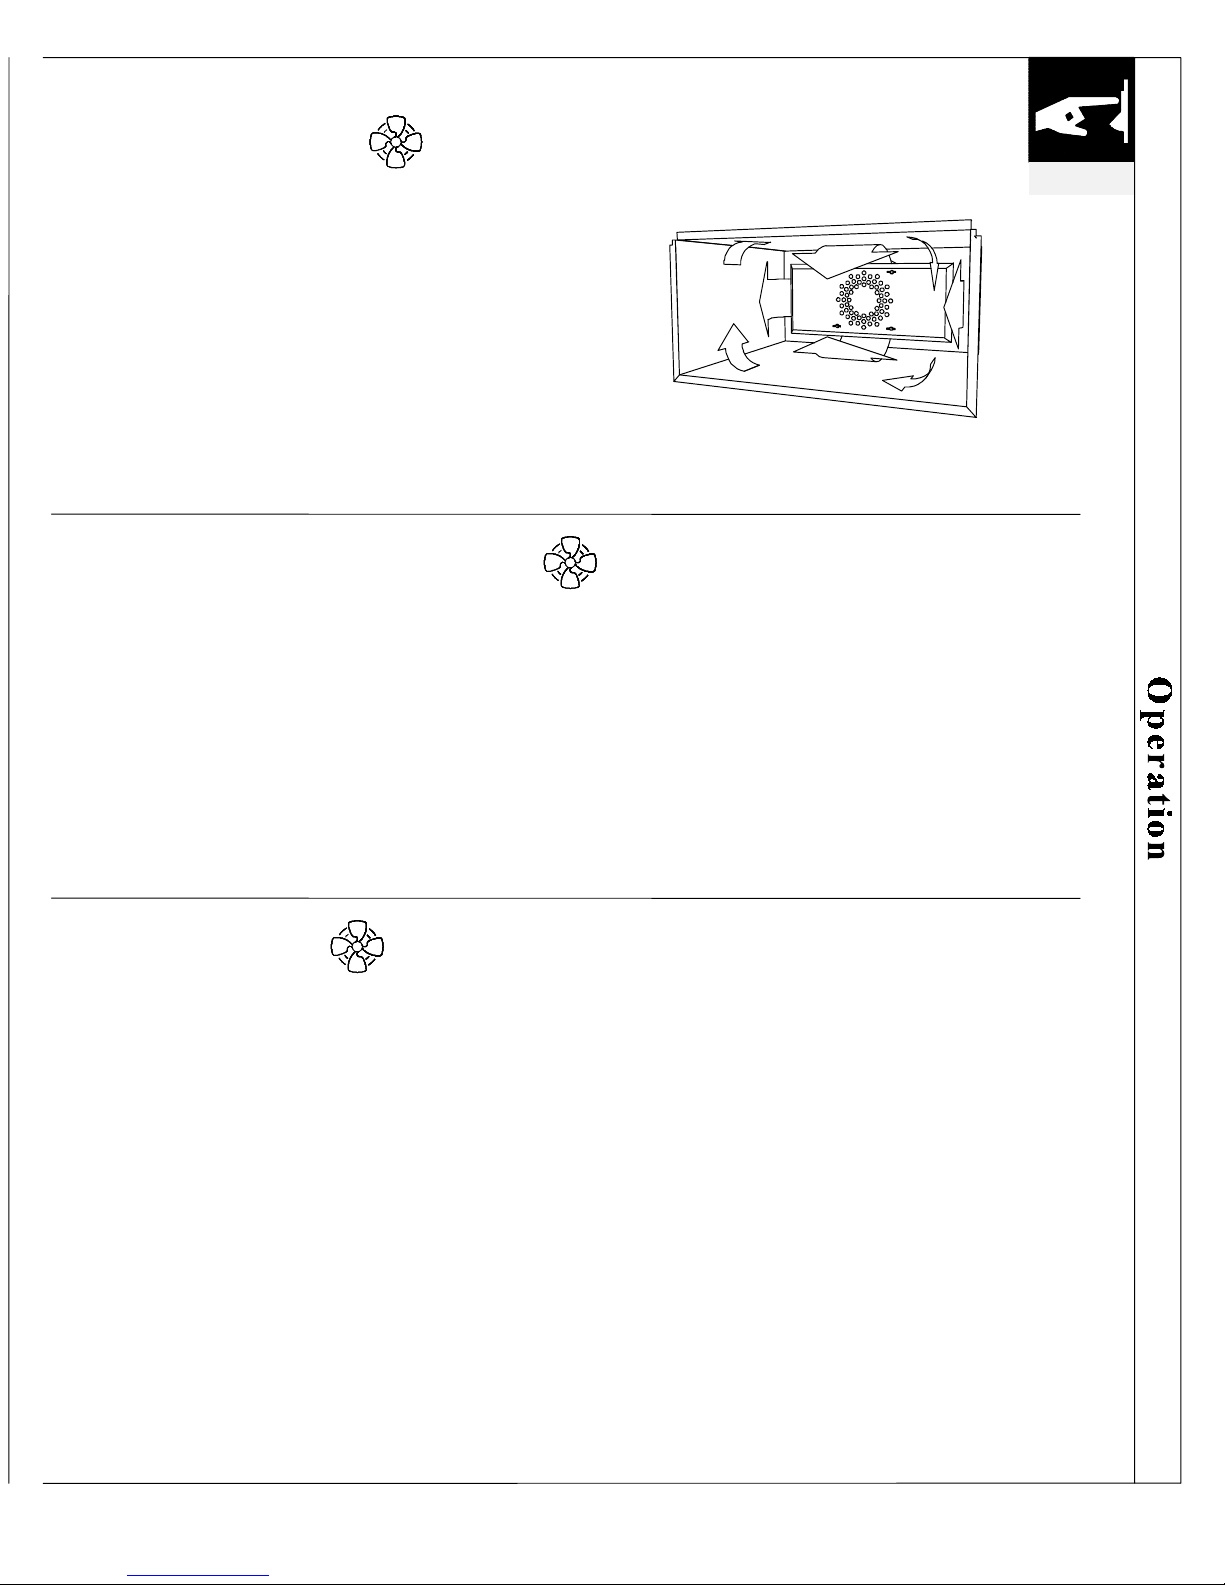
Convection Oven
Convection ovens feature a sealed design that prevents
the products of combustion from entering the oven
interior. The oven tank is a one-piece welded
construction of stainless steel. During cooking, the
oven burner heats the interior oven walls, top and
bottom. Then a fan, powered by a commercial size
blower motor, blows the heat from the walls and
circulates it inside the oven. With no flue openings in
the oven tank to provide a means of escape, moisture
and flavors remain trapped inside the oven. This
promotes even browning, and exceptional roasting and
baking.
Both the amount of cooking time, and the temperature
required are reduced (compared to a standard oven)
when a convection oven is used. On the average,
temperatures in a convection oven can be reduced
F, or cooking times decreased by approximately 10
°
25
to 20 percent. This increased cooking efficiency is a
result of the superior heat distribution provided by the
convection oven centrifugal blower.
18

Operating The Convection Oven
RJGR Series
1. Make sure all thermostat knobs are in the off
position.
2. Before heating the oven, place the oven racks in the
desired position.
Warning: Use extreme caution when moving racks
while the oven is hot. We recommend the use of
oven mittens or potholders to prevent injury.
3. Turn the POWER SWITCH ON. The power switch
will activate all the thermostats that are not set in
the OFF position.
4. Push in the oven thermostat and set to a desired
cooking temperature between 150
orange bake light will light to indicate the oven is
on. When the desired temperature has been reached,
the orange bake light will go off to indicate the
burner is off. The oven thermostat will cycle on and
off to maintain the desired temperature at a constant
level.
5. NOTICE: Because of the sealed design of the
oven, the blower must be used during cooking.
Set the oven blower switch to AUTO. This will
cause the blower to run while the door is closed. To
prevent hot air or steam from rushing to the front of
the oven and compromising the heat distribution,
the blower will stop when the door is open.
6. Preheat the oven at the desired setting for at least
20-30 minutes, or until the oven cycles on and off.
When the bake light cycles off, the oven is ready.
Avoid opening the oven door during preheating.
7. Place the food in the oven.
8. After cooking, turn the THERMOSTAT OFF.
9. To quickly cool the oven after cooking, set the
blower switch to MANUAL and open the oven
door. This will allow the blower to run continuously
with the door open or closed. When cooling has
been completed, turn BLOWER SWITCH OFF and
close the door.
10. If you are not using the griddle or any other ovens,
turn the POWER SWITCH OFF.
-550°F. The
°
OFF ON
operation
POWER SWITCH
OVEN THERMOSTAT
OFF MANUAL
AUTO
BLOWER SWITCH
19

operation
The Secret’s In The Tiles
The infrared oven broiler burner uses ceramic tiles as
heating elements. These tiles begin to glow within a
few seconds of ignition and immediately begin to
radiate infrared heat. This “instant” heating capability
makes preheating the infrared broiler unnecessary.
Professional chefs rely on the searing properties of
infrared broiling to seal in the nutrients, flavors and
juices of meats, poultry and fish. Your new Dynasty
Range places this professional style infrared broiling
capability at your fingertips.
INFRARED BROILING
ALL SERIES
Advantages Of Infrared Broiling
• Since much of the fat contained in food drips off during the broiling process,
infrared broiling is recognized as a healthy cooking method.
• Gas infrared broiling is also a clean, cool and smokeless cooking method. Any
smoke and splatters produced during this closed door process are consumed by the
gas flame.
• The infrared broiler cooks food up to 50% faster than other methods, due to the
intense penetrating heat generated by the ceramic tiles.
• Infrared broiling produces attractive, appetizing food with a professional style seared
appearance.
Infrared Broiling Tips
• For optimum performance make sure the oven rack is
in the correct broiling position.
• Always use a broiler pan to collect drippings. You can
use aluminum foil to line your broiler pan and broiler
rack. However, you must mold the foil tightly to the
rack and cut slits in it just like the rack.
• Defrost meats before broiling.
• Slit fatty edge to prevent meat from curling.
• Broil on first side for slightly more than half the
recommended time, season and turn. Season second
side just before removing. Turn meat only once to
limit piercing and the release of juices.
• Before turning or removing food, always pull out rack
to stop position.
• Do not leave the broiler pan in the oven after broiling
is completed.
ALUMINUM
FOIL
20

Operating The Infrared Broiler
RJGR
Notice: Before using the infrared broiler for the first
time, you must turn it on for a period of 45 minutes to
burn off residuals left from the manufacturing process.
1. Make sure all thermostat knobs are in the off
2. Before heating the oven, place the oven racks in the
3. Place food in the broiler pan.
4. Place the broiler pan on the oven rack, and position
5. Turn the POWER SWITCH ON. The power switch
6. Push in the oven thermostat and set to broil. The red
7. Close the oven door during broiling. Broil the first
8. After cooking, turn the oven THERMOSTAT OFF.
9. Pull oven rack and remove the broiling pan.
10. If you are not using the griddle or any other ovens,
.
position.
correct broiling position; the 2nd and 3rd rack
positions from the top are most commonly used for
broiling. For more doneness, use the 3rd rack
position. For searing (great for rare to medium rare
steaks), use the 2nd rack position.
Warning: Use extreme caution when moving racks
while the oven is hot. We recommend the use of
oven mittens or potholders to prevent injury.
the pan under the infrared broiler.
will illuminate and activate all the thermostats not set
in the OFF position.
broil light will illuminate to indicate the oven is in
the broiling mode. The burner surface will begin to
change from a bluish color when cold, to a bright
orange glow, and will emit infrared heat within a few
seconds of ignition.
side of the food. To broil the other side of the food,
open the oven door and pull the oven rack toward
you. Turn the food and return the rack into the oven.
Close the door and continue broiling.
turn the POWER SWITCH OFF.
USING YOUR INFRARED BROILER
RJGR SERIES
OFF ON
POWER SWITCH
SET OVEN THERMOSTAT TO BROIL
operation
21

operation
RJGR Series Ovens
Ovens in the RJGR Series are engineered to operate in
five different modes: standard bake, convection bake,
standard broil, convection broil and convection defrost.
USING YOUR STANDARD & CONVECTION OVEN
RJGR SERIES
Operating The RJGR Series Oven
If your Jade model has two ovens, find the POWER
SWITCH and THERMOSTAT KNOB that correspond
to the oven you wish to use. LEFT and RIGHT ovens
are operated with controls located on corresponding
sides.
1. Make sure the thermostat knob for the oven is in the
OFF position.
2. Before heating, place the oven racks in the desired
position.
Warning: Use extreme caution when moving racks
while the oven is hot. We recommend the use of
oven mittens or potholders to prevent injury.
3. Follow the RJGR SERIES SETTINGS on page 25
to determine appropriate settings for each of the
five operation modes.
4. Turn the POWER SWITCH ON by pushing the
switch to the middle position. This will also
illuminate the POWER LIGHT. Push the switch
one setting further to activate the OVEN LIGHT (as
needed).
5. Push in the oven thermostat and set to a desired
cooking temperature between 150
orange bake light will light to indicate the oven is
on. When the desired temperature has been reached,
the orange bake light will turn off to indicate the
burner is off. The oven thermostat will cycle on and
off to maintain the desired temperature at a constant
level.
-550°F. The
°
OFF ON
POWER & OVEN LAMP SWITCH
LAMP ON
22
OVEN THERMOSTAT
Operating The RJGR Series Oven
(continued)
6. Preheat the oven at the desired setting for at least 20
minutes, or until the oven cycles on and off. Avoid
opening the door during preheating.
7. Place food in the oven.
8. After cooking is completed, turn the
THERMOSTAT OFF.
9. To quickly cool the oven after use, turn the
BLOWER SWITCH ON and open the oven door.
When cooling has been completed, turn the
BLOWER SWITCH OFF and close the door.
10. When use of the oven is no longer needed, turn the
POWER SWITCH OFF.
Note: The welded construction of your Jade Range
may cause expansion and contraction of the metal,
which produces a sound. This is perfectly normal and
is no cause for concern.
OFF
BLOWER SWITCH
ON
operation
23

operation
Operating The Infrared Broiler
RJGR Series
If your Jade model has two ovens, find the POWER
SWITCH and THERMOSTAT KNOB that correspond
to the oven you wish to use. LEFT and RIGHT ovens
are operated with controls located on corresponding
sides.
Notice: Before using the infrared broiler for the first
time, you must turn it on for a period of 45 minutes to
burn off residuals left from the manufacturing
process.
1. Make sure the thermostat knob for the oven is in the
2. Before heating the oven, place the oven racks in the
3. Place the broiler pan on the oven rack, and position
4. Turn the POWER SWITCH ON by pushing the
5. Push in the oven thermostat and set it on the white
6. Close the oven door during broiling. Broil the first
off position.
correct broiling position; the 2nd and 3rd rack
positions from the top are most commonly used for
broiling. For more doneness, use the 3rd rack
position. For searing (great for rare to medium rare
steaks), use the 2nd rack position.
Warning: Use extreme caution when moving racks
while the oven is hot. We recommend the use of
oven mittens or potholders to prevent injury.
the pan under the infrared broiler.
switch to the middle position. This will also
illuminate the POWER LIGHT. Push the switch
one setting further to activate the OVEN LIGHT (as
needed).
dot located on the control knob. The red broil light
will illuminate to indicate the oven is in the broiling
mode. The burner surface will begin to change from
a bluish color when cold, to a bright orange glow,
and will emit infrared heat within a few seconds of
ignition.
side of the food.
USING YOUR INFRARED BROILER
RJGR SERIES
OFF ON
POWER & OVEN LAMP SWITCH
SET OVEN THERMOSTAT TO BROIL
LAMP ON
24

Operating The Infrared Broiler
RJGR Series
(continued)
7. To broil the other side of the food, open the oven
door and pull the oven rack toward you. Turn the
food and return the rack into the oven. Close the
door and continue broiling.
8. After cooking, turn the oven thermostat OFF. Pull
oven rack and remove the broiling pan.
9. To quickly cool the oven after use, turn the
BLOWER SWITCH ON and open the oven door.
When cooling has been completed, turn the
BLOWER SWITCH OFF and close the door.
10. When use of the oven is no longer needed, turn the
POWER SWITCH OFF.
OFF
BLOWER SWITCH
ON
operation
RJGR SERIES SETTINGS
Operation Oven Infrared Broiler Blower
Standard Bake
Convection Bake
Standard Infrared Broiling
Convection Infrared Broiling
Convection Defrost
On
On
Off
Off
Off
Off
Off
On
On
Off
Off
On
Off
On
On
25

b
operation
TOP SECTION CHARACTERISTICS
ALL SERIES
Open Top Burners With Electronic Spark Ignition
Your Jade appliance features stainless steel open top burners engineered with
electronic spark ignition to eliminate the necessity of continuous pilots. These
urners provide immediate heat, and also respond immediately to adjustments
of heat settings.
Control Knobs Operation
The burner control knobs are configured in sets of two.
The right hand knob controls the front burner, and the
left hand knob controls the rear burner. To ignite a
burner, push in the appropriate burner control knob
and turn it to HI, and then to the LITE position. You
will hear a clicking sound, which indicates the spark
igniters are firing properly. The burner should ignite
within seconds (which is the time required to purge the
air in the gas supply line). As soon as the burner
ignites, turn the knob to the desired heat setting, the
clicking sound should stop once the knob is no longer
in the LITE position. Burner control knobs should be
kept in the OFF position when not in use.
REMEMBER: These burners produce a great deal of
heat, especially on the HI setting. Do not operate the
burners for an extended period of time without
cookware on the grates, as it may cause the porcelain
on the grates to chip.
Note: A slight popping sound is normal during initial
operation. This is due to the high rate of gas input to
the burner
TOP BURNER CONTROL KNOB
Burner Caps Feature
RJGR Series Only
This additional feature allows the enhancement of the
appearance of the range top by placing Burner Caps on
the burners without hindering on the performance.
26

To Simmer After Boiling
Turn the control knob to the OFF position. The cast
iron burner grates will retain enough heat to provide 20
to 30 minutes of continuous simmering. If additional
simmering is desired, turn the knob back to the LOW
position.
Each burner has been adjusted at the factory to produce
operation
the smallest possible stable flame at the LOW setting.
Due to fluctuations in gas pressures and changes in
heating value, you may wish to adjust the height of the
flame at the LOW setting. Refer to the Initial Startup
and Adjustment section of the Installation Manual for
further instructions.
Determining The Proper Flame Height
The proper height of the flame depends on the size and
material of the utensil being used, the food being
cooked, and the amount of liquid in the utensil.
However, certain basic rules apply:
• The flame should never extend beyond the bottom of
the pan.
• Use a lower flame with utensils made of slow heat
conductors, such as stainless steel, ceramic glass, etc.
Excessive heat applied to these materials will result
in scorching or burning.
• When boiling, adjust the flame to the size of the
cookware until boil begins. Then lower flame height
to the minimum needed to maintain a gentle boil.
Foods cook just as fast at a gentle boil, as they do at
a vigorous boil.
• To prevent spillovers and boilovers when frying,
always use properly sized cookware. Do not fry with
excessive heat, and never leave the range unattended.
27

operation
Wok
Ignition, operation and adjustment of the Wok burner
are similar to that of the open top burners; see a
complete explanation of control knobs operation on
page 26.
Make sure the flue opening of the Wok conduction
chamber is at the back, and position the Wok handles
away from the flue opening.
USING YOUR WOK
ALL SERIES
The Mysteries Of Wok Cooking Revealed
Wok cookery offers a fun and easy technique for the
preparation of delicious, creative and healthy meals. A
unique method of cooking, its roots go back thousands
of years.
Since the Wok was invented by the Chinese, it is
closely tied to Asian cuisine. In this style of cooking,
most ingredients are cooked very quickly at a high
temperature to preserve their color, crispness and
flavor. The Wok design and construction promotes this
cooking method.
The cone shape of the Wok concentrates the heat in the
base, where the actual cooking takes place. The Jade
Wok conduction chamber is cylindrical which serves to
trap and focus the heat in the base. A flue opening at
the back of the conduction chamber provides an exit
for spent heat.
Since heat dissipates as it travels up the sloping sides
of the Wok, the cylindrical shape allows prepared
foods to stay warm while other ingredients cook in the
center. Therefore, in Wok cooking, each ingredient
may be cook individually, in the same utensil, and will
stay hot until it is time to mix it with the other
ingredients. This promotes a distinctive blending of
various textures, tastes and types of food, and achieves
a delicious balance between contrasting meats and
vegetables.
Wok Cooking Techniques
Although different styles of Wok cooking naturally
suit certain types of food, there are three main Wok
cooking techniques which bring out the food's best
qualities:
Stir-frying
In this technique, each item is cooked quickly in hot
oil, then pushed up on the sides of the Wok while the
next item is being cooked. This preserves the color,
flavor and crispness of vegetables and seals in the
natural juices of meats and seafood.
Steaming
Steaming preserves the natural nutrients of the
vegetables and heightens their freshness.
Tempura
This batter-fried method of cooking adds a unique
dimension to meats, seafood and vegetables.
Cooking in a Wok is quick and easy. Because it is so
quick, ingredients must be prepared ahead of time. As
a result, Wok cooking is ideal for entertaining.
28

USING YOUR CHARBROILER
ALL SERIES
operation
Charbroiler
Like the open top burners, the Charbroiler is also
equipped with electronic spark ignition.
Use of the Charbroiler requires the installation of an
appropriately sized ventilating hood above the range.
Refer to the Jade Installation Manual for recommended
hood sizes.
Unique Charbroiler Design
The Jade Charbroiler is built primarily for indoor use. With that in mind, it has been
designed to operate with less flare-ups, and without the use of lava rocks that collect
grease and often emit a foul odor.
Designed for practicality and versatility, the Jade Charbroiler allows you to cook small
amounts of food using only one burner and one side of the broiling grill.
Unlike typical broilers and barbecues which are designed with the hottest part of the grill
at the center, Jade Charbroilers are engineered with burners at the sides. This allows
foods to be seared when positioned on the sides of the Charbroiler, and then placed in
the center for completion. Since fat and grease drippings are more prevalent during the
final stage of broiling, the Jade side burner design prevents excessive flare-ups.
The front of the grid can be used to keep foods warm. In the event the grill surface is
fully covered with food, the center and the front of the grill will also provide high heat.
29

operation
USING YOUR CHARBROILER
Operating The Charbroiler
1. Make sure the broiler heat deflector, splash guard,
and grates are properly positioned (see illustration
on page 42). The drip tray should also be in place.
2. Push in and turn burner knob to the HI position,
and then back to LITE. You will hear a clicking
sound which indicates the electronic ignition
system is operating. After the burner ignites, turn
the knob to HI.
3. Preheat the charbroiler for 15 minutes. If heavy
"branding" is desired, preheat for 20 minutes. The
radiants will begin glowing red hot approximately
two inches from each end.
4. Place the food directly above the glowing radiants.
Sear the food to seal its juices. Just after the juices
begin to bubble to the surface, turn the food once
only and sear the other side. Turning the food more
often will cause it to lose more juices and will
lessen the caramelized effect and flavor.
5. If a greater degree of doneness is desired, finish the
food by placing it at the center of the grill, or by
lowering the burner flame.
6. Foods may be kept warm by placing them on the
front section of the grill. This section is also ideal
for toasting bread and buns while broiling.
ALL SERIES
(continuation)
CHARBROILER CONTROL KNOB
30

Griddle
The Griddle operates with a U-shape burner. The
griddle plate is constructed of highly polished 1/2"
thick, restaurant quality steel. An electric thermostat
controls the plate temperature. Each time the
thermostat calls for heat, the burner is automatically
ignited by an electric glowbar ignition system. This
eliminates the need for standing pilots with
continuously burning flames.
USING YOUR GRIDDLE
Before Using Your Griddle
A thin film of oil is applied to the griddle plate at the
factory to preserve its luster and protect it from rust.
Dust and dirt may accumulate during manufacturing
and transit. It is important to thoroughly clean the
griddle and season it before using it for the first time.
To prepare the griddle:
1. Clean the griddle surface with a mild
cleaner/degreaser to remove the film of protective
oil.
2. Rinse with a mixture of 1/4 cup of vinegar to one
quart of water. Dry thoroughly.
3. Apply thin film of cooking oil (do not use corn oil)
to the entire griddle surface.
F. Follow normal operation
4. Heat the griddle to 400
instructions. (Steps 1 and 2 on page 32.)
5. When the oil begins to smoke, turn the control knob
OFF. Allow the griddle to cool
6. Repeat steps 3, 4 and 5 several times.
°
ALL SERIES
8. When the griddle is cool, wipe it with clean burlap
or any heavy coarse cloth.
9. Apply a light coat of cooking oil to the griddle to
prevent rusting.
10. The griddle is now ready to use.
11. It is normal for the griddle to darken with use. This
is a sign of a well-seasoned griddle.
operation
31

operation
USING YOUR GRIDDLE
Using Your Griddle
1. Make sure the drip tray is properly positioned.
2. Push in and turn the griddle thermostat knob to the
desired temperature setting.
3. Preheat the griddle for 15 minutes or until the
burner cycles twice. Preheating is vital for even
heat distribution on the griddle plate, and faster heat
recovery during cooking.
4. Place food on the griddle and cook to desired
doneness.
5. Removal of food particles with a metal spatula
during cooking will facilitate cleanup, and will
keep the particles from mixing with the cooked
food.
6. After cooking, turn the thermostat OFF.
Allow the griddle surface to cool before washing or
rinsing. The hot steam can cause injury. It may also
damage the griddle plate.
ALL SERIES
GRIDDLE THERMOSTAT
32

Foods
E
ggs 250
Griddle Setting
- 325
°
° F
operation
Bacon, Ham,
Pork Chops, Sausage
Grilled cheese sandwiches
Pancakes
French Toast
Hamburgers
Fish fillets
Steaks
Hash Brown Potatoes
350° - 375
375° - 400
400° - 425
400° - 425
375° - 400
375° - 400
375° - 400
450° - 475
° F
° F
° F
° F
° F
° F
° F
° F
33

cleani
ng
CLEANING AND MAINTENANCE
ALL SERIES
As with any piece of fine equipment, your Jade Range
must be kept clean and properly maintained to
maximize its performance and longevity.
This appliance may be cleaned and serviced through its
IMPORTANT: TURN OFF ELECTRICAL POWER
BEFORE CLEANING ANY PART OF THE RANGE
Cleaning The Standard Oven
RJGR48 Series
Clean oven immediately after cooking, before any food
spills dry. Remove any food residuals before the next
use. Removing food particles when the oven is still
warm is helpful; particles can harden and become more
difficult to remove when the oven cools.
1. Remove oven racks and wash with a mild
cleaner/degreaser or a commercial oven cleaner.
2. Soak the broiler pan in a mild cleaner/degreaser to
loosen dirt and facilitate cleaning.
3. Scrape off any food spills from the interior oven
walls and bottom pan. Use a soft spatula or a rough
cloth to remove encrusted residue.
4. The oven bottom pan is removable for easy access.
To remove, pull forward and lift the front of the
pan, then slide it toward you until it is out.
(continued next page)
front. It is not necessary to remove it from its
installation for cleaning or service.
To assure safe and proper maintenance, we recommend
you follow these directions carefully.
MOVE
FORWARD
LIFT
TRAY
SLIDE
IT OUT
34
REMOVING OVEN BOTTOM PAN

Cleaning The Standard Oven
RJGR48 Series
(continued)
5. The oven side liners can also be removed to
facilitate washing.(The oven racks and bottom pan
must be removed before this can be accomplished.)
Each liner is held in place by a hook located at the
bottom rear of the liner. To unhook, hold the liner
at the rear end of the rack guides and lift. Swing the
rear of the liner toward the middle of the oven, tilt
in and push toward the rear, then pull toward you to
remove.
6. Use hot soapy water or a commercial oven cleaner
to wash the liners. Follow the manufacturer's
instructions when using a commercial oven cleaner.
7. Heat can cause slight discoloration of the oven
interior. This can be removed with a mild abrasive
or a stainless steel cleaner. When using a powdered
cleanser, apply it with a damp sponge or cloth
according to the manufacturer’s directions. Rub the
cleanser lightly, as excessive scrubbing can damage
the finish. Rubbing in one direction will maintain
better aesthetics, since the use of some abrasive
cleaners will produce line marks. Rinse thoroughly
and wipe dry.
8. When reinstalling the oven side liners, make sure
they are both held correctly in place by the hooks
located on both side walls of the oven.
cleaning
LINER IN
POSITION
UP
HOOK
SWIN G REAR
TO MIDDLE
OF OVEN
PUSH TOWARDS
THE BACK & TILT
PULL OUT
LINER
REMOVING OVEN SIDE LINERS
35

cleani
ng
CLEANING AND MAINTENANCE
Cleaning The Standard Oven
RJGR48 Series
1. Remove oven racks and wash with a mild
cleaner/degreaser or a commercial oven cleaner.
2. Soak the broiler pan in a mild cleaner/degreaser to
loosen dirt and facilitate cleaning.
3. Scrape off any food spills from the interior oven
walls and bottom pan. Use a soft spatula or a rough
cloth to remove encrusted residue.
4. The oven bottom pan is removable for easy access.
To remove, pull forward and lift the front of the
pan, then slide it toward you until it is out (See
illustration on page 34.)
5. Use hot soapy water or a commercial oven cleaner
to wash the oven walls and bottom pan. Follow the
manufacturer's instructions when using a
commercial oven cleaner.
6. Heat can cause slight discoloration of the oven
interior. This can be removed with a mild abrasive
or a stainless steel cleaner. When using a powdered
cleanser, apply it with a damp sponge or cloth
according to the manufacturer's directions. Rub the
cleanser lightly, as excessive scrubbing can damage
the finish. Rubbing in one direction will maintain
better aesthetics, since the use of some abrasive
cleaners will produce line marks. Rinse thoroughly
and wipe dry.
(continued)
IMPORTANT: TURN OFF ELECTRICAL
POWER BEFORE CLEANING ANY PART
OF THE RANGE
36

Cleaning The Convection Oven
RJGR Series
1. Remove oven racks and wash with a mild
cleaner/degreaser.
2. Soak the broiler pan in a mild cleaner/degreaser to
loosen dirt and facilitate cleaning.
3. Scrape off any food spills from the interior oven
walls and bottom pan. Use a soft spatula or a rough
cloth to remove encrusted material.
4. The tank of the convection oven is a one-piece
welded construction, therefore it cannot be
removed. Oven racks and rack guides can be
removed to facilitate cleaning.
5. The blower cover can be easily removed by
removing four wing nuts. Tools are not needed. Use
a mild cleaner/degreaser to clean the outside of the
blower cover.
6. With use, a limited amount of debris may
accumulate on the fins of the blower. Use a brass
bristle brush to remove any debris. Use extreme
caution to avoid bending or otherwise damaging the
blower fins.
7. The holes on the blower cover are not symmetrical.
When replacing the blower cover, make sure the
pattern of the holes is located at the lowest position.
This assures proper alignment with the blower axis.
Carefully tighten the four wings nuts to secure the
blower cover.
IMPORTANT: TURN OFF ELECTRICAL
POWER BEFORE CLEANING ANY PART
OF THE RANGE
WINGNUTS
cleaning
BLOWER
COVER
37

cleani
ng
CLEANING AND MAINTENANCE
Cleaning The Convection Oven
RJGR Series
1. Remove oven racks and wash with a mild
cleaner/degreaser.
2. Soak the broiler pan in a mild cleaner/degreaser to
loosen dirt and facilitate cleaning.
3. Scrape off any food spills from the interior oven
walls and bottom pan. Use a soft spatula or a rough
cloth to remove encrusted material.
4. The bottom pan, oven racks and rack guides can be
removed to facilitate cleaning. To remove bottom
pan follow illustration on page 34.
5. Use a mild cleaner/degreaser to clean the outside of
the blower cover.
(continued)
IMPORTANT: TURN OFF ELECTRICAL
POWER BEFORE CLEANING ANY PART
OF THE RANGE
The Infrared Oven Broiler Requires No Cleaning
All Series
The infrared oven broiler does not require cleaning. The heat it generates will burn
off any residual grease. The ceramic tiles it utilizes as heating elements are
breakable and should not be cleaned.
Avoid bumping or hitting the tiles with any hard objects, they are brittle and can
chip or break.
38

Cleaning Exterior Surfaces
Cleaning Exterior Surfaces
Stainless Steel: Stainless Steel:
Stainless steel surfaces may be cleaned by wiping with a damp cloth. Use any mild
Stainless steel surfaces may be cleaned by wiping with a damp cloth. Use any mild
glass cleaner to remove fingerprints and smears. Do not use steel wool, it will
glass cleaner to remove fingerprints and smears. Do not use steel wool, it will
scratch this surface. Small surface scratches may be removed by using 100 grit
scratch this surface. Small surface scratches may be removed by using 100 grit
sandpaper to lightly sand the area in the direction of the grain.
sandpaper to lightly sand the area in the direction of the grain.
Porcelain Finish: Porcelain Finish:
Any of the following may be used on a porcelain finish when the surface is cool;
Any of the following may be used on a porcelain finish when the surface is cool;
soap and water; paste of baking soda and water; and non-abrasive plastic pad or
soap and water; paste of baking soda and water; and non-abrasive plastic pad or
sponge. Never use abrasive or caustic cleaning agents on any porcelain surfaces of
sponge. Never use abrasive or caustic cleaning agents on any porcelain surfaces of
your range. Porcelain enamel is glass fused on metal, therefore it may crack or chip
your range. Porcelain enamel is glass fused on metal, therefore it may crack or chip
with misuse.
with misuse.
Wipe all spillovers immediately with a dry cloth especially acid or sugar spillovers.
Wipe all spillovers immediately with a dry cloth especially acid or sugar spillovers.
The surface may discolor or dull if soil is not removed.
The surface may discolor or dull if soil is not removed.
cleaning
cleaning
39
39

N
cleani
ng
CLEANING AND MAINTENANCE
Cleaning The Open Top And Wok Burners
All Series
Spillovers should be wiped up as soon as they occur,
before they burn and become solid.
In the event of a spillover:
1. Turn off electrical power before cleaning any part
of the range.
2. Lift off spider grates or wok adapter, be careful not
to scratch stainless steel surfaces or to chip
porcelain surfaces.
3.
RJGR & RJCT MODELS: Lift the front of the
grate support. These supports are secured by clips
located on each of the four corners. Hold the back
of the top grate and snap it up to free it for removal
(See illustration on page 41.)
ote: When removing grate supports, use care to avoid
scratching stainless steel surfaces.
4. Wash with a mild cleaner/degreaser, rinse and dry.
5. If drip tray requires cleaning, remove it and wash
with a mild cleaner/degreaser, rinse and dry.
(continued next page)
(continued)
IMPORTANT: TURN OFF ELECTRICAL
POWER BEFORE CLEANING ANY PART
OF THE RANGE
40

Cleaning The Open Top And Wok Burners
cleaning
All Series
(continued)
6. To clean the burners you must first remove the
grates and the grate supports. Then unscrew the
wing nut that attaches the burner to the hanger.
Remove the burner and let it soak in hot sudsy
water. Wipe off the stains. Scrub stubborn stains
with a non-abrasive cleaning pad. Rinse thoroughly
and dry.
7. Removal of burners allows for easy cleaning of
hangers. Note: the igniter lead cable runs
underneath the hanger; do not get this cable wet. If
the cable is wet the igniter will not operate until the
cable has dried. (Should this occur, the burner can
be lit manually with a match. Manual lighting will
speed the drying process.) The grounding of the
circuit prevents the cable from operating when wet.
In this situation, the range can still be turned on
safely without danger of electrical shock resulting
from this specific condition.
8. Burners must be thoroughly dried before
reinstalling them in the range. A wet burner will not
allow the gas to ignite properly. After drying,
reposition the burners, and secure them in place by
tightening the wing nuts.
9. Control knobs are removable to facilitate cleaning.
Before removing the knobs, make sure they are in
the OFF position. Remove the knobs by pulling
them toward you. Wash with a mild
cleaner/degreaser, rinse well and dry.
GRATES
GRATE
SUPPORT
HANGER
WINGNUTS
BURNERS
SPARK
IGNITER
41

cleaning
CLEANING AND MAINTENANCE
(continued)
Cleaning The Charbroiler
All Series
Allow the charbroiler to cool before cleaning. The
broiler grills, splashguard, and drip pan are removable
to facilitate cleaning. Follow these steps when cleaning
the charbroiler:
1. Lift off the charbroiler grates and soak in a mild
cleaner/degreaser for 15 minutes to loosen the dirt.
Brush the grates with a brass bristle brush. Rinse
well and wipe dry.
2. Lift off the splashguard and heat deflector. Wash
with a mild cleaner/degreaser, rinse well and dry.
3. Pull out the drip pan. Wash with a mild
cleaner/degreaser, rinse well and dry.
IMPORTANT: TURN OFF ELECTRICAL
POWER BEFORE CLEANING ANY PART
OF THE RANGE
GRATES
SPLASH GUARD
HEAT
DEFLECTOR
42

cleaning
Cleaning The Griddle
All Series
1. Liquids generated by the cleaning process will
collect in the drip tray located beneath the griddle.
Therefore, it is most practical to clean the griddle
surface before removing the drip tray.
2. When the griddle is hot, rub the surface with
unsalted shortening or vegetable oil. Do not use
corn oil. Wipe with a rough cloth to remove food
particles and other residue.
3. After cleaning the griddle surface, always remove
the drip tray located underneath. The pan will
collect cooked-off grease that has drained from the
griddle. Wash the pan in hot soapy water or with a
mild cleaner/degreaser. The drain chute can be
cleaned using a bottle brush and a mild
cleaner/degreaser.
4. Spots may be removed by applying vegetable oil to
the area with a rough grain nylon scouring pad.
5. Follow the manufacturer's instructions when using
special griddle cleaners. After using these cleaners,
rinse the griddle with a solution of vinegar and
water. Rinse with clear water, and dry. Before using
again, season griddle by reapplying a thin film of
vegetable oil.
6. If griddle has areas where food has been cooked
into the surface, and cannot be removed through the
above steps, polish the griddle surface with a fine
grain griddle stone. Wipe away all dust and food
particles after cleaning, then reapply a thin film of
vegetable oil.
7. Never flood a hot griddle surface with cold water.
This promotes warping and can cause the griddle
plate to crack.
IMPORTANT: TURN OFF ELECTRICAL
POWER BEFORE CLEANING ANY PART
OF THE RANGE
43

cleaning
CLEANING AND MAINTENANCE
(continued)
A Guide To The Perfect Flame
All Series
A properly adjusted flame should be stable and quiet. The flame should have a
sharp, well defined blue inner cone. Yellow tipping should not be present. The
flame should be stable and uniform, and not lift out of the ports. Allow 5 minutes
for the flame to "warm up" and stabilize.
Checking The Flame
All Series
The color of the flame is significant in determining if
the proper amount of air is present in the gas mixture.
Flames on the HI setting must have clean, sharp blue
flames with distinct inner cones approximately one
inch high. Soft, lazy flames with indistinct cones or
with yellow tips signify an insufficient amount of air.
Noisy flames that tend to lift away from the burner
signify excessive air.
To adjust the air mixture: first make sure the burner
knobs are in the off position, then loosen the screw on
top of the air shutter, and turn the shutter to obtain the
correct aperture size (see table on page 45). Tighten
the screw after the adjustment is completed.
Flames on the LOW setting must also be checked.
Turn the burner control knob to the LOW (simmer)
setting. At this setting, all ports in the burner must be
fully lit with the smallest possible flames. An
adjustment is necessary if some ports do not stay lit, or
if the flames are high. To adjust, set the knob to LOW,
then pull the knob out. Use a thin flat screwdriver (1/8"
wide) to reset the adjusting screw located at the center
of the valve stem. Turn the screw clockwise to lower
the flame and counterclockwise to increase it.
44

Dimensions of Air Shutter Apertures (in Inches)
Dimensions of Air Shutter Apertures (in Inches)
cleaning
cleaning
Natural Gas Natural Gas Propane Propane
Large Burner
Large Burner
Simmer Burner
Simmer Burner
1/2 TO 9/16 1/2 TO 9/16 3/16 TO 1/4 3/16 TO 1/4
3/8 TO 7/16 3/8 TO 7/16 1/16 TO 1/8 1/16 TO 1/8
45
45

CLEANING AND MAINTENANCE
cleaning
Lubricating The Oven Door
All Series
The oven door should be lubricated periodically,
depending on frequency of use. To lubricate, remove
the front kick plate by lifting and pulling it toward you.
This will expose the door mechanism.
Three to four drops of lubricating oil applied to the
door hinge and rocker arm as shown below will be
sufficient to properly maintain it for normal use.
(continued)
KICK PLATE
ROCKER ARM HINGE
DOOR HINGE
(BOTH SIDES)
(ACTUAL DOOR MECHANISM MAY VARY ACCORDING TO MODEL)
APPLY LUBRICATING OIL ON LOCATIONS AS SHOWN
46

Replacing The Oven Bulbs
All Series
The oven light bulbs are located on the front sections
of both side walls.
1. Allow the bulb to cool completely before removing
cleaning
IMPORTANT: TURN OFF
ELECTRICAL POWER BEFORE
BEGINNING MAINTENANCE TO
ANY PART OF THE RANGE
it. Do not touch a hot bulb with a damp cloth; this
will cause the bulb to break.
2. Hold the cover glass with one hand, and use your
other hand to insert a bladed screwdriver between
the cover glass and the metallic case (metallic strip)
of the lamp. Do not insert the screwdriver between
the oven wall and the metallic case.
METALLIC
CASE
3. Unscrew and remove the burned out bulb. Screw
the new bulb in place.
BULB
4. To re-install the cover glass, first insert one side of
the cover in the metallic case; then, snap the
opposite side into place.
COVER GLASS
OVEN TRAY
47

questions
QUESTIONS?
USE THIS EASY TROUBLESHOOTING GUIDE
PROBLEM
TOP BURNER DOESN’T
LIGHT
YELLOW TIPPING ON
FLAME; PRODUCES SOOT
AND BLOCKS FLUE
OPENINGS
PROBABLE CAUSE
1. Range not connected to
power supply.
2. Clogged burner port.
3. Burner improperly
positioned.
1. Lack of primary air due to
incorrect air shutter
adjustment.
2. Blocked, dirty primary air
openings or blocked
burner ports.
3. An improperly aligned
orifice hood is reducing
primary air injection.
4. Incorrect orifice size.
5. Faulty drilling or a dirty
orifice.
POSSIBLE SOLUTION
1. Connect range to wall outlet;
check circuit breaker or fuse
box.
2. Clean burner port with a
straight pin.
3. Place burner in proper
position on valve and burner
hanger.
1. Open air shutters to
eliminate yellow tips.
Caution: too much air will
cause lifting, noisy
flames. A balance must be
maintained. (See page 44.)
2. Clean and readjust burner.
3. Align with burner venturi
and tube.
4. Replace with correct
orifice size.
5. Clean orifice or replace
faulty drilled orifice.
LIFTING FLAMES;
FLAMES RISE FROM THE
PORTS AND BURN ABOVE
THE PORTS, ALSO KNOWN
AS NOISY FLAME
48
1. Occurs when the flow
velocity of air/gas mixture
exceeds flame velocity.
(Flame velocity is the
speed at which a flame
moves through a fuel/air
mixture.)
1. Reduce air shutter
opening. Caution: Over
reduction of air will cause
yellow flames. Proper
fuel/air balance must be
maintained. (See page 44.)

PROBLEM
PROBLEM
LIFTING FLAMES LIFTING FLAMES
(continued) (continued)
OVEN DOES NOT LIGHT OVEN DOES NOT LIGHT
PROBABLE CAUSE
PROBABLE CAUSE
2. Incorrect gas pressure. 2. Incorrect gas pressure.
3. Incorrect orifice size. 3. Incorrect orifice size.
1. Range not connected to
1. Range not connected to
power supply.
power supply.
2. Power switch OFF. 2. Power switch OFF.
3. Shutoff valve is in OFF
3. Shutoff valve is in OFF
position.
position.
4. Main gas line shut OFF. 4. Main gas line shut OFF.
questions
questions
POSSIBLE SOLUTION POSSIBLE SOLUTION
2. Main valve must be fully open.
2. Main valve must be fully open.
Have gas pressure checked by
Have gas pressure checked by
an authorized technician.
an authorized technician.
3. Replace with correct orifice
3. Replace with correct orifice
size.
size.
1. Connect range to wall outlet,
1. Connect range to wall outlet,
check circuit breaker or fuse
check circuit breaker or fuse
box
box
2. Turn power switch ON. 2. Turn power switch ON.
3. Turn shutoff valve to the ON
3. Turn shutoff valve to the ON
position. (see illustration on
position. (see illustration on
page 12.)
page 12.)
4. Turn main gas valve ON. 4. Turn main gas valve ON.
OVEN TEMPERATURES OVEN TEMPERATURES
SEEM INACCURATE: SEEM INACCURATE:
• Cooking takes too long • Cooking takes too long
• Food cooks too fast • Food cooks too fast
• Food pale in color • Food pale in color
• Food overbrowned • Food overbrowned
• Food overdone on outside,
• Food overdone on outside,
underdone on inside
underdone on inside
RANGE LIGHTS DON’T
RANGE LIGHTS DON’T
WORK
WORK
1. Oven wasn’t preheated. 1. Oven wasn’t preheated.
2. Incorrect gas pressure. 2. Incorrect gas pressure.
3. Incorrect use of aluminum foil. 3. Incorrect use of aluminum foil.
4. Oven bottom improperly
4. Oven bottom improperly
positioned.
positioned.
5. Incorrect type of cookware
5. Incorrect type of cookware
was used.
was used.
1. Switch not set on LIGHT. 1. Switch not set on LIGHT.
2. Range not connected to
2. Range not connected to
power supply.
power supply.
3. Bulb is burned out. 3. Bulb is burned out.
1. Preheat oven for at least 20
1. Preheat oven for at least 20
minutes.
minutes.
2. Main valve must be fully open.
2. Main valve must be fully open.
Have gas pressure checked by
Have gas pressure checked by
an authorized technician.
an authorized technician.
3. Refer to page 17. 3. Refer to page 17.
4. Properly reposition oven
4. Properly reposition oven
bottom.
bottom.
5. Use shiny pans for cakes,
5. Use shiny pans for cakes,
cookies & biscuits. Use dull or
cookies & biscuits. Use dull or
glass cookware for pies &
glass cookware for pies &
breads. Dark pans absorb heat
breads. Dark pans absorb heat
and cause overbrowning.
and cause overbrowning.
1. Turn LIGHT switch ON. 1. Turn LIGHT switch ON.
2. Connect range to outlet, check
2. Connect range to outlet, check
circuit breaker or fuse box.
circuit breaker or fuse box.
3. Replace bulb. Refer to page 47. 3. Replace bulb. Refer to page 47.
49
49

NOTES
50

CUSTOMER SERVICE
Before calling for service...
Many operating problems are minor, and can be corrected without a
technician. Refer to the Troubleshooting Guide on pages 46-47 before calling a
service technician.
For additional assistance regarding the use and care of your Jade range, please
contact:
• Your Jade dealer or distributor (see page 4), or
• Customer Service
Jade Products Company
7355 East Slauson Avenue
City of Commerce, CA 90040
1-213-889-4888
1-800-794-5233
1-213-889-4890 (FAX)
Please have the model and serial numbers handy when calling for service (see
pages 4-5).
support
51

YOUR JADE GAS RANGE AND COOKTOP
WARRANTY
FULL ONE YEAR WARRANTY
LIMITED THREE YEAR WARRANTY
LIMITED SEVEN YEAR WARRANTY
Jade products are warranted to be free from defect in material and
workmanship under normal household use and service for a period of twelve
(12) months from the date of original retail purchase (not to exceed eighteen
(18) months from manufacturing date). Jade, the warrantor, agrees to repair
or replace, at its option, any part which fails or is found to be defective during
the warranty period.
Any oven bake/roast burner or griddle burner and stainless steel open top
burner which fails in normal household use within three (3) years from the
date of original retail purchase (not to exceed forty two (42) months from
manufacturing date) will be repaired or replaced, free of charge when the
range is located within the United States. This only applies to the actual part,
and excludes all other costs, including labor.
Any stainless steel oven interior which fails in normal household use within a
period of seven (7) years from the date of original retail purchase (not to
exceed ninety (90) months from manufacturing date) will be repaired or
replaced, free of charge when the range is located within the United States.
This applies only to the actual part, and excludes all other costs, including
labor.
This warranty shall apply to products purchased and located in the United
States. Warranty labor shall be performed by an authorized Jade service
agency or representative.
Warranty does not apply to damage resulting from abuse, accident, natural
disaster, loss of electrical power (for any reason) to the product, alteration,
outdoor use, improper installation or improper operation, unauthorized
adjustments and calibrations performed on the product, nor damage due to
harsh chemicals (i.e., cleaning products improperly applied). Oven light bulbs
are also excluded from this warranty.
Warrantor is not responsible for consequential or incidental damage.
Warranty does not apply to commercial usage, or to products with altered or
removed serial numbers.
Owner shall be responsible for proper installation, providing normal care and
maintenance, providing proof of purchase upon request, and making the
appliance accessible for service.
Warrantor's liability on any claim of any kind, with respect to the goods or
services covered herein, shall in no case exceed the price of the goods or
services or part thereof which gives rise to the claim.
WARRANTY SERVICE
Any implied warranties of merchantability and fitness applicable to the equipment are limited in duration to the period of coverage of this express
written warranty. This warranty grants specific legal rights to the purchaser. Other rights, which may vary from state to state, may also apply. Title to
the merchandise passes to the consignee upon acceptance by the carrier. After acceptance by the carrier, the merchandise travels at the risk of the
purchaser. In the event of freight damage do not refuse shipment. Advise the agent of the damage, and note the details of that damage on the freight
bill before any freight charges are paid. File a claim for damages with the freight agent. In the event of concealed damage (shipment arrives in
apparent good order, but upon unpacking is found to be damaged) immediately notify the freight agent in writing and retain a copy of the notification.
Under the terms of this warranty, service must be performed by a factory
authorized Jade service agent or representative. Service will be provided
during normal business hours. Labor performed at overtime or premium rates
shall not be covered by this warranty. To obtain warranty service, contact the
dealer from whom the product was purchased, an authorized Jade service
agent or Jade. Provide model and serial number and date of original
purchase.
IMPORTANT: Retain original proof of purchase to establish warranty period.
RJGR RJCT
 Loading...