


JADAK a business unit of Novanta HS2R9 Users Manual

Flexpoint HS2R9

Chapter 1 – Getting Started ......................................................................................... 5
About This Manual ...................................................................................................... 5
flexpoint HS2R9 Imager Identification .......................................................................... 6
flexpoint HS2R9 Imager Components ............................................................................ 7
About the Battery ......................................................................................................... 8
Charging Information ............................................................................................... 8
Battery Recommendations....................................................................................... 8
Proper Disposal of the Battery ................................................................................. 9
Connecting the Base ................................................................................................. 10
Reading Techniques ................................................................................................. 11
Chapter 2 – Basic System Operation ............................................................................ 12
Base .......................................................................................................................... 12
RF (Radio Frequency) Module Operation .................................................................. 12
Cordless HS2R9 ........................................................................................................ 12
System Conditions .................................................................................................... 13
Bluetooth Association Process .............................................................................. 13
HS2R9 Is Out of Range ......................................................................................... 13
Base Charge Mode ................................................................................................... 14
Beeper and LED Indicators........................................................................................ 14
Troubleshooting ............................................................................................................ 18
Chapter 6 – Symbologies .............................................................................................. 20
All Symbologies ......................................................................................................... 21
2
9/10/15

Message Length Description ..................................................................................... 21
Chapter 8 – Product SpecificationsHS2R9 Product Specifications ............................ 23
Chapter 9 – Maintenance .............................................................................................. 26
Cleaning the Scanning Window ................................................................................. 26
Cleaning the Scanner Housing .................................................................................. 26
Interface Cable .......................................................................................................... 28
Replacing the Battery ................................................................................................ 28
Repairs ...................................................................................................................... 28
Chapter 10 – REGULATORY, Service, Maintenance .................................................... 29
10.1 FCC, IC ............................................................................................................. 29
FCC Class B Compliance .......................................................................................... 29
10.2 Industry Canada IC Compliance ........................................................................ 30
10.3 CE ................................................................................................................. 31
10.4 – Customer Support .......................................................................................... 34
Obtaining Technical Assistance or Factory Service ................................................... 34
North America........................................................................................................ 34
Europe ................................................................................................................... 34
10.4 Limited Warranty ............................................................................................... 35
Appendices ............................................................................................................... 37
Appendix A - Programming Bar Codes ...................................................................... 37
Appendix B – ASCII Conversion Chart ...................................................................... 39
3
9/10/15

Appendix B – ASCII Conversion Chart (continued) .................................................... 41
Appendix C - Symbology Chart ................................................................................. 42
Appendix C - Symbology Chart (continued) ............................................................... 43
Appendix D - Data Matching, Collation [Needs 7-bit commands] ............................... 44
Appendix E – GS1 Formatting [Needs 7-bit commands] ............................................ 47
Appendix F - Japan 2 Byte Output Mode [Needs 7-bit commands] ............................ 50
Appendix G – HS2R9 Theory of Operation ................................................................ 50
Appendix H – Laser Safety ........................................................................................ 55
Appendix I – Power Input .......................................................................................... 55
4
9/10/15

Chapter 1 – Getting Started
The flexpoint™ HS2R9 from JADAK™ is a wireless Bluetooth BLE handheld
scanner capable of decoding all major 1d and 2d barcode varieties as well as
reading a broad variety of HF RFID tags. The HS2R9 consists of a highly
configurable area imaging camera, decoding engine, and an HF RFID
transceiver that will communicate via a Bluetooth BLE 4.1 interface.
With a small ergonomic shape, the HS2R9 can be used in a wide variety of
applications, but is especially designed for Healthcare applications and
environments. The HS2R9 has a sealed housing that protects it from day to day
debris and spills and is built with medical grade plastics that are compatible with
popular medical cleansers and disinfectants.
About This Manual
This User’s Guide provides installation and programming instructions for the
flexpoint HS2R9. Product specifications, dimensions, warranty, and customer
support information are also included. JADAK’s bar code imagers are factory
programmed for the most common terminal and communications settings. If you
need to change these settings, programming is accomplished by scanning the
bar codes in this guide. An asterisk (*) next to an option indicates the default
setting.
5
9/10/15
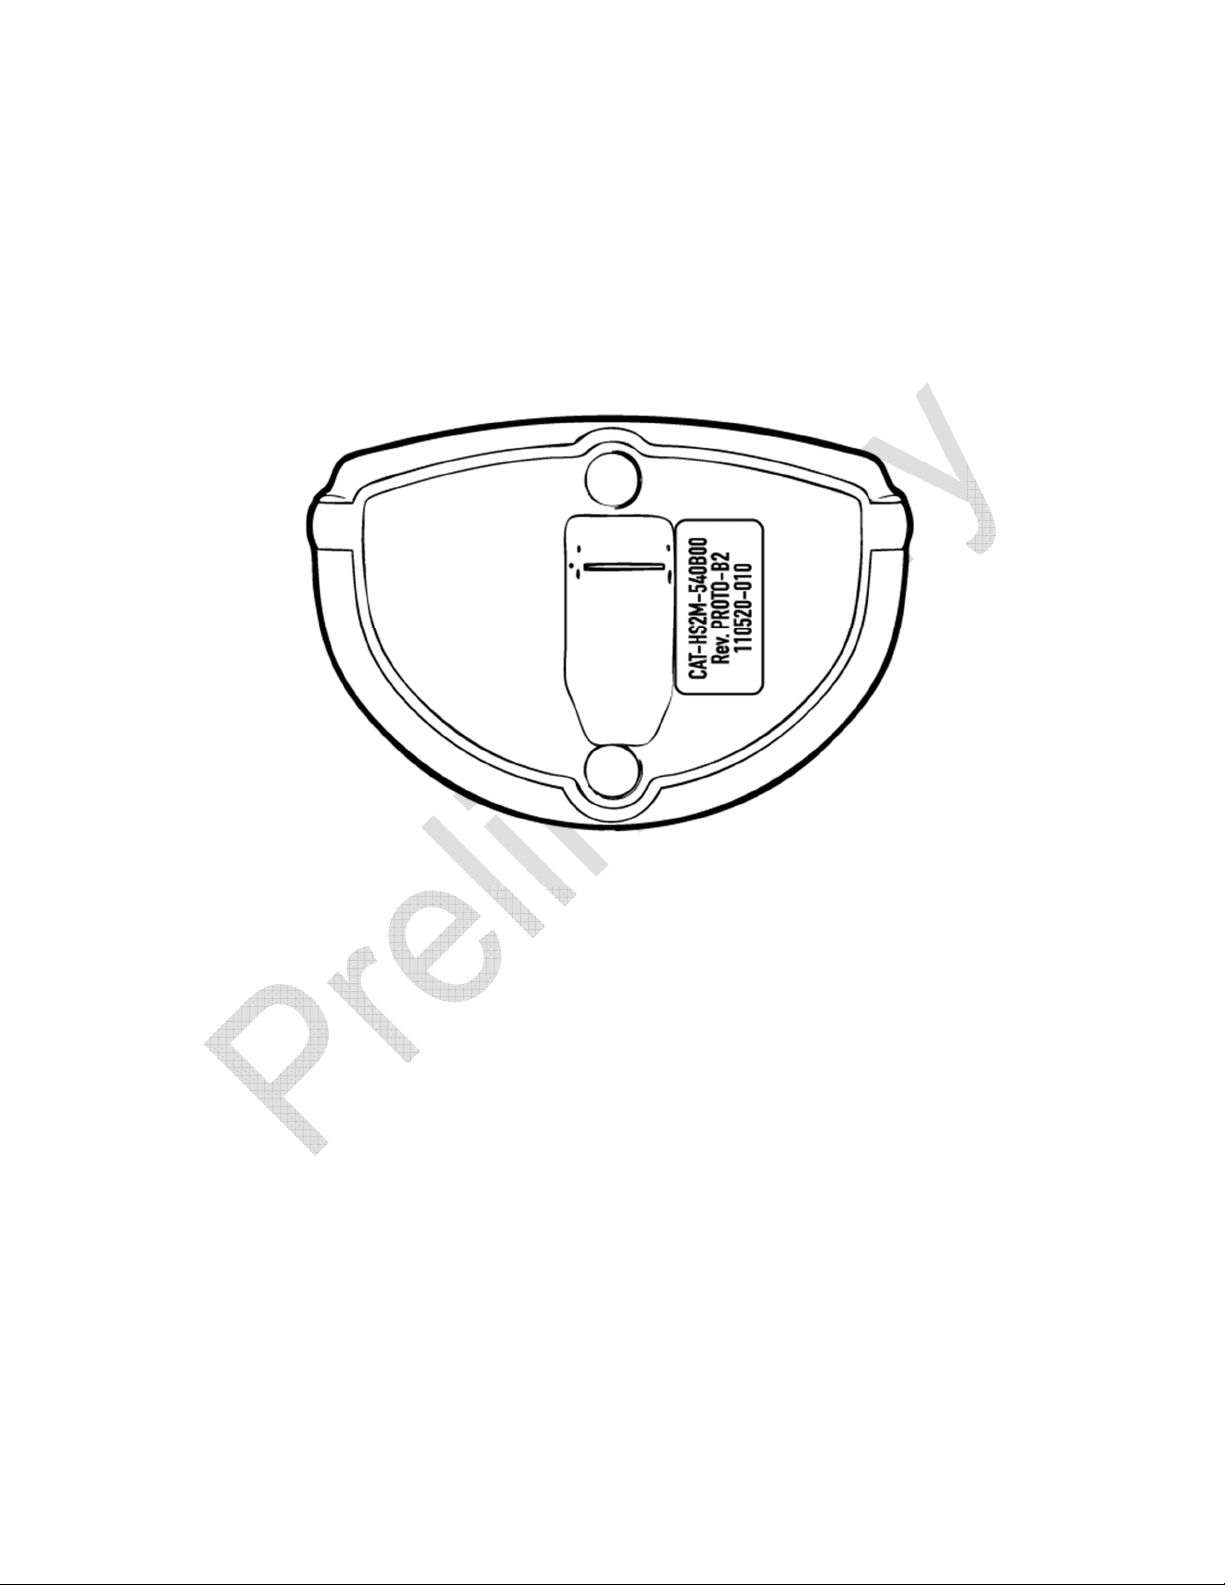
flexpoint HS2R9 Imager Identification
On the bottom of your scanner you will see a label as shown below:
Configuration String:
The configuration string defines the configuration style of the HS2R9 unit.
Please consult the factory for configuration information.
Revision String:
The revision string indicates the revision number of the product. Serial Number:
The serial number format is as follows: YYMMDD-NNN
Where:
YY = Year
MM = Month
DD = Day
NNN = Number of unit
9/10/15
6
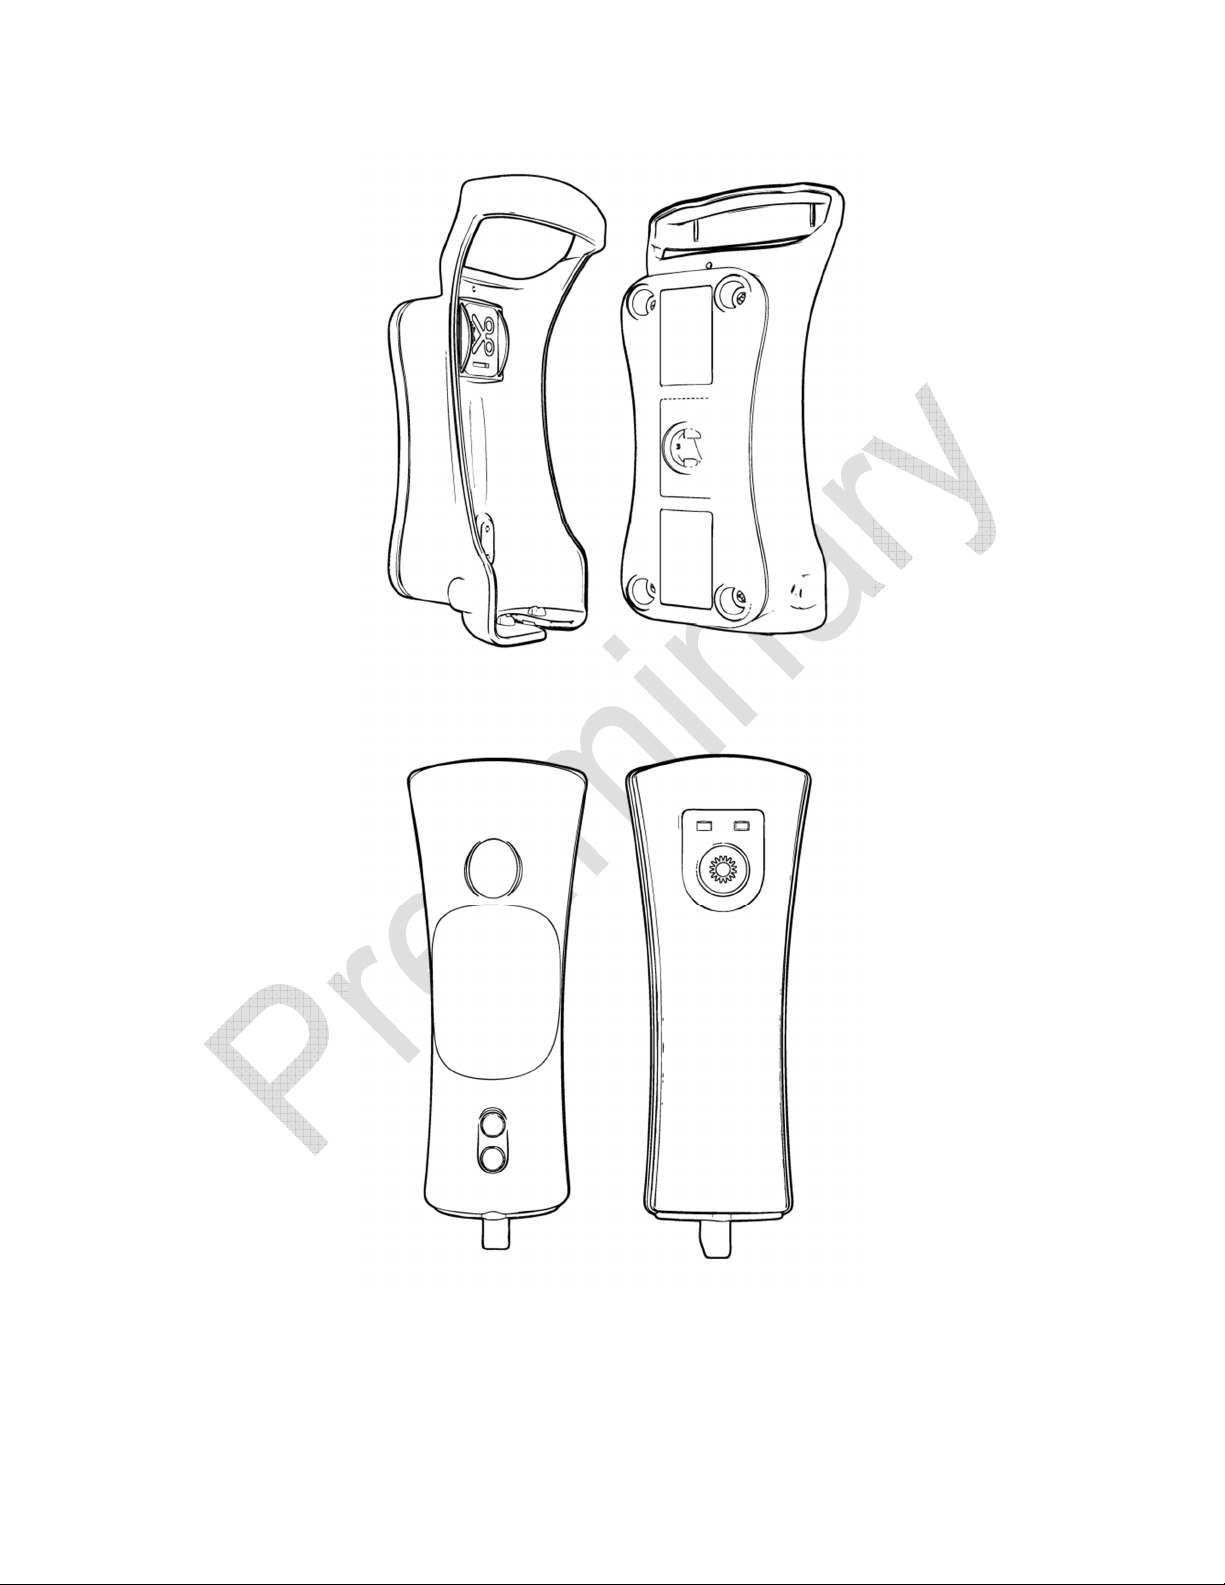
flexpoint HS2R9 Imager Components
7
9/10/15

About the Battery
Power is supplied to the HS2R9 imager by a rechargeable battery located in the
body of the imager. Each HS2R9 imager is shipped with a Lithium Ion battery
already installed. See “HS2R9 Product Specifications” on page 8-1.
Charging Information
The HS2R9 imager is designed to recharge the battery whenever the imager is in
the base. Be sure that the base is connected to an appropriate power supply.
Battery Recommendations
Batteries are shipped approximately 30% to 60% charged and should be
fully charged for maximum charge capacity.
The battery is a lithium ion cell and can be used without a full charge, and
can also be charged without fully discharging, without impacting the
battery life. There is no need to perform any charge/discharge conditioning
on this type of battery.
Do not disassemble the battery. There are no user-serviceable parts in the
battery.
Keep the base connected to power when the host is not in use.
Replace a defective battery immediately since it could damage the imager.
Do not short-circuit a battery or throw it into a fire. It can explode and
cause severe personal injury.
8
9/10/15

The Lithium Ion battery in the HS2R9 can be recharged many times. Eventually
it will be unable to hold a charge and be unusable. See Chapter 9, Replacing the
Battery
A new battery at full charge should allow operation for a full 8 hour shift
given a typical use case of scanning 30 times per hour (triggered for 5
seconds per scan).
Recharging a fully discharged battery will take 3-4 hours depending on the
level of use (scanning) while in the base.
If you are not sure if the battery or charger is working properly please see the
troubleshooting section, in Chapter 2.
Proper Disposal of the Battery
When the battery has reached the end of its useful life, the battery should be
disposed of by a qualified recycler or hazardous materials handler. Do not
incinerate the battery or dispose of the battery with general waste materials. You
may send the imager’s battery to JADAK (postage pre-paid). The shipper is
responsible for complying with all federal, state, and local laws and regulations
related to the packing, labeling, manifesting, and shipping of spent batteries.
Since you may find your cost of returning the batteries significant, it may be more
cost-effective to locate a local recycle/disposal company.
9
9/10/15
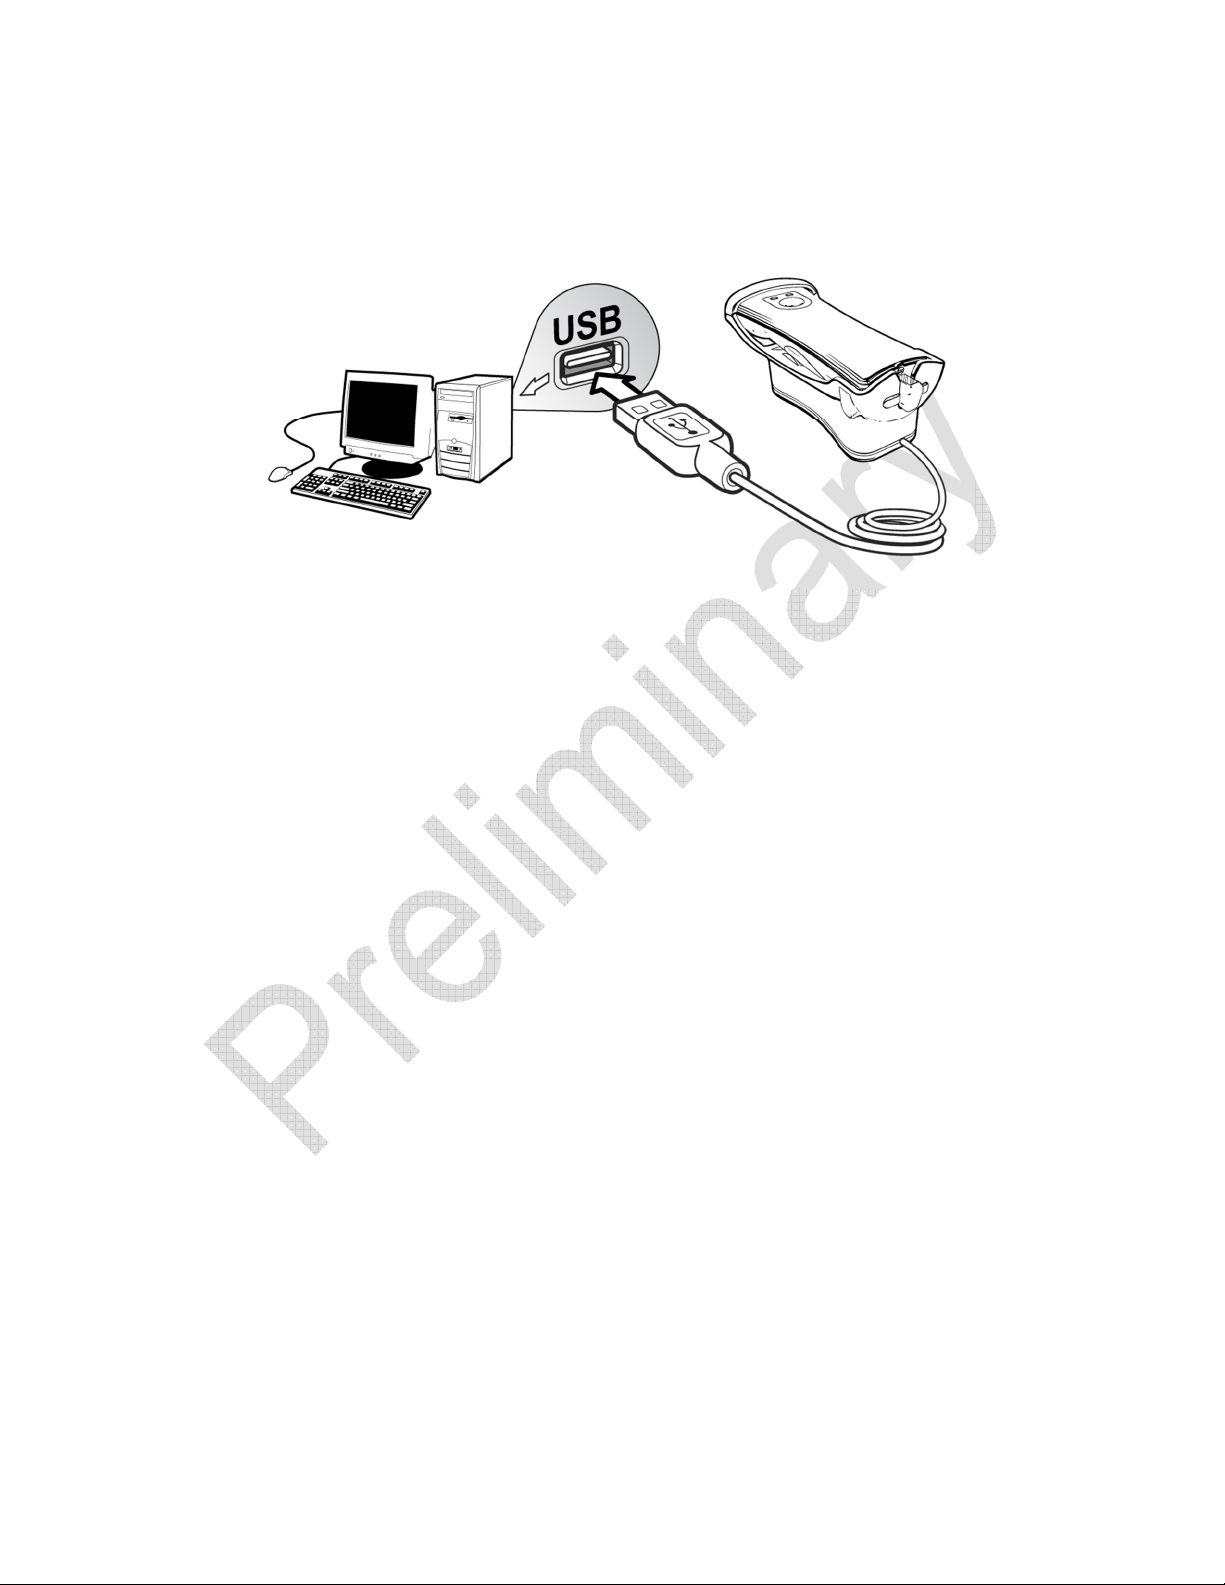
Connecting the Base
The base can be plugged into a computer’s USB port.
When the base is connected, place the HS2R9 imager into the base to charge
the battery. The imager’s indicator LEDs flash, alternating between the green and
red LED, to indicate the battery is charging. If only the red LED is flashing, this
indicates the unit is charging but the voltage/charge is too low to allow operation
(presentation mode) and charging simultaneously. Please wait until the HS2R9’s
LED’s alternate between red and green before attempting to use in presentation
mode while in the base.
10
9/10/15
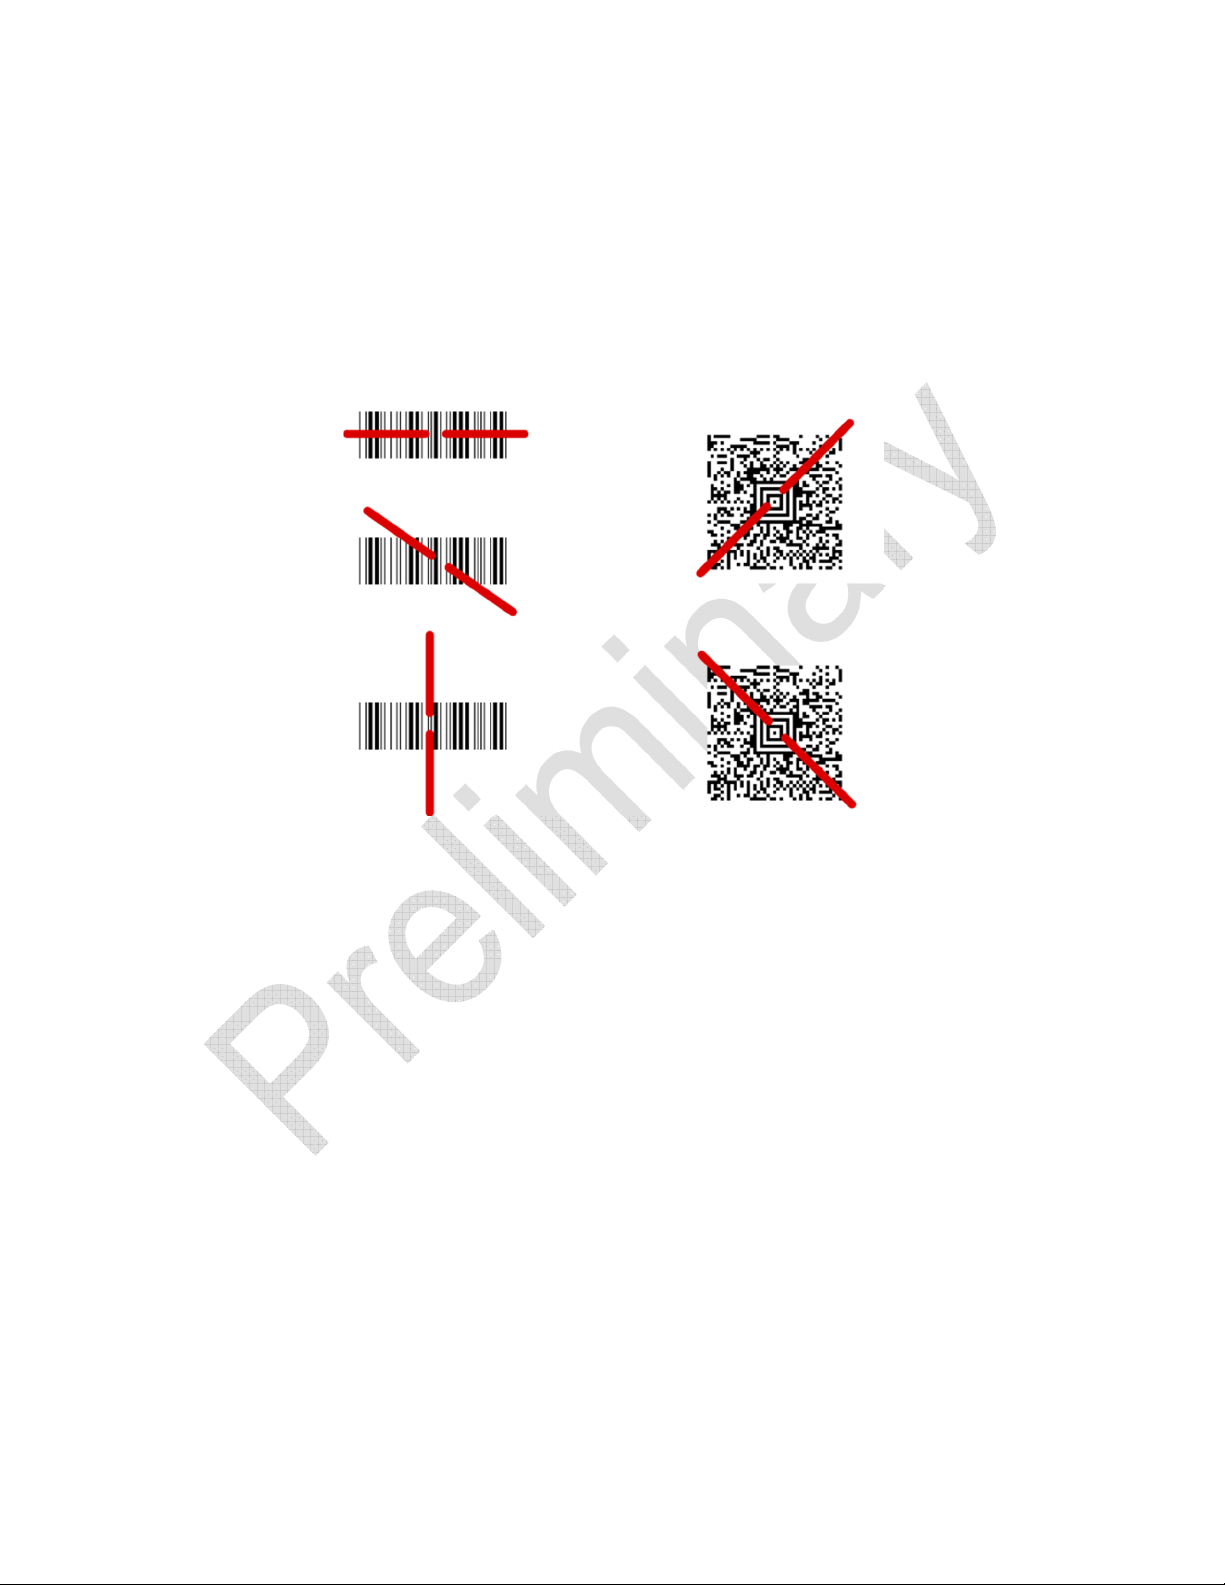
Reading Techniques
The imager has a view finder that projects a bright red or green aiming beam that
corresponds to the imager’s horizontal field of view. The aiming beam should be
centered over the bar code, but it can be positioned in any direction for a good
read.
The aiming beam is smaller when the imager is closer to the code and larger
when it is farther from the code. Symbologies with smaller bars or elements (mil
size) should be read closer to the unit. Symbologies with larger bars or elements
(mil size) should be read farther from the unit. To read a symbol (on a page or on
an object), hold the imager at an appropriate distance from the target, pull the
trigger, and center the aiming beam on the symbol. If the code being scanned is
highly reflective (e.g., laminated), it may be necessary to tilt the code up 15° to
18° to prevent unwanted reflection.
11
9/10/15

Chapter 2 – Basic System Operation
Base
The USB-connected base provides the link between the HS2R9 and the host
system. The base contains an interface assembly and an RF communication
module. The interface assembly performs the data exchange between the
HS2R9 and the host system.
The base is also the HS2R9’s battery charger. Refer to “Base Charge Mode” on
page 2-2 for additional information.
RF (Radio Frequency) Module Operation
The cordless system uses a two-way Bluetooth radio to transmit and receive data
between the HS2R9 and the Base. Designed for point-to point applications, the
radio operates using a license free ISM band, which sends relatively small data
packets at a fast data rate over a radio signal with randomly changing
frequencies, making the cordless system highly responsive to a wide variety of
data collection applications and resistant to noisy RF environments.
Cordless HS2R9
The HS2R9 enables fast and accurate bar code scanning using a non-contact
area image sensor.
The HS2R9 is comprised of an image engine, a decode/control assembly, and an
RF communication module. The image engine performs the bar code image
illumination and sensing. The decode/control assembly coordinates the central
communication activities including: capturing and decoding the bar code image
data, performing software activities (parameter menuing, visual indicator support,
low battery indication), and data translation required for the host system. The RF
communication module performs the data exchange between HS2R9 and the
base.
12
9/10/15

System Conditions
The components of the cordless system interact in specific ways as you
associate an HS2R9 to a base, as you move an HS2R9 out of range, bring an
HS2R9 back in range, or swap HS2R9s between two bases. The following
information explains the cordless system operating conditions.
Bluetooth Association Process
Once an HS2R9 is placed into the base, the HS2R9’s battery charge status is
checked and ,if a sufficient charge is available, the HS2R9 is powered on. The
device will begin the association (establishing a one to one communication link)
process if the
on Power-up
Associate on Power-up
has not been enabled, the device will not associate with another
device until one of two conditions occur:
setting has been enabled. If
Associate
If a base’s
•
Association
barcode is scanned (located in the well of the
base in front of the contact pins) the HS2R9 will begin the association
process with the Bluetooth module in that base.
If a regular barcode is scanned, the HS2R9 will begin the association
•
process with the last associated device.
HS2R9 Is Out of Range
The HS2R9 is in communication with its base, even when it is not transmitting
bar code data. Whenever the HS2R9 handset cannot communicate with the
base, it is out of range. If the device is out of range and you scan a bar code, the
device will emit a clicking sound as it attempts to re-associate with the base.
If the HS2R9 successfully re-associates with the base, the green indicator
LED will flash once and the device will issue one Good Read (high
frequency) beep. You may then re-scan the bar code.
If the HS2R9 is unable to re-associate with the base after the Bluetooth
association timeout duration (default is 20 seconds), the red indicator LED
will flash once and the device will issue one Error (low frequency) beep.
13
9/10/15

Once you move back into range, you may again attempt to re-associate
the HS2R9 with the base by scanning a bar code. If the device is still
unsuccessful in communicating with the base, you will need to place the
HS2R9 in its base momentarily and scan the Association code in order to
re-link them.
Base Charge Mode
Power is supplied to the HS2R9 imager by a rechargeable battery located in the
body of the device. When the battery level falls below 3.4 Volts, the imager’s red
LED blinks to indicate the low battery situation. The HS2R9 should then be
placed in the USB-connected base to re-charge. When the HS2R9 is charging, it
will indicate this by flashing the red and green LEDs alternately.
If the battery charge falls below 3.2 Volts during use, the red LED will stop
blinking and the HS2R9 will enter sleep mode to preserve battery life. Placing the
HS2R9 into the base will initiate charging. The red LED will begin blinking again
and will continue blinking until the battery level reaches 3.4 Volts, at which point
the red and green LEDs will flash alternately indicating battery charging and
potential use in presentation mode.
Beeper and LED Indicators
The HS2R9 contains LEDs on the top of the unit to indicate its power up,
communication, and battery status. Simply stated, red LED = error; green LED =
success of any type. The HS2R9’s audible indicators have meaning as well, with
a single low-frequency beep indicating an error and a single high-frequency beep
indicating success.
14
9/10/15

Red LED (RFID)
Green LED
Meaning
The table below lists the indications of the LED illuminations:
(Barcode)
Off Off Sleep, Idle, or no power (depleted battery)
Off Blink once Successful Barcode decode
Off Blink once Successful RFID read
Long Blink once Off
Blink once Off Bluetooth association attempt failed
Off Blink once Bluetooth association attempt succeed
Blinking Off
Blinking Off
Alternating Red and Green Blinking In base charging, alternating red/green state.
Off On Continuously
Off On Continuously Handheld Fully Charged (In Base)
Unsuccessful barcode decode / no read, or
unsuccessful / partial RFID read
Battery critically low if discharging, system ill shut down
shortly.
Battery too low to power hand held up if in the cradle.
The battery is charging, just very low. This state
precedes the alternating red/green stat.
Handheld in Active State (until sleep mode) (PHASE 2,
Do Not Implement)
Red and Green blink once simultaneously
Power up from Sleep. Blink on once simultaneously
after a trigger press.
15
9/10/15

Function
Blink Once
Blink Once
In base, base not powered, both LED’s on constantly.
On On
This state will persist for about 2 minutes, then the unit
will completely power down. The only way to wake it is
to plug it into a powered base.
Blinking for
approximately 12 sec.
Blinking for
approximately 12 sec.
Off
(After R/NR Beep)
Off
Off
(After R/NR Beep)
Off (After Unsuccessful Display
Power up self-check, internal communications error,
Power up self-check, internal communications error,
scanner will also beep for the same duration of time to
The table below lists the indications of the beeper:
Active
Beeper Tone Beeper Frequency Meaning
RFID transceiver not detected.
barcode scanner not detected. For this error the
differentiate between error modes.
Successful Display
Single long high beep
Barcode
Barcode
RFID
Approximate duration
250msec.
Single long low beep
Approximate duration
250msec.
Single short high beep
Approximate duration
100msec.
Approximate frequency
4,000Hz
Approximate frequency 500Hz
Approximate frequency
3,000Hz
Successful Decode
Un-Successful Decode /
Barcode No Read
Successful RFID read
16
9/10/15

RFID
Power up self-
check
initialization
Power up beep
sequence
Single short low beep
Approximate duration
100msec.
Repeated Long low beeps.
Limit duration to allow other
function to still operate.
Beep and flash red LED for
approximately 12sec then stop
indicators.
Three beeps of increasing
frequency
Geiger counter beep
Approximate frequency
Approximate frequency
200Hz
500Hz
Varying Power up
Un-successful / partial RFID
read
Internal Communications
error on the barcode
scanner.
Bluetooth associating with
base (opening connection)
Bluetooth
Association
Menuing
barcode
Sleep mode Three descending beeps Varying
Successful
Display
Two ascending beeps Varying
One long low beep Varying Bluetooth association failure
Two alternating high/low beeps
Single long high beep
Approximate duration
250msec.
Varying
4,500hz
Bluetooth association
successful
Menu barcode scanned to
set internal configurations
Tone indicates the device is
entering low power mode 2.
Communication will be
closed for power savings
Information has been
successfully displayed by
host
17
9/10/15