

Page 1

™
WHIRLPOOL
BATH
R
Z101/301
Owner's Manual
Page 2
IMPORTANT SAFETY INFORMATION
READ AND FOLLOW ALL INSTRUCTIONS
Warning — Risk of injury: Children, the elderly,
and the infirm should not use the spa unless they are super-
vised at all times. Infants should not be permitted in the spa
at water temperatures over 100° F (38°C).
Spa water temperature in excess of 104° F is not recommended. High water temperatures in excess of 104° F (40° C)
and prolonged periods of use can raise internal human body
temperature excessively and impair the body’s ability to regulate its internal temperature.
Pregnant women and people with heart circulatory conditions, or diabetes, should consult their physicians before using
the spa at water temperatures over 100° F (38° C).
Limit your initial use of the spa to 10-15 minutes. High
body temperatures affect people differently; consult your
physician about your safety and comfort before using the spa.
If your spa product does not have a thermometer, we
recommend that you use a medical (clinical) type thermometer
for an accurate measurement of spa water temperatures.
Other types of thermometer, generally available, such as
those used for swimming pools are not sufficiently accurate to
determine spa water temperature.
Extra care should be taken when using the spa and
consuming alcoholic beverages. Alcohol, drugs, or certain
medications, such as tranquilizers, affect a person’s ability to
withstand high temperatures and may produce dangerous
effects, including drowning. Persons using medication should
consult with a physician before using a spa.
Danger — Risk of injury: Do not remove the suction grille!
It is a safety device and must always be in place on the suction
fitting to minimize the potential hazard of hair entanglement or
body entrapment.
Keep body, hair, and clothing a minimum of 12 inches
away from suction fitting and skimmers at all times when the
spa is operating. Hair longer than shoulder length should be
secured close to the head, or a bathing cap should be worn.
Do not operate the spa if the suction cover is broken or
missing. Contact your Dealer for replacement cover if broken
or missing.
The wet surface of the spa is slippery. Use care when
entering and exiting.
DANGER — Risk of child drowning: Do not permit children
to use this product unless they are closely supervised. The
use of a locked cover is highly recommended to prevent
unattended access.
DANGER — RISK OF ELECTRICAL SHOCK: When installing and operating this electrical equipment, basic safety precautions should always be adhered to including the following.
Warning: A wire connector is provided at the electrical
cabinet on this spa to connect a minimum No. 8 AWG (8.4
2
mm
) solid copper conductor between this spa and any metal
equipment, metal enclosures of electrical equipment, metal
water pipe, or conduit within 5 feet (1.5 m) of the spa.
Do not use electrically connected devices such as television, radio, or stereo speakers, lights, cooking devices, or
telephones within 5 feet (1.5 m) of the spa while the spa is
being used. Lighting fixtures must not be located directly
above or within 5 feet (1.5 m) of the spa. If located within 10
feet (3.0 m) of the spa, they must be on a circuit protected by
a GFCI (Ground Fault Interrupter Circuit).
All fixed metal objects located within 5 feet of the spa,
such as fence posts, railings, door frames, greenhouse structures, gutters, etc., must be attached to the bonding bar on the
outside of the spa electrical cabinet using #8 solid copper wire.
With #8 solid copper wire, bond the spa to the house
electrical panel or approved local bond.
The spa must be installed with adequate access and
water drainage system, refer to Installation Instructions, to
drain water away from electrical components.
CAUTION: Do not turn power ON to the spa unless it is filled
with water to the normal water level, which is to the water level
indicator mark on the skimmer frame. Activating the spa when
there is an insufficient amount of water can damage the
circulation pump and may cause a fire.
T
S
E
T
T
E
INDICATOR
S
E
TEST
BUTTON
R
LIGHT
RESET
BUTTON
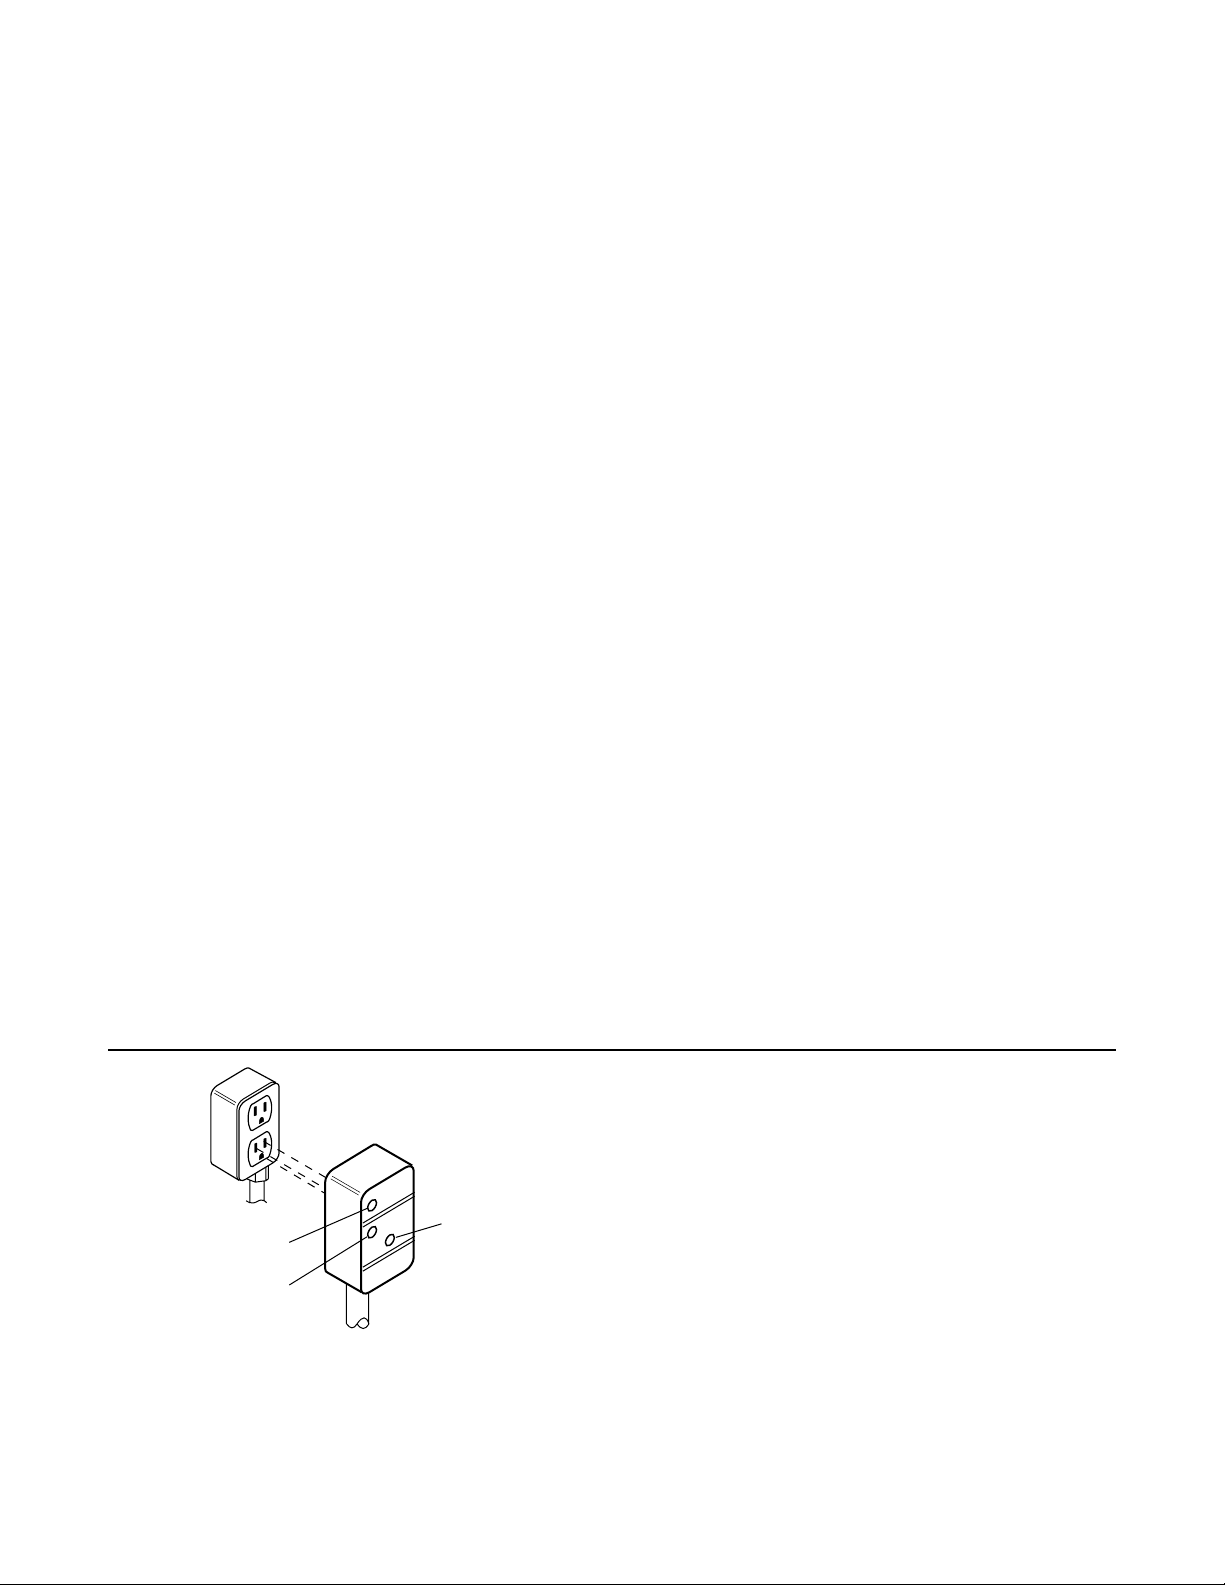
1. The spa is supplied with a 15 foot line cord which
terminates with an integral GFCI plug. Locate the spa near
enough to a weather protected outlet, but no closer than 10
feet. DO NOT USE AN EXTENSION CORD! Using an
extension cord is hazardous and will decrease the amount of
power to the unit, causing slow heating, poor whirlpool performance, or system malfunction.
Read manufacturer’s safety information provided with all optional equipment.
2. Replace damaged line cord immediately. Do not bury
line cord. Connect to a grounded, grounding type receptacle
only.
3. Bring the line cord out from under the skirt. Remove
access panel screws to gain access. Make sure the line cord
does not lie across a walkway or in a heavily traveled area
where it may be a safety hazard or become damaged.
4. At initial start-up and before each use thereafter, test
the GFCI. With power ON, the indicator light should be on. If
not, press RESET and light should come on. Then press TEST
button - light must go OFF. Press RESET for use. If the
interrupter fails to operate in this manner, there is a ground
current flowing or a device malfunctioning, indicating the
possibility of electrical shock. Turn off power and do not use
the spa until the source of the breakdown has been
identified and corrected.
Page 3

Z10/301 Whirlpool Spa
OWNER’S MANUAL
Contents
Specifications ___________________________________________________ 2
Installation
Inspection and Shipping Claim _______________________________________ 3
Positioning Your Spa_______________________________________________ 3
Electrical Requirements ____________________________________________ 3
Outdoor/Indoor Installation __________________________________________ 4
Drainage ________________________________________________________ 4
Equipment Set-Up_________________________________________________ 5
Operation
Operating Instructions ______________________________________________ 6
Control Panel Operation ____________________________________________ 6
Normal Operation/Whirlpool System___________________________________ 7
Magic Touch® Switch ______________________________________________ 7
Silent Air Induction ________________________________________________ 7
Maintenance
Water Quality and Water Chemistry ___________________________________ 8
Filtration ________________________________________________________ 8
Water Chemistry __________________________________________________ 8
Disinfecting ______________________________________________________ 9
Balancing pH_____________________________________________________ 9
Balancing Total Alkalinity ___________________________________________ 9
Water Quality Definitions____________________________________________ 9
Water Level/Drain _________________________________________________ 10
Skimmer Basket Maintenance _______________________________________ 10
Filter Maintenance_________________________________________________ 10
Automatic Filtration/Maintenance _____________________________________ 11
Winterizing ______________________________________________________ 11
Factory Installed Skirt ______________________________________________ 11
Cleaning Your Spa ________________________________________________ 12
Covering Your Spa ________________________________________________ 12
Repairs to the Acrylic ______________________________________________ 12
Warranty________________________________________________________ 13-14
Owner's Record
Date Purchased ________________________________________________________
Purchased From ________________________________________________________
Installed By ____________________________________________________________
Spa Serial Number __________________________ Model # ____________________
SAVE THESE INSTRUCTIONS
1
Page 4
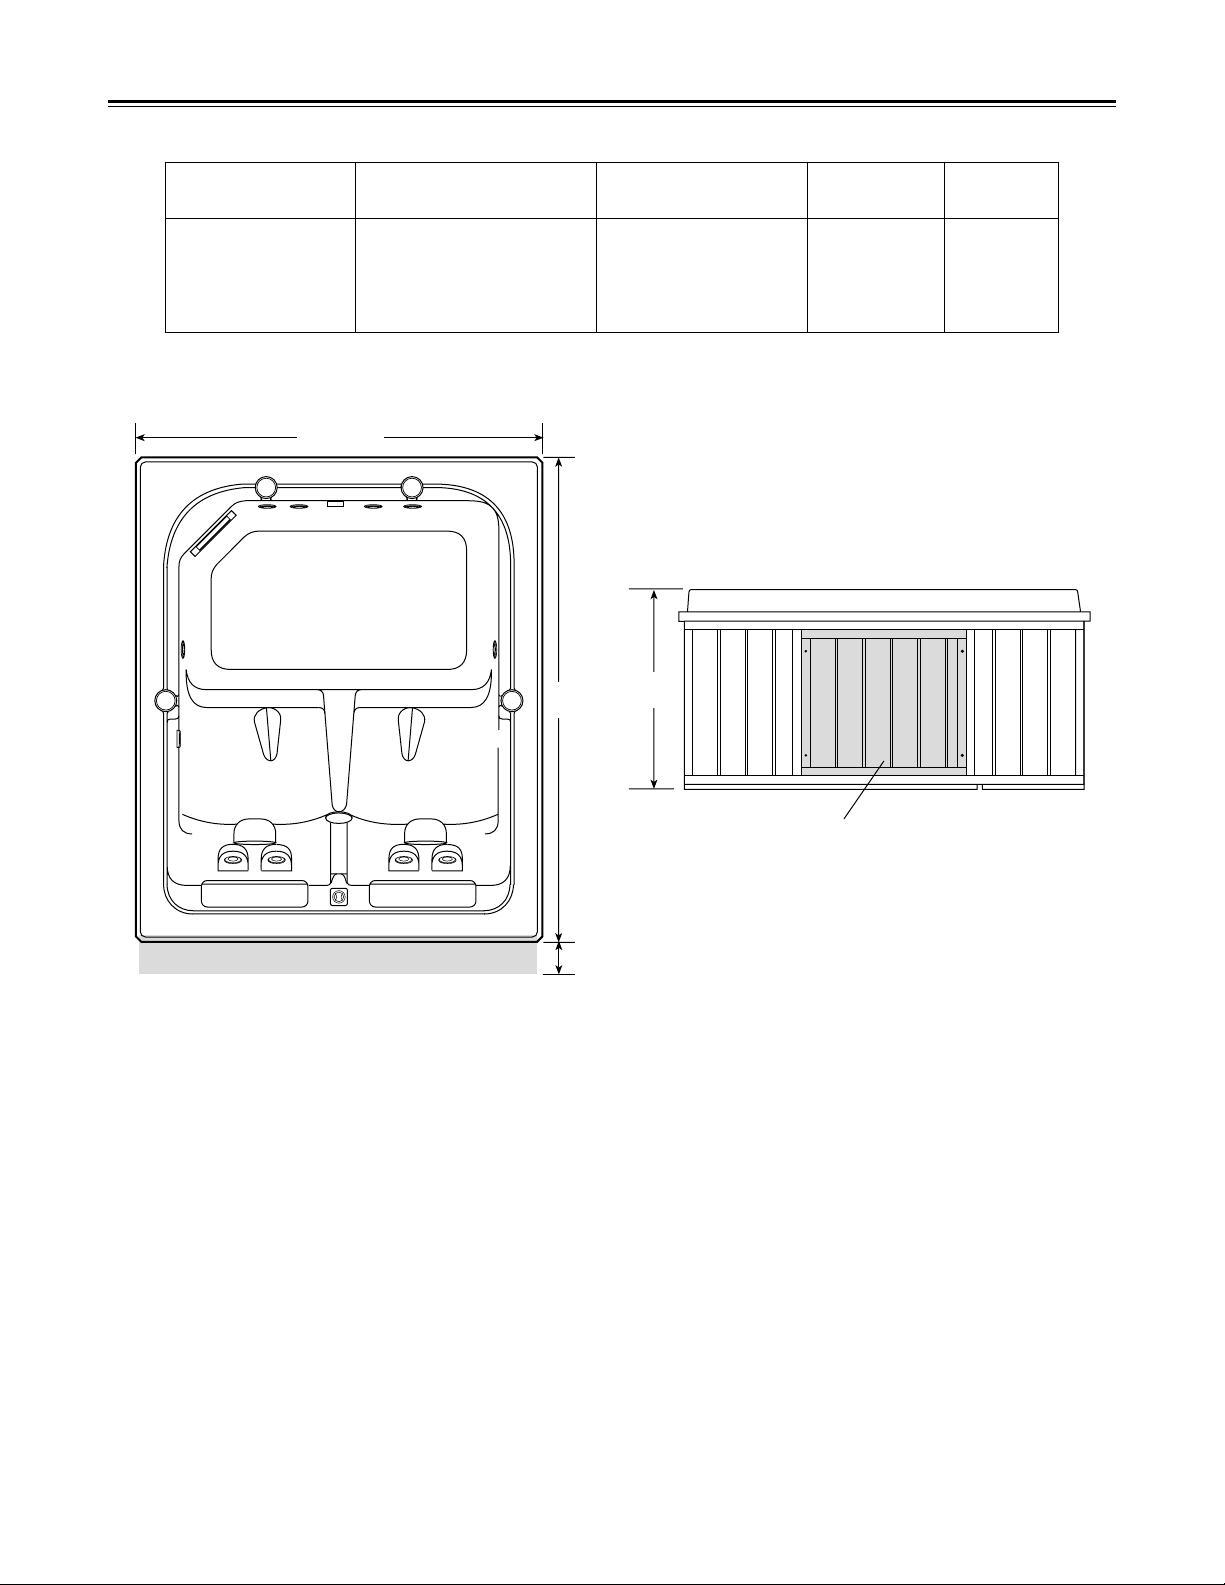
SPECIFICATIONS
Z101/301
ELECTRICAL
DIMENSIONS
74-1/4" (1886 mm) L
62-5/16" (1582 mm) W
29" ( 737 mm) H
Product specifications are subject to change without notice.
REQUIREMENTS*
115 VAC, 15 AMP, 60 Hz
Requires Dedicated
Separate Circuit.
Equipped with GFCI
Incorporated in Line Cord
62-5/16"
74-1/4"
TOTAL WEIGHT/
FLOOR LOADING
2373lb (1076 kg)
84lb/sq. ft. (411 kg/m2)
29"
OPERATING
GALLONAGE
192 U.S. gal
(727 liters)
PRODUCT
WEIGHT
371 lb
(169 kg)
ACCESS AREA
ACCESS PANEL
TO GAIN ACCESS FOR SERVICE OR MAINTENANCE:
REMOVE SCREWS RETAINING ACCESS PANEL.
(THE WHOLE SIDE PANEL CAN ALSO BE REMOVED
BY REMOVING CORNER POSTS (2) AND SCREWS
RETAINING SIDE PANEL.)
24"
SERIAL NUMBER IS LOCATED BEHIND PANEL.
2
Page 5

INSTALLATION
Inspection and Shipping Claim
Check for shipping damage upon receipt of the spa.
Jacuzzi Whirlpool Bath is not responsible for damage to
the spa sustained during shipping. If damage is evident
before unpacking, refer to instructions regarding shipping claims on the outside of the carton and immediately
file a claim with the carrier.
Once the spa has been removed from the carton
and before it is permanently installed , check the spa
completely for damage. Fill the shell with water and
operate the system (refer to Operating Instructions) to
check for leaks which may have resulted from improper
shipment or handling. All Jacuzzi Whirlpool Bath spas
are factory tested for proper operation and water tight
connections prior to shipment. If leaks or other problems
are detected, immediately notify your Jacuzzi Whirlpool
Bath dealer, Authorized Service Agent, or call Jacuzzi
Whirlpool Bath, (925) 938-7411, or (925) 938-7070 for
Warranty Service.
NOTE: Damage or defects which could have been
discovered and repaired prior to installation and
which are claimed after final installation of the spa,
are excluded from our warranty.
Positioning Y our Spa
Because your spa is portable, you can locate it just
about anywhere you wish—on a deck, patio, or even
indoors. Just be sure to position it above ground in an
area with good drainage and on a level, continuous
surface which can support the weight of the spa when
filled with water and people. You must also provide
access to the spa's equipment for service and general
maintenance. See specifications for minimum service
access requirements.
Electrical Requirements
Your spa, as it comes from the factory, has a
115VAC GFCI equipped line cord, and requires a 115
VAC, 15 AMP electrical outlet and must be in a grounded
separate circuit having no other appliance connected in
that circuit. If you do not have a 115 VAC, 15 AMP circuit,
a qualified electrician should be called in to install the
necessary wiring. Inadequately sized wiring may cause
the unit to malfunction and bring about permanent
damage to the spa’s electrical system. The circuit must
also have a ground wire in order to take advantage of the
designed-in safety features of the spa. An approved
ground may be an 8 foot long ground rod, a plate
electrode, or a buried metal water pipe with at least 10
feet of buried pipe. Check your local building code for
requirements. A bond wire must also be used. Bond
according to procedure described on page 4.
WARNING
Without proper grounding and bonding, a system
malfunction may cause fatal shock.
The continuous service ground wire is located in the
line cord supplied. Do not modify this cord in any
way! Tampering with the ground wire or using an
adaptor which would make the built-in grounding
device and GFCI ineffective would cause electrical
shock. Such modification would also nullify the
warranty.
CAUTION
Do not plug in the spa unless it is filled with water to
the normal water level, which is approx. 6" below the
spa rim. If the spa’s motor/pump is actuated when
there is not sufficient water in the unit, the circulation pump could be irreparably damaged. Not heeding this caution will nullify the warranty. In addition
to damaging the unit, operating the unit with insufficient water could cause a fire.
Electrical Precautions
The spa is supplied with a 15 foot line cord which
terminates with an integral GFCI plug. Locate the spa
near enough to a weather protected outlet, but no closer
than 10 feet. DO NOT USE AN EXTENSION CORD!
Using an extension cord is hazardous and will decrease
the amount of power to the unit, causing slow heating,
poor whirlpool performance, or system malfunction.
Replace damaged line cord immediately. Do not
bury line cord. Connect to a grounded, grounding type
receptacle only.
Bring the line cord out from under the skirt. Remove
access panel screws to gain access. Make sure the line
cord does not lie across a walkway or in a heavily
traveled area where it may be a safety hazard or become
damaged.
At initial start-up and before each use thereafter, test
the GFCI. With power ON, the indicator light should be
on. If not, press RESET and light should come on. Then
press TEST button - light must go OFF. Press RESET
for use. If the interrupter fails to operate in this manner,
there is a ground current flowing or a device malfunctioning, indicating the possibility of electrical shock. Turn off
power and do not use the spa until the source of the
breakdown has been identified and corrected.
T
S
E
T
T
INDICATOR
E
S
E
TEST
BUTTON
R
LIGHT
RESET
BUTTON
3
Page 6

INSTALLATION
Outdoor Installation
If you install the spa outdoors, we recommend that
you provide a concrete pad for it to rest on. To do this,
construct forms for a 4" thick level pad. Install a #10
gauge wire mesh 6" x 6" steel reinforced grid. Attach a
#8 solid copper wire to the grid with a ground clamp. This
wire should be long enough to reach the bond bar on the
spa electrical cabinet (minimum 36"), but should not be
located under the base of the spa. Then pour the
concrete pad.
Indoor Installation
Water that splashes on the floor during spa use may
cause a walking hazard and/or structural damage. Good
drainage must be provided and proper waterproof building materials must be used in the area surrounding and
beneath the spa. Take into consideration that high room
humidity will exist due to high spa water temperatures.
Providing natural or forced ventilation of the room will
help maintain comfort and minimize moisture damage to
the building. Jacuzzi Whirlpool Bath is not responsible
for damages resulting from excess moisture or water
spillage. Consult an architect or engineer for aid in
designing your indoor installation.
Drainage
Whether you install your spa indoors or outdoors, you can drain it completely by attaching a garden hose to the
hose bibb located on the suction plumbing of the spa. Simply run the hose to the house sewer line or drain field and
open the hose bibb.
Make sure the area surrounding the spa has good drainage to keep water from collecting at the base of the spa—
especially near the equipment area. If drainage is poor, install a drain line and/or gravel drain field. (Refer to illustration
below.)
WIRE
MESH
GRID
CONTROL
BOX
GRAVEL DRAIN FIELD
BOND LUG
#8 BOND WIRE
COLD
HOT
HIGH HEAT LIMIT
PUSH TO RESET
THERMOSTATTIME CLOCK
4" THICK CONCRETE PAD
(TO LOCAL BOND)
4
Page 7

INSTALLATION
Equipment Set-Up
1. Remove the plastic sheet covering the spa.
NOTE: Stepping into the spa with shoes will scratch
the acrylic surface.
2. Remove any packing materials from the spa.
3. Remove the filter cartridge from its plastic bag.
4. Pull open the skimmer/filter door by the handle lo-
cated in the middle of the door and remove the
skimmer basket. Then insert the filter cartridge into
the filter housing and reinsert the basket so that it fits
in place over the filter cartridge and close the skimmer/filter door.
5. Clean the interior of the spa of any remaining con-
struction debris. Remove stubborn stains, paint, or
tar with turpentine, isopropyl alcohol or paint thinner.
A mild liquid dishwashing detergent on a damp cloth
is fine for cleaning off other dirt. Plaster can be
removed by scraping with a soft plastic or wooden
edge. Do not use a metal scraper, wire brush, or other
metal tools, as they will damage the spa’s surface.
6. Remove access panel. Uncoil line cord and feed
through mouse hole. Connect to a separate 115V 15
AMP circuit.
7. On initial start-up, it is necessary to purge and sanitize
the system as stated below.
• Remove the spa cover completely.
• Close the hose bibb on the suction plumbing (To
gain access to the hose bibb remove access panel
as shown under specifications.).
• Open the adjustable jets.
• Fill the spa with water to its normal operating level,
which is to the water level indicator mark on the
skimmer/filter frame.
• Turn ON the circuit breakers at the main electrical
panel. Test GFCI.
• At the control panel on the spa rim, press the
control button three times for high speed pump
operation.
• Add 1/4 cup sodium dichlor (a fast dissolving
granular type of chlorine) to the water and run for
15 minutes.
• Turn OFF the circuit breakers.
• Immediately open the drain valve and drain the
spa completely.
CAUTION: Leave the optional cover OFF the
spa during this procedure. DO NOT use the
spa during this procedure. Drain the spa
immediately afterward.
8. Close the hose bibb and fill the spa with water
(approximately 6 inches below the spa rim) to the
water line indicator mark on the skimmer frame.
9. Turn ON circuit breakers at the main panel.
10. Test the spa for proper operation. (Refer to Operating Instructions.)
11. Refer to Water Quality section of the Operating
Instructions. Test for water quality and then add
treatment chemicals as necessary to ensure proper
water quality levels.
All Jacuzzi Whirlpool Bath spas are factory tested for
proper operation and water tight connections prior to
shipment. If leaks or other malfunctions are detected,
immediately notify your Jacuzzi Whirlpool Bath dealer,
Authorized Service Agent, or call Jacuzzi Whirlpool
Bath, (925) 938-7411 or (925) 938-7070 for Warranty
Service.
5
Page 8

OPERATION
Operating Instructions
Initial Instructions
Using a garden hose, fill the spa with water to the
water line indicator mark on the skimmer frame.
WARNING: Do not provide power to the spa unless it
is filled with water to the normal water level. Refer to
water line indicator mark on skimmer frame. Whenever the power is ON, the system will activate even
though no controls are operated. When there is not
sufficient water in the unit with the spa’s motor/pump
actuated, the circulation pump and heater could be
irreparably damaged. Not heeding this caution will
nullify the warranty. In addition to damaging the unit,
operating the spa with insufficient water could cause
a fire.
Control Panel
THERMOSTAT
COLD
HOT
HIGH HEAT LIMIT
PUSH TO RESET
HIGH LIMIT
RESET SWITCH
TIMED FILTRATION
AND HEAT POSITION
At the house service panel, turn ON the circuit
breaker or switch that controls the electrical service to
your spa. Make sure there is no other appliance on that
circuit.
Your spa is provided with a Ground Fault Circuit
Interrupter (GFCI) on the cord end. At initial start-up and
before each use thereafter, with power on, push test
button on the GFCI. The reset button should pop out.
Push this button in to reset. If the interrupter fails to
operate in this manner, there is a ground current flowing
or a device malfunctioning, indicating the possibility of
electric shock.
Turn OFF power and do not use the spa until the
source of the problem has been identified and corrected.
TIMECLOCK
GFCI
TIMED FILTRATION
AND AUTO HEAT
RESET
TEST
TIMED FILTRATION
AND HEAT POSITION
SELECTOR
SWITCH
Temperature Control
To increase the temperature, turn the thermostat
clockwise to the desired setting. To reduce the temperature, turn the knob counter clockwise.
Selector Switch
This switch selects the unit’s heating and filtering
functions.
Timed Filtration and Heat Position
In this position, the spa will heat and filter only when
the clock comes on.
Timed Filtration and Auto Heat Position
If the temperature falls below that set by the thermostat, the low pump and heater will come on and run the
spa until the thermostat setting is reached. To increase
the temperature, turn the Temperature Control Knob
clockwise to the desired setting. To reduce the temperature, turn the knob counter clockwise. Filtration is
controlled by the time clock.
TIMED FILTRATION
AND AUTO HEAT
Filter Cycles & Setting Timer
The clock operates the spa’s filtration cycles.
To set the time of day: rotate the entire dial until the
clock indicates the correct time of day.
To set the filtration cycles: locate the tabs for the
time periods for filtration and push from the inside
towards the outside. Press one tab for each 15 minutes
of the filter period. The entire group of tabs between the
on-time and the off-time must be depressed. It is
suggested that the spa filter for at least 4 hours a day.
This time can be divided into 2 cycles 12 hours apart.
Over Heat Protection
In the event the spa should overheat, the spa will
shut down. If this situation occurs, turn off all power to
the spa and contact your dealer or service organization.
To reset the spa, press the High Limit switch. The time
of day may also have to be reset.
6
Page 9

OPERATION
Normal Operation/Whirlpool System
You can enjoy the spa with or without activating the
whirlpool. Either way, bathing in your spa can be
pleasurable, as well as therapeutic. After a busy,
stressful day, you can look forward to soaking in your
spa in still water with no turbulence—only the gentle
warmth of the soothing and relaxing water.
For a more invigorating spa experience, you can
take advantage of the built-in whirlpool system. Sit or
recline in the spa so you are comfortable. The Magic
Touch® whirlpool switch, conveniently located between
the built-in headrests, allows you to turn the whirlpool
system on while in the spa. Simply push down on the
switch button to turn on the whirlpool system. Pressing
once turns on high speed jets Pressing a second time
turns off the whirlpool.
Since the jets are directionally adjustable, you can
direct a jet toward an area where muscles feels tense or
stiff. The warmth of the water and the stimulating water
flow from the jets will pleasantly increase circulation.
For the total whirlpool effect and all over feeling of
well being, you can adjust the jets so they point in a
clockwise or counterclockwise direction to circulate the
air and water mixture in a whirlpool all about the spa.
Silent Air Induction
The intensity of the whirlpool action is determined by
how much air is inducted into the water. You control this
by adjusting the air induction control knobs located on
spa rim. For maximum air induction, rotate each control
knob fully counter clockwise to the largest circle. For
fewer air bubbles, decrease the amount of air induction
by rotating the control knobs clockwise. When the knobs
are turned to the smallest circles, only water is being
circulated. (Refer to illustration below.)
AIR INDUCTION CONTROLS
INCREASE AIR FLOW
(COUNTERCLOCKWISE)
DECREASE AIR FLOW
(CLOCKWISE)
MAGIC TOUCH SWITCH
P
L
O
R
I
O
H
W
DEPRESS CENTER
L
DIRECTIONALLY ADJUSTABLE
WHIRLPOOL JETS
FULLY ADJUSTABLE
WHIRLPOOL JETS
7
Page 10

MAINTENANCE
Water Quality and Water Chemistry
Maintaining water quality and water chemistry in your spa is extremely important and should be a regular part of
your spa maintenance program, as a neglected spa can be a breeding place for dangerous bacteria.
The water quality of your spa is maintained by a combination of filtration and chemistry. The spa’s integral filter
system helps maintain the water cleanliness and clarity by trapping most solid materials such as hair, and other debris
resulting from normal use. However, the most important part of maintaining water chemistry is keeping the proper level
of disinfectant in the water at all times. This is accomplished by adding chlorine to the water, which will control particles
too small to be trapped by the filter, such as bacteria and algae, and will oxidize any organic materials. Follow
instructions provided here and with water quality products for the health and safety of spa users, as well as to make
your spa bathing as enjoyable as possible.
Filtration
The filtration system of your spa will keep your water
clear and clean if used properly. The filter cartridge
elements will trap most solid materials and debris in the
water. However, the presence of materials such as body
oils or other particles which are too small to be captured
in the filters may bring about various undesirable water
quality conditions. These conditions can be corrected
with the use of spa treatment chemicals which are
available from your Jacuzzi Whirlpool Bath dealer. Such
conditions include the following:
Foaming: A defoamer is available to minimize foaming
of the water. This condition is usually caused by the
addition of soaps or oils, or other fatty substances to the
spa water. The interaction of these with hot water,
especially at high pH (more alkaline), will cause the
water to foam. (Refer to Water Quality Definitions.)
Oil Film or Cloudy Water: Add clarifier to congeal oil
film on the water surface into globules sufficiently large
to be trapped by the system’s filter. Cloudiness is
caused by particles that are too small to be trapped in the
filter, and is also due to the presence of human body oils,
lotions, and cosmetics. During normal use, these materials can accumulate on the filter element and clog its
pores. The addition of clarifier will make the water
clearer, but clogged filters must be cleaned as prescribed under the section entitled Filter Maintenance in
this manual.
Water Chemistry
You can ensure better water chemistry by testing
your spa water every day and adjusting the chemical
balance frequently. Obtain a water quality test kit,
designed especially for spas, from your Jacuzzi Whirlpool Bath dealer. The test kit must be of the type which
allows you to test for the disinfectant (chlorine) level, pH,
and total alkalinity. Ensure that the chemicals used in
your spa are especially for spa use, and not for swimming pools, as water quality maintenance of spas and of
swimming pools is very different.
Set up a daily program at first to check the disinfectant level, pH, and total alkalinity of the water. Familiarize yourself with the amount of chemicals to add and to
determine how often to make chemical adjustments
during normal use. Remember that the more heavily the
spa is used, the more often you should check the water
chemistry.
When adding any chemicals, always run the filter
system to ensure complete dilution with the water.
Do not add chemicals directly into the skimmer.
Hard Water: Add a demineralizer to break down or
deionize mineral particles present in the spa water.
Follow the Filter Maintenance procedure described
in this manual to ensure optimum performance of your
spa’s filtration system.
8
Page 11

MAINTENANCE
Water Chemistry (Continued)
Disinfecting
When filling the spa for the first time, follow the
purge/sanitizing instructions in the Equipment Set-Up
procedure of the Installation Instructions.
Add chlorine to the water on a regular basis to help
control the amount of bacteria, algae and organic materials. Such bacterial contaminants, if not controlled,
could cause skin rashes or other physical problems. To
disinfect the spa for normal use, first establish the
amount of chlorine to add and determine how often you
need to add it.
We recommend that you maintain a free chlorine
level of 2.0-5.0 ppm at all times except when you must
exceed that during the initial purge/sanitizing procedure
or during superchlorination (refer to Water Quality Definitions below). Superchlorinate your spa every two
weeks with heavy use. If using sodium dichlor, add one
heaping tablespoon for each 150 gallons of spa water.
Scrub the spa surfaces with this solution to remove any
oily deposits. This will ensure that any bacteria or algae
which are resistant to the normal disinfectant level are
killed. After adding the disinfectant, run the filter system
and allow the free chlorine level to return to the 2.0 to 5.0
ppm range before using the spa again.
Do not install a cover until the disinfectant level
is back to normal. High concentrations of chlorine
will damage metallic plated finishes if the cover is in
place.
Balancing pH
For good hygiene and equipment longevity, maintain the pH of your spa water according to the instructions provided. pH is the measure to determine if the spa
water is too acidic (low pH), or too alkaline (high pH).
The ideal range for spa water is 7.4 to 7.6 pH. For
excessive acidity (below 7.2 pH) add soda ash or sodium
bicarbonate to the spa water. For excessive alkalinity
(above 7.6 pH) add dry acid to the spa water.
CAUTION: Refer to the spa chemical manufacturer’s
instructions for the initial amount of chemicals to
add for the gallonage of your spa. Low pH can cause
equipment damage, as acid water will dissolve metals, while high pH can cause scale or calcium deposits to build up in the system or on the shell. After
adding chemicals, run the filter system for at least 30
minutes before testing water quality again for accurate readings.
Balancing Total Alkalinity
Total alkalinity is the measure of alkaline materials
in the water. The recommended range for total alkalinity
is between 80 ppm and 150 ppm. If the chemistry of the
water is not within this range, you will have difficulty
adjusting your pH level, which will affect your adjustments for the proper amount of free available chlorine.
If the alkalinity of your spa water is high, it is advisable
to drain the water from the spa and begin the balancing
process over again. Purge and sanitize your spa (according to instructions in Equipment Set-Up section of
the Installation Instructions) and clean the spa surfaces
thoroughly before refilling with fresh water. Then reestablish water chemistry. If the spa is used heavily,
change the water at least every month.
WATER QUALITY DEFINITIONS
pH: A chemical term used in expressing relative acidity or
alkalinity in numeric values with 7.0 usually regarded as
neutral, and for purposes of this manual, indicating pure
water. From 7 to 0 indicates increasing acidity, and 7 to 14
indicates alkalinity.
PPM: Parts per million.
Ozone: triatomic oxygen (O
nature, which, when dissolved in spa water helps to destroy
impurities and contaminants.
Free Chlorine: Chlorine that has not combined with other
chemicals and that is available to destroy bacteria in the spa
water.
Trichlor: A form of chlorine used in pool or spa water
treatment; usually supplied in tablet form. Not recommended because of its higher acidic nature and slow
dissolving action. Prolonged contact with the spa shell may
bleach or permanently mark the shell.
Sodium dichlor: The type of chlorine that is recommended
for spa use, as it is available in fast dissolving granular form.
It is neither excessively acid nor alkaline in character and
does not readily dissipate in higher water temperatures.
), a gas found commonly in
3
Calcium Hypochlorite: A granular chlorine product that is
inexpensive and effective but not recommended because it
often tends to form calcium deposits on heater parts and
plumbing fittings and leaves an unattractive film on the spa
at the water line.
Sodium Hypochlorite: A liquid chlorine product that is
inexpensive and effective but not recommended because
the liquid is readily spilled onto the spa or a surrounding
area, causing permanent damage.
Total Alkalinity: The measure of the amount of alkaline
materials (such as carbonates, bicarbonates and hydroxides) in the water. High alkalinity inhibits the effectiveness
of chemicals to change the pH. If the alkalinity of your spa
water is high (above 150 ppm), it is advisable to drain the
water from the spa and begin the balancing process over
again. Low total alkalinity (below 60 ppm) could be corrosive and damage your spa system.
Superchlorination: (Also referred to as shock treatment.)
The addition of an above-normal level of disinfectant to kill
any bacteria or algae that might have become resistant to
normal levels of disinfectant.
9
Page 12

MAINTENANCE
Water Level/Drain
The water level in the spa must be maintained at its
normal level. Evaporation and splashing will cause the
water level to drop.
When concentrations of impurities from evaporation, water quality chemicals, body oils, perfumes, dirty
feet, and winds, etc., accumulate in the spa and cannot
be filtered out, it is necessary to drain your spa and refill
it with fresh water. This should be done every 2 months
or more often depending on the amount of use.
To drain the spa, turn OFF circuit breakers at the
main electrical panel. Connect a garden hose to the
hose bibb. Turn the handle and drain the spa.
After draining the spa, clean the spa shell, suction
cover, skimmer, and filter. Close the hose bibb. Then
refill the spa with fresh water. Check the pH level and
maintain water quality.
NORMAL WATER LEVEL
WATER LEVEL
MARKER
Skimmer Basket Maintenance
The basket located in the skimmer of the spa should
be checked at least once a week for collection of debris,
such as leaves, hair, etc., and cleaned as necessary. To
clean the basket, remove it from the skimmer by pulling
it out, then backflush it with water from a garden hose
and reinstall.
SKIMMER BASKET ACCESS
SKIMMER BASKET
DOOR
WEIR
Filter Maintenance
The suction cover located in the foot well area
should be checked at least once a week for collected
debris, such as leaves, hair, etc., and cleaned as
necessary. It may not be necessary to remove the
suction cover to clean it, but if you need to, remove the
center screw with a Phillips screwdriver and clean the
cover by flushing with water from a hose.
CAUTION: Ensure replacement of the suction cover
immediately after cleaning. It is a safety device and
must be in place over the suction fitting to minimize
potential hazard of hair and body entrapment.
If heavy rains raise the spa water level, drain the spa
to its normal level.
A spa cover (available as an option), when in place
over the spa, will help reduce evaporation and control
the amount of debris entering the spa when the spa is not
occupied. In addition, its use will reduce energy consumption.
The filter cartridges should be checked periodically.
In normal use, check them at least once a month. Keep
them clean. An obstructed filter cartridge reduces water
quality and inhibits proper system performance.
Removable filter cartridges are located inside the
filter well. To remove them, lift the well cover, then pull
the filter cartridges upward and out of the well by the loop
at the top of the filters. Clean the filter by separating the
folds of the filter and spraying with fresh water from a
garden hose. Then reinstall the cartridges into the well
reversing the above procedure. See Equipment Setup.
If you are using the spa water treatment cartridge, this is
an ideal time for replacement. The spa water treatment
cartridge should be replaced every 4 months of operation.
Oils will coat the filter, resulting in a reduced flow. To
remove such materials, soak the cartridge in a plastic
pail containing a commercial filter cleaning solution
(available from your Jacuzzi Whirlpool Bath dealer or
most pool supply stores). Follow the manufacturer’s
instructions for use. Another method is to soak the filter
cartridge in a plastic pail containing a mild solution of
trisodium phosphate (TSP) and water. An hour of
soaking time is usually required to break down oil
coatings from the cartridge. Use a stronger solution of
TSP and water to remove algae. Most hardware or paint
stores stock TSP. Use the same method of cleaning
when the cartridge becomes plugged with clay or vegetation. Replacement cartridges are available through
your Jacuzzi Whirlpool Bath dealer.
10
Page 13

MAINTENANCE
Automatic Filtration/Maintenance
If you plan to be away, minimum water quality will be maintained by running the filter system.
If you will be away for an extended period, however, we recommend that you drain the spa (following the procedure
described under Winterizing on this page), as long periods without maintenance of water quality could be detrimental
to the spa.
NOTE: We do not recommend using this procedure if you are absent during the summer, when algae buildup
is most likely.
Always keep your spa covered when not in use to reduce heat loss and evaporation and to prevent debris from
falling in.
Winterizing
In a climate where winter temperatures are below
freezing, follow this procedure when the spa will
NOT be used:
1. Turn OFF power to the unit at the main electric panel.
2. Drain the spa completely by attaching a garden hose
to the hose bibb on the suction plumbing. Then
remove the hose and leave the drain valve open to
completely drain the spa.
3. Remove, clean and store the filter cartridges, in a dry
location.
4. Keep water and debris out by covering with a spa
cover.
Before using the spa again, review the Operating
Instructions.
Factory Installed Wooden Skirt
Your spa is supplied with a factory-installed stained
wooden skirt which completely surrounds the spa. The
door can be opened for maintenance.
If it becomes necessary to remove one or more of
the skirt panels for major service access, simply remove
the screws with which the section is secured.
To detach any of the panels, first remove all screws
from the panel being detached.
The panels can be reattached to the spa by reversing the above procedure.
11
Page 14

MAINTENANCE
Cleaning Your Spa
Your spa shell consists of two layers of plastic
materials. Its smooth top surface of acrylic is tough and
durable and contains concentrated color. This is supported by a substantial thickness of fiberglass-reinforced polyester resin. A catalyst causes a chemical
reaction during manufacture that bonds these layers
permanently into a hard, strong material. With a minimum amount of care and cleaning, your whirlpool spa
will look new for years.
To clean your spa, simply use a mild, nonabrasive
liquid detergent, isopropyl alcohol, or commercially prepared spa cleaner. Do not use abrasive cleaners. You
can protect and restore the gloss to a dulled surface by
applying Meguiar’s #10 Mirror Glaze, which is a product
specifically designed for use on acrylic finishes. If
Meguiar’s is not available, an acrylic polish of equal
quality or automotive paste wax will do.
Use a spa cleaner for residue buildup at the water
level of the spa surface. This may be applied to the
acrylic surface with a soft cloth and wiped clean. Use
sparingly in small amounts to avoid contaminating the
spa water. If the water line is heavily soiled, it may be
advisable to lower the water level 2-3 inches before
cleaning; then refill to normal level.
Covering Your Spa
An optional rigid spa cover for your spa is available
from your Jacuzzi Whirlpool Bath dealer. Use of this
cover will help to reduce energy costs by minimizing heat
loss and evaporation. In addition, the attractive cover is
an effective means of preventing debris such as leaves
and dirt from entering your spa when not in use. Follow
the instructions for use and care provided with the spa
cover.
CAUTION: The spa cover is not designed to support
any weight. Therefore, as a safety precaution and
to preserve the life of your cover, you must not sit,
stand, or lie on it; nor should you place objects of
any kind on top of it.
Jacuzzi Whirlpool Bath does not guarantee or
warrant this cover. Refer to spa cover manufacturer's
information provided with the cover.
Repairs to the Acrylic
Minor scratches which do not penetrate the color
finish (acrylic) can be removed with 600-grit wet/dry
sandpaper. Restore the glossy finish with Meguiar’s #10
Mirror Glaze or comparable automotive paste wax.
Major scratches or gouges which penetrate the
acrylic surface will require refinishing. Ask your Jacuzzi
Whirlpool Bath dealer for special instructions.
PRODUCT SPECIFICATIONS ARE SUBJECT TO CHANGE WITHOUT NOTICE.
USE INSTALLATION INSTRUCTIONS SUPPLIED WITH PRODUCT.
Jacuzzi Whirlpool Bath has obtained applicable code (standards) listings generally available on a national basis for products of this type.
It is the responsibility of the installer/owner to determine specific local code compliance prior to installation of this product. Jacuzzi Whirlpool
Bath makes no representation or warranty regarding, and will not be responsible for any code compliance.
Jacuzzi Whirlpool Bath National Headquarters
P.O. Drawer J, Walnut Creek, CA 94596 (925) 938-7070
Service Support: Call (800) 288-4002
©2000 Jacuzzi Whirlpool Bath R756000 1/00
Printed on Recycled Paper
12
Printed in the U.S.A.
Page 15

Jacuzzi Whirlpool Bath Limited W arranty
Z101/301 Spa
Jacuzzi Whirlpool Bath (the “Company”) offers the following express limited warranty to the original purchaser of any Jacuzzi Whirlpool Bath Spa Line Product (“unit”)
who purchases the product for personal or single family use (“user”). The Company will repair or replace, at its option, the unit or its equipment in accordance with the
following terms and conditions.
FIVE YEAR LIMITED WARRANTY ON VESSEL
The spa shell is warranted against water leakage caused by a defect in material or workmanship for five (5) years from the original date of purchase. Specifically excluded
is water leakage in the plumbing fixtures, connections, water systems or equipment provided with the spa. Units determined by the Company to be non-repairable will
be replaced on a prorated basis with the same or a comparable unit. The User will be charged one (1) percent of the current retail cost for each full month of ownership
from the date of purchase through the date failure is determined to be non-repairable. This charge will be waived during the first twelve (12) months of ownership.
ONE YEAR LIMITED WARRANTY ON SURFACE
The interior acrylic surface is warranted against blistering, cracking, or delamination caused by a defect in the acrylic material for one (1) year from the original date
of purchase. Specifically excluded are scratches and damage caused by normal use.
ONE YEAR LIMITED WARRANTY ON EQUIPMENT
The spa equipment (e.g., heater, filter, pump, motor , etc.) is warranted against defects in material or workmanship for one (1) year from the original date of purchase.
During the first six months of the warranty period, parts and labor are covered. During the next six months, only parts are covered.
Spa skirts are covered for six (6) months for parts only.
Our warranty does not cover defects, damage, or failure caused by the common carrier, installer, user, or other person, or resulting from, without limitation, any of the
following: careless handling (lifting unit by plumbing, abrading finish, etc.); modification of any type for any reason (including modification to meet local codes);
improper installation (including installation not in accordance with instructions and specifications provided with the unit); connections supplied by the installer of the
equipment; improper voltage supply or unauthorized electrical modification; misuse; incorrect operation, or lack of proper routine maintenance; operation of the unit
without specified minimum amount of water or at inappropriate water temperature; failure to maintain proper water chemistry and chemical balance; improper storage
of chemicals; failure to properly winterize against freezing; use of abrasive or improper cleaners; or acts of God, such as lightning, floods, earthquakes, etc.
In addition, THE COMPANY WILL NOT BE RESPONSIBLE FOR INCIDENTAL OR CONSEQUENTIAL DAMAGES or losses arising from any cause (e.g., water
damage to carpet, ceiling, loss of use, etc.) including its own negligence; damages to, respecting, or resulting from: discoloration, warpage or deterioration of wood skirts
due to water displacement or environmental exposure; failure of spa covers; failure of ozone generators; optional spa equipment not manufactured by the Company,
supplied by Dealer, installer or the Company; the unit's prior usage as an operational display; or defects that should have been discovered before installation. This limited
warranty does not include: labor, transportation, or other costs incurred in the removal and/or reinstallation of the original unit and/or installation of a replacement unit; any
costs relating to obtaining access for repair; or loss of use damage, including loss of sales, profit or business advantage of any kind under any circumstances. Spa units in
commercial use are excluded from any warranty coverage whatsoever.
Warranty coverage is provided in the United States of America only.
All implied warranties of merchantability and fitness for a particular purpose are equal in duration with the express warranties set forth herein.
NOTICE: This warranty gives you specific legal rights, and you may also have other rights which vary from state to state. There are no warranties applicable to Jacuzzi
Whirlpool Bath products except as expressly stated herein or as implied by applicable state and federal laws. The Company will not be responsible for any statements
or representations made in any form that go beyond, are broader than or are inconsistent with any authorized literature or specifications furnished by the Company.
Some states do not allow limitations on how long an implied warranty lasts, or the exclusion or limitation of incidental or consequential damages, so the above limitations
and exclusions may not apply to you.
The attached pre-addressed Warranty Registration Card MUST be filled out by the purchaser within thirty (30) days from purchase and mailed to Jacuzzi Whirlpool
Bath in order for this warranty to become effective.
WARRANTY COVERAGE
WARRANTY LIMITATIONS
IMPLIED WARRANTIES
RETURN OF WARRANTY CARD
Jacuzzi Whirlpool Bath
P.O. Drawer J
Walnut Creek, CA 94596-9885
Page 16

Inspecting the unit prior to installation is the responsibility of the installer or building contractor who acts on behalf of the user. They are responsible for ensuring the
WHIRLPOOL
BATH
R
RESPONSIBILITIES OF OTHERS
unit is free of defect or damage. Notices are placed on and in the unit and on the shipping carton advising the installer of this responsibility. In the event of a problem,
the unit must not be installed. The Company is not responsible for failures or damage that could have been discovered, repaired, or avoided by proper inspection and
testing prior to installation.
Damage occurring in transit is the responsibility of the carrier. The user or installer MUST open the crate and inspect the unit for damage when it is delivered. If damage
is discovered, it must be reported immediately to the seller and the carrier in writing, and an inspection requested. Failure of the carrier to respond should be reported
to the seller and the carrier. Your freight claims should be filed promptly thereafter.
It is the responsibility of the installer, building contractor, or user to provide access for service. The Company is not responsible for any costs relating to obtaining access
for repair. The user shall bear such costs and, if appropriate, must seek recovery from the installer.
Damage occurring to the unit during installation is the responsibility of the installer and/or building contractor and damage occurring thereafter is the responsibility of
the user.
Failure of any optional equipment is the sole responsibility of the equipment manufacturer. (Options and accessories manufactured by the Company are warranted for
ninety (90) days from the original date of purchase for parts only.)
The Distributor or Dealer is responsible for knowing local code requirements and notifying the installing contractor and/or user of these requirements at the time of
purchase. The Company is not responsible for costs to modify any product to obtain any code approval, such as city, county, or state building codes.
For the customer's benefit, the Company maintains a list of independent service personnel to perform required warranty service repairs. Such firms are not agents
or representatives of the Company and cannot bind the Company by words or conduct.
The Company will provide the warranty service described above when the following conditions have been met: the failure is of the nature or type covered by the
warranty; the user has informed an Authorized Jacuzzi Whirlpool Bath Service Agent or Warranty Service Department Representative of the nature of the problem
during the warranty period; conclusive evidence (e.g., proof of purchase or installation) is provided to the foregoing by the user proving that the failure occurred or
was discovered within the warranty period; an authorized independent service person or Company representative has been permitted to inspect the unit during
regular business hours within a reasonable time after the problem was reported by the user.
In order to obtain warranty service, call or write:
Jacuzzi Whirlpool Bath
Warranty Service Department
P.O. Drawer J
Walnut Creek, California 94596
Call: (925) 938-7411
To obtain warranty replacement for factory-installed components for Company supplied options and accessories manufactured and supplied by the Company, call or
write the above. Provide a description of the problem and proof of purchase. You will be instructed how to obtain replacements and where to return the failed
component(s), option(s), or accessory(ies) at your expense.
All replacement parts, equipment, and repairs shall assume the remaining warranty period of the part(s) replaced.
The Company's warranty obligation shall be discharged upon tender of replacement or repair. The customer's refusal to accept the tender terminates the Company's warranty
obligation.
Jacuzzi® is a Federally registered trademark owned by Jacuzzi Inc. ©Jacuzzi Whirlpool Bath R756000 1/00
Limited Warranty
WARRANTY SERVICE
Accessory(ies)
On
Ninety-Day
Parts Only
Accessory(ies)
R756000
Limited Warranty
Ninety-Day
Parts Only
On
11. Was your purchase process?
12. How technically aware were you of the patented Jacuzzi® jet system prior to
( ) $40,000 to $49,999 ( ) $150,000 and Above
( ) Very easy ( ) Easy ( ) Difficult ( ) Very difficult
your purchase?
( ) Not aware ( ) Somewhat aware ( ) Very aware
10. Approximately how long have you lived in this home? _________________
( ) 1 month-2months
Please indicate, approximately, the total annual income of your household.
( ) Up to $24,999 ( ) $50,000 to $74,999
( ) $25,000 to $29,999 ( ) $75,000 to $99,999
( ) $30,000 to $39,999 ( ) $100,000 to $149,999
9. How long did you shop before purchasing unit?
( ) Eljer ( ) Lasco ( ) Price Pfister ( ) Aqua Glass
( ) Kohler ( ) American Standard ( ) Sterling
( ) Other (Specify) ___________________________________________
( ) 1 day ( ) 2 months-6 months
( ) 2-7 days ( ) 6 months-1year
( ) 1 week-2 weeks ( ) 1 year-2 years
( ) 2 weeks-4 weeks ( ) +2 years
7. What is the age of the head of the household? _________________ Years
8. What other manufacturers did you consider?
6. What is the current market value of this property?
( ) Self/Spouse when remodeling
( ) Other ___________________________________________________
Please estimate $ _____________________________________________
( ) Self ( ) Spouse ( ) Self and Spouse Together
( ) Other Family Member ( ) Designer/Architect
( ) Builder/Plumber/Remodeler ( ) Already Installed
( ) Contractor/Plumber when remodeling
4. Who finally decided which product you would buy?
5. Who installed? ( ) Already installed/New Home
3. What was the main reason for purchase?
( ) Styling ( ) Warranty Service ( ) Product Features
( ) Brand Name ( ) Price ( ) Hydrotherapy
( ) Home Resale _____________________________________________
( ) Other ___________________________________________________
2. Who first gave you specific information about this product (specifications,
( ) Word of Mouth . . . Friend/Relative/Acquaintance
( ) Other . . . Please Describe __________________________________
prices, etc.)?
( ) Dealer/Plumbing Supplier ( ) Builder ( ) Remodeler
( ) Plumbing Contractor ( ) Retailer/Home Center Store
( ) Decorator/Architect ( ) Already Installed
This card must be filled out and returned to the address printed on the
other side within thirty (30) days from date of purchase in order for this
warranty to be come effective.
Purchaser's Name______________________________________
Purchaser's Address ____________________________________
City __________ State _____ Zip _______
Date of Purchase ______________________________________
Model Name __________________________________________
Serial Number ________________________________________
Dealer's Name ________________________________________
Dealer's Address
1. How did you first hear about this Jacuzzi
( ) Advertisement ( ) Article in Magazine/Newspaper
( ) Visited Dealer/Plumbing Supplier ( ) Yellow Pages
( ) Builder/Plumber/Remodeler ( ) Decorator/Architect
( ) Visited Retailer/Home Center Store
®
product?
Warranty
Registration Card
 Loading...