

Page 1

OWNER’S MANUAL
CLEARLIGHT SANCTUARY
FULL SPECTRUM SAUNAS
Congratulations on your purchase of a Clearlight Infrared Sauna™.
We are condent that you will enjoy the many benets of your sauna for years to come.
Please read this manual before using your Sauna for the rst time.
1077 Eastshore Hwy Berkeley, CA 94710
Superior Quality and Service
Please keep this manual for future reference.
• Phone: 800.798.1779 • +1.510.601.1775 • www.infraredsauna.com
Page 2

Welcome ------------------------------------------ 03
Installation ----------------------------------------- 04
01 | SANCTUARY 1 --------------------------------- 05
02 | SANCTUARY 2 --------------------------------- 19
03 | SANCTUARY 3 --------------------------------- 33
04 | SANCTUARY Y --------------------------------- 47
05 | SANCTUARY C --------------------------------- 65
Enjoying Your Sauna ---------------------------------- 80
Using Your Sauna Control Panel ------------------------- 81
Tips for Use ---------------------------------------- 85
Safety Instructions ----------------------------------- 87
Important Safeguards --------------------------------- 89
Warranty ------------------------------------------ 91
Why Detoxify --------------------------------------- 97
Table of Contents
* The information contained in this manual is subject to change without notice.
Page 3

Dear Customer,
Thank you for choosing Jacuzzi® saunas. We realize that you have many
choices.
The Jacuzzi
1) Exceptional Customer Service
2) Quality workmanship
3) Superior product performance
We use only the nest materials with expert craftsmanship, state of the art
technology, and the highest safety standards in the industry. We also offer
our residential customers a lifetime warranty on all Jacuzzi
You may be surprised at the noticeable effects on pain, weight, skin tone,
and stress after using your Jacuzzi® sauna. We invite you to experience the
difference: superior quality, service and performance.
®
brand is known the world over for three important factors:
®
infrared saunas.
We thank you for your purchase and look forward to serving you further. After
using your sauna, please tell your friends about the positive changes that you
see. We nd that this simple communication from one person to another is
the best way to share the story of health found by using our unique infrared
saunas.
Please contact me directly with any questions, comments or suggestions.
I look forward to hearing from you.
Sincerely,
Dr. Raleigh Duncan | CEO
Sauna Works Inc.
drduncan@infraredsauna.com
800.798.1779 x 804 | International: +1.510.601.1775
Page 4

Installation
Choosing a location
Place your sauna on a dry and level surface for best results. Garage, basement, attic, playroom, bedroom, or garden
house are just a few of the possible locations for your sauna.
Your sauna’s natural cedar or basswood exterior will beautifully compliment any location.
Outside, place the sauna on a deck or concrete pavers, available at your local building supply store, to protect it from
moisture in the ground which can wick up through the wooden feet. Outside installation also requires our optional
canvas cover.
Installation requirements for your sauna are as follows:
®
1. Your Jacuzzi
prior authorization.
2. Please maintain a minimum of 4-inch clearance on all sides of the unit to allow air to circulate while giving
access for the power cord..
Cleaning and maintenance
sauna is a self-contained and freestanding unit. It should not be built into any structure without
1. Before using your sauna for the rst time, clean the inside of the sauna with a damp cloth.
Use your favorite furniture polish on the exterior.
2. Place a towel on the floor and bench to absorb any perspiration. Wash these often to maintain a clean and
pleasant environment inside your sauna.
3. Perspiration may darken the wood over time. This can be removed by a light sanding with ne grit sandpaper.
Please be careful when carrying and installing the glass pieces to avoid breakage. Make certain the glass is securely fastened
during installation before letting go of any individual piece that could break.
www.infraredsauna.com
4
CALL NOW 800.798.1779
Page 5

SANCTUARY 1
SANCTUARY 101
Packaging - - - - - - - - - - - - - - - - - - - - - - - 06
Assembly Instructions - - - - - - - - - - - - - - - - - 07
CALL NOW 800.798.1779
www.infraredsauna.com
5
Page 6

SANCTUARY 1
Packaging
CONTENTS OF BOXES
.
Box 1 of 4 Box 2 of 4 Box 3 of 4 Box 4 of 4
1. Floor Panel 1. Left Side Wall 1. Front Wall Glass 1. Front Heaters
2. Ceiling Panel 2. Right Side Wall 2. Back Wall
3 . A c c e s s o r i e s 3. Bench & Bench Support
4. Installation Manual
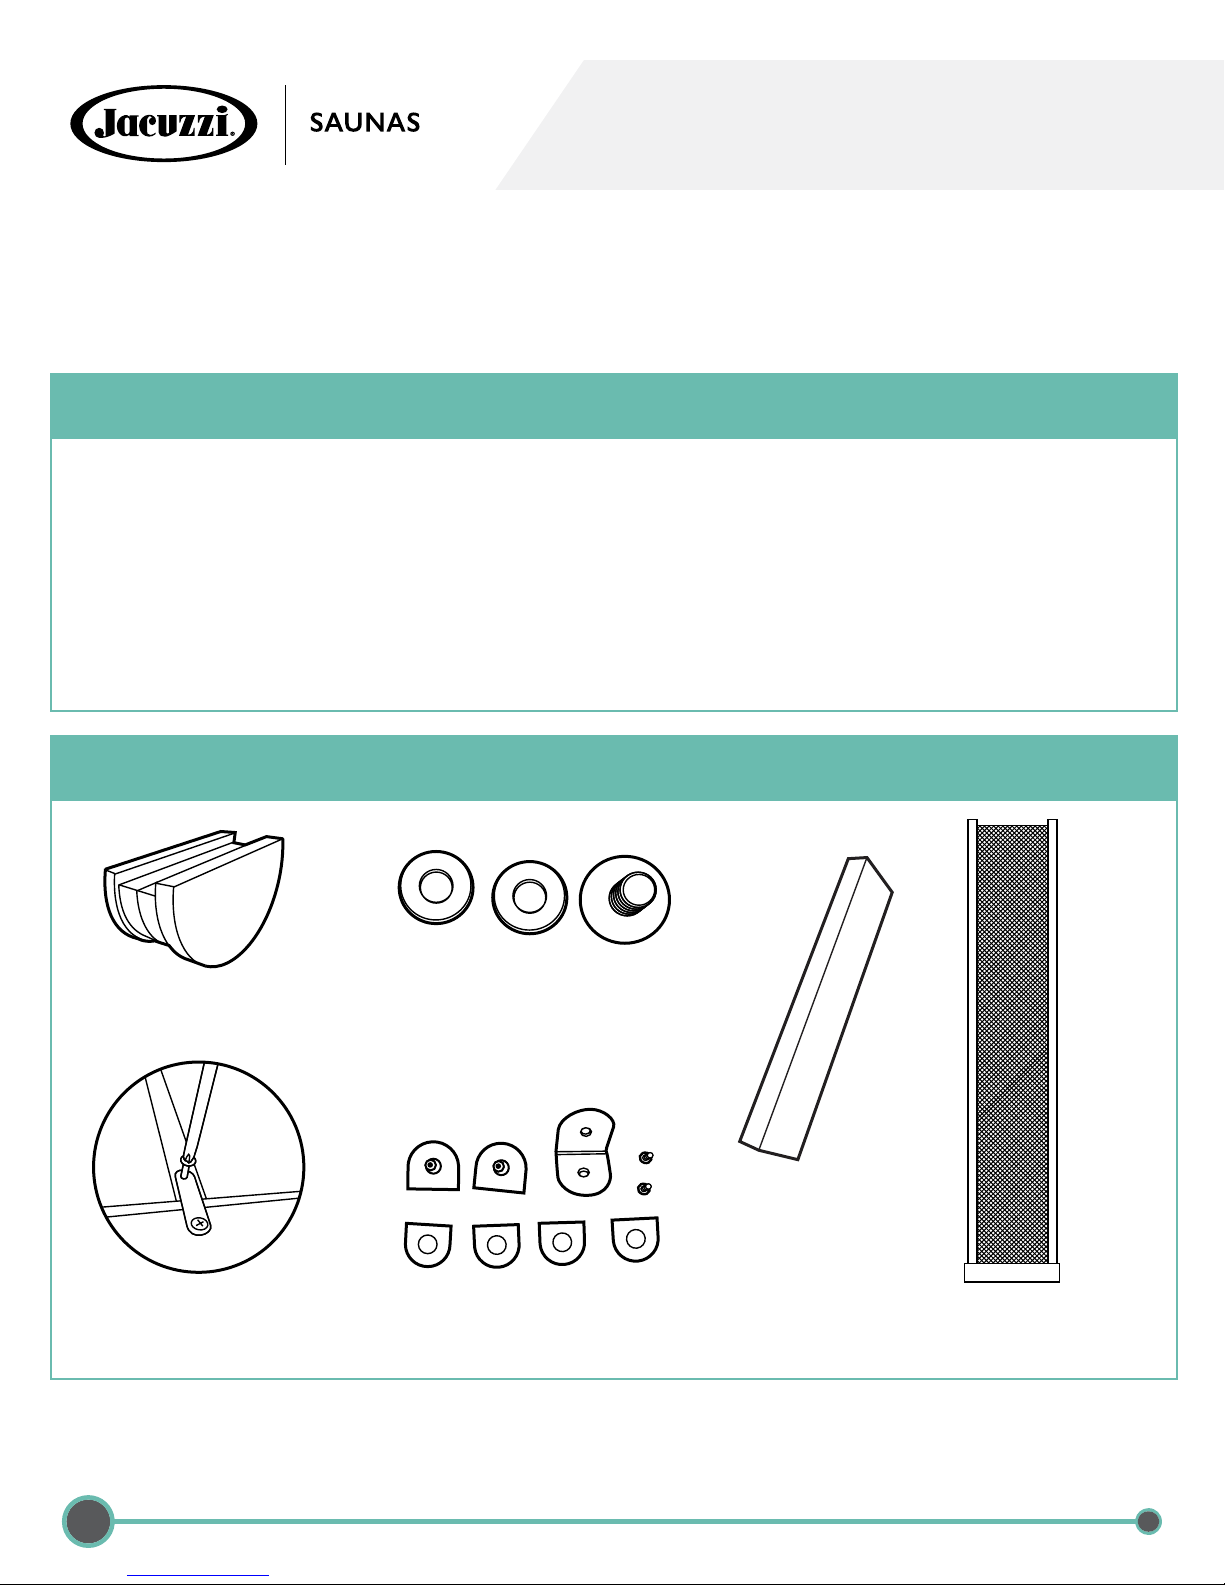
Door Handle
ACCESSORY BOX CONTENTS
Front Heater
Mouting Screws
(4 sets)
Wood piece
(2 pieces)
Wall Security
Bracket (4 pieces)
www.infraredsauna.com
6
Glass Security
Brackets (2 sets)
Full Spectrum
Heater Guard (2 pieces)
CALL NOW 800.798.1779
Page 7

SANCTUARY 1
Assembly Instructions
Assembly of the sauna requires two adults to complete. Please read the instructions thoroughly before and during
assembly to ensure proper installation of the unit. If you encounter any problems or have questions during assembly,
please feel free to call our Customer Service department at 1-800-798-1779 or +1-510-601-1775.
1 - LOCATION OF SAUNA & INSTALLATION ORDER
When determining a location for your sauna, please keep in mind the following:
1. The main power cord on the sauna must be easily accessible.
2. The location must be dry and level.
3. Panels should be installed in the following order:
1) Floor 4) Right Side Wall 7) Wood Roof
2) Back Wall 5) Under Bench Support 8) Glass Roof
3) Left Side Wall 6) Bench 9) Front Wall Glass
2 - PLACING FLOOR PANEL
1. Place the bottom floor panel on the ground
near the location you will using the sauna.
Make sure the front of the floor is in the
desired location of the door. The two floor
receptacles and the door magnet indicate
the front of the sauna.
3 - CONNECTING THE BACK PANEL
TO THE FLOOR PANEL
1. Place the back panel on the floor panel by placing it in
the groove of the floor panel.
CALL NOW 800.798.1779
www.infraredsauna.com
7
Page 8

SANCTUARY 1
Assembly Instructions Cont’d
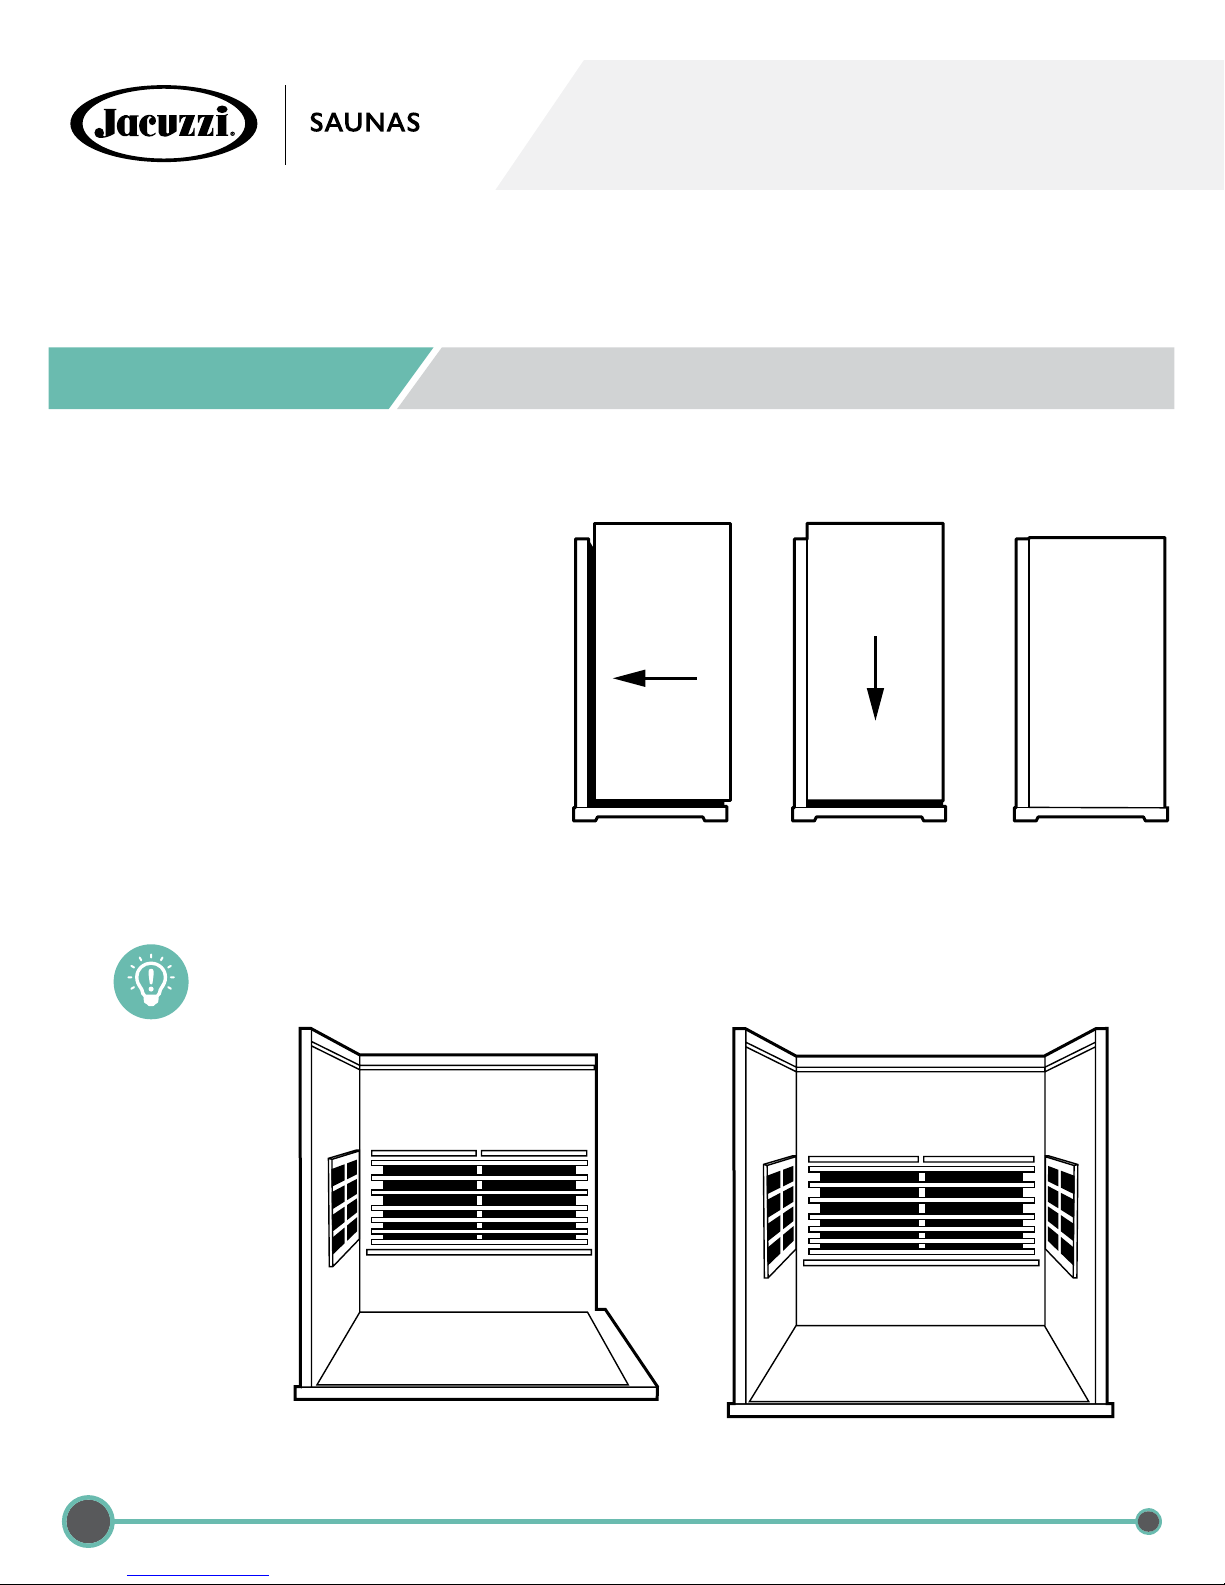
4 - CONNECTING SIDE WALLS
The side wall panels connect to the back wall with the installed locking brackets. There are mating brackets on
the side of each panel.
1. Place the left side wall in the slot in the floor.
Lift the side wall up about 4” (10cm) higher
than the backwall panel (See Picture 1).
2. Place the side wall panel against the back
wall (See Picture 2), then slide down side
wall panel until the two panels are equal
height. (See Picture 3).
3. If the panels are not equal height or there is
an obvious gap between the two panels, this
means they are not propery attached and
you should try again.
4. Repeat the steps above for the right side
wall panel.
If the panels still seem too tight to come
down all the way, try backing off the
bracket screws by one half turn with a
Phillips head screwdriver on the female
bracket.
Picture 1 Picture 2 Picture 3
www.infraredsauna.com
8
Right Side Wall InstalledLeft Side Wall Installed
CALL NOW 800.798.1779
Page 9

SANCTUARY 1
Assembly Instructions Cont’d
5 - INSTALLING UNDER BENCH SUPPORT
Slide down the bench heater panel by lining up its sides with the vertical guides on the left and right side wall
panel.
1. Be careful not to scratch the side panels when positioning the heater panel.
2. Push the bench heater panel all the way down until it is touching the floor panel and securely in place.
Heater must be
facing outward
Vertical bench heater
panel guides are found
on the side panels.
CALL NOW 800.798.1779
www.infraredsauna.com
9
Page 10

SANCTUARY 1
Assembly Instructions Cont’d
6 - CONNECT HEATER CONNECTION UNDER BENCH
Follow the connections as in the following illustration:
1. Connect the black and white cable coming out of the back of the under bench support to one of the left side
wall connectors.
2. Connect the side black and white wall cable to one of the floor connectors.
3. Connect the black and white back wall cable to the other floor connector.
4. Connect the green ground connectors together.
You can plug any male connector to any female one as long as the colors match.
5. The two remaining cables labeled “VRT” will be connected if Vibrational Resonance Therapy is being added to
the sauna. If you did not add this to your sauna, these cables will not be used.
www.infraredsauna.com
10
CALL NOW 800.798.1779
Page 11

SANCTUARY 1
Assembly Instructions Cont’d
7 - INSTALLING THE BENCH
Install the bench panel by sliding it over the horizontal bench guides on the side panels. Be careful not to scratch
the adjacent panels when sliding in the bench.
Push the bench all the way in until it touches the back panel and is securely in place.
The bench is reversible. One side is ergonomic and one side is flat. You can reverse the bench after the sauna
installation is nished. Be sure that the bench is pushed all the way back until it slides under the heater guard
to secure the bench in place.
Optional: After the bench is installed, you can
slide in the included wood pieces to prevent
the bench from sliding left to right. One piece
can be placed on each side next to the bench.
If you decide to flip the reversible bench over,
please remove the wood pieces rst.
B
P
O
T
L
AC
K
T
T
F
E
N
L
O
R
F
M
TTO
O
B
B
P
O
T
L
A
C
K
T
T
F
E
N
L
O
R
F
M
O
T
T
O
B
8 - INSTALLING WOOD PORTION OF ROOF
1. Set the wood portion of the
roof on the back roof guide.
Besure to slide the roof back
against the back wall.
CALL NOW 800.798.1779
www.infraredsauna.com
11
Page 12

Assembly Instructions Cont’d
SANCTUARY 1
9 - INSTALLING WALL LOCKS
1. The side walls must be secured to the back wall and wood roof piece using the attached eye hooks.
2. Screw in one of the eye hooks between the left side wall and backwall and one between the right side wall and
backwall.
3. Secure one of the eye hooks between the left side wall and top front of the wood roof piece and one between
the right side wall and the top front of the wood roof piece.
Attach eye hook so
that it is screwed
into both the side
walls and back walls.
THIS STEP IS VERY IMPORTANT.
PLEASE DO NOT OMIT THIS STEP.
Attach the eye hook
so that it is screwed
into side walls and
the wood roof piece.
4. Latch the three buckles that connect the
wood roof piece to the back and side walls.
www.infraredsauna.com
12
CALL NOW 800.798.1779
Page 13

Assembly Instructions Cont’d
10 - INSTALLING GLASS PORTION OF ROOF AND RIGHT FRONT WALL
1. Locate the glass roof piece as in
the photo below.
2. Locate the 4 sets of roof locking
brackets with washers and
screws.
SANCTUARY 1
3. Attach the brackets to the roof piece as shown
below using the enclosed Allen Wrench.
4. Place the long edge of the glass roof piece
into the groove in the wood roof piece.
Center this piece in the wood roof piece.
HOLD THIS PIECE IN PLACE UNTIL
THE RIGHT SIDE FRONT WALL AND
DOOR ARE INSTALLED
CALL NOW 800.798.1779
www.infraredsauna.com
13
Page 14

Assembly Instructions Cont’d
10 - INSTALLING GLASS PORTION OF ROOF AND RIGHT FRONT WALL
1. Locate the right front wall with right
door.
2. Place the right front wall into the groove
in the floor and align it under the glass
roof piece. Until this piece is secured
using the enlcosed brackets, someone
should hold the wall and roof in place.
3. Secure the left front glass window to the
roof glass using the included brackets.
You will see pre-drilled holes in both the
front glass and roof glass.
SANCTUARY 1
4. Repeat this process for the left front
wall and door.
www.infraredsauna.com
14
CALL NOW 800.798.1779
Page 15

Assembly Instructions Cont’d
11 - CONNECT HEATERS IN ROOF
1. Locate the “trap” doors that open in the wood roof.
2. Connect the black and white cables that that
come out of the side wall to the connector
located in the wood roof.
3. Connect the green ground wire that come out of
the side wall to the green ground wire that is in
the wood roof.
Push the wiring inside the roof area and close the
roof door compartments.
SANCTUARY 1
4. In the left side wall compartment, there will be
two connectors: 1) Heater connector. 2) Keypad
connector. The heater connector is a two wire
connector. The keypad connector is a seven wire
connector.
BE SURE TO MATCH THE COLORS IN THE CONNECTORS.
THE BLACK WIRE SHOULD MATCH UP WITH THE BLACK WIRE, ETC.
12 - INSTALLING DOOR HANDLE
1. Locate the two door handles.
2. Attach the right side door handle using the enclosed screws.
3. Attach the left side door handle using the enclosed screws.
Note: If you are using a tablet or smartphone to control your sauna, the door handle will act as both
the door handle and tablet/smartphone holder when the door is closed.
CALL NOW 800.798.1779
www.infraredsauna.com
15
Page 16

SANCTUARY 1
Assembly Instructions Cont’d
13 - INSTALLING FRONT HEATERS
1. Locate the two front heaters.
2. Align the left front heater and plug the connector that comes out of the bottom of the heater into the plug
coming out of the in the floor.
3. Align the the hole in the back of the heater with the hole in the front wall glass Using the enlcosed screws and
washers, secure the heater to the glass through the pre-drilled hole. One washer will be placed on the inside
and one on the outside glass. The heater will be secured with these screws in two locations.
4. Repeat this step for the right front heater.
www.infraredsauna.com
16
Front
Heater
Installed
CALL NOW 800.798.1779
Page 17

SANCTUARY 1
Assembly Instructions Cont’d
13 - INSTALLING FRONT HEATERS
5. Once both heaters are installed carefully push the included Full Spectrum Heater guards securely over each
of the front heaters. The full spectrum heaters are hot to the touch when running and this will prevent burning
should you get close to the heater.
Warning Notice: The infrared heaters in your sauna are
a potential BURN HAZARD. Do NOT touch the infrared
heaters when they are in operation and allow to cool before
servicing.
14 - LOCATING AND PLUGGING IN POWER CORD
The power cord comes out of the roof of the sauna. If you are standing facing the sauna, it comes out of the rear
left corner of the roof. Open the trap door to access the power cord and run the cord down the back of the sauna.
The power cord will plug into the appropriate electrical receptacle.
Note: We do not recommend using an extension cord for your sauna.
Please plug the sauna directly into the wall receptacle.
CALL NOW 800.798.1779
www.infraredsauna.com
17
Page 18

SANCTUARY 1
Assembly Instructions Cont’d
15 - INSTALLATION IS COMPLETE
Installation of your sauna is now complete. Using a damp cloth, wipe out the sauna to remove any excess
saw dust that may have settled on the wall & floor panels and the heater panels during manufacturing and
shipment.
Please refer to usage instructions located later on in this manual.
www.infraredsauna.com
18
CALL NOW 800.798.1779
Page 19

SANCTUARY 1
SANCTUARY 202
Packaging - - - - - - - - - - - - - - - - - - - - - - - 20
Assembly Instructions - - - - - - - - - - - - - - - - - 21
CALL NOW 800.798.1779
www.infraredsauna.com
19
Page 20
SANCTUARY 2
Packaging
CONTENTS OF BOXES
.
Box 1 of 4 Box 2 of 4 Box 3 of 4 Box 4 of 4
1. Floor Panel 1. Left Side Wall 1. Front Wall Glass 1. Front Heaters
2. Ceiling Panel 2. Right Side Wall 2. Back Wall
3 . A c c e s s o r i e s 3. Bench & Bench Support
4. Installation Manual
Door Handle
ACCESSORY BOX CONTENTS
Front Heater
Mouting Screws
(4 sets)
Wood piece
(2 pieces)
Wall Security
Bracket (4 pieces)
www.infraredsauna.com
20
Glass Security
Brackets (2 sets)
Full Spectrum
Heater Guard (2 pieces)
CALL NOW 800.798.1779
Page 21

SANCTUARY 2
Assembly Instructions
Assembly of the sauna requires two adults to complete. Please read the instructions thoroughly before and during
assembly to ensure proper installation of the unit. If you encounter any problems or have questions during assembly,
please feel free to call our Customer Service department at 1-800-798-1779 or +1-510-601-1775.
1 - LOCATION OF SAUNA & INSTALLATION ORDER
When determining a location for your sauna, please keep in mind the following:
1. The main power cord on the sauna must be easily accessible.
2. The location must be dry and level.
3. Panels should be installed in the following order:
1) Floor 4) Right Side Wall 7) Wood Roof
2) Back Wall 5) Under Bench Support 8) Glass Roof
3) Left Side Wall 6) Bench 9) Front Wall Glass
2 - PLACING FLOOR PANEL
1. Place the bottom floor panel on the ground
near the location you will using the sauna.
Make sure the front of the floor is in the
desired location of the door. The two plugs
and the door magnet indicate the front of the
sauna.
3 - CONNECTING THE BACK PANEL
TO THE FLOOR PANEL
1. Connect the back panel to the floor panel by lining up
the back panel on the groove of the floor panel.
CALL NOW 800.798.1779
www.infraredsauna.com
21
Page 22

SANCTUARY 2
Assembly Instructions Cont’d
4 - CONNECTING SIDE WALLS
The side wall panels will be connected to the back wall by connecting together the installed brackets. There are
“+” brackets and “-” brackets on the side of each panel. The side walls will be installed as follows:
1. Place the left side wall in the slot in the floor.
Lift the side wall up about 4” (10cm) higher
than the backwall panel (See Picture 1).
2. Place the side wall panel against the back wall
(See Picture 2), then slide down side wall panel
until the two panels are equal height. (See
Picture 3).
3. If the panels are not equal height or there is
an obvious gap between the two panels, this
means they are not propery attached and you
should try again.
4. Repeat the steps above for the right side wall
panel.
If the panels still seem too tight to come
down all the way, try backing off the
bracket screws by one half turn with a
Phillips head screwdriver on the female
bracket.
Picture 1 Picture 2 Picture 3
www.infraredsauna.com
22
Left Side Wall Installed
Right Side Wall Installed
CALL NOW 800.798.1779
Page 23

SANCTUARY 2
Assembly Instructions Cont’d
5 - INSTALLING UNDER BENCH SUPPORT
Slide down the bench heater panel by lining up its sides with the vertical guides on the left and right side wall
panel.
1. Be careful not to scratch the side panels when positioning the heater panel.
2. Push the bench heater panel all the way down until it is touching the floor panel and securely in place.
Heater must be
facing outward
Vertical bench heater
panel guides are found
on the side panels.
CALL NOW 800.798.1779
www.infraredsauna.com
23
Page 24

SANCTUARY 2
Assembly Instructions Cont’d
6 - CONNECT HEATER CONNECTION UNDER BENCH
Follow the connections as in the following illustration:
1. Connect the black and white cable coming out of the back of the under bench support to one of the left side
wall connectors.
2. Connect the side black and white wall cable to one of the floor connectors.
3. Connect the black and white back wall cable to the other floor connector.
4. Connect the green ground connectors together.
You can plug any male connector to a female one as long as the colors match.
5. The two remaining cables labeled “VRT” will be connected if added Vibrational Resonance Therapy is being
added to the sauna. If you did not add this to your sauna, these cables will not be used.
www.infraredsauna.com
24
CALL NOW 800.798.1779
Page 25

SANCTUARY 2
Assembly Instructions Cont’d
7 - INSTALLING THE BENCH
Install the bench panel by sliding it over the horizontal bench guides on the side panels. Be careful not to scratch
the adjacent panels when sliding in the bench.
Push the bench all the way in until it touches the back panel and is securely in place.
The bench is reversible. One side is ergonomic and one side is flat. You can reverse the bench after the sauna
installation is nished. Be sure that the bench is pushed all the way back until it slides under the heater guard
to secure the bench in place.
B
P
O
T
L
AC
K
T
T
F
E
N
L
O
R
F
M
TTO
O
B
Optional: After the bench is installed, you can
slide in the included wood pieces to prevent
the bench from sliding left to right. One piece
can be placed on each side next to the bench.
If you decide to flip the reversible bench over,
please remove the wood pieces rst.
B
P
O
T
L
A
C
K
T
T
F
E
N
L
O
R
F
M
O
T
T
O
B
CALL NOW 800.798.1779
www.infraredsauna.com
25
Page 26

Assembly Instructions Cont’d
8 - INSTALLING WOOD PORTION OF ROOF
1. Set the wood portion of the roof on the back roof guide.
Besure to slide the roof back against the back wall.
SANCTUARY 2
9 - INSTALLING GLASS PORTION OF ROOF
1. Place the glass roof portion on the front roof guides. Be sure that it is pushed rmly back against the
wood roof portion.
www.infraredsauna.com
26
CALL NOW 800.798.1779
Page 27

Assembly Instructions Cont’d
SANCTUARY 2
10 - INSTALLING WALL LOCKS
1. The side walls must be secured to the back wall and wood roof piece using the attached eye hooks.
2. Screw in one of the eye hooks between the left side wall and backwall and one between the right side wall and
backwall.
3. Secure one of the eye hooks between the left side wall and top front of the wood roof piece and one between
the right side wall and the top front of the wood roof piece.
4. Latch the three buckles that connect the wood roof piece to the back and side walls.
Attach eye hook so that it is screwed
into both the side walls and back walls.
Attach the eye hook so that it is screwed
into side walls and the wood roof piece.
THIS STEP IS VERY IMPORTANT.
PLEASE DO NOT OMIT THIS STEP.
11 - INSTALLING GLASS DOOR AND RIGHT SIDE GLASS WINDOW
1. We recommend using two people to move the
glass door and right window piece. Place the glass
door with right window in the groove in the floor
and slide it securely into place against the righ wall.
It may help to put the corner of the glass in place
rst then put the rest of the glass in the slot. Until
this piece is secured as in step 2 below using the
enlcosed brackets, please hold this piece in place.
2. Secure the front glass door and right side glass
window to the roof glass using the included
brackets. You will see pre-drilled holes in both the
front glass and roof glass. One person should
hold the outside piece while the other person
screws in the bolt.
CALL NOW 800.798.1779
Front Wall
Installed
www.infraredsauna.com
27
Page 28

Assembly Instructions Cont’d
12 - INSTALLING LEFT SIDE GLASS
1. Open the door of the sauna to allow
room to place the left side glass
window.
2. Place the left side glass window and
push it against the left side wall so it
is securly in place. Until this piece is
secured using the included brackets,
someone should hold the piece in place.
3. Secure the left front glass window to the
roof glass using the included brackets.
You will see pre-drilled holes in both the
front glass and roof glass.
SANCTUARY 2
www.infraredsauna.com
28
Front Wall
Installed
CALL NOW 800.798.1779
Page 29

Assembly Instructions Cont’d
13 - CONNECT HEATERS IN ROOF
1. Locate the “trap” doors that open in the wood roof.
2. Connect the black and white cables that come
out of the side wall to the connector located in
the wood roof.
3. Connect the green ground wire that come out
of the side wall to the green ground wire that is
in the wood roof. Push the wiring inside the roof
area and close the roof door compartments.
4. In the left side wall compartment, there will be
two connectors: 1) Heater connector. 2) Keypad
connector. The heater connector is a two wire
connector. The keypad connector is a seven wire
connector.
SANCTUARY 2
BE SURE TO MATCH THE COLORS IN THE CONNECTORS.
THE BLACK WIRE SHOULD MATCH UP WITH THE BLACK WIRE, ETC.
14 - INSTALLING DOOR HANDLE
1. Locate the door handle.
2. Attach the door handle using the enclosed screws.
Note: If you are using a tablet or smartphone to control your sauna, the door handle will act as both
the door handle and tablet/smartphone holder when the door is closed.
CALL NOW 800.798.1779
www.infraredsauna.com
29
Page 30

SANCTUARY 2
Assembly Instructions Cont’d
15 - INSTALLING FRONT HEATERS
1. Locate the two front heaters.
2. Align the left front heater and plug the connector that comes out of the bottom of the heater into the plug
coming out of the in the floor.
3. Align the the hole in the back of the heater with the hole in the front wall glass. Using the included screws and
washers, secure the heater to the glass through the pre-drilled hole. One washer will be placed on the inside
and one on the outside glass. The heater will be secured with these screws in two locations.
4. Repeat this step for the right front heater.
www.infraredsauna.com
30
Front
Heater
Installed
CALL NOW 800.798.1779
Page 31

SANCTUARY 2
Assembly Instructions Cont’d
15 - INSTALLING FRONT HEATERS
5. Once both heaters are installed carefully push the included Full Spectrum Heater guards securely over each
of the front heaters. The full spectrum heaters are hot to the touch when running and this will prevent burning
should you get close to the heater.
Warning Notice: The infrared heaters in your sauna are
a potential BURN HAZARD. Do NOT touch the infrared
heaters when they are in operation and allow to cool before
servicing.
16 - LOCATING AND PLUGGING IN POWER CORD
The power cord comes out of the roof of the sauna. If you are standing facing the sauna, it comes out of the rear
left corner of the roof. Open the trap door to access the power cord and run the cord down the back of the sauna.
The power cord will plug into the appropriate electrical receptacle.
Note: We do not recommend using an extension cord for your sauna.
Please plug the sauna directly into the wall receptacle.
CALL NOW 800.798.1779
www.infraredsauna.com
31
Page 32

SANCTUARY 2
Assembly Instructions Cont’d
17 - INSTALLATION IS COMPLETE
Installation of your sauna is now complete. Using a damp cloth, wipe out the sauna to remove any excess saw
dust that may have settled on the wall & floor panels and the heater panels during manufacturing and shipment.
Please refer to usage instructions located later on in this manual.
www.infraredsauna.com
32
CALL NOW 800.798.1779
Page 33

SANCTUARY 2
SANCTUARY 303
Packaging - - - - - - - - - - - - - - - - - - - - - - - 34
Assembly Instructions - - - - - - - - - - - - - - - - - 35
CALL NOW 800.798.1779
www.infraredsauna.com
33
Page 34

SANCTUARY 3
Packaging
CONTENTS OF BOXES
.
Box 1 of 4 Box 2 of 4 Box 3 of 4 Box 4 of 4
1. Floor Panel 1. Left Side Wall 1. Front Wall Glass 1. Front Heaters
2. Ceiling Panel 2. Right Side Wall 2. Back Wall
3 . A c c e s s o r i e s 3. Bench & Bench Support
4. Installation Manual
Door Handle
ACCESSORY BOX CONTENTS
Front Heater
Mouting Screws
(4 sets)
Wood piece
(2 pieces)
Wall Security
Bracket (4 pieces)
www.infraredsauna.com
34
Glass Security
Brackets (2 sets)
Full Spectrum
Heater Guard (2 pieces)
CALL NOW 800.798.1779
Page 35

SANCTUARY 3
Assembly Instructions
Assembly of the sauna requires two adults to complete. Please read the instructions thoroughly before and during
assembly to ensure proper installation of the unit. If you encounter any problems or have questions during assembly,
please feel free to call our Customer Service department at 1-800-798-1779 or +1-510-601-1775.
1 - LOCATION OF SAUNA & INSTALLATION ORDER
When determining a location for your sauna, please keep in mind the following:
1. The main power cord on the sauna must be easily accessible.
2. The location must be dry and level.
3. Panels should be installed in the following order:
1) Floor 4) Right Side Wall 7) Wood Roof
2) Back Wall 5) Under Bench Support 8) Glass Roof
3) Left Side Wall 6) Bench 9) Front Wall Glass
2 - PLACING FLOOR PANEL
1. Place the bottom floor panel on the ground
near the location you will using the sauna.
Make sure the front of the floor is in the
desired location of the door. The two plugs
and the door magnet indicate the front of the
sauna.
3 - CONNECTING THE BACK PANEL
TO THE FLOOR PANEL
1. Connect the back panel to the floor panel by lining up
the back panel on the groove of the floor panel.
CALL NOW 800.798.1779
www.infraredsauna.com
35
Page 36
SANCTUARY 3
Assembly Instructions Cont’d
4 - CONNECTING SIDE WALLS
The side wall panels will be connected to the back wall by connecting together the installed brackets. There are
“+” brackets and “-” brackets on the side of each panel. The side walls will be installed as follows:
1. Place the left side wall in the slot in the floor.
Lift the side wall up about 4” (10cm) higher
than the backwall panel (See Picture 1).
2. Place the side wall panel against the back wall
(See Picture 2), then slide down side wall panel
until the two panels are equal height. (See
Picture 3).
3. If the panels are not equal height or there is
an obvious gap between the two panels, this
means they are not propery attached and you
should try again.
4. Repeat the steps above for the right side wall
panel.
If the panels still seem too tight to come down all the way, try backing off
the bracket screws by one half turn with a Phillips head screwdriver.
Picture 1 Picture 2 Picture 3
Left Side Wall Installed
www.infraredsauna.com
36
Right Side Wall Installed
CALL NOW 800.798.1779
Page 37

SANCTUARY 3
Assembly Instructions Cont’d
5 - INSTALLING UNDER BENCH SUPPORT
Slide down the bench heater panel by lining up its sides with the vertical guides on the left and right side wall
panel.
1. Be careful not to scratch the side panels when positioning the heater panel.
2. Push the bench heater panel all the way down until it is touching the floor panel and securely in place.
Heater must be
facing outward
Vertical bench heater
panel guides are found
on the side panels.
CALL NOW 800.798.1779
www.infraredsauna.com
37
Page 38

SANCTUARY 3
Assembly Instructions Cont’d
6 - CONNECT HEATER CONNECTION UNDER BENCH
Follow the connections as in the following illustration:
1. Connect the black and white cable coming out of the back of the under bench support to one of the left side
wall connectors.
2. Connect the side black and white wall cable to one of the floor connectors.
3. Connect the black and white back wall cable to the other floor connector.
4. Connect the green ground connectors together.
You can plug any male connector to a female one as long as the colors match.
5. The two remaining cables labeled “VRT” will be connected if Vibrational Resonance Therapy is being added to
the sauna. If you did not add this to your sauna, these cables will not be used.
www.infraredsauna.com
38
CALL NOW 800.798.1779
Page 39

SANCTUARY 3
Assembly Instructions Cont’d
7 - INSTALLING THE BENCH
Install the bench panel by sliding it over the horizontal bench guides on the side panels. Be careful not to scratch
the adjacent panels when sliding in the bench.
Push the bench all the way in until it touches the back panel and is securely in place.
The bench is reversible. One side is ergonomic and one side is flat. You can reverse the bench after the sauna
installation is nished. Be sure that the bench is pushed all the way back until it slides under the heater guard
to secure the bench in place.
B
P
O
T
L
AC
K
T
T
F
E
N
L
O
R
F
M
TTO
O
B
Optional: After the bench is installed, you can
slide in the included wood pieces to prevent
the bench from sliding left to right. One piece
can be placed on each side next to the bench.
If you decide to flip the reversible bench over,
please remove the wood pieces rst.
B
P
O
T
L
A
C
K
T
T
F
E
N
L
O
R
F
M
O
T
T
O
B
CALL NOW 800.798.1779
www.infraredsauna.com
39
Page 40

Assembly Instructions Cont’d
8 - INSTALLING WOOD PORTION OF ROOF
1. Set the wood portion of the roof on the back roof guide.
Besure to slide the roof back against the back wall.
SANCTUARY 3
Roof Guide
9 - INSTALLING GLASS PORTION OF ROOF
1. Place the glass roof portion on the front roof guides. Be sure that it is pushed rmly back against the
wood roof portion.
Roof Guide
www.infraredsauna.com
40
CALL NOW 800.798.1779
Page 41

Assembly Instructions Cont’d
SANCTUARY 3
10 - INSTALLING WALL LOCKS
1. The side walls must be secured to the back wall and wood roof piece using the attached eye hooks.
2. Screw in one of the eye hooks between the left side wall and backwall and one between the right side wall and
backwall.
3. Secure one of the eye hooks between the left side wall and top front of the wood roof piece and one between
the right side wall and the top front of the wood roof piece.
Attach eye hook so that it is screwed
into both the side walls and back walls.
Attach the eye hook so that it is screwed
into side walls and the wood roof piece.
THIS STEP IS VERY IMPORTANT.
PLEASE DO NOT OMIT THIS STEP.
11 - INSTALLING LEFT SIDE GLASS WINDOW
1. We recommend using two people to move the
glass door and right window piece. Place the
glass door with left window in the groove in the
floor and slide it securely into place against the
left wall. It may help to put the corner of the
glass in place rst then put the rest of the glass
in the slot. Until this piece is secured as in step
2 below using the enlcosed brackets, please
hold this piece in place.
2. Secure the lef side glass window to the roof
glass using the included brackets. You will see
pre-drilled holes in both the front glass and roof
glass. One person should hold the outside piece
while the other person screws in the bolt.
CALL NOW 800.798.1779
Front Wall Installed
www.infraredsauna.com
41
Page 42

Assembly Instructions Cont’d
12 - INSTALLING DOOR / RIGHT SIDE GLASS WINDOW
1. Place the right side glass window
and push it against the right side
wall so it is securly in place.
Be sure to secure the door so
it does not swing open. Until
this piece is secured using the
included brackets, someone
should hold the piece in place.
2. Secure the right front glass
window to the roof glass using the
included brackets. You will see
pre-drilled holes in both the front
glass and roof glass.
SANCTUARY 3
www.infraredsauna.com
42
Front Wall
Installed
CALL NOW 800.798.1779
Page 43

Assembly Instructions Cont’d
13 - CONNECT HEATERS IN ROOF
1. Locate the “trap” doors that open in the wood roof.
2. Connect the black and white cables that come
out of the side wall to the connector located in
the wood roof.
3. Connect the green ground wire that come out
of the side wall to the green ground wire that is
in the wood roof. Push the wiring inside the roof
area and close the roof door compartments.
4. In the left side wall compartment, there will be
two connectors: 1) Heater connector. 2) Keypad
connector. The heater connector is a two wire
connector. The keypad connector is a seven wire
connector.
SANCTUARY 3
BE SURE TO MATCH THE COLORS IN THE CONNECTORS.
THE BLACK WIRE SHOULD MATCH UP WITH THE BLACK WIRE, ETC.
14 - INSTALLING DOOR HANDLE
1. Locate the door handle.
2. Attach the door handle using the enclosed screws.
Note: If you are using a tablet or smartphone to control your sauna, the door handle will act as both
the door handle and tablet/smartphone holder when the door is closed.
CALL NOW 800.798.1779
www.infraredsauna.com
43
Page 44

SANCTUARY 3
Assembly Instructions Cont’d
15 - INSTALLING FRONT HEATERS
1. Locate the two front heaters.
2. Align the left front heater and plug the connector that comes out of the bottom of the heater into the plug
coming out of the in the floor.
3. Align the the hole in the back of the heater with the hole in the front wall glass. Using the included screws and
washers, secure the heater to the glass through the pre-drilled hole. One washer will be placed on the inside
and one on the outside glass. The heater will be secured with these screws in two locations.
4. Repeat this step for the right front heater.
www.infraredsauna.com
44
Front
Heater
Installed
CALL NOW 800.798.1779
Page 45

SANCTUARY 3
Assembly Instructions Cont’d
15 - INSTALLING FRONT HEATERS
5. Once both heaters are installed carefully push the included Full Spectrum Heater guards securely over each
of the front heaters. The full spectrum heaters are hot to the touch when running and this will prevent burning
should you get close to the heater.
Warning Notice: The infrared heaters in your sauna are
a potential BURN HAZARD. Do NOT touch the infrared
heaters when they are in operation and allow to cool before
servicing.
16 - LOCATING AND PLUGGING IN POWER CORD
The power cord comes out of the roof of the sauna. If you are standing facing the sauna, it comes out of the rear
left corner of the roof. Open the trap door to access the power cord and run the cord down the back of the sauna.
The power cord will plug into the appropriate electrical receptacle.
Note: We do not recommend using an extension cord for your sauna.
Please plug the sauna directly into the wall receptacle.
CALL NOW 800.798.1779
www.infraredsauna.com
45
Page 46

SANCTUARY 3
Assembly Instructions Cont’d
17 - INSTALLATION IS COMPLETE
Installation of your sauna is now complete. Using a damp cloth, wipe out the sauna to remove any excess
saw dust that may have settled on the wall & floor panels and the heater panels during manufacturing and shipping.
Please refer to usage instructions located later on in this manual.
www.infraredsauna.com
46
CALL NOW 800.798.1779
Page 47

SANCTUARY 2
SANCTUARY Y04
Packaging - - - - - - - - - - - - - - - - - - - - - - - 48
Assembly Instructions - - - - - - - - - - - - - - - - - 49
CALL NOW 800.798.1779
www.infraredsauna.com
47
Page 48

SANCTUARY Y
Packaging
CONTENTS OF BOXES
.
Box 1 of 4 Box 2 of 4 Box 3 of 4 Box 4 of 4
1. Floor Panel 1. Left Side Wall 1. Front Wall Glass 1. Front Heaters
2. Ceiling Panel 2. Right Side Wall 2. Back Wall
3 . A c c e s s o r i e s 3. Bench & Bench Support
4. Installation Manual
Door Handle
ACCESSORY BOX CONTENTS
Front Heater Mouting Screws (4 sets)
Glass Security Brackets (2 sets)
Wall Security
Bracket (4 pieces)
www.infraredsauna.com
48
Bench
Metal Brackets
(4 sets)
CALL NOW 800.798.1779
Full Spectrum
Heater Guard
(2 pieces)
Page 49

SANCTUARY Y
Assembly Instructions
Assembly of the sauna requires two adults to complete. Please read the instructions thoroughly before and during
assembly to ensure proper installation of the unit. If you encounter any problems or have questions during assembly,
please feel free to call our Customer Service department at 1-800-798-1779 or +1-510-601-1775.
1 - LOCATION OF SAUNA & INSTALLATION ORDER
When determining a location for your sauna, please keep in mind the following:
1. The main power cord on the sauna must be easily accessible.
2. The location must be dry and level.
3. Panels should be installed in the following order:
1) Floor 4) Right Side Wall 7) Wood Roof
2) Back Wall 5) Under Bench Support 8) Glass Roof
3) Left Side Wall 6) Bench 9) Front Wall Glass
2 - PLACING FLOOR PANEL
1. Place the bottom floor panel on the ground
near the location you will using the sauna.
Make sure the front of the floor is in the
desired location of the door. The two plugs
and the door magnet indicate the front of the
sauna.
3 - CONNECTING THE BACK PANEL
TO THE FLOOR PANEL
1. Connect the back panel to the floor panel by lining up
the back panel on the groove of the floor panel.
Connect the cables coming out of the floor to the
cables coming out of the back wall panel as you insert
the wall into the groove.
CALL NOW 800.798.1779
www.infraredsauna.com
49
Page 50

SANCTUARY Y
Assembly Instructions Cont’d
4 - CONNECTING SIDE WALLS
The side wall panels will be connected to the back wall by connecting together the installed brackets. There are
“+” brackets and “-” brackets on the side of each panel. The side walls will be installed as follows:
1. Place the left side wall in the slot in the floor.
Lift the side wall up about 4” (10cm) higher
than the backwall panel (See Picture 1).
2. Place the side wall panel against the back wall
(See Picture 2), then slide down side wall panel
until the two panels are equal height. (See
Picture 3).
3. If the panels are not equal height or there is
an obvious gap between the two panels, this
means they are not propery attached and you
should try again.
If the panels still seem too tight to come
down all the way, try backing off the
bracket screws by one half turn with a
Phillips head screwdriver on the female
bracket.
Picture 1 Picture 2 Picture 3
www.infraredsauna.com
50
Left Side Wall Installed
CALL NOW 800.798.1779
Page 51

SANCTUARY Y
Assembly Instructions Cont’d
5 - INSTALLING RIGHT SIDE WALL
Install the right side wall in the same manner as the left side wall.
1. Place the right side wall in the slot in the floor. Lift the side wall up about 4” (10cm) higher than the
backwall panel (See Picture 1).
2. Place the side wall panel against the back wall (See Picture 2), then slide down side wall panel until the
two panels are equal height. (See Picture 3).
3. If the panels are not equal height or there is an obvious gap between the two panels, this means they are
not propery attached and you should try again.
CALL NOW 800.798.1779
Right Side Wall Installed
www.infraredsauna.com
51
Page 52

Assembly Instructions Cont’d
6 - INSTALLING WOOD PORTION OF ROOF
1. Set the wood portion of the roof on the back roof guide.
Besure to slide the roof back against the back wall.
SANCTUARY Y
7 - INSTALLING GLASS PORTION OF ROOF
1. Place the glass roof portion on the front roof guides. Be sure that it is pushed rmly back against the
wood roof portion.
www.infraredsauna.com
52
CALL NOW 800.798.1779
Page 53

Assembly Instructions Cont’d
SANCTUARY Y
8 - INSTALLING WALL LOCKS
1. The side walls must be secured to the back wall and wood roof piece using the attached eye hooks.
2. Screw in one of the eye hooks between the left side wall and backwall and one between the right side wall and
backwall.
3. Secure one of the eye hooks between the left side wall and top front of the wood roof piece and one between
the right side wall and the top front of the wood roof piece.
Attach eye hook so that it is screwed
into both the side walls and back walls.
Attach the eye hook so that it is screwed
into side walls and the wood roof piece.
THIS STEP IS VERY IMPORTANT.
PLEASE DO NOT OMIT THIS STEP.
9 - ASSEMBLING BENCHES
1. The Sanctuary Y - FS comes with two benches. The benches are identical. Please located the pieces for one
bench as shown below:
(4 x)
(4 x legs, 2 x long side supports, 2 x short side supports)
CALL NOW 800.798.1779
www.infraredsauna.com
53
Page 54

Assembly Instructions Cont’d
9 - ASSEMBLING BENCH’S CONTINUED
SANCTUARY Y
2. Line up the two long side support, two short side
supports and four legs as shown in the image
below:
4. Place one of the metal brackets in one of the corners of the bench support frame as show below:
3. Insert the side pieces into the slots in the legs
www.infraredsauna.com
54
CALL NOW 800.798.1779
Page 55

SANCTUARY Y
Assembly Instructions Cont’d
9 - ASSEMBLING BENCH’S CONTINUED
5. Line up the hole in the bracket with the screw thread in the leg piece and screw one of the bolts into the
leg piece. Be sure that the bracket ends are inserted into the groove of the side support pieces.
6. Repeat this for all four legs.
7. Using 6 x wood screws for each bracket, screw the wood screws into the bracket to secure it to the side
support pieces.
CALL NOW 800.798.1779
www.infraredsauna.com
55
Page 56

Assembly Instructions Cont’d
9 - ASSEMBLING BENCH’S CONTINUED
8. Locate the bench top
SANCTUARY Y
9. Turn the bench top upside down as in the drawing below:
www.infraredsauna.com
56
CALL NOW 800.798.1779
Page 57

Assembly Instructions Cont’d
9 - ASSEMBLING BENCH’S CONTINUED
10. Place the frame support piece completed in steps 1-7 on the bottom side of the bench top.
SANCTUARY Y
11. Locate the bag with 6 x wood screws.
CALL NOW 800.798.1779
www.infraredsauna.com
57
Page 58

Assembly Instructions Cont’d
9 - ASSEMBLING BENCH’S CONTINUED
12. Screw the bench top into the long side supports using the pre-drilled holes as guides.
SANCTUARY Y
13. The bench is complete
www.infraredsauna.com
58
14. Repeat steps 1-13 for the second bench.
CALL NOW 800.798.1779
Page 59

SANCTUARY Y
Assembly Instructions Cont’d
10 - INSTALLING RIGHT SIDE GLASS WINDOW
1. We recommend using two people to move the glass door and right window piece. Place the glass door with
left window in the groove in the floor and slide it securely into place against the left wall. It may help to put the
corner of the glass in place rst then put the rest of the glass in the slot. Until this piece is secured as in step
2 below using the included brackets, please hold this piece in place.
2. Secure the lef side glass window to the roof glass using the included brackets. You will see
pre-drilled holes in both the front glass and roof glass. One person should hold the outside piece while the
other person screws in the bolt.
CALL NOW 800.798.1779
Door and Right Front Wall Installed
www.infraredsauna.com
59
Page 60

Assembly Instructions Cont’d
11 - INSTALLING LEFT SIDE GLASS WINDOW
12 - ASSEMBLING BENCH’S CONTINUED
1. Open the door of the sauna to
allow room to place the left
side glass window.
2. Place the left side glass
window and push it against
the left side wall so it is
securly in place. Until this
piece is secured using the
enlcosed brackets, someone
should hold the piece in place.
SANCTUARY Y
3. Secure the left front glass
window to the roof glass
using the included brackets.
You will see pre-drilled holes
in both the front glass and
roof glass.
Front Wall
Installed
www.infraredsauna.com
60
CALL NOW 800.798.1779
Page 61

Assembly Instructions Cont’d
12 - CONNECT HEATERS IN ROOF
1. Locate the “trap” doors that open in the wood roof.
2. Connect the black and white cables that that
come out of the side wall to the connector
located in the wood roof.
3. Connect the green ground wire that come out of
the side wall to the green ground wire that is in
the wood roof.
Push the wiring inside the roof area and close the
roof door compartments.
SANCTUARY Y
4. In the left side wall compartment, there will be
two connectors: 1) Heater connector. 2) Keypad
connector. The heater connector is a two wire
connector. The keypad connector is a seven wire
connector.
BE SURE TO MATCH THE COLORS IN THE CONNECTORS.
THE BLACK WIRE SHOULD MATCH UP WITH THE BLACK WIRE, ETC.
13 - INSTALLING DOOR HANDLE
1. Locate the door handle.
2. Attach the door handle using the enclosed screws.
Note: If you are using a tablet or smartphone to control your sauna, the door handle will act as both
the door handle and tablet/smartphone holder when the door is closed.
CALL NOW 800.798.1779
www.infraredsauna.com
61
Page 62

SANCTUARY Y
Assembly Instructions Cont’d
14 - INSTALLING FRONT HEATERS
1. Locate the two front heaters.
2. Align the left front heater and plug the connector that comes out of the bottom of the heater into the plug
coming out of the in the floor.
3. Align the the hole in the back of the heater with the hole in the front wall glass Using the enlcosed screws and
washers, secure the heater to the glass through the pre-drilled hole. One washer will be placed on the inside
and one on the outside glass. The heater will be secured with these screws in two locations.
4. Repeat this step for the right front heater.
www.infraredsauna.com
62
Front
Heater
Installed
CALL NOW 800.798.1779
Page 63

SANCTUARY Y
Assembly Instructions Cont’d
14 - INSTALLING FRONT HEATERS
5. Once both heaters are installed carefully push the included Full Spectrum Heater guards securely over each
of the front heaters. The full spectrum heaters are hot to the touch when running and this will prevent burning
should you get close to the heater.
Warning Notice: The infrared heaters in your sauna are
a potential BURN HAZARD. Do NOT touch the infrared
heaters when they are in operation and allow to cool before
servicing.
15 - LOCATING AND PLUGGING IN POWER CORD
The power cord comes out of the roof of the sauna. If you are standing facing the sauna, it comes out of the rear
left corner of the roof. Open the trap door to access the power cord and run the cord down the back of the sauna.
The power cord will plug into the appropriate electrical receptacle.
Note: We do not recommend using an extension cord for your sauna.
Please plug the sauna directly into the wall receptacle.
CALL NOW 800.798.1779
www.infraredsauna.com
63
Page 64

SANCTUARY Y
Assembly Instructions Cont’d
16 - INSTALLATION IS COMPLETE
Installation of your sauna is now complete. Using a damp cloth, wipe out the sauna to remove any excess saw
dust that may have settled on the wall & floor panels and the heater panels.
Please refer to usage instructions located later on in this manual.
www.infraredsauna.com
64
CALL NOW 800.798.1779
Page 65

SANCTUARY Y
SANCTUARY C05
Packaging - - - - - - - - - - - - - - - - - - - - - - - 66
Assembly Instructions - - - - - - - - - - - - - - - - - 67
CALL NOW 800.798.1779
www.infraredsauna.com
65
Page 66

SANCTUARY C
Packaging
CONTENTS OF BOXES
.
Box 1 of 4 Box 2 of 4 Box 3 of 4 Box 4 of 4
1. Floor Panel 1. Left Side Wall 1. Front Wall Glass 1. Front Heaters
2. Ceiling Panel 2. Right Side Wall 2. Back Wall
3 . A c c e s s o r i e s 3. Bench & Bench Support
4. Installation Manual
Door Handle
ACCESSORY BOX CONTENTS
Front Heater
Mouting Screws
(4 sets)
Wood piece
(2 pieces)
Wall Security
Bracket (4 pieces)
www.infraredsauna.com
66
Glass Security
Brackets (2 sets)
Full Spectrum
Heater Guard (2 pieces)
CALL NOW 800.798.1779
Page 67

SANCTUARY C
Assembly Instructions
Assembly of the sauna requires two adults to complete. Please read the instructions thoroughly before and during
assembly to ensure proper installation of the unit. If you encounter any problems or have questions during assembly,
please feel free to call our Customer Service department at 1-800-798-1779 or +1-510-601-1775.
1 - LOCATION OF SAUNA & INSTALLATION ORDER
When determining a location for your sauna, please keep in mind the following:
1. The main power cord on the sauna must be easily accessible.
2. The location must be dry and level.
3. Panels should be installed in the following order:
1) Floor 4) Right Side Wall 7) Wood Roof
2) Back Wall 5) Under Bench Support 8) Glass Roof
3) Left Side Wall 6) Bench 9) Front Wall Glass
2 - PLACING FLOOR PANEL
1. Place the bottom floor panel on the ground
near the location you will using the sauna.
Make sure the front of the floor is in the
desired location of the door. The two plugs
and the door magnet indicate the front of the
sauna.
3 - CONNECTING THE LEFT BACK
PANEL TO THE FLOOR
1. Place the Left Back panel on the floor panel by lining
up the back panel on the groove of the floor panel.
CALL NOW 800.798.1779
www.infraredsauna.com
67
Page 68

Assembly Instructions Cont’d
4 - CONNECTING THE RIGHT BACK PANEL
1. Place the Right Backwall in the slot in the floor.
SANCTUARY C
www.infraredsauna.com
68
Left and Right Backwalls Installed
CALL NOW 800.798.1779
Page 69

SANCTUARY C
Assembly Instructions Cont’d
5 - INSTALLING UNDER BENCH SUPPORT
Locate the long under bench support (left side) and shorter under bench support (right side).
1. Install the left long under bench support rst. Slide the bench support down by lining it up with the vertical
guide on the right back wall panel.
2. Install the shorter right side under bench support by sliding it down the vertical guide on the long bench
support that was just installed.
3. Be careful not to scratch the side panels while positioning the heater panel.
4. Make certain that the under bench supports are seated on the floor panel and are securely in place.
Heater must be
facing outward
Vertical bench heater
panel guides are found
on the side panels.
CALL NOW 800.798.1779
www.infraredsauna.com
69
Page 70

Assembly Instructions Cont’d
6 - INSTALL THE LEFT AND RIGHT SIDE WALLS
1. Place the left side wall in the slot in the floor.
Lift the side wall up about 4” (10cm) higher
than the backwall panel (See Picture 1).
2. Place the side wall panel against the back wall
(See Picture 2), then slide down side wall panel
until the two panels are equal height. (See
Picture 3).
If the panels still seem too tight to come
down all the way, try backing off the
bracket screws by one half turn with a
Phillips head screwdriver on the female
brackets.
Picture 1 Picture 2 Picture 3
SANCTUARY C
3. Repeat the steps above for the right side wall
panel.
Left Side Wall Connected Right Side Wall Connected
www.infraredsauna.com
70
CALL NOW 800.798.1779
Page 71

SANCTUARY C
Assembly Instructions Cont’d
7 - CONNECT HEATER CONNECTION UNDER BENCH
Follow the connections as in the following illustration:
1. Connect the black and white cable coming out of the back of the under bench support to one of the left side
wall connectors.
2. Connect the side black and white wall cable to one of the floor connectors.
3. Connect the black and white back wall cable to the other floor connector.
4. Connect the green ground connectors together.
You can plug any male connector to a female one as long as the colors match.
5. The two remaining cables labeled “VRT” will be connected if Vibrational Resonance Therapy is being added to
the sauna. If you did not add this to your sauna, these cables will not be used.
Left Bench Installed Right Bench Installed
CALL NOW 800.798.1779
www.infraredsauna.com
71
Page 72

SANCTUARY C
Assembly Instructions Cont’d
8 - INSTALLING BENCH
Install the benchs by sliding it over the horizontal bench guides on the back and side walls. Be careful not to
scratch the adjacent panels when sliding in the bench.
Push the bench all the way in until it touches the back panel and is securely in place.
The bench is reversible. One side is ergonomic and one side is flat. You can reverse the bench after the sauna
installation is nished. Be sure that the bench is pushed all the way back until it slides under the heater guard
to secure the bench in place.
1. Install the long left side bench rst.
2. Install the shorter right side bench second.
B
P
O
T
L
A
C
K
T
T
F
E
N
L
O
R
F
M
O
T
T
O
B
Optional: After the bench is installed, you can
slide in the included wood pieces to prevent
the bench from sliding left to right. One piece
can be placed on each side next to the bench.
If you decide to flip the reversible bench over,
please remove the wood pieces rst.
www.infraredsauna.com
72
CALL NOW 800.798.1779
Page 73

Assembly Instructions Cont’d
7 - CONNECT HEATER CONNECTION UNDER BENCH
9 - INSTALLING WOOD PORTION OF ROOF
1. Set the wood portion of the roof on the back roof guide.
Besure to slide the roof back against the back wall.
SANCTUARY C
10 - INSTALLING WALL LOCKS
1. The side walls must be secured to the back wall and wood roof piece using the attached eye hooks.
2. Screw in one of the eye hooks between the left side wall and backwall and one between the right side wall and
backwall.
3. Secure one of the eye hooks between the left side wall and top front of the wood roof piece and one between
the right side wall and the top front of the wood roof piece.
Attach eye hook so that it is screwed
into both the side walls and back walls.
Attach the eye hook so that it is screwed
into side walls and the wood roof piece.
THIS STEP IS VERY IMPORTANT.
PLEASE DO NOT OMIT THIS STEP.
CALL NOW 800.798.1779
www.infraredsauna.com
73
Page 74

Assembly Instructions Cont’d
12 - INSTALLING DOOR / RIGHT SIDE GLASS WINDOW
11 - INSTALLING GLASS PORTION OF ROOF
1. Place the glass roof portion on the front roof
guides. Be sure that it is pushed rmly back
against the wood roof portion.
SANCTUARY C
12 - INSTALLING DOOR / RIGHT SIDE GLASS WINDOW
12 - INSTALLING GLASS DOOR AND RIGHT SIDE GLASS WINDOW
1. We recommend using two people to move the
glass door and right window piece. Place the
glass door with left window in the groove in the
floor and slide it securely into place against the
left wall. It may help to put the corner of the
glass in place rst then put the rest of the glass
in the slot. Until this piece is secured as in step
2 below using the included brackets, please
hold this piece in place.
2. Secure the lef side glass window to the roof
glass using the included brackets. You will see
pre-drilled holes in both the front glass and roof
glass. One person should hold the outside piece
while the other person screws in the bolt.
www.infraredsauna.com
74
Right Front Wall Installed
CALL NOW 800.798.1779
Page 75

SANCTUARY C
Assembly Instructions Cont’d
13 - INSTALLING LEFT SIDE GLASS WINDOW
1. Open the door of the sauna to allow room to place the left side glass window.
2. Place the left side glass window and push it against the left side wall so it is securly in place. Until this piece
is secured using the enlcosed brackets, someone should hold the piece in place.
3. Secure the left front glass window to the roof glass using the included brackets. You will see pre-drilled
holes in both the front glass and roof glass.
Left Front Wall Installed
CALL NOW 800.798.1779
www.infraredsauna.com
75
Page 76

Assembly Instructions Cont’d
14 - CONNECT HEATERS IN ROOF
1. Locate the “trap” doors that open in the wood roof.
2. Connect the black and white cables that that
come out of the side wall to the connector
located in the wood roof.
3. Connect the green ground wire that come out
of the side wall to the green ground wire that is
in the wood roof. Push the wiring inside the roof
area and close the roof door compartments.
4. In the left side wall compartment, there will be
two connectors: 1) Heater connector. 2) Keypad
connector. The heater connector is a two wire
connector. The keypad connector is a seven wire
connector.
SANCTUARY C
BE SURE TO MATCH THE COLORS IN THE CONNECTORS.
THE BLACK WIRE SHOULD MATCH UP WITH THE BLACK WIRE, ETC.
15 - INSTALLING DOOR HANDLE
1. Locate the door handle.
2. Attach the door handle using the enclosed screws.
Note: If you are using a tablet or smartphone to control your sauna, the door handle will act as both
the door handle and tablet/smartphone holder when the door is closed.
www.infraredsauna.com
76
CALL NOW 800.798.1779
Page 77

SANCTUARY C
Assembly Instructions Cont’d
16 - INSTALLING FRONT HEATERS
1. Locate the two front heaters.
2. Align the left front heater and plug it into the receptacle in the floor near the front wall.
3. Align the the hole in the back of the heater with the hole in the front wall glass and using the enlcosed
screw/washers, secure the heater to the glass through the pre-drilled hole. One washer will be placed on the
inside and one on the outside glass. The heater will be secured with these screws in two locations.
4. Repeat this step for the right front heater.
CALL NOW 800.798.1779
Front Heater
Installed
www.infraredsauna.com
77
Page 78

SANCTUARY C
Assembly Instructions Cont’d
16 - INSTALLING FRONT HEATERS
5. Once both heaters are installed carefully push the included Full Spectrum Heater guards securely over each
of the front heaters. The full spectrum heaters are hot to the touch when running and this will prevent burning
should you get close to the heater.
Warning Notice: The infrared heaters in your sauna are
a potential BURN HAZARD. Do NOT touch the infrared
heaters when they are in operation and allow to cool before
servicing.
17 - LOCATING AND PLUGGING IN POWER CORD
The power cord comes out of the roof of the sauna. If you are standing facing the sauna, it comes out of the rear
left corner of the roof. Open the trap door to access the power cord and run the cord down the back of the sauna.
The power cord will plug into the appropriate electrical receptacle.
Note: We do not recommend using an extension cord for your sauna.
Please plug the sauna directly into the wall receptacle.
www.infraredsauna.com
78
CALL NOW 800.798.1779
Page 79

SANCTUARY C
Assembly Instructions Cont’d
18 - INSTALLATION IS COMPLETE
Installation of your sauna is now complete. Using a damp cloth, wipe out the sauna to remove any excess
saw dust that may have settled on the wall & floor panels and the heater panels during shipping.
Please refer to usage instructions located later on in this manual.
CALL NOW 800.798.1779
www.infraredsauna.com
79
Page 80

Enjoying Your Sauna
ENJOY YOUR SAUNA!
Your sauna is now ready for use and you are about to enjoy the nest infrared sauna experience available. Make
sure you have a plenty of water to drink and enough towels. Sit back and relax as you are now on your way
to better health.
Infrared heat works by warming your body directly without having to heat the air inside the sauna. Breathing
is easier and healthier because the air temperature is not heated to the same degree as other types of saunas.
The infrared heat penetrates deeply into your body to relax sore muscles and help alleviate pain. The bench,
walls and xtures are not hot to the touch. This allow for a more enjoyable sauna session.
Instructions for use
Review all health and safety instructions. If in doubt as to the advisability of using your infrared sauna, consult with
your physician. If you feel light-headed or heat-exhausted during a session, exit the sauna immediately.
1. Select the desired session temperature and time using the control panel.
2. Allow approximately 10-15 minutes for the sauna to warm up before beginning a session.
3. Starting out, we recommend that your sauna session does not exceed 30 minutes.
4. When the temperature reaches the level set on the control panel, the heaters will turn off and on periodically in order
to maintain the desired temperature level inside the sauna. Keeping the thermostat set at its maximum will ensure
the heaters stay on continuously.
5. The ceiling vent(s) in the ceiling panel can be opened at any time to allow fresh air into the sauna.
6. Infrared’s unique property of direct penetration into the body without heating the intervening space in-between
allows the users to enjoy all of its benets while the door is open for ventilation.
7. Always drink plenty of water before, during, and after a session. Doing so will replenish fluids lost from the body
through perspiration.
8. Choosing to take a hot shower or bath prior to the sauna session will further promote perspiration. However, dry
off thoroughly before going into the sauna because excessive water will stain or warp the wood. A shower after the
session is refreshing and rinses perspiration from the body.
9. To absorb perspiration and keep the sauna tidy during the session, place a towel on the bench and floor of the sauna.
Keep one towel handy to wipe excessive perspiration from your body.
10. Your Clearlight Infrared Sauna is made of the nest Western Red Canadian Cedar or Basswood.
If the light fragrance of the fresh wood is too strong during the rst few months of usage, wipe the wood with a
damp cloth to minimize the aroma.
www.infraredsauna.com
80
CALL NOW 800.798.1779
Page 81

Using Your Sauna Control Panel
USING YOUR INFRARED SAUNA
Unlike a traditional sauna, infrared heats the body directly. Air temperature
in the sauna is not as important as the type and quality of the infrared being
received. We recommend the following protocol:
a. Turn the sauna on for 10 minutes to allow the heaters to come up to
optimal temperature and for the cabin to warm to a comfortable
temperature.
b. When you enter the sauna, set the time to the desired session time and
turn the thermostat up to 150+F / 65C. This will keep the heaters are on
the entire time to ensure that you are receiving constant
infrared heat. During a 30 minute sauna session, the air temperature
will reach between 115-125F / 46-51C depending on the starting
ambient air temperature.
c. Sit back and relax. Enjoy your sauna session.
®
When connected to the properly grounded power source, your Jacuzzi
will turn ON to the set temperature and count-down with
a few pushes of the Power button.
System On/Off
1) Press the “POWER” button once to
turn on the sauna.
2) Your session will automatically end
after the programmed timer expires.
3) ress the “POWER” button at any time
turn off the sauna.
sauna
Sauna Session Time
You can set the duration of your sauna
session for a maximum of 60 minutes.
Press the TIME UP or TIME DOWN buttons
to increase or decrease your desired sauna
session time in 5 minute increments.
When you have reached your desired time,
release the button.
Controlling the Set Temperature
You can program your sauna for a maximum temperature of 158°F (70°C). Press the TEMP UP/DOWN (+/-) buttons
to set the desired temperature. When the display shows your desired temperature, release the buttons. Press either
the TEMP UP or TEMP DOWN buttons during your sauna session to manually control the desired cabin temperature.
*See “Instructions For Use” on next page for recommendations.
CALL NOW 800.798.1779
www.infraredsauna.com
81
Page 82

Using Your Sauna Control Panel
USING YOUR INFRARED SAUNA
USING YOUR INFRARED SAUNA
Fahrenheit & Celsius
You can alternate between Fahrenheit and Celsius by pressing the F/C button on the keypad.
Inside / Outside Light
1. Press the button labeled “INSIDE” to turn on or off the Interior light.
2. Press the button labeled “OUTSIDE” to turn on or off the exterior light and the heater backlights.
Full Spectrum
Press the “Full Spectrum” button to turn on and off the Full Spectrum heaters. When the sauna is turned on, both
Full Spectrum heaters will turn on.
1. Press the button once and the right front heater will turn off with the left front heater on.
2. Press the button a second time and the left front heater will turn off with the right front heater on.
3. Press the button a third time and both front full spectrum heaters will turn off.
4. Press the button a fourth time and both front full spectrum heaters will turn on.
Reservation
You can preset your sauna to turn on up to 36 hours in the future:
1. Press the POWER button to turn on your sauna.
2. Press the RESERVE button.
3. The time and temperature will begin to flash.
4. Press the TIME UP button to set the number of hours ahead you would like your sauna to turn on.
5. The range is 1 - 36.
6. Set the maximum set temperature by pressing the TEMP UP or TEMP DOWN button.
7. The keypad will flash and the time will count down in one hour increments until the sauna turns on.
8. To cancel the reservation, press the “POWER” button once to turn off the sauna.
AUX
The AUX button will be used to control additional features that can be added to your sauna. The instructions to
use these features will be included when the item is purchased.
www.infraredsauna.com
82
CALL NOW 800.798.1779
Page 83

Using Your Sauna Control Panel
USING YOUR INFRARED SAUNA
Keypad Lock
The keypad can be locked to prevent it from being turned on or off or the temperature adjusted. There are two
locking functions:
1. Lock Entire Keypad: Hold down the TIME UP and TEMP DOWN buttons at the same time for 5 seconds. This
will lock the entire keypad. To unlock the keypad, repeat the above step.
2. Lock Keypad - Light Button Will Continue To Work: Hold down the TIME DOWN / TEMP UP buttons at the
same time for5 seconds. This will lock the entire keypad except the light button.
Note: With the keypad locked, the time will continue to count down and the sauna will turn off
when the time is expired.
Audio System
Your Jacuzzi® sauna is equipped with stereo speakers that can be accessed by either Bluetooth or through the
Aux 3.5 mm connection in the charging compartment. You can also charge your device via the USB connection
in the charging compartment.
®
1. Your Jacuzzi
sauna is Bluetooth ready. To connect audio via Bluetooth:
A) Open your Bluetooth enabled phone, tablet or computer and search for surrounding Bluetooth devices to
nd a device called Infrared Sauna. The pairing code for this device is 0000.
2. There is a 3.5mm jack in the charging compartment that is connected to the speakers in your sauna. You can
connect any audio to the speakers using this connection.
3. There is a switch located in the ceiling of the sauna next
to the left speaker. This switch will toggle between the
audio speakers included in the sauna and the Vibrational
Resonance Therapy (VRT) that can be added to your sauna.
If you did not purchase the VRT, you do not need to use this
switch.
CALL NOW 800.798.1779
www.infraredsauna.com
83
Page 84

Using Your Sauna Control Panel
USING YOUR INFRARED SAUNA
Chromotherapy
Color light therapy can benet your well being. Chromotherapy or Color Light Therapy is the science that uses the
seven colors of the light spectrum. The seven colors have the ability to affect the vibrations of the body various
frequencies. For optimal health, we all need the light of the sun. We receive light from the sun which is divided
into 7 main groups of rays which are absorbed by our bodies.
Chromotherapy works on various energy points to help balance your body using the full spectrum of visible light.
Color and light have been utilized by healers for thousands of years. Color therapy possibly has roots in Ayurveda,
ancient Egyptian culture and traditional Chinese healing.
Alternative medicine practitioners who use chromotherapy often relate the seven colors of the color spectrum to
specic body areas. Color has a profound effect on us on all levels, physical, mental, emotional and spiritual.
The chromotherapy light is controlled by pressing the buttons on the INCLUDED REMOTE CONTROL.
1. Press the “POWER” button to turn on the Chromotherapy light.
2. Press the “MANUAL” button to manually select a color.
3. Press the “AUTO” button and the Chromotherapy light will automatically change through the various colors.
4. Press the “INTENSITY” up or down buttons to control the brightness of the Chromotherapy light.
The available color in the Chromotherapy light have been specically selected based on their wavelength:
1) Red: Activates the circulatory and nervous systems.
2) Strong Green: Provides anti-infectious, anti-septic and regeneraive stimulation.
3) Strong Blue: Lubricates joints. Helps address infections, stress, nervous tension.
4) Orange: Energized and eliminates localized fat. Helps address asthma and bronchitis.
5) Green: Acts as a relaxant.
6) Blue: Stimulates muscle and skin cells, nerves and the circulatory systems.
7) Strong Yellow: Strengthens the body and acts on internal tissue.
8) Strong Indigo: Helps address eye inammation, cataracts, glaucoma and ocular fatigue.
9) Strong Pink: Act as a cleanser, strengthening the veins & arteries.
10) Yellow: Reactivates and puries the skin. Helps with indigestion and bodily stress.
11) Indigo: Activates and eliminates impurities from the blood stream.
12) Violet: Relaxes the nerves & lymphatic system. Addresses inammation and urinary illness.
www.infraredsauna.com
84
CALL NOW 800.798.1779
Page 85

Tips for Use
1. Opening the roof vent and/or door allows fresh air to enter the sauna.
2. Drink liquids prior to and after your session.
3. Towel off during your session. This will help the body prespire more freely.
4. To relieve sore and tight muscles massage these areas for faster healing and effectiveness
5. Oil and lotions tend to decrease perspiration by blocking pores. Apply these after your session for best results.
6. Some minerals can be lost in perspiration. Eating a sensible diet including fruits and green leafy vegetables will
replace these. Supplements can also be taken to replenish minerals.
7. Limit food intake an hour before your sauna session. Your body will be able to detox more effectively because it
will not be using that energy for digestion.
8. Taking a shower or bath before a sauna session tends to increase perspiration as bathing opens the pores.
9. Use at least 2-3 towels for maximum comfort.
a. Sit on one towel folded over several times for added cushioning.
b. Use another towel on the floor to absorb extra perspiration.
10. At the rst sign of cold or flu, increasing your sauna sessions may be benecial in boosting your immune
system and decreasing the reproductive rate of the viruses. Consult your physician for the proper treatment for
this, or any other condition.
®
11. As you become more heat conditioned, you may wish to increase the length of your Jacuzzi
40 minutes. This is especially useful for soft tissue therapy. (Make sure to drink fluids throughout your sauna
session.)
sauna session to
CALL NOW 800.798.1779
www.infraredsauna.com
85
Page 86

Tips for Use
12. If you notice any drying of your skin with ongoing use of your Jacuzzi® sauna or wish to maximize the detoxication
benets from your Sauna, it is suggested that you obtain the best quality oil available (i.e. expeller pressed oil
such as Organic Canola Oil or Organic Coconut Oil are very good). Add 2-4 tablespoons a day to your diet. The
essential oils in these products are needed for skin health and allow the body to let go of stored toxins, fat and
cholesterol.
13. Unlike a traditional sauna, infrared heats the body directly. Air temperature in the sauna is not as important
as the type and quality of the infrared being received. We recommend the following protocol:
a. Turn the sauna on for 10-15 minutes to allow the heaters to come up to optimal temperature and for
the cabin to warm to a comfortable temperature.
b. When you enter the sauna, set the time to the desired session time and turn the thermostat up to
158 degrees. This will keep the heaters on the entire time to ensure that you are receiving constant
infrared heat. During a 30 minute sauna session, the air temperature will reach between 115-125F.
c. Sit back and relax. Enjoy your sauna session.
®
We hope you enjoy years of relaxation and better health from regular use of your Jacuzzi
If you have any question on the proper use of your sauna, please call us at 800.798.1779 or +1.510.601.1775.
sauna.
Jacuzzi® saunas... Here’s to good health!
www.infraredsauna.com
86
CALL NOW 800.798.1779
Page 87

Safety Instructions
1. Read and follow all instructions carefully.
2. When installing and using this electrical equipment, basic safety precautions should always be
followed.
3. To reduce the risk of injury, do not allow children to use the sauna unless they are closely supervised at
all times.
4. Do not use the sauna immediately following strenuous exercise. Wait at least 15 minutes to allow the
body to cool down completely.
5. Excessive temperatures have a high potential for causing fetal damage during the early months of
pregnancy. Pregnant or possibly pregnant women should contact their physician prior to using the
sauna.
6. Hyperthermia Danger: Prolonged exposure to hot air will induce hyperthermia. Hyperthermia occurs
when the internal temperature of the body reaches a level several degrees above the normal body
temperature of 98.6F (37C). While hyperthermia has many health benets, it is important not to allow
your body’s core temperature to rise above 103F (39.5C). Symptoms of excessive hyperthermia include
dizziness, lethargy, drowsiness, and fainting. The effects of excessive hyperthermia may include failure
to perceive heat, failure to recognize the need to exit, unawareness of impending hazard, fetal damage
in pregnant women, physical inability to exit the sauna, and unconsciousness.
7. The use of alcohol, drugs, or medications prior to or during the sauna session may lead to
unconsciousness.
8. Persons suffering from obesity or with a medical history of heart disease, low or high blood pressure,
circulatory system problems, or diabetes should consult a physician prior to using the sauna.
9. Persons using medications should consult a physician before using the sauna since some medications
may induce drowsiness while others may affect heart rate, blood pressure, and circulation.
CALL NOW 800.798.1779
www.infraredsauna.com
87
Page 88

Safety Instructions
10. Exercise care when entering or exiting the sauna.
11. Never sleep inside the sauna while the unit is in full operation.
12. Do not use any type of cleaning agents on the interior of the sauna.
13. Do not stack or store any objects on top of or inside the sauna.
14. If the power supply cord becomes damaged, it must immediately be replaced by the manufacturer or its
agent or a similarly qualied person to avoid a hazard.
15. Do not use the unit during an electrical storm, as there is a remote risk of shock.
16. Altering or tampering of any electrical connections on the power supply will void the manufacturer’s
warranty.
17. Dry your hands before handling electrical controls. Never unplug the power cord or adjust the controls
with wet hands or when you have wet bare feet. A danger of electrical shock exists.
18. Do not attempt any repair without consulting the manufacturer rst. Unauthorized repair attempts will
void manufacturer’s warranty.
19. We strongly recommend the use of a GROUND FAULT CIRCUIT INTERRUPTER (GFCI) device in any
potentially wet locations.
®
20. Your Jacuzzi
in the color, grain, and may have irregularities such as knots, and ne cracks. These reflect reflect the
natural beauty of the wood and should not be considered defects.
21. To safeguard against burns, do not touch heaters or lamps directly.
sauna is made of the nest Canadian Cedar or Basswood. All wood products have variations
www.infraredsauna.com
88
CALL NOW 800.798.1779
Page 89

Important Safeguards
IMPORTANT SAFEGUARDS
1. READ INSTRUCTIONS - All safety and operating instructions should be read before the sauna is installed &
operated.
2. RETAIN INSTRUCTIONS - The safety and operating instructions should be retained for future reference.
3. HEED WARNINGS - All warnings on the sauna should be adhered to.
4. FOLLOW INSTRUCTIONS - All operating and usage instructions should be followed at all times.
5. CLEANING - Unplug the sauna from the wall outlet before cleaning. Do not use liquid cleaners or aerosol
cleansers inside the sauna. Use a damp cloth for cleaning.
6. ATTACHMENTS - Do not use attachments that are not recommended by the manufacturer as they may
cause hazard.
7. WATER OR MOISTURE - Do not use this product near water-for example near a bathtub, in a wet basement,
or near a swimming pool or similar area.
8. GROUNDING OR POLARIZATION - This sauna is intended for use with a 3-wire properly grounded power
socket Do not defeat the safety purpose of the supplied line cord and plug.
9. POWER SOURCES - This product should be operated only from the required type of power source indicated
on the marking label. If you are not sure of the type of power supplied to your home, consult your local power
company.
10. POWER-CORD PROTECTION - Power supply cords should be routed so they are not likely to be walked on or
pinched.
11. LIGHTNING - For added protection for this product during a lightning storm, or when it is left unattended and
unused for long periods of time, unplug it from the wall outlet.
12. OVERLOADING - Do not overload wall outlets and extension cords as this can result in a risk of re or electrical
shock.
CALL NOW 800.798.1779
www.infraredsauna.com
89
Page 90

Important Safeguards
IMPORTANT SAFEGUARDS
13. SERVICING - Always unplug this product from the wall outlet before servicing the product.
14. POWER SUPPLY - Do not remove power supply covers. No user-serviceable parts are located inside the power
supply.
15. REPLACEMENT PARTS - When replacement parts are required, only use parts specied by the manufacturer.
Unauthorized substitutes could result in re, electrical shock or other hazards.
16. SAFETY CHECK - Upon completion of any service or repairs to this product by a service technician, ask the
technician to perform safety checks make certain that the product is in proper operating condition.
PRECAUTIONS FOR POWER SUPPLY
This FEMALE INLET takes
the MALE POWER CORD
from the back panel.
Make sure that the cord is
plugged securely into this
inlet at all times.
Rear Heater Inlet Main Power Cord Inlet
www.infraredsauna.com
90
This MALE INTET takes the
FEMALE PLUG on the main
power cord.
Make sure that the cord is
plugged securely into this
inlet at all times.
CALL NOW 800.798.1779
Page 91

Warranty
SAUNA WORKS LIMITED LIFETIME WARRANTY
Sauna Works, Inc. (“Company”) offers the following to the original purchaser of any Sauna Works manufactured
®
or distributed Jacuzzi
saunas (“Sauna”) and designated parts and accessories:
Product
®
Jacuzzi
brand sauna
Cabin
Factory-Installed
Sauna Controls
and Wiring
Factory-Installed
Heater Components
Factory-Installed
Audio Components
®
Labor on Jacuzzi
brand
sauna Cabin
(USA & Canada only)
Labor of Factory-Installed
Components
(USA & Canada only)
Indoor Residential-Use
Saunas*
Lifetime 5 Years 5 Years
Lifetime Lifetime 5 Years
Lifetime Lifetime 5 Years
Lifetime Lifetime 5 Years
7 Years 5 Years 5 Years
7 Years 5 Years 5 Years
Outdoor Residential-Use
Saunas
Commercial-Use
Saunas
Water-Resistant Cover
(fabric only)
Non-Factory Installed
Components, Options,
Per manufacturer’s warranty unless specied in Sauna Works’ Quote,
Parts and Accessories
Extends to outdoor use if purchased simultaneously with and kept continually covered by the Sauna Works water-resistant cover
*
specied for that Sauna model.
CALL NOW 800.798.1779
1 Year 1 Year 1 Year
Invoice or Website
www.infraredsauna.com
91
Page 92

Warranty
SAUNA WORKS LIMITED LIFETIME WARRANTY
For the coverage period specied (“warranty period”), Company agrees to repair or replace, at its sole option, the
products listed above, subject to and solely in accordance with the terms, conditions, exclusions and limitations
set forth herein. PLEASE READ THIS LIMITED WARRANTY IN ITS ENTIRETY TO UNDERSTAND YOUR RIGHTS
AND OBLIGATIONS.
LIMITED WARRANTY ON SAUNA CABIN AND FACTORY-INSTALLED COMPONENTS
Company warrants to the user during the warranty period (a) that the Sauna Cabin will maintain its structural
integrity and for outdoor models, that it will not leak, and (b) that factory-installed components (i.e., heater
controls, power supply, electrical wiring, and audio system) will be free from defects in material or workmanship.
This limited warranty shall not apply to any display model unless expressly agreed by Sauna Works in writing at
the time of purchase or to any Sauna installed more than six months after the delivery date.
LABOR WARRANTY FOR SAUNA CABIN AND FACTORY-INSTALLED COMPONENTS
The Sauna cabin and factory-installed components are covered under Company’s labor warranty for the specied
labor warranty period.
LIMITED WARRANTY ON NON-FACTORY-INSTALLED COMPONENTS, OPTIONS, PARTS AND
ACCESSORIES
Non-factory installed components, and Sauna Works options, parts and accessories are not warranted to the
user against defects in material or workmanship except to the extent of any warranty period expressly set forth
in the Sauna Works nal quote or invoice. These items may also be covered by a manufacturer’s warranty which
may have a longer duration than this limited warranty. Please conrm with the manufacturer of these items the
duration of its warranty. If no warranty period is specied, only the manufacturer’s warranty, if any, shall apply.
The Sauna Works water-resistant cover warranty only applies to the cover’s fabric under normal usage and
environmental exposure. It does not cover failure or unserviceability resulting from excessive environmental
exposure, cleaning or other chemicals, or failure to follow the care instructions included with the cover.
www.infraredsauna.com
92
CALL NOW 800.798.1779
Page 93

Warranty
SAUNA WORKS LIMITED LIFETIME WARRANTY
DISCLAIMER OF IMPLIED WARRANTIES
ALL IMPLIED WARRANTIES, INCLUDING WITHOUT LIMITATION, THE IMPLIED WARRANTIES OF
MERCHANTABILITY AND FITNESS FOR A PARTICULAR PURPOSE ARE HEREBY DISCLAIMED IN THEIR
ENTIRETY OR TO THE FULLEST EXTENT ALLOWED BY LAW. THIS LIMITED WARRANTY TAKES THE PLACE OF
ALL OTHER WARRANTIES, EXPRESS OR IMPLIED, IN FACT OR AT LAW, INCLUDING IMPLIED WARRANTIES OF
MERCHANTABILITY AND FITNESS FOR A PARTICULAR PURPOSE.
WARRANTY LIMITATIONS AND EXCLUSIONS
The warranty period begins on the date the unit is purchased by the user. This warranty may not be transferred,
sold, donated, gifted or assigned to a third party except with the prior written consent of Sauna Works, in its sole and
absolute discretion. Absent written consent, only the original purchaser can make claims hereunder. All warranty
labor must be performed by Company or its designated representative using authorized Sauna Works parts. No
agent, dealer, distributor, service company or other party is authorized to change, modify. or extend the terms of this
limited warranty in any manner whatsoever. Any warranty so provided shall be solely their separate obligation. As
used in this warranty, (a) “commercial use” shall mean any use that involves a fee, rate, charge, or other consideration,
any use directly or indirectly in connection with a business, going concern, or undertaking intended for prot or
pecuniary gain, and any non-residential use, (b) “residential use” shall mean when purchased for use by a singlefamily for internal household purposes, and (c) “user” shall mean the original purchaser.
The limited warranty does not cover defects, damage, or failure (“Damage”) caused by the delivery service providers
or common carrier, the installer, user, or other persons and animals, including without limitation, termites and
other wood-destroying insects or rodents. The limited warranty excludes Damage resulting from transportation,
careless handling, improper location, storage, or relocation, as well as from cleaning, painting, staining or other
use of abrasive or improper chemicals. The limited warranty also excludes Damage arising from user’s or a third
party’s negligence; modication of any type for any reason (including modication to meet local codes); improper
installation (including installation not in accordance with instructions and specications provided with the unit);
connections supplied by the installer of the equipment, an electrician or a third party; improper voltage supply;
unauthorized electrical modication; misuse; improper use; abuse; incorrect operation, lack of proper routine or
preventive maintenance; unauthorized repair by a third-party; normal wear and tear; re, and acts of God such as
lightning, floods, earthquakes, etc. Outdoor-Use Sauna warranties do not include damage arising from a failure (i)
to maintain the Sauna on a flat, level, hardtop surface with adequate drainage and (ii) to keep the exterior free and
clear from plants, trees, grasses, soil, and snow deposits.
CALL NOW 800.798.1779
www.infraredsauna.com
93
Page 94

Warranty
SAUNA WORKS LIMITED LIFETIME WARRANTY
The limited warranty does not include: labor, transportation, or other costs incurred in the removal and/or reinstallation
of the original unit and/or installation of a replacement unit; any costs relating to obtaining access for repair; or
loss of use damage, including loss of sales, prot or business advantage of any kind under any circumstances.
The labor warranty is provided in the United States of America and Canada only. User shall be obligated to pay for
postage and handling for mailing and delivery of any products outside the United States and Canada. Dated proof
of purchase of the product is required for a warranty claim. These disclaimers shall be equally applicable to any
labor or service provided by Company and its designated representatives.
RESPONSIBILITIES OF OTHERS
Unless otherwise expressly agreed in writing, (a) all installers are separately contracted for by user and are not
under the direction and control of Company, (b) the installer is the user’s responsibility, and (c) Company will have
no obligation, liability, or responsibility in connection with the same. Your installer is responsible for inspecting
the unit prior to installation and ensuring the unit is free of defect or damage. Notices are placed on and in the
unit and on the shipping carton advising the installer of this responsibility. In the event of a problem identied
prior to installation, the unit must not be installed, and Company is not responsible for failures or damage that
could have been discovered, repaired, or avoided by proper inspection prior to installation. Damage occurring
in transit is the responsibility of the carrier. The user or installer MUST open the crate and inspect the unit for
damage when it is delivered. If damage is discovered, it must be reported immediately to the seller and the carrier
in writing, and an inspection requested. Failure of the carrier to respond should be reported to the seller and the
carrier. Your freight claims should be led promptly thereafter. Damage occurring to the unit during installation is
the responsibility of the installer and/or building contractor and damage occurring thereafter is the responsibility
of the user. Failure of any non-factory installed components, parts and accessories is the sole responsibility of
the equipment manufacturer except as provided above. Any replacement parts shall be covered only by the original
equipment manufacturer warranty, if any. Your installer is responsible for knowing local code requirements and
installing the unit safely in accordance with the same. The Company is not responsible for costs to modify any
product to obtain any code approval, such as city, county, or state building codes.
WARRANTY REGISTRATION
To register your product, please go to our website www.InfraredSauna.com/warrantyform. You will then be
prompted to enter your product Serial Number followed by your warranty registration information.
www.infraredsauna.com
94
CALL NOW 800.798.1779
Page 95

Warranty
SAUNA WORKS LIMITED LIFETIME WARRANTY
The warranty must be registered within thirty (30) days from the date of purchase in order for this warranty to
become effective.
WARRANTY SERVICE
For the user’s benet, the Company maintains a list of independent service personnel to perform required
warranty service repairs. Such rms are not agents or representatives of the Company and cannot bind the
Company by words or conduct.
The Company will provide the warranty service described above when the following conditions have been met:
the failure is covered by the warranty; the user has informed an Authorized Sauna Works Warranty Service
Department Representative of the nature of the problem during the warranty period; conclusive evidence (e.g.,
proof of purchase or installation) is provided to the foregoing by the user proving that the failure occurred or was
discovered within the warranty period; and, an authorized independent service person or Company representative
has been permitted to inspect the unit during regular business hours within a reasonable time after the problem
was reported by the user. In order to obtain warranty service, contact Sauna Works at:
www.InfraredSauna.com or
Sauna Works, Inc.
Warranty Service Department
1077 Eastshore Highway
Berkeley, California 94710
Call: (800) 798-1779 or (510) 601-1775
To obtain warranty service, call or write the above. Provide a description of the problem and proof of purchase.
You will be instructed how to obtain replacements and where to return, at your expense, the failed component(s),
option(s), or accessory(ies). All replacement parts, equipment, and repairs shall assume the remaining warranty
period of the part(s) replaced and do not extend the same.
The Company’s warranty obligation shall be discharged upon tender of replacement or repair. The customer’s
refusal to accept the tender terminates the Company’s warranty obligation. Company will only pay for shipping and
handling fees to return the repaired or replacement unit to you if we elect to replace the defective unit.
CALL NOW 800.798.1779
www.infraredsauna.com
95
Page 96

Warranty
SAUNA WORKS LIMITED LIFETIME WARRANTY
LEGAL RIGHTS: This Limited Warranty gives you specic legal rights. Warranty obligations are provided by
®
Company and not Jacuzzi
sauna products manufactured and distributed by Company, except as expressly stated herein or as implied by
applicable state and federal laws. You may also have other rights that vary from state to state. Some states do
not allow limitations on how long an implied warranty lasts, disclaimer of certain warranties, or the exclusion or
limitation of incidental or consequential damages, so some of the above limitations and exclusions may not apply
to you. Company will not be responsible for any statements or representations made in any form that go beyond,
are broader than, or are inconsistent with any technical specications furnished by the Company.
LIMITATION OF LIABILITY
THE REMEDIES DESCRIBED IN THIS LIMITED WARRANTY ARE YOUR SOLE AND EXCLUSIVE REMEDIES AND
COMPANY’S ENTIRE LIABILITY, INCLUDING, WITHOUT LIMITATION, FOR ANY BREACH OF THIS LIMITED
WARRANTY. COMPANY’S LIABILITY SHALL UNDER NO CIRCUMSTANCES EXCEED THE ACTUAL AMOUNT PAID
BY USER FOR THE APPLICABLE DEFECTIVE PRODUCT, NOR SHALL COMPANY UNDER ANY CIRCUMSTANCES
BE LIABLE FOR ANY CONSEQUENTIAL, INCIDENTAL, SPECIAL OR PUNITIVE DAMAGES OR LOSSES, WHETHER
DIRECT OR INDIRECT. IN ADDITION, THE COMPANY WILL NOT BE RESPONSIBLE FOR CONSEQUENTIAL,
INCIDENTAL, SPECIAL OR PUNITIVE DAMAGES OR LOSSES, WHETHER DIRECT OR INDIRECT FROM ANY CAUSE
WHATSOEVER, INCLUDING BUT NOT LIMITED TO COMPANY’S GROSS NEGLIGENCE. THIS EXCLUSION APPLIES
EVEN IF COMPANY WAS ADVISED IN ADVANCE OF THE POSSIBILITY OF SUCH DAMAGES.
brand sauna Inc. or its afliates. There are no warranties applicable to Jacuzzi® brand
SOME STATES DO NOT ALLOW THE EXCLUSION OR LIMITATION OF INCIDENTAL OR CONSEQUENTIAL
DAMAGES, SO THE ABOVE LIMITATION OR EXCLUSION MAY NOT APPLY TO YOU.
®
Jacuzzi
of Sauna Works, Inc.
96
is a trademark of Jacuzzi Inc. and is used under license by Sauna Works Inc. Sauna Works® is a trademark
www.infraredsauna.com
CALL NOW 800.798.1779
Page 97

Why Detoxify
Why Is Detoxication Important
Excerpted from: Literature Review & Comparison Studies of Sauna/Hyperthermia in Detoxication Townsend Letter
for Doctors, June 1992 Zane R. Gard, M.D. & Erma J. Brown, BSN, PhN
The past 150 years have been a time of incredible progress for medicine, science and industry. Because of these
advancements we now enjoy longer, more productive lives. However, there are many who pay a tremendously high price
for our modern lifestyle. The by-products of our chemical technology have resulted in ubiquitous contamination of our
atmosphere, lakes, oceans and soil. Our natural environment is now permeated by a barrage of “unnatural” substances.
Unquestionably, many of the chemical sources have been in existence for centuries. However, today we are exposed
to chemical concentrations far greater than were our ancestors. Although the human mechanism is known to be
accommodating, ecological alterations are now occurring at a faster rate than our bodies are able to adapt. We are
now faced with a situation where inadequacies or uncertainties centering around the manufacturing, use, storage,
and disposal of toxic chemicals, have resulted in an overwhelming number of environmentally-induced illnesses.
Since 1965, over 4 million distinct chemical compounds have been reported in scientic literature. Over 6000 new
chemicals were added to this list between 1965 and 1978. As of 1981, of over 70,000 chemicals in commercial
production, 3,000 have been identied as intentionally added to our food supplies and over 700 in drinking water.
During food processing and storage 10,000 other compounds can become an integral part of many commonly
used foods. Added to this list of potential body toxins, petrochemicals, industrial waste, medical and street drugs,
radiation (X-rays, nuclear fallout etc.) and tons of pesticides, herbicides, and insecticides, the result is an incredible
chemicalavalanche to have befallen the human race in a relatively short period of evolutionary history.
There is currently a wealth of scientic evidence showing that thousands of drugs, preservatives, pesticides, and
other pollutants remain stored in the body long after exposure. We know for example that an organochlorinated
pesticide such as the metabolites of DDT have a half life of between 20 and 50 years in the fat deposits of humans.
According to the U.S. Environmental Protection Agency over 400 chemicals have been detected in human tissue; 48
were found in adipose tissue, 40 in breastmilk, 73 in the liver andover 250 in the blood.
CALL NOW 800.798.1779
www.infraredsauna.com
97
Page 98

Why Detoxify
The process of bodily accumulation and storage of toxins is known as “toxic bio-accumulation”. Though the
predominate storage site in the body is the fatty tissue, toxins may re-enter the bloodstream during times of physical
stress (i.e.. illness, fasting, excessive heat, exercise) or emotional stress. Every organ that is accessible to these
chemicals, which have been mobilized or released from the fat, is being continually exposed at low levels. As stated
by Dr. William L. Marcus, Senior Advisor and Chief Toxicologist for the U.S. Environmental Protection Agency, “It’s a
chronic exposure. That’s why chemicals like dioxin, even in small amounts, are extremely dangerous. Unfortunately
the human body has no previous experience with these chemicals and there is no natural machinery in the body to
break them down, much less eliminate them.
Human accumulation of such compounds as DDT, PCP, PCB, and dioxin, reflect biologically persistent chemicals
which are partitioned in the body from water into lipids. Eventually the metabolizing of xenobiotics (chemicals
foreign to the biological system) leads to the accumulation of the chemicals and/or their products in lipid deposits
throughout the body, particularly in adipose tissue. The simple chemistry involved in this process can be illustrated
by the fact that some chemicals readily dissolve in water, whileothers dissolve only in oil bases. Oil soluble chemicals
therefore have a tendency to accumulate in body fatty tissue or lipids, which are also insoluble in water. There is no
such thing as a fat “cell”...[rather] almost every cell has a fat component.
The brain has a high fat content as does virtually every organ.
Directly or indirectly, toxic residues nd there way into our air, food and water supplies. The net effect of this
ecological overload is to alter the body’s balance or “homeostasis”. This interference with our natural biological
tendencies to restore internal balance, results in “disease” in one form or another. According to Professor Edward J.
Calabrese of the University of Massachusetts, and author of Pollutants and High RiskGroups, “It is this homeostatic
process which neutralizes the pollutant’s effect and returns the system to equilibrium.”
Marshall Mandell, MD, nationally renowned in the eld of bio-ecologic medicine, wrote in a recent publication that the influx
of chemicals in our society today “has resulted in a lowered threshold of resistance and subsequent inability to cope with
the natural and unnatural environment due to altered body metabolism, enzyme dysfunction, nutritional deciencies, and
hormonal imbalances.” Health depends on the balance of both external and internal environmental forces.
In response to the above facts, many health care practitioners have been recommending a vast array of
detoxication programs. Circulating toxins and toxic bowels need proper cleansing. The removal of these
toxins is relatively well known. When toxins are deposited in fat storage sites this becomes much more
complicated. The only way to remove toxins from the fat storage sites is to mobilize the toxic fat. Heat-stress [of a
sauna] is an effective method of removing fat-stored toxins from the body.
www.infraredsauna.com
98
CALL NOW 800.798.1779
Page 99

SANCTUARY C
CALL NOW 800.798.1779
www.infraredsauna.com
99
Page 100

1077 Eastshore Hwy Berkeley, CA 94710 • Phone: 800.798.1779 • +1.510.601.1775 • www.infraredsauna.com
 Loading...