

Page 1

SHOWER BASES
INSTALLATION AND OPERATION INSTRUCTIONS
Jacuzzi Luxury Bath
14525 Monte Vista Avenue
Chino, CA 91710
1-800-288-4002
www.jacuzzi.com
E124000Z 03/2015
Page 2

Contents
Contents. ......................................................................................................................................................................... 2
Product Information. ........................................................................................................................................................ 2
English
Catalina™ Shower Base Specications .......................................................................................................................... 3
Cayman™ Tru-Level™ Shower Base Specications. ..................................................................................................... 4
Catalina™ Shower Base Installation Instructions ............................................................................................................ 5
Cayman™ Tru-Level™ Shower Base Installation Instructions. ....................................................................................... 6
Clean Up After Installation. .............................................................................................................................................. 8
Rough-In Dimensions (Neo-Angle Only) ......................................................................................................................... 8
Catalina™ Drain Cover Installation and Removal Instructions ........................................................................................ 9
Warranty .........................................................................................................................................................................11
Product Information
NOTE
Save these instructions for future use. Use the form below to record your model and serial number for future reference.
Date Purchased
Purchased From
Installed By
Serial Number
Model
Installer: Leave the manual for the homeowner.
Homeowner: Read this manual and keep for future reference.
Page 2 www.jacuzzi.com Shower Base Installation And Operation
Page 3

Catalina™ Shower Base Specications
A
A
C
B
Product
Conguration
Center
Drain
D
Center Drain
(Threshold Side)
*Add 1/8” (3mm) for rough-in dimensions.
Shower
Base Part
Number
MB96000 CAT4836 SCX XXX X 48”
MB71000 CAT4848 SCX XXX X 48”
Marketing Product Code
(MPC)
D
C
B
Left And Right Hand Drain
(Threshold Side)
Dimensions
A B C D Weight
(1219mm)
(1219mm)
36”
(914mm)
48”
(1219mm)
17-3/16”
(437mm)
23-3/16”
(589mm)
24”
(610mm)
24”
(610mm)
English
50 lbs.
(23kg)
55 lbs.
(25kg)
Left/Right
Hand Drain
MB92000 CAT6042 SCX XXX X 60”
MB76000 CAT6030 SLX XXX X 60”
MB80000 CAT6030 SRX XXX X
MB84000 CAT6032 SLX XXX X 60”
MB88000 CAT6032 SRX XXX X
(1524mm)
(1524mm)
(1524mm)
42”
(1067mm)
30”
(762mm)
32”
(813mm)
20-3/16”
(513mm)
14-3/16”
(360mm)
15-3/16”
(386mm)
30”
(762mm)
5-7/8”
(149mm)
5-7/8”
(149mm)
68 lbs.
(31kg)
55 lbs.
(25kg)
59 lbs.
(27kg)
Product specications are subject to change without notice.
Note: This is a professional grade product. A knowledge of construction techniques, plumbing and electrical installation
according to codes are required for proper installation and user satisfaction. We recommend that a licensed contractor
perform the installation of all Jacuzzi Luxury Bath products. Our warranty does not cover improper installation related
problems.
Shower Base Installation And Operation www.jacuzzi.com Page 3
Page 4

Cayman™ Tru-Level™ Shower Base Specications
Threshold Side
A*
English
B
C
D
Square
*Add 1/8" (3mm) for rough-in dimensions
Product
Conguration
Square/
Center Drain
Retangular/
Center Drain
Neo-Angle/
Center Drain
Shower
Base Part
Number
S344000 CAY3636SCXXXX 36"
S348000 CAY4242SCXXXX 42"
S364000 CAY4848SCXXXX 48"
S356000 CAY4834SCXXXX 48"
S368000 CAY6036SCXXXX 60"
T228000 CAY6034SCXXXX 60"
T232000 CAY4234SCXXXX 42"
T354000 CAY3642SCXXXX 36"
T362000 CAY4236SCXXXX 42"
T366000 CAY4248SCXXXX 42"
T370000 CAY6042SCXXXX 60"
T374000 CAY4832SCXXXX 48"
T358000 CAY3838SNXXXX 38"
S352000 CAY4242SNXXXX 42"
S360000 CAY4848SNXXXX 48"
MARKETING
PRODUCT CODE
(MPC)
Threshold Side
A*
A
B
C
D
Rectangular
DIMENSIONS
A B C D E F G H
(914mm)
(1067mm)
(1219mm)
(1219mm)
(1524mm)
(1524mm)
(1067mm)
(914mm)
(1067mm)
(1067mm)
(1524mm)
(1219mm)
(965mm)
(1067mm)
(1219mm)
36"
(914mm)
42"
(1067mm)
48"
(1219mm)
34"
(864mm)
36"
(914mm)
34"
(864mm)
34"
(864mm)
42"
(1067mm)
36"
(914mm)
48"
(1219mm)
42"
(1067mm)
32"
(813mm)
38"
(965mm)
42"
(1067mm)
48"
(1219mm)
17.50"
(445mm)
20.25"
(514mm)
23.25"
(591mm)
16.50"
(419mm)
17.50"
(445mm)
16.50"
(419mm)
16.50"
(419mm)
20.25"
(514mm)
17.50"
(445mm)
23.25"
(591mm)
20.25"
(514mm)
15.00"
(381mm)
14.50"
(368mm)
16.06"
(408mm)
16.25"
(413mm)
18.00"
(457mm)
21.00"
(533mm)
24.00"
(610mm)
24.00"
(610mm)
30.00"
(762mm)
30.00"
(762mm)
21.00"
(533mm)
18.00"
(457mm)
21.00"
(533mm)
21.00"
(533mm)
30.00"
(762mm)
24.00"
(610mm)
14.50"
(368mm)
16.06"
(408mm)
16.25"
(413mm)
- - - - 24 lb
- - - - 34 lb
- - - - 43 lb
- - - - 30 lb
- - - - 43 lb
- - - - 39 lb
- - - - 27 lb
- - - - 28 lb
- - - - 28 lb
- - - - 38 lb
- - - - 50 lb
- - - - 29 lb
17.38"
(441mm)
21.50"
(546mm)
27.50"
(699mm)
(737mm)
(737mm)
(737mm)
29.00"
29.00"
29.00"
C
(441mm)
(546mm)
(699mm)
D
Neo-Angle
17.38"
21.50"
27.50"
E
H
B
39.00"
(991mm)
45.00"
(1143mm)
53.00"
(1346mm)
F
G
PRODUCT
WEIGHT
(11kg)
(15.4kg)
(19.5kg)
(13.6kg)
(19.5kg)
(17.7kg)
(12.2kg)
(12.7kg)
(12.7kg)
(17.2kg)
(22.7kg)
(13.2kg)
23 lb
(10.4kg)
29 lb
(13.2kg)
39 lb
(17.7kg)
Product specications are subject to change without notice.
NOTE: This is a professional grade product. A knowledge of construction techniques, plumbing and electrical installation according
to codes are required for proper installation and user satisfaction. We recommend that a licensed contractor perform the instalaltion
of all Jacuzzi Luxury Bath products. Our warranty does not cover improper installation related problems.
Page 4 www.jacuzzi.com Shower Base Installation And Operation
Page 5

Catalina™ Shower Base Installation Instructions
Figure 1. Preliminary Rough-in (See Product Chart for drain location)
Remove the shower base from the carton. Do not destroy the shipping carton until after satisfactory inspection of the
1
product. Should initial inspection reveal any damage or defect in the shower nish, do not install the shower base. Jacuzzi®
Luxury Bath’s responsibility for shipping damage ceases upon delivery of the product in good order to the carrier. Refer any
claims of damage to the carrier. Any damage or defect claimed after installation is excluded from the warranty. Jacuzzi
is not responsible for any defect or damage that could have been discovered, repaired, or avoided by following this
inspection and testing procedure.
Plan the installation in relation to the nished wall surfaces. Take into account the dimensions of both the shower base and
2
the door enclosure. Install the optional trim parts after all other installation is completed.
Provide a minimum 5 x 5” opening in the suboor. The opening should be located on the center lines ( ) of the base drain
3
hole, see Product Chart. The opening is to acommodate a 2” waste pipe. The waste pipe should be 1/4 to 1/2” above the
surface of the suboor, see Figure 1. If the suboor is level, no other preparation is necessary. Proceed to install the base.
If the suboor is not level, level the shower base by spreading a oor-leveling compund, mortar, plaster, or minimal
expansion structural foam with a density of 5 pounds per cubic foot (lb/ft³) minimum.
NOTE: The compound must make contact with the entire bottom surface of the base feet. The base is not to be supported
by the base ange. Both sides of a joint or splice of sub-oor should be level to each other.
English
2 x 4” Blocking
*4½”
o
90
*4½” from subfloor to top of blocking
2”
Waste
Pipe
5 x 5”
Opening
(Max)
o
90
2 x 4” Blocking
Left Hand
Models
o
90
*5½” from subfloor to top of blocking
5 x 5” Opening (Max)
*5½”
2” Waste Pipe
Right Hand
Models
o
90
Center Drain Left Hand / Right Hand Drain
4
Position and install the base over the drain, see Figure 2. With the drain tting passing over the center of the drain pipe,
lower the shower base carefully into place. Push down rmly until the base is in place. Check the level of the base in two
directions. A high shim is necessary at the back of the base for front-to-back leveling (see Figures 3 & 4). Advance to page 7
to continue this installation procedure.
Figure 3 - Front to Back Leveling
(Center Drain Models)
7/8” High Shim
Level
*4-3/16”
Spread mortar or leveling compound evenly over
the entire area. Lift and lower the base over the
center of the drain pipe and set it into place.
F igure 2
Shower Base Installation And Operation www.jacuzzi.com Page 5
*Height variation from 4 to 4-3/4”
Figure 4 - Front to Back Leveling
(Left Hand And Right Hand Drain Models)
1/2” High Shim
Level
Front of base
*5-1/8”
Front of base*Height variation from 4-7/8 to 5-1/8”
Page 6

Cayman™ Tru-Level™ Shower Base Installation Instructions
Neo-Angle Square or Rectangular
Figure 5. Preliminary Rough-in (See Product Chart for drain location)
The shower base does not include a shower drain, required to complete installation. Remove the shower base from the
1
carton. Do not destroy the shipping carton until after satisfactory inspection of the product. Should initial inspection
reveal any damage or defect in the shower nish, do not install the shower base. Jacuzzi Luxury Bath’s responsibility
for shipping damage ceases upon delivery of the product in good order to the carrier. Refer any claims of damage to the
carrier. Any damage or defect claimed after installation is excluded from the warranty. Jacuzzi is not responsible for any
English
defect or damage that could have been discovered, repaired, or avoided by following this inspection and testing procedure.
Plan the installation in relation to the nished wall surfaces. Take into account the dimensions of both the shower base and
2
the door enclosure. Install the optional trim parts after all other installation is completed.
Provide a minimum 5 x 5” opening in the suboor. The opening should be located on the center lines ( ) of the base drain
3
hole, see Product Chart. The opening is to acommodate a 2” waste pipe. The waste pipe should be 1/4 to 1/2” above the
surface of the suboor, see Figure 5. If the suboor is level, no other preparation is necessary. Proceed to install the base.
If the suboor is not level, level the shower base by spreading a oor-leveling compund, mortar, plaster, or minimal
expansion structural foam with a density of 5 pounds per cubic foot (lb/ft³) minimum.
NOTE: The compound must make contact with the entire bottom surface of the base feet. The base is not to be supported by the
base ange. Both sides of a joint or splice of sub-oor should be level to each other.
2 x 4” Blocking
o
90
o
90
*7” from subfloor to top of blocking
Position and install the base over the drain, see Figure 6. With the drain tting passing over the center of the drain pipe,
4
90
o
2” Waste
pipe
*7”
5 x 5” Opening
(Max)
o
90
2 x 4” Blocking
*7”
o
90
2” Waste
pipe
*7” from subfloor to top of blocking
5 x 5” Opening
(Max)
o
90
lower the shower base carefully into place. Push down rmly until the base is in place. Check the level of the base in two
directions. A 1/4” high shim is necessary at the back of the base for front-to-back leveling, see Figure 7.
Spread mortar or leveling compound evenly over
the entire area. Lift and lower the base over the
center of the drain pipe and set it into place.
Figure 6
Page 6 www.jacuzzi.com Shower Base Installation And Operation
1/4”-high shimFlange Level
Figure 7. Front-to-back leveling
Top of threshold: Use
100% Silicone under tile or
other wall finish material.
Front of base*Height variation from 5-3/4 to 6”
*6”
Page 7

Installation Instructions Continued (All Models)
Figure 8
Figure 10
Cement
adhesive
Blocking
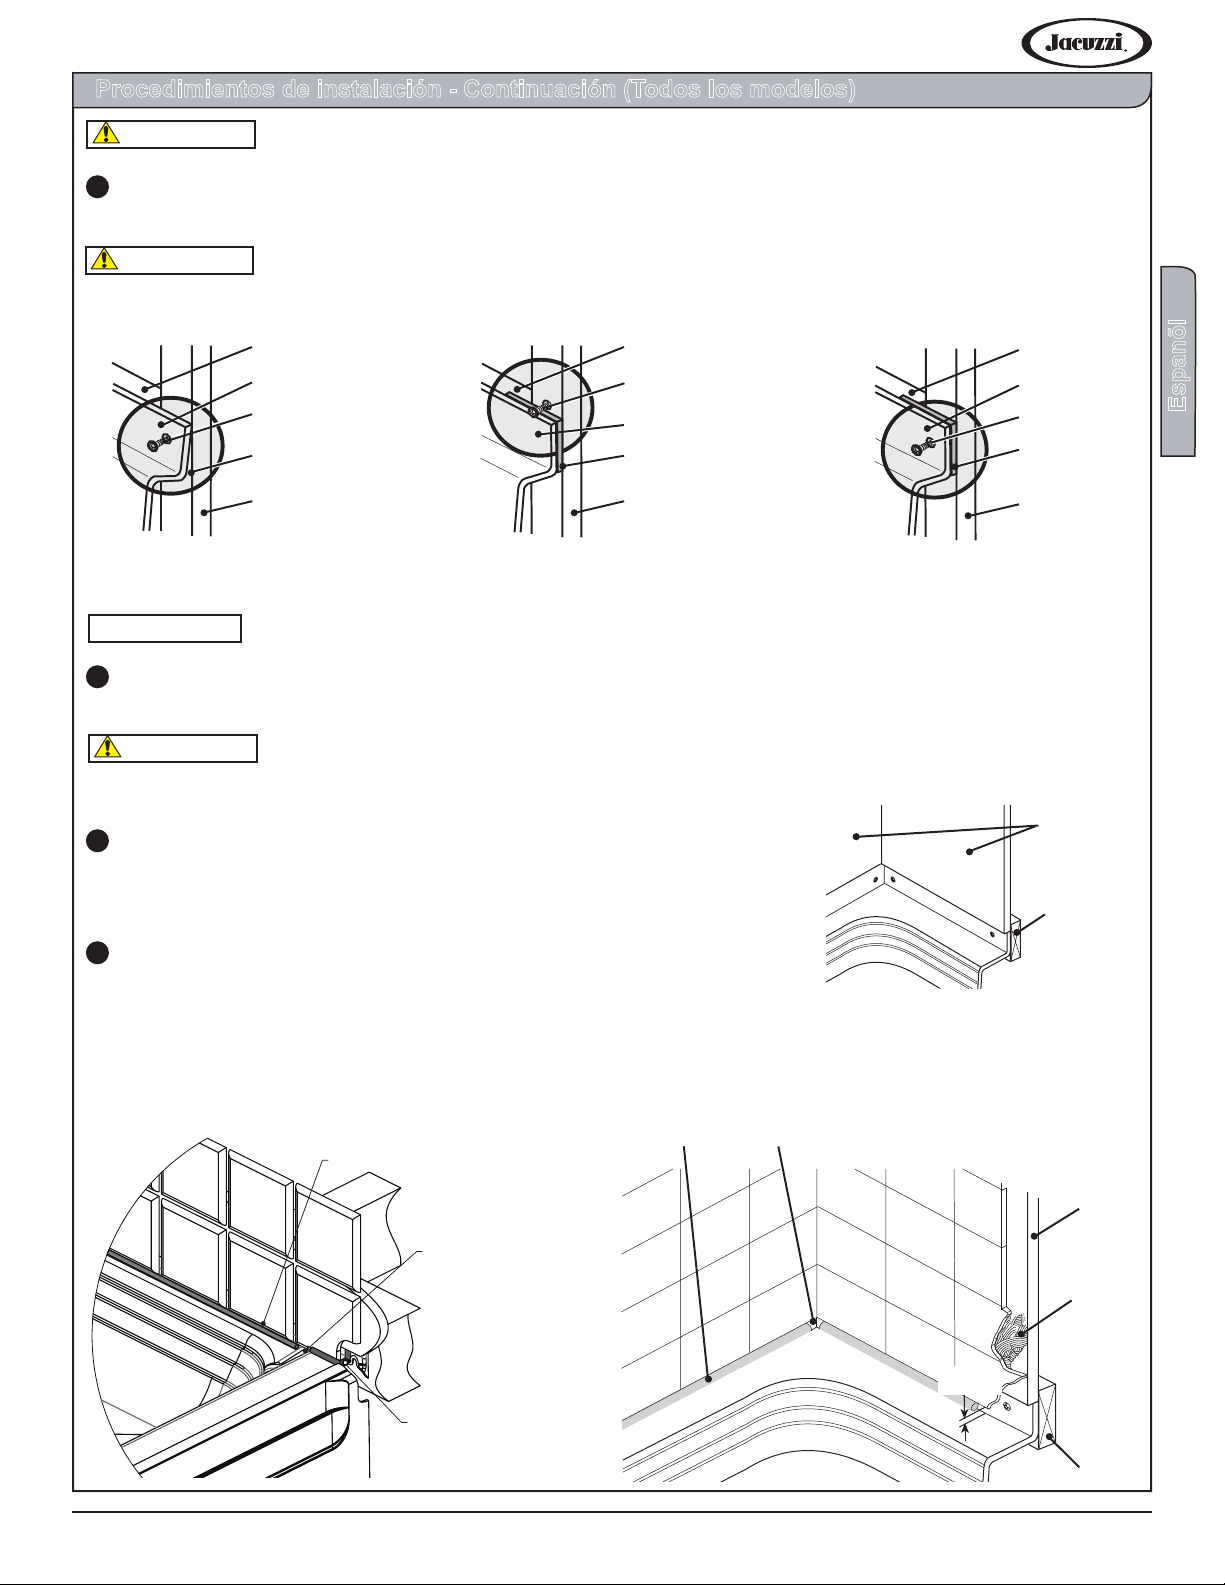
Do not lift a corner to level the base. This will result in loss of contact with the mortar.
CAUTION
Attach the shower base ange to the stud wall and blocking with the stainless-steel screws provided. Use a minimum of three
5
screws per ange section, see Figure 8. If there is a gap between the base ange and the stud or blocking, a shim must be
used to prevent distortion or cracking of the ange.
Use the stainless-steel screws provided.
CAUTION
English
Blocking
Base flange
Use screws
provided
Gap
Stud
INCORRECT INCORRECT
If there is any gap between the base ange and stud or blocking, shims must be used.
IMPORTANT
Tighten the drain as directed by the instructions that came with the drain kit. After the drain is fully installed, test for proper
6
drainage.
If the shower base does not drain properly, correct this condition before proceeding with the installation.
CAUTION
Watertight installation is the installer’s responsibility, as drain leakage is excluded from the Warranty. Jacuzzi is
Blocking
Use screws
provided
Base flange
Leveling
Shim
Stud
CORRECT
Blocking
Base flange
Use screws
provided
Leveling
shim
Stud
not responsible for reinstallation costs.
Cement board
Replace the strainer, if your drain kit came with one, and tape over the drain
7
hole to prevent nishing material from entering the drain. Place a
cement board or equivalent on top of the shower base ange and
secure to studwall, see Figure 9.
Blocking
Apply tile, or other nishing material, leaving a 1/8” gap between the
8
nishing material and the ange lip of the shower base. Seal this gap with
a silicone sealant. Leave a minimum 1/4” weep hole at the back and front
Figure 9
corners of the shower base, see Figures 10 and 11. Add 100% silicone under the tile and backer board on top of the dam
only (see Figures 7 and 10). Refer to local building codes for proper nishing or other trades.
Silicone sealant
100% Silicone under
tile on top of dam sealing
the front perimeter from any
possible water passage.
1/4” Min Weep HoleSilicone sealant
1/4” Min Weep Hole
Leave drain valley clear
of silicone
Figure 11
Tile
1/8” Gap
board
Tile
Shower Base Installation And Operation www.jacuzzi.com Page 7
Page 8

Installation Procedures Continued (All Models)
The weep holes are necessary to allow drainage
CAUTION
from leakage through an unsealed tiled grout.
Filling the area marked, Do Not Fill, will prevent moisture
9
Cement board
Figure 12
from draining back to the base through the weep holes, see
English
Figure 12. Such moisture is due to leakage through the tile
grout. Sealing the tile grout will prevent this leakage.
Blocking
Shim (If
necessary)
STUD
DO NOT FILL
Clean Up After Installation
• The acrylic nish will give long-lasting beauty when properly maintained. To avoid dulling and scratching of the nish, never
use abrasive cleaners or harsh chemicals. A mild liquid detergent and warm water will clean soiled surfaces.
• Remove spilled plaster with a wood or plastic edge. Metal tools will scratch the surface. Spots left by plaster or grout can be
removed if lightly rubbed with a mild detergent and a damp cloth or sponge.
• Minor scratches that do not penetrate the color nish can be removed by lightly sanding the surface with a 600-grit,
wet-dry sandpaper. To restore the glossy nish, use a special compound like Meguiar’s No. 10 Mirror Glaze. If it is not
available, use an automotive rubbing compound followed by an application of automotive paste wax.
Tile
Grout
Silicone sealant
• Major scratches and gouges that penetrate the acrylic surface may require renishing. Ask your Jacuzzi Luxury Bath
dealer for special instructions.
Rough-In Dimension Chart (Neo-Angle Only)
*C represents the dimension from the stud wall to the face
of the nishing materials used in the shower construction. If
Jacuzzi Luxury Bath surround walls are used, subtract 1-3/8"
from dimension A to arrive at glass enclosure dimensions.
If other materials are used, subtract their thickness from
dimension A.
FOR SQUARE & RECTANGULAR SHOWER BASES: If
Jacuzzi Luxury Bath surround walls are used, subtract
1-3/8" from stud wall of each end to arrive at glass enclosure
dimensions (see front page illustration and chart). If other
materials are used, subtract their thickness from stud wall of
each end.
Model A B C
3838N 16-3/4" 28" 1-3/8"
4242N 20-3/4" 27-3/8" 1-3/8"
4848N 26-3/4" 27-1/2" 1-3/8"
Determine Glass Enclosure Dimensions
*C
A
of Threshold
*C
B
A
Specications Subject To Change Without Notice
Jacuzzi Luxury Bath has obtained applicable code (standards) listings generally available on a national basis for products of this
type. It is the responsibility of the installer/owner to determine specic local code compliance prior to installation of the product.
Jacuzzi Luxury Bath makes no representation or warranty regarding, and will not be responsible for any code compliance.
Page 8 www.jacuzzi.com Shower Base Installation And Operation
Page 9

Catalina™ Drain Cover Installation and Removal Instructions
Snap 4 Drain Cover
Clip Legs Into 4
Strainer Slots.
Four Drain Cover Legs
2
4
3
1
The Catalina™ Drain Cover is designed to t snugly over the top of
the recessed drain as illustrated (Figure 13).
To Install Drain Cover
Position the Drain Cover over the top of the recessed shower base
drain area. Make sure the four Drain Cover Clip Legs line up with
the four strainer slots as illustrated (Figure 14A) before pressing
downward to snap it into place.
NOTE: It is necessary to line up strainer slots with the Drain Cover
Clip Legs prior to pressing downward as illustrated (Figure 14B).
The legs are designed to t into the Jacuzzi strainer MB28827
(included in shower pan purchase).
To Remove Drain Cover
Carefully pry the Drain Cover upward using a non-abrasive tool
such as a plastic spatula as illustrated (Figure 15). DO NOT USE
an abrasive tool or a tool with sharp edges of any of any kind!
NOTE: The Drain Cover is made of fragile material and will break if
accidentally dropped.
RISK OF ACCIDENTAL INJURY! Do not permit children to use this
unit unless they are closely supervised at all times. This equipment
is intended for indoor use only.
Figure 13
English
Figure 14A
Drain Cover Care And Cleaning Instructions
Jacuzzi Luxury Bath Drain Covers are manufactured with nonporous and durable materials that, when properly cared for and
cleaned, resist soil buildup and stains to a great degree. To ensure
proper care, follow these simple steps:
1. First clean the Drain Cover with a mild dish soap and warm
water, wipe it clean, then wipe it again with a soft (slightly
dampened) cloth to remove any remaining soap residue.
2. For more difcult stains such as grease, oil, paint or ink, apply
rubbing alcohol to the affected area, then wipe it clean with a
soft, dry cloth.
3. Avoid abrasive cleansers and solvents, harsh chemicals or
those containing lime removal elements. They may damage the
nish and void the warranty.
4. DO NOT use abrasive scrubbing cloths or pads of any kind.
5. DO NOT use razor blades or other sharp objects that might
scratch the surface.
6. DO NOT use aftermarket bath products containing dye.
7. If unsure of the suitability of a product’s appropriateness for use
with these baths, rst test a very small amount of the product
on an inconspicuous area before using it on a visible surface.
For Solid Surface Matte Finish Models (Observe these additional
guidelines). For very difcult stains, Jacuzzi Luxury Bath
recommends the following cleansers and materials:
• Mr. Clean Magic Eraser
Figure 14B
Figure 15
Plastic
Spatula
• Soft Scrub, Bon Ami or Gray Scotch Brite Pads (Only).
• CAUTION: DO NOT use Green Scotch Brite Pads for any
reason since they will damage the tub surfaces.
Shower Base Installation And Operation www.jacuzzi.com Page 9
Page 10

Notes:
English
Page 10 www.jacuzzi.com Shower Base Installation And Operation
Page 11

Jacuzzi Luxury Bath Limited Warranty
Shower System Product
WARRANTY COVERAGE
Jacuzzi Luxury Bath (the “Company”) offers the following express limited warranty to the original purchaser of any Jacuzzi Luxury Bath Shower
System product (“unit”) who purchases the product for personal or single family use (“user”). The Company will repair or replace, at its option, the
unit or its equipment in accordance with the following terms and conditions. Units in commercial use are excluded from any warranty coverage
whatsoever.
ONE YEAR LIMITED WARRANTY ON SHOWER SYSTEM
Our limited warranty on Shower System products is for one (1) year. Our warranty covers the unit and factory-installed components (e.g., pump,
motor) against defects in material or workmanship. Warranty coverage begins on the date the unit was originally purchased by the user.
NINETY DAY (PARTS ONLY) LIMITED WARRANTY ON OPTIONS AND ACCESSORIES
Our limited warranty on options and accessories manufactured by the Company is for ninety (90) days for parts only. Our warranty covers options
and accessories manufactured by the Company (e.g., ll spout kits, trim kits, skirts) against defects in material or workmanship. Warranty coverage
begins on the date the option or accessory was originally purchased by the user.
WARRANTY LIMITATIONS
Our limited warranty does not cover defects, damage, or failure caused by the common carrier, installer, user, or other person, or resulting from,
without limitation, any of the following: careless handling (lifting unit by plumbing, abrading nish, etc.); modication of any type for any reason
(including modication to meet local codes); improper installation (including installation not in accordance with instructions and specications
provided with the unit); connections supplied by the installer of the equipment; improper voltage supply or unauthorized electrical modication;
misuse; incorrect operation, or lack of proper routine maintenance; operation of the unit without specied minimum amount of water or at
inappropriate water temperature; use of abrasive or improper cleaners; or acts of God, such as lightning, oods, earthquakes, etc.
In addition, THE COMPANY WILL NOT BE RESPONSIBLE FOR INCIDENTAL OR CONSEQUENTIAL DAMAGES or losses arising from any
cause (e.g., water damage to carpet, ceiling, loss of use, etc.) including its own negligence; damages to, respecting, or resulting from: plated parts
when chemicals are used in the unit; optional equipment not manufactured by the Company but supplied by Dealer, installer or the Company; the
unit's prior usage as an operational display; or defects that should have been discovered before installation. This limited warranty does not include:
labor, transportation, or other costs incurred in the removal and/or reinstallation of the original unit and/or installation of a replacement unit; any
costs relating to obtaining access for repair; or loss of use damage, including loss of sales, prot or business advantage of any kind under any
circumstances. Units in commercial use are excluded from any warranty coverage whatsoever.
Warranty coverage is provided only in the United States of America and Canada.
EXCLUSION OF IMPLIED WARRANTIES
IMPLIED WARRANTIES OF MERCHANTABILITY AND FITNESS FOR A PARTICULAR PURPOSE ARE DISCLAIMED ALTOGETHER OR TO THE
FULL EXTENT ALLOWED BY LAW.
NOTICE: This warranty gives you specic legal rights, and you may also have other rights which vary from state to state. There are no warranties
applicable to Jacuzz®i Luxury Bath products except as expressly stated herein or as implied by applicable state and federal laws. The Company
will not be responsible for any statements or representations made in any form that go beyond, are broader than or are inconsistent with any
authorized literature or specications furnished by the Company.
Some states do not allow limitations on how long an implied warranty lasts, or the exclusion or limitation of incidental or consequential damages, so
the above limitations and exclusions may not apply to you.
RETURN OF WARRANTY CARD
The attached pre-addressed Warranty Registration Card MUST be lled out by the purchaser within thirty (30) days from purchase and mailed to
Jacuzzi Luxury Bath in order for this warranty to become effective.
Jacuzzi Luxury Bath Shower Base
E124000Y, June 2013
English
Jacuzzi Luxury Bath
14525 Monte Vista Avenue
Chino, California 91710
Page 12

RESPONSIBILITIES OF OTHERS
Inspecting the unit prior to installation is the responsibility of the installer or building contractor who acts on behalf of the user. They are responsible
for ensuring the unit is free of defect or damage. Notices are placed on and in the unit and on the shipping carton advising the installer of this
responsibility. In the event of a problem, the unit must not be installed. The Company is not responsible for failures or damage that could have been
discovered, repaired, or avoided by proper inspection and testing prior to installation.
Damage occurring in transit is the responsibility of the carrier. The user or installer MUST open the crates and inspect the unit for damage when it
is delivered. If damage is discovered, it must be reported immediately to the seller and the carrier in writing, and an inspection requested. Failure of
the carrier to respond should be reported to the seller and the carrier. Your freight claims should be led promptly thereafter.
It is the responsibility of the installer, building contractor, or user to provide access for service. The Company is not responsible for any costs
relating to obtaining access for repair. The user shall bear such costs and, if appropriate, must seek recovery from the installer.
Damage occurring to the unit during installation is the responsibility of the installer and/or building contractor and damage occurring thereafter is the
responsibility of the user.
Failure of any optional equipment is the sole responsibility of the equipment manufacturer. (Options and accessories manufactured by the Company
are warranted for ninety (90) days from the original date of purchase for parts only.)
The Distributor or Dealer is responsible for knowing local code requirements and notifying the installing contractor and/or user of these
requirements at the time of purchase. The Company is not responsible for costs to modify any product to obtain any code approval, such as city,
county, or state building codes in U.S.A. or municipal or provincial codes in Canada.
WARRANTY SERVICE
For the customer's benet, the Company maintains a list of independent service personnel to perform required warranty service repairs. Such rms
are not agents or representatives of the Company and cannot bind the Company by words or conduct.
The Company will provide the warranty service described above when the following conditions have been met: the failure is of the nature or type
covered by the warranty; the user has informed an Authorized Jacuzzi Luxury Bath Service Agent or Warranty Service Department Representative
of the nature of the problem during the warranty period; conclusive evidence (e.g., proof of purchase or installation) is provided to the foregoing
by the user proving that the failure occurred or was discovered within the warranty period; an authorized independent service person or Company
representative has been permitted to inspect the unit during regular business hours within a reasonable time after the problem was reported by the
user.
In order to obtain warranty service, consult your local telephone book for the location of the nearest Jacuzzi Luxury Bath Authorized Service Agent.
Describe the problem and the Authorized Service Agent will inspect the unit and provide the required warranty service.
If you are unable to contact a Jacuzzi Luxury Bath Authorized Service Agent, call or write:
Limited Warranty
Accessory(ies)
Ninety-Day
Parts Only
On
Limited Warranty
Accessory(ies)
Ninety-Day
Parts Only
On
To obtain warranty replacement for factory-installed components or Company supplied options and accessories
manufactured and supplied by the Company, call or write the above. Provide a description of the problem and
proof of purchase. You will be instructed how to obtain replacements and where to return, at your expense, the
failed component(s), option(s), or accessory(ies).
All replacement parts, equipment, and repairs shall assume the remaining warranty period of the part(s) replaced.
The Company's warranty obligation shall be discharged upon tender of replacement or repair. The customer's
refusal to accept the tender terminates the Company's warranty obligation.
7. What is the age of the head of the household? _____________ years
8. What other manufacturers did you consider?
( ) Eljer ( ) Lasco ( ) Price Pster ( ) Aqua Glass
( ) Kohler ( ) American Standard ( ) Sterling
( ) Other (Specify) ______________________________________
9. How long did you shop before purchasing unit?
( ) 1 day ( ) 2 months-6 months
( ) 2-7 days ( ) 6 months-1year
( ) 1 week-2 weeks ( ) 1 year-2 years
( ) 2 weeks-4 weeks ( ) +2 years
( ) 1 month-2 months
10. Approximately how long have you lived in this home?____________
11. Please indicate, approximately, the total annual income of your
( ) Up to $24,999 ( ) $50,000 to $74,999
( ) $25,000 to $29,999 ( ) $75,000 to $99,999
( ) $30,000 to $39,999 ( ) $100,000 to $149,999
( ) $40,000 to $49,999 ( ) $150,000 and Above
12. Was your purchase process?
( ) Very easy ( ) Easy ( ) Difcult ( ) Very Difcult
household.
Jacuzzi Luxury Bath
14525 Monte Vista Avenue
Chino, California, 91710
Call: 800-288-4002
2. Who rst gave you specic information about this product (specications,
( ) Dealer/Plumbing Supplier ( ) Builder ( ) Remodeler
( ) Plumbing Contractor ( ) Retailer/Home Center Store
( ) Decorator/Architect ( ) Already Installed
3. What was the main reason for purchase?
( ) Styling ( ) Warranty Service ( ) Product Features
( ) Brand Name ( ) Price ( ) Hydrotherapy
( ) Home Resale _______________________________________
( ) Other _____________________________________________
4. Who nally decided which product you would buy?
( ) Self ( ) Spouse ( ) Self and Spouse Together
( ) Other Family Member ( ) Designer/Architect
( ) Builder/Plumber/Remodeler ( ) Already Installed
5. Who installed? ( ) Already installed/New Home
( ) Contractor/Plumber when remodeling
( ) Self/Spouse when remodeling
( ) Other _____________________________________________
6. What is the current market value of this property?
Please estimate $________________________________________
prices, etc.)?
to be come effective.
Purchaser's Name __________________________________________
Purchaser's Address ________________________________________
City _____________________________ State ______Zip _________
Date of Purchase ___________________________________________
Model Name ______________________________________________
Serial Number _____________________________________________
Dealer's Name _____________________________________________
Dealer's Address ___________________________________________
1. How did you rst hear about this Jacuzzi® product?
( ) Advertisement ( ) Article in Magazine/Newspaper
( ) Visited Dealer/Plumbing Supplier ( ) Yellow Pages
( ) Builder/Plumber/Remodeler ( ) Decorator/Architect
( ) Visited Retailer/Home Center Store
( ) Word of Mouth . . . Friend/Relative/Acquaintance
( ) Other (Please Describe) ________________________________
This card must be lled out and returned to the address printed on the other
side within thirty (30) days from date of purchase in order for this warranty
E124000Y
Warranty
Registration Card
Page 13
BASE PARA DUCHA
Espanõl
INSTRUCCIONES DE INSTALACION
Jacuzzi Luxury Bath
14525 Monte Vista Avenue
Chino, CA 91710
1-800-288-4002
www.jacuzzi.com
Jacuzzi® Base para Ducha: Instalación y Operación www.jacuzzi.com Page 13
Page 14
Série Signature
Contenido
Contenido . . . . . . . . . . . . . . . . . . . . . . . . . . . . . . . . . . . . . . . . . . . . . . . . . . . . . . .14
Conserve estas instrucciones para uso futuro . . . . . . . . . . . . . . . . . . . . . . . . . . . . . . . . . . . . .14
Especicaciones de la base para ducha Catalina™ . . . . . . . . . . . . . . . . . . . . . . . . . . . . . . . . . .15
Especicaciones de la base para ducha Cayman™ Tru-Level™ . . . . . . . . . . . . . . . . . . . . . . . . . . 16
Instrucciones de Instalación de la base para ducha Catalina™ . . . . . . . . . . . . . . . . . . . . . . . . . . 17
Especicaciones de la base para ducha Cayman™ Tru-Level™ . . . . . . . . . . . . . . . . . . . . . . . . . . . 18
Espanõl
Espanõl
Limpieza Después de la Instalación . . . . . . . . . . . . . . . . . . . . . . . . . . . . . . . . . . . . . . . . 20
Dimensiones para Preparación de Instalación (Solo Neo-Angular) . . . . . . . . . . . . . . . . . . . . . . . . 20
Instrucciones de instalación y extracción de la tapa del desagüe de la base Catalina™ . . . . . . . . . . . . . . . 21
Garantía limitada . . . . . . . . . . . . . . . . . . . . . . . . . . . . . . . . . . . . . . . . . . . . . . . . . . .23
Conserve estas instrucciones para uso futuro.
NOTA
Escriba y guarde el número de modelo y serie de su unidad abajo
Fecha de compra
Comprado a
Instalado por
Número de serie
Número de modelo
Complete y envíe la tarjeta de registro de producto proveída con las instruccions.
Instalador: Deje este manual al propietario.
Propietario: Lea este manual y guárdelo para referencia.
Page 14 www.jacuzzi.com Jacuzzi
®
Base para Ducha: Instalación y Operación
Page 15

Especicaciones de la base para ducha Catalina™
A
A
C
B
(Lado del umbral)
Conguración
del producto
Desagüe
central
D
Desagüe central
Número de
pieza de la
base para
ducha
MB96000 CAT4836 SCX XXX X 48”
MB71000 CAT4848 SCX XXX X 48”
D
C
B
Desagüe izquierdo y derecho
*Agregue 1/8” (3mm) para las dimensiones preliminares.
Código de venta del
producto (MPC, por
sus siglas en inglés)
A B C D Peso del
(1219mm)
(1219mm)
36” (914mm) 17-3/16”
48”
(1219mm)
(Lado del umbral)
Dimensiones
(437mm)
23-3/16”
(589mm)
(610mm)
(610mm)
24”
24”
Espanõl
Producto
50 lbs.
(23kg)
55 lbs.
(25kg)
Desagüe
izquierdo/
derecho
MB92000 CAT6042 SCX XXX X 60”
MB76000 CAT6030 SLX XXX X 60”
MB80000 CAT6030 SRX XXX X
MB84000 CAT6032 SLX XXX X 60”
MB88000 CAT6032 SRX XXX X
(1524mm)
(1524mm)
(1524mm)
42”
(1067mm)
30” (762mm) 14-3/16”
32” (813mm) 15-3/16”
20-3/16”
(513mm)
(360mm)
(386mm)
30”
(762mm)
5-7/8”
(149mm)
5-7/8”
(149mm)
68 lbs.
(31kg)
55 lbs.
(25kg)
59 lbs.
(27kg)
Las especicaciones del producto están sujetas a cambio sin previo aviso.
Nota: Este es un producto de calidad profesional. Se requieren conocimientos de técnicas de construcción,
fontanería e instalación eléctrica conforme a los códigos para la instalación apropiada y la satisfacción del usuario.
Recomendamos que un contratista autorizado realice la instalación de todos los productos Jacuzzi Luxury Bath.
Nuestra garantía no cubre problemas relacionados con instalaciones inadecuadas.
Jacuzzi® Base para Ducha: Instalación y Operación www.jacuzzi.com Page 15
Page 16

Especicaciones de la base para ducha Cayman™ Tru-Level™
Lado Umbral
C
D
Rectangular
B
Espanõl
Lado Umbral
A*
B
C
D
Cuadrado
*Añada 1/8” (3mm) en las dimensiones del bosquejo para la instalación.
Código de
venta del
Conguración
del producto
Desagüe
cuadrado/central
Desagüe
rectangular/
central
Desagüe neo-
angular/central
Número
Producto
del
producto
(MPC, por
sus siglas en
inglés)
S344000 CAY3636SCXXXX 36"
S348000 CAY4242SCXXXX 42"
S364000 CAY4848SCXXXX 48"
S356000 CAY4834SCXXXX 48"
S368000 CAY6036SCXXXX 60"
T228000 CAY6034SCXXXX 60"
T232000 CAY4234SCXXXX 42"
T354000 CAY3642SCXXXX 36"
T362000 CAY4236SCXXXX 42"
T366000 CAY4248SCXXXX 42"
T370000 CAY6042SCXXXX 60"
T374000 CAY4832SCXXXX 48"
T358000 CAY3838SNXXXX 38"
S352000 CAY4242SNXXXX 42"
S360000 CAY4848SNXXXX 48"
(914mm)
(1067mm)
(1219mm)
(1219mm)
(1524mm)
(1524mm)
(1067mm)
(914mm)
(1067mm)
(1067mm)
(1524mm)
(1219mm)
(965mm)
(1067mm)
(1219mm)
A B C D E F G H
36"
(914mm)
42"
(1067mm)
48"
(1219mm)
34"
(864mm)
36"
(914mm)
34"
(864mm)
34"
(864mm)
42"
(1067mm)
36"
(914mm)
48"
(1219mm)
42"
(1067mm)
32"
(813mm)
38"
(965mm)
42"
(1067mm)
48"
(1219mm)
A*
17.50"
(445mm)
20.25"
(514mm)
23.25"
(591mm)
16.50"
(419mm)
17.50"
(445mm)
16.50"
(419mm)
16.50"
(419mm)
20.25"
(514mm)
17.50"
(445mm)
23.25"
(591mm)
20.25"
(514mm)
15.00"
(381mm)
14.50"
(368mm)
16.06"
(408mm)
16.25"
(413mm)
Dimensiones
18.00"
(457mm)
21.00"
(533mm)
24.00"
(610mm)
24.00"
(610mm)
30.00"
(762mm)
30.00"
(762mm)
21.00"
(533mm)
18.00"
(457mm)
21.00"
(533mm)
21.00"
(533mm)
30.00"
(762mm)
24.00"
(610mm)
14.50"
(368mm)
16.06"
(408mm)
16.25"
(413mm)
E
A
C
D
H
B
Neo-Angular
- - - - 24 lb
- - - - 34 lb
- - - - 43 lb
- - - - 30 lb
- - - - 43 lb
- - - - 39 lb
- - - - 27 lb
- - - - 28 lb
- - - - 28 lb
- - - - 38 lb
- - - - 50 lb
- - - - 29 lb
17.38"
(441mm)
21.50"
(546mm)
27.50"
(699mm)
29.00"
(737mm)
29.00"
(737mm)
29.00"
(737mm)
17.38"
(441mm)
21.50"
(546mm)
27.50"
(699mm)
39.00"
(991mm)
45.00"
(1143mm)
53.00"
(1346mm)
F
Peso del
Producto
(11kg)
(15.4kg)
(19.5kg)
(13.6kg)
(19.5kg)
(17.7kg)
(12.2kg)
(12.7kg)
(12.7kg)
(17.2kg)
(22.7kg)
(13.2kg)
23 lb
(10.4kg)
29 lb
(13.2kg)
39 lb
(17.7kg)
G
Las especicaciones del producto están sujetas a cambio sin previo aviso.
NOTA: Este es un producto de calidad profesional. Para una instalación apropiada y la satisfacción del usuario, se requiere de un
conocimiento de acuerdo a los códigos en las técnicas de construcción, plomería y eléctricidad. Recomendamos que un contratista
licenciado efectúe la instalación de todos los productos de Jacuzzi Luxury Bath. Nuestra garantía no cubre los problemas que
resulten de una instalación inadecuada.
Page 16 www.jacuzzi.com Jacuzzi
®
Base para Ducha: Instalación y Operación
Page 17

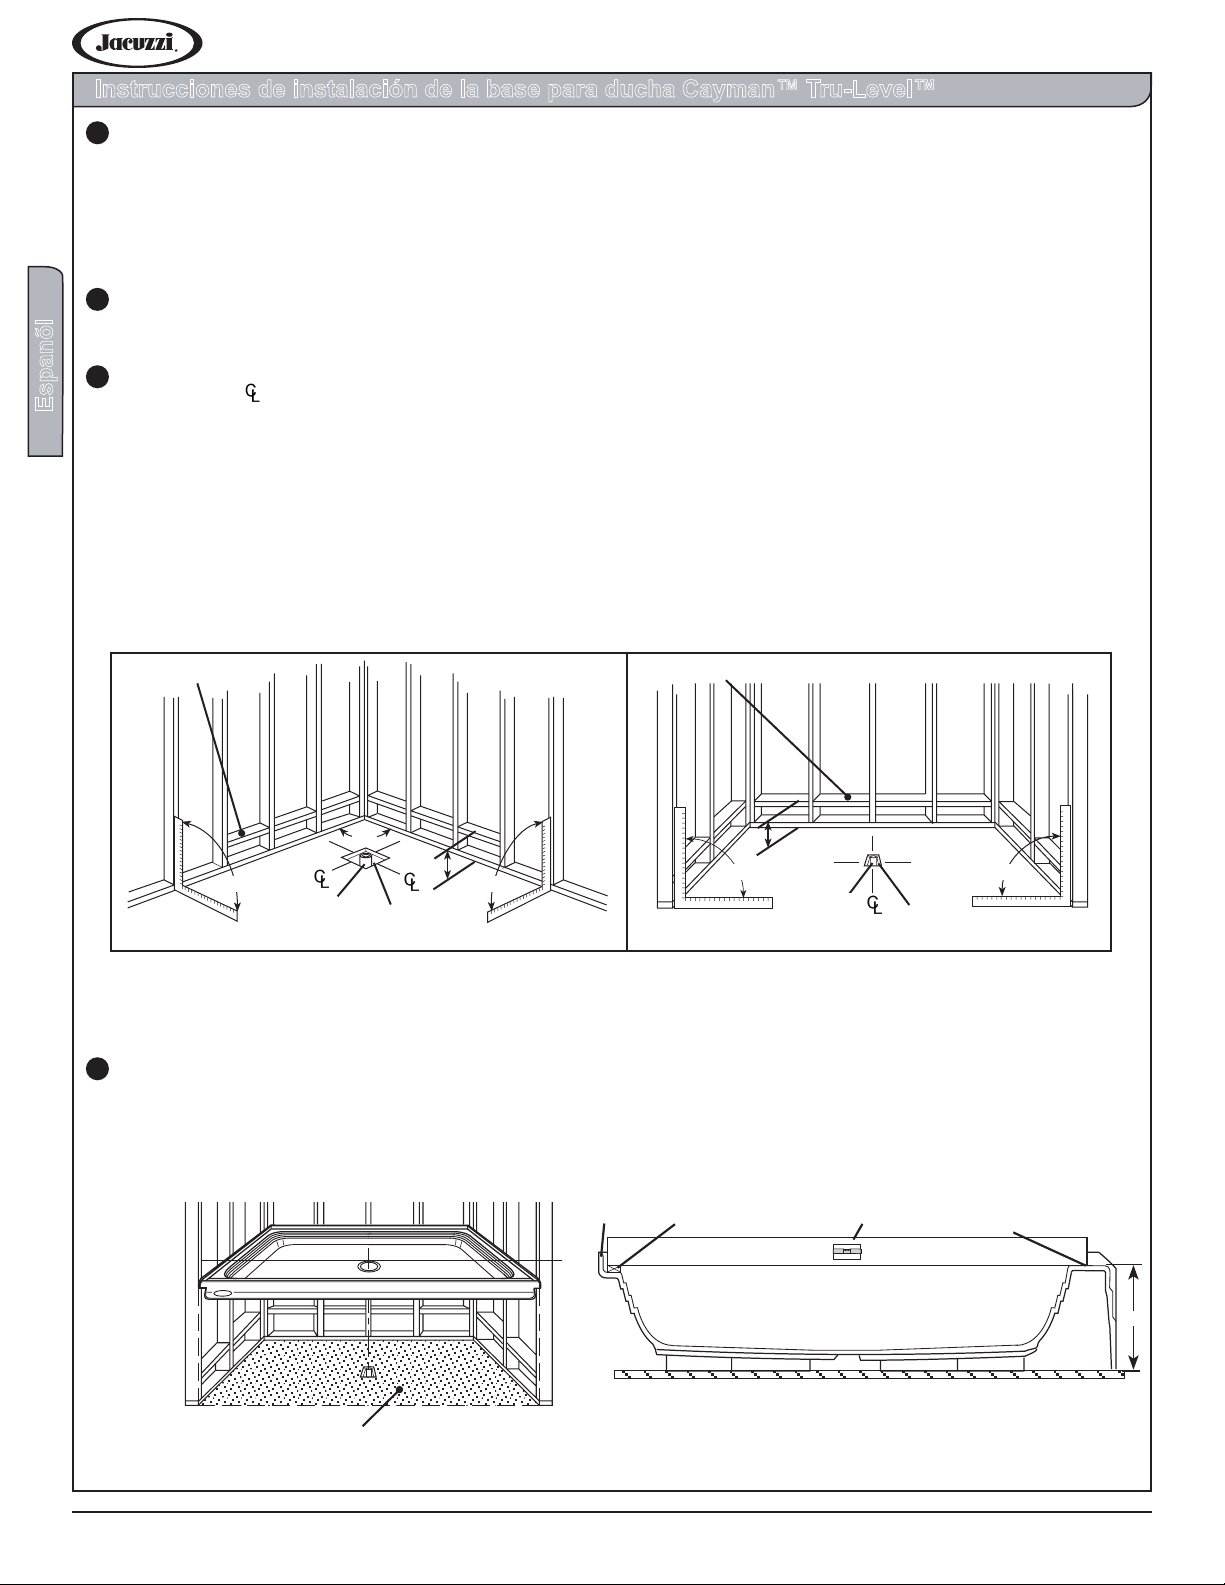
Instrucciones de instalación de la base para ducha Catalina™
Desagüe central Desagüe izquierdo/derecho
Figura 1: Dimensiones preliminares (consulte el Cuadro del producto para conocer la ubicación del desagüe)
Retire la base para ducha de la caja. No destruya la caja de envío hasta que haya realizado una inspección satisfactoria
1
del producto. En caso de que la inspección inicial revele algún daño o defecto en el acabado, no instale la base para
ducha. La responsabilidad de Jacuzzi Luxury Bath por daños durante el transporte naliza contra entrega del producto en
buen estado al transportista. Presente sus reclamos por daños al transportista. Los daños o defectos reclamados después
de la instalación están excluidos de la garantía. Jacuzzi no se hace responsable de ningún defecto o daño que pudiera
haberse descubierto, reparado o evitado de haberse seguido este procedimiento de inspección y prueba.
Planique la instalación en función a las supercies de la pared terminadas. Tenga en cuenta las dimensiones tanto de la
2
base para ducha como del compartimiento. Instale los accesorios opcionales después de que haya completado toda la
instalación.
Deje una abertura mínima de 5 x 5” en el contrapiso. La abertura debe estar ubicada en las líneas centrales ( ) del oricio
3
de desagüe de la base (consulte el Cuadro del producto). La abertura debe permitir la instalación de una tubería residual
de 2”. La tubería residual debe estar entre ¼” y ½” por encima de la supercie del contrapiso (consulte la Figura 1). Si el
contrapiso está nivelado, no es necesario realizar otra preparación. Comience a instalar la base. Si el contrapiso no está
nivelado, nivele la base para ducha esparciendo un compuesto nivelador para pisos, mortero, yeso o espuma estructural de
mínima expansión que tenga una densidad de un mínimo de 5 libras por pie cúbico.
NOTE: The compound must make contact with the entire bottom surface of the base feet. The base is not to be supported
by the base ange. Both sides of a joint or splice of sub-oor should be level to each other.
Espanõl
Obstrucción de 2x4
*4½”
o
90
*4 ½ desde el contrapiso hasta la parte superior de la obstrucción
Ubique e instale la base sobre el desagüe (consulte la Figura 2). Pase la conexión de drenaje por el centro de la tubería
4
Tubería
residual
de 2”
Abertura
de 5x5”
(Max)
o
90
Obstrucción de 2x4
Modelos de
desagüe
izquierdo
o
90
*5½” desde el contrapiso hasta la parte superior de la obstrucción
Abertura de 5x5” (Max)
Tubería residual de 2”
*5½”
Modelos
Mano
Derecha
o
90
de desagüe y baje cuidadosamente la base de la ducha. Presione rmemente hasta que la base esté en posición. Controle
el nivel de la base en dos direcciones. Se necesita una cuña alta en la parte posterior de la base para lograr el nivelado de
adelante hacia atrás (consulte las Figuras 3 y 4). Avance a la página 19 para continuar con este proceso de instalación.
Figura 3 – Nivelado de adelante hacia atrás
(Modelos de desagüe central)
Cuña alta de 7/8"
Nivelado
*4-3/16”
*Variación de altura de 4 a 4-3/4"
Frente de la base
Figura 4: Nivelado de adelante hacia atrás
(modelos de desagüe izquierdo y derecho)
Cuña alta de 1/2"
Nivelado
Esparza el mortero o compuesto nivelador
uniformemente por toda la superficie. Levante y
baje la base por el centro de la tubería de desagüe
y ubíquela en su lugar.
Jacuzzi® Base para Ducha: Instalación y Operación www.jacuzzi.com Page 17
F igura 2
Frente de la base*Variación de altura de 4-7/8 a 5-1/8"
*5-1/8”
Page 18
Instrucciones de instalación de la base para ducha Cayman™ Tru-Level™
Neo-Angular Cuadrado o Rectangular
La base para ducha no incluye el desagüe, que se requiere para completar la instalación. Quite la base de
1
ducha del cartón. No destruya el cartón de empaque hasta que la inspección sea satisfactoria del producto.
Si la inspección inicial muestra cualquier daño o defecto en el supercie, no lo installarle. La responsabilidad
de Jacuzzi Luxury Bath termina con la entrega del producto en buena condición al portador. Dirigir cualquier
reclamación de daño al portador. Cualquier daño o defecto de reclamo registrado después de la instalación
es excluido de la garantía. Jacuzzi no es responsable de ningún daño o defecto que podría haber sido
descubierto, reparado, o evitado siguiendo la inspección y prueba.
Planear la instalación en relación del supercie de las paredes terminadas. Tomar en cuenta las dimensiones
2
de ambos base y recinto de la puerta. Instalar las partes opcionales después de que toda otra instalación es
completa.
Proporcionar una apertura en el subsuelo, mínimo de 5 x 5”. La apertura debe ser localizada en las líneas
3
de centro ( ) del desagüe, ver la Gráca de Producto. La apertura es para acommodar un tubo de deshecho
de 2”. El tubo debe ser 1/4 a 1/2” encima de la supercie del subsuelo, ver la Figura 5. Si el subsuelo está
Espanõl
nivelado, no se necesita ninguna preparación. Seguir a instalar la base. Si el subsuelo no está nivelado, poner
un compuesto para nivelar el suelo como mortero, yeso, o espuma expansiva estructural con densidad mínimo
de 5 libras por pie cúbico (lb/ft3).
NOTA: El compuesto debe hacer contacto con toda la supercie con los pies del base. No sostenga la base por los
estremos superiores de la base. Ambos lados de la unión se empalman al subsuelo debería ser el nivel uno del otro.
Figura 5. Preparación Preliminar del Area (Ver la Tabla de Productos (Tru-Level™)
2 x 4”, Bloque
o
90
o
90
*7” de la base a la superficie del bloque
4
Alinear e instalar la base sobre el desagüe, ver la Figura 6. Con la parte de denaje posicionado sobre el centro del tubo,
o
90
2” Tubería
de desague
*7”
5 x 5”, Abertura
de (Máx)
o
90
2 x 4”, Bloque
*7”
o
90
2” Tubería
de desague
*7” de la base a la superficie del bloque
5 x 5”, Abertura
de (Máx)
o
90
bajar la base cuidadosamente en su lugar. Prescionarlo rmemente hasta que la base está colocada. Vericar el nivel de la
base de dos direcciones. Una láminilla de 1/4” es necesario atrás de la base de frente hacia atrás, ver la Figura 7.
Laminilla de nivelación de 1/4”Brida Nivelador
Applique 100% silicon
debajo del umbral
Motero o yeso cubriendo a nivel el área entera.
Levante y baje la base sobre el centro de la
tubería de desagüe y colóquela en su lugar.
Figura 6
Figura 7. Nivelar de Frente Hacia Atras
Page 18 www.jacuzzi.com Jacuzzi
Frente de la base*Variación de altura de 5-3/4 a 6”
®
Base para Ducha: Instalación y Operación
*6”
Page 19
Procedimientos de instalación - Continuación (Todos los modelos)
Figura 8
INCORRECTO INCORRECTO
CORRECTO
No levante una esquina de la base para nivelarla. Este causará la pérdida del contacto con el mortero.
PRECAUCIÓN
Pegar un extremo de la base al pared de pie derecho y asegurala con con los tornillos proveídos. Utilizar un mínimo de tres
5
tornillos por sección del frente, ver la Figura 8. Si hay espacio libre entre la brida y el pie derecho, usar una láminilla debe ser
usado para prevenir la deformación o agrietamiento del frente.
Utilizar los tornillos de acero inoxidable incluidos.
PRECAUCIÓN
Entramado
Extremo de
la base
Fija con tornillos
proveídos
Espacio libre
Pie derecho
o montante
Si hay un espacio entre el extremo de la base y el pie derecho o entramado, hay que usar láminilla.
IMPORTANTE
Apretar el desagüe según las instrucciones que viene con el juego de equipo. Al installar el drenaje, vericar que hay
6
desagüe apropiado.
Si la base para ducha no tiene el desagüe adecuado, corregirla antes de proceder con la instalación.
PRECAUCIÓN
Es la responsabilidad del Instalador hacer una instalación hermética. La fuga de agua es excluída de la
Entramado
Fija con tornillos
proveídos
Extremo de
la base
Láminilla de
nivelación
Pie derecho
o montante
Entramado
Extremo de la base
Fija con tornillos
proveídos
Láminilla de
nivelación
Pie derecho
o montante
Garantía. Jacuzzi no es responsible de gastos de reinstalación.
Sustituir el tamiz, si el equipo tiene. Cubrir la apertura del drenaje
7
Pared de cemento
con cinta para que no entra el sucio de los materiales de instalación.
Colocar un pared de cemento o equivalente encima del borde de la base
y asegurarlo al entramado, ver Figura 9
Entramado
Espanõl
8
Aplicar el azulejo u otro material de acabamiento, dejando un espacio de
1/8” entre el material y el labio de la brida de la base. Usar silicona para
llenar el espacio. Dejar un agujero de desagüe de 1/4” mínimo en las
Figura 9
esquinas de frente y atrás de la base, ver las Figuras 10 y 11. Aplique 100% silicon
debajo del azulejo y sobre el umbral (ver Figura 7 y 10). Consulte los codigos locales para el acabado adecuado ú otros
ocios.
Figura 10
Sellador de silicona
1/4” Min Para
desague. No aplique
silicon.
1/4” Mín, Agujero de desagüeSellador de silicona
Figura 11
Azulejo
1/8”,
Espacio de
100% Silicone sobre el
unbral solamente.
Jacuzzi® Base para Ducha: Instalación y Operación www.jacuzzi.com Page 19
Pared de
cemento
Adhesivo
para losa
Entramado
Page 20

Procedimientos de instalación - Continuación (Todos los modelos)
PRECAUCIÓN
Los agujeros de desagüe son necesarios
Figura 12
para dirigir cualquiera fuga de aqua
posible.
Llenando la área marcada, Do Not Fill (No Llenarse), va
9
Pared de
cemento
a prevenir el agua pasar por los agujeros de desagüe,
ver Figura 12. Tal humedad es debido a la salida
por la lechada de azulejo. Es necesario dirigir
la humedad por los agujeros.
Espanõl
Entramado
Use laminillas
de nivelación si
es necesario
Pie
derecho
NO RELLENE
Limpieza Depués De La Instalación
• El acabado del acrílico no perderá en buen estado dando el mantenimiento adecuado. Para evitar daños, no usar jabones
abrasivos o químicos ásperos. Un detergente líquido suave y el agua caliente limpiarán supercies manchadas.
• Quite el yeso derramado con un cuchillo de madera o plástico. Los instrumentos metálicos dañan agresivamente la
supercie. Las manchas dejados por yeso o lechada se quitan con detergente suave y una tela o esponja húmeda aplicado
ligeramente.
• Los rasguños menores que no afectan el acabado del color pueden ser removidos ligeramente con un papel de lija de 600
arenas, mojado-seco. Para restaurar el n lustroso, use un compuesto especial como el Meguiar’s No. 10 Mirror Glaze. Si
no está disponible, use un compuesto de frotamiento automotor seguido de una aplicación de la cera de pasta automotor.
Azulejo
Lechada
Sellador de
silicona
• Rasguñas mayores y marcas que afectan la supercie acrílica puede requerir un reacabado. Mejor contactar su distriuidor
Jacuzzi Luxury Bath para instrucciones.
Dimensiones para Preparación de Instalación (Solo Neo-Angular)
*C representa la dimensión desde la pared de montantes hasta
la cara de los materiales de acabado usados en la construcción
de la ducha. Si se usan las pardes envolventes de Jacuzzi
Luxury Bath, se debe substraer 1-3/8" de la demensión A
para obtener la dimensiones de la envolvente de vidrio. Si se
usan otros materiales, se debe substraer el espesor de esos
materiales de la dimensión A.
PARA BASES DE DUCHA CUADRADAS Y
RECTANGULARES: Si se usan paredes envolventes de
Jacuzzi Luxury Bath, se debe substraer 1-3/8" de la distancia
desde la pred de montantes hasta cada extremo para obtener
las dimensiones de la puerta envolvente de vidrio (vea la
ilustración en la página del frente y el cuadro). Si se usan otros
materiales, reste sus espesores de la distancia entre la pared de
montantes y cada extremo.
Modelo A B C
3838N 16-3/4" 28" 1-3/8"
4242N 20-3/4" 27-3/8" 1-3/8"
4848N 26-3/4" 27-1/2" 1-3/8"
Determinar las dimensiones de
la puerta de vidrio envolente
*C
A
de umbral
*C
A
B
Use Las Instrucciones De Instalación Porporcionadas Con El Producto
Jacuzzi Luxury Bath ha obtenido las listas de códigos correspondientes (standards), para productos de este tipo, que
generalmente están a disposición por todo el país. Antes de instalar el producto, el instalador o dueño de éste tiene la obligación
de cumplir con el código especíco local. Jacuzzi Luxury Bath no representa, ni garantiza, ni es responsable de hacer cumplir
cualiquiera de estos códigos de instalación.
Page 20 www.jacuzzi.com Jacuzzi
®
Base para Ducha: Instalación y Operación
Page 21

Instrucciones de instalación y extracción de la tapa del desagüe de la base Catalina™
Cuatro patas de tapa
del desagúe Haga encajar
las patas en las cuatro
ranuras del filtro.
Cuatro patas de
tapa del desagúe
2
4
3
1
El diseño de la tapa del desagüe de la base Catalina™ permite que
se adapte perfectamente a la parte superior del desagüe empotrado,
como muestra la Figura 13.
Para instalar la tapa del desagüe
Coloque la tapa del desagüe por encima de la parte superior del
área de la base para ducha empotrada. Asegúrese de que las cuatro
patas de enganche de la tapa del desagüe estén alineadas con
las cuatro ranuras del ltro (como muestra la Figura 14A) antes de
presionar hacia abajo para trabar.
NOTA: Es necesario alinear las ranuras del ltro con las patas de
enganche de la tapa del desagüe antes de presionar hacia abajo,
como muestra la Figura 14B. Las piernas están diseñados para
encajar en el colador Jacuzzi MB28827 (incluido en la compra plato
de ducha).
Para extraer la tapa del desagüe
Levante con cuidado la tapa del desagüe con una herramienta no
abrasiva, como una espátula de plástico, como muestra la Figura 15.
NO UTILICE herramientas abrasivas o con bordes losos de ningún
tipo.
NOTA: La tapa del desagüe está hecha de un material frágil y se
romperá si se cae por accidente.
RIESGO DE LESIÓN CAUSADA POR UN ACCIDENTE: No permita
que los niños utilicen esta unidad a menos que sean supervisados
atentamente en todo momento. Este equipo está previsto para uso
en interiores solamente.
Figura 13
Espanõl
Figura 14A
Instrucciones de cuidado y limpieza de la tapa del desagüe
Las tapas del desagüe Jacuzzi Luxury Bath se fabrican con
materiales no porosos y duraderos que, con el cuidado y la limpieza
apropiados, resisten en gran medida la acumulación de suciedad y
manchas. Para garantizar el cuidado adecuado, siga estos pasos
sencillos:
1. Primero limpie la tapa del desagüe con detergente suave y agua
tibia, enjuague y vuelva a limpiar con un paño suave (ligeramente
humedecido) para retirar el exceso de jabón.
2. Para quitar manchas más difíciles, como las manchas de grasa,
aceite, pintura o tinta, coloque alcohol en la supercie afectada, y
luego limpie con un paño suave y seco.
3. Evite el uso de disolventes y limpiadores abrasivos, químicos
agresivos o productos que contengan ingredientes para la
remoción de cal. Estos productos pueden dañar el acabado y
anular la garantía.
4. NO utilice paños o almohadillas abrasivos de ningún tipo.
5. NO utilice navajas u otros objetos losos que puedan rayar la
supercie.
6. NO utilice productos de baño que contengan colorantes.
7. Si no está seguro de si el producto es adecuado para usar en estas
bañeras, pruebe primero una pequeña cantidad del producto en un
área que sea inadvertida antes de utilizarlo en una parte visible.
Para modelos de supercie sólida de acabado mate consulte estas
pautas adicionales Para quitar manchas muy difíciles, Jacuzzi Luxury
Bath recomienda los siguientes limpiadores y materiales:
• Mr. Clean Magic Eraser
• Soft Scrub, almohadillas Bon Ami o Scotch Brite grises
(únicamente).
• PRECAUCIÓN: NO utilice almohadillas Scotch Brite verdes
por ningún motivo, ya que dañan la supercie de la bañera.
Figura 14B
Figura 15
Espátula de plástico
Jacuzzi® Base para Ducha: Instalación y Operación www.jacuzzi.com Page 21
Page 22
Notas:
Espanõl
Page 22 www.jacuzzi.com Jacuzzi
®
Base para Ducha: Instalación y Operación
Page 23
Garantía Limitada de Tinas de Jacuzzi Luxury Bath
Producto Base para Ducha
COBERTURA DE LA GARANTÍA
Jacuzzi Luxury Bath ( la "Compañía") ofrece la siguiente garantía limitada expresa a los compradores originales de cualquier producto de los sistemas de baños de
ducha de Jacuzzi Luxury Bath Builder Group Bath Product ("unidad") que compren el producto para uso personal o de una sola familia ("usuario"). La Compañía
se compromete a la reparación o sustitución, según sea su decisión , de la unidad o sus equipos, de conformidad con los siguientes términos y condiciones. Las
unidades en uso comercial quedan excluídas de cualquier cobertura de garantía.
GARANTÍA LIMITADA DE UN AÑO EN LOS SISTEMAS DE BAÑOS DE DUCHA
Nuestra garantía limitada en los productos de los sistemas de baños de ducha es de un (1) año. La garantía cubre a la unidad y a los componentes instalados de
fábrica (v.g. la bomba, el motor) en contra de cualquier defecto de material o de construcción. La cobertura de la garantía empieza el día que el usuario compró la
unidad.
GARANTÍA LIMITADA DE NOVENTA DÍAS ( REPUESTOS ÚNICAMENTE) EN OPCIONES Y ACCESORIOS
Nuestra garantía limitada en las opciones y accesorios de los repuestos únicamente fabricados por la Compañía es de noventa (90) días. Nuestra garantía cubre
las opciones y accesorios fabricadas por la Compañía (v.g. juego de cascadas, vestiduras, faldas) en contra de cualquier defecto de material o de construcción. La
cobertura de la garantía empieza el día que el usuario compró la opción o accesorio.
LIMITACIONES DE LA GARANTÍA
Nuestra garantía limitada no cubre los defectos, daños o fallas ocasionados por el distribuidor, instalador, o cualquier otra persona, ni los que resulten, sin
limitaciones, de cualquiera de los casos siguientes: descuido en el manejo (levantamiento de la unidad al usando la plomería como mango, abresión de los
terminados, etc.), modicación de cualquier tipo por cualquier razón (incluso modicaciones para cumplir con las normas de los códigos locales), instalación
inadecuada (incluso instalación no conforme a las instrucciones y especicaciones que acompañan a la unidad); conexiones proporcionadas por el instalador del
equipo; improprio abasto de voltaje o alguna modicación eléctrica no autorizada; mal uso; operación incorrecta; o falta de mantenimiento adecuado de rutina,
operación de la unidad sin la cantidad mínima de agua que se especica o a una temperatura del agua inadecuada; uso de limpiadores abrasivos o improprios; o
desastres naturales como relámpagos, inundaciones, terremotos, etc.
Ademas, la COMPAÑÍA NO SERÁ RESPONSABLE POR DAÑOS INCIDENTALES O CONSECUENCIALES o pérdidas que se deriven de cualquier causa (v.g.,
daño del agua a las alffombras, techos, pérdida de uso, etc.) incluso su propia negligencia, daños a, relativos a, o que resulten de las partes cromadas cuando se
usen en la unidad sustancias químicas para piscina o "spa"; equipo opcionál de tina no fabricado por la Compañía pero provisto por el Distribuidor, instalador o por
la Compañía; el uso anterior de la unidad para hacer demostraciones, o defectos que debieran haberse descubierto antes de la instalación. Esta garantía limitada
no incluye: mano de obra, transporte, u otros costos en los que se incurra en la remoción y/o reinstalación de la unidad original y/o instalación de una unidad de
reemplazo; cualquier costo relativo a lograr el acceso para la reparación, o daño por pérdida de uso, incluso pérdida de ventas, utilidades o ventajas comercionales
de cualquier tipo en cualquier circunstancia. Las unidades en uso comercial quedan excluídas de cualquier cobertura de garantía.
La cobertura de la garantía se proporciona únicamente en los Estados Unidos de América y Canadá.
EXCLUSIÓN DE GARANTÍAS IMPLÍCITAS
GARANTÍAS APLICABLES DE MERCANTIBILIDAD Y ADECUACIÓN PARA UN PROPÓSITO DETERMINADO SON NEGADAS TOTALMENTE O HASTA EL
LIMITE COMPLETO PERMITIDO CONFORME A LA LEY.
AVISO: Esta garantía le ofrece derechos legales concretos y es posible que además tenga usted otros derechos que varían de un estado a otro. No existen
garantías aplicables a los productos Jacuzzi Luxury Bath, excepto los que aquí se expresan o los implícitos en leyes estatales y federales aplicables. La compañía
no se hace responsable por declaraciones o interpretaciones que se hagan de cualquier forma y que resulten más amplias o que no correspondan con la literatura
autorizada que proporciona la Compañía.
Algunos estados no permiten limitaciones a la duración de una garantía implícita, o la exclusión o limitación de daños incidentales o consecuenciales, de tal forma
que las limitaciones o exclusiones antes descritas quizá no sean aplicables a usted.
RESPONSABILIDAD DE LA TARJETA DE GARANTÍA
La tarjeta anexa, que ya incluye la dirección de la Compañía, y que tiene por objeto el registro de la unidad para nes de garantía debe llenarse antes de que hayan
pasado (30) treinta días de la compra y enviarse a Jacuzzi Luxury Bath para que esta garantía entre en vigor.
Jacuzzi®, Base para Ducha
E1Z4000Y, Junio 2013
Jacuzzi Luxury Bath
14525 Monte Vista Avenue
Chino, California, 91710
Page 24

RESPONSABILIDAD DE TERCEROS
Es responsabilidad del instalador o del contratista constructor que actúen en nombre del usuario realizar una inspección de la unidad antes de instalarla. Ellos son
responsables de asegurarse de que la unidad no tiene defectos ni daños. Se ponen avisos en la unidad y en la caja que la contiene para advertir al instalador sobre
esta responsabilidad. En caso de que haya algún problema, no debe instalarse la unidad. La Compañía no se hace responsable de fallas o daños que podrían
haberse detectado, reparado o evitado mediante una inspección apropiada y pruebas antes de la instalación.
Cualquier daño que ocurra durante el trayecto es responsabilidad del transportista. El usuario o instalador DEBE abrir la caja y revisar que la unidad no tenga
ningún daño, al momento de la entrega. Si se encuentra algún daño, debe informarles de inmediato al vendedor y al transportista por escrito y debe solicitarse una
inspección. En caso de que el transportista no responda, debe avisarles al vendedor y al transportista. Los reclamos de ete deben presentarse inmediatamente
después.
Es responsabilidad del instalador, contratista constructor o usuario proporcionar acceso para servicio. La Compañía no es responsable por ningún costo incurrido
para obtener acceso para reparación. El usuario deberá afrontar con estos gastos y, si es apropiado, deberá recobrar este costo del instalador.
Los daños que ocurran a la unidad durante su instalación son responsabilidad del instalador y/o del contratista constructor y daños que ocurran después de la
instalación de la unidad son responsabilidad del usuario.
Fallas en cualquier equipo opcional son responsabilidad única del fabricante del equipo. (Opciones y accesorios fabricadas por la Compañía tienen garantía de
noventa (90) días desde la fecha original de su compra para los repuestos únicamente).
El Distribuidor o Vendedor es responsable de conocer los requisitos de los códigos locales y de noticar al contratista instalador y o al usuario de estos requisitos al
momento de su compra. La Compañía no es responable por ningún costo incurrido en la modicación del producto para conseguir la aprobación del código, a n
de obtener la aprobación municipal, estatal o del condado para el código en los E.E.U.U., o códigos municipales o provincialos un Canadá.
SERVICIO DE GARANTÍA
Para benecio del cliente, la Compañía tiene una lista de proveedores de servicio independientes que pueden realizar las reparaciones requeridas para el servicio
de garantía. Dichas empresas no son ni agentes ni representantes de la Compañía y no pueden obligar a la Compañía por palabra o conducta.
La Compañía debe proporcionar el servicio de garantía que se describe arriba, cuando se hayan cumplido las siguientes condiciones: la falla es de una naturaleza
o de un tipo que queda cubierto por la garantía; el usuario le ha informado a un Agente autorizado o Representante del Departamento de Garantías cuál es la
naturaleza del problema durante el período cubierto por la garantía; el usuario le ha entregado a dicho agente o representante pruebas irrefutables (v.g. pruebas de
compra o instalación) de que la falla ocurrió o se descubrió dentro del período de garantía; una persona autorizada de servicio independiente o representante de la
Compañía ha tenido la oportunidad de inspeccionar la unidad durante horas hábiles regulares dentro de un lapso razonable después de que el usuario reportó la
falla.
A n de obtener un servicio de garantía, consulte su directorio telefónico para encontrar al Agente de Servicio Autorizado de Jacuzzi Luxury Bath que más cerca le
quede. Describa su problema y el Agente de Servicio Autorizado inspeccionará la unidad y le ofrecerá el servicio que requiere la garantía.
En caso de que no peuda ocnseguir a un Agente de Servicio Autorizado de Jacuzzi Luxury Bath, escriba o llame a:
Jacuzzi Luxury Bath
14525 Monte Vista Avenue
Repuestos Únicamente
Garnatía Limitada de
de Accesorio(s)
Noventa Días
Repuestos Únicamente
Garnatía Limitada de
de Accesorio(s)
Noventa Días
Chino, California, 91710
Call: 800-288-4002
Para obtener un reemplazo según la garantía para componentes instalados de fábrica para opciones abastecidos por la Compañía y accesorios
fabricados y abastecidos por la Compañía, llame o escriba al domicilio que abajo se señala. Proporcione una descripción del problema y una
prueba de compra. Recibirá instrucciones de cómo obtener su reemplazo y de cómo devolver, a sus expensas, el o los componentes, opciones o
accesorios defectuosos.
Todas las partes, equipos y reparaciones asumirán el resto del lapso de garantía de la parte o partes reemplazados.
La obligación de garantía de la Compañía quedarán descargadas con la oferta de reemplazo o reparación. En caso de que el cliente se niegue a
aceptar la solución, se da por terminada la obligación de cumplimiento de garantía de la Compañía.
Para que esta garantía entre en vigor, esta tarjeta debe llenarse y enviarse
al domicilio que está impreso al reverso, antes de que hayan pasado (30)
treinta días después de la fecha de compra.
Nombre del Jefe de Familia ___________________________________
Domicilio _________________________________________________
Ciudad ____________________Estado _____ Código Postal ________
Fecha de compra/ocupación __________________________________
Nombre del modelo _________________________________________
Número de serie ___________________________________________
Nombre del distribuidor/constructor _____________________________
Dirección del distribuidor/constructor ___________________________
1. ¿Cómo se enteró de la existencia de este producto de Jacuzzi®, protegi?
( ) Anuncio Publicitario ( ) Artículo en revista, periódico
( ) Visita a Proveedor/distribuidor
( ) Sección páginas amarillas
( ) Constructor/Plomero/Remodelador ( ) Decorador/Arquitecto
( ) Visité Revendedor/Ferreteria
( ) Publicidad de boca....amigo/pariente/conocido
( ) Otro (por favor describa) _______________________________
2. ¿Quien fue la primera persona que le dio información sobre este
( ) Proveedor de productos de baño ( ) Constructor
( ) Remodelador ( ) Contratista de productos de plomería
( ) Decorador/Arquitecto ( )Ya estaba instalado
3. ¿Cual fue la principal razón para la compra?
( ) El estilo ( ) Servicio de garantía ( ) Accesorios del producto
( ) Marca de Fábrica ( ) Precio ( ) Hydroterapía
( ) Reventia de Casa
( ) Otro _______________________________________________
4. ¿Quien tomó la decisión nal sobre qué producto comprar?
( ) Yo mismo ( ) Cónyuge ( ) Cónyuge y yo juntos
( ) Otro miembro de la familia ( ) Diseñador/Arquitecto
( ) Constructor/ Plomero/Remodelador ( )Ya estaba instalado
5. ¿Quien Instaló? ( ) Ya Instalada/Casa Nueva
( ) Contratista/Plomero Durante Renovación
( ) Usted/Cónyuge Durante Renovación
( ) Otro (Especique) ____________________________________
6. ¿Cuales actualmente el valor en el mercado de esta propiedad?
Aproximadamente $ ______________________________________
7. ¿Qué edad tiene el jefe de familia? ______________________ años
8. ¿Cuales otros fabricantes consideró usted?
( ) Eljer ( ) Lasco ( ) Price Pster ( ) Aqua Glass
( ) Kohler ( ) American Standard ( ) Sterling
( ) Otro (Especifque) ____________________________________
9. ¿Cuanto tiempo pasó usted buscando antes de compar su unidad?
( ) 1 dia ( ) 2 meses-6meses
( ) 2-7 dias ( ) 6 meses-1año
( ) 1 semana-2 semanas ( ) 1 años-2 años
( ) 2 semanas-4 semanas ( ) mas de 2 años
( ) 1 mes-2 meses
10. Aproximadamente, ¿cuánto tiempo han vivido en esa casa?
11. Por favor indique, aproximadamente, ¿cuál es el ingreso total al año de
( ) Hasta $24.999 ( ) De $50.000 a $74.999
( ) De $25.000 a $29.999 ( ) De $75.000 a $99.999
( ) De $30.000 a $39.999 ( ) De $100.000 a $149.999
( ) De $40.000 a $49.999 ( ) $150.000 y más
12. ¿Fue su proceso de compras?
( ) Muy fácil ( ) Fácil ( ) Dicil ( ) Muy Dicil
su hogar?
producto (especicaciones, precios, etc)?
Tarjeta de Registro
para la Garantía
E124000Y
Page 25
BASES DE DOUCHE
Français
CONSIGNES D’INSTALLATION ET D’UTILISATION
Jacuzzi Luxury Bath
14525 Monte Vista Avenue
Chino, CA 91710
1-800-288-4002
www.jacuzzi.com
Installation et utilisation de la base de douche www.jacuzzi.com Page 25
Page 26
Table des matières
Table des matières ........................................................................................................................................................ 26
Renseignements sur le produit . .................................................................................................................................... 26
Caractéristiques des bases de douche CatalinaMC ....................................................................................................... 27
Caractéristiques des bases de douche CaymanMC Tru-LevelMC .................................................................................. 28
Consignes d’installation pour les bases de douche CatalinaMC .................................................................................... 29
Consignes d'installation pour les bases de douche CaymanMC Tru-LevelMC ............................................................... 30
Nettoyage après installation . ........................................................................................................................................ 32
Dimensions de disposition des tuyaux (néo-angle uniquement) .................................................................................. 32
Français
Consignes d’installation et de retrait du couvercle d’évacuation CatalinaMC ................................................................. 33
Garantie ......................................................................................................................................................................... 35
Renseignements sur le produit
REMARQUE
Conservez ces consignes pour utilisation ultérieure. Notez sur le formulaire ci-dessous votre modèle et numéro de
série pour consultation ultérieure.
Date d’achat
Acheté chez
Installé par
Numéro de série
Modèle
Installateur : laissez le manuel au propriétaire.
Propriétaire : lisez ce manuel et gardez-le pour consultation future.
Page 26 www.jacuzzi.com Installation et utilisation de la base de douche
Page 27

Caractéristiques des bases de douche Catalina
A
A
MC
C
B
Conguration
du produit
Évacuation
centrée
D
Évacuation centrée
(côté seuil)
*Ajoutez 0,125 po (3mm) pour connaître les dimensions de disposition des tuyaux.
Numéro de pièce de
la base de douche
MB96000 CAT4836 SCX XXX X 48”
MB71000 CAT4848 SCX XXX X 48”
Code produit
marketing (MPC)
B
D
C
Évacuation à gauche/à droite
(côté seuil)
Dimensions
A B C D Poids
(1219mm)
(1219mm)
36”
(914mm)
48”
(1219mm)
17-3/16”
(437mm)
23-3/16”
(589mm)
24”
(610mm)
24”
(610mm)
Français
50 lbs.
(23kg)
55 lbs.
(25kg)
Évacuation
à gauche/à
droite
MB92000 CAT6042 SCX XXX X 60”
MB76000 CAT6030 SLX XXX X 60”
MB80000 CAT6030 SRX XXX X
MB84000 CAT6032 SLX XXX X 60”
MB88000 CAT6032 SRX XXX X
(1524mm)
(1524mm)
(1524mm)
42”
(1067mm)
30”
(762mm)
32”
(813mm)
20-3/16”
(513mm)
14-3/16”
(360mm)
15-3/16”
(386mm)
30”
(762mm)
5-7/8”
(149mm)
5-7/8”
(149mm)
68 lbs.
(31kg)
55 lbs.
(25kg)
59 lbs.
(27kg)
Les caractéristiques techniques du produit peuvent être modiées sans préavis.
Remarque : il s’agit d’un produit de qualité professionnelle. Des connaissances relatives aux techniques de
construction, à la plomberie et l’installation électrique conformes aux codes sont nécessaires à une installation
adéquate et à la satisfaction de l’utilisateur. Nous vous recommandons d’obtenir les services d’un entrepreneur agréé
pour effectuer l’installation des produits Jacuzzi Luxury Bath. Notre garantie ne couvre pas les problèmes causés par
une mauvaise installation.
Installation et utilisation de la base de douche www.jacuzzi.com Page 27
Page 28

Caractéristiques des bases de douche CaymanMC Tru-Level
Threshold Side
Threshold Side
MC
E
A*
B
C
D
B
C
Square
A*
D
Rectangular
*Ajoutez 0,125 po (3mm) pour connaître les dimensions de disposition des tuyaux.
Conguration
du produit
Français
Carrées/
évacuation
centrale
Rectangulaires/
évacuation
centrale
Néo-angle/
évacuation
centrale
Numéro
de pièce
de la
base de
Code produit
marketing
(MPC)
douche
S344000 CAY3636SCXXXX 36"
S348000 CAY4242SCXXXX 42"
S364000 CAY4848SCXXXX 48"
S356000 CAY4834SCXXXX 48"
S368000 CAY6036SCXXXX 60"
T228000 CAY6034SCXXXX 60"
T232000 CAY4234SCXXXX 42"
T354000 CAY3642SCXXXX 36"
T362000 CAY4236SCXXXX 42"
T366000 CAY4248SCXXXX 42"
T370000 CAY6042SCXXXX 60"
T374000 CAY4832SCXXXX 48"
T358000 CAY3838SNXXXX 38"
S352000 CAY4242SNXXXX 42"
S360000 CAY4848SNXXXX 48"
(914mm)
(1067mm)
(1219mm)
(1219mm)
(1524mm)
(1524mm)
(1067mm)
(914mm)
(1067mm)
(1067mm)
(1524mm)
(1219mm)
(965mm)
(1067mm)
(1219mm)
A B C D E F G H
36"
(914mm)
42"
(1067mm)
48"
(1219mm)
34"
(864mm)
36"
(914mm)
34"
(864mm)
34"
(864mm)
42"
(1067mm)
36"
(914mm)
48"
(1219mm)
42"
(1067mm)
32"
(813mm)
38"
(965mm)
42"
(1067mm)
48"
(1219mm)
17.50"
(445mm)
20.25"
(514mm)
23.25"
(591mm)
16.50"
(419mm)
17.50"
(445mm)
16.50"
(419mm)
16.50"
(419mm)
20.25"
(514mm)
17.50"
(445mm)
23.25"
(591mm)
20.25"
(514mm)
15.00"
(381mm)
14.50"
(368mm)
16.06"
(408mm)
16.25"
(413mm)
Dimensions
18.00"
(457mm)
21.00"
(533mm)
24.00"
(610mm)
24.00"
(610mm)
30.00"
(762mm)
30.00"
(762mm)
21.00"
(533mm)
18.00"
(457mm)
21.00"
(533mm)
21.00"
(533mm)
30.00"
(762mm)
24.00"
(610mm)
14.50"
(368mm)
16.06"
(408mm)
16.25"
(413mm)
F
A
C
D
H
B
Neo-Angle
- - - - 24 lb
- - - - 34 lb
- - - - 43 lb
- - - - 30 lb
- - - - 43 lb
- - - - 39 lb
- - - - 27 lb
- - - - 28 lb
- - - - 28 lb
- - - - 38 lb
- - - - 50 lb
- - - - 29 lb
17.38"
(441mm)
21.50"
(546mm)
27.50"
(699mm)
29.00"
(737mm)
29.00"
(737mm)
29.00"
(737mm)
17.38"
(441mm)
21.50"
(546mm)
27.50"
(699mm)
39.00"
(991mm)
45.00"
(1143mm)
53.00"
(1346mm)
G
Poids
(11kg)
(15.4kg)
(19.5kg)
(13.6kg)
(19.5kg)
(17.7kg)
(12.2kg)
(12.7kg)
(12.7kg)
(17.2kg)
(22.7kg)
(13.2kg)
23 lb
(10.4kg)
29 lb
(13.2kg)
39 lb
(17.7kg)
Les caractéristiques techniques du produit peuvent être modiées sans préavis.
Remarque : il s’agit d’un produit de qualité professionnelle. Des connaissances relatives aux techniques de
construction, à la plomberie et l’installation électrique conformes aux codes sont nécessaires à une installation
adéquate et à la satisfaction de l’utilisateur. Nous vous recommandons d’obtenir les services d’un entrepreneur agréé
pour effectuer l’installation des produits Jacuzzi Luxury Bath. Notre garantie ne couvre pas les problèmes causés par
une mauvaise installation.
Page 28 www.jacuzzi.com Installation et utilisation de la base de douche
Page 29

Consignes d’installation pour les bases de douche Catalina
Évacuation centrée Évacuation à gauche/à droite
Figure 1. Disposition préliminaire des tuyaux (référez-vous au tableau des produits pour connaître
Retirez la base de douche de son emballage. Ne détruisez pas le carton de livraison tant que vous n’avez pas vérié
1
le bon état du produit. Si l’inspection révèle des dommages ou des défauts dans le ni de la douche, n’installez
MC
pas la base de douche. La responsabilité de Jacuzzi Luxury Bath quant aux dommages causés par l’expédition
prend n au moment de la livraison au transporteur de produits en bon état. Communiquez avec le transporteur pour
toute réclamation pour des dommages. Les réclamations relatives à des dommages ou défauts faites après l’installation
ne sont pas couvertes par la garantie. Jacuzzi n’est pas responsable des défauts ou dommages qui auraient pu être
découverts, réparés ou évités en effectuant cette inspection et procédure d’essai.
Planiez l’installation par rapport aux surfaces des murs nis. Prenez en compte les dimensions de la base de douche et de
2
la porte. Installez les pièces de garniture en option après toutes les autres opérations d’installation.
Prévoyez une ouverture d’au moins 5 x 5 po dans le sous-plancher. Cette ouverture doit se situer au niveau des conduites
3
centrales ( ) du trou d’évacuation de la base. Référez-vous au tableau des produits. L’ouverture est destinée à accueillir
un tuyau d’évacuation de 2 po. Ce dernier doit se situer entre 0,25 po et 0,5 po de hauteur par rapport à la surface du
sous-plancher. Référez-vous à la Figure 1. Si le sous-plancher est de niveau égal, il n’y a pas d’autre préparation à faire.
Vous pouvez installer la base. Si le sous-plancher n’est pas de niveau égal, nivelez la base de douche en étalant du
composé de nivellement, mortier, plâtre ou mousse structurelle à expansion minimale avec une densité d’au moins 5 livres
par pied cube (lb/pi³).
REMARQUE : le composé doit entrer en contact avec toute la surface inférieure des pieds de la base. La base ne doit pas
être soutenue par sa bride. Les deux côtés d’un joint ou d’une épissure d’un sous-plancher doivent être au même niveau.
l'emplacement de l'évacuation)
Cale de 2 x 4 po
Cale de 2 x 4 po
Français
*4,5 po
o
90
*4,5 po du sous-plancher à la surface supérieure de la cale
Tuyau
d'évacuation
de 2 po
Ouverture
5 x 5 po
(max)
Modèles à
évacuation
o
90
*5,5 po du sous-plancher à la surface supérieure de la cale
à gauche
o
90
Tuyau d'évacuation de 2 po
*5,5 po
Ouverture 5 x 5 po (max)
modèles
évacuation
à droite
Placez et installez la base sur l’évacuation. Référez-vous à la Figure 2. Positionnez le raccord d’évacuation sur le centre
4
du tuyau d’évacuation, et posez délicatement la base de douche. Appuyez fermement jusqu’à ce que la base soit bien
en place. Vériez le niveau de la base dans deux directions. Une cale élevée est nécessaire à l’arrière de la base pour le
nivellement de l’avant vers l’arrière (référez-vous aux Figures 3 et 4). Allez à la page 31 pour poursuivre l'installation.
Figure 3 - Nivellement de l'avant vers l'arrière
(modèles à évacuation centrée)
Cale de 0,875po de haut
*Hauteur variable de 4 à 4,75 po
Figure 4 - Nivellement de l'avant vers l'arrière
(modèles à évacuation à gauche/à droite)
Cale de 0,5po de haut
Étalez le mortier ou le composé de nivellement
de façon homogène sur toute la surface. Levez
et posez la base sur le centre du tuyau
d'évacuation, et mettez-la en place.
F igure 2
Niveau
Niveau
o
90
Avant de la base
Avant de la base*Hauteur variable de 4,875 à 5,125 po
*4-3/16”
*5-1/8”
Installation et utilisation de la base de douche www.jacuzzi.com Page 29
Page 30

Consignes d'installation pour les bases de douche CaymanMC Tru-Level
Figure 5. Disposition préliminaire des tuyaux (référez-vous au tableau des produits pour connaître
La base de douche ne dispose pas d'une évacuation de douche, un élément nécessaire pour que l'installation soit
1
MC
complète. Retirez la base de douche de son emballage. Ne détruisez pas le carton de livraison tant que vous n'avez pas
vérié le bon état du produit. Si l'inspection révèle des dommages ou des défauts dans le ni de la douche, n'installez
pas la base de douche. La responsabilité de Jacuzzi Luxury Bath quant aux dommages causés par l'expédition prend
n au moment de la livraison au transporteur de produits en bon état. Communiquez avec le transporteur pour toute
réclamation pour des dommages. Les dommages ou défauts dont la réclamation a été effectuée après l'installation ne sont
pas couverts par la garantie. Jacuzzi n'est pas responsable des défauts ou dommages qui auraient pu être découverts,
réparés ou évités en suivant cette procédure d'inspection et d'essai.
2
Planiez l'installation par rapport aux surfaces des murs nis. Prenez en compte les dimensions de la base de douche et de
la cabine. Installez les pièces de garniture en option après toutes les autres opérations d'installation.
3
Prévoyez une ouverture d'au moins 5 x 5 po. dans le sous-plancher. Cette ouverture doit se situer au niveau des conduites
centrales ( ) du trou d'évacuation de la base. Référez-vous au tableau des produits. L'ouverture est destinée à accueillir
un tuyau d'évacuation de 2 po. Ce dernier doit se trouver à une hauteur comprise entre 0,25 po. et 0,5 po. par rapport
à la surface du sous-plancher (voir la Figure 5). Si le sous-plancher est de niveau égal, il n'y a pas d'autre préparation à
faire. Vous pouvez installer la base. Si le sous-plancher n'est pas de niveau égal, nivelez la base de douche en étalant du
composé de nivellement, du mortier, du plâtre ou de la mousse structurelle à expansion minimale avec une densité d'au
moins 5 livres par pied cube (lb/pi³).
REMARQUE : le composé doit entrer en contact avec toute la surface inférieure des pieds de la base. La base ne doit pas être
soutenue par sa bride. Les deux côtés d'un joint ou d'une épissure d'un sous-plancher doivent être au même niveau.
l'emplacement de l'évacuation)
Français
Cale de 2 x 4 po.
Cale de 2 x 4 po.
o
90
o
90
Tuyau
d'évacuation
de 2 po.
*7 po. du sous-plancher à la surface supérieure de la cale
Ouverture de
5 x 5 po. (max)
*7 po.
o
90
*7 po. du sous-plancher à la surface supérieure de la cale
*7 po.
o
90
Tuyau
d'évacuation
de 2 po.
Ouverture de
5 x 5 po. (max)
Néo-angle Carrée ou rectangulaire
Placez et installez la base sur l'évacuation (voir la Figure 6). Positionnez le raccord d'évacuation sur le centre du tuyau
4
d'évacuation, et posez délicatement la base de douche. Appuyez fermement jusqu'à ce que la base soit bien en place.
Vériez le niveau de la base dans deux directions. Une cale élevée de 0,25 po. est nécessaire à l'arrière de la base pour le
nivellement de l'avant vers l'arrière (voir la Figure 7).
Bride Niveau
Cale de 0,25 po. de haut
Étalez le mortier ou le composé de nivellement
de façon homogène sur toute la surface. Levez
et posez la base sur le centre du tuyau
d'évacuation, et mettez-la en place.
Figure 6
Figure 7. Nivellement de l'avant vers l'arrière
Dessus du seuil : utilisez du silicone
100 % sous le carreau ou tout autre
matériau de finition murale.
o
90
*6 po.
Avant de la base Hauteur variable de 5,75 à 6 po.
Page 30 www.jacuzzi.com Installation et utilisation de la base de douche
Page 31

Consignes d'installation - Suite (tous les modèles)
Figure 9
Figure 10
Ne levez pas un coin pour niveler la base. Le mortier risquerait de ne plus être en contact.
MISE EN GARDE
Fixez la bride de la base de douche au poteau d'ossature murale et bloquez-la à l'aide des vis en acier inoxydable fournies.
5
Utilisez au moins trois vis pour chaque partie de la bride (voir la Figure 8). S'il y a un espace entre la bride de la base et le poteau
ou la cale, une cale doit être utilisée pour éviter que la bride ne se déforme ou ne se ssure.
Utilisez les vis en acier inoxydable fournies.
MISE EN GARDE
Figure 8
Cale
Bride de la base
Utilisez les vis
fournies
Espace
Montant
Cale le
Utilisez les vis
fournies
Bride de la base
Lamelle de
nivellement
Montant
Cale le
Bride de la base
Utilisez les vis
fournies
Lamelle de
nivellement
Montant
INCORRECT INCORRECT
S'il y a un espace entre la bride de la base et le poteau ou la cale, des cales doivent être utilisées.
IMPORTANT
Serrez l'évacuation conformément aux instructions fournies avec la trousse d'évacuation. Une fois l’évacuation complètement
6
CORRECT
installée, vériez que l’eau s’évacue correctement.
MISE EN GARDE
Si la base de douche ne s’évacue pas correctement, rectiez le problème avant de continuer l'installation.
L’installateur est responsable de l’étanchéité de l’installation, car toute fuite de l’évacuation est exclue de la garantie. Jacuzzi
n'est pas responsable des frais encourus pour la réinstallation.
Remettez en place le tamis si celui-ci est inclus dans votre trousse d'évacuation,
7
puis recouvrez le trou d'évacuation avec du ruban pour que le matériau de
Panneau de
ciment
nition ne puisse pas y entrer. Placez un panneau de ciment ou équivalent audessus de la bride de la base de douche et xez-le au poteau d'ossature murale
(voir la Figure 9).
Remettez en place le tamis si celui-ci est inclus dans votre trousse d'évacuation,
8
puis recouvrez le trou d'évacuation avec du ruban pour que le matériau de
nition ne puisse pas y entrer. Placez un panneau de ciment ou équivalent audessus de la bride de la base de douche et xez-le au poteau d'ossature murale
(voir la Figure 9).
Agent d'étanchéité au silicone
Agent d'étanchéité
au silicone
Trou d'évacuation
d'au moins 0,25 po.
Figure 11
Français
Cale
Trou d'évacuation d'au moins 0,25 po.
Ne mettez pas de silicone dans la fosse
d'évacuation
Silicone 100 % sous le carreau au-dessus
du rebord anti-écoulement qui empêche l'eau
d'entrer dans le périmètre avant.
Espace
de 0,125 po.
Carreau
Panneau
de
ciment
Adhésif à
carrelage
Cale
Installation et utilisation de la base de douche www.jacuzzi.com Page 31
Page 32
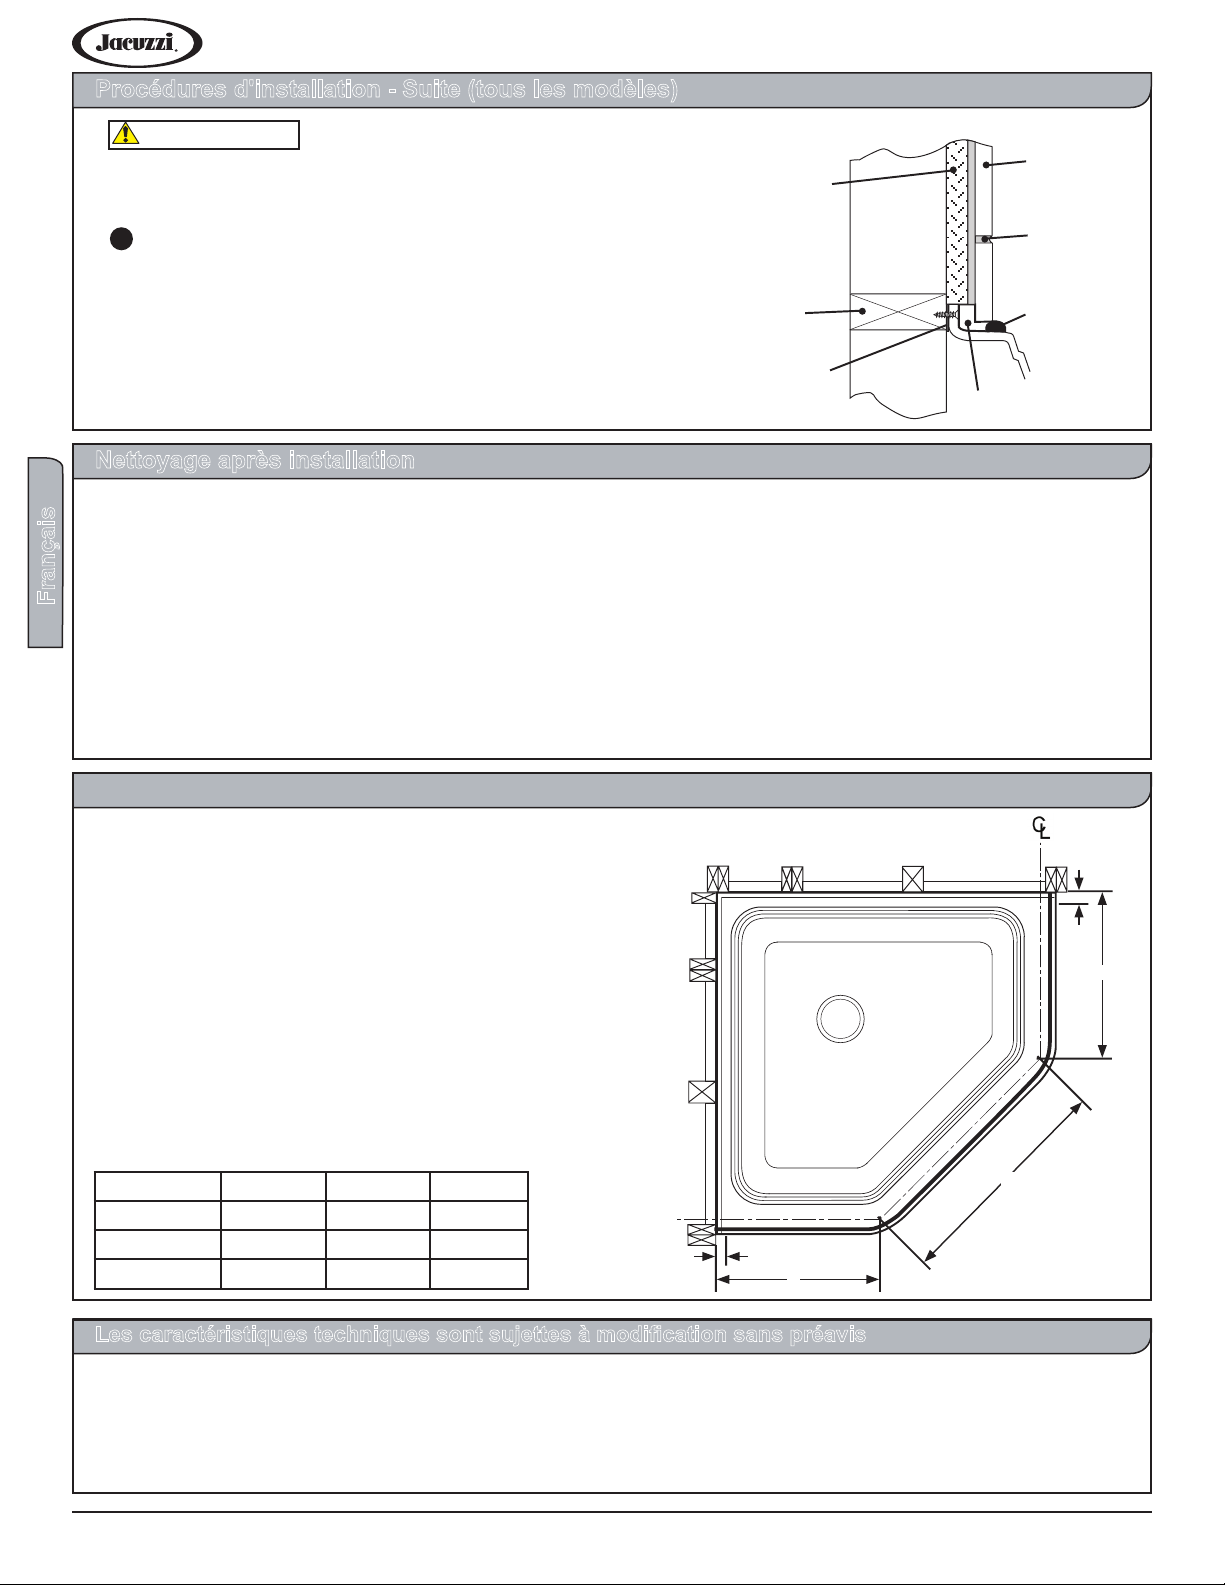
Procédures d'installation - Suite (tous les modèles)
Les trous d'évacuation sont
MISE EN GARDE
nécessaires pour évacuer les fuites par
l'intermédiaire d'un coulis à carreaux
non scellé.
Le remplissage de la zone « NE PAS REMPLIR » empêchera l'humidité
9
Panneau de
ciment
Figure 12
Carreau
Coulis
de reuer vers la base par l'intermédiaire des trous d'évacuation (voir
la Figure 12). Cette humidité est due à l'eau fuyant à travers le coulis à
carreaux. L'étanchéication du coulis à carreaux permettra d'éviter cette
fuite.
Cale
Cale
(si nécessaire)
POTEAU
Agent d'étanchéité
au silicone
NE PAS REMPLIR
Nettoyage après installation
• La nition acrylique apportera une élégance durable si l'entretien est correctement effectué. Pour ne pas ternir et rayer la
nition, n'utilisez jamais de nettoyants abrasifs ou de produits chimiques puissants. Un détergent liquide doux et de l'eau
chaude sufsent pour nettoyer les surfaces sales.
• Retirez le plâtre renversé au moyen d’une lame en bois ou en plastique. Les outils en métal risquent de rayer la surface. Les
taches laissées par le plâtre ou le coulis peuvent être éliminées en les frottant légèrement avec un détergent doux versé sur un
chiffon ou une éponge humide.
Français
• Les petites griffes qui ne pénètrent pas le ni en couleur peuvent être éliminées en effectuant un ponçage léger avec un papier
de verre mouillé/sec de 600 grains. Pour restaurer le ni brillant, utilisez un composé spécial tel que Meguiar’s M10 Mirror
Glaze. Si ce produit n’est pas disponible, utilisez une pâte à polir automobile suivie de l'application d'une cire automobile en
pâte.
• Les rayures et les stries profondes qui pénètrent la surface acrylique risquent de nécessiter une restauration. Renseignez-vous
sur les instructions spéciales auprès de votre revendeur Jacuzzi Luxury Bath.
Tableau des dimensions de disposition des tuyaux (néo-angle uniquement)
*C représente la dimension entre le poteau d'ossature
murale et l'avant des matériaux de nition utilisés dans
l'installation de la douche. Si des contours Jacuzzi Luxury
Bath sont utilisés, soustrayez 1,375 po. de la dimension A
pour obtenir les dimensions de la cabine vitrée. Si d'autres
matériaux sont utilisés, soustrayez leur épaisseur de la
dimension A.
POUR LES BASES DE DOUCHE CARRÉES ET
RECTANGULAIRES : si des contours Jaccuzi Luxury Bath
sont utilisés, soustrayez 1,375 po. du poteau mural de
chaque extrémité pour obtenir les dimensions de la cabine
vitrée (voir le tableau et l'illustration en première page). Si
d'autres matériaux sont utilisés, soustrayez leur épaisseur
du poteau mural de chaque extrémité.
Modèle A B C
3838N 16-3/4 po. 28 po. 1-3/8 po.
4242N 20-3/4 po. 27-3/8 po. 1-3/8 po.
4848N 26-3/4 po. 27-1/2 po. 1-3/8 po.
Déterminer les dimensions de la
cabine vitrée
*C
A
Les caractéristiques techniques sont sujettes à modication sans préavis
du seuil
*C
A
B
Jacuzzi Luxury Bath a obtenu les classications de code (normes) applicables habituellement offertes à l’échelle nationale pour les
produits de ce type. L’installateur/le propriétaire doivent déterminer la conformité au code local précis avant d’installer le produit.
Jacuzzi Luxury Bath n’effectue aucune représentation ou garantie relatives à la conformité au code et elle ne sera pas responsable
de cette dernière.
Page 32 www.jacuzzi.com Installation et utilisation de la base de douche
Page 33

Instructions d’installation et de retrait du couvercle d’évacuation Catalina
Encliquetez les 4 pattes
du couvercle d'évacuation
dans les 4 fiches de la grille.
Quatre pattes encliquetables
du couvercle
2
4
3
1
MC
Le couvercle d’évacuation CatalinaMC est conçu pour pouvoir être posé
de façon stable sur l’évacuation encastrée, comme illustré par la Figure
13.
Installation du couvercle d’évacuation
Placez le couvercle d’évacuation sur le haut de l’espace d’évacuation
encastré de la base de douche. Assurez-vous que les quatre pattes
encliquetables du couvercle d’évacuation sont alignées avec les quatre
ches de la grille, comme illustré dans la Figure 14A, avant d’appuyer
dessus pour nir la mise en place.
REMARQUE : il est indispensable d’aligner les ches de la grille avec
les pattes encliquetables du couvercle d’évacuation avant d’appuyer
dessus comme illustré dans la Figure 14B. Les jambes sont conçus pour
se adapter dans le jacuzzi crépine MB28827 (inclus dans la douche
achat de pan).
Retrait du couvercle d’évacuation
Tirez délicatement le couvercle d’évacuation vers le haut à l’aide
d’un outil non abrasif, comme une spatule en plastique (Figure 15).
N’UTILISEZ PAS un outil abrasif ou un outil aux bords coupants, quel
qu’il soit!
REMARQUE : le couvercle d’évacuation est composé de matériaux
fragiles, et en cas de chute accidentelle.
RISQUE DE BLESSURE ACCIDENTELLE! Ne laissez pas les enfants
utiliser cette unité à moins de les surveiller de près en permanence. Cet
équipement est exclusivement prévu pour une utilisation à l’intérieur.
Figure 13
Figure 14A
Français
Instructions d’entretien et de nettoyage du couvercle
d’évacuation
Les couvercles d’évacuation de Jacuzzi Luxury Bath sont
fabriqués à partir de matériaux durables et non poreux, qui,
lorsqu’ils sont correctement entretenus et nettoyés, résistent à
l’accumulation de saleté et aux tâches dans une large mesure
An d’entretenir correctement votre unité, veuillez suivre ces étapes
simples :
1. Commencez par nettoyer avec un produit vaisselle doux et de l’eau
chaude; puis, essuyez avec un chiffon doux légèrement humide
pour éliminer les résidus de produit nettoyant.
2. Pour les taches plus tenaces comme de la graisse, de l’huile, de
la peinture ou de l’encre, appliquez de l’alcool à friction sur la zone
affectée; puis, essuyez avec un chiffon propre et sec.
3. N’utilisez pas d’agents nettoyants abrasifs, de solvants, de produits
chimiques nocifs ou de produits détachants à la chaux. Ils peuvent
endommager le ni et annuler la garantie.
4. N’UTILISEZ PAS de chiffons ou d’éponges à récurer.
5. N’UTILISEZ PAS de lames de rasoir ou tout autre objet coupant qui
pourrait abîmer la surface.
6. N’UTILISEZ PAS de produits pour le bain issus du marché
secondaire et contenant du colorant.
7. Si vous ne savez si ce produit conviendrait à votre unité,
commencez par appliquer une très petite quantité du produit
sur une partie peu visible avant de l’utiliser sur une surface visible.
Pour les modèles Solid Surface Matte Finish (respectez ces directives
supplémentaires). Pour les taches les plus tenaces, Jacuzzi Luxury
Bath recommande l’utilisation des produits et du matériel de nettoyage
suivants :
Figure 14B
Figure 15
Spatule en plastique
• Mr. Clean Magic Eraser
• Soft Scrub, Bon Ami or Gray Scotch Brite Pads (uniquement)
• MISE EN GARDE : N’UTILISEZ PAS Green Scotch Brite Pads pour
quelque raison que ce soit, car ce produit endommagera la surface
de l’unité.
Installation et utilisation de la base de douche www.jacuzzi.com Page 33
Page 34

Remarques:
Français
Page 34 www.jacuzzi.com Installation et utilisation de la base de douche
Page 35

Garantie limitée de Jacuzzi Luxury Bath
Système de douche
COUVERTURE DE LA GARANTIE
Jacuzzi Luxury Bath (« l’Entreprise ») offre la garantie limitée expresse suivante à l’acheteur original d'un système de douche Jacuzzi Luxury Bath
(« l'unité ») qui a acheté ce produit pour un usage personnel ou unifamilial (« l'utilisateur »). L’Entreprise réparera ou remplacera, à son entière
discrétion, l'unité ou son équipement conformément aux conditions et modalités suivantes. Les unités réservées à un usage commercial ne sont
pas garanties.
GARANTIE LIMITÉE D'UN AN SUR LES SYSTÈMES DE DOUCHE
Notre garantie limitée sur les systèmes de douche est d'un (1) an. Notre garantie couvre les défauts de matériaux ou de fabrication que peuvent
présenter l'unité et les composants installés en usine (pompe ou moteur par ex.). La garantie entre en vigueur à la date d'achat de l’unité par
l’utilisateur.
GARANTIE LIMITÉE DE QUATRE-VINGT-DIX JOURS (PIÈCES SEULEMENT) SUR LES OPTIONS ET LES ACCESSOIRES
Notre garantie limitée sur les options et les accessoires est de quatre-vingt-dix (90) jours pour les pièces seulement. Notre garantie couvre
les défauts de matériaux ou de fabrication que peuvent présenter les options et accessoires fabriqués par l’Entreprise (trousses de bec de
remplissage, trousses de garniture ou jupes par ex.). La garantie entre en vigueur à la date d'achat de l'option ou de l'accessoire par l’utilisateur.
LIMITES DE LA GARANTIE
Notre garantie limitée ne couvre pas les défauts, les dommages ou les pannes causés par le transporteur, l’installateur, l'utilisateur ou d’autres
personnes ou découlant, sans en exclure d’autres, de l’un ou l’autre des éléments suivants : la manipulation négligente (soulever l’unité par la
plomberie, abraser le ni, etc.); les modications de toute sorte pour quelque raison que ce soit (y compris les modications effectuées pour
satisfaire les codes locaux); une mauvaise installation (y compris toute installation non conforme aux directives et spécications fournies avec
l’unité); les connexions fournies par l’installateur de l’équipement; une mauvaise tension d’alimentation ou une modication électrique non
autorisée; une mauvaise utilisation; un fonctionnement inadéquat ou l'absence d'une routine d'entretien appropriée; le fonctionnement de l'unité
sans la quantité minimale d'eau précisée ou à une température d’eau inappropriée; l’utilisation de nettoyants abrasifs ou inappropriés ou les
catastrophes naturelles, comme la foudre, les inondations, les tremblements de terre, etc.
En outre, L’ENTREPRISE NE SERA PAS RESPONSABLE DES DOMMAGES CONSÉCUTIFS OU INDIRECTS ou des pertes découlant de
toute cause (par ex., dommages d’eau aux tapis, plafonds, perte d’utilisation, etc.), y compris de sa propre négligence; les dommages causés à,
concernant ou découlant : de pièces plaquées lorsque des produits chimiques sont utilisés dans l’unité; de l’équipement en option non fabriqué
par l’Entreprise, mais fourni par le dépositaire, l’installateur ou l’Entreprise; d’un usage antérieur de l’unité à titre de présentoir fonctionnel; ou de
défauts qui auraient dû être découverts avant l’installation. Cette garantie limitée ne comprend pas : la main d’œuvre, le transport ou les autres
frais encourus pour le retrait et/ou la réinstallation de l’unité originale et/ou l’installation d’une unité de rechange; les frais encourus pour obtenir
l’accès pour effectuer la réparation; ou les dommages causés par la perte d’utilisation, y compris la perte de ventes, de prots ou d’avantages
concurrentiels de toute sorte, quelles que soient les circonstances. Les unités réservées à un usage commercial ne sont pas garanties.
La garantie n'est valable qu'aux États-Unis d’Amérique et au Canada.
EXCLUSION DES GARANTIES IMPLICITES
LES GARANTIES IMPLICITES DE VALEUR MARCHANDE ET D’ADAPTATION À UN USAGE PARTICULIER SONT ENTIÈREMENT DÉCLINÉES
OU DANS LA MESURE LA PLUS GRANDE PERMISE PAR LA LOI.
AVIS : cette garantie vous confère des droits légaux précis et vous pouvez aussi avoir d’autres droits qui varient d’une province à l’autre. Il n’y a
pas de garanties qui s’appliquent aux produits Jacuzzi Luxury Bath à l’exception de ce qui est expressément indiqué aux présentes ou impliqué
par les lois fédérales et provinciales en vigueur. L'Entreprise ne sera pas responsable des déclarations ou des représentations effectuées sous
toute forme qui vont au-delà, qui sont plus vastes ou qui ne sont pas conformes à la documentation autorisée ou aux spécications fournies par
l’Entreprise.
Certaines provinces ne permettent pas les limites sur la durée des garanties limitées ou l’exclusion ou la limite des dommages consécutifs ou
indirects; par conséquent, les limites précédentes peuvent ne pas s’appliquer à votre cas.
RETOUR DE LA CARTE DE GARANTIE
Pour que garantie entre en vigueur, la carte d’enregistrement de garantie préadressée ci-jointe DOIT être remplie par l’acheteur dans un
délai de trente (30) jours à compter de l’achat et être envoyée par voie postale à Jacuzzi Luxury Bath.
Jacuzzi Luxury Bath Shower Base
E124000Y, juin 2013
Jacuzzi Luxury Bath
14525 Monte Vista Avenue
Chino, Californie 91710, États-Unis
Installation et utilisation de la base de douche www.jacuzzi.com Page 35
Page 36
RESPONSABILITÉS DES AUTRES
Il incombe à l’installateur ou à l’entrepreneur agissant au nom de l’utilisateur d'inspecter l’unité avant de l’installer. Celui-ci doit s’assurer que l’unité
ne présente aucun défaut ou dommage. Des avis sont placés sur et dans l’unité ainsi que sur la boîte d’expédition avisant l’installateur de cette
responsabilité. En cas de problème, l’unité ne doit pas être installée. L’Entreprise n’est pas responsable des pannes ou dommages qui auraient pu
être découverts, réparés ou évités grâce à une inspection et un essai appropriés avant l’installation.
Le transporteur est responsable des dommages qui surviennent pendant le transport. L’utilisateur ou l’installateur DOIT ouvrir la boîte et
vérier l'état de l’unité au moment de la livraison. Si des dommages sont découverts, ils doivent être immédiatement signalés au vendeur et au
transporteur par écrit et une inspection doit être demandée. Si le transporteur ne répond pas, vous devez le signaler au vendeur et au transporteur.
Vos réclamations de transport doivent être présentées dans un court délai.
Il incombe à l’installateur, l’entrepreneur ou l'utilisateur de fournir un accès pour le service. L'Entreprise n’est pas responsable des frais encourus
pour obtenir l’accès en cas de réparation. L'utilisateur sera responsable de tels frais et, le cas échéant, devra solliciter un recouvrement auprès de
l’installateur.
L’installateur et/ou l’entrepreneur sont responsables des dommages survenant pendant l’installation, tandis que l’utilisateur est responsable des
dommages survenant par la suite.
La défaillance d'un équipement en option relève de la responsabilité exclusive du fabricant de cet équipement. (Les options et accessoires
fabriqués par l'Entreprise sont garantis pendant quatre-vingt-dix (90) jours à compter de la date d'achat originale pour les pièces seulement.)
Il incombe au distributeur ou au dépositaire de connaître les exigences relatives aux codes locaux et de les communiquer à l’entrepreneur qui
effectuera l’installation et/ou à l'utilisateur au moment de l’achat. L’Entreprise n’est pas responsable des frais encourus pour modier un produit
pour se conformer à un code, comme les codes de construction de la ville, du conté ou de l’État aux États-Unis ou les codes municipaux ou
provinciaux au Canada.
SERVICE DE GARANTIE
Pour la commodité des clients, l’entreprise conserve une liste de réparateurs indépendants qui effectuent les réparations requises en vertu de la
garantie. Ces personnes ne sont pas des agents ou des représentants de l’Entreprise et ne peuvent pas lier l’Entreprise par leurs paroles ou leur
comportement.
L’Entreprise fournit le service de garantie décrit ci-dessus lorsque les conditions suivantes sont respectées : la panne est de nature ou de type
couvert par la garantie; l’utilisateur a informé l’agent de service agréé Jacuzzi Luxury Bath ou un représentant du service de la garantie de la nature
du problème pendant la période de garantie; des preuves concluantes (une preuve d’achat ou d’installation par ex.) sont fournies par l’utilisateur,
prouvant que la panne s’est produite ou a été découverte pendant la période de garantie; un réparateur indépendant autorisé ou un représentant
de l’Entreprise a reçu l'autorisation d’inspecter l’unité pendant les heures normales de travail dans un délai raisonnable après la signalisation du
problème par l’utilisateur.
An d’obtenir le service de garantie, consultez les pages jaunes pour trouver l'agent de service agréé Jacuzzi Luxury Bath le plus proche. Décrivez
le problème et l'agent de service agréé inspectera l'unité et fournira le service de garantie demandé.
Si vous n'arrivez pas à contacter un agent de service agréé Jacuzzi Luxury Bath, appelez le numéro suivant ou écrivez à l'adresse suivante :
de quatre-vingt-dix jours
(pièces seulement)
accessoires
Garantie limitée
sur les
de quatre-vingt-dix jours
(pièces seulement)
accessoires
Garantie limitée
sur les
Jacuzzi Luxury Bath
14525 Monte Vista Avenue, Chino, Californie 91710, États-Unis
Appelez le : 800-288-4002
Pour obtenir un remplacement de garantie pour les composants installés en usine ou les options et les
accessoires fournis par l’Entreprise et fabriqués et fournis par l’Entreprise, appelez le numéro indiqué ci-dessus
ou écrivez à l’adresse mentionnée ci-dessus. Fournissez une description du problème et une preuve d’achat. On
vous indiquera comment obtenir des pièces de rechange et où retourner, à vos frais, le(s) composant(s), l’option
(les options) ou l'accessoire (les accessoires) défectueux.
Toutes les pièces ou l’Équipement de rechange et les réparations seront garantis pendant la période de garantie
restante de la(es) pièce(s) remplacée(s).
L’obligation de garantie de l’Entreprise sera acquittée au moment de la remise du remplacement ou de la
réparation. Si le client refuse le remplacement ou la réparation, l'obligation de garantie de l'entreprise est alors
terminée.
Ville _____________________Province _______ Code postal ______
Date d’achat ______________________________________________
Nom du modèle ____________________________________________
Numéro de série ___________________________________________
Nom du dépositaire _________________________________________
Adresse du dépositaire ______________________________________
1. Comment avez-vous entendu parler de ce produit Jacuzzi
( ) Publicité ( ) Article dans une revue/un journal
( ) Visite d'un dépositaire/fournisseur de plomberie ( ) Pages jaunes
( ) Bouche-à-oreille . . Ami/parent/connaissance
( ) Autre (veuillez préciser)_________________________________
2. Qui est la première personne vous ayant donné des renseignements précis au
( ) Dépositaire/fournisseur de plomberie ( ) Constructeur ( ) Rénovateur
( ) Entrepreneur en plomberie ( ) Détaillant/magasin de rénovation
3. Quelle était la principale raison de votre achat?
( ) Style ( ) Service de garantie ( ) Caractéristiques du produit
( ) Revente de maison________________________________________
( ) Autre ___________________________________________________
4. Qui a nalement choisi le produit que vous avez acheté?
( ) Moi ( ) Mon conjoint ( ) Moi et mon conjoint ensemble
( ) Autre membre de la famille ( ) Décorateur/architecte
( ) Constructeur/plombier/rénovateur ( ) Déjà installé
5. Qui l’a installé? ( ) Déjà installé/Nouvelle résidence
( ) Entrepreneur/plombier lors de la rénovation
( ) Moi/mon conjoint lors d’une rénovation
( ) Autre ___________________________________________________
6. Quelle est la valeur actuelle sur le marché de cette propriété?
Veuillez l’évaluer en dollars _____________________________________
7. Quel est l’âge du chef du ménage?_____________________________ans
8. Quel(s) autre(s) fabricant(s) aviez-vous envisagé(s)?
( ) Eljer ( ) Lasco ( ) Price Pster ( ) Aqua Glass
( ) Kohler ( ) American Standard ( ) Sterling
( ) Autre (précisez) ____________________________________________
9. Combien de temps avez-vous magasiné avant d’acheter cette unité?
( ) 2 à 7 jours ( ) 6 mois à 1 an
( ) 1 à 2 semaines ( ) 1 à 2 ans
( ) 2 à 4 semaines ( ) +2 ans
( ) 1 à 2 mois
10. Depuis combien de temps environ habitez-vous dans cette résidence?_____
11. Veuillez indiquer, environ, le revenu annuel total de votre ménage.
( ) 25 000 à 29 999 $ ( ) 75 000 à 99 999 $
( ) 30 000 à 39 999 $ ( ) 100 000 à 149 999 $
( ) 40 000 à 49 999 $ ( ) 150 000 $ et plus
2. Comment a été votre processus d’achat?
( ) Très facile ( ) Facile ( ) Difcile ( ) Très difcile
( ) Constructeur/plombier/rénovateur ( ) Décorateur/architecte
( ) Visite d'un détaillant/magasin de rénovation
sujet de ce produit (caractéristiques, prix, etc.)?
( ) Décorateur/architecte ( ) Déjà installé
( ) Jusqu’à 24 999 $ ( ) 50 000 à 74 999 $
( ) 1 jour ( ) 2 à 6 mois
( ) Nom de la marque ( ) Prix ( ) Hydrothérapie
Pour que la garantie entre en vigueur, cette carte doit être remplie et retournée
à l'adresse imprimée sur l'autre côté dans un délai de trente (30) jours à
compter de la date d'achat.
Nom de l’acheteur _________________________________________
Adresse de l’acheteur _______________________________________
Carte d'enregistrement
de garantie
E124000Y
MD
?
 Loading...