

Page 1

STELLA™, SIENA™
& CELESTE™
FREESTANDING BATHS
English
INSTALLATION AND OPERATION INSTRUCTIONS
NX89000D 3/2016
Jacuzzi Luxury Bath
14525 Monte Vista Avenue
Chino, CA 91710
1-800-288-4002
www.jacuzzi.com
Page 2

Stella™ Siena™ & Celeste™ Freestanding Baths
Contents
Contents. .............................................................................................................................................................................................. 2
Product Information. ............................................................................................................................................................................. 2
Important Safety Instructions. ............................................................................................................................................................... 3
English
English
Inspection and Testing. ......................................................................................................................................................................... 4
Framing and Support ............................................................................................................................................................................ 4
Installation Instructions for Tubs with Integral Overow ....................................................................................................................... 4
Maintenance ......................................................................................................................................................................................... 5
Stella™ Freestanding Bath Specications ........................................................................................................................................... 6
Siena™ Freestanding Bath Specications ........................................................................................................................................... 7
Celeste™ Freestanding Bath Specications ........................................................................................................................................ 8
Authorized Service ............................................................................................................................................................................... 9
Warranty ............................................................................................................................................................................................. 10
Notes: ................................................................................................................................................................................................. 12
Warranty Registration Card ................................................................................................................................................................ 13
Product Information
NOTE
future reference.
Date Purchased
Purchased From
Installed By
Serial Number
Model
Installer: Leave the manual for the homeowner.
Homeowner: Read this manual and keep for future reference.
Save these instructions for future use. Use the form below to record your model and serial number for
Dealer/Installer
Information
Page 2 Installation and Operation
Dealer/Installer
Information
Page 3

Stella™ Siena™ & Celeste™ Freestanding Baths
Important Safety Instructions
This is a professional grade product. A working knowledge of construction techniques, plumbing and electrical
installation according to codes are required for proper installation and user satisfaction. We recommend that a licensed
contractor perform the installation of all Jacuzzi® products. Our warranty does not cover improper installation-related
problems.
READ AND FOLLOW ALL INSTRUCTIONS. SAVE THESE INSTRUCTIONS.
Use this unit only for its intended use as described in this manual. Do not use attachments not recommended by the
manufacturer.
DANGER
use this unit unless they are closely supervised at all times.
DANGER
dryer, lamp, telephone, radio or television) within 60” (1524mm) of this bathtub.
DANGER
RISK OF ACCIDENTAL INJURY OR DROWNING! Do not permit children to
RISK OF ELECTRIC SHOCK! Do not permit electrical appliances (such as a hair
PROLONGED IMMERSION IN HOT WATER MAY INDUCE
HYPERTHERMIA! Hyperthermia occurs when the internal temperature of the body
reaches a level several degrees above the normal body temperature of 98.6°F (37°C). The
symptoms of hyperthermia include an increase in the internal temperature of the body,
dizziness, lethargy, drowsiness and fainting. The effects of hyperthermia include:
A. Failure to perceive heat.
B. Failure to recognize the need to exit the bath.
C. Unawareness of impending hazard.
D. Fetal damage in pregnant women.
E. Physical inability to exit the bath.
F. Unconsciousness resulting in danger of drowning.
English
DANGER
instructions.
CAUTION
CAUTION
CAUTION
CAUTION
adjust water temperature before use.
This equipment is intended for indoor use only. Install the equipment in accordance with these
To avoid injury, use care when entering and exiting the bathtub.
Do not use drugs or alcohol before or during the use of a bathtub. Possible drowning may occur.
Use this unit only for its intended use as described in this manual.
Water temperature in excess of 104°F (40°C) may be injurious to your health. Check and
SAVE THESE INSTRUCTIONS.
The Company has obtained applicable code (standards) listings generally available on a national basis for products of
this type. It is the responsibility of the installer/owner to determine specic local code compliance prior to installation of
the product. Proper installation of the units is the responsibility of the installer. Jacuzzi Luxury Bath is not responsible
for water damage due to improper installation. Product specications are subject to change without notice.
Installation and Operation Page 3
Page 4

Stella™ Siena™ & Celeste™ Freestanding Baths
Inspection and Testing
Visual Inspection
Remove the bathtub from the shipping packaging. Be careful not to scratch the surface of the bathtub with exposed staples,
1
screws, or nails. Retain the packaging until satisfactory inspection of the product has been made.
English
any components, do not install the bathtub. Damage or defect to the nish claimed after the bathtub is installed is excluded
Inspect the shell and bathtub components. Should inspection reveal any damage or defect in the nish or visible damage to
2
from the warranty. Jacuzzi Luxury Bath responsibility for shipping damage ceases upon delivery of the products in good order
to the carrier.
Refer any claims for damage to the carrier. For denitions of warranty coverage and limitations, refer to the published
3
warranty information packaged with the product or in the back of this manual. Please note: blemishes, air holes, or casting
marks on the underside of the bath are not considered defects and do not affect performance or quality of bath.
Bathtub Water and Operational Test
All bathtub units are factory tested for proper operation and watertight connections prior to shipping. However, the unit must be
retested by the installer prior to installation. Jacuzzi Luxury Bath is not responsible for any defect that could have been discovered,
repaired, or avoided by following this inspection and testing procedure:
Place the bathtub on a level surface, near appropriate water supply, and water drainage. A driveway is a suitable choice.
1
Cover the drain and overow hole with tape or a stopper and ll the bathtub to the bottom of the overow hole.
2
Allow bathtub to stand for 5 minutes.
3
Visually inspect for leaks. Do not install the bathtub if leaks are detected.
4
5
Return bathtub to packaging or otherwise protect from damage until time of installation.
Framing and Support
READ ALL INSTALLATION INSTRUCTIONS COMPLETELY. IMPROPER INSTALLATION WILL VOID THE
WARRANTY.
IMPORTANT
• Make sure that walls and oors meet re safety requirements of local building code and/or FHA/HUD Minimum Property
Standards.
• Observe all governing codes and ordinances.
• Proper installation is your responsibility. Have a qualied technician install this bathtub.
• Ensure location is structurally sound, at and level. A Technical Specication has been included with your bathtub. The Technical
Specication will contain pertinent information regarding your product. Locate the Technical Specication at this time.
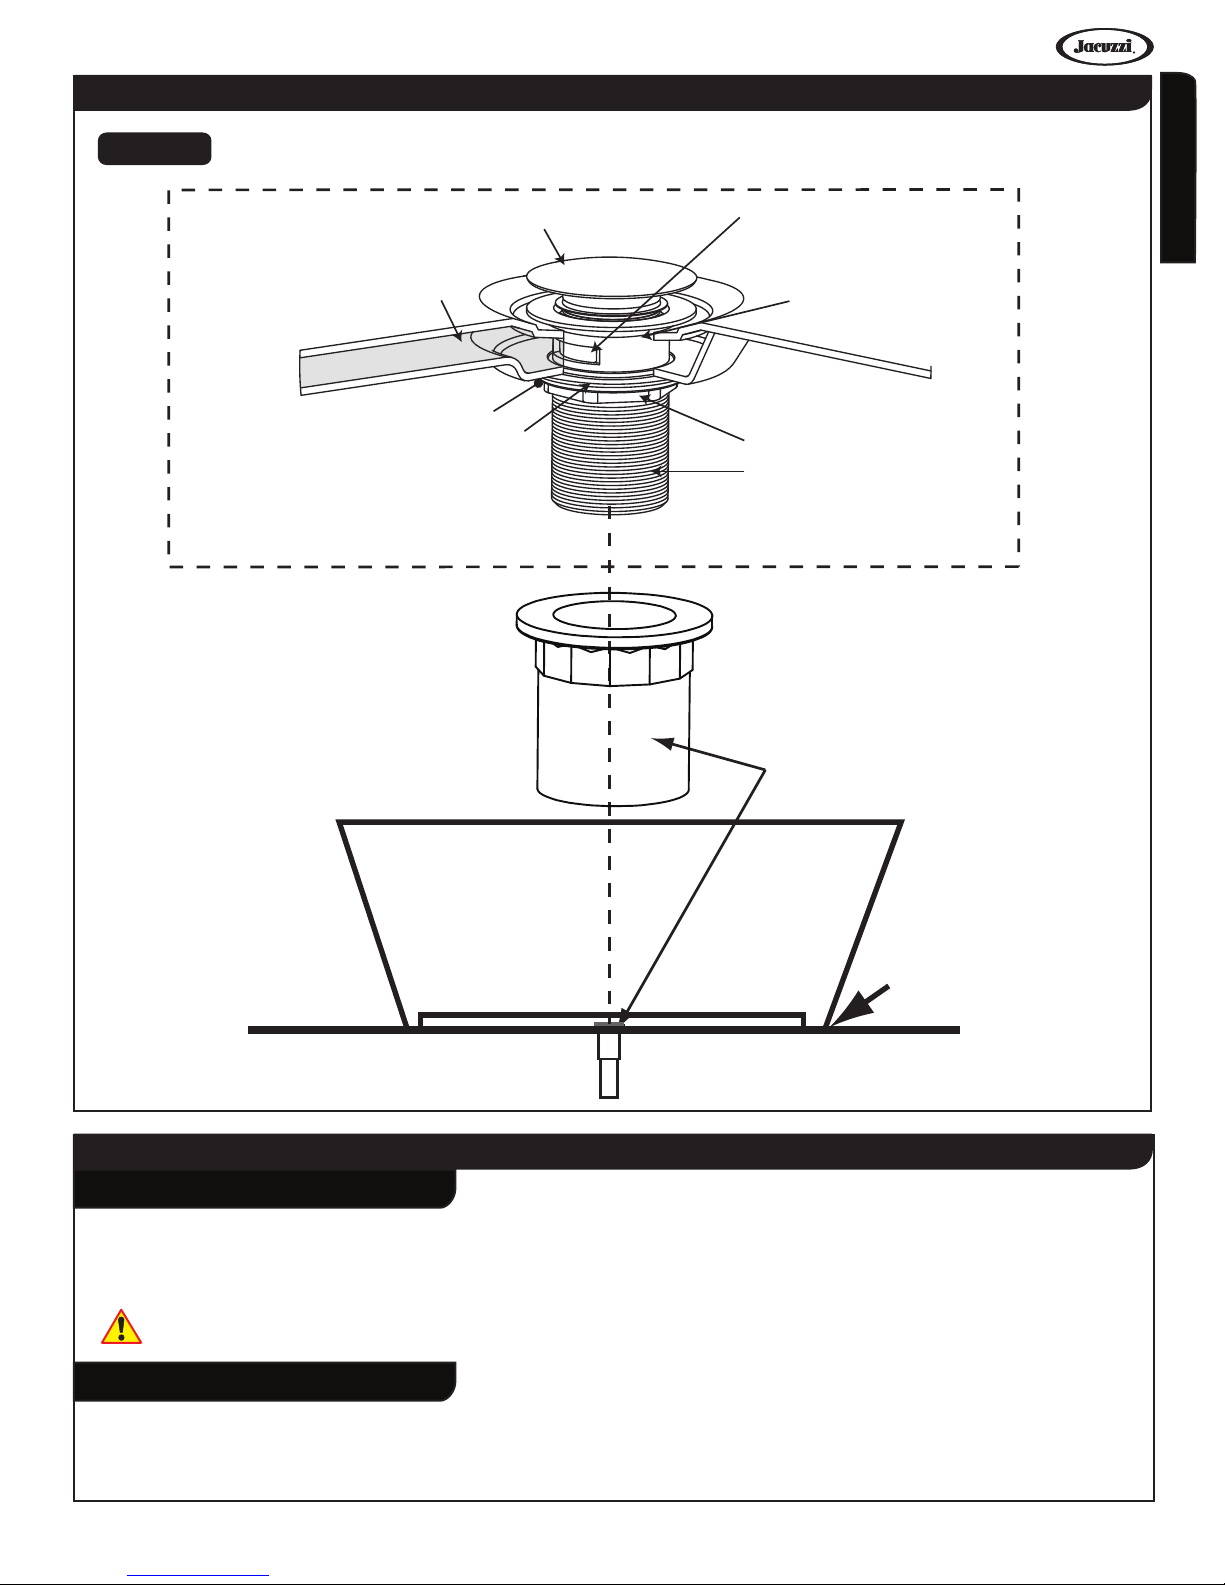
Installation Instructions for Tubs with Integral Overow
Install the metal drain/waste tting (supplied with the tub) into the drain hole as illustrated (Figure 1). Ensure that the drain
1
opening on the waste tting is situated in the integral overow channel (Figure 1).
CAUTION! The integral overow cover is not removable. The warranty will be voided if attempted.
2
Use clear silicone to adhere the bottom gasket to the underside of the integral overow channel (Figure 1).
Secure the waste tting with the supplied waste tting nut. Apply thread sealant to the threads prior to inserting the nut.
3
Overtightening the nut may cause shell damage. Ensure the drain opening on the waste tting is not exposed after tightening
of the nut.
4
Install a PVC thread adaptor (not supplied) to the metal waste tting. This is to provide a PVC to PVC connection to the stub
up in the oor. Water test tting for leaks before installation. NOTE: Use PVC Cement per ASTM D 2564 on all PVC joints.
5
Carefully lift the tub and apply a bead of clear silicone or construction adhesive to the bottom edge of the tub (Figure 1).
CAUTION! Before applying construction adhesive, please make sure that the permanent location of the bathtub has
been determined.
6
Carefully lower tub over the drain stub up in the oor. Thread the metal toe-tap drain cover (supplied) into the waste tting.
Wipe off excess silicone or construction adhesive with a clean cloth.
Page 4 Installation and Operation
Page 5
Stella™ Siena™ & Celeste™ Freestanding Baths
Installation Instructions for Tubs with Integral Overow (Continued)
Fig. 1
TOE-TAP DRAIN COVER (SUPPLIED)
INTEGRAL OVERFLOW CHANNEL
SILICONE ALL AROUND
WASTE FITTING
BOTTOM GASKET
Supplied Hardware
(SUPPLIED)
DRAIN OPENING
WASTE FITTING
TOP GASKET (SUPPLIED)
WASTE FITTING NUT (SUPPLIED)
WASTE FITTING (SUPPLIED)
PVC Drain Fitting
(Not Supplied)
English
Tub
Clear silicone or
construction
adhesive all
around
Maintenance
Cleaning The Bathtub
To clean the bathtub, use a mild Meguiar’s nonabrasive liquid detergent solution. You can protect and restore the
luster to a dulled acrylic surface by applying Meguiar’s #10 Mirror Glaze, a product specically designed for use on
acrylic nishes.
Never use abrasive household cleaners of any kind on any Jacuzzi® Product.
Surface Repair
Minor scratches which do not penetrate the color nish can be removed by lightly sanding with #600-grit wet and dry
sandpaper. Restore the gloss using Meguiar’s Mirror Glaze. Major scratches and gouges which penetrate the acrylic
surface will require renishing. Call Jacuzzi Luxury Bath at 1-800-288-4002 to nd a service agent in your area.
Installation and Operation Page 5
Page 6
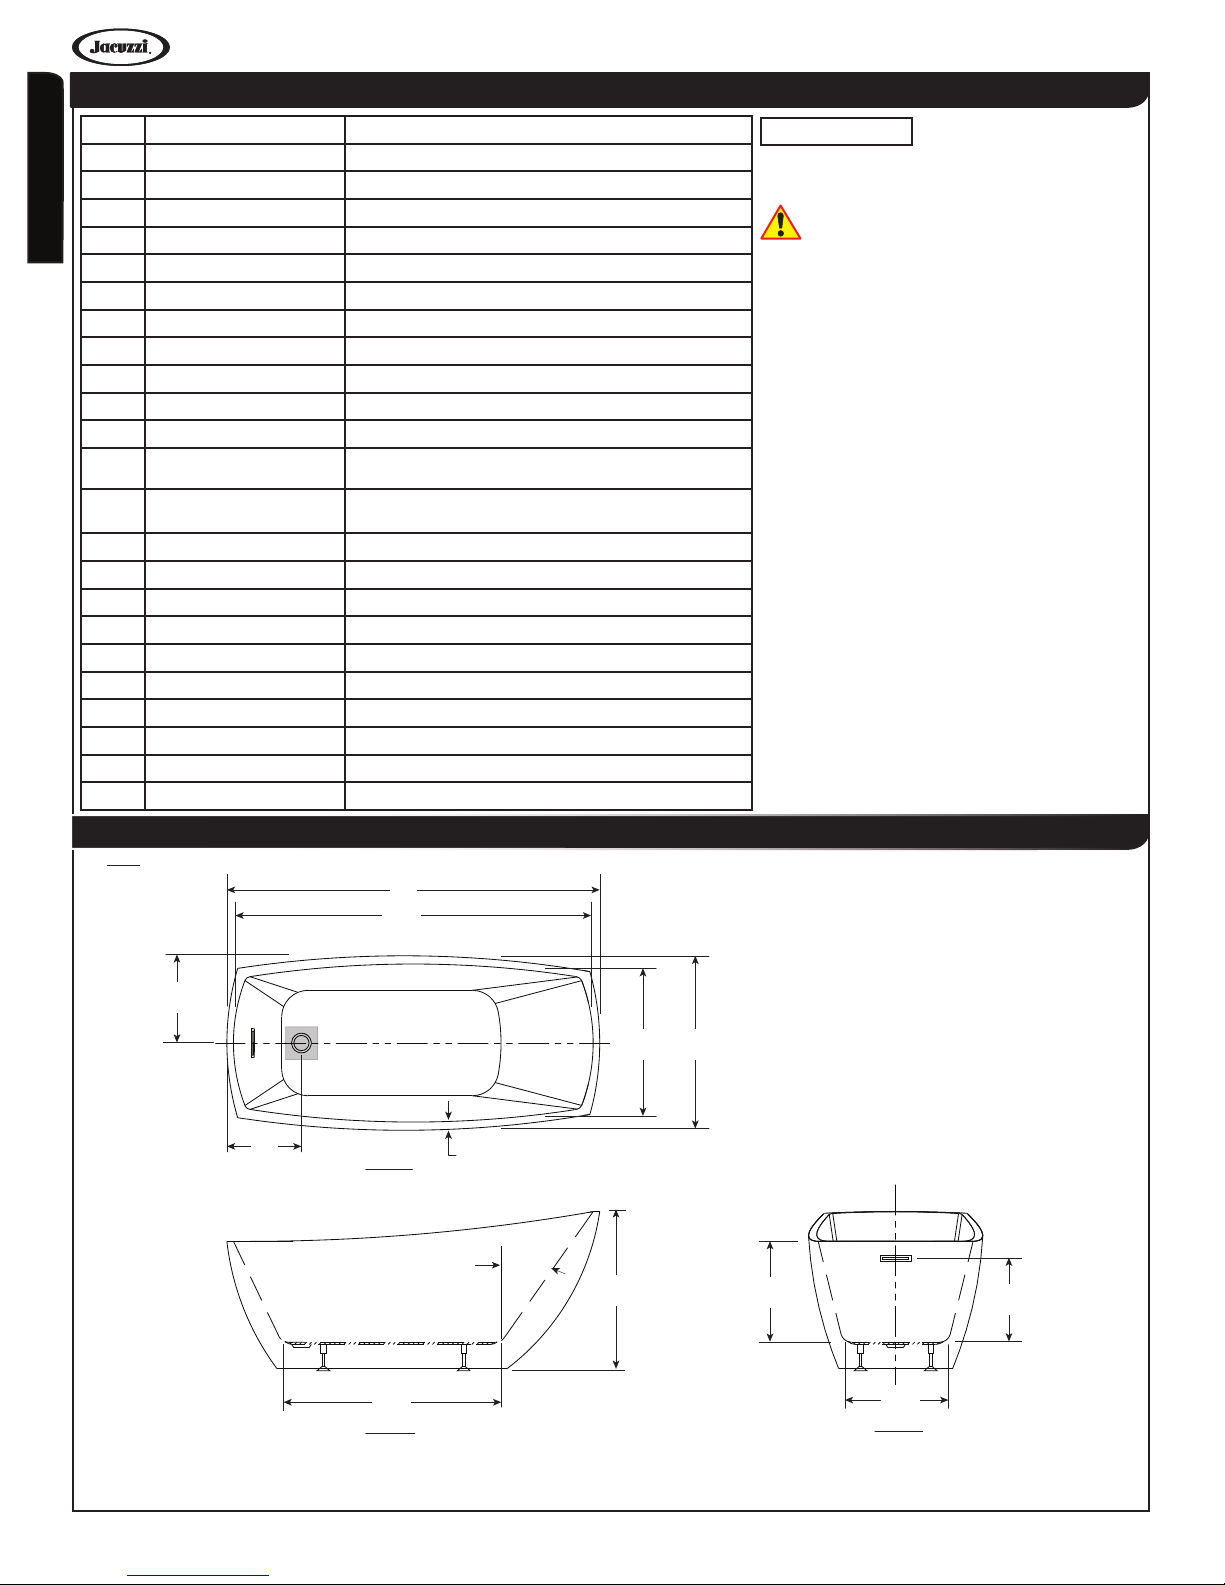
Stella™ Freestanding Bathtub Specications
Stella™ Siena™ & Celeste™ Freestanding Baths
Letter Description Soaking
Drain Location Universal End Drain
-
Pump Location N/A
-
Cutout Template N/A
-
English
Total Weight 912 lb (414 kg)
-
Floor Loading 59 lb/ft
-
Operating Gallons (Min/Max) 67 Gal (254 L)
-
Product Weight - Empty 104 lb (47 kg)
-
Soaking Depth 15.00" (381 mm)
-
Outer Length 67.00" (1702 mm)
L
Outer Width 31.00" (787 mm)
W
Overall Height 28.25" (718 mm)
H
Interior Dimensions (JW x JL)
J
Bottom of Bath
Interior Dimensions (KW x KL)
K
Top of Bath
Interior Depth - Drain End (D) 17.75" (451 mm)
L
Overow Height 15.25" (387 mm)
A
Long Edge to Drain Center 15.62" (397 mm)
B
Short Edge to Drain Center 13.38" (340 mm)
C
Drain Shoe Length N/A
D
Flange Height N/A
E
Deck Width* 1.50" (38 mm)
F
Service Access Dimensions No Service Access
G
Floor Cutout for Drain 4.00" x 4.00" (102 mm x 102 mm)
I
Backrest Angle 35°
M
19.38" x 40.50" (492 mm x 1029 mm)
28.25" x 64.00" (718 mm x 1626 mm)
2
(288 kg/m2)
NOTE
The overall dimensions are nominal with a tolerance of
+0 and -.25" (6mm).
CAUTION: The integral overow cover is not
removable. The warranty will be voided if attempted.
Key Dimensions
NOTE: Drawings not to scale.
B
C
*Deck width reects only area indicated on detail.
L
K (L)
K(W)
I
TOP VIEW
F
W
M
H
J (L)
SIDE VIEW
L (D)
A
J (L)
END VIEW
©2015 Jacuzzi Luxury Bath • For additional information call Customer Service 800-288-4002 • www.jacuzzi.com/baths/
Refer to installation instructions included with xture before beginning installation. Please conrm product availability and specications before commencing with any installation work
PRODUCT SPECIFICATIONS AND AVAILABILITY ARE SUBJECT TO CHANGE WITHOUT NOTICE.
Page 6 Installation and Operation
Page 7

Stella™ Siena™ & Celeste™ Freestanding Baths
Siena™ Freestanding Bathtub Specications
Letter Description Soaking
Drain Location Center Drain
-
Pump Location N/A
-
Cutout Template N/A
-
Total Weight 885 lb (401 kg)
-
Floor Loading 54 lb/ft
-
Operating Gallons (Min/Max) 90 gal (341 L)
-
Product Weight - Empty 138 lb (63 kg)
-
Soaking Depth 18.00" (457 mm)
-
Outer Length 69.00" (1752 mm)
L
Outer Width 34.00" (863 mm)
W
Overall Height 24.00" (610 mm)
H
Interior Dimensions (JW x JL)
J
Bottom of Bath
Interior Dimensions (KW x KL)
K
Top of Bath
Interior Depth - Drain End (D) 20.80" (528 mm)
L
Overow Height 18.30" (465 mm)
A
Long Edge to Drain Center 34.50" (876 mm)
B
Short Edge to Drain Center 17.00" (431 mm)
C
Drain Shoe Length N/A
D
Flange Height N/A
E
Deck Width* 5.10" / 2.80" (130 mm / 71 mm)
F
Service Access Dimensions No Service Access
G
Floor Cutout for Drain 4.00" x 4.00" (102 mm x 102 mm)
I
Backrest Angle 26°
M
17.50" x 39.00" (444 mm x 990 mm)
28.20" x 60.10" (716 mm x 1527 mm)
2
(264 kg/m2)
NOTE
The overall dimensions are nominal with a tolerance of
+0 and -.25" (6mm).
CAUTION: The integral overow cover is not
removable. The warranty will be voided if
attempted.
English
Key Dimensions
NOTE: Drawings not to scale.
K(W)
W
A
H
*Deck width reects only area indicated on detail.
L
K(L)
I
C
TOP VIEW
F
M
B
L(D)
©2015 Jacuzzi Luxury Bath • For additional information call Customer Service 800-288-4002 • www.jacuzzi.com/baths/
Refer to installation instructions included with xture before beginning installation. Please conrm product availability and specications before commencing with any installation work
PRODUCT SPECIFICATIONS AND AVAILABILITY ARE SUBJECT TO CHANGE WITHOUT NOTICE.
Installation and Operation Page 7
J(L)
SIDE VIEW
J(W)
END VIEW
Page 8

Celeste™ Freestanding Bathtub Specications
Stella™ Siena™ & Celeste™ Freestanding Baths
Letter Description Soaking
Drain Location Universal End Drain
-
Pump Location N/A
-
Cutout Template N/A
-
English
Total Weight 916 lb (415 kg)
-
Floor Loading 59 lb/ft
-
Operating Gallons (Min/Max) 67 Gal (254 L)
-
Product Weight - Empty 110 lb (50 kg)
-
Soaking Depth 14.50" (368 mm)
-
Outer Length 70.00" (1778 mm)
L
Outer Width 32.00" (813 mm)
W
Overall Height 23.00" (584 mm)
H
Interior Dimensions (JW x JL)
J
Bottom of Bath
Interior Dimensions (KW x KL)
K
Top of Bath
Interior Depth - Drain End (D) 17.72" (450 mm)
L
Overow Height 14.75" (375 mm)
A
Long Edge to Drain Center 15.81" (402 mm)
B
Short Edge to Drain Center 35.00" (889 mm)
C
Drain Shoe Length N/A
D
Flange Height N/A
E
Deck Width* 2.50" (64 mm)
F
Service Access Dimensions No Service Access
G
Floor Cutout for Drain 4.00" x 4.00" (102 mm x 102 mm)
I
Backrest Angle 24°
M
18.06" x 49.86" (459 mm x 1266 mm)
26.55" x 64.89" (674 mm x 1648 mm)
2
(288 kg/m2)
NOTE
The overall dimensions are nominal with a tolerance of
+0 and -.25" (6mm).
CAUTION: The integral overow cover is not
removable. The warranty will be voided if attempted.
Key Dimensions
NOTE: Drawings not to scale.
B
H
L
*Deck width reects only area indicated on detail.
K (L)
K(W)
W
I
C
TOP VIEW
F
M
A
L (D)
©2015 Jacuzzi Luxury Bath • For additional information call Customer Service 800-288-4002 • www.jacuzzi.com/baths/
Refer to installation instructions included with xture before beginning installation. Please conrm product availability and specications before commencing with any installation work
PRODUCT SPECIFICATIONS AND AVAILABILITY ARE SUBJECT TO CHANGE WITHOUT NOTICE.
SIDE VIEW END VIEW
Page 8 Installation and Operation
J (L) J (L)
Page 9

Stella™ Siena™ & Celeste™ Freestanding Baths
Authorized Service
If you need a referral for a service company near you, or need assistance with operation or maintenance-related questions, please
call our Service Support Department at 1-800-288-4002. Visit our website at www.jacuzzi.com for products, services, and an online
copy of these Installation and Operation Instructions.
When requesting service or technical assistance please have available both the model and serial number of your unit. This
information can be obtained from the product registration card provided with your unit. If the card has been misplaced, this
information can be obtained from the specication/serial number label on the unit itself (Figure 2). The label is located on the
exterior wall of the bathtub near the overow drain.
SPECIFICATION/SERIAL NUMBER LABEL
Fig. 2
You will nd your serial
number here
MODEL: XXXXXXX
NAME: XXXXX
COLOR: XXXXX
MFG#: XXXXX
SER#: XXXXXX
English
PRODUCT SPECIFICATIONS ARE SUBJECT TO CHANGE WITHOUT NOTICE.
USE TECHNICAL SPECIFICATIONS MANUAL SUPPLIED WITH PRODUCT.
Jacuzzi Luxury Bath has obtained applicable code (standards) listings generally available on a national basis for products
of this type. It is the responsibility of the installer/owner to determine specic local code compliance prior to installation
of the product. Jacuzzi Luxury Bath makes no representation or warranty regarding, and will not be responsible for any
Installation and Operation Page 9
Installation and Operation Page 9
code compliance.
Jacuzzi Luxury Bath
14525 Monte Vista Avenue
Chino, California, 91710
1-800-288-4002
www.jacuzzi.com
Page 10

Limited Lifetime Warranty on Jacuzzi® Branded Bathtubs
for the Stella™ and Celeste™ Freestanding Bath Series
Jacuzzi Luxury Bath (the “Company”) offers the following expressed limited lifetime warranty to the original purchaser of
any Jacuzzi Luxury Bath products provided in the Company’s Stella™ and Celeste™ Freestanding Baths (“Bath”) who
purchases the Bath for personal or single family residential use (“User”): The Company will repair or replace, at its sole
English
option, the Bath or its equipment in accordance with the following terms and conditions. This warranty does not apply to
non-branded Bath products manufactured by the Company.
LIFETIME WARRANTY ON BATHS
The Company extends to the User of the Bath a non-transferable limited lifetime warranty that the shell will maintain its
structural integrity and conguration and be free of water loss due to a defect in the bathtub shell. This warranty covers
only the bathtub shell and the manufacturer installed pump, jets, controls, and blower against defects in material or
workmanship. This warranty does not apply to any display models or to any options or accessories which are covered
under our limited ninety (90) day warranty set forth below. Warranty coverage begins on the date the unit was originally
purchased by the User and upon receipt by the Company of a completely lled out Warranty Registration Card as
described below.
2-YEAR LABOR WARRANTY FOR ALL FACTORY INSTALLED COMPONENTS
Our limited labor warranty is for a period of two (2) years from the date the unit was originally purchased by the User, but
not more than three (3) Years from date of manufacture. All factory installed components (e.g., pump, motor, blower, and
plumbing) are covered under our labor warranty against failure due to defects in materials and workmanship.
90-DAY (PARTS ONLY) LIMITED WARRANTY ON OPTIONS AND ACCESSORIES
Our limited warranty on options and accessories is for ninety (90) days for parts only. Our warranty covers options and
accessories manufactured (e.g., drains ll spout kits, trim kits, skirts, video monitors, LCD at panel screens, CD and MP3
players and other music and video devices and optional heaters) against defects in material or workmanship. Warranty
coverage begins on the date the option or accessory was originally purchased by the User. These items may be covered
by a manufacturer’s warranty which may have a longer duration than this limited warranty. Please conrm with the
manufacturer the duration of the appropriate warranty for Options and Accessories.
WARRANTY LIMITATIONS
Our limited warranty does not cover defects, damage, or failure caused by the common carrier, installer, user, or
other persons, pets, or rodents, or resulting from, without limitation, any of the following: careless handling (lifting unit
by plumbing, abrading nish, etc.) including its own negligence; modication of any type for any reason (including
modication to meet local codes); improper installation (including installation not in accordance with instructions and
specications provided with the unit); connections supplied by the installer of the equipment; improper voltage supply
or unauthorized electrical modication; misuse; incorrect operation, or lack of proper routine maintenance; operation of
the unit without specied minimum amount of water or at inappropriate water temperature; use of abrasive or improper
cleaners; or acts of God, such as lightning, oods, earthquakes, etc.
In addition, THE COMPANY WILL NOT BE RESPONSIBLE FOR INCIDENTAL OR CONSEQUENTIAL DAMAGES or
losses arising from any cause (e.g., water damage to carpet, ceiling, tiles, marble, loss of use, etc.) including its own
negligence; damages to, respecting, or resulting from: plated parts when pool and/or spa chemicals are used in the unit
or hard water conditions; optional bathtub equipment not manufactured by the Company but supplied by Dealer, installer
or the Company; the unit’s prior usage as an operational display; or defects that should have been discovered before
installation.
This limited warranty does not include: labor, transportation, or other costs incurred in the removal and/or reinstallation of
the original unit and/or installation of a replacement unit; any costs relating to obtaining access for repair; or loss of use
damage, including loss of sales, prot or business advantage of any kind under any circumstances. Bathtub units are
excluded from any warranty coverage if any addition, deletion, or modication of any kind whatsoever has been made to
the unit (or to any component). Warranty coverage is provided in the United States of America and Canada only.
EXCLUSION OF IMPLIED WARRANTIES
IMPLIED WARRANTIES OF MERCHANTABILITY AND FITNESS FOR A PARTICULAR PURPOSE ARE DISCLAIMED
ALTOGETHER OR TO THE FULLEST EXTENT ALLOWED BY LAW.
NOTICE: This warranty gives you specic legal rights, and you may also have other rights which vary from state to state.
There are no warranties applicable to Jacuzzi Luxury Bath products except as expressly stated herein or as implied by
applicable state and federal laws. The Company will not be responsible for any statements or representations made in
any form that go beyond, are broader than or are inconsistent with any authorized literature or specications furnished by
the Company. Some states do not allow limitations on how long an implied warranty lasts, or the exclusion or limitation of
incidental or consequential damages, so the above limitations and exclusions may not apply to you.
Page 10 Installation and Operation
Jacuzzi Luxury Bath
NX89000
Page 11

RETURN OF WARRANTY REGISTRATION OR NO WARRANTY
To register your product, please go to our website www.jacuzzi.com, click on Bath and Showers, then select ONLINE
WARRANTY REGISTRATION from the top of the page. You will then be prompted to enter your product Serial Number
followed by your warranty registration information. Or you may also register by completing the registration below and
mailing it to Jacuzzi at the address provided below.
THE ATTACHED WARRANTY REGISTRATION MUST BE FILLED OUT BY THE PURCHASER WITHIN THIRTY (30)
DAYS FROM PURCHASE AND RECEIVED BY JACUZZI LUXURY BATH IN ORDER FOR THIS WARRANTY TO
BECOME EFFECTIVE.
RESPONSIBILITIES OF OTHERS
Inspecting the unit prior to installation is the responsibility of the installer or building contractor who acts on behalf
of the User. They are responsible for ensuring the unit is free of defect or damage. Notices are placed on and in the
unit and on the shipping carton advising the installer of this responsibility. In the event of a problem, the unit must not
be installed. THE COMPANY IS NOT RESPONSIBLE FOR FAILURES OR DAMAGE THAT COULD HAVE BEEN
DISCOVERED, REPAIRED, OR AVOIDED BY PROPER INSPECTION AND TESTING (INCLUDING PROPER WATER
TESTING) PRIOR TO INSTALLATION.
Damage occurring in transit is the responsibility of the carrier. The User or installer MUST open the crate and inspect
the unit for damage when it is delivered. If damage is discovered, it must be reported immediately to the seller and the
carrier in writing, and an inspection requested. Failure of the carrier to respond should be reported to the seller and the
carrier. Your freight claims should be led promptly thereafter.
Damage occurring to the unit during installation is the responsibility of the installer and/or building contractor and
damage occurring thereafter is the responsibility of the User.
Failure of any optional equipment is the sole responsibility of the equipment manufacturer except as provided above
and shall not extend to or apply to any replacement parts for the Options and Accessories. Any replacement parts shall
be covered by the original equipment manufacturer.
The Distributor or Dealer is responsible for knowing local code requirements and notifying the installing contractor and/
or User of these requirements at the time of purchase. The Company is not responsible for costs to modify any product
to obtain any code approval, such as city, county, or state building codes in U.S.A. or municipal or provincial codes in
Canada.
English
WARRANTY SERVICE
For the User's benet, the Company maintains a list of independent service personnel to perform required warranty
service repairs. Such rms are not agents or representatives of the Company and cannot bind the Company by words
or conduct.
The Company will provide the warranty service described above when the following conditions have been met: the
failure is of the nature or type covered by the warranty; the User has informed an Authorized Jacuzzi Luxury Bath
Service Agent or Warranty Service Department Representative of the nature of the problem during the warranty period;
conclusive evidence (e.g., proof of purchase or installation) is provided to the foregoing by the user proving that the
failure occurred or was discovered within the warranty period; an authorized independent service person or Company
representative has been permitted to inspect the unit during regular business hours within a reasonable time after the
problem was reported by the User. In order to obtain warranty service, contact Jacuzzi Luxury Bath at:
www.jacuzzi.com
or
Jacuzzi Luxury Bath
Warranty Service Department
14525 Monte Vista Avenue
Chino, California 91710
Call: 1-(800) 288-4002
To obtain warranty replacement for factory-installed components for Company supplied options and accessories
manufactured and supplied by the Company, call or write the above. Provide a description of the problem and proof
of purchase. You will be instructed how to obtain replacements and where to return, at your expense, the failed
component(s), option(s), or accessory(ies).
All replacement parts, equipment, and repairs shall assume the remaining warranty period of the part(s) replaced.
The Company's warranty obligation shall be discharged upon tender of replacement or repair. The customer's refusal to
accept the tender terminates the Company's warranty obligation.
Installation and Operation Page 11
Ninety-Day
Parts Only
Limited Warranty
On
Accessory(ies)
Page 12

Notes:
English
Stella™ Siena™ & Celeste™ Freestanding Baths
Page 12 Installation and Operation
Page 13

Jacuzzi Luxury Bath
14525 Monte Vista Avenue
Chino, California 91710
Page 14

WARRANTY REGISTRATION CARD
To complete your registration, visit our website at www.jacuzzi.com/baths/support/warranty-registration or ll out
and mail this card to the address printed on the other side within thirty (30) days from date of purchase in order
for this warranty to become effective.
Purchaser's Name ______________________
Purchaser's Address ____________________
City __________________ State __ Zip ____
Home Phone __________________ Cell Phone___________________________
Email ________________________________
Date of Purchase ________
Model Name __________________________
Serial Number _________________________
Dealer's Name _________________________
Dealer's Address _______________________
1. How did you rst hear about this Jacuzzi® product?
( ) Advertisement ( ) Article in Magazine/Newspaper
( ) Visited Dealer/Plumbing Supplier ( ) Yellow Pages
( ) Builder/Plumber/Remodeler ( ) Decorator/Architect
( ) Visited Retailer/Home Center Store
( ) Word of Mouth . . . Friend/Relative/Acquaintance
( ) Other (Please Describe) ______________
2. Who rst gave you specic information about this product (specications, prices, etc.)?
( ) Dealer/Plumbing Supplier ( ) Builder ( ) Remodeler
( ) Plumbing Contractor ( ) Retailer/Home Center Store
( ) Decorator/Architect ( ) Already Installed
3. What was the main reason for purchase?
( ) Styling ( ) Warranty Service ( ) Product Features
( ) Brand Name ( ) Price ( ) Hydrotherapy
( ) Home Resale _______________________
( ) Other _____________________________
4. Who nally decided which product you would buy?
( ) Self ( ) Spouse ( ) Self and Spouse Together
( ) Other Family Member ( ) Designer/Architect
( ) Builder/Plumber/Remodeler ( ) Already Installed
5. Who installed? ( ) Already installed/New Home
( ) Contractor/Plumber when remodeling
( ) Self/Spouse when remodeling
( ) Other _____________________________
6. What is the current market value of this property?
Please estimate $ _____________________
7. What is the age of the head of the household? _______
8. What other manufacturers did you consider?
( ) Eljer ( ) Lasco ( ) Price Pster ( ) Aqua Glass
( ) Kohler ( ) American Standard ( ) Sterling
( ) Other (Specify) _____________________
9. How long did you shop before purchasing unit?
( ) 1 day ( ) 2 months- 6 months
( ) 2-7 days ( ) 6 months- 1 year
( ) 1 week- 2 weeks ( ) 1 year- 2 years
( ) 2 weeks- 4 weeks ( ) +2 years
( ) 1 month- 2 months
10. Approximately how long have you lived in this home ?
11. Please indicate, approximately, the total annual income of your household.
( ) Up to $24,999 ( ) $50,000 to $74,999
( ) $25,000 to $29,999 ( ) $75,000 to $99,999
( ) $30,000 to $39,999 ( ) $100,000 to $149,999
( ) $40,000 to $49,999 ( ) $150,000 and Above
12. Was your purchase process?
( ) Very easy ( ) Easy ( ) Difcult ( ) Very difcult
13. How technically aware were you of the Jacuzzi® Jet system prior to your purchase?
( ) Not aware ( ) Somewhat aware ( ) Very aware
Ninety-Day
Parts Only
Limited Warranty
On
Accessory(ies)
JACUZZI LUXURY BATH
NX89000
 Loading...