

Page 1
ARGA™
BATHTUBS
FEATURING
SWIRLPOOL™
INSTALLATION AND OPERATION
INSTRUCTIONS
Safety Instructions. ....................................................................................................................................................... 2
INSTALLATION
Inspection and Testing. ................................................................................................................................................. 4
Sub Floor Preparation. .................................................................................................................................................. 4
Preparing the Floor for MZ20000 Drain Alignment Kit. ................................................................................................. 4
Drain Installation. .......................................................................................................................................................... 5
After Installing the Finished Floor.................................................................................................................................. 5
OPERATION
General Operating Instructions. .................................................................................................................................... 7
Cleaning - Systems Clean™. ........................................................................................................................................ 7
Suction Cover/Strainer Maintenance. ........................................................................................................................... 7
Bathtub Additives. ......................................................................................................................................................... 8
Filter Basket Maintenance. ........................................................................................................................................... 8
J6 Control Panel Swirlpool™ System Reference Illustration. ....................................................................................... 8
Gloss Bathtub Care & Cleaning. ................................................................................................................................... 9
Gloss Bathtub Surface Repair....................................................................................................................................... 9
Matte Bathtub Care & Cleaning. ................................................................................................................................... 9
Matte Bathtub Surface Repair. ...................................................................................................................................... 9
Troubleshooting Procedures. ........................................................................................................................................ 9
EXPERIENCE ARGA™: OPERATING INSTRUCTIONS
Before Use. ................................................................................................................................................................. 10
Swirlpool™. ................................................................................................................................................................. 10
Salt Infuser & Jacuzzi® Epsom Salts. ........................................................................................................................ 10
Waterfall. ......................................................................................................................................................................11
Illumatherapy™ Light System. .....................................................................................................................................11
Jacuzzi Luxury Bath
14525 Monte Vista Avenue
Chino, California 91710
RG43000 8/2019
Page 2
Arga™ Bathtubs
Safety Instructions
INSTRUCTIONS PERTAINING TO A RISK OF FIRE, ELECTRIC SHOCK, OR INJURY TO PERSONS.
This is a professional grade product. A knowledge of construction techniques, plumbing and electrical installation according to
codes are required for proper installation and user satisfaction. We recommend that a licensed contractor perform the installation
of all Jacuzzi Luxury Bath products. Our warranty does not cover improper installation related problems.
English
CAUTION: When using this unit, basic precautions should always be performed, including the following:
READ AND FOLLOW ALL INSTRUCTIONS. SAVE THESE INSTRUCTIONS.
• Use this unit only for its intended use as described in this manual. Do not use attachments not recommended by the
manufacturer.
• Never drop or insert any object into any opening.
WARNING: RISK OF ACCIDENTAL INJURY OR DROWNING!
Do not permit children to use this unit unless they are closely supervised at all times. Do not use hydromassage bathtub
unless all suction guards are installed to prevent body and hair entrapment. Never operate the hydromassage bathtub if the
suction cover is broken, damaged or missing.
DANGER: RISK OF SEVERE INJURY FROM ELECTRIC SHOCK OR DEATH FROM ELECTROCUTION!
This unit must be connected only to a supply circuit that is protected by a 15 amp ground fault circuit interrupter (GFCI).
Such a GFCI should be provided by the installer and should be tested on a routine basis. To test the GFCI, push the test
button. The GFCI should interrupt power. Push the reset button. Power should be restored. If the GFCI fails to operate
in this manner, the GFCI is defective. If the GFCI interrupts power to the bathtub without the test button being pushed, a
ground current is owing, indicating a possibility of an electric shock. Do not use this hydromassage bathtub. Disconnect the
hydromassage bathtub and have the problem corrected by a qualied service representative before using.
WARNING: RISK OF ELECTRIC SHOCK!
Connect only to a circuit protected by a ground fault circuit interrupter (GFCI). (For permanently connected units) A greencolored terminal (or a wire connector) marked “G,” “GR,” “GROUND,” or “GROUNDING”) is provided within the terminal
compartment. To reduce the risk of electric shock, connect the terminal or connector to the grounding terminal of your
electric service or supply panel with a conductor equivalent in size to the circuit conductors supplying the equipment.
CAUTION: This equipment is intended for indoor use only. Install the equipment in accordance with these instructions. Use
supply wires that are suitable for 167°F (75°C), including the temperature rating of the supply conductors to be used. This
unit should be electrically grounded and installed by a licensed contractor, electrician, and plumber. Building materials and
wiring should be routed away from the motor/pump or blower or other heat producing components of this unit. A pressure
wire connector is provided on the exterior of the motor/pump and heater to permit connection of an No. 8 AWG solid copper
bonding conductor between this unit and all other electric equipment and exposed metal in the vicinity, as needed to comply
with local requirements.
Important CSA Safety Instructions (Canadian models only)
When using this electrical equipment, basic safety precautions should always be followed, including the
following:
1. WARNING: RISK OF ACCIDENTAL INJURY OR DROWNING! CHILDREN SHOULD NOT USE HYDROMASSAGE
BATHTUB WITHOUT ADULT SUPERVISION.
2. WARNING: RISK OF ACCIDENTAL INJURY OR DROWNING! DO NOT USE HYDROMASSAGE
BATHTUB UNLESS ALL SUCTION GUARDS ARE INSTALLED TO PREVENT BODY AND HAIR ENTRAPMENT.
3. WARNING: TO AVOID INJURY, EXERCISE CARE WHEN ENTERING OR EXITING THE HYDROMASSAGE
BATHTUB.
4. WARNING: RISK OF ACCIDENTAL INJURY OR DROWNING! DO NOT USE DRUGS OR ALCOHOL BEFORE OR
DURING THE USE OF A HYDROMASSAGE BATHTUB EQUIPPED WITH A HEATER TO AVOID
UNCONSCIOUSNESS AND POSSIBLE DROWNING.
5. WARNING: RISK OF FETAL INJURY! PREGNANT OR POSSIBLY PREGNANT WOMEN SHOULD CONSULT A
PHYSICIAN BEFORE USING A HYDROMASSAGE BATHTUB EQUIPPED WITH A HEATER.
6. WARNING: RISK OF HYPERTHERMIA AND POSSIBLE DROWNING: DO NOT USE A HYDROMASSAGE BATHTUB
EQUIPPED WITH A HEATER IMMEDIATELY FOLLOWING STRENUOUS EXERCISE.
7. SAVE THESE INSTRUCTIONS.
Page 2 www.jacuzzi.com Safety Instructions
Page 3
Arga™ Bathtubs
Safety Instructions (Continued)
WARNING: RISK OF HYPERTHERMIA AND POSSIBLE DROWNING!
Do not use a hydromassage bathtub equipped with a heater immediately following strenuous exercise.
WARNING: RISK OF ELECTRICAL SHOCK!
• Do not permit electrical appliances (such as a hair dryer, lamp, telephone, radio or television) within 60˝
(1524 mm) of this hydromassage bathtub.
• Do not operate hydromassage system unless the bathtub is lled with water to at least 1-2˝ (25-51 mm)
above the highest air hole.
• Do not immerse the control panel by overlling the bathtub.
• When cleaning your bathtub, do not use abrasive substances which will damage the bathtub’s surface.
• To prevent discoloration of the acrylic nish, do not ll the bathtub with water in excess of 140°F (60°C).
WARNING: PROLONGED IMMERSION IN HOT WATER MAY INDUCE HYPERTHERMIA!
Hyperthermia occurs when the internal temperature of the body reaches a level several degrees above the normal body
temperature of 98.6°F (37°C). The symptoms of hyperthermia include an increase in the internal temperature of the body,
dizziness, lethargy, drowsiness and fainting. The effects of hyperthermia include:
A. Failure to perceive heat.
B. Failure to recognize the need to exit the bathtub.
C. Unawareness of impending hazard.
D. Fetal damage in pregnant women.
E. Physical inability to exit the bathtub.
F. Unconsciousness resulting in danger of drowning.
English
WARNING: RISK OF FETAL INJURY!
Pregnant or possibly pregnant women should consult a physician before using a hydromassage bathtub equipped with a
heater.
WARNING: The use of alcohol, drugs or medication can greatly increase the risk of fatal hyperthermia.
People using medications or having an adverse medical history should consult a physician before using a hydromassage
bathtub equipped with a heater.
WARNING: Do not tamper with user-operated controls or such devices.
WARNING: Use this unit only for its intended use as described in this manual. Do not use attachments not
recommended by the manufacturers.
WARNING: To avoid injury, exercise caution when entering or exiting the hydromassage bathtub.
WARNING: Do not use hydromassage bathtub unless all suction guards are installed to prevent body and
hair entrapment. Never operate the hydromassage bathtub if the suction cover is broken, damaged or missing.
WARNING: Water temperature in excess of 104°F (40°C) may be injurious to your health. Check and adjust
water temperature before use.
CAUTION: Test the ground fault circuit interrupter protecting this appliance periodically in accordance with
manufacturer’s instructions.
IMPORTANT: Read the complete instructions provided in this manual before beginning installation.
The Company has obtained applicable code (standards) listings generally available on a national basis for products of this
type. It is the responsibility of the installer/owner to determine specic local code compliance prior to installation of the product.
The Company makes no representation or warranty regarding, and will not be responsible for any code compliance. Product
specications are subject to change without notice.
Safety Instructions www.jacuzzi.com Page 3
Page 4
Arga™ Bathtubs
Inspection and Testing
Visual Inspection
Remove the bathtub from the shipping carton. Be careful not to scratch the surface of the bathtub on exposed staples.
1
Remove the staples or fold them into the carton. Retain the carton until satisfactory inspection of the product has been made.
Do not lift the bathtub by the plumbing at any time; handle by the shell only.
English
Inspect the shell and bathtub components. Should inspection reveal any damage or defect in the nish or visible damage to
2
any components, do not install the bathtub. Damage or defect to the nish claimed after the bathtub is installed is excluded
from the warranty. Jacuzzi Luxury Bath’s responsibility for shipping damage ceases upon delivery of the products in good
order to the carrier.
Refer any claims for damage to the carrier. For denitions of warranty coverage and limitations, refer to the published
3
warranty information packed with the product.
Bathtub Water and Operational Test
All bathtub units are factory tested for proper operation and watertight connections prior to shipping. However, the unit must be
retested by the installer prior to installation. Jacuzzi Luxury Bath is not responsible for any defect that could have been discovered,
repaired, or avoided by following this inspection and testing procedure:
Remove bathtub from skirt and place on a level surface, near appropriate water supply, and water drainage. A driveway is a
1
suitable choice.
Seal the drain and overow hole with tape or a stopper and ll the bathtub to the bottom of the overow hole.
2
Allow bathtub to stand for 5 minutes. Use operating instructions to ensure tub functions as described. Do not install if tub does
3
not function properly.
Visually inspect all joints for leaks. Do not install the bathtub if leaks are detected.
4
Return bathtub to box or otherwise protect from damage until time of installation.
5
Sub Floor Preparation
Prepare the sub oor for the drain and ensure that the area is level.
The drain/overow of the bathtub extends below the bottom of the bathtub. Identify the drawing in the Technical Specications
1
section that corresponds with your bathtub (available on www.jacuzzi.com).
Determine the location of the basin. The oor must be at and level.
2
Make appropriate cuts to the Sub oor to accommodate the drain.
3
Please refer to the drawing(s) in the Technical Specications section that correspond to your bathtub.
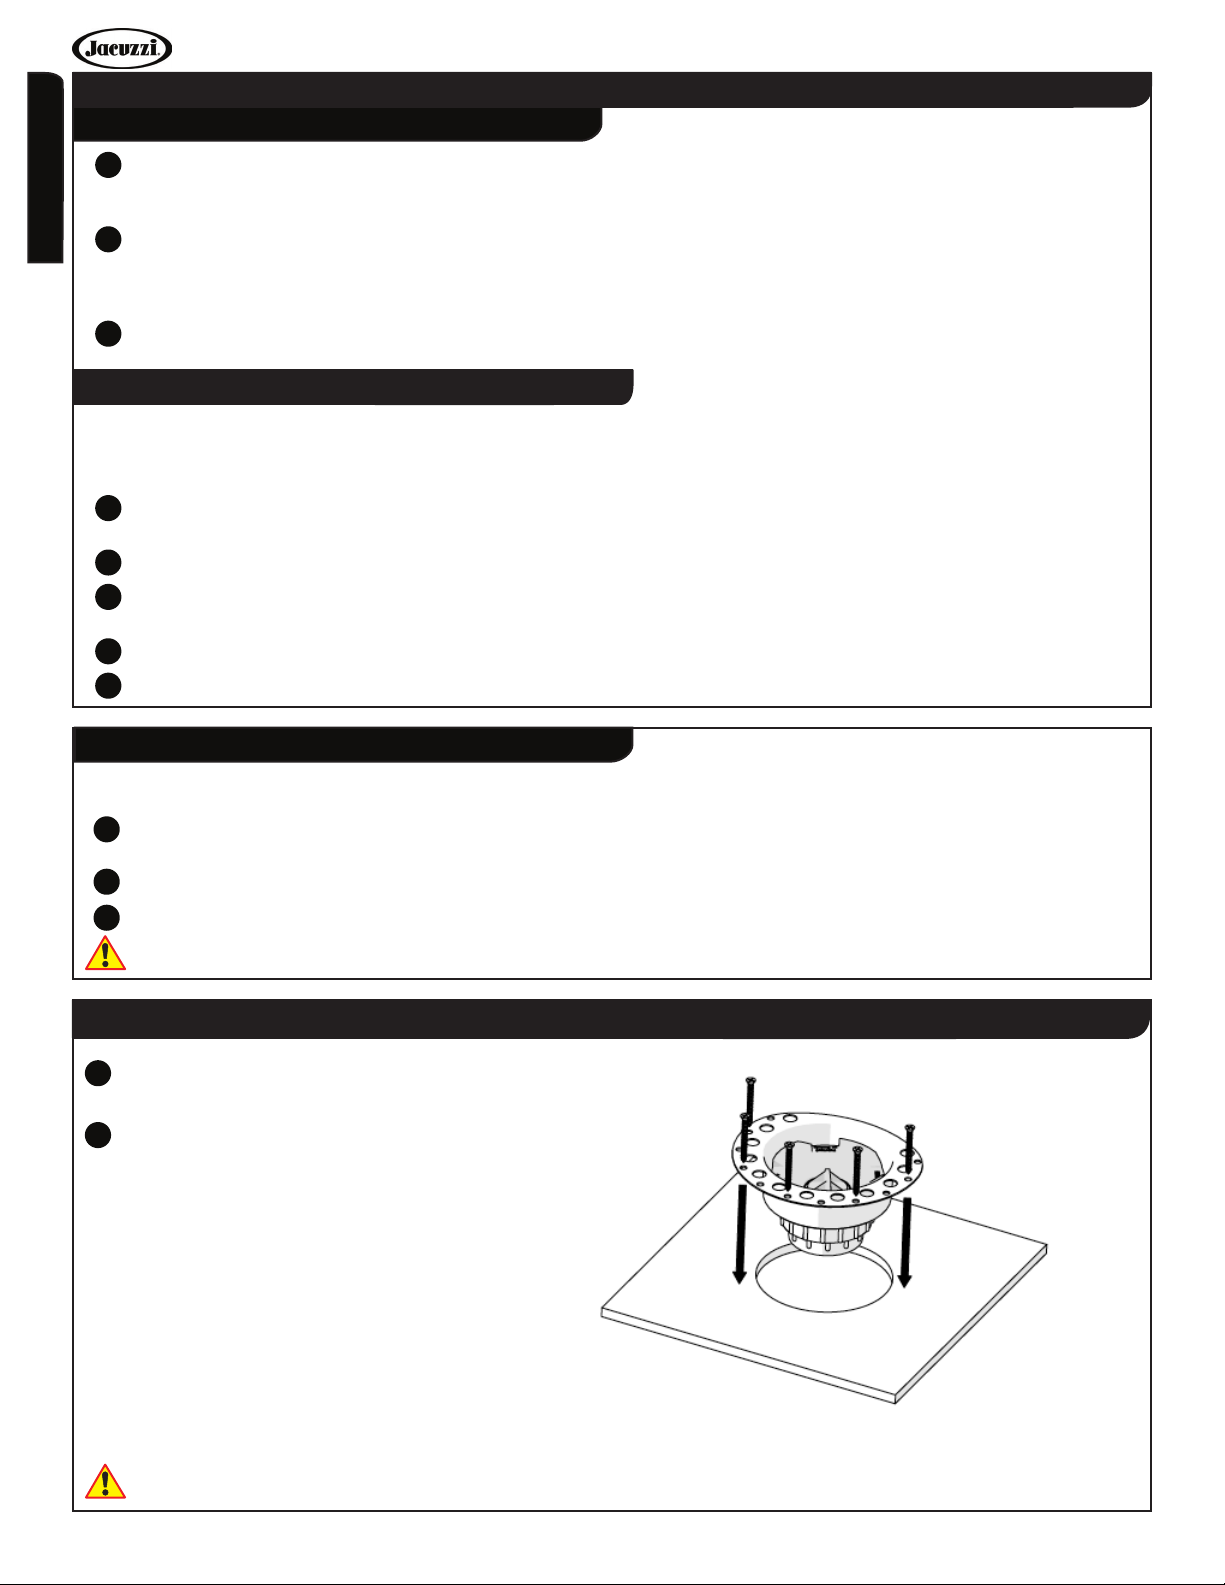
Preparing the Floor for MZ20000 Drain Alignment Kit
Using the supplied template, cut a 5” hole in the sub
1
oor.
Install the drain alignment kit into the sub oor
2
according to the included instructions.
Fig. 1
NOTE: Use included template to plan for placement of drain and electrical connection location for required 15A GFCI
protected outlet.
Page 4 www.jacuzzi.com Installation Instructions
Page 5
Arga™ Bathtubs
Installation Instructions
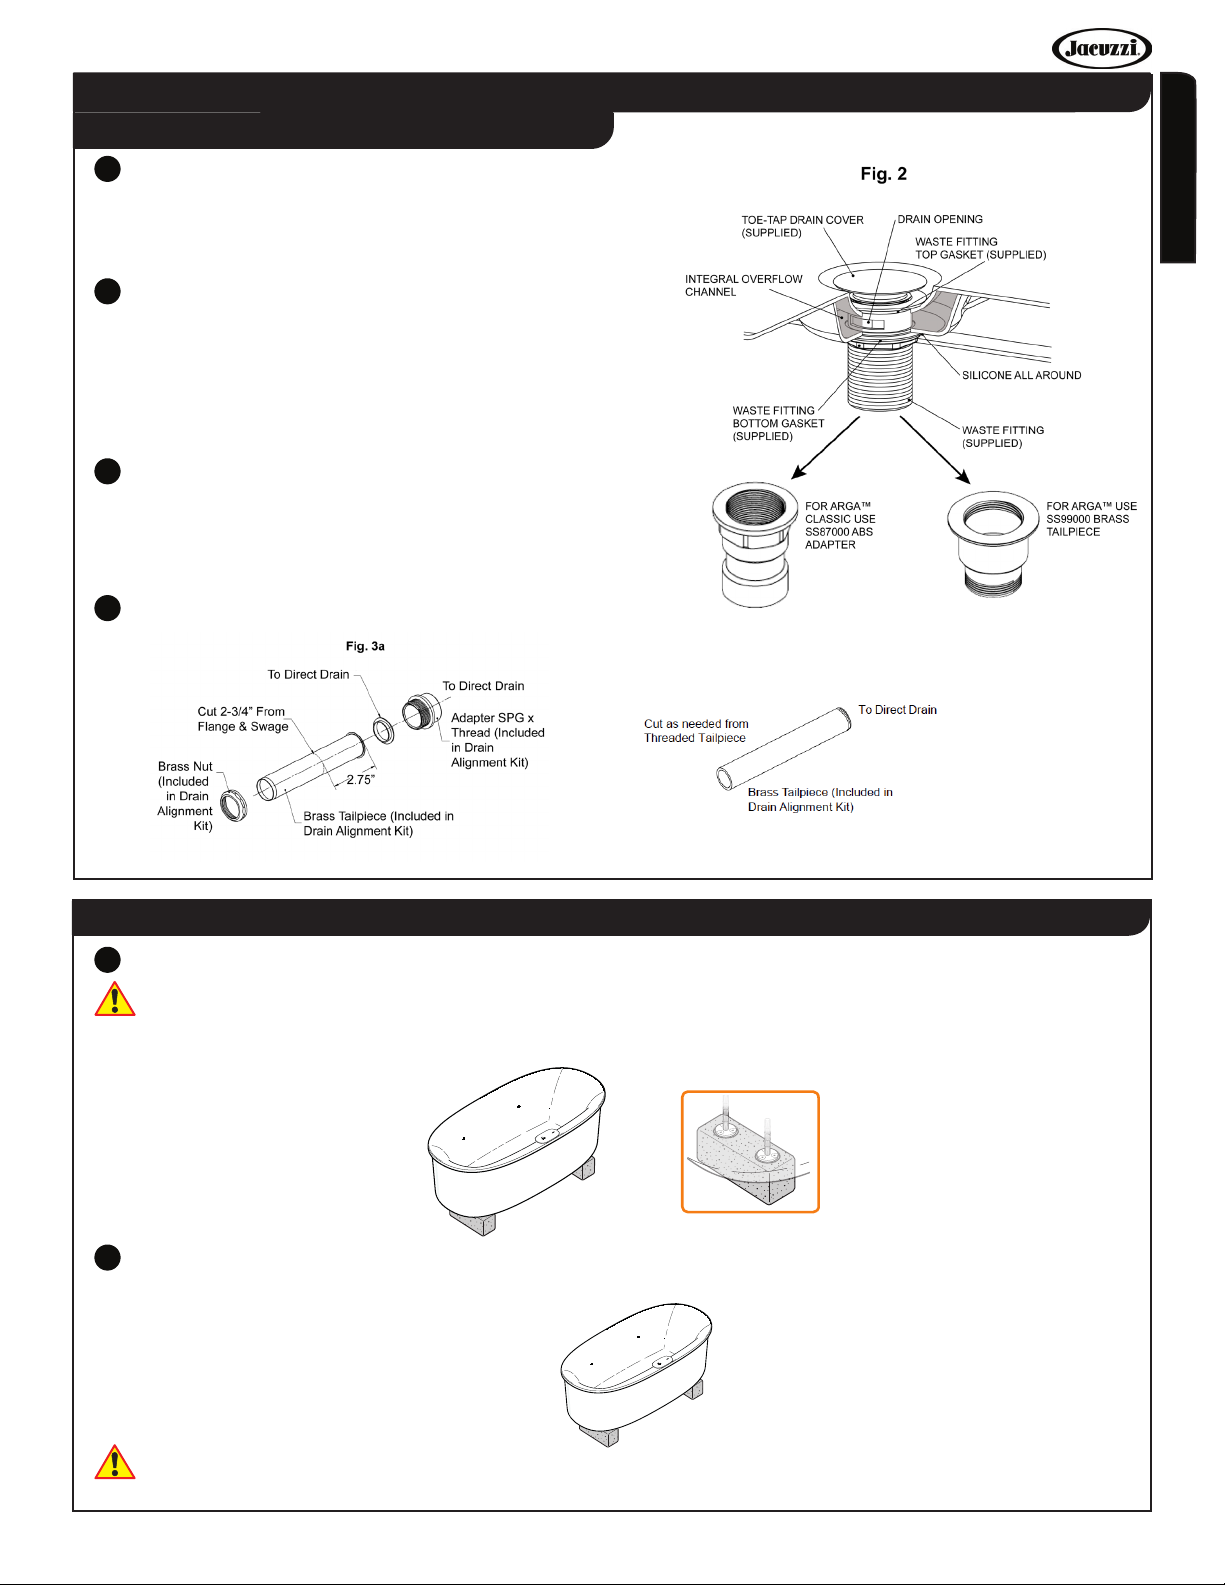
Drain Installation
Install the metal drain/waste tting (supplied with the tub) into the
1
drain hole as illustrated (Fig. 2). Ensure that the drain opening on
the waste tting is situated in the integral overow channel. Use
the brass tting SS99000 & relevant MZ20000 pieces as needed
by model (Fig. 3a/b).
A - For Arga™ Classic: Use SS87000 ABS adapter with poly
2
adapter, brass tailpiece and nut from the drain alignment kit
included in your tub. These will be used for the conversion (Fig.
3a).
B - For Arga™: Use SS99000 brass tailpiece with the threaded
tailpiece from the drain alignment kit and install directly to
SS99000 (Fig. 3b).
A - Cut the brass tailpiece to length. For SS87000 connection,
3
deburr and roll the cut edge with a swage tool. Install
components to the brass tailpiece as shown (Fig. 3a).
B - Cut the brass tailpiece to length. Install components to the
brass tailpiece as shown (Fig. 3b).
Glue the brass tailpiece assembly to the direct drain.
4
English
Fig. 3b
After Installing the Finished Floor
Place bathtub on supports (ex. blocks or 4x4 lumber), ensuring tub feet are fully supported (Fig. 4).
1
CAUTION: Bathtub comes factory pre-leveled, however it may be necessary to make adjustments to the levelling feet. These
feet operate in a manner similar to those of a home appliance. Prior to beginning installation, check to ensure that the tub is
level and make adjustments to the feet as needed.
Fig. 4
Connect the electrical plug to the dedicated GFCI-protected outlet and conrm tailpiece sits properly over drain alignment kit
2
(Fig. 5). Apply silicone to the bottom of tub to attach to oor when lowered in step 3.
Fig. 5
✓
CAUTION: Ensure that the skirt has been fully bolted on before moving further.
Installation Instructions www.jacuzzi.com Page 5
Page 6

Arga™ Bathtubs
Installation Instructions
3
Apply the grease included in the drain alignment kit to the end of the brass tailpiece. Carefully team lift the bathtub while
a third person removes and discards the material that was supporting the feet (Fig. 6). Carefully lower the tub in the same
position down into the drain alignment kit, using caution to avoid damage to the brass tailpiece.
English
Fig. 6
Install your bathtub ller according to the manufacturer’s directions included with the purchased ller, sold separately (Fig. 7).
4
Fig. 7
Turn power supply on for GFCI protected outlet and ensure that the system performs properly (Fig. 8).
5
Fig. 8
Clean up debris left over from the construction steps taken thus far. Place weights on the tub and allow the silicone to cure.
6
Now that installation is completed, use the last two pages of this manual to complete the warranty registration for this product.
Page 6 www.jacuzzi.com Installation Instructions
Page 7

Arga™ Bathtubs
Operation & Maintenance Instructions
General Operating Instructions
All bathtubs manufactured by Jacuzzi Luxury Bath are designed for “ll and drain,” which means the bathtub should be drained
after each use and lled with fresh water by the next bather. This is a health precaution, as these bathtubs are not designed to hold
water continuously like pools or spas.
Close the drain and ll the bathtub until water is at least 1” to 2” (25 mm to 51 mm) above the highest jet (see water line indicated in
the illustration - Fig. 1). Do not turn on the system at any time if the jets are not completely immersed in water. Running the system
when there is insufcient water in the bathtub could result in water spraying outside the bath area.
ATTENTION: When exiting the bathtub, the water level will drop below the jets which could result in water being sprayed out
of the unit. To prevent this, you must turn unit OFF before exiting bathtub.
Fig. 1
English
Cleaning - Systems Clean™
To remove accumulations of bathtub residue from the system, it is recommended that Swirlpool™ bathtubs be cleaned at least
twice a month. For best results, we recommend that you clean your tub after each use using Systems Clean™, our exclusive twopart plumbing system cleaner made exclusively for experience bathtubs. Systems clean is available through jacuzzi.com/baths or
call us direct at 1-800-288-4002.
Suction Cover/Strainer Maintenance
Clean the suction cover/strainer of hair and debris when necessary (Fig. 2).
1. Remove the screw and detach the suction cover.
2. Clean the cover by back ushing debris from the holes.
3. Replace the suction cover immediately after cleaning.
WARNING! When reinstalling, orient the cover/strainer with the holes facing
up.
Fig. 2
DANGER: RISK OF SEVERE INJURY OR DROWNING! Keep hair a
minimum of 6 inches (152 mm) away from the suction tting at all times when the whirlpool system is operating. Hair longer
than shoulder length should be secured close to the head, or a bathing cap should be worn.
DANGER: RISK OF SEVERE INJURY OR DROWNING! Do not operate the Swirlpool™ system with the suction
cover/strainer removed! It is a safety device and must always be in place on the suction tting to minimize the potential
hazard of hair and body entrapment.
Operation Instructions www.jacuzzi.com Page 7
Page 8

Arga™ Bathtubs
Operation & Maintenance Instructions
Bathtub Additives
CAUTION: Do not use oil or oil-based bathtub additives. Never use abrasive cleaners on any Jacuzzi Luxury Bath product.
Arga™ Swirlpool™ bathtubs are intended for use with Jacuzzi® Epsom Salts.
English
If you want to use any other kind of bathtub additive, use only a small amount of low-foaming powder or crystal substance; the
system action intensies the foaming properties of soaps.
The use of certain bathtub oils, bubble baths, and bathtub additives may increase the level of accumulations of bathtub residue in
the system and may cause false reading of the water level sensors. If excess accumulations persist, you should discontinue use of
these products.
Filter Basket Maintenance
After each use, remove & rinse the lter basket to remove any residue (Fig.
3).
ATTENTION: If anything becomes trapped or dried into the strainer,
rst soak the lter basket in dish soap and warm water, then scrub as
needed with a brush.
Fig. 3
J6 Control Panel Swirlpool™ System Reference Illustration
WATERFALL
BUTTON
CONTROL KIT
SWIRLPOOL™
BUTTON
ILLUMATHERAPY™
BUTTON
CONTROL PANEL
120V 15A
GFCI
LIGHT WIRING CONNECTORS
4-PIN RECEPTACLE
4-PIN PLUG
NOT USED IN
4-JET CONFIG.
LIGHT WIRING, 1600MM
JET ASSEMBLY
W/ LED
LIGHT WIRING, 500MM
PUMP SALT DISCHARGE
ON/OFF VALVE
Page 8 www.jacuzzi.com Operation Instructions
Page 9

Arga™ Bathtubs
Operation & Maintenance Instructions
Gloss Bathtub Care & Cleaning
To clean the bathtub, use a mild Meguiar’s nonabrasive liquid detergent solution. You can protect and restore the luster to a dulled
acrylic surface by applying Meguiar’s #10 Mirror Glaze, a product specically designed for use on acrylic nishes.
Never use abrasive household cleaners of any kind on any Jacuzzi Luxury Bath product.
Gloss Bathtub Surface Repair
Minor scratches which do not penetrate the color nish can be removed by lightly sanding with #600-grit wet and dry sandpaper.
Restore the gloss using Meguiar’s Mirror Glaze. Major scratches and gouges which penetrate the acrylic surface will require
renishing. Call Jacuzzi Luxury Bath to nd a service agent in your area.
Matte Bathtub Care & Cleaning
1. First clean with a mild dish soap and warm water; wipe clean with a soft, slightly damp cloth.
2. For more difcult stains such as grease, oil, paint or ink, apply rubbing alcohol; wipe clean with a soft, dry cloth.
3. Avoid abrasive cleansers and solvents, harsh chemicals or those containing lime removal elements. They may damage the nish
and void the warranty.
4. Avoid abrasive scrubbing cloths or pads.
5. Avoid using razor blades or other sharp objects that might scratch the surface.
6. If unsure as to the suitability of a product’s appropriateness for use with these baths, rst test a very small amount of the product
on an inconspicuous area of the bath before using on a visible surface.
7. For very difcult stains, Jacuzzi Luxury Bath recommends the following cleansers and materials: Mr. Clean Magic Eraser, Soft
Scrub, Bon Ami or Gray Scotch Brite Pads (DO NOT use Green Scotch Brite Pads).
Matte Bathtub Surface Repair
Minor scratches which do not penetrate the color nish can be removed by lightly sanding with #600-grit wet and dry sandpaper.
Restore the nish using a Gray Scotch Brite Pad. Major scratches and gouges which penetrate the acrylic surface will require
renishing. Call Jacuzzi Luxury Bath to nd a service agent in your area.
English
Troubleshooting Procedures
PROBLEM PROBABLE CAUSES REMEDY
Pump/motor does not
start
Pump/motor operates
but no fully adjustable
jets are functioning
Illumatherapy™ lights
do not operate
Water leakage from
pump unions
Pump/motor shuts off
by itself before time
elapses
Waterfall not working • Swirlpool™ function not on
If the unit is within the warranty period, contact Jacuzzi Luxury Bath Service Support at 1-800-288-4002 with your bath’s serial number
before work is started. The serial number is located on the Specication/Serial Number Plate.
• No power to pump/motor
• Pump/motor not plugged in
• Pump/motor faulty
• Suction cover/strainer may be clogged • With the motor turned OFF, remove the suction cover/strainer and remove any
• Connector has come loose • Contact Jacuzzi Luxury Bath @ 800-288-4002
• Overtightened, O-ring may be
pinched or improperly seated, under
tightened
• Motor thermal protection has
deactivated pump/ motor due to
overheating (supply voltage low)
• GFCI tripped
• Inadequate supply wiring
• Waterfall button not activated
• Debris in waterfall outlet
• Valve not functioning properly
• Loose connections (wiring)
• Reset GFCI
• Insert plug securely into outlet
• Ensure control panel is connected to control box
• Contact Jacuzzi Luxury Bath @ 800-288-4002
debris. Replace the suction cover before operating
• Loosen unions, check and reseat O-ring. If O-ring has been pinched out of
shape, replace (refer to number below). When tightening union nuts, hand
tighten only
• Let motor cool; thermal protection will reset. Check for proper ventilation (check
supply voltage)
• Reset GFCI; if it continues to trip, do not use this unit. Disconnect the unit and
have the problem corrected by a licensed electrician before using
• Consult a licensed electrician to correct the wiring unit
• Turn on whirlpool
• Press waterfall button (watch for blue lights to ash)
• Use a thin, rigid and non-abrasive material (i.e. credit card) and gently swipe
back and forth until debris is cleared away from the waterfall opening
• Contact Jacuzzi Luxury Bath @ 800-288-4002
Operation Instructions www.jacuzzi.com Page 9
Page 10

Experience Arga™
Before Use
Close the drain and ll the bathtub until water is at least 1” to 2” (25 mm to 51 mm) above the highest jet (see water line
1
indicated in the illustration - Figure 1). Do not turn on the system at any time if the jets are not completely immersed in water.
Running the system when there is insufcient water in the bathtub could result in water spraying outside the bath area.
English
ATTENTION: When exiting the bathtub, the water level will drop below the jets which could result in water being sprayed
out of the unit. To prevent this, you must turn unit OFF before exiting bathtub.
Swirlpool™
To activate the Swirlpool™ function, touch the button briey (the function starts after lifting your nger) (Fig. 5).
2
Arga™ Bathtubs
Fig. 4
Fig. 5
NOTE: The Swirlpool™ function is programmed to run for 20 minutes, after which the function stops automatically. To stop the
function earlier if preferred, simply touch the button again.
Salt Infuser & Jacuzzi® Epsom Salts
The Arga™ is specically designed to allow for the use of Jacuzzi® Epsom Salts through the integrated salt infuser. The salt
infuser relieves the need to mix the salts by hand, perfectly blending the salts and delivering them into the bathing well through
the waterfall. Salt use is not required to operate the waterfall.
Salts can be added before or during the Swirlpool™ function, before starting the waterfall. To add, rotate the display toward
3
the inside of the tub as shown (Fig. 6). Check that the strainer basket is in the infuser, and pour 8-9 oz. (1 container) of Epsom
Salt inside before returning the control panel to closed position.
Fig. 6
WARNING: Do not add salt without the strainer basket present. Do not use more than one container of salt at a time. The
use of more than one container of Epsom salt or salt use without the strainer basket could potentially clog the system.
Page 10 www.jacuzzi.com Operation Instructions
Page 11

Arga™ Bathtubs
Experience Arga™
Waterfall
Activate the waterfall after starting the Swirlpool™ function (and adding Jacuzzi® Epsom Salts in step 3 if desired) by touching
4
the button briey (the function starts after lifting your nger) (Fig. 7).
Fig. 7
2
English
WARNING: Do not press multiple times. Do not
block the waterfall outlet at any time.
ATTENTION: The waterfall cannot operate if the
Swirlpool™ function is not activated.
Once the button is touched, the Illumatherapy™ lights will ash blue (Fig. 8). The salt infuser will mix the salts for
5
approximately 10 seconds before the waterfall action begins. If the waterfall is activated without salt, the 10 second mixing still
occurs.
Fig. 8
The waterfall will continue to operate throughout the Swirlpool™ experience, or can be turned off if desired by touching the
6
button again.
1
Note: After the waterfall is turned off, the salt infuser will slowly drain into the tub. As such, adding salt to the infuser after the
waterfall has run during a bath will allow a small amount of dissolved salt to drain into the tub. This is normal and will not cause
any issues for the bath.
Illumatherapy™ Light System
The Illumatherapy™ light system can be used at any time while the bath is lled or empty. To activate, simply touch the
7
button briey (the lights activate after lifting your nger) (Fig. 9). The lights will activate on the rainbow cycle.
To change color, touch the button again to move through the colors in Figure 10. Hold for 2 seconds at any time to turn
off the lights. The lights are programmed to turn off after 30 minutes.
Fig. 9
1. Activate Lights on
Rainbow Cycle
2. Blue
3. Red
4. Yellow
5. White
6. Turquiose
7. Green
8. Orange
9. Magenta
Fig. 10
Operation Instructions www.jacuzzi.com Page 11
Page 12

Notes:
English
Arga™ Bathtubs
Page 12 www.jacuzzi.com
Page 13

Jacuzzi Luxury Bath
14525 Monte Vista Avenue
Chino, California 91710
Page 14

WARRANTY REGISTRATION CARD
To complete your registration, visit our website at www.jacuzzi.com or ll out and mail this card to the address printed
on the other side within thirty (30) days from date of purchase in order for this warranty to take effect.
Purchaser's Name ______________________
Purchaser's Address ____________________
Español
City __________________ State __ Zip ____
Home Phone: __________________ Cell Phone:
Email: ________________________________
Date of Purchase ________
Model Name __________________________
Serial Number _________________________
Dealer's Name _________________________
Dealer's Address _______________________
1. How did you rst hear about this Jacuzzi® product?
( ) Advertisement ( ) Article in Magazine/Newspaper
( ) Visited Dealer/Plumbing Supplier ( ) Yellow Pages
( ) Builder/Plumber/Remodeler ( ) Decorator/Architect
( ) Visited Retailer/Home Center Store
( ) Word of Mouth . . . Friend/Relative/Acquaintance
( ) Other (Please Describe) ______________
2. Who rst gave you specic information about this product (specications, prices, etc.)?
( ) Dealer/Plumbing Supplier ( ) Builder ( ) Remodeler
( ) Plumbing Contractor ( ) Retailer/Home Center Store
( ) Decorator/Architect ( ) Already Installed
3. What was the main reason for purchase?
( ) Styling ( ) Warranty Service ( ) Product Features
( ) Brand Name ( ) Price ( ) Hydrotherapy
( ) Home Resale _______________________
( ) Other _____________________________
4. Who nally decided which product you would buy?
( ) Self ( ) Spouse ( ) Self and Spouse Together
( ) Other Family Member ( ) Designer/Architect
( ) Builder/Plumber/Remodeler ( ) Already Installed
5. Who installed? ( ) Already installed/New Home
( ) Contractor/Plumber when remodeling
( ) Self/Spouse when remodeling
( ) Other _____________________________
6. What is the current market value of this property?
Please estimate $ _____________________
7. What is the age of the head of the household? Years
8. What other manufacturers did you consider?
( ) Eljer ( ) Lasco ( ) Price Pster ( ) Aqua Glass
( ) Kohler ( ) American Standard ( ) Sterling
( ) Other (Specify) _____________________
9. How long did you shop before purchasing unit?
( ) 1 day ( ) 2 months- 6 months
( ) 2-7 days ( ) 6 months- 1 year
( ) 1 week- 2 weeks ( ) 1 year- 2 years
( ) 2 weeks- 4 weeks ( ) +2 years
( ) 1 month- 2 months
10. Approximately how long have you lived in this home ?
11. Please indicate, approximately, the total annual income of your household.
( ) Up to $24,999 ( ) $50,000 to $74,999
( ) $25,000 to $29,999 ( ) $75,000 to $99,999
( ) $30,000 to $39,999 ( ) $100,000 to $149,999
( ) $40,000 to $49,999 ( ) $150,000 and Above
12. Was your purchase process?
( ) Very easy ( ) Easy ( ) Difcult ( ) Very Difcult
13. How technically aware were you of the patented Jacuzzi® jet system prior to your purchase?
( ) Not aware ( ) Somewhat aware ( ) Very aware
Ninety-Day
Parts Only
Limited Warranty
On
Accessory(ies)
JACUZZI LUXURY BATH
RG43000
 Loading...