

Page 1
5' Corner Style Bath Skirt
Install the bath unit per instructions supplied with
the product.
Installation Instructions
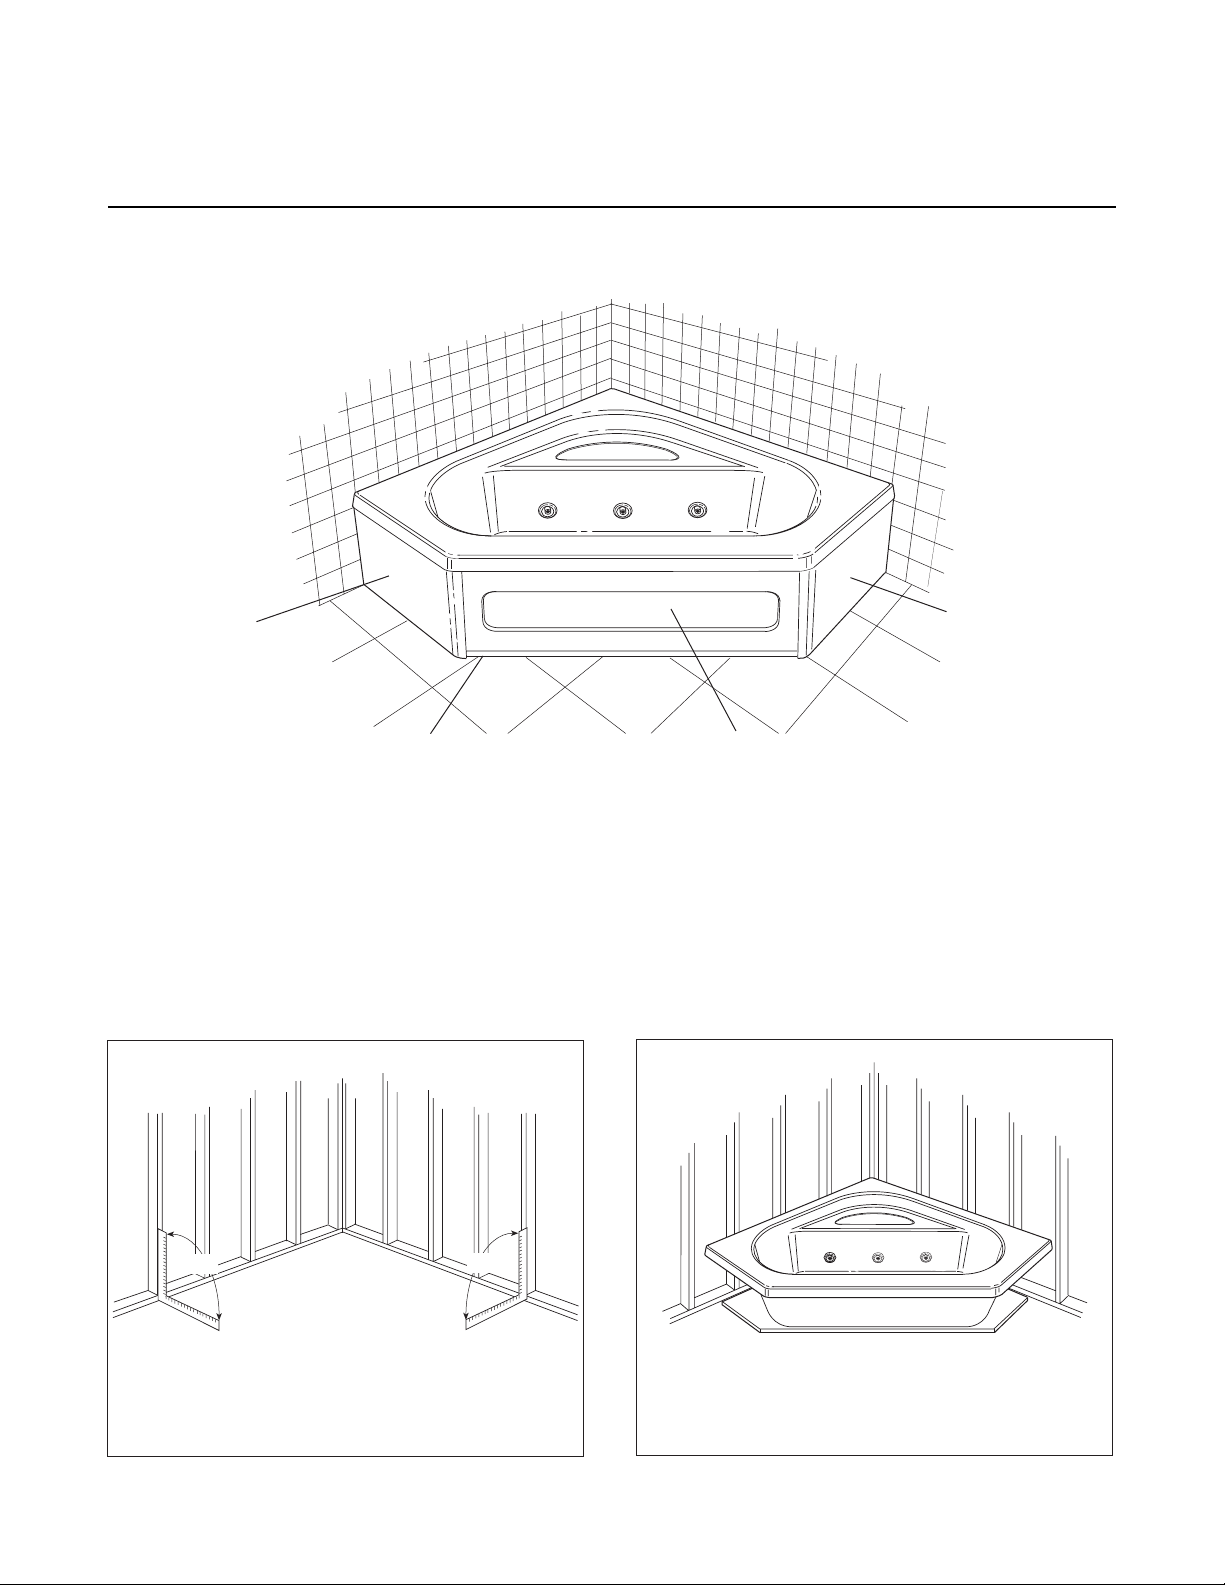
LEFT-HAND
FIXED SKIRT
BOTTOM RAIL
The optional skirt is designed to allow the minimum service access necessary to the motor/pump and plumbing of the
bath and consists of three pieces; left-hand fixed, right-hand fixed, and removable front panel, along with the necessary
bottom rail and hardware for installation. (See the Illustration above.)
Allow clearance of at least 8" in front of the bath for skirt removal. The skirt should be attached after the bath has been
installed.
As part of the roughing-in of the bath, follow these steps to ensure that the bath skirt fits properly.
REMOVABLE
SKIRT
RIGHT-HAND
FIXED SKIRT
90°
Check that wall structure is plumb and square
to the floor.
90°
Page 2

Bath Skirt Installation
FIXED SIDE
PANEL
5/8"
BOTTOM
RAIL
BOTTOM
RAIL
SCREWS
(PROVIDED)
FIXED SIDE
PANEL
4.
The bath should already be set and leveled. Electricity
should be connected and bath unit tested to be sure it is
working properly before installing the skirt.
Mount the five shell clips to the wooden blocks located
under the rim of the bath. (See Illustration 1.) Shell clips
are to be located 5/8" from the inside of the bath rim
edge. Mark hole locations on the blocks using one of the
clips as a template. Then drill pilot holes about 1/8" deep
with a 3/32" drill. Use caution to avoid drilling through
bath rim. Secure the clips to the wooden blocks as
shown.
PLUMB LINE
OR SQUARE
FROM EDGE
OF BATH RIM
7/8" FROM
STUD WALL
BATH
RIM
(Interior)
WOODEN
BLOCK
SCREWS
(PROVIDED)
SHELL CLIP
5/8"
1.
Place the 21" long aluminum angle strips at each side of
the bath. They should be located 7/8" from the stud wall
and 1/4" behind a plumb line dropped from the edge of
the bath rim. Fasten the aluminum angles to the subfloor using the screws provided (See Illustration 2.)
Clean an area about 2" long, approximately 4" from each
end, on the bottom of the skirt and on the skirt rail with
isopropyl alcohol. Attach strips of self-adhesive Velcro
hook tape to the rail and the loop tape to the skirt, where
cleaned, ensuring that the tapes will mesh properly.
(See Illustration 3.)
2.
VELCRO
LOOP T APE
(Place on bottom
of skirt)
VELCRO
HOOK TAPE
(Place on top side of
aluminum angle)
ALIGN CORNER OF SKIRT
3.
®
WITH CORNER OF BATH RIM.
1/4"
Lift skirt up under bath at a slight angle, engaging the
shell clips. Drop down and into place against skirt rail.
Follow the same procedure for the installation of the
other fixed skirt.
To install the removable skirt. (See Illustration 4.) Lay
the remaining skirt rail (47-1/4" long) between the fixed
skirts. Ensure that the front edges of the side skirt panels
are in line with the contour of the bath rim edge and are
vertical. Locate the front surfaces of the skirt rail 5/8"
behind the front surfaces of the side panels as shown.
Fasten the bottom rail to the floor using the screws
provided.
Page 3

REMOVABLE SKIRT
®
VELCRO
TAPE
5.
LOOP
HOOK TAPE
3"
2"
BOTTOM RAIL
CENTER
LINE
Clean an area about 2" long in the center, and 3" from
each end of the rail and the bottom of the skirt with
isopropyl alcohol. (See illustration 5). Attach strips of
Velcro®, as before, hook tape to rail, loop tape to skirt,
ensuring that they will mesh when the skirt is installed.
WOODEN
BLOCK
SHELL CLIP
LIFT TOP OF
SKIRT UP
UNDERNEATH
RIM OF BATH
INTERLOCKING
VELCRO
®
TAPES
6.
Lift the top of the skirt up under the rim of the bath,
engaging the clip. Swing the bottom of the skirt in
towards the rail and lower the skirt onto it. The Velcro
tapes will mesh, holding the skirt in place. Proceed with
the installation of the wall and finished flooring materials.
®
Page 4

© Copyright 1991 B244000 C 10/98
 Loading...