

Page 1
XP
JACTO INC.
19217 SW 119
th
Ave.
Tualatin, Oregon 97062
Tel: (503) 885-8723
Fax: (800) 511-3671
Toll free: (800) 522-8610
E-mail: [email protected]
Home page: www.jacto.com
Operator's manual ∙ Manual de instrucciones
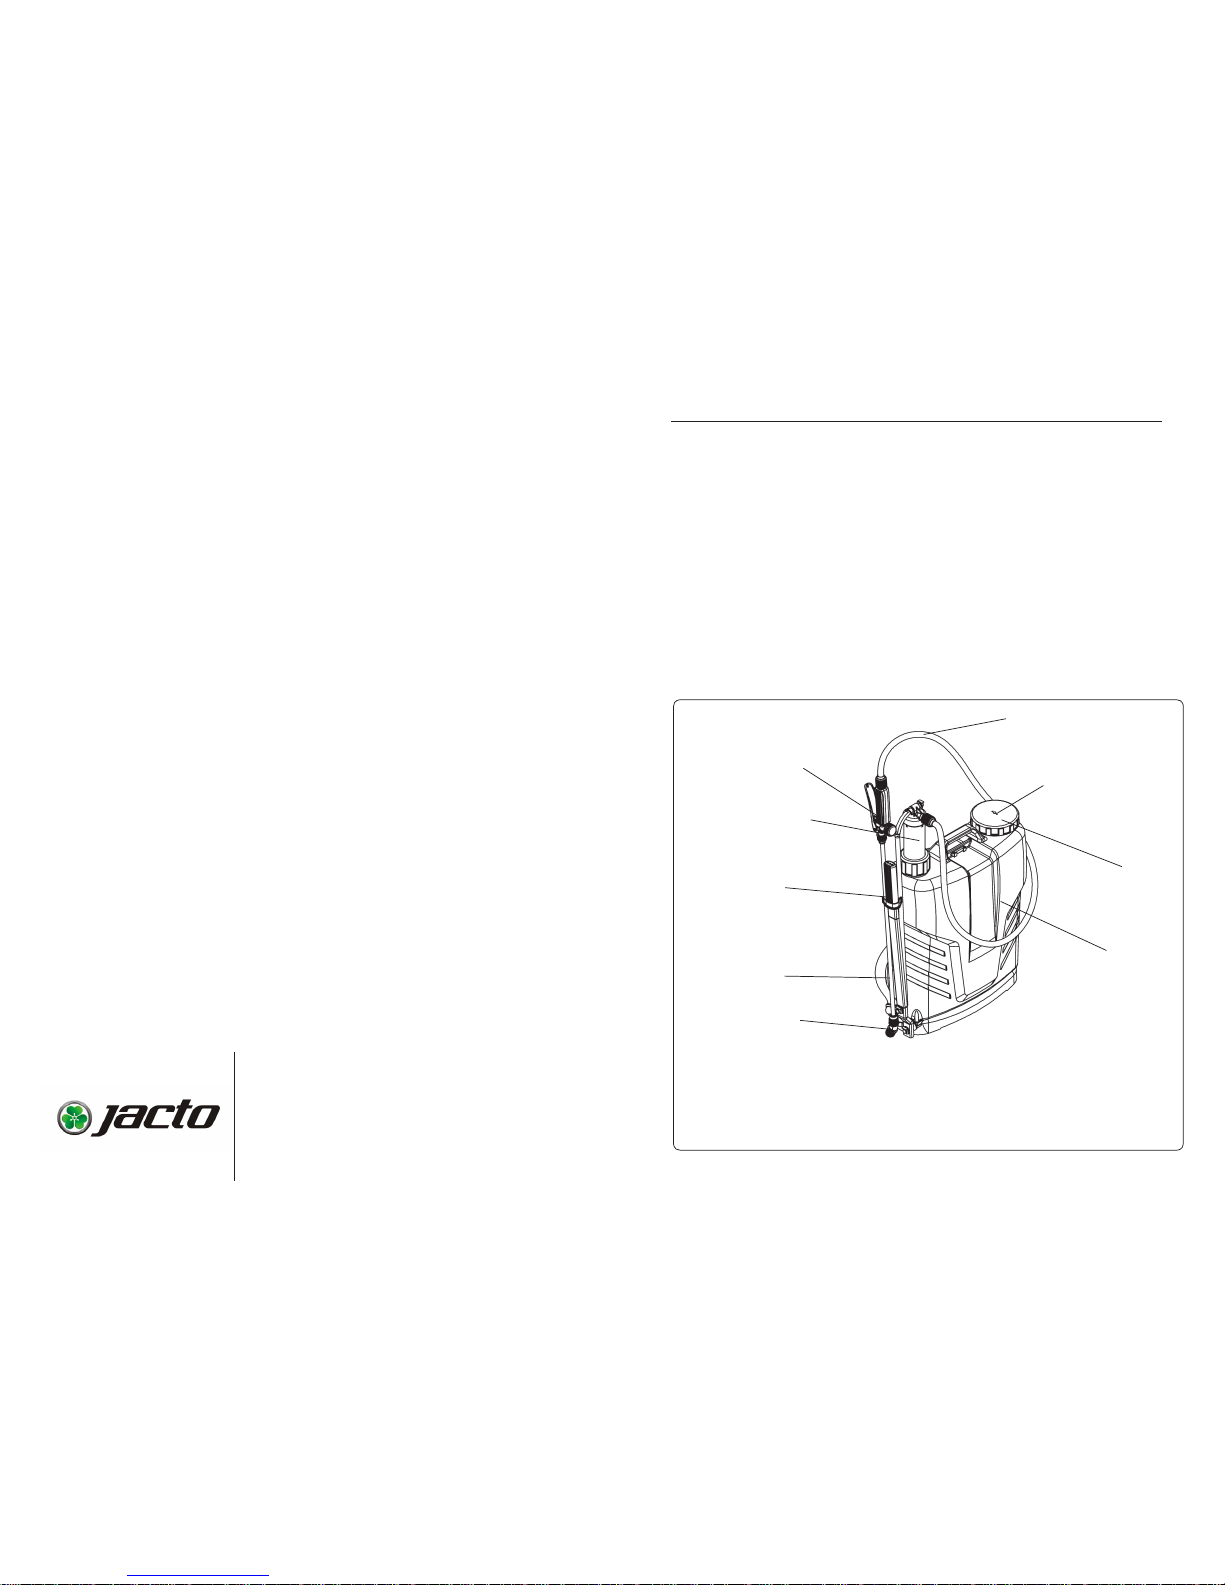
Tank / Depósito
Lever / Palanca
Lance / Lanza
Trigger valve / Válvula
Diaphragm / Diafragma
Chamber / Cámara
Nozzle / Boquilla
Lid / Tapa
SPRAYER VIEW ∙ PRESENTACIÓN
XP312, XP416, XP12
& XP-16
INTRODUCTION ∙ INTRODUCCIÓN
04/2014 - 1211834 - 0547 - MIC_USA
This manual contains information for the
proper assembly, operation and care of
your sprayer.Carefully read and follow the
instructions contained in this manual before using your sprayer.
Este manual contiene todas las informaciones
necesarias sobre el montaje y funcionamiento
de su equipo. Léalo con atención y siga
rigurosamente sus instrucciones de uso.
Hose / Manguera
Page 2
XP
XP
02
SPECIFICATIONS ∙ ESPECIFICACIONES TÉCNICAS
∙ Model / Modelo .........................................................XP (312 & 12 - 416 & 16)
∙ Net weight / Peso neto ......................................................7.7 - 7.9 Lbs
∙ Tank /
Depósito
Capacity / Capacidad .......................................................... 3 - 4 gallons / galones
Material / Material
..... ...............................................................
Polypropylene / Polipropileno
Fill opening Ø / Ø de la boca
.................................................3.9 inches
∙ Pump / Bomba
Type / Tipo ..........................................................................Piston / Pistón
Material / Material. .............................................................
Polypropylene / Polipropileno
Pressure / Presión ............................................................ ...130 psi
∙ Lance length / Longitud de la lanza ..............................23.6 in
∙ Hose length / Longitud de la manguera .........................53.2 in
∙ Nozzle fitted / Boquilla instalada ...................................
Adjustable cone / Cono regulable
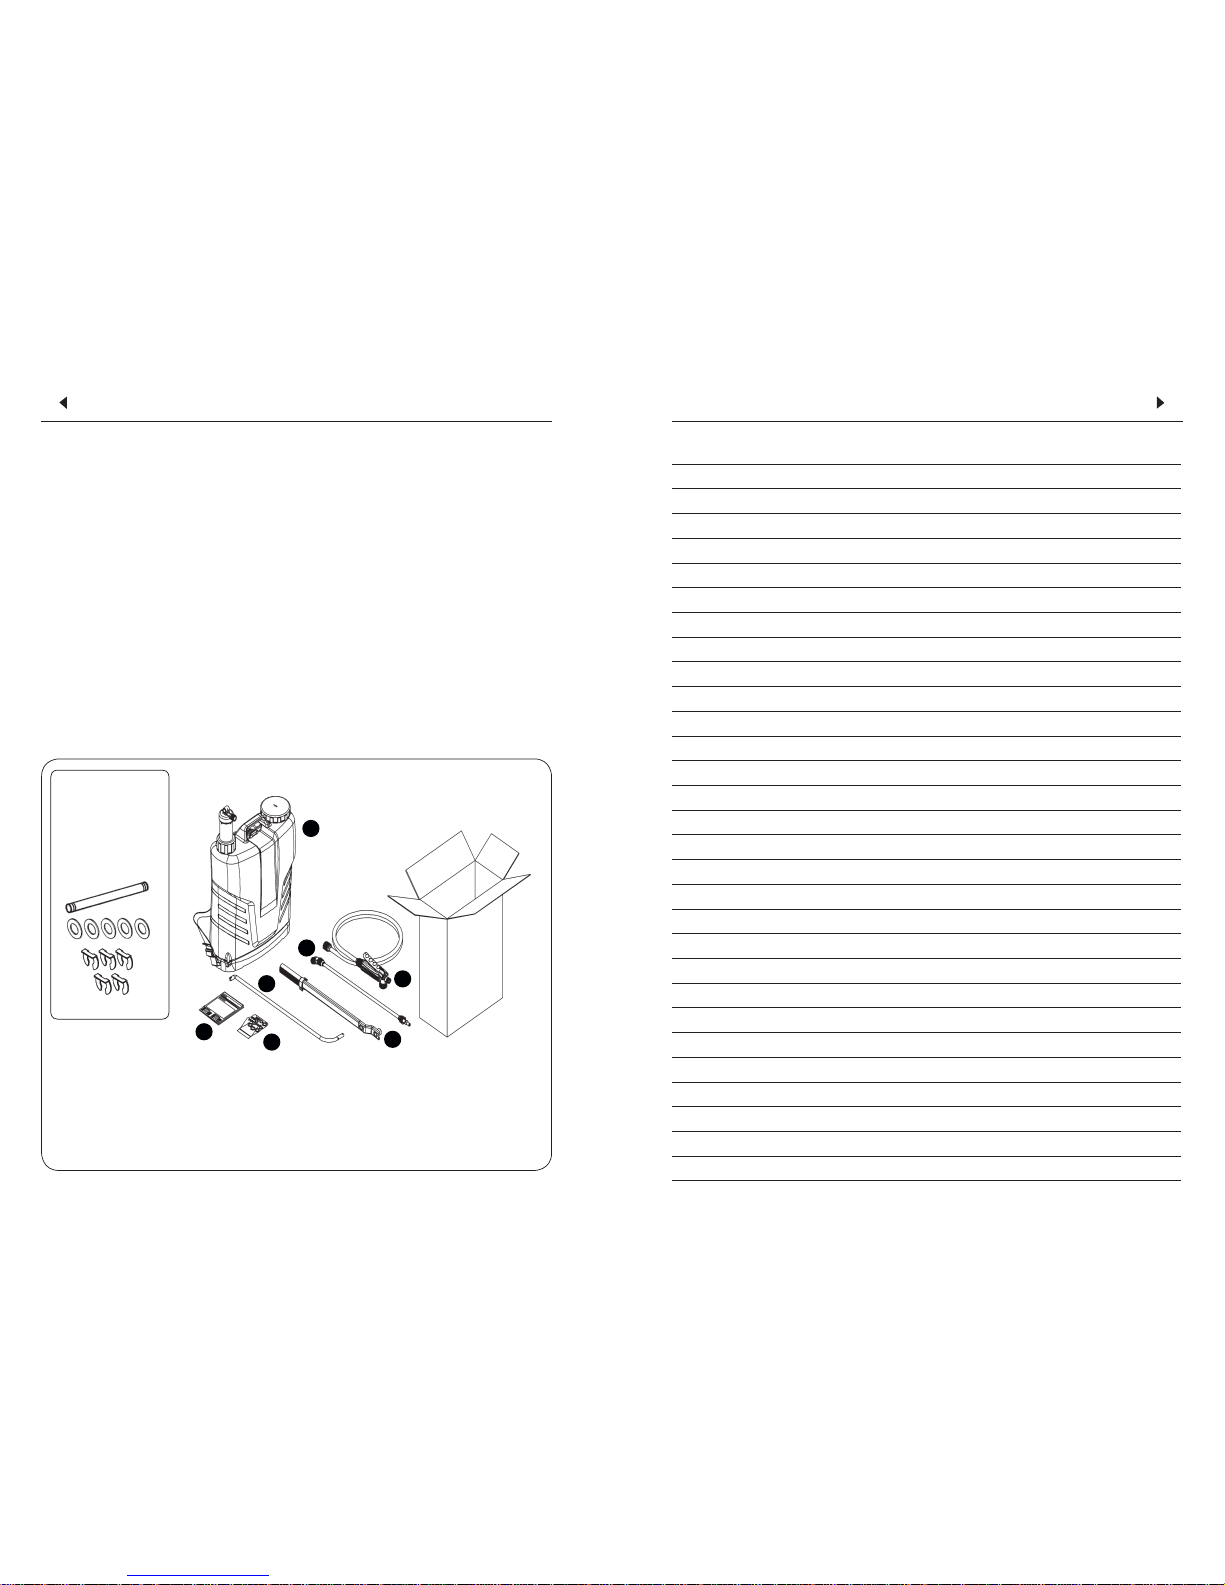
Contents of the
plastic bag
Piezas
acondicionadas
dentro de la bolsa
plástica
1∙ Accessories plastic bag
/ Bolsa plástica con accesorios
2∙ Lever / Palanca
3∙ Lance / Lanza
4∙ Rod / Varilla
5∙ Trigger valve / Válvula
6∙ Operator's manual / Manual de instrucciones
7∙ Tank / Depósito
23
NOTE ∙ ANOTACIONES
1
2
3
4
5
6
7
Page 3
XP
XP
Attention ∙ Atención
∙ Be careful when taking the sprayer out of the carton because the lever is
loose and can cause damage.
∙ Cuidado al retirar el depósito con la palanca, pues puede estar suelta y
podrá provocar un accidente.
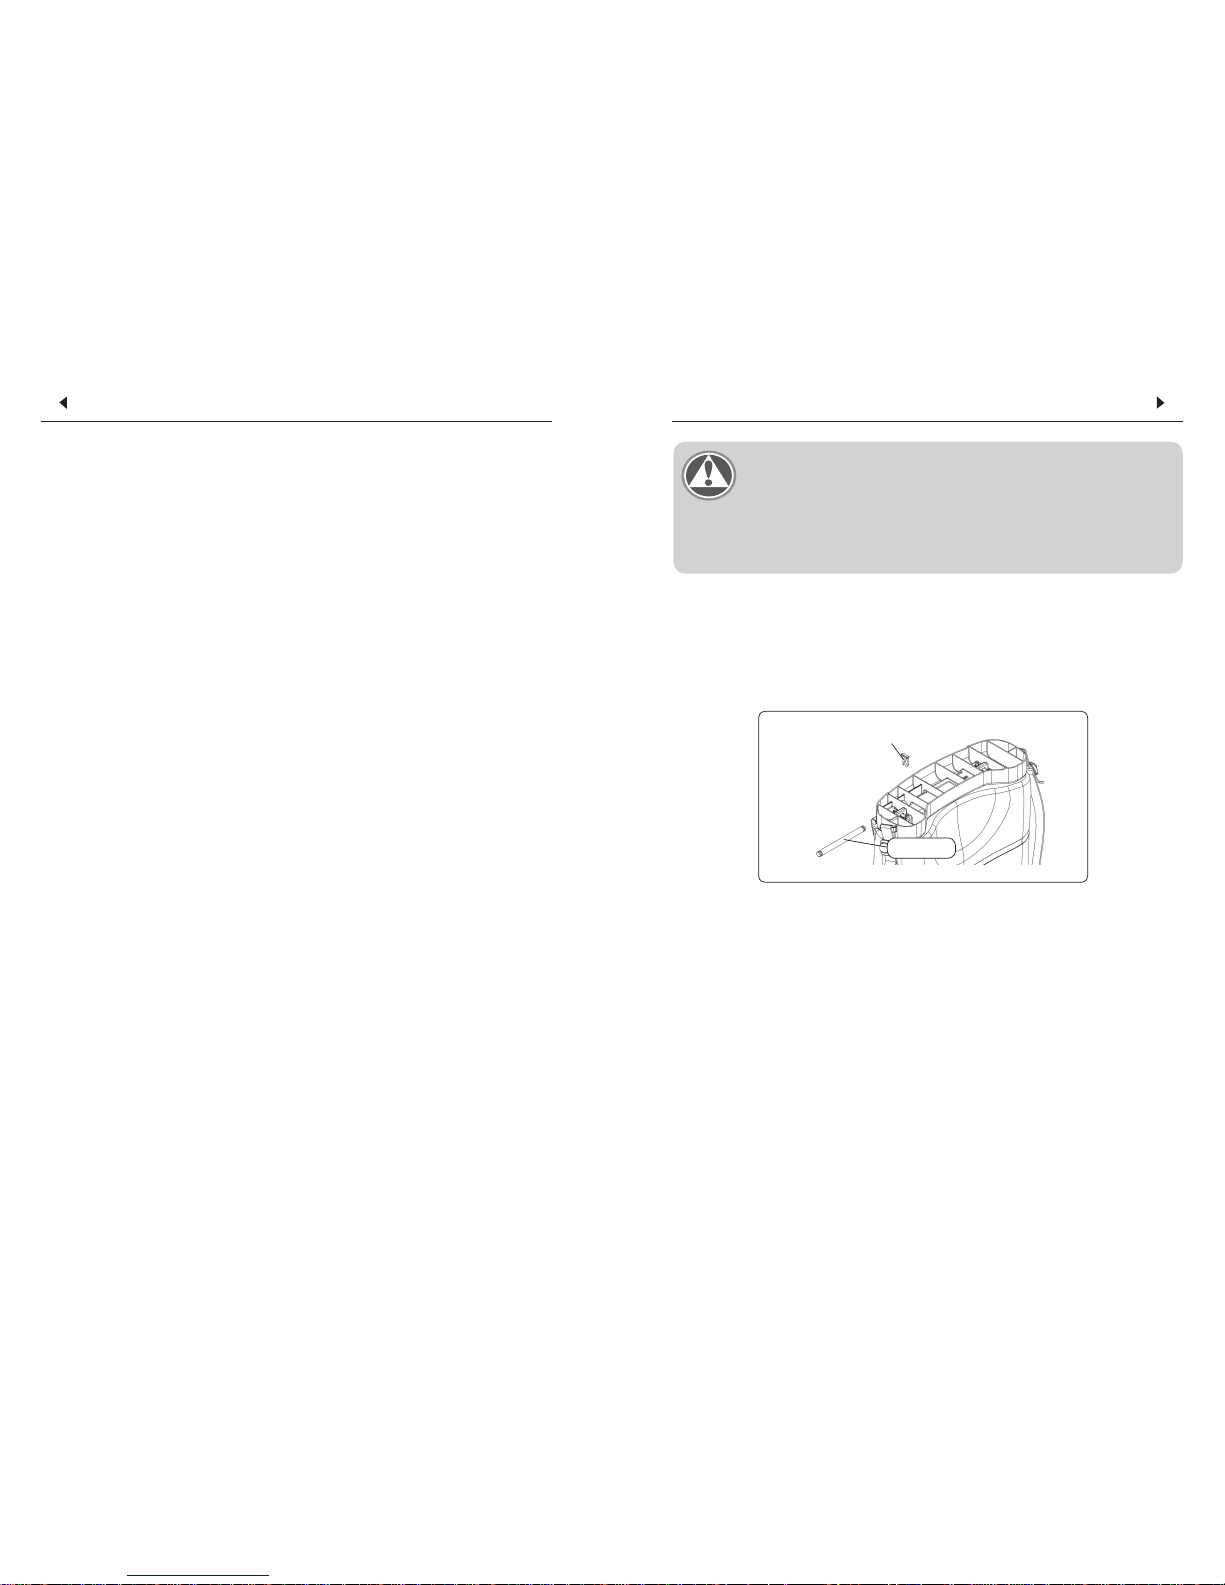
INSTALLING THE SHAFT ∙ MONTAJE DEL EJE
∙ Insert the shaft (1) in the free opening
on the tank base (on the same side
of the chamber).Fit the shaft lock (2).
∙ Introduzca el eje (1) en el orificio que
está libre en la base del equipo (cáma-
ra). Trabe el eje con la contraclavija (2).
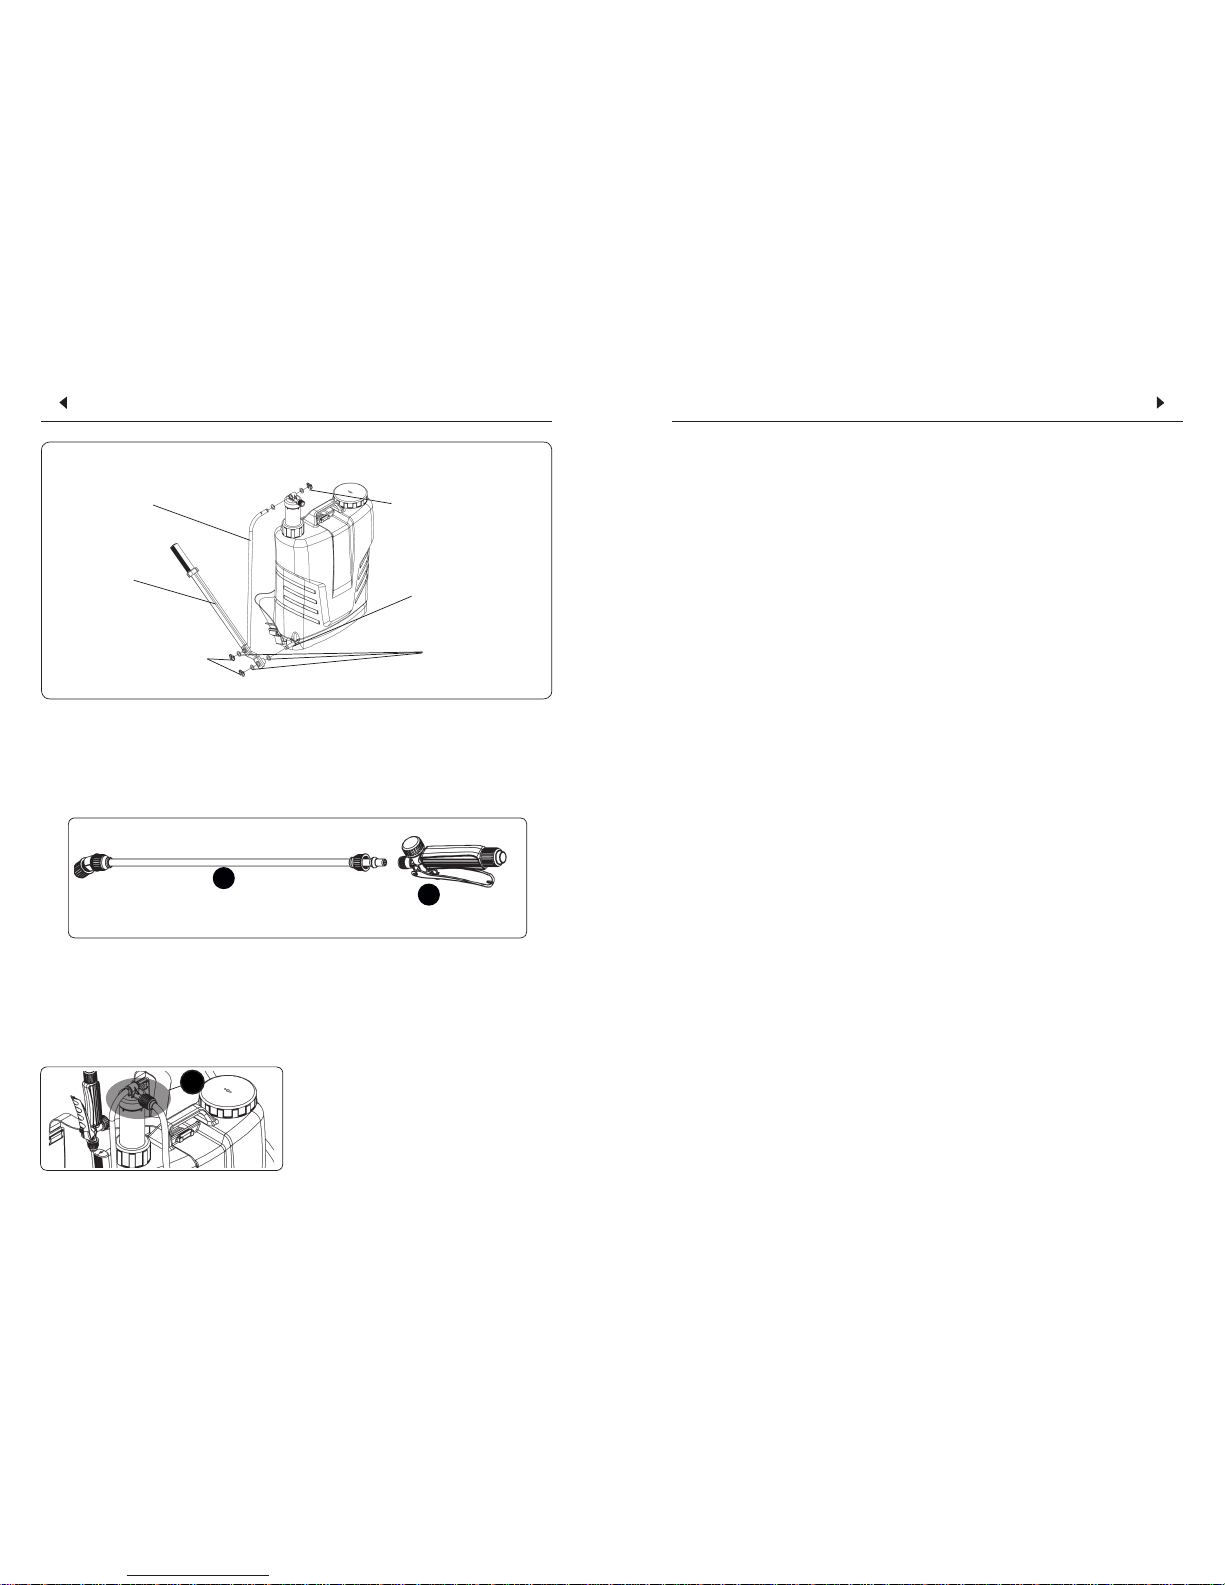
INSTALLING THE LEVER ∙ MONTAJE DE LA PALANCA
22 03
∙
Lightly greases the orifice on the chamber top.
∙ Fit a flat washer on the shaft and rod.
∙ For easy assembly, install the lever on the
shaft and the rod on the chamber top at
the same time.
∙ Install the other flat washers on the shaft
and rod and lock with the lock ring.
∙ Pase una fina camada de grasa en el ori-
ficio de la palanca y móntela en la varilla
usando una arandela lisa antes de instalar
la traba de fijación.
∙
Pase una fina camada de grasa en el orificio
de la cámara.
∙
Para facilitar el montaje, instale la palanca
en el eje y en la cámara simultáneamente.
∙
Coloque la otra arandela en el eje y en la
varilla y préndala con la traba de fijación
ITEMS EXCLUÍDOS DE LA GARANTÍA:
∙
Piezas que presenten desgaste o fatiga por uso, SALVO SI PRESENTASEN DEFECTOS
DE FABRICACIÓN, MONTAJE O DE MATÉRIA PRIMA.
∙
Defectos resultantes de accidentes.
∙
Traslados y fletes de los equipos, piezas y componentes cuando las garantías no fueran
concedidas.
∙
Traslados y transporte de personas y vehículos.
GENERALIDADES
∙
Piezas sustituidas en garantía serán propiedad de JACTO.
∙ La garantía de piezas y componentes sustituidos acaba con el plazo de garantía del equipo.
∙
Eventuales atrasos en la ejecución de los servicios no le dan derecho al propietario a
indemnización o extensiones del plazo de garantía.
∙
Cualquier sugerencia, duda o reclamación, favor dirigirse al DISTRIBUIDOR JACTO más próximo.
∙ JACTO se reserva el derecho de introducir modificaciones o paralizar la fabricación de los equipos.
Shaft lock (2)
Shaft (1)
Page 4
XP
XP
04
ATTACHING THE LANCE TO THE TRIGGER VALVE ∙ MONTAJE DE LA
LANZA EN LA VÁLVULA
* Do not overtighten the screw cap. No apriete excesivamente la tuerca.
1∙ Lance / Lanza
2∙ Trigger valve / Válvula
1
2
21
Rod /Varilla
Lever / Varilla
Flat washers /
Arandelas
Lock ring /
Traba de fijación
∙ Insert the lance into the trigger valve
and secure it with the screw cap.
Lock ring /
Traba de fijación
Shaft / Eje de la base
TIGHTENING THE FASTENING NUT ∙ APRIETO DE LA TUERCA DE FIJACIÓN
STATEMENT OF LIMITED ∙ GARANTÍA
MÁQUINAS AGRÍCOLAS JACTO S.A. shall warrant the equipment described in
this manual and shall repair or replace parts and components which, under normal operation
and wear, in accordance with technical recommendations, show DEFECTS IN MATERIAL
OR WORKMANSHIP, based on the following conditions.
WARRANT Y PERIOD
∙
01 (one) year from the date of sale to the original purchaser.
WARRANTY APPLICATION
∙
JACTO shall honor this warranty, free of charge, if any part or component shows defect in
MATERIAL OR WORKMANSHIP, after final analysis at the factory.
THIS WARRANTY SHALL BE NULL & VOID IN CASE OF:
∙
Misuse of the equipment against specifications in the OPERATOR'S MANUAL, overwork or
accidents. Preventive/remedial maintenance performed by unauthorized people.
∙
Use of parts and components not supplied by JACTO. Modification of the equipment or any
characteristic of the original design.
THIS WARRANTY SHALL EXCLUDE:
∙
Parts which show wear and tear due to use, UNLESS THEY SHOW DEFECTS IN WORK-
MANSHIP, ASSEMBLY OR MATERIAL.
∙
Damages resulting from accidents.
∙
Transportation or freight of the equipment, parts and components in case such warranty is not approved.
GENERAL INFORMATION:
∙
Parts replaced within the warranty period shall be property of JACTO.
∙
The warranty on replaced parts and components shall expire together with the equipment
warranty period.
∙
Eventual delays in performing services shall not give the owner right either to indemnity or
to extension of the warranty period.
∙
JACTO reserves the right to modify its products or to interrupt the manufacture without prior notice.
MÁQUINAS AGRÍCOLAS JACTO S.A. garantiza el equipo identificado en este manual,
obligándose a reparar o substituir piezas y componentes que durante su utilización, en condiciones
normales y siguiendo las recomendaciones técnicas, presenten DEFECTOS DE FABRICACIÓN O
DE MATERIA PRIMA, obedeciendo las siguientes reglas.
PLAZO DE GARANTÍA:
∙
1 (un) año a contar de la fecha de emisión del boleto fiscal de venta al primer propietario.
APLICACIÓN DE LA GARANTÍA:
∙
La garantía será concedida por JACTO, gratuitamente, desde que las piezas y componentes
presenten defectos de fabricación o montaje y después de análisis conclusivo en la fábrica.
PÉRDIDA DEL DERECHO DE GARANTÍA:
∙
Utilización del equipo en desacuerdo con las recomendaciones técnicas del MANUAL DE
INSTRUCCIONES; con abusos, sobrecargas de trabajo o accidentes.
∙
Mantenimiento preventivo/correctivo dado por personas no autorizadas.
∙
Empleo de piezas y componentes no suministrados por JACTO.
∙
Alteración del equipo o de cualesquiera características del proyecto original.
∙
Llenado incompleto o incorrecto de la solicitud de garantía.
∙ Before using the equipment, tighten the
fastening nut (A).
IMPORTANT: This operation must be done
by hand. Do not use any type of tool.
∙
Antes de utilizar el equipo, apriete la tuerca
de fijación (detalle A).
IMPORTANTE:
Ese aprieto debe ser hecho con la
mano. No hay necesidad de usar herramientas.
∙ Monte la lanza en la válvula y apriete
la tuerca lo suficiente para que no haya
fugas.
A
Page 5
XP
XP
20
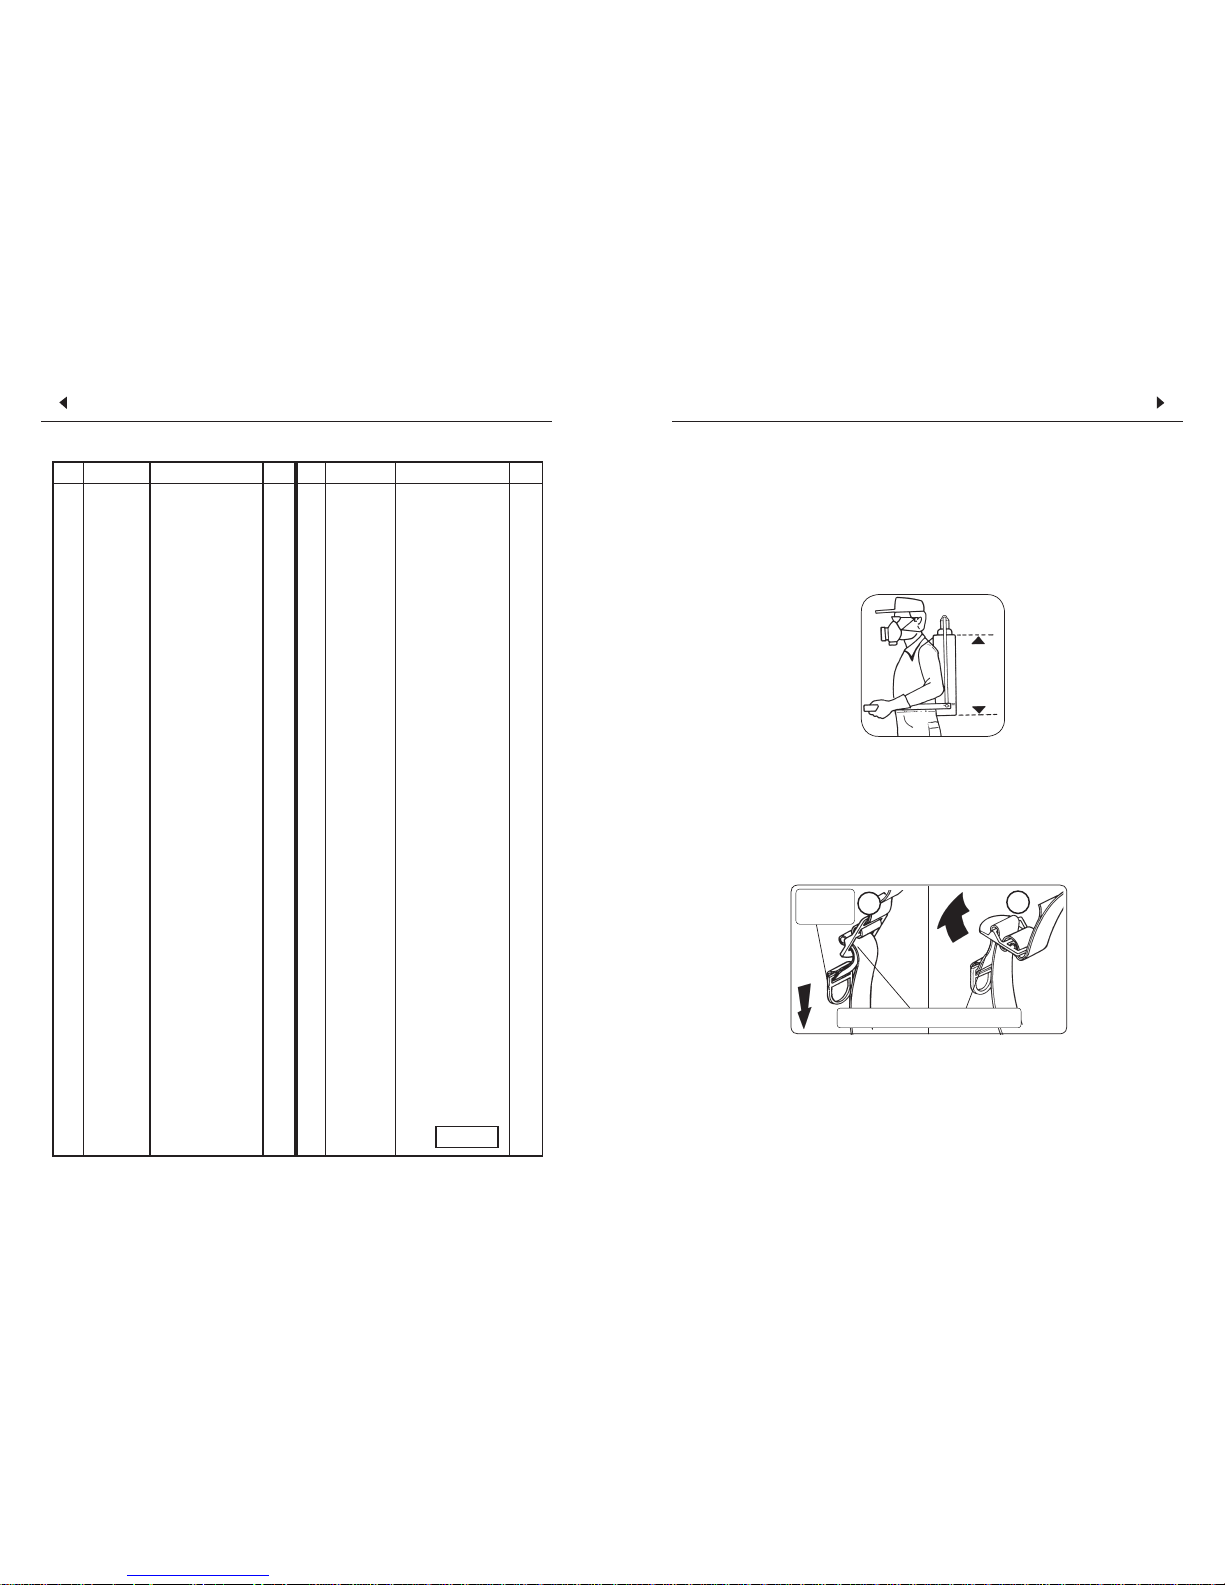
ADJUSTING THE SHOULDER STRAP ∙ AJUSTE DE LA CINTA
∙ The tank is contoured for the operator
comfort. The shoulder straps can be
quickly adjusted to properly position the
sprayer on the operator's back.
∙ El depósito del equipo tiene forma una
anatómica que le proporciona mayor
comodidad al operador. La correcta posi-
ción del equipo en el cuerpo del operador
puede obtenerse con un sencillo ajuste
de la cinta
.
05
Handle
Hebilla
Buckle / Fijador intermediario
A
B
TIGHTENING ∙ APRETAR LA CINTA
∙ Hold the strap buckle firmly with one hand,
and pull the handle downward with the
other hand.
∙ Sujete firmemente el fijador intermediario
de la cinta. Con la otra mano, tire la hebilla
hacia abajo.
ESPAÑOL
Nº
CÓDIGO
DENOMINACIÓN CT.
Nº
CÓDIGO
DENOMINACIÓN CT.
LLM-464
LOOSENING ∙ AFLOJAR LA CINTA
∙
Hold the buckle firmly with one hand, and
pull the strap upward with the other hand.
∙
Sujete firmemente el fijador intermediario
de la cinta. Con la otra mano tire la cinta
hacia atrás.
1 1198800
Repuesto-arandelas
y traba de fijación 1
2 1210725 Porta empaque XP 1
3 1168409 Empaque de fieltro 1
4 1168407 Émbolo
(SANTOPRENE) 1
5 1168406
Cámara con émbolo
1
6 1168404 Anillo ORI-033 1
7 1168405
Cilindro de la cáma ra 1
8 1168410 Esfera de acero
inoxidable 1
9 560573 Diafragma de la
tapa (Nitrílica) 1
10 1210726
Tapa con diafragma
XP 1
11 1168414
Colador - LÍNEA XP
1
12 1210727 Base del depósito 1
13 1168397 Traba de la base 1
14 1211809 Depósito XP312
con trabas (blanco) 1
14A 1211810 Depósito XP416
con trabas (blanco) 1
14B 1200395
Depósito XP12 con
trabas (azul) 1
14C 1200398 Depósito XP16
con trabas (azul) 1
15 883108 Eje con traba 1
16 1197400
Varilla (naranja) XP
1
17 495648 Manija completa 1
18 615005
Palanca de acciona-
miento compl.
(naranja) 1
19 635664 Traba de la cinta 1
20 1176504 Cinta completa c/
regulacíon XP 1
21 942193 Tuerca S 20 x 1,5 2
22 1168403
Manguera completa
XP 1
23 1168418 Filtro LP-3 1
24 502757 Hebilla 2
25 1168421 Palanca completa
LP-3 1
26 1168422 Aguja completa
LP-3 1
27 1168419 Válvula completa
LP-3 1
28 635276 Unión con junta
cónica 1
29 100131 Lanza 1
30 1180613 Resorte 1
31 592139
Filtro de la boquilla
M40 1
32 325787
Boquilla cono regu
-
lable azul 1
33 942201 Boquilla de salida 2
34 231845 Anillo O-ring 110 2
35 996058 Tapa 1
36 915744 Tuerca cónica 2
37 1176816
Lanza LP-3 comple-
ta 1
Page 6
XP
XP
06 19
N.
P/N
DESCRIPTION
Qty
N.
P/N
DESCRIPTION
Qty
LLM-464
ENGLISH
Attention ∙ Atención
∙ After assembling the sprayer, fill the tank with clean water and pressure-
-check the tank lid, diaphragm, tank bottom, lance and trigger valve
for leakage. Most leaks can be stopped by retightening the appropriate
connections and fittings. Any leakage must be repaired before returning
to service
.
∙ Después de montado, llene el depósito del pulverizador y pruébelo para
eliminar posibles fugas.Conexión de las manguera; diafragma de la tapa;
fondo del depósito; lanza; válvula, etc
.
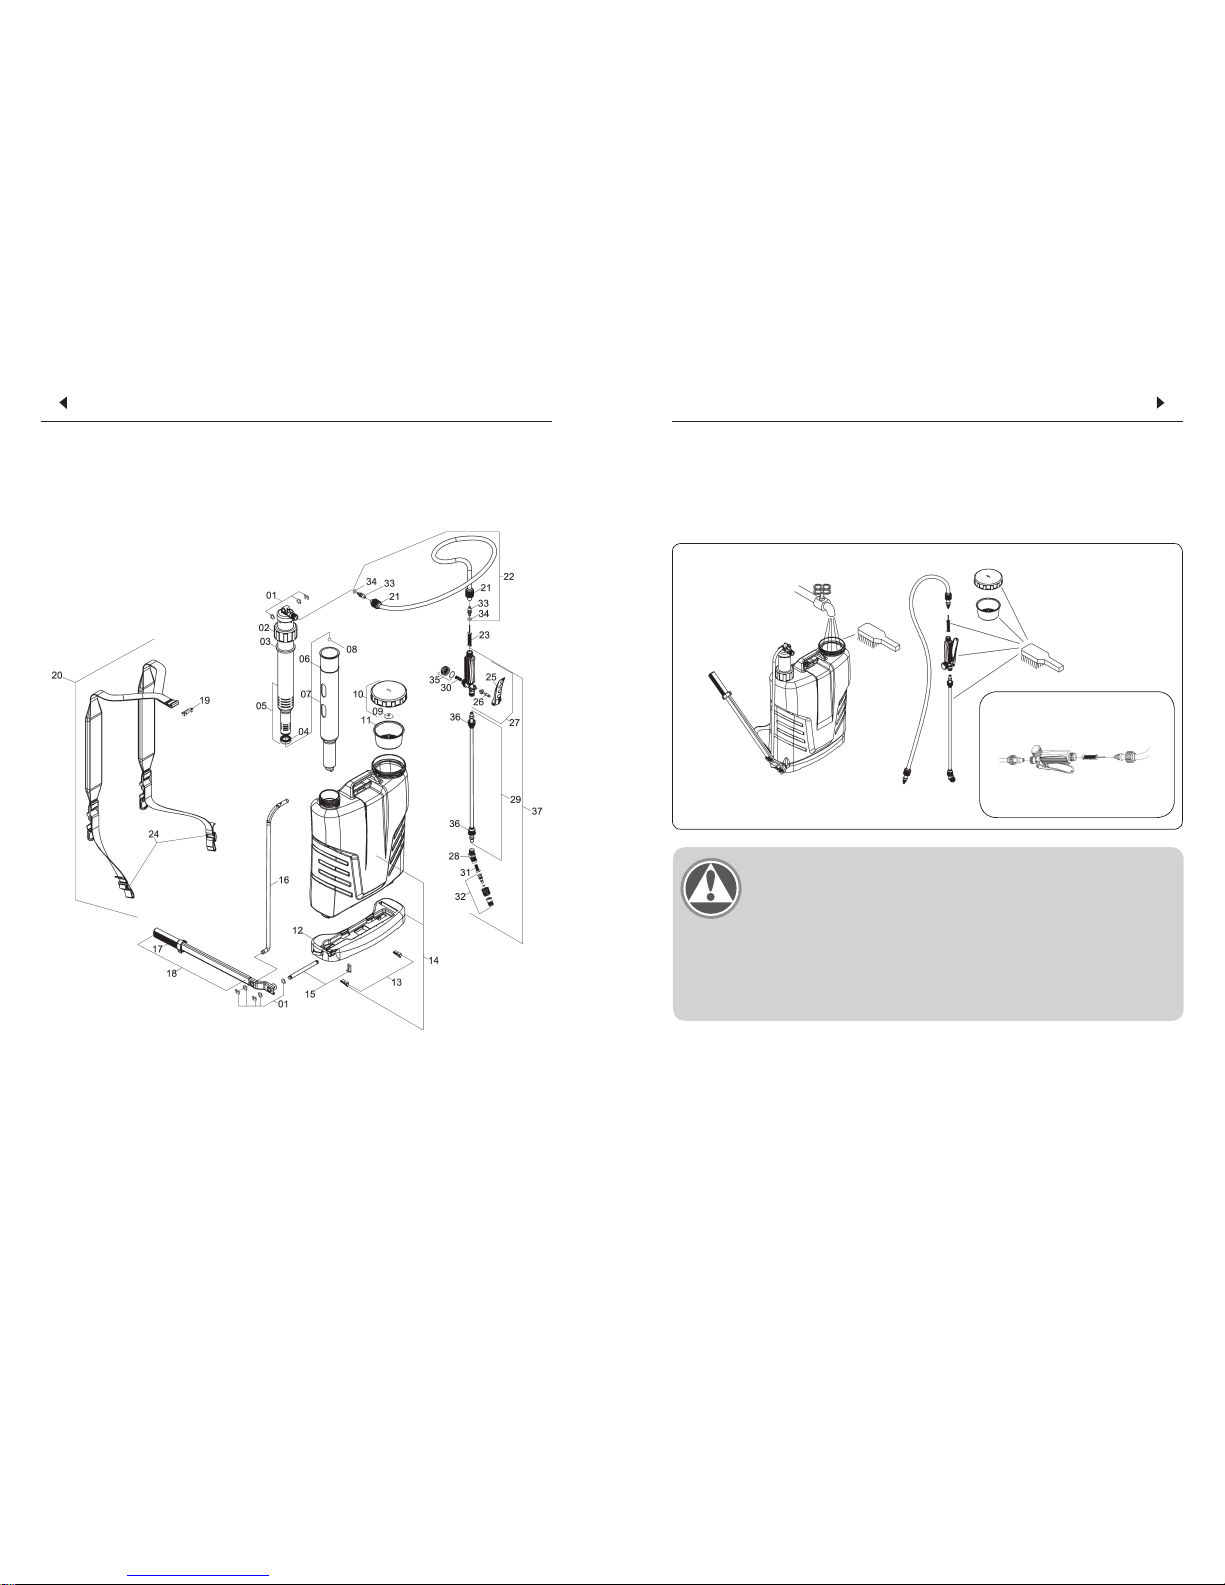
1 1198800 Washers and lock
rings set (repair) 1
2 1210725 Gasket holder XP 1
3 1168409 Gasket (felt) 1
4 1168407 Piston cup
(Santoprene™) 1
5 1168406 Chamber with
piston cup 1
6 1168404 O-ring ORI-033 1
7 1168405 Chamber cylinder 1
8 1168410 Stainless steel ball 1
9 560573 Lid diaphragm 1
10 1210726
Lid with diaphragm
XP 1
11 1168414 Strainer XP 1
12 1210727 Tank base 1
13 1168397 Base lock 2
14 1211809 Tank XP312 with
lock (white) 1
14A 1211810 Tank XP416 with
lock (white) 1
14B 1200395 Tank XP12 with
lock (blue) 1
14C 1200398 Tank XP16 with
lock (blue) 1
15 883108 Axle with lock 1
16 1197400 Pumping rod XP
(orange) 1
17 495648
Handgrip assembly
1
18 615005 Lever assembly
(orange) 1
19 635664 Strap lock 1
20 1176504 Strap assembly
with adjustment XP
1
21 942193 Screw cap S20 2
22 1168403 Hose assembly XP 1
23 1168418 Filter LP-3 1
24 502757 Strap buckle 2
25 1168421
Lever assembly LP-3
1
26 1168422 Trigger valve nee dle assembly LP-3 1
27 1168419
Trigger valve assem
-
bly LP-3 1
28 635276 Elbow with cone
packing 1
29 100131 Lance 601 1
30 1180613 Spring 1
31 592139 Nozzle filter M40 1
32 325787 Blue adjustable
cone nozzle 1
33 942201 Outlet tube 2
34 231845 O-ring 110 2
35 996058 Trigger valve cap 1
36 915744 Screw cap 2
37 1176816 Lance LP-3 assem bly 1
Page 7
XP
XP
18
MAINTENANCE ∙ MANTENIMIENTO
∙ After finishing the application, clean and
wash all equipment in an approved decontamination area.
∙ Al finalizar la aplicación, limpie y lave
todo el equipo en un local donde no haya
ningún riesgo de contaminación. Accione
la palanca para la limpieza de la cámara.
Attention ∙ Atención
∙ Remove all chemicals before storing the sprayer. Chemical products have
different reactions and can damage the sprayer components and environment as well as cause personal injury.
∙ No almacene el equipo con producto en el interior del depósito. Los
productos químicos pueden provocar diferentes reacciones y dañar los
componentes del equipo y perjudicar la salud del operador.
07
PARTS LIST
CATÁLOGO DE PIEZAS
Filter assembly / Montaje del filtro
Filter / Filtro
∙ Every 40 hours, clean the chamber and lu-
bricate the components, as shown. Remove
the chamber and lubricate the piston cups.
∙ Preferably, use graphite-base grea-
se. Silicone and vaseline are also
acceptable for lubrication. Do not
apply grease excessively to avoid clogging and impurities from building up.
∙ Cada 40 horas limpie la cámara y lubrique
los componentes como se muestra en la figura. Saque la cámara y lubrique los émbolos.
∙
De preferencia use grasa a base de grafito.
Grasas con silicona o vaselina también
son recomendadas. Não coloque graxa
em excesso para evitar entupimentos
y la acumulación de las impurezas.
Page 8
XP
XP
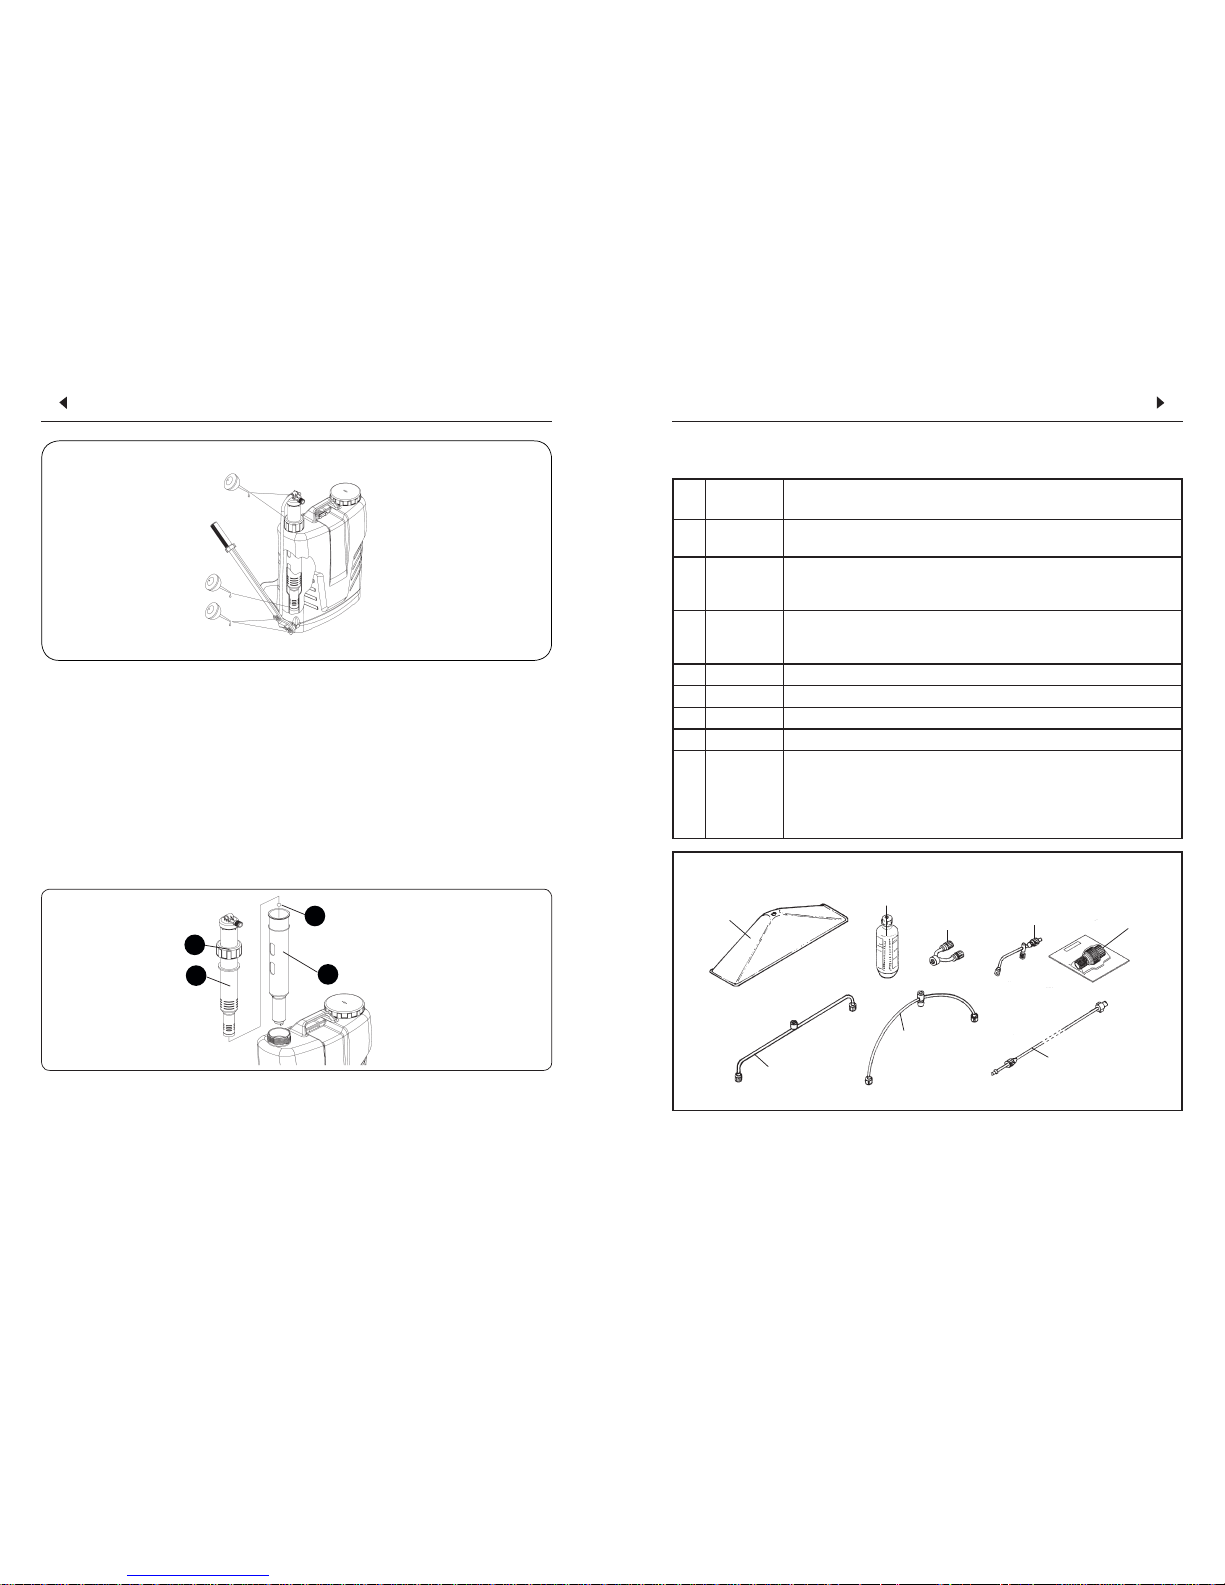
∙ Remove the pumping rod from the cham-
ber. Loosen the gasket holder and remove
the assembly.
∙ Remove the chamber (A) from the cylinder
(B). Clean the ball (C) and the piston cup
(D); replace them if necessary.
∙ Saque la varilla de la cámara. Suelte el
portaempaque y saque el conjunto.
∙ Saque la cámara (A) del cilindro (B).
Limpie
la esfera (C) o el émbolo (D); caso necessário
substitua-
os.
CYLINDER MAINTENANCE ∙ MANTENIMIENTO DEL CILINDRO
08 17
01
07
08
06
02
03
04
05
Nº
PART N.
CÓDIGO
USE / RECOMENDACIÓN
01 761882
∙ Herbicide hood: prevents nonselective herbicides from drifting.
∙ Aplicación de herbicidas no selectivos próximo a los cultivos.
02 902296
∙ Boom 500: improves the coverage and increases the productivity.
∙ Aplicación de agroquímicos en cultivos de bajo porte, mejorando
la cobertura.
03 907873
∙ Flexible boom: holds the required shape for better coverage.
∙ Aplicación de agroquímicos en cultivos de bajo porte, mejorando
la cobertura.
04 728139 ∙ Extension 600 ∙ Extensión 600
05 100016 ∙ Extension 160 ∙ Extensión 160
06 834309
∙ Flow calibrator bottle ∙ Calibrage de l'appareil ∙ Calibrador
07 336115 ∙ Y Nozzle ∙ Boquilla Y
08
1197164
1197159
1197163
1197162
Ecovalve:
∙ Green ∙ Verde - (1,0 kgf/cm2)
∙ Yellow ∙ Amarillo - (1,5 kgf/cm2)
∙ Blue ∙ Azul - (2,0 kgf/cm2)
∙ Red ∙ Rojo - (3,0 kgf/cm2)
OPTIONAL ACCESSORIES ∙ ACCESORIOS OPCIONALES
A
B
C
D
Page 9

XP
XP
TROUBLESHOOTING
PROCEDIMIENTOS PARA IDENTIFICACIÓN DE DEFICIENCIA DE PRESIÓN
∙ Put about 1/2 gallon of water in the tank.
While operating the pumping lever, look
into the tank to investigate the problem.
∙ Refer to the table and diagram below.
∙
Coloque aproximadamente 1/2 galón de
agua en el depósito.Accione la palanca y
observe en el interior del depósito como
se presenta el problema.
∙
Compare el problema con la descripción
de la tabla abajo.
PROBLEM ∙ DESCRIPCIÓN CAUSES ∙ CAUSAS
CORRECTIONS ∙
CORRECCIONES
Leakage through the cylinder upper
part.
Fuga de líquido por los orificios del
cilindro.
Worn or dried out piston cup.
Émbolo gastado o resecado.
Replace or lubricate the
piston cup.
Sustituya o lubrique el
émbolo.
After pumping and pressurizing the
chamber, as you operate the lever it
drops fast.
Después de bombear y cargar la
cámara, al accionar la palanca, ella
baja rápidamente.
Cylinder valve not sealing properly
due to wear or impurities.
Deficiencia de sellado por desgaste
o impurezas en la válvula
Clean or replace the
cylinder valve.
Limpie o sustituya la
válvula del cilindro.
After pumping and pressurizing the
chamber, the lever rises slowly when
released.
Después de bombear y cargar la cá-
mara, al soltar la palanca, ella sube
lentamente.
Chamber valve not sealing properly
due to wear or impurities.
Válvula de la cámara con deficiencia de sellado por desgaste o
impurezas.
Clean or replace the
valve.
Limpie o sustituya la
válvula de la cámara.
09
16
8 ∙ The useless containers can be stored
temporarily in an appropriate place, until
final destination.
9 ∙ In the case of mid and large size contai-
ner (15, 25, and 50 gallons), after washing
with the appropriate volume (1/4 of the
total) and fitting the cap, roll it on the
ground for approximately 30 seconds.
10 ∙ Place the container in the upright po-
sition complete the agitation by moving
back and forth for approximately 30
seconds.
11 ∙ Empty the container by pouring the
rinse water into the spray tank.
12 ∙ REPEAT this operation two more times.
Totally empty the container by pouring
the rinse water in the sprayer tank.
13 ∙ The least amount quantity of rinse
water that remains in the container, from
one wash to the next, the better descontamination will be.
14 ∙ For the best performance of the TRIPLE
WASH, do not use a water volume either
much lower or much higher than 1/4 of
the container capacity.
15 ∙ The TRIPLE WASH must be done IM-
MEDIATELY AFTER emptying the contai-
ner, during the preparation of the solution.
SOURCE - ANDEF (NATIONAL ASSOCIATION OF VEGETAL DEFENSE - BRAZIL)
8 ∙ Mientras se les destina un local defi-
nitivo, los envases inutilizados podrán ser
almacenados provisoriamente en un sitio
debidamente acondicionado.
9 ∙ En el caso de envases de tamaños me-
diano o grande (15, 20, and 50 galóns),
después del lavado, tápelos y hágalos rodar
en el suelo por unos 30 segundos.
10 ∙ Complete el proceso levantando alter-
nadamente las extremidades del envase,
apoyando una de ellas en el suelo. Hágalo
durante unos 30 segundos.
11 ∙
La retirada del agua del envase deberá
ser hecha de la misma manera que fue
hecha la retirada del producto. Hay que
colocarla en el tanque del pulverizador.
12 ∙ Repita dos veces las operaciones de
lavado. La última vez, vacíe totalmente el
envase y coloque el agua de los lavados en
el tanque del pulverizador.
13 ∙
Cuanto menor sea la cantidad de agua
de lavado que quede en el interior del en-
vase entre un lavado y otro, más perfecta y
completa será la descontaminación.
14 ∙
Para realizar el triple lavado no use
una cantidad de agua mayor o menor que
la equivalente a un cuarto del volumen
del envase.
15 ∙
El triple lavado deberá ser realizado
inmediatamente después de haber vaciado
el envase para preparar el producto.
FUENTE: ASSOCIAÇÃO NACIONAL DE DEFESA VEGETAL - ANDEF/BRAZIL
Page 10
XP
XP
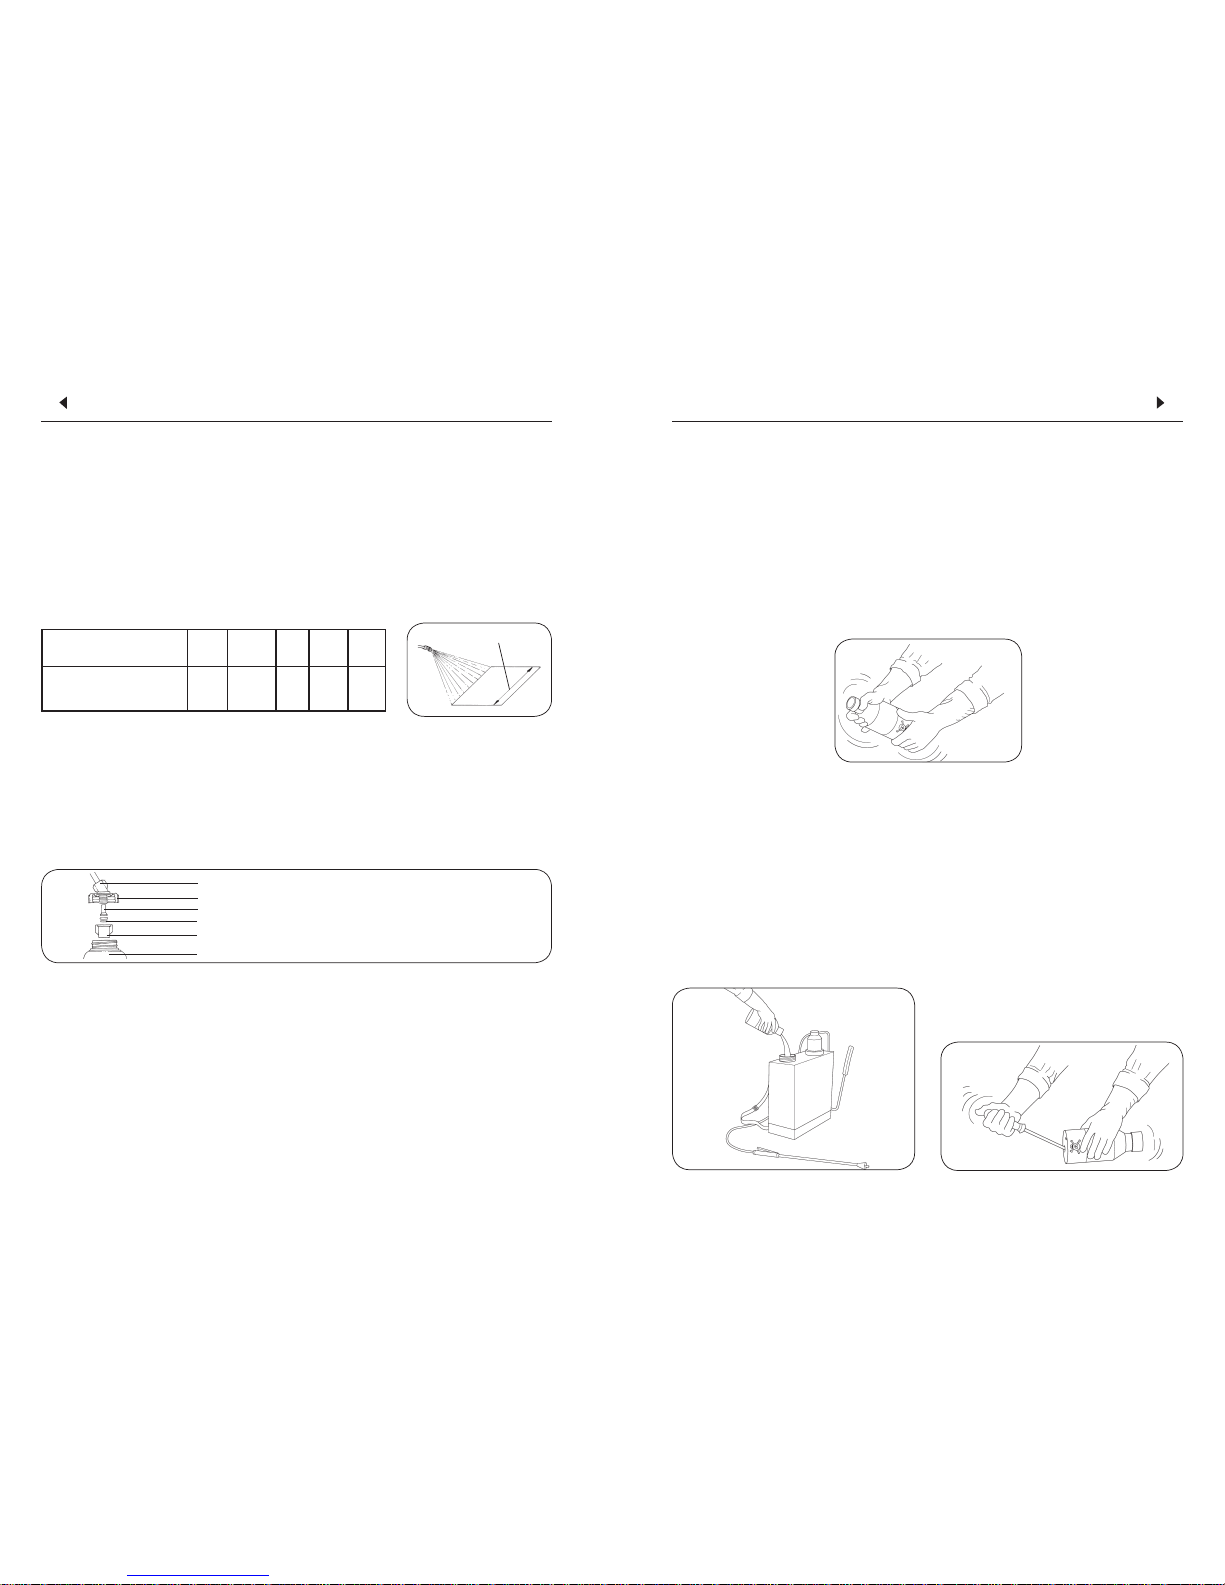
Lance / Lanza
Cover /Tapa
Filter / Filtro
Nozzle / Boquilla
Nozzle cap / Boquilla
Calibrator bottle / Calibrador
Band width / Franja
Band width (ft)
Ancho de la franja (ft)
1.6 2.2 3.2 3.9 4.9
Distance to walk (ft)
Distancia a recorrer (ft)
164 117.1 82 68.2 54.7
CALIBRATION OF MANUAL BACKPACK SPRAYER
CALIBRACIÓN DEL PULVERIZADOR
USING CALIBRATOR BOTTLE (optional) ∙ USO DEL CALIBRADOR
∙
Hold the lance at the working height and
spray to measure the application band
width. Based on the band width, calculate
the total walking distance required to spray
the desired area
269.1 sq/ft²
.
∙ Coloque la lanza en la altura de tra-
bajo y mida el ancho de la franja de
aplicación. De acuerdo con el ancho
de la franja de aplicación se debe re-
correr una distancia que corresponda
a 269.1 sq/ft
.
A - Remove the cap, nozzle and filter.
B - Mount the calibrator cover to the lance.
C - Reinstall the filter, nozzle and cap.
D - Screw the calibrator onto the cover.
A - Saque la tapa, la boquilla y el filtro.
B - Monte la tapa del calibrador.
C - Instale nuevamente la boquilla, el
filtro y la tapa.
D - Atornille el recipiente en la tapa.
∙ Attach the calibrator bottle to the lance as shown:
∙ Fije el calibrador a la tapa conforme sigue:
1510
∙ Hold the lance at the normal working hei-
ght and spray into the bottle while walking
the distance required to spray an area corresponding to 269.1 sq/ft². Place the bottle
on a level surface and observe the liquid
level visible through the side of the bottle.
Match the liquid level to the corresponding
scale on the calibrator bottle. Empty the
bottle and repeat this operation to determine the average of two or more readings.
∙ Afirme la lanza en la posición normal
de trabajo y pulverice del recipiente
hasta cubrir el área correspondiente a
269.1 sq/ft²
. Mantenga el recipiente en
el nivel y haga la lectura. El nivel
del líquido indicará el volumen
en la escala correspondiente. Vacíe el
recipiente y repita la operación. Obten-
drá el promedio de dos o más mediciones.
1∙ Enseguida coloque agua en el envase en
una cantidad aproximada a un cuarto de
su volumen total. Por ejemplo, para un
envase de 4 galóns, coloque 1 galón de
agua (Fig. A).
2∙ Tape el envase cerrándolo bien para evitar
fugas mientras sea agitado.
3∙ Agítelo bien, moviéndolo en todos los
sentidos por aproximadamente 30 segundos para retirar los residuos de los
productos que permanezcan adheridos
en su interior.
4∙ Destape el envase y coloque el agua
del lavado en el tanque del pulveriza-
dor (Fig. B).
5∙ Mantenga el envase sobre la aber-
tura del tanque del pulverizador por
aproximadamente 30 segundos, hasta
vaciarlo totalmente.
6∙
Repita las operaciones de lavado más dos
veces, completando así el triple lavado.
7∙
Inutilice los envases plásticos y los metálicos perforándoles el fondo con algún ins-
trumento puntiagudo. Así se evitará que
las etiquetas sean damnificadas e impidan
la identificación del tipo de producto
contenido y también que esos envases
sean usados nuevamente (Fig. C).
1∙ Next, hold the container in the upright
position and fill it with water up to 1/4
full. For example: in a 4 gallons container,
put 1 gallon of water (Fig. A).
2∙ Fit the container cap and tighten it
enough to avoid leakage during the
agitation.
3∙ Agitate the container strongly in all
directions (horizontal and vertical), for
approximately 30 seconds to remove the
residues that are sticked to the container
internal walls.
4∙ Take the container cap off and carefully
pour the rinse water into the spray tank
(Fig. B).
5∙ Continue holding the container over
the spray tank opening for approximately 30 seconds until the last drop.
6∙ REPEAT this operation two more times
to complete the TRIPLE WASH.
7∙ Make the plastic and metallic contain-
ers useless by piercing the container
bottom with a sharp pointed instrument.
This ensures the labels are not damaged
for identification purposes
(Fig. C).
Fig. A
Fig. B
Fig. C
Page 11
XP
XP
1114
* ATTENTION:This sprayers is supplied with the adustable blue adjustable cone nozzle
fitted in the lance. Other nozzles mentioned in this manual are optional, so they DO NOT
ACCOMPANY THIS SPRAYER.
* ATENCIÓN: Acompaña el equipo la boquilla cono regulable azul. Lás demás boquillas
constantes en esta lista son opcionales y NO ACOMPAÑAN EL PRODUCTO.
TRIPLE WASH OF EMPTY AGROCHEMICALS CONTAINERS
TRIPLE LAVADO DE ENVASES VACÍOS
∙
Even the containers considered empty
contain chemical residues. Some publications show that somewhere around
0.3% of the chemicals remains in the
container after being used. Discarding
the containers without washing out the
residues is extremely dangerous to man,
animals and environment.
∙
In the case of metal, plastic and glass
chemical containers, each container
must be rinsed three times to ensure
the residues are completely removed.
This manual describeds how to perform
the TRIPLE WASH in a correct, safe and
effective way.
∙
During the TRIPLE WASH, you must use
appropriate protective clothing, such
as: gloves, apron, boots, goggles and
protective masks with appropriate filters.
∙
Después de usar productos fitosanitarios
acaban sobrando envases que necesitan
ser desechados de manera adecuada y
segura para no contaminar al hombre,
a los animales domésticos y al medio
ambiente (suelo, aire y agua). Por lo
tanto, antes de darles un destino final,
es extremadamente importante que
el resto del producto que permanece
en su interior sea retirado y desechado
correctamente.
∙
En el caso de envases metálicos, de plás-
ticos rígidos y de vidrio que contengan
productos fitosanitarios diluibles en
agua, la retirada de los residuos debe ser
realizada por medio del Triple Lavado.
Este método no se aplica a los productos
envasados en bolsas plásticas, aluminizadas o multifoliadas, que podrán ser
desechados de otra manera.
∙
Al hacer el Triple Lavado siempre se deben
usar equipos de protección individual
como guantes, delantal, botas, gafas
protectoras o protector facial.
∙
IMMEDIATELY AFTER emptying the
container, you must keep it with the opening upside down over the sprayer tank
opening or over the bucket that you are
using to prepare the chemical mixture
for at least 30 seconds, until no residue is
left in the container, when the drops are
falling in long intervals (Fig. D).
∙
Inmediatamente después de haber vertido
el contenido del envase, colóquelo con
la abertura hacia abajo sobre el tanque
del pulverizador o sobre el recipiente
que esté utilizando para la preparación
del producto, por un tiempo mínimo de
30 segundos y hasta vaciarlo totalmente
(Fig. D).
Fig. D
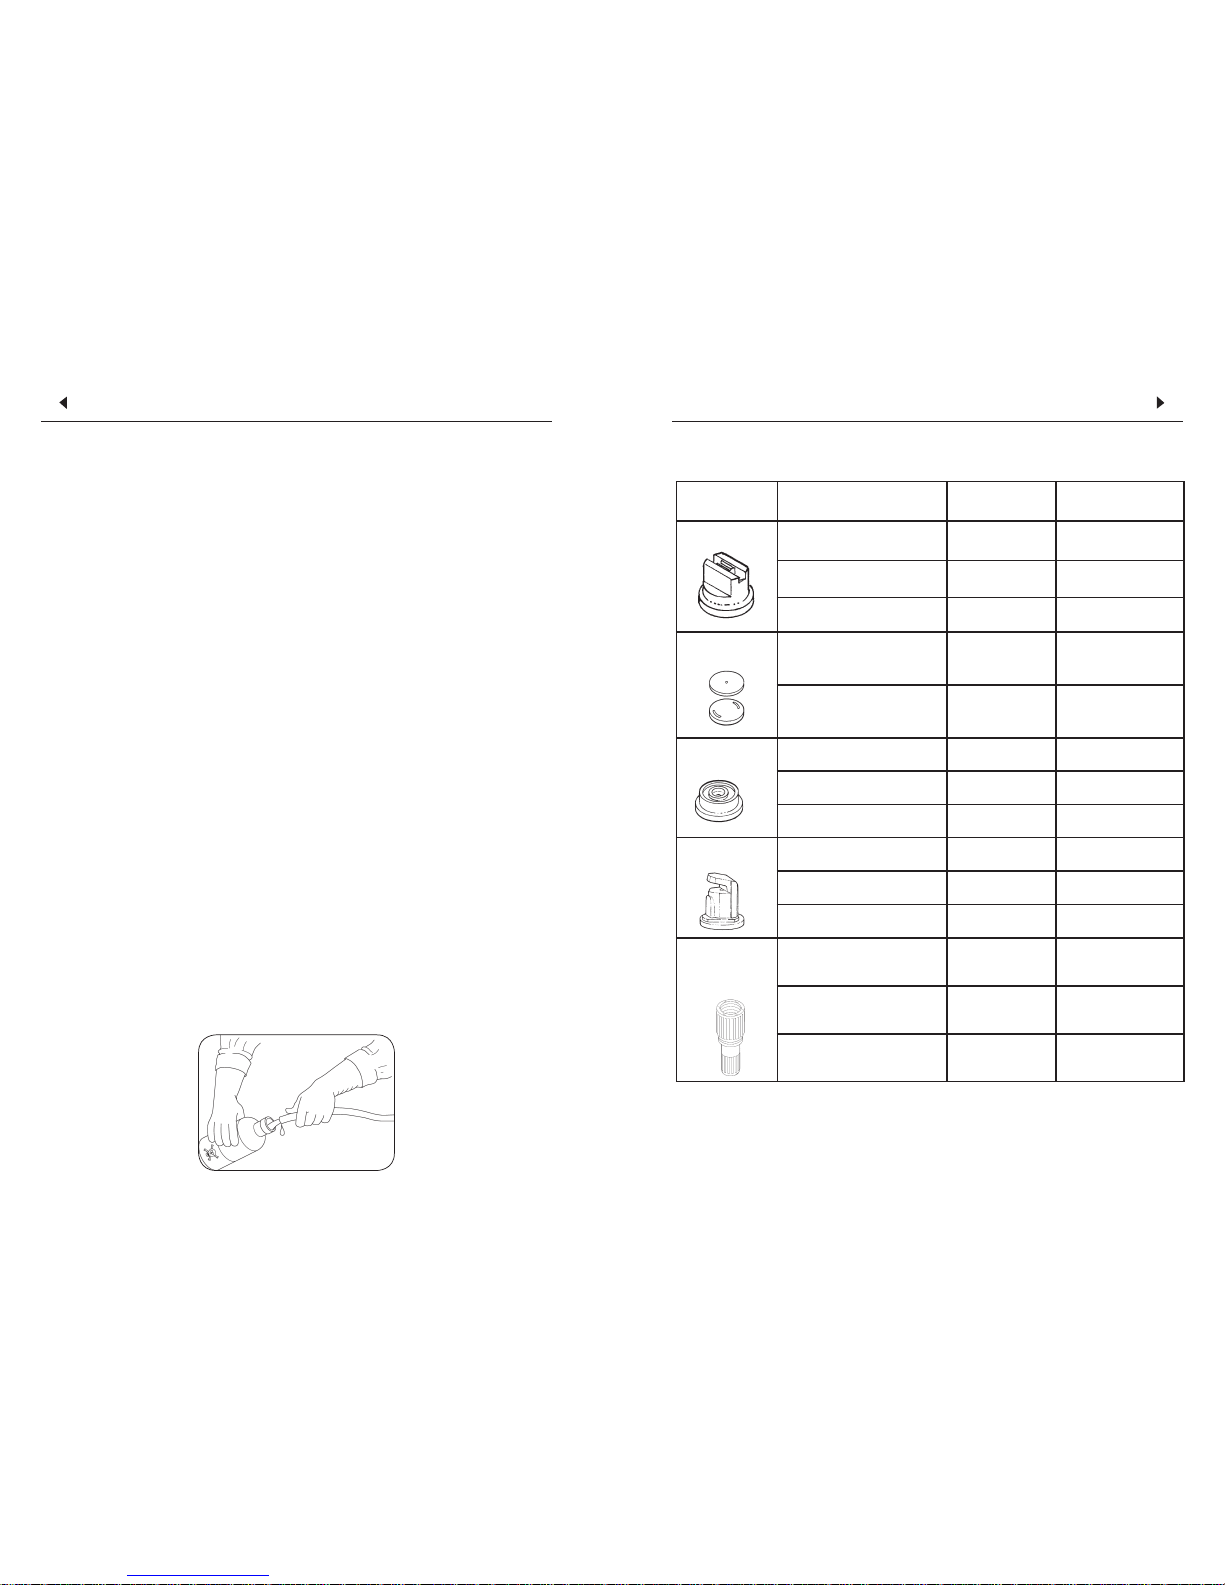
NOZZLE TYPE
BOQUILLAS
IDENTIFICATION
IDENTIFICACIÓN
PRESSURE
PRESIÓN (PSI)
FLOW RATE
CAUDAL (gallons/min)
FLAT FAN
ABANICO
1197535-JEF 80015
GREEN
1197535-JEF 80015
VERDE
45 0.16
1197536-JEF 8002
YELLOW
1197536-JEF 8002 AMARILLO
45 0.21
1197537-JEF 8003 BLUE
1197537-JEF 8003 AZUL
45 0.33
CONE
CONO ACERO
717942 - JD 10A 45 0.08
217174 - JD 12P 45 0.16
CONE
CONO ACERO
1197565 - JHC 8002 45 0.22
1198892 - JHC 8004
45 0.44
1198893 - JHC 8005 45 0.54
DEFLECTOR
DEFLECTOR
1197486 - JDF 11004 15 0.25
1197487 - JDF 11005 15 0.31
1197488 - JDF 11006 15 0.41
ADJUSTABLE
CONE
CONO ACERO
REGULABLE
323725 - YELLOW
/ AMARILLO
45 0.08
015024 - RED
/ ROJO
45 0.17
325787 - BLUE
/ AZUL
45 0.18
SPRAY NOZZLE
BOQUILLAS DE PULVERIZACIÓN
Page 12
XP
XP
12
13
∙
Put 1 gallon of water in a bucket and add the
chemical product. Stir until it becomes an
homogeneous mixture and pour the solution
into the tank while filling with water.
∙ Carefully read the chemicals manufac-Carefully read the chemicals manufac-
turer's label.
∙ Use of individual protective clothing and
safety equipment is required.
∙ Coloque 1 galón de agua en un recipien-
te. Adicione el producto químico. Agite
hasta mezclarlo y coloque la mezcla en
el tanque durante el abastecimiento.
∙ Lea la etiqueta del producto.
∙
Es obligatorio el uso de vestimenta y
equipos de seguridad adecuados.
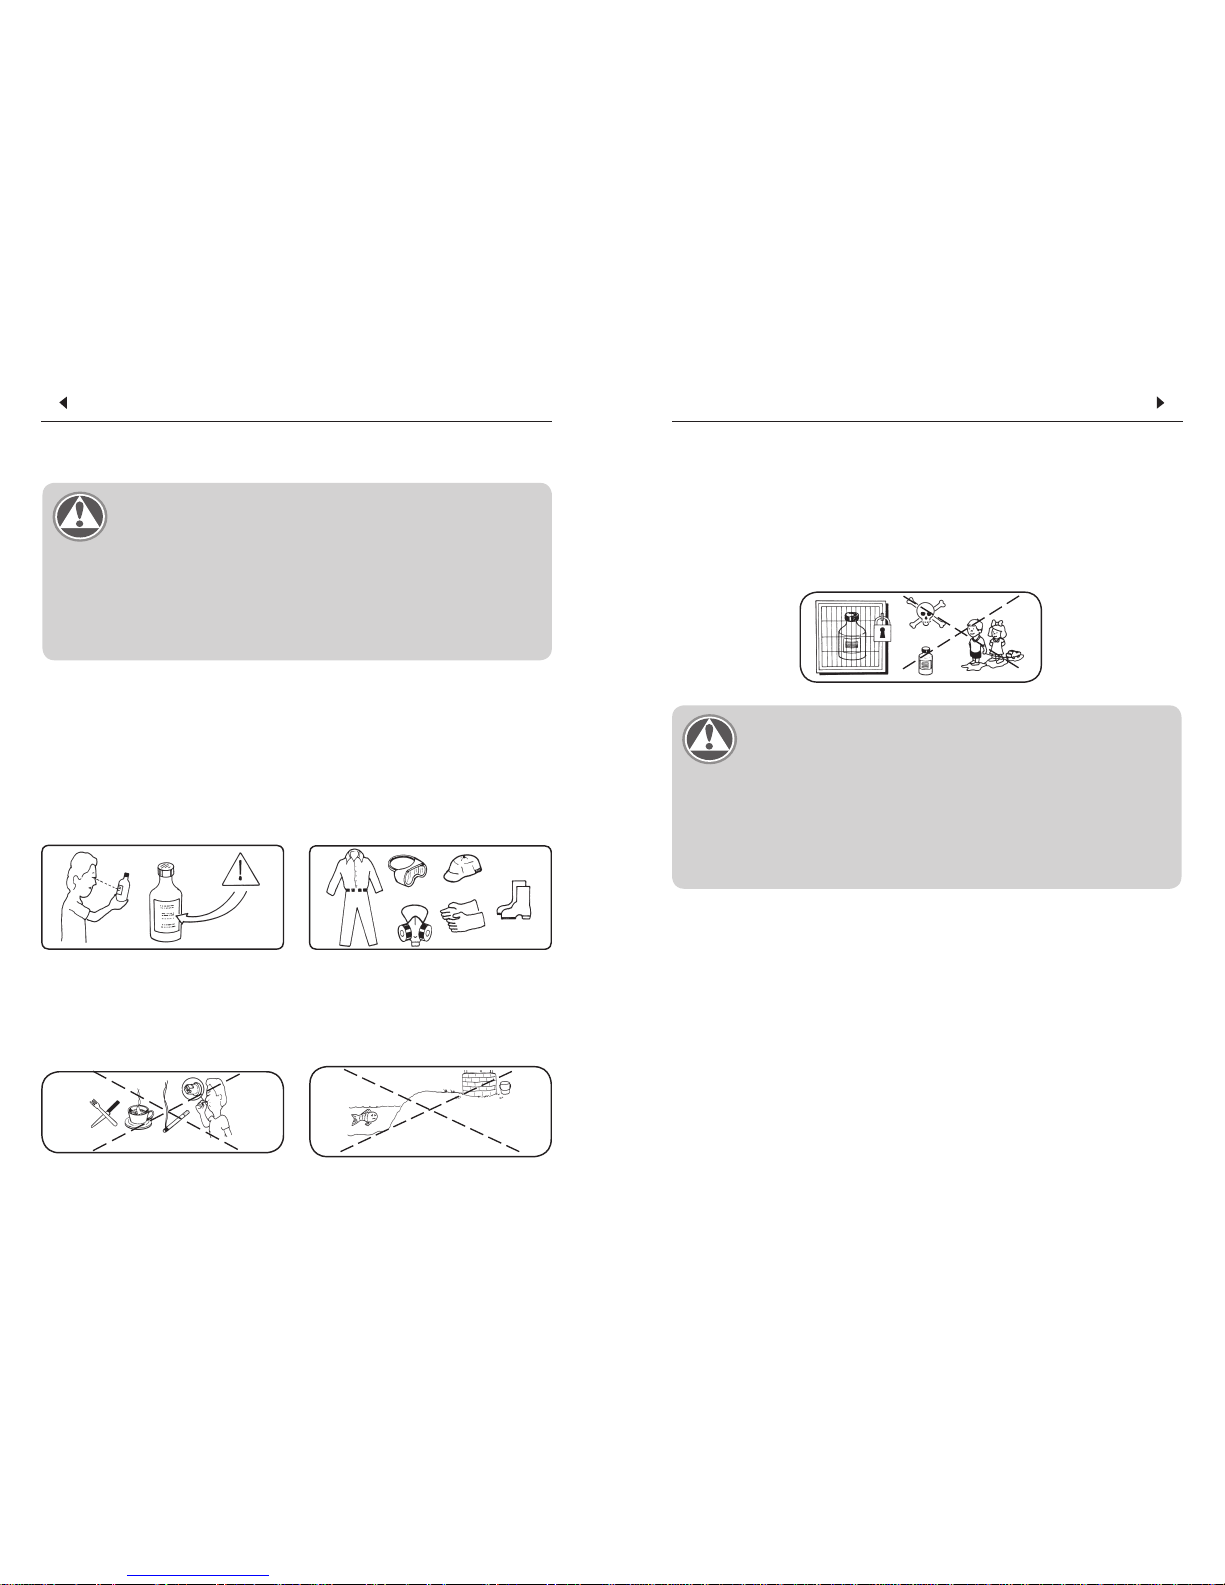
SAFETY PRECAUTIONS
RECOMENDACIONES DE SEGURIDAD
Attention ∙ Atención
∙ Read carefully the chemicals manufacturer´s labels.
∙ Wash hands and other parts of the body that have touched chemicals
before starting to spray.
∙ Lea la etiqueta de los productos químicos.
∙
Lávese las manos y las partes del cuerpo que tuvieran contacto con los
productos químicos. Haga la pulverización enseguida.
∙ Do not eat, drink or smoke while spraying.
∙ Do not pollute the environment.
∙ No coma, ni beba, ni fume durante la
aplicación.
∙ No contamine el medio ambiente.
∙ Keep the products out of reach of children
and animals. Lock up the chemical products to prevent untrained persons from
handling them.
∙ After finishing the spray application, take
a shower with plenty of water and soap.
Put on clean clothes.
∙ Mantenga los productos químicos fuera
del alcance de niños y animales. Guarde
los productos químicos en un lugar seguro.
∙
Después del trabajo, dúchese con agua
fría y bastante jabón. Cámbiese la ropa.
Attention ∙ Atención
∙ The clothing used during the application must be washed separate from
other clothes of ordinary use. In case of intoxication, see a doctor imme-
diately and show him the chemicals manufacturer's label.
∙ La ropa usada durante la aplicación debe ser lavada diariamente,
separada de la ropa de uso cotidiano. En caso de intoxicación, busque
inmediatamente un médico y muéstrele la etiqueta del producto químico
utilizado.
 Loading...