

JACOB JENSEN Telephone 10 Users Manual

Important Safety Instruction
When using your telephone equipment, basic safety precautions should always be followed to
reduce the risk of fire, electric shock and injury to persons, including the following:
z Do not use this product near water, for example, near a bath tub, wash bowl, kitchen sink or
laundry tub, in a wet basement or near a swimming pool. Do not allow the handset to come
into contact with liquids or moisture.
z Avoid using a telephone (other than a cordless type) during an electrical storm. There may
be a remote risk of electric shock from lightning.
z Do not use the telephone to report a gas leak in the vicinity of the leak.
z Use only the power cord and batteries indicated in this manual. Do not dispose of batteries in
a fire. They may explode. Check with local codes for possible special disposal instructions.
z Plug the adaptor to the socket-outlet that near the equipment and shall be easily accessible.
z Do not open the handset, base station or charger. This could expose you to high voltage.
z Do not allow the charging contacts of the charger or the battery to come into contact with
extraneous conductive materials.
z Young children should be supervised to ensure that they do not play with the telephone.
z Since the phone works by sending radio signals between the base unit and the handset,
wearers of hearing aids may experience interference in the form of a humming noise.
z We advise that this phone should not be used near intensive care medical equipment or by
persons with pacemakers.
z Your phone can interfere with electrical equipment such as ans wering machines, TV, and
radio sets if placed too close. It is recommended that you position th e base u nit at least o ne
meter form such appliances.
SAVE THESE INSTRUCTIONS

Accessories & Content
The following items are included in the package of JACOB JENSEN
interchangeable speaker-cover/battery door and country adaptor (optional):
1. Telephone Handset
2. Base Station
3. Table Stand
4. Screws and plugs
5. Power supply unit
6. Li-ion 3.7V 650mAh Battery
7. Combo jack
8. Combo cord.
9. Line cord
TM
Telephone 10, with

Illustration Diagram
Handset
1. Earpiece
2. Rear Speaker
3. LCD screen
4. Function Keys
5. Dial number Keys
6. Microphone
7. Changeable Speaker-cover and Battery Compartment (user handset)
8. Handset charging contact
Base
9. Base charge contacts
10. Charge indicator
11. Page Key

Main Feature List
z 12 hours talk time
z 7 days standby time
z Indoor range 50m
z Outdoor range 300m
z Low radiation
z LCD type, 14 digit x 3 line + icons
z Flash selectable 80 ~ 800mS
z Caller ID Type 1 & 2 and DTMF
z Call log List
z Hands-free
z Speaker and ringer volume
z 100 phonebook memory locations
z HS intercom
z 3-Party conference
z Call Transfer between HS
z Alarm call and date reminder
z 8 midi/polyphonic ringtones
z Room monitor
z Equalizer
z Li-ion Battery

A. INSTALLATION AND START-UP............................................................................7
B. DISPLAY SYMBOLS AND THEIR INDICATION................................................ 12
C. BUTTONS AND THEIR FUNCTIONS................................................................... 13
D. PREPARATION BEFORE USE...............................................................................16
E. NORMAL OPERATION.......................................................................................... 23
F. PHONE BOOK......................................................................................................... 26
G. CALL ER IDENTIFICATION MEMORY (CALLER ID) ........................... .. .......... 29
H. PERSONALIZING YOUR PHONE ........................................................................ 31
I. ADVANCED OPERATION ..................................................................................... 33
J. REVERTING TO FACTORY DEFAULT SETTING...............................................37
K. MAINTENANCE..................................................................................................... 38
L. TROIBLESHOOTING............................................................................................. 39
M. SAFETY PRECAUTIONS...................................................................................41
N. WARRANTRY AND SERVICE............................................................................... 42
O. FCC COMPLIANCE................................................................................................43

Congratulations with your new JACOB JENSEN
TM
Telephone.
The Telephone 10 is designed in Denmark by Jacob Jensen, whose products have gained
international recognition for their original, simple and classic design. It is a state of art device
created with consideration of form and function. The Telephone 10 is designed for both desktop
and wall mounting and a wall mount bracket is included in the gift box.
The Tele phone 10 is powered with latest digital technology – DECT system (Digitally Enhanced
Cordless Telecommunication). It brings you digital sound, penetrating range and user-friendly
menu-driven functions. According to the DECT system standard (GAP compatible), 6 different
handsets can be registered to a single base unit to perform function of a mini-PABX system which
offers you functions of intercom and call transfer between handsets. In addition, its built-in Caller
ID decoder, Phone Book, Redial List and Caller ID memory provide you great convenience to
manage your phone calls.
The Telephone 10 is equipped with a low radiation feature in both the base and the handset. It
works intelligent by detecting and adjusting the strength of the radio frequency (RF) signal
depending on the distance between the handset and the base as well as the number of handsets
attached. This is done automatically where the system always adjusts the RF-signal to the
minimum radiation according to the working conditions.
This DECT telephone can only work under constant main power supply. It is advisable to connect
another corded phone (which works without main power supply) to your telephone system for
emergency calls in case of power failure.
A. INSTALLATION AND START-UP
The cordless phone system can only work under constant power supply to the base station. It is
advisable that another corded phone (works without main power supply) is connected to your
phone system for emergency call purpose in case of power failure.
Caution
z Use only the Ktec Model KSLFB0750035W1US power adaptor unit that came with
unit. Using other power adaptors may damage the unit and inva lidat e you r warrant y.
z Plug the adaptor to the socket-outlet that near the equipment and shall be easily
accessible.
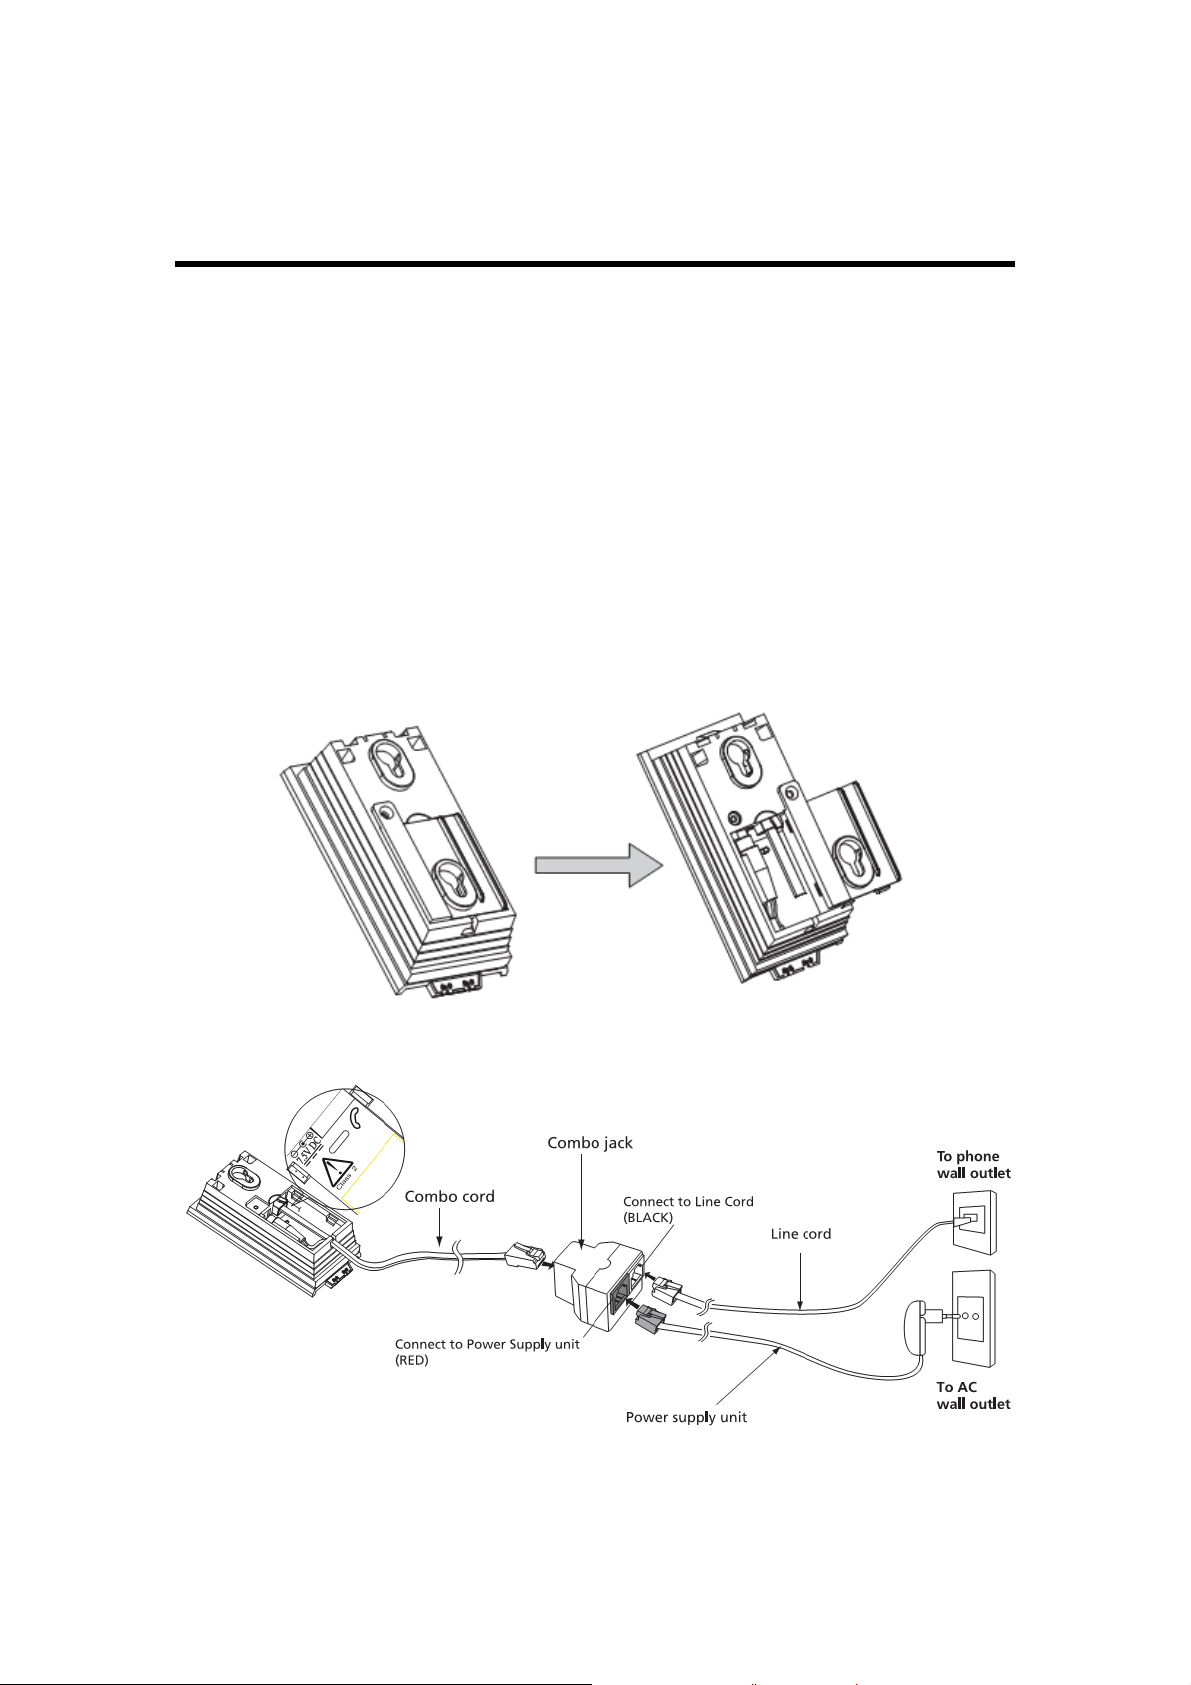
1. Unscrew the back cover from the base station.
2. Connect the combo cord to the RJ45 jack of the combo jack.

3. Plug the power supply into the main wall outlet and connect the other end to the RED jack of
the combo jack
4. Connect one en d of the telephone line cord to the BLACK jack of the combo jack; connect
the other end of the telephone line cord to the country telephone plug adaptor (optional).
5. Connect the country telephone plug adaptor to the wall outlet for telephone.
A.1 Assembling the table stand
Slide the canals of the table stand into the tracks of the back side on the base station. The table
stand is mounted when you hear a click.
A.2 Wall Mount
If you desire wall mount, please follow the following procedures:
1. Push th e button inside the square hole at the bottom of the base station, using a pen or a
finger, and pull the bracket away from the base station at the same time.

2. Pull the com bo cord downwards through the groove in order to let it out at the bottom and
connect it to the combo jack.
3. Mount the base station by the enclosed screws and plugs for 6mm drill.
A.3 Fixing battery
1. On the handset, firmly slide and remove the handset back cover, install the rechargeable
battery into the the battery compartment. Slide back the handset back cover. The LCD
screen will light up as soon as battery installed.

Caution
z Risk of explosion if battery is replaced by an incorrect type. Use only the RTX battery model
60020437 , 3.7V 650mAh Li-ion rechargeable battery pack.
z Dispose of used batteries according to the instructions.
z You must install the handset batteries before using the cordless handset.
z Li-ion batteries must be disposed of in accordance with the applicable waste disposal
regulations.
z Do not dispose of the battery(ies) in fire. They may explode. Check with local codes for
possible special disposal instructions.
z Keep batteries out of the reach of children
2. Put the handset into th e b a se un it, ac cording to the picture shown below. Make sure that the
LED charge indicator on the base unit lights up to show charging is in progress.
Important Notice
z To obtain best battery performance, keep the handset being charged for 6 hour s after first
time installation.
z When handset is removed from the base, the LED in the base will stay on for approximately 5
seconds before it will fade off.
z Remove battery form this product if storing over 30 days.
A.4 Setting language
Depending on product package (refer to information on packaging), additional handsets with
standalone charging units may be included in package. Simply connect batteries of the additional
handset as described above, and connect power adapter of standalone charging unit to the wall
outlet. Then you may put additional handset onto standalone charging unit for initial 6 hours
recommended charging.
After the initial charging of 6 hours you can start using your telephone. If you woul d like to ch oose
another language than the pre-set English do as follows:

Press and press 3 times to select Display Æ press Æ press twice to
select Select Lang. Press
Deutch, Francais, Italiano, Nederlands, Espanol, Dansk, Svenska, Türkse, Norsk and press
Æ press to select your desired language: English,
A.5 Replacement of Batteries
Depending on your usage, it is recommended to change rechargeable batteries every year to
achieve best performance.
To replace batteries, follow instructions below:-
1. Prepare one rechargeable batteries, 3.7V 650mAH Li-ion battery, part number 60020437.
2. Gently remove the handset back cover, remove the old battery.
3. Observe polarity marks inside the battery compartment, and insert the rechargeable battery. It is
not possible to connect the battery with wrong polarity.
4. Replace the handset back gently; making sure the orientation of battery compartment cover is
correct.
A.6 Operation
To lift off the handset, gently press on the upper part of the handset with your index finge r and the
handset falls into your hand.

B. DISPLAY SYMBOLS AND THEIR INDICATION
In standby/Idle mode:

C. BUTTONS AND THEIR FUNCTIONS
Before going through the following keypad functions, it is a good idea to understand multiple
functions may be assigned to a single button in order to reduce buttons cluster. To some buttons,
short and long pushes on one button give you different functions in different mode. Pay attention to
the following description regarding long and short push. Short push means push and release
immediately. Long push means pus h an d ho ld for approximately 2 seconds.

 Loading...