

Page 1

BODY STRAIGHTENER
10 TON CAPACITY
MODEL 851/857
USER'S MANUAL
Page 2

GENERAL SAFETY WARNINGS AND PRECAUTIONS
1. KEEP WORK AREA CLEAN AND DRY. Cluttered, damp or wet work areas
invite injuries.
2. KEEP CHILDREN AWAY FROM WORK AREA. Do not allow children to
handle this product. Do not allow children in the work area.
3. STORE IDLE EQUIPMENT. When not in use , tools and equipment should
be stored in a dry location to inhibit rust. Always lock up tools and equipment
and keep out of reach of children.
4. DO NOT USE THIS PRODUCT IF UNDER THE INFLUENCE OF
ALCOHOL OR DRUGS. Read warning labels on prescriptions to determine
if your judgment of reflexes are impaired while taking drugs. If there is any doubt,
do not attempt to use this product.
5. USE EYE PROTECTION. Wear ANSI approved safety impact eye glasses
when using this product. ANSI approved impact eye glasses are available form
Harbor Freight Tools.
6. DRESS SAFELY. Non-skid footwear or safety shoes should be used when
working with this product. Do not wear loose clothing or jewelry as hey can
become caught in moving parts. Wear a protective hair covering to prevent
long hair form becoming caught in moving parts. If wearing a long-sleeve shirt,
roll sleeves up above elbows.
7. DO NOT OVERREACH. Keep proper footing and balance at all times to
prevent tripping, falling, back injury, etcetera.
8.STAY ALERT. Watch what you are doing at all times. Use common sense.
Do not use this product when you are tired or distracted form the job at hand.
9.CHECK FOR DAMAGED PARTS. Before using this product, carefully
check that it will operate properly and perform its intended function. Check
for damaged parts and any other conditions that may affect the operation of
this product. Replace or repair damaged or worn parts immediately.
10.MAINTAIN THIS PRODUCT FOR THE RIGHT JOB. There are certain
applications for which this product was designed. Do not use small equipment,
tools or attachments to do the work of larger industrial equipment, tools or
attachments to do the work of larger industrial equipment, loose or attachments.
Do not use this product for a purpose for which it was not intended.
1.
Page 3
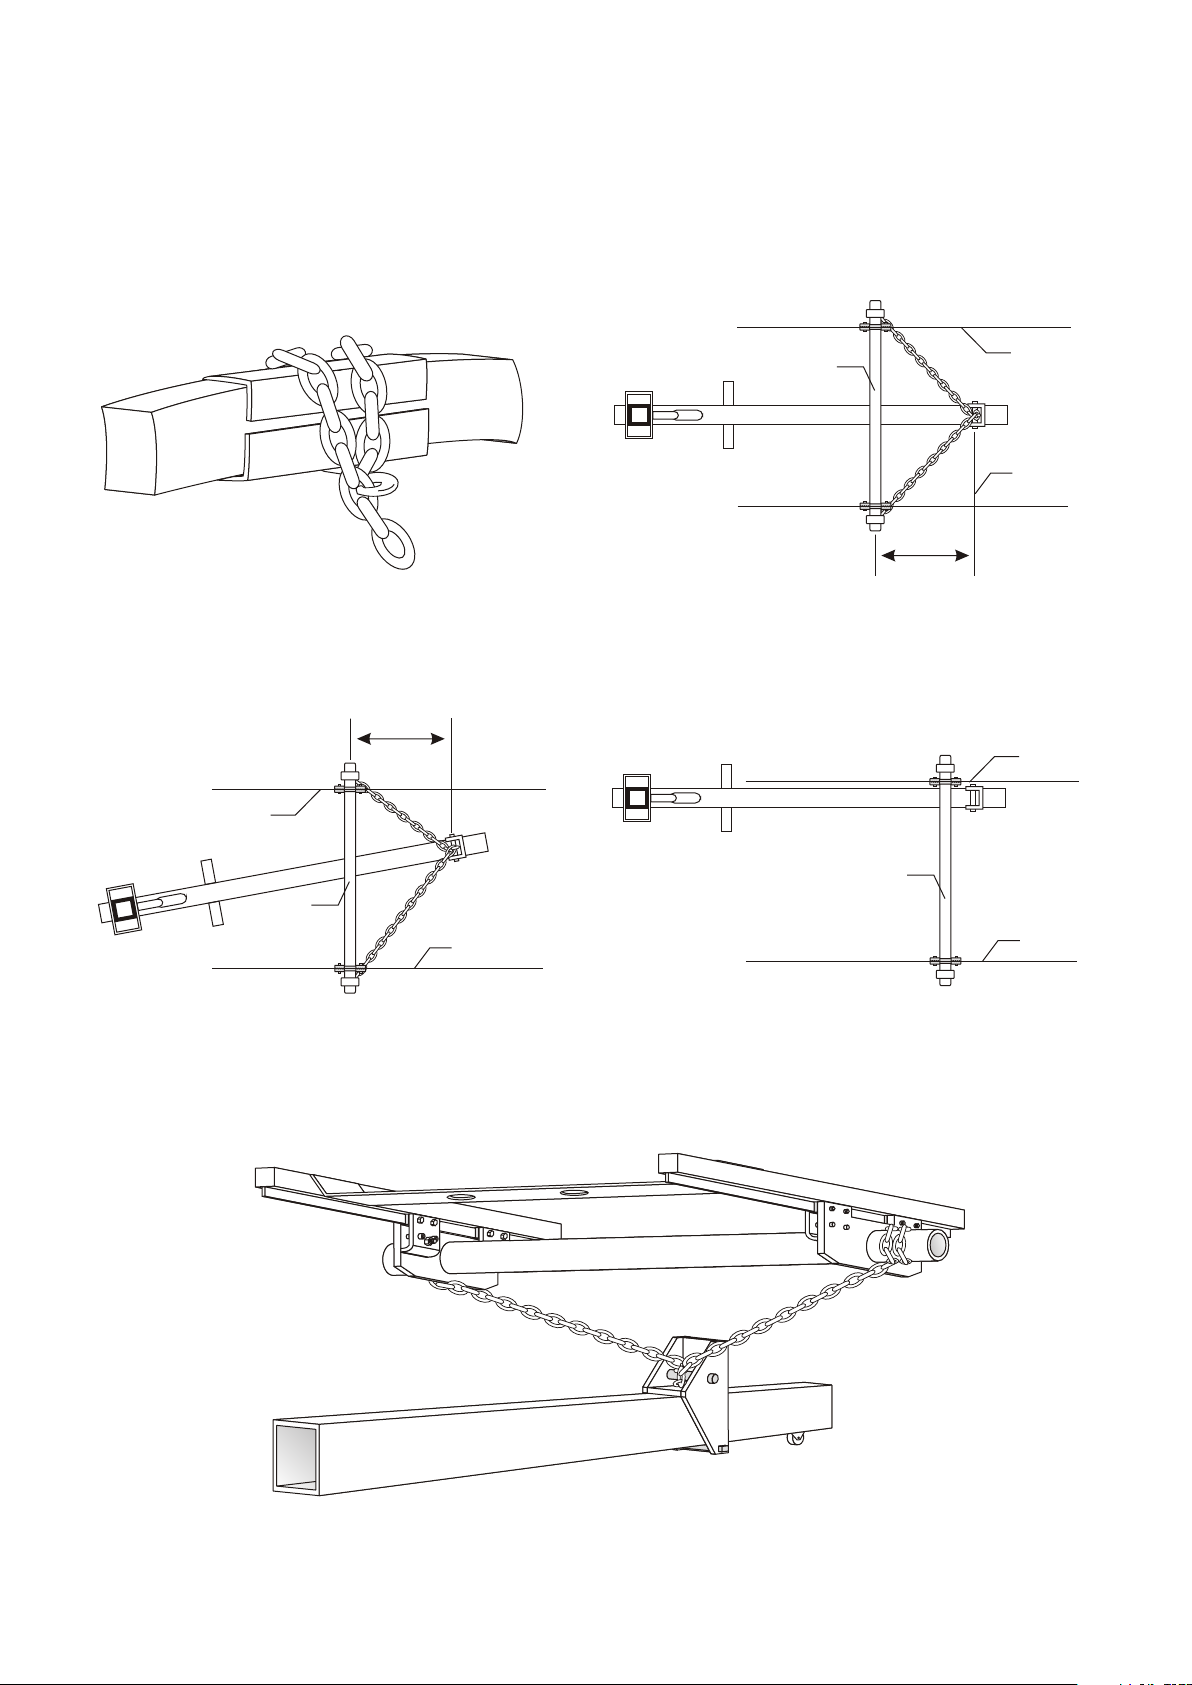
HOW TO SET UP THE FRAME STARIGHTENER
Frames and bodies are bent and distorted by collision with a relatively large area of the car bearing the impact.
However, the correction procedure utilizes, powerful, concentrated loads at key points which can cause local
crushing of frame members, etc., if these points are not property padded to spread the load over a large area.
Illustration of recommended anchoring procedures are shown below for efficient use of the under body anchoring
System.
Box frames and channel sections should be padded
with short pieces of angles iron to prevent damage to
the corner of the section when a chain is wrapped around the frame section.
24"Min
Pinch Weld
Cross Tube
Cross Tube
24"Min
Pinch Weld
Pinch Weld
Proper anchoring for a heavy fore and aft pull utilizes
the underbody anchoring system as shown here.
Pinch Weld
Cross Tube
Pinch Weld
For a diagonal pull, the underbody anchoring system
provides atachment to both rocker panels, for better
efficiency and less damage. The anchoring loads are
spread across both sides of the car.
Pinch Weld
For pulling on one side only, it is best to attach the cross
tube to both rocker panels. Anchor your body straightener
to the cross tube. This will prevent unwanted rolling of the
underbody clamps on the pinch weld.
The underbody clamp secures to the pinch welds allows more
versatile positioning of the body straightener.
2.
Page 4
24"Min
24"Min
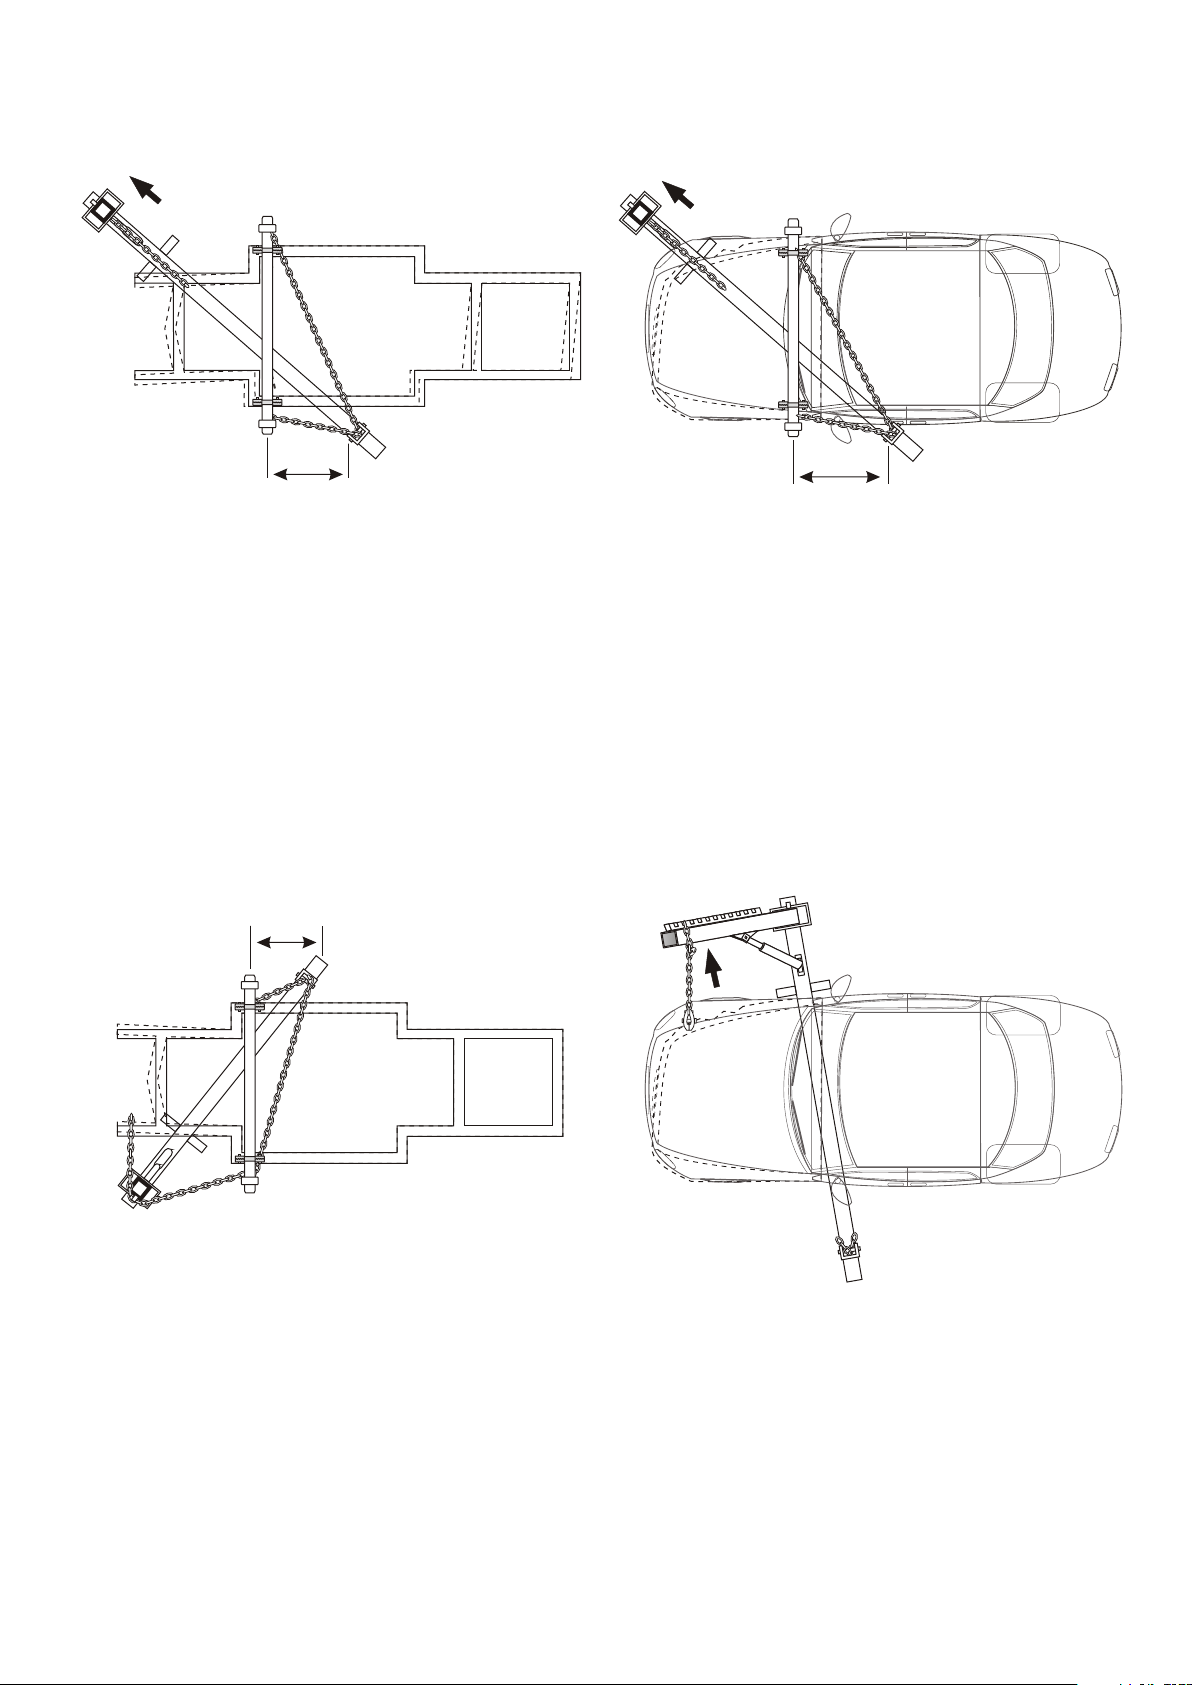
HOOK-FOR SWAY WITH MASH
Perimeter Frame(ladder frame)
this configuration will move the frame forward and sideways
at the same time. Thereby correcting combination damage in
a single hookup.
24"Min
HOOK-UP SWAY AND MASH
Unibody Construction
For vehicles with unibody construction, secure the body
by using underbody clamps and rocker pinch welds.
Multiple clamps (secure points) maybe needed to move
the section as a unit
ALTERNATE HOOK-UP FOR FRONT END SWAY
Place the body straightener as show and anchor it to the rocker
panel pinch weld. The pivot arm first is chained the frame rail or
with the help of underbody clamps, to prevent the machine from
swinging forward under load. Then a pulling chain is attached to
the front end to provide a direct sideway pull. Both the holding
chain and pulling chain should be attached to the body
straightener at the same point to avoid tipping the body
straightener.
HOOK-UP FOR FRONT END SWAY
To obtain a direct side movement of the front end, use a
hook-up as shown above. Place body straightener on its
side and anchor it to the pinch welds or to the pivot arm
pulls horizontally sideways. The underbody anchoring
system should be used to resist the side load through
both rocker panels. This system can be used with either
unibody or frame type construction.
3.
Page 5
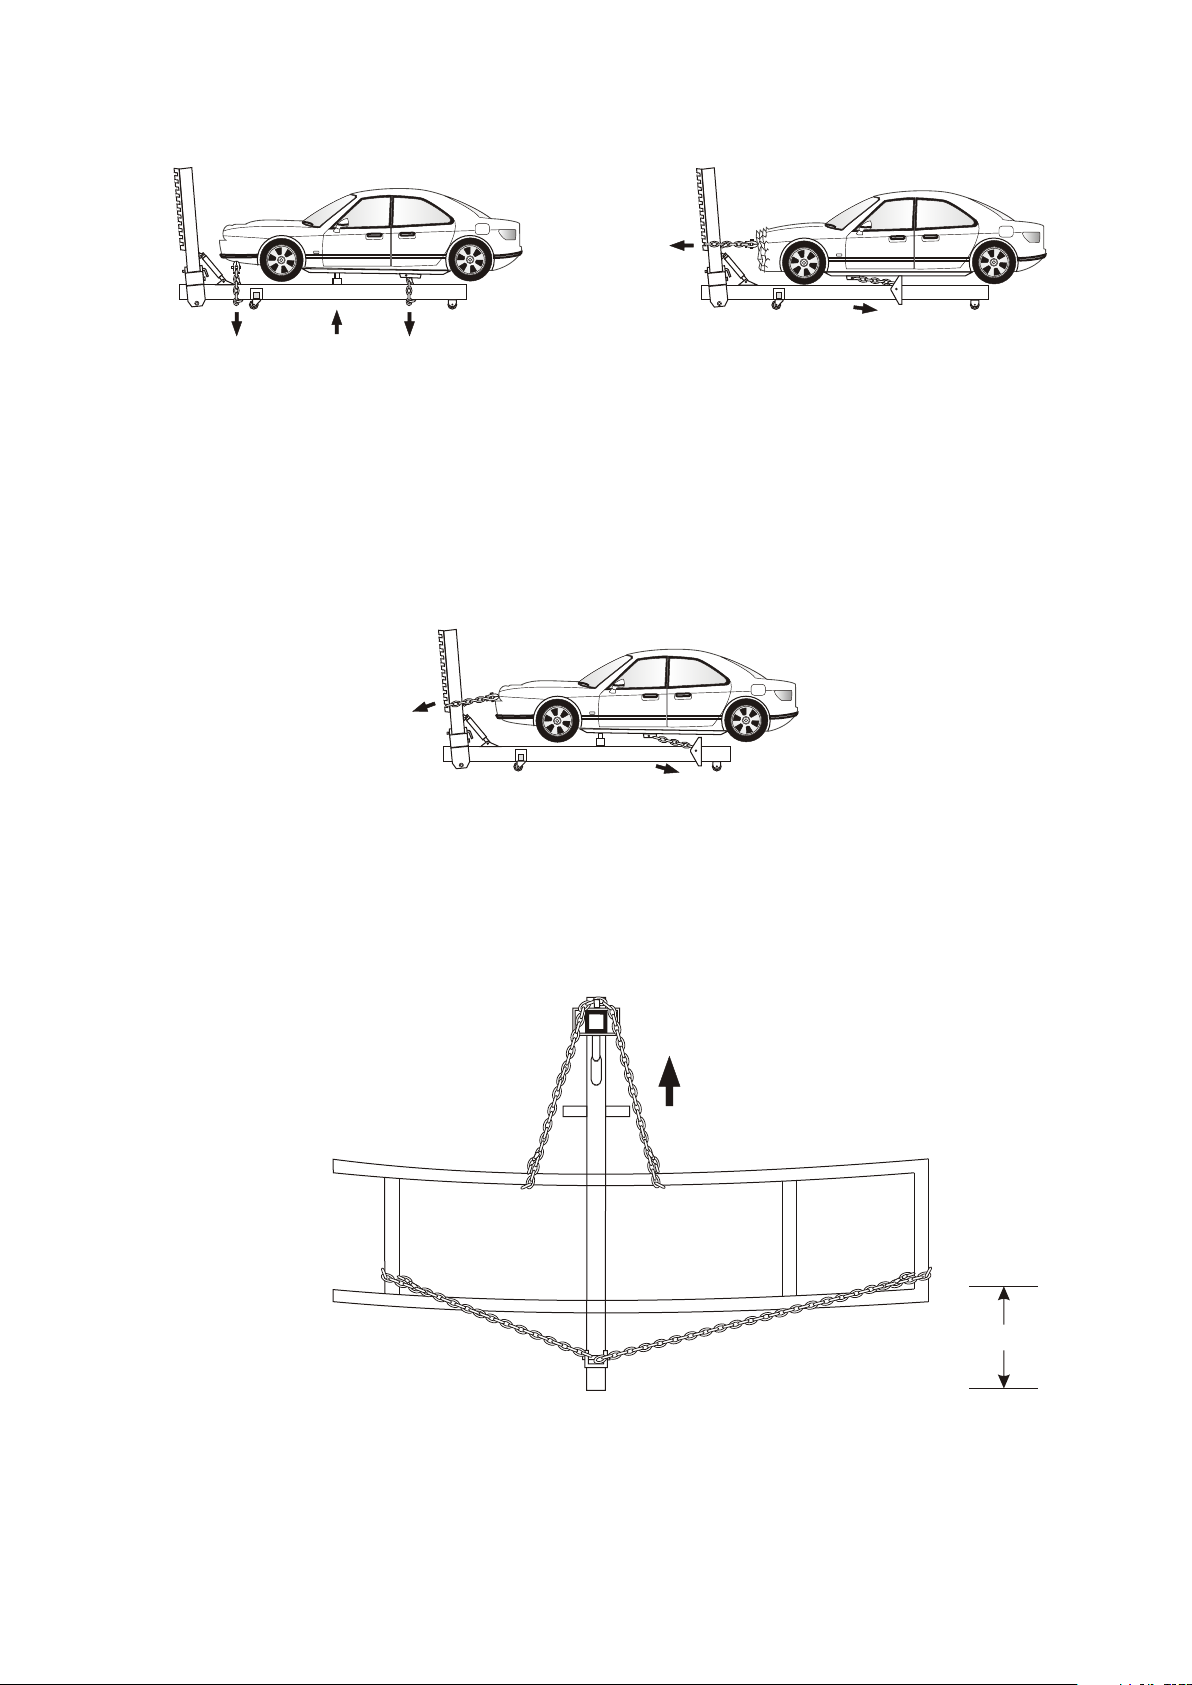
HOOK-UP FOR SAG OR KICK-UP
HOOK-UP FOR MASH
With the car firmly supported on safety stands, place
the body straightener under the frame rail to be corrected.
Withe the use of underbody clamps, anchor both front
and rear end of the vehicle with chain onto the beam
of the body striaghtner. Place a bottle jack or portapower
on the Dozer beam under the low area to raise it.
HOOK-UP FOR MASH WITH SAG
Attach the anchor post of the body straightener to the underside of the car. near the rear wheels, using chain
or the underbody anchoring system. Place a block or jack between the beam and the car. Chain the front of
the frame to the pivot arm so that you pull the frame forward and downward simultaneously.
This is a basic a pulling and stretching operation.
With the car firmly supported on safety stands,
place the body straightener under the frame rail
to be corrected. Anchor the body straightener to
the frame or the pinch weld with underbody clamps.
HOOK-UP FOR CENTER SWAY
This configuration shows a common hook-up for removing the center sway from a ladder frame. This set up
can be used for other types of frame, but the frame should be tied together by the chain in order to move both
rail at the same rate. Please note the car should be well supported with cross tubes and safety stands, and
when attaching the frame with chains, it is a good idea to use short pieces of angle iron to pad the corners
where chains wraps around the frame.
4.
36” Min
Page 6
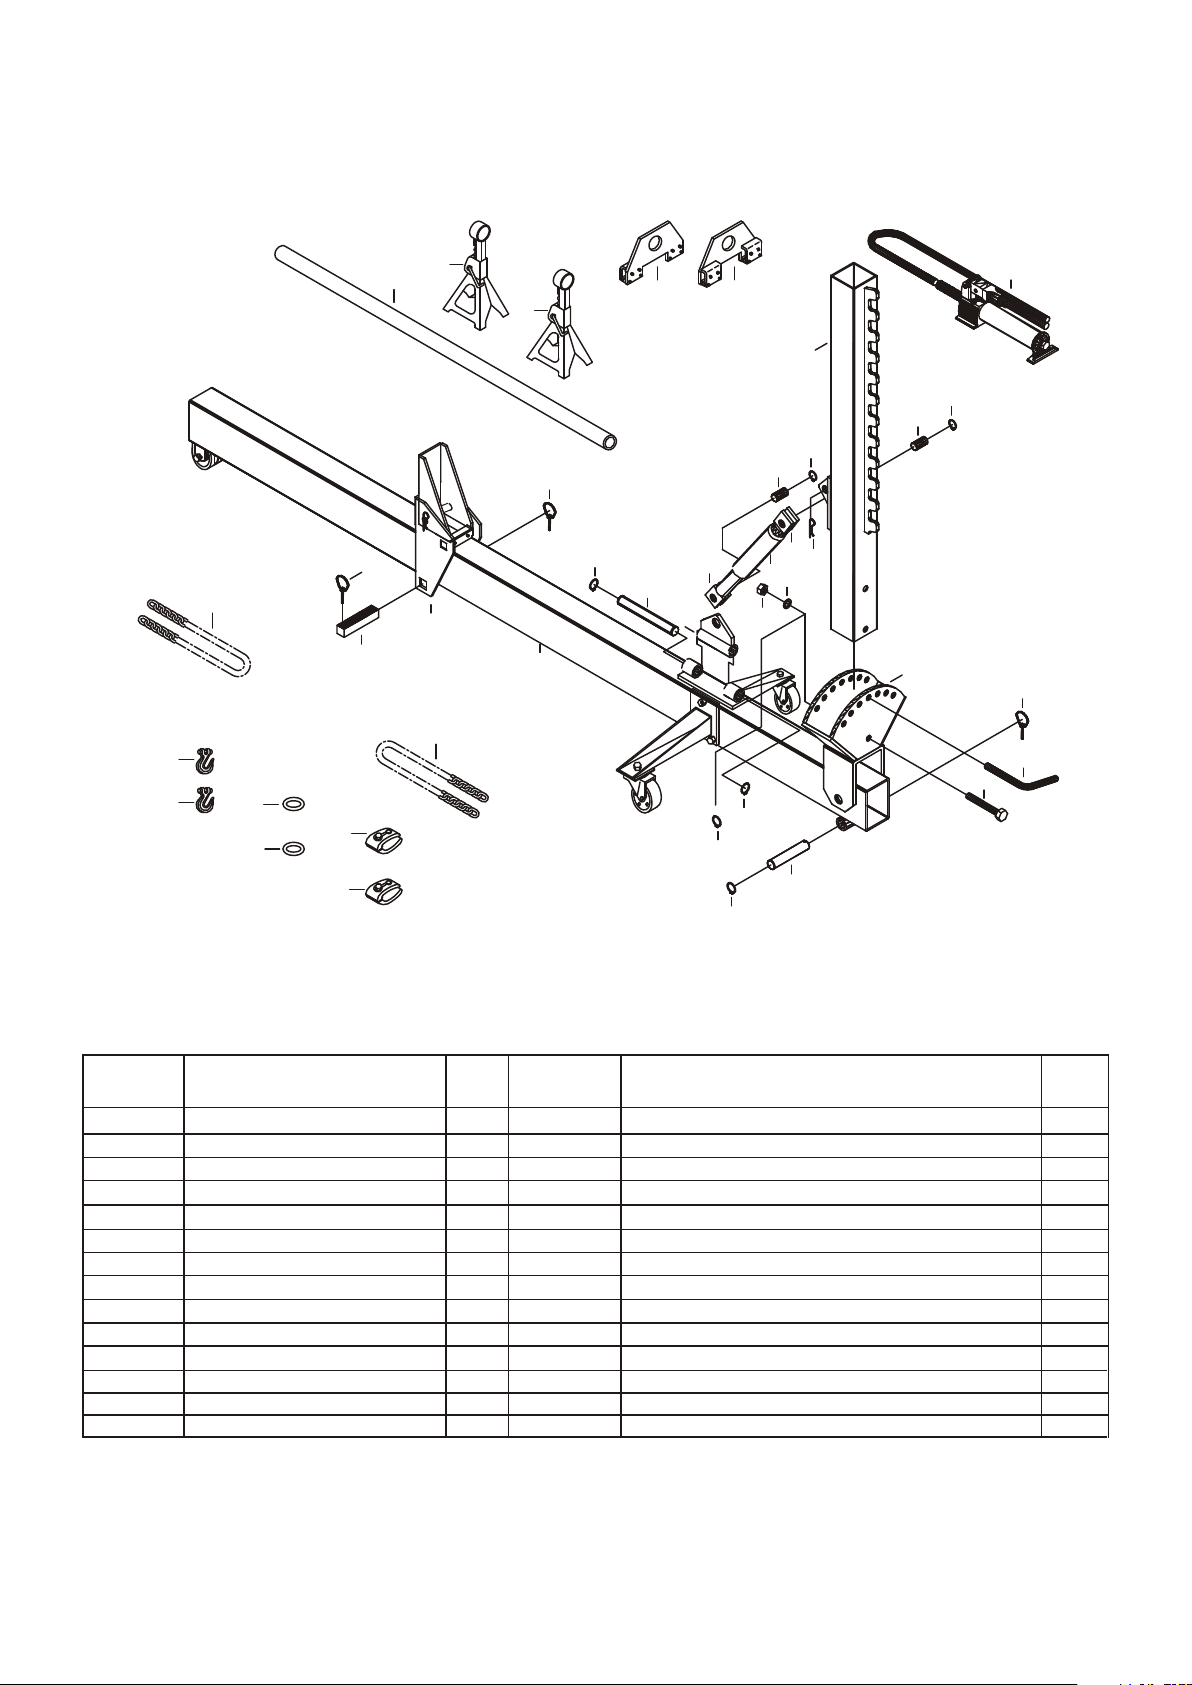
BODY STRAIGHTENER
MODEL 851
26
26
25
24
24
23
18
19
21
17
25
20
20
27
12
14
22
06
16
15
16
15
11
08
09
2
05
10
07
04
16
22
19
04
13
1
23
04
03
PARTS LIST
PARTS
NO
DESCRIPTION
QTY
PARTS
NO
01 MAIN BEAM 1 15 SPINDLE 2
02 TILTING SUPPORT 1 16 SNAP-RING"C" 2
03 SPINDLE 1 17 MULTI-POSITION ANCHOR POST 1
04 SNAP-RING"C" 3 18 STOP BLOCK 1
05 PIN 1 19 PIN 2
06 POST 1 20 SUPPORT STAND 2
07 BOLT 3*4"X7" 1 21 CROSS TUBE 1
08 SPRING WASHER 1 22 UNDERBODY SUPPORT CLAMPS 2
09 NUT 3/4" 1 23 PULL CLAMPS 2
10 LOCK PIN 1 24 PULL RING 2
11 COTTER PIN 3 25 6"X3/8"CHAIN 2
12 SUPPORT 1 26 3/8 HOOK 2
13 SPINDLE 1 27 10 TON HYDRAULIC UNIT 1
14 10 TON RAM 1
DESCRIPTION QTY
5.
Page 7
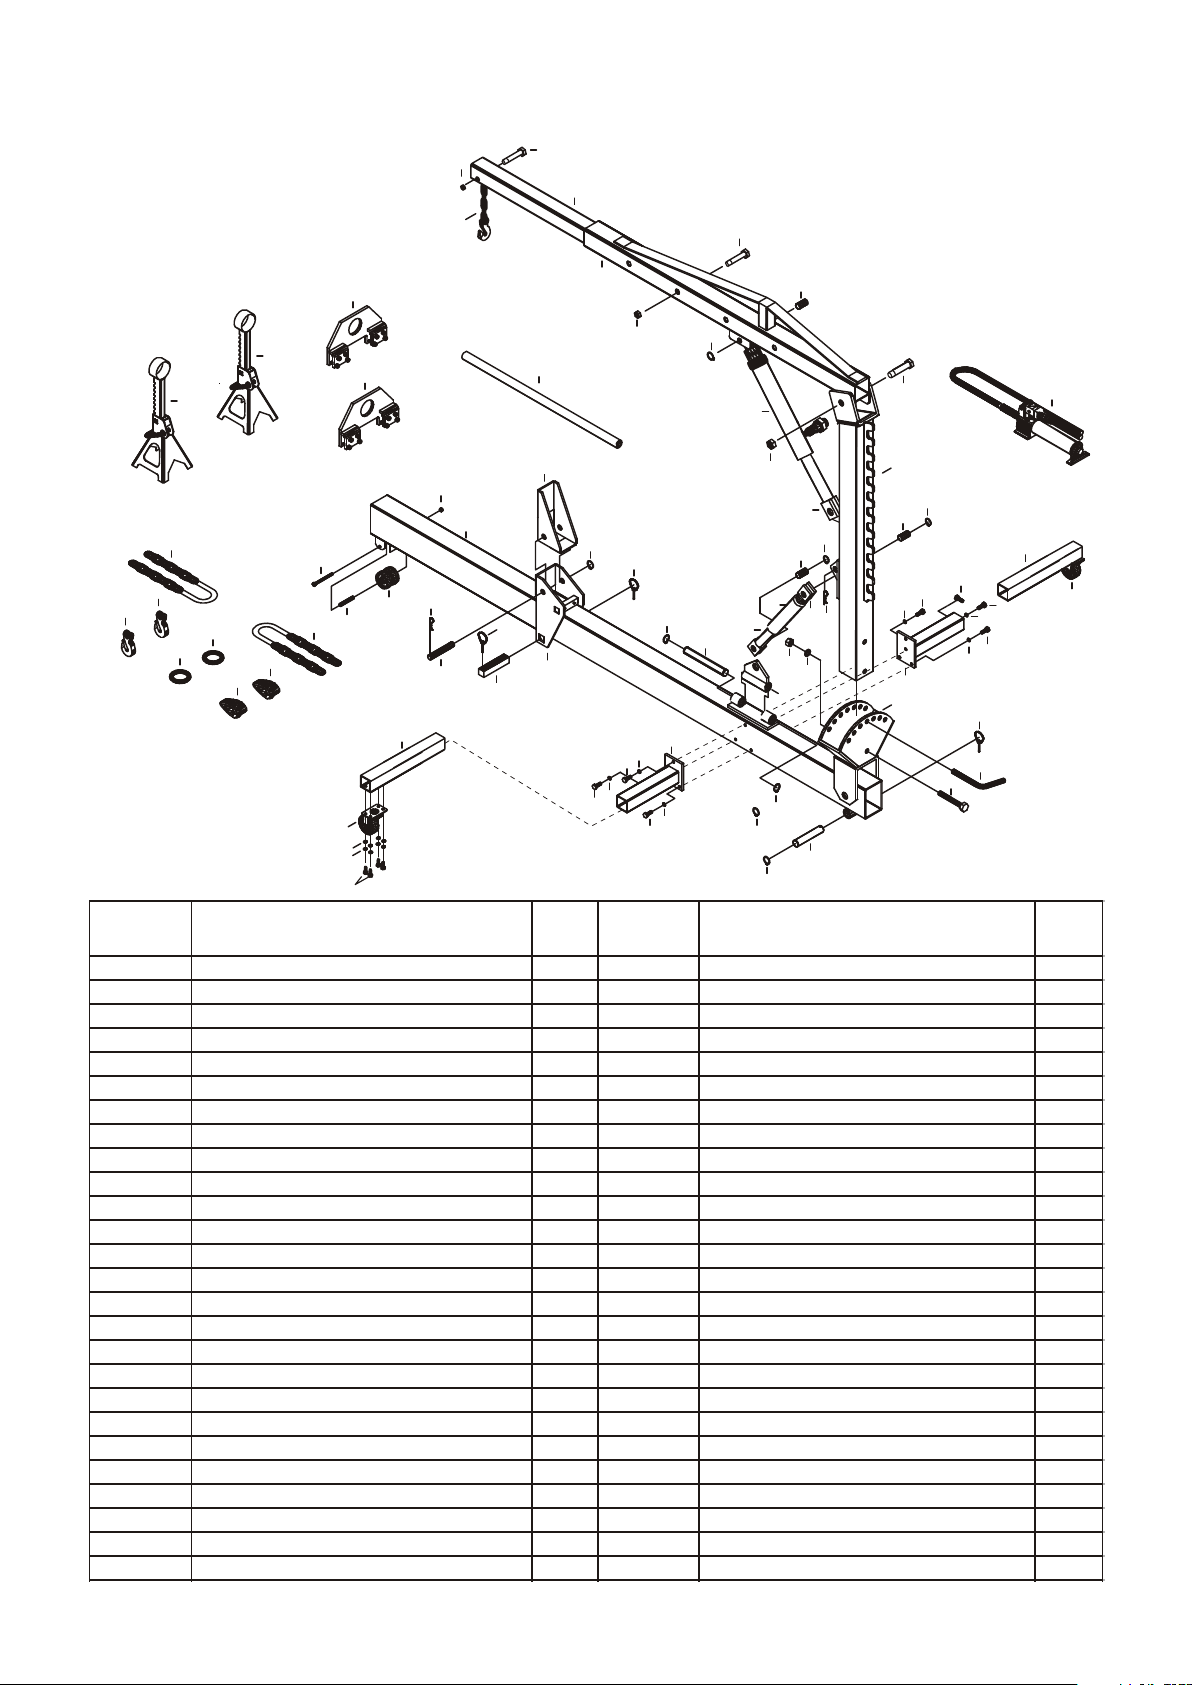
BODY STRAIGHTENER W/2TON CRANE
MODEL 857
40
38
39
35
36
54
54
PARTS
NO
50
45
45
53
52
52
51
51
50
15
02B
14
30
12
13
53
29
07
08
10
11
09
49
27
26
DESCRIPTION QTY
32
37
28
31
27
25
04
05
04
05
05
23
18
61
03A
04
PARTS
NO
22
2020
34
24
23
22
20
24
21
18
30
34
58
60
18
17
33
16B
22
04
03B
56
23
06
05
04
57
DESCRIPTION QTY
07
05
04
05
19
59
02B MAIN BEAM 1 28 ANCHOR POST UPPER BRACKET 1
03A FRAME CANNULA 1 29 SPINDLE 1
03B FRAME CANNULA 1 30 COTTER PIN 5
04 SPRING WASHER 3 15/16" 6 31 SNAP-RING"C" 1
05 BOLT 3 15/16"x 11 13/16"L 6 32 BOOM 1
06 BOLT 1/2"X3/4"L 2 33 BOLT 3/4"X46 1/4"L 1
07 EXTENSION BOOM 2 34 NUT 3/4" 2
08 CASTER ASS'Y 2 35 BOOM EXTENSION 1
09 BOLT 5/16"X3/4L 8 36 BOLT 5/8"X36 5/8" 1
10 SPRING WASHER 3 1/8" 8 37 NUT 5/8" 1
11 NUT 5/16" 8 38 HOOK AND CHAIN 1
12 FRONT WHEEL 2 39 BOLT 1/2"X30 5/16 1
13 BUSHING 1 40 NUT 1/2" 3
14 BOLT 3 1/8"X39 3/8"L 1 45 SUPPORT STAND 2
15 NUT 3 1/8" 1 49 CROSS TUBE 1
16B POST 1 50 UNDERBODY SUPPORT CLAMPS 2
17 SPINDLE 1 51 PULL CLAMPS 2
18 SNAP-RING"C" 3 52 PULL RING 2
19 LOCK PIN 1 53 6"X3/8"CHAIN 2
20 CYLINDER 2 54 3/8"HOOK 2
21 ADAPTER 2 55 10 TON HYDRAULIC UNIT 1
22 SPINDLE 4 56 TILTING SUPPORT 1
23 SNAP-RING"C" 4 57 BOLT 3/4"X2 3/8"L 1
24 ADAPTER 2 58 SPRING WASHER 1
25 MULTI-POSITION ANCHOR POST 1 59 LOCK PIN 1
26 STOP BLOCK 1 60 SUPPORT 1
55
08
6.
 Loading...