

Page 1
CONFORMITY CERTIFICATE TO THE EUROPEAN DIRECTIVES.
CERTIFICAT DE CONFORMITE AUX DIRECTIVES EUROPEENNES.
GETUIGSCHRIFT VAN OVEREENSTEMMING MET DE EUROPESE RICHTLIJNEN.
CERTIFICATO DI CONFORMIT0 ALLE DIRETTIVE EUROPEE.
CERTIFICADO DE CONFORMIDAD CON LAS DIRECTIVAS EUROPEAS.
KONFORMITÄTSZEUGNIS AN DIE EUROPÄISCHEN RICHTLINIEN.
СЕРТИФИКАТ СООТВЕТСТВИЯ ЕВРОПЕЙСКИМ ДИРЕКТИВАМ.
EN
EN
ENEN
FR
FR
FRFR
DE
DE
DEDE
NL
NL
NLNL
IT
IT
ITIT
ES
ES
ESES
RU
RU
RURU
The undersigned certifies that the machine complies with the European Directives 2006/42,
2006/95, 2004/108.
Le soussigné déclare que cette machine est conforme aux directives européennes 2006/42,
2006/95, 2004/108.
Unterzeichneter erklärt, daß diese Maschine den Europäischen Richtlinien 2006/42
2006/95, 2004/108.
Ik ondertekende verklaar dat deze machine in overeenstemming met de Europese
richtlijnen 2006/42, 2006/95, 2004/108.
Ii sottoscritto dichiara questa macchina conforme alle ultime versioni delle seguenti direttive
europee: 2006/42, 2006/95, 2004/108.
El infrascrito declara que esta máquina es conforme con las directivas europeas 2006/42,
2006/95, 2004/108.
Нижеподписавшееся лицо заявляет, что данное устройство соответствует
европейским директивам 2006/42, 2006/95, 2004/108.
B. Van Cauwenberghe
General Manager
JAC s.a.
Page 2
MAINTENANCE / ENTRETIEN / WARTUNG / ONDERHOUD /
MAINTENANCE / ENTRETIEN / WARTUNG / ONDERHOUD /
MAINTENANCE / ENTRETIEN / WARTUNG / ONDERHOUD / MAINTENANCE / ENTRETIEN / WARTUNG / ONDERHOUD /
MANUTENZIONE / MANTENIMIENTO /
MANUTENZIONE / MANTENIMIENTO / ОБСЛУЖИВАНИЕ
MANUTENZIONE / MANTENIMIENTO / MANUTENZIONE / MANTENIMIENTO /
63
Page 3

EN
EN
ENEN
FR
FR
FRFR
DE
DE
DEDE
NL
NL
NLNL
ES
ES
ESES
RU
RU
RURU
AUTOMATIC DIVIDERS
(Translation of the original instructions)
DIVISEUSE AUTOMATIQUES
(Notice d’instructions originale)
TEIGTEILMASCHINEN
(Übersetzung der Original betriebsanleitung)
DEEGVERDELMACHINES
(Vertaling van de oorspronkelijke gebruiksaanwijzing)
SPEZZATRICI AUTOMATICHE
IT
IT
ITIT
(Traduzione delle istruzioni originali)
DIVISORAS AUTOMÁTICAS
(Traducción del manual original)
АВТОМАТИЧЕСКИЕ ТЕСТОДЕЛИТЕЛЬНЫЕ
МАШИНЫ
(Перевод оригинальной инструкции)
DIV / DIV-R
5
13
21
29
37
45
53
62
3
Page 4

Translation of the original instructions
4
61
Page 5

DIV - DIV-R
BEFORE START-UP
You have just received a JAC machine and we would like to thank your very much for your
confidence.
In order for you to be completely satisfied over the next few years, please note the following
advices :
- Obtain assistance from your authorised agent for installation, start-up and follow-up ;
- In order to be able to benefit from the 3 year warranty (see conditions for returning be-
low), you should have the service book filled out by your distributor when the machine is
installed. The service book is located at the back of this manual.
WARRANTY
JAC offers a 3 year warranty on all its products.
This warranty includes replacement of original parts found to be defective and installation
free of charge by the JAC agent.
The warranty becomes effective from the installation date of the equipment.
Under the following restrictive conditions :
1. The equipment is purchased under “normal“ conditions ;
2. Installation is made by an authorised agent ;
3. Utilisation of equipment conforming to the indications of the instructions for use and for
the purpose for which it is made ;
4. The equipment is maintained daily as a good father should and with all due care ;
5. Maintenance followed-up by the authorised agent conforming to the maintenance specifications with at least one maintenance a year (maintenance at the user’s cost).
The manual has a page for this where the agent can detail the different maintenance.
If there is no maintenance follow-up by an authorised agent and/or if the service
book is not completed correctly, the warranty is limited to one year.
6. Exclusive use of JAC original parts.
This warranty doesn’t cover
1. Replacement of normally wearing parts ;
2. Parts found not to be defective by our dealers ;
3. Problems resulting from abnormal use of the equipment ;
4. Problems resulting from an installation not installed by an authorised agent ;
5. Parts where problems result from transport damage or incorrect handling.
Repair and/or replacement of defective parts during the warranty period does not extend the
initial warranty.
60
5
Page 6

CAUTION
- This machine is intended for professional bakers ;
- It may only be used by one person at a time. (unless otherwise stated) ;
- Don’t allow children or unauthorised persons to use or manipulate the machine ;
- It has to be kept and used inside in a location, away from humidity and heat ;
- The machine has to be adequately lit for carrying out the work satisfactorily ;
- This machine has a noise level below 70 dB(A) as per standard EN ISO 3744.
- Flour dust may cause allergic reactions or breathing problems.
To avoid or reduce flour emissions it is recommended to :
- limit the flouring while using the machine ;
- use a professional vacuum cleaner, fitted with a flexible hose and an
anti-static vat, for cleaning.
CONNECTION
- Before connecting your machine to the electricity network, check that the machine operation voltage (see rating plate on the machine) and voltage of the electricity network
are appropriate ;
- Connection of the machine has to be made using an earthed plug ;
- Your electrical installation supplying the machine has to be protected as below :
- North America : Main protection 15A ;
- Rest of the world : Main protection 16 A.
- A fuse has to be associated with the plug as follows :
- 8A for a 400V three phase supply ;
- 12A for a 230V three phase supply.
Note : All other problems resulting from another type of connection will not be taken into
account.
START-UP
- Ensure that the casters are properly locked to ensure good machine stability at the
workplace ;
- Before using the hydraulic divider make sure it is turning the right way. To do so :
- Open the cover and check that the vat is empty ;
- Connect the electrical plug of the divider ;
- Pull the control lever towards you for 2 seconds ;
- Make sure that the head raises ;
- If the head raises during this test , then the connection is correct. If not discon
nect the mains plug and invert 2 of its phases and re-start the test.
NOTE
…………………………………………………………………………………………………………
…………………………………………………………………………………………………………
…………………………………………………………………………………………………………
…………………………………………………………………………………………………………
…………………………………………………………………………………………………………
…………………………………………………………………………………………………………
…………………………………………………………………………………………………………
…………………………………………………………………………………………………………
…………………………………………………………………………………………………………
…………………………………………………………………………………………………………
…………………………………………………………………………………………………………
…………………………………………………………………………………………………………
…………………………………………………………………………………………………………
…………………………………………………………………………………………………………
6
59
Page 7
ЗАПАСНЫЕ ЧАСТИ
При осуществлении заказа запасной части, выберите вместе с авторизированным
специалистом необходимую запасную часть на основе каталога запасных частей
производителя.
Всегда точно указывайте номер машины, нанесенный на паспортную табличку.
Заказы у компании JAC осуществляет авторизированный специалист.
УСТРАНЕНИЕ НЕИСПРАВНОСТЕЙ
Двигатель не вращается.
Проверить подачу электропитания;
Проверить термореле.
Двигатель гудит, но не вращается.
Проверить правильность подключения фаз сети электропитания.
Машине не хватает мощности.
Проверить уровень масла в маслобаке.
Головка поднимается, но ножи не выходят.
Обратиться к поставщику оборудования, отрегулировать давление в дозаторе.
Заготовки теста плохо разрезаны.
Отрегулировать давление и обратиться к поставщику.
Масло на полу.
Отключить машину от сети и обратиться к поставщику.
Во избежание риска лишения гарантии техническое обслуживание машины
должен выполнять авторизованный специалист.
PRESSURE ADJUSTMENT
1. Open :
- The side doors (DIV) ;
- The front hatch (DIV-R).
2. Turn the handle/thumb wheel :
- To the right to increase the pressure ;
- To the left to decrease the pressure.
DANGER
- In case of danger for the user, use the red Stop Button ;
- Remove the electric plug before every maintenance and service operation ;
- All maintenance or part changing operations are to be carried out by a qualified person ;
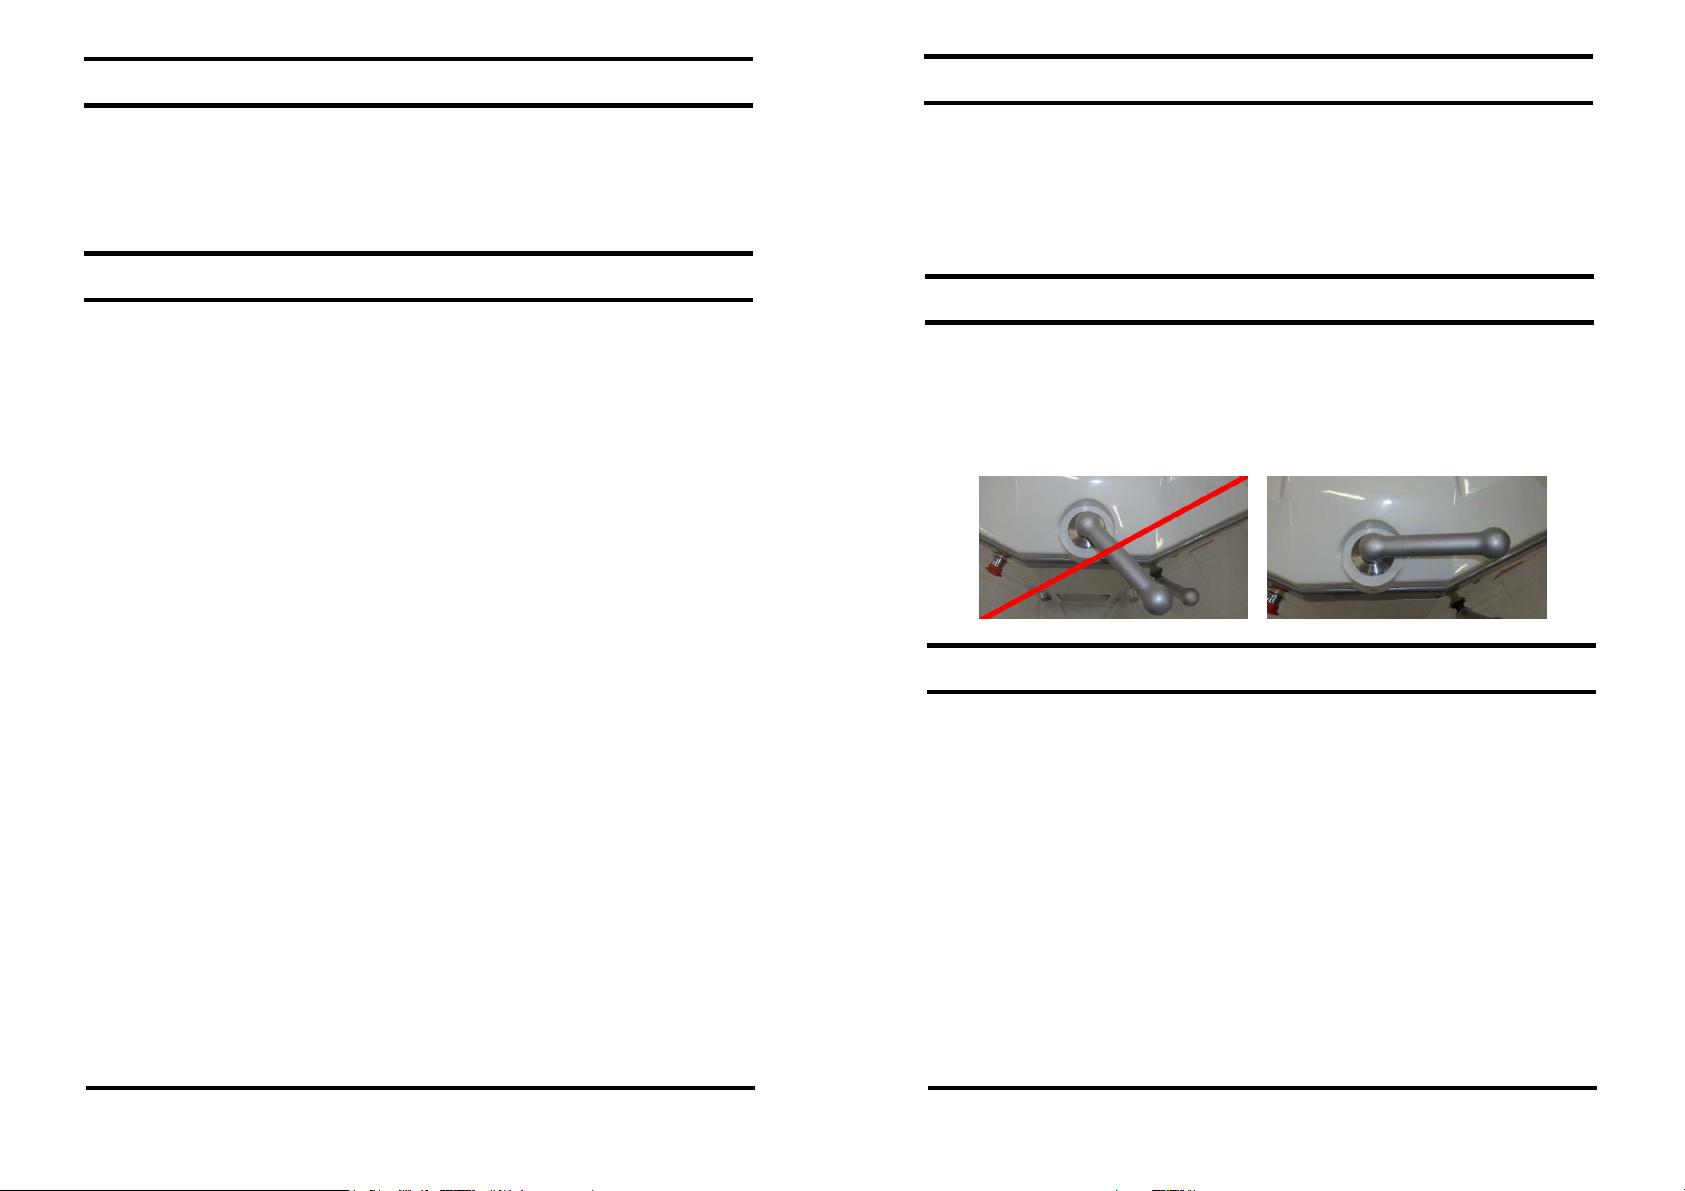
- In order to work in complete safety, while the cover is closed, the cover closing handle
has to be pressed sufficiently and have a minimum angle of 60° in relation to the machine axis in front of the operator :
INSTRUCTIONS FOR USE
Use the schematics on page 60 for using the machine.
At the start of the day power up the machine with the aid of the main switch inside the machine ;
At the beginning and end of a day of use, oil the inside of the vat, using a soft cloth impregnated with oil.
Instructions for use
1. Push the control lever to lower the head and blade assembly ;
NB: If necessary, lightly flour the top of the head in the vat ;
2. Pour the dough into the vat ;
3. Close the cover ;
4. Pull the control lever in order to raise the head and divide the dough ;
5. Push the lever briefly forward in order to release the pressure ;
6. Open the cover ;
7. Pull the control lever in order to raise the head up to a maximum and remove the dough
pieces.
58
7
Page 8

INSTRUCTIONS FOR USE
Once the operation is completed, press the red STOP button to power the machine off.
Tip : For safety, the operator running the hydraulic divider has to be the only one within 1 m
of the machine and be facing it.
Capacity : Number of cycles per hour : 0 to 120 cycles ;
Safety : Pressing the emergency stop button will stop the machine.
MAINTENANCE
Each time it is used, by a trained user :
Internal cleaning of the vat and cover :
1. Place the head and the blades in the bottom position ;
2. Unplug the machine from the mains ;
3. Vacuum the excess flour in the vat, the edges and the orifices of the flour collection
system ;
4. Clean the inside of the vat and the blades, using a soft cloth impregnated with oil, after
each use.
Cleaning the blades :
1. Place the head and the blades in the bottom position ;
2. Hold the white button and pull the control lever in order to raise the head and the
blades ;
3. Disconnect the mains plug ;
4. Loosen and remove the remaining dough from the blades with the aid of an oiled cloth.
Every week, by a trained user :
External cleaning of the machine :
1. Close the cover, press the emergency stop button and disconnect the mains plug ;
2. Wash the complete body with the aid of a damp cloth ;
3. Empty the flour recovery bin (DIV-R) ;
4. Reconnect and restart the machine.
Never use water or a water-dampened cloth for cleaning the inside of the vat
Never wash the machine with large amounts of water
ОБСЛУЖИВАНИЕ
Чистка машины внутри:
1. Установить головку и ножи как для чистки ножей ;
2. Отсоединить машину от сети электропитания ;
3. С помощью отвертки открыть две боковые дверцы ;
4. Почистить пылесосом все внутренние части машины, а также механические
блоки ;
5. Закрыть обе дверцы ;
6. Подключить машину к сети и включить.
Каждые 3 месяца, выполняется обученным оператором :
Контроль уровня масла :
1.. Установить головку в нижнее положение ;
2. Отсоединить машину от сети электропитания ;
3. Открыть правую дверцу ;
4. Проверить, чтобы уровень масла был от 4 до 5 см ниже верхнего края маслобака.
При необходимости добавить гидравлическое масло в соответствии с
техническими условиями ;
5. Закрыть дверцу ;
6. Подключить машину к сети и включить.
Примечание:
Чтобы можно было использовать масла различных марок, ниже приводятся данные
по их взаимозаменяемости :
Ежегодно, выполняется авторизованным специалистом :
ELF
ELF
ELFELF
TOTAL
TOTAL
TOTALTOTAL
CASTROL
CASTROL
CASTROLCASTROL
CONDAT
CONDAT
CONDATCONDAT
Проверка предохранительных устройств
В устройстве DIV R менять уплотнение против выбросов муки каждые 3 года (исходя
из нагрузки в 100 ежедневных циклов).
Hydrelf DS46
Azolla ZS32
Ayspin AWS 46
Hydrolub S46
8
57
Page 9

ЭКСПЛУАТАЦИЯ МАШИНЫ
По окончании работы нажмите красную кнопку STOP для отключения машины.
Совет : Из соображений техники безопасности, оператор, управляющий
тестоделительной машиной, должен быть один в радиусе 1 м от машины и
располагаться перед ней.
Производительность : Количество циклов в час: от 0 до 120.
Безопасность : При нажатии на кнопку аварийного останова работа машины
прекращается ;
ОБСЛУЖИВАНИЕ
После каждого использования, обученный оператор должен :
Почистить изнутри бункер и крышку :
1. Установить головку и ножи в нижнее положение ;
2. Отсоединить машину от сети электропитания ;
3. Очистить с помощью пылесоса от остатков муки бункер, края и рекуперационные
отверстия для муки ;
4. При помощи влажной тканевой салфетки убрать остатки теста.
Чистка ножей :
1. Установить головку и ножи в нижнее положение ;
2. Держите белую кнопку и Потянуть рычаг управления, чтобы поднять головку и
ножи ;
3. Отсоединить машину от сети электропитания ;
4. При помощи влажной тканевой салфетки убрать остатки теста с ножей.
Каждую неделю, выполняется одним обученным оператором :
Чистка машины снаружи :
1. Закрыть крышку, нажать кнопку экстренного выключения и отсоединить машину от
сети электропитания ;
2. Помыть корпус влажной тряпкой ;
3. Подключить машину к сети и включить.
Не мыть машину большим количеством воды
MAINTENANCE
Internal cleaning of the machine :
1. Position the head and the blades as for cleaning the blades ;
2. Unplug the machine from the mains ;
3. Open the two side doors with the aid of a screwdriver ;
4. Vacuum all the internal parts of the machine, as well as the mechanical parts ;
5. Close the two doors ;
6. Reconnect and restart the machine.
Every 3 months, by a trained user :
Check the oil level :
1. Place the head in the bottom position ;
2. Unplug the machine from the mains ;
3. Open the right door ;
4. Check that the oil level is between 4 and 5 cm of the upper edge of the reservoir. If
necessary, add hydraulic oil that meets the specifications ;
5. Close the door ;
6. Reconnect and restart the machine.
Note:
Several brands of oil may be used, here are the equivalents :
ELF
ELF
ELFELF
TOTAL
TOTAL
TOTALTOTAL
CASTROL
CASTROL
CASTROLCASTROL
CONDAT
CONDAT
CONDATCONDAT
Every year, by an authorised agent :
Verification of the safety devices
For the DIV R, change the flour anti-rejection seal every 3 years (based on a use of 100
cycles per day).
Check that your authorised agent records the intervention in your service book in
order to keep your 3 year warranty
Hydrelf DS46
Azolla ZS32
Ayspin AWS 46
Hydrolub S46
56
9
Page 10

SPARE PARTS
When ordering spare parts, check with your authorised agent the parts concerned using
the spare parts catalogue published by the manufacturer.
Always provide the machine number as indicated on the rating plate.
Your agent will order the parts from JAC.
TROUBLESHOOTING
The motor does not turn.
Check the power supply;
Check the thermal relay.
The motor buzzes but does not turn.
Check that the phases are correct.
The machine lacks power.
Check the oil level.
The head raises but the blades don’t come out.
Ring your distributor and have them adjust the distributor pressure.
The dough pieces are badly cut.
Adjust the pressure and contact your distributor.
Presence of oil on the floor.
Disconnect the machine and contact your distributor.
Always get an authorised agent to carry out maintenance work
on your machine to avoid losing the warranty.
Регулировка давления
1. Откройте :
- Боковые дверцы (DIV) ;
- Передний затвор (DIV-R).
2. Поверните рукоятку/колесико :
- Вправо, чтобы повысить давление ;
- Влево, чтобы понизить давление;
ОПАСНО!
- В случае опасности для пользователя или для машины следует воспользоваться
красной кнопкой STOP ;
- Перед любыми действиями по техобслуживанию и уходу необходимо вынуть
вилку машины из розетки электросети ;
- Все действия по обслуживанию или замене частей должны выполняться
квалифицированным персоналом.
- Для обеспечения полной безопасности работы при закрытой крышке ручка
закрытия крышки должна быть повернута под минимальным углом 60 ° по
отношению к оси машины, находящейся перед оператором.
ЭКСПЛУАТАЦИЯ МАШИНЫ
Для эксплуатации машины см. схемы на стр 60.
В начале рабочего дня включите машину в сеть с помощью общего рубильника или,
отжав кнопку STOP (если она нажата).
Порядок эксплуатации :
1. Нажмите на рычаг управления, чтобы опустить блок головки и ножей.
NB : При необходимости слегка посыпьте мукой верх головки в бункере ;
2. Положите тесто в бункер ;
3. Закройте крышку ;
4. Потяните рычаг управления, чтобы поднять блок головки и ножей ;
5. Нажмите коротко на рычаг по направлению вперед, чтобы понизить давление ;
6. Откройте крышку ;
7. Потяните рычаг управления, чтобы максимально поднять головку и подать
тестовые заготовки на выход.
10
55
Page 11

ПРЕДУПРЕЖДЕНИЕ
- Данная машина предназначена для профессионального применения в
хлебопекарнях ;
- Она должна использоваться одновременно только одним человеком. (если нет
инструкций об обратном) ;
- Не следует разрешать детям или лицам, не имеющим допуска, пользоваться или
управлять машиной ;
- Машина должна храниться и использоваться внутри помещения, в защищенном от
влаги и тепла месте ;
- Для выполнения работ машина должна быть хорошо освещена ;
- Данная машина имеет уровень шума менее 70 дБ(А) согласно норме EN ISO 3744.
- Мучная пыль может вызвать аллергические и респираторные заболевания.
Чтобы исключить или уменьшить выбросы муки, рекомендуется:
- максимально ограничить посыпание хлеба при использовании машины ;
- во время чистки пользоваться профессиональным пылесосом, оснащенным
гибким шлангом и антистатическим резервуаром.
ПОДКЛЮЧЕНИЕ
- Прежде, чем подключить машину к сети, проверьте, соответствует ли рабочее
напряжение машины (см. паспортную табличку на машине) напряжению вашей сети ;
- Подключение машины должно осуществляться штепсельной вилкой с
заземлением ;
- Электрические цепи питания машины должны быть защищены как указано ниже :
- Северная Америка: Защита 15А ;
- Другие страны: Защита 16А.
- Сетевая розетка должна быть оснащена плавким предохранителем, как указано
ниже :
- 8A для трехфазной сети питания 400 В ;
- 12A для трехфазной сети питания 230 В.
ВКЛЮЧЕНИЕ МАШИНЫ
- Чтобы обеспечить устойчивость машины на рабочем месте, проверьте, чтобы
колесики были заблокированы ;
- Перед началом эксплуатации гидравлической тестоделительной машины убедитесь
в правильном направлении вращения. Для этого :
- Откройте крышку и убедитесь, что бункер пустой ;
- Включите тестоделительную машину в электросеть ;
- Потяните рычаг управления на себя в течение 2 секунд ;
- Убедитесь, что головка поднялась ;
- Если в ходе этого испытания головка поднялась, машина подключена
правильно. В противном случае отключите машину от сети и поменяйте в ней
2 фазы местами, затем повторите проверку.
NOTE
…………………………………………………………………………………………………………
…………………………………………………………………………………………………………
…………………………………………………………………………………………………………
…………………………………………………………………………………………………………
…………………………………………………………………………………………………………
…………………………………………………………………………………………………………
…………………………………………………………………………………………………………
…………………………………………………………………………………………………………
…………………………………………………………………………………………………………
…………………………………………………………………………………………………………
…………………………………………………………………………………………………………
…………………………………………………………………………………………………………
…………………………………………………………………………………………………………
…………………………………………………………………………………………………………
54
11
Page 12

Notice d’instructions originale
ДО НАЧАЛА РАБОТЫ
Вы только что приобрели машину компании JAC, благодарим вас за доверие.
Для того, чтобы машина надежно служила вам в течение следующих лет, просим вас
ознакомиться с следующими советами:
- Воспользуйтесь помощью авторизованного специалиста для установки, ввода в
эксплуатацию и сопровождения ;
- Чтобы воспользоваться трехлетней гарантией (см. условия, указанные ниже), во
время установки машины заполните у вашего продавца гарантийный талон.
Гарантийный талон находится в конце данной инструкции.
ГАРАНТИЯ
На всю свою продукцию JAC предлагает трехлетнюю гарантию.
Эта гарантия включает замену оригинальных частей, признанных дефектными, и их
бесплатную установку авторизованным специалистом JAC.
Гарантийный период начинается с даты установки машины.
Применяются следующие ограничительные условия:
1. Машины были приобретены по «стандартным» условиям ;
2. Установка осуществляется авторизованным специалистом ;
3. Эксплуатирование машин производится в соответствии с инструкцией по
эксплуатации и с целью, для которой она была предназначена ;
4. Техника ежедневно обслуживается ;
5. Техническое обслуживание проводится авторизованным специалистом согласно
спецификациям проведения техобслуживания c проведением, минимум, одного
техобслуживания в год (техобслуживание за счет пользователя). С этой целью
инструкция содержит одну страницу, позволяющую специалисту указывать
информацию о различных видах техобслуживания.
Если авторизированным специалистом не проводится техобслуживание
и / или гарантийный талон не заполнен правильно, гарантия ограничивается
одним годом.
6. Использование исключительно оригинальных частей JAC.
Даня гарантия не распространяется на:
1. Замену деталей с нормальным износом ;
2. Детали, не признанные дефектными нашими службами ;
3. Неисправности, вызванные неправильной эксплуатацией машины ;
4. Неисправности, вызванные установкой, произведенной неавторизованным
специалистом ;
5. Детали или неисправности, вызванные транспортными повреждениями или
ненадлежащим проведением погрузочно-разгрузочных работ.
Ремонт и / или замена дефектных частей, выполненные в течение гарантийного периода,
не являются основанием для продления указанной гарантии.
12
53
Page 13

Перевод оригинальной инструкции
AVANT MISE EN SERVICE
Vous venez d’acquérir une machine JAC, nous vous remercions pour votre confiance.
Pour que votre machine vous donne entière satisfaction au cours des prochaines années,
nous vous invitons à prendre connaissance des conseils suivants :
- Faites-vous aider par votre agent agréé pour l’installation, la mise en service et le suivi ;
- Afin de pouvoir bénéficier de la garantie des 3 ans (voir conditions reprises ci-après),
faites compléter, par votre distributeur, le carnet d’entretien lors de l’installation de votre
machine. Ce carnet d’entretien se trouve à la fin de cette notice d’utilisation.
GARANTIE
JAC offre une garantie de 3 ans sur tous ses produits.
Cette garantie comprend le remplacement des pièces d'origines reconnues défectueuses et
l'installation gratuite de celles-ci par l'agent JAC.
La garantie prend effet à la date d'installation du matériel.
Sous les conditions restrictives suivantes :
1. Matériel acquis dans des conditions « normales » ;
2. Installation effectuée par un agent agréé ;
3. Utilisation du matériel conformément aux indications du mode d’emploi et dans le but
pour lequel il a été fabriqué ;
4. Matériel journellement entretenu en « bon père de famille » ;
5. Entretiens suivis par l'agent agréé conformément aux spécifications d’entretien avec, au
minimum, un entretien par an (entretien à charge de l’utilisateur). La notice comprend à
cet effet une page permettant à l'agent d'indiquer les différents entretiens.
Si il n’y a pas de suivi d’entretien par un agent agréé et/ou que le carnet d’entretien
n’est pas correctement complété, la garantie se limite à un an.
6. L'utilisation exclusive des pièces d'origine JAC.
Cette garantie ne couvre pas :
1. Le remplacement de pièces d'usure normale ;
2. Les pièces non reconnues défectueuses par nos services ;
3. Les problèmes résultant d'une utilisation anormale du matériel ;
4. Les problèmes résultant d'une installation non effectuée par un agent agréé ;
5. Les pièces ou les problèmes résultant d'un dégât de transport ou d'une manutention
inappropriée.
Une réparation et/ou un remplacement de pièces défectueuses effectués durant la période
de garantie n’a pas pour effet de prolonger ladite garantie.
52
13
Page 14

AVERTISSEMENT
- Cette machine est destinée aux professionnels de la boulangerie ;
- Elle doit être utilisée par une seule personne à la fois. (sauf prescription contraire) ;
- Ne pas laisser des enfants ou des personnes non autorisées utiliser ou manipuler la
machine ;
- Elle doit être stockée et utilisée à l’intérieur dans un local, à l’abri de l’humidité et de la
chaleur ;
- La machine doit être éclairée suffisamment pour effectuer le travail ;
- Cette machine a un niveau sonore inférieur à 70 dB(A) suivant norme EN ISO 3744.
- Les poussières de farine peuvent provoquer des réactions allergiques ou respiratoires.
Pour éviter ou réduire ces émissions de farine, il est conseillé :
- de limiter au maximum le fleurage lors de l’utilisation de la machine ;
- d’utiliser lors du nettoyage, un aspirateur professionnel muni d’un flexible et d’une
cuve antistatique.
RACCORDEMENT
- Avant de connecter votre machine au réseau, vérifier l’adéquation de la tension de service de la machine (voir plaque signalétique sur la machine) et de la tension de votre
réseau ;
- Le raccordement de la machine doit se faire par l’intermédiaire d’une fiche munie d’une
terre ;
- Votre installation électrique alimentant la machine doit être protégée comme indiqué cidessous :
- Amérique du Nord : Protection principale 15A ;
- Reste du monde : Protection principale 16 A.
- Un fusible doit être associé à la prise comme indiqué ci-dessous :
- 8A pour une alimentation en 400V triphasée ;
- 12A pour une alimentation 230V triphasée.
Note : Tout problème résultant d’un autre type de raccordement vous incomberait.
MISE EN SERVICE
- Pour la bonne stabilité de la machine au poste de travail, vérifier que les roulettes ont
bien été bloquées ;
- Avant d'utiliser votre diviseuse hydraulique, vérifier son bon sens de rotation. Pour ce
faire :
- Ouvrir le couvercle et vérifiez que la cuve est vide ;
- Brancher la prise électrique de votre diviseuse ;
- Tirer le levier de commande vers vous durant 2 secondes ;
- Vérifier que la tête monte ;
- Si la tête est montée durant cet essai, votre connexion est correcte. Sinon dé
brancher la prise de courant et inverser 2 phases dans celle-ci, puis
recommencer cet essai.
NOTE
…………………………………………………………………………………………………………
…………………………………………………………………………………………………………
…………………………………………………………………………………………………………
…………………………………………………………………………………………………………
…………………………………………………………………………………………………………
…………………………………………………………………………………………………………
…………………………………………………………………………………………………………
…………………………………………………………………………………………………………
…………………………………………………………………………………………………………
…………………………………………………………………………………………………………
…………………………………………………………………………………………………………
…………………………………………………………………………………………………………
…………………………………………………………………………………………………………
…………………………………………………………………………………………………………
14
51
Page 15

PIEZAS DE RECAMBIO
En el momento de hacer un pedido de una pieza de recambio, verifique con su agente
autorizado de qué pieza se trata en base al catálogo de piezas de recambio emitido por el
fabricante.
Precise siempre el número de máquina tal como se indica en la placa de características.
Su agente realizará el pedido a JAC.
PROBLEMES
El motor no funciona
Verificar la alimentación eléctrica ;
Controlar el relé térmico ;
El motor runrunea, pero no gira
Controle la alimentación correcta en las fases
A la máquina le falta potencia
Compruebe el nivel de aceite
La cabeza sube, pero los cuchillos no salen
Consulte a su distribuidor, regulado de presión del distribuidor
Los pedazos de pasta están mal cortados.
Adapte la presión. Consulte a su distribuidor
Presencia de aceite en el suelo
Desconecte la máquina Consulte a su distribuidor
Un agente autorizado debe hacer el mantenimiento de la máquina!
REGLAGE DE PRESSION
1. Ouvrir :
- Les portes des cotés (DIV) ;
- La trappe en façade (DIV-R).
2. Tourner la poignée/molette :
- Vers la droite pour augmenter la pression ;
- Vers la gauche pour diminuer la pression.
DANGER
- En cas de danger pour l’utilisateur ou pour la machine, utiliser le bouton rouge STOP ;
- Retirer la fiche de la prise électrique avant toute opération de maintenance et d’entretien ;
- Toute opération de maintenance ou remplacement de pièce doit être effectuée par une
personne qualifiée.
- Afin de travailler en toute sécurité, lorsque le couvercle est fermé, la poignée de fermeture du couvercle doit être suffisamment poussée et faire un angle de minimum 60° par
rapport à l'axe de la machine se trouvant devant l'opérateur :
MODE D’EMPLOI
Utiliser les schémas de la page 60 pour l’utilisation de la machine.
En début de journée, mettre la machine sous tension à l’aide de l’interrupteur général ou en
relâchant le bouton STOP (si ce dernier est enclenché) ;
En début et en fin de journée d’utilisation, huiler l’intérieur de la cuve à l’aide d’un chiffon
doux imbibé d’huile.
Procédure d’utilisation :
1. Pousser le levier de commande pour faire descendre l'ensemble tête et couteaux.
NB : Si besoin, fariner légèrement le dessus de la tête dans la cuve ;
2. Verser la pâte dans la cuve ;
3. Fermer le couvercle ;
4. Tirer le levier de commande pour faire monter la tête et diviser la pâte ;
5. Pousser le levier brièvement vers l’avant afin de supprimer la pression ;
6. Ouvrir le couvercle ;
7. Tirer le levier de commande pour faire monter la tête au maximum et sortir les pâtons.
50
15
Page 16

MODE D’EMPLOI
En fin de journée, appuyer sur le bouton rouge STOP pour mettre la machine hors tension.
Conseil : Par sécurité, l'opérateur faisant fonctionner la diviseuse hydraulique doit être seul
dans un rayon de 1 m autour de la machine et se trouver en face de celle-ci.
Capacité : Nombre de cycles par heure : 0 à 120 cycles.
Sécurité : L’appui sur l’arrêt d’urgence empêche le fonctionnement de la machine.
ENTRETIEN
Après chaque utilisation, par un utilisateur formé :
Nettoyage intérieur de la cuve et du couvercle :
1. Positionner la tête et les couteaux en position basse ;
2. Débrancher la prise de courant du secteur ;
3. Aspirer les excédents de farine dans la cuve, les bords et les orifices de récupération de
farine ;
4. Après chaque utilisation nettoyer l’intérieur de la cuve et les couteaux avec un chiffon
doux imbibé d’huile
Nettoyage des couteaux :
1. Positionner la tête et les couteaux en position basse ;
2. Maintenir le bouton blanc et tirer le levier de commande pour faire monter les couteaux ;
3. Débrancher la prise de courant ;
4. A l'aide d'un tissu huilé, décoller et enlever les restes de pâte sur les couteaux.
Toutes les semaines, par un utilisateur formé :
Nettoyage extérieur de la machine :
1. Fermer le couvercle, appuyer sur le bouton d'arrêt d'urgence et débrancher la prise de
courant ;
2. Laver l'ensemble de la carrosserie à l'aide d'une chiffon humide ;
3. Vider le bac de récupération farine (DIV-R) ;
4. Rebrancher votre machine et remettre en fonctionnement.
Ne lavez jamais la machine à grandes eaux
Pour le nettoyage, ne jamais utiliser d’eau ou de chiffon humide (à l’eau) à l’intérieur
de la cuve
MANTENIMIENTO
Limpieza del interior de la máquina :
1. Coloque la cabeza y las cuchillas como para la limpieza de las cuchillas ;
2. Desenchufe la toma de corriente del sector ;
3. Abra las dos puertas laterales con un destornillador ;
4. Aspire todas las partes interiores de la máquina, así como las partes mecánicas ;
5. Vuelva a cerrar las dos puertas ;
6. Vuelva a conectar la máquina y póngala en marcha.
El cada 3 mes, por un usuario preparado para ello :
Control del nivel de aceite :
1. Ponga la cabeza en posición baja ;
2. desconecte la toma de corriente de la red ;
3. Abrir la puerta de derecha ;
4. Comprobar que el nivel de aceite se encuentra entre 4 y 5 cm del borde superior del
tanque. En caso necesario, añada aceite hidráulico conforme a las especificaciones ;
5. Cerrar la puerta ;
6. Vuelva a conectar la máquina, y póngala en funcionamiento .
Nota :
Se pueden utilizar aceites de varias marcas, he aquí las equivalencias :
ELF
ELF
ELFELF
TOTAL
TOTAL
TOTALTOTAL
CASTROL
CASTROL
CASTROLCASTROL
CONDAT
CONDAT
CONDATCONDAT
Hydrelf DS46
Azolla ZS32
Ayspin AWS 46
Hydrolub S46
Cada año, por un agente autorizado :
Comprobación de los órganos de seguridad
Para la DIV R, cambie la junta anti-proyección de harina cada 3 años (sobre la base de una
frecuencia de 100 ciclos diarios).
16
49
Page 17

INSTRUCCIONES DE USO
Al final del trabajo, apretar el botón rojo STOP para desconectar la máquina.
Consejo : Por motivos de seguridad, el operario que haga funcionar la divisora hidráulica
debe estar solo en un radio de 1 m alrededor de la máquina y encontrarse delante de la
misma.
.Capacidad : Número de ciclo por hora: 0 a 120 ciclos.
Seguridad : Si se pulsa el freno de urgencia se impide el funcionamiento de la máquina.
MANTENIMIENTO
Después de cada utilización, por un usuario preparado para ello :
Limpieza del interior de la cuba y de la tapa :
1. Ponga la cabeza y los cuchillos en posición baja ;
2. desconecte la toma de corriente de la red ;
3. aspire los excedentes de harina en la cuba, los bordes y los orificios de recuperación de
harina ;
4. Con un paño húmedo, despegue y retire los restos de pasta .
Limpieza de los cuchillos :
1. Ponga la cabeza y los cuchillos en posición baja ;
2. Sostenga el botón blanco y accione la palanca de mando para hacer subir la cabeza y
cuchillos ;
3. desconecte la toma de corriente de la red ;
4. Con un paño húmedo, despegue y retire los restos de pasta de los cuchillos.
Todas las semanas, por un usuario preparado para ello :
Limpieza del exterior de la máquina :
1. Cierre la tapa , pulse el botón de parada de emergencia, y desconecte la toma de corriente ;
2. Lave el conjunto de la carrocería con un paño húmedo;
3. Bandeja de recuperación de harina a vaciar
4. Vuelva a conectar la máquina, y póngala en funcionamiento
No lavar nunca la máquina con chorro de agua
ENTRETIEN
Nettoyage intérieur de la machine :
1. Positionner la tête et les couteaux comme pour le nettoyage des couteaux ;
2. Débrancher la prise de courant du secteur ;
3. Ouvrir les deux portes des cotés, à l'aide d'un tournevis ;
4. Aspirer toutes les parties intérieures de la machine, ainsi que les parties mécaniques ;
5. Refermer les deux portes ;
6. Rebrancher votre machine et remettre en fonctionnement.
Tout les 3 mois, par un utilisateur formé :
Contrôle du niveau d’huile :
1. Mettre la tête en position basse ;
2. Débrancher la prise de courant du secteur ;
3. Ouvrir la porte droite ;
4. Vérifier que le niveau d'huile se trouve entre 4 et 5 cm du bord supérieur du réservoir. Si
nécessaire, ajouter de l'huile hydraulique conforme aux spécifications ;
5. Refermer la porte ;
6. Rebrancher votre machine et remettre en fonctionnement.
Nota :
Pour l’huile plusieurs marques peuvent être utilisées, voici les équivalences :
ELF
ELF
ELFELF
TOTAL
TOTAL
TOTALTOTAL
CASTROL
CASTROL
CASTROLCASTROL
CONDAT
CONDAT
CONDATCONDAT
Hydrelf DS46
Azolla ZS32
Ayspin AWS 46
Hydrolub S46
Chaque année, par un agent agréé :
Vérification des organes de sécurité
Pour la DIV R, changer le joint anti-projection de farine tous les 3 ans (sur base d’une fréquence de 100 cycles journaliers).
48
17
Page 18

PIECES DE RECHANGE
Lors d’une commande d’une pièce de rechange, vérifier avec votre agent agréé de quelle
pièce il s’agit sur base du catalogue de pièces de rechange émis par le fabricant.
Préciser toujours le numéro de machine comme indiqué sur la plaque signalétique.
Votre agent effectue les commandes auprès de JAC.
PROBLEMES
Le moteur ne tourne pas.
Vérifier l'alimentation électrique ;
Contrôler le relais thermique.
Le moteur ronronne mais ne tourne pas.
Contrôler l'alimentation correcte sur les phases.
La machine manque de puissance.
Vérifier le niveau d'huile.
La tête monte mais les couteaux ne sortent pas.
Appeler votre revendeur, réglage de pression du distributeur.
Les pâtons sont mal coupés.
Adapter la pression et contacter votre distributeur.
Présence d’huile au sol.
Débrancher votre machine et contacter votre distributeur.
Faire toujours entretenir sa machine par un agent agréé
au risque de perdre votre garantie.
REGULADO DE LA PRESIÓN
1. Abra :
- Las puertas laterales (DIV) ;
- La trampilla delantera (DIV-R).
2. Gire la manecilla/moleta :
- Hacia la derecha para aumentar la presión ;
- Hacia la izquierda para disminuir la presión.
PELIGRO
En caso de peligro para el usuario o para la máquina, debe utilizar el botón rojo STOP ;
- Retire el enchufe de la toma eléctrica antes de cualquier operación de mantenimiento o
reparación ;
- Cualquier operación de mantenimiento o sustitución de piezas debe ser efectuada por
una persona cualificada ;
- Para que pueda trabajar con total seguridad, cuando la tapa está cerrada, la empuñadura de cierre de la tapa se debe presionar suficientemente y formar un ángulo de
60° como mínimo con respecto al eje de la máquina que se encuentra delante del operador.
INSTRUCCIONES DE USO
Utilice los esquemas de la página 60 para el uso de la máquina.
Al inicio de la jornada, conecte la máquina con el interruptor general o soltando el botón
STOP (si está accionado).
Procedimiento de utilización :
1. Empuje la palanca de mando para hacer descender el conjunto de cabeza y cuchillas.
NB: Si es necesario, enharine ligeramente la parte superior de la cabeza en la cuba ;
2. Vierta la masa en la cuba ;
3. Cierre la tapa ;
4. Tire de la palanca de mando para hacer subir la cabeza y dividir la masa ;
5. Empuje ligeramente la palanca hacia delante para suprimir la presión ;
6. Abra la tapa ;
7. Tire de la palanca de mando para hacer subir la cabeza al máximo y hacer salir las
piezas
.
18
47
Page 19

ADVERTENCIA
- Esta máquina está destinada a los profesionales de la panadería ;
- Debe ser utilizada por una sola persona a la vez. (Salvo que se prescriba lo contrario) ;
- No permita utilizar ni manipular esta máquina a niños ni personas no autorizadas ;
- Debe colocarse y utilizarse en el interior de un local, al abrigo de la humedad y el calor ;
- La máquina debe estar suficientemente despejada para realizar el trabajo ;
- Esta máquina tiene un nivel sonoro inferior a 70 dB(A) de acuerdo con la norma
EN ISO 3744.
- El polvo de harina puede provocar reacciones alérgicas y afecciones respiratorias .
Para disminuir las emisiones de harina, se aconseja :
- de limitar como máximo el espolvoreamiento en la utilización de la máquina ;
- de utilizar en la limpieza , un aspirador profesional, provisto de un flexible y una
cuba antiestática.
CONEXIÓN
- Antes de conectar la máquina a la red, verifique la adecuación de la tensión de servicio de
la máquina (vea la placa de características en la máquina) y la tensión de su red ;
- La conexión de la máquina debe hacerse a través de un enchufe con toma de tierra ;
- La instalación eléctrica que alimenta a la máquina debe estar protegida de la siguiente
manera :
- América del Norte : Protección principal 15A ;
- Resto del mundo : Protección principal 16 A.
- Un fusible debe estar asociado a la toma como se indica abajo :
- 8 Am para una alimentación de 400V trifásica ;
- 12 Am para una alimentación de 230V trifásica.
Nota : Cualquier problema que resulte de otro tipo de conexión será de su responsabilidad
PUESTA EN SERVICIO
- Para la buena estabilidad de la máquina en el lugar de trabajo, verifique que los rodillos
estén bien bloqueados ;
- Antes de utilizar la divisora hidráulica, verifique que el sentido de rotación sea el correcto.
Para ello :
- Abra la tapa y verifique que la cuba esté vacía ;
- Conecte la toma eléctrica de su divisora ;
- Tire de la palanca de mando hacia usted durante 2 segundos ;
- Verifique que la cabeza suba ;
- Si durante este ensayo la cabeza sube, su conexión es correcta. En caso contra
rio, desconecte la toma de corriente e invierta 2 fases en la misma, luego reinicie
este ensayo.
NOTE
…………………………………………………………………………………………………………
…………………………………………………………………………………………………………
…………………………………………………………………………………………………………
…………………………………………………………………………………………………………
…………………………………………………………………………………………………………
…………………………………………………………………………………………………………
…………………………………………………………………………………………………………
…………………………………………………………………………………………………………
…………………………………………………………………………………………………………
…………………………………………………………………………………………………………
…………………………………………………………………………………………………………
…………………………………………………………………………………………………………
…………………………………………………………………………………………………………
…………………………………………………………………………………………………………
46
19
Page 20

Übersetzung der Original-betriebsanleitung
ANTES DE LA PUESTA EN SERVICIO
Usted acaba de adquirir una máquina JAC, le agradecemos su confianza.
Para que su máquina sea completamente satisfactoria a lo largo de los próximos años, le
invitamos a que tenga en cuenta los siguientes consejos:
- Busque la ayuda de su agente autorizado para la instalación, la puesta en servicio y el
seguimiento ;
- Para que le cubra la garantía de 3 años (véanse las condiciones expuestas a continua
ción), su distribuidor debe rellenar el cuaderno de mantenimiento en el momento de la
instalación de la máquina. Este cuaderno de mantenimiento se encuentra al final de
esta nota de uso.
GARANTÍA
JAC ofrece una garantía de 3 años para todos los productos.
Esta garantía cubre el recambio de piezas originales reconocidas como defectuosas y la
instalación gratuita de las mismas por el agente de JAC.
La garantía es efectiva a partir de la fecha de instalación del material.
Bajo las siguientes condiciones restrictivas :
1. Material adquirido en condiciones "normales" ;
2. Instalación efectuada por un agente autorizado ;
3. Utilización del material conforme a las indicaciones de sus instrucciones de uso y de
acuerdo con la finalidad para la que ha sido fabricado ;
4. Material diariamente mantenido de una manera razonable ;
5. Mantenimientos controlados por el agente autorizado conforme a las especificaciones de
mantenimiento con, por lo menos, un mantenimiento al año (mantenimiento a cargo del
usuario). Para ello, la nota consta de una página que permite al agente indicar los dife
rentes mantenimientos.
Si no hay control de mantenimiento por un agente autorizado y/o el cuaderno de
mantenimiento no es rellenado correctamente, la garantía se limita a un año.
6. Utilización exclusiva de piezas originales JAC.
Esta garantía no cubre
1 El recambio de piezas de desgaste normal ;
2. Las piezas no reconocidas como defectuosas por nuestros servicios ;
3. Los problemas que resulten de un uso anormal del material ;
4. Los problemas que resulten de una instalación no realizada por un agente autorizado ;
5. Las piezas o los problemas que resulten de un daño de transporte o de un
mantenimiento inapropiado.
Una reparación y/o un recambio de piezas defectuosas efectuados durante el período de
garantía no tienen como consecuencia la prolongación de dicha garantía.
20
45
Page 21

Traducción del manual original
VOR DER INBETRIEBNAHME
Sie haben eine JAC-Maschine erworben, und wir danken Ihnen für Ihr Vertrauen.
Damit Ihre Maschine Sie in den kommenden Jahren vollkommen zufrieden stellt, bitten wir Sie
darum, sich die nachstehenden Empfehlungen zur Herzen zu nehmen:
- Lassen Sie sich von Ihrem Vertragshändler bei der Montage, der Inbetriebnahme und den
darauffolgenden Schritten helfen ;
- Um in den Vorzug der Dreijahresgarantie zu gelangen (siehe nachstehende Bedingungen), lassen Sie von Ihrem Vertragshändler das Wartungsheft bei der Einrichtung Ihrer
Maschine ausfüllen. Dieses Wartungsheft finden Sie am Ende dieser Betriebsanleitung vor.
GARANTIE
JAC bietet eine Dreijahresgarantie auf all seine Produkte.
Diese Garantie umfasst die Auswechselung von Originalteilen, die für schadhaft befunden
wurden, und deren kostenlosen Einbau seitens des JAC-Vertreters.
Die Garantie beginnt am Tag der Installation des Materials.
Die Garantie ist folgenden einschränkenden Bedingungen unterworfen:
1. Material wurde unter „normalen“ Bedingungen erworben ;
2. Installation durch einen befugten Vertreter ;
3. Benutzung des Materials entsprechend den Bestimmungen der Gebrauchsanweisung
und für den Zweck, für den es hergestellt wurde ;
4. Material wurde täglich instandgehalten laut Anweisungen und mit der Sorgfalt eines
„guten Familienvaters“ ;
5. Die Wartungen wurden vom Vertragsvertreter gemäß den Wartungsspezifikationen vorgenommen, mindestens einmal im Jahr (Wartung zu Lasten des Benutzers). Die Anleitung enthält eine Seite, auf der der Vertragsvertreter die einzelnen Wartungen vermerken
kann ;
In Ermangelung einer Wartung durch einen befugten Vertreter oder wenn das War-
tungsheft nicht ordentlich ausgefüllt ist, ist die Garantie auf ein Jahr beschränkt.
6. Es dürfen ausschließlich Originalteile von JAC verwendet werden.
Diese Garantie deckt nicht folgende Umstände:
1. Die Auswechselung von normalen Verschleißteilen ;
2. Teile, die von unserer Seite nicht für schadhaft befunden wurden ;
3. Schwierigkeiten aufgrund einer zweckfremden Benutzung des Materials ;
4. Schwierigkeiten aufgrund einer Installation, die nicht von einem befugten Vertreter vorgenommen worden war ;
5. Teileschäden oder Schwierigkeiten infolge von Transportschäden oder einer unsachgemäßen Handhabung.
Eine Reparatur und/oder Auswechselung von schadhaften Teilen, die während der Garantielaufzeit stattfand, bewirkt keine Verlängerung der anfänglichen Garantielaufzeit.
44
21
Page 22

SICHERHEITSHINWEISE
- Diese Maschine ist für die Nutzung durch das Bäckereipersonal gedacht ;
- Sie darf ausschließlich von einer Person gleichzeitig bedient werden (sofern nicht anderslautend bestimmt) ;
- Es dürfen keine Kinder oder Unbefugte die Maschine benutzen oder handhaben ;
- Sie muss in einem Raum abgestellt und eingesetzt werden, abseits von Feuchtigkeit und
Hitze ;
- Die Maschine muss ausreichend beleuchtet sein, wenn mit ihr gearbeitet wird ;
- Die Maschine hat einen Lärmpegel unter 70 dB(A) nach der Norm EN ISO 3744 ;
- Mehlstaub kann allergische Reaktionen oder Atemwegbeschwerden verursachen.
Um die Mehlstauberzeugung zu vermeiden oder zu verringern, wird empfohlen :
- die Bemehlung bei der Verwendung der Maschine möglichst einzuschränken ;
- zur Reinigung einen professionellen Staubsauger mit Schlauch und antistati
schem Behälter einzusetzen.
ANSCHLUSS
- Vor dem Anschluss der Maschine ans Stromnetz ist die Übereinstimmung der Betriebs-
spannung der Maschine, die auf dem Typenschild der Maschine steht, mit der Spannung
Ihres Stromnetzes nachzuprüfen ;
- Der Anschluss der Maschine muss auf jeden Fall über einen geerdeten Stecker herge-
stellt werden ;
- Die Elektroinstallation, von der die Maschine gespeist wird, muss folgendermaßen gesi-
chert sein :
- Nordamerika : Hauptsicherung von 15 Ampere ;
- Restliche Welt : Hauptsicherung von 16 Ampere.
- Die Steckdose muss über folgende Sicherung verfügen:
- 8A bei einer Versorgung mit 400 V Drehstrom ;
- 12A bei einer Versorgung mit 230 V Drehstrom.
Hinweis : Jedes Problem infolge einer anderen Anschlussweise wird nicht berücksichtigt.
INBETRIEBNAHME
- Um einen stabilen Stand der Maschine am Arbeitsplatz zu gewährleisten, muss überprüft
werden, ob die Laufrollen ordnungsgemäß blockiert wurden ;
- Vor Verwendung der hydraulischen Teigteilmaschine muss die korrekte Drehrichtung
überprüft werden. Dazu :
- Den Deckel öffnen und überprüfen, ob der Behälter leer ist;
- Die Teigteilmaschine an die Stromversorgung anschließen;
- Den Steuerhebel 2 Sekunden lang auf Sie zu ziehen;
- Prüfen, ob der Kopf sich hebt;
- Wenn sich der Kopf bei diesem Test hebt, ist die Maschine korrekt angeschlossen. Ansonsten den Stecker abziehen und 2 Phasen umkehren, dann den Versuch
wiederholen.
NOTE
…………………………………………………………………………………………………………
…………………………………………………………………………………………………………
…………………………………………………………………………………………………………
…………………………………………………………………………………………………………
…………………………………………………………………………………………………………
…………………………………………………………………………………………………………
…………………………………………………………………………………………………………
…………………………………………………………………………………………………………
…………………………………………………………………………………………………………
…………………………………………………………………………………………………………
…………………………………………………………………………………………………………
…………………………………………………………………………………………………………
…………………………………………………………………………………………………………
…………………………………………………………………………………………………………
22
43
Page 23

PEZZI DI RICAMBIO
Quando si ordina un pezzo di ricambio, verificate con il Vostro agente autorizzato di quale
pezzo si tratta sulla base del catalogo dei pezzi di ricambio redatto dal produttore.
Precisate sempre il numero di serie della macchina come indicato sulla targhetta.
Il Vostro agente invia gli ordini alla JAC.
PROBLEMI
Il motore non gira
Verificare l'alimentazione elettrica ;
Controllare il relè termico ;
Il motore ronza ma non gira
Controllare l’alimentazione corretta sulle fasi
La macchina non ha potenza
.Verificare il livello dell’olio
La testa sale ma le lame non fuoriescono.
Contattare il rivenditore:Regolazione della pressione del distributore.
I pezzi di pasta sono tagliati in modo errato
Adattare la pressione e Contattare il proprio distributore
Presenza d’olio al suolo
Scollegare la macchina, Contattare il proprio distributore
Fate eseguire sempre la manutenzione della vostra machina da un agente
autorizzato!
DRUCKEINSTELLUNG
1. Öffnen:
- Die Seitentüren (DIV) ;
- Die vordere Klappe (DIV-R).
2. Den Griff/das Rad drehen :
- Nach rechts, um den Druck zu erhöhen ;
- Nach links, um den Druck zu senken.
GEFAHREN
- Ziehen Sie das Stromkabel aus der Steckdose vor jeder Instandhaltung oder Wartung
der Maschine ;
- Berühren Sie die Messer nicht, selbst wenn sie still stehen ;
- Um sichere Arbeitsbedingungen zu schaffen, muss bei geschlossenem Deckel der Griff
fest genug gedrückt sein und vom Bediener aus gesehen einen Winkel von mindestens
60° zur Achse der Maschine bilden ;
- Jede Instandhaltung oder Auswechselung von Teilen muss von einer fachkundigen
Person durchgeführt werden.
GEBRAUCHSANWEISUNG
Siehe die Schemata auf der Seite 60 zur Benutzung der Maschine.
Setzen Sie die Maschine vor ihrem Einsatz durch die Betätigung des Hauptschalters im
Innern der Maschine (neben dem Krumenfang) unter Spannung.
Vorgehensweise:
1. Den Steuerhebel betätigen, damit der Kopf mit den Messern sich absenkt.
NB: Gegebenenfalls den Kopf im Behälter leicht mit Mehl bestreuen ;
2. Den Teig in den Behälter geben ;
3. Den Deckel schließen ;
4. Am Steuerhebel ziehen, um den Kopf zu heben und den Teig zu teilen ;
5. Den Hebel kurz nach vorne drücken, um den Druck wegzunehmen ;
6. Den Deckel öffnen ;
7. Am Steuerhebel ziehen, um den Kopf vollständig zu heben und die Teiglinge zu entfer
nen.
42
23
Page 24

MODE GEBRUIKSAANWIJZING
Tipp: Aus Sicherheitsgründen darf sich in einem Umkreis von 1 m um die hydraulische
Teigteilmaschine niemand abgesehen vom Bediener befinden, und dieser muss genau vor
der Maschine stehen
Kapazität : Stündlicher Arbeitstakt: 0 bis 120
Sicherheit : Mit der Betätigung des Not-Aus-Schalters wird die Maschine angehalten.
WARTUNG
Nach jeder Nutzung durch einen geschulten Bediener:
Innenreinigung von Behälter und Deckel :
1. Den Kopf und die Messer in die untere Position bringen ;
2. Den Netzstecker ziehen ;
3. Die Mehlreste im Behälter, an den Rändern und aus den Öffnungen des Mehlfangs
absaugen ;
4. Mit einem feuchten Tuch die Teigreste lösen und entfernen.
Reinigung der Messer :
1. Den Kopf und die Messer in die untere Position bringen ;
2. Halten Sie den weißen Knopf und Am Steuerhebel ziehen, um den Kopf und die Messer zu heben ;
3. Den Stecker abziehen ;
4. Mit einem beölten Tuch die Teigreste auf den Messern lösen und entfernen.
Jede Woche durch einen geschulten Bediener :
Außenreinigung der Maschine :
1. Den Deckel schließen, den Not-Aus-Schalter betätigen und die Stromversorgung ab
trennen ;
2. Den gesamten Aufbau mit einem feuchten Lappen waschen ;
3. Die Maschine wieder ans Netz anschließen und in Betrieb nehmen.
Niemals die Maschine im Wasserstrahl oder –bad reinigen.
MANUTENZIONE
Pulizia interna della macchina :
1. Posizionare la testa ed i coltelli come per la pulizia dei coltelli ;
2. Scollegare la presa di corrente dal settore ;
3. Aprire i due sportelli dai lati con un cacciavite ;
4. Aspirare tutte le parti interne della macchina, nonché le parti meccaniche ;
5. Chiudere nuovamente i due sportelli ;
6. Ricollegare la vostra macchina e rimettere in moto.
Ogni 3 mesi, da parte di un utente adeguatamente formato :
Controllo del livello dell’olio :
1. Mettere la testa in posizione bassa ;
2. Scollegare la presa di corrente dal settore ;
3. Aprire lo sportello destro ;
4. Verificare che il livello dell'olio si trovi tra 4 e 5 cm dal bordo superiore del serbatoio. Se
necessario, aggiungere olio idraulico conforme alle specificazioni ;
5. Richiudere lo sportello ;
6. Ricollegare la vostra macchina e rimettere in moto.
Nota :
È possibile utilizzare diverse marche d’olio, riportiamo di seguito le equivalenze :
ELF
ELF
ELFELF
TOTAL
TOTAL
TOTALTOTAL
CASTROL
CASTROL
CASTROLCASTROL
CONDAT
CONDAT
CONDATCONDAT
Hydrelf DS46
Azolla ZS32
Ayspin AWS 46
Hydrolub S46
Ogni anno, da un agente autorizzato :
Verifica dei dispositivi di sicurezza
Per la DIV R, sostituzionare il giunto ogni 3 anni in caso di frequenza pari a 100 cicli
giornalieri.
24
41
Page 25

ISTRUZIONI PER L’USO
A fine di lavoro, premere sul pulsante rosso STOP per spegnere la macchina.
Consiglio : Per ragioni di sicurezza, l'operatore che addetto alla ripartitrice idraulica deve
trovarsi da solo in un reparto di 1 m intorno alla macchina e deve trovarsi di fronte ad essa.
Capacità : Numero di cicli orario:: da 0 a 120 cicli.
Sicurezza : La pressione sul pulsante di sicurezza impedisce il funzionamento della
macchina ;
MANUTENZIONE
Dopo ogni utilizzo, da parte di utente adeguatamente formato :
Pulizia interna del contenitore e del coperchio :
1. Posizionare la testa e le lame in posizione inferiore ;
2. Scollegare la presa elettrica dalla rete ;
3. Aspirare l'eccedenza nel contenitore, sui bordi e negli orifizi di recupero della farina ;
4. Utilizzando un panno umido, staccare e rimuovere eventuali residui di pasta .
Pulizia delle lame :
1. Posizionare la testa ed i coltelli in posizione bassa ;
2. Tenere premuto il pulsante bianco e tirare la leva di comando per fare salire la testa ed i
coltelli ;
3. Scollegare la presa di corrente ;
4. Con un panno oliato, staccare e togliere i residui di pasta sui coltelli.
Tutte le settimane, da parte di un utente appositamente formato :
Pulizia esterna della macchina :
1. Chiudere il coperchio, premere il pulsante per arresto d'emergenza e scollegare la presa
lettrica ;
2. Lavare il complessivo della carrozzeria utilizzando un panno umido ;
3. Contenitore di recupero farina da svuotare
4. Ricollegare la macchina e riavviarla .
Non lavare mai la macchina con acqua abbondante
ONDERHOUD
Innenreinigung der Maschine :
1. Kopf und Messer wie bei der Reinigung der Messer positionieren ;
2. Den Netzstecker ziehen ;
3. Die beiden Türen an den Seiten mit einem Schraubendreher öffnen ;
4. Alle Innenteile der Maschine sowie die mechanischen Teile staubsaugen ;
5. Die beiden Türen wieder schließen ;
6. Die Maschine wieder ans Netz anschließen und in Betrieb nehmen.
Alle drei Monate durch einen geschulten Benutzer :
Ölstandskontrolle :
1. Den Kopf in die untere Position bringen ;
2. Den Netzstecker ziehen ;
3. Die rechte Tür öffnen ;
4. Überprüfen, ob der Ölstand sich zwischen 4 und 5 cm unter dem oberen Rand des
Behälters befindet. Gegebenenfalls Hydrauliköl gemäß den Spezifikationen nachfüllen
5. Die Tür wieder schließen ;
6. Die Maschine wieder ans Netz anschließen und in Betrieb nehmen.
Hinweis :
Es können verschiedene Ölmarken verwendet werden, hier die Entsprechungen :
ELF
ELF
ELFELF
TOTAL
TOTAL
TOTALTOTAL
CASTROL
CASTROL
CASTROLCASTROL
CONDAT
CONDAT
CONDATCONDAT
Hydrelf DS46
Azolla ZS32
Ayspin AWS 46
Hydrolub S46
Jedes Jahr vom Fachmann :
Überprüfung der Sicherheitselemente
Bei der DIV R die Mehlschutzdichtung alle drei Jahre austauschen (bei 100 Zyklen täglich).
40
25
Page 26

ERSATZTEILE
Sehen Sie bei einer Ersatzteilbestellung gemeinsam mit Ihrem Vertragshändler nach, um
welches Teil es sich handelt. Sehen Sie im Ersatzteilekatalog des Herstellers nach.
Geben Sie immer die Nummer der Maschine, die auf dem Typenschild steht, an.
Ihr Vertragshändler reicht die Bestellung bei JAC ein.
PROBLEM
Motor läuft nicht.
Die Spannungsversorgung nachprüfen.
Das Thermorelais überprüfen.
Motor brummt, aber er läuft nicht.
Korrekte Versorgung der Phasen überprüfen.
Die Maschine bringt nicht genügend Leistung.
Ölstand überprüfen.
Der Kopf hebt sich zwar, aber die Messer kommen nicht heraus.
Rufen Sie Ihren Händler an, Druckeinstellung des Verteilers.
Die Teiglinge sind schlecht geschnitten.
Druck anpassen und den Händler kontaktieren.
Es befindet sich Öl auf dem Boden.
Die Maschine von der Stromversorgung trennen und den Händler kontaktieren.
Die Maschine muss immer von einem befugten Vertreter gewartet werden,
ansonsten verfällt die Garantie.
REGOLAZIONE DELLA PRESSIONE
1. Aprire :
- Gli sportelli dai lati (DIV) ;
- Lo sportellino di fronte (DIV-R).
2. Girare la maniglia/rotella :
- Verso la destra per aumentare la pressione ;
- Verso la sinistra per diminuire la pressione.
PERICOLO
- In caso di pericolo per l’utente o per la macchina, dovrete premere il tasto rosso STOP ;
- Togliere la spina dalla presa elettrica prima di qualsiasi operazione di manutenzione ;
- Qualsiasi operazione di manutenzione o sostituzione dei pezzi deve essere eseguita da
personale qualificato ;
- Per lavorare in tutta sicurezza, quando il coperchio è chiuso, la maniglia di chiusura del
coperchio deve essere spinta a sufficienza e fare un angolo minimo di 60° rispetto
all'asse della macchina che si trova davanti all'operatore.
ISTRUZIONI PER L’USO
Seguite gli schemi a pagina 46 per l’utilizzo della macchina.
All’inizio di giornata, accendere la macchina a mezzo interruttore generale o rilasciando il
tasto STOP (se questo dovesse essere attivato).
Procedura di utilizzo :
1. Spingere la leva di comando per fare abbassare il gruppo testa e coltelli ;
NB : Se occorre, infarinare leggermente la parte superiore della testa nel contenitore ;
2. Versare la pasta nel contenitore ;
3. Chiudere il coperchio ;
4. Tirare la leva di comando per fare salire la testa e dividere la pasta ;
5. Spingere brevemente la leva in avanti per eliminare la pressione ;
6. Aprire il coperchio ;
7. Tirare la leva di comando per fare salire la testa al massimo e fare uscire gli impasti.
26
39
Page 27

AVVERTENZA
- Questa macchina è stata concepita per panettieri specializzati ;
- Deve essere utilizzata da una sola persona per volta. (salvo diversa indicazione) ;
- Non permettere l'utilizzo o la manipolazione della macchina a bambini o persone non
autorizzate ;
- Deve essere conservata e utilizzata all’interno di un locale, al riparo dall’umidità e da fonti di
calore ;
- La macchina deve essere sufficientemente illuminata per eseguire il lavoro ;
- Questa macchina ha un livello sonoro inferiore ai 70 dB(A) conformemente alla norma EN
ISO 3744.
- Le polveri di farina possono provocare reazioni allergiche e affezioni respiratorie.
Per ridurre le emissioni di farina, è consigliato :
- di limitare al massimo la spolveratura nell'utilizzo della macchina ;
- di utilizzare in occasione della pulizia , un aspiratore di tipo professionale, provvisto di
tubo flessibile e di serbatoio antistatico .
COLLEGAMENTI
- Prima di collegare la Vostra macchina alla rete, controllate la rispondenza della tensione di
funzionamento della macchina (vedi targhetta a bordo macchina) con la tensione della
Vostra rete ;
- Il collegamento della macchina deve essere effettuato con un’apposita spina munita di
messa a terra ;
- Il Vostro impianto elettrico che alimenta la macchina deve essere protetto secondo quanto di
seguito indicato :
- America del Nord : Protezione principale 15A ;
- Resto del mondo : Protezione principale 16 A.
- Associare un fusibile alla presa così indicato sotto :
- un fusibile da 8 amp. per un’alimentazione a 400 V trifase ;
- un fusibile da 12 amp. per un’alimentazione a 230 V trifase.
Nota : Qualsiasi problema derivante da un altro tipo di collegamento non è a noi attribuibile.
MESSA IN ESERCIZIO
- Per la buona stabilità della macchina alla postazione di lavoro, verificare che le rotelle siano
state ben bloccate ;
- Prima di utilizzare la vostra ripartitrice idraulica, accertatevi che il senso di rotazione sia
corretto. A tal fine, procedere come segue :
- Aprire il coperchio e verificate che il contenitore sia vuoto ;
- Collegare la presa elettrica della vostra ripartitrice ;
- Trarre la leva di comando verso di voi per 2 secondi ;
- Verificare che la testa salga ;
- Se la testa è salita durante questa prova, la vostra connessione è corretta. In caso
contrario disinserire la presa di corrente ed invertire 2 fasi in questa, poi ricominciare
la stessa prova.
NOTE
…………………………………………………………………………………………………………
…………………………………………………………………………………………………………
…………………………………………………………………………………………………………
…………………………………………………………………………………………………………
…………………………………………………………………………………………………………
…………………………………………………………………………………………………………
…………………………………………………………………………………………………………
…………………………………………………………………………………………………………
…………………………………………………………………………………………………………
…………………………………………………………………………………………………………
…………………………………………………………………………………………………………
…………………………………………………………………………………………………………
…………………………………………………………………………………………………………
…………………………………………………………………………………………………………
38
27
Page 28

Vertaling van de oorspronkelijke gebruiksaanwijzing
28
PRIMA DELLA MESSA IN ESERCIZIO
Avete appena acquistato una macchina JAC e Vi ringraziamo per la fiducia che ci avete
accordato.
Affinché la Vostra macchina vi soddisfi pienamente nel corso dei prossimi anni, Vi invitiamo a
seguire i suggerimenti seguenti :
- FateVi aiutare dal Vostro agente autorizzato per l’installazione, la messa in esercizio ed il
controllo periodico ;
- Per poter beneficiare della garanzia di 3 anni (vedi condizioni indicate in seguito), fate
compilare, al Vostro distributore, il libretto di manutenzione al momento dell’installazione
della Vostra macchina. Il suddetto libretto di manutenzione si trova alla fine delle presenti i
struzioni per l’uso.
GARANZIA
JAC offre una garanzia di 3 anni su tutti i propri prodotti.
Tale garanzia comprende la sostituzione dei pezzi originali rivelatisi difettosi e l’installazione
gratuita degli stessi ad opera dell’agente JAC.
La garanzia decorre a partire dalla data di installazione del macchinario.
Nelle seguenti condizioni restrittive :
1. Macchinario acquistato in condizioni “normali” ;
2. Installazione effettuata da un agente autorizzato ;
3. Utilizzo del materiale secondo le indicazioni di utilizzo e allo scopo per cui è stato
realizzato ;
4. Materiale giornalmente mantenuto secondo “gli standard di riferimento” ;
5. Manutenzioni eseguite dall’agente autorizzato ai sensi delle specifiche di manutenzione
con almeno una manutenzione all'anno (manutenzione a carico dell'utente).
L’informativa comprende, a tal proposito, una pagina che permette all’agente di indicare l
e diverse manutenzioni.
Se non vi è monitoraggio della manutenzione da parte di un agente autorizzato e/o il
libretto delle manutenzioni non è correttamente compilato, la garanzia è limitata ad
un anno.
6. L’utilizzo esclusivo dei pezzi originali JAC.
Questa garanzia non copre
1. La sostituzione di pezzi esposti a normale usura ;
2. I pezzi non riconosciuti come difettosi dai nostri servizi ;
3. I problemi che rilevano da un utilizzo anormale del macchinario ;
4. I problemi che rilevano da un’installazione non effettuata da un agente autorizzato ;
5. I pezzi o i problemi derivanti da un danno durante il trasporto o da una manutenzione
erronea.
Una riparazione e/o una sostituzione dei pezzi difettosi effettuate durante il periodo di
garanzia non dà luogo al prolungamento della suddetta garanzia.
37
Page 29

Traduzione delle istruzioni originali
VOOR DE INBEDRIJFSTELLING
U hebt een machine van JAC aangekocht en wij danken u voor uw vertrouwen.
Opdat uw machine tijdens de volgende jaren volledig zou werken zoals u dat wenst, vragen
wij u kennis te nemen van de volgende raadgevingen:
- Laat u voor de installatie, inbedrijfstelling en opvolging bijstaan door uw officieel erkende
dealer ;
- Om van de garantie van 3 jaar (zie de voorwaarden hierna) te kunnen genieten, moet u
uw dealer het onderhoudsboekje doen invullen tijdens de installatie van uw machine. Dit
onderhoudsboekje vindt u achteraan in deze gebruiksaanwijzing.
GARANTIE
JAC biedt een garantie van 3 jaar op al zijn producten.
Deze garantie omvat de vervanging van defecte originele onderdelen en de gratis installatie
ervan door de dealer van JAC.
De garantie vangt aan op de datum van installatie van het materieel.
Onder de volgende beperkende voorwaarden:
1. Materieel verworven onder “normale” omstandigheden ;
2. Installatie uitgevoerd door een officieel erkende dealer ;
3. Gebruik van het materieel in overeenstemming met de aanwijzingen in de gebruiksaanwij
zing en voor het doel waarvoor het ontworpen is ;
4. Materieel dat dagelijks wordt onderhouden als een “goede huisvader” ;
5. Onderhoud dat opgevolgd wordt door de officieel erkende dealer in overeenstemming met
de onderhoudsspecificaties met minstens één onderhoud per jaar (onderhoud ten laste
van de gebruiker). Te dien einde bevat de gebruiksaanwijzing een pagina waar de dealer
de verschillende onderhoudsbeurten kan registreren.
Bij gebrek aan opvolging van het onderhoud door een officieel erkende dealer en/of in
geval van een foutief ingevuld onderhoudsboekje beperkt de garantie zich tot één jaar.
6. Het uitsluitend gebruiken van originele onderdelen van JAC.
Deze garantie geldt niet voor :
1. De vervanging van onderdelen die aan normale slijtage onderhevig zijn ;
2. De onderdelen die door onze diensten niet als defect erkend worden ;
3. De problemen die het resultaat zijn van een abnormaal gebruik van het materieel ;
4. De problemen die het resultaat zijn van een installatie die niet door een officieel erkende
dealer uitgevoerd werd ;
5. De onderdelen of problemen die het resultaat zijn van transportschade of een onoordeel
kundige goederenbehandeling.
Een herstelling en/of vervanging van defecte onderdelen tijdens de garantieperiode leidt niet
tot de verlenging van de genoemde garantie.
36
29
Page 30

WAARSCHUWING
- Deze machine is voor de bakker bedoeld ;
- Zij mag nooit door meerdere personen tegelijk gebruikt worden. (behoudens andersluidend voorschrift) ;
- Laat nooit kinderen of onbevoegden de machine gebruiken of bedienen ;
- De machine moet opgeslagen en gebruikt worden in een ruimte die beschutting biedt te
gen vochtigheid en warmte ;
- De machine moet voldoende verlicht zijn om ze te kunnen bedienen ;
- Deze machine heeft een geluidsniveau van minder dan 70 dB(A) volgens de norm EN
ISO 3744.
- Meelstof kan een allergische reactie en ademhalingsproblemen veroorzaken .
Om het uitwerpen van meel te verminderen, hij wordt geadviseerd :
- om de verstuiving zoveel mogelijk te beperken bij het gebruik van de machine;
- om bij het schoonmaken te gebruiken, een professionele zuiger te geschieden, die
voorzien is van een flexibele slang en antistatische kuip.
AANSLUITING
- Alvorens uw machine op het net aan te sluiten, dient u de conformiteit tussen de bedrijfsspanning van de machine (zie kenplaat op de machine) en de netspanning na te gaan ;
- De aansluiting van de machine moet geschieden door middel van een geaarde stekker ;
- Uw elektrische installatie die de machine voedt, dient als volgt beschermd te zijn :
- Noord-Amerika : Hoofdzekering van 15 A ;
- Rest van de wereld : Hoofdzekering van 16 A.
- Een zekering aan het stopcontact verbonden te worden zoals hieronder aangegeven
: - bij driefasige 400V voeding een zekering van 8 Am ;
- bij driefasige 230V voeding een zekering van 12 Am .
Opmerking : Elk probleem dat het resultaat is van een ander type van aansluiting, valt ten
uwen laste.
INBEDRIJFSTELLING
- Controleer voor een goede stabiliteit van de machine op de werkplek of de wieltjes ge
blokkeerd zijn ;
- Voordat u de hydraulische verdeler gaat gebruiken, dient u de goede draairichting te cont
roleren. Voer hiertoe de volgende stappen uit :
- Open het deksel en controleer of de kuip leeg is ;
- Steek de stekker van de verdeler in het stopcontact ;
- Haal de besturingshendel 2 seconden naar u toe ;
- Controleer of de kop omhoog gaat ;
- Als de kop bij deze test omhoog gaat, is de aansluiting in orde.
Als dit niet het geval is, haalt u de stekker uit het stopcontact en schakelt u hierin 2
fasen om. Voer vervolgens de test opnieuw uit.
NOTE
…………………………………………………………………………………………………………
…………………………………………………………………………………………………………
…………………………………………………………………………………………………………
…………………………………………………………………………………………………………
…………………………………………………………………………………………………………
…………………………………………………………………………………………………………
…………………………………………………………………………………………………………
…………………………………………………………………………………………………………
…………………………………………………………………………………………………………
…………………………………………………………………………………………………………
…………………………………………………………………………………………………………
…………………………………………………………………………………………………………
…………………………………………………………………………………………………………
…………………………………………………………………………………………………………
30
35
Page 31

RESERVEONDERDELEN
Voor het bestellen van een reserveonderdeel controleert u samen met uw officieel erkende dealer om welk onderdeel het gaat aan de hand van de catalogus met reserveonderdelen uitgegeven door de fabrikant.
Preciseer altijd het machinenummer zoals aangegeven op de kenplaat.
Uw dealer maakt de bestelling over aan JAC.
PROBLEMEN
De motor doet het niet.
Controleer de elektrische voeding ;
Controleer de thermische beveiliging ;
De motor ronkt maar werkt niet
Controleer de juiste voeding op de fasen
De machine heeft niet genoeg power
Controleer het oliepeil
De kop gaat omhoog maar de messen komen niet naar buiten
Neem contact op met uw verkooppunt. Drukregeling bij de distributeur
De deegballen zijn slecht gesneden
Pas de druk aan
Neem contact op met de distributeur
Olie op de vloer
Haal de stekker van de machine uit het stopcontact
Neem contact op met de distributeur
Laat uw machine altijd onderhouden door een officieel erkende dealer!
DRUKREGELING
1. Open :
- De zijdeuren (DIV) ;
- hiertoe het luikje aan de voorkant (DIV-R).
2. Het handvat richten/spoorradje ::
- Naar rechts draaien om de druk te verhogen ;
- Naar links draaien om de druk te verlagen .
GEVAAR
- In geval van gevaar voor de gebruiker of de machine moet u op de rode STOP-knop
drukken ;
- Haal de stekker uit de contactdoos alvorens onderhoudswerken uit te voeren ;
- Alle onderhoudswerken of vervangingen van onderdelen mogen uitsluitend door een
gekwalificeerde werkkracht uitgevoerd worden.
- Om in alle veiligheid te kunnen werken moet het sluitingshandvat van het deksel, wanneer het deksel gesloten is, voldoende uitgeduwd te zijn en een hoek van minimaal 60º
te vertonen ten opzichte van de as van de machine die zich voor de operator bevindt.
GEBRUIKSAANWIJZING
Raadpleeg de schema's op pagina 60 voor het bedienen van de machine.
Aan het begin van de dag zet u de machine onder spanning met behulp van de hoofdschakelaar of door de STOP-knop los te laten (als deze ingeschakeld is).
Bediening :
1. Duw tegen de besturingshendel om de kop plus messen te laten dalen ;
NB : Bestuif zo nodig de bovenkant van de kop in de kuip ;
2. Doe het deeg in de kuip ;
3. Sluit het deksel ;
4. Trek aan de besturingshendel B om de kop zoveel mogelijk omhoog te laten komen en
het deeg verdelen ;
5. Duw de besturingshendel een beetje naar voren om eventuele druk in de kuip te verwijderen ;
6. Open het deksel ;
7. Trek aan de besturingshendel B om de kop zoveel mogelijk omhoog te laten komen en
Haal alle deegballen eruit.
34
31
Page 32

GEBRUIKSAANWIJZING
Nadat het werken beëindigd is, de rode STOP-toets indrukken om de machine uit te schakelen.
Advies : Om veiligheidsredenen dient de operator die aan de hydraulische verdeler werkt,
zich alleen binnen een straal van 1 m rondom de machine te bevinden en en zich tegenover
deze bevinden.
Vermogen : Aantal cycli per uur : 0 tot 120 cycli.
Veiligheid : Het indrukken van de noodstop verhindert de werking van de machine ;
ONDERHOUD
Na ieder gebruik, door een opgeleide gebruiker :
Reiniging binnenkant van de kuip en het deksel :
1. Plaats de kop en de messen in lage stand ;
2. haal de stekker uit het stopcontact ;
3. zuigt u het teveel aan meel in de kuip, op de randen en in de meelopvangopeningen
op;
4. Week met een vochtige doek deegresten .
Reiniging messen :
1. Plaats de kop en de messen in lage stand ;
2. Houd de witte knop en trek aan de besturingshendel B om de kop zoveel mogelijk omhoog te laten komen plus messen ;
3. haal de stekker uit het stopcontact ;
4. Week met een in olie gedrenkte doek deegresten op de messen
.
Alle weken, door een opgeleide gebruiker :
Reiniging buitenkant machine :
1. Sluit het deksel , druk op de noodstopknop en haal de stekker uit het stopcontact ;
2. Was de carrosserie met een vochtige ;
ONDERHOUD
Reiniging binnenkant machine :
1. Zet de kop en de messen zoals voor het schoonmaken van de messen;
2. haal de stekker uit het stopcontact ;
3. Beide zijdeuren openen, met een schroevendraaier ;
4. Zuig alle onderdelen binnen in de machine uit en mechanische onderdelen ;
5. Beide deuren sluiten.;
6. Sluit de machine weer op de stroom aan en zet deze weer in werking .
Alle 3 maand, door een opgeleide gebruiker :
Oliepeilcontrole :
1. Plaats de kop in lage stand ;
2. haal de stekker uit het stopcontact ;
3. De deur van rechterkant openen ;
4. Controleren dat het niveau van olie zich tussen 4 en 5 cm van de hogere kant van het reservoir bevindt. Voeg zo nodig hydraulische olie toe volgens de voorschriften ;
5. De deur sluiten ;
6. Sluit de machine weer op de stroom aan en zet deze weer in werking.
Opmerking :
Als olie kunnen verschillende merken worden gebruikt, zie de equivalenties hieronder:
ELF
ELF
Ieder jaar,
ELFELF
TOTAL
TOTAL
TOTALTOTAL
CASTROL
CASTROL
CASTROLCASTROL
CONDAT
CONDAT
CONDATCONDAT
door een officieel erkende dealer
Hydrelf DS46
Azolla ZS32
Ayspin AWS 46
Hydrolub S46
:
Controle beveiligingsorganen
Voor DIV R, het is raadzaam de pakking bij een gebruik van 100 cycli per dag om de 3 jaar
te vervangen.
32
33
 Loading...