

Page 1

pHATmatik PRO
iZotope, Inc.
pHATmatik PRO
-1-
Page 2

1. Installation.............................................................................. 3
Welcome to pHATmatik PRO ...................................................... 4
About the manual ....................................................................... 4
Requirements ............................................................................. 4
New in 1.1................................................................................... 5
Installing pHATmatik PRO........................................................... 6
Authorization............................................................................... 6
Uninstalling ................................................................................. 6
Support ....................................................................................... 7
2. Getting Started ....................................................................... 8
What is pHATmatik PRO? ........................................................... 9
Tutorial...................................................................................... 11
3. Loop Edit............................................................................... 13
About Loop Edit ........................................................................ 14
Working with slices...................................................................17
Exporting slices......................................................................... 18
Zoom......................................................................................... 19
4. Slice Edit............................................................................... 20
About Slice Edit......................................................................... 21
Multipurpose edit screen.......................................................... 22
5. Channel Master .................................................................... 24
About the Channel Master........................................................ 25
About the LFOs ......................................................................... 26
About the Comb Filter............................................................... 26
Master multipurpose edit......................................................... 27
About the Mod Matrix ............................................................... 28
About Midi Learn and Automation............................................ 29
Manual revision 1.5 April 10, 2005
pHATmatik PRO
-2-
Page 3
1. Installation
pHATmatik PRO
pHATmatik PRO
-3-
-3-
Page 4

Welcome to pHATmatik PRO
Thanks for purchasing pHATmatik PRO.
pHATmatik PRO is the result of nearly a year and a half of research and
development. There were three goals while developing it:
• Make it easy for professional musicians, producers and
engineers to work with loop-based content within their
existing digital audio workstation.
• Free musicians, producers, and engineers from the creative
limitations traditionally imposed by using loop-based content
by eliminating the constraints of tempo, key, and even
timbre.
• Above all else, create a truly musical instrument… a way to
interact with and ‘perform’ loop based content that is a
means of creative expression, not simply another ‘toy’ for the
studio.
Have fun and enjoy making music with pHATmatik PRO!
About the manual
This manual covers the concepts and operation of pHATmatik
PRO v 1.1. Always be sure to check for updates
www.izotope.com.
All the screenshots in this manual are from the Windows
version of pHATmatik PRO. The Mac and Windows versions
of pHATmatik PRO are nearly identical in terms of Musician
User Interface, but we’ll be sure to point out wherever things
are different for Mac musicians.
Translations of this manual may be downloaded from our web
site at http://www.izotope.com/phatmatik/
at
Requirements
• Mac OS X – Audio Unit or VST compatible host
application, G3 333, 128 MB RAM
• Windows XP/2000 – VST 2.0 compatible host
application, PIII 450, 128 MB RAM
pHATmatik PRO
-4-
Page 5

New in 1.1
• Support for Mac OS X Audio Units and VST
• Support for saving and loading pHATfiles. Now you
can store and retrieve all your slice and tempo
settings right along with your loop in an industrystandard .WAV file!
• New ‘trim loop’ features allow you to remove leading
and trailing audio data in your loops. You no longer
have to switch to an external editor to get rid of those
extra downbeats!
• Improved loop browser with preview and favorites
(natively on OS X) makes navigating even the largest
loop library a breeze.
• In addition to automatic transient detection for slicing,
you can now also tell pHATmatik PRO™ to slice on 16
nd
or 32
notes.
• Per-slice switchable one-shot mode.
• Midi trigger export files can now optionally have midi
velocity interpolated from each slice’s RMS value.
Perfect for creating groove templates!
th
pHATmatik PRO
-5-
Page 6

Installing pHATmatik PRO
Installing pHATmatik PRO is simple:
FOR MAC OS X Audio Unit:
1. Mount the pHATmatik PRO AU.dmg file by double-
clicking on it.
2. Drag the pHATmatik PRO.component file from the
mounted volume to either /Library/Audio/PlugIns/Components/ or <your home
directory>/Library/Audio/Plug-Ins/Components/.
FOR MAC OS X VST:
1. Mount the pHATmatik PRO VST.dmg file by double-
clicking on it.
2. Drag the pHATmatik PRO.vst file from the mounted
volume to either /Library/Audio/Plug-Ins/VST/ or
<your home directory>/Library/Audio/Plug-Ins/VST/.
FOR PC:
1. Run the installer
2. The installer will choose a default installation location
for the documentation and the pHATmatik PRO dll and
ask you if you’d like to install to a different directory.
Note that the installer checks to see if you have a VST
Plugins directory entry in the Windows registry and
copies the dll there if it’s found. If the installer
doesn’t automatically detect your host’s VST Plugins
directory, you can simply manually copy the
PhatmatikPROVST.dll file from the installation location
to your host’s plugin folder.
Authorization
The first time you run pHATmatik PRO, you’ll be asked to enter
your serial number. Simply enter the serial number included in
the pHATmatik PRO box (or in your registration e-mail if you
purchased pHATmatik PRO directly via download). Save your
serial number in a safe place! You need it each time you
install the software.
Uninstalling
FOR MAC:
1. Simply delete the component/vst/plug in file
you copied during installation.
2. Optionally, delete ‘pHATmatik PRO
Preferences’ from your preferences folder.
FOR PC:
To uninstall pHATmatik PRO, simply go to the Windows
Control Panel, select ‘Add/Remove Programs’ and select
pHATmatik PRO from the list of installed programs. The
uninstaller will remove all files copied during installation.
Note: The installer won’t uninstall the pHATmatik
PRO dll from your host’s folder if you manually
copied it there after installation.
pHATmatik PRO
-6-
Page 7

Support
You can always get support at www.izotope.com/support/.
There, you will find our searchable knowledge base and
frequently asked questions.
If you your question is not already answered in our
knowledgebase, you can submit questions through the online
form for additional support.
pHATmatik PRO
-7-
Page 8

2. Getting Started
pHATmatik PRO
-8-
Page 9

What is pHATmatik PRO?
pHATmatik PRO is a completely new type of virtual
instrument… it’s not a synth and it’s not a sampler,
but it’s a little bit of both, too. If you’ve never
worked with loop slicing tools before, expect to
spend a little time wrapping your head around
pHATmatik PRO. This manual and our support site
at
http://www.izotope.com/support are your
friends.
In order to explain pHATmatik PRO, we have to spend a little
time explaining its core feature: beat slicing.
Every audio file contains essentially two types of data:
Sound information, the individual sounds that make up a
sound file, or the what of the audio, and timing information,
the when of the audio.
To illustrate, let’s look at the waveform of a single snare
drum hit
And then at a simple drum pattern:
Notice the snare is set to be triggered on the two and four,
with an accent on the three’s ‘and’. Now if we use that
pattern to trigger a drum kit with the snare sound depicted
in the first figure, we might have a loop that looks something
like this:
Note that the sound information (the individual sounds of
the drum instruments) and the timing information (from our
midi pattern above) are now encoded into a single audio
stream.
Now, this is fundamentally how music works: the encoding
of various timbres with rhythmic and harmonic data. The
problem with audio is, once it’s ‘encoded’ it’s difficult to
work with either the sounds or the timing/harmonic data
separately.
If, for instance, we recorded our scenario above at a tempo
of 120 bpm, and then later wanted to use the loop in a
project at 140 bpm, the only solution is to play the loop back
faster… which has the annoying side effect of making the
pitch higher as well. Likewise, if our example were harmonic
data, say a bass guitar loop, recorded in the key of ‘C’ and
we later wanted to use this loop in a project that is in the
key of ‘F’, the only way we could do it would be to speed up
the audio the corresponding amount to get the desired
change in pitch. Of course, now the loop will be shorter, and
won’t play back in time.
It’s clear then, that we need a way to decode the original
timing and sound information from an audio loop. That’s
what beat slicing accomplishes.
pHATmatik PRO
-9-
Page 10

If we look again at the waveform of our loop, we see a
pattern of transients corresponding to the individual hits in
our loop. These transients correspond to the rhythmic
content of the loop and, via sophisticated software analysis,
we can extract the original timing information of the loop.
The transients further act as ‘sound markers’ delineating
where individual timbres begin and end within the loop.
Once again, software can quickly analyze these transients
and break the waveform into its constituent sounds.
Once we’ve performed these two analyses and have our
timing data and our sound data separated, we have
unlimited freedom in editing the loop:
• We can change the pitch of the audio (or individual
slices) without affecting the length.
• We can play the timing info back slower or faster
(as a midi sequence) without affecting the timbre
of the audio. You can even gradually change
tempo and the loop will follow.
These two features alone are a powerful tool: Audio content
no longer needs to be in the key or the tempo you need it in!
Simply slice it up and make any adjustments you need. But
that’s just the beginning of the creative possibilities….
• Create completely new content from existing loops.
Since the timing information is in a malleable
format (MIDI), you can create fills, correct timing,
or even pitch correct individual syllables of a vocal
performance with affecting its rhythmic feel
• Mixing freedom. Ever wondered how you were
going to add a little reverb to the snare in that
killer loop without washing out the hats and kick?
Now that all your sounds are isolated, it’s no
problem.
In the past, to utilize beat-slicing, musicians had to interrupt
their creative workflow, switch to another app, deal with
confusing, poorly supported proprietary file formats, sample
dump transfer or any number of other hurdles seemingly
designed to halt the creative process. pHATmatik PRO
provides you with the only beat slicing technology that drops
right into your creative environment as a Musical
Instrument, ready to respond to your creative whims
instantly. pHATmatik PRO does everything you’ve just read
about better, faster, and more intuitively than any other tool
on the market. And much, much more as you’ll see…
Now that you’re in the loop, let’s have some fun…
pHATmatik PRO
-10-
Page 11

Tutorial
Let’s get started by loading up an instance of pHATmatik
PRO in your host.
to be found in the ‘free loops’ folder on the CD-ROM.
While you can theoretically load any audio into
pHATmatik PRO, it generally makes sense to load
loops that are four bars or less, since pHATmatik
PRO can only trigger 80 slices.
2. Enable loop preview by un-muting the speaker button in
the file browser’s toolbar (In OS X check ‘Auto-Preview’):
pHATmatik PRO launches ready to go. The first thing you’ll
need to do is load a loop, so open pHATmatik PRO’s file
browser using the file button in the toolbar:
MAC OS X: pHATmatik PRO for Mac OS X doesn’t use the
custom file browser, but rather the excellent standard Mac
OS X Navigation Services File Dialogs.
The file button toggles the file browser open
pHATmatik PRO’s custom file
browser opens. The file
browser is a little different
than what you’re used to, but
it’s that way for a reason! It’s
custom-designed to make
working with large numbers of
loops super-easy!
1. Navigate to a folder with
a loop you’d like to work
with. If you purchased
the boxed version of
pHATmatik PRO, there
are many excellent loops
Note: You can leave loop preview enabled and
quickly move through an entire directory of loops,
previewing each against your arrangement.
(future versions of pHATmatik PRO will actually
preview files at the host tempo and in sync with
the transport!)
3. Once you’ve previewed the loop, double click on its
name in the lower file pane to load it into the slice
editor.
4. Close the file browser by clicking on the file icon in the
toolbar again.
5. To slice your loop, simply adjust the sensitivity slider
and press the ‘do slice’ button in pHATmatik PRO’s
toolbar:
6. We’ll get more into the slice editing features later in
this manual… for now, notice that the loop has been
divided up into ‘slices’ and that each ‘slice’ has a
corresponding midi note.
7. If you have a midi keyboard connected to your DAW,
you can trigger the slices using your keyboard! Simply
pHATmatik PRO
-11-
Page 12

set up your keyboard/host to deliver midi on track 1 to
pHATmatik PRO and check it out. Instant drum kit!
8. You can also preview individual slices directly from
pHATmatik PRO’s MUI: simply hold down the [SHIFT]
key and click on a slice in the waveform display.
9. Preview the loop at the host’s tempo by pressing the
‘play preview’ button in pHATmatik PRO’s toolbar.
Play Preview works in two modes: when the host’s transport
is stopped, play preview plays the current channel’s loop at
the host’s tempo. When the host’s transport is engaged
(i.e., when the song is playing) play preview will play back
the loop at the host’s tempo –AND- phase locked to the
host’s bar/beat position.
10. If you want to recreate the original loop in your
arrangement, you’re going to want to get the timing
information from your loop into your song as midi data
triggering pHATmatik PRO. I’ll show you two ways to do
it.
11. a) Click on the midi export button. A standard file
dialog pops up asking you what name you’d like to give
the exported midi file.
14. Now ensure the track you just imported/dragged the
midi to is set to send midi to pHATmatik PRO, press ‘play’ in
your host and you’ll hear the original loop at your host’s
tempo! Change your host’s tempo and the loop will follow
the changes seamlessly. With the midi loaded into your
sequencer, you could now edit the midi to create fills,
quantize the midi to create a different feel for the loop, or
simply scrap the midi data altogether and create a new loop
from scratch with the old loop’s sounds!
It’s up to you… you’re in the loop.
As you’ve probably guessed, this tutorial has only scratched
the surface of what’s possible with pHATmatik PRO. We
recommend you spend some quality time with the
remainder of this manual to familiarize yourself with the
deeper features, but it’s certainly not a requirement. With
these basics, you can simply experiment with all the knobs
in the slice and master section and get right on to having
fun.
Then use your hosts’ midi import feature to import the file
you just exported.
12. b) -OR- You can do it the easy way! Simply press the
[OPTION/ALT] key, click on the midi export button, and
drag the midi to your hosts’ arrange page!
pHATmatik PRO
-12-
Page 13

3. Loop Edit
pHATmatik PRO
-13-
Page 14

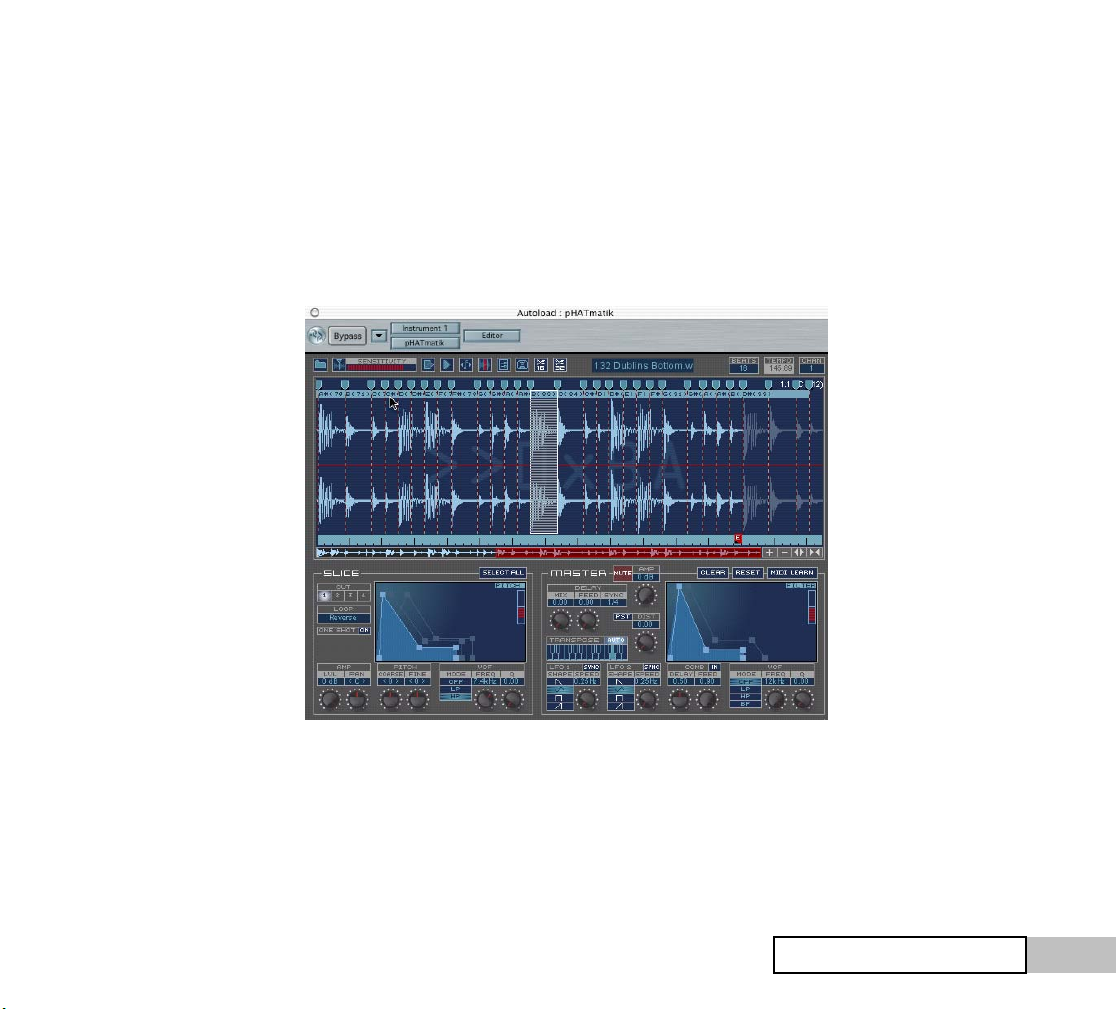
About Loop Edit
The top half of pHATmatik PRO’s user interface coupled with
the file browser is where you’ll do most of your work loading
and editing loops. It was designed to be very fast to use,
and so some of the features aren’t immediately apparent
and rely on keyboard shortcuts instead of ‘mouse marathon’
back and forth clicking.
Let’s start off by going through all of the components of the
loop edit interface:
Loop Browser Button - this toggles pHATmatik PRO’s
custom loop browser (standard file dialog on OS X) open and
closed.
Do Slice Button – this button will engage pHATmatik
PRO’s sophisticated auto-slice detection engine and slice up
the currently loaded loop with the current sensitivity
settings.
When you slice your loop, each slice will automatically be
assigned a midi note,
Note: this will erase any slices that you currently have in
your loop!
Sensitivity Slider - this determines how
picky pHATmatik PRO’s auto-detection algorithm is when
slicing up a loop. Generally, a higher setting (further to the
right) will result in more slices.
Midi Export – this button allows you to export the
timing information of your groove to a standard midi file
suitable for import into your host application. The button
works in two ways:
1. You can simply click on it and a standard file save
prompt will ask you where you’d like to save the
file. After choosing a location, use your
sequencer’s ‘import midi file’ feature to load the
file and trigger pHATmatik PRO.
2. You can press [OPTION/ALT] and then click on the
midi export button and drag the midi timing
information to your host’s arrange page. This is an
extremely easy and streamlined way to work.
Play Preview Button – clicking on this button has a
different effect depending on the current state of the
host:
1. If the host isn’t playing. This button will play the
current loop at the host’s tempo. This is great for
quickly previewing your slice settings, filters,
envelopes, etc.
2. If the host is playing. This button will play the
current loop at the host’s tempo phase locked to
bar/beat position. This is great for previewing the
loop against your arrangement. Note: this works
well in most host applications, but is intended as a
preview feature only… occasionally a bar will drop
out.
If you change slice positions while play preview is engaged,
it will take some time for the changes to be reflected in what
you’re hearing. Best to stop play preview and start it again.
This will refresh the internal sequencer and let you hear
your changes immediately.
Midi Selects Slice Button - when this button is engaged,
incoming midi will select the current slice, just as if you had
clicked on the slice with your mouse. This is very useful for
quickly switching between slices when editing per-slice
parameters.
pHATmatik PRO
-14-
Page 15

If midi selects slice is engaged and you have multiple slices
selected, the next incoming midi note will clear the
selection, leaving only the triggered slice selected.
Midi Animate Button - When this button is engaged,
incoming midi will briefly flash a slice red. This is helpful in
determining which slice is making what sound.
Tip: turn the studio lights down low, export the loop’s midi,
engage ‘midi animate’, then sit back and enjoy the light
show. It’s quite fun to watch!
Preferences Button – When this button is pressed, the
pHATmatik PRO preferences dialog will be displayed. The
preferences are straightforward:
1. Favorites. Specify up to five folders for ‘quick
navigation’ in the custom loop browser. Note that
in Mac OS X, you should use the Finder’s Favorites
feature instead.
2. Sample Export Directory. Specify the directory
where pHATmatik PRO will place audio files for
slices exported via drag and drop.
3. Knob Style. Choose whether you like circular or
linear (slider-style) mouse-interaction with
pHATmatik PRO’s knobs.
4. Export Midi Velocity. When checked, exported midi
files will have velocity corresponding to the
‘loudness’ of the corresponding audio for each
slice. This is really only useful for extracting
‘groove templates’ from a loop, as using a midi file
exported with this option engaged to trigger the
source loop sounds very strange!
Save as pHATfile Button – Clicking on this button will
open a standard ‘Save As…’ dialog for saving the current
loop as a new pHATfile. A pHATfile is simply a standard 24-
bit .WAV file with additional headers describing the tempo
and slice points of a sliced file. If you subsequently load a
pHATfile from pHATmatik PRO’s browser, all the slice and
tempo information will be intact. This also lets you transfer
slice information to other applications and virtual
instruments that support pHATfiles.
Slice on Metric Value Buttons – Clicking on these
buttons will ignore transient information in the loop and
instead place slice markers on every 16
th
or 32nd note,
respectively.
The placement of slice markers when you slice on
metric values is dependent on the current number
of beats and tempo. In order for the markers to
be placed correctly, the ‘Beats’ setting (see next
section) must be accurate for the current loop.
Tip: you can slice on metric values other than 16
or 32 by ‘fudging’ the beats value. For example, if
the loop actually has 8 beats (2 bars), you can
place slice markers on every 64
th
note by
temporarily changing the number of beats to 4 and
clicking on the ‘32
nd
Note Slice’ button.
Beats entry/display – This field displays the beats
in the current loop. If you’ve loaded a pHAT file or ACIDized
wav file, this will be set to the actual number of beats in the
file. If not, pHATmatik PRO makes an educated guess
(which is always four) and calculates the tempo of the loop
based on the number of beats and the length of the file.
To change the number of beats, simply click in the blue area
and type in the new number of beats.
If your loop isn’t four beats long, you MUST enter the correct
number of beats into this field before exporting midi or
pHATmatik PRO
-15-
Page 16

engaging play preview. Otherwise, pHATmatik PRO will
calculate the tempo of your loop incorrectly and will not be
able to match it to the host’s tempo in a sensible fashion.
Tempo display – This field displays the currently
calculated tempo. Note that you can’t change this
manually… you must change the number of beats in order to
change the tempo.
Channel select control – this display tells you which
of pHATmatik PRO’s 16 channels you’re currently working
on. Each of pHATmatik’s 16 slots corresponds to the same
midi channel. So if you’re working on channel 3 in
pHATmatik PRO, you want to make sure that the
corresponding track in your host application is also set to
send midi to pHATmatik PRO on channel 3.
To change the current channel simply click in the blue area
of the channel select control and select the channel from
the drop down.
REMEMBER: All of pHATmatik PRO’s controls correspond to
the current channel. If you ‘re making tweaks and you don’t
hear what you expect to, check to make sure you’re making
the tweaks in the right channel.
pHATmatik PRO
-16-
Page 17

Working with slices
Although pHATmatik PRO’s automatic transient detection is
the best available, you may still want to edit the slice
markers manually. pHATmatik PRO makes this painless.
5. Selecting a slice – to select a slice for editing in the
slice editor, simply click on it. The selected slice gets a
white overlay to indicate that it’s selected.
6. Selecting multiple slices – to add additional slices to
the current selection, hold down the [CTRL] key and
click on the slice you’d like to add. Holding down the
[CTRL] key and clicking on an already selected slice will
remove it from the selection.
The marker lane
1. Moving a slice - to move a slice, simply click on its
marker and drag it where you would like it.
2. Deleting a slice – to delete a slice, simply hold
down [ALT/OPTION] and click on the slices marker.
Note that this cannot be undone.
3. Creating a new slice - to create a new slice, simply
hold down [ALT/OPTION] and click in the marker
lane where you’d like the new slice marker to
appear. A dark grey vertical line appears to let you
know where the slice will be when you release the
mouse button.
4. Previewing a slice - to hear a slice along with all of
its settings, press the [SHIFT] key and click on the
slice in the waveform display.
Previewing a slice works just like striking a midi key…
as long as you hold down the mouse button (or the shift
key) the slice will sound. When you release the mouse
button, a note-off is sent to the sounding voice. This is
extremely useful for previewing envelope and loop
settings.
7. Selecting all slices – to select all slices
quickly, click on the ‘select all’ button in
the slice editor.
8. Trimming The Loop – Sometimes, you’ll load a loop that
has extra audio at the beginning or end of the file. This
is very common in loop libraries that come
on Audio CD – many times the loop will have
the first downbeat of the next bar. To ‘trim’
the loop, simply move the start or end
markers located in the ruler lane so that the
audio you’d like to crop is dimmed in the
display. The start marker snaps to the
nearest slice marker when moved, while the
end marker moves freely for finding the perfect loop
point.
HINT: When trimming a loop with known tempo
that has an extra downbeat at the end, watch the
tempo display while you drag the end marker to
the left. When the tempo display matches the
pHATmatik PRO
-17-
Page 18

loop’s documented tempo, you’ve found the right
spot.
Exporting slices
pHATmatik PRO gives you the ability to quickly export slices
to another application or plugin via drag + drop.
1. Select the slices you’d like to export by holding
down the [CTRL] key and clicking on them with the
mouse.
2. Hold down the [ALT/OPTION] key, click anywhere in
the waveform display, and drag the slices to the
application you’d like to export them to. Different
applications and plugins support drag and drop
differently, consult the target application’s
documentation for more information.
When you export slices via drag and drop, the audio files are
placed in the folder specified in the ’Sample Export
Directory’ in pHATmatik PRO’s preferences.
pHATmatik PRO
-18-
Page 19

Zoom
If you need to get a closer look at your loop’s waveform
simply use the zoom buttons in the lower right corner of the
loop edit window:
Zoom in
When you’re zoomed in, you can use pHATmatik PRO’s
zoom scroller to move around the loop in the wave editor. A
miniature view of the loop’s waveform is super-imposed on
the background of the zoom scroller.
Zoom Out
Max Zoom
Min Zoom
pHATmatik PRO
-19-
Page 20

4. Slice Edit
pHATmatik PRO
pHATmatik PRO
-20-
-20-
Page 21

About Slice Edit
pHATmatik PRO has a multitude of per-slice options. Each
slice can be panned, pitched, filtered, looped, reversed
independently of other slices. Thanks to the abundant
features available to you in the per-slice edit window, you
can treat each slice in your loop as a fully-independent
oscillator.
Slice output selector – each slice in each of
pHATmatik PRO’s sixteen channels can be independently
routed to any of pHATmatik PRO’s four stereo outs. This is
useful if you want to route all of the snare hits in your loop
to a different channel in your host to add reverb without
affecting the rest of the loop. If multiple slices are selected
when this control is clicked, all of the slices will be routed to
the specified output.
Slice loop mode selector - this
control allows you to switch the slice
between an of five looping modes:
1. Forward – the slice plays
normally from start to finish
and stops.
2. Reverse – the slice plays
backwards from it’s end to it’s beginning and stops
3. Forward loop – the slice plays the area between the
start and end loop points (see page 23) continuously as
long as a key is held, moving forward through the
samples.
4. Reverse loop – the slice plays the area between the
start and end loop points (see page 23) continuously as
long as a key is held, moving backwards through the
samples.
5. Alternate between forward and reverse loops,
beginning with forward.
6. Alternate between reverse and forward looping,
beginning with reverse.
If multiple slices are selected when the loop mode is
changed, all of the slices will receive the new loop mode
settings.
Amp Level – controls the volume level of
the slice. Note that there is no gain, only
attenuation.
Amp Pan – places the slice in the stereo
field. Note that for stereo loops, this is
true stereo panning, and so may cause
clipping when panned hard left or right. If this happens,
reduce the Amp Level control until the clipping stops.
Pitch coarse and fine – adjusts the pitch
of the slice. Display in cents.
Per slice filter – each slice has it’s own
resonant highpass/lowpass 12dB filter.
One-shot - each slice can be switched
into one-shot mode. In One-shot mode,
the slice will ignore note-off messages
and play to the end of its sample. If the
slice is in a looping mode, the one-shot
mode button won’t engage.
pHATmatik PRO
-21-
Page 22

Multipurpose edit screen
In Order to maximize the utilization of your limited screen
real estate, pHATmatik PRO uses a multipurpose edit
display in both the Slice and Channel Master sections.
Getting familiar with the operation of this screen and it’s
options is key to becoming a pHATmatik PRO poweruser.
It’s really simple once you get the basic concept.
To switch between different screens in the multipurpose
editor, simply click on the screen’s function name in the
upper right hand corner. This will cycle you to the next edit
screen until you come back round to the first one again.
In the Slice multipurpose edit screen, the available screens
in order are:
Amp Envelope (pictured above) - a standard ADSR envelope
that controls the amplitude output of the slice. Note that
each slice’s amp envelope is independent of the others. If
you want to change the amp envelope for all slices, simply
select them all, and then adjust the amp envelope. (This
applies to all the envelopes in the per edit section).
Filter Envelope – a standard ADSR envelope modulating the
slice’s filter cutoff frequency. Note that the filter envelop
has an addition ‘amount’ bipolar slider on the right side of
the screen. This determines to what degree and in which
direction the envelope’s modulation will affect the filter’s
cutoff frequency. To change the amount, simply click and
drag in the amount slider. The amount slider can be reset
to ‘no modulation’ (the center position) by holding down the
[CTRL] key and clicking anywhere in the slider. This
envelope can be edited for multiply selected slices.
Pitch Envelope – a standard ADSR envelope envelope
modulating the slice’s playback pitch. Note that, like the
filter envelope, the pitch envelope has a bipolar amount
control that determines the degree and in which direction
the envelope’s modulation affects pitch. To change the
amount, simply click and drag in the amount slider. The
amount slider can be reset to ‘no modulation’ (the center
position) by holding down the [CTRL] key and clicking
anywhere in the slider. This envelope can be edited for
multiply selected slices.
pHATmatik PRO
-22-
Page 23

Loop start and end edit – This screen allows you to adjust
the slice’s loop points (see the description of the playback
modes above). To move the loop points, simply click and
drag on the large red square marker handles.
Loop points are absolute and therefore cannot be edited for
multiply selected slices. If you edit the loop points while
more than one slice is selected, only the first selected
slice’s loop points will be changed.
pHATmatik PRO
-23-
Page 24

5. Channel Master
pHATmatik PRO
pHATmatik PRO
-24-
-24-
Page 25

About the Channel Master
pHATmatik PRO’s channel master section provides
enormous power in shaping the sound of your loop. With
tempo-synced LFOs that go into the audio range, a superhorrible distortion, spacey comb filter, sweet analogmodeled multimode filter and more, a single loop can
generate countless variations effortlessly.
Mute button - this button stops all output from the
channel. It’s post-everything.
Clear button – This button unloads the current
channel’s loop, freeing up memory.
Reset button – This button resets all of the
parameters in the master and slice section to
their default values. Perfect for when your tweaking gets
out of control.
Amp knob – controls the output level of the
channel. Note there’s no gain, only
attenuation.
The amp knob is automatable via midi cc
Tempo-synced delay – this is a
straightforward tempo-synced
delay with settings for
1. Mix – how much of the delay
2. Feed - How much each iteration of the delay attenuates
signal in the delay buffer. Note that pHATmatik PRO’s
delay supports full feedback. You’ve been warned.
signal is present in the
channel master output.
3. Sync – The length of the delay buffer. pHATmatik
PRO’s tempo delay offers up a huge number of
musically useful synchronization values. To select the
synchronization amount, click in the
blue area underneath ‘SYNC’… a
pop-up menu will appear displaying
all of the synchronization options.
Select the desired note value.
The mix and feed knobs are automatable via midi cc.
Distortion – does what it says – distorts your output. The
single control affects the amount of the distortion from
‘none’ to ‘subtle’ to ‘make it stop! It hurts!’. The distortion
is switchable pre/post vcf via the ‘PST/PRE’ switch to the
left of the knob.
The distortion amount is automatable via midi cc.
Transpose – this control lets you modify
the pitch of the loop by musically useful
values, namely half steps. The center
‘C’ note of the control is ‘no transpose’ with the keys below
and above indicating the appropriate amount of
transposition.
Note: you can control the transpose function easily from
your midi keyboard! The keys on the transpose control
respond to midi note numbers 24 – 47 with midi note
number 36 corresponding to ‘no transpose’. This is very
useful when working with harmonic loops like bass lines.
(or banjo!)
You can temporarily disengage this feature if you find that
you inadvertently transpose by hitting one of the
transposition keys in your midi keyboard, or your
sequencer’s piano roll. Click on the ‘Auto’ button above the
transpose keyboard to toggle the feature on and off. Note
that this is a temporary setting and is not saved with the
song file or in the preferences.
pHATmatik PRO
-25-
Page 26

About the LFOs
pHATmatik PRO sports two advanced sample accurate
tempo-syncable Low Frequency Oscillators that can also
reach well into the audio range in non-sync mode.
LFO in ‘sync’ mode – place one of
pHATmatik PRO’s two LFOs into sync
mode by clicking on the ‘sync’ button in
the upper right hand corner of the LFO.
Select a waveform from the ‘SHAPE’
column. There are four choices, saw, sine, square and ramp
(reverse saw).
To change the desired synchronization division, click
anywhere in the blue area below ‘SPEED’. A pop-up menu
with the available synchronization values will appear. Select
the desired setting from the menu.
pHATmatik PRO’s LFOs are sample-accurate when they’re
synchronized to tempo. This means that your settings will
always sound the same and will always lock instantly to
wherever you start playback. This is invaluable when
working with slow synchronization settings (e.g. 8 bars)…
However, note that if your host is looping in an area shorter
than the current synchronization setting that the lfo will
‘reset’ each time the transport loops.
LFO in ‘free wheel’ mode – place one
of pHATmatik PRO’s two LFOs into
freewheel mode by clicking the ‘sync’
button in the upper right hand corner
of the LFO.
Select a waveform from the ‘SHAPE’
column. There are four choices: saw, sine, square and
ramp (reverse saw).
To change the frequency of the LFO, turn the ‘SPEED’ knob
to the desired frequency.
NOTE: if you’re new to this, LFOs don’t make any sound of
their own… instead they’re used to modulate other
parameters. Kind of like a very steady second (and third!)
pair of hands. We’ll find out more about how to make the
LFOs useful when we discuss the mod matrix further down.
The LFOs speed knob is automatable via midi cc in
‘freewheel’mode
About the Comb Filter
Comb filters sound great on drums!
A comb filter is a very short delay (<
250 ms) with variable feedback that
gives a metallic, alien vibe to everything
you pass through it. No one can
describe it to you. You have to hear it
for yourself.
The comb filter is made up of three controls:
In switch – essentially the ‘on’ button. When the in switch is
lit, the comb filter is switched into the signal path and
affecting the output.
Delay knob – controls the length of the comb filter’s buffer.
At settings between 0.50 and 0.90, takes on a tuned
metallic quality at high feedback settings.
The Comb Filter delay knob is automatable via midi cc.
Feedback knob – controls how quickly signal in the comb
filter’s buffer is attenuated down to zero. Useful to think of
this as an ‘amount’ control.
pHATmatik PRO
-26-
Page 27

The Comb Filter feedback knob is automatable via midi cc.
Master multipurpose edit
The channel master’s multipurpose edit screen provides
access to three master functions. The master pitch and
filter envelopes, and the super-powerful modulation matrix.
Master pitch envelope - a standard ADSR envelope
envelope modulating the master playback pitch.
To adjust the envelope, simply click on one of the
envelope’s handles and drag.
Note that, like the filter envelope, the pitch envelope has a
bipolar amount control that determines the degree and in
which direction the envelope’s modulation affects pitch. To
change the amount, simply click and drag in the amount
slider. The amount slider can be reset to ‘no modulation’
(the center position) by holding down the [CTRL] key and
clicking anywhere in the slider.
All envelope handles and the amount slider are
automatable via midi cc.
pHATmatik PRO
-27-
Page 28

About the Mod Matrix
Master filter envelope - a standard ADSR envelope
modulating the master filter cutoff frequency.
To adjust the envelope, simply click on one of the
envelope’s handles and drag.
Note that the filter envelope has an ‘amount’ bipolar slider
on the right side of the screen. This determines to what
degree and in which direction the envelope’s modulation will
affect the filter’s cutoff frequency. To change the amount,
simply click and drag in the amount slider. The amount
slider can be reset to ‘no modulation’ (the center position)
by holding down the [CTRL] key and clicking anywhere in the
slider.
All envelope handles and the amount slider are automatable
via midi cc.
pHATmatik PRO allows you to route four different
modulators, LFO1, LFO2, Mod Wheel, and Velocity to four
different targets; Master VCF cutoff, Master Pitch, Master
Amp, and Master Filter Envelope Amount.
To route LFO1 to Master VCF cutoff, for example, simply
click in the corresponding field in the matrix and drag up or
down to set the amount of modulation applied to the target
parameter.
To reset a matrix field, simply click in it.
All of the matrix fields are automatable via midi cc control.
pHATmatik PRO
-28-
Page 29

About Midi Learn and
Automation
This will be the shortest section on automation EVER! To
map a midi cc to an automatable parameter in pHATmatik
PRO, simply do the following:
1. Right click (CTRL-click or ALT-click on Mac OS) on the
control you want to automate. (the midi learn light will
light up)
2. Send a midi cc message to pHATmatik PRO.
3. Tweak away! The midi cc number is mapped to that
control. You can map as many controls to the same cc
as you’d like.
4. To un-learn a midi-cc to control mapping, hold down the
[SHIFT] key and right click (Just SHIFT+click on
MacOS)on the control.
If you initiate a midi learn and then change your mind, just
click on the midi learn light to turn midi learn off.
NOTE: When you map one of pHATmatik PRO’s controls to
midi cc, the mapping applies to all 16 channels. In other
words, if you’ve mapped controller 74 to master vcf cutoff in
channel one, midi cc 74 will control vcf cutoff in all
channels. (however, each channel’s automation will still
work independently)
There is also a rudimentary implementation of standard
host automation for musicians who for one reason or
another can’t use midi cc messages for automation.
However, the host automation only works on the first
pHATmatik channel. If you want to record and play back
automation on multiple channels, you’ll need to use midi cc.
For more information on using the standard host
automation in pHATmatik PRO, consult your host’s manual
or visit
www.izotope.com.
© Copyright 2006 iZotope, Inc. All rights reserved. iZotope,
pHATmatik PRO and other marks which may from time to
time appear are the trademarks or US registered
trademarks of iZotope, Inc. in the United States and other
countries.
pHATmatik PRO
-29-
 Loading...