

Page 1

ANR-B
Adaptive Realtime Noise Reduction
USER’S GUIDE
Page 2

Page 3

ABOUT IZOTOPE ANR-B
Thank you for purchasing iZotope ANR-B Adaptive Realtime Noise Reduction. ANR-B is the first product
of its kind—it features advanced new algorithms that can recognize noise and suppress it in realtime.
ANR-B is designed to clean up call-ins, on-location interviews, noisy studio feeds and any audio source
that suffers from broadband noise, tonal noise and phone line artifacts. We believe that ANR-B will
change the way you work by taking care of the tedious process of noise removal for you, without requiring
constant input.
Before you set up ANR-B in your studio, please take a few moments to read through this User’s Guide.
Once you master the basic concepts of ANR-B’s operation, we think you’ll be amazed at how simple it is
to use.
Sincerely,
The iZotope ANR-B Development Team
Page 4

TABLE OF CONTENTS
IZOTOPE ANR-B OVERVIEW..............................................................................1
SETTING UP ANR-B ............................................................................................2
Connectivity.....................................................................................................2
Signal Chain....................................................................................................3
Input Level.......................................................................................................3
Number of Sources ......................................................................................... 3
ANR-B BASIC CONCEPTS..................................................................................4
Types of Noise ANR-B Suppresses................................................................4
Channels.........................................................................................................4
The Suppression Knob....................................................................................4
Noise Reduction Modes..................................................................................4
Adapt Mode.........................................................................................4
Manual Mode (Adapt Mode Disabled).................................................5
Training ANR-B...............................................................................................5
Metering .......................................................................................................... 6
Bypass and Residual Controls........................................................................6
ANR-B MENUS AND OPTIONS ........................................................................... 7
The Setup Menu..............................................................................................7
Select Audio I/O ..................................................................................7
Route Residual....................................................................................7
Brightness ...........................................................................................7
Configure Ethernet ..............................................................................8
Clear Memory......................................................................................8
Reset Hardware ..................................................................................8
Status..................................................................................................8
Update Firmware.................................................................................8
ANR-B Preset System.....................................................................................9
Loading a Preset.................................................................................9
Creating a Preset ................................................................................9
Clearing a Preset...............................................................................10
Set Filters..........................................................................................10
OTHER INFORMATION .....................................................................................10
Firmware Updates and Recovery..................................................................10
ANR-B TIPS AND FREQUENTLY ASKED QUESTIONS................................... 11
WARRANTY AND REGISTRATION INFORMATION......................................... 12
FCC NOTICE......................................................................................................14
Page 5
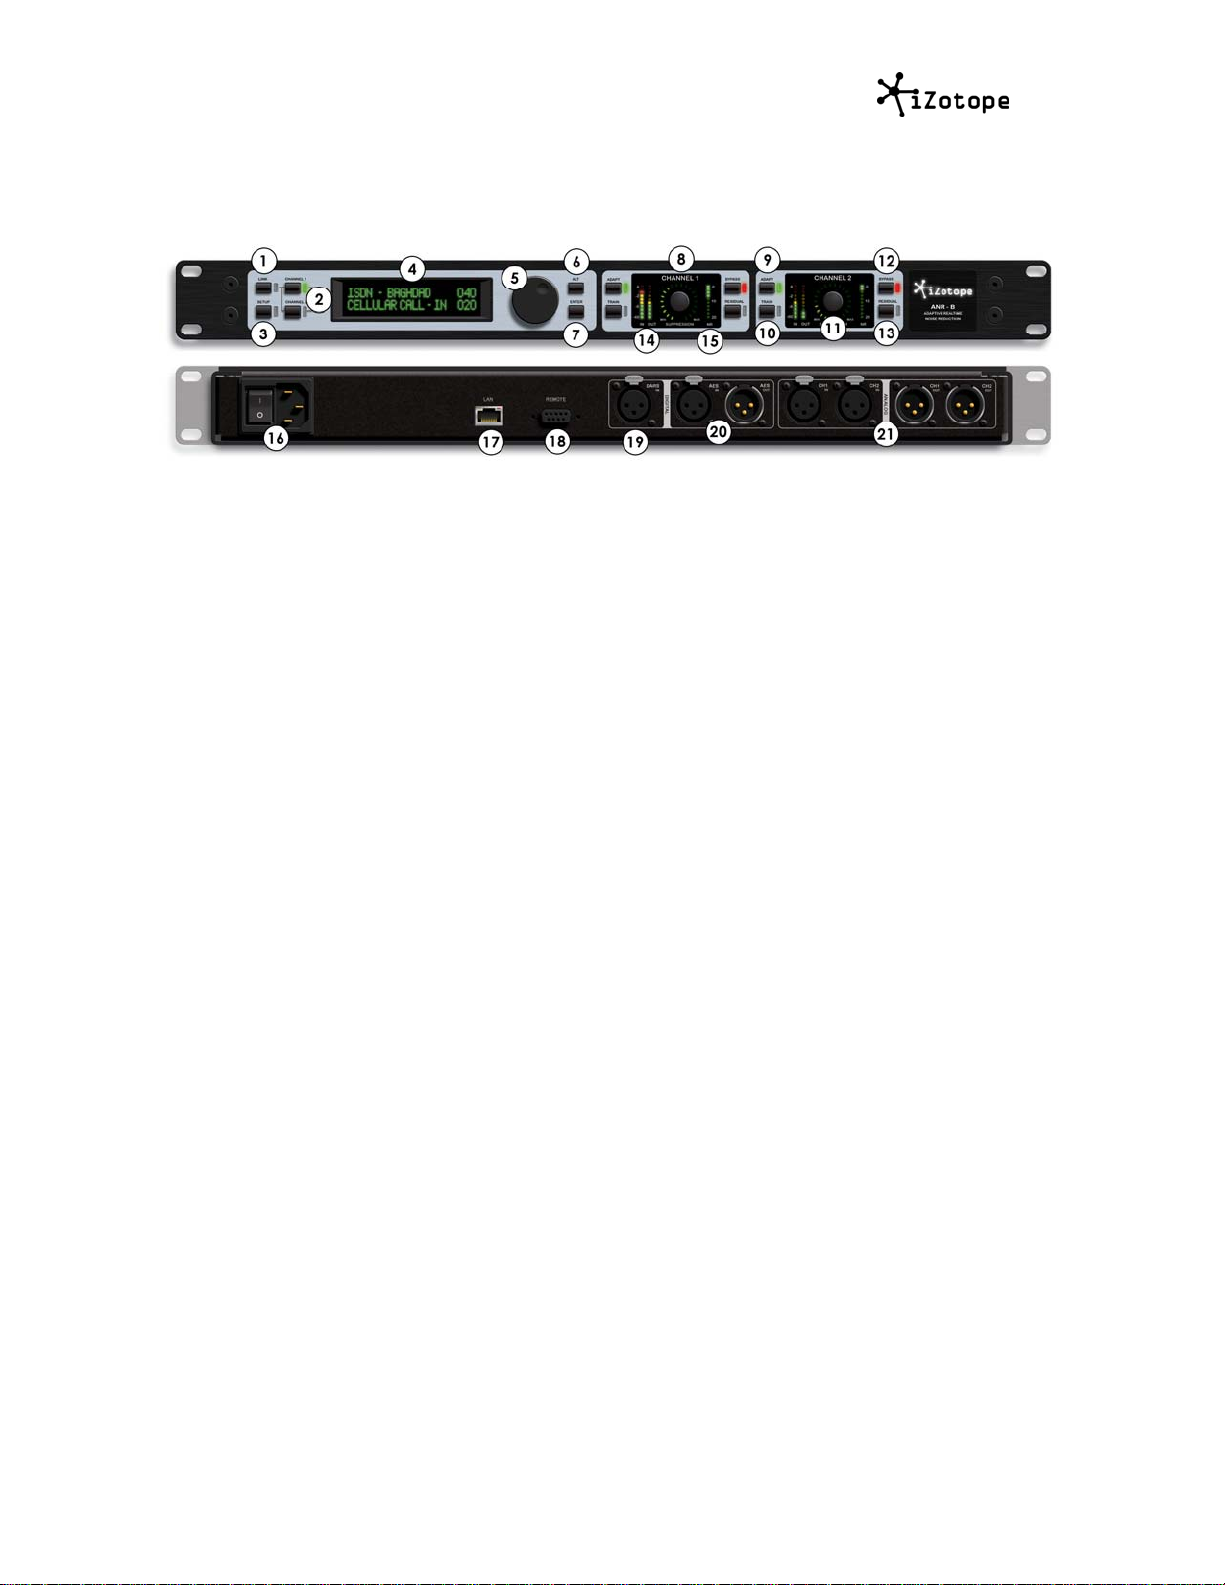
iZotope ANR-B Overview
1. Link – when enabled, channels 1 and 2 work together as a stereo pair, when disabled,
each channel can be controlled independently
2. Channel Buttons – When selected, this button allows you to edit/view parameters for its
respective channel in the main display
3. Setup – Pressing this button allows you to edit I/O configuration and other settings
4. Display – Displays information about the channels (suppression lev el, preset name, etc)
and setup menu information
5. Data Wheel – Allows you to scroll through presets, menu items and parameters; by
pushing the wheel, it also acts as an “Enter” button
6. Preset – Allows you to save and manage your presets
7. Enter – Used to confirm menu items, parameters and preset selections
8. Channel Controls – When channels are linked, adjusting one channel’s controls will
automatically change the other channel’s controls
9. Adapt Button – Enables Adapt Mode. When enabled, ANR-B will automatically detect the
noise profile of incoming audio
10. Train Button – Lets you capture a single noise profile from a noise-only input signal
11. Suppression Knob – Controls the amount of noise removed. Lower settings remove less
noise, higher settings are more aggressive
12. Bypass Button – Bypasses the noise reduction algorithm to allow you to A/B the
unprocessed and processed signals
13. Residual Button – Holding this momentary switch will let you hear what the noise
reduction algorithm is removing
14. Input/Output Meters – Shows the level of audio going into and out of the noise reduction
process
15. Suppression Meter – Shows the amount of noise suppression being applied to the audio
signal (reads downward)
16. Power – Power switch and standard three-prong power cable socket
17. LAN – Provides Ethernet connectivity to a computer host for updating firmware and other
remote features
18. RS-422 Port – Provides the same functionality as ANR-B’s LAN port
19. DARS – Digital Audio Reference Signal input (AES black) for syncing ANR-B to a master
reference clock
20. AES/EBU – Digital XLR input/output
21. Analog Inputs/Outputs – Balanced XLR input and output pair
iZotope ANR-B™ User’s Guide 1
Page 6

SETTING UP ANR-B
Connectivity
ANR-B features both analog and digital inputs and output options. You can manually switch between
analog and digital modes using the Setup Menu. By default, ANR-B will automatically detect which input
source is receiving a signal.
Analog XLR - Analog audio can be sent to and from ANR-B using balanced XLR inputs and outputs.
When using analog inputs and outputs, ANR-B internally processes at a fixed 48kHz sample rate.
NOTE: The analog section of ANR-B is designed to have 0dB (unity) gain and h andle levels up to
+24dBU 34.7V peak to peak, 12.28V rms.
Digital AES/EBU - ANR-B includes digital AES/EBU input and output (2 channels).
NOTE: When using AES/EBU for your primary input and output you may simultaneously use the analog
XLR outputs to monitor residual noise. Read the Setup Menu section for more details.
LAN and RS-422 - These connections allow firmware updates and control information to be sent to ANR-
B. Contact iZotope Support for more information. (support@izotope.com)
Digital Clock Sync
When using digital I/O, ANR-B’s sample rate will sync to the incoming digital audio signal or to a clock
signal connected to the DARS connection. In order to ensure sync throughout your studio setup you
should use one of these two synchronization methods:
AES Sync - ANR-B will automatically sync to information provided by the digital input signal, no further
settings need to be made in the ANR-B unit to ensure that it is correctly synced. However, be sure that a
device before ANR-B in the signal chain is set to be the master clock and that all devices following ANR-B
in the signal chain are set to sync to incoming digital audio. If these other devices are set to ignore
incoming sync information and use their internal clocks, you may hear sync artifacts like clicks and pops.
DARS (AES Black) – If your studio has a master clock, connect this to ANR-B’s DARS input, and sync all
other audio equipment in the signal chain to this master clock. This will ensure proper sync is maintained.
1
1
ANR-B has internal jumpers for studio and consumer levels. Please contact iZotope support for more information.
iZotope ANR-B™ User’s Guide 2
Page 7

Signal Chain
In general, ANR-B should be put as close to the source audio as possible in your audio processing signal
chain. ANR-B will perform better when it can work on audio that has not already gone through
compression, EQ, gating and other typical broadcast signal processing tools.
If you have an input signal with unpredictable volume levels, adding a protective limiting stage before
ANR-B to prevent clipping can be an exception to the above.
Input Level
Make sure that ANR-B gets a good, strong audio signal. Watching the input meters, the input signal
should, in general, be peaking above -12dbFS but not hitting CLIP on the input meter. ANR-B noise
detection and reduction will perform best with a strong input signal.
Number of Sources
ANR-B’s noise suppression works best when given a single audio source per channel or stereo pair. For
example, if you have two mono microphone or phone line sources, we recommend sending each source
to its own channel in ANR-B before the sources are mixed.
You can also use ANR-B on mixed audio, such as a pre-recorded interview whe re multiple sources have
already been combined. However, ANR-B will always deliver the best quality when it is able to listen to
and process each source independently.
iZotope ANR-B™ User’s Guide 3
Page 8

ANR-B BASIC CONCEPTS
Types of Noise ANR-B Suppresses
ANR-B excels at removing steady-state and slowly changing noise such as hiss and other types of
broadband noise, mains hum, electrical buzz and more. ANR-B can even tackle other constant or
predictably-repeating noises such as idling engines or HVAC noi se.
ANR-B is not designed to remove intermittent noises such as horn blasts, explosions, ringing cell phones,
microphone wind noise, etc. We recommend using a suitable post-production tool such as iZotope RX
Advanced software (www.izotope.com/rx) to remove noises of this nature.
Channels
ANR-B features two completely independent channels. These channels can be used simultaneously to
remove noise from two completely different mono sources with different noise profiles, or they can be
linked with the Link switch to process a single stereo source. In both cases, each channel adapts to the
unique noise print in that channel.
The Suppression Knob
The Suppression knob allows you to control the amount of noise removed from the incoming audio signal.
You will see the amount of noise reduction applied represented in the LEDs surrounding the Suppression
Knob. ANR-B’s main display will also show a numerical suppression value of 0-100, with 0 being minimal
suppression and 100 being full suppression. In order to achieve no suppression, the unit must be
bypassed.
NOTE: In some cases higher levels of noise suppression may cause unwanted artifact s or some noise
may be desired for ambience. We recommend starting with around 50-6 0 suppression and adjusting as
necessary for the best balance of natural sounding audio and noise attenuation.
There is a suppression knob for each of ANR-B’s channels. When using the channels independently, both
knobs can have unique settings. When using Link mode, turning one suppression knob will
simultaneously adjust the suppression level of the other channel.
Noise Reduction Modes
There are two primary methods of removing noise with ANR-B. Adaptive mode is fully automatic, and is
optimized for dialog. Manual mode allows the user to define a noise profile using a noise-only audio
sample, and can yield better quality when working with non-spoken content like music. You can toggle
between these modes with the “Adapt” button on each channel. When the green Adapt light is lit,
Adaptive mode is enabled. When it is off, ANR-B is in Manual mode.
Adapt Mode
In this mode, the noise reduction algorithm is always adapting and re-evaluating what is noise in real time
in the incoming signal. Therefore, as the noise profile of the incoming audio changes, the algorithm
adapts to it. This allows ANR-B to suppress new types of noise as they are introduced over time and
automatically tailor the noise profile to changing noise sources.
Adaptive mode is optimized for dialog. It looks for properties that characterize speech, and recognizes the
difference between speech and steady state sounds like hum, hiss and buzz. Then it attenuates the pa rt
of the signal that is noise without damaging dialog.
iZotope ANR-B™ User’s Guide 4
Page 9

Manual Mode (Adapt Mode Disabled)
When the Adapt indicator is off, ANR-B is in Manual mode. In this mode, the noise profile remains
constant and the algorithm does not continually re-evaluate the noise. With Adapt enabled the user predefines what noise is by using the Train button.
One good use of this mode is when the original audio contains musical content or other full range
frequency material. As the adaptive algorithm is optimized for voice, it may mistake sustained musical
notes for noise, leading to unwanted artifacts.
In some cases you may also want to use the Manual mode to create presets for specific noise problems
that do not change. For example, perhaps a studio feed has a consistent hum, you may wish to capture
that hum as a noise profile and save a preset for it that you can recall when needed.
Training ANR-B
Training in Manual Mode
In order to suppress noise in Manual mode, you need to first define a noise profile. Pressing the Train
button in Manual mode allows you to capture a single noise profile from the incoming audio signal. This
quickly defines for ANR-B what is noise.
To use this feature you must locate a portion of the audio that contains ONLY the noise you want to
remove. Then tap the Train button once to capture the noise profile. It takes less than a second of noise
to achieve a quality snapshot of the noise. Once the noise profile is captured, the noise will be
immediately removed from the audio.
When you are using ANR-B’s channels independently, each can be trained independ ently. When ANRB’s two channels are linked, they will be trained at the same moment but will create unique profiles for
each channel to match the noise as closely as possible.
NOTE: Tap the Train button once and ANR-B will capture a noise profile for about one se cond. If you hold
down the train button, ANR-B will continue capturing the noise profile until you let go of the button. If the
noise is changing and not stable, holding the Train button longer may increase the accuracy of the
suppression.
Training in Adapt mode
You can also, if you wish, use the Train button to capture a noise profile while in Adapt mode, but this is
not required. When in adapt mode, the noise reduction algorithm will use the trained profile as a starting
point, but it will continue to listen to incoming audio and vary the noise profile as necessary. Using
Training while Adapt is enabled may allow you to remove a new noise source more quickly than waiting
for the automatic detection.
iZotope ANR-B™ User’s Guide 5
Page 10

Metering
Each channel has several meters that provide important visual feedback:
Input Meter – Shows the level (in dBFS) of the source audio. The meter scale is from -60 to CLIP
(clipping). The top red LED of the meter indicates an over in the signal.
Output Meter – The output meter shows the level (in dBFS) of audio after being processed by ANR-B.
The meter scale is from -60 to CLIP (clipping). The top red LED of the meter indicates an over in the
signal.
Suppression Meter – This meter shows how much noise is being attenuated (in dB ). The suppression
meter’s scale is from 0 to 20 dB, and it reads downward.
Bypass and Residual Controls
The Bypass and Residual buttons are useful for critical listening and fine-tuning of the noise reduction
process. You may find that these controls help you set the suppression level to get the most transparent
noise reduction possible.
Bypass - Engaging the bypass button allows you to monitor the original audio signal with no noise
suppression being applied. This is useful for comparing the proce s sed signal to the noisy signal.
Residual - The residual button lets you hear only the noise that the noise suppression algorithm is
removing. You can use this feature to hear if there is any non-noise material being removed by the
process. This is a momentary switch—when you let go of the switch, ANR-B will operate in its normal
mode.
NOTE: If you hear a lot of non-noise material in Residual mode, you may want to use a less aggressive
suppression setting, or you may want to try Manual mode for the program material in question.
iZotope ANR-B™ User’s Guide 6
Page 11

ANR-B MENUS AND OPTIONS
The Setup Menu
To enter the Setup Menu, press the Setup button. To exit the Setup Menu or cancel a selection, press
the Setup button. To navigate through the Setup Menu items or to select a value, use the Data Wheel
(large knob to the right of the display). To choose a menu item or select a value, either press the Enter
button or press the Data Wheel.
Select Audio I/O
This menu item allows you to select which inputs and outputs ANR-B will use for each of its channels.
Auto – when this mode is selected, ANR-B will automatically detect which inputs are being sent audio and
will set itself accordingly. If multiple inputs have valid signal, it will give priority to AES (DARS clock),
AES, and finally Analog as the default.
Analog – enables Analog XLR input and output
AES – enables the digital AES-EBU input and output
AES (DARS Clock) – enables the DARS (AES Black) sync input, allowing ANR-B to sync up to a master
clock. ANR-B still uses the AES/EBU input and output for the audio signal.
Route Residual
The Route Residual feature is available when using the AES-EBU input and output mode for your
program material. Enabling the Route Residual feature allows you to send the residual, or “noise only,”
signal that ANR-B has removed to your ANR-B’s analog outputs.
This allows you to separately monitor the noise only signal to fine tune the suppression control without
having to use the Residual buttons on the front panel.
Brightness
The Brightness control allows you to set the brightness of the information display.
iZotope ANR-B™ User’s Guide 7
Page 12

Configure Ethernet
ANR-B uses an Ethernet connection to allow you to pass firmware updates and more between a
computer and ANR-B. From this menu, you can configure your connection to the network.
DHCP – with DHCP enabled, ANR-B will automatically obtain network settings like IP Address
from the network it is connected to. When disabled, internet parameters can be manually
changed.
IP Address – the Internet Protocol address used by ANR-B on your network. To change the IP
address, spin the data wheel for each group of numbers and press the wheel to accept the
current number and move to the next number.
MAC Address – the ANR-B unit’s Media Access Control address.
Other Ethernet Settings - Gateway IP and subnet mask can be manually edited by the user if so
needed when DHCP is disabled. To change the Gateway IP address, use the same input
method as described for the unit IP address above.
NOTE: After changing any of the Ethernet settings, you must choose the “LAN: Save Settings” menu item
to commit the changes.
Clear Memory
The Clear Memory function will clear the current noise profiles, settings and remove all user-created
presets, returning ANR-B to its factory default state.
Reset Hardware
The Reset Hardware function does the equivalent of turning the unit’s power off and on again. This is
meant to be used in troubleshooting situations when it is not practical to reach the back of the ANR-B unit
to cycle the power.
Status
This menu provides service information for factory testing and repair diagnosis.
Update Firmware
This can be used to load new firmware or replacement firmware onto ANR-B (over an Ethernet
connection).
NOTE: ANR-B can also be placed into firmware update mode by holding down any button when ANR-B
powers up. This mode is only designed to recover from a failed firmware update and should not be
necessary in normal operation.
Version Info
This menu shows what version of ANR-B’s internal software is loaded.
iZotope ANR-B™ User’s Guide 8
Page 13

ANR-B Preset System
ANR-B’s included presets provide a quick way to set up the unit for different types of audio scenarios.
You can also save your own presets for easy recall.
Presets in ANR-B include the following information:
Mode – whether the preset will be working in Adaptive or Manual mode
Suppression Level – the amount of noise suppression to be applied
Filters – the cutoff points for ANR-B’s built in low and high pass filters, which are useful for
removing excess high and low frequency noise when needed audio is not found in these
frequency ranges
Noise Profile – presets using Manual mode can include a noise profile, allowing you to save
presets for specific unchanging noise scenarios and recall them without re-training ANR-B.
Loading a Preset
Spin the Data Wheel to preview the name and parameters of a new preset. The preset will not be
engaged and the display will blink until pressing the Enter button. To cancel your selection, either wait a
few seconds for the selection to time-out or press the Preset button.
In Link mode, use the Data Wheel to navigate through the list of available presets. When ANR-B’s
channels are being used independently, you can choose a preset for each one. For selecting presets in
single change mode, tap the Channel 1 or Channel 2 button to select a channel and use the Data Wheel
to cycle through presets for the respective channel. When in Link mode, choosing a preset will apply that
preset to both channels.
Creating a Preset
To save your current settings as a preset, select a User Preset or an empty preset using the data wheel,
then tap the Preset button. Choose Update Current from the menu to save the settings as a preset in the
current location.
In Manual Mode - Once you’ve used the Train button to capture a noise profile in Manual Mode, saving a
preset will save that noise profile for further use.
In Adapt Mode - Presets in Adapt Mode do not save a noise profile. However they are useful for saving
high pass and low pass filter settings and suppression level settings.
iZotope ANR-B™ User’s Guide 9
Page 14

Clearing a Preset
To erase a preset, select the preset with the data wheel and tap the Preset button. Choose Clear Current
from the menu.
Set Filters
Within the preset menu, you can specify whether you want your preset to use ANR-B’s built in filters. The
filters can be useful for removing high and low frequency information that contains no program material
but may contain noise.
The filters in ANR-B have two modes:
ISDN – optimized for the frequency range covered by ISDN sources (50Hz to 8kHz)
Cell – optimized for the frequency range covered by cellular/mobile phones (220Hz-3.8 kHz)
At this time, it is not possible to set your own frequencies for the high pass and low pass filters.
OTHER INFORMATION
Firmware Updates and Recovery
In the future, iZotope may provide firmware updates to ANR-B. In case of a problem with ANR-B’s
firmware, contact iZotope’s support for more information on how to obtain and reload the unit’s firmware.
Updates and More Information
For the latest version of iZotope ANR-B firmware and manuals, please visit www.izotope.com.
iZotope ANR-B™ User’s Guide 10
Page 15

ANR-B TIPS AND FREQUENTLY ASKED QUESTIONS
I hear a clicking sound when I first power up ANR-B. What is this? Should I be concerned?
You are hearing ANR-B’s de-thump relays. This is a built in feature that prevents the thumping noise
heard when audio equipment is powered up.
When Adapt mode is used on musical content, it produces a lot of artifacts. What should I do?
Adapt mode is optimized for the human speaking voice, making it a good match for interviews and call-ins
and other dialog settings. If you want to use ANR-B on music or full frequency range content, we
recommend using manual mode to capture a noise profile.
What happens when I hit the Train button when ANR-B is in Adapt mode?
Hitting Train while in Adapt mode fast forwards ANR-B’s learning process by giving it a noise profile as a
starting point. It only takes ANR-B a matter of seconds to learn on its own, but if you have a good section
of noise-only audio, training can give you optimal noise reduction in less than a second instead of a few
seconds. ANR-B will continue to adapt after you train it in this mode as well.
How do I capture the best noise profile using Train mode?
Locate or wait for a section of audio where there is clearly only noise in the signal. Then tap the train
button to capture the noise profile—this operation will take about one second. For situations like call-ins
and live interviews, you may wish to ask the talent or caller to remain silent for a few moments so you can
capture the noise profile accurately.
iZotope ANR-B™ User’s Guide 11
Page 16

WARRANTY AND REGISTRATION INFORMATION
Register ANR-B
Please visit www.izotope.com/support/ANR-B
to receive important product updates and warranty service.
Limited Warranty
Two (2) Year Limited Warranty Vendor's warranty obligations for this hardware product are limited to the
terms set forth below:
Vendor warrants this Vendor hardware product against defects in materials and workmanship under
normal use for a period of TWO (2) YEARS from the date of purchase by the original end-user purchaser
(the "Warranty Period"). If a hardware defect arises and a valid claim from the end-user purchaser is
received within the Warranty Period, at its option Vendor will either (1) repair the hardware defect at no
charge, using new or refurbished replacement parts, (2) exchange the product with a product that is new
or which has been manufactured from new or serviceable used parts and is at least functionally
equivalent to the original product, or (3) refund the purchase price of the product. Vendor may request
that you replace defective parts with new or refurbished user-installable parts that Vendor provides in
fulfillment of its warranty obligation. A replacement product or part, including a user-installable part that
has been installed in accordance with instructions provided by Vendor, assumes the remaining warranty
of the original product or ninety (90) days from the date of replacement or repair, whichever provides
longer coverage for you. Parts provided by Vendor in fulfillment of its warranty obligation must be used in
products for which warranty service is claimed. When a refund is given, the product for which the refund is
provided must be returned to Vendor and becomes Vendor's property.
EXCLUSIONS AND LIMITATIONS
This Limited Warranty does not apply to any non-Vendor hardware products or any software, even if
packaged or sold with Vendor hardware. Manufacturers, suppliers, or publishers, other than Vendor, may
provide their own warranties to the end user purchaser, but Vendor, in so far as permitted by law,
provides their products "as is". Software distributed by Vendor with or without the Vendor brand name
(including, but not limited to system software) is not covered under this Limited Warranty. Refer to the
licensing agreement accompanying the software for details of your rights with respect to its use.
Vendor does not warrant that the operation of the product will be uninterrupted or error-free. Vendor is not
responsible for damage arising from failure to follow instructions relating to the product's use.
This warranty does not apply: (a) to damage caused by use with non-Vendor products; (b) to damage
caused by accident, abuse, misuse, earthquake, flood, fire, or other external causes; (c) to damage
caused by operating the product outside the permitted or intended uses described by Vendor; (d) to
damage caused by service (including upgrades and expansions) performed by anyone other than
Vendor; (e) to a product or part that has been modified to alter functionality or capability without the
written permission of Vendor; (f ) to cosmetic damage, including but not limited to scratches, dents and
broken plastic on ports; or (g) if any Vendor serial number has been removed or defaced.
Vendor's responsibility for hardware defects is limited to repair or replacement se rvice as determined by
vendor in its sole discretion. All express and implied warranties, including but not limited to any implied
warranties and conditions of merchantability and fitness for a particular purpose, are limited in time to the
term of this limited warranty. No warranties, whether express or implied, will apply after the expiration of
the limited warranty period. Some states do not allow limitations on how long an implied warranty lasts, so
to register your product. By registering you will be eligible
iZotope ANR-B™ User’s Guide 12
Page 17

this limitation may not apply to you. No vendor reseller, agent, or employee is authorized to make any
modification, extension, or additions to this warranty. This warranty gives you specific legal rights, and
you may also have other rights which vary from state to state. If any term is held to be unenforceable or
illegal the enforceability or legality of the remaining terms shall not be affected or limited.
Except as provided in this warranty and to the extent permitted by law, vendor is not responsible for
direct, special, incidental or consequential damages resulting from any breach of warranty or condition, or
under any other legal theory, including but not limited to loss of use; loss of revenue; loss of actual or
anticipated profits (including loss of profits on contracts); loss of business; loss of opportunity; loss of
goodwill; loss of reputation; loss of, damage to or corruption of data; or any indirect or consequential loss
or damage howsoever caused including the replacement of equipment and property, any costs of
recovering, programming, or reproducing any program or data stored or used with vendor product s and
any failure to maintain the confidentiality of data stored on the product. Some states do not allow the
exclusion or limitation of incidental or consequential damages, so the above limitation may not apply to
you.
For updates to the warranty, please contact iZotope support or www.izotope.com
.
iZotope ANR-B™ User’s Guide 13
Page 18

FCC NOTICE
Radio and Television Interference
NOTE: This equipment has been tested and found to comply with the limits for a Class A digital device,
pursuant to Part 15 of the FCC rules. These limits are designed to provide reasonable protection against
harmful interference when the equipment is operated in a commercial environment. This equipment
generates, uses and can radiate radio frequency energy and, if not installed and use d in acco rdance with
the instruction manual, may cause harmful interference to radio communications. Operation of this
equipment in a residential area is likely to cause harmful interference in which case the user will be
required to correct the interference at his own expense.
In order to maintain compliance with FCC regulations, shielded cables must be used with this equipment.
Operation with non-approved equipment or unshielded cables is likely to result in interference to radio &
television reception.
iZotope ANR-B™ User’s Guide 14
Page 19

COPYRIGHT NOTICE
© 2008 iZotope, Inc.
iZotope, the iZotope logo, ANR-B, iZotope RX, and other marks which may from time to time appear are
the trademarks or US registered trademarks of iZotope, Inc. in the United States and other countries.
iZotope ANR-B™ User’s Guide 15
 Loading...