


English
Table of Contents
Table of Contents............................................................................................................ 1
Safety .............................................................................................................................. 2
What is iZ3D....................................................................................................................5
iZ3D Bundle.....................................................................................................................6
Knowing your iZ3D monitor ............................................................................................. 7
iZ3D monitor....................................................................................................................8
Back panel.......................................................................................................................8
Front panel ...................................................................................................................... 8
Hardware Requirements..................................................................................................9
Graphics Card ................................................................................................................. 9
Software Requirements...................................................................................................9
Software, Processor, Memory, etc. .................................................................................9
Set up............................................................................................................................10
Controls in Stereo..........................................................................................................11
Driver.............................................................................................................................11
Adjusting Driver Settings............................................................................................... 12
Adjusting Stereo Settings.............................................................................................. 13
Recommended Games..................................................................................................14
Stereo Vision................................................................................................................. 15
How iZ3D displays stereo images ................................................................................. 15
Troubleshooting.............................................................................................................16
1

Safety
Note the following safety precautions before using this monitor.
Power input: AC 100-240 V, 1.6A, 50-60Hz
Environmental condition: +5° C ~ +35° C, 20% ~ 80%RH
FCC DECLARATON OF CONFORMITY
This device complies with Part 15 of the FCC Rules. Operation is subject to the
following two conditions: (1) This device may not cause harmful interference, and (2)
this device must accept any interference received, including interference that may
cause undesired operation.
This device has been tested and found to comply with the limits for Class B personal
Computers and peripherals, pursuant to Part 15 of the FCC Rules. These limits are
designed to provide reasonable protection against harmful interference when the device
is operated in a residential environment. This device generates, uses and can radiate
radio frequency energy, and if not installed and used in accordance with the instructions,
may cause harmful interference to radio communications. However, there is no
guarantee that interference will not occur in a particular installation. If you determine the
device does cause harmful interference to radio or television reception (this may be
determined by monitoring the interference while turning the device off and on), you are
encouraged to try to correct the interference by on of the following measures:
• Reorient or relocate the receiving antenna.
• Increase the separation between the device and receiver.
• Connect the device into an outlet on a circuit different from that to which the
receiver is connected.
• Consult the dealer or an experienced radio or TV technician for help.
To meet the FCC requirements, you should use a signal cable with ferrite core at both
ends.
CAUTION: Changes or modifications not expressly approved by iZ3D LLC could void
the users authority to operate the device under FCC compliance regulations.
CANADIAN DEPARTMENT OF COMMUNICATIONS COMPLIANCE STATEMENT
This digital apparatus does not exceed the Class B limits for radio noise emissions from
digital apparatus as set out in the radio interference regulation of the Canadian
department of communications.
CE MARKING DECLARATION OF CONFORMITY
This LCD monitor complies with the requirements of the EC Directive 89/336/EEC “EMC
Directive” and 73/23/EEC “Low Voltage Directive” as amended by Directive 93/68/EEC.
The electro-magnetic susceptibility has been chosen at a level that gives correct
operation in residential areas, business and light industrial premises and small-scale
enterprises, inside as well as outside of the buildings.
All places of operation are characterized by their connection to the public low voltage
power supply system.
2

English
Monitor Care
• Avoid touching the screen with your fingers or any hard objects. Oil from the skin
is difficult to remove, and touching the screen with anything may damage the
panel. Clean the monitor using a soft, dry cloth after first turning it off.
• The LCD monitor should not be used in dusty or humid environments.
• The LCD monitor should be kept away from heat sources and radiation. Such as:
stoves, ovens, or direct sunlight.
• To reduce glare, avoid placing the monitor in a place that receives direct sunlight.
• Avoid letting small children play with monitor. Frequent touching of the panel will
leave marks on the screen and lower the image quality.
• Handle with care when unplugging and moving the monitor.
• Do not place items on top of the LCD monitor.
• If the LCD monitor is not in use for a long time, unplug it and store it in the proper
package. The original carton and packaging should be used if possible.
• The openings in the LCD monitor casing are for ventilation. To prevent
overheating, the openings should not be blocked or covered. Do not place the
LCD monitor on a bed, sofa, blanket or other soft surfaces; as soft objects may
block the vents in the LCD monitor.
• If you place the LCD monitor on a bookshelf or other enclosed space, it is
essential to leave an air-space of 4-inches (10cm) between the monitor and the
enclosure.
• Ensure that the area around the LCD monitor is clean and free of moisture
Screen Care
• Unplug the LCD monitor from the AC socket before conducting maintenance.
• Never spray or pour any liquid directly onto the screen or case.
• Do not allow water or liquid to enter the LCD monitor or accessories.
• Use pure water or non-ammonia, non-alcohol based glass cleaner.
• Do not use ketene (such as acetone), ethanol, toluene, acetic acid, methane,
chloride, or abrasive detergent to clean the monitor because these chemicals can
damage the LCD monitor.
• To clean your LCD monitor screen, use water or mild cleaner, as above, to gently
moisten a soft, clean cloth.
• If possible, use a special screen cleaner sheet or a solution suitable for static
electricity application.
• To clean your LCD monitor case, use water or mild cleaner, as above, to gently
moisten a soft, clean cloth.
• To clean your accessories, use water or mild cleaner, as above, to gently
moisten a soft, clean cloth.
• Conservation
Disclaimer
Any damage resulting from use of any cleaner that is not mentioned above is not
covered under this warranty term.
3

Electrical
A certified power supply cord has to be used with this equipment. The relevant national
installation and/or equipment regulations shall be considered. A certified power supply
cord not lighter than ordinary polyvinyl chloride flexible cord according to IEC 60227
(designation H05VV-F 3G 0.75mm2 or H05VVH2-F2 3G 0.75mm2) shall be used.
Alternative a flexible cord be of synthetic rubber according to IEC 60245 (designation
H05RR-F 3G 0.75mm2) shall be used. Do not disable the safety purpose of grounding
type plug. Use the power supply cord only in combination with an earthed socket-outlet.
Check the voltage
This product should be operated from the type of power indicated on the marking label.
If you are not sure of the type of power available, consult your dealer or local power
company.
Electrical Shock
This product is equipped with a 3-wire grounding-type plug, a plug having a third
(grounding) pin. This plug will only fit into a grounding-type power outlet. This is a safety
feature. If you are unable to insert the plug into the outlet, contact your electrician to
replace your obsolete outlet. Do not defeat the purpose of the grounding-type plug.
To prevent electrical shock, do not insert any metal object into any opening in the LCD
monitor casing.
Do not attempt to service this product yourself, as opening or removing covers may
expose you to dangerous voltage points or other risks. Refer all servicing to qualified
service personnel.
If the power cord is damaged, do not use the LCD monitor. Do not place any object on
the power cord, and place the power cord away from crowded areas.
While pulling the LCD monitor plug away from the socket on the wall, hold the plug not
the power cord.
Unusual conditions
If the LCD monitor begins to perform abnormally, makes a noise, or emits smoke or
odors, unplug it immediately and contact a service center.
Do not expose the LCD monitor to rain and do not use it in environments near water
(such as in the kitchen, or near a swimming pool).
If the LCD monitor becomes wet, unplug the power cord immediately and contact a
Service Center. The LCD monitor shall be used at maximum 35C ambient temperature.
4

English
What is iZ3D
Congratulations. You’re the owner of the first 3D monitor that is specially designed for
gamers!
iZ3D is both a software and hardware solution.
The hardware part is the iZ3D monitor – an LCD-based monitor that is capable of
showing 3D content, when observed through 3D polarized glasses. Unlike any other
LCD monitors, iZ3D consists of TWO superimposed display matrices, BACK SCREEN
and FRONT SCREEN. Back screen is a common LCD panel. This is what you see
when you look at the iZ3D without glasses. Front screen is a transparent LCD panel that
is placed in front of the back screen. The front panel can be observed through 3D
polarized glasses only – when you put on the glasses, it becomes visible.
So, without 3D glasses, iZ3D can be used just like any other monitor. All the magic
begins when you put the glasses on.
3D content displayed by the iZ3D monitor, is generated by the iZ3D Driver - software
part of iZ3D. iZ3D Driver is a special software that renders games into a third
dimension – that’s it, there is a single driver that makes the different games 3D. To
enjoy 3D on the iZ3D monitor you need to install iZ3D 3D driver and run the game!
5

iZ3D Bundle
One 22” wide iZ3D monitor
One CD with iZ3D Driver
Two Polarized Plastic Glasses and One Clip On Glasses
Cables: Two DVI cables, One VGA cable
Power Supply Cable
Quick Start Card
Warranty Card
User Manual
6
English
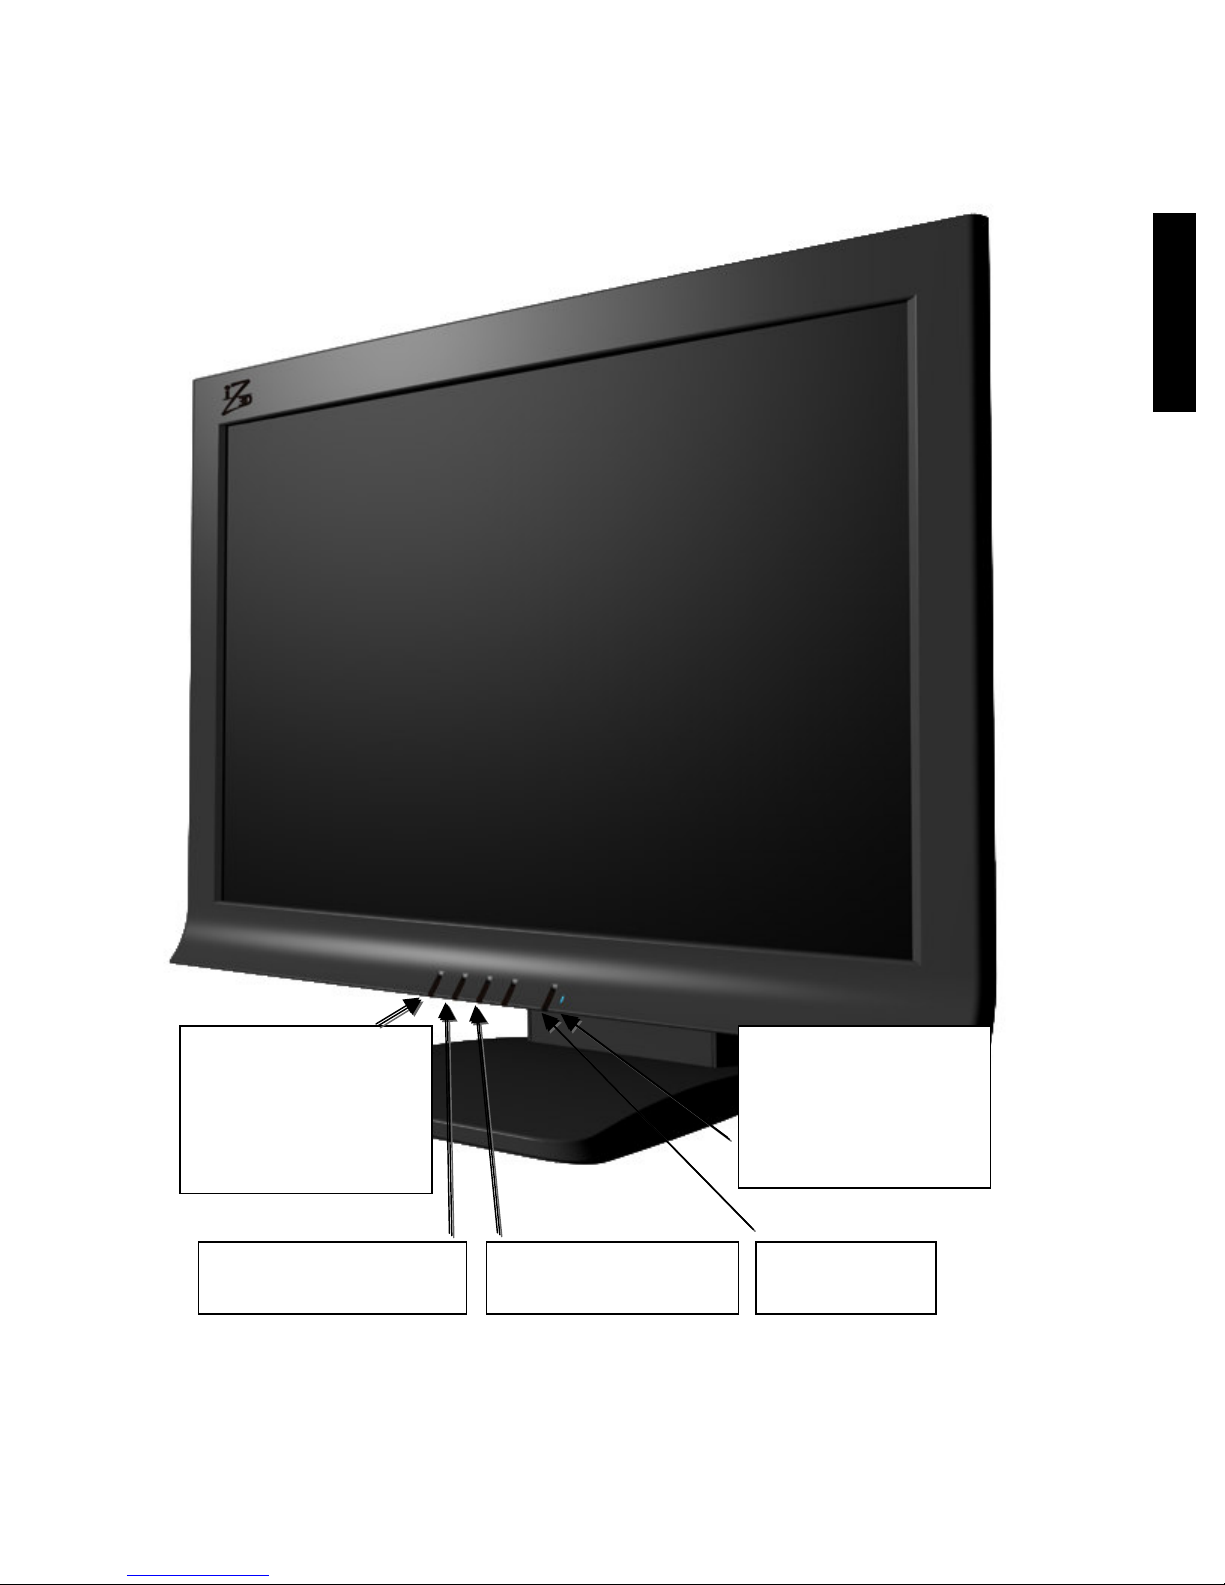
Knowing your iZ3D monitor
Auto adjust button
Press to auto adjust
image in VGA mode,
if image is misplaced
or colors are distorted.
+ Brightness button
Increase brightness
7
- Brightness button
Decrease brightness
Power indicator LED
Solid blue means ON
Blinking red means
STANDBY
Black means OFF
Power button
On/off

iZ3D monitor
The iZ3D monitor is made of two superimposed LCD panels, BACK and FRONT. Both
panels act like independent displays and should be connected to the PC graphic card
outputs (back panel with D-SUB or DVI connector and front panel with DVI connector).
So, after you connect your iZ3D monitor to your PC, Windows should report that you
have two displays connected – iZ3D BACK and iZ3D FRONT.
Back panel
Back panel is a common LCD panel. It works just like ordinary LCD monitor, and this is
what you see if you look at the iZ3D monitor without glasses.
Front panel
Front panel is a transparent LCD panel that is visible only through polarized 3D glasses.
If you do not wear 3D glasses the front panel is not noticeable and you can use the
iZ3D monitor just like an ordinary monitor.
As a display screen, front panel shows some images. Through the right polarizer of 3D
glasses images on the front panel are visible in common colors, through the left
polarizer of 3D glasses images on the front panel are visible in inverted colors.
8

English
Hardware Requirements
Graphics Card
Currently 3D games run with most nVidia and AMD/ATI graphics cards with dual output
support. Below is the list of recommended and tested cards:
nVidia AMD/ATI
GeForce 6600
GeForce 6600GT
GeForce 6800
GeForce 6800GT
GeForce 6800 Ultra
GeForce 7800
GeForce 7800GT
GeForce 7800GTX or
higher
GeForce 8800 series
Recommended memory size of graphics card is equal doubled size recommended for
each specific game.
Radeon 9200
Radeon 9550
Radeon 9600 or higher
Radeon X300
Radeon X550
Radeon X600
Radeon X800
Radeon X1300 or higher
Software Requirements
Driver works under Windows family of operational systems, except Windows 2000, but
including Vista. In order to run games in 3D, latest video card drivers need to be
installed.
Microsoft DirectX 8 and Microsoft DirectX 9 should be installed, latest DirectX runtime
update may be required.
Software, Processor, Memory, etc.
For processor, RAM, sound card and other requirements please see the requirements
from the game publishers. Each game comes with its own hardware requirements,
typically published on its packaging.
Multi-core CPUs are supported.
9

Set up
1. Switch off the PC. Connect one DVI output of the graphics card to green marked
DVI input on iZ3D monitor.
2. Connect the second output of the graphics card to one of the red marked inputs
on iZ3D monitor. If your graphics card has 1 VGA and 1 DVI output, connect
VGA output to VGA input of iZ3D using VGA cable. If your graphics card has
dual DVI outputs, connect one DVI cable to one DVI output of the graphics card
and to the red marked iZ3D monitor input.
3. Plug in iZ3D monitor to power supply
4. Start PC. Run Windows. If login screen or windows desktop with controls and
icons is visible, proceed to step 5. If not, put on glasses, make sure that login
screen or windows desktop with controls and icons is visible and proceed to step
5 with glasses on.
5. Insert iZ3D installation CD, install iZ3D Driver following the instructions on the
screen. After selecting “Install” button take off the glasses. When asked, press
the key with the character that you see on the screen.
6. At the end of installation iZ3D driver properties window will open. Make sure that
“Enable stereo by hotkey” item is selected and redefine stereo hotkeys if needed
7 Run your favorite game, press Toggle Stereo hotkey (Numpad * by default )
when game is ready, put on iZ3D glasses, and refer to the 3D Adjustment Quick
Start.
NOTE: If your graphics card has 1 VGA and 1 DVI output, press AUTO ADJUST
button on the monitor.
Refer to http://www.iZ3D.com/games for the latest approved list of supported games.
10
English
Controls in Stereo
You can adjust stereo settings in game to make it more comfortable.
Use the following keys:
Key Function
NumPad* Toggle Stereo ON/OFF
NumPad+ Decrease 3D depth
NumPad- Increase 3D depth
Shift +
NumPadShift +
NumPad+
You can customize stereo settings for each game separately and they will be
automatically saved. Following keys and combinations can not be used for driver control:
NumLock, NumPad /, NumPad Del, all the combinations with “Windows” key.
Keys can be redefined in iZ3D Driver properties:
START
All ProgramsiZ3D DriveriZ3D
Shift the scene deeper into the monitor
Shift the scene closer out of the monitor
Driver
Driver
In order to enjoy your favorite game in 3D on iZ3D monitor you need to install iZ3D
Driver. When activated, the driver renders the game in 3D on iZ3D monitor, you can put
on glasses and feel the magic.
After you install the driver, it is always active and you can switch 3D on by pressing
NumPad* hotkey. When you’re in 3D mode you can adjust 3D depth of the whole
scene by hotkeys NumPad+, NumPad-, Shift + NumPad-, Shift + NumPad+ as it is
described in “Adjusting Stereo Settings” section on page 13. The driver can be
deactivated and hotkeys can be changed in driver settings dialog window, described on
this page. For more information about 3D please refer to chapter “Stereo Vision” on
page 15
11

Adjusting Driver Settings
To open iZ3D Driver settings window
DriveriZ3D
Driver
Here you can:
1. Change Default Stereo Separation with Stereo Separation slider
2. Change Stereo Mode.
a. Select “Enable Stereo” if you want Stereo in the game to be enabled by
default.
b. Select “Enable Stereo by Hotkey” if you want Stereo in the game to be
activated by hotkey (RECOMMENDED)
c. Select “Disable Stereo” to switch iZ3D Driver off.
3. Change HotKeys
4. Display Stereo Test picture
Press “Apply” to apply changes, “OK” to apply changes and exit or “Cancel” to discard
changes and exit.
go to START
All ProgramsiZ3D
12

English
Adjusting Stereo Settings
The observer’s perception of 3d depends on the images observer’s left and right eyes
see on the iZ3D’s screen. As long as these images are computer generated, the user
can adjust some stereo settings for his or her visual comfort. First, the user can make
the whole scene look closer or further. Second, the user can make the whole scene look
deeper or shallower.
iZ3D Screen
iZ3D Screen
Further from observer (Shift + NumPad–) and closer to observer (Shift + NumPad+)
iZ3D Screen
iZ3D Screen
less depth (NumPad–) and more depth (NumPad+)
13

Recommended Games
The following games have been tested and show the best performance in 3D:
1. Age Of Empires III
2. Battlefield 2
3. Ballance
4. Black & White 2
5. Cars
6. Civilization IV
7. Counter Strike Source
8. Day of Defeat: Source
9. Delta Force: Xtreme
10. Dungeon Siege II
11. Earth 2160
12. Fahrenheit
13. Fable – The Lost Chapters
14. Far Cry
15. FEAR
16. FIFA 2005
17. Grand Theft Auto: San Andreas
18. Guild Wars
19. Heroes of Might and Magic V
20. Lego Star Wars
21. Life for Speed
22. Lord of The Rings
Battle for MiddleEarth II
23. Lord of The Rings
Return of the King
24. Men of Valor
25. Mercedes Benz World Racing
26. Micro Machines 4
27. Microsoft Flight Simulator 2004
28. MTX Moto Trax
29. Narnia
30. NASCAR Thunder
We continuously test new games, please refer to http://www.iZ3D.com/games for the
latest approved list of supported games.
31. NBA 2005
32. NHL 2005
33. Need for Speen Underground 2
34. Need for Speed Underground
Most Wanted
35. Painkiller
36. Red Orchestra
37. Rise and Fall
38. Rome: Total Wars
39. Serious Sam II
40. SiN2: Episodes Sniper Elite
41. Sonic Adventure DX:
Directors Cut
42. SpellForce2: Shadow Wars
43. Starship Troopers
44. Star Wars Galaxies
45. Star Wars: Empire at War
46. Star Wars: Battlefront II
47. Tiger Woods PGA Tour 2004
48. The Movies
49. Trains 2006
50. Unreal Tournament 2004
51. V8 Supercars 3
52. Warcraft III Reign of Chaos
53. Warcraft III Frozen Throne
54. Warhammer 40K
55. World of Warcraft
14

Stereo Vision
adapted from Magic Eye, Inc. and Rachel Cooper.
Unlike horses, humans have two eyes located side-by-side in the front of their
heads. Thanks to the close side-by-side positioning, each eye takes a view of the
same area from a slightly different angle. The two eye
views have plenty in common, but each eye picks up
visual information the other doesn't.
Each eye captures its own view and the two separate
images are sent to the brain for processing. When the
two images arrive simultaneously in the back of the
brain, they are combined into one picture. The brain
combines the two images by matching up the
similarities and adding in the small differences. The
small differences between the two images add up to a
big difference in the final picture! The combined image
is more than the sum of its parts. It is a threedimensional stereo picture.
The word "stereo" comes from the Greek word
"stereos" which means firm or solid. With stereo vision you see an object as solid
in three spatial dimensions--width, height and depth--or x, y and z. It is the added
perception of the depth dimension that makes stereo vision so rich and special.
How iZ3D displays stereo images
In order to make observer see 3d scenes on the screen of iZ3D, we show
different pictures to each of the eyes– pictures of the same objects but shot from
different viewpoints. As a result, in iZ3D glasses, the left eye sees images
rendered by the left camera and the right eye sees image rendered by the right
camera.
The cube is drawn on the same
position for both eyes, therefore
to observer it will seem to be
situated right in the iZ3D screen
plane.
The ball is drawn with positive
parallax – in right eye it is
drawn to the right from its
image in the left eye – therefore
the ball will seem to be deep
inside the display.
The pyramid is drawn with
negative parallax – in the right
eye it is drawn to the left from its image in the left eye – so the pyramid will seem
to be floating in front of the iZ3D.
iZ3D Screen
15

English
Troubleshooting
Problem: Image on the screen looks fuzzy and doubled.
Solution: Put on the 3D glasses or switch off the 3D mode
Problem: iZ3D is connected with VGA+DVI cables. Image on the screen looks
displaced
Solution: Push AUTO button on the iZ3D to auto-adjust image position.
Problem: In Windows some windows, icons or the mouse cursor are not
displayed
Solution: Put on glasses – now you can see, that missing windows, icons or
mouse cursor is diplayed on the front screen. Drag windows, icons or mouse
cursor to the back screen and take off the glasses. Ensure that iZ3D BACK
screen is the primary screen.
Problem : Games do not start or there is no 3D
Solution: Install latest DirectX and graphics card drivers. Be sure that both
screens are activated in Windows Display properties and iZ3D Back screen is the
primary screen.
Problem: Games start, but 3D does not switch on when NumPad* is pressed
Solution: Be sure that stereo mode is set to “Enabled by Hot Key” and Enable
Stereo Hot Key is defined as NumPad*.
Problem: In some games NumPad* or Stereo control keys do not work
Solution: Redefine hot keys in Driver by going to:
START
Problem: Games starts but 3D is with artifacts
Solution: Try to adjust in-game video settings: visual effects, shadows etc.
Problem: Images are doubling
Solution: Lower the depth settings with NumPad–
Problem: 3D depth is missing or low
Solution: Increase the depth settings with NumPad+. If this does not help, try
switching between 3D and 2D modes by NumPad*.
Please refer to the Technical Support section of http://www.iZ3D.com for the up
to date troubleshooting list.
All ProgramsiZ3D DriveriZ3D
Driver
16
 Loading...