

Page 1
Installation Instructions
and User Guide
EASY DUCT
Model: 11511 Easy Duct Triumph
Model: 11532 Easy Duct Mirage
Model: 12511 Easy Duct Sensation
Electrical Rating: 230~240 V. 50 Hz.
www.ixlappliances.com.au
www.ixlappliances.co.nz
Page 2

Welcome
Thank you for buying this IXL Tastic. Even if you have used a Tastic before, there are very good reasons
to read this user guide before using this one:
• You and your family, property and home will be safe from harm.
• You will learn how this appliance may differ from others.
• By using the Tastic fully and properly, you will get maximum life and value from it.
• Our warranty depends on you using the Tastic according to this user guide.
It will only take you a few minutes, so please read on!
Contents
Easy Duct Tastic Range ................................................... Pg 3
Safety ............................................................................Pg 4-5
How it Works .................................................................... Pg 5
Ventilation Requirements ................................................ Pg 6
Clearances ....................................................................... Pg 6
Overview .......................................................................... Pg 7
Electrical Requirements .................................................. Pg 7
Wiring Diagrams .............................................................. Pg 8
Wiring Aust & NZ ............................................................. Pg 9
Installation ............................................................... Pg 10-13
Replacement Lamps ...................................................... Pg 13
Cleaning & Maintenance ............................................... Pg 14
FAQ’s ........................................................................ Pg 14-15
Warranty ...................................................................Pg 16-17
Warranty Registration ................................................... Pg 18
2
Page 3
®
Tastic
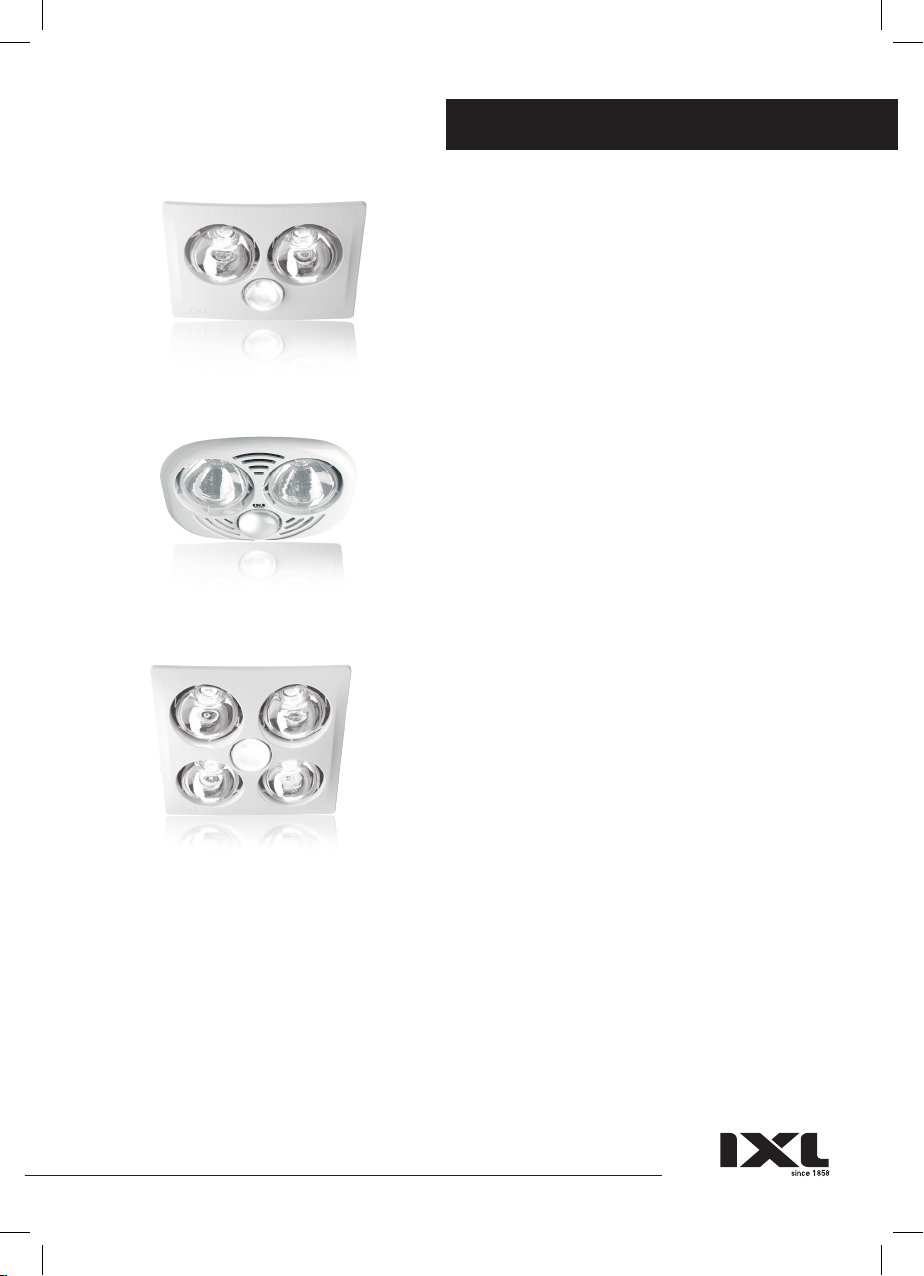
Model: 12511 Sensation
Mo d el: 11511 Triu mph
Models: 11532 Mirage
Easy Duct Tastic Range
11511 Easy Duct Triumph
2 x 275 W Heat, Vent & Light
10 W R80 LED Centre Globe
Cutout Template Supplied
170 mm Ducted Blower, 210m3/hr or 58l/s
11532 Easy Duct Mirage
2 x 275 W Heat, Vent & Light
10 W R80 LED Centre Globe
Cutout Template Supplied
170 mm Ducted Blower, 210m3/hr or 58l/s
12511 Easy Duct Sensation
4 x 275 W Heat, Vent & Light
10 W R80 LED Centre Globe
Half Heat Function
Cutout 330 mm x 330 mm
170 mm Ducted Blower, 223m3/hr or 62l/s
Page 4

®
Tastic
Safety
Read through these instructions completely before commencing installation.
Do not allow insulation material to rest against the sides or top
of the Tastic unit when installed. This Tastic must not be installed
where there is a possibility of water splashing on to the lamps.
There is no IP rating on any IXL Tastic.
NOTE: This product must be installed by a qualified installer.
The infra-red lamps heat by direct radiation rather than by heating the air in the room, so the Tastic should
be located directly over where drying off occurs.
Locate the Tastic in accordance with the requirements of the current Australian/New Zealand Wiring Rules
AS/NZS 3000 relating to damp situations, or according to applicable Wiring Rules for installations outside
of Australia and New Zealand.
In some installations this may mean that no part of the Tastic may be located directly above any part of a
bath or shower recess or enclosure.
For unenclosed showers refer to Wiring Rules conditions.
Switches and other controls must not be located where they can be touched by a person in the bath
or shower.
NOTE: Tastic products must only be installed horizontally in ceiling.
• Do not look directly into heat lamps when in use.
• Tastic products are not tanning lamps.
• Make sure the lamps have cooled and power is off to the Tastic before removing lamps for replacement.
• Do not operate this appliance without the fascia in position.
• This appliance is not intended for use by persons (including children) with reduced physical, sensory or
mental capabilities, or lack of experience and knowledge, unless they have been given supervision or
instruction concerning use of the appliance by a person responsible for their safety.
• Young children should be supervised to ensure they do not play with the appliance.
• This appliance must be mounted with the lowest point at least 2.1 metres from the floor.
• This appliance must not be mounted immediately below a socket outlet.
• Regulations concerning the discharge of air have to be fulfilled.
WARNING: Curtains or combustible material may ignite if in contact with the heater.
SAFETY FEATURES
Thermal switch:
When Easy Duct Tastic works in FAN OFF mode and the temperature inside the unit reaches 55°C, the
thermal switch will switch on the fan automatically. When the temperature drops, the thermal switch will
switch off the fan.
4
Page 5

®
Tastic
Over-temperature switch (PTCR):
When for any reason the temperature inside the unit reaches 80°C for model 12511, the PTCR will cut off
power to the Easy Duct Tastic. The PTCR can be reset by turning off power to the unit at the isolating switch
and allowing to cool for 10-15 minutes. The fusible resistor in models 11511 & 11532, when it reaches
93˚C will cut off the power. It is non-resettable. In such a case the Service Centre should be called as this
is not normal operation.
Safety
How it Works
The IXL Tastic range has been designed to exacting standards to give you many years of trouble-free
operation. To ensure you get the most from your Tastic there are a few simple points to keep in mind.
HEAT LAMPS
The IXL Tastic Heat Lamps have no warm up period because the infra red lamps provide instantaneous
heat, and are designed to heat you and not your bathroom - that’s the efficient way infra red heat
works. You’ll save money and energy, with an average cost of around one cent a shower if used
correctly, (based on average 5 minute drying time). Also, to get the full benefit of Tastic’s infra red
warmth, stand directly under the heat lamps. IXL’s exclusive clear heat lamps have been designed
specifically for this application, and concentrate their heat for maximum effectiveness.
Make sure you have the Tastic model that suits your bathroom ceiling height. This Tastic is
manufactured to offer peak performance with bathroom ceiling heights up to 2.4 m for the
Triumph 11511 and Mirage 11532, 2.7 m for Sensation 12511.
The Tastic half heat function is available on the 4 lamp models, and is another energy saver,
allowing you to adjust the heat level to suit prevailing conditions or personal preference.
VENTILATION
To ensure optimum performance of the exhaust fan, it is essential that there is adequate air flow into
your bathroom to help the Tastic’s powerful and efficient exhaust fan to quickly remove steam while
you shower. Your Tastic works by drawing steam-laden air from the room, and as with all exhaust fans
it is essential that sufficient air inlet is provided. Ensure adequate inlets exist through windows, vents
or under the door. Air flow path from inlet to fan should ideally pass over the steam source.
CENTRE LIGHT
The centre light in all Tastic models is designed to provide general illumination in your bathroom.
Note: For efficiency purposes, the centre light will not operate simultaneously with the heat lamps.
Page 6
®
Tastic
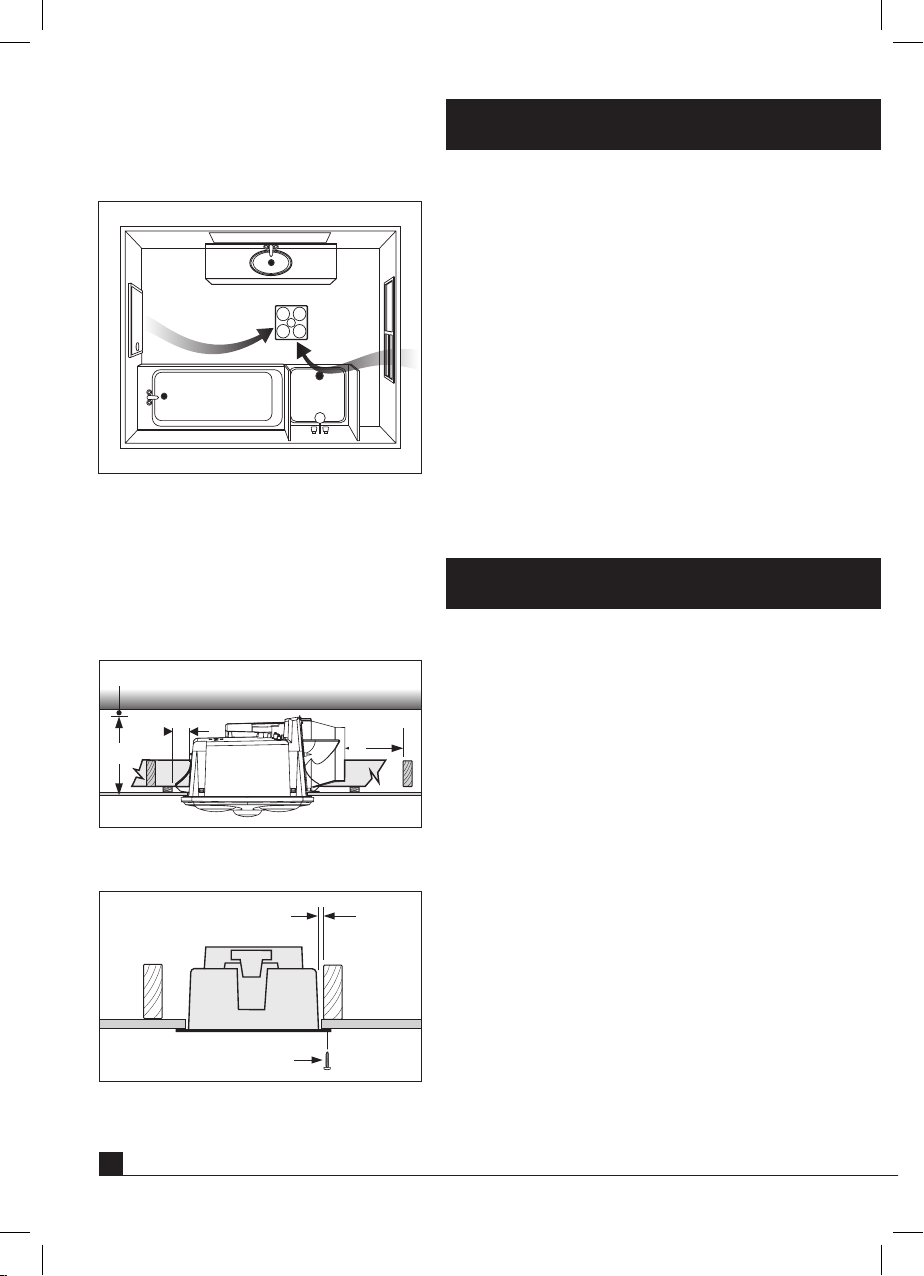
Fig. 1: Ideal placement of Tastic.
Sufficient air inlets into room are required
A
C
B
Fig. 2: Minimum clearances for installation
E
Fasten with screw
D
Ventilation Requirements
For maximum efficiency and fan performance there
are a few key points to keep in mind when installing
your Tastic.
Sufficient air inlet into room
Steam will only be removed if there is sufficient flow
of air through the room. Ensure generous inlets exist
through windows, vents or under the door. Air flow
path from inlet to fan should ideally pass over the
steam sources (see Fig. 1).
Clearances
This appliance must be mounted so that the
lowest point is at least 2.1 m above the floor. The
Tastic body and ducted blower is designed to fit
a ceiling cavity or between – floor space with a
minimum height of 235 mm (Fig. 2). The Tastic may
be installed between joists using the in built clip
fasteners. Ensure the outlet of the Tastic is directed
towards the outer wall. If the desired orientation of
the Tastic unit directs the ducting across ceiling joist
ensure that the closest ceiling joist is not within 200
mm of the Tastic outlet.
Figure 2
A : 15 mm min. B: 220 mm. C: 35 mm min.
clearance required when using the in built clip
fasteners. D: 200 mm min. clearance between Tastic
outlet and nearest ceiling joist.
Figure 3 measurement E:
20 mm min. clearance on the two vertical sides.
Fig. 3: Joist clearances
6
Page 7
®
Tastic
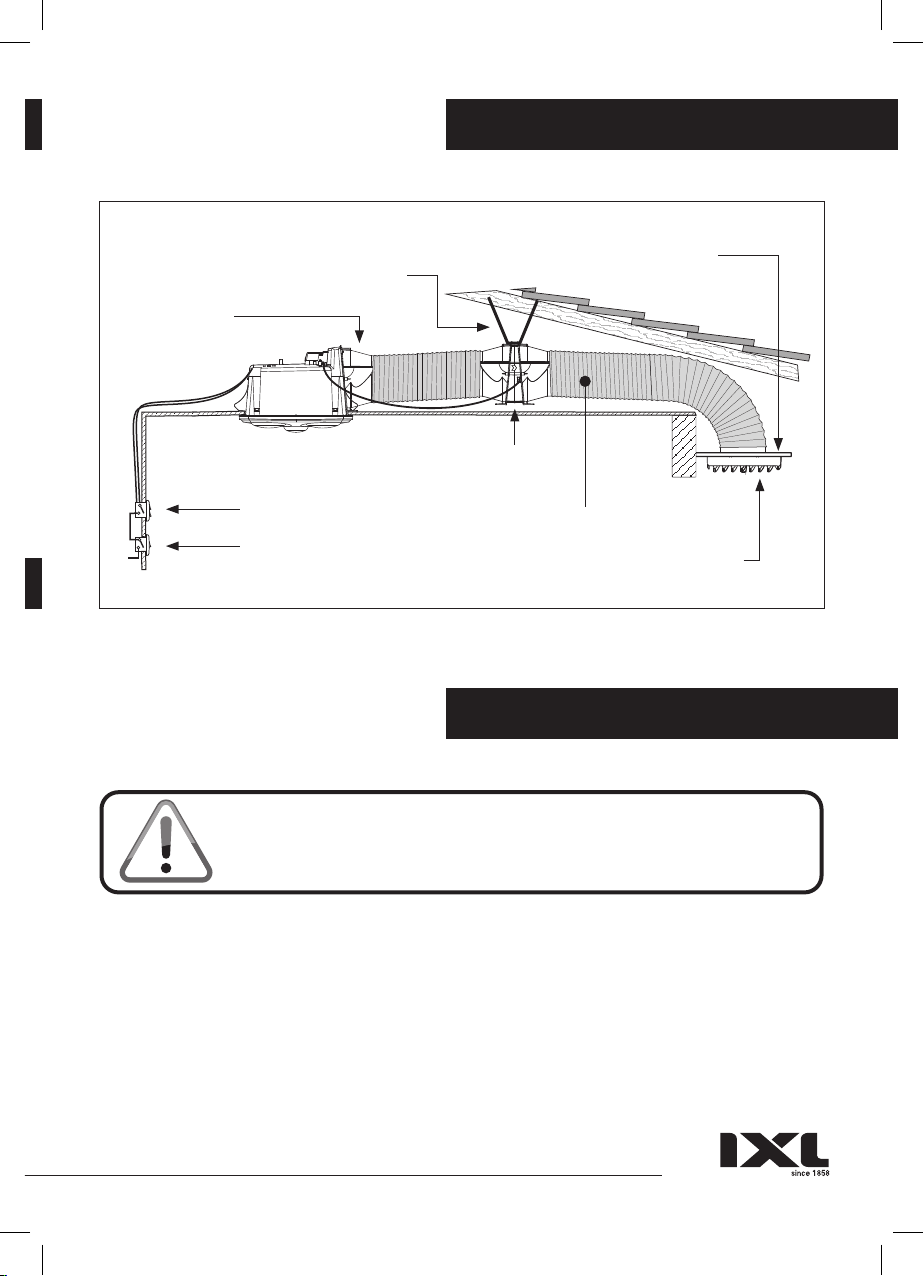
Easy Duct Models: 11511, 12511 & 11532
Flexible support
Transition
Tastic unit
3 or 4 gang wall switch (supplied)
Isolating wall
switch (not
supplied)
Fig. 4: Layout of Tastic Easy Duct
Overview
Eaves
lining
Ducted blower
Ducting
Air outlet grille
Electrical Requirements
Tastic units are fitted with a LED centre lamp. To ensure
correct operation and to prolong the life of the LED please wire as
per the following wiring diagrams for the appropriate model.
See the wiring diagrams on the following pages for supply requirements and maximum loadings for
each model. Tastics may be connected to a lighting or power circuit if loading permits. These models
are for wired-in installation and wiring must be carried out by a registered electrician. Switches and
a wall plate are provided with the Tastic*. Do not use this product with any solid state speed control
or commercial dimming device. If the supply cord is damaged, it must be replaced by IXL Home, its
service agent or similarly qualified persons in order to avoid a hazard.
* Number of switches depends on your Tastic model.
* Excludes Model 11532 (Tastic Easy Ducted Mirage 3 in 1)..
Page 8
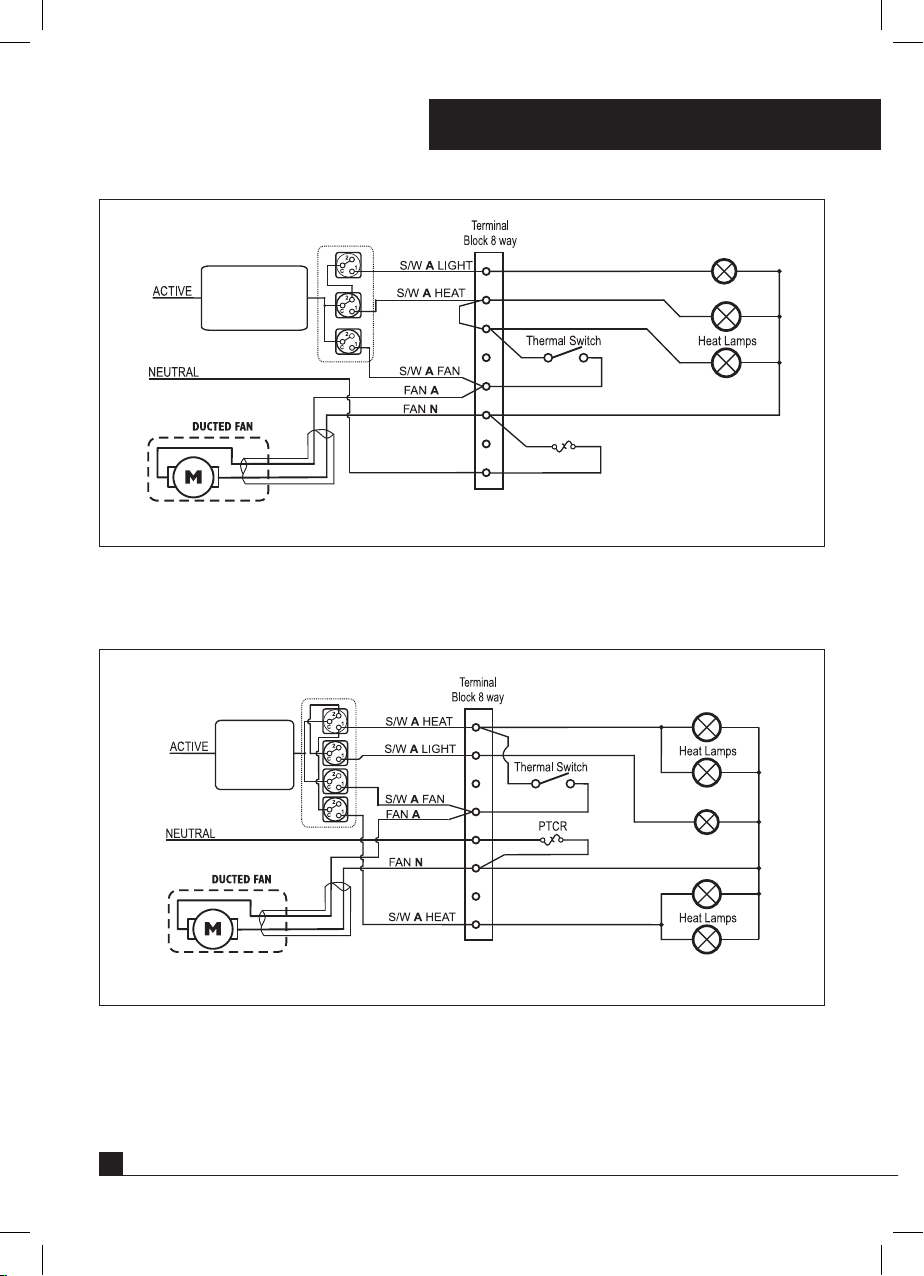
®
Tastic
For wiring connection
see additional
information
Figure 7
11511 & 11532: 2.5A 50Hz
11511: 2.5A 50Hz
Fig. 5: Wiring diagram for model 11511 & 11532
Wiring Diagrams
LED GLOBE
Fusible resistor
For wiring
connections see
additional
information
Figure 7
12511: 4.8A 50Hz
Fig. 6: Wiring diagram for model 12511
8
LED GLOBE
Page 9
®
Tastic
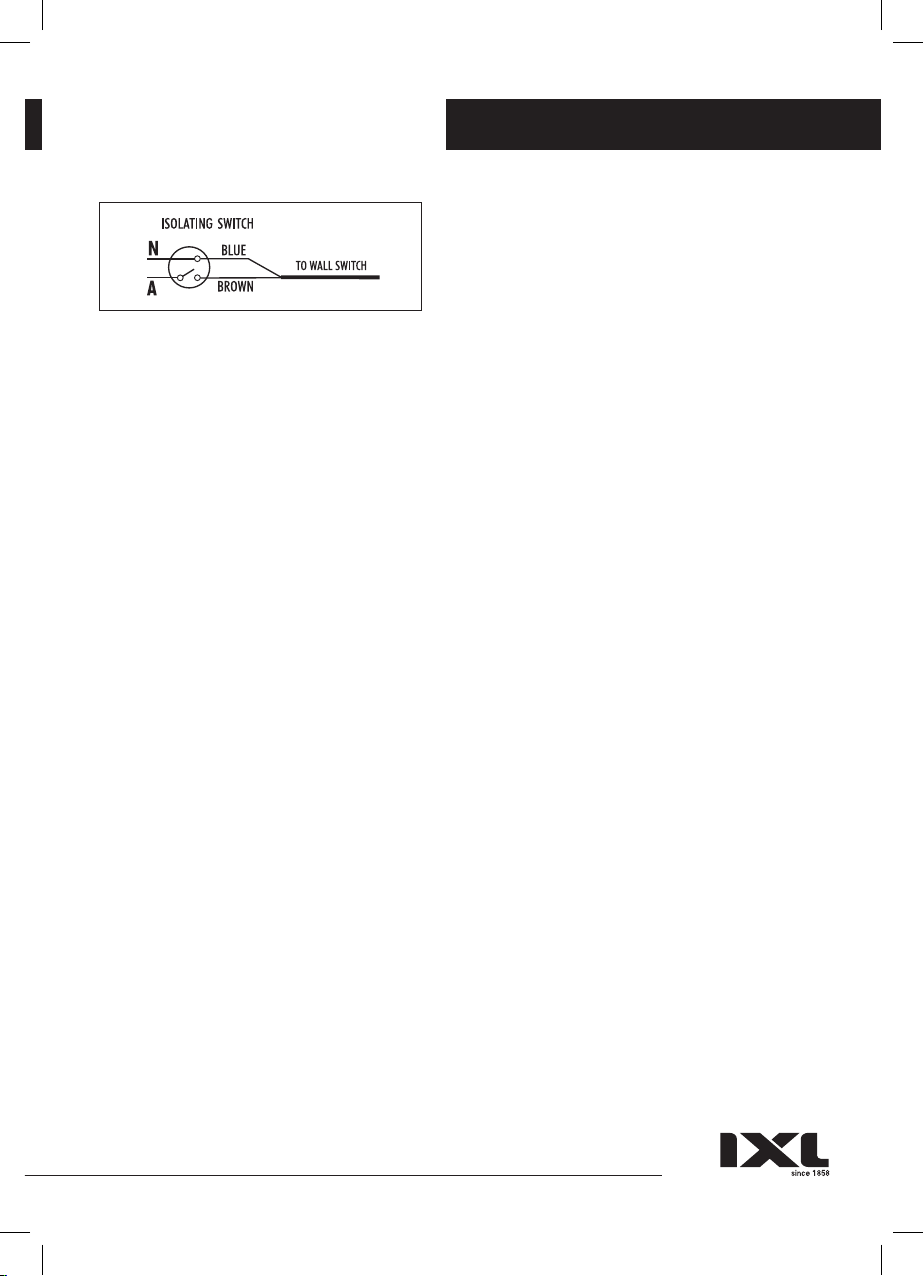
Fig. 7: Hardwired
Wiring – Aust & NZ
Hardwired models 11511, 12511 & 11532: A local
isolating switch (not supplied) must be incorporated in
the fixed wiring to the appliance to allow disconnection
of supply during maintenance. This isolating switch
should be located in close proximity to the Tastic and
must be installed in accordance with applicable Wiring
Codes.
Page 10
®
Tastic
The Tastic may be installed between joists using the in built clip fasteners. Alternatively, the unit can
be installed against a joist using two screws through notches located in the flange (Fig. 3 on page 6),
provided that the clearances for the two vertical sides are maintained as per Fig. 2 on page 6.
IMPORTANT:
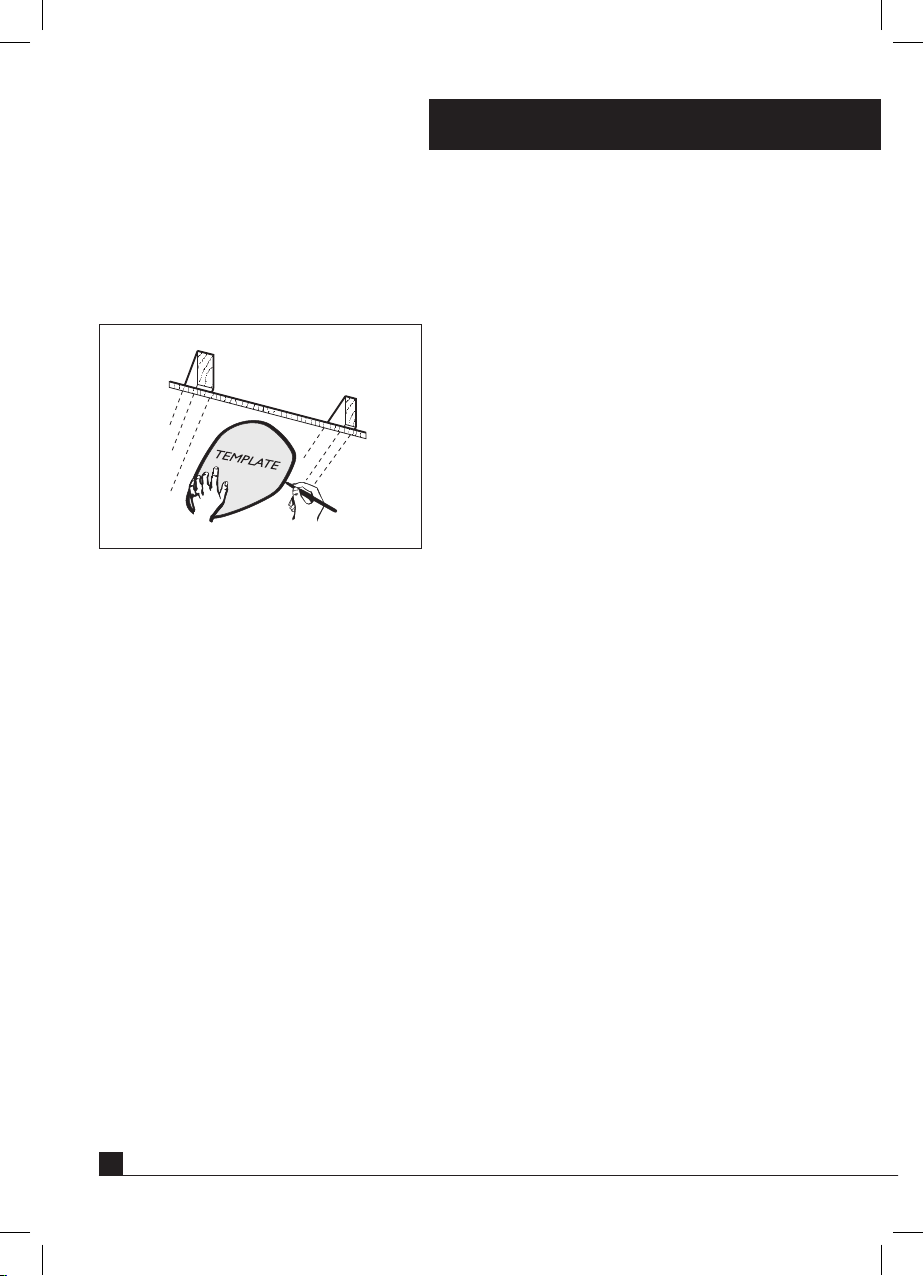
Fig. 8: Use template to mark position of Tastic
Joists, beams and rafters shall not be cut or notched to install the appliance.
Installation
Depending on your model, the Tastic has a weight
of 2 – 3.5 kg (see below). If adequate support is not
available for the Tastic, it may be necessary to provide
extra strengthening.
Triumph & Mirage – approx 2 kg
Sensation – approx 3.5 kg
NOTE: This product must be installed by a qualified
installer. Ensure power is off to location of Tastic.
1. After determining the location of the Tastic and
components according to directions, use the card
included with your Tastic Carton as a template to
mark out and cut an aperture in the ceiling (Fig. 8).
Make sure that template is parallel to a wall.
2. Remove fascia from the body. Remove all lamps.
3. Unscrew terminal cover.
10
Page 11
®
Tastic
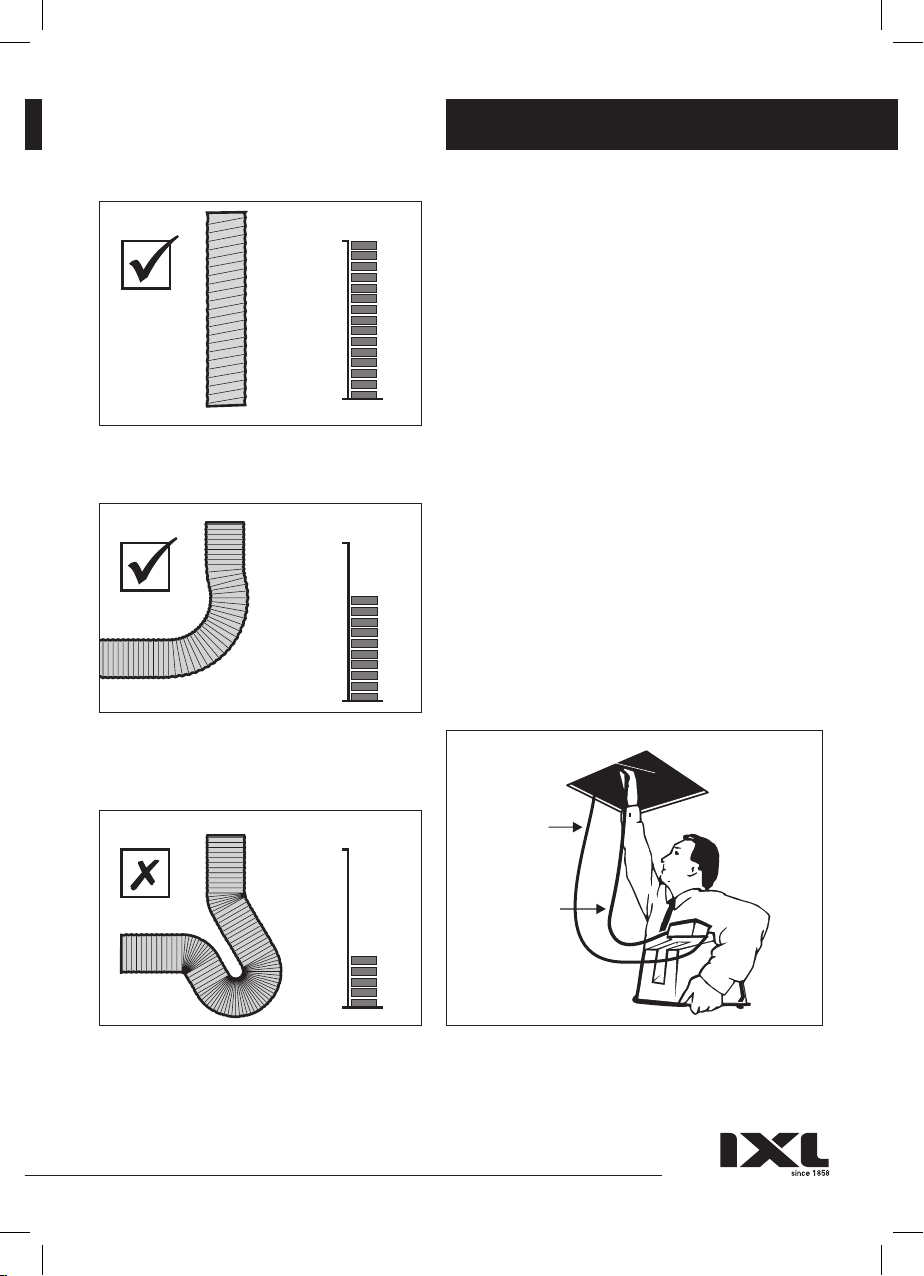
Fig. 9: Straight ducting
Performance
100%
Performance
100%
Installation
Ducting
1. These products have been designed to suit 150
mm dia. ducting. Determine the length of ducting
required ensuring that the length is as short as
possible. Refer to Fig’s 9 – 11 to attain optimum
performance.
2. Tape a length of ducting 1 m long (max) between
the blower inlet and the Transition. Tape remaining
length of ducting to exit of blower.
Installing the Ducted Blower
NOTE: The transition is assembled to the main body
after the main body has been snapped into place in
the ceiling.
1. Feed ducting and blower through hole in ceiling.
While feeding ducting into ceiling direct it towards
the installation position of the outlet grille. Position
blower so that the short length of ducting is
stretched out and Transition piece along striped or
terminated wire is sitting next to the hole as seen
in Fig. 12.
Fig. 10: Gradual bends,
ducting stretched straight
Performance
100%
Fig. 11: Tightly compressed bends Fig. 12
Fan lead
Power cord
Page 12
®
Tastic
Fig. 13
Push down to
lock in place
Thumbscrew
Fig. 14
Fig. 15 – 11511, 11532
Clip Transition
onto body
Installation
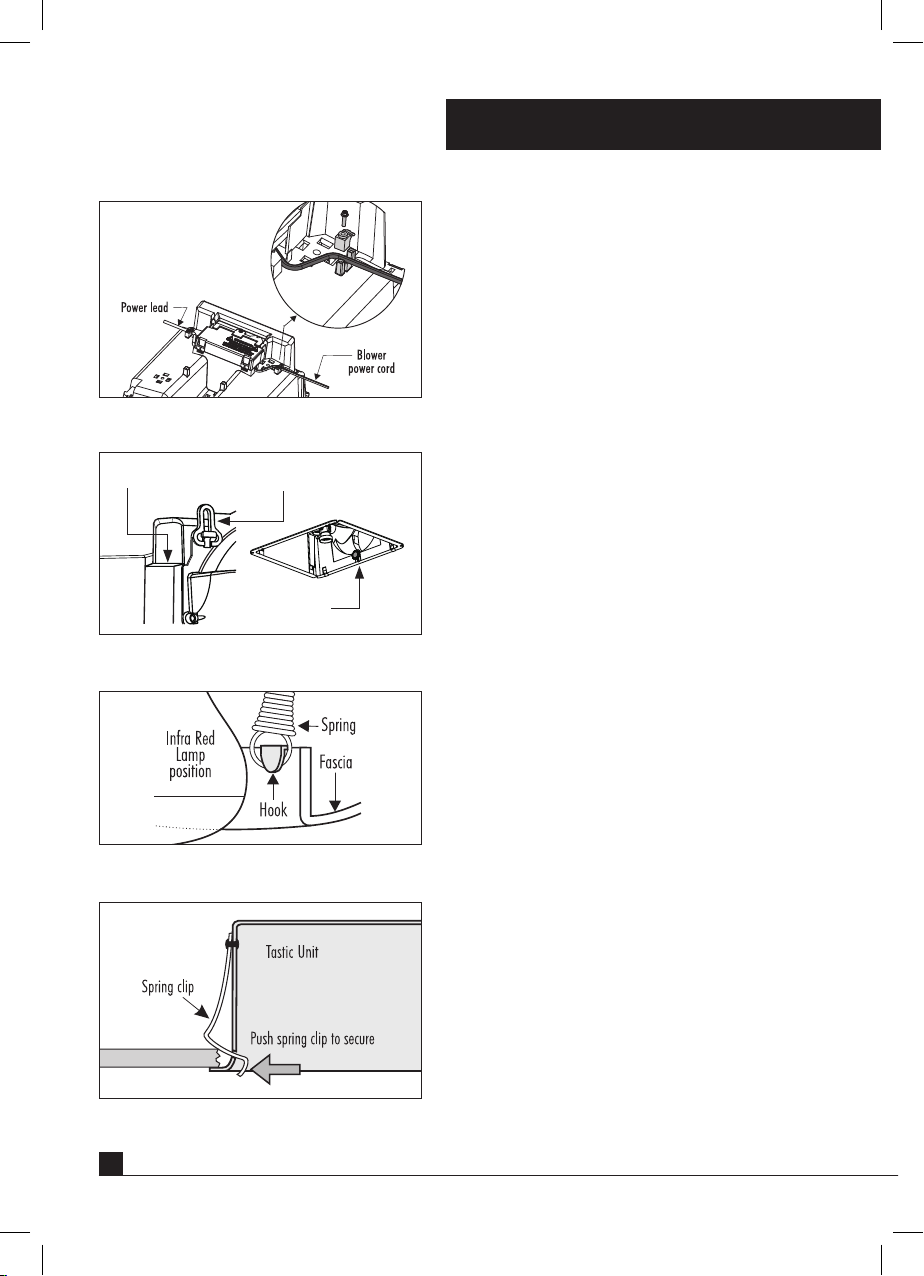
2. Cut plug from end of blower power cord and
strip wires 10mm. Make the necessary electrical
connections ie. connect wiring from blower
assembly and wall switch to terminal block as
per circuit diagram. For models 11511, 12511
and 11532 reposition terminal cover on top of the
Tastic unit and then secure with screw. Fit two cord
anchor clamps as per Fig. 13.
3. Push Tastic body into ceiling aperture, allowing
metal springs to snap open. As the Tastic is raised
into the ceiling, ensure electric cables do not rest
over the Tastic.
4. Connect Transition to Tastic body and secure with
thumbscrew as shown in Fig 14.
Final Assembly
1. Model 11511, 11532, remove lamps and centre
globe to fit fascia into position and hook coilspring onto fascia as per Fig. 15.
Model 12511 has a snap-on fascia, however
the lamps and centre globe must be fitted in
these models prior to the fascia. The legs of the
lamp surround must rest freely on the ceiling. A
clearance of approximately 3-5 mm should exist
between the ceiling and outer rim of surround.
2. Insert infra-red lamps and centre globe into socket
and screw in well to give good electrical contact
to ensure correct operation.
3. To secure the Tastic in position, push lower ends
of springs apart (Fig 16). Ceiling board thickness
should be adjusted to enable springs to be fitted
without excessive force.
4. Centralise fascia and wipe surround and
bulbs clean.
5. Turn on power at the isolating switch and check
operation of Tastic.
Fig. 16
12
Page 13
®
Tastic
Installation
Installing the Grille
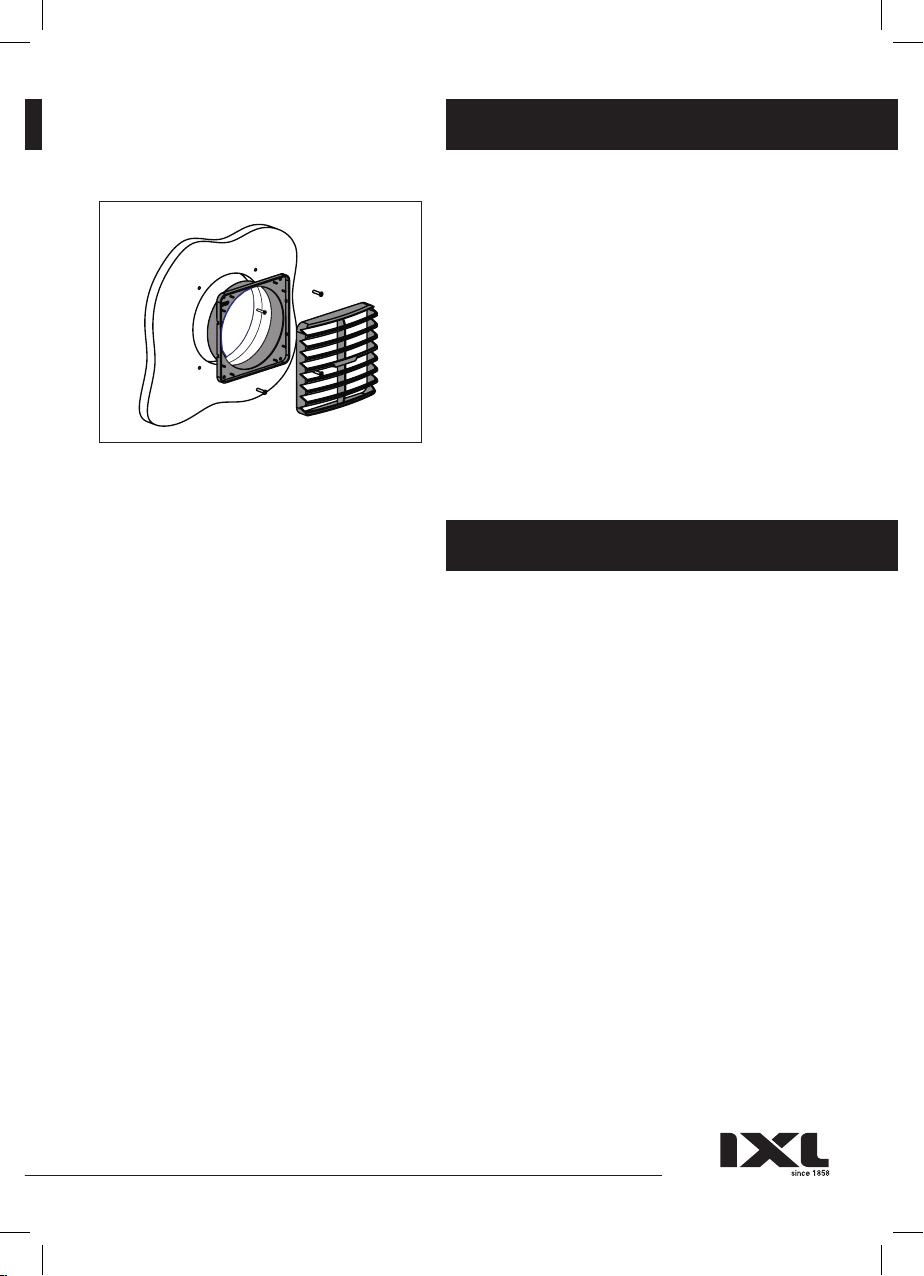
1. Cut a hole 160 mm in diameter in eaves or outer
wall. Feed ducting out through this hole and tape
to the Grille baseplate.
2. Feed the ducting back through the hole so that the
Grille base is against the eaves or outer wall.
3. Fix Grille base with four 6 G screws and snap fit
the Grille louvres over the Grille base as shown in
Fig. 17.
Fig. 17
Replacement Lamps
The Sensation lamp fascia must be removed prior to replacing lamps. Ensure lamps are screwed well
in after replacement to give good electrical contact.
NOTE: Replacement with any other lamps other than those listed below may cause damage to the
moulding and void the warranty.
Heat Lamps
The IXL Tastic lamps have been specially developed for best performance.
275 watts max IXL Model no. 11300.
NOTE: Replace only with genuine IXL approved Hard Glass Infra-Red lamps.
Light Bulb
10 W R80 LED IXL Model no. 12281
Light bulb is not covered by manufacturer’s warranty.
NOTE: 100 W maximum light bulb on all above Tastics.
Page 14

®
Tastic
WARNING: Always make sure the unit is turned off and allow all bulbs to cool before cleaning.
Maintenance of the Tastic is required to ensure the quality of the product and functions
are maintained.
It is recommended that the Tastic body, fascia and globes be checked and cleaned every 2 years.
To clean bulbs and lamp fascia use a damp cloth with liquid glass cleaner. Fascias are dishwasher
safe.
Cleaning and maintenance will help to preserve the life-span and performance of the Tastic.
Cleaning & Maintenance
FAQ’s
Service
NOTE: Do not remove the Tastic from the ceiling. Your Tastic will be serviced in your home.
If service is required, please contact customer service at IXL Home on 1300 727 421.
Frequently asked questions
Q – Will my Tastic heat my bathroom?
A – No, your Tastic is designed to provide infra red radiant heat to warm the body while drying,
when standing directly underneath. It is not designed as a room heater.
Q – Can I install my Tastic directly above a shower recess?
A – For safety reasons it is not recommended to install above shower recess. Please refer to the
current Australian/New Zealand Wiring Rules AS/NZS 3000 relating to damp situations for
further details.
Q – Can I replace by 275 watt heat lamps with 375 watt lamps?
A – You can only use heat lamps which have been fitted and approved for use in your product.
The rating label will state the maximum wattage for your product.
Q – What is the maximum recommended light globe wattage that I can install in my Tastic?
A – Check the rating label for the maximum safe wattage for your product.
14
Page 15

®
Tastic
Q – What will happen if I leave my heat lamps on without fan operation?
A – On certain models (Eco & Easy Duct) the fan will commence operation automatically to keep the
unit operating at a safe temperature. When the unit has cooled sufficiently the fan will switch off
automatically. While the heat lamps of Classic Tastic models will operate normally when the fan
is off.
Q – Why is my Tastic making noise?
A – All Tastics create some noise due to the rapid movement of air through the Tastic.
Q – Can I retro fit a remote control to my existing hardwired Tastic?
A – No, unfortunately this is not possible.
Q – My Tastic unit’s extraction fan doesn’t seem to be removing all the moisture and steam from
my bathroom?
A – There are a number of factors that will influence the exhaust fan’s performance. Firstly you can
improve your cross ventilation via an open door or window; refer to page 6 of the instructions for
details on improving the room’s air flow.
If you live in a traditionally cooler climate, in the winter months during hot showers, you may
notice that there is more moisture and condensation build up. If this is the case, you may wish to
improve your natural ventilation or invest in an additional exhaust fan.
Bathrooms which have high ceilings, are larger than average, or have an open shower may all
require additional ventilation. We recommend that you visit our www.ixlappliances.com.au for
further details and suggestions on effectively ventilating your bathroom.
FAQ’s
Q – Can the installer rotate the IXL wall switch mechanisms?
A – Yes, the wall switches can be rotated by a qualified electrical trades person.
Q – Can my installer use an alternative wall switch mechanism other than the one supplied with my
IXL product?
A – Yes, your authorised installer can use an alternative switch mechanism.
For more information or help, please contact IXL Home on 1300 727 421.
Page 16

®
Tastic
This Warranty against defects for your newly purchased Tastic product is proudly prepared by IXL
Home Pty Ltd of 1K Marine Parade, Abbotsford, VIC 3067, phone 1300 727 421.
1. IXL Home Tastic products come with guarantees that do not exclude the following consumer
entitlements under the Australian Consumer Law:
a. replacement or refund for a major failure and compensation for any other reasonably
foreseeable loss or damage; and
b. to have the goods repaired or replaced if goods fail to be of acceptable quality and the
failure does not amount to a major failure.
2. IXL Home warrants that your product and related supply will be free from defects in materials
and workmanship during the warranty term. Your in home warranty term is five years with
a two year heat lamp and inline motor replacement warranty, commencing from the date of
purchase. IXL Home acknowledges this product requires professional installation and product
removal is hazardous to consumers, accordingly any necessary inspections and services will
be carried out on site. You should not attempt de-installation.
3. Subject to Point 1, IXL Home will repair any defects in materials and workmanship during
the warranty term and if the product is deemed irreparable provide a replacement of an
equivalent current model where the balance of the warranty period from the original date of
purchase will take effect.
4. To the fullest extent permitted by law and subject always to Point 1, IXL Home will not
be liable for:
a. any loss or damage arising from loss of use, loss of profits or revenue; or
b. for any indirect or consequential loss or damage resulting from any breach of this
warranty against defects.
5. Defective IXL Home Tastic products may be repaired using refurbished parts or if required,
completely replaced by a refurbished product of the same type.
Warranty
Limitations to Your IXL Home Warranty
6. Subject to Point 1, this Warranty:
a. will only be provided to the original purchaser where the original purchase was made from
a IXL Home Authorised Dealer or Reseller and proof of such purchase can be presented at
the time of service;
b. only applies to IXL Home Tastic products purchased in Australia from a IXL Home
Authorised Dealer or Reseller and installed by a qualified person where a Certificate of
Compliance in accordance with State/Territory laws is provided;
c. will not apply where the defect in or failure of the product is attributable to misuse,
abuse, accident or non-observation of the manufacturer’s instructions. This product
must be used in accordance with the manufacturer’s instructions;
d. will not cover faults due to normal wear and tear with reasonable use nor consumable
components such as globes, filters, glass items, etc;
16
Page 17

®
Tastic
e. will not cover any damages or problems caused to this product by natural forces, e.g. storm,
fire, flood, and earthquake; or by intrusion or accumulation (or both) of foreign matters, e.g.
dust, soil, and moisture. IXL Home recommends that you take out appropriate insurances to
protect your product to this end;
f. will not apply if this product is installed in a mobile dwelling eg. caravan or boat;
g. will not apply if this product is removed from the location where it was first installed;
h. is immediately void if the serial or model number label is removed or defaced;
i. is immediately void if the product is serviced or repaired by an unauthorised/unqualified
personnel;
j. covers use of this product for domestic use only;
k. will not be restarted or extended upon repair or replacement of the product or a part.
Warranty
How to make a Claim under Your IXL Warranty
7. To make a claim under this Warranty you will need to:
a. contact IXL Home service department on 1300 727 421 or [email protected] for
Australia, 0800 727 421 or [email protected] for New Zealand to provide details
and register your claim enabling a IXL Home assessment;
b. submit proof of purchase with your claim eg. tax invoice or purchase receipt;
c. where a property has been constructed by a builder/developer and it is fitted with IXL
products, please submit proof of purchase by way of the certificate of occupancy,
with your claim.
8. IXL Home will contact you to make arrangements for service on site.
9. Subject to Point 1, you will be responsible for any costs relating to the provision of your product
to a IXL Home Authorised Service Dealer.
10. Subject to Point 1, in the event you live more than 50 km from a IXL Home Authorised Service
Dealer you may be subject to travel or transport costs to facilitate the repairing or replacement
of your IXL product.
11. IXL Home and its Authorised Service Dealers reserve the right to seek reimbursement of any
costs incurred by them should your IXL product be found to be in good working order.
Privacy
The privacy of your personal information has always been important to us. To learn more about
how we collect, keep and use your personal information, please obtain a copy of our privacy
statement by visiting our website at www.ixlappliances.com.au or by contacting us via email on
[email protected] or by telephone on 1300 727 421.
Page 18

Tastic
Notes
18
Page 19

Tastic
Visit the IXL Home website below to register your warranty details online.
Australia New Zealand
www.ixlappliances.com.au/warranty www.ixlappliances.com.au/warranty
Warranty Registration
Page 20

For comments, questions or warranty matters:
IXL Home Pty Ltd
Australia:
1K Marine Parade,
Abbotsford VIC 3067, Australia
Free Call: 1300 727 421
[email protected]
www.ixlappliances.com.au
© Copyright IXL Home, 2020
New Zealand:
Free Call: 0800 727 421
[email protected]
www.ixlappliances.co.nz
Approved by the appropriate
electrical supply authorities.
Part number 611022 Issue F
 Loading...