

Page 1

Contents
i976
UserManual
Version5.97GRID
14/09/2009
iWOWCommunicationsPteLtd
Page 2

ii
Important Notice
It is important that you read this user guide prior to using your handset.
The device described in this user guide is approved for use on the GSM 900, 1800, 1900 and
iDEN networks. Certain mobile phone features are dependent on the capabilities and settings of
your service provider’s network. Additionally, certain features may not be activated by your service
provider, and/or the provider’s network settings may limit the feature’s functionality. For more
information about networks, feature availability and functionality; please contact your respective
local service provider.
Your device supports internet connections and other methods of connectivity. Like computers, it
may be exposed to viruses, malicious messages and applications, and other harmful content.
Exercise caution and open messages, accept connectivity requests, download content, and
installations only from trustworthy sources. To increase the security of your device, consider
installing, using, and regularly updating antivirus software, firewall, and other related software on
your device and any connected computer.
When using the features in this device, obey all laws and respect local customs, privacy and
legitimate rights of others, including copyrights. Copyright protections may prevent some images,
music (including ringing tones), and other content from being copied, modified, transferred, or
Page 3

iii
forwarded. GRID disclaims any and all liability for any losses incurred relating to such information
in any way.
Defects or damages that result from the use of non-approved or non-certified accessories,
including but not limited to replacement housings and or other peripheral accessories, are
excluded from any warranty coverage.
All features, functionality, and other product specifications, as well as the information contained in
this user’s guide are based on the latest available information and are believed to be accurate at
the time of printing. GRID reserves the right to change or modify any information or specifications
without notice or obligation.
Page 4

iv
Table of Contents
Menu Tree (GSM Mode)* .......................... 1
Menu Tree (iDEN Mode) ........................... 2
Features Available in Home and Abroad3
Usage and Care ........................................ 6
Care for Your Phone ............................... 7
Getting Started ......................................... 8
Battery Installation .................................. 8
Charging the Battery ............................... 9
The battery indicator ............................. 10
Inserting the SIM card .......................... 11
Switch the Phone ON/OFF ................... 13
Offline Mode ........................................... 13
Basics ...................................................... 15
Keys & Parts ......................................... 15
Navigation Keys .................................... 17
Display .................................................. 17
Active Desktop ...................................... 18
Status Indicators ................................... 20
Menu ..................................................... 22
Text Entry ............................................. 22
Normal Mode ........................................ 23
Predictive Mode ................................... 23
Lock & Unlock Keypad ......................... 24
PIN & PUK Codes ................................ 24
Connecting to a Compatible Headset .. 25
Connecting to the USB Cable .............. 26
Call Functions ........................................ 27
Making a Phone Call ............................ 27
Speed Dialing ....................................... 28
Answering a Phone Call ....................... 28
Options During a Call ........................... 29
Call Waiting .......................................... 29
Making a Direct Connect Call ............... 30
Answering a Direct Connect Call ......... 32
Direct Connect Call Sessions ............... 32
Making a Multi-Party Call ..................... 33
Adjusting Volume ................................. 34
Recent Calls ......................................... 34
Contacts ................................................. 36
Viewing Phone Numbers ...................... 36
Viewing by Type ................................... 36
Storing Phone Numbers ....................... 37
Page 5

Contents
v
Copy Contacts ...................................... 37
Delete Contacts .................................... 38
Assign Ringtone ................................... 39
Assign Picture ID .................................. 39
Messages ................................................ 40
Create New Text Messages ................. 40
Create New MMS ................................. 41
Read Messages .................................... 43
Delete Messages .................................. 44
Message Settings ................................. 45
Voice Mail ............................................. 46
Settings ................................................... 47
Sound Settings ..................................... 47
Manage Profiles .................................... 48
Phone Settings ..................................... 48
Display Settings .................................... 51
Network Settings .................................. 52
Call Settings ......................................... 52
Restore Original Factory Settings ........ 54
Bluetooth ................................................ 55
Pairing with Other Devices ................... 56
Send Files via Bluetooth ....................... 56
Receive Files via Bluetooth .................. 57
Multimedia .............................................. 58
Media Center ........................................ 58
File Browser ......................................... 58
Camera ................................................ 58
Camera Settings .................................. 59
Music Player ......................................... 60
Tools ....................................................... 62
Date Book ............................................ 62
Alarm .................................................... 63
GPS ...................................................... 63
Calculator ............................................. 64
Convertor ............................................. 64
Stopwatch ............................................ 64
Voice Memo ......................................... 65
Web ......................................................... 66
Configure Phone for Browser Service .. 66
Making a Connection ........................... 66
Bookmarks ........................................... 67
Safety Information ................................. 68
Index ....................................................... 79
Page 6

Menu Tree
1
Menu Tree (GSM Mode)*
Recent Calls
• Missed Calls
• Received Calls
• Outgoing Calls
• Call Summary
• Packet Data
Counter
• Reset
Contacts
• View
• Add New Entry
• View Type
• Memory Status
• Options
Message Center
• SMS
• MMS
Web
• Homepage
• Google
Java
Multimedia
• Media Center
• Camera
• Music Player
• File Browser
Tools
• Date Book
• Alarm
• Calculator
• Converter
• Stopwatch
• Games
• Voice Memo
Settings
• Manage
Profiles
• Sound Settings
• Phone Settings
• Display Setting
• Call Settings
• Keypad
Settings
• Connectivity
• Factory Reset
*Note: Some GSM services only
available in networks with roaming
agreements with your operator.
Page 7

2
Menu Tree (iDEN Mode)
Recent Calls
• Missed Calls
• Received Calls
• Outgoing Calls
• Call Summary
• Packet Data
Counter
• Reset
Contacts
• View
• Add New Entry
• View Type
• Memory Status
• Options
Message Center
• SMS
• MMS
• Voice Mail
• Help
Web
Multimedia
• Media Center
• Camera
• Music Player
• File Browser
PTT
• Call Alert Q
• Options
Java
Tools
• Date Book
• Alarm
• GPS
• Calculator
• Converter
• Stopwatch
• Games
• Voice Memo
Settings
• Manage
Profiles
• Sound Settings
• Phone Settings
• Display Setting
• Call Settings
• Keypad
Settings
• Connectivity
• Factory Reset
• Information
Page 8

Available Features
3
Features Available in Home and Abroad
Feature Available in Home Available Abroad
Push to Talk Yes Available in selected countries
Wireless Data Services Yes Available in selected countries
Voice Mail Yes Yes
Dial-up Service Yes Yes
Call Waiting Yes No
Caller ID Yes Available in selected countries
Call Forwarding Yes Yes
GPS Yes No
Emergency Calls Yes Available in selected countries
SMS Yes Available in selected countries
MMS No Available in selected countries
Frequency Bands in i976
iDEN 800Mhz, 900Mhz
GSM 900Mhz , 1800Mhz, 1900Mhz
Page 9

4
GSM Network Availability per Country
Countries GSM
Argentina GSM 1900
Australia GSM 900/1800
Bahamas GSM 1900
Belgium GSM 900/1800
Bermudas GSM 1900
Brazil GSM 900/1800/1900
British Virgin Islands GSM 900/1800/1900
Bulgaria GSM 900/1800
Cameroon GSM 900
Cayman Islands GSM 900/1800/1900
Chile GSM 1900
China/Hong Kong/Macau GSM 900/1800
Colombia GSM 1900
Congo GSM 900/1800
Costa Rica GSM 1800
Cuba GSM 900
Denmark GSM 900/1800
Dominican Republic GSM 900/1800/1900
Fiji GSM 900
Finland GSM 900/1800
France GSM 900/1800
Germany GSM 900/1800
Greece GSM 900/1800
Greenland GSM 900
Guatemala GSM 900/1900
Haiti GSM 900/1800
Honduras GSM 1900
Iceland GSM 900/1800
India GSM 900/1800
Italy GS M 900/1800
Jamaica GSM 900/1800
Jordan GSM 900/1800
North Korea GSM 900
Luxembourg GSM 900/1800
Madagascar GSM 900/1800
Mongolia GSM 900
Page 10

Available Features
5
Montenegro GSM 900/1800
Papua New Guinea GSM 900
Peru GSM 1900
Poland GSM 900/1800
Portugal GSM 900/1800
Romania GSM 900/1800
Russia GSM 900/1800
Saudi Arabia GSM 900/1800
Singapore GSM 900/1800
South Africa GSM 900/1800
Spain GSM 900/1800
Switzerland GSM 900/1800
Taiwan GSM 900/1800
Thailand GSM 900/1800/1900
Turkey GSM 900/1800
Ukraine GSM 900/1800
United Kingdom GSM 900/1800
USA GSM 1900
Venezuela GSM 900
Vietnam GSM 900/1800
Zambia GSM 900
Zimbabwe GSM 900
Please refer to the website http://www.gsmworld.com/roaming/gsminfo/index.shtml
for the
complete list of countries with GSM cellular services. Please refer to your local operator for more
details on GSM roaming.
Page 11

6
Usage and Care
For your own safety, please follow the
following guidelines when you use your
mobile phone. Failure to comply may be
dangerous or illegal.
Road Safety
Do not use the mobile phone while driving.
If necessary, park the vehicle first.
Switch off in aircraft
Mobile phones can cause interference to
aircraft electronics. Using them on an
aircraft is both illegal and dangerous.
Switch off when refueling vehicle
Do not use the phone at a refueling station
or near fuels or chemicals.
Forbidden Usage
Always switch off your phone where usage
is forbidden in areas such as a hospital.
Interference
All mobile phones may be subject to radio
interference, which could affect
performance.
Use qualified service
Only qualified service personnel should
repair your cellular mobile phone.
Emergency calls
Ensure your phone is switched on and in
service. Enter the emergency number for
your country and press the call key. Give
your location. Do not end the call until told
to do so.
Accessories
Use only approved batteries and
accessories. The use of other types may
invalidate the warranty for the product and
may be dangerous.
Page 12

Usage and Care
7
Care for Your Phone
To ensure the longevity of the product,
please keep it away from:
Liquids
Do not expose your phone to
liquids of any form including
water, rain, high humidity and
moisture.
Dust and dirt
Do not expose your phone to
dust, dirt, sand or any other
potential contaminants.
Extreme temperatures
Do not expose your phone to
extreme temperatures below –
10°C or above 45°C.
For example, leaving your phone
on the dashboard of a car during
a hot day.
Cleaning solutions
Avoid using alcohol or other
cleaning solutions on your phone.
Use only a dry, lint-free soft cloth
to clean the phone surface.
Microwave
Do not place your phone in a
microwave oven.
Page 13
8
Getting Started
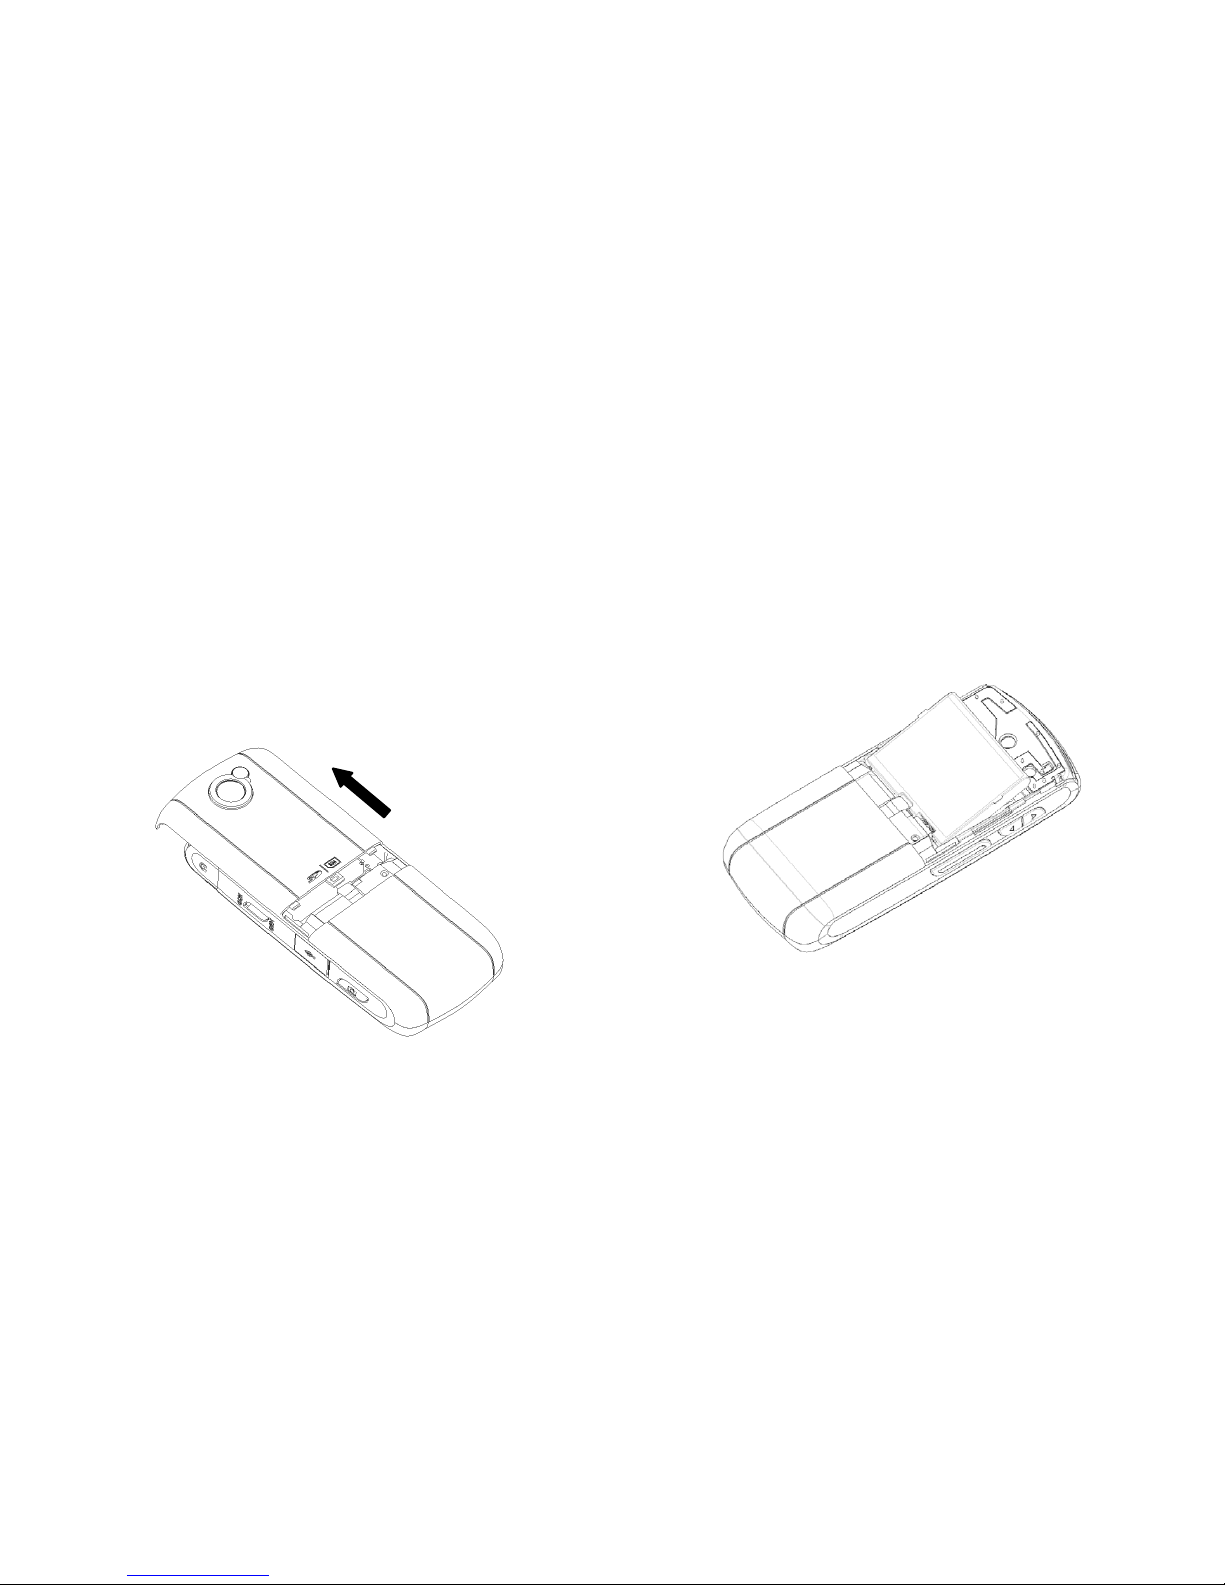
Battery Installation
1. Remove the battery door by sliding it
upwards as shown.
2. Align the contacts of the battery and
push the battery gently into position. The
battery should sit snugly in the battery
compartment.
3. Slide the battery door until it clicks back
into place.
Inserting the battery
Removing the battery cover
Page 14

Getting Started
9
Charging the Battery
The phone can be charged from the
charger supplied or via a computer USB
port.
1. Lift up the USB connector cover.
2. Insert the connector into the phone. The
battery charging progress will be
indicated via the battery icon.
Note:
The phone will charge at a slower rate as
compared to charging from the supplied
rapid charger. Please use the USB cable
provided when charging from the computer.
Please also ensure that the computer is
turned on and the necessary drivers are
installed for the computer’s USB port to
allow charging.
Always use the recommended battery and
chargers. Use of batteries other than the
recommended type may present a risk of
fire, explosion or leakage and may result in
injury to the user or damage to property.
Battery Charging
USB / Charging Cable
USB Connector
Cover
USB
Connector
Slot
Page 15

10
If the phone has not been used for some
time, the phone may take about 2 to 3
minutes to show the charging indicator.
This is normal if the battery is fully
exhausted.
The battery indicator
Indicator Bars Capacity Color
4
>95%
BLUE
3
~ 70%
BLUE
2
~ 40%
BLUE
1
~ 15%
BLUE
0
< 5%
RED
Page 16

Getting Started
11
Inserting the SIM card
Ensure that the phone is turned off before
inserting or removing the SIM cards.
1. Carefully slide upwards to remove the
battery door.
2. Remove the battery from the battery
compartment.
3. Locate the iDEN SIM card and MicroSD
card slot and the SIM door latch
4. Slide the SIM door latch in the direction
as shown to unlock.
5. Flip up the SIM card slot.
6. Remove any plastic insert in the SIM
card slot and the MicroSD card slot.
7. Insert the iDEN SIM card as shown
below. Ensure that the iDEN SIM card
contacts are facing downwards.
MicroSD card slot
iDEN SIM card
slot
SIM door latch
Opening the iDEN SIM card
iDEN SIM
Page 17

12
8. Insert the MicroSD card as shown below.
Close the iDEN SIM card slot and slide the
SIM door latch back to lock the iDEN SIM
card and MicroSD card in place.
9. To insert the GSM SIM card, locate the
GSM SIM slot. The SIM card will slide
into the slot in the direction as indicated
in the following diagram.
Caution:
The SIM card can be easily damaged by
scratching or bending, so be careful when
handling, inserting or removing the card. To
prevent damage to the SIM card, do not
remove the SIM card unless necessary.
Inserting the MicroSD
MicroSD card
Inserting GSM SIM
GSM SIM
Page 18

Getting Started
13
Switch the Phone ON/OFF
To turn on the phone, press and hold the
Power On/Off
key on the top of the
phone until the display turns on.
If PIN code is prompted, key in the PIN
code, and select OK.
If lock code is prompted, key in the lock
code, and select OK.
To turn the phone off, press and hold the
Power On/Off
button until the display
turns off.
Offline Mode
The transmitter feature allows you to use
your device by connecting to the wireless
network.
When you turn off the transmitter, the
connection to the wireless network is turned
off, as indicated by in the signal strength
indicator area. All wireless RF signals to
and from the device are prevented.
To switch between transmission modes:
:
1. Select Menu > Settings > Phone
Settings > Transmitter > On/Off.
2. Select Yes when prompted to confirm the
action.
Note:
In the offline mode you cannot make or
receive any calls, or use other features that
require cellular network coverage.
However, calls may still be possible to the
official emergency number programmed
into your device.
Page 19

14
To make calls, you must first activate the
phone function by changing profiles. If the
device has been locked, enter the lock
code.
If you try to send messages while in the
offline mode, the messages will be placed
in the Unsent folder to be sent later.
Page 20

Basics
15
Basics
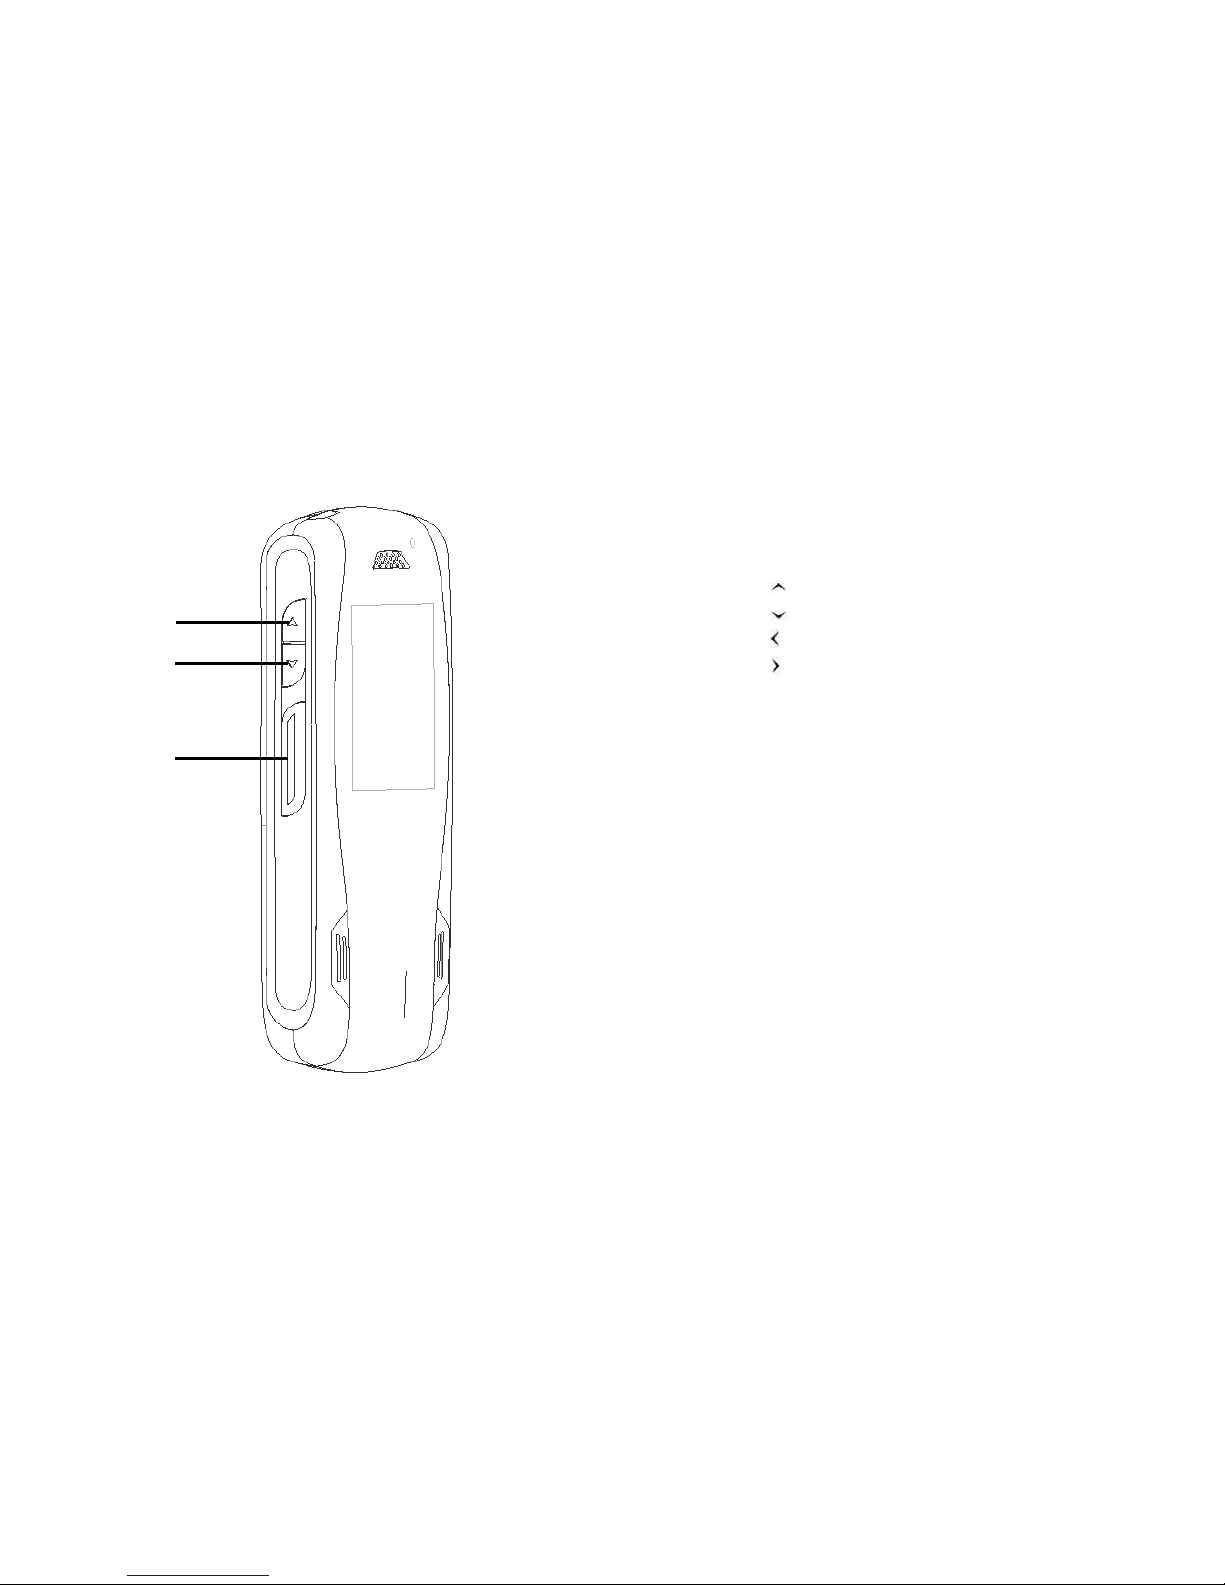
Keys & Parts
11
12
Top View
9
Front View
3
2
4
5
6
7
8
10
Right Side View
13
14
15
16
Page 21
16
1 Speaker
2 Display
3 Navigation keys
Up
Down
Left
Right
4 Left selection key
5 Right selection key
6 End key
7 Send key
8 Menu key
9 Number keys
10 Speaker
11 High Audio
12 Power On/Off key
13 Camera Hot Key
14 USB Port
15 Network Switch
16 Headset Jack
17 Volume Up Key
18 Volume Down Key
19 Push to Talk (PTT) key
17
18
19
Left Side View
Page 22
Basics
17
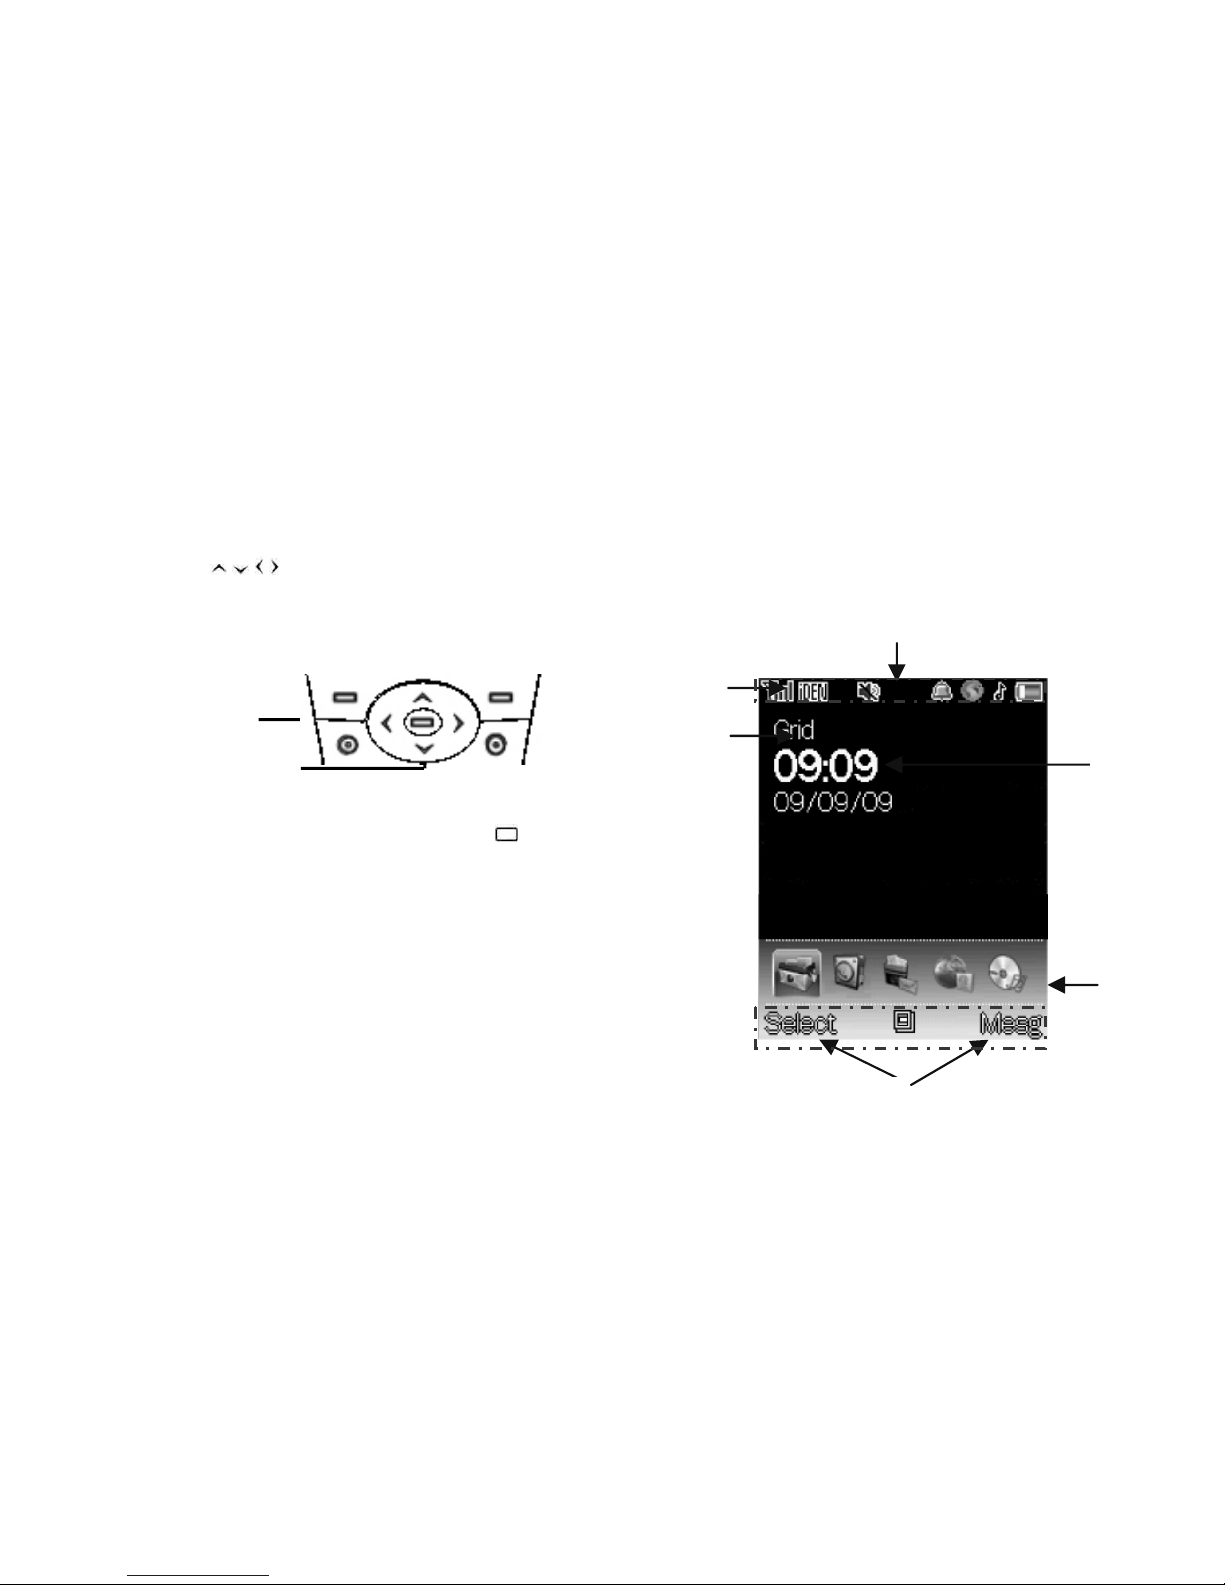
Navigation Keys
Press the
navigation keys to scroll to
and from the items in the screen display.
To select the item, press the Menu
key
or the left selection key.
Display
The diagram shows the Idle Screen display
when you turn on the phone.
Navigation Keys
Menu Key
Status Ba
r
Operator
Name
Network
Mode
Soft Keys
Idle Screen Display
Active
Desktop
Date &
Time
Page 23
18
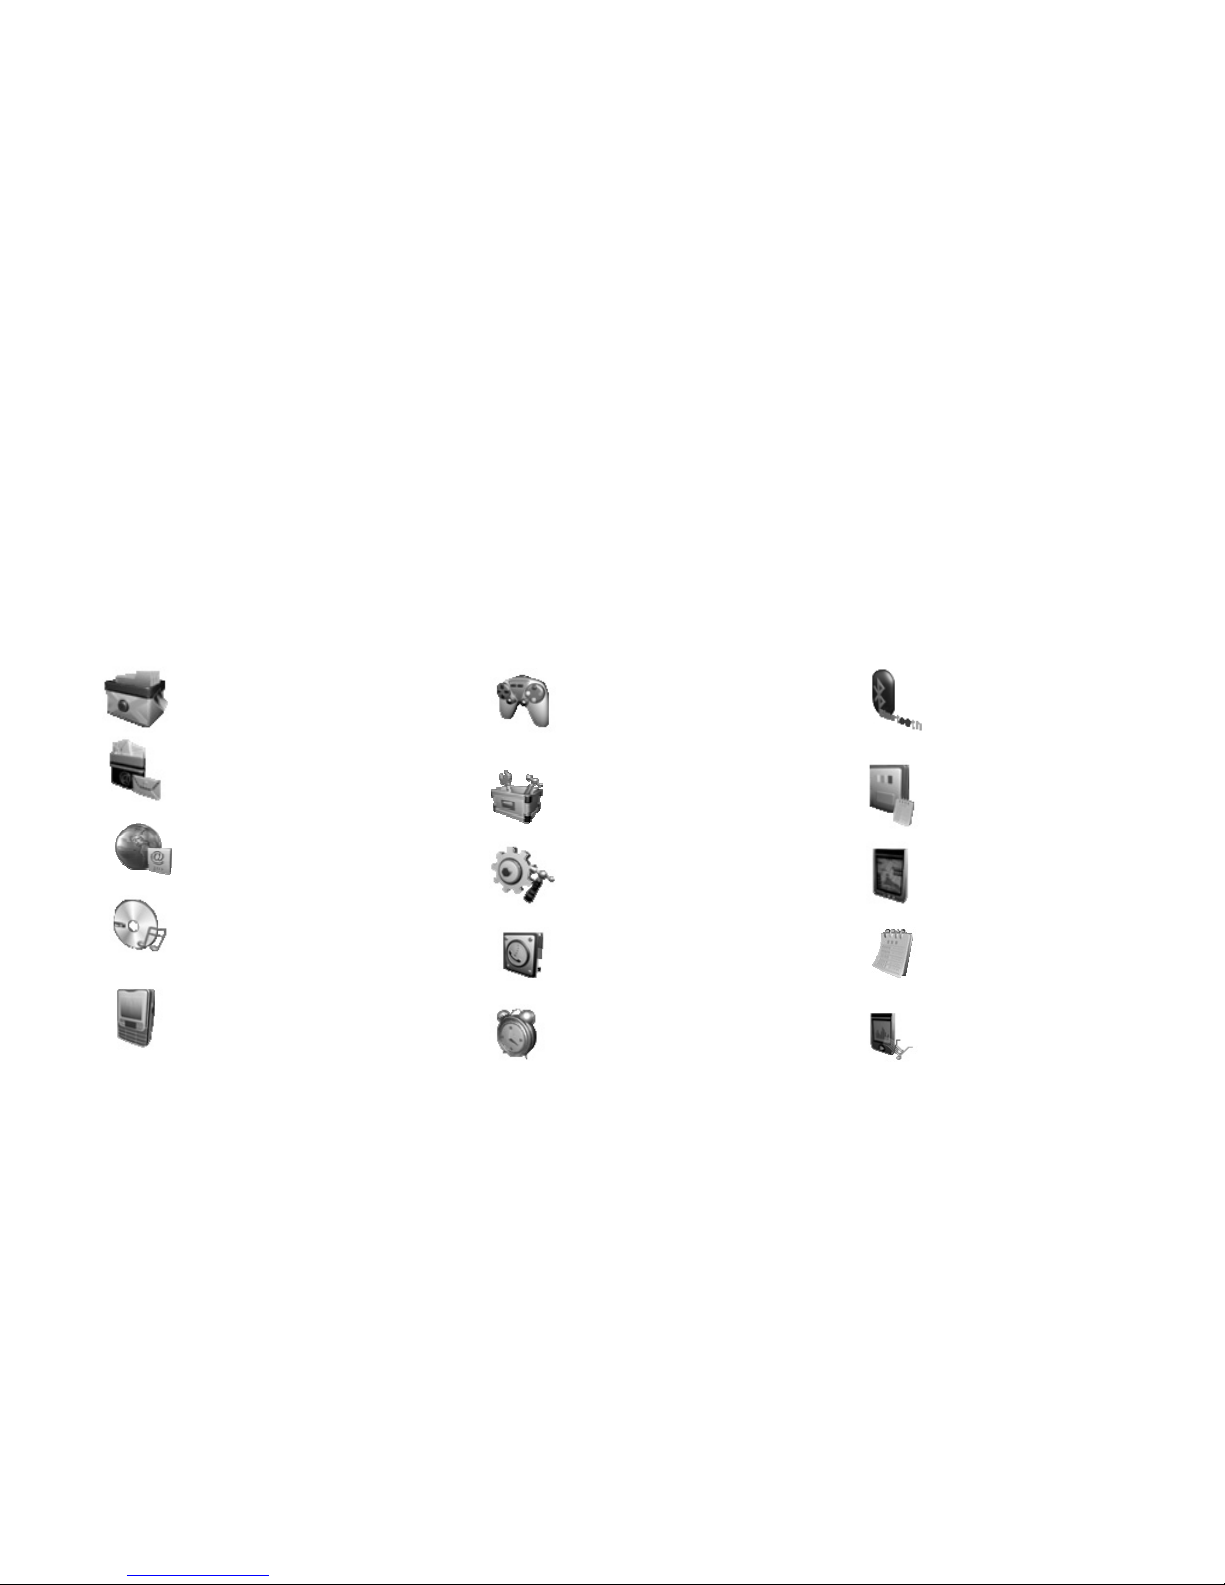
Active Desktop
The active desktop enables fast access to
the following frequently used applications:
Contacts
Message Center
Web
Multimedia
PTT
Java
Tools
Settings
Recent Calls
Alarm
Bluetooth
Datebook
GPS
Profile
Music Player
Page 24

Basics
19
To turn enable/disable active desktop:
1. Select Menu > Settings > Display
Settings > Active Desktop > On/Off.
Note:
When active desktop is disabled, function
key provide shortcuts for applications as
follow:
Function Key Application
Left selection key Contacts
Right selection key Message Center
Navigation key Web
Navigation key Recent Calls
Navigation key Tools
Navigation key PTT
Center key Menu or OK
Send key Recent Calls
To customize the applications in the active
desktop:
1. Select Menu > Settings > Phone
Settings > Shortcuts.
2. Select the icon to customize. A list of
available applications will be displayed.
3. Select the application for the icon from
the list of available applications.
To access active desktop applications:
1. Scroll to the application using the
navigation keys.
2. Press the left selection key Select to
select the application.
Page 25

20
To go to the calendar entry:
1. Scroll to the calendar entry using the
navigation keys.
2. Press the left selection key Select to
view and edit the entry.
Status Indicators
The following icons indicate the status of
the phone:
Signal Strength (5 levels)
The number of bars indicates the
signal strength of the cellular
network.
Bluetooth
Bluetooth is turned on.
Key Lock
The keypad is locked.
Call Divert
You have enabled call forwarding
feature.
Alarm On/Off
The Alarm Clock is turned on.
Message Waiting
You have received a new
message.
Silent
The phone ringer is set to Silent.
Page 26

Basics
21
Battery Indicator
The icon indicates the battery
strength status.
General
The phone profile is set to
General.
Headset
The phone profile is set to
Headset.
Vibrating
The phone profile is set to
Vibrating mode.
Packet Data
Data service is active.
Roaming
You are out of your home area
and have registered with a
different network (when travelling
in other countries for example).
Page 27

22
Menu
You can access the functions in your device
from the menu.
To access the main menu:
1. Press the Menu
key when in idle
mode.
2. To open an application or folder, scroll to
it by using the
navigation keys
and press the Menu
key.
The menu is available in two views:
• Matrix – Icons are displayed in a grid
layout
• List – Icons are displayed in a list layout
To change the menu view:
1. Go to Menu > Settings > Display
Setting > Main Menu Style > Matrix/
List.
Text Entry
Whenever you are prompted to enter text
(e.g. When adding a contact or when using
text messaging) the text input indicator icon
at the top right of the display indicates the
input mode.
Four input modes are available:
• Normal Mode
• Predictive Mode (T9)
• Symbols
• Numbers
Page 28

Basics
23
To change the text input mode:
1. Press * and select the preferred input
mode.
Normal Mode
Press the number keys (2 to 9) repeatedly
until the desired character appears. To
insert a number, press the number keys
repeatedly until the number appears.
If the next character you want is on the
same key as the current one, wait till the
cursor reappears or scroll forward before
entering the next text.
To insert a space, press #.
To change the letter case of the character,
press and hold #.
For common punctuation marks, press 1
repeatedly until the desired punctuation
mark appears.
For other punctuation marks or symbols,
press * and select Symbols.
Predictive Mode
Press the number keys (2 to 9) only once
for each letter. The word changes after
every press of the key.
To insert a number, press and hold the
number key until the number appears.
When you have finished and the word is
correct, scroll forward or insert a space by
pressing #.
If the word is not correct, press 0 to toggle
to the next available word in the dictionary.
Page 29

24
If the word you intended to write is not in
the dictionary, you will be prompted to add
a new word. Select Yes and enter the word
using normal mode. Select Save to save
the word in the dictionary.
To change the letter case of the character,
press and hold #.
For common punctuation marks, press 1. If
the punctuation mark is not correct, press 0
repeatedly until the desired punctuation
mark appears.
For other punctuation marks or symbols,
press * and select Symbols.
Lock & Unlock Keypad
To lock and unlock the phone, press the
Menu
key, followed by the Asterisk *
key.
PIN & PUK Codes
The Personal Identification Number (PIN)
code helps protect your SIM card against
unauthorized usage.
The PIN Unblock Key (PUK) code is
required to unblock a blocked PIN code.
The PIN and PUK codes are usually
supplied together with your SIM card. If you
do not have the codes, please contact your
local service provider for the codes.
Page 30

Basics
25
Connecting to a Compatible
Headset
1. Remove the headset cover.
2. Plug the headset to the phone in the
direction as shown below.
Note:
This device is compatible with any standard
2.5mm PTT audio headset. When
connecting any external device or headset
to the audio connector, please pay attention
to the volume level.
Do not connect products that create an
output signal or any voltage source to the
audio connector as this may cause damage
to the device.
Headset Cover
Page 31
26
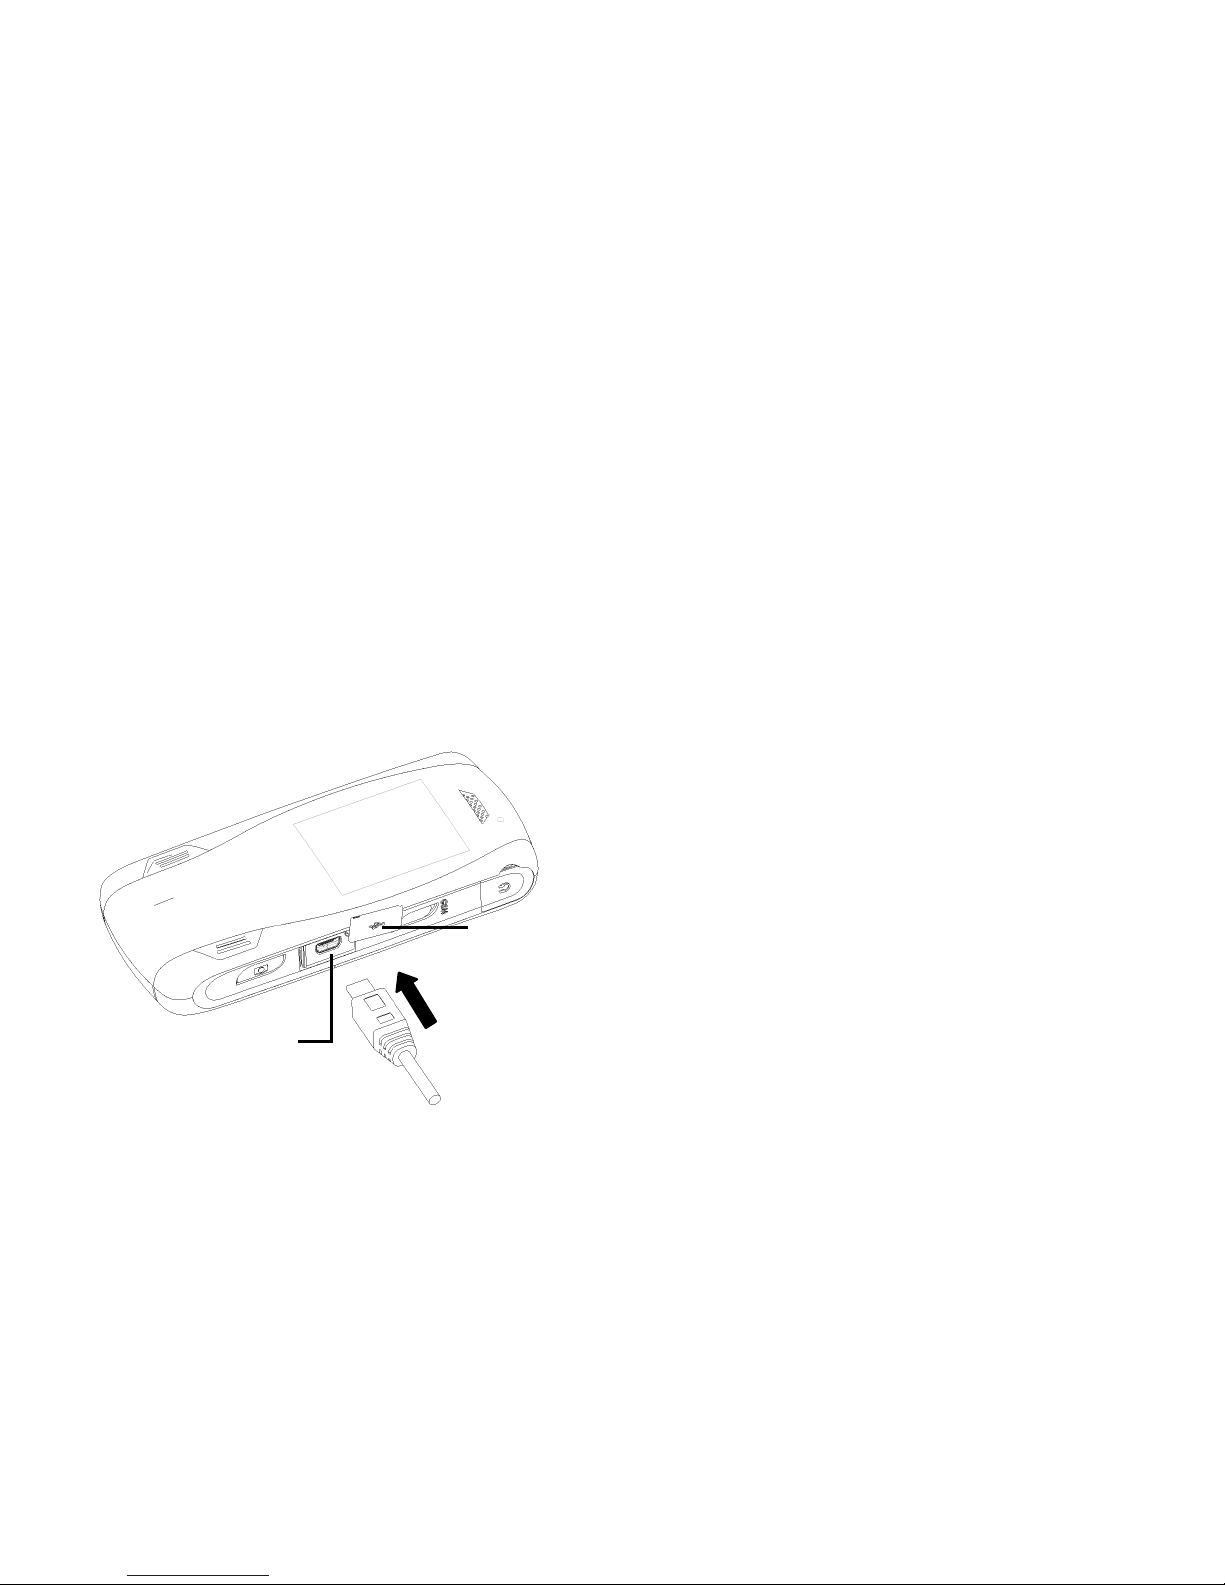
Connecting to the USB
Cable
1. Remove the USB jack cover.
2. Plug the USB cable to the USB jack as
shown in the diagram below.
USB Jack Cover
USB Jack
Page 32

Call Functions
27
Call Functions
Making a Phone Call
Make sure that you are in the correct mode
[IDEN or GSM] and logged on to a network.
To call a number:
1. Enter the phone number using the
keypad and press the Send
key.
2. To hang up, press the End
key.
To call a contact in your contacts list:
1. Select Menu > Contacts > View. A list of
contacts will be displayed.
2. Scroll to the contact to call and press the
Send
key.
3. If there are multiple entries under the
contact name, select the entry type
(Mobile, Home, Work etc.) to call and
press the Send
key.
4. To hang up, press the End
key.
To call a contact from the recent calls list:
1. Select Menu > Recent Calls and a call
type or press the Send
key to view all
recent calls.
2. Scroll to the contact you want to call and
press the Send
key.
Note: There will not be any DTMF tone
heard when selecting any key during an
ongoing call.
Page 33

28
Speed Dialing
You can assign a phone number to one of
the dialing keys 1 to 9 (refer to Settings –
Speed Dial on pg 49).
To call a speed dial number:
1. Press and hold the dialing key (1 to 9).
Answering a Phone Call
When there is an incoming call, the caller’s
number is shown in the display if your
subscription includes the Caller
Identification service.
If you have saved the caller’s name and
phone number in the contacts list, the
caller’s name is displayed. If the network
does not send the number, the display
shows ‘Unknown Number’.
To answer an incoming call:
1. Press the Send
key or select Accept
to answer an incoming call.
To reject an incoming call:
1. Press the End
key or select Reject to
reject an incoming call.
Note:
If Any-key Answer option in the phone
setting is enabled, pressing any key, except
the End
key or Reject, will accept a call.
Page 34

Call Functions
29
Options During a Call
To mute / unmute the speaker:
1. Press the left selection key Mute/
Unmute.
To switch to handsfree mode:
1. Press the right selection key Speaker.
Alternatively, you may access other
available options by pressing the Menu
key.
The following options are available
during a call:
• Speaker On – to turn on the speaker
Note:
When a headset is connected to the
device while the speaker is turned on,
the audio path will be routed to the
headset.
• Hold – to put the active call on hold
• Mute – to mute the speaker
• Contacts – to access contacts list
• Message Center – to view messages in
the Inbox
• End Current Call – to end the call
• Record – to record the voice
conversation
Call Waiting
You can receive a second incoming call
while already connected to one.
Page 35

30
To receive a second incoming call:
1. Press the Send
key or select Accept
to answer the call.
2. Press the End
key or select Reject to
reject the call.
To switch between the calls:
1. Press the Send
key. The first call will
be put on hold.
2. To end the call, press the End
key.
The active call will be disconnected.
Making a Direct Connect
Call
The PTT feature provides direct
communication via a single key-press. This
feature is only available when the phone is
switched to iDEN network and the One
Touch PTT feature is turned on.
To turn on One Touch PTT feature:
1. Select Menu > PTT > Options > One
Touch PTT > Last Call/ Assigned
Number.
To make a direct connect call:
1. Enter the Direct Connect ID/ Talk group
number.
Page 36

Call Functions
31
2. Press and hold the PTT key. You may
start talking once you hear a ‘beep’
sound.
3. Release the PTT button to listen to the
other party.
4. To end the direct connect call, press the
End
key.
Note:
To alert the other party of an incoming
direct connect call, enter the direct connect
number and then select ALERT by pressing
the left selection key. A beep to the
receiving party will notify them of the
incoming private call.
To call a contact from the recent calls list:
1. Select Menu > Recent Calls and a call
type or press the Send
key to view all
recent calls.
2. Scroll to the contact you want to call and
press the PTT button.
To make a direct connect call to a contact
in your contacts list:
1. Select Menu > Contacts > View. A list of
contacts will be displayed.
2. Select the contact to whom you wish to
make the direct connection.
3. Scroll to the entry type (Direct Connect).
Press and hold the PTT key. You may
start talking once you hear a ‘beep’
sound.
4. To end the direct connect call, press the
End
key.
Page 37
32
Answering a Direct
Connect Call
A chirping sound indicates an incoming
direct connect call. Allow the caller to finish
speaking. This will be indicated by another
chirp once the other party has finished
speaking.
Press and hold the PTT key and wait for a
chirp before speaking.
Release the PTT button once you have
finished speaking.
Direct Connect Call
Sessions
In a direct connect communication, one
person talks while the others listen.
Speakers take turns responding to each
other.
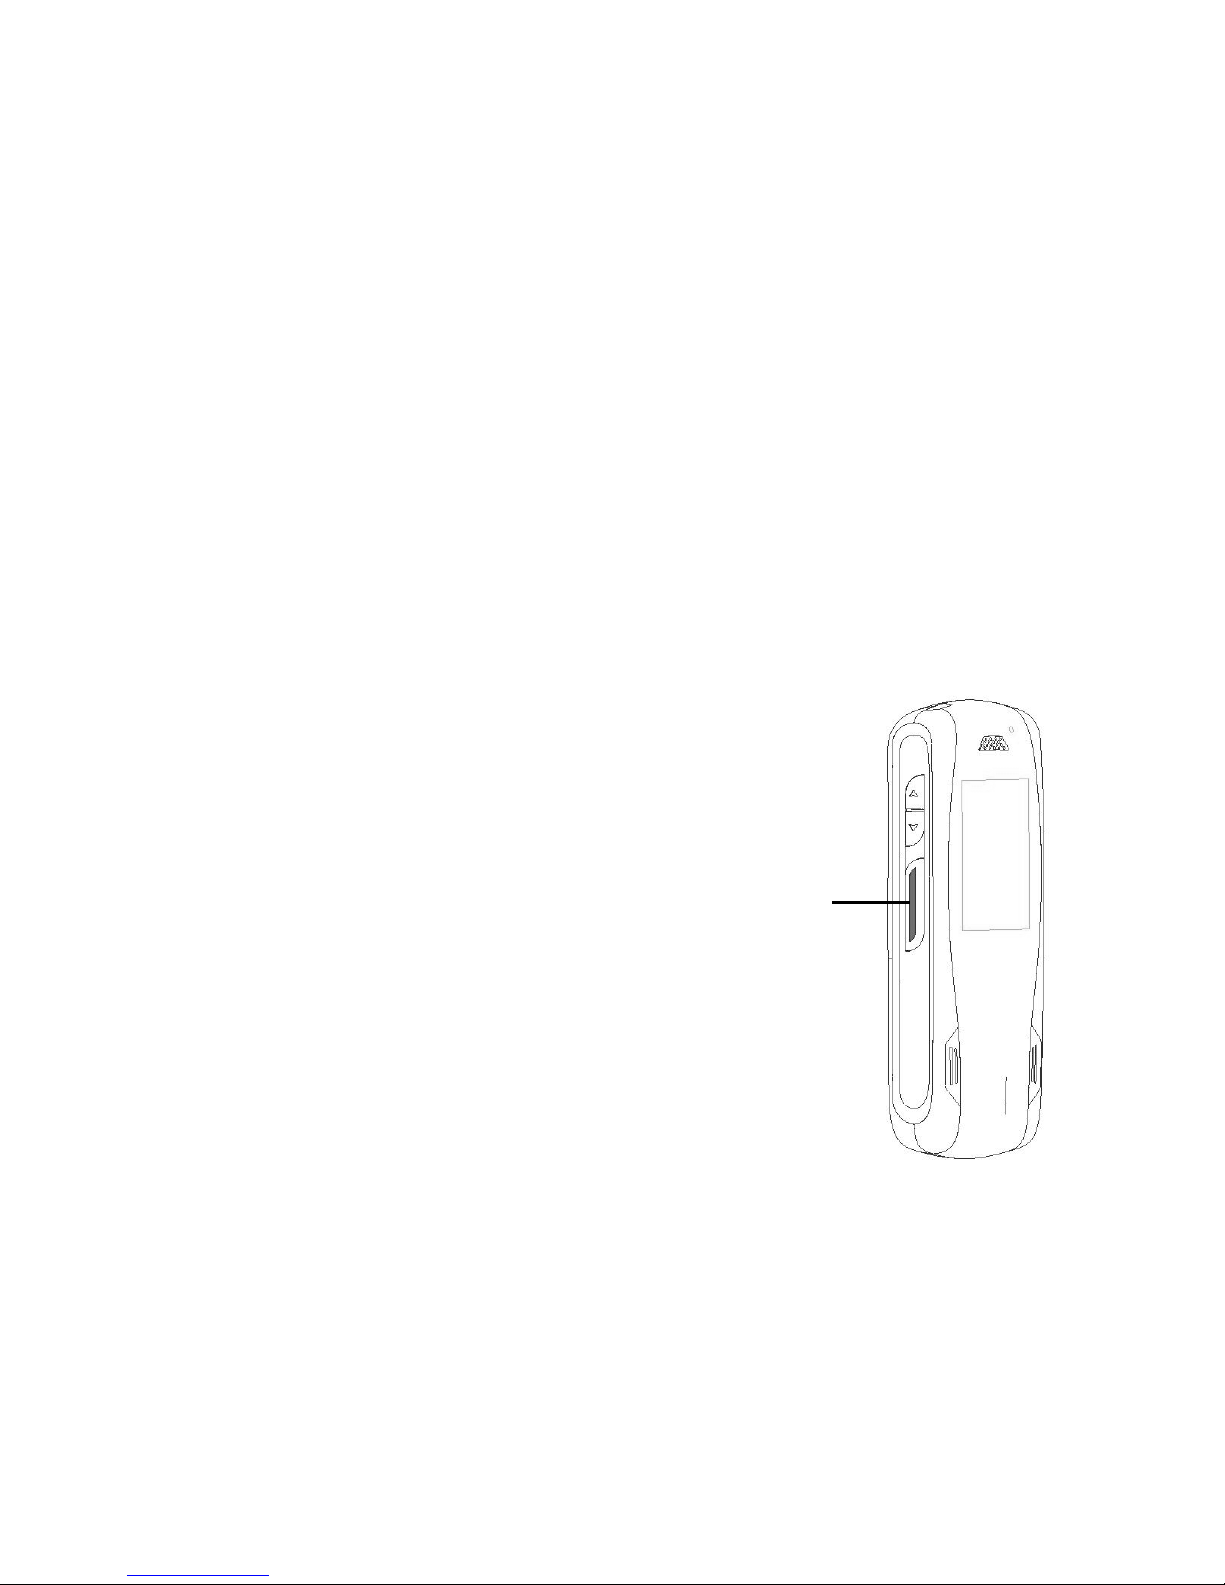
A back lighting indicates a ready state
(receiving) of a dispatch call. The PTT
backlight functions independently of the
keypad backlight.
PTT Backlight
Page 38

Call Functions
33
During a PTT session, the display shows
information of the PTT status such as:
Wait shown when PTT key is pressed
and someone else is still speaking
in the PTT session.
Talk shown when PTT key is pressed
and no one is speaking in the PTT
session. User can proceed to
speak.
Making a Multi-Party Call
You can call another party while already
connected to a call.
1. While connected to a call, enter the
phone number of the second party that
you wish to call.
To select the contact from your contacts
list, press the Menu
key and select
Contacts.
2. Press the Send
key.
To switch between the calls:
1. Press the Send
key. The first call will
be put on hold.
2. To end the call, press the End
key.
The active call will be disconnected.
Note:
You can make a multi-party call to up to 3
parties at a time, after which no calls will be
allowed even if one of the parties
disconnects the call.
Page 39
34
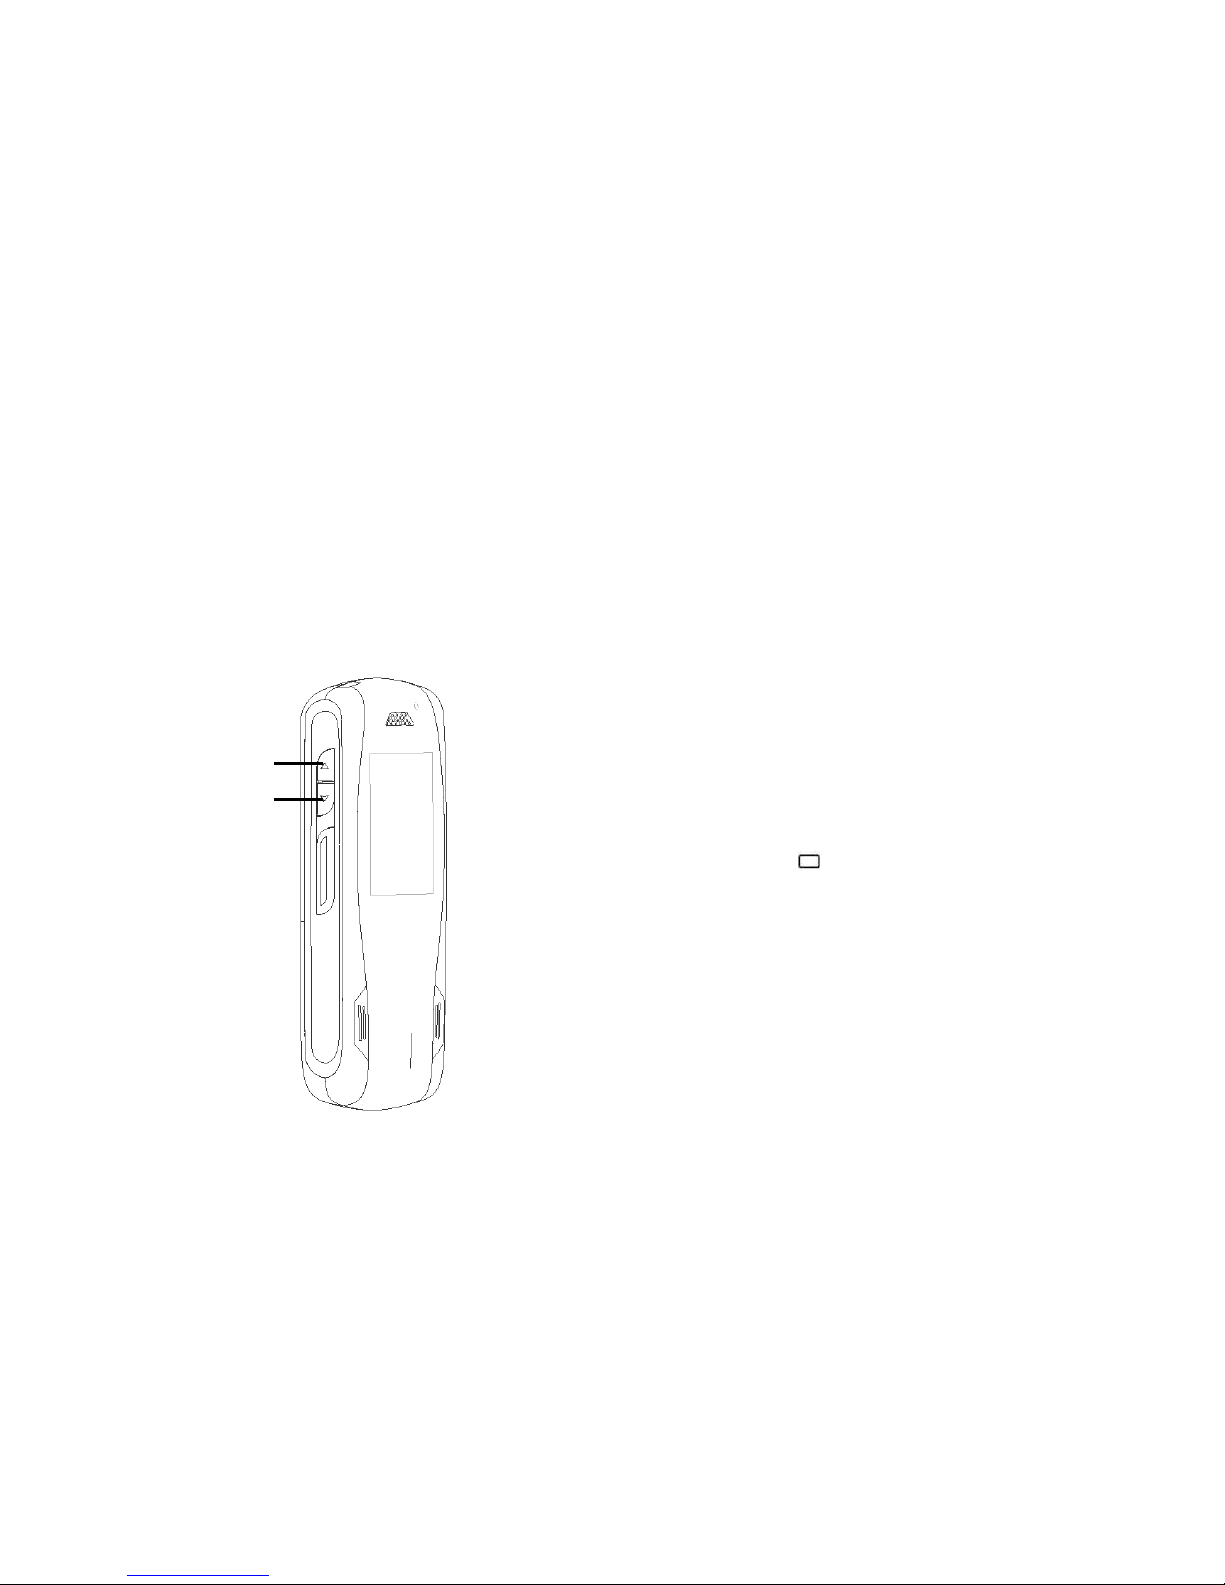
Volume Up
Volume Down
Adjusting Volume
During a call, you can adjust the listening
volume by pressing the volume keys on the
side of the phone.
Recent Calls
The device registers the phone numbers of
missed, received, and dialed calls, and the
approximate duration of your calls.
To view list of recent calls:
1. Select Menu > Recent calls and a call
type.
2. To view the call details of a particular
number, scroll to the number and press
the Menu
key.
Note:
Each set of call log (Missed, Received,
Outgoing Calls) can register up to 30
numbers.
Once the call log exceeds the limit, the
oldest log will be replaced by the last
registered call.
Page 40

Call Functions
35
To view call duration:
1. Select Menu > Recent calls > Call
Summary. The call duration for the last
call, incoming calls and outgoing calls will
be displayed.
To clear call timers:
1. Select Menu > Recent calls > Call
Summary.
2. Select the call type to reset.
3. Press the left selection key Reset to
clear the call timer for the selected call
type.
4. Select Yes when prompted to confirm the
action.
Page 41
36
Contacts
Viewing Phone Numbers
The phone allows you to search and view
the contacts in the GSM or iDEN SIM
individually depending on the mode the
phone is in regardless of the network mode
the phone is in.
1. Select Menu > Contacts > View. A list of
all the contacts will be displayed.
2. Using the
navigation keys, scroll to
the desired contact.
3. Press the Menu
key to view the
contact details.
You may also search for a particular
contact by entering the contact name in the
search bar.
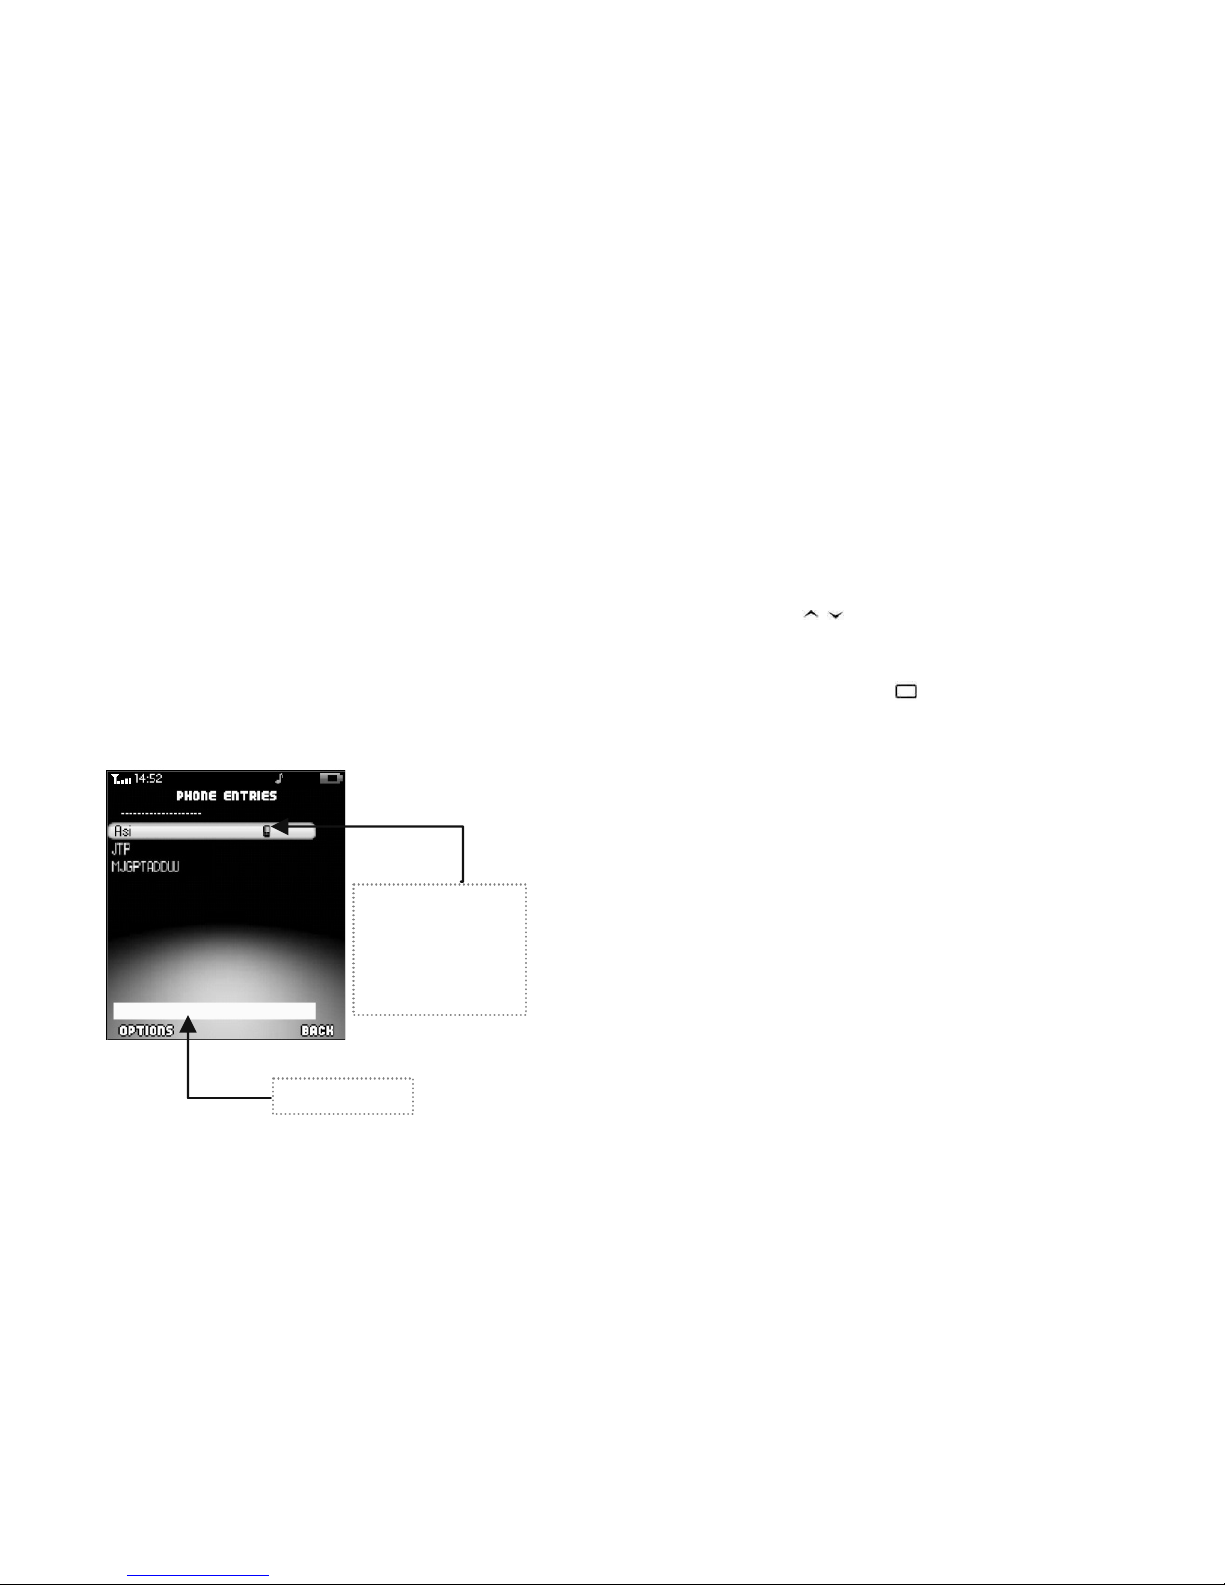
Viewing by Type
You can view all the contacts saved in a
particular storage location.
1. Select Menu > Contacts > View Type.
Type of Entry
Icons indicate if
contact entry is
from GSM SIM,
iDEN SIM or
Page 42

Using the Menu - Contacts
37
2. Select the storage location (Phone
Contacts/ GSM SIM Contacts/ iDEN
SIM Contacts) as required. The
contacts saved under the selected
storage location will be displayed.
Storing Phone Numbers
You can store contact details in Contacts.
1. Enter the contact number in the idle
screen and select Save. Alternatively,
select Menu > Contacts > Add New
Entry.
2. Select the preferred storage location for
the new contact.
3. Enter a name for the contact.
4. Scroll to the desired entry type (Mobile,
Home, Work etc) and press the Menu
key.
5. Enter the required information into the
selected entry and select OK.
6. Select Save when done.
Copy Contacts
You can copy contacts from your contacts
list one by one or from a selected storage
location all at once.
To copy contact one by one
:
1. Select Menu > Contacts > View.
2. Scroll to the contact that you wish to
copy.
3. Under Options, select Copy to <the
directory that you want to copy to>.
Page 43

38
4. Confirm the action by selecting Copy
when prompted.
To copy all contacts
in a particular storage
location:
1. Select Menu > Contacts > Options >
Copy All.
2. Select the storage location to which you
want to copy the contacts.
3. Confirm the action by selecting Yes
when prompted.
Delete Contacts
You can delete contacts from the contacts
list one by one or from a selected storage
location all at once.
To delete contact one by one
:
1. Select Menu > Contacts > View.
2. Scroll to the contact that you want to
delete.
3. Under Options, select Delete.
4. Confirm the action by selecting Yes
when prompted.
To delete all contacts
in a particular
storage location:
1. Select Menu > Contacts > Options >
Delete All.
2. Select the storage location from which
you want to delete the contacts.
Page 44

Using the Menu - Contacts
39
3. Confirm the action by selecting Yes
when prompted.
Assign Ringtone
You can assign a ringtone for each contact.
1. Select Menu > Contacts > View.
2. To assign or edit the ringtone for a
contact, scroll to the contact. Under
Options, select Edit.
3. Scroll to Ringtone ID and press the
Menu
key. Select the storage location
of your preferred ringtone. A list of
available ringtones will be displayed.
4. Scroll to the ringtone you wish to assign
to the contact and press the left selection
key Select or the Menu
key to select
it.
Assign Picture ID
You can assign a picture caller ID for each
contact.
1. Select Menu > Contacts > View.
2. To assign or edit the picture for a
contact, scroll to the contact. Under
Options, select Edit.
3. Scroll to Picture ID and press the Menu
key. Select the storage location of
your preferred picture ID. A list of
available pictures will be displayed.
4. Scroll to the picture you wish to assign to
the contact and press the left selection
key Select or the Menu
key to select
it.
Page 45

40
Messages
The Messages application allows you to
read, write, send, and save text and
multimedia messages.
Create New Text Messages
You can write and send messages of up to
765 (GSM) or 140 (iDEN) characters.
1. Go to Menu > Message Center > SMS.
2. Select Create Message.
3. Scroll to the text area and write the
message using the editor. The message
length indicator at the top right of the
display indicates the number of typed
characters and pages of the message.
Once you have typed your message,
select Done or press the Menu
key to
proceed.
Note:
To use a template for the text message,
go to Menu > Message Center >
Templates.
Indicates the
editor mode
Text area
Page 46

Using the Menu – Messaging
41
4. To select the recipient(s) for the
message, scroll to To field and press the
Menu
key.
5. To select the contact from the
phonebook, select Contacts. Select the
desired contact from the list displayed
and the entry type to send the message
to.
If the intended recipient is not available in
the phonebook, enter the contact number
manually and select OK.
6. For multiple recipients, repeat step 4. A
list of intended recipients will be
displayed.
To add to the list of recipients, scroll to
the next available slot in the list and
press the Menu
key. Input the contact
details and select OK.
Once the list is complete, select Options
> Done.
7. To send the message, select Send.
Note:
The handset supports the sending of text
messages beyond the character limit for a
single message. Messages that exceed the
character limit are sent as a series of two or
more messages. Your service provider may
charge you accordingly.
Characters that use accents or other marks,
and characters from some language
options may take up more space, limiting
the number of characters that can be sent
in a single message.
Create New MMS
1. Go to Menu > Message Center > MMS.
Page 47

42
2. Select Create Message. The display will
show a blank message. Press the Menu
key to enter to the editor menu.
3. The display will show four options:
- Text
- Picture
- Video
- Sound
Highlight one of the above and press the
Menu
key to enter the appropriate
editor.
4. When the message is composed, the
display will show the items in the
message as below.
5. To send the message, go to Options >
Send.
Fill in the fields as required.
To select the recipient(s), scroll to the To
field and press the Menu
key.
MMS Editor
Page 48

Using the Menu – Messaging
43
Press the Menu key to select an
available (marked as ‘Empty’) slot in the
list. To select the recipient from the
phonebook, go to Contacts. Select the
desired contact and the entry type to
send the message to. Press the Menu
key to confirm the recipient details.
If the intended recipient is not available in
the phonebook, enter the contact number
manually and select the Menu
key to
confirm the recipient details.
Once the recipient list is complete, select
Back.
6. To send the message, select Send.
Note:
You may not be able to send multimedia
files that exceed the size limit of 100kb in a
multimedia message.
MMS received in iDEN mode may appear
different from the MMS received in GSM
mode. This is due to the formatting
differences of both systems. MMS in iDEN
is in multipart related message format
where else the MMS in GSM is multipart
mixed message format.
Read Messages
All received text and multimedia messages
are stored in the Inbox folder.
To view received messages:
1. Go to Menu > Message Center and
select the type of message to view.
2. Select Inbox to view the list of received
messages.
Page 49

44
3. Scroll to the desired message and select
View or press the Menu
key to read
the message.
Delete Messages
You can choose to empty the Inbox, Draft
or Sent folders, or delete messages one by
one.
To empty a particular folder:
1. Go to Menu > Message Center and
select the type of message to delete.
2. Select Delete All.
3. Scroll to the folder(s) which you want to
empty and select by pressing the Menu
key.
4. Select Delete to empty the selected
folders.
5. Confirm the action by selecting Yes
when prompted.
To delete a particular message:
1. Go to Menu > Messages and select the
type of message to delete.
2. Select the folder in which the message is
stored.
3. Scroll to the message and press the
Menu
key to view it. Under Options,
select Delete.
4. Confirm the action by selecting Yes
when prompted.
Note:
This action is irreversible and deleted
messages are not recoverable.
Page 50

Using the Menu – Messaging
45
Message Settings
The following settings have to be
configured in order to send and receive
messages.
To edit or activate the settings, select Menu
> SMS/MMS > Settings.
SMS Settings:
• Service Center - Enter or edit the
service center number needed for
sending and receiving messages. You
can obtain the number from your network
operator or service provider
• Validity - Set the default time period for
which your messages are stored in the
SMS center while attempts are made to
deliver them
• Status Report - Request for an
acknowledgement message to be sent
back from the network once it has
successfully received the sent message
• Broadcast – to configure the settings for
cell broadcast messages (Note: this
feature is network-dependent and
available in GSM mode only)
MMS Settings:
• Expiry – Set the message validity period
for the message. If the recipient of a
message cannot be reached within the
validity period, the message is removed
from the multimedia message centre.
• Reply Type – Set the default reply mode
for the message
• Delivery Report – Turn on or off the
delivery report for MMS sending
Page 51

46
• Read Report – Turn on or off the report
for read MMS
• Size Limit – Set the size limit of the
MMS that the device can receive
• Class – sets the default for the type of
MMS that can be composed
• View Mode – Set the view mode for
received messages
• Max Pages – Define the maximum
number of pages that can be received for
a single message
• Directory – Set the directory to which
each received media type can be saved
and from which each media type can be
selected when composing a new MMS
• Auto Cleanup – Set the automatic
cleanup for messages in the Inbox and
Sent folders
• HTTP Push – Set to enable or disable
MMS receiving
Voice Mail
The voice mail feature shows you the
number of voice messages in your voice
mailbox.
1. Go to Menu > Message Center > Voice
Mail.
2. Press the Menu
key to connect to
your voice mail.
Note:
This feature is only available when the
device is switched to iDEN mode.
Page 52

Using the Menu - Settings
47
Settings
Sound Settings
You can customize your device tones for
different events, environments of caller
groups.
To customize your device sounds, go to
Menu > Settings > Sound Settings and
select from the following settings:
• Ring Tones - Select the ring tone for
incoming calls.
• Ring Volume - Adjust the volume level
for the ring tones and SMS tones.
• Receiver Volume - Select the receiver
volume level during a call.
• Vibrating Alert - Set the phone to
vibrate when you receive a call or
message.
• SMS Tones - Select the SMS tone for
incoming messages.
• Alarm Tones - Select the tone for alarm
alerts.
Page 53

48
Manage Profiles
The phone has various setting groups, or
profiles from which you can personalize the
device tones for different events,
environment or caller groups.
1. In the Settings menu, select Manage
Profiles.
2. Scroll to the desired profile and select
Options > Activate.
To personalize the profile settings:
1. Select Options > Edit.
2. Change the desired sound setting to suit
your preferences.
Note:
When the Silent profile is selected,
changes to the sound settings are not
allowed.
Phone Settings
To access or edit phone settings, go to
Menu > Settings > Phone Settings.
• Language - to change the language for
the display texts in your device. If you
select Automatic, the device selects the
language according to the information on
your SIM card
• Time and Date
Time and Date – to set the time and
date
Page 54

Using the Menu - Settings
49
Time format – to select between the 12hour and 24-hour time format
Date format – to select the format to
display dates
Auto Update – to allow the network to
update the time, date and time-zone
information to your device.
World Time – to set the GMT for your
location
Enable DST – to set the daylight saving
time for the device
Note:
The Auto Update feature may
occasionally take up to 10minutes to
update the time. The time will be updated
correctly once it is done. This is normal
operating condition.
• Security – to activate/ deactivate and
change the PIN1, PIN2 and phone lock
codes.
To activate/ deactivate the PIN:
1. Select Menu > Settings > Phone
Setting > Security > PIN1 Code >
Activate/ Deactivate.
2. Enter the PIN code and select OK.
To change the PIN code:
1. Activate the PIN.
2. Select Menu > Settings > Phone
Setting > Security > PIN1 Code >
Change.
3. Enter the current PIN code and select
OK.
Page 55

50
4. You will be prompted to enter the new
PIN code. Select OK when done.
5. Confirm the new PIN code by re-entering
the new PIN code.
To activate/ deactivate the phone lock:
1. Select Menu > Settings > Phone
Setting > Phone Lock > Activate/
Deactivate.
2. Enter the phone lock code and select
OK.
To change the Phone Lock code:
1. Activate the phone lock.
2. Select Menu > Settings > Phone
Setting > Security > Phone Lock >
Phone Lock Change.
3. Enter the current phone lock code and
select OK.
4. You will be prompted to enter the new
phone lock code. Select OK when done.
5. Confirm the new phone lock code by reentering the new PIN code and select
OK.
Note:
The default phone lock code for your device
is 00000.
• Speed Dial
To assign phone numbers to the speed
dialing keys:
Page 56

Using the Menu - Settings
51
1. Select Menu > Settings > Phone
Settings > Speed Dial.
2. Scroll to the key you want to assign a
number to and press the Menu
key.
The contacts list will be displayed.
3. Select the contact and the number for the
speed dial.
• Shortcuts – to set the application for
each of the icons in the active desktop.
• Transmitter – to turn the transmitter on
or off.
• Alert Timeout – to set the timeout period
for alerts
• Auto Power On - to define a time at
which the phone will be turned on
automatically
• Auto Power Off - to define a time at
which the phone will be turned off
automatically
Display Settings
• Theme – to personalize a theme for the
phone display
• Active Desktop – to activate/ deactivate
the active desktop
• Wallpaper – to personalize the look of
the main display
• Greetings – to define a greeting
message when the phone is turned on
• Brightness – to set the brightness of the
display screen
Page 57

52
• Backlight – to automatically turn off the
backlight after a pre-defined period of
inactivity
• Main Menu Style – to set the type of
view for the main menu
• Font Size – to set display font size
Network Settings
You can access your network settings by
selecting Menu > Settings > Connectivity
> Network.
To set the device to search for network:
1. For automatic selection of network,
select Automatic.
To select a preferred network manually
from a list of available networks, select
Manual.
The device will search for available
networks for your selection.
Call Settings
• Call Forward – to forward calls to
another number
1. Select the call type to which you want
to divert.
2. Select the condition in which the call
will be diverted:
Unconditional – all calls are diverted.
Page 58

Using the Menu - Settings
53
Busy – calls are diverted when the
number is busy or when you reject the
incoming call
No Reply – calls are diverted when
there is no reply
Unreachable – calls are diverted
when you are in an area not covered
by your network service provider
• Call Waiting – to set the network to
notify you of a new incoming call while
you have a call in progress.
• Minute Alert – to alert the user with a
beep sound every minute during a call.
The alert will be replaced with vibration
when a call is active.
• Auto Redial – to set the device to make
a maximum of 10 attempts to connect the
call after an unsuccessful call attempt.
To stop the automatic redialing, press the
End
key.
• Answer Mode
Any Key Answer - to answer an
incoming call by briefly pressing any key,
except the End
key.
Send Key – to answer an incoming call
by pressing the Send
key.
Automatic – to answer all incoming calls
automatically.
• Call – to set the line for all calls
Page 59

54
Restore Original Factory
Settings
You can reset your device to its original
factory settings.
1. Select Menu > Settings > Factory
Reset.
2. Select Yes when prompted to confirm the
action.
Page 60

Using the Menu - Bluetooth
55
Bluetooth
Bluetooth technology enables wireless
connections between electronic devices
within a range of up to 10 meters (33 feet).
A Bluetooth connection can be used to
send images, videos, texts, business cards,
or to connect wirelessly to compatible
devices using Bluetooth technology, such
as computers. Do check with the
manufacturers of other devices to
determine their compatibility with this
device.
There may be restrictions on using
Bluetooth technology in some locations. For
more information, please check with your
local authorities or service provider.
Note:
Features using Bluetooth technology, or
allowing such features to run in the
background while using other features,
increase the demand on battery power and
reduces the battery life.
• Power – to turn Bluetooth on or off
• Visibility – to allow your device to be
found by other Bluetooth devices
• Search Devices – to search for all
Bluetooth devices within range
• Connected Audio Devices – display a
list of currently connected audio devices
• Device History – display a list of
previously paired devices
• Phone Name – to define the name for
your device
Page 61

56
Pairing with Other Devices
Pairing allows your device to be able to
communicate with another via Bluetooth. To
pair with another device, you need to
ensure that the Bluetooth feature is turned
on first.
To turn Bluetooth on:
1. Select Menu > Settings > Connectivity
> Bluetooth > Power > On.
To pair with another device:
1. Select Menu > Settings > Connectivity
> Bluetooth > Search Devices.
2. Your device will start to search for other
Bluetooth devices within range.
3. Scroll to the device with which you want
to pair and select Connect.
4. When prompted, enter a passkey (1-16
digits).
5. The owner of the other device will be
prompted whether to accept the pairing.
If accepted, the other owner needs to
enter the same passkey.
When the devices have successfully been
paired, Pairing Success is displayed.
Send Files via Bluetooth
To send a file via Bluetooth, you need to
ensure that the Bluetooth feature is turned
on first.
Page 62

Using the Menu - Bluetooth
57
To send a file:
1. Open the application where the file you
want to send is stored.
2. Scroll to the file you want to send and
select Options > Send > Send by
Bluetooth.
Your device will start to search for other
Bluetooth devices within range.
3. Select the device with which you want to
send the file to.
If the other device requires pairing, enter
a passkey (1-16 digits). The owner of the
other device needs to enter the same
passkey on the other device to allow a
connection to be established.
When the connection has successfully been
established, Complete is displayed.
Receive Files via Bluetooth
To receive a file via Bluetooth, you need to
ensure that the Bluetooth feature is turned
on first.
To turn Bluetooth on:
1. Select Menu > Settings > Connectivity
> Bluetooth > Power > On.
To receive a file:
1. You will be prompted whether to accept
the incoming file.
2. Select Accept to start the file transfer or
Reject to reject the file transfer.
Once the you have successfully received
the file, Completed is displayed.
Page 63

58
Multimedia
Media Center
The Media Center allows you to view/ play
all supported digital media types stored in
the expansion memory or in the phone
memory.
1. To view or play the media file, go to
Menu > Multimedia > Media Center.
2. Select the storage location and type of
media file.
3. Scroll to the desired file and press the
Menu
key to view or play the file.
Note:
The following indicates the file type
supported in each media folder:
Image jpeg, jpg, png, gif, bmp, wbmp
Music mp3, wav, mid, au, imy, amr, aac
Sound amr, aac
Video 3gp, mp4
File Browser
File Browser allows you to browse all
available supported digital media files
stored in both the expansion memory and
phone memory.
Camera
The device has a high resolution camera on
the back cover. You can use this camera to
take still pictures and videos.
Page 64
Using the Menu - Multimedia
59
To take still pictures:
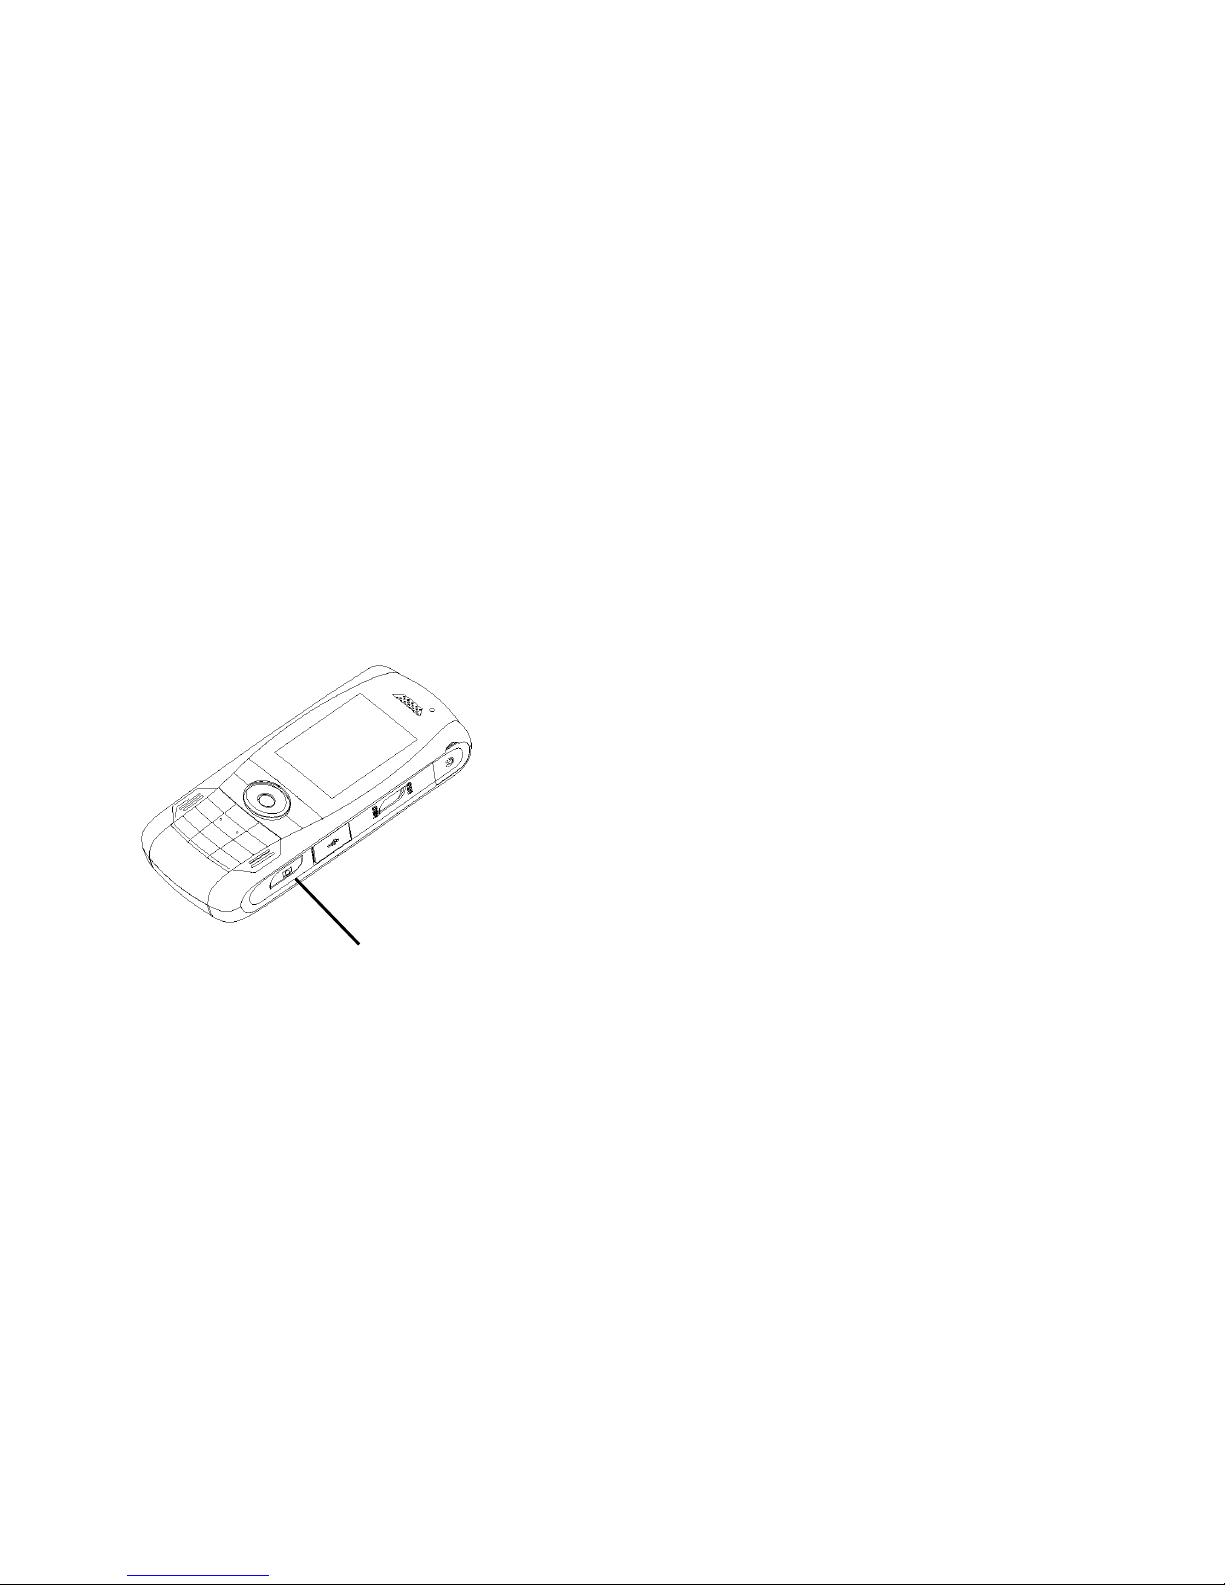
1. Activate the camera by pressing the
Camera hot key at the side of the phone
or select Menu > Multimedia > Camera.
2. To capture an image, press the Camera
hot key again. Select Save to keep the
image or Delete to discard it.
To record a video clip:
1. Activate the camera by pressing the
Camera hot key at the side of the phone
or select Menu > Multimedia > Camera.
2. Under Options, select Switch to Video.
3. To start/stop the recording, press the
Camera hot key. Select Save to keep the
video clip or Delete to discard.
Camera Settings
Your device supports an image capture
resolution of 1600 x 1200 pixels.
To change camera settings:
1. Select Menu > Multimedia > Camera >
Options.
Camera Hot Key
Page 65

60
2. The following settings can be configured
under Options:
Delay Capture – select the time period
in which the image capture is delayed
Night Mode – to set the camera to adjust
the image in dim light settings
Picture Effect – select the overlying
color effect for the image
Save to - Select whether you want to
save your images in the device memory
or on the memory card
Resolution - The better the image
quality and the higher the resolution, the
more memory the image consumes.
Music Player
You can listen to MP3 songs on the phone
music player.
To play a music file:
1. Go to Menu > Multimedia > Media
Center.
2. Select the storage location where the file
is stored, followed by the music folder.
3. Scroll to the desired file and press the
Menu
key to play the music.
To play the next music, press
.
To play the previous music, press
.
To stop the music, press
.
To pause the music, press the Menu
key.
Page 66

Using the Menu - Multimedia
61
For other music settings, select Options
and edit accordingly.
To create a playlist:
1. Go to Music Player > Options > Create
Playlist.
2. Type a name for the new playlist and
select OK.
3. To add songs to the playlist, scroll to the
playlist and select Options > Add
Music. A list of available songs will be
displayed.
4. Scroll to the desired song(s) and select
Add.
5. Select Back to return to the playlist
menu.
To song from a playlist:
1. Open the playlist which you want to edit.
2. Scroll to the song which you want to
remove and select Options > Remove
From Playlist.
3. Select Yes when prompted to confirm the
action.
Page 67

62
Tools
Date Book
The Date Book allows you to keep track of
your appointments, meetings, birthdays and
other events.
To view calendar:
1. Select Menu > Tools > Date Book.
2. To view the current month’s calendar,
select Month View.
3. To view the activities of a certain date,
select Go to Date and enter the date.
To create a new entry:
1. Go to Menu > Tools > Date Book.
2. Select New Entry.
3. Scroll to the required fields and press the
Menu
key to input the required
information.
4. Once done, select Save to save the
entry.
To delete an entry:
1. Go to Menu > Tools > Date Book.
2. Select Delete and choose the entry type
to delete.
3. Scroll to the desired entry to delete and
select Delete.
4. Select Yes when prompted to confirm the
action.
Page 68

Using the Menu – Tools
63
Alarm
To set an alarm:
1. Select Menu > Tools > Alarm > On.
2. Enter the alarm time and select Set.
The following settings are also available:
• Alarm Tones – to set the tone for the
alarm.
• Repeat – to select the day(s) on which
you want the alarm to be active.
• Snooze - Set the time interval for the
alarm to ring.
GPS
You can view your approximate location in
GPS.
To view your location:
1. Go to Menu > Tools > GPS > Position.
Your device will start scanning for
satellites and the latitude and longitude
of your position will be displayed on the
screen.
2. To update your current position, select
Refresh.
Note:
This feature is only available in iDEN mode.
Page 69

64
Calculator
1. Select Menu > Tools > Calculator.
2. Enter numeric figures using the keypad
and use the
navigation keys and
the Menu
key to select +/-/x/÷/=.
For decimal points, press
*.
To clear a number, press #.
Convertor
You can convert measurement parameters
from one unit to another in Converter.
1. Go to Menu > Tools > Convertor.
2. Select the type of measurement to
convert.
3. Scroll to First Unit, and select Edit.
4. Select the unit that you want to convert
from.
5. Scroll down and press the Menu
key
to enter the value to be converted. Select
OK once done.
6. Scroll to Second Unit and select Edit to
select the unit that you want the value to
be converted to. The field below changes
automatically to reflect the converted
value.
Stopwatch
1. Go to Menu > Tools > Stopwatch.
2. To start the stopwatch, select Start.
3. To end, select Stop.
Page 70

Using the Menu – Tools
65
Voice Memo
To record a voice clip:
1. Go to Menu > Tools > Voice Memo.
2. To start the voice recording, select Yes
when prompted.
3. To end the voice recording, select Stop.
4. Select Save to keep the voice recording
or Delete to discard it.
Note:
All recorded voice memo will be stored in
the Sound folder under Media Centre.
To play a voice clip:
1. Go to Menu > Multimedia > Media
Centre.
2. Select the Sound folder and scroll to the
desired voice clip.
3. Press the Menu
key or go to Options
> Open to play the voice clip.
To delete a voice clip:
1. Go to Menu > Multimedia > Media
Centre.
2. Select the Sound folder and scroll to the
desired voice clip.
3. Select Options > Delete to delete the
voice clip.
Page 71

66
Web
You can browse web pages written in
XHTML, WML, or HTML by selecting
Menu > Web.
Note:
Data charges may apply. For more
information on the availability of service,
pricing and tariffs, please contact your local
service provider.
Configure Phone for
Browser Service
Your device may configure the Browser or
internet access point automatically based
on your SIM card. You may also receive
service settings in a configuration message
from the service provider.
To define an access point manually, you
need to obtain the access point information
from your service provider.
To edit the profile for browser service:
1. Go to Menu > Settings >
Connectivity > Connection Profile >
WAP Browser.
2. Scroll to the profile to edit and under
Options, select Edit Profile.
3. Edit the settings as necessary. To save
the new settings, select Save.
Making a Connection
To access web pages:
1. Go to Menu > Web.
Page 72

Using the Menu - Web
67
2. To go to the homepage, select
Homepage.
3. To access another web page, select
Options > Input URL.
4. Enter the URL of the web page you want
to access and select Options > Go.
Bookmarks
Your device may have preinstalled
bookmarks and links for third-party internet
sites. If you choose to access such sites,
you should take precautions for security or
content.
To add bookmarks manually:
1. Go to Menu > Web. Under Options,
select Bookmarks.
2. Select Create New.
3. Enter the URL of the web page that you
wish to add to the bookmark and select
OK.
4. Enter a name for the bookmark and
select OK to save the URL.
Page 73

68
Safety Information
This section contains important information on the safe
and efficient operation of your mobile device. Read this
information before using your mobile phone.
Exposure to Radio Frequency (RF) Energy
Your phone contains a transmitter and receiver. When it is
ON, it receives and transmits RF energy. When you
communicate with your phone, the system handling your
call controls the power level at which your phone
transmits.
Your mobile phone is designed to comply with local
regulatory requirements in your country concerning
exposure of human beings to RF energy.
Portable Radio Product Operation and EME Exposure
Your radio product is designed to comply with the
following national and international standards and
guidelines regarding exposure of human beings to radio
frequency electromagnetic energy (EME):
• United States Federal Communications Commission,
Code of Federal Regulations; 47 CFR 2.1093 ©, 47
CFR 20.18, 47 CFR part 6 subpart C, 47 CFR part 7
subpart C, 47 CFR part 15 subparts B & C, 47 CFR
Part 24 subpart D, 47 CFR part 90 subparts I & S
• ANATEL, Brazil Regulatory Authority, Resolutions
238/00, 242/00 and 303/02 Annex
Page 74

Safety and General Information
69
FCC Safety Requirement
Your mobile device complies with Part 15 of the FCC
rules. Operation is subject to the following two conditions:
1. This device may not cause harmful interference.
2. This device must accept any interference received,
including interference that may cause undesired
operation.
Changes or modifications not expressly approved by the
manufacturer could void the user’s authority to operate the
equipment.
Industry Canada Requirement
Your mobile device complies with RSS-210 of Industry
Canada. Operation is subject to the following two
conditions:
1. This device may not cause interference.
2. This device must accept any interference, including
interference that may cause undesired operation of the
device.
This Class B digital apparatus complies with Canadian
ICES-003.
Operational Precautions
To assure optimal radio product performance and to be
sure that human exposure to RF does not exceed the
guidelines set forth in the relevant standards, always
follow these instructions and precautions:
Page 75

70
Two-way radio operation
Your radio product has been designed and tested to
comply with national and international standards and
guidelines regarding human exposure to RF
electromagnetic energy, when operated in the two-way
mode (at the face, or at the abdomen when using an audio
accessory) at usage factors of up to 50% talk/ 50% listen.
Transmit no more than the rated duty factor of 50% of the
time. To transmit (talk), push the PTT button. To receive
calls, release the PTT button. Transmitting 50% of the
time or less is important because this radio generates
measurable RF energy only when transmitting (in terms of
measuring for standards compliance).
When using your radio product as a traditional two-way
radio, hold the radio product in a vertical position with the
microphone one to two inches (2.5 to 5 cm) away from the
lips.
Product Operation
When placing or receiving a phone call, hold your radio
product as you would a wire-line telephone. Speak directly
into the microphone.
If you wear a radio product on your body when
transmitting, always place the radio product in a preapproved clip, holder, holster, case or body harness. If you
do not use a pre-approved body-worn accessory and are
not using the radio product in the intended use positions
alongside the head in the phone mode or in front of the
face in the two-way radio mode - or if you hang your
device from a lanyard around your neck - keep the device
at least 2.5 centimeters (1 inch) from your body when
transmitting.
Page 76

Safety and General Information
71
ALL MODELS WITH FCC ID WSM-IGP801 MEET THE
GOVERNMENT’S REQUIREMENTS FOR EXPOSURE
TO RADIO WAVES.
Your wireless phone is a radio transmitter and receiver. It
is designed and manufactured not to exceed the emission
limits for exposure to radiofrequency (RF) energy set by
the Federal Communications Commission of the U.S.
Government. These limits are part of comprehensive
guidelines and establish permitted levels of RF energy for
the general population. The guidelines are based on
standards that were developed by independent scientific
organizations through periodic and thorough evaluation of
scientific studies. The standards include a substantial
safety margin designed to assure the safety of all persons,
regardless of age and health.
Before a phone model is available for sale to the public, it
must be tested and certified by the FCC that is does not
exceed the limit established by the government-adopted
requirement for safe exposure. The tests are performed in
positions and locations (e.g. at the ear and worn on the
body) as required by the FCC for each model.
This equipment complies with the FCC radiation exposure
limits set forth for an uncontrolled environment. This
transmitter must not be co-located or operating in
conjunction with any other antenna or transmitter.
For body operation, models with FCC ID WSM-IGP801
have been tested and meets the FCC RF exposure
guidelines when used directly against the body. Specific
Absorption Rate or SAR is a measurement of radio
frequency energy. The FCC permits a maximum SAR
value of 1.6 W/kg¹. Tests for SAR are conducted using
standard operating positions reviewed by the FCC with the
phone transmitting at its highest certified power level in all
tested frequency bands. Although the SAR is determined
at the highest certified power level, the actual SAR level of
the phone while operating can be well below the maximum
value. This is because the phone is designed to operate at
multiple power levels so as to use only the power required
to reach the network. In general, the closer you are to a
wireless base station antenna, the lower the power output.
The highest SAR value for this product when used on the
body, as described in this user's guide, is 0.59 W/kg
(Body-worn measurements differ among phone models,
depending upon available accessories and FCC
requirements)².
While there may be differences between the SAR levels of
various phones and at various positions, they all meet the
government requirement for safe exposure.
The FCC has granted an Equipment Authorization for this
model phone with all reported SAR levels evaluated as in
compliance with the FCC RF exposure guidelines. SAR
information on this model phone is on file with the FCC
and can be found under the Display Grant section of
http://www.fcc.gov/oet/fccid after searching on FCC ID
WSM-IGP801.
Page 77

72
¹In the United States and Canada, the SAR limit for mobile
phones used by the public is 1.6 watts/kg (W/kg) averaged
over one gram of tissue. The standard incorporates a
substantial margin of safety to give additional protection
for the public and to account for any variations in
measurements.
²The SAR information reported to the FCC includes the
FCC-accepted testing protocol, assessment procedure,
and measurement uncertainty range for this product.
The device is also designed to the SAR limit stated in the
ICNIRP guidelines is 2.0 watts/kilogram (W/kg) averaged
over 10 grams of tissue. The actual SAR level of an
operating device can be below the maximum value
depending on a number of factors such as the distance to
a network base station.
The highest SAR value for the i976 under the ICNIRP
guidelines for use of the device at the ear is 0.47 W/kg
RF Energy Interference/Compatibility
Nearly every electronic device is subject to RF energy
interference from external sources if inadequately
shielded, designed or otherwise configured for RF energy
compatibility. In some circumstances your handset may
cause interference with other devices.
Follow Instructions to Avoid Interference
Problems
Turn OFF your radio product where posted notices instruct
you to do so.
In an aircraft, turn off your radio product whenever
instructed to do so by airline staff. If your radio product
offers an airplane mode or similar feature, consult airline
staff about using it in flight.
Implantable Medical Devices
If you have an implantable medical device, such as a
pacemaker or defibrillator, consult your physician before
using this radio product.
Persons with implantable medical devices should observe
the following precautions:
• ALWAYS keep the phone more than 20 centimeters (8
inches) from the implantable medical device when the
phone is turned ON.
• DO NOT carry the phone in a breast pocket;
Page 78

Safety and General Information
73
• Use the ear opposite the implantable medical device to
minimize the potential for interference.
• Turn OFF the phone immediately if you have any
reason to suspect that the interference is taking place.
Read and follow the directions from the manufacturer of
your implantable medical device. If you have any
questions about using your wireless phone with your
implantable medical device, consult your health care
provider.
Hearing Aids
Some mobile devices may interfere with some hearing
aids. In the event of such interference, you may want to
consult your hearing aid manufacturer or physician to
discuss alternatives.
Other Medical Devices and Health Care Facilities
If you use any other personal medical devices, consult
your physician or the manufacturer or your device to
determine if it is adequately shielded from RF energy.
Turn off your radio product when instructed to do so in
hospitals or health care facilities that may be using
equipment that is sensitive to external RF energy.
Driving Precautions
Check the laws and regulations on the use of radio
products in the area where you drive. Always obey them.
When using your radio product while driving, please:
• Give full attention to driving and to the road. Using a
mobile device may be distracting. Discontinue a call if
you can’t concentrate on driving.
• Use hands-free operation, if available.
• Pull off the road and park before making or answering
a call.
Operational Warnings
Obey all posted signs when using mobile devices in public
areas.
Potentially Explosive Atmospheres
Areas with potentially explosive atmospheres are often but
not always posted, and can include fueling areas such as
below decks on boats, fuel or chemical transfer or storage
facilities, or areas where the air contains chemicals or
particles, such as grain, dust or metal powders.
When you are in such area, turn off your handset, and do
not remove, install, or charge batteries unless it is a radio
product type especially qualified for use in such areas as
“Intrinsically Safe” (for example, Factory Mutual, CSA, or
Page 79
74
UL approved). In such areas, sparks can occur and cause
an explosion or fire.
Batteries and Chargers
Caution:
Improper treatment or use of batteries may present a
danger of fire, explosion, leakage, or other hazard.
Your battery, charger, or portable radio may contain
symbols, defined as follows:
Symbol Definition
CAUTION Do not dispose of your battery or
mobile device in a fire
CAUTION Your battery or mobile device may
require recycling in accordance
with local laws.
Contact your local regulatory
authorities for more information.
Do not throw your battery or
mobile device in the trash.
CAUTION Your mobile device contains an
internal lithium ion battery.
Do not let your battery, charger or
mobile device get wet.
Choking Hazards
Your portable radio or its accessories may include
detachable parts, which may present a choking hazard to
small children. Keep your device and its accessories away
from small children.
Glass Parts
Some parts of your mobile device may be made of glass.
This glass could break if the product is dropped on a hard
surface or receives a substantial impact. If glass breaks,
do not touch or attempt to remove.
Stop using your mobile device until the glass is replaced
by a qualified service center.
Seizures/Blackouts
Some people may be susceptible to epileptic seizures or
blackouts when exposed to flashing lights, such as when
playing video games. These may occur even if a person
has never had a previous seizure or blackout.
If you have experienced seizures or blackouts, or if you
have a family history of such occurrences, please consult
your physician before playing video games or enabling a
flashing-lights feature (if available) on your mobile device.
Discontinue use and consult a physician if any of the
following symptoms occur: convulsion, eye or muscle
Page 80

Safety and General Information
75
twitching, loss of awareness, involuntary movements, or
disorientation. It is always a good idea to hold the screen
away from your eyes, leave the lights on in the room, take
a 15-minute break every hour, and stop use if you are very
tired.
Caution on High Volume Usage
Listening at full volume to music or voice through a
headset may damage your hearing.
Repetitive Motion
When you repetitively perform actions such as pressing
keys or entering finger-written characters, you may
experience occasional discomfort in your hands, arms,
shoulders, neck, or other parts of your body. If you
continue to have discomfort during or after such use, stop
use and see a physician.
Page 81

76
Subject to the exclusions contained below, iWOW
Communications Pte Ltd. warrants its iDEN Digital Mobile
and Portable Handsets ("Products"), certified accessories
sold for use with these Products ("Accessories") and
iWOW software contained on CD-Roms or other tangible
media and sold for use with these Products ("Software") to
be free from defects in materials and workmanship under
normal consumer usage for the period(s) outlined below.
This limited warranty is a consumer's exclusive
remedy, and applies as follows to new Products,
Accessories and Software purchased by consumers
and are accompanied by this written warranty:
Products Covered Coverage Length
Products as defined above One (1) year from the date
of purchase by the first
consumer purchaser of the
product.
Accessories as defined
above
One (1) year from the date
of purchase by the first
consumer purchaser of the
product.
Software as defined
above. Applies to physical
defect in the media ie
CDROM.
Ninety (90) days from the
date of purchase by the
first consumer purchaser
of the product.
Exclusions to the warranty
Normal Wear and Tear. Periodic maintenance, repair and
replacement of parts due to normal wear and tear are
excluded from coverage.
Ornamental Decorations. Ornamental decorations such
as emblems, graphics, rhinestones, jewels, gemstones
and their settings, and other decorative elements, are
excluded from coverage.
Batteries. Only batteries whose fully charged capacity
falls below 80% of their rated capacity and batteries that
leak are covered by this limited warranty.
Abuse & Misuse. Defects or damage that result from: (a)
improper operation, storage, misuse or abuse, accident or
neglect, such as physical damage (cracks, scratches, etc.)
to the surface of the product resulting from misuse; (b)
contact with liquid, water, rain, extreme humidity or heavy
perspiration, sand, dirt or the like, extreme heat, or food;
(c) use of the Products or Accessories for commercial
purposes or subjecting the Product or Accessory to
abnormal usage or conditions; or (d) other acts which are
not the fault of iWOW, are excluded from coverage.
Use of Non-iWOW approved Products and
Accessories. Defects or damage that result from the use
of Non-iWOW approved or certified Products,
Accessories, Software or other peripheral equipment are
excluded from coverage.
Page 82

Limited Warranty Information
77
Unauthorized Service or Modification. Defects or
damages resulting from service, testing, adjustment,
installation, maintenance, alteration, including without
limitation, software changes, or modification in any way by
someone other than iWOW, or its authorized service
centers, are excluded from coverage.
Altered Products. Products or Accessories with (a) serial
numbers or date tags that have been removed, altered or
obliterated; (b) broken seals or that show evidence of
tampering; (c) mismatched board serial numbers; or (d)
nonconforming or non-iWOW housings, antennas, or
parts, are excluded from coverage.
Communication Services. Defects, damages, or the
failure of Products, Accessories or Software due to any
communication service or signal you may subscribe to or
use with the Products, Accessories or Software is
excluded from coverage.
Software Embodied in Physical Media. No warranty is
made that the software will meet your requirements or will
work in combination with any hardware or software
applications provided by third parties, that the operation of
the software products will be uninterrupted or error free, or
that all defects in the software products will be corrected.
Software NOT Embodied in Physical Media. Software
that is not embodied in physical media (e.g. software that
is downloaded from the internet), is provided "as is" and
without warranty.
ANY IMPLIED WARRANTIES, INCLUDING WITHOUT
LIMITATION THE IMPLIED WARRANTIES OF
MERCHANTABILITY AND FITNESS FOR A PARTICULAR
PURPOSE, SHALL BE LIMITED TO THE DURATION OF
THIS LIMITED WARRANTY, OTHERWISE THE REPAIR,
REPLACEMENT, OR REFUND AS PROVIDED UNDER
THIS EXPRESS LIMITED WARRANTY IS THE
EXCLUSIVE REMEDY OF THE CONSUMER, AND IS
PROVIDED IN LIEU OF ALL OTHER WARRANTIES,
EXPRESS OF IMPLIED. IN NO EVENT SHALL iWOW BE
LIABLE, WHETHER IN CONTRACT OR TORT
(INCLUDING NEGLIGENCE) FOR DAMAGES IN EXCESS
OF THE PURCHASE PRICE OF THE PRODUCT,
ACCESSORY OR SOFTWARE, OR FOR ANY INDIRECT,
INCIDENTAL, SPECIAL OR CONSEQUENTIAL
DAMAGES OF ANY KIND, OR LOSS OF REVENUE OR
PROFITS, LOSS OF BUSINESS, LOSS OF INFORMATION
OR DATA, SOFTWARE OR APPLICATIONS OR OTHER
FINANCIAL LOSS ARISING OUT OF OR IN CONNECTION
WITH THE ABILITY OR INABILITY TO USE THE
PRODUCTS, ACCESSORIES OR SOFTWARE TO THE
FULL EXTENT THESE DAMAGES MAY BE DISCLAIMED
BY LAW.
Page 83

78
iWOW, at its option,will at no charge either repair the
Product (with new or reconditioned parts), replace it (with
a new or reconditioned Product), or refund the purchase
price of the Product during the warranty period provided
that it is returned in accordance with the terms of this
warranty. Replaced parts or boards are warranted for the
balance of the original applicable warranty period. All
replaced parts shall become the property of iWOW.
This limited warranty is extended by iWOW to the original
end user purchaser only and is not assignable or
transferable to any other party. This is the complete
warranty for the Product manufactured by iWOW. iWOW
assumes no obligations or liability for the additions or
modifications to this warranty unless made in writing and
signed by an officer of iWOW. iWOW does not warrant the
installation, maintenance or service of the Product.
iWOW cannot be responsible in any way for any ancillary
equipment not furnished by iWOW which is attached to or
used in connections with the Product, or for operation of
the Product with any ancillary equipment, and all such
equipment if expressly excluded from this warranty.
Because each system which may use the Product is
unique, iWOW disclaims liability for range, coverage or
operations of the system as a whole, or any portion of the
system not produced by iWOW, under this warranty.
Warranty service:
To be able to qualify for warranty service, the proof of
purchase with date of purchase together with Product
serial number included. The customer will be liable for all
costs to transport the faulty product to the service center.
Warranty service will be available through iWOW
authorized service centers or the sales company where
the product was sold.
Page 84

Index
79
Index
A
Alarm,76
Answering,34
B
Basics,18
BatteriesandChargers,
87
Battery,9
Charging,11
indicator,12
Installation,9
Bluetooth,65
Pairing,66
C
Call,33
Options,35
CallWaiting,36
Camera,69
Care,7
Contacts,43
D
DateBook,74
Desktop,22
DirectConnectCall,36
Answering,39
Display,20
DrivingPrecautions,86
E
Emergency,6
F
FCCSafety,82
Features,3
G
GPS,76
H
Headset,31
I
Interference,85
L
Lock,29
M
MenuTree,1
Messages,48
MMS,51
MP3,72
Multimedia,69
Multi‐PartyCall,40
MusicPlayer,72
N
Navigation,20
O
Offline,16
P
PictureID,46
PIN,29
playlist,73
Power,16
Predictive,28
PUK,29
R
RecentCalls,41
Restore,64
RF,81
Ringtone,46
S
Safety,81
Settings,57
SIM,14
SpeedDialing,34
Status,24
T
Text,27
TextMessages,48
Tools,74
U
Unlock,29
USB,32
V
VoiceMail,55
Volume,41
W
warranty,89
Web,79
 Loading...