

Iwatsu Platinum Enterprise 2.0 Quick Reference Manual
FEATURE OPERATION CODES
All features listed except those marked with a † require the user to lift the receiver before
operating the feature. Press [FEAT]+[#]+[9]+{button} to determine the function of a button.
Absence Message
Return Time .....................[Absence Message]+1+HH:MM
Return Date .....................[Absence Message]+2+DD
Meeting Time ...................[Absence Message]+3+HH:MM
Telephone No. .................[Absence Message]+4+(Phon e No.)+#
Cancel .............................[Absence Message]+*
Account Code .....................[Account Code]+(Code)+*
Auto Repeat Dial .................[Auto Repea t Dial]
Cancel .............................[Auto R epeat D i al]+*
BGM-On† ............................[BGM]
Off† .................................[BGM]
Busy ICM Callback ..............[ICM Call Back]
Cancel .............................[ICM Call Back]+*
Busy Number Callback ........[Timed Trunk Queue]
Cancel .............................[Timed Trunk Queue]+*
Busy Trunk Queue ..............[Trunk Queuing]
Cancel .............................[Trunk Queuing]+*
Call Coverage [CCV] ...........[Delayed n], [Immed. n], [No ring n]
Immediate ........................[CCV]+1
Delay Indication ...............[CCV]+2
No Ring ...........................[CCV]+3
Call Mode Change ..............Tone to Voice: ICM extension +#
Call Mode Chang e† .............Voice to Tone: [Calling Mode CHG ]
Call Park Pick Up ................[Call Park Pickup]+Ext.No.
Call Pick Up
Internal Group ..................[Call Pickup In]
External Group .................[Call Pick up Out]+Group No.
Direct Extension ...............[Spec. Call Pickup]+Ext.No.
Conference
Add On ............................[TRAN]+Ext.No.+[ADD]
Multi Line .........................[HOLD]+(Line 2)+[ADD]+(Line 1)
Trunk to Trunk .................[HOLD]
Display Change ...................[LCD Mode Change]
Extension Lock ....................[Station Lockout ]+(Password)
Release ...........................[Station Loc kout
Flexible Call Forwarding
All ....................................[FORWARD]+Call Type (1-3)+1+(Destination)
Busy/No Answer ..............[FORWARD]+Call Type (1-3)+2+(Destination)
No Answer .......................[FORWARD]+Call Type (1-3)+3+(Destination)
All External ......................[FORWARD]+Call Type (1-3)+4+(Destination(90-99))
Cancel ..............................[FORWARD]+*+Call Type (1-4)
Follow Me .........................[FORWARD]+[FORWARD]+Call Type+(Ext. No.)
Flash-Short .........................[Short Flash]
Last No. Redial ...................[SPEED]+#
Meet-Me Page Answer .... ....[Meet Me]
Memo Dial
Set ...................................[Memo Dial]+(Phone No.)+[Memo Dial]
Dial ..................................[Memo Dial]
Message Waiting
Set ...................................[MESSAGE]+#
Cancel .............................[MESSAGE]+*+Ext.No.
Display .............................[MESSAGE]
Answer ............................[MESSAGE]+#
Clear ................................[MESSAGE]+**
Privacy Release ..................[Privacy Release]
Save No. Redial ..................[Save No. Redial]
Speaker Phone
Full/Half duplex ................[Speaker Duplex] or [FEAT] +[6]+[6]
Speed Dial Registration†
Number ............................[FEAT]+[SPEED]+(Code)+(Phone No.)+ FEAT]
Trunk Group .....................[FEAT]+[SPEED]+#+(Code)+(LineNo.)+[FEAT]
Name ...............................[FEAT]+[SPEED]+*+(Code)+(Name)+[FEAT]
Speed Dial ..........................[
Speed Dial-Scroll ................[SPEED]+*+(Code)+*/#+[SPEED]
Transfer to Park ..................[TRAN]+[PARK]+Ext.No.
Time Reminder
Set ...................................[Reminder]+HH:MM
Cancel .............................[Reminder]+*
Universal Night Answer .......[UNA Pickup]
Whisper Page .....................Press *
Depending on the hardware, software and programmed functions in your Iwatsu system,
available features and feature operations m a y differ from those listed in this guide. For
more information contact your authorized Iw ats u dist r ib ut or.
SPEED]+(Code)
]+(Password)
1-800-974-5070
www.iwatsu.com
Printed in USA
June 2006
Iwatsu Voice Networks
8001 Jetstar Drive
Irving, TX 75063
Part Number: 108680
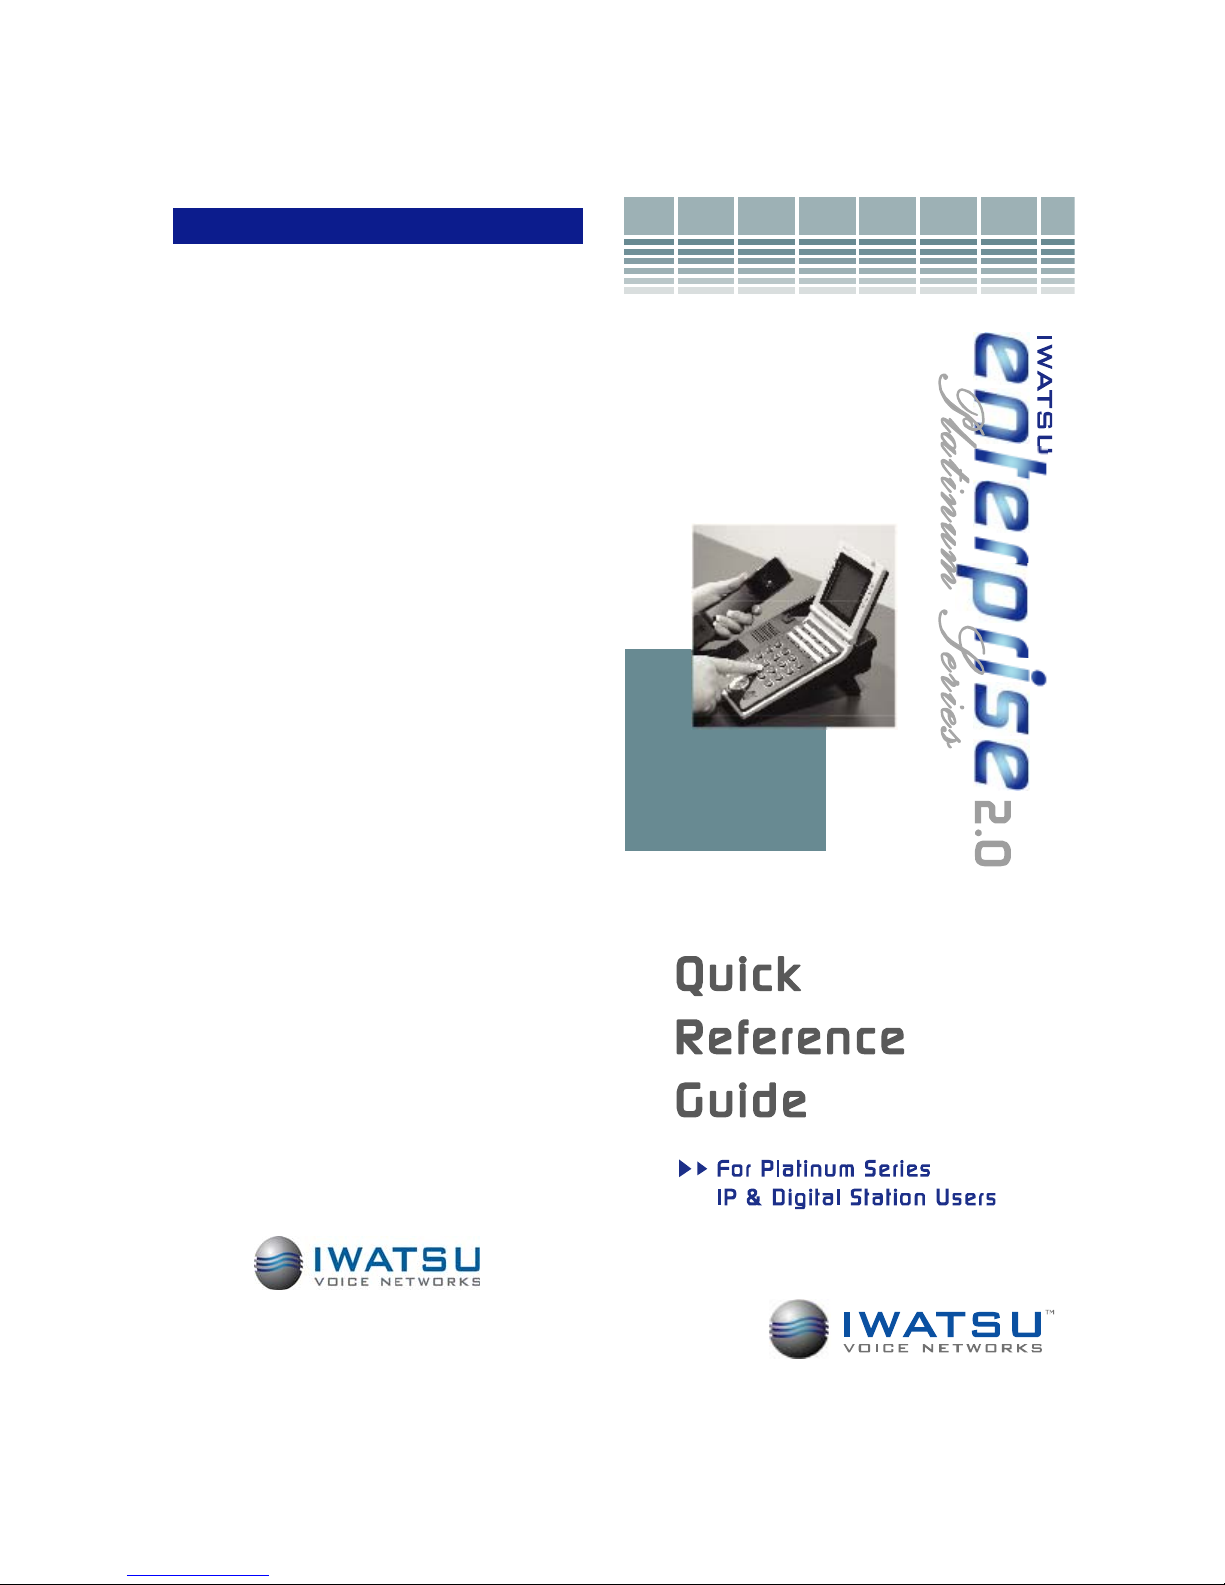
INTRODUCTION
Forward
VMail
Call Log
Park
EZDial
15 TUE 10:40 AM
System Name
The Enterprise 18i/d Platinum Series Telephone
This guide describes basic and advanced features
and operations for Iwatsu Enterprise 2.0 Communications Server Platinum Series IP and Digital Telephones.
For more information, refer to your Iwatsu Owner’s
Manual or contact your authorized Iwatsu distributor.
Only Iwatsu qualified personnel are authorized to
install any component of an Iwatsu system. Should
you require service, please contact your authorized
Iwatsu distributor.
Multipurpose Keys - These keys can be
programmed for specific functions, including
outside line access, individual extension selection,
and one-touch feature operation.
Note: Multipurpose keys must be programmed for
your individual station and are denoted in this guide
by []. For example: [TEXT MSG].
Key Lamps - These lamps light up or flash
when someone is using the line or feature corresponding to that key. A green lamp indicates that
you are using that line/feature. A red lamp indicates
that someone else is using that line/feature.
Speaker - This button allows you to dial and
receive outside or internal calls and talk with-
out lifting the receiver.
Mute Key - When talking using the handset,
pressing the Mute key mutes the handset
transmitter. If using the speakerphone, pressing the Mute key mutes the station microphone.
When using the headset jack, the Mute key mutes
the transmitter on the headset.
K
Key Lamps ......................................................1
L
Last Number Redial ........................................ 4
Layer 2 Switch ................................................20
M
Making an Outgoing Call ................................3
Making an Intercom Call ................................. 3
Making an Intercom Group Call ...................... 3
Master Hunt Groups .......................................14
MENU KEYS ...................................................5
Message Waiting ............................................14
Multipurpose Keys ..........................................1
Mute Key .........................................................1
P
Paging ............................................................. 15
Park Menu Key ...............................................7
Personal Ringing Tones .................................15
Picking Up a Call On Hold ..............................4
Putting a Call On Hold ....................................3
R
Receiving an Incoming Call ............................3
Ringer Volume Control ...................................2
Receiving a Call From Another Extension ...... 3
S
Speaker ..........................................................1
Speaker Volume Control ................................. 2
Save Dialed Number ....................................... 4
Speed Dial ......................................................16
T
TRAN (Transfer) .............................................2
Transferring a Call to Another Extension ........4
Transfer to Park .............................................. 8
Text Messaging ..............................................17
U
Universal Night Answer ..................................19
V
Voice Mail .......................................................8
Volume Control ............................................... 2
W
Whisper Page .................................................15
1
22
INDEX
Symbols
Keys ................................................................1
911 Support ....................................................4
A
ADVANCED FEATURES ................................9
Answering Machine Emulation
(Voice Mail Monitor) ...............................10
B
BASIC FEATURES .........................................3
Busy ICM Callback .........................................10
Busy Number Callback ...................................10
C
Call Storage (System) .....................................9
Call Coverage .................................................11
Call Log ...........................................................6
Call Pick-Up ....................................................11
Internal Group .............................................11
Direct Extension .......................................... 11
Call Recording ................................................12
Conference .....................................................6
D
DIRECT INWARD SYSTEM ACCESS ...........19
Do Not Disturb ................................................12
DISPLAY MENU FEATURE OPERATION .....6
E
ePod ...............................................................2
E-Response Help Call ....................................19
Exclusive Hold On Outside Line .....................12
EZDial .............................................................7
F
FEAT (Feature) ...............................................2
Flash ...............................................................13
Forward ...........................................................7
Forward Features (Advanced) ........................13
Forward (Follow-Me) .......................................13
FEATURE OPERATION CODES ... Back Cover
H
Handset Volume Control .................................2
HOLD/DND (Hold/Do Not Disturb) ..................2
I
INTRODUCTION ............................................1
ICM .................................................................2
Mailbox - This key is used to access your
voice mailbox.
FEAT (Feature) - This button is used to
FEAT
access many Iwatsu system features.
TRAN (Transfer) - This button allows you
TRAN
to transfer a call from your phone to another
extension.
HOLD/DND (Hold/Do Not Disturb) -
HOLD
/DND
This key is used to put a call on Hold or to
set the Do Not Disturb function and prevent
any calls from getting through or ringing at your
extension.
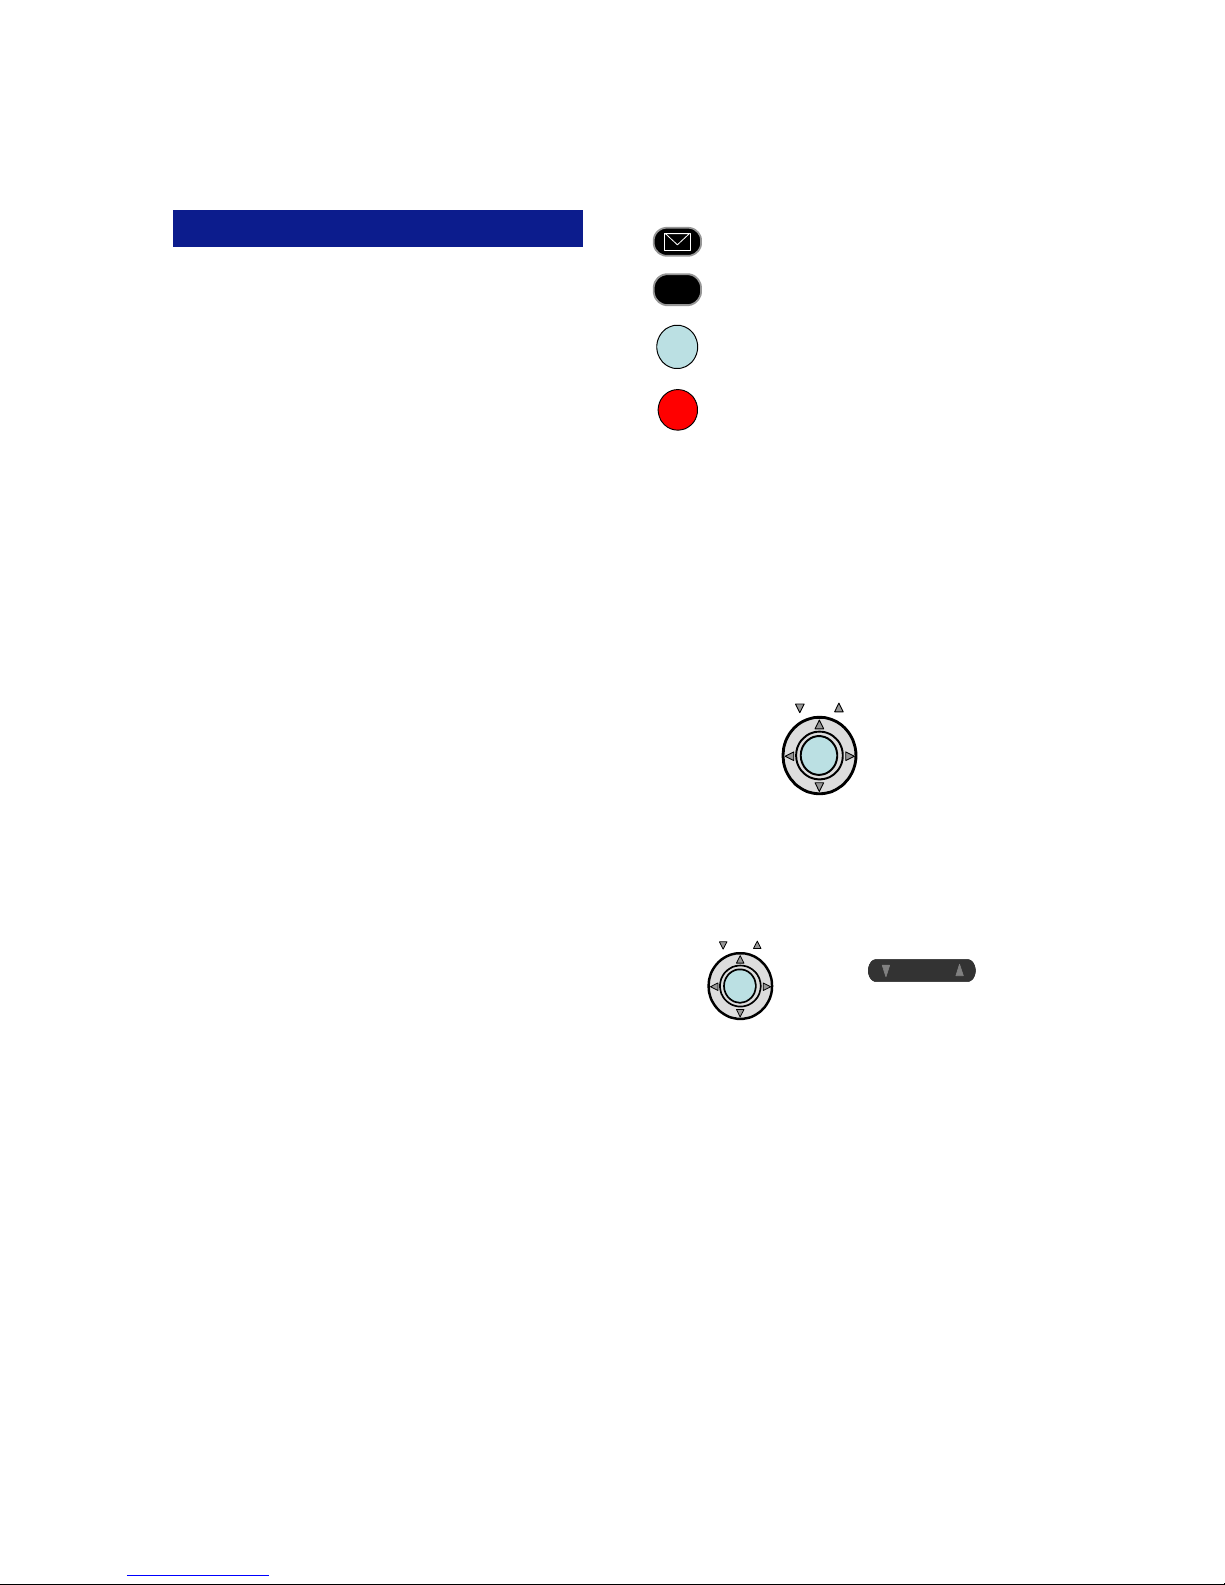
ePod (Easy Point of Decision) is used for easy
access to the Display Menu, navigating the Call
Log, and changing volume levels on your Enterprise
18i/d Telephone.
• Press IN or OUT to access incoming or outgoing
Call records.
• Press the VOL up or down arrows to control re-
ceiver, speaker, ringer, and handset volumes.
• Press the SET button and use the arrows to
scroll through the menu options.
VOL
IN OUT
SET
Volume Control:
The UP and DOWN arrow volume control keys are
used adjust the Handset, Speaker, and Ringer volume based on the state of the telephone.
Enterprise 18i/d Enterprise 12i/d
VOL
IN OUT
SET
Receiver (Handset) Volume - When using the
Handset, the volume control key allows you to adjust the handset volume to one of three levels.
Speaker Volume - When using the Speaker, the
volume control allows you to adjust the speaker
volume to one of eleven levels.
Ringer Volume - Pressing the ringer volume control
button allows you to adjust the ringer volume to one
of four levels.
ICM - The intercom system is the internal network
used to communicate between the telephone extensions in your Iwatsu system. Pressing the [ICM]
button connects you to an intercom line for conversation with other extensions.
V O LV O L
21
2

BASIC FEATURES
Making an Outgoing Call
• Press the Speaker key or lift the receiver.
• Press an outside line button. You will hear a dial
tone.
• Dial telephone number.
Make a dialing mistake?
• Press the [FLASH] button to get new dial tone.
• Dial again.
Receiving an Incoming Call
When your phone rings and lamp flashes:
• Press the Speaker key or Lift the receiver to con-
nect the call.
If your phone does not connect you to the call
automatically
When your phone rings and lamp flashes:
• Lift the receiver.
• Press the button with the flashing lamp to connect
the call.
Making an Intercom Call
• Press the Speaker key or lift the receiver and
wait for dial tone.
• Dial an extension number.
or
If you have a DSS (Direct Station Selection) button
assigned for the extension:
• Lift the receiver and wait for dial tone.
• Press the assigned extension button.
Receiving a Call From Another Ex tension
When you hear the intercom call signal - either the
caller’s voice or intercom ringing tone:
• Pick up the receiver, and the call is connected.
or
• Speak into the microphone without lifting the r e-
ceiver.
Making an Intercom Group Call
• Dial the Intercom Group access number when
you hear the Intercom Dial Tone.
Putting a Call On Hold
When speaking on an outside line:
• Press the HOLD/DND button.
The active outside line button lamp flashes green on
your phone and red at other extensions.
If the call is not picked up, the call will ring again at
your phone.
• Dial the desired extension number, hunt group
access code, paging access code or outside line
access code and phone number.
To register a flash to make another call
• Dial +.
• Once an outside call has been made, another
call may not be placed.
LAYER 2 SWITCH
There are two jacks on the back of your Enterprise 2.0 IP Telephone. One jack is labeled “PC”
and the ot her is la bele d “LA N”. Us e the PC jack to
connect to a second device.
To use the layer 2 switch:
• Connect on Category 5 cable from the PC jack
on the IP telephone to the NIC card on your
PC.
• Connect one Category 5 cable from the LAN
jack on the IP telephone to the wall jack connected to the local area network.
For a full list of Display Menu features, please refer to the IP Telephone User Guide in your
Iwatsu Owner’s Manual.
3
20
 Loading...