

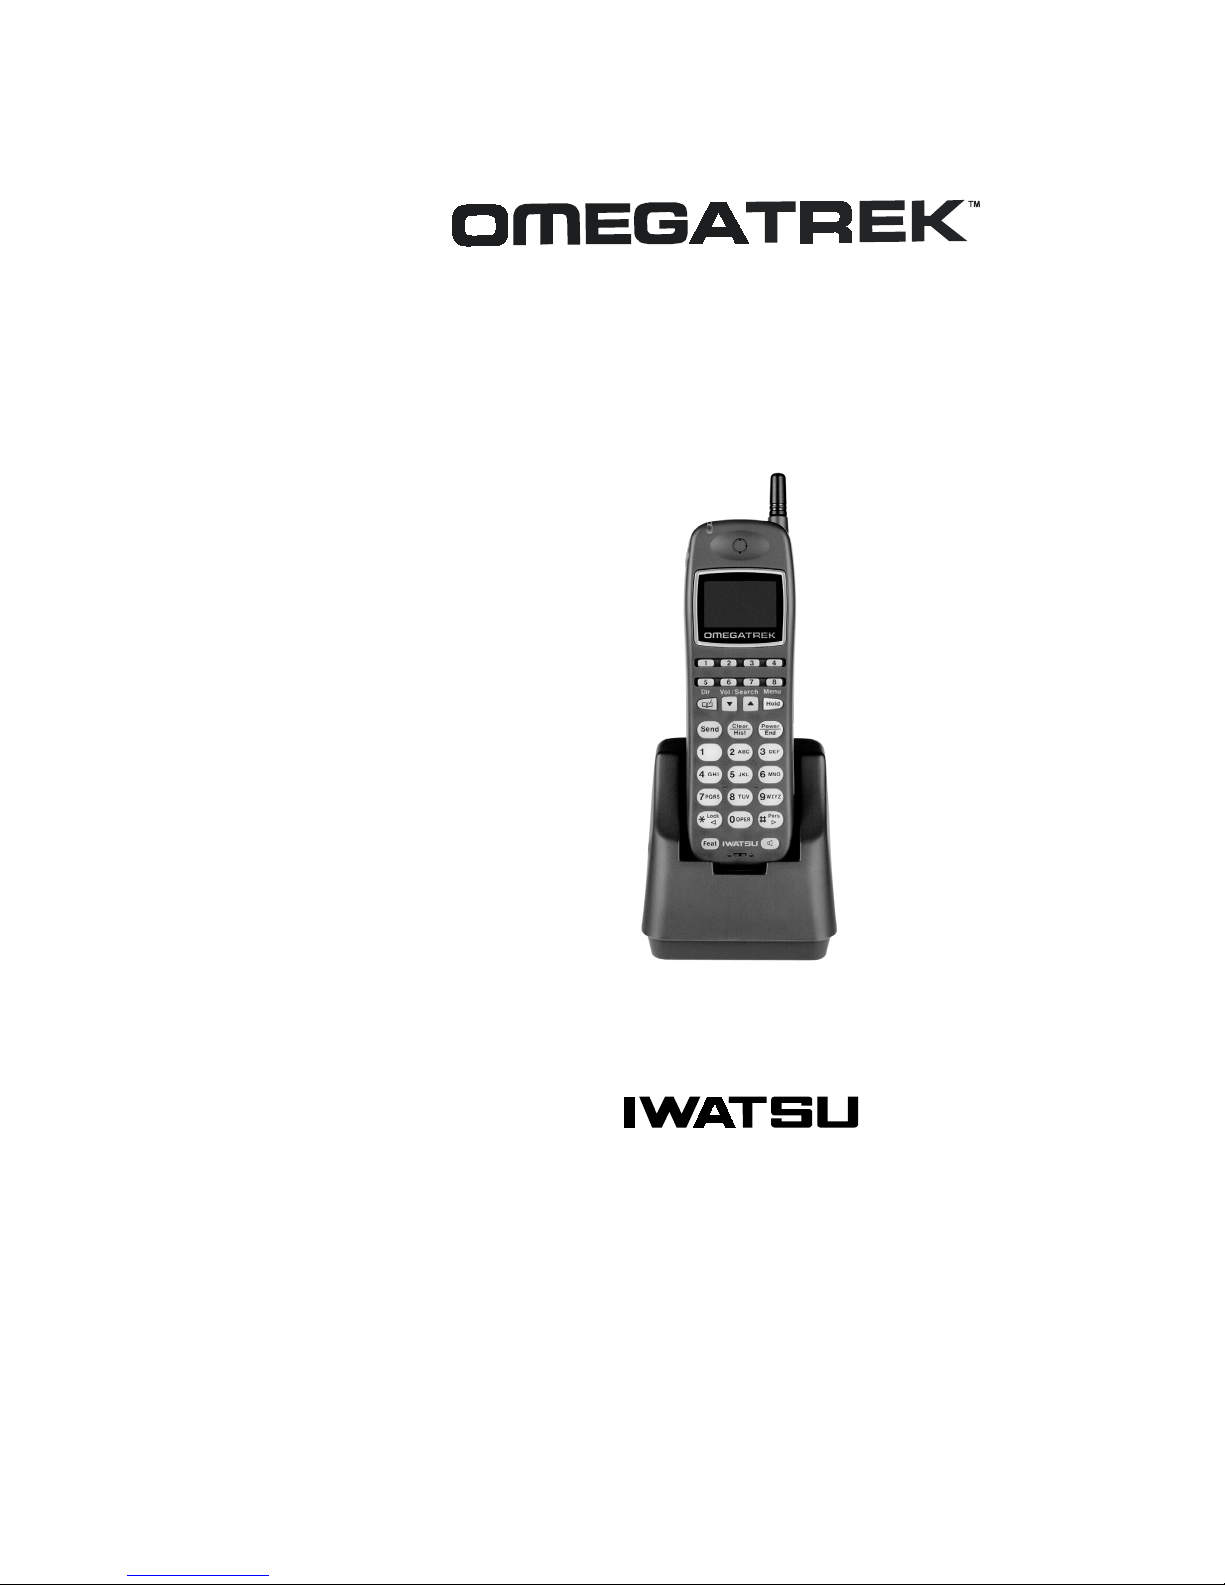
Iwatsu Omegatrek PS6 Owner's Manual
36'LJLWDO:LUHOHVV3RUWDEOH6WDWLRQ
2ZQHU·V0DQXDO

Omegatrek is a trademark of Iwatsu America, Inc.
Omega-Phone and ADIX are registered trademarks of Iwatsu America, Inc.
Iwatsu America, Inc., 430 Commerce Boulevard, Carlstadt, NJ 07072, (201)935-8580,
E-mail: info@iwatsu.com, Web: www.iwatsu.com
©2001 Iwatsu America, Inc.
All rights reserved.
First Edition January 2001
Printed in the United States of America
All rights are reserved. No part of this manual or accompanying software may be reproduced, in any form or
by any means, without the permission of Iwatsu America, Inc.
This manual was written for the Omegatrek system with version 7.0 software. In some cases, available feature
operations may differ from those listed in this manual, depending on the hardware, software and programmed
functions in your Omegatrek system. For more information, contact your Authorized Iwatsu Distributor.
Iwatsu America, Inc., has used its best effort to ensure that the information in this manual was accurate at the
time of printing. Iwatsu America, Inc., makes no warranty of any kind, expressed or implied, with regard to
the contents of this manual. This information is subject to change without notice. Iwatsu America, Inc. shall
not be held responsible for any representation made regarding this information by any individual.
IMPORTANT NOTE:
The instructions contained in this Owner’s Manual deal with features that are unique to the PS6 Digital
Wireless Portable Station. If you require additional information on ADIX feature operation, refer to the ADIX
Owner’s Manual.
SAFETY INFORMATION:
The PS6 Portable Station is a low power radio transmitter and receiver. When it is on, it receives and sends
out radio frequency (RF) signals. The design of the PS6 Portable Station complies with the FCC 96-326
guidelines for RF emissions from mobile and portable devices.
Part Number: 108500 (Iwatsu America); TML126611 (Iwatsu Electric)

Contents
y
ging
g
g
g
y
y
g
g
g
g
g
g
g
g
g
ging
y
y
y
g
g
g
Chapter 1 - Introduction . . . . . . . . . . . . . . . . . . . . . . . . . . . . . . . . . . . . . . . . . . . . . . . 1
PS6 Digital Wireless Portable Station Feature Locator . . . . . . . . . . . . . . . . . . . . . . . . . . . . . . . . 1
Chapter 2 - Getting Started . . . . . . . . . . . . . . . . . . . . . . . . . . . . . . . . . . . . . . . . . . . . 7
You Cannot Use Your Portable Station When: . . . . . . . . . . . . . . . . . . . . . . . . . . . . . . . . . . . . . . . 7
Installation . . . . . . . . . . . . . . . . . . . . . . . . . . . . . . . . . . . . . . . . . . . . . . . . . . . . . . . . . . . . 7
Batter
Char
Hand Strap Installation . . . . . . . . . . . . . . . . . . . . . . . . . . . . . . . . . . . . . . . . . . . . . . . . . . . . . . . . 10
Operatin
Searchin
PS6 Operatin
Extension Number Displa
Batter
Si
Clock and Calendar . . . . . . . . . . . . . . . . . . . . . . . . . . . . . . . . . . . . . . . . . . . . . . . . . . . . . . . . . . 16
Chapter 3 - Basic Features . . . . . . . . . . . . . . . . . . . . . . . . . . . . . . . . . . . . . . . . . . . 19
Additional Features . . . . . . . . . . . . . . . . . . . . . . . . . . . . . . . . . . . . . . . . . . . . . . . . . . . . . . . . . . . 19
Call Forwardin
Call Park . . . . . . . . . . . . . . . . . . . . . . . . . . . . . . . . . . . . . . . . . . . . . . . . . . . . . . . . . . . . . . . . . . . 21
Conference Call . . . . . . . . . . . . . . . . . . . . . . . . . . . . . . . . . . . . . . . . . . . . . . . . . . . . . . . . . . . . . 21
Exclusive Hold . . . . . . . . . . . . . . . . . . . . . . . . . . . . . . . . . . . . . . . . . . . . . . . . . . . . . . . . . . . . . . 22
Group Park . . . . . . . . . . . . . . . . . . . . . . . . . . . . . . . . . . . . . . . . . . . . . . . . . . . . . . . . . . . . . . . . . 23
Hands-Free Answerback on Intercom . . . . . . . . . . . . . . . . . . . . . . . . . . . . . . . . . . . . . . . . . . . . 23
Idle State Indicators . . . . . . . . . . . . . . . . . . . . . . . . . . . . . . . . . . . . . . . . . . . . . . . . . . . . . . . . . . 24
Intercom Call . . . . . . . . . . . . . . . . . . . . . . . . . . . . . . . . . . . . . . . . . . . . . . . . . . . . . . . . . . . . . . . 25
Outside Line Callin
Pa
PS6 Portable Station Ke
Chapter 4 - Advanced Features . . . . . . . . . . . . . . . . . . . . . . . . . . . . . . . . . . . . . . . . 31
Alarm Clock . . . . . . . . . . . . . . . . . . . . . . . . . . . . . . . . . . . . . . . . . . . . . . . . . . . . . . . . . . . . . . . . 31
An
Call Histor
the Battery . . . . . . . . . . . . . . . . . . . . . . . . . . . . . . . . . . . . . . . . . . . . . . . . . . . . . . . . . . . 9
Menus . . . . . . . . . . . . . . . . . . . . . . . . . . . . . . . . . . . . . . . . . . . . . . . . . . . . . . . . . . . . 11
Through the Operating Menus . . . . . . . . . . . . . . . . . . . . . . . . . . . . . . . . . . . . . . . . . 12
Menus Option Locator . . . . . . . . . . . . . . . . . . . . . . . . . . . . . . . . . . . . . . . . . . . . 12
Charge Level . . . . . . . . . . . . . . . . . . . . . . . . . . . . . . . . . . . . . . . . . . . . . . . . . . . . . . . . . 15
nal Strength . . . . . . . . . . . . . . . . . . . . . . . . . . . . . . . . . . . . . . . . . . . . . . . . . . . . . . . . . . . . . . 16
Forward Cancel . . . . . . . . . . . . . . . . . . . . . . . . . . . . . . . . . . . . . . . . . . . . . . . . . . . . . . . . . . . 21
Addin
Addin
Placin
Receivin
Placin
Receivin
Prime Line to Optimized . . . . . . . . . . . . . . . . . . . . . . . . . . . . . . . . . . . . . . . . . . . . . . . . . . . . .27
Call (Station Origination Only) . . . . . . . . . . . . . . . . . . . . . . . . . . . . . . . . . . . . . . . . . . . . 28
Key Answer . . . . . . . . . . . . . . . . . . . . . . . . . . . . . . . . . . . . . . . . . . . . . . . . . . . . . . . . . . . . .32
Dialin
Deletin
Deletin
(for Outside Line and Intercom) . . . . . . . . . . . . . . . . . . . . . . . . . . . . . . . . . . . . 20
Another Extension to an Outside Line Call . . . . . . . . . . . . . . . . . . . . . . . . . . . . . . . . . 22
Another Extension to an Intercom Call . . . . . . . . . . . . . . . . . . . . . . . . . . . . . . . . . . . . 22
an Intercom Call . . . . . . . . . . . . . . . . . . . . . . . . . . . . . . . . . . . . . . . . . . . . . . . . . . . . . 25
an Intercom Call . . . . . . . . . . . . . . . . . . . . . . . . . . . . . . . . . . . . . . . . . . . . . . . . . . . 25
an Outside Line Call . . . . . . . . . . . . . . . . . . . . . . . . . . . . . . . . . . . . . . . . . . . . . . . . . 26
an Outside Line Call . . . . . . . . . . . . . . . . . . . . . . . . . . . . . . . . . . . . . . . . . . . . . . . 27
. . . . . . . . . . . . . . . . . . . . . . . . . . . . . . . . . . . . . . . . . . . . . . . . . . . . . . . . . . . . . . . . . 32
Phone Numbers from the Call History List . . . . . . . . . . . . . . . . . . . . . . . . . . . . . . . . . 33
an Item from the Call History . . . . . . . . . . . . . . . . . . . . . . . . . . . . . . . . . . . . . . . . . . 34
All Items from the Call History . . . . . . . . . . . . . . . . . . . . . . . . . . . . . . . . . . . . . . . . . 34
. . . . . . . . . . . . . . . . . . . . . . . . . . . . . . . . . . . . . . . . . . . . . . . . . . . . . 15
. . . . . . . . . . . . . . . . . . . . . . . . . . . . . . . . . . . . . . . . . . . . . . . . . . . . . . . . . . 26
Labels . . . . . . . . . . . . . . . . . . . . . . . . . . . . . . . . . . . . . . . . . . . . . . . . 29
i

Character Entr
y
g
g
y
y
g
g
g
g
y
g
g
g
g
g
g
y
y
g
g
ging
ging
g
ging
g
g
g
g
g
g
y
Char
er Tone . . . . . . . . . . . . . . . . . . . . . . . . . . . . . . . . . . . . . . . . . . . . . . . . . . . . . . . . . . . . . . . 36
Dial Lock . . . . . . . . . . . . . . . . . . . . . . . . . . . . . . . . . . . . . . . . . . . . . . . . . . . . . . . . . . . . . . . . . . . 36
Disablin
Director
Director
Makin
Editin
Deletin
Deletin
Director
istering a Phone Number from the Call History to the Directory . . . . . . . . . . . . . . . . . . . 43
Re
Dialin
Dialin
Insertin
Disablin
Headset Operation . . . . . . . . . . . . . . . . . . . . . . . . . . . . . . . . . . . . . . . . . . . . . . . . . . . . . . . . . . . 45
Placin
Help Displa
Ke
Lock . . . . . . . . . . . . . . . . . . . . . . . . . . . . . . . . . . . . . . . . . . . . . . . . . . . . . . . . . . . . . . . . . . . 45
Disablin
PS6 Portable Station Rin
Rin
Vibrate Alert . . . . . . . . . . . . . . . . . . . . . . . . . . . . . . . . . . . . . . . . . . . . . . . . . . . . . . . . . . . . . . 48
Personal Rin
Disablin
Personal Rin
Quick Dial . . . . . . . . . . . . . . . . . . . . . . . . . . . . . . . . . . . . . . . . . . . . . . . . . . . . . . . . . . . . . . . . . . 50
Placin
istering a Quick Dial Number . . . . . . . . . . . . . . . . . . . . . . . . . . . . . . . . . . . . . . . . . . . . . . 50
Re
Deletin
Re
istering a Phone Number from Call History to a Quick Dial Key Combination . . . . . . . . . 51
istering a Phone Number from a Directory to a Quick Dial Key Combination . . . . . . . . . 52
Re
Quick Mode . . . . . . . . . . . . . . . . . . . . . . . . . . . . . . . . . . . . . . . . . . . . . . . . . . . . . . . . . . . . . . . . 53
Quick Mode Guard . . . . . . . . . . . . . . . . . . . . . . . . . . . . . . . . . . . . . . . . . . . . . . . . . . . . . . . . . 53
e Notify . . . . . . . . . . . . . . . . . . . . . . . . . . . . . . . . . . . . . . . . . . . . . . . . . . . . . . . . . . . . . . . .54
Ran
Speaker Feature . . . . . . . . . . . . . . . . . . . . . . . . . . . . . . . . . . . . . . . . . . . . . . . . . . . . . . . . . . . . . 55
Station Password . . . . . . . . . . . . . . . . . . . . . . . . . . . . . . . . . . . . . . . . . . . . . . . . . . . . . . . . . . . . 55
stem Select . . . . . . . . . . . . . . . . . . . . . . . . . . . . . . . . . . . . . . . . . . . . . . . . . . . . . . . . . . . . . . . 56
S
User Name . . . . . . . . . . . . . . . . . . . . . . . . . . . . . . . . . . . . . . . . . . . . . . . . . . . . . . . . . . . . . . . . . 58
Volume Controls . . . . . . . . . . . . . . . . . . . . . . . . . . . . . . . . . . . . . . . . . . . . . . . . . . . . . . . . . . . . . 58
. . . . . . . . . . . . . . . . . . . . . . . . . . . . . . . . . . . . . . . . . . . . . . . . . . . . . . . . . . . . . 34
Dial Lock . . . . . . . . . . . . . . . . . . . . . . . . . . . . . . . . . . . . . . . . . . . . . . . . . . . . . . . . . 37
. . . . . . . . . . . . . . . . . . . . . . . . . . . . . . . . . . . . . . . . . . . . . . . . . . . . . . . . . . . . . . . . . . . 38
Lock . . . . . . . . . . . . . . . . . . . . . . . . . . . . . . . . . . . . . . . . . . . . . . . . . . . . . . . . . . . . . 38
an Entry in Directory . . . . . . . . . . . . . . . . . . . . . . . . . . . . . . . . . . . . . . . . . . . . . . . . . 39
an Entry in the Directory . . . . . . . . . . . . . . . . . . . . . . . . . . . . . . . . . . . . . . . . . . . . . . . 40
a Directory Entry . . . . . . . . . . . . . . . . . . . . . . . . . . . . . . . . . . . . . . . . . . . . . . . . . . . . 41
All Entries in a Directory . . . . . . . . . . . . . . . . . . . . . . . . . . . . . . . . . . . . . . . . . . . . . . 42
Group Name . . . . . . . . . . . . . . . . . . . . . . . . . . . . . . . . . . . . . . . . . . . . . . . . . . . . . . 42
a Phone Number in the Directory with an Access Code . . . . . . . . . . . . . . . . . . . . . . . 43
a Phone Number in the Directory with an Additional Number . . . . . . . . . . . . . . . . . . 43
a Pause When Registering a Phone Number . . . . . . . . . . . . . . . . . . . . . . . . . . . . . 44
the Omegatrek Keypad Tone . . . . . . . . . . . . . . . . . . . . . . . . . . . . . . . . . . . . . . . . . . . 44
a Call with the Headset . . . . . . . . . . . . . . . . . . . . . . . . . . . . . . . . . . . . . . . . . . . . . . . 45
. . . . . . . . . . . . . . . . . . . . . . . . . . . . . . . . . . . . . . . . . . . . . . . . . . . . . . . . . . . . . . . .45
Key Lock . . . . . . . . . . . . . . . . . . . . . . . . . . . . . . . . . . . . . . . . . . . . . . . . . . . . . . . . . 46
er . . . . . . . . . . . . . . . . . . . . . . . . . . . . . . . . . . . . . . . . . . . . . . . . . . . . 46
Options . . . . . . . . . . . . . . . . . . . . . . . . . . . . . . . . . . . . . . . . . . . . . . . . . . . . . . . . . . . 46
Mode . . . . . . . . . . . . . . . . . . . . . . . . . . . . . . . . . . . . . . . . . . . . . . . . . . . . . 48
Personal Ringing Mode . . . . . . . . . . . . . . . . . . . . . . . . . . . . . . . . . . . . . . . . . . . . . 49
Settings . . . . . . . . . . . . . . . . . . . . . . . . . . . . . . . . . . . . . . . . . . . . . . . . . . . 49
a Call Using the Quick Dial Feature . . . . . . . . . . . . . . . . . . . . . . . . . . . . . . . . . . . . . . 50
a Phone Number from a Quick Dial Key Combination . . . . . . . . . . . . . . . . . . . . . . . 51
ii
Chapter 1
Introduction
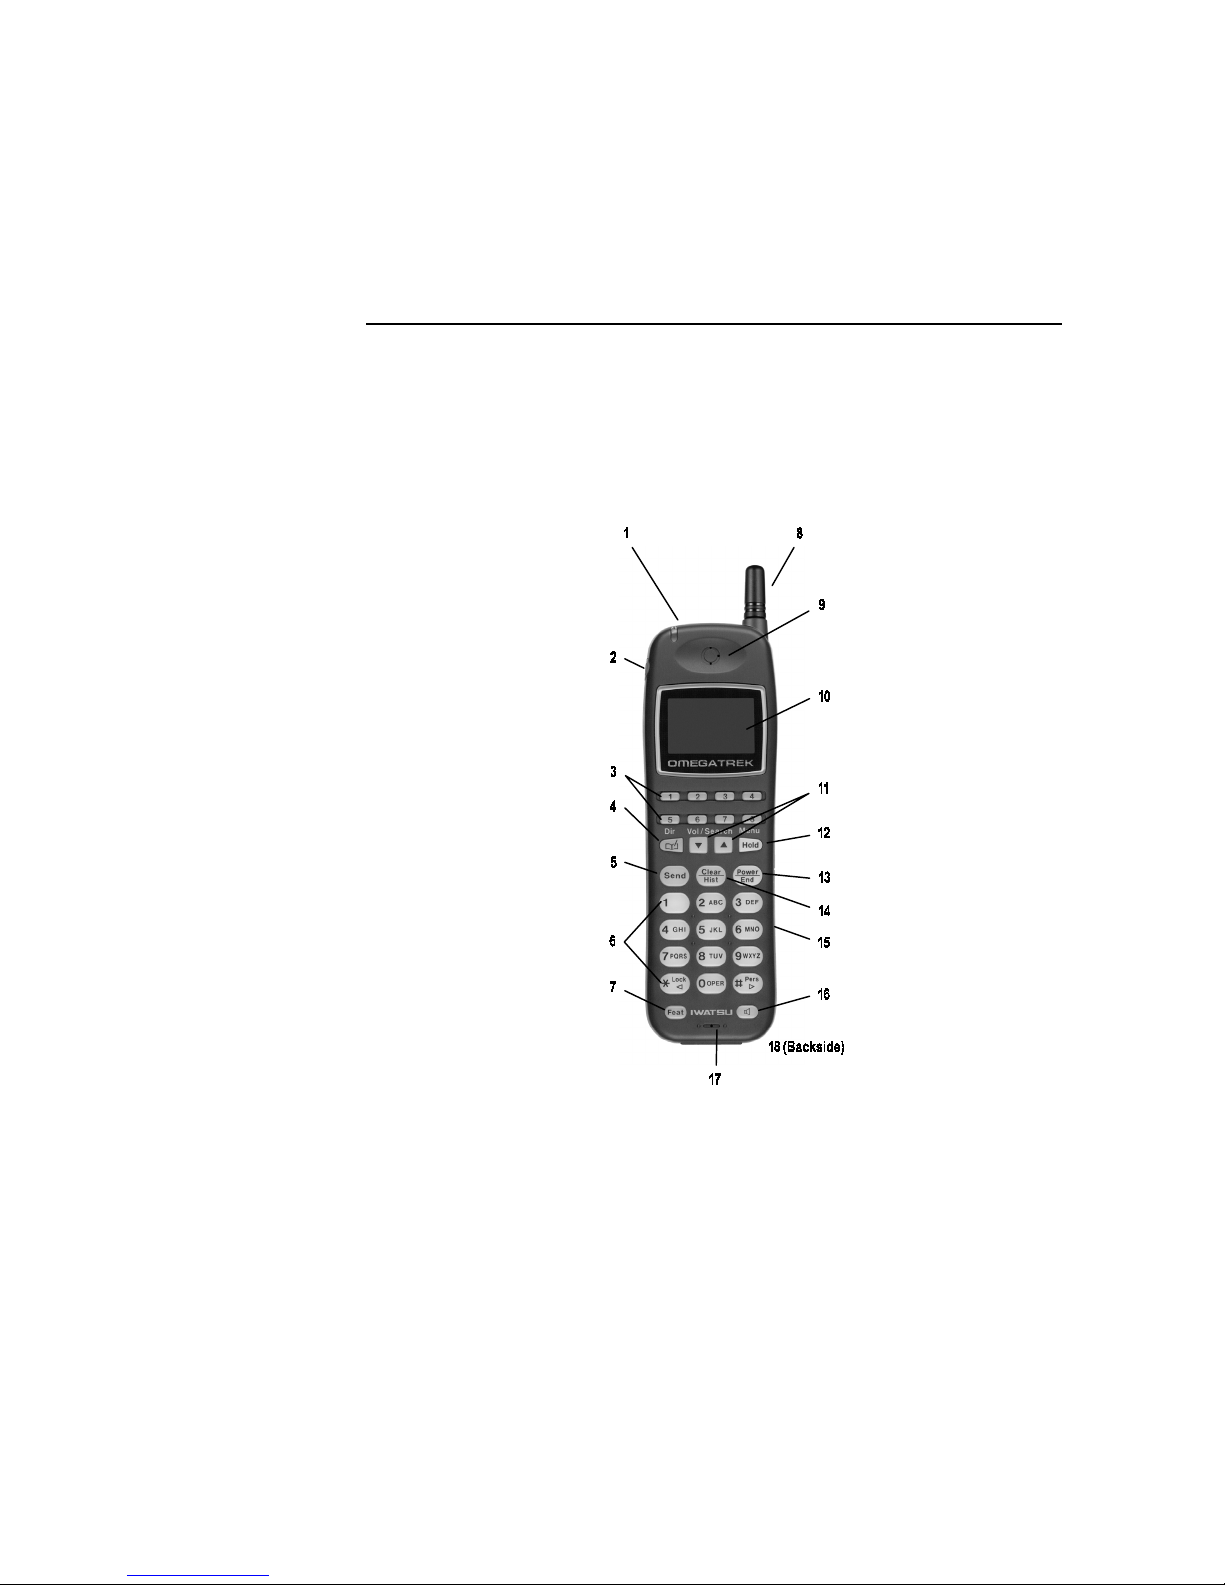
PS6 Digital Wireless Portable Station
Feature Locator
The PS6 Digital Wireless Portable Station enables users to carry a
small, lightweight unit within a large service area, no longer confining
them to their desks to make or receive intercom or outside line calls.
Figure 1. PS6 Digital Wireless Portable Station Features
Omegatrek Owner’s Manual•1

• Introduction
g
y
g
ging
y
y
g
y
y
y
y
g
y
y
y
g
y
PS6 Digital Wireless Portable Station Features
# Feature Description
1 Dual Function
Lamp:
Incoming Call Indicator
when a new call rin
s at your PS6 portable
- This lamp flashes red
station.
Incomin
Indicator Lamp/
Batter
Status Lamp
Call
Charging
Battery Charging Status
the char
status of the battery when the
- This lamp indicates
portable station is in the cradle. Red indicates
the battery is charging, Green indicates the
is fully charged.
batter
2 Headset Jack Used to connect the IX-PSEM Headset for
hands-free conversation.
3 Multipurpose Ke
s These keys are programmed with a specific
function durin
Examples of multipurpose ke
Omegatrek system setup.
functions include
outside line access, one-touch feature operation
and message waiting.
4Director
5 Send Ke
6 Alphanumeric Ke
Pad
Ke
Press to access the PS6 Speed Dial Directory.
Press to answer an incoming phone call or
initiate an out
Use these keys to enter telephone numbers or
oing phone call.
alphanumeric characters.
7 Feature Ke
8 Antenna Extend the antenna for optimal si
9 Receiver Hold to
2•Omegatrek Owner’s Manual
Press this key to access ADIX and Omegatrek
s
stem features.
nal strength.
our ear to listen during phone calls.

y
g
y
g
g
y
y
g
g
y
g
y
y
g
y
y
y
y
y
g
y
g
y
PS6 Digital Wireless Portable Station Features
# Feature Description
• Introduction
10 Alphanumeric
Displa
(LCD)
11 Dual Function Ke
Volume Control/
Search and Scroll
12 Dual Function Ke
Hold/Menu Access
13 Dual Function Ke
Power/End
Provides visual indication of handset status, call
indication, programming menus, directory lists,
and dia
:
Volume Control - Press the up or down keys to
adjust the Rin
nostic status.
er Volume when the telephone is
idle and the Receiver Volume while on a call.
Search and Scroll - When viewin
histor
, directory, or programming items, press
the up or down ke
h lists such as Directory Names are
throu
pro
ramming menu options.
:
Hold - Press while on a call to place a call on
s to scroll forward or back
the call
Hold
Menu Access - Press while the portable station
is idle to access pro
:
Power - Press and hold for three seconds to turn
ramming menus.
our PS6 Portable Station on or off.
End - While on a call press to end the phone call.
When accessin
close the menu or director
a menu or directory press to
.
14 Dual Function Ke
15 Cable Port Connect the PS6 to a PC usin
Clear/Histor
:
Clear - Use this key to correct alphanumeric
characters
Alphanumeric Displa
ou have entered that appear on the
.
History - When the PS6 Portable Station is idle
press to access the out
list.
histor
oing and incoming call
the IX-PSCB
Cable. Provides an interface to the ADIX
Director
Tool.
Omegatrek Owner’s Manual 3
• Introduction
y
g
y
g
g
PS6 Digital Wireless Portable Station Features
# Feature Description
16 Speaker Ke
While on a call press to listen to audio through
the PS6 portable station speaker (incomin
audio onl
audio feed throu
). Press a second time to resume
h the receiver.
17 Microphone Speak into the microphone durin
conversation.
18 Speaker Use the speaker to listen to voice
announcements and to hear station tones and
signals.
a
Figure 2. LCD Display Icon Map
4•Omegatrek Owner’s Manual

LCD Display Icon Map
ying
y
g
g
g
g
g
y
ging
y
y
y
y
y
y
y
y
g
y
g
y
g
g
g
y
y
y
y
y
y
• Introduction
#
Information Description
19 Telephone
Icon
Flashes while the personal station is tr
a communication with a base station. Displa
to establish
s steady
once a communication channel is established and during a call. Does not display when the PS6 is idle.
20 Speaker Indicates that the speaker is on.
Display
21
&
22
nal
Si
th
Stren
Indicator
23 Silent Mode Indicates that
Shows the si
est signal. Calls may not be sent or received in
stron
weak si
nal strength. Three bars indicate the
nal areas.
our PS6 Portable Station is in Personal
Rin
displa
mode and the ringer is turned off. When “S” is
ed, your PS6 will not ring when a new call is
received.
24 Vibrate Mode Indicates that the PS6 Vibrate Alert feature is active.
When “V” is displa
ed your PS6 will vibrate when a
new call is received.
25 Alarm Indicates that the PS6 Alarm Clock feature is set.
26 Scroll Arrows Indicates that additional displa
viewed or selected b
ke
.
27 Feature Indicates that
stem feature using the Feature Key.
e. When you see only the outline of the Bat-
icon, it is time to recharge the battery. This indica-
28 Batter
Stren
Indicator
th
ADIX s
Shows the level of batter
full char
ter
pressing an up or down scroll
ou are accessing an Omegatrek or
information may be
charge. Two bars shows a
tor flashes when there is less than one minute of talk
.
is active on your PS6 portable station.
s must be programmed on your PS6 by
29 Messa
e /
Forward
30 Common Ke
Active
time remainin
Indicates that you have a message waiting or that Station Forwardin
s
Indicates that “Common Keys” are available to use.
(Common Ke
our Iwatsu Authorized Distributor. If your PS6 does not
31 Alphanumeric
Area
Displa
use Common Ke
View up to three lines (12 characters per line) of displa
information.
s, this indication will never appear.)
Omegatrek Owner’s Manual 5

• Introduction
ging
y
y
g
LCD Display Icon Map
Display
#
Information Description
32 Personal
Ringing Mode
33 Call Histor
List
Indicates that Personal Rin
our PS6 Portable Station.
Indicates there are new entries in your Incoming/Out-
oing Call History List.
Mode is enabled on
6•Omegatrek Owner’s Manual

Chapter 2
Getting Started
You Cannot Use Your Portable Station
When:
You do not see the Antenna icon. (Refer to LCD Display)
1.
When the Portable Station is outside the service area or receiving
a weak signal in the service area, you cannot place or receive
phone calls. Go to an area where the Portable Station receives a
stronger signal. The Antenna icon will appear when you enter an
area with a stronger signal.
You press a key and see KEY LOCK on the display.
2.
Lock feature is enabled to prevent unintentional key operations.
Disable the Key Lock feature.
You press a key and see DIAL LOCK on the display.
3.
Lock feature is enabled to prevent unauthorized outgoing calls.
Disable the Dial Lock feature.
The outline of the Battery icon is blinking.
4.
has become too low. You will also hear a slow warning tone.
Place the Portable Station into the charger to recharge the battery.
The battery charge
.
The Key
The Dial
Battery Installation
1. Plug the battery into the connector. The connector is a small, white input
device located on the back of the Portable Station within the battery compartment. You must gently slide the battery cover down and off to access
the compartment. The connector should be installed with the red (+) wire
to the left and the black (-) wire to the right (see diagram below).
2. Place the battery snugly into the compartment.
Omegatrek Owner’s Manual•7

• Getting Started
3. Replace the battery cover over the battery compartment.
CAUTION:
Replace the battery with an Iwatsu IX-PSBP only. Use of another battery may present a
risk of fire or explosion. There is a danger of explosion if battery is incorrectly
replaced. Dispose of used batteries according to the manufacturer’s instructions.
Now you are ready to begin charging your battery!
Figure 3. Battery Installation
Red (+)
Black (–)
8•Omegatrek Owner’s Manual

• Getting Started
Charging the Battery
Use the supplied IX-PSCG charger only.
1. Plug the charger into an AC outlet.
2. Place the Portable Station snugly into the charger. The Charge Lamp will light red
while charging. Leave the Portable Station in place for at least seven hours before
use.
3. Plug the charger directly into an electrical outlet. Do not plug the charger into an
extension cord.
Figure 4. Charging the Battery
Omegatrek Owner’s Manual•9

• Getting Started
NOTES:
• When the battery is fully charged, the Battery Charging Status Lamp
• The Portable Station and the charger may feel warm to the touch. This is
• You cannot turn the power on while the battery is being charged. Pick up
• If you place the Portable Station in the charger while the power is still on,
• When you use the Portable Station for the first time, or if you have not
• If the Portable Station or the charger is wet, wipe it with a dry cloth before
• The operating temperature is 41°F to 95°F. The battery may not be charged
changes from red to green.
normal.
the Portable Station from the charger before turning the power on.
charging the battery may take loner than usual.
used it for a long time, leave the Portable Station in the charger for at least
seven hours.
charging.
properly if the temperature is outside the range.
• If the battery is not being charged properly, the Charge lamp flashes red.
Pick up the PS6 Portable Station and place it back in the charger. This
indication will also occur if the battery needs to be replaced.
• If the level of battery charge becomes too low, the Charge lamp may not
illuminate.
Hand Strap Installation
To attach the hand strap, follow these steps:
Put the thin string of the hand strap through the hole in the Portable Station
1.
as shown in the following diagram.
Put the other end through the thin string and pull it tight.
2.
10•Omegatrek Owner’s Manual

1.
2.
Figure 5. Hand Strap Installation
Operating Menus
• Getting Started
The PS6 has a number of menu options available that allow you to customize
the operation of your Portable Station. These options allow you to customize
the operation of your Portable Station. To access these menu items, press the
[Menu] key and the corresponding menu number. Some menu items have
sub-menu items within them for further customizing. Once you have accessed
the main menu number, the sub-menu’s are accessed by entering the
corresponding number listed in the table below or by scrolling to each
sub-menu using the up or down arrows. Each item is detailed individually in the
Advanced Features
chapter of this manual.
Omegatrek Owner’s Manual•11

• Getting Started
Searching Through the Operating Menus
1.
2.
3.
4.
5.
6.
Press [Menu].
Press the up or down arrow to select the first digit of the desired menu
number.
Press [Menu] when you have found your desired menu.
Press the up or down arrow to display the submenus within this main menu
number. A description of each menu will be displayed along with the
number of that menu. Quick Mode will be displayed when you scroll to
[2].
Press [Menu] to select the desired function. The setup menu for the
specific function is displayed.
When the setup is complete and your selection has been made, press
[Menu] to save your selection. The LCD displays your choice. You will
hear two short confirmation tones.
The Portable Station goes back to the idle state.
NOTES:
• Press [Clear] to go back to the previous menu screen.
• Press [End] to exit from any menu screen to the idle state.
PS6 Operating Menus Option Locator
The tables on the following pages list the function of each PS6 Menu Option.
For more information on each of the options described please reference the
associated feature description located in this manual.
12•Omegatrek Owner’s Manual

Operating Menus Option Locator
y y
y
y
y by
y by
g
ging
g
ging
g
y
y
y
g
y
• Getting Started
Programming
Item
Extension
Number
Menu
# Description
0Verif
our PS6 Portable Station
extension number.
Alarm Clock 11 Set the PS6 Portable Station
Alarm Clock feature.
stem Select 12 Allows the PS6 Portable Station
S
to operate in multiple ADIX
stems. This can be enabled
s
Personal
Rin
s
Settin
Modem
automaticall
manuall
ramming item.
pro
14 Change settings for the Personal
Rin
mode.
15 Not Used. OFF
the system, or
the user using this
Connection
Dial Lock 21 Activate or deactivate the Dial
Lock feature.
Default
Setting
-------
-------
-------
er: OFF
Rin
Confirmation
/Warning:
OFF
Vibration:
ON
OFF
Director
Lock 22 Activate or deactivate the
Delete All
Director
Vibrate Alert 31 Enable or disable the Vibration
Option 32 Select a tone type. -------
Rin
Ke
pad Tone 41 Enable or disable the keypad
OFF
Director
Lock feature.
23 Delete all entries in the Directory. -------
OFF
Alert feature.
ON
tone.
Omegatrek Owner’s Manual•13

• Getting Started
y
y
y
y
g
y
y
y
g
y
y
y
g
y
y
g
Operating Menus Option Locator
Programming
Item
Range Notif
Menu
# Description
42 Enable or disable the PS6
Portable Station capabilit
to
produce an audible indication
ou leave the service area
when
covered b
er Tone 43 Enable or disable the PS6
Char
Portable Station capabilit
the system.
to
produce an audible indication
ou place the PS6 in the
when
Batter
Charger.
Time 51 Pro
ram time and calendar that
appears on the PS6
Alphanumeric Displa
.
Quick Mode 52 Enable or disable the Quick
Mode feature.
Quick Mode
Guard
Key
An
Answer
53 Enable or disable Quick Mode
Guard.
54 Enable or disable the Any Key
Answer feature.
Default
Setting
OFF
ON
-------
OFF
OFF
OFF
Registering
Password
User Name 57 Re
Director
Group Name
14•Omegatrek Owner’s Manual
55 Use this menu option to register
a password for
ou PS6 Portable
Station.
ister the alphanumeric name
that appears on
ou PS6 display
when in the idle state.
58 Program a Name for a Directory
Group for use with the One
Touch Dialin
Feature.
-------
-------
-------

y
g
y
Operating Menus Option Locator
• Getting Started
Programming
Item
Quick Dial 7 Register a phone number to a
Help Displa
NOTES:
Menu
# Description
Quick Dial Ke
or delete a phone number
ned to a Quick Dial Key
assi
Combination.
9 Browse a list of programming
items.
Combination. Edit
Default
Setting
-------
-------
• If you do not press a key during an operation for 30 seconds, the Portable
Station will go back to the idle state. Start the operation over from the
beginning. Press [Clear] to go back to the previous menu screen.
• If you receive a call during an operation, the operation will be canceled
and the Portable Station will ring. Start the operation over from the
beginning after finishing the call.
Extension Number Display
You can verify your own extension number.
When the Portable Station is idle, press [Menu] [0]. The Display prompts
1.
you to press [Menu] to confirm your action.
Press [Menu]. The display shows the extension number.
2.
Press [End] to go back to the idle state.
3.
Battery Charge Level
The Battery icon shows the approximate level of battery charge. The icon is
located in the upper right-hand side of your LCD display.
Omegatrek Owner’s Manual•15
 Loading...