

Iwatsu ADIX ACD, IX-12KTD-2, Omega-Phone ADIX ACD Quick Reference Manual

AGENT / SUPERVISOR
DIGITAL TELEPHONE QUICK
REFERENCE GUIDE
●
(201) 935-8580
INTRODUCTION
This guide describes basic features and operations
for the ADIX Digital Multi-line Telephones in the ADIX
ACD System.
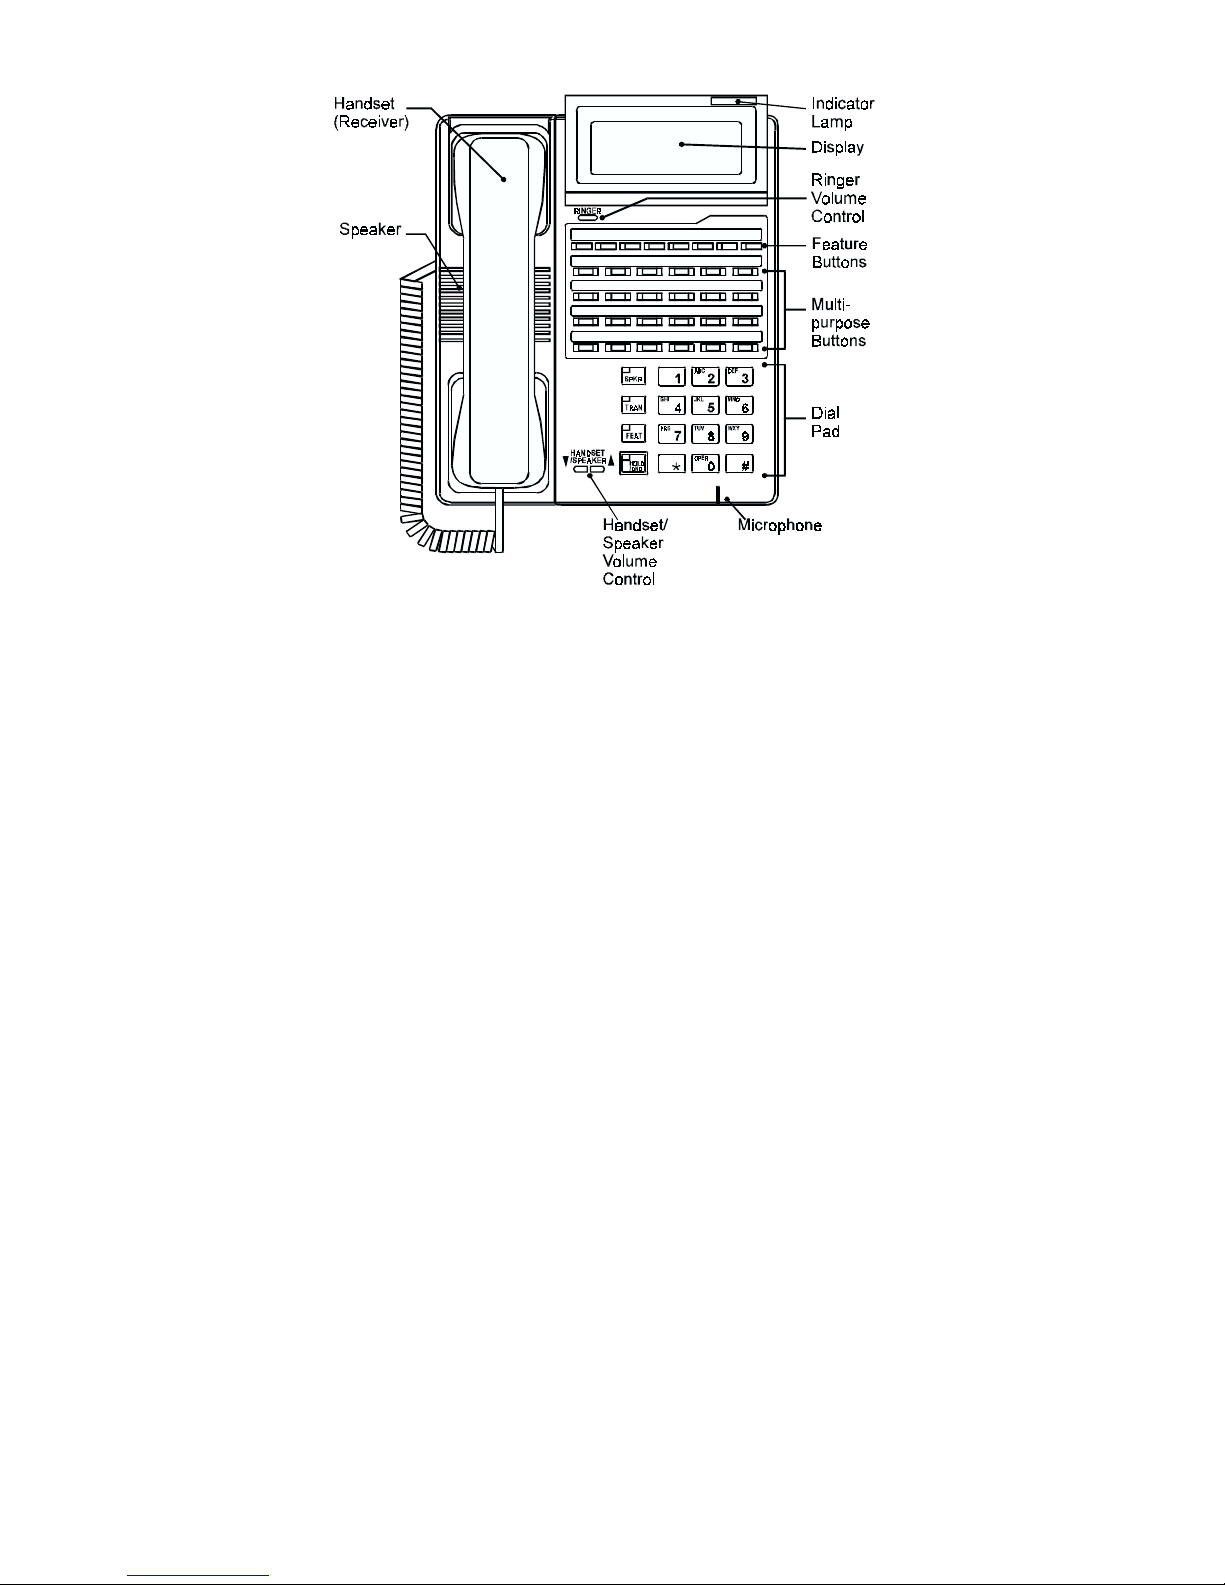
Multi-Purpose Buttons - Can be programmed for a
specific function such as outside lines, individual
extensions, or one-touch feature operation.
Button Lamps - Light up or flash when someone is
using the line or feature corresponding to that button.
Green Lamp - Indicates that you are using that
line.
Red Lamp - Indicates that someone else is using
that line.
SPKR (Speaker) - The Speaker button allows you to
dial and receive calls without lifting the receiver. The
Speaker button also allows you to converse using
the “hands free operation” feature.
TRAN (Transfer) - Allows you to transfer a call from
your phone to another extension.
FEAT (Feature) - The Feature button is used to access
many system features.
To Listen to All Messages
Lift the receiver.
Press the Message Recording button [A.REC].
The Message Record button [A.REC] will flash red
and the display will read “Record Class.”
Dial [#][#].
Hang up.
Call Monitoring
This feature allows the Supervisor to silently listen to
an Agent’s conversation.
Lift the receiver.
Dial the Agent’s extension number.
When you hear the busy signal:
Press the Monitor button [MONITOR],
or
Press the Agent button [AGTnnn].
The display will read:
MONITOR ACD GROUP
AGENT
Barge-in
This feature allows the ACD Supervisor to enter an
Agent’s conversation. The system may be
programmed to provide a tone to the agent
indicating barge-in has occurred.
While Monitoring a Conversation
Press the Add button [ADD].
The display will read:
ACD CNF ACD GROUP
AGENT
When Not Monitoring a Conversation
Lift the receiver.
Dial the Agent’s extension number.
Wait for the busy signal, then:
Press the Add button [ADD].
The display will read:
ACD CNF ACD GROUP
AGENT
ACD Group Night Service
Allows the ACD Supervisor to change the Call
Sequence Table from Day Mode to Night Mode for
the ACD Group.
To Place an ACD Group in Night Mode
Press the ACD Group Night button [NIGHT].
The ACD Group Night button [NIGHT] lamp is
red.

HOLD/DND (Hold/Do Not Disturb) - This button is
used to put a call on Hold, or to set the Do Not
Disturb function. Do Not Disturb mode prevents calls
from ringing at your extension. (When an Agent is
logged-in, DND prevents only non-ACD calls from
ringing. Not Available must be used to prevent ACD
Calls from ringing.)
Handset Volume Control - The Handset (receiver)
Volume Control button allows you to adjust the
receiver volume to one of three levels.
Ringer Volume Control - The Ringer Volume Control
button allows you to adjust the ringer volume to one
of four levels.
Speaker Volume Control - The left button lowers the
speaker volume, the right button raises it.
MIC OFF - When using the speakerphone or ICM
hands-free answer back feature, the MIC OFF button
prevents your voice from being heard by the person
on the other end of your call. When the MIC OFF
button LED is red, the microphone is off. When the
MIC OFF button LED is not lit, the microphone is
on. Press the MIC OFF button to toggle between
microphone off and microphone on.
ICM - The intercom system allows communication
between the telephone extensions in your ADIX
system. Pressing the ICM button connects you to
an intercom line for conversation with another
extension.
BASIC FEATURES
Making an Outgoing Call
Lift the receiver.
Press an outside line button [FLT], [COL], [OPT].
After you hear dial tone:
Dial the telephone number.
Make a dialing mistake?
Press the FLASH button [FLASH] to reorder dial
tone.
Dial again.

Receiving an Incoming Call
When your telephone rings, lamp flashes:
Lift the receiver to connect the call.
If you are not connected to the call automatically
When your telephone rings, lamp flashes:
Lift the receiver.
Press the button with the flashing lamp to connect
the call.
Transferring a Call to Another Extension
When speaking on an outside line:
Press the Transfer button [TRAN].
After you hear dial tone:
Dial an extension number,
or
Press an extension button (if assigned).
Hang up.
Putting a Call on Hold
When speaking on an outside line:
Press the Hold button [HOLD/DND].
The Outside Line button lamp flashes green.
If the call remains on hold for a specified time the
call will ring at your telephone.
Picking Up a Call on Hold
Press the Outside Line button with the green
flashing lamp to pick up the call.
Call Park
Put or “park” a call where it can be picked up at
another extension. (ACD Calls may not be picked
up at another extension.)
Putting a Call in Call Park
When speaking on an outside line:
Press the Park button [PARK].
You will hear a confirmation tone and the Park
button will flash green. If the call remains on park
for a specified time the call will ring at your
telephone.
Picking Up a Call in Call Park
From the extension that parked the call:
Lift the receiver.
Press the flashing Park button [PARK] to connect
with the call.
From another extension:
Lift the receiver.
Press the Park Pick Up button [PICK UP].
Dial the extension number where call is parked to
connect with the call.
Using a Headset
Make sure the Headset button [HEAD] lamp is on. If
not, press the Headset button [HEAD].
To Answer an Incoming ACD Call with Manual
Connection
Press the Answer button [AGT ANS],
or
Press the button representing the new call.
To Answer a Call with Automatic Connection
When the call stops ringing it is automatically
connected.
To Hang Up
Press the Release button [RLS].
To Transfer a Call
Press the Transfer button [TRAN].
After you hear dial tone:
Dial an extension number.
Press the Connect button [CNCT].
Help
Alerts the Supervisor that their help is required.
Press the Help button [HELP].
The Help button will flash red. When the Supervisor
responds, the button will be red and the Supervisor
will be in the Call Monitoring state. If the Supervisor
does not respond, the lamp will go off after a
specified period of time.
Emergency Recording
Records the conversation and notifies the Supervisor
that assistance is needed.
Press the Emergency Recording button [EMG
REC]. The Emergency Recording button will flash
red indicating that the paging port is available and
the Supervisor will be notified that assistance is
required. If a paging port is not available this feature
will not operate and there will be no lamp
indication.
SUPERVISOR FEATURES
Supervisor Log-In
Allows the Supervisor to receive Help calls and
Emergency Recording calls.
Press the Speaker button [SPKR].
Press the Supervisor Log button [S. LOG].
The Supervisor Log button [S. LOG] will flash red
and display will read “Enter ID#.”
Dial Supervisor ID Code [ ][ ].
Supervisor Log button [S. LOG] lamp is solid red.
 Loading...