

Iwatsu ICON IX-5930 Series, ICON IX-5810Series, Icon Series, IX-5910, ICON IX-5810 Quick Reference Manual


INTRODUCTION
Indicator Lamp
Speaker
Transfer Key
Feature Key
Hold/DND Key
Mute Key
Volume Control Keys
Iwatsu ICON Series IX-5930 IP Key Telephone
Self-Labeling Keys
Speaker
Key
Navigation/
Setup Keys
Microphone
This guide describes basic and advanced featur es
and operations for your Iwatsu ICON Series IX-5930
or IX-5910 IP Telephone.
For more information, refer to your Iwatsu O wner’s
Manual or contact your authorized Iwatsu distributor.
Only Iwatsu qualified personnel are authorized to
install any component of an Iwatsu system. Should
you require service, please contact your authorized
Iwatsu distributor.
Self-Labeling Keys - The IX-5930
labeling keys that support system features on two
menu pages. Use the left and right Navigation keys
to toggle between pages. Underlined keys have an
associated sub-menu.
and IX-5910 are equipped with self-
Date/Time
Ext or Sys Info
15-Line
24-Character
Display
Page 1 Page 2
7 FRI 12:06 PM
SCOTT P x2325 SCOTT P x2325
Intercom
Directory
Call Log
Call FWD
Conference
IX-5910 Self-Labeling Display Example:
1
Voice Mail
Screen Call
Park
Page All
Redial
7 FRI 12:06 PM
Display Chg
Repeat Dial
Music
Memory Dial
TextMessage
Alarm Clock
2
Call Back
Save/Redial
External Q
Text We b
Multipurpose Keys - These keys
tions, including outside line access, individual extension selection, and one-touch feature operation.
can be programmed for specific func-
Key Lamps - These lamps light up or
feature corresponding to that key. A green lamp
indicates that you are using that line/feature. A red
lamp indicates that someone else is using that line/
feature.
flash when someone is using the line or
1

SPEAKER - This key allows you to dial
and receive outside or internal calls and talk
SPEAKER
without lifting the receiver.
TRANSFER - This key allows you to transfer a
call from your phone to another extension.
FEATURE - This key is used to access additional
Iwatsu system features.
HOLD/DND (Hold/Do Not Disturb) - This key
is used to put a call on Hold or to set the Do Not
Disturb function and prevent any calls from ringing
at your extension.
TRANSFER FEATURE HOLD/DND
Note: See Hold/Quick Forward on page 21.
Volume Control
The - and + volu me control keys are used to adjust
the Handset, Ringer, and Speaker volume levels
based on the state of the telephone.
• Receiver (Handset) Volume - When using the
Handset or Bluetooth headset, the volume control
key allows you to adjust the handset volume to
one of five levels.
• Ringer Volume - Pressing the ringer volume
control key while the station is inactive allows you
to adjust the ringer volume to one of four levels.
• Speaker Volume - When using the Speaker-
phone, the volume control keys allow you to
adjust the speaker volume to one of eleven
levels.
MUTE
MUTE - When talking using the handset,
pressing the Mute key mutes the handset transmitter. If using the speakerphone, pressing the Mute
Volume
UpDown
MUTE
key mutes the station microphone. When using the
headset jack or Bluetooth, the Mute key mutes the
transmitter on the headset.
Intercom - The intercom system is the internal
network used to communicate between the telephone extensions in your Iwatsu system. Pressing
the Intercom menu key connects you to an intercom line for conversation with other extensions.
Voice Mail - This key is used to access your
voice mailbox.
Bluetooth Headset - A Bluetooth Headset is
active when this icon appears on your display.
Requires an IX-59BTINF Bluetooth Module.*
2

BASIC FEATURES
911 Dialing
At default, your Iwatsu system is programmed to
automatically contact your local Public Safety Answering Point (PSAP) when 911 is dialed. Enhanced
911 Service ensures that when 911 is dialed from a
system extension, information that allows the PSAP
to identify the caller’s location in a building is sent to
the PSAP along with the call. Check with your system installer or Authorized Iwatsu Distributor to make
sure your system is programmed for Enhanced 911
Service.
Last Number Redial
To automatically redial the last outside (external)
number you called:
• Press the Redial key (if programmed).
Making an Intercom Call
• Press the SPEAKER key or lift the receiver and
wait for dial tone.
• Dial an extension number.
or
If you have a DSS (Direct Station Selection) key
assigned for the extension you are calling:
• Press the assigned extension key.
Making an Intercom Group Call
• Dial the Intercom Group access number when
you hear the intercom dial tone.
Making an Outgoing Call
• Press the SPEAKER key or lift the receiver.
• Press an outside line key. You will hear a dial
tone.
• Dial telephone number.
Make a dialing mistake?
Note: If you are pre-dialing a number and make a
mistake, you can use the FEATURE key to delete
digits,
or
• Press the FLASH or outside line key to get new
dial tone.
• Dial again.
Picking Up a Call On Hold
• Press the key with either the green or the red
flashing lamp to pick up the call being held on that
line.
Note: Requires an Intercom (ICM) key to retrieve an
internal call on hold.
3

Placing a Call On Hold
When speaking on an outside line:
• Press the HOLD/DND key.
The active outside line key lamp flashes green on
your phone and red at other extensions.
If the call is not picked up, the call will ring again at
your phone.
Receiving a Call From Another Extension
When you hear the intercom call signal - either the
caller’s voice or intercom ring tone:
• Pick up the receiver and the call is connected.
or
• Speak into the microphone without lifting the
receiver (Voice calls only).
Receiving an Incoming Call
When your phone rings and lamp flashes:
• Press the SPEAKER key or lift the receiver to
connect the call.
If your phone does not connect you to the call
automatically
When your phone rings and lamp flashes:
• Lift the receiver.
• Press the key with the flashing lamp to connect
the call.
Save Dialed Number
While speaking on an outside line:
• Press the FEATURE key and dial 2+1.
or
• Press the SAVE DIAL key (if assigned).
You will hear a confirmation tone that indicates the
phone number you just dialed has been saved.
To dial the saved number
• Lift the receiver.
• Press the FEATURE key and dial 2+1.
or
• Press the SAVE DIAL key (if assigned).
• The saved number is automatically dialed.
Transferring a Call to Another Exte nsion
When speaking on an outside line:
• Press the TRANSFER key. When you hear dial
tone.
• Dial an extension number.
or
• Press an extension key.
• Announce the call when the extension answers
and hang up or just hang up.
4
SELF-LABELING DISPLAY
Self-Labeling Display
The Iwatsu ICON Series IP Telephones are
equipped with Self-Labeling keys that support system features. When a key is changed on the key
pattern of your phone, the label will change. Underlined keys have an associated sub-menu.
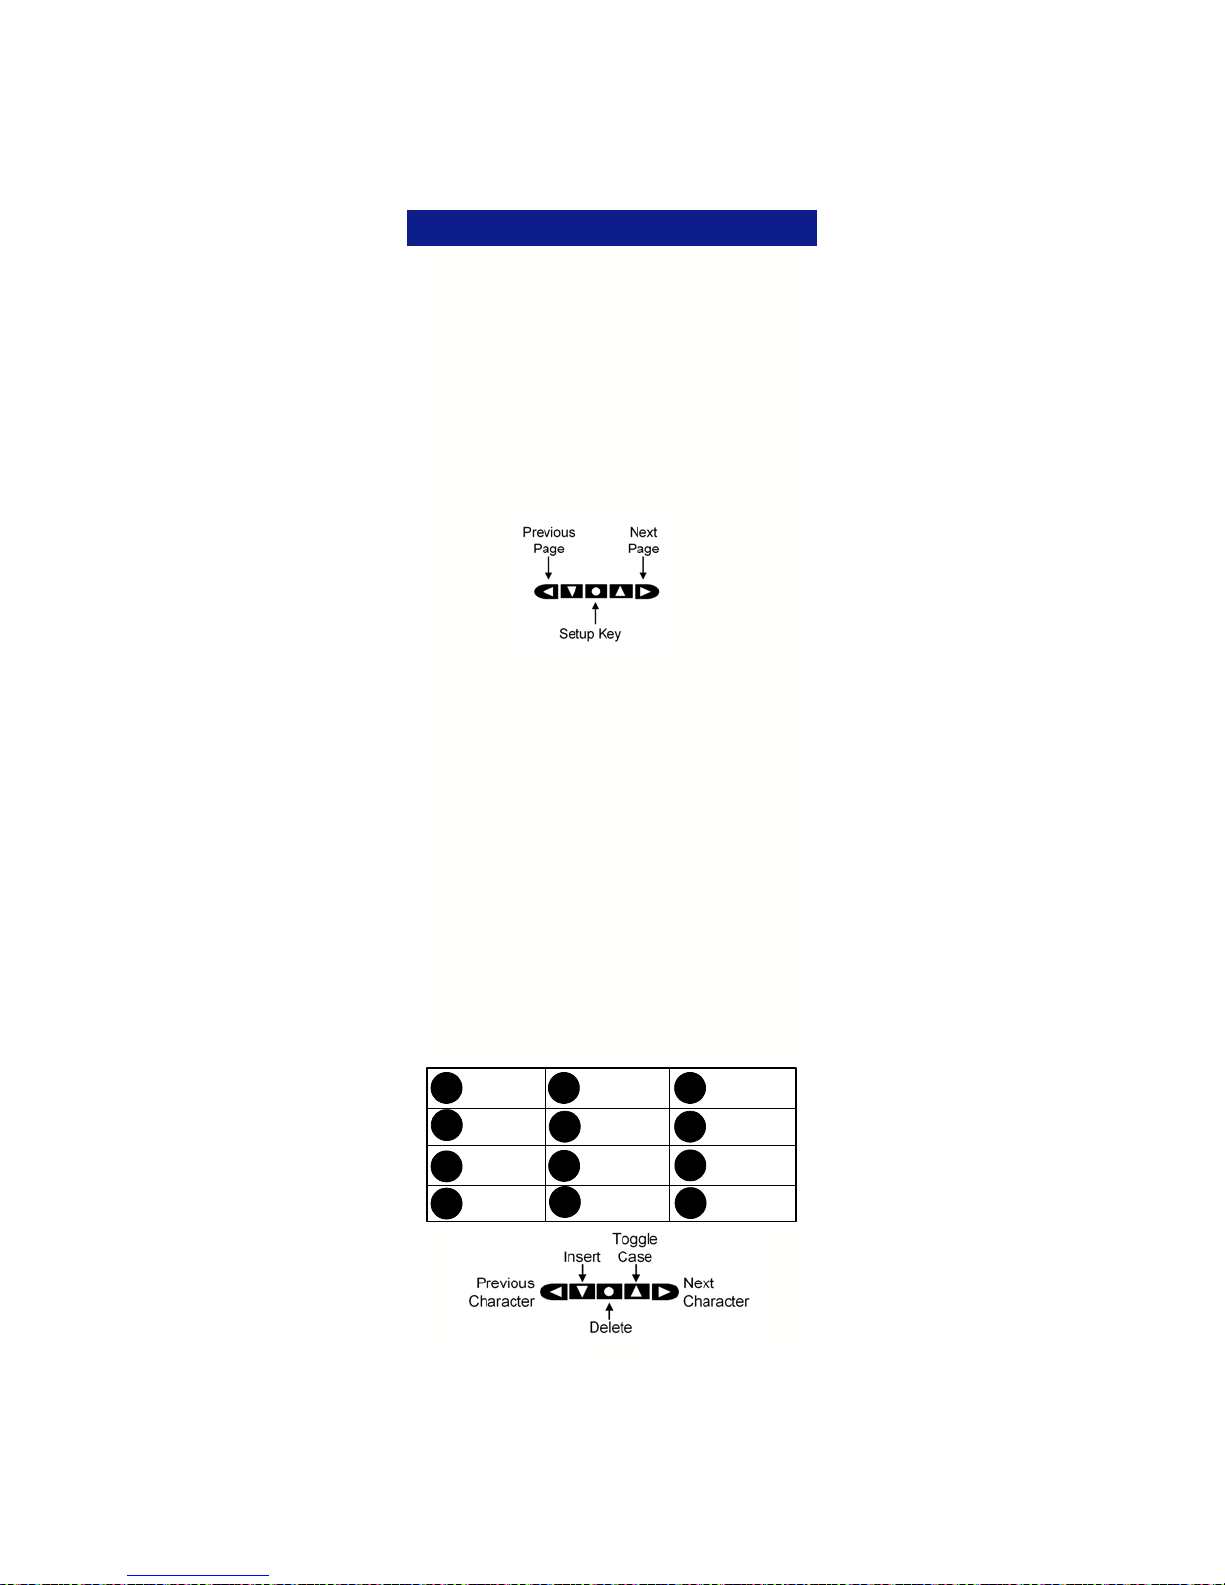
IX-5930/5910 Self-Labeling Display Navigation
To navigate the Self-Labeling display:
• Use the Next page and Previous page keys to
access page 1 and page 2 on the display.
• The Setup Menu key is used to access Blue-
tooth setup, LCD Contrast, Iwatsu Ticker, and
User Options.
Self-Labeling Name Change
You can manually change the name of a key on the
display. This does not change the function of the
key, only how it appears on your display.
Note: If you change the label on a key and that key
assignment is changed, the label you assigned to
that key will not change. You cannot change the
name of a Press Page key through the key telephone.
To change the name of a key on the display
• Press and hold ( five seconds) the key that cor-
responds to the label you want to change.
• When the Label Name Change screen appears,
use the dial pad and the navigation keys to enter
the new name for the key.
• Press Save to save your changes or Cancel to
exit the name change without saving.
Note: Characters advance automatically when
changing keys. Advance manually for the same
key.
1
[space], @, 1
4
g, h, i, 4j, k, l, 5m, n, o, 6
GHI
7
p, q, r, s, 7t, u, v, 8w, x, y, z, 9
PQRS
[, ], _, !, *(, ), ?, , , #
*
2
a, b, c, 2d, e, f, 3
ABC
5
JKL
8
TUV
-, ., &, /, 0
0
3
DEF
6
MNO
9
WXYZ
#
5

Return a key label to its default name
If you have changed the name of the key and wish
to return the key name to its default setting:
• Press and hold (five seconds) the desired key
that corresponds to the label you want to return
to the default name.
• Delete the ke y name, press Save without enter-
ing a new name.
• The default key label is now displayed.
SETUP MENU
From the Setup Menu you can pair a Bluetooth
headset, change the LCD Contrast, activate an
Iwatsu Ticker (TFD), and perform station programming through the User Options selection. The
Setup menu can only be accessed while the phone
is in the idle mode.
Bluetooth*
(Bluetooth QD ID: B012826)
From the Bluetooth menu, you can Discover (pair),
Connect, and Disconnect a Bluetooth headset.
Refer to page 27 for additional Bluetooth information.
Note: Follow the Bluetooth m anufacturers instructions to prepare your Bluetooth device for pairing.
Your Bluetooth device must be in the pairing mode
before beginning this procedure.
To Discover (Pair) a Bluetooth device
• Press the Setup Menu key.
• Press Bluetooth.
• If Bluetooth does not appear on your LCD,
you do not have an IX-59BTINF Bluetooth
module installed in your telephone.
• Press Discover.
• Searching will flash on your display.
• When the discovery process is complete, select
the key that corresponds to the name of the
Bluetooth device your are pairing.
• If Unknown appears on your display, continue
the pairing process. In most cases the device
will pair successfully.
• Enter the Bluetooth device’s Password and
press Enter. (Example password: 0000)
• When pairing is complete, press Exit. You will
see the Bluetooth icon on your display.
To Disconnect or Connect your Paired Bluetooth device
• Press the Setup Menu key.
• Press Bluetooth.
• Select Disconnect or Connect.
• Press Exit.
Setup Menu
6

LCD Contrast
Change the LCD contrast
• Press the Setup Menu key.
• Press LCD Contrast.
• Use the Left and Right arrow keys to decrease
or increase the display contrast.
Iwatsu Ticker (TFD)
A ticker URL must be programmed in the system
database to activate this feature.
To Activate the Ticker
• Press the Setup Menu key.
• Press Iwatsu Ticker (TFD).
• Select a ticker (TFD). Up to five data sources
can be programmed in the system database.
• Select the ticker scroll Speed:
• Slow
• Medium
• Fast
• Select the Line where the ticker will appear:
• First or Second line of the display.
• The ticker that you selected will display Acti-
vated.
• Press Exit to return to the main screen.
To Deactivate the Ticker
• Press the Setup Menu key.
• Press Iwatsu Ticker (TFD).
• Select the ticker that is Active (TFD 1-5). When
the Activated TFD is selected, the LCD will display Canceled.
• Press Exit to return to the main screen.
User Options (Station Programming)
Note: If your station does not have an assigned
Station Password, you will not have access to this
feature.
From the User Options menu, you can access and
change your Station User ID, Station Password,
Dial Confirmation Tone, Handset Volume Control,
Hold Recall Timer, Camp-On Recall Timer, Station
Ring Tone, Key Assignments, LCD Backlight Duration, and Caller ID on Hold.
Note: If Key Assignments does not appear on your
display, you do not have access to this programming item. Stations that share a common key pattern cannot change Key Assignments and you cannot change a key while the LED for that key is lit
(red or green/solid or flashing).
Change Your Station User ID
• Press the Setup Menu key.
• Press User Options.
• Enter your Station Password and press Enter.
• Select Station User ID.
• Use the dial pad and navigation keys to enter a
new Station ID. (Refer to page 5 for data entry)
• Press Save and Exit to sav e your data and re-
turn to the main screen.
7

Change Your Station Password
Note: If your station does not have an assigned
Station Password, you will not have access to the
User Options menu.
• Press the Setup Menu key.
• Press User Options.
• Enter your current Station Password and press
Enter.
• Select Station Password.
• Use the dial pad to enter a new four-digit nu-
meric Station Password.
• Press Save and Exit to sav e your data and re-
turn to the main screen.
Change Your Dial Confirmation Tone
• Press the Setup Menu key.
• Press User Options.
• Enter your Station Password and press Enter.
• Select Dial Confirmation Tone.
• Use the lef t or right navigation keys to toggle the
Dial Confirmation Tone ON or OFF.
• Press Save and Exit to save your change and
return to the main screen.
Change Your Default Handset Volume
If a change is made to the volume while of f-hook,
the volume is reset to the value programmed here
after going on-hook.
• Press the Setup Menu key.
• Press User Options.
• Enter your Station Password and press Enter.
• Select Handset Volume Control.
• Use the left or right navigation keys to scroll to
set your Handset Volume to one of four options:
• Minimum Volume Level
• Medium Volume Level
• Maximum Volume Level
• Use Last Volume Level (Retain last setting)
• Press Save and Exit to save your change and
return to the main screen.
Change Your Hold Recall Timer
• Press the Setup Menu key.
• Press User Options.
• Enter your Station Password and press Enter.
• Press the right navigation key to move to the
next menu page.
• Select Hold Recall Timer.
• Use the dial pad to enter a new Hold Recall
Time.
• Range = 0-255 seconds
• Default = 0 (When set to 0, the system default
Hold Recall Time is used)
• Press Save and Exit to save your change and
return to the main screen.
8

Change Your Camp-On Recall Timer
• Press the Setup Menu key.
• Press User Options.
• Enter your Station Password and press Enter.
• Press the right navigation key to move to the
next menu page.
• Select Camp -O n Recall Timer .
• Use the dial pad to enter a new Camp-On Recall
Time.
• Range = 0-255 seconds.
• Default = 0 (When set to 0, the system default
Camp-On Recall Time is used).
• Press Save and Exit to save your change and
return to the main screen.
Change Your Station Ring Tone
You may choose one of eight different ring tones to
distinguish your station from others.
• Press the Setup Menu key.
• Press User Options.
• Enter your Station Password and press Enter.
• Press the right navigation key to scroll to the
next menu page.
• Select Station Ring Tone.
• Use the left or right navigation keys to scroll
through and select one of nine ring tones:
• System Tone.
• Station Ring Tones 1-8.
• Press Save and Exit to save your change and
return to the main screen.
Change a Key Assignment on Your Station
Note: If Key Assignment does not appear on your
display, you do not have access to this programming item. Stations that share a common key pattern cannot change Key Assignments and you cannot change a key while the LED for that key is lit
(red or green/solid or flashing).
• Press the Setup Menu key.
• Press User Options.
• Enter your Station Password and press Enter.
• Press the right navigation key to move to the
next menu page.
• Select Key Assignment.
• Use the left or right navigation keys to scroll
through and select one of the Key Assignment
Categories.
• Select the Key Type you want to add to your key
pattern.
• Select the key you wish to change on your sta-
tion. The new Key Type that you selected will
display in the key location you have selected.
• Select Exit to return to the main screen.
9
 Loading...