

Iwatsu Icon IX-12IPKTD, IX-12IPKTD-E, Enterprise C5, IX-12ELK-3, IX-HSCD-16 Quick Reference Manual
Page 1
1-800-974-5070
www.iwatsu.com
Iwa tsu A meric a, In c.
Printed in USA
December 2005
8001 Jet star Drive
Irving, TX 75063
Part Number: 108645
Page 2
INTRODUCTION
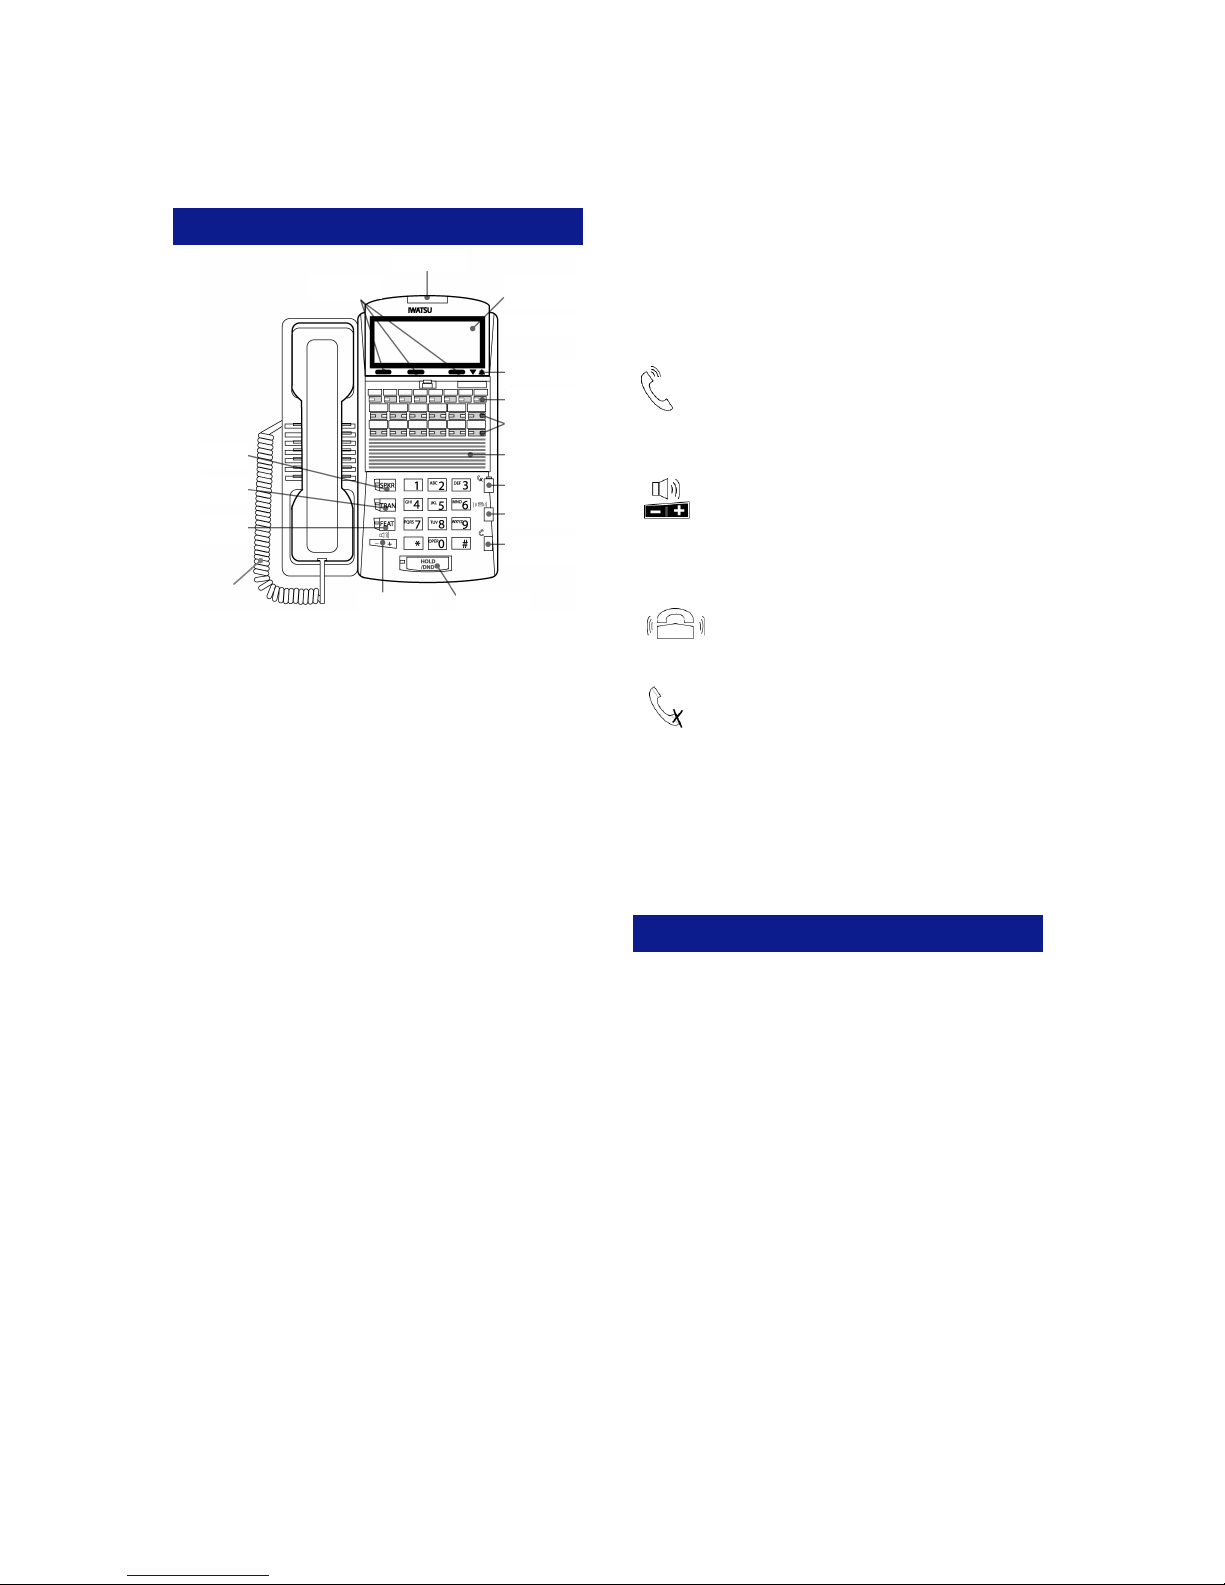
Indicator LED
Indicator LED
(Red / Green)
3 Menu Buttons
3 Menu Buttons
IX-12IPKTD
IX-12IPKTD
IX-12IPKTD-E
IX-12IPKTD-E
Speaker Key with
Speaker Key with
Red LED
Red LED
Transfer Key with
Transfer Key with
Red LED
Red LED
Feature Key with
Feature Key with
Red LED
Red LED
Handset Cord
IX-HSCD-16
This guide describes basic Automatic Call
Distribution (ACD) features and operations for
Iwatsu telephones for the ACD System.
Only Iwatsu qualified personnel are authorized to
install any component of an Iwatsu system. Should
you require service, please contact your authorized
Iwatsu Distributor.
Multipurpose Keys - These keys can be
programmed for specific functions, including outside
line access, individual extension selection and onetouch feature operation.
Key Lamps - These lamps light up or flash when
someone is using the line or feature corresponding
to that key.
• Green lamp — Indicates that you are using that
line/feature.
• Red lamp — Indicates that someone else is
using that line/feature.
SPKR (Speaker) - This button allows you to dial
and receive outside or internal calls and converse
without lifting the receiver while using the handsfree operation feature.
TRAN (Transfer) - This button allows you to
transfer a call from your phone to another
extension.
FEAT (Feature) - This button is used to access
many Iwatsu system features.
Note: The Echo Cancellation DSP technology used
in the IX-12KTD/S-3 speakerphone was developed
by NTT.
(Red / Green)
Speaker Volume
Speaker Volume
Control
Control
1
Hold / DND with
Hold / DND with
Red LED
Red LED
4-Line Backlit LCD
4-Line Backlit LCD
IX-12IPKTD
IX-12IPKTD
IX-12IPKTD-E
IX-12IPKTD-E
Up / Down
Up / Down
Scroll Keys
Scroll Keys
8 Function Keys
8 Function Keys
with Red LEDs
with Red LEDs
12 Multipurpose
12 Multipurpose
Keys with
Keys with
Red / Green LEDs
Red / Green LEDs
Key Expansion
Key Expansion
Location
Location
IX-12ELK-3
IX-12ELK-3
Mute Key with
Mute Key with
Red LED
Red LED
Ringer Volume
Ringer Volume
Control
Control
Handset / Headset
Handset / Headset
Volume Control
Volume Control
HOLD/DND (Hold/Do Not Disturb) - This key
is used to put a call on Hold or to set the Do Not
Disturb function and prevent any calls from getting
through or ringing at your extension.
When an Agent is logged-in, DND prevents only
non-ACD calls from ringing. Not Available must be
used to prevent ACD calls from ringing.
Handset Volume Control - The handset
volume control key allows you to adjust the
handset volume to one of three levels. Pressing
the button will toggle between the three volume
levels.
Speaker Volume Control - The speaker
volume control key allows you to adjust the
volume control of the speaker when using
the speakerphone. Pressing the [+] key raises the
volume to one of nine settings. Pressing the [-] will
decrease the volume.
Ringer Volume Control -
ringer volume control button allows you to
adjust the ringer volume to one of four levels.
Pressing the
[Mute] Key - When talking using the hand-
set, pressing the [Mute] key mutes the hand-
set transmitter. If using the speakerphone,
pressing the [Mute] key mutes the station microphone. When using the headset jack, the [Mute]
key mutes the transmitter on the headset.
ICM - The intercom system is the internal network
used to communicate between the telephone extensions in your Iwatsu system. Pressing the [ICM]
button connects you to an intercom line for conversation with other extensions.
BASIC FEATURES
Making an Outgoing Call
• Lift the receiver
• Press an outside line button. You will hear a dial
tone.
• Dial telephone number
Make a dialing mistake?
• Press the [FLASH] button to get new dial tone
• Dial again
Receiving an Incoming Call
When your phone rings and lamp flashes:
• Lift the receiver to connect the call
If your phone does not connect you to the call
automatically
When your phone rings and lamp flashes:
• Lift the receiver
• Press the button with the flashing lamp to connect
the call
2
Page 3

Making an Intercom Call
Lift the receiver and wait for dial tone
Dial an extension number
or
If your phone has a [DIRECT STATION SELEC-
TION] button assigned for the extension
Lift the receiver and wait for dial tone
Press the assigned extension button
Receiving a Call From Another Extension
When you hear the intercom call signal - either the
caller’s voice or intercom ringing tone
Pick up the receiver, and the call is connected
or
Speak into the microphone without lifting the receiver
Making an Intercom Group Call
Dial the Intercom Group access number when you
hear the Intercom Dial Tone
Putting a Call On Hold
When speaking on an outside line
Press the [HOLD/DND] button
The active outside line button lamp flashes green on
your phone and red at other extensions.
If the call is not picked up, the call will not ring again
at your phone.
Picking Up a Call On Hold
Press the key with either the green or the red flashing lamp to pick up the call being held on that line
Transferring a Call to Another Extension
When speaking on an outside line
Press the [TRAN] button. You will hear a dial tone
Dial an extension number
or
Press an extension button (if assigned)
Announce the call when the extension answers
Hang up
Full / Half-Duplex Toggle
You can now toggle from half to full-duplex speakerphone modes
Lift receiver
Press [Speaker Duplex]
or
Press [FEAT] button and dial + (Full-Duplex)
Press [FEAT] button and dial ++ (Half-Duplex)
911 Support
At default, your Iwatsu system is programmed to
automatically contact your local Public Safety Answering Point (PSAP) when 911 is dialed. Enhanced 911 Service ensures that when 911 is dialed
from a system extension, information that allows the
PSAP to identify the caller’s location in a building is
sent to the PSAP along with the call. Check with
your system installer or Authorized Iwatsu Distributor to make sure your system is programmed for
Enhanced 911 Service.
Call Park
Park a call so that it can be reached from another
extension.
Putting a call in Call Park
When speaking on an outside line:
• Press the [PARK] button
• You will hear confirmation tone and the [PARK]
button will flash green
If the call is not picked up, it will return to your
phone.
Picking up a call in Call Park
From the extension that parked the call:
• Lift receiver
• Press flashing [PARK] button
From another extension:
• Lift receiver
• Press [PARK PICK-UP]
• Dial extension number where the call is parked to
pick-up the call
Transfer to Park
You can transfer a call to another user’s individual
park on their telephone. The call can then be picked
up remotely from another telephone. The call can
also be picked up from the telephone where it is
parked.
Transferring a call to another user’s individual
park
When speaking on an outside line:
• Press [TRAN] + [PARK]
• Dial the number of the extension where the call is
to be parked, or press the extension button (if
assigned)
• When you hear confirmation tone, hang up
• The [PARK] key on the user’s phone will be lit
• If desired, use the paging system to inform the
user of the call parked on their telephone
Picking up a call parked on your individual park
from your telephone
• Lift the receiver (handset)
• Press [PARK]
Picking up a call parked on your individual park
from another telephone
• Lift the receiver (handset)
• Press [PARK]
• Dial the number of the extension where the call is
parked, or press the extension button (if as-
signed)
or
3
4
Page 4

• Lift the receiver (handset)
• Press the [FEAT] button and dial +
• Dial the number of the extension where the call
is parked, or press the extension button (if assigned)
or
• Lift the receiver (handset)
• Press [PARK PICK-UP]
• Dial the number of the extension where the call
is parked, or press the extension button (if assigned)
Save Dialed Number
While speaking on an outside line
• Press the [FEAT] button and dial +
or
• Press the [SAVE DIAL] button (if assigned)
You will hear a confirmation tone that indicates the
phone number you just dialed has been saved.
To dial the saved number
• Lift the receiver
• Press the [FEAT] button and dial +
or
• Press the [SAVE DIAL] button (if assigned)
• The saved number is automatically dialed
Last Number Redial
To automatically redial the last number you called
• Lift the receiver
• Press the [SPEED] button and dial
AGENT FEATURES
Call Queue Display
To display the number of calls in an ACD queue:
• Press the [QUEUEn] key
The number of ACD calls in the queue will display.
Log-In
Allows an Agent to receive ACD Calls and begin the
ACD Day. The are two types of log-in methods:
Dual and Multigroup. When Dual Group Log-In is
used, you can log-in to either one or two groups.
When Multigroup Login is selected, you can log-in
any number of ACD groups.
To Log-in to an ACD Group Using the Dual
Group
• Press the Speaker button [SPKR]
• Press the Log button [LOG]
The Log button [LOG] flashes red. The display
reads “Enter ID#.”
• Dial your Agent ID Code [ ][ ][ ][ ]
The Log button [LOG] lamp is solid red.
Immediately after Log-in the phone is in the Not
Available mode.
To Log-in to Multiple ACD Groups
• Press the Speaker button [SPKR]
• Press the Log button [LOG]
The Log button [LOG] will flash red. The
display will read “Enter ID#.”
• Dial your Agent ID Code [ ][ ][ ][ ]
• Enter the ACD Group you wish to log-in to
• Enter your ACD Agent Priority (numbers 1-3,
based on the priority you wish to take calls)
To Start Answering ACD Calls After Log-In
• Press the Not Available button [N/A]
The Not Available button lamp LED turns off.
Agent Log-Out
Ends the ACD Day.
To Log-Out of an Individual ACD Group
• Press the Feature button [FEAT]
• Press the Log button [LOG]
The LOG button lamp is off.
To Log-Out of All ACD Groups
• Press the Feature button [FEAT]
• Press the Log button [LOG]
• Press
The LOG button lamp is off.
Not Available
Not Available temporarily removes an Agent from
ACD Call distribution. An agent is programmed for
either the Reserved or Immediate Method.
Reserved Method - Makes Agent Not Available
when the Call is terminated
During a conversation:
• Press the Not Available button [N/A]
The Not Available button [N/A] will flash red.
• Hang up to terminate the call and place the
station in Not Available mode.
Immediate Method - Terminates the Call and
Makes Agent Not Available
During a conversation:
• Press the Not Available button [N/A] to
immediately terminate the conversation and place
the station in Not Available mode. The Not
Available button [N/A] will flash red.
To Make the Phone Available
• Press the red-flashing Not Available button [N/A]
The lamp will turn off.
5
6
Page 5

Wrap-Up
Following an ACD call an Agent can be
programmed for Wrap-up. During Wrap-up ACD
calls will not be distributed to the station. Wrap-up
can be programmed to occur either Automatically or
Manually following the completion of an ACD call.
Automatic Method
After the completion of a call the agent is
automatically placed in Wrap-up mode. During
Wrap-up the Wrap-up button [WRAP] flashes red
and the display reads “Wrap-up.” The Automatic
Wrap-up duration is programmed in the ACD
database.
To Extend the Automatic Wrap-up Duration
Five seconds before the end of Wrap-up a tone is
audible. To extend Wrap-up for the programmed
length of time:
• Press the Wrap-up button [WRAP] after the tone
Manual Method
During a conversation the agent must press the
Wrap-up button [WRAP] to end the conversation
and place the station in Wrap-up mode. During
Wrap-up the Wrap-up button [WRAP] flashes red
and the display reads “Wrap-up.”
To End Wrap-Up
• Press red-flashing Wrap-up button [WRAP]
The lamp will turn off.
Qualifier Code Entry
Qualifier Codes may be entered during Wrap-up.
Up to four three-digit codes may be entered.
To Enter Qualifier Codes Manually
• Press the Qualify button [QUALIFY]
The Qualify button [QUALIFY] will flash red and
the display will read “Enter Code.”
• Enter a three-digit code [ ] [ ] [ ]
• Dial to confirm
• Dial to cancel
The lamp will turn off.
• To enter multiple codes repeat the procedure
To Enter Preset Qualifier Codes
• Press the desired Qualify button [QUALIFYnnn]
• To enter multiple codes repeat the procedure
Forced Qualify
Note: This feature only works when Automatic
Wrap-up is programmed. A code may not be
entered during the five-second Wrap-up time
extension period. When this option is programmed,
the Qualify button will flash red and a Qualifier Code
must be entered.
• Press the Qualify button [QUALIFY] and enter a
code as described above
Queue Indication
Three Threshold Levels may be assigned to
indicate the number of calls waiting to be answered
by the ACD Group. A fourth indication informs the
Agents that ACD Calls are expanding to another
ACD Group.
Queue Button Level Number of Calls
Red 1 _____
Flashing Red 2 _____
Fast Flashing Red 3 _____
Green & Red Expansion
Call Park/Swap
To alternate between an ACD Call and an ECS call
when speaking on an ACD Call:
• Press the Call Park button [PARK]
It will flash green.
• Initiate either an intercom or outside call
• Press the Call Park button [PARK] to return to
the ACD Call and place the new call on Call Park
Using a Headset
To Answer an Incoming ACD Call
• Press the [Headset Control] key
To Hang Up
• Press the [Headset Control] key
To Transfer a Call
• Press the Transfer button [TRAN]
After you hear dial tone:
• Dial an extension number
• Press the [Headset Control] key
Help
Alerts the Supervisor that their help is required.
• Press the Help button [HELP]
The Help button will flash red. When the Supervisor
responds, the button will be red and the Supervisor
will be in the Call Monitoring state. If the Supervisor
does not respond, the lamp will go off after a
specified period of time.
7
8
Page 6

Emergency Help Calls
Records the conversation and notifies the
Supervisor that assistance is needed.
• Press the Emergency Recording button [EMG
REC]. The Emergency Recording button will flash
red indicating that the paging port is available and
the Supervisor will be notified that assistance is
required.
If a paging port is not available this feature will not
operate and there will be no lamp indication.
Important: Use of this feature may be prohibited by
state law.
SUPERVISOR FEATURES
Supervisor Log-In
Allows the Supervisor to receive Help calls and
Emergency Help calls.
• Press the Speaker button [SPKR]
• Press the Supervisor Log button [S. LOG]
The Supervisor Log button [S. LOG] will flash red
and display will read “Enter ID#.”
• Dial Supervisor ID Code [ ][ ]
Supervisor Log button [S. LOG] lamp is solid red.
Supervisor All Group Log-In
• Press the Speaker button [SPKR]
• Press the Supervisor Log button [S. LOG]
The Supervisor Log button [S. LOG] will flash red
and display will read “Enter ID#.”
• Press
• Dial Supervisor ID Code [ ][ ]
Supervisor Log button [S. LOG] lamp is solid red.
Simultaneous Supervisor / Agent Log-In
While logged in as an Agent:
Follow the Supervisor Log-In instructions above
or
While logged in as a Supervisor:
• Follow the Agent Log-In instructions on page 5
Supervisor Log-Out:
• Press the Speaker button [SPKR]
• Press the Supervisor Log button [S. LOG]
The lamp will turn off.
• Press the Speaker button [SPKR]
Message Recording
Allows the ACD Supervisor to change the recorded
messages in the Call Sequence Table.
To Record a Message
• Lift the receiver
• Press the Message Recording button [A. REC]
• The Message Record button [A. REC] will flash
red and the display will read “Record Class.”
• Dial a number [1-30] for the new message
• Record the message by speaking into the
receiver
• Dial to end the recording
• Hang up
To Erase the Message
• Lift the receiver
• Press the Message Recording button [A. REC]
The Message Record button [A. REC] will flash
red and the display will read “Record Class.”
• Dial
The display will read “Clear Class.”
• Dial the number [1-30] of the message to be
erased
• Hang up
To Erase all Messages
• Lift the receiver
• Press the Message Recording button [A. REC]
The Message Record button [A. REC] will flash
red and the display will read “Record Class.”
• Dial
• Hang up
To Listen to a Message
• Lift the receiver
• Press the Message Recording button [A. REC]
The Message Record button [A. REC] will flash
red and the display will read “Record Class.”
• Dial
The display will read “Replay Class.”
• Dial the message number [1-30] of the message
to be played
• Hang up
To Listen to All Messages
• Lift the receiver
• Press the Message Recording button [A.REC]
The Message Record button [A.REC] will flash
red and the display will read “Record Class.”
• Dial
• Hang up
Call Monitoring
This feature allows the Supervisor to silently listen
to an Agent’s conversation.
• Lift the receiver
• Dial the Agent’s extension number
When you hear the busy signal:
• Press the Monitor button [MONITOR] or
• Press the Agent button [AGTnnnn]
The display will read:
MONITOR ACD GROUP
AGENT
9
10
Page 7

Barge-In
This feature allows the ACD Supervisor to enter an
Agent’s conversation. The system may be
programmed to provide a tone to the agent
indicating barge-in has occurred.
To Barge-In
While monitoring an outside, ICM or ACD call:
• Press the [ADD] key
You are now part of the conversation. Both the
monitored station and the caller can hear and speak
with you.
To Barge-In While Whisper Monitoring
While whisper monitoring an outside, ICM or ACD
call:
• Press
• Press the [ADD] key
You are now part of the conversation. Both the
monitored station and the caller can hear and speak
with you.
While Monitoring a Conversation
• Press the Add button [ADD]
The display will read:
ACD CNF ACD GROUP
AGENT
When Not Monitoring a Conversation
• Lift the receiver
• Dial the Agent’s extension number
Wait for the busy signal, then:
• Press the Add button [ADD]
The display will read:
ACD CNF ACD GROUP
AGENT
Station Coaching
Station Coaching includes two actions: Monitoring
and whisper paging (called Whisper Monitor). A
digital key telephone is able to whisper monitor a
digital key telephone after invoking the monitor
feature. The Monitoring station can whisper monitor
other stations while on an outside call, an intercom
call or an ACD call by pressing the key to speak
to the monitored station without the calling station
hearing.
Important: Use of this feature may be prohibited by
state law.
To Station Coach
While monitoring an outside, ICM or ACD call
• Press
You can now speak without the caller hearing.
To Return to Monitoring
While Station Coaching an outside, ICM or ACD call
• Press
You are now monitoring the conversation but can no
longer speak with the monitored station.
ACD Group Night Service
Allows the ACD Supervisor to change the Call
Sequence Table from Day Mode to Night Mode for
the ACD Group.
To Place an ACD Group in Night Mode
• Press the ACD Group Night button [NIGHT]
The ACD Group Night button [NIGHT] lamp is red.
To Place in Day Mode
• Press the ACD Group Night button [NIGHT]
The ACD Group Night button [NIGHT] lamp is off.
Answering a Help Call
When an Agent requests assistance, the ACD line
button will flash red and the display will show the
Agent’s extension number, name, and Help.
To Answer a Help Call
• Press an ACD line button
To Enter the Conversation
• Press the ADD button [ADD]
Answering an Emergency Help Call
When an Agent requests assistance, the ACD line
button will flash red and the display will show the
Agent’s extension number, name, and Emergency.
To Answer an Emergency Help Call
• Press an ACD line button
To Enter the Conversation
• Press the ADD button [ADD]
Call Sequence Table Number Change
Manual Selection
• Press the Call Sequence Table Number Change
button [SQC]
• Dial the ACD Group Number [1-250]
• Dial the Call Sequence Table Mode [1-3], 1=day,
2=night, 3=transfer
• Dial the Call Sequence Table Number [1-250]
• Press the Call Sequence Table Number Change
button [SQC]
Preset Selection
ACD Group, Call Sequence Table Mode, and Call
Sequence Table Number are programmed.
• Press the Call Sequence Table Number Change
button [SQCn]
11
12
Page 8

INDEX
Symbols
Keys .................................................................1
911 Support .....................................................3
A
AGENT FEATURES ..........................................5
ACD Group Night Service .................................12
B
BASIC FEATURES ...........................................2
Barge-In .............................................................11
C
Call Park/Swap ..................................................8
Call Park ............................................................4
Call Queue Display ............................................5
Call Monitoring ..................................................10
Call Sequence Table Number Change ..............12
Call On Hold ......................................................3
E
Emergency Help Calls .......................................9
Emergency Help Call (Answering) ....................12
H
Headset Usage ..................................................8
Help .................................................................8
Help Call (Answering) ........................................12
I
INTRODUCTION ...............................................1
Intercom Group Call ..........................................3
N
Not Available .................................................. 6
Q
Qualifier Code Entry ....................................... 7
Queue Indication ............................................ 8
R
Receiving an Incoming Call ............................ 2
Receiving a Call From Another Extension ...... 3
S
Save Dialed Number ...................................... 5
SUPERVISOR FEATURES ............................ 9
Station Coaching ............................................ 11
T
Transferring a Call to Another Extension ........ 3
Transfer to Park .............................................. 4
W
Wrap-Up ......................................................... 7
NOTES:
L
Last Number Redial ...........................................5
Log-In (Agent) ...................................................5
Log-Out (Agent) .................................................6
Log-In (Supervisor) ............................................9
M
Making an Outgoing Call ...................................2
Making an Intercom Call ....................................3
Message Recording (Supervisor) ......................9
13
14
 Loading...