

Page 1
IWATA STUDIO SERIES MAXX JET AIR COMPRESSOR — IS-1000
MAXX JET IS-1000
AIR COMPRESSOR
Congratulations on your new purchase! The Iwata Maxx Jet Air Compressor delivers quiet, clean,
pulse free air along with superb moisture separation and precise air pressure adjustment.
Page 2

Page 3

ANEST IWATA-MEDEA, INC.
Portland, Oregon U.S.A.
+1-503-253-7308 (M-F)
[email protected]
www.iwata-medea.com
ANEST IWATA AUSTRALIA PTY LTD.
Mt. Druitt, NSW
+61-(02)-9853-2000
www.anest-iwata.com.au
ANEST IWATA STRATEGIC CENTER
Cardano al Campo, Italy
+39-0331-733120
www.anest-iwataeu.com
ANEST IWATA SOUTH-EAST ASIA CO., LTD.
Bangkok, Thailand
+66-(0)-2643-2870
www.anest-iwatasoutheastasia.com
ANEST IWATA SHANGHAI
Shanghai, China
+86-(0)21-6407-9713 / 15 / 16
www.anest-iwata-sh.com
ANEST IWATA RUS LLC
Moscow, Russia
+7-495-938-77-28
www.anestiwata.ru
ANEST IWATA CORPORATION
Yokohama, Japan
+81-(0)45-591-1111
www.anest-iwata.co.jp
ANEST IWATA (U.K.) LTD.
Neots Cambs, England
+44-(0)1480-405419
www.anest-iwata.co.uk
ANEST IWATA MOTHERSON LTD.
Uttar Pradesh, India
+91-(0)120-4600500 / 14 / 17
www.aircompressors.com
ANEST IWATA SOUTH AFRICA (PTY) LTD.
Johannesburg, Republic of South Africa
+27-11-463-2169/2265/2223
www.anest-iwata.co.za
CENTURY TRADING CO., LTD.
Seoul, Korea
82-2-2163-0300
www.centrading.co.kr
If you have any issues or warranty service questions, contact your
local ANEST IWATA aliate before returning to your place of purchase.
NEED ASSISTANCE
3
Page 4

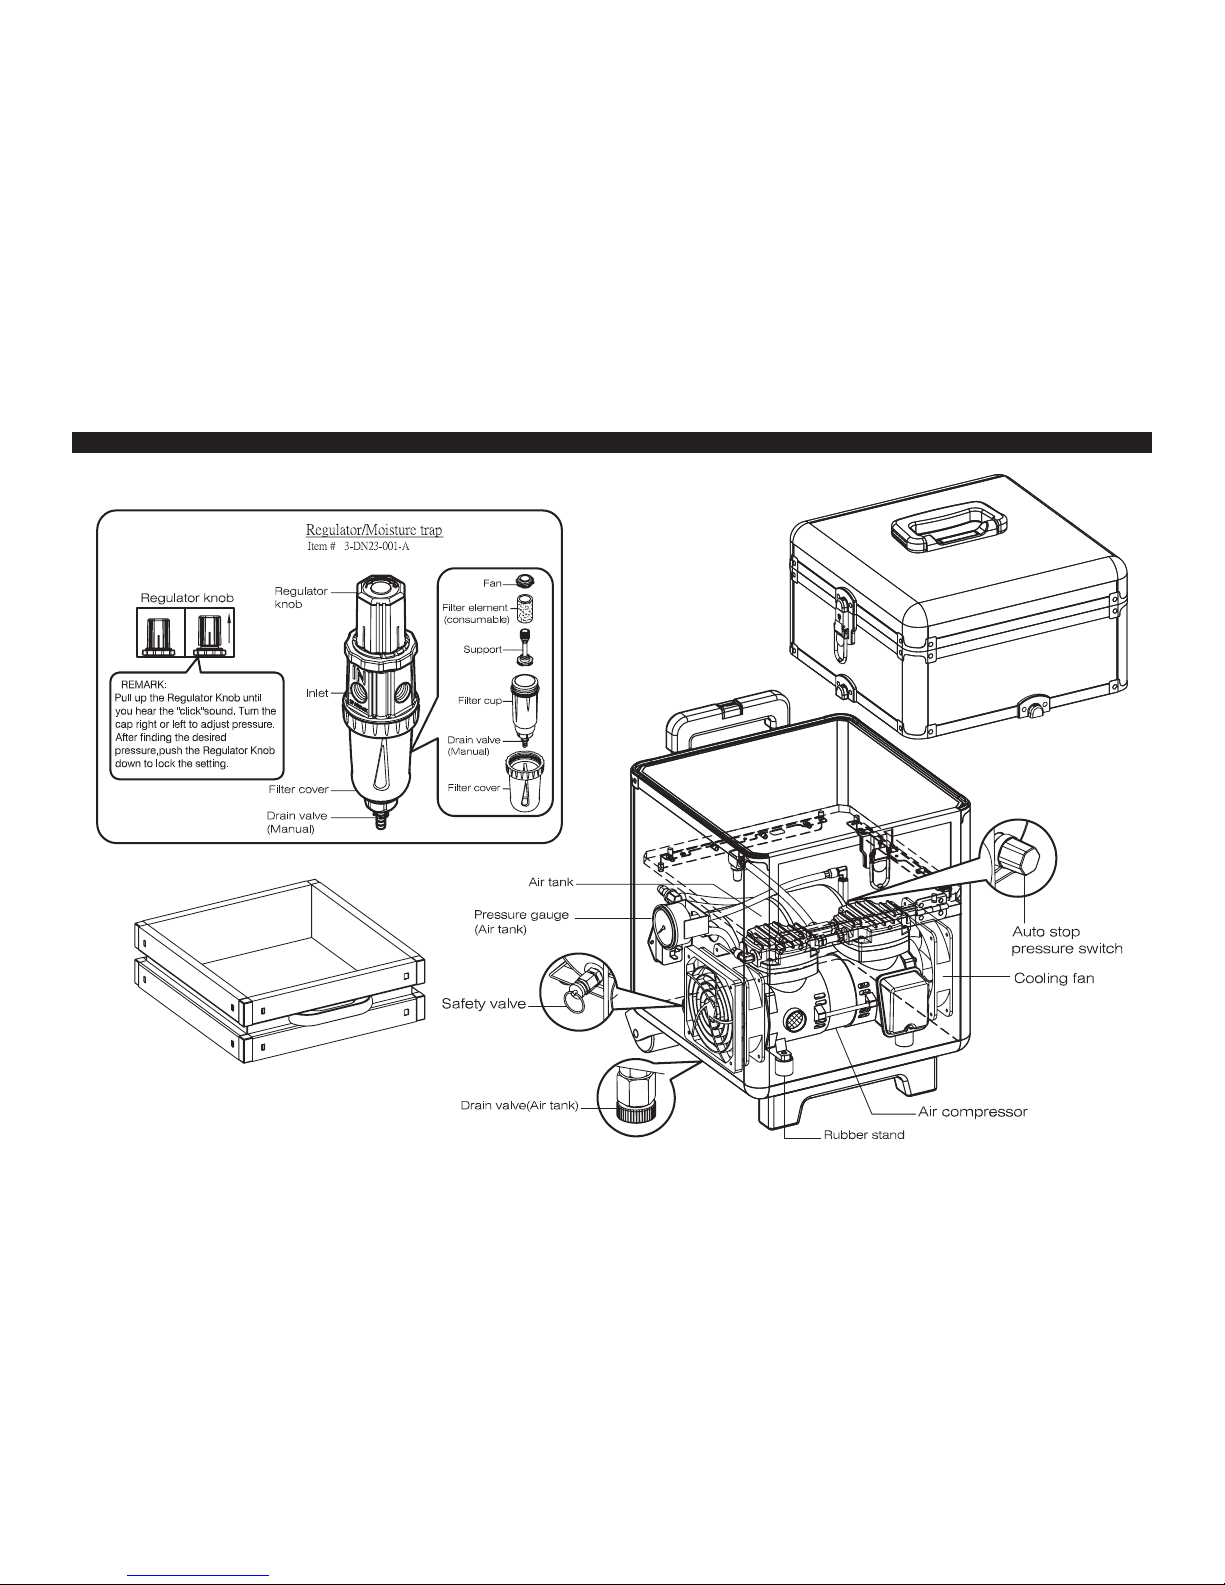
EXPLODED DIAGRAM
4
Page 5
5
Page 6
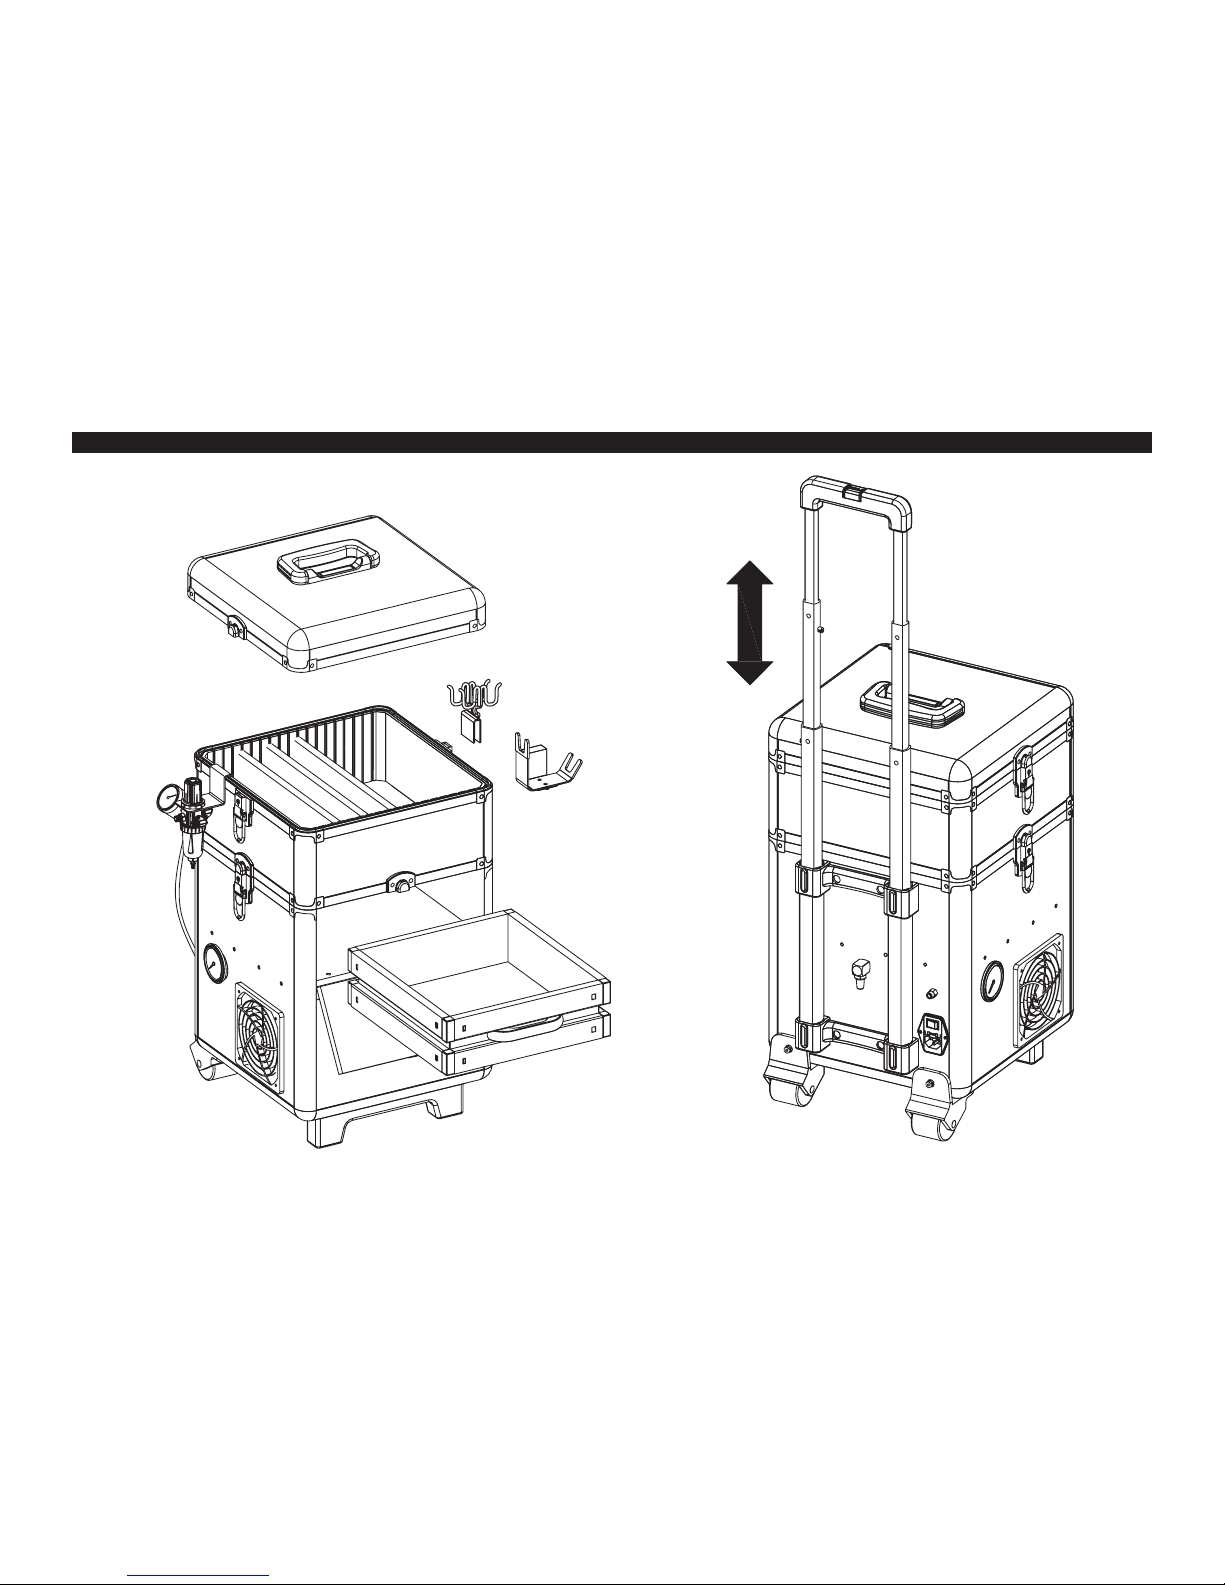
EXPLODED DIAGRAM (CONT’D)
6
Page 7

FEATURES
• A powerful 1/6 hp, oil-less, two pole motor
• Runs at twice the RPMs of the Iwata Power Jet
• The Maxx Jet powers Iwata’s Eclipse G-3, G-5, G-6 and light use with the RG-3
• Dual manifold air regulator with airbrush and spray gun holders
• 2.5 liter air storage tank and internal cooling fan
• Two braided air hoses for an airbrush and a spray gun
• Gear storage galore
• Strong, protective travel case with wheels and retractable handle
• Detachable top with handle opens a tray for your accessories
• External air intake lter
• On/O switch and detachable power cord (10ft)
• Tank pressure gauge and internal cooling fan
Voltage - CAUTION READ CAREFULLY
If you bought the compressor in the country you’re going to use it, it’s completely ready to go. If you’re going to transfer the compressor to
another country with a dierent voltage, you’ll need a plug adapter and the appropriate power converter. These items typically are found at
hardware stores or electronic stores. Using compressors with the wrong voltage can damage the compressor or result in an electrical re.
7
Page 8

Unpack the compressor and all packaged components. Enclosed you will nd:
• Maxx Jet Compressor
• Black vinyl connector air hose (compressor to regulator)
• Two (2) airbrush hoses (regulator to airbrush)
• One (1) airbrush holder
• One (1) spray gun holder
• One (1) dual manifold air regulator and gauge
• One (1) power cord
Set Up
1. Remove top lid o compressor exposing top accessory tray.
2. Attach the power cord to the unit near the base of the retractable handle.
3. Screw one end of the black vinyl connector air hose onto the air outlet above the on/o switch.
4. Screw the other end of the black vinyl connector air hose onto the air regulator input.
5. Mount the air regulator on the edge of accessory compartment by sliding it onto the edge. Do the same with the airbrush holder
and spray gun holder.
6. Take the airbrush hose (air hose with small tting on one end and large tting on the other) and screw the large tting onto the air regulator
output. (There are 2 outputs. Choose one.)
7. To use the optional second output, remove the protective cap from the second output of the air regulator.
8. Take the spray gun hose (large ttings on both ends) and screw one end to the second output on the air regulator.
9. Now you can screw your Iwata airbrush onto the airbrush hose and your Iwata G-3, G-5, G-6 or RG-3 onto the spray gun hose.
GETTING STARTED
8
Page 9

10. Place your airbrush on the airbrush holder and your spray gun onto the spray gun holder.
11. Plug the compressor into a grounded wall outlet. (Avoid using an extension cord.)
12. Turn the compressor ON by pressing down the on/o switch back of the unit. (You will see the button light up.)
A. The Maxx Jet will run until its storage tank lls up, then stop. As you run your airbrush, the stored air will deplete. At a certain point
the Maxx Jet will turn itself on to replenish the stored air.
Using The Compressor
1. Turn compressor on by pressing the power button.
* You will see the button light up. If there is no air in the air tank then the compressor engine will turn on and ll up the tank.
2. To adjust the air pressure, pull up on the black knob to unlock it.
A. Twist clockwise to raise the pressure.
B. Twist counter-clockwise to lower the pressure.
Note: There’s a + and - sign on top of the knob with arrows to remind you which direction raises and lowers pressure.
3. After you’ve obtained the desired pressure, push down on the knob to lock it in place.
Note: The regulators come from the factory set at 100psi. (Keep twisting counter-clockwise until the gauge starts to move.)
4. While using the compressor, you’ll notice moisture start to condense in the clear plastic bowl of the moisture trap on the air regulator.
5. When droplets start to form in the trap, simply press up on the pressure release valve underneath the clear plastic bowl to release the built
up moisture. Note: How often you need to do this will vary based on the weather and how much humidity is in the air.
6. When the airbrush or spray gun is not in use it may be placed in the appropriate holder.
GETTING STARTED (CONT’D)
9
Page 10

MAINTENANCE
Remove The External Air Intake Filter
• Use a crescent wrench (or 16 mm wrench) adjusted to t the at faces of the external air lter mounted to the back of the case.
• With the wrench tted to air lter unscrew the external air lter by turning the wrench counter-clockwise until it is unthreaded from the case.
• If the material clogging the lter is water soluble, (ie., tanning liquid, cosmetics, water colors) soak the air intake lter in warm and soapy
water. Rinse by running through the threaded end of the lter and let air dry.
• If the material clogging the lter is solvent-based, soak the air intake lter in appropriate solvent bath. Use forced air from your airbrush,
through the threaded end to push solvent and residue out from the lter.
• Test the lter by blowing into the back, threaded end, and if air ows through it freely then the lter is clean. If not repeat cleaning cycle
or replace lter.
• Gently thread the clean external air lter into place and tighten with a wrench until snug. Be careful not to over tighten as this may strip the threads.
Cleaning The Vent Filters
• Since this lter generally attracts dust and dirt, use a small hose from a vacuum and run the end of the vacuum over the lter while it is in place.
• If it requires advanced cleaning, remove the plastic vent cover by using the at end of a screwdriver placing it underneath the outside edge
and gently pry it o.
• Remove the vent lter, it is only held in place by the vent cover.
• Wash gently in warm and soapy water. Rinse and allow to dry.
• Re-t the vent lter into place and replace vent cover.
• If the vent lter is not cleanable replace with new vent lter.
Releasing Built Up Moisture In The Moisture Trap
• Release the water by pushing up on the drain valve located underneath the moisture trap’s clear bowl.
• This will open the valve and drain o the collected moisture.
• Hold a paper towel under the open valve to collect the water.
• Do not let excess water build up in the moisture trap.
DO NOT use oil in/on the compressor.
10
Page 11
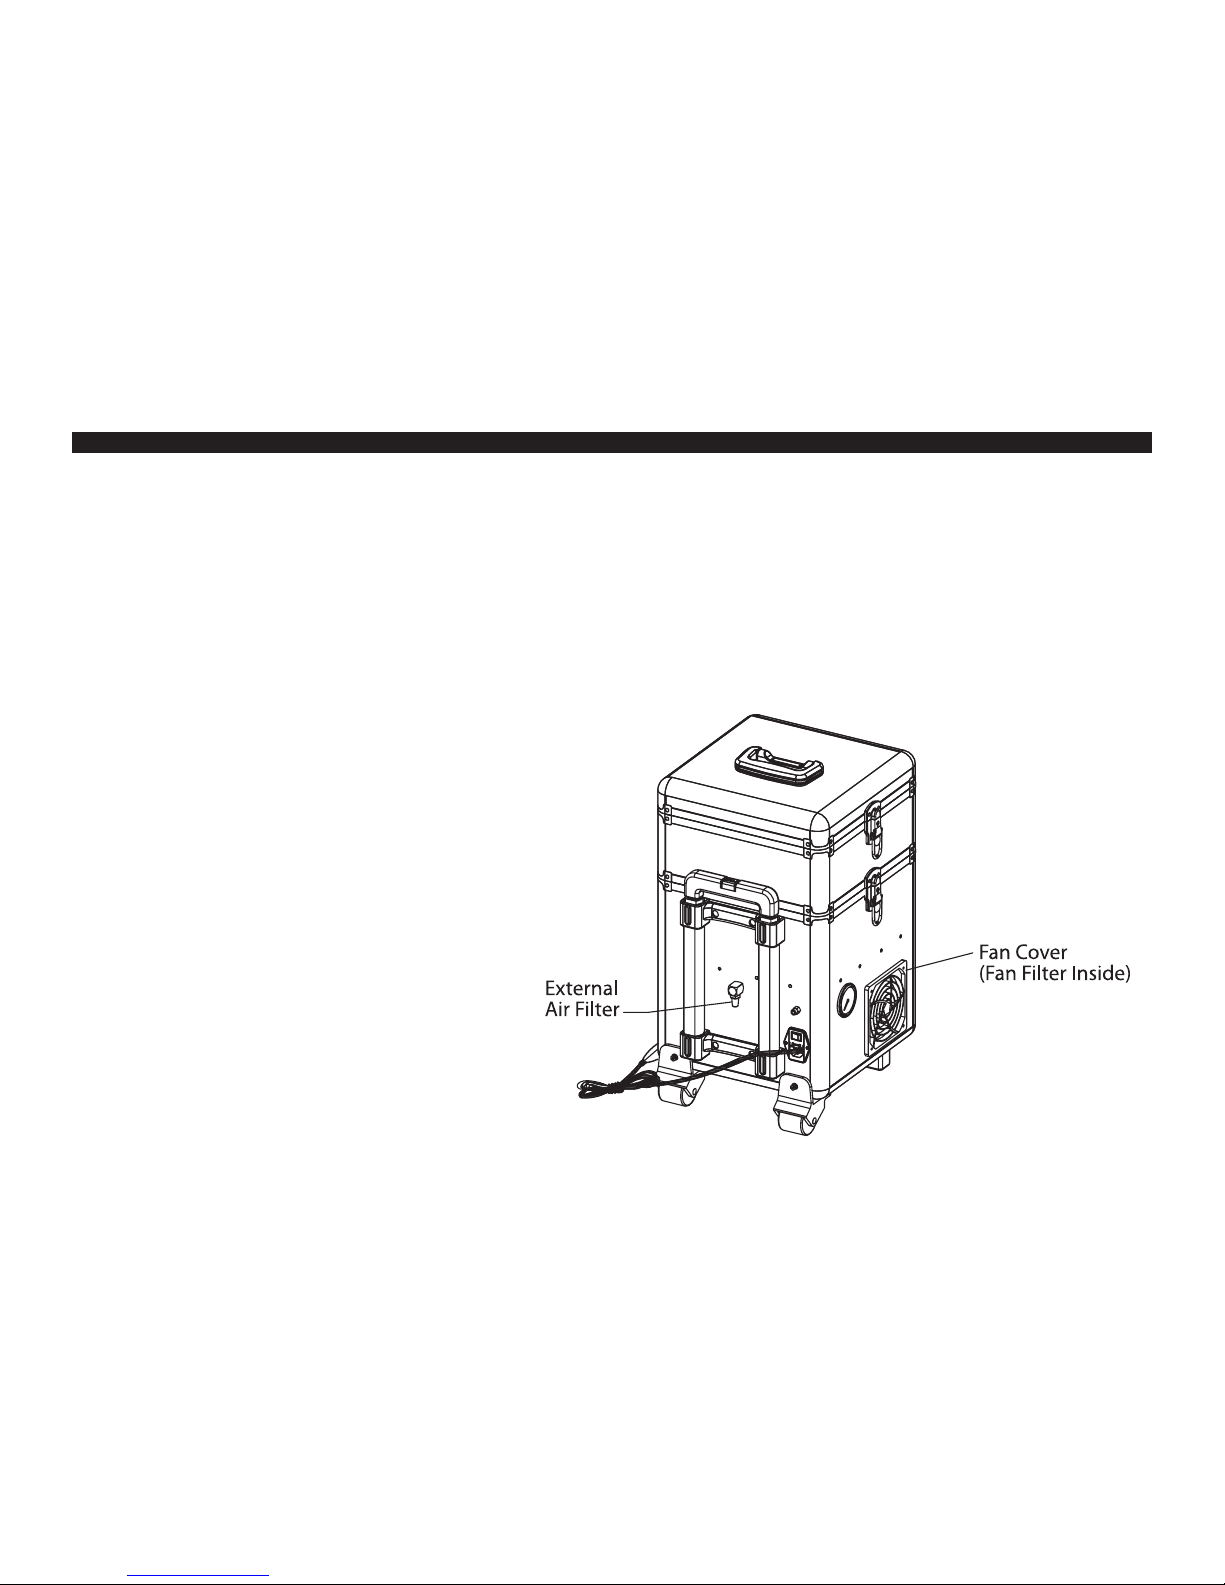
Changing The Air Intake Filter
• If the external air intake lter is clogged with debris and cannot be cleaned it will need to be replaced.
• Use a crescent wrench (or 16 mm wrench) adjusted to t the at faces of the external air lter mounted to the back of the case.
• With the wrench tted to air lter unscrew the external air lter by turning the wrench counter-clockwise until it is unthreaded from the case.
• A replacement external air lter is included with the Maxx Jet. Extras can be purchased separately.
• Gently thread new external air lter into place and tighten with a wrench until snug. Be careful not to over tighten as this may strip the threads.
Changing The Fan Filter
• If the external air intake lter is clogged with debris and cannot
be cleaned it will need to be replaced.
• Remove the plastic vent cover by using the at end of a screwdriver
placing it underneath the outside edge and gently pry it o.
• Remove the fan lter, it is only held in place by the fan cover.
• Two replacement fan lters are included with the Maxx Jet.
Extras can be purchased separately.
• Replace with clean fan lter.
• Replace fan cover by snapping it into place.
MAINTENANCE (CONT’D)
11
Page 12

1. Release any built up moisture in moisture trap and in air storage tank.
2. Turn o the compressor.
3. Release any leftover air by pressing down on your airbrush trigger (being careful of any excess paint) or unscrewing your airbrush
from the air hose.
ENDING A SESSION
MAINTENANCE (CONT’D)
The air tank will collect moisture and will need to be drained. How often is based on the weather and how much humidity is in the air.
1. Turn o the compressor.
2. Depressurize the tank. (Release remaining air in tank.)
* Air may be released through the airbrush or through the moisture trap pressure relief valve.
3. Unscrew the nut on the drain valve at the lower back part of the air storage tank.
4. Tip the compressor back.
5. Let it drain.
6. When its nished draining, set compressor upright.
7. Screw the nut back into the tank drain valve.
12
Page 13

TROUBLESHOOTING
Compressor turns on and o while airbrush is not spraying air. The compressor has an air leak somewhere. When this happens, try the
following steps:
1. Spray all connections with a soapy solution. Resulting bubbles indicate an air leak.
2. Tighten connections.
3. If bubbling doesn’t stop, try wrapping threads with thread sealant tape (max 3 wraps only) or applying beeswax to the threads.
Both methods provide an airtight seal.
4. If the air leak is in the middle of a hose the hose will need to be replaced.
For any other problems or issues call or contact ANEST IWATA-MEDEA at 503-253-7308 or email at: [email protected]
13
Page 14

14
WARRANTY
All Iwata compressors are Warranted against all manufacturing defects of material and manufacture or workmanship for a period of ONE year
from the date of purchase*. This warranty does not cover intake air lters as periodic replacement of these parts is REQUIRED due to normal wear.
Any part or material that is or becomes defective so as not to be usable within this period will be repaired or replaced. This warranty does not cover
damage caused by negligence or a compressor that has been altered or abused in any way.
Call or email Anest Iwata-Medea before returning a compressor for the appropriate procedure for warranty repairs. Any material that is shipped
to Anest Iwata-Medea without prior authorization will not be accepted.
• Anest Iwata-Medea oers technical support over the phone at no charge. Call Customer Care at 503-253-7308 Monday – Friday,
8am – 4:30pm Pacic Time. Telephone support includes general usage information, cleaning tips, and troubleshooting.
• NOTE: All compressors returned for repair must have a Return Authorization Number. Please call 503-253-7308 to obtain an RA number,
instructions and shipping address.
Warranty service will be provided only at authorized Anest Iwata-Medea service centers. You must pay all charges for shipping/transporting your
Iwata Studio Series Compressor to/from these service facilities.
Anest Iwata-Medea, Inc. will not be responsible for damage to persons or property, commercial loss or any other incidental or consequential damage
caused by a defective compressor. However, some states do not allow the exclusion or limitation of incidental or consequential damages, so the above
limitations may not apply to you.
All implied warranties, including any warranty of merchantability or tness are limited to the duration of this written warranty. However, some states
do not allow limitations on how long an implied warranty lasts, so the above limitation may not apply to you.
* Please keep the sales receipt.
Genuine Iwata
©2016 Anest Iwata-Medea, Inc. All rights reserved. The Anest Iwata-Medea logo, Anest Iwata-Medea and Iwata Studio Series are registered trademarks of Anest Iwata-Medea, Inc. Iwata Custom Micron, Iwata Hi-Line and Iwata Eclipse are trademarks of ANEST IWATA
Corporation. Iwata, the Iwata logo and NEO for Iwata are registered trademarks of ANEST IWATA Corporation. All other trademarks are the properties of their respective owners.
Page 15

Page 16

Rev4 9/16
www.IWATA-AIRBRUSH.com
 Loading...