

Iwata Power Jet Series, Power Jet IS-900, Power Jet Lite IS-925, Power Jet IS-975 User Manual
Page 1
POWER JET SERIES
AIR COMPRESSORS
IS-900, IS-925 and IS-975
IWATA STUDIO SERIES POWER JET SERIES AIR COMPRESSORS — IS-900, IS-925 and IS-975
Congratulations on your new purchase! The Iwata Power Jet Series Air Compressors delivers quiet,
clean, pulse free air along with superb moisture separation and precise air pressure adjustment.
Page 2

Page 3

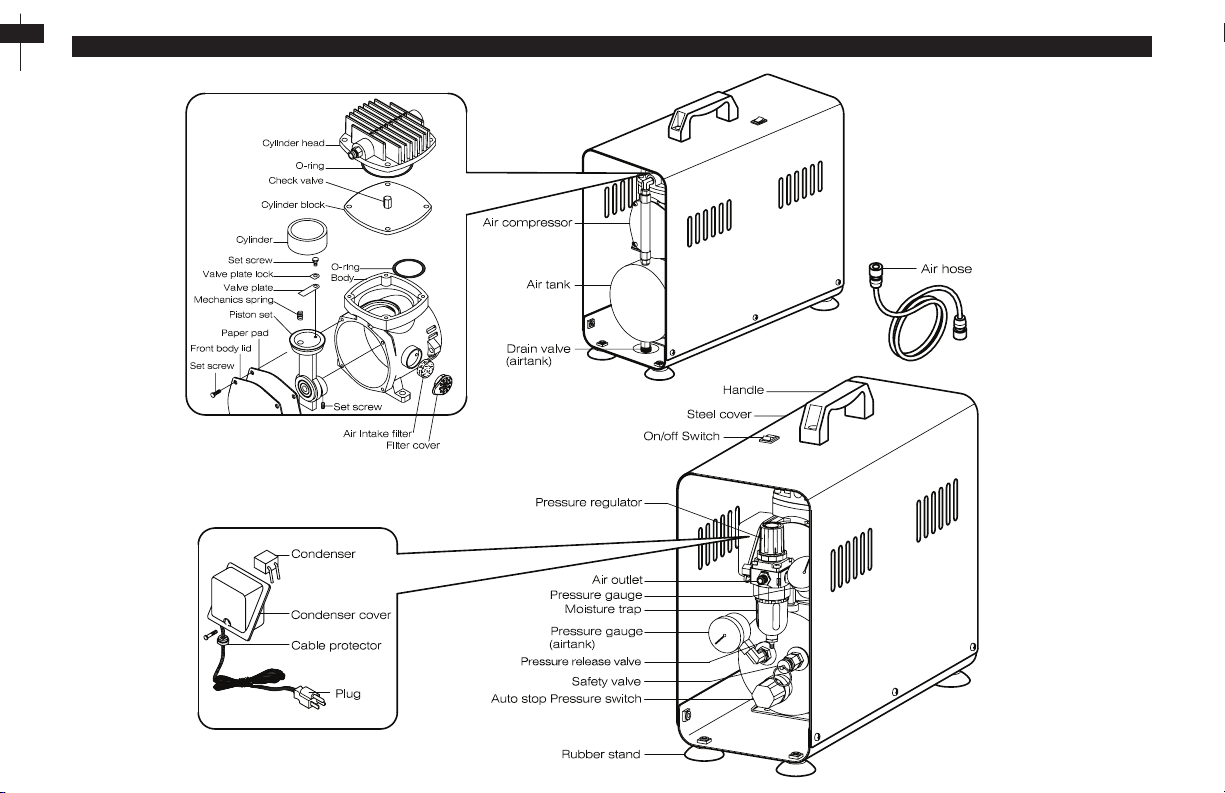
EXPLODED DIAGRAM - POWER JET PRO IS-975
VOLTAGE - CAUTION READ CAREFULLY
If you bought the compressor in the country you’re
going to use it, it’s completely ready to go. If you’re
going to transfer the compressor to another country
with a dierent voltage, you’ll need a plug adapter and
the appropriate power converter. These items typically
are found at hardware stores or electronic stores. Using
compressors with the wrong voltage can damage the
compressor or result in an electrical re.
3
Page 4
4
EXPLODED DIAGRAM - POWER JET IS-900
VOLTAGE - CAUTION READ CAREFULLY
If you bought the compressor in the country you’re
going to use it, it’s completely ready to go. If you’re
going to transfer the compressor to another country
with a dierent voltage, you’ll need a plug adapter and
the appropriate power converter. These items typically
are found at hardware stores or electronic stores. Using
compressors with the wrong voltage can damage the
compressor or result in an electrical re.
Page 5
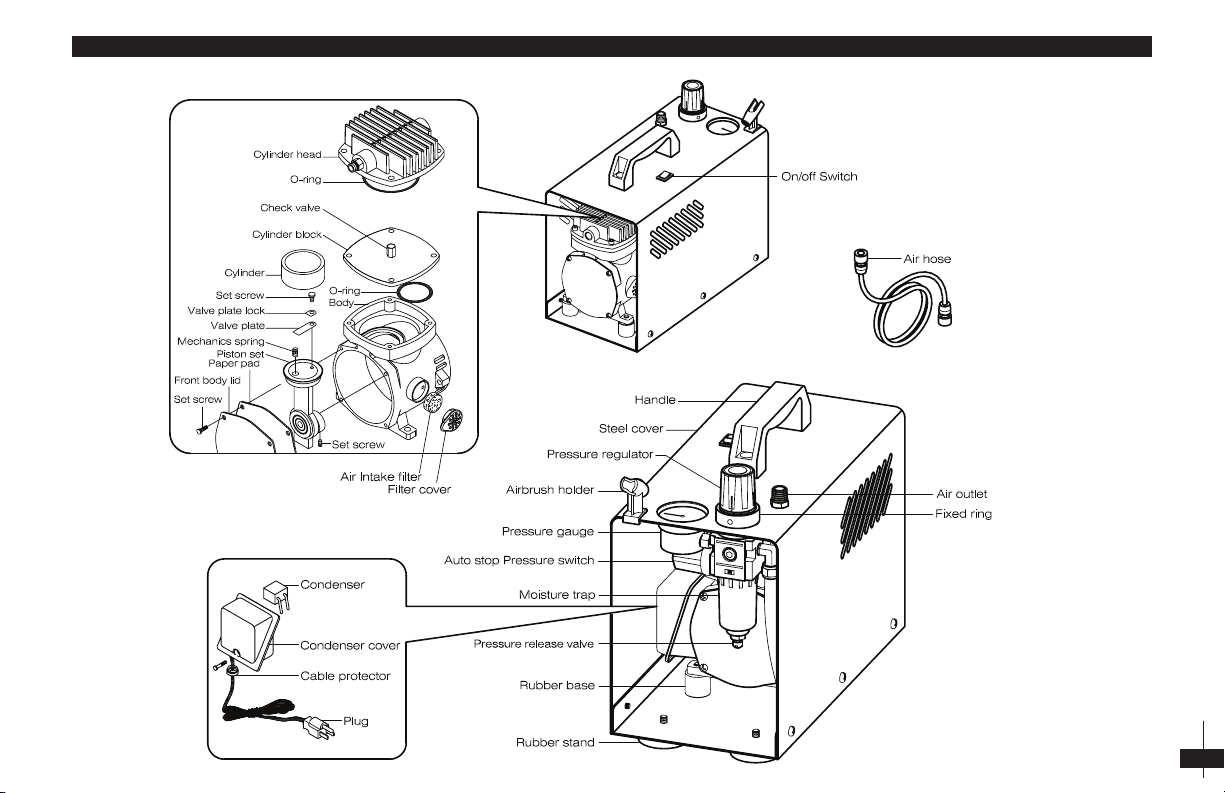
EXPLODED DIAGRAM - POWER JET LITE IS-925
VOLTAGE - CAUTION READ CAREFULLY
If you bought the compressor in the country you’re
going to use it, it’s completely ready to go. If you’re
going to transfer the compressor to another country
with a dierent voltage, you’ll need a plug adapter and
the appropriate power converter. These items typically
are found at hardware stores or electronic stores. Using
compressors with the wrong voltage can damage the
compressor or result in an electrical re.
5
Page 6

6
HOW TO SET UP YOUR POWER JET PRO
Unpack the Power Jet Pro and all packaged components. Enclosed you’ll nd:
NOTE: If you have the IS 900 Power Jet or IS 925 Power Jet Lite then go to page 8 for Set Up Instructions.
(1) Power Jet Pro Compressor
(2) 1/4 inch Quick Disconnect Adapters
(2) Coiled Air hoses
(1) Extra Air Intake Filter
(1) Iwata Air Hose to Badger Airbrush Adapter
(1) Iwata Air Hose to Paasche Airbrush Adapter
(1) Iwata Air Hose to Aztek Airbrush Adapter
(1) Printed Compressor Diagram
(1) Iwata Catalog
Features
1. Airbrush Holders
2. Air Hoses
3. Air Tank
4. Moisture Traps
5. Pressure Gauges
6. Pressure Regulators
7. Quick Disconnect (QD) Adapters
8. Quick Disconnect (QD) Ports
9. Air Hose Adapters
(See also www.iwata-medea.com and search for “How to set up your Power Jet Pro”)
Set Up
1. Plug it in.
2. The coiled air hoses and male QD adapters come pre-assembled. Take the coiled air hoses and push the male QD adapter into the female QD
Socket on the top of the compressor. You should hear and feel it click into place. CLICK!
Page 7

HOW TO SET UP YOUR POWER JET PRO (CONT’D)
Things To Remember
Extension Cords: Note: DO NOT use an undersized extension cord. Use only with Heavy Duty extension cord.
QDs And Air Hoses:
Note: If a leak is found later on, use a wrench to tighten the air hose to the adapter.
Note: If using a dierent brand airbrush screw the appropriate adapter onto the air hose, then screw the airbrush into the adapter.
Note: You should not need Teon Tape, Pipe Dope, or Beeswax to seal any of the air hose connections, but if an air leak is found,
these are the options to create a seal.
Using The Compressor
1. Turn compressor on by pressing the power button.
* You will see the button light up. If there is no air in the air tank then the compressor engine will turn on and ll up the tank.
2. To adjust the air pressure, pull up on the black knob to unlock it.
A. Twist clockwise to raise the pressure.
B. Twist counter-clockwise to lower the pressure.
Note: There’s a + and - sign on top of the knob with arrows to remind you which direction raises and lowers pressure.
3. After you’ve obtained the desired pressure, push down on the knob to lock it in place.
Note: The regulators come from the factory set at 100psi. (Keep twisting counter-clockwise until the gauge starts to move.)
4. While using the compressor, you’ll notice moisture start to condense in the clear plastic bowl of the moisture trap underneath the each
of the black knobs on the front of the compressor.
5. When droplets start to form, simply press up on the pressure release valve underneath the clear plastic bowl to release the built up moisture.
Note: How often you need to do this will vary based on the weather and how much humidity is in the air.
6. When the airbrush is not in use it may be placed in an airbrush holder.
Go to page 10 for instructions on how to drain your tank.
7
Page 8

8
HOW TO SET UP YOUR POWER JET (IS 900) & POWER JET LITE (IS 925)
Unpack the Power Jet or Power Jet Lite and all packaged components. Enclosed you’ll nd:
(1) Power Jet or Power Jet Lite Compressor
(1) Straight Air Hose
(1) Extra Air Intake Filter
(1) Iwata Air Hose to Badger Airbrush Adapter
(1) Iwata Air Hose to Paasche Airbrush Adapter
(1) Iwata Air Hose to Aztek Airbrush Adapter
(1) Printed Compressor Diagram
(1) Iwata Catalog
Features
1. Airbrush Holder
2. Air Hose
3. Air Tank (No tank on Power Jet Lite)
4. Moisture Trap
5. Pressure Gauge
6. Pressure Regulator
9. Hose Adapters
Set Up
1. Plug it in.
2. Screw the large end of the air hose onto the air outlet on the moisture trap.
3. Screw the other end of the air hose onto the airbrush.
Note: If you’re using a brand of airbrush other than Iwata, use the appropriate adapter from the adapter kit. You might have to try them
out to see which one is right.
Page 9

HOW TO SET UP YOUR POWER JET (IS 900) & POWER JET LITE (IS 925) (CONT’D)
4. On the Power Jet Lite, the airbrush should t into the black airbrush holder by placing the front end of the airbrush into the holder. If using a
bottle feed airbrush with the bottle attached, put the back end of the airbrush into the holder.
A. An airbrush holder can purchased separately for use with the Power Jet.
5. Plug the compressor into a grounded wall outlet. (Avoid using an extension cord.)
6. Turn the compressor ON by pressing down the on/o switch on top of the unit. (You will see the button light up.)
A. The Power Jet will run until its storage tank lls up, then stop. As you run your airbrush, the stored air will deplete. At a certain point
the Power Jet will turn itself on to replenish the stored air.
B. The Power Jet Lite (which has no storage tank) will remain running as it is used with your airbrush.
Using The Compressor
1. Turn compressor on by pressing the power button.
* You will see the button light up. If there is no air in the air tank then the compressor engine will turn on and ll up the tank (Power Jet only).
2. To adjust the air pressure, pull up on the black knob to unlock it.
A. Twist clockwise to raise the pressure.
B. Twist counter-clockwise to lower the pressure.
Note: There’s a + and - sign on top of the knob with arrows to remind you which direction raises and lowers pressure.
3. After you’ve obtained the desired pressure, push down on the knob to lock it in place.
Note: The regulators come from the factory set at 100psi. (Keep twisting counter-clockwise until the gauge starts to move.)
4. While using the compressor, you’ll notice moisture start to condense in the clear plastic bowl of the moisture trap underneath the each
of the black knobs on the front of the compressor.
5. When droplets start to form, simply press up on the pressure release valve underneath the clear plastic bowl to release the built up moisture.
Note: How often you need to do this will vary based on the weather and how much humidity is in the air.
6. When the airbrush is not in use it may be placed in an airbrush holder.
9
Page 10

10
DRAINING THE TANK ON YOUR POWER JET SERIES AIR COMPRESSOR
The air tank will collect moisture and will need to be drained. How often is based on the weather and how much humidity is in the air.
1. Turn o the compressor.
2. Depressurize the tank. (Release remaining air in tank.)
* Air may be released through the airbrush or through the moisture trap pressure relief valve.
3. Unscrew the nut on the drain valve at the lower back part of the air storage tank.
4. Tip the compressor back.
5. Let it drain.
6. When its nished draining, set compressor upright on all four rubber feet.
7. Screw the nut back into the tank drain valve.
Page 11

MAINTENANCE FOR ALL POWER JET SERIES AIR COMPRESSORS
Releasing Built Up Moisture In The Moisture Trap
• Release the water by pushing up on the drain valve located underneath the moisture trap’s clear bowl.
• This will open the valve and drain o the collected moisture.
• Hold a paper towel under the open valve to collect the water.
• Do not let excess water build up in the moisture trap.
Changing The Air Intake Filter
The lter only needs to be changed if it’s signicantly dirty or dirty enough to cut air ow into the compressor.
• Use your nger to pull the black tab out
• Pull out the sponge-like air-lter
• Replace with new air lter (Part # IS 030 – 10 pack)
• Please inspect your air lter once per week with heavy compressor use.
DO NOT use oil in/on the compressor.
ENDING A SESSION
1. Release any built up moisture in moisture trap and in air storage tank.
2. Turn o the compressor.
3. Release any leftover air.
11
Page 12

12
TROUBLESHOOTING
Compressor turns on and o while airbrush is not spraying air. The compressor has an air leak somewhere. When this happens, try the
following steps:
1. Spray all connections with Windex or soap and water solution. Resulting bubbles indicate an air leak.
2. Tighten connections.
3. If bubbling doesn’t stop, try wrapping threads with Teon Tape (max 3 wraps only) or applying beeswax to the threads. Both methods
provide an airtight seal.
4. If the air leak is in the middle of a hose the hose will need to be replaced.
For all other problems or issues call or contact Iwata-Medea at (503) 253-7308 or email us at: [email protected].
Page 13

FEATURES
Oil-Less Piston Compressor
Oil-less means oil-less! The compressor uses Teon gaskets to seal the compression chamber. This allows the compressor to be quiet without
atomizing oil into the air stream, which makes the compressor virtually maintenance free.
Moisture Trap Assembly
The moisture trap lters out the water and debris down to 5 microns.
Air Regulator
The air regulator allows control of the air pressure.
Air Pressure Gauge
Don’t guess what pressure you’re spraying at! Know it!
Airbrush Holder (Power Jet Pro and Power Jet Lite Only)
Built-in, hands-free device! It’s always best to keep your airbrush upright when it’s full of paint and you need to set it down for a moment –
otherwise, paint can ow into areas inside the brush where it shouldn’t. Keep your airbrush upright with the airbrush holder.
Quick Disconnects (Power Jet Pro Only)
Allows quick removal of the air hose from the compressor.
Air Hose Adapters
Almost any airbrush can be retro tted to your compressor with included air hose adapters.
Power Switch
Yes, it’s a feature! You don’t have to unplug the compressor when you want it to stop, just ip the switch.
Auto-Shut o
This is the Smart part of the Power Jet series.
Thermal Overload Switch
If the compressor ever decides to overheat, the Thermal Overload Switch will turn o your compressor. If this switch cuts in it’s saving your
compressor. Let it cool down. The switch will automatically reset itself.
Voltage - CAUTION READ CAREFULLY
If you bought the compressor in the country you’re going to use it, it’s completely ready to go. If you’re going to transfer the compressor to
another country with a dierent voltage, you’ll need a plug adapter and the appropriate power converter. These items typically are found at
hardware stores or electronic stores. Using compressors with the wrong voltage can damage the compressor or result in an electrical re.
13
Page 14

14
WARRANTY
All Iwata compressors are Warranted against all manufacturing defects of material and manufacture or workmanship for a period of ONE year
from the date of purchase*. Any part or material that is or becomes defective so as not to be usable within this period will be repaired or replaced.
This warranty does not cover damage caused by negligence or a compressor that has been altered or abused in any way.
Call or email Iwata-Medea before returning a compressor for the appropriate procedure for warranty repairs. Any material that is shipped to
Iwata-Medea without prior authorization will not be accepted.
• Telephone Technical Support: Iwata-Medea oers technical support over the phone at no charge. Telephone support includes general
usage information, cleaning tips, and troubleshooting.
• For Tech Support please call us at 503-253-7308 Pacic Time, 9am – 12pm & 1pm – 4pm, Monday – Friday
• NOTE: All compressors returned for repair must have a Return Authorization Number. Please call 503-253-7308 to obtain an RA number,
instructions, and our shipping address.
Warranty service will be provided only at authorized Iwata-Medea service centers. You must pay all charges for shipping/transporting your
Iwata Studio Series Compressor to/from these service facilities.
Iwata-Medea, Inc will not be responsible for damage to persons or property, commercial loss or any other incidental or consequential damage caused
by a defective compressor. However, some states do not allow the exclusion or limitation of incidental or consequential damages, so the above
limitations may not apply to you.
All implied warranties, including any warranty of merchantability or tness are limited to the duration of this written warranty. However, some states
do not allow limitations on how long an implied warranty lasts, so the above limitation may not apply to you.
* Please keep the sales receipt.
Genuine Iwata
Copyright © 2010 Iwata-Medea Inc. All rights reserved. The Iwata-Medea logo, Iwata-Medea®, Iwata Eclipse™, Iwata Revolution™, Iwata Kustom™, Iwata Micron™, Sprint Jet™, Smart Jet™, Power Jet Pro™, Power Jet Lite™, Medea Super Lube ™, Pistol Grip Filter™, and
all products denoted with ® or ™ are registered trademarks or trademarks of Iwata-Medea Inc. • Iwata® and the Iwata logo are registered trademarks of Anest Iwata Japan • Teflon is a registered trademark of E.I. dupont de Nemours and Company or its aliates. All
other trademarks are of their respective owners. For more information visit www.iwata-medea.com
Page 15

Page 16

— w w w . I W A T A M E D E A . c o m —
Iwata-Medea, Inc. • 1336 N. Mason St. • Portland, Oregon 97217
tel: (503) 253-7308 • fax: (503) 253-0721 • [email protected]
 Loading...