

Page 1
Read this manual before use of product
IWAKIController
ModelFDC-1
InstructionManual
Page 2

Thank you for purchasing Iwaki Controller Model FDC-1.
This controller is an exclusive use for Iwaki pneumatic bellows pump. This document provides
“Notice and warnings”, “Overview”, “Set up”, “Operation” and “Maintenance”, and explains
handling and how to operate the controller.
To make sure for your safety and correct use, please read this manual entirely before using the
controller, and comprehend thoroughly for each clause.
Contents
NOTICE AND WARNING FOR HUMAN SAFETY ························ 1
OVERVIEW ··················································································· 3
1. Unpacking and inspection ····················································· 4
2. Specification ·········································································· 4
3. External dimensions ······························································ 5
4. Names and explanations of component devices ··················· 6
5. Explanation of work ······························································· 7
6. Main functions ······································································· 8
SETUP ··························································································· 9
1. Installation ·········································································· 10
2. Connection ·········································································· 10
Operation ···················································································· 17
1. How to operate ···································································· 18
2. How to set controller ···························································· 18
3. Operation screen ································································· 21
4. Setting confirming and setting change procedure ··············· 22
5. Pump operation ··································································· 22
6. Alarm reset procedure ························································· 23
Maintenance ··············································································· 24
1. Troubleshooting ··································································· 25
Please keep this document at customer’s site in order to review
whenever it is necessary. For additional information, please inquire
our local representatives in your area, or call us directly.
Page 3
−1−
Important Instruction
Types of Symbols
Indicates that “Warning” or “Caution” must be exercised. Inside this
triangle, a concrete and practical image provided as a warning or cau-
tion message is depicted.
Indicates a prohibited action or procedure. Inside or near this circle, a
concrete and practical image of the activity to be avoided is depicted.
Indicates an important action or procedure which must be performed
or carried out without fail. Failure to follow the instructions herein
can lead to malfunction or damage to the pump.
Nonobservance or misapplication of the
contents of the “Caution” section could lead to
serious physical injury to the user or serious
damage to the product.
Warning
Nonobservance or misapplication of the
contents of the “Warning” section could lead to
a serious accident, including death or injury.
Caution
For the Safe and Correct Handling of the Pump
• Read the "Safety Instructions" sections carefully to prevent accidents involving your customers
or other personnel and to avoid damage or loss of other assets. Always follow the instructions
and advice found in these sections.
• Observe and abide by the instructions described in this manual. These instructions are very
important for protecting pump users from potentially dangerous conditions and situations related
with the use of the pump system.
• The symbols relate to the following meanings described below:
Page 4

Safety Section
WARNING
• For specified application only
Model FDC-1 is the exclusive use controller designed for IWAKI pneumatic drive bellows pump FA, FF, FH, FW and FS Series. Do not use this controller for other pumps
or application.
• Do not disassemble and remodel
Do not disassemble and remodel the controller.
CAUTION
• Qualified operator only
The controller must be operated or maintained by the person who has enough knowledge of the product and experience of handling of product.
• Place to be installed and stored
This controller is not explosion-proof design. Do not install or store the controller at
flammable atmosphere. Do not install or store the controller at corrosive
atmosphere.Otherwise, it may be failed or cause accident.
• Precautions for wiring proximity switches
Wrongly wired proximity switches (Right and Left) may cause the seizure of contacts.
Pay attention to the wiring.
• Specified voltage only
Do not use the controller with other voltage than specified one. Otherwise it may
causes fire or electrical shock.
- 2 -
Caution
No Remodeling
Prohibited
Prohibited
Prohibited
Prohibited
Page 5

−3−
OVERVIEW
1. Unpacking and inspection.................... 4
2. Specification......................................... 4
3. External dimensions............................. 5
4. Names and explanations
of component devices......... 6
5. Explanation of work.............................. 7
6. Main functions...................................... 8
Page 6

−4−
1) Please inspect immediately on the followings as soon as you receive the product, and inquire the shop you ordered if
any objectionable was found.
(1) Identify if the model number described on the front panel is the same as you ordered.
(2) Check if there is any damage(s) suffered from accident(s) during transportation.
(3) Confirm all of accessories were included. (if specified)
*Standard accessories: one each connector (CN1~CN6), total 6 connectors and a set of contact for the connectors.
*Optional accessories: Cable exclusively used for Electro- pneumatic regulator. (Only if ordered as an optional)
General
Spec.
Power supply DC24V + / - 10%
Power Consumption 24VA or less
Ambient temp. 0 ~ 50 °C
Ambient humidity 85% or less (No condensing)
Input
Spec.
Leak sensor input
Voltage between electrodes DC24V + / - 10%
Operating resistance Detect:0~15kohm (25k ohm or more: no detection)
Proximity switch input
Input signal Proximity Switch (negative logic operation)
ON voltage level 3V or less
OFF voltage level 5V or more
External start input
Input signal Potential free contact or NPN open collector output
ON voltage level 3V or less
OFF voltage level 18V or more
External alarm reset
input
Input signal Potential free contact or NPN open collector output
ON voltage level 3V or less
OFF voltage level 18V or more
Output
Spec.
Solenoid valve
operation output
Output NPN open collector output
Output load voltage DC 24V + / - 10%
Output load current 1A (MAX)
Leak alarm output
Time-up alarm output
Life alarm output
Fast alarm output
Output NPN open collector output
Output load voltage DC 24V + / - 10%
Output load current 1A (MAX)
Electro-pneumatic
Regulator control output
Output signal Analog signal
Voltage range 0 ~ 10V
Resolution 8bit D/A converter
1. Unpacking and inspection
2. Specification
Page 7
−5−
Fig. 1
PUMP CONTROLLER MODEL FDC-1
IWAKI
RUN
LEAK
TIME
LIFE
FAST
CN1 CN2 CN3 CN4 CN5 CN6
141
+1
0
148
±
0.3
4-φ4.5
4-φ4.5
44
+1
0
38±0.3
136
152
158
SELECT
MENU
ENT
AUTO MANU
148
38
48
42.3
(2)
Fig. 2
50
3−PT
1
/
4
PT
1
/
4
,
EXH.
52
(9)
72
22.5
×
×
OUT
SUP
PUSH OPEN
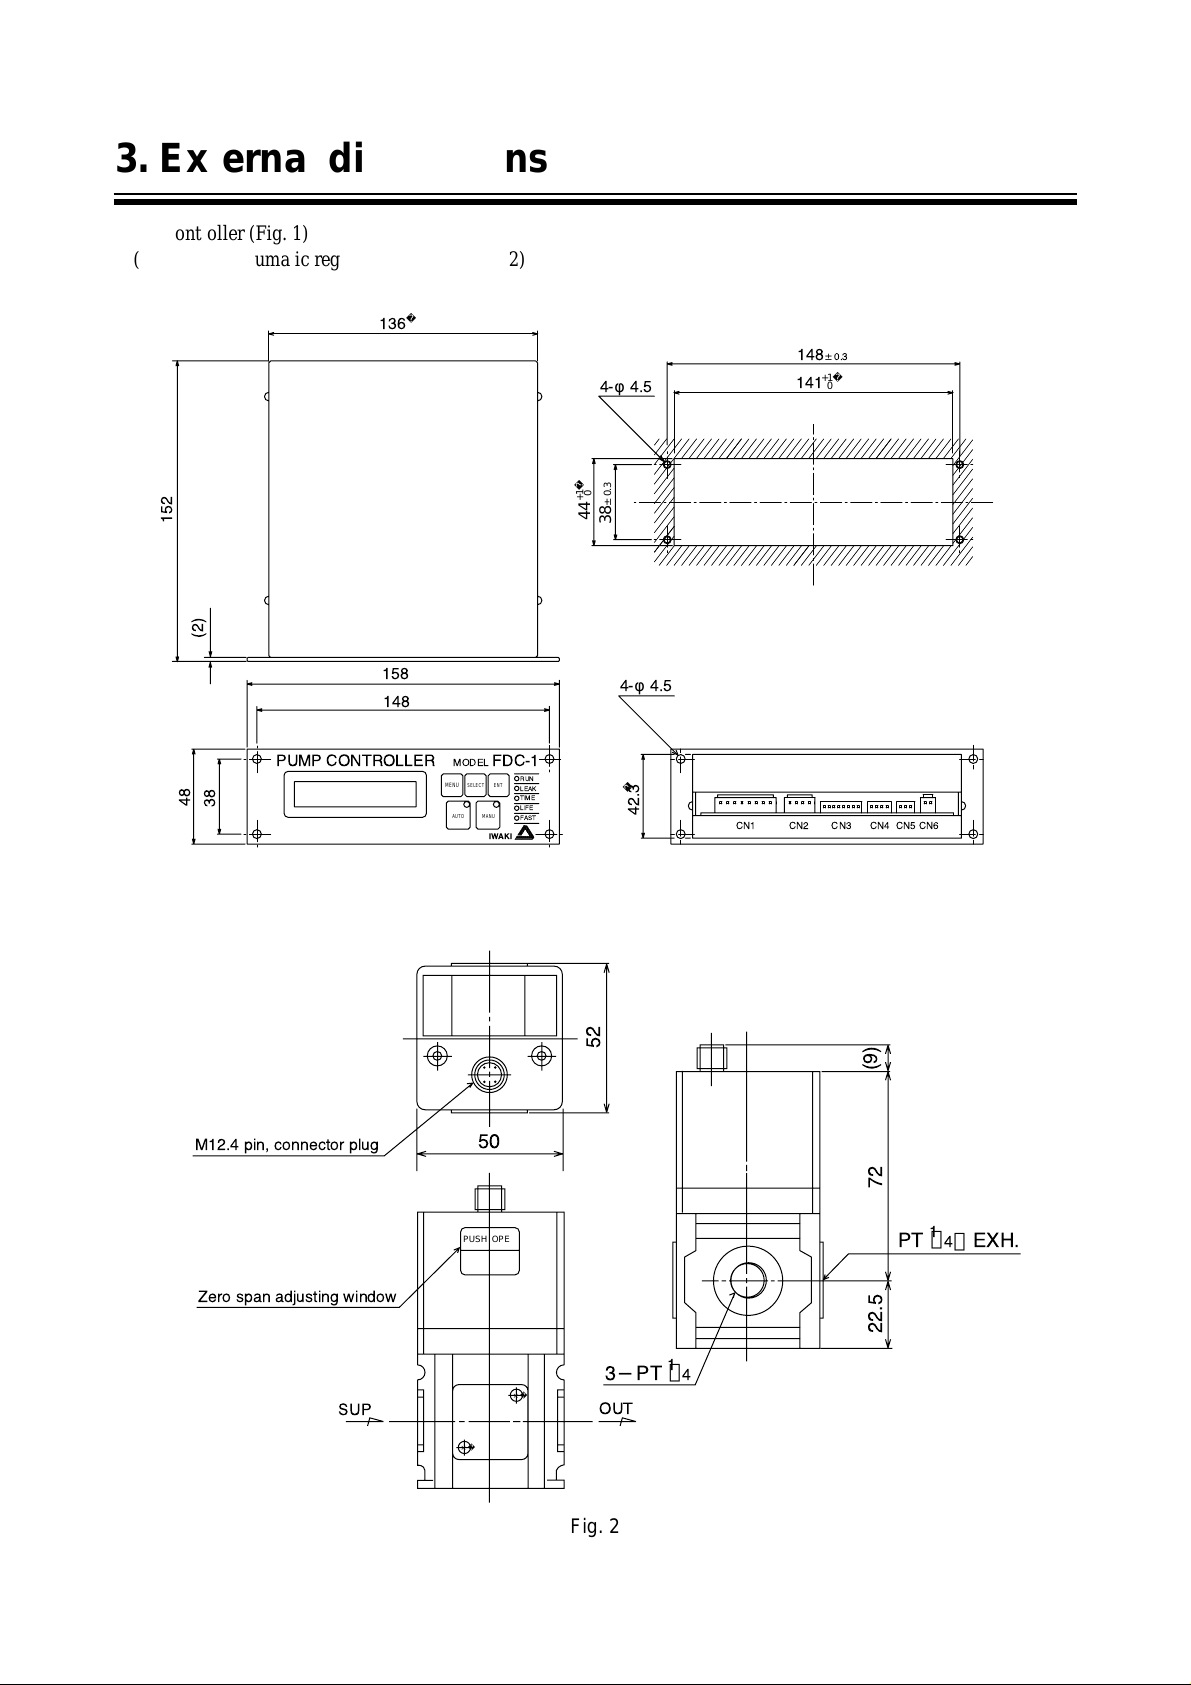
Zero span adjusting window
M12.4 pin, connector plug
(1) Controller (Fig. 1)
(2) Electro-pneumatic regulator (Option) (Fig. 2)
3. External dimensions
Page 8
−6−
Fig. 3
PUMP CONTROLLER MODEL FDC-1
IWAKI
;
;
;
;
;
;
;
;
;;;;
;
;
;;
;
;
;
;;
;
;
;
;
;
;
;
;
;;
;
;
;
;
;
;
;
;
;
;
;
;
;
;
;
;
;
;
;
;
;
;
;
;
;
;
;
;;
;
;
;
;
;
;
;
;
;
;
;
;
;
;
;;;;
;
;
;
;
;
;
;
;;;
;
;
;
;
;
;;
;
;;
;;;
;
;
;;;
;
;
;
;
;
;
;
;
;
;
;
;
;
;
;;;
;
;
;
;;
;
;
;
;
;
;
;
;
;
;
;
;
;
;
;
;
;
;
;;;;;
;
;
;
;
;
;;;
;
;
;
;
;
;;
;;;
;
;
;
;
;;
;
;
;
;
;
;
;
;
;
;
;
;
;
;
;
;
;
;
;
;
;
;
;
;
;
;
;
;
;
;
;
;
;
;
;
;
;
;;;;
;
;
;
;
;
;
;
;;;
;
;
;
;
;
;
;
;
;
;
;
;
;
;
;
;
;
;;
;
;
;
;
;
;
;
;
;
;
;
;
;
;
;
;;
;
;
;
;
;
;
;
;
;
;;;;
;
;
;;
;
;
;
;
;
;
;
;
;
;;
;
;
;
;
;
;
;;
;
;
;
;
;
;
;;
;
;
;
;;;;;
;
;
;
;
;
;
;
;;
;
;
;
;;;
;;
;
;;
;
;
;;
;
;
;
;;;
;;
;
;
;
;;
;;;
;
;
;
;;;;
;
;
;
;
;
;;;;
;
;
;
;
;;
;
;
;
;
;
;
;
;
;
;
;
;
;
;
;
;
;
;
;
;
;;
;
;;
;
;
;
;
;
;
;
;
;
;
;
;
;
;
;
;
;
;
;
;
;;
;
;
;
;
;
;;;
;
;;;
;
;
;
;;;
;
;
;
;
;
;
;
;
;;
;
;
;
;
;;;
;
;
;
;
;;;
;
;
;
;
;
;
;
;;;
;
;
;
;;;
;
;;;
;
;
;
;
;;;
;
;
;
;
;
;
;
;
;
;
;
;
;
;
;
;
;
;
;
;
;
;
;
;
;;
;
;
;
;
;
;
;
;
;
;
;
;
;
;
;
;
;
;
;
;
;
;
;
;;
;
;
;
;
;
;
;;
;
;;;
;;;;
;
;
;
;
;
;
;;;
;
;
;
;;;
;;
;
;
;;;
;;;
;
;
;
;
;
;
;
;;
;
;
;
;
;
;
;
;
;
;
;;
;
;;
;;;
;
;
;;;
;
;
;
;
;
;
;
;
;
;;;
;
;
;
;;
;;;
;
;
;
;;
;
;
;
;
;
;
;
;
;
;
;
;
;
;
;
;
;;
;
;
;
;
;
;
;;
;
;
;
;
;
;
;
;
;;;
;
;
;;;;
;
;
;
;
;
;
;
;
;
;
;
;
;
;
;
;;
;
;;
;
;
;
;
;
;
;
;
;
;
;
;
;
;
;
;
;
;
;
;
;
;;
;
;
;
;;
;
;
;
;
;
;
;
;
;
;
;
;
;;;
;
;
;
;;;
;
;
;
;;;;
;
;
;
;
;
;
;
;
;
;
;
;
;
;;;
;
;
;
;
;
;
;
;;;;
;
;
;
;;
;;
;
;
;
;
;
;;
;
;;
;
;
;
;
;
;
;
;
;;
;
;
;
;
;
;
;
;
;
;
;
;
;
;
;
;
;
;
;
;
;
;
;
;
;
;
;
;
;
;
;
;
;
;
;
;
;
;
;
;
;
;
;
;
;;
;
;
;;
;
;
;
;
;
;
;
;
;
;;;
;
;
;
;
;
;
;
;
;;
;
;
;
;
;;;
;
;
;
;
;
;
;
;;;
;
;
;
;
;
;
;
;
;
;
;
;
;
;
;;;
;
;
;
;
;
;;
;;;
;
;
;
;;;
;
;;
;
;
;
;
;
;;;
;
;
;
;;;
;
;
;
;
;
;
;
;
;
;
;
;
;
;
;
;
;
;
;;;
;
;
;
;
;
;;
;;;
;
;
;
;
;
;
;
;
;
;
;
;
;
;
;
;
;
;
;
;
;
;
;
;
;
;
;
;
;
;
;
;
;
;
;
;
;
;
;
;
;
;
;
;
;
;
;
;
;
;
;
;
;
;
;
;
;
;
;
;
;
;
;
;
;
;
;
;
;
;
;
;
;
;;
;
;
;
;;;
;
;;
;
;
;
;
;;;;
;
;
;
;;;
;;
;
;;
;
;
;;;;
;
;
;
;
;
;
;;
;
;
;
;
;
;
;
;
;
;;
;
;
;
;
;
;
;
;
;
;
;
;
;;
;
;
;;
;
;;
;;;
;
;
;
;;;;
;
;
;
;
;
;
;;;;
;
;
;
;;
;;;
;
;
;
;;;;
;
;
;
;
;
;
;
;;;
;
;
;
;;
;
;
;
;
;
;
;
;
;
;
;
;
;
;
;
;
;
;
;
;
;
;;;;
;;
;
;
;
;
;
;
;
;
;
;;
;
;
;
;
;
;
;
;;
;;;
;
;
;
;
;
;
;
;
;
;
;
;
;
;
;
;
;
;
;
;
;;;
;
;
;
;
;
;
;
;;
;;
;
;
;
;
;
;
;
;;
;
;
;
;
;
;
;
;
;
;
;
;
;
;;;
;
;
;
;
;
;
;
;
;;
;
;
;
;;;
;
;
;
;
;
;
;;
;
;;
;
;
;
;;;
;
;
;
;
;;;
;
;
;
;;;;
;
;
;
;
;
;
;;;;
;
;
;
;
;
;
;
;
;
;
;
;
;
;;;;
;
;
;
;
;
;
;;
;
;
;;
;
;
;
;;
;;;
;
;
;;;;;
;
;
;
;
;
;
;
;
;
;
;
;
;;;
;
;
;;
;
;
;
;
;
;
;
;
;
;
;
;
;
;
;
;
;
;
;
;
;
;
;
;
;
;
;;
;
;
;;
;
;
;
;
;
;
;
;
;
;
;
;
;
;
;
;
;
;
;
;
;;
;
;;
;
;
;
;
;
;
;
;
;
;
;
;
;
;;
;
;
;
;
;;;
;
;
;
;
;
;
;
;
;;
;
;
;
;
;
;
;;
;
;
;
;
;
;
;;;
;
;
;
;
;
;
;
;;
;
;
;
;
;
;;;
;
;
;
;
;
;
;
;
;
;
;
;
;
;
;
;
;
;
;
;
;
;
;
;
;;
;
;
;
;;;
;
;
;
;;;
;;
;;;;;
;
;
;
;
;
;
;
;;;
;
;
;
;;
;;;
;
;
;
;;;;
;
;
;
;
;
;
;
;;;
;
;
;
;;;
;;
;
;
;
;
;
;;;
;;
;
;
;
;
;
;
;
;;;
;
;
;
;
;
;
;
;
;
;
;
;
;
;
;;
;
;
;
;
;
;
;
;
;
;
;
;
;
;
;
;
;
;
;
;
;
;
;
;;
;
;
;
;;;
;
;
;
;
;
;
;
;
;
;
;
;
;
;
;
;
;
;
;
;
;;
;
;
;
;;
;
;
;
;
;
;
;;
;
;
;
;
;
;
;
;
;
;
;
;
;
;;;;
;
;
;
;
;
;
;
;
;
;
;
;
;
;
;
;
;
;
;
;
;
;;;
;;
;
;
;
;
;
;
;
;
;;
;
;
;
;
;
;
;
;
;
;
;;;;
;
;
;
;
;;
;;;
;
;
;
;;;;
;
;
;
;
;
;
;
;;;
;
;
;
;;;
;;
;
;
;
;
;
;;;
;
;
;
;
;;;
;;
;
;
;
;;;
;
;
;
;
;
;
;
;;;;
;
;
;
;;;
;
;
;
;;;
;
;
;
;
;
;
;
;
;;
;
;
;
;
;;
;
;
;
;;;
;
;
;;;
;
;
;
;
;
;
;;
;
;
;
;
;
;
;
;;
;
;
;
;
;
;
;
;;;
;
;
;
;
;
;
;
;
;
;
;
;
;
;
;;
;
;
;
;
;
;
;
;
;;;
;
;
;
;
;
;
;
;
;
;
;
;
;
;
;
;
;
;
;
;
;
;
;
;
;
;;
;;
;
;
;
;
;
;
;
;
;
;
;
;
;
;
;
;
;
;
;
;
;
;;
;
;;
;
;
;
;
;
;
;
;
;
;
;
;
;
;
;
;
;
;
;
;
;;
;
;
;
;
;
;
;
;
;
;
;
;
;
;;
;
;;
;;;
;
;
;
;
;
;
;
;;;;;
;
;
;;;
;;
;
;
;
;
;
;
;
;;
;
;
;
;
;
;
;;;;
;
;
;
;
;
;
;
;
;
;
;
;
;
;;;
;
;
;
;
;
;
;
;;;
;
;
;;
;
;
;
;
;
;
;;;
;
;
;
;
;
;;
;;;
;
;
;
;
;
;
;
;
;
;
;
;
;
;
;;;
;
;
;
;;
;
;
;
;
;
;
;;
;
;
;
;
;
;
;
;
;
;;;
;
;
;
;;;
;
;
;
;
;
;
;;
;
;
;
;
;
;
;
;
;
;
;
;
;
;
;
;
;
;
;
;
;
;
;
;
;
;
;
;
;
;
;
;
;
;
;
;
;
;
;
;
;
;
;
;;
;
;
;
;
;
;
;
;
;
;
;
;
;
;
;
;
;
;
;
;
;
;
;
;;
;
;
;
;
;
;
;
;
;
;
;
;
;
;
;
;
;
;
;
;
;
;
;
;
;
;;;;
;
;
;
;
;
;
;
;;;
;
;
;
;;;
;;
;
;
;
;
;
;;;
;
;
;
;
;
;
;
;;
;
;
;
;;;
;;
;
;
;
;
;
;;;;
;
;
;
;;;
;;
;
;
;
;
;
;
;
;
;
;;
;
;
;
;
;
;
;
;;
;
;
;
;
;
;
;
;
;
;
;
;
;
;
;
;;
;
;
;
;
;
;
;
;
;
;;
;
;
;
;
;
;
;
;;;
;
;
;;
;
;
;
;;;
;
;
;
;;
;
;
;
;
;
;
;
;
;
;
;
;
;
;
;
;
;
;
;
;
;
;
;
;
;;;;
;;
;
;
;
;
;
;
;
;
;
;;
;
;
;
;
;
;
;
;
;
;;;
;
;
;
;
;
;
;
;
;
;
;
;
;
;
;
;
;
;
;
;
;
;;;;
;
;
;
;;
;
;
;
;
;
;
;
;;
;
;
;
;
;
;
;
;
;
;;
;;;
;
;
;
;;;;
;
;
;
;
;
;
;;
;
;
;
;
;
;;;
;;
;
;
;
;
;
;;;
;
;
;
;
;
;
;
;
;
;
;
;
;;;
;
;
;
;;;
;
;;;;;
;
;
;
;
;
;
;
;
;
;
;
;;
;
;
;
;
;
;
;
;;;
;
;
;
;
;;
;
;;;
;
;
;
;;
;
;
;
;
;
;
;
;;;
;
;
;
;;
;;
;
;
;
;
;
;
;
;;;
;
;
;
;
;
;
;
;;;
;
;;;
;;
;
;
;
;
;
;
;
;
;
;
;
;
;
;;;
;
;
;
;
;
;
;
;
;
;
;
;
;
;
;
;
;
;
;
;
;
;
;
;
;;;
;
;
;
;
;;
;
;
;
;
;
;
;
;
;
;
;
;
;
;
;
;
;;;
;
;
;
;
;
;
;
;
;
;
;
;
;
;
;
;
;
;
;
;
;
;
;
;
;
;;;
;
;
;
;
;
;
;
;;
;
;
;
;;;
;;
;
;;;
;
;;;;;
;
;
;
;
;
;;
;
;;
;
;
;
;
;
;
;;;
;
;
;
;;;;
;
;
;
;
;
;
;
;;;
;
;
;
;
;
;
;;
;
;
;
;
;
;
;
;
;
;;
;;;
;
;
;
;;;;
;
;
;
;
;
;
;
;;;
;
;
;
;;;
;
;
;
;
;
;;
;
;;;
;
;
;
;
;
;
;
;
;
;
;
;
;;
;
;
;
;
;
;
;
;
;;;
;
;
;
;
;
;
;
;
;
;
;
;
;
;
;
;
;
;
;;
;
;
;
;
;
;
;
;
;
;
;
;
;
;
;
;
;
;
;
;
;
;
;
;
;
;
;
;
;
;
;
;
;
;
;
;
;
;
;
;
;
;
;
;
;
;
;
;
;
;
;
;
;
;
;
;
;
;
;
;
;
;
;
;
;
;
;
;
;
;
;
;
;
;
;;
;
;
;
;
;
;
;;;
;
;
;
;
;;
;
;
;
;
;
;
;
;
;;;
;
;
;
;;;
;;
;
;
;
;;;
;;
;
;
;
;
;
;
;
;;
;
;
;
;;;
;
;
;
;
;
;;;
;;;;
;
;
;;;
;;
;
;;;;;
;
;
;
;
;;;
;
;
;
;
;
;;
;
;
;
;;;
;
;
;;;
;
;
;
;
;
;
;
;
;
;
;
;
;
;
;
;;
;;;
;
;
;
;;;;
;
;
;
;
;
;;
;;;
;
;
;
;;;
;
;
;
;
;
;
;;
;
;
;
;
;
;
;
;
;
;
;
;
;
;
;
;
;
;
;;;;;
;
;
;
;
;
;
;
;
;
;
;
;
;
;
;
;
;
;
;
;
;
;;;;
;
;
;
;
;
;
;
;
;
;
;
;
;
;
;
;
;
;
;
;
;
;;;;
;
;
;
;
;
;
;
;
;
;
;;;
;
;
;
;
;
;;
;
;
;
;
;
;;;
;
;
;
;
;
;
;
;;;
;
;
;
;
;
;
;
;;
;
;;
;
;
;
;
;
;
;
;
;
;
;
;
;;;
;
;
;;;
;
;
;
;;;
;
;
;
;;;
;
;
;
;
;
;
;
;
;
;
;
;;;
;
;
;
;;;;
;
;
;
;
;
;;
;;
;
;
;
;
;;;
;
;
;
;
;
;
;;;;;
;
;
;
;;
;;
;
;
;
;
;
;;
;
;
;
;
;
;
;
;
;;;
;
;
;
;;;
;;
;
;
;
;
;
;
;
;
;
;
;
;
;
;;;
;;
;
;
;
;
;
;
;
;
;
;
;
;
;
;
;
;
;
;
;
;
;
;
;
;
;
;
;
;
;
;
;
;
;
;
;
;
;
;
;
;
;
;
;
;
;
;
;
;
;
;;
;
;
;
;
;
;
;
;
;
;
;
;
;
;
;;
;
;
;
;
;
;
;;;
;
;
;
;
;
;
;
;
;
;
;
;
;
;
;;;
;
;
;
;
;
;
;
;;;
;
;
;
;
;
;
;
;;
;
;
;
;;;
;
;
;
;
;
;
;
;;;
;
;
;
;
;
;
;
;;
;
;;
;;;
;
;
;
;;
;
;;
;
;
;
;
;
;;;;
;
;
;
;;;
;
;
;
;
;
;
;
;
;
;
;;
;
;
;
;
;
;;;;
;
;;;
;
;
;
;;;
;
;
;
;
;
;
;
;
;
;
;
;
;
;;;;;
;
;
;
;
;
;
;
;
;
;
;
;
;
;
;
;
;
;
;
;
;
;
;
;
;
;
;
;
;
;
;
;;
;
;
;
;
;
;
;
;;
;
;
;
;
;
;
;
;
;
;
;
;
;
;
;
;;
;
;
;
;
;
;
;
;
;
;
;;
;
;
;
;;;
;
;;
;
;
;
;
;
;
;
;
;
;
;
;
;
;
;;
;
;
;
;
;
;
;
;
;
;
;;;
;
;
;;
;
;
;
;
;
;
;
;
;
;;
;
;
;
;
;
;
;;
;
;
;
;
;
;
;
;
;
;
;
;
;
;
;
;;;
;
;
;
;;
;
;
;
;
;
;
;;
;
;
;
;
;
;
;
;;
;;;
;
;
;
;;;;
;
;
;
;
;
;
;
;
;;
;
;
;
;;;
;
;
;
;
;
;
;
;
;
;
;
;
;
;
;;;
;
;
;
;
;
;;;
;
;
;
;
;
;
;
;
;
;
;
;
;
;
;
;
;
;
;
;;
;
;
;
;
;
;
;
;
;
;
;
;
;
;
;
;
;
;
;
;
;
;
;
;;
;
;
;
;
;
;
;
;;
;;
;
;
;;;
;
;
;
;
;
;
;
;;
;
;
;
;;
;
;
;
;
;;;
;
;
;
;;;
;
;
;
;
;
;
;
;
;
;
;;
;
;
;;;
;
;;
;
;
;
;
;
;
;;;;
;
;
;
;
;
;
;
;
;
;
;
;
;;;;;
;
;
;
;
;
;;;
;
;
;
;;
;
;;
;
;;;
;
;
;;;
;
;
;
;
;
;
;
;
;
;
;
;
;
;
;
;
;
;
;
;
;
;
;
;
;
;
;
;
;
;
;
;
;;
;
;
;;;
;
;
;
;
;
;
;
;
;
;
;
;
;
;
;
;
;
;
;
;
;
;
;;;
;
;
;
;
;
;
;
;
;
;
;;
;
;
;
;
;;;
;
;
;
;
;
;
;
;;;
;
;
;
;
;
;
;
;;
;
;
;
;;;
;;
;
;
;
;
;
;;;
;
;
;
;
;
;
;;;
;
;
;
;
;
;
;
;
;
;
;
;
;
;
;
;
;
;
;
;
;;
;;;
;
;
;;
;;;
;
;
;
;
;
;
;
;;;
;
;
;
;;;
;;
;
;
;
;
;
;
;
;
;
;
;
;
;
;
;
;
;
;
;
;
;
;
;
;
;;
;
;
;
;
;
;
;;
;
;
;
;
;
;
;
;
;;;
;
;
;
;
;
;
;
;
;
;
;
;
;
;
;;;;;
;
;;
;
;;
;
;
;
;
;
;
;
;
;
;
;
;
;
;
;
;
;
;;
;
;
;
;
;
;
;
;;
;
;
;
;
;
;
;
;
;
;
;
;;;
;;
;
;
;
;;;;;;
;
;
;
;
;
;
;;
;
;
;
;;;
;
;
;
;
;
;
;
;;;;
;
;
;
;
;;
;
;
;
;
;
;;
;
;
;
;;;
;
;;
;
;
;
;
;
;
;
;;;
;
;
;
;
;
;
;
;
;
;
;
;
;
;
;
;
;
;
;
;
;
;
;
;
;
;
;
;
;
;
;
;
;
;
;
;
;
;
;
;
;
;;;
;;
;
;
;
;;;
;
;
;
;
;
;
;
;;;
;
;
;
;
;
;;;
;;
;
;
;
;
;
;
;
;
;
;
;
;
;
;
;
;;;;
;
;;;
;
;
;
;;
;
;
;
;
;;;
;
;
;
;
;;
;
;
;
;
;
;
;
;;
;
;
;
;
;
;
;;;
;;
;
;
;
;
;
;
;;;
;
;
;
;;;
;
;
;
;
;
;;
;
;
;;
;
;
;;;
;
;
;
;
;
;
;
;
;
;
;
;
;
;
;
;
;
;
;
;
;
;
;
;
;
;
;
;
;;;
;
;
;
;
;
;
;;;
;
;
;
;;
;
;
;
;
;
;
;
;
;;;;
;
;
;
;;
;;
;
;;
;
;
;
;
;;;
;
;
;
;
;;;
;
;
;
;;;
;
;
;
;;
;
;
;
;
;
;
;
;
;;;
;
;
;
;
;
;
;
;
;
;
;
;
;
;
;
;;
;
;;;
;
;;
;
;
;
;;;
;
;
;
;
;
;
;
;
;
;
;
;
;
;
;
;
;
;
;;;
;
;;;;;
;
;
;
;;
;
;
;
;
;
;;;
;
;
;
;
;
;
;
;;;
;
;
;;
;
;
;
;
;
;
;
;
;
;
;
;
;;
;
;
;
;
;
;
;
;;
;
;
;
;
;
;
;
;
;
;
;
;
;
;
;;;;
;
;
;
;
;
;
;
;;;
;
;
;
;
;
;
;
;
;
;
;;
;
;
;
;
;
;
;
;
;
;
;
;
;
;
;
;
;
;
;
;
;
;;
;
;
;
;
;
;
;
;
;
;
;
;
;
;
;
;
;
;;;
;;
;
;
;
;
;
;
;
;
;
;
;
;
;
;
;
;;
;
;
;;
;
;
;
;;
;
;
;
;
;
;
;
;
;
;
;
;
;
;
;
;
;
;
;
;
;
;;
;
;
;
;
;
;
;
;
;
;
;
;;;
;
;
;
;
;
;
;
;
;
;;;
;
;
;
;;;
;
;
;
;
;
;
;
;
;
RUN
LEAK
TIME
LIFE
FAST
CN1 CN2 CN3 CN4 CN5 CN6
SELECT
MENU
ENT
AUTO MANU
①
②
⑦
⑥
④③
⑤
⑨⑩⑧
⑪
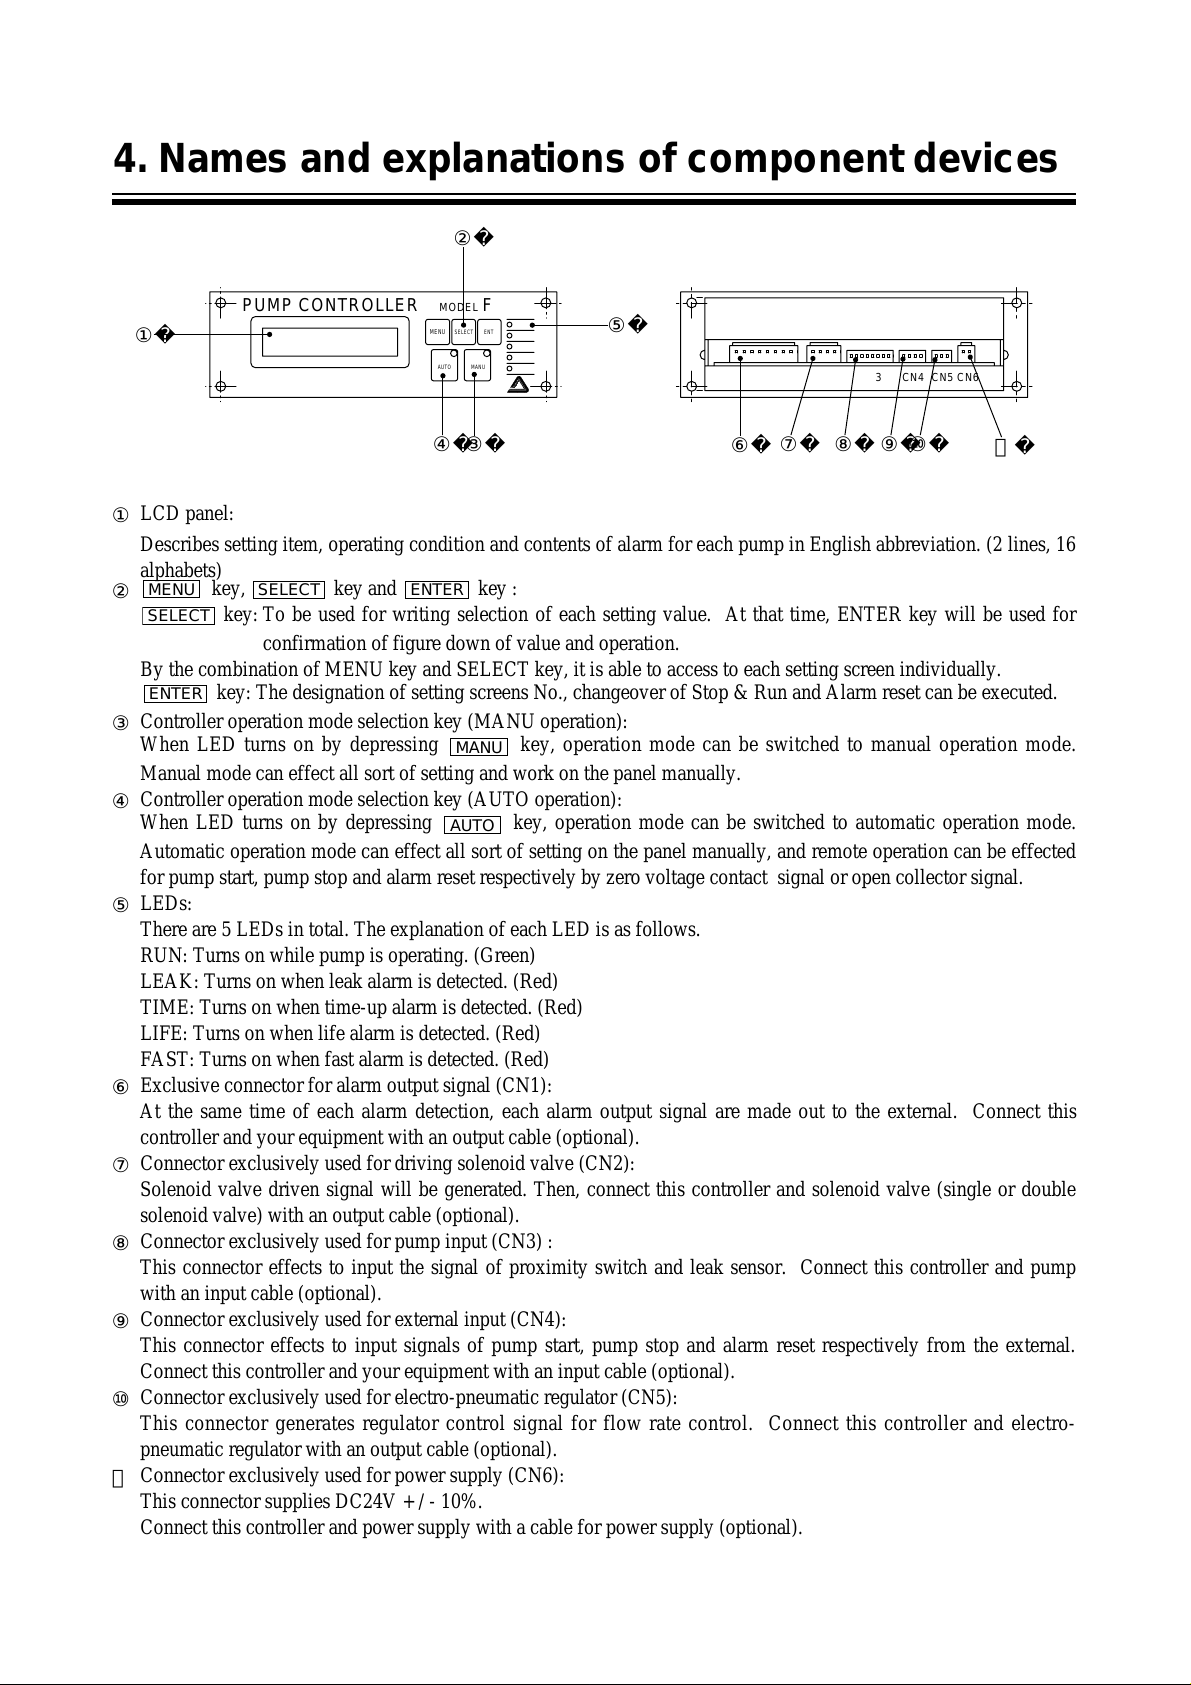
①
LCD panel:
Describes setting item, operating condition and contents of alarm for each pump in English abbreviation. (2 lines, 16
alphabets)
②
key, key and key :
key: To be used for writing selection of each setting value. At that time, ENTER key will be used for
confirmation of figure down of value and operation.
By the combination of MENU key and SELECT key, it is able to access to each setting screen individually.
key: The designation of setting screens No., changeover of Stop & Run and Alarm reset can be executed.
③
Controller operation mode selection key (MANU operation):
When LED turns on by depressing key, operation mode can be switched to manual operation mode.
Manual mode can effect all sort of setting and work on the panel manually.
④
Controller operation mode selection key (AUTO operation):
When LED turns on by depressing key, operation mode can be switched to automatic operation mode.
Automatic operation mode can effect all sort of setting on the panel manually, and remote operation can be effected
for pump start, pump stop and alarm reset respectively by zero voltage contact signal or open collector signal.
⑤
LEDs:
There are 5 LEDs in total. The explanation of each LED is as follows.
RUN: Turns on while pump is operating. (Green)
LEAK: Turns on when leak alarm is detected. (Red)
TIME: Turns on when time-up alarm is detected. (Red)
LIFE: Turns on when life alarm is detected. (Red)
FAST: Turns on when fast alarm is detected. (Red)
⑥
Exclusive connector for alarm output signal (CN1):
At the same time of each alarm detection, each alarm output signal are made out to the external. Connect this
controller and your equipment with an output cable (optional).
⑦
Connector exclusively used for driving solenoid valve (CN2):
Solenoid valve driven signal will be generated. Then, connect this controller and solenoid valve (single or double
solenoid valve) with an output cable (optional).
⑧
Connector exclusively used for pump input (CN3) :
This connector effects to input the signal of proximity switch and leak sensor. Connect this controller and pump
with an input cable (optional).
⑨
Connector exclusively used for external input (CN4):
This connector effects to input signals of pump start, pump stop and alarm reset respectively from the external.
Connect this controller and your equipment with an input cable (optional).
⑩
Connector exclusively used for electro-pneumatic regulator (CN5):
This connector generates regulator control signal for flow rate control. Connect this controller and electropneumatic regulator with an output cable (optional).
⑪
Connector exclusively used for power supply (CN6):
This connector supplies DC24V + / - 10%.
Connect this controller and power supply with a cable for power supply (optional).
AUTO
MANU
ENTER
SELECT
ENTER
SELECT
MENU
4. Names and explanations of component devices
Page 9
−7−
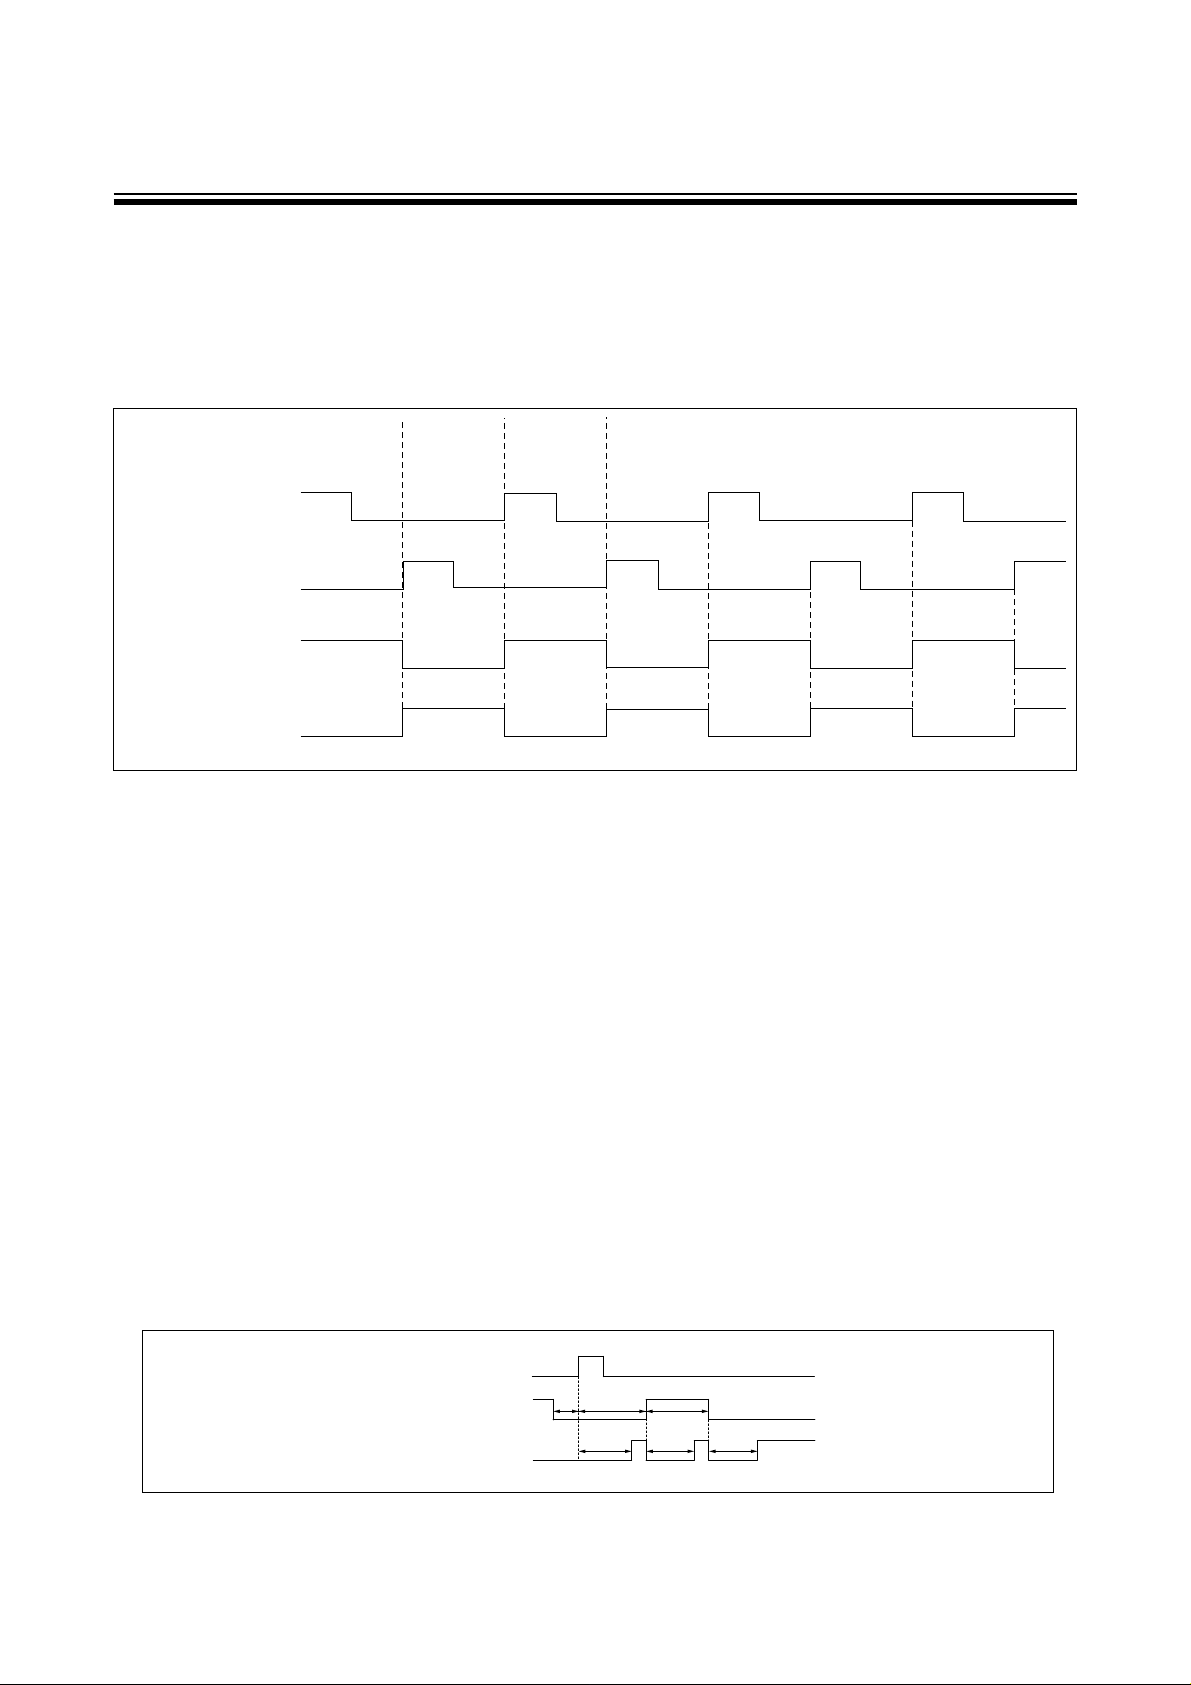
(1) Pump operation:
① When proximity switch R input is on, solenoid valve operation output keeps ON condition.
② Even if proximity switch R input is off, solenoid valve operation output keeps ON condition.
③ At the condition of proximity switch L input is on, solenoid valve operation output becomes off.
④ Then, until proximity switch R input comes on, solenoid valve operation output keeps off condition.
⑤ The above operations (①~④) shall be repeated in order.
②
①
Proximity switch L
Proximity switch R
Solenoid valve
operation output L
Solenoid valve
operation output R
(2) Flow rate control:
1 shot flow rate for F pump has been arranged; discharge capacity shall be “pump stroke rate times 1 shot flow rate”.
When the flow rate was set arbitrarily, stroke rate shall be converted automatically within the controller. Comparing
this converted stroke rate and operating cycle of proximity switch, which is effected to input into controller while
pump is operating, control voltage (DC0~10V) to Electro-pneumatic regulator (ER1) shall be adjusted. Varying
secondary air pressure of electro-pneumatic regulator (ER1), discharge capacity shall be controlled.
(3) Leak alarm:
This function effects to stop pump with alarm signal when pump brings about leakage.
It detects leakage and makes output signal by that leaked liquid conducts between electrodes (C1- C2 or D1-D2) of
which set up corresponding to each bellows (left and right).
Receiving this alarm, the controller effects warning, and put control signal off to Electro-pneumatic regulator
simultaneously. Then, it makes stop pump.
On this occasion, pneumatic pressure to drive inside of pump shall be released and becomes no-pressure only when
Electro-pneumatic regulator (optional) is being used.
(4) Time up alarm:
This function effect to alarm when pump stops or stroke speed becomes abnormally slow down for some reason.
Output for solenoid valve still keeps operating condition, though. Time set for criterion of warning shall be
executed on setting screen No.8.
It makes output as an alarm in case of whatever longer stroke time (t1, t2 and t3), than preset time t0. When all of
t1, t2 and t3 become shorter than t0, this alarm shall be reset automatically, and starts operation again.
5. Explanation of work
t1 t2
t3
t0 t0 t0
Proximity switch L
Proximity switch R
Time up alarm
Page 10

−8−
(5) Life alarm:
This function effects to alarm and notice when accumulated count number becomes beyond the fixed total count
number which was set manually.
Output for solenoid valve and Electro-pneumatic regulator (optional) still keep operating condition, though.
Total count number setting can be executed at setting screen No.9, and also, it is able to reset by manual reset or
reset signal from the externals. After input of reset, Life alarm detection is neglected for 2 minutes. After 2 minutes
past, it detects again if pump is operating condition.
(6) Fast alarm:
This function effects to alarm when pump stroke became abnormally faster than the preset stroke rate for some
reasons. Output for solenoid valve and Electro-pneumatic regulator (optional) still keep operating condition,
though.
Stroke rate setting for criterion of warning shall be executed on setting screen No.10.
If actual operating stroke becomes slower than the fixed stroke, then it resets automatically. Also it is able to reset
by reset signal from manual reset device. After reset signal input, it neglects detection for 2 minutes. After
2minuites, it may start again if it is in alarm condition.
① Possible to fix a specified flow rate control against the load fluctuation at discharge side.
② Possible to set flow rate freely.
③Possible to display stroke rate, flow rate and total count number while pump is operating.
④ In case of bellows broken, leak alarm will be output to the externals. Pump stops simultaneously with alarm output.
⑤ Possible to set necessary time set for 1 shot of pump operation. When the time for 1 shot of pump is beyond the
setting time, time up alarm will be output to the externals.
⑥ Possible to set total counts number of pump. When count number for 1 shot of pump is beyond the setting number,
life alarm will be output to the externals.
⑦ Possible to set maximum counts stroke rate. When count number for stroke is beyond the setting number while its
operation, first alarm will be outputting to the externals.
⑧ Possible to set alarm reset for start / stop of pump by signals from the externals.
⑨ Possible to select operation mode of controller from MANU and AUTO.
⑩ In case of proximity switch broken, possible to operate pump by timer mode until proximity switch is replaced.
6. Main functions
Page 11

−9−
SETUP
1. Installation.......................................... 10
2. Connection......................................... 10
Page 12

−10−
(1) Installation to instrument panels (see the illustration):
Fig. 4
• Cutout (W141 x H44mm) on instrument panel.
• Tap 4 screw holes (W148 x H38mm) for fitting.
• Insert the controller into the hole, and fix firmly with M4 screws.
• Install with enough room toward the depth.
PUMP CONTROLLER MODEL FDC-1
IWAKI
RUN
LEAK
TIME
LIFE
FAST
CN1 CN2 CN3 CN4 CN5 CN6
141
+1
0
148
±
0.3
4-φ4.5
4-φ4.5
44
+1
0
38±0.3
136
152
158
SELECT
MENU
ENT
AUTO MANU
148
38
48
42.3
(2)
1. Installation
WARNING
• Do not install or store at explosion atmosphere, such places causing particulate or corrosion
gases (such as chlorine gas).
It may cause fire or harm to human body.
2. Connection
Execute wiring and piping referring illustrations 5 & 6 of which shows electrical wiring of controller and piping
drawing of air and charts 2 ~ 7 as well as an instruction of pump.
Caution: In case of wrong wiring, it may cause breakdown or wrong operation of controller and
pump. Please pay special attention!
Page 13

−11−
CN 1
GND
GND
GND
CN 3
CN 2
◯
−
◯
+
LR
FA・FF・FH・FW・FS pump
C1
C2
D1
D2
SV
ER
CN 4
GND
CN 5
CN 6
GND
FR
Leak alarm
DC+24V output
Time up alarm
DC+24V output
Life alarm
DC+24V output
DC+24V output
Fast alarm
SV output R
DC+24V output
DC+24V output
SV output L
Leak detection input
DC+24V output
Proximity switch input R
DC+24V output
Proximity switch input L
Red (Brown)
White (Black)
Black (Blue)
Red (Brown)
White (Black)
Black (Blue)
Proximity switch
input R
Proximity switch
input L
Electrode
Electrode
Your device
External start input
External alarm reset input
Electro-pneumatic reguleter
DC+24V output
Electro-pneumatic reguleter
DC0-+10V output
Electro-pneumatic reguleter GND
DC+24V supply
GND supply
DC+24V
power source
SV: Electro-magnetic valve
(Single solenoid valve)
ER: Electro-pneumatic regulater
FR: Manual regulater
Note: L and R are in reverse for air piping of FS pump.
Fig. 5 Wiring for single solenoid valve.
Page 14

−12−
CN 1
CN 3
CN 2
◯
−
◯
+
LR
C1
C2
D1
D2
WSV
ER
CN 4
CN 5
CN 6
FR
Leak alarm
DC+24V output
Time up alarm
DC+24V output
Life alarm
DC+24V output
DC+24V output
Fast alarm
SV output R
DC+24V output
DC+24V output
SV output L
GND
GND
GND
Leak detection input
DC+24V output
Proximity switch input R
DC+24V output
Proximity switch input L
Red
(Brown)
White
(Black)
Black
(Blue)
Red
(Brown)
White
(Black)
Black
(Blue)
FA・FF・FH・FW・FS pump
Proximity switch
input R
Proximity switch
input L
Electrode
Electrode
GND
GND
External start input
External alarm reset input
Electro-pneumatic reguleter
DC+24V output
Electro-pneumatic reguleter
DC0-+10V output
Electro-pneumatic reguleter GND
DC+24V supply
GND supply
DC+24V
power source
WSV: Electro-magnetic valve
(Double solenoid valve)
ER: Electro-pneumatic regulater
FR: Manual regulater
Note: L and R are in reverse for air piping of FS pump.
Fig. 6 Wiring for double-solenoid valve.
Your device
Page 15

−13−
CN1 Chart 2
OUTPUT
Purpose of wiring Wiring objects
Pin No. Marker Tube No.
1P 1 Leak alarm
Connection between FDC-1 and
your equipment
2P 2 COM (DC+24V)
3P 3 Time up alarm
4P 4 COM (DC+24V)
5P 5 Life alarm
6P 6 COM (DC+24V)
7P 7 Fast alarm
8P 8 COM (DC+24V)
OUTPUT
Purpose of wiring
Pin No. Marker Tube No.
1P 9 Solenoid valve output R2P 10 Solenoid valve output R+
3P 11 Solenoid valve output L4P 12 Solenoid valve output L+
Connection between FDC-1 and
Solenoid valve (Note)
Wiring objects
Note: In case of connection with single solenoid, it is no matter to connect pin Nos. 3P and 4P
1P
2P
3P
4P
5P
6P
7P
8P
FDC-1 Controller inside
DC+24V
Fig. 7 Output scheme
Your equipment side
Inside circuit
CN2 Chart 3
Page 16

−14−
INPUT
Purpose of wiring
Pin No. Marker Tube No.
1P 21 External input (pump start, stop)
2P 22 GND
3P 23 External input (alarm reset)
4P 24 GND
Connection between FDC-1 and
your equipment
Wiring objects
(Brown) (Black) (Blue) : FH, FA type pump proximity switch
(Red) (White) (Black) : FF, FW, FS type pump proximity switch
Note: Proximity switch L & R signify Left and Right respectively from the view of pump inlet port.
For FH-40R, FA-40VE, L & R are Upper side and Lower side respectively.
INPUT
Purpose of wiring Wiring objects
Pin No. Marker Tube No.
1P 13 Leak sensor C1, D1
Connection between FDC-1 and
pump
2P
14 Leak sensor C2, D
2
3P 15 Proximity switch R (Brown) [Red]
4P 16 Proximity switch R (Black) [White]
5P 17 Proximity switch R (Blue) [Black]
6P 18 Proximity switch L (Brown) [Red]
7P
19 Proximity switch L (Black) [White]
8P 20 Proximity switch L (Blue) [Black]
CN3 Chart 4
CN4 Chart 5
1P
2P
3P
4P
DC+24V
NPN Open collector
Your equipment side
Start signal
Alarm reset signal
or
or
Potential free
contact
Inside of FDC-1
Same as above
Fig. 8 CN4 Input scheme
Inside
circuit
Page 17

−15−
INPUT
Purpose of wiring
Pin No. Marker Tube No.
1P 25 Power supply for Electro-pneumatic regulator (Red)
2P 26 Input signal for Electro-pneumatic regulator (White)
3P 27 GND for Electro-pneumatic regulator (Black)
Connection between FDC-1 and
Electro-pneumatic regulator
Wiring objects
INPUT
Purpose of wiring
Pin No. Marker Tube No.
1P 28 DC24V Power supply +
2P 29 GND
Connection between FDC-1 and
power supply (Note)
Wiring objects
Note: Please provides DC24V power supply with 1A or more.
CN5 Chart 6
Note: Wiring is not needed when electro-pneumatic regulator is not used.
CN6 Chart 7
Chart 8 Table of wiring devices
FDC-1 side
connector
Contact
Wire
Remarks
Cross section mm2AWG
CN1 VHR-8N BVH-21T-P1.1 0.5 20 8 wires, 5m or less
CN2 VHR-4N BVH-21T-P1.1 0.5 20 4 wires, 5m or less
CN3 XHP-8 BXH-001T-P0.6 0.3 22 8 wires, 5m or less
CN4 XHP-4 BXH-001T-P0.6 0.3 22 4 wires, 5m or less
CN5 XHP-3 BXH-001T-P0.6
0.3mm2, Outer dia. φ5.9 4 wires shield cord、5m or less
CN6 VHR-2N BVH-21T-P1.1 0.5 20 2 wires, 5m or less
Note 1: Use the connector and pin made by J.S.T. Mfg. Co., Ltd.
2: For the wiring of CN5, use Omron made XS2C-D422 as electro-pneumatic regulator side I/O connector. Refer
to Chart 9) for connection.
Chart 9 Wiring of electro-pneumatic regulator
FDC-1 side
connector
Electro-pneumatic regulator
side I/O connector
1P 1P
2P 4P
3P 3P
Note: Connect shield cord to 3P of FDC-1 side connector XHP-3.
Page 18

−16−
Caution
• Proximity switch cord of FF, FW and FS pumps consists of three wires of black, white and red. Wrong connection
of them will cause the failure of proximity switch.
Caution
1. Standard proximity switch can not be used to handle flammable liquid such as solvent or so. Ask IWAKI for
explosion-proof proximity switch.
2. Electrode can not be used to handle flammable liquid. If used, it may spark resulting in fire.
Caution
• Use power source of DC24V plus minus 10% range.
■Air piping
Figure 5 and 6 show electrical wiring and air piping schemes. Make the air piping according to following procedures
referring to the schemes.
(1) Precautions for air piping
a) Bad quality air will give bad influence to the performance and life of the equipments.
Supply clean air which contains no solid matters, water and oil.
b) Flush pipes before they are connected. When the seal tape is used for piping, pay attention so that the tape can be
get into the pipe.
c) Install a regulator before the electro-pneumatic regulator (option) and adjust supplied air pressure to get the stable
performance.
d) If the electro-pneumatic regulator is not used, connect pipe from manual regulator
(FR) on Fig. 5 and 6 to the solenoid valve.
Note: The secondary side set pressure of manual regulator must not exceed the max. supply air pressure of the pump.
Refer to the instruction manual of the used pump.
(Pay attention to the pumped liquid temperature range.)
(2) Piping of electro-pneumatic regulator
Install the electro-pneumatic regulator between the manual regulator and the solenoid valve. Refer to the
instruction manual of the electro-pneumatic regulator for details.
The first side set pressure of electro-pneumatic regulator : Between the max. supply air pressure of pump and the
max. supply air pressure of pump + 0.05 MPa (Pay attention to the pumped liquid temperature range.)
Page 19

−17−
OPERATION
1. How to operate................................... 18
2. How to set controller.......................... 18
3. Operation screen ............................... 21
4. Setting confirmation and
setting change procedure ........... 22
5. Pump operation.................................. 22
6. Alarm reset procedure ....................... 23
Page 20

−18−
1. How to operate
① Confirm if pump, solenoid valve, alarm devices and electro-pneumatic regulator are connected correctly each other,
and if it is connected DC24V as well.
(Adjust voltage to DC24V with the help of transformer if it is an abnormal voltage.)
② Supply air to preliminary inlet of electro-pneumatic regulator with manual regulator.
2-1 Flow of setting
Flow of setting is as follow.
Setting Pump Sensor
Power on
No. 1
No. 2
No. 3
No. 4
No. 5
No. 6
No. 7
No. 8
No. 9
No. 10
No. 11
Selecting Timer
NO
Selecting Sensor
YES
No. 3
No. 8
No. 9
No. 10
No. 11
No. 2
NO
No. 12
No. 3
No. 9
No. 11
No. 3
No. 9
No. 11
No. 12
YES
Setting Electro-pneumatic
regulator presence
Setting 1 shot of pump
discharge
Setting necessary pump
discharge
Setting maximum air supply
pressure for Electro-pneumatic
regulator
Completion of setting
(Control of constant discharge)
Setting key protect for setting
operation
Setting standard No. of stroke
of detection
Setting standard No. of count
of detection for Life alarm
Setting standard time of
detection for Time up alarm
Setting air supply pressure
when pump starts
Setting minimum air supply
pressure for Electro-pneumatic
regulator
Setting 1 shot of pump
discharge
Setting standard time of
detection for Time up alarm
Setting standard count number
of detection for Life alarm
Setting standard stroke rate of
detection for First alarm
Setting key protect for setting
operation
Completion of setting
(Normal operation)
Setting Electro-pneumatic
regulator presence
No. 5
No. 6
No. 7
Setting maximum air supply
pressure for Electro-pneumatic
regulator
Setting air supply pressure
when pump starts
Setting minimum air supply
pressure for Electro-pneumatic
regulator
Setting Pump stroke rate
Setting 1 shot of pump
discharge
Setting standard count number
of detection for Life alarm
Setting key protect for setting
operation
Completion of setting
(Timer mode)
Setting Pump stroke rate
Setting 1 shot of pump
discharge
Setting standard count number
of detection for Life alarm
Setting key protect for setting
operation
Completion of setting
(Timer mode)
2. How to set controller
Page 21

−19−
2-2 Setting
• Initial screen (At power on)
PUMPCONTROLLER
IWAKIPUMPS
After indicated on screen, it scrolls automatically to screen No.1.
• Setting screen No.1 (Setting the pump drive system)
1.DRIVEMODE
SENSOR?TIMER?
• The setting object mode is flickering.
• Select the setting object with key, and enter by key.
A specified flow rate control,Normal operation →SENSOR
→
Setting screen No.2
Timer mode →TIMER →Setting screen No.12
ENTER
SELECT
• Setting screen No.2 (Setting the presence of electro-pneumatic regulator)
2.E−PRegSET
Yes? No?
• The setting object mode is flickering.
• Select the presence (Y / N) of Electro-pneumatic regulator.
• Select the setting object with key, and enter by key.
A specified flow rate control →Yes →Setting screen No.3
Normal operation
→
No →Setting screen No.8
ENTER
SELECT
• Setting screen No.3 (Setting 1 shot discharge capacity of pump)
3.1Shotdcapa.
dc=****.*cc/shot
• Setting 1 shot discharge capacity of pump to ****.* area.
• Set 1 shot discharge capacity of each pump as shown in Chart 8.
•Every time depressing key, each input value is
sequentially indicated as 1 →2 →3
→
........
→9 →0 →
1
......
.
Then the required value can be settled by depressing ENTER key.
After the settlement of the first figure, by depressing ENTER key to
decrease the figure, and then input each required value as the same
step as above.
SELECT
Pump type Logical value of 1 shot discharge capacity [cc / shot]
FF-10H 93
FF-20H 185
FF-40H 500
FH-10R 85
FH-20R 190
FH-40R 500
FF-10 93
FF-20 204
FA-40VE 500
FW-20 200
FW-40 500
FW-80 1000
FS-15 63
FS-30 138
FS-60 284
Chart 10
Page 22

−20−
• Setting screen No.5 (Setting the maximum air pressure being supplied by Electro-pneumatic regulator)
5.E−PRegPres.
MAX.=0.**MPa
• Setting the maximum air pressure being supplied by Electropneumatic regulator in 0.** area.
• Input of value shall be processed as same as Setting screen No.3.
• Electro-pneumatic regulator supplies air as the setting value is to be
the upper limit.
• For the protection of pump, do not set the value exceeding the
maximum air pressure supply of pump.
• Setting screen No.6 (Setting the minimum air pressure being supplied by Electro-pneumatic regulator)
6.E−PRegPres.
MIN.=0.**MPa
• Setting the minimum air pressure being supplied by Electropneumatic regulator in 0.** area.
• Input of value shall be processed as same as Setting screen No.3.
• Electro-pneumatic regulator supplies air as the setting value must be
the lowest limit.
• Setting screen No.7 (Setting the air pressure being supplied at the start of pump operation)
7.STARTPres.
sp=0.**MPa
• Setting the required air pressure at the start of pump operation.
• Input of value shall be processed as same as Setting screen No.3.
• For the protection of pump, do not set the value exceeding the
maximum air pressure supply of pump.
• Setting screen No.8 (Setting the standard time of Time Up alarm detection)
8.TIMEUPALARM
T=**.*Sec
• Setting the standard time of Time Up alarm detection in **.* area.
• Input of value shall be processed as same as Setting screen No.3.
• In case pump operates slower than the setting value, then the alarm
will be output.
• Setting screen No.9 (Setting the standard count number of Life alarm detection)
9.LIFEALARM
L=****×100000count
• Setting the standard count number of Life alarm detection in ****
area.
• Input of value shall be processed as same as Setting screen No.3.
• In case pump operates exceeding the setting value, then the alarm
will be output.
• Setting screen No.10 (Setting the standard stroke rate of Fast alarm detection)
10.FASTALARM
F=***.*spm
• Setting the standard count number of Fast alarm detection in ***.*
area.
• Input of value shall be processed as same as Setting screen No.3.
• In case pump operates faster than the setting value, then the alarm
will be output.
• Setting screen No.4 (Setting the required flow rate of pump)
4.FLOWRATESET
fr
=***.*L/min
• Setting the required flow rate of pump in ****.* area.
• Input of value shall be processed as same as Setting screen No.3.
• For the protection of pump, do not set the value exceeding the
maximum discharge capacity.
Page 23

−21−
• Setting screen No.11 (Setting the key protect of setting operation)
11.KEYPROTECT
Yes? No?
• Setting the key protect of setting operation.
• This function is to prevent the setting change by wrong operation
once the setting has been executed.
• The selection procedure shall be the same as Setting screen No.2.
• When it is necessary to change the setting, refer “4-2 Setting
change”.
• Setting screen No.12 (Setting the stroke rate at Timer mode)
12.STROKERATE
SR=***.*spm
• Setting the pump stroke rate at Timer mode.
• This function is to operate ON/OFF of the solenoid valve
compulsory, so as to become the settled stroke number.
• Pump may operate intermittently depending on stroke rate to be set.
• Setting screen No.13 (Reset of the accumulation count of pump)
13.COUNTRESET
Yes? No?
• This function is used whenever it is required to reset the
accumulation count, in case of changing pump, etc.
• The selection procedure shall be the same as Setting screen No.2.
• Unless the accumulation count is not to be reset at changing pump,
etc., the Life alarm may alert.
Stroke rate, flow rate and accumulation count can be displayed on LCD screen of controller.
PUMPSTROKE
***.*spm
FLOWRATE
**.*L/min
TOTALCOUNTS
*********counts
• Display of stroke rate
• Display of accumulation count
SELECT
• Display of flow rate
Press key
SELECT
Press key
SELECT
Press key
3. Operation screen
Page 24

−22−
4. Setting confirmation and setting change procedure
4-1 Setting confirmation:
Confirm if the screen is the operation screen, then press key.
LCD screen of the controller is displayed as shown left. Then, input
[01] in “No. **” area.
Input of value shall be processed as same as Setting screen No.3.
Every time pressing key, display comes out in the order of
setting. If it is necessary to confirm each screen individually, input the
required setting screen No. into the “No.**” area.
ENTER
MENU
CHANGENo.
No.**
4-2 Setting change:
In case of setting the key protect for setting operation, it is able to
cancel the key protect for setting operation using key +
key in the operation screen. After the cancellation, press
key. Then LCD screen of the controller displays as
mentioned left.
Input the required Setting screen No. into “No.**”.
Input of value shall be processed as same as setting screen No.3.
If “01” is input, all of setting are reset again.
MENU
ENTER
SELECT
CHANGENo.
No.**
After the completion of cancel procedure, LCD screen of the
controller displays as mentioned left and the operation screen is
automatically displayed.
Note : After the change is done, set the key protect according to
setting screen No.11.
CHANGEOK!!
5-1 Manual operation (if necessary) :
Confirm if the screen shows the operation mode.
Confirm that LED of key lights on, and then press
key.
LCD screen of the controller displays as mentioned left.
Select START or STOP by key, and then enter by
key.
Select START?
...................
pump start
Select STOP?
......................
pump stop
ENTER
SELECT
ENTER
MANU
14.DRIVEMODE
START? STOP?
5-2 Automatic operation (If it is necessary to operate from your equipment using an
external signal)
Non-voltage contact signal or open collector signal from the externals can operate this controller, as well.
Automatic operation for pump start, pump stop and alarm reset are available by an external signal.
Confirm if the screen displays the operation mode.
Automatic operation is practicable if LED of key lights on when pressed key.
AUTO
AUTO
5. Pump operation
Page 25

−23−
When each alarm (leak alarm, time up alarm, life alarm and fast alarm) outputs, LED corresponding to each alarm lights
on and displayed on LCD screen of the controller as mentioned below.
LEAK ALARM TIME UP ALARM LIFE ALARM FAST ALARM
Leak alarm
Time up alarm
Life alarm Fast alarm
RESET
RESET
RESET RESET
6. Alarm reset procedure
In case of LED of key lights on, by depressing key, alarm shall be reset.
In case of LED of key lights on, non-voltage contact signal or open collector signal from the externals shall
reset alarm.
Other work shall not be accepted until all of alarms are released.
AUTO
ENTER
MANU
5-3 To change operation mode
Press key and key simultaneously to release the key protection. After the protection is released,
press either key or key to change to operation mode. After the change, set the key protection
according to item 4-2 “setting change” on page 22.
AUTO
MANU
ENTER
SELECT
WARNING
• When the pump is stopped and air piping is removed or bolts on pump are loosened, it may
happen the inside liquid spauts due to the residual pressure. Pay attention to liquid spauting.
Page 26

−24−
MAINTENANCE
1. Troubleshooting ................................. 25
Page 27

−25−
1. Troubleshooting
Symptom Causes Check point & countermeasure
Pump does not start Defective electrical
wiring line
Confirm wiring between FDC-1 and solenoid valve for pump.
Confirm wiring between FDC-1 and proximity switch.
NO and NC proximity sensor of pump supply are being input to FDC-1
as right and left reversed.
Defective pump proximity sensor.
After power on to FDC-1, confirm output voltage of proximity sensor
without supplying air to pump.
FF pump: voltage between white and black is approx. 24V.
FH, FA pump: voltage between black and blue is approx. 24V.
FS pump: voltage between white and black is approx. 24V.
FW pump: voltage between white and black is approx. 24V.
If the above voltages close to 0V, it seems defective.
Electrode (leak sensor) is conducted.
The sequence is arranged to let inter-lock work among pump, FDC-1
and equipment when pump starts.
Defective air piping
line
Air supply is not provided correctly to the preliminary (IN) side of
Electro-pneumatic regulator EV2000.
Defective solenoid valve.
Minimum air pressure for drive becomes higher due to solenoid valve
run down.
Exhaust outlet of solenoid valve or QEV is covered or closed.
Wrong IN and OUT connection of Electro-pneumatic regulator
EV2500.
Wrong IN and OUT connection of QEV.
Air piping for pilot is not arranged in spite of using solenoid valve for
external pilot way.
Defective liquid
piping line
Liquid valve installed at both sides of pump inlet and outlet are closed.
The sequence is arranged for not to open liquid valve when pump starts
Sufficient filtration size is not secured and it becomes high load due to
entangled filter by air.
Pump stops soon
after it starts.
Time up alarm
outputs.
Improper setting
Too little flow rates.
Resettle value of setting screen No.4.
When the pump discharge side pressure gets lower, the flow control
function of FDC-1 lowers the supply air pressure. When the air
pressure gets lowered, it may happen the pump stops because enough air
pressure to drive the pump can not be kept. If this happens, change the
value on Setting screen No. 6 on page 20 to the value at which the pump
can not stop.
Confirm wiring between FDC-1 and Electro-pneumatic regulator
EV2500.
Page 28

−26−
Symptom
Causes Check point & countermeasure
Leak alarm comes
out so often.
Broken bellows Check and change pump, if necessary.
Water included in
air supplied
Drop of water mixed in pump cylinder.
Condensation of air
piping.
Pinhole of bellows.
Electrodes are conducted by condensed drop of water. (short circuited)
Check and change pump, if necessary.
Time up alarm
comes out so often.
Solenoid valve run
down
Minimum air pressure of solenoid valve becomes higher.
Air pressure to pump
becomes lower and
fluctuates.
Confirm if air is supplied correctly to preliminary side of EV2500.
Setting value in
setting screen No. 6
is too small.
Change setting value.
Fast alarm comes
out.
Pump stroke
exceeds pump spec.
It occasionally outputs at the initial starting of pump or idling at
changing liquid medicine.
Max stroke alarm may output when pump stroke exceeds stroke rate of
spec. after 10 sec., after pump started.
Take measure for your equipment so that the alarm can not be activated.
Bubbles are
mingled suddenly
during pump
operation.
(especially foamy
liquid)
Take measure for bubble not to be mingled.
Pump stops when
some alarm outputs.
Improper sequence
at equipment side.
When alarm was recognized at equipment side, equipment side will stop
pump. Function to stop pump by output of alarm effects only for leak
alarm.
Page 29

T438 01/06
( )Country codes
IWAKI CO.,LTD.
6-6 Kanda-Sudacho 2-chome Chiyoda-ku Tokyo 101-8558 Japan
TEL:(81)3 3254 2935 FAX:3 3252 8892(http://www.iwaki-pumps.co.jp/)
U.S.A. : IWAKI WALCHEM Corporation
Australia : IWAKI Pumps Australia Pty. Ltd.
Singapore : IWAKI Singapore Pte. Ltd.
Indonesia : IWAKI Singapore (Indonesia Branch)
Malaysia : IWAKIm Sdn. Bhd.
Taiwan : IWAKI Pumps Taiwan Co., Ltd.
Thailand : IWAKI (Thailand) Co.,Ltd.
Hong Kong : IWAKI Pumps Co., Ltd.
China : IWAKI Pumps Co., Ltd. (Guangzhou office)
China : IWAKI Pumps Co., Ltd. (Beijing office)
China : IWAKI Pumps (Shanghai) Co., Ltd.
Philippines : IWAKI Chemical Pumps Philippines, Inc.
Korea : IWAKI Korea Co.,Ltd.
TEL : (1)508 429 1440 FAX : 508 429 1386
TEL : (61)2 9899 2411 FAX : 2 9899 2421
TEL : (65)763 2744 FAX : 763 2372
TEL : (62)21 392 8288 FAX : 21 392 8088
TEL : (60)3 703 8807 FAX : 3 703 4800
TEL : (886)2 2776 5900 FAX : 2 2740 2812
TEL : (66)2 320 1303 FAX : 2 322 2477
TEL : (852)2 607 1168 FAX : 2 607 1000
TEL : (86)20 8130 0605 FAX : 20 8130 0601
TEL : (86)10 6442 7713 FAX : 10 6442 7712
TEL : (86)21 5234 0776 FAX : 21 5234 0775
TEL : (63)2 888 0245 FAX : 2 843 3096
TEL : (82)2 3474 0523 FAX : 2 3474 0221
Germany : IWAKI EUROPE GmbH
Italy : IWAKI Italia S.R.L.
Denmark : IWAKI Pumper A/S
Sweden : IWAKI Sverige AB
Finland : IWAKI Suomi Oy
Norway : IWAKI Norge AS
France : IWAKI France S.A.
U.K. : IWAKI PUMPS (UK) LTD.
Switzerland: IWAKI (Schweiz) AG
Austria : IWAKI (Austria) GmbH
Holland : IWAKI Holland B.V.
Spain : IWAKI Iberica Pumps, S.A.
Belgium : IWAKI Belgium n.v.
TEL : (49)2154 9254 0 FAX : 2154 1028
TEL : (39)02 990 3931 FAX : 02 990 42888
TEL : (45)48 24 2345 FAX : 48 24 2346
TEL : (46)8 511 72900 FAX : 8 511 72922
TEL : (358)9 2742714 FAX : 9 2742715
TEL : (47)66 81 16 60 FAX : 66 81 16 61
TEL : (33)1 69 63 33 70 FAX : 1 64 49 92 73
TEL : (44)1743 231363 FAX : 1743 366507
TEL : (41)32 3235024 FAX : 32 3226084
TEL : (43)2236 33469 FAX : 2236 33469
TEL : (31)297 241121 FAX : 297 273902
TEL : (34)943 630030 FAX : 943 628799
TEL : (32)1430 7007 FAX : 1430 7008
 Loading...