

Page 1
Operating Instructions
HMC300
6 720 808 471-00.1O
EMS plus
Control unit
6 720 813 192 (2014/10)
Page 2

2
Contents
HMC300 – 6 720 813 192 (2014/10)
Contents
Key to symbols and safety instructions . . . . . . . . . . . . . . . .3
1.1 Key to symbols . . . . . . . . . . . . . . . . . . . . . . . . . . . 3
1.2 General safety instructions . . . . . . . . . . . . . . . . . 3
2 Product data . . . . . . . . . . . . . . . . . . . . . . . . . . . . . . . . . . 4
2.1 Functions . . . . . . . . . . . . . . . . . . . . . . . . . . . . . . . 4
2.2 Functionality of the control unit . . . . . . . . . . . . 4
2.3 Operation after power failure . . . . . . . . . . . . . . . 4
3 Overview of buttons and symbols . . . . . . . . . . . . . . . . 5
4 Quick manual . . . . . . . . . . . . . . . . . . . . . . . . . . . . . . . . . . 9
4.1 Select heating circuit for initial menu . . . . . . . . . 9
4.2 Setting of operating mode . . . . . . . . . . . . . . . . . . 9
4.3 Change room temperature . . . . . . . . . . . . . . . . 10
4.4 Additional settings . . . . . . . . . . . . . . . . . . . . . . . 11
4.5 Favourite functions . . . . . . . . . . . . . . . . . . . . . . 12
5 Use the main menu . . . . . . . . . . . . . . . . . . . . . . . . . . . . 13
5.1 Overview of main menu . . . . . . . . . . . . . . . . . . . 14
5.2 Adjust settings for automatic operation of house
heating . . . . . . . . . . . . . . . . . . . . . . . . . . . . . . . . 15
5.3 Change settings for heating hot water . . . . . . . 19
5.4 Settings for heated pool . . . . . . . . . . . . . . . . . . 24
5.5 Settings for extra heat source
(additional heat) . . . . . . . . . . . . . . . . . . . . . . . . 24
5.6 Set holiday program . . . . . . . . . . . . . . . . . . . . . 25
5.7 Adjust settings for hybrid system . . . . . . . . . . . 28
5.8 General settings . . . . . . . . . . . . . . . . . . . . . . . . . 29
6 Get information on the system . . . . . . . . . . . . . . . . . . 29
7 Energy saving tips . . . . . . . . . . . . . . . . . . . . . . . . . . . . . 35
8 Common questions . . . . . . . . . . . . . . . . . . . . . . . . . . . . 36
9 Rectify operating fault . . . . . . . . . . . . . . . . . . . . . . . . . 37
9.1 Rectify “experienced” fault . . . . . . . . . . . . . . . . 37
9.2 Rectify shown operating fault . . . . . . . . . . . . . . 38
10 Environment / disposal . . . . . . . . . . . . . . . . . . . . . . . . 40
Page 3
3
Key to symbols and safety instructions
HMC300 – 6 720 813 192 (2014/10)
1 Key to symbols and safety
instructions
1.1 Key to symbols
Warnings
The following keywords are defined and can be used in this
document:
• NOTICE indicates a situation that could result in damage to
property or equipment.
• CAUTION indicates a situation that could result in minor to
medium injury.
• WARNING indicates a situation that could result in severe
injury or death.
• DANGER indicates a situation that will result in severe
injury or death.
Important information
Additional symbols
1.2 General safety instructions
These instructions are intended for the user of the heating
system
▶ Read the instructions (for heat source, modules etc.)
before use and keep them handy.
▶ Pay attention to the safety and warning instructions.
Intended use
▶ The product should only be used to control heating systems
in one-family houses.
All other use is not suitable. We cannot accept liability for
damages resulting from unauthorised use.
Safety of electrical appliances for domestic use and similar
purposes
The following requirements apply in accordance with EN
60335-1 in order to prevent hazards from occurring when
using electrical appliances:
“This device can be used by children of 8 years and up as well
and by people with reduced physical, sensory or mental
capabilities or lacking in experience and knowledge, if they are
supervised and have been given instruction in the safe use of
the device and understand the resulting dangers. Children
must not play with the device. Cleaning and user maintenance
may not be performed by children without supervision”
“If the power supply cable is damaged, in order to avoid risks it
must be replaced by the manufacturer or its customer service
department or a similarly qualified person.”
Inspection and maintenance
Inspection and maintenance at regular intervals is essential for
safe and environmentally-friendly operation of the heating
system.
▶ Only allow authorised installers to work on the product.
▶ Rectify any confirmed faults immediately.
Damage caused by frost
If the system is not in operation it can freeze:
▶ Follow the instructions to ensure protection from freezing.
▶ Always keep the system switched on for additional
functions, such as heating hot water or protection from
blocking.
▶ Rectify operating faults immediately.
Risk of scalding at the hot water draw-off points
▶ If hot water temperatures above 60 °C are set or if thermal
disinfection is activated, a mixer must be installed. If in
doubt, ask your contractor.
Warnings in this document are identified by
a warning triangle printed against a grey
background.
Keywords at the start of a warning indicate
the type and seriousness of the ensuing risk
if measures to prevent the risk are not taken.
This symbol indicates important information
where there is no risk to people or property.
Symbol Explanation
▶ Step in an action sequence
Cross-reference to another part of the
document
• List entry
– List entry (second level)
Table 1
Page 4

4
Product data
HMC300 – 6 720 813 192 (2014/10)
2 Product data
With the help of the HPC400 (Procontrol 600) control unit it is
easy to control the heat pump.
You select the required room temperature in your home by
turning the menu dial. The thermostat valves on the radiators
should normally be fully open, but can be adjusted if it gets too
cold or hot in one room.
The optimised operating mode ensures the efficient use of
energy. Heating and cooling are controlled to ensure optimum
comfort with the minimum possible consumption of energy.
The heating of hot water can easily be set, and then requires
few adjustments.
2.1 Functions
The number of functions and the menu structure on the control
unit depend upon how the system is built up.
• Settings for different heating and cooling circuits are only
accessible if two or more heating/cooling circuits are
installed.
• Information on the solar heating system is only shown if a
solar heating system is installed.
There are references to indicate that functions are related to
the structure of the system where this is relevant. The range of
settings and default settings vary, depending on which system
has been installed and can deviate from the information in
these operating instructions.
Consult your installer if you have any additional questions.
2.2 Functionality of the control unit
Cooling is disabled in the UK model to
comply with the regulations for RHI.
The control unit can control up to four heating/cooling circuits.
In heating mode the control unit works with one of the main
control modes in each heating circuit. Depending on your
requirements, the installer selects one of these and sets it.
The main control modes for heating are:
• Outdoor temperature controlled:
– Control of room temperature in relation to outdoor
temperature
– The control unit adjusts the flow temperature
according to a simplified or optimised heat curve.
• Outdoor temperature controlled with input from room
temperature:
– Control of room temperature on the basis of outdoor
temperature and measured room temperature. The
room unit actuates the flow temperature on the basis of
the measured and required room temperature.
– The control unit adjusts the flow temperature
according to a simplified or optimised heat curve.
2.3 Operation after power failure
In the event of a power failure, or periods with disconnected
heat source, no settings are lost. The control unit starts again
when the power returns. It may be necessary to redo the
settings for the time and date. No other settings are necessary.
For outdoor temperature controlled
adjustment with input from room temperature
the following applies:
The thermostat valves in the reference room
(the room where the room unit is installed)
must be fully open.
Page 5

5
Overview of buttons and symbols
HMC300 – 6 720 813 192 (2014/10)
3 Overview of buttons and symbols
Fig. 1 Buttons
[1] Favourites button
[2] Extra hot water button
[3] Hot water button
[4] Menu button
[5] Info button
[6] Return button
[7] Menu dial
fav
info
menu
6 720 810 300-01.1O
5
6
7
4
2
3
1
If the display is off it goes on when a button is
used, and the respective function is carried
out. A short tap on the menu dial will only light
up the display. The display goes off
automatically if no buttons are used.
Page 6

6
Overview of buttons and symbols
HMC300 – 6 720 813 192 (2014/10)
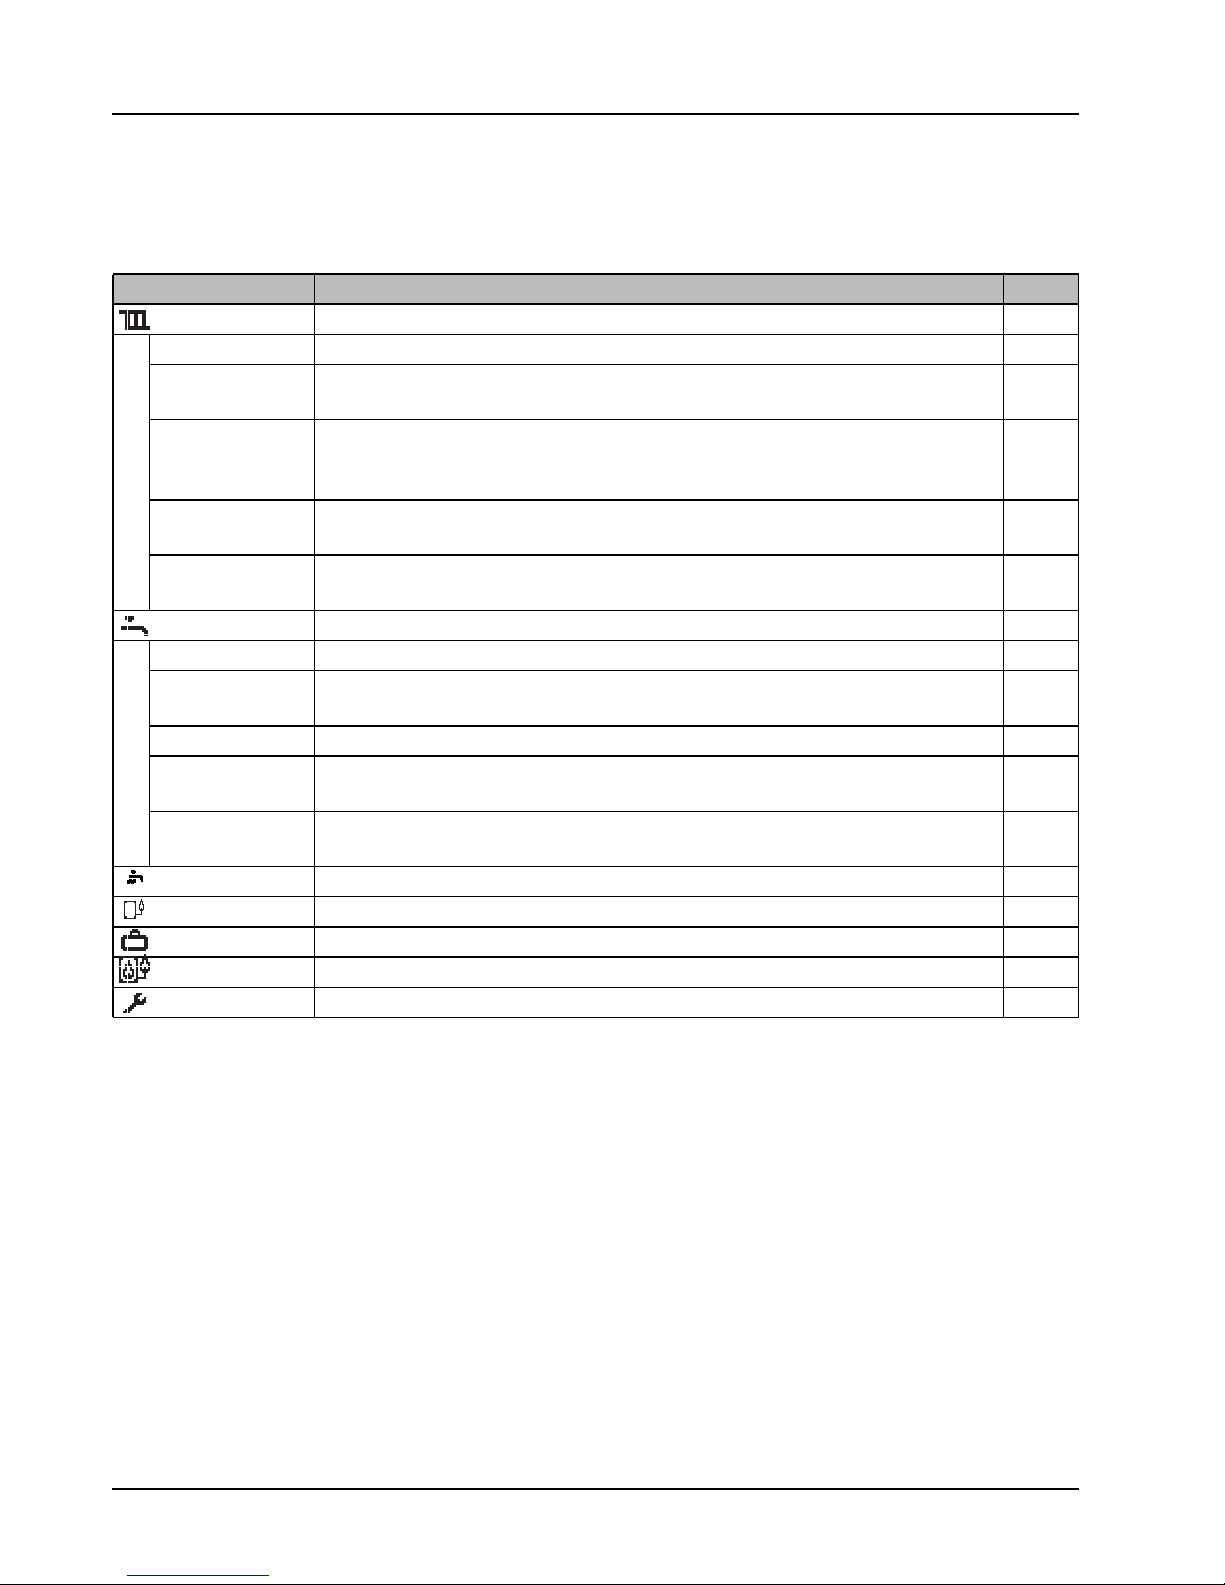
image 1, page 5
Pos. Button Designation Explanation
1 Favourites
button
▶ Press this button to show favourite functions for heating circuit 1.
▶ Keep this button pressed to adjust the favourites menu ( chapter 4.5, page 12).
2 Extra hot water
button
▶ Press to activate or deactivate extra hot water ( chapter 4.4, page 11).
3 Hot water
button
▶ Press this button to open the menu Hot water ( chapter 4.4, page 11).
4 Menu button ▶ Press this button to open the main menu ( chapter 5, page 13).
5 Info button When a menu is shown:
▶ Press the button show more information on the selected menu option.
When the initial menu is open:
▶ Press the button to open the information menu ( chapter 6, page 29).
6 Return button ▶ Press this button to return to the main menu, or to delete the changed value.
When maintenance is due, or a fault has been confirmed:
▶ Press the button to switch between the initial menu and the fault message.
▶ Keep the button pressed to switch from a menu to the initial menu.
7 Menu dial ▶ Turn the menu dial to change a set value (e.g. temperature) or to select a menu or
menu option.
When the display is off:
▶ Press the menu dial to switch on the display.
When the display is on:
▶ Press the menu dial to open a selected menu or a selected menu option, to confirm a
set value (e.g. temperature) or a message, or to close a popup window.
When the initial menu is open:
▶ Press the menu dial to activate the input box for selection of heating circuit in the
initial menu (only applies to systems with at least two heating circuits,
chapter 4.1, page 9).
Table 2 Buttons
fav
menu
info
Page 7
7
Overview of buttons and symbols
HMC300 – 6 720 813 192 (2014/10)
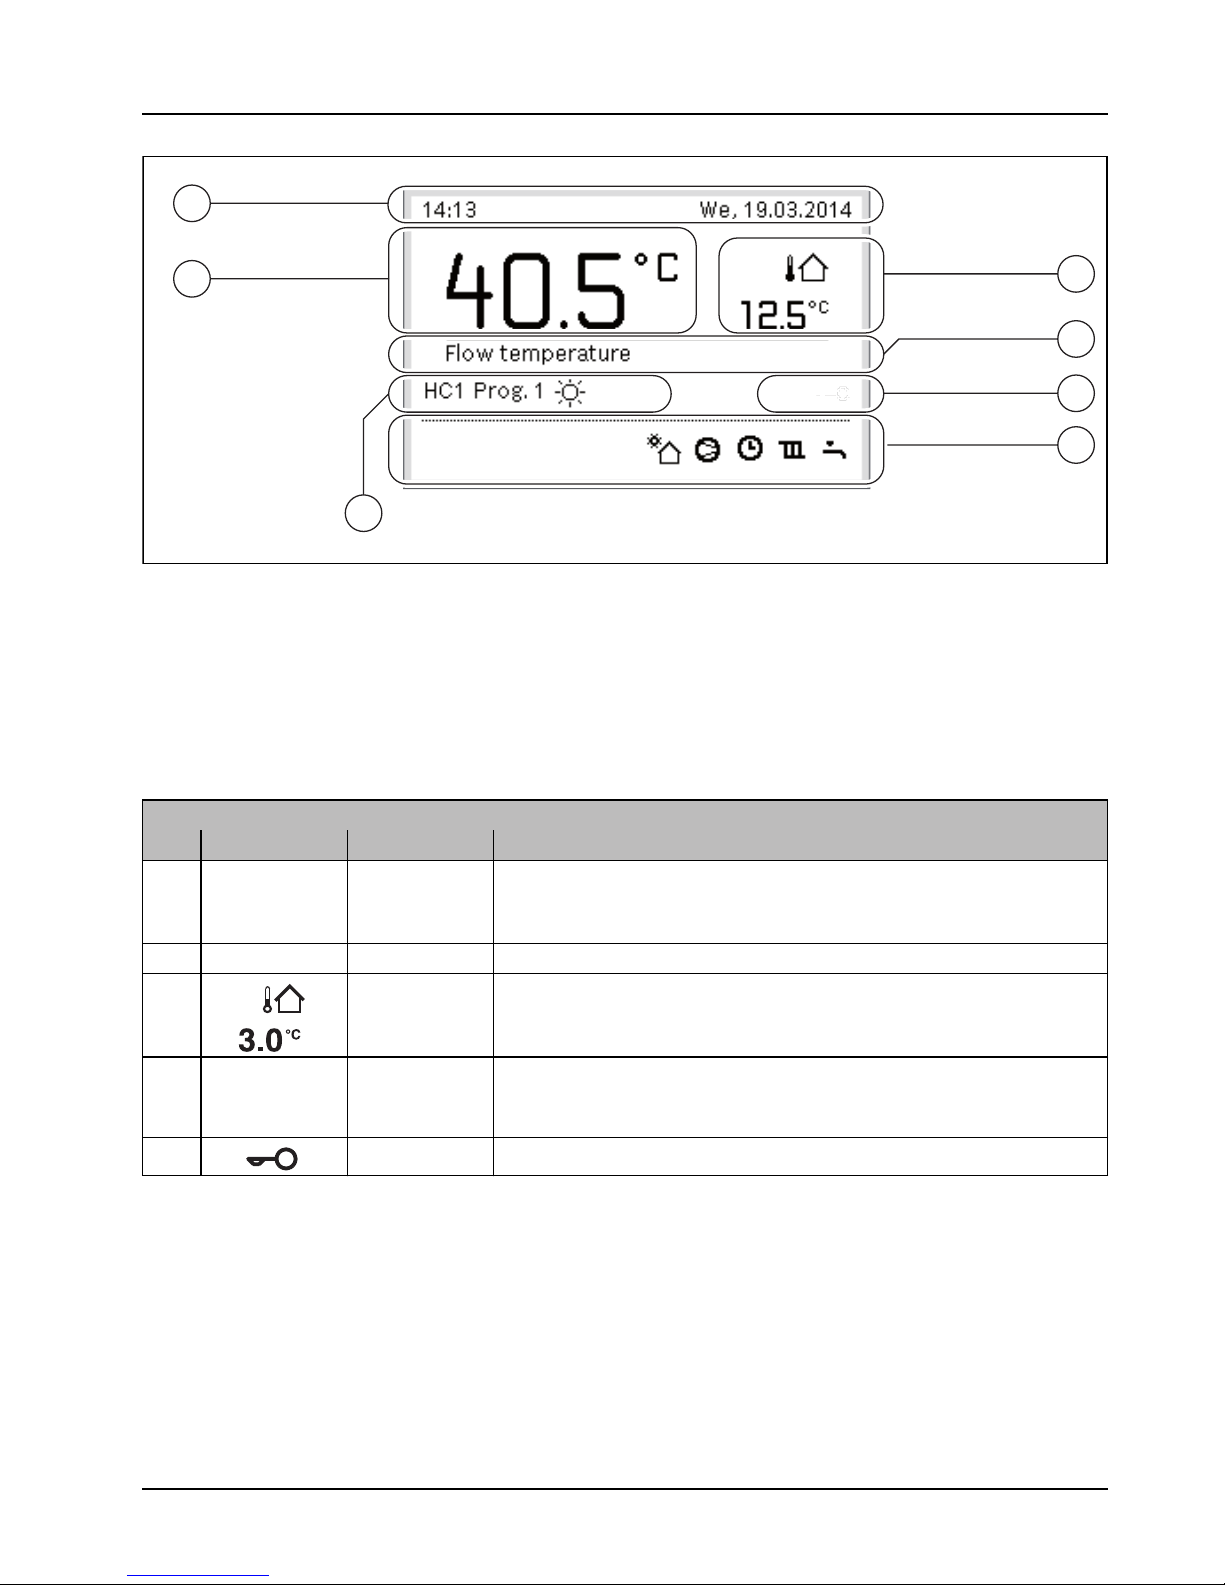
Fig. 2 Example of what the initial menu looks like on a system with several heating circuits.
[1] Temperature
[2] Information line
[3] Outdoor temperature
[4] Information text
[5] Button lock
[6] Information graphics
[7] Operating mode
6 720 811 136-01.1O
6
1
3
7
2
4
5
image 2, page 7
Pos. Symbol Designation Explanation
1 Temperature • Display of flow temperature or
• room temperature if a room unit for the heating circuit shown has been
installed.
2 – Information line The week day and date are shown here.
3 Display of other
temperature
An additional temperature, e.g. outdoor temperature, solar panel temperature or
temperature in the hot water system, is shown here (read more about this on
page 29).
4 – Information text E.g. designation for the temperature being shown ( image 2, [1]). If an
operating fault occurs a message will be shown here until the fault has been
rectified.
5 Button lock The button lock is activated if the key is shown.
Table 3 Symbols in initial menu
Page 8

8
Overview of buttons and symbols
HMC300 – 6 720 813 192 (2014/10)
6 Information
graphics
Information symbols are shown here, which inform the user of which functions
are active in the system.
Hot water heating active
Thermal disinfection (hot water) active
Function for extra hot water active
Pool heating active
House heating active
Cooling active
Failure caused by power company
External input closed (Remote control)
Holiday function active
Time program – program 1 or 2 for house heating active
Function for Smart Grid activated
Drying active
Additional electric heat active
Power guard active
External heat source (additional heat) active
Defrosting function active
Heat pump working
Solar circuit pump working
7 Optimised Operating mode
Program 1 The house heating follows the time program active in the respective heating
circuit. The house heating switches between heating mode and temperature
reduction mode at the set times.
Program 2
Heating mode in displayed heating circuit active
Temperature reduction mode in displayed heating circuit active
image 2, page 7
Pos. Symbol Designation Explanation
Table 3 Symbols in initial menu
Page 9
9
Quick manual
HMC300 – 6 720 813 192 (2014/10)
4 Quick manual
On page 13 there is an overview of the structure of the main
menu and the individual menu option positions.
The following descriptions are based on the initial menu
( image 2, page 7).
4.1 Select heating circuit for initial menu
Information for one single heating circuit is always shown in the
initial menu. If two or more heating circuits are installed it is
possible to set which heating circuit the initial menu is to show
information on.
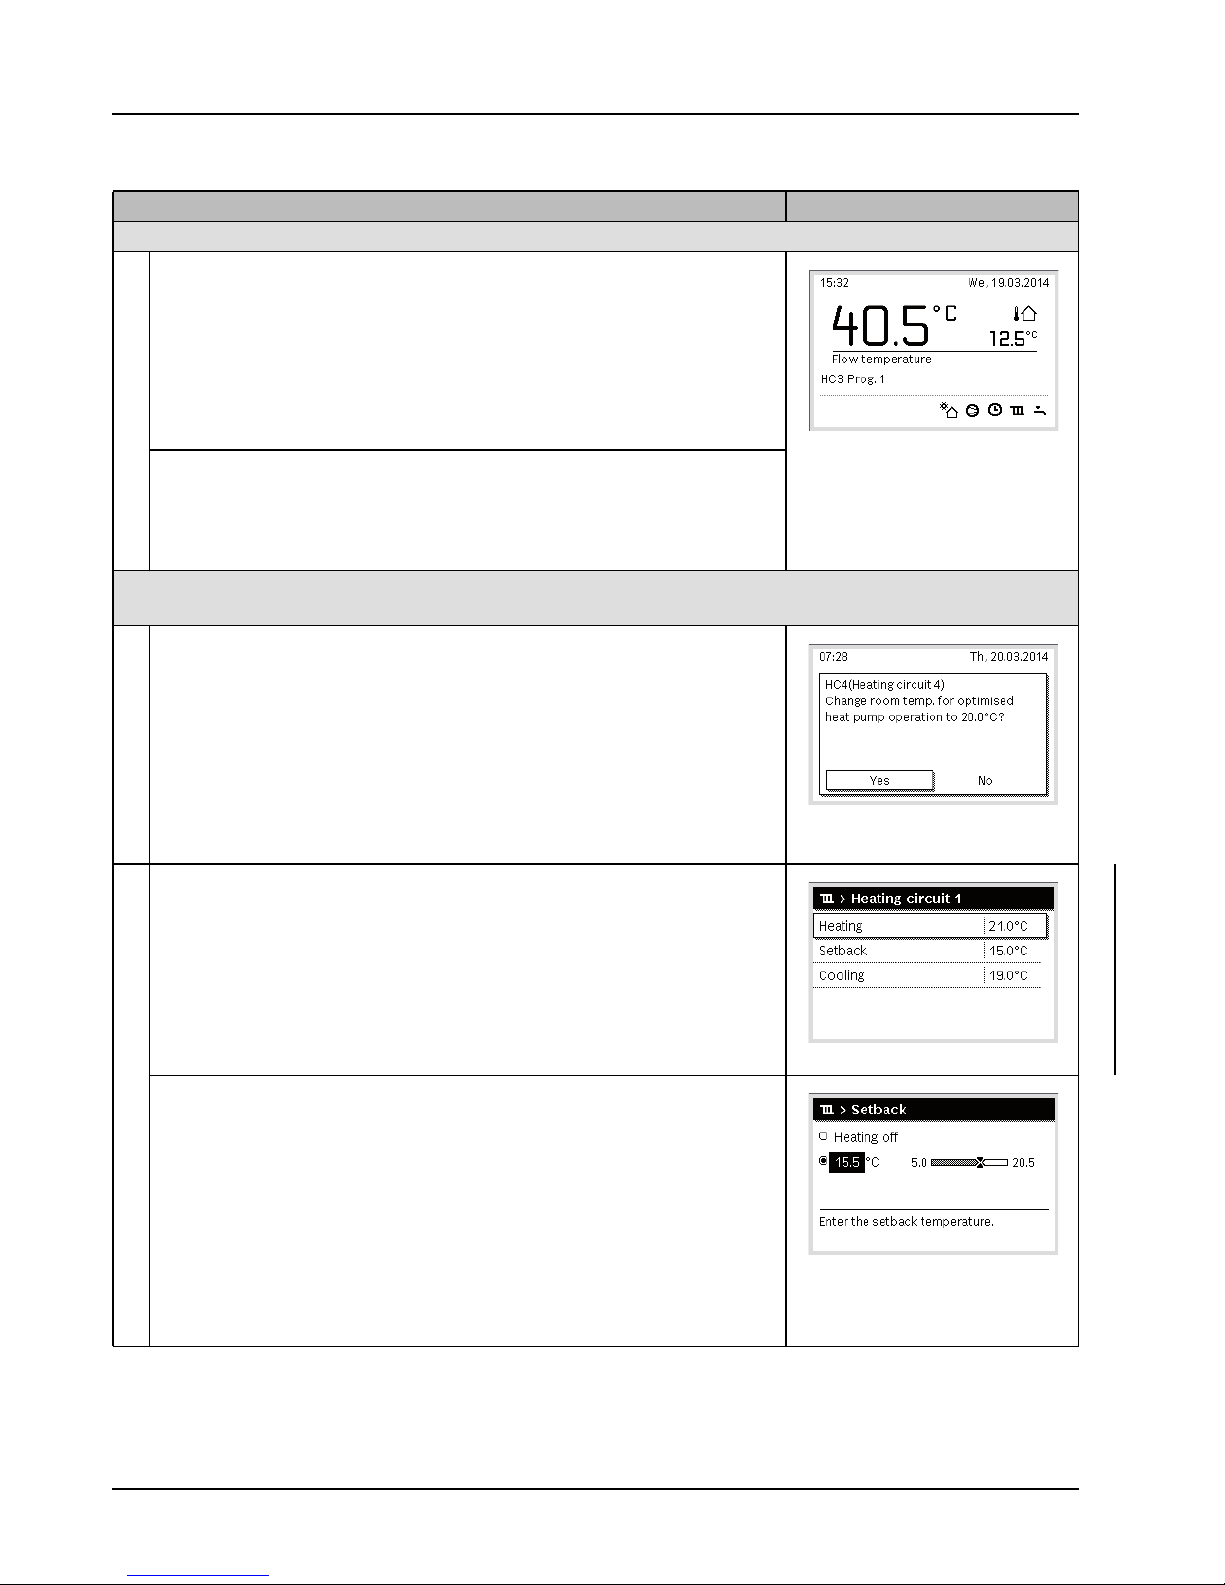
4.2 Setting of operating mode
Cooling is disabled in the UK model to
comply with the regulations for RHI.
Explanation of concepts“operating mode”, “automatic mode”
and“optimised operation” are on page 40 and 41. Optimised
operation is active with the default settings, because this mode
ensures the most efficient operation of the heat pump.
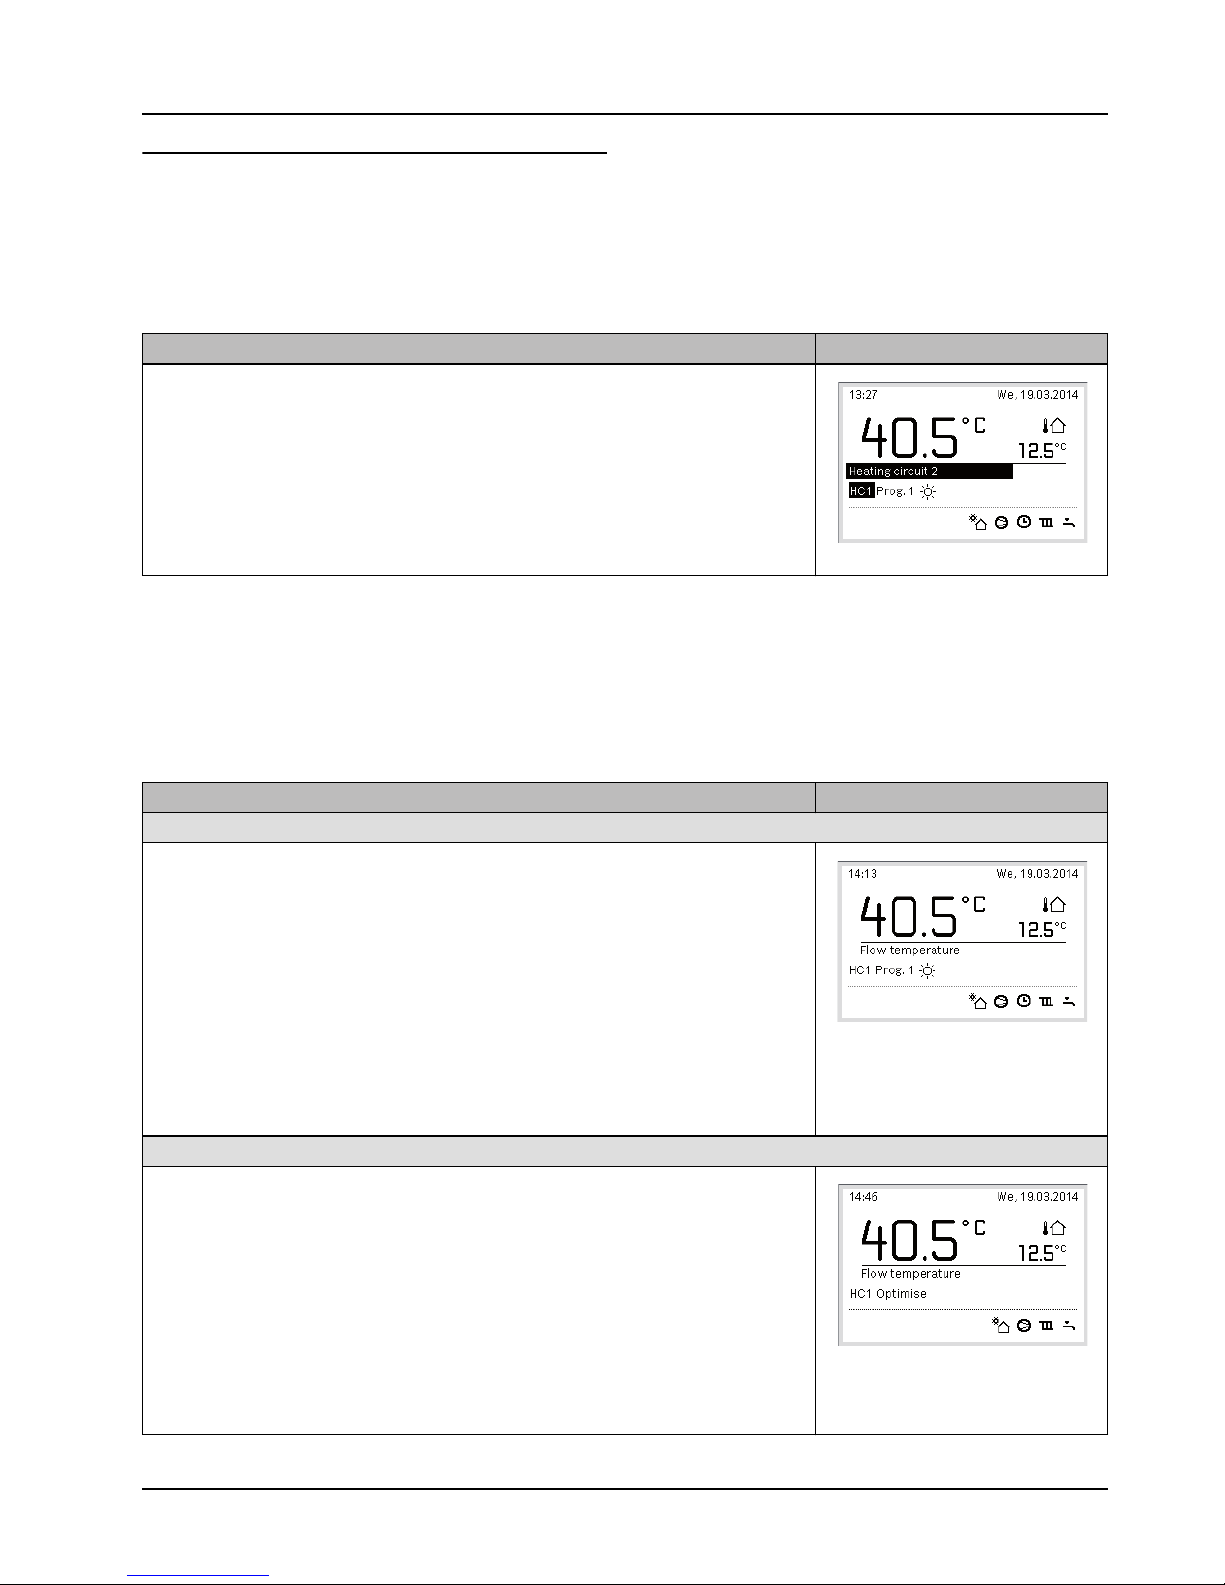
Use Result
▶ If the display is on, press the menu dial.
The selected heating circuit number, operating mode and name are shown in the
bottom half of the display.
▶ Turn the menu dial to select a heating circuit.
It is only possible to select the heating circuits available in the system.
▶ Wait a few seconds or press the menu dial.
The initial menu shows the selected heating circuit.
Table 4 Quick manual – Heating circuit in initial menu
6 720 811 136-02.1O
Use Result
To activate automatic mode (and apply the time program)
▶ Press the menu button to open the main menu.
▶ Press the menu dial to open the menu Heating/Cooling.
▶ Press the menu dial to open the menu Operating mode .
▶ If two or more heating circuits are installed: turn the menu dial to mark Heating
circuit 1, 2, 3 or 4 and press the menu dial.
▶ Turn the menu dial to mark Auto and press the menu dial.
▶ Return to the initial menu by pressing and holding the return button.
All temperatures in the relevant time program for house heating are shown in the
bottom half of the display, in a popup window. The actual temperature flashes.
The control unit adjusts the room temperature according to the active time program
for house heating.
To return to optimised operation (without time program)
▶ Press the menu button to open the main menu.
▶ Press the menu dial to open the menu Heating/Cooling .
▶ Press the menu dial to open the menu Operating mode .
▶ If two or more heating circuits are installed: turn the menu dial to mark Heating
circuit 1 , 2, 3 or 4 and press the menu dial.
▶ Turn the menu dial to mark Optimised and press the menu dial.
▶ Return to the initial menu by pressing and holding the return button.
The required room temperature is shown in the bottom of the display, in a popup
window. The control unit adjusts the permanent room temperature to the required
room temperature.
Table 5 Quick guide – Activate operating mode
6 720 811 136-03.1O
6 720 811 136-04.1O
Page 10
10
Quick manual
HMC300 – 6 720 813 192 (2014/10)
4.3 Change room temperature
Use Result
If you are cold or think that it will be too hot: change the room temperature temporarily
Automatic mode
Change room temperature to next break point
▶ Turn the menu dial to set the required room temperature.
The period in question is shown in grey in the time program bar chart.
▶ Wait a few seconds or press the menu dial.
The control unit works with the new setting. The change applies to the next break
point in the time program for house heating. After this the settings in the time
program apply again.
Undo temperature change
▶ Turn the menu dial until the time period is shown in black in the time program bar
chart, and then press the menu dial.
The change has been cancelled.
If you are always cold or think it is too hot: set the required room temperature (e.g. for heating and temperature reduction
mode)
Optimised operation
▶ Activate optimised operation ( chapter 4.2).
▶ Wait a few seconds or press the menu dial to close the popup window.
▶ Turn the menu dial to set the required room temperature.
▶ Wait a few seconds or press the menu dial. Confirm the change in the popup
window by pressing the menu dial (or cancel the change by pressing the return
button).
The actual room temperature is shown in the bottom half of the display, in a
popup window.
The control unit works with the new settings.
Automatic mode
▶ Press the menu button to open the main menu.
▶ Press the menu dial to open the menu Heating/Cooling .
▶ Turn the menu dial to mark the menu Temperature settings.
▶ Press the menu dial to open the menu.
▶ If two or more heating circuits are installed: turn the menu dial to mark Heating
circuit 1 , 2, 3 or 4 and press the menu dial.
▶ Turn the menu dial to mark Heating, Setback, Increase or Cooling.
▶ Press the menu dial.
▶ Turn the menu dial and press to activate the required setting e.g. for
temperature reduction mode.
When the temperature adjustment is activated:
▶ turn the menu dial and press it to set the temperature. The limit for the values set
for temperature depend on the settings for the other operating mode.
The control unit works with the new settings. The settings apply for all time
programs for house heating (when two or more heating ciruits are set they only
apply to the selected heating circuit).
Table 6 Quick guide – Room temperature
6 720 811 136-05.1O
6 720 811 136-06.1O
6 720 811 136-07.1O
6 720 811 136-08.1O
Page 11
11
Quick manual
HMC300 – 6 720 813 192 (2014/10)
4.4 Additional settings
Use Result
If the demand for hot water is temporarily higher than usual: activate extra hot water (= quick function for hot water).
▶ Press the extra hot water button.
The heating of hot water is activated immediately with the set temperature and for the
set time. After a few seconds the symbol for extra hot water is shown in the
information graphics (settings for Extra hot water chapter 5.3.3, page 21).
To deactivate the function for extra hot water before the set time has gone:
▶ Press the button for extra hot water once again.
If the hot water is too cold or too hot: Change operating mode for heating hot water
▶ Press the hot water button.
The control unit shows the selection list for the operating mode for heating hot water
(more information chapter 5.3.1, page 20).
▶ Turn the menu dial to mark the required operating mode for a period.
▶ Press the menu dial.
The control unit works with the new settings. Your installer can set the temperatures
for the operating modes DHW and DHW reduced for you.
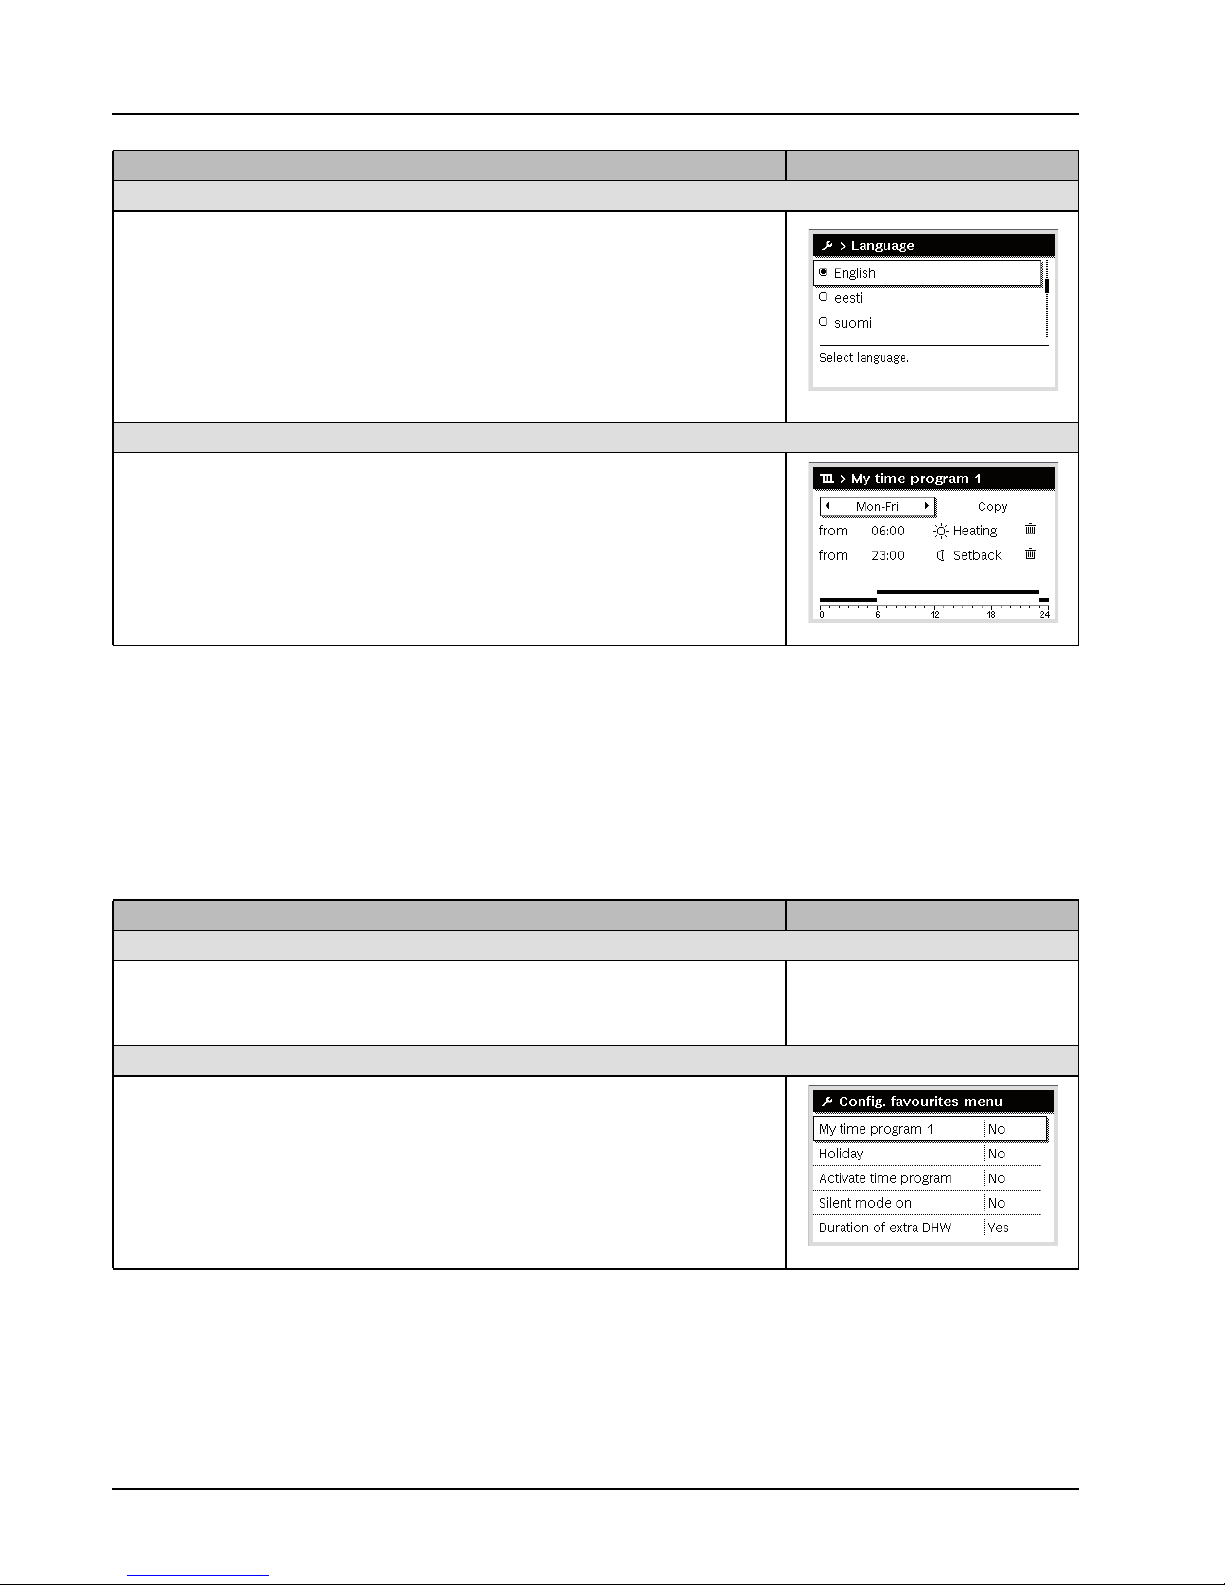
Set the date and time
If the power supply to the control unit is disconnected for a long time the user will be
automatically asked to enter the date and time. The control unit will then return to normal
mode.
▶ Activate the power supply
The control unit shows the date settings.
▶ Turn the menu dial and press it to set the day, month and year.
The text is marked on the display Continue.
▶ Press the menu dial.
▶ Set the time in the same way as the date.
The text is marked on the display Continue .
▶ Press the menu dial.
The control unit works with the new settings. No additional settings are needed to put
the control unit in operation again.
To avoid unintentionally changing the control unit settings:
activate or cancel the button lock (child lock, page 40)
▶ Press the hot water button and the menu dial and keep them pressed for a few
seconds to activate or cancel the button lock.
If the button lock is active a key is shown on the display ( image 2 [5], page 7).
Table 7 Quick manual – Additional settings
6 720 811 136-09.1O
6 720 811 136-10.1O
6 720 811 136-11.1O
6 720 811 136-12.1O
Page 12
12
Quick manual
HMC300 – 6 720 813 192 (2014/10)
4.5 Favourite functions
With the help of the favourites button you have direct access to
the functions you use most often with heating circuit 1. When
you press the favourites button the first time the menu for
configuration of the favourites menu opens. You can save your
personal favourites there, and if necessary adjust the
favourites menu to your requirements later on.
The function of the favourites button depends on which heating
circuit is shown in the initial menu. The settings changed in the
favourites menu always only apply for heating circuit 1.
To change the language for the texts shown in the display: set language
▶ Press the menu button to open the main menu.
▶ Turn the menu dial to mark Settings .
▶ Press the menu dial to open the menu Settings .
▶ Press the menu dial.
▶ Turn the menu dial to select a language.
▶ Press the menu dial.
The control unit works with the new settings.
If your daily rhythm changes (e.g. working shifts): adjust time program
In the menu Heating/Cooling > Time program the time program can in a few simple
steps be adjusted to your individual habits or circumstances ( chapter 5.2.1,
page 15).
Use Result
Table 7 Quick manual – Additional settings
6 720 811 136-13.1O
6 720 811 136-14.1O
Use Result
To use a favourite function: open the favourites menu
▶ Press the favourites button to open the favourites menu.
▶ Turn and press the menu dial to select a favourite function.
▶ Change the settings (this is done in the same way as in the main menu).
To adjust the list of favourite functions to your requirements: adjust the favourites menu
▶ Press the favourites button and keep it pressed until the menu for configuration of the
favourites menu is shown.
▶ Turn and press the menu dial to select a function (Yes) or to cancel the selection
(No).
The changes take effect immediately.
▶ Press the return button to close the menu.
Table 8 Quick manual – Favourites functions
6 720 811 136-15.1O
Page 13
13
Use the main menu
HMC300 – 6 720 813 192 (2014/10)
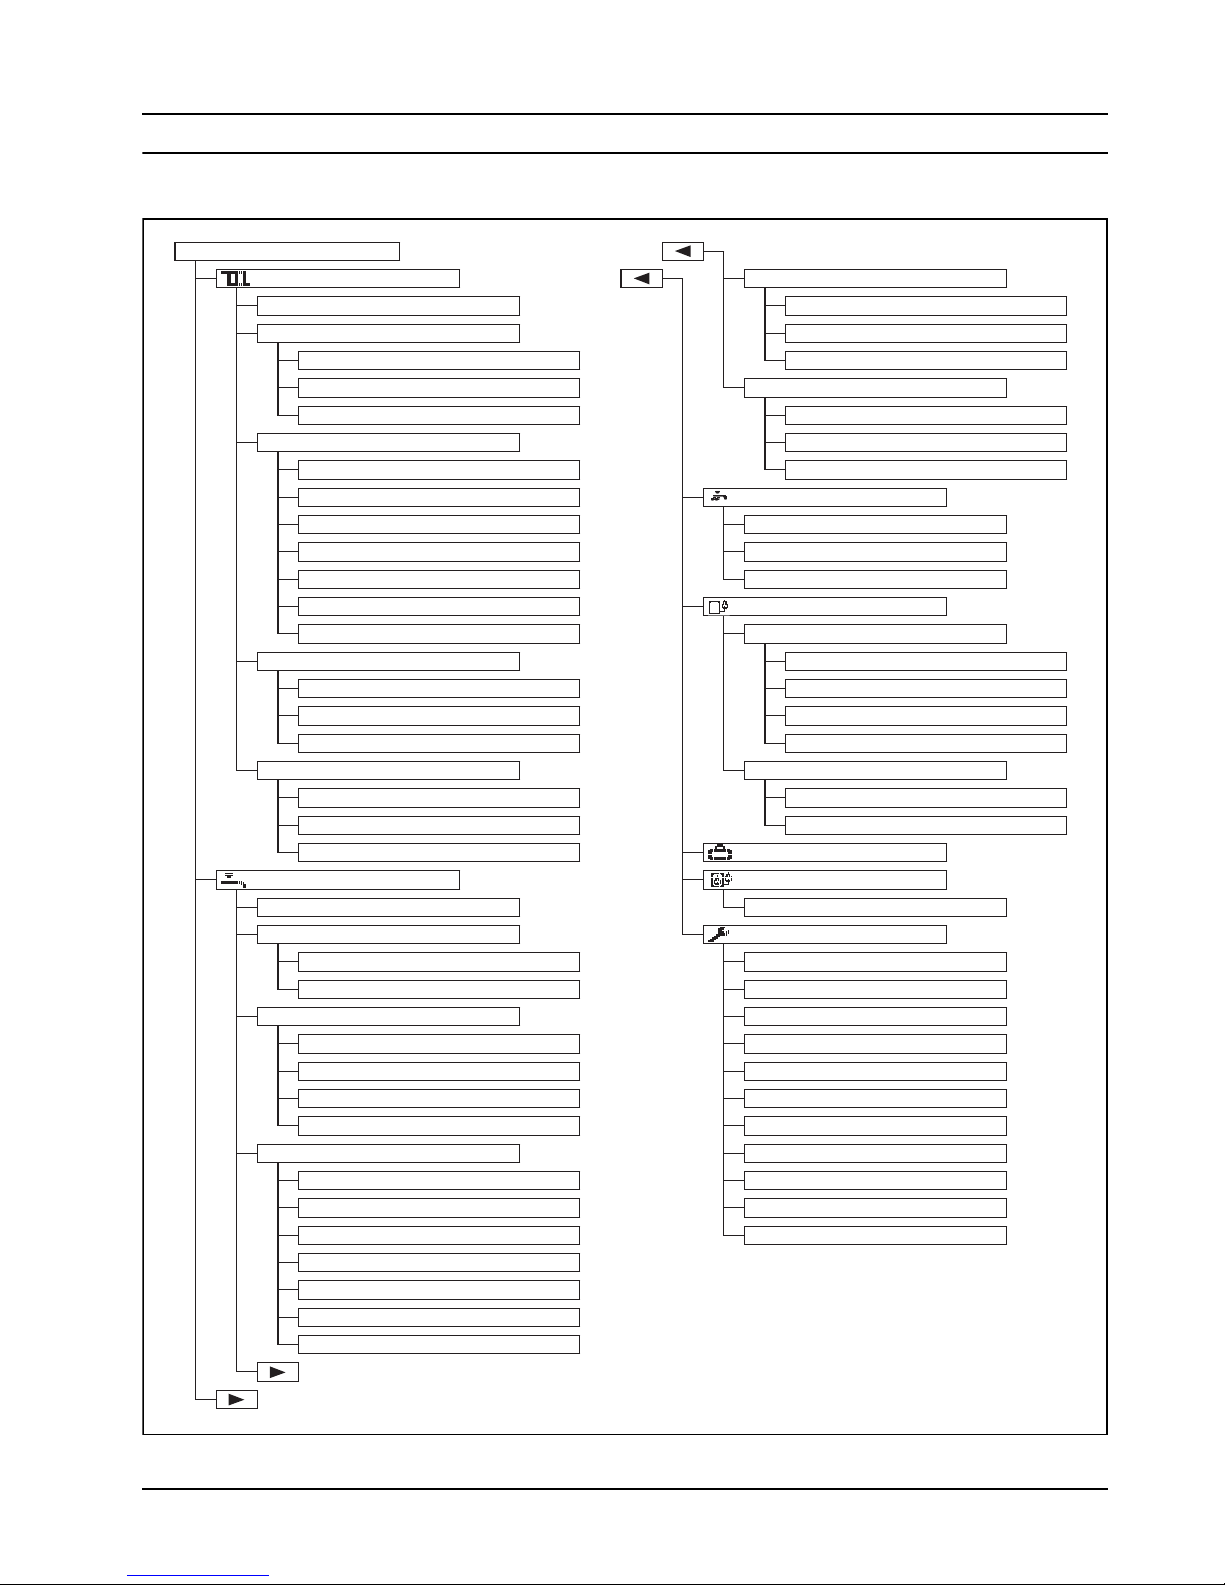
5 Use the main menu
Fig. 3 Menu structure of the main menu
Main menu
Heating/Cooling DHW priority
Operating Mode Switch on DHW priority
Temperature settings DHW priority for
Heating Prioritise heating for
Setback Circulation
Cooling Operating Mode
Time program Start frequency
Activate time program My DHW circltn time prog.
My time program 1 Pool
Reset prog. Activate pool heating
My time program 2 Pool temperature
Reset prog. Allow additional heat in pool mode
Rename heating circuit Unit
Rename time program Time program additional heat
Sum./wint. changeover Time program Activate additional heat
Heating/Cooling My time program
Heating mode off Reset time program
Cooling mode off Time program min. outdoor temp.
DHW priority Silent mode
Switch on DHW priority Silent mode
DHW priority for Min. outdoor temperature
Prioritise heating for Holiday
DHW Hybrid system
Operating Mode Energy:price ratio
Time program Settings
My DHW time program Language
Reset prog. Time format
Extra hot water Time
Start now Date format
Cancel Date
Temperature Autom. time changeover
Time Display contrast
Thermal disinfection Room temp. sen. adj.
Start Time correction
Start now Standard display
Cancel Internet password
Temperature
Day
Time
Max. period
6 720 811 136-101.1O
Page 14
14
Use the main menu
HMC300 – 6 720 813 192 (2014/10)
5.1 Overview of main menu
If two or more heating/cooling circuits are installed in the
system it is necessary to make several selections in some
menus.
▶ Turn the menu dial to select which heating circuit the
settings are to apply to.
▶ Press the menu dial to show the menu.
Menu The purpose of the menu Page
Heating/Cooling Change mode, room temperatures and time program for house heating permanently. 15
Operating mode Change mode for house heating or time program, or optimised operation. 4
Temperature
settings
Set the required room temperatures allocated to the time program periods, e.g. with
heating and temperature reduction mode or cooling mode.
Time program Switch between heating and temperature reduction mode at fixed times and weekdays
(automatic mode). In this menu you can change the name of the heating circuits and time
programs.
15
Summer/winter
mode
Switching between summer mode (house heating switched off or active cooling) or winter
mode (house heating switched on).
19
DHW priority When alternative DHW modes are activated the control switches between heating
requirements from the house heating and hot water requirements.
22
DHW Change water temperatures and time program for heating hot water permanently. 19
Operating mode Select mode for heating hot water, e.g. according to time program or always active. 20
Time program Switch between modes for hot water, reduced heating of hot water and no heating of hot
water at fixed times and weekdays (automatic mode).
20
Extra hot water Change temperature and activation time for Extra hot water function. 21
Thermal
disinfection
Heat up the hot water to prevent bacteria. 21
DHW priority When alternating DHW modes are activated, the control switches between heating
requirements from the house heating and hot water requirements.
22
Pool Settings for operation of heated pool. 24
Unit Settings for operation of additional heat (electric/gas/oil/solid fuel). 24
Holiday Settings for operation of system during long absence (holiday program). 25
Hybrid system Set energy price ratio 28
Settings Change general settings, e.g. time, date, display contrast etc. 21
Table 9 Overview of main menu
Page 15

15
Use the main menu
HMC300 – 6 720 813 192 (2014/10)
5.2 Adjust settings for automatic operation of
house heating
Cooling is disabled in the UK model to
comply with the regulations for RHI.
Menu: Heating/Cooling
Optimised operation normally produces the highest comfort
with the largest possible energy savings. A constant
temperature can be set in cooling mode.
Optimised operation for each heating circuit is active with the
default settings
Heating circuit 1 – 4
If several heating circuits are installed and configured, the
settings for heating circuits 1 – 4 are changed in the same way
as in systems with one heating circuit. The changes only apply
however to the selected heating circuit. If the heating circuits
are given names that are easy to distinguish, this considerably
simplifies the selection of the correct heating circuit.
5.2.1 Adjust Time program for automatic operation of
house heating
The time program for house heating is only active if automatic
mode is active ( chapter 4.2, page 9).
This is how you can set the same break points for several
weekdays:
▶ Set break points for a group of several days, e.g.
Mon-Sun or Mon-Fri.
▶ Adjust the time program for the individually deviating
weekdays during Monday – Sunday (detailed description
table 12, page 16).
Menu: Time program
The time programs automatically switch from one mode to
another at fixed times. The control unit has two time programs
for each heating circuit. You can program two break points per
day, with their own operating mode. The default settings for the
time programs result in reduced heating during the night.
Operation without a time program results in the highest
possible energy saving.
If the settings, temperatures or time program break points do
not match your requirements you can adjust the time program.
Talk to your installer if you do not want to heat the house during
the night. He can also set the temperature reduction mode.
The following table shows how to activate and select a time
program for house heating.
Menu options Description
Activate time
program
When automatic mode is activated the
control unit applies this selected time
program (My time program 1 or My time
program 2).
My time
program 1
6 break points can be set for each day or
each group of days. Each break point can
be allocated one of the two modes in
automatic mode. The shortest possible
period between two break points is
15 minutes.
Reset prog. Here My time program 1 can be reset to
the default settings.
My time
program 2
My time program 1
Reset prog. Here My time program 2 can be reset to
the default settings.
Rename heating
circuit
The name of the selected heating circuit
can be adjusted here (this function is only
available if more than one heating circuit
is installed). This simplifies the selection
of the correct heating circuit, e.g.“floor
heating” or“loft”. The names are preset
with Heating circuit 1 – 4 ( table 13,
page 18).
Rename time
program
It is possible to change the name of the
time programs in the same way as the
heat circuits. It simplifies the selection of
the correct time program to give the
programs names like“family”or“night
shift”.
Table 10 Settings of time program for house heating
Page 16

16
Use the main menu
HMC300 – 6 720 813 192 (2014/10)
The following table shows how to adjust a time program for house heating.
Use Result
Select active time program for house heating
▶ When the initial menu is active, press the menu button to open the main menu.
▶ Press the menu dial to open the menu Heating/Cooling .
▶ Turn the menu dial to mark Time program .
▶ Press the menu dial to open the menu Time program .
The text is marked on the display Activate time program . Depending on the
installed system, you may need to select a heating circuit.
▶ Press the menu dial.
▶ Turn the menu dial to mark My time program 1 or 2 and press the menu dial.
The control unit works in automatic mode with the selected time program (when two
or more heating circuits are installed the setting only applies on the selected heating
circuit).
Table 11 Activate and select time program for house heating
Use Result
Open the menu to adjust a time program for house heating
▶ When the initial menu is active, press the menu button to open the main menu.
▶ Press the menu dial to open the menu Heating/Cooling .
▶ Turn the menu dial to mark Time program .
▶ Press the menu dial to open the menu Time program .
▶ Turn the menu dial to mark My time program 1 or 2.
Depending on the installed system, you may need to select a heating circuit.
▶ Press the menu dial.
▶ Press the menu dial again to activate the input box for weekday or group of days.
▶ Turn the menu dial to select a weekday or a group of days and press the menu dial.
Changes in this menu only apply to the selected weekday or group of days.
Change break point
▶ Open the menu to adjust a time program for house heating.
▶ Turn the menu dial to mark a break point.
▶ Press the menu dial to activate the input box for the break point.
▶ Turn the menu dial to change the break point.
The new time period is shown in grey in the time program bar chart.
▶ Press the menu dial.
The control unit works with the new settings.
Table 12 Adjust time program for house heating or individual requirements
6 720 811 136-16.1O
6 720 811 136-17.1O
6 720 811 136-18.1O
6 720 811 136-19.1O
6 720 811 136-20.1O
Page 17

17
Use the main menu
HMC300 – 6 720 813 192 (2014/10)
The following table shows how to change the name of the heating circuits.
Set the temperature for a period
▶ Open the menu to adjust a time program for house heating ( page 16).
▶ Turn the menu dial to mark the operating mode for a period.
▶ Press the menu dial to activate the input box for the operating mode.
▶ Turn the menu dial to select a mode (heating or temperature reduction).
The new time period is shown in grey in the time program bar chart.
▶ Press the menu dial.
The control unit works with the new settings.
Copy a time program (e.g. copy the time program for Thursday to Monday and Tuesday)
▶ Open the menu to adjust a time program for house heating ( page 16) and select
the day to be copied, e.g. Thursday.
▶ Turn the menu dial to mark Copy .
▶ Press the menu dial.
A list is shown in the display where you can select to which days the time program is
to be copied.
▶ Turn and press the menu dial to select the weekdays, e.g. Monday and Tuesday.
▶ Turn the menu dial to mark Copy and press the menu dial.
▶ Which time program to copy is shown in a popup window.
▶ Press the menu dial to close the popup window.
The control unit works with the new settings.
Use Result
Table 12 Adjust time program for house heating or individual requirements
6 720 811 136-21.1O
6 720 811 136-22.1O
6 720 811 136-23.1O
Page 18

18
Use the main menu
HMC300 – 6 720 813 192 (2014/10)
Use Result
Open the menu to change the name of a heating circuit (or a time program)
▶ When the initial menu is active, press the menu button to open the main menu.
▶ Press the menu dial to open the menu Heating/Cooling .
▶ Turn the menu dial to mark Time program .
▶ Press the menu dial to open the menu Time program .
▶ Turn the menu dial to mark Rename heating circuit (only available when more than
one heating circuit is installed) or Rename time program.
▶ Press the menu dial.
The flashing cursor shows in which position the input starts. The names of the heating
circuits and time programs are saved with standard designations.
Select and enter the characters
▶ Turn the menu dial to move the cursor to the position where the character is to be
entered.
▶ Press the menu dial to activate the input box to the right of the cursor.
▶ Turn the menu dial to select a character.
▶ Press the menu dial to enter the character.
The selected character is entered. The input box for the next position in the text is
now active.
▶ Turn the menu dial and press it to enter additional characters.
▶ Press the return button to close the input.
The cursor flashes to the right of the entered characters. The control unit works with
the new settings.
Delete characters/delete the full name
▶ Turn the menu dial to place the cursor behind the letters to be deleted.
▶ Press the menu dial to activate the input box to the right of the cursor.
▶ Turn the menu dial until <C is shown.
▶ Press the menu dial to delete the character to the left of the active input box
(<C remains active).
▶ Press the menu dial again to delete additional characters, or press the return button
to exit.
The cursor flashes in the position where the character <C was last shown.
▶ Press the return button to exit the input and use the entered name.
Table 13 Change the name of the heating circuit
6 720 811 136-24.1O
6 720 811 136-25.1O
6 720 811 136-26.1O
Page 19

19
Use the main menu
HMC300 – 6 720 813 192 (2014/10)
5.2.2 Setting of changeover temperature for summer/
winter mode
Heating hot water is not affected by summer/winter mode.
Menu: Summer/winter mode
5.3 Change settings for heating hot water
Menu: DHW
These settings are only available if a hot water system is
installed in the system. The water is then heated in a hot water
heater.
A time program has been set at the factory for heating hot
water. Alternatively the heating of hot water is managed
constantly ( chapter 5.3.2, page 20).
NOTICE: System damage
▶ Do not switch over to summer mode if
there is a risk of frost.
Summer/winter changeover is only active if
Heating/Cooling > Automatic mode has
been set.
Menu
options
Description
Heating/
Cooling
• Constant summer mode (= OFF): The
heat pump is not used for heating or
cooling.
• Automatic mode: Heating or cooling mode
is activated, depending on the outdoor
temperature. When the outdoor
temperature lies between the two limiting
values the system only provides hot water.
• Continuous heating: Cooling mode is not
activated, and the system does not run on
idle.
• Continuous cooling : Heating mode is not
activated, and the system does not run on
idle.
Heating
mode off
1)
1) Only available when the outdoor temperature controlled
summer/winter mode is active in respective heating circuit.
When the damped outdoor temperature
2)
exceeds the changeover temperature set here,
the house heating is switched off.
If the damped outdoor temperature falls below
the changeover temperature by 1 °C, the house
heating is switched on. In systems with several
heating circuits this setting applies for the
selected heating circuit.
2) Damped outdoor temperature involves a delayed effect of
the measured outdoor temperature to equalise
temperature variations.
Cooling
mode off
1)
If the outdoor temperature exceeds this set
temperature, the cooling mode starts.
Table 14 Settings for summer/winter mode
WARNING: Scalding risk!
If the temperature for extra hot water is set
higher than 60 °C or if thermal disinfection has
been activated to prevent legionnaires'
disease, the hot water is heated once to over
65 °C. The default setting for the hot water
temperature is 60 °C. With higher settings
there is a risk of scalding from hot water taps.
▶ Make sure a mixer is installed. Ask your
installer if you are unsure how to do this.
Page 20

20
Use the main menu
HMC300 – 6 720 813 192 (2014/10)
5.3.1 Set operating mode for heating hot water
By default the heating of hot water follows a separate time
program.
• If Own time program is set, the operating mode DHW is
active from 05:00 (Saturdays and Sundays: from 07:00)
to 23:00 (default time program).
Menu: Operating mode
5.3.2 Set time program for heating hot water
In this menu you can adjust the time program for heating of hot
water.
Menu: Time program
The following table shows to to adjust the settings for heating hot water.
Menu options Description
Operating
mode
• With Own time program a time program
can be set to heat hot water that works
independantly of the time program for
house heating.
• If Always on - DHW red. or Always on -
DHW is set the heating of hot water
works continuously.
• If it is deactivated there is no heating of
hot water.
Table 15 Operating mode for heating hot water
Menu options Description
My DHW time
program
6 break points can be set for each day
or each group of days. Each break point
can be allocated one of the up to three
modes in automatic mode. The shortest
possible period between two break
points is 15 minutes.
Reset prog. With this menu option the hot water
system can be reset to the default
settings.
Table 16 Settings in the time program for hot water
Use Result
Select and set time program for heating hot water
▶ When the initial menu is open: press the hot water button.
▶ Turn the menu dial to mark the menu option Own time program and press the menu
dial.
The time program for hot water is activated. The break points can be set individually
in the menu DHW > Time program > My DHW time program (according to the
instructions in chapter 5.2.1 from page 15). The hot water temperatures set for
respective modes apply during the periods.
Activate constant heating of hot water
▶ When the initial menu is open: press the hot water button.
▶ Turn the menu dial to mark Always on - DHW red. or Always on - DHW.
▶ Press the menu dial.
Heating of hot water takes place without interruption
Table 17 Adjust settings for heating hot water
6 720 811 136-27.1O
6 720 811 136-28.1O
Page 21

21
Use the main menu
HMC300 – 6 720 813 192 (2014/10)
5.3.3 Extra hot water heating
In this menu you can set how the heating of hot water should
work when the function Extra hot water is activated.
Menu: Extra hot water
5.3.4 Thermal disinfection
After thermal disinfection the content in the hot water heater
slowly cools to the set hot water temperature. This mainly takes
place through heat loss. The hot water temperature can
therefore temporarily be higher than the set temperature.
Thermal disinfection guarantees a hygienic impeccable quality
of the hot water. The hot water is also regularly heated up to the
set temperature. This also contributes towards preventing
legionnaires' bacteria. This menu is used to configure thermal
disinfection.
Menu: Thermal disinfection
Menu options Description
Start / Cancel With this menu option the function Extra hot
water can be started and cancelled. The
function is the same as with the Extra hot
water button.
Temperature When the function Extra hot water is active
the hot water is heated up to the
temperature set here.
Time The function Extra hot water stops
automatically after the time set here.
Table 18 Settings for extra heating of hot water
CAUTION: Legionnaire's bacteria constitute a
health hazard!
▶ At low hot water temperatures thermal
disinfection or daily heating should be
activated
1)
( note the drinking water
statute).
1) Daily heating can be set by your installer in the service
menu.
WARNING: Risk of scalding!
If thermal disinfection has been activated to
avoid legionella, the hot water is heated once
to in excess of 65 °C (e.g. Thursday night at
02:00).
▶ Only schedule thermal disinfection for
periods outside normal usage times.
▶ Make sure that a mixer is installed. If in
doubt, ask your contractor.
Menu options Description
Start It is only if Auto is set here that the full
volume of hot water will be automatically
heated up to the set temperature once a
week or once a day.
Start / Cancel Thermal disinfection starts or stops
immediately, irrespective of the set
weekday.
Temperature Temperature of hot water volume during
thermal disinfection (65 – 80 °C)
Day The weekday when thermal disinfection is
carried out automatically.
Time of day Time when thermal disinfection starts
automatically
Max. period If the temperature for thermal disinfection is
not reached during the time specified here,
the thermal disinfection will be cancelled.
The control unit will then indicate
interference.
Table 19 Settings for thermal disinfection
Page 22

22
Use the main menu
HMC300 – 6 720 813 192 (2014/10)
5.3.5 Settings for hot water prioritisation
If the heating of hot water is more important that heating the
home, the function for hot water prioritisation can ensure that
the heat produced with the heat pump is used to heat hot water
as soon as the need arises. During this time the heating
requirements from the house heating will be ignored.
If the hot water prioritisation is deactivated there will be a
switch from heating hot water to house heating according to
the settings ( table 20).
Menu: DHW priority
5.3.6 Settings for hot water circulation
A hot water circulation pump allows the hot water to circulate
between the hot water heater and the taps. In this way you have
quick assess to hot water at the taps.
This menu is only shown if the system is fitted with a hot water
circulation pump.
Menu: DHW circulation
1)
The settings for the circulation pump control when and how
often it should be activated.
Menu options Description
DHW priority onIf Yes is selected: In the event of
simultaneous heating requirements there
will be a switch between hot water heating
and heating mode during DHW priority for
and Prioritise heating for.
DHW priority
for
Time period for hot water heating during
DHW priority on.
Prioritise
heating for
Time period for heating mode during DHW
priority on .
Table 20 Operating mode for heating hot water
1) Not available if Sweden or Finland has been specified as
the country where the heat pump is installed.
Menu
options
Description
Operating
mode
• The circulation can be disconnected
permanently (Off). When this setting is
On the pump works according to the
settings for Start frequency. The time
program for the circulation pump is not
active.
• The circulation can be connected to the
time program for heating hot water (As
hot water system).
• With Own time program a time program
can be set for the circulation pump so
that it works independently of the time
program for hot water.
Start
frequency
The connection frequency controls how
many times an hour the circulation pump is
run for three minutes (1 x 3 minutes/hour –
6 x 3 minutes/hour) or continuously. In all
circumstances the circulation will only work
during the time interval set in the time
program.
My DHW
circltn time
prog.
6 break points can be set for each day or
each group of days. The circulation pump can
be switched on or off at each break point. The
shortest possible period between two break
points is 15 minutes.
Table 21 Settings for circulation
Page 23

23
Use the main menu
HMC300 – 6 720 813 192 (2014/10)
The following table shows how to adjust the settings for circulation.
Use Result
▶ When the initial menu is active, press the menu button to open the main menu.
▶ Turn the menu dial to mark DHW and press the menu dial.
▶ Turn the menu dial to mark
▶ and press the menu dial.
The menu option Operating mode is marked.
▶ Press the menu dial.
▶ Turn the menu dial to mark As hot water system and press the menu dial.
The control unit works with the new settings. The circulation pump only works when
hot water heating is active.
▶ Turn the menu dial to mark Own time program and press the menu dial.
The time program for circulation is independent of the time program for hot water
heating. The break points can be set individually in the menu DHW circulation > My
DHW circltn time prog. (according to the instructions in chapter 5.2.1 from
page 15). During the periods the circulation is either switched on or off.
▶ Turn the menu dial to mark off or on and press the menu dial.
The control unit works with the new settings. In periods with the setting off the
circulation pump is always switched off.
Table 22 Adjust settings for adjust circulation
6 720 811 136-29.1O
6 720 811 136-30.1O
Page 24

24
Use the main menu
HMC300 – 6 720 813 192 (2014/10)
5.4 Settings for heated pool
In this menu you can adjust the settings for heating a pool.
Menu: Pool
5.5 Settings for extra heat source (additional
heat)
If the heat pump cannot deliver enough heat quickly enough
during the winter, or for heating hot water, an extra heating
source is required (additional heat). It is possible to use
additional electric heat, or an extra heat source (gas, oil or
wood heater via a mixing valve).
This menu is only shown when additional heat is installed in the
system.
5.5.1 Time program for extra heat source
If you are not at home, or for any other reason want to have a
lower room temperature, you can reduce your energy
consumption by limiting the effect of the extra heat source.
Menu: Unit > Time program additional heat
5.5.2 Settings for Silent mode of heat pump
If a heat pump has been installed the settings in this menu can
be used to reduce the noise level when the system is in
operation.
Menu: Unit > Silent mode
Menu options Description
Activate pool
heating
If the heating for a pool is activated here,
the pool is heated up.
Pool
temperature
The water in the pool is heated up to this set
temperature.
Allow
additional
heat in pool
mode
If additional heat for pool mode has been
approved the required water temperature
can also be achieved by means of additional
heat if the heat pump cannot deliver enough
heat.
Table 23 Settings for a pool
Menu
options
Description
Time
program
Activate
additional
heat
If the time program for additional heat is
activated the additional heat can only deliver
extra heating in the periods with the mode on.
My time
program
The time program for additional heat can be set
with this menu option.
Reset time
program
The time program for additional heat is reset to
the default settings.
Time
program
min.
outdoor
temp.
If the outdoor temperature is less than this set
temperature the time program for additional
heat is disconnected.
Table 24 Time program for an extra heat source
Menu
options
Description
Silent
mode
• If No has been selected the noise level will
not be reduced.
• If Auto has been selected the heat pump
starts automatically in silent mode at
22:00. At 6:00 silent mode is switched off
again, i.e. the noise level is reduced from
22:00 to 6:00.
• If On has been selected the noise is
reduced continuously.
Min.
outdoor
temperatur
e
If the outdoor temperature is less than this set
temperature the heat pump cancels silent
mode.
Table 25 Settings for silent mode
Page 25

25
Use the main menu
HMC300 – 6 720 813 192 (2014/10)
5.6 Set holiday program
Menu: Holiday
If you are going away for some time, or taking some time off for
a few days, you can set the holiday program. If the heat pump is
set to heating mode according to the settings for summer/
winter mode you use the holiday function. With the holiday
program the heating is set very low according to the time
program for "Saturdays", or to no heating at all.
You may decide to switch off the heating of hot water
completely during the holiday. The default settings guarantee
energy efficient and safe operation during your holiday. The
display shows to which date the holiday program is active
during the holiday period.
Fig. 4 Initial menu during the holiday period.
The settings and use of the holiday program do not change the
other time programs. When the holiday program has been
completed the control unit works with the set time programs
again. The holiday program is automatically deleted once it has
finished.
A detailed description of how to set the holiday program is
given in table 27 from page 26.
Menu: Holiday 1, Holiday 2, Holiday 3, Holiday 4 and Holiday
5
Whatever settings are used for the holiday
program, the cooling mode is not used during
the holiday.
NOTICE: Damage to the system.
▶ If you are going to be away for a long time
you should only change the settings in the
menu option Holiday.
▶ After a long period away the operating
pressure should be checked with pressure
gauge for the heating system and where
necessary solar panel system.
▶ The solar heating system should not be
switched off, even if you are away for a
long time.
6 720 811 136-31.1O
Menu options Description
Holiday
period
Set when your absence during the holiday
period starts and ends. The holiday program
starts at 00:00 on the set start date. The
holiday program continues to 24:00 on the
set date.
Selection
heat. circ./
DHW
The holiday program does not affect the
parts of the system marked here.
Only the heating/cooling circuits that are
actually installed in the system can be
selected.
Heating Control of room temperature for selected
heating circuits during the holiday period:
• With the setting As Saturday the house
heating in selected heating circuits
works every day according to the active
time program for Saturdays (holiday at
home).
• Optional Constant temperature can be
set to apply during the entire holiday for
selected heating circuits.
• With the setting Off the house heating is
completely deactivated for selected
heating circuits.
• With the setting Setback the house
heating works in selected heating
circuits in the mode set by the installer
(Reduced mode, Outside temperature
threshold, Room temperature
threshold from page 36).
DHW Hot water settings during the holiday period.
• If the setting is Off no hot water will be
produced during the entire holiday
period.
• If Off + therm. disinfection on is set the
heating of hot water is deactivated, but
thermal disinfection is carried out as
usual once a week, or once a day.
If you spend your holiday at home you must
ensure that the hot water is not marked in
the option Selection heat. circ./DHW so
that you have hot water.
Delete Delete all settings for selected holiday
program
Table 26 Settings for holiday programs
Page 26

26
Use the main menu
HMC300 – 6 720 813 192 (2014/10)
The following table shows how to set a holiday program, how to cancel an active holiday program, and how to delete a holiday
program.
Use Result
Open the menu for holiday program
▶ When the initial menu is active, press the menu button to open the main menu.
▶ Turn the menu dial to mark Holiday .
▶ Press the menu dial to open the menu Holiday .
▶ Turn the menu dial to mark Holiday 1, 2, 3, 4 or 5. If a period has been set for a
holiday program, the start date is shown in the menu.
▶ Press the menu dial.
If the period has already been set for the holiday program, the following menu is
shown Holiday 1, 2, 3, 4 or 5. If a period has not been set for the holiday program,
the start and end date for the holiday program must be set. The following menu is
then shown Holiday 1, 2, 3, 4 or 5.
Set holiday period
▶ Open the menu for holiday program.
The menu option for input of the start and end date for the holiday period is open. The
input box for the start date is marked.
▶ Turn the menu dial to mark the day, month or year for the start date or end date and
press the menu dial.
The marked box is activated for input. If no holiday period had been entered, the
entered date would be saved as the start date. The end date is put in a week later than
the start date.
▶ Turn and press the menu dial to set the day, month or year for the start date or end
date.
▶ When the holiday period is set, turn the menu dial to mark Continue and press the
menu dial.
When the display switches to the main menu level the control unit works with the new
settings.
If the control unit does not switch to the main menu level you should follow the
instructions on the display.
Select a set the heating circuits and hot water system for the holiday program
▶ Open the menu for holiday program.
▶ Turn the menu dial to mark Selection heat. circ./DHW .
Table 27 Set, cancel or delete holiday program
6 720 811 136-32.1O
6 720 811 136-33.1O
6 720 811 136-34.1O
Page 27

27
Use the main menu
HMC300 – 6 720 813 192 (2014/10)
▶ Press the menu dial to open the menu Selection heat. circ./DHW .
When Total system is selected all the system parts are marked.
▶ Turn the menu dial to mark a heating circuit or a hot water system.
▶ Press the menu dial.
▶ The selection for the heating circuit or hot water system is cancelled. Press the menu
dial again to select the heating circuit or hot water system again.
If the selection of the heating circuit or hot water system is cancelled, the selection of
the entire system is cancelled automatically.
▶ Turn the menu dial to mark Continue and press the menu dial.
The control unit works with the new settings.
▶ Check and adjust if necessary the settings for house heating and hot water
( chapter 5.6, page 25).
Cancel a holiday program
The display shows to which date the holiday program is active during the holiday period.
If two or more heating circuits are installed the heating circuit must be selected before the
holiday program is cancelled ( chapter 4.1, page 9).
If the holiday program is set to As Saturday you can cancel the program by turning the
menu dial. The change applies to the next break point in the active time program. The
holiday program applies again from this break point.
Delete the holiday program, e.g. to close it in advance.
▶ Open the menu for holiday program ( page 26).
▶ Turn the menu dial to mark the menu option Delete and press the menu dial.
A popup window is shown on the display, which asks if the selected holiday program
should be deleted.
▶ Turn the menu dial to mark Yes and press the menu dial.
▶ A message on which holiday program has been deleted is shown in a popup window.
▶ Press the menu dial.
The holiday program has now been deleted.
Use Result
Table 27 Set, cancel or delete holiday program
6 720 811 136-35.1O
6 720 811 136-36.1O
6 720 811 136-37.1O
Page 28

28
Use the main menu
HMC300 – 6 720 813 192 (2014/10)
5.7 Adjust settings for hybrid system
Menu: Hybrid system
In a system with a hybrid system there are two different heat
sources. A heat source that utilises regenerative energy
generates heat from geothermal energy, from the air, from
biomass, or from solar energy. Heat is also supplied from a
conventional source, e.g. oil or gas.
If a hybrid system is installed in the system the following menu
is shown Hybrid system.
In this case the hybrid system consists of a heat pump and a
separate gas or oil heating source.
Depending on the actual circumstances and heating
requirements, either the heat pump or the gas/oil heating
source produces the best price-performance ratio.
Controlling the heat pump controls the actual output data of the
heat pump with the set energy price ratio and whether the heat
pump or gas/oil heating source is more beneficial from the
perspective of cost. Either the heat pump or the gas/oil heating
source is used, depending on the result.
In the menu Hybrid system > Energy:price ratio the energy
ratio between electric power and solid fuel can be regularly
adjusted to the actual price structure.
The cost ratio is calculated according to the following formula:
e.g.
• Electricity costs: 24 cent/kWh
• Gas/oil costs: 8 cent/kWh
This ratio must be given via the menu Hybrid system >
Energy:price ratio.
The setting of the price ratio is made by dividing the price of
electricity with gas
Page 29

29
Get information on the system
HMC300 – 6 720 813 192 (2014/10)
5.8 General settings
No settings are deleted during short power failures and period
when the heat source is switched off. The control unit starts
again when the power returns. If the switched off period last
longer it is possible that the settings for the date and time must
be redone. Other settings are not necessary (table 7, page 11).
Menu: Settings
Set correct time correction (Time correction)
Example of calculation of the value for time correction with a
deviation of approx. – 6 minutes per year (the control unit
clock runs 6 minutes late):
• – 6 minutes per year = – 360 seconds per year
• 1 year = 52 weeks
• – 360 seconds: 52 weeks = – 6.92 seconds per week
• Increase time correction to 7 seconds per week.
6 Get information on the system
In the information menu you can easily show actual values and
active modes in the system. No changes can be made in this
menu.
The information menu adjusts automatically to your system.
The availability of some menu options depends on the design of
the system and the correct setting of the control unit
( chapter 2.1, page 4).
▶ In the active initial menu, press the info button to open the
information menu.
▶ Turn the menu dial to select the required menu, e.g. DHW.
▶ Press the menu dial to open the selected menu.
▶ Turn the menu dial to show other available information.
▶ Go back one step in the menu with the return button.
▶ Return to the initial menu by pressing and holding the
return button.
Menu options Description
Language Language that display texts are shown in
Time of day This time controls all time programs and the
thermal disinfection. The time is set in this
menu.
Date This date controls the holiday program. This
date is also used to set the actual weekday,
which controls the time programs and, for
example, thermal disinfection. The date is
set in this menu.
Autom. time
changeover
Activate or block automatic changeover
from summer to winter time. If Yes is set the
time will be changed automatically (last
Sunday in March from 02:00 to 03:00, last
Sunday in October from 03:00 to 02:00).
Display
contrast
Change the contrast (to make display easier
to read)
Time
correction
Time correction of control unit's internal
clock in s/week ( Set correct time
correction (Time correction), page 29)
Standard
display
Settings to show additional temperatures in
initial menu
Internet
password
Reset personal password for Internet
connection (only possible with
IP-module). Next time you login, e.g. with an
app, you will be automatically asked to give
a new password.
Table 28 General settings
Page 30

30
Get information on the system
HMC300 – 6 720 813 192 (2014/10)
Fig. 5 Information menu structure
1) Only available if a temperature sensor or a room unit has
been installed in the reference room for the
corresponding heating circuit.
Info
Heating/Cooling Solar
Circuit 1 ... 4 Solar sensors
Operating mode heating/cooling Solar yield
Set room temp. Solar yield
Actual room temp. Gross collector area 1
Actual flow temp. Solar pump
DHW Gross collector area 2
Set temp. Solar circ.pump 2
Actual temp. Reload pump
Pool Therm. disinfection pump
Pool set point temp. Outdoor temp.
Actual temp. pool Outdoor temp. curve
Operating data Outdoor temp.
Operating hours Control Internet
Heat pump 1 ... 2 IP connection
Output additional heat Server connection
Operating hours compressor heating SW version
Operating hours compressor cooling Login data
Operating hours compressor HW MAC address
Op. hours for comp. pool System information
Number of starts heating Status outdoor unit
Number of starts cooling Heat pump 1 ... 2
Number of starts HW Status additional heat
Number of starts pool Heat pump 1 ... 2
Output produced Immersion heater heating output
Total output produced Heat pump 1 ... 2
Heating output produced Status mixed additional heat
DHW output produced Add. heat source
Cooling output produced Mixing valve
Pool output produced El. DHW additional heater
Heat pump 1 ... 2
Electricity company block
Actual mode
6 720 811 136-102.1O
Page 31

31
Get information on the system
HMC300 – 6 720 813 192 (2014/10)
Menu: Heating/Cooling
This menu only shows menu options for installed heating
circuits.
Menu: DHW
This menu is only shown if a hot water system is installed.
Menu: Pool
This menu is only available if a heated pool is installed.
Menu: Operating data
Apart from the first menu option, only the menu options for
installed units are shown in this menu. If two heat pumps are
working in combination all the menu options are shown
separately for each heat pump after the control system's
operating hours.
Menu options Description
Operating mode
heating/cooling
Actual operating mode for selected
heating ciruict (Heating, Idling,
Cooling)
Set room temp. Actual setting of room temperature for
selected heating circuit:
• May change several times a day in
automatic mode
• Constant setting in optimised
mode
Actual room temp. Actual measured room temperature in
selected heating circuit
Actual flow temp. Actual measured flow temperature in
selected heating circuit
Table 29 Information on house heating
Menu options Description
Set temp. Required hot water temperature
Actual temp. Actual measured hot water
temperature
Table 30 Information on hot water
Menu options Description
Pool set point
temp.
Required water temperature in pool
Actual temp. pool Measured temperature in pool
Table 31 Information on heated pool
Menu options Description
Operating hours
Control
Control unit operating hours since
commissioning of the heat pump or
since last reset.
Output additional
heat
Output of additional electric heat after
commissioning or since last reset.
Operating hours
compressor
heating
The compressor operating hours in
heating mode since commissioning or
since last reset.
Operating hours
compressor
cooling
The compressor operating hours in
cooling mode since commissioning or
since last reset.
Operating hours
compressor HW
The compressor operating hours in hot
water mode since commissioning or
since last reset.
Operating hours
compressor pool
The compressor operating hours in
pool mode since commissioning or
since last reset.
Number of starts
heating
The number of compressor starts in
heating mode since commissioning or
since last reset.
Number of starts
cooling
The number of compressor starts in
cooling mode since commissioning or
since last reset.
Number of starts HWThe number of compressor starts in
hot water mode since commissioning
or since last reset.
Number of starts
pool
The number of compressor starts in
pool mode since commissioning or
since last reset.
Table 32 Information on operation of heat pump
Page 32

32
Get information on the system
HMC300 – 6 720 813 192 (2014/10)
Menu: Produced output
This menu shows the accumulated output for the heat pump.
Menu: Solar
This menu is only shown if a solar heating system is installed.
The information under respective menu options is only shown
if the corresponding system parts are installed.
Menu options Description
Produced total
output
Accumulated total output for heat
pump
Produced output
heating
Accumulated output for heating mode
Produced output
hot water
Accumulated output for heating hot
water
Produced output
cooling
Accumulated output for cooling mode
Produced output
pool
Accumulated output for pool heating
Table 33 Information on produced output
Menu options Description
Solar sensors
(graphic)
Actual measured temperatures with
indication on position of selected
temperature sensor in the solar heating
system (with graphic display of actual
operating status of control mechanism)
Solar yield Solar energy product for last week, solar
energy production for actual week and
total energy produced by solar heating
system since commissioning
Solar thermal
system
This submenu shows information on the
set gross solar panel area (can only be set
by technician with the help of the technical
documentation for the solar panel module)
and the operating status of different
pumps in the solar panel system.
Table 34 Information on solar heating system
Page 33

33
Get information on the system
HMC300 – 6 720 813 192 (2014/10)
Menu options: Outside temp.
This menu shows the actual measured temperature. There is
also a diagram here that shows the development of the outdoor
temperature during the actual day and previous day (from
00:00 to 24:00).
Use Result
Show information on solar heating system
▶ In the active initial menu, press the info button to open the information menu.
▶ Turn the menu dial to mark Solar .
▶ Press the menu dial to open the menu Solar .
▶ Turn the menu dial to mark the menu option Solar sensors and press the menu dial.
Actual temperature of temperature sensor with the lowest number is shown. The
number on the display indicates the position of the temperature sensor in the system,
e.g. solor panel temperature [1].
▶ Turn the menu dial to show additional temperatures.
The images in the information menu show pumps, shunt valves and valves installed in
the solar heating system. When a pump is working the symbol for the pump
rotates .
Information on solar energy production
▶ In the active initial menu, press the info button to open the information menu.
▶ Turn the menu dial to mark Solar .
▶ Press the menu dial to open the menu Solar .
▶ Turn the menu dial to mark Solar yield and press the menu dial.
Solar energy production values for the actual week are shown.
▶ Turn the menu dial to switch between showing solar energy production for last week,
solar energy production for the actual week and the total energy produced by the
solar heating system since its commissioning.
Table 35 Show information on solar heating system
6 720 811 136-38.1O
6 720 811 136-39.1O
6 720 811 136-40.1O
6 720 811 136-41.1O
Page 34

34
Get information on the system
HMC300 – 6 720 813 192 (2014/10)
Menu: Internet
This menu is only shown if a communication module has been
installed.
Use Result
Show development of outdoor temperature
▶ In the active initial menu, press the info button to open the information menu.
▶ Turn the menu dial to mark Outside temp. and press the menu dial.
▶ Press the menu dial.
The diagram shows history of outdoor temperature for 2 last days (detailed
information chapter 6, page 29).
Table 36 Information on outdoor temperature show
6 720 811 136-42.1O
Menu options Description
IP connection Status for link between
communication module and router
Server connection Status for link between
communication module and internet
(via router)
SW version Program version for communication
module
Login data Login name and password to login the
app to control the system via a
smartphone
MAC address Communication module MAC address
Table 37 Information on internet connection
Page 35

35
Energy saving tips
HMC300 – 6 720 813 192 (2014/10)
Menu: System information
The information under respective menu options is only shown
if the corresponding system parts are installed. If 2 heat pumps
have been installed you must choose between heat pump 1 and
2.
7 Energy saving tips
Heating/cooling set low
• Use the optimised mode. Set the required room
temperature to your personal comfort level. The heat pump
saves most energy if it works continuously.
• Open the thermostat valves completely in all rooms.
Increase the temperature on the control unit only when the
required room temperatures has not been reached after a
long period. Only close the thermostat valve in a room if it
gets too hot just in that room.
• If there is a room unit in the system the room temperature
can be optimally controlled. Avoid the effect of induced
heat (e.g. from sunlight or stove). Otherwise there can be
unwanted variations in the room temperature.
• Do not place any large objects directly in front of radiators,
e.g. a soffa (minimum 50 cm gap). The heated or cooled air
will otherwise not be able to circulate and heat up or cool
the room.
• Do not set the temperature too low to start the cooling.
Cooling of the home also consumes energy.
Air properly
Open the windows completely for a short time instead of
allowing them to stand ajar. If windows are left ajar heat
dissappears continuously from the room without the air in the
room become much better.
Close the thermostat valves while airing the room.
Heating of hot water according to need
• Use the time program for automatic operation of heating
hot water.
• Set the lowest possible hot water temperature. This saves
a lot of energy, without significantly reducing hot water
comfort.
Menu options Description
Status
outdoor unit
The outdoor unit is switched off or in
operation for different reasons. This menu
option shows the following operating status
for this: Off; Heating; Cooling; DHW; Pool;
Pool/heating; Defrosting; Alarm
Status
additional
heat
Additional heat is switched off or in
operation for different reasons. This menu
option shows the following operating status
for this: Off; Heating; DHW; Pool; Pool/
heating; Alarm
Immersion
heater
heating
output
Actual via the output supplied by the
additional heat in kW (0.1– 15.0)
Status mixed
additional
heat
• Extra heat source: Additional heat is On
or Off.
• Mixing valve: If the output of the heat
pump is insufficient, hot water is
supplied from the additional heat to the
heating system via a shunt. The following
then applies: 0% = no additional heat
supplied – 100% maximum additional
heat output supplied.
Electricity
company
block
1)
1) Not used in Sweden.
If On is shown the system is working with a
limited electric output. If Off is shown here
the system can work with full electric output.
Additional
heat in hot
water heater
Additional heat hot water heating is On or
Off .
Actual mode Actual operating mode for selected heating
circuit (Heating, Idling, Cooling)
Table 38 System information
Page 36

36
Common questions
HMC300 – 6 720 813 192 (2014/10)
8 Common questions
Why do I have to set a set point value for the room
temperature even though the temperature is not
measured?
When you set a set point value for the room temperature you
change the heat curve. This also changes the room
temperature, because the temperature in the heating system
changes.
Why do the radiators get too hot with a high outdoor
temperature?
Even in summer mode radiators can heat up for a short period
in special circumstances, such as when the circulation pump
starts automatically at a certain interval to prevent it "jaming"
(blocking). If the circulation pump should by chance start
immediately after the heating up of hot water the residual heat
that is not used is moved away via the heating circuit and the
radiators.
Why does the heat pump work at night if the heating is
negligible or very little?
There can be different reasons for this. It depends on which
setting your installer has made for temperature reduction.
• Reduced mode: The heat pump works even when the
heating requirement is less to achieve the set room
temperature, even if it is low.
• Outside temperature threshold and Room temperature
threshold: the heating system switches automatically on if
the measured temperature drops below the set value. The
heat pump will then start as well.
• Protection from freezing: The heating mode is also used
to avoid the system freezing if the outdoor temperature
drops.
Why is the extra heat source used when the time program
switches from lowering to heating?
The output of the heat pump is limited. If the required room
temperature suddenly increases then the extra heat source
must also produce heat, even if no extra heat source is needed
when the temperature is the same. This is why the time
program is not a good choice to save energy.
The measured room temperature is higher than the
required room temperature. Why is the heat source
working anyway?
The heat source can heat up hot water.
Your heating system can be set to 2 possible control modes
( chapter 2.2, page 4).
With outdoor temperature controlled adjustment (and with the
effect of the room temperature) the heat source can also work
if the measured room temperature is higher than the set room
temperature. This also serves to heat adjacent rooms, which do
not have their own room unit, sufficiently.
Why does the house heating not switch off even though the
outdoor temperature has reached the threshold
temperature set for disconnection in the summer?
Disconnection for the summer on the basis of the outdoor
temperature takes the thermal inertial of the building and its
mass (equalisation of temperature differences due to the
structure of the building) into consideration. There is therefore
a delay of several hours before disconnection takes place.
Page 37

37
Rectify operating fault
HMC300 – 6 720 813 192 (2014/10)
9 Rectify operating fault
9.1 Rectify “experienced” fault
There can be several reasons for an “experienced” fault, which
are often easy to rectify.
If you are cold or too hot, for example, the following table will
help you to rectify the “experienced” faults.
Symptom Cause Action
The required room
temperature is not reached.
The thermostat valves on the radiators
are set to a temperature that is too low.
Increase the settings for the thermostat valves.
The temperature for heating mode is
set too low.
Increase the temperature for heating mode if the
thermostat valves are completely open.
The system is working in summer
mode.
Reconnect the system to winter mode ( chapter 5.2.2,
page 19).
The extra heat source flow
temperature control is set too low.
Increase the setting on the flow temperature control
( instructions for heat source).
There is air in the heating system. Bleed the radiators and heating system.
The outdoor sensor is not in a good
position.
Contact your installer and get him to move the outdoor
sensor to a better place.
The room temperature is
considerably higher than
what is wanted.
The radiators get too hot. Set a lower temperature for the operating mode in
question.
Set lower temperatures for all modes.
Set the thermostat valves in adjacent rooms to a lower
setting.
If the room unit is installed in the
reference room: the position of the
unit is not suitable, e.g. on outer wall,
near a window, or where there is
draught.
Contact your installer and get him to move the room sensor
to a better place.
Excessive changes in
temperature.
Repeated temporary effect of induced
heat (e.g. from sunlight, lighting,
television or stove).
Contact your installer and get him to move the room sensor
to a better place.
The temperature rises
instead of dropping.
The time is set incorrectly. Set the time.
Room temperature too high
during temperature
reduction mode.
The building stores a lot of heat. Select a previous break point for temperature reduction
mode.
The hot water heater does
not get hot.
The hot water temperature
1)
is set too
low on the heat source.
Switch from DHW reduced to DHW.
The hot water temperature
1)
is not set
too low on the heat source
Check the settings on the control unit.
The hot water program is set
incorrectly.
Set the hot water program.
The configuration of the hot water
heating does not suit the heating
system.
Contact the installer and get him to check the settings.
Table 39 Rectify "experienced" fault
Page 38

38
Rectify operating fault
HMC300 – 6 720 813 192 (2014/10)
9.2 Rectify shown operating fault
A fault in the system is shown on the control unit display.
Fig. 6 Fault message
If several faults occur at the same time the fault with the highest
priority is shown first. Error codes and additional codes are
shown. These codes inform the installer of the causes. If you
acknowledge a fault (by pressing the menu dial) the display
returns to the initial menu. A message on the fault is still shown
on the information line. If the fault is still active you can show it
again by pressing the return button.
The fault could be caused by an operating fault in the control
unit, on a component, a module or the heat source.
The system continues to remain in operation as long as
possible, i.e. heating can still take place.
The hot water at the taps
does not reach the required
temperature.
The mixer valve is set lower than the
required hot water temperature.
If in doubt, contact your installer to have the mixer valve
settings checked.
The figure 0 is always
shown in the information
menu for solar energy
production, even though
the solar heating system is
in operation.
The solar heating system is set
incorrectly.
Contact your installer to have the settings for the control
unit checked.
1) Read more about this in the instructions for extra heat source.
Symptom Cause Action
Table 39 Rectify "experienced" fault
NOTICE: System damage due to frost! The
system can freeze up if it is taken out of service
due to fault shutdown.
▶ Use Tab. 40 to check if the fault can be
fixed.
▶ If the fault cannot be fixed, contact your
contractor immediately.
6 720 811 136-43.1O
Page 39

39
Rectify operating fault
HMC300 – 6 720 813 192 (2014/10)
Faults that you can rectify yourself.
If an operating fault cannot be rectified:
▶ Contact an authorised installer, or customer service.
Submit error code, additional code and control unit ID
number.
Interference at extra heat source Faults that block the heat source can be rectified by resetting.
▶ Do a reset of the heat source.
More information on how to rectify operating faults on the heat
source are available in the instructions for the heat source.
▶ Contact your installer if the fault cannot be rectified by
resetting.
Fault
code
Additional
code
Cause or description
of the fault
Check/cause Action
Nothing shown on the display The system is switched off. ▶ Switch on the system.
The power supply to the control unit has been
disconnected.
▶ Check if the room unit is correctly
placed in the wall bracket.
H01 5284 Warning: The last
thermal disinfection
could not be carried out
Check if water is continuously taken from the hot
water heater via the hot tap water during the
thermal disinfection.
▶ Stop such continuous
consumption of hot water, or
change the time for thermal
disinfection.
A11 1010 No communication via
bus connection EMS
plus
– ▶ Check if the room unit is correctly
placed in the wall bracket.
A11 1038 Invalid value time/date Date/time still not set ▶ Set date/time
Long power failure ▶ Avoid power failure.
A11 3061
3062
3063
3064
No communication with
mixing module (3061:
heating circuit 1, ...,
3064: heating circuit 4)
– ▶ Check if the room unit is correctly
placed in the wall bracket.
A11 6004 No communication with
solar heating module
– ▶ Check if the room unit is correctly
placed in the wall bracket.
A21
A22
A23
A24
1001 – No bus connection between HPC400 and CR10
or CR10H in corresponding heating circuit (A22:
heating circuit 2, ..., A24: heating circuit 4).
▶ Check if the room unit is correctly
placed in the wall bracket.
A01 5451 The heat pump needs
servicing
Maintenance is required. The system continues
to work as far as possible.
▶ Contact the installer to carry out
maintenance.
Table 40
__ _
Table 41 The control unit ID number must be filled in here by the installer at installation.
Faults at the heat source are always shown at
the heat source.
If there is a bus connection between the
control unit and heat source, the fault will also
be shown in the control unit.
Ask your installer if you are unsure of which
connection there is.
Page 40

40
Environment / disposal
HMC300 – 6 720 813 192 (2014/10)
10 Environment / disposal
Environmental protection is a fundamental corporate strategy
of the Bosch Group.
The quality of our products, their efficiency and environmental
safety are all of equal importance to us and all environmental
protection legislation and regulations are strictly observed.
We use the best possible technology and materials for
protecting the environment taking into account of economic
considerations.
Packaging
We participate in the recycling programmes of the countries in
which our products are sold to ensure optimum recycling.
All of our packaging materials are environmentally friendly and
can be recycled.
Old electrical and electronic appliances
Electrical or electronic devices that are no
longer serviceable must be collected
separately and sent for environmentally
compatible recycling (in accordance with the
European Waste Electrical and Electronic
Equipment Directive).
To dispose of old electrical or electronic
devices, you should use the return and collection systems put
in place in the country concerned.
Technical terms
Setback phase
A time slot during automatic mode, with Setback operating
mode.
Automatic mode
The heating system is heating in accordance with the time
program and an automatic changeover takes place between
operating modes.
Operating mode
The operating modes for heating are: Heating and Setback.
They are shown with the symbols and .
The operating modes for hot water heating are: DHW, DHW
reduced and Off.
For each mode (with the exception of Off) it is possible to set a
temperature.
Frost protection
Depending on the selected frost protection, the heat pump will
turn on when the outside and/or room temperature reaches
below a certain set threshold. Frost protection prevents the
heating system from freezing up.
Required room temperature (also desired or set
temperature/set room temp.)
The room temperature to be achieved by the heating system. It
can be set individually.
Default setting
Values permanently saved in the programming unit
(e.g. complete time programs) that are available at any time
and that can be reinstated according to demand.
Heating phase
A time slot during automatic mode, with Heating operating
mode.
Hybrid system
Heating system from factory set heat sources with built-in
optimised control, which are offered as separate installation
modules (e.g. heat pump with conventional heat source as
additional heat). The system produces hot water for the
heating of a building, and where appropriate hot water heating.
Child lock
The settings in the initial menu and in the menu can only be
changed when the child lock (button lock) has been removed
( page 11).
Page 41

41
Technical terms
HMC300 – 6 720 813 192 (2014/10)
Mixer
Assembly that automatically ensures that hot water can be
drawn from the taps at a temperature no higher than the
temperature set on the mixer.
Optimised mode
In optimised mode the automatic mode (time program for
house heating) is not active and the system provides heating
continuously according to the temperature set for optimised
mode.
Reference room
The reference room is the room in the home where a room unit
has been installed. The room temperature in this room acts as
the control variable for the assigned heating circuit.
Switching time
A certain time at which the heating system starts to heat or hot
water is produced, for example. A switching time is a
component of a time program.
Temperature of an operating mode
A temperature that is assigned to an operating mode. The
temperature is adjustable. See the explanations on operating
mode.
Thermal disinfection
This function heats up the hot water to a temperature in excess
of 65 °C. This temperature is sufficient to kill off pathogens
(e.g. legionella). Observe the anti-scalding safety instructions.
Holiday program
The holiday program enables the settings that would ordinarily
be applied to be interrupted for a number of days. After the end
of the holiday program, the programming unit resumes
operation with the settings that would ordinarily be applied.
Flow temperature
The temperature that the heated water maintains in the central
heating circuit, from the heat source to the heating surfaces in
the rooms.
Water heater
A water heater stores large volumes of heated tap DHW.
Thereby, sufficient DHW is available at the draw-off points (e.g.
taps). This is a prerequisite for longer hot shower.
Time program for the heating system
This time program ensures automatic changeover between
operating modes at defined switching times.
Time program for hot water heating
This time program means that the system automatically
switches between the modes DHW, DHW reduced and Off at
fixed break points. It can be connected to the time program for
house heating ( chapter 5.3.2, page 20).
Time program for circulation
This time program ensures automatic operation of the DHW
circulation pump at defined switching times. Linking this time
program to the time program for hot water is recommended.
Hot water circulation pump
A hot water circulation pump allows the hot water to circulate
between the hot water heater and the taps. In this way you have
quick assess to hot water at the taps. The circulation pump can
be controlled with a time program.
Page 42

Page 43

Page 44

Alto Energy Limited
Unit 17 Glenmore Business Centre
Witney, Oxfordshire, OX29 0AA, United Kingdom
www.altoenergy.co.uk | info@altoenergy.co.uk
 Loading...