

Page 1
www.ivt-ht.com | tools for every use
EN
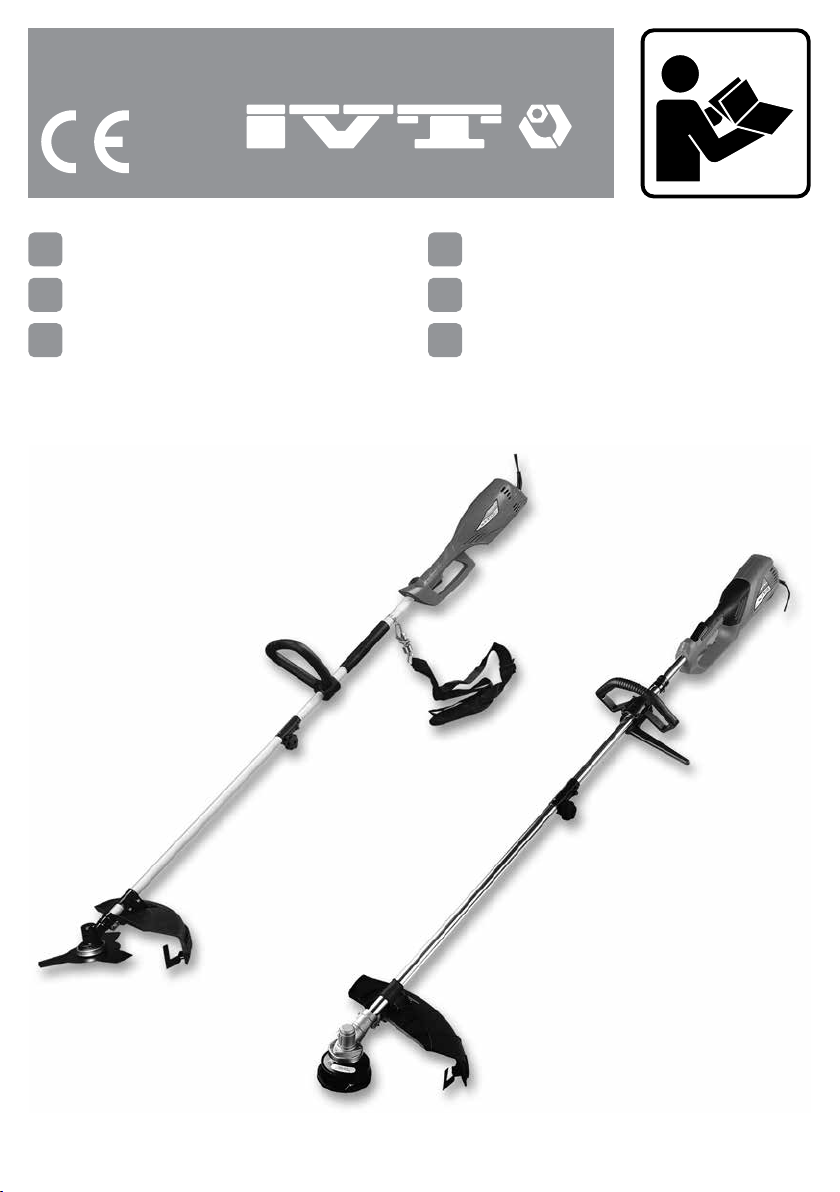
Electric grass trimmer 08-15
DE
Elektrischer Gras-Trimmer 16-25
RU
Электрический триммер для травы 26-35
KZ
Шөпке арналған электрлі қырықтық 36-45
IT
Tagliabordi elettrico 46-55
FR
Trimmeur électrique 56-65
GTE-1000 GTE-1200
Page 2

EN
CONGRATULATION!
Dear customer,
RU
ПОЗДРАВЛЯЕМ!
Уважаемый Покупатель,
IVT team would like to thank you for your choice and for
the condence you put in our product.
Our aim is always to offer an innovative, high-class-strong
and prize-adequate product to the customer.
We wish you’ll get much satisfaction from all your do-it-
yourself activities, by using this tool.
Your IVT Swiss SA Team
NOTE: Illustrations, gures, photos and contents might
vary slightly due to our program of continuous product
improvements.
DE
WIR GRATULIEREN!
Sehr geehrter Kunde,
das Team der Firma IVT dankt Ihnen für Ihr Vertrauen
und für die Wahl unserer Produktion.
Wir streben danach, damit unsere Kunden die Möglichkeit
haben, nur moderne, feste und hochwertige Produkte zu
benutzen.
Wir hoffen, dass mit unseren Werkzeugen Sie ein
wirkliches Vergnügen von der Arbeit bekommen.
Коллектив компании IVT благодарит вас за оказанное
доверие и выбор в пользу нашей продукции.
Мы стремимся к тому, чтобы у наших покупателей была
возможность пользоваться только современными,
прочными и высококачественными продуктами.
Надеемся, что с нашими инструментами вы получите
истинное удовольствие от работы.
С уважением, коллектив IVT Swiss SA
ПРИМЕЧАНИЕ: Рисунки, количественные данные,
фотографии и содержание инструкции могут
изменяться в силу постоянного усовершенствования
нашей продукции.
KZ
ҚҰТТЫҚТАЙМЫЗ!
Құрметті сатып алушы,
IVT компаниясының ұжымы Сізге бізге сенім
артқаныңыз үшін және біздің өнімімізді таңдағаныңыз
үшін алғыс білдіреді.
Біз Сіздерге инновациялық, жоғарғы классты және
жоғары сапалы өнімді тиімді бағамен ұсынуға үнемі
ұмтылып келеміз.
Біздің құралдарыңызбен сіз өз жұмысыңыздан
рахаттанасыз деп үміттенеміз.
Mit freundlichen Grüßen, Team IVT Swiss SA
ANMERKUNG: Bilder, Mengenangaben, Fotos und der
Inhalt der Anleitung können sich kraft der ständigen
Nacharbeit unserer Produktion verändern.
Ізгі ниетпен, IVT Swiss SA ұжымы
ЕСКЕРТУ: Суреттер, сандық мәліметтер және
нұсқаудың мазмұны біздің өнімнің үздіксіз жетілуіне
байланысты өзгеруі мүмкін.
2
Page 3

IT
CONGRATULAZIONI!
Gentile cliente,
l’azienda IVT desidera ringraziarLa per la scelta e per la
ducia dimostrata nel nostro prodotto.
Il nostro obiettivo è offrire sempre prodotti innovativi che
garantiscano un adeguato rapporto qualità/prezzo.
Le auguriamo che i suoi lavori di bricolage possano
diventare un piacere, utilizzando il nostro prodotto.
La squadra IVT Swiss SA
Nota: illustrazioni, gure, foto e contenuti potrebbero
variare leggermente a causa del nostro programma di
continuo miglioramento del prodotto.
FR
FÉLICITATIONS!
Cher client,
Le personnel de l’entreprise IVT vous remercie pour votre
choix et la conance que vous portez à nos produits.
Notre objectif est d’offrir à nos clients le plus moderne
des produits, le plus sûr et de meilleure qualité à un prix
raisonnable.
Nous souhaiterions que votre travail manuel soit, grâce à
notre appareil, un véritable plaisir.
Le personnel de l’entreprise IVT Swiss SA est toujours à
votre disposition.
REMARQUE: Les images, observations quantitatives,
photographies et le contenu du manuel peuvent
sensiblement changer du au perfectionnement
permanent de notre produit.
3
Page 4
GTE-1000
11
14
13
GTE-1200
12
24
9
7
4
8
101
101
3
2
6
5
13
14
11 24
12
4
7
8
9
3
2
6
4
Page 5
[F1] [F4]
12
[F2]
8 7
2
[F3]
GTE-1200GTE-1000
5
Page 6
[F5]
[F6-A]
1517 14 16
[F7]
16
17
18
13
15
14
[F9]
[F6-B]
22
11
15
[F8]
1
1
[F10]
3
2
2
1
23
2
2
6
Page 7
[F11]
[F12]
30°
[F14][F13]
20
22
19
21
1
2
7
Page 8

Instruction manual
TOOL SPECIFICATIONS
Model GTE-1000 GTE-1200
EN
Voltage~Frequency [V~Hz]
Rated power [W] 1000 1200
No-load speed [RPM] 7500 7500
Max. cutting line diameter [mm]
Cutting line diameter [mm] 1.6 1.6
Reserve of the cutting line [m] 5 5
Blade diameter [mm] 255 (25.4) 255 (25.4)
Vibration level [m/s
Sound pressure level [dB(A)] 75.6 (K=3) 75.6 (K=3)
Sound power level [dB(A)] 95.5 (K=3) 95.5 (K=3)
Weight [Kg] 5.8 5.8
Safety class II II
2
] 6.749 (K=1.5) 6.749 (K=1.5)
230~50 230~50
420 420
PART LIST
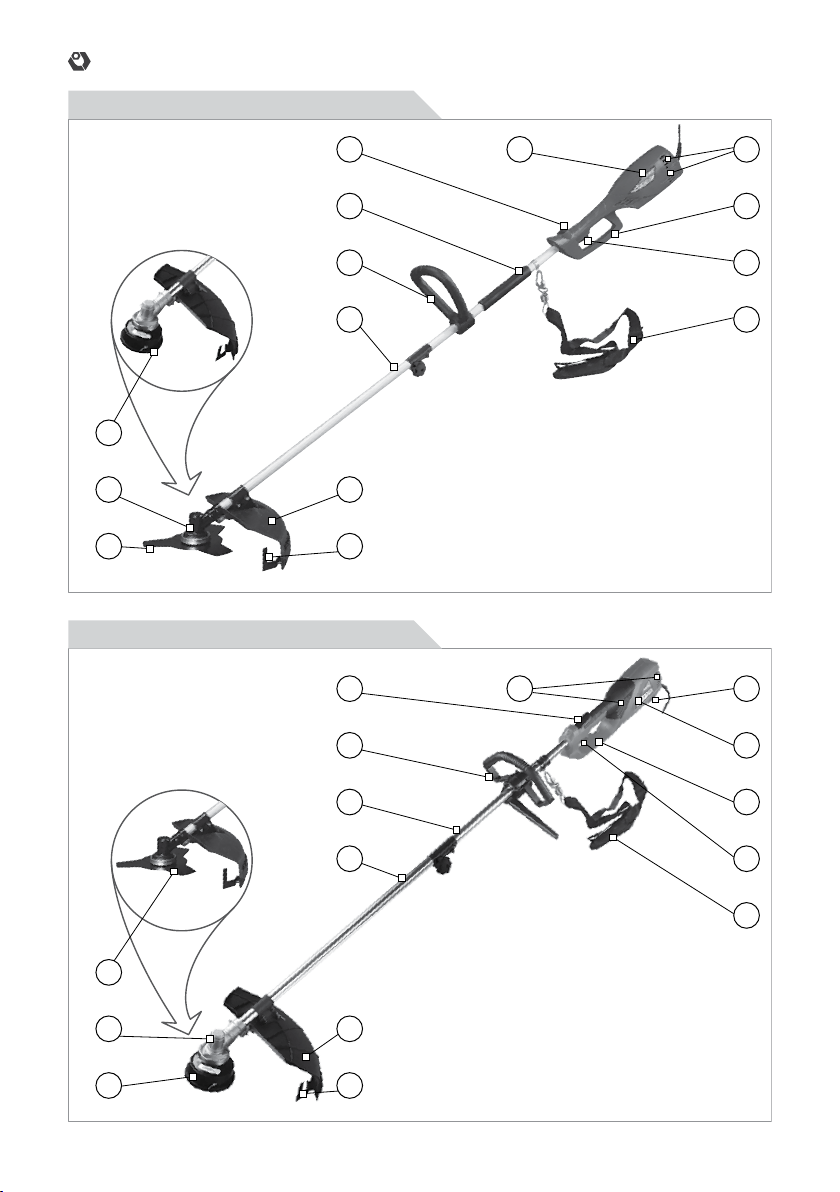
1. Lock-off button
2. On/Off switch
3. Front handle
4. Auxiliary handle
5. Cable strain-relief hook
6. Carrying strap
7. Upper shaft
8. Lower shaft
9. Motor housing
10. Ventilation openings
11. Cutting head
12. Trimmer safety guard
13. Brushcutter blade
14. Gearhead
15. Inner ange
16. Locking nut
17. Cover plate
18. Outer ange
19. Cutting head cover
20. Cover release latch
21. Trimmer spool
22. Cutting line
23. Cutting line feed button
24. Line cutter
CONTENT OF THE BOX
Instruction manual (1 pc), protective guard (1 set), x
screw (1 set), multi-purpose spanner (1 pc), brushcutter
blade (1 pc), trimmer spool (1 pc), auxiliary handle
assembly (1 set), carrying strap (1 pc), hex key (1 pc),
line cutter (1 pc).
INTENDED USE
This tool is intended for cutting lawns and small
areas of grass or similar soft vegetation in private and
hobby gardens and along bed edges, if equipped with
appropriate cutting attachment.
The device is not allowed to be used in public gardens,
parks, sports centres or at roadsides as well as in
agriculture and forestry.
Their light weight and manoeuvrability enable them to
be used in areas which are difcult to access and in
restricted spaces.
This unit can be used as either a trimmer or a
brushcutter, because it is equipped also with a metal
blade which makes it capable of cutting through thicker
weeds and overgrown areas.
SAFETY REGULATION FOR THE USE
General safety rules
The following listed safety instructions should serve you
for the right use of the tool and for the protection of your
own safety, therefore, please read this very carefully.
When passing this tool to a third person, these
instructions must be handed too.
Retain this user’s manual and all other literature
supplied with your tool for any future reference.
Comply with all the safety information and the warnings
on the tool.
Be familiar with the controls and the proper use of the
tool before attempting to use it and above all, make sure
you know how to stop to use it in case of emergency.
Following these simple instructions will also maintain
your tool in good working order.
8
Page 9
Instruction manual
∙ The tool must be assembled correctly before use.
∙ Only use the tool for its designed purposes.
∙ On the tool, there may be also decals and further
indications about the safety equipment to use that must
be considered. The prevention of accidents is dependent
upon the awareness, common sense and proper
training of everyone involved in the operation, transport,
maintenance and storage of the tool.
∙ Never leave the tool unattended.
∙ Never allow children to use the tool. Children should
be supervised to ensure that they do not play with the tool.
∙ Keep children and pets away. All onlookers should
be kept at a safe distance away from the tool when it is
in use.
∙ The user is responsible for third parties while
working with the tool.
∙ People who aren’t acquainted with the operating
instructions, children, juveniles who have not yet reached
the minimum age for using this tool and people under the
inuence of alcohol, drugs or medication are not allowed
to use the tool. Local regulations may restrict the age of
the operator.
WARNING! The consumption of
alcohol, medication and drugs, plus
states of illness, fever and fatigue will
affect your ability to react. Do not use
this tool in any of these situations.
∙ Make sure that all the protective devices (if present)
are tted and are in good condition.
∙ Never operate the tool with defective safety devices
or guards (if present), or without safety devices in place.
∙ Inspect the entire tool to look for loose parts (e.g.
nuts, bolts, screws, etc.) and for any damage. Check
at frequent intervals if screws and bolts (if present) are
properly tight to be sure the equipment is in safe working
condition. Repair or replace them, if necessary, before
using the tool. Serious injury to the operator and to the
bystanders could result if there’s any damage to the tool.
∙ While using the tool, dress properly. Do not
wear loose clothing or jewelery that could become
caught by the tool. Wear suitable working clothes. It is
recommended that legs and feet are covered, to protect
them from eventual ying debris. Do not work barefoot
or wearing open sandals. Long air should be tided back.
∙ Keep handles and grips dry, clean and free from oil
and grease.
∙ Use proper protective equipment. Use safety
glasses and safety gloves. Also use a dust mask during
pulverulent operations or if exhaust gases are present.
When necessary, use also non-slipping boots or shoes,
hardhat and earplugs. If the noise level exceeds 85
dB(A), ear protection is obligatory.
WARNING! Use personal protective
equipment! Safety devices and
personal protective equipment
protect your own health and the
health of others and ensure a troublefree operation of the tool.
∙ Do not start to use the tool if it is in an inverted
position or it is not in the right working order.
∙ Ensure that you have a good stand, while you
operate with the tool. Keep proper footing and balance
at all times.
∙ Keep work area clean. Cluttered areas invite
injuries. Before use, all foreign bodies must be removed
from the working area, also pay attention to foreign
objects during operation.
∙ Do not force the tool.
∙ Only work in daylight or sufciently good articial
light. Never operate the tool without good visibility.
∙ Be careful not to drop the tool or hit it against
obstacles.
ATTENTION! Stay alert. Watch what you are doing.
Distraction can cause you to lose control. Use
common sense.
Electrical safety rules
ATTENTION! When using electrical tools, the
following safety instructions should be observed to
prevent the risk of electric shock, personal injury
and re. Read and observe these instructions
carefully before using the tool.
∙ It is recommended for increased electrical safety
to use a Residual Current Device (RCD) with a tripping
current of not more than 30 mA. Always check your RCD
every time you use it. Consult a reliable electrician.
WARNING! The use of an RCD or
other circuit breaker unit does not
release the operator from the safety
instructions and safe working
practices given in this manual.
∙ The main voltage must correspond to the one
marked on the labels and on this manual. Do not use
other sources of power.
∙ Before inserting the plug in the main socket, make
sure that the socket ratings are correct and correspond
to those indicated on the rating label on the appliance.
∙ Avoid body contact with grounded surfaces such
as pipes, radiators, ranges and refrigerators. This
EN
9
Page 10

Instruction manual
increases risk of electric shock if your body is grounded.
CAUTION! Touching electried parts
EN
∙ Never move the appliance by pulling at the cables.
∙ Do not abuse the cord. Keep it away from heat, oil,
sharp edges or moving parts.
∙ Always guide the connection line safely.
∙ Do not use power tools near ammable liquids or
gases.
∙ Always disconnect the appliance from the mains
supply before transporting it to other places.
∙ Never pass the appliance over its own cord or
extension cable, while the tool is working. Make sure
you always know where the cable is.
∙ Do not wire a power cable directly into your device
yourself. Instead, take the device to your nearest
authorized Service Center.
∙ To avoid danger, damaged power cord should
be replaced by manufacturer or its agent, or similar
qualied person.
∙ Immediately unplug the tool when its cable is
damaged or cut.
Consider working area environment. Do not expose
power tools to rain. Do not use power tools in damp
or wet locations. Keep work area well lit and dry. Try
to prevent the device from getting wet or being
exposed to humidity. Do not leave it outside
overnight. Water entering a power tool will increase
the risk of electric shock.
∙ The power supply cable should be checked
regularly and, before using it, make sure the cable is
not damaged or worn out. If the cable is not in good
condition, do not use the appliance; take it to an
authorized service Center.
∙ When tool is used outdoor, only use an extension
cable that is suitable for outdoor use and which is
marked for this specic use. Keep it away from the
working area, from damp, wet or oily surfaces and away
may cause death by electric shock or
burn.
CAUTION! The appliance should
always be switched off at the mains
before disconnecting any plug and
socket connector or extension cables.
ATTENTION! DANGER OF ELECTRIC
SHOCK!
from heat and ammable materials.
∙ Avoid any accidental starting: make sure that the
power switch (if present) is in the «off» position, before
plugging the tool in.
∙ Remove adjusting keys or wrenches before turning
the tool on.
∙ Do not use the tool if the switch does not turn the
tool on or off. Any tool that cannot be controlled with the
switch is dangerous and must be repaired.
WARNING! During the use of certain
power tools, some dust containing
chemicals known to cause cancer,
may occur.
Some of these chemicals are: lead from lead based
paints, crystalline silica from bricks and cement and other
masonry products, arsenic and chromium from chemically
treated lumber and other dangerous products. If dust is
present, your risk from these exposures varies,
depending on how often you do this type of work. To
reduce your exposure to these chemicals, any time
you do pulverulent operations, work in a well
ventilated area and work with approved safety
equipment, such as dust masks that are specially
designed to lter out microscopic particles.
∙ If the appliance strikes a foreign body, examine the
device for signs of damage and carry out any necessary
repairs before restarting and continuing to work.
∙ If the appliance starts to vibrate abnormally, turn
it off and check for the cause immediately. Vibration is
generally a warning of trouble.
∙ Always switch off the appliance and wait until
the device completely stops whenever you leave
the machine, before carrying out maintenance,
before changing accessories, checking, cleaning,
troubleshooting or working on the appliance.
∙ It is forbidden to move or modify any of the internal
parts of the device.
Specic safety rules
∙ Use suitable working clothes and personal
protective equipment! Basically, wear protective goggles
or eye protection, protection for the ears, boots or shoes
with anti-slip sole and robust, long trousers, as well as
working gloves. Do not operate the unit when barefoot
or wearing open sandals.
∙ The operation of the machine can result in foreign
objects being thrown into your eyes, which can result
in severe eye damaged. Before beginning operation,
always wear safety goggles or safety glasses with side
shields and a full face shield when needed.
∙ Always wear an approved helmet when working in
the forest.
∙ Only use the unit in daylight or good articial light.
10
Page 11
Instruction manual
∙ Do not use the unit near ammable liquids or
gases: danger of explosion.
∙ Never use the machine on slippery ground, at night,
in heavy fog, during rain storms or in any other weather
condition that might make it unsafe to use this product
or difcult to gain a clear view of the area.
∙ Protect the device against humidity. The device
must not be moist and neither should it be operated in a
moist environment.
∙ Only use extension cords for outdoor use, in PVC
ordinary duty.
∙ Always keep the supply cord and extension cord
behind you and away from the cutting equipment.
Always be sure that your power cords do not become
entangled with obstacles or objects.
∙ Do not cut any material other than weed or similar
soft vegetation.
∙ Switch off the device during transport.
∙ Do not operate the unit in awkward positions, off
balance, outstretched arms, or one-handed. Always use
two hands when operating the unit.
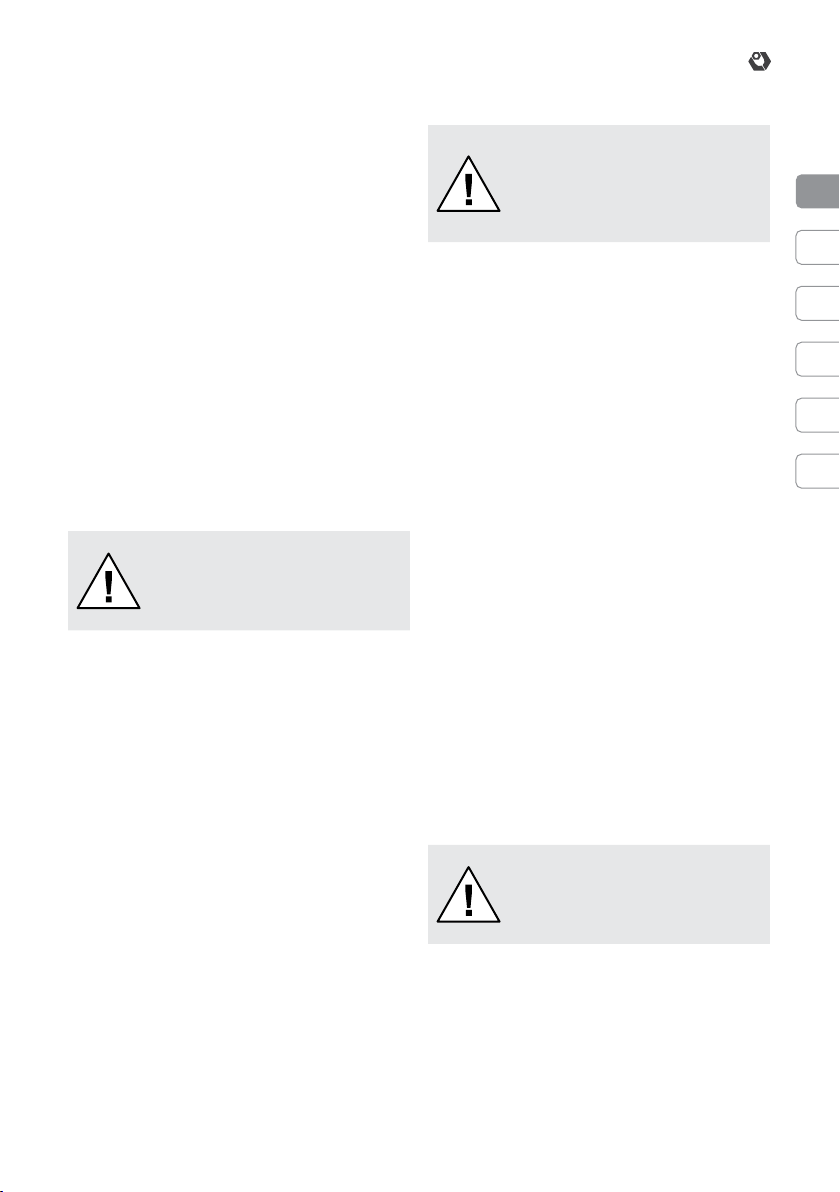
∙ The device has normally to be used at ground level
with the cutting attachment parallel to the ground. Do
not use the device to cut grass that is not on the ground
level, e.g. grass that grows on walls, rocks etc.
∙ Before cutting, inspect the area for stones, glass,
pieces of metal, trash or other solid objects. Make sure
that the cutting equipment does not come in contact
with stones, gravel, wire or other foreign bodies during
the start-up and while working. The cutting attachment
could throw object of this kind.
∙ Always keep a safety distance of 15 m around
yourself. Stones and gravel can be thrown off, which
can cause injuries.
∙ Within the range of action, the user is responsible
for damages to third parties which have been caused by
the use of the device.
∙ Stop using the machine while people, especially
children, or pets are nearby.
∙ Never operate the unit with damaged safety guards
or without the safety guard in place. Make sure the
appropriate safety guard is in place.
∙ Before using the machine and after any impact,
check for signs of wear or damage and repair as
necessary.
∙ Keep the cutting tool, especially when rotating, at a
distance from all parts of your body, particularly hands
and feet.
∙ Always keep proper footing and balance at all
times. Be especially cautious while working on slopes,
on overgrown terrain or in slippery conditions. Watch out
for hidden obstacles.
∙ Take care against injury from the line cutter tted for
trimming the cutting line length.
∙ Do not cross any gravel-strewn roadways or paths
with device still running.
∙ Do not operate unit for prolonged periods, rest
periodically. Limit the amount of time over which the
device is to be used continuously (around 30-40 minutes
per session), and take 10-20 minutes of rest between
work sessions. Also try to keep the total amount of work
performed in a single day under 2 hours or less.
∙ Replace the trimmer spool if cracked, chipped or
damaged in any way. Be sure it is properly installed and
securely fastened.
∙ Never use blades that are incorrect, bent, warped,
cracked, broken or damaged. Keep the blade always
sharp. Check the bolt to fasten the blade and be sure the
blade turns freely without abnormal noise.
CAUTION! After switching off the
device, the cutting head still rotates
for some seconds. Never attempt to
stop the cutting equipment with your
hands. Always wait until it stops by
itself completly.
CAUSES AND OPERATOR PREVENTION
OF THE KICKBACK
When operating the brushcutter, uncontrolled kickback
can occur. Kickback is the sudden and uncontrolled
motion of the machine and cutting tools towards the
operator that can occur:
∙ if the blade binds in the cut;
∙ if the blade segment between 12 and 2 o’clock, as
viewed from the operator’s position [F1] of a rotating
blade comes in contact with a solid rigid object like tree,
rock, bush or wall.
This kickback can cause loss of control of the unit and
may result in serious or fatal injury to the operator or
bystanders.
To avoid kickback and reduce the risk of loss of control:
∙ before beginning work, watch out for hidden
obstacles, such as rocks, stumps, roots, etc., that could
cause the blade to kick back if struck.
∙ always handle the device securely with two hands
and do not grip other parts except the handles.
∙ replace or resharpen dull blades.
∙ never raise the unit above your waist.
∙ avoid operating the brushcutter using the blade
segment between the 12 and 2 o’clock position.
11
EN
Page 12
Instruction manual
UNPACKING
When unpacking, check to make sure that all
components are included. Refer to the drawings on this
EN
manual. If any parts are missing or broken, please call
an IVT assistance center.
ASSEMBLY AND ADJUSTING
INSTRUCTIONS
WARNING! Always disconnect the
trimmer from the mains before making
adjustments!
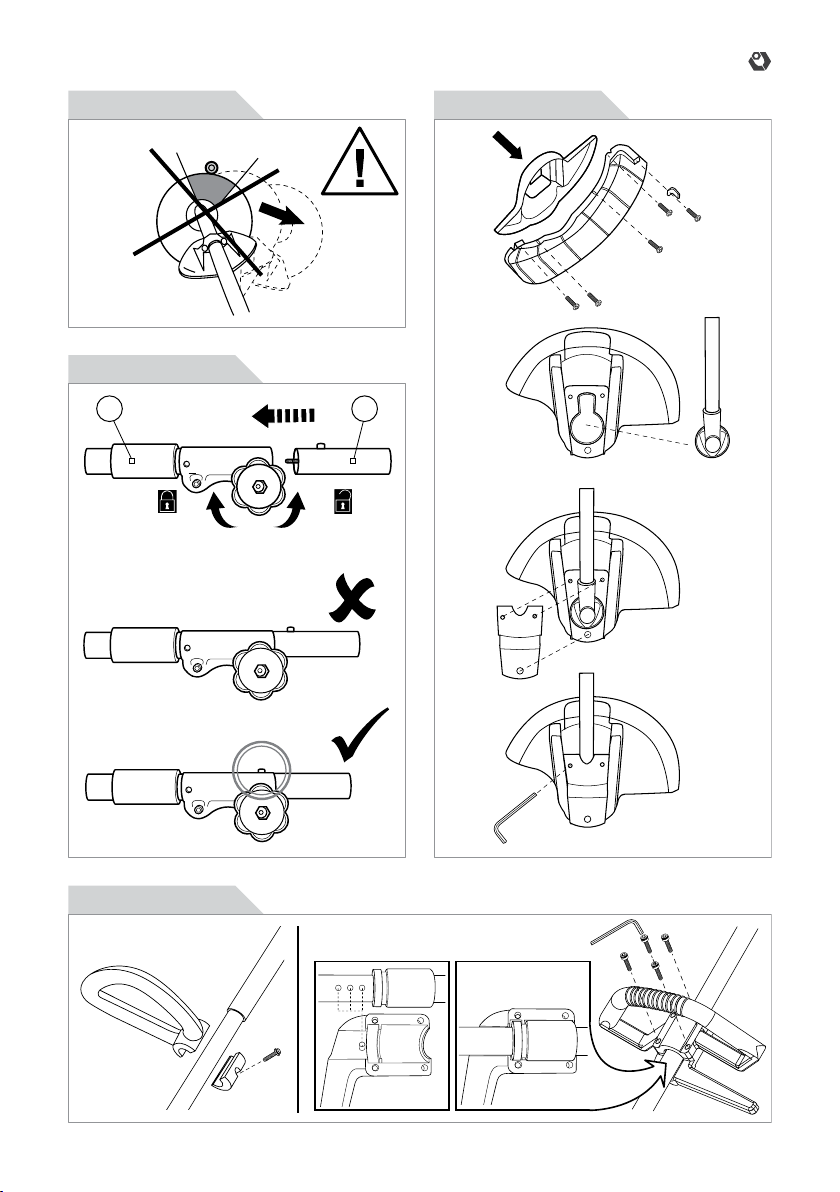
Assembling the whole shaft >> [F2]
Fitting, adjusting the auxiliary handle (4) >> [F3]
Fitting the trimmer safety guard (12) >> [F4]
WARNING! Never operate the tool
without the trimmer safety guard (12)
properly in place. Use of the unit without
having installed the safety guard (12)
will cause the motor to overheat, and
void the warranty, but above all it can
result in very serious injury.
WARNING! Take care against injury
from the line cutter (24) tted on the
trimmer safety guard (12) for trimming
the cutting line (22) to length: it has a
very sharp cutting edge.
1. Snap the trimmer safety guard (12) over the metal
bracket at the end of the lower shaft (8).
2. Fix the trimmer safety guard (12) in position with
screws.
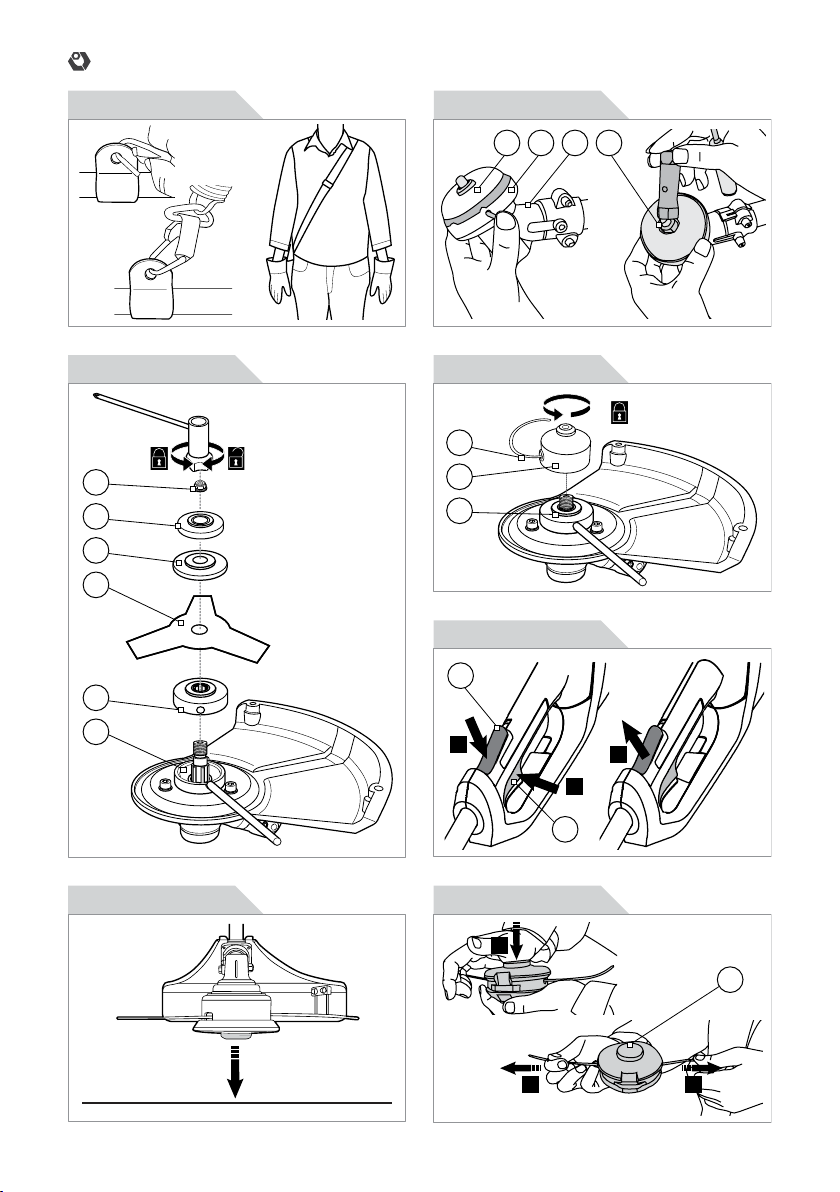
Assembling the carrying strap (6) >> [F5]
Using the cable strain-relief hook (5)
Before connecting the cord to the mains supply, make
sure that the extension cord is located through the
cable strain-relief hook (5). This will prevent undue
pressure being put on the cord connections and is an
important safety device.
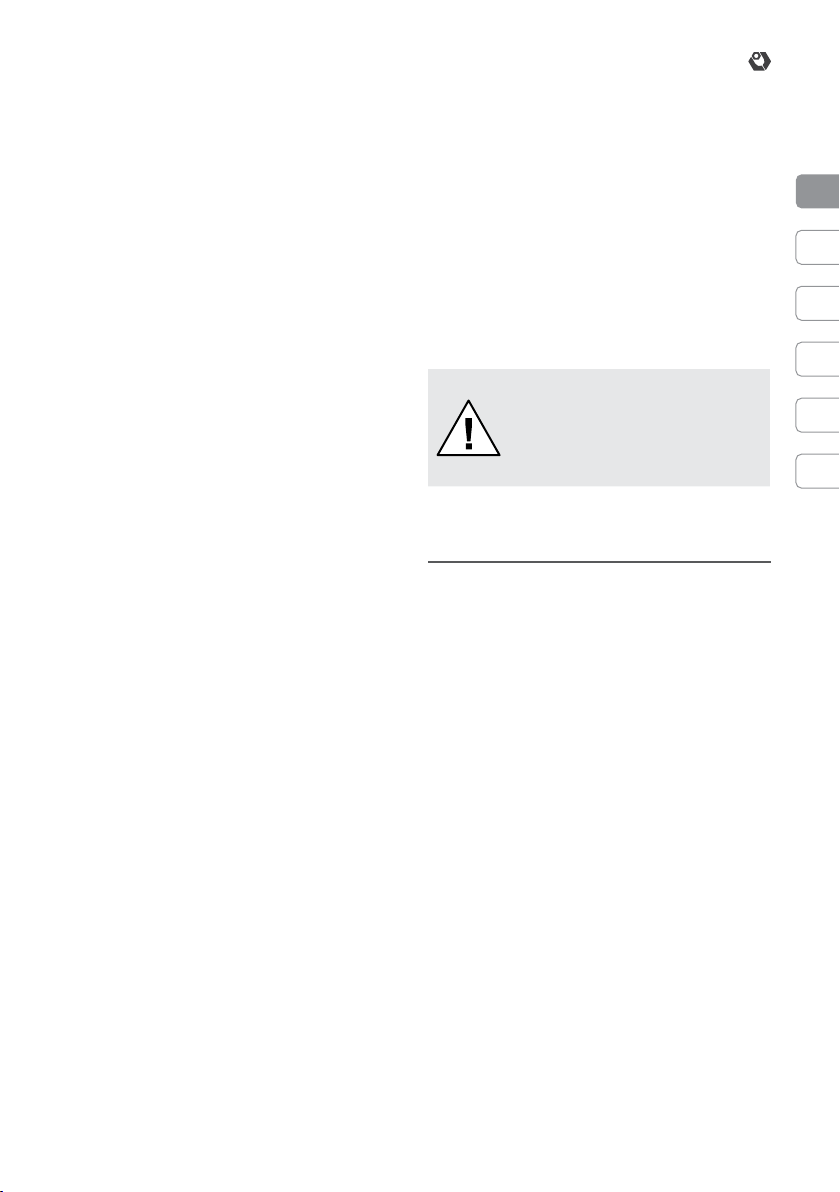
to block the shaft so that parts won’t rotate [F6-A].
2. Use the combination wrench to loosen the locking
nut (16) and take it off. CAUTION! Left-hand thread.
3. Remove the cover plate (17) and outer ange (18).
4. Install the cutting head (11) [F6-B].
5. Screw cutting head (11) onto the threaded output
of the shaft as far as stop.
6. Remove the metal bar.
Assembling the brushcutter blade (13) >> [F7]
Brushcutter blades (13) can be used as an alternative
to nylon monolament line for cutting grass and
ordinary weeds. However, blades should never be used
for edging against solid surfaces.
1. Align the hole of gearhead (14) with the hole of
inner ange (15) and insert the metal bar into the holes
to block the shaft, so that parts won’t rotate.
2. Use the combination wrench to loosen the locking
nut (16) and take it off.
3. Remove the cover plate (17), outer ange (18) and
inner ange (15).
4. Place the inner ange (15) back on.
5. Install the brushcutter blade (13).
6. Place the outer ange (18) back on properly.
7. Insert the cover plate (17) and the locking nut (16).
8. Tighten the locking nut (16).
9. Remove the metal bar.
INITIAL OPERATION
Always use the correct supply voltage: the power
supply voltage must match the information quoted on
the tool identication plate.
SWITCHING ON/OFF
Switching On >> [F8]
WARNING! Switch on only when your
hands and feet are away from the
cutting tools.
Hold the device rmly and without letting it touch the
grass that has to be cut.
∙ Depress the lock-off button (1) and the on/off
switch (2) at the same time.
Switching Off
∙ Release the on/off switch (2).
Assembling the cutting head (11)
1. Align the hole of gearhead (14) with the hole of
inner ange (15) and insert the metal bar into the holes
12
Page 13
Instruction manual
CAUTION! The cutting head (11)
continues to rotate after motor is
switched off for a few seconds! Wait
until it has stopped completly then lay
down the tool.
ADVANCING THE CUTTING LINE (22)
Check the cutting line (22) regularly if it is damaged.
Short or worn cutting lines (22) cut less efciently.
NOTE: Hitting hard and abrasive objects, such as
fences, concrete and rocks within and around long
grass may cause the cutting line (22) to disappear and
can be easily advanced from the trimmer spool (21) by
following simple instructions.
After extending new cutting line (22), always return the
device to its normal operating position, before switching on.
Semi-Matic feed of cutting line (22) (bump-feed) [F9]
∙ Tap the cutting head (11) lightly on the ground
while the device is running at full speed. This will
automatically supply extra cutting line (22).
∙ The line cutter (24) situated under the trimmer
safety guard (12) will automatically trim the cutting line
(22) to the correct length during operation.
ATTENTION! Do not use excessive force nor tap the
cutting head (11) on pavement or concrete.
NOTE: the fresh cutting line (22) will be advanced only
if cutting line (22) is still at least 2,5 cm.
If the cutting line (22) is shorter than 2,5 cm:
∙ Switch off the trimmer and feed the cutting line (22)
manually.
If the end of the cutting line (22) is not visible:
∙ The trimmer spool (21) should be replaced.
ATTENTION! Check the condition of
line cutter (24) regularly. Do not emply
the device under any circumstances
without line cutter (24) or with
defective line cutter (24). Clean the
line cutter (24) from grass and debris
on a regular basis to avoid any
inuence of the cutting effect.
button (23), whilst gently pull out the ends of cutting line
(22) until they reach line cutter (24).
∙ If the line extends past the line cutter (24), too
much cutting line (22) has been fed out. So, remove
the cutting head cover (19) by pressing and holding in
the two cover release latches (20) and make the cutting
line (22) at the desired length.
INSTRUCTIONS FOR USE
CAUTION! Do not employ the device
without the correct safety guard. Make
sure it is functional before every use.
WARNING! Always wear heavy
clothing and eye protection. Rocks or
debris can ricochet or be thrown into
eyes and face and cause blindness or
other serious injury.
∙ Hold front handle (3) with one hand and auxiliary
handle (4) with the other hand.
∙ Make sure that cutting line (22) is fed out before
operation.
∙ Do not switch the machine on with the cutting head
(11) on or near material to be cut. Ensure the machine
is at full speed before contacting material to be cut.
∙ Keep unit below waist level.
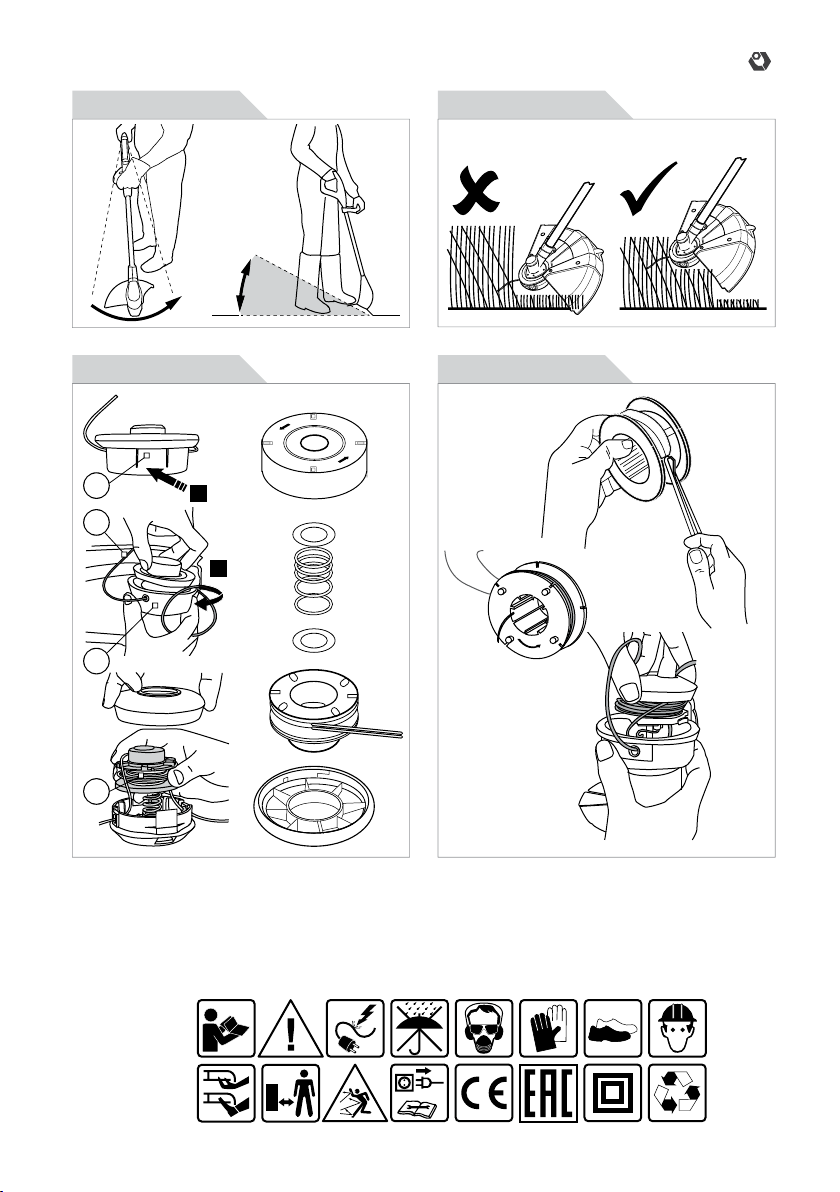
∙ Work only from your right to your left to ensure
debris is thrown away from you. Proceed slowly,
keeping the trimmer inclined (approx. 30°). [F11]
∙ Without bending over, keep cutting head (11) near
and parallel to the ground (perpendicular when edging).
Allow only the tip of cutting line (22) to make contact.
∙ Do not cut damp or wet grass.
∙ High grass should be cut in layers, always
beginning from the top. The cuts should be short. [F12]
∙ Avoid wearing the cutting line (22) out quickly by
knocking against hard objects (stone, walls, fences
etc).
∙ Avoid swinging over the extension cord with the
device still running. You could damage it. You should
always play out the extension cord behind yourself.
WARNING! Do not use the brushcutter
blade (13) for edging against solid
surfaces.
EN
Manual feed of cutting line (22) >> [F10]
If required, the cutting line (22) can be fed out manually.
∙ To operate, press and release cutting line feed
13
Page 14

Instruction manual
MAINTENANCE AND STORAGE
EN
∙ Always keep the tool and the ventilation slots (if
present) cleaned. Regular cleaning and maintenance will
ensure efciency and prolong the life of your tool.
∙ If the tool should fail despite the rigorous manufacturing
and testing procedures, the repair should be carried out by
an authorized IVT customer service.
∙ Keep all nuts, bolts, and screws tight, to be sure the
tool is in safe working condition.
∙ Replace worn or damaged parts for safety.
∙ Use only original spare parts. Parts not produced by
manufacturer may cause poor t and possible injury.
∙ Store the tool in a dry room out of reach of kids and
away from any ammable material.
∙ Never wet the device or spray water on it!
∙ After every cutting procedure, clean grass and earth
off from the cutting equipment and the trimmer safety guard
(12). In this way you can prevent the formation of mildew.
∙ Make sure that handles are clean and free from
grease.
∙ Clean the device with a soft brush or a cloth. Do
not employ any cleaning agent and solvent. They could
damage the device irreparably. Chemical substances can
attack the plastic parts of the machine.
∙ Do not store the unit for a long period in direct sunlight.
∙ Do not cover the device with plastic bags, since this
could generate humidity and mold.
∙ Do not place the device on its trimmer safety guard
(12). The best thing is to suspend it from the front handle
(3) so that the trimmer safety guard (12) does not come in
contact with any other object. The danger exist otherwise
that the trimmer safety guard (12) will deform and
dimensions and safety features will thus change.
Before any work on the device itself,
pull the mains plug.
REPLACING THE TRIMMER SPOOL (21)
ATTENTION! Do not use any kind of
metal, wire or wire rope line on the
trimmer.
WARNING! Use only cutting lines (22)
with correct diameter. Other sizes of
cutting line (22) will not feed properly
and will result in improper function or
can cause serious injury.
IMPORTANT! Make sure that you pull
out the power plug before replacing
the cutting attachment.
Fitting trimmer spool (21) and cutting line (22)
complete
Your trimmer is supplied with a fully disposable trimmer
spool (21) which overcomes troublesome rewinding the
cutting line (22).
1. Disconnect the machine from the main supply.
2. Ensure that you are on a at surface and have
secure footing.
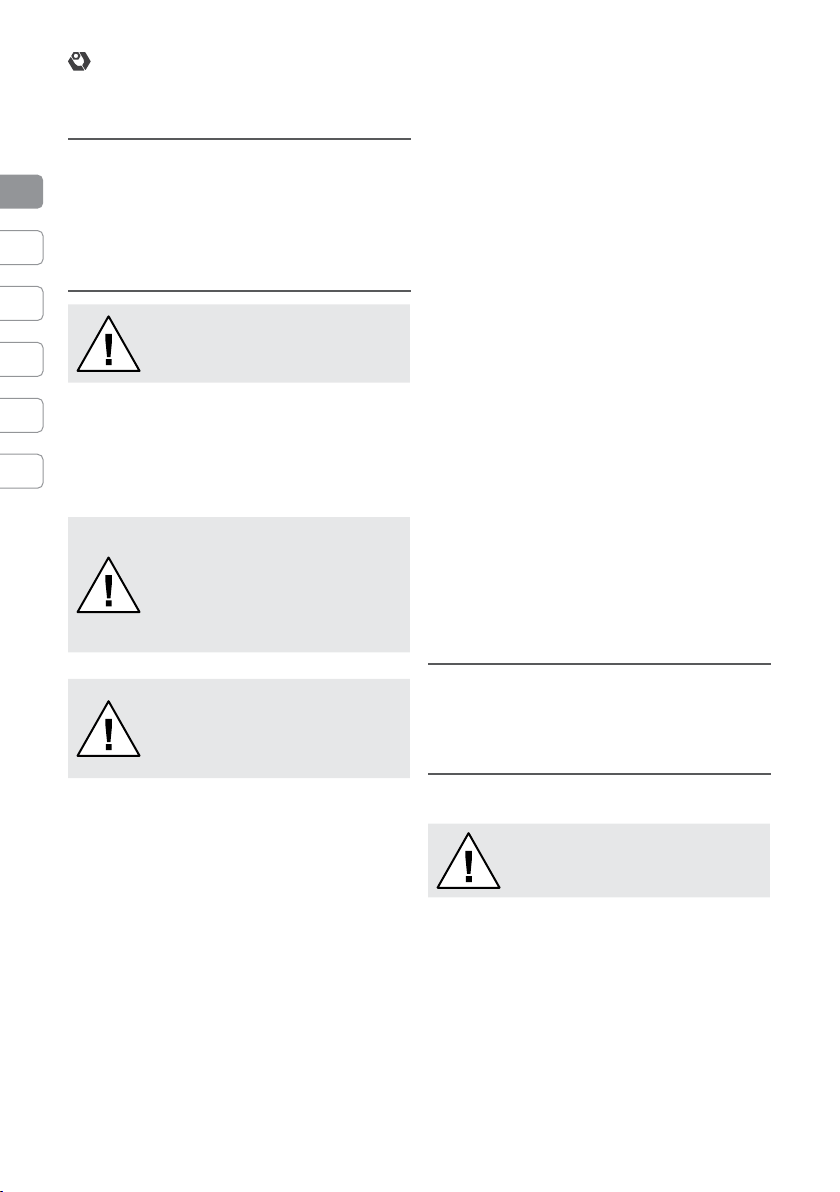
3. Turn the machine upside down with the trimmer
safety guard (12) facing upwards.
4. Press and hold in the cover release latches (20)
to open the cutting head cover (19) and pull out the old
trimmer spool (21) from the cutting head (11). [F13]
5. Clean out the cutting head (11).
6. Insert the two ends of the new cutting line (22)
through the spool eyelets and put the new trimmer spool
(21) into the cutting head (11).
7. Ret the cutting head cover (19).
8. Pull out the ends of the cutting line (22) until they
reach the outside edge of trimmer safety guard (12).
CAUTION! After changing the trimmer
spool (21), run the trimmer under no
load for at least one minute to make
sure that the cutting line (22) and the
tool are both operating correctly.
Fitting nylon cutting line (22) on an empty trimmer
spool (21) >> [F14]
Alternatively, you can also wind a nylon cutting line (22)
onto the trimmer spool (21) yourself. Please refer to the
table of tool specications for maximum diameter and
length of cutting line (22) suitable for your model.
Absolutely ensure also, that you wind the new cutting
line (22) opposite the motor rotation direction which is
marked on the cutting head cover (19) or on the base of
trimmer spool (21) with an arrow.
ATTENTION! Care should be taken to ensure that the
cutting line (22) is neatly coiled on the trimmer spool
(21). Failure to do so will impair the efciency of the
cutting line (22) feed system.
1. Fix the cutting line (22) at its half length into notch
or eyelet in trimmer spool (21).
2. Rewind the cutting line (22) as the arrow shows.
Leave some length (approximately 100 mm) of cutting
line (22) unwound.
14
Page 15
Instruction manual
3. Thread the two ends of the cutting line (22) through
the two eyelets in the cutting head (11) and insert the
trimmer spool (21).
4. Put full trimmer spool (21) into cutting head (11)
back again and close with cutting head cover (19).
5. Press the cutting line feed button (23) and pull out
both ends of cutting line (22) until they reach the outside
edge of the trimmer safety guard (12).
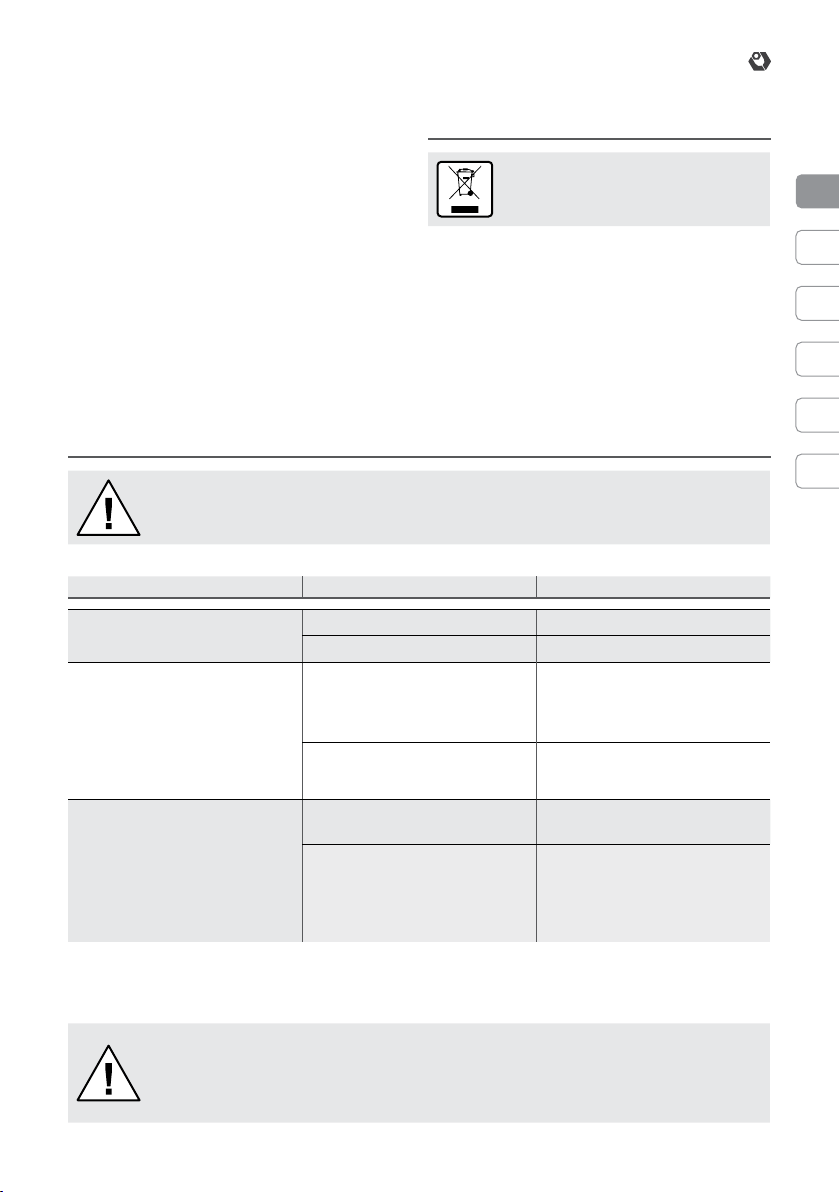
ENVIRONMENTAL PROTECTION
Recycle raw materials instead of
disposing as waste.
Tool, accessories and packaging should be sorted for
environment-friendly recycling.
The plastic components are labeled for categorized
recycling. These instructions are printed on recycled
paper manufactured without chlorine.
TROUBLESHOOTING
CAUTION! Switch off and remove plug from mains before investigating fault.
Conventional trouble Trouble reason Remedy
Device vibrates
Device does not start:
Inferior cutting performance:
If the problem cannot be remedied on the basis of the information above, please take the device to an authorized
IVT Service Center.
∙ Trimmer spool (21) is soiled
∙ Trimmer spool (21) is defective
∙ Mains voltage not applied
∙ On/Off switch (2) defective
∙ Worn carbon brushes
∙ Defective motor
∙ Trimmer spool (21) does not
have sufcient cutting line (22)
∙ Cutting line is not guided out of
the trimmer spool (21) or extends
from the trimmer spool (21) on one
side only
∙ Carefully clean it
∙ Replace it
∙ Check plug socket, cable,
line and plug, where appropriate,
have repaired through electrical
specialist
∙ Repair through customer
service
∙ Adjust cutting line (22) length,
or replace the trimmer spool (21)
∙ Remove the trimmer spool
(21) and thread the cutting line (22)
through the openings to outside;
then mount the trimmer spool (21)
back again
EN
ATTENTION! DO NOT ATTEMPT TO REPAIR THE PRODUCT BY YOURSELF AND DO NOT
TAMPER WITH IT! Any operation of repairing or extraordinary maintenance must be carried
out only by a qualied and authorized IVT Service Center. Do not try to modify any internal
part of the product! THIS WILL COMPLETELY VOID THE WARRANTY AND IT COULD CAUSE
SERIOUS INJURY AND DAMAGE.
15
Page 16

Bedienungsanleitung
TECHNISCHE DATEN DES WERKZEUGES
Modell GTE-1000 GTE-1200
Spannung~Frequenz [V~Hz]
Nennleistung [W] 1000 1200
Drehzahl lastlos [U/min] 7500 7500
DE
Maxmaldurchmesser des Schneidens [mm] 420 420
Durchmesser der Schneidsaite [mm] 1.6 1.6
Vorrat der Schneidsaite [m] 5 5
Durchmesser des Schlegels [mm] 255 (25.4) (3 Zähne) 255 (25.4) (3 Zähne)
Vibrationsniveau [m/s
Schalldruckpegel [dB(A)] 75.6 (K=3) 75.6 (K=3)
Schallleistungspegel [dB(A)] 95.5 (K=3) 95.5 (K=3)
Gewicht [Kg] 5.8 5.8
Klasse der Sicherheit II II
2
] 6.749 (K=1.5) 6.749 (K=1.5)
230~50 230~50
ZUBEHÖRTEILE
1. Halteknopf
2. Zweistellungsschalter “Ein/Aus”
3. Vordere Griff
4. Hilfsgriff
5. Haken zur Ausladung des Kabelzuges
6. Gurt für das Tragen
7. Querlatte
8. Untere Stange
9. Gehäuse des Motors
10. Lüftungsschlitze
11. Schneidkopf
12. Schutzvorrichtung des Trimmers
13. Buschschneidemesser
14. Antriebsreduktor
15. Innenansch
16. Gegenmutter
17. Ebener Deckel
18. Außenansch
19. Deckel des Schneidkopfes
20. Einsperrender Deckelverschluss
21. Druckbehälter des Trimmers
22. Schneidsaite
23. Zufuhrknopf der Schneidsaite
24. Schneider für Saite
BOXGEHALT
Bedienungsanleitung (1 St.), Schutzvorrichtung (1 Satz),
Aufspannschrauben (1 Satz), Universalschraubenschlüssel
(1 St.), Buschschneidemesser (1 St.), Druckbehälter
des Trimmers (1 St), Hilfsgriff komplett (1 Satz), Gurt
für das Tragen (1 St.), Innensechskantschlüssel (1 St.),
Schneider für Saite (1 St.).
VORAUSSICHTLICHE BENUTZUNG
Dieses Gerät ist für Scheren von Rasen und kleinen
Grasabschnitten oder dem analogen weichen
Panzenbestand in privaten und Laiengärten sowie am
Rande von Beeten, wenn das Gerät mit einer geeigneten
Schneidvorrichtung ausgerüstet ist, bestimmt.
Dieses Gerät ist für die Verwendung in öffentlichen
Anlagen, Parks, Sportzentren oder an Straßenrändern
sowie in der Land- und Forstwirtschaft bestimmt.
Das kleine Gewicht und hohe Beweglichkeit lassen
es auf schwerzugänglichen Abschnitten und knappem
Raum anwenden.
Dieses Gerät kann man als Trimmer und Buschschneider
anwenden, da es auch mit der metallischen Klinge
ausgerüstet ist, die es erlaubt, Unkraut mit dickerem
Stiel zu schneiden und stark bewachsene Abschnitte zu
scheren.
ARBEITSSICHERHEIT BEI DER
BENUTZUNG
Allgemeine Regeln der Arbeitssicherheit
Folgende Anleitungen zur Arbeitssicherheit helfen
Ihnen das Werkzeug richtig benutzen und Ihre eigene
Sicherheit gewährleisten. Deswegen lesen Sie sie
besonnen und aufmerksam.
Im Falle der Übergabe des Werkzeuges für die
Benutzung eines Dritten, geben Sie ihm auch
vorliegende Anleitungen der Arbeitssicherheit.
Behalten Sie diese Anleitung und sonstige Literatur, die
mitgeliefert werden. Wenden Sie sich an sie, wenn die
Fragen entstehen.
Folgen Sie strikt den Regeln der Arbeitssicherheit und
16
Page 17
Bedienungsanleitung
Warnungen, die am Werkzeug angegeben sind.
Vor der Arbeit machen Sie sich mit der
Werkzeugsteuerung bekannt, aber, vor allem, studieren
Sie die Verfahren seines Nothalts.
Indem Sie diesen einfachen Anleitungen folgen, werden
Sie Ihr Werkzeug im einwandfreien Zustand halten.
∙ Vor dem Einsatz ist das Werkzeug richtig zu
montieren.
∙ Setzten Sie das Werkzeug streng zweckgemäß.
∙ Nehmen Sie Warnungstafeln und Hinweise
am Werkzeug und studieren Sie sie aufmerksam.
Aufmerksamkeit, vernünftiges Herangehen zur Arbeit
und eine entsprechende Ausbildung von Personen,
die am Betrieb, Transportieren, an der Wartung und
Lagerhaltung des Werkzeuges teilnehmen, helfen
Unfälle verhindern.
∙ Lassen Sie das Werkzeug ohne Aufsicht nicht.
∙ Lassen Sie die Benutzung des Werkzeuges durch
Kinder nicht zu. Erlauben Sie den Kindern nicht, mit
dem Werkzeug zu spielen. играть с инструментом.
∙ Lassen Sie das Aufnden von Kindern und Tieren in
der Nähe des Werkzeuges nicht zu. Die, die den Wunsch
haben, die Arbeit des Werkzeuges zu beobachten, sollen
sich im sicheren Abstand von ihm benden.
∙ Bei der Arbeit mit dem Werkzeug haftet der
Benutzer für die Sicherheit von Dritten.
∙ Personen, die Bedienungsanleitung nicht studiert
haben, Kinder, Minderjährige, die das Alter, das die
Benutzung des Werkzeuges erlaubt, nicht erreicht
haben, sowie Personen, die sich im Alkohol- oder
Rauschzustand oder unter Wirkung medizinischer
Präparate benden, werden zur Arbeit mit dem
Werkzeug nicht zugelassen. Das Alter des Bedienenden
wird durch örtliche Rechtsvorschriften bestimmt.
VORSICHT! Alkohol, einige
Heilmittelpräparate und
berauschende Mittel sowie Krankheit,
Fieber und Müdigkeit vermindern die
Geschwindigkeit der Reaktion. In
oben genannten Fällen benutzen Sie
das Werkzeug nicht.
∙ Versichern Sie sich, dass alle Schutzeinrichtungen
(falls vorhanden) installiert und nutzungsfähig sind.
∙ Benutzen Sie das Werkzeug ohne
Schutzeinrichtungen (falls vorhanden), oder falls sie
beschädigt sind, nicht.
∙ Prüfen Sie das Werkzeug in bezug auf den Bestand
von losen Teilstücken (Muttern, Bolzen, Schrauben
usw.) oder Beschädigungen. Um sichere Arbeit des
Werkzeuges zu gewährleisten, prüfen Sie regelmäßig,
ob Bolzen und Schrauben gut festgezogen sind (falls
vorhanden). Bei Bedarf führen Sie vor dem Einsatz
des Werkzeuges ihre Reparatur oder ihren Austausch
17
durch. Im Falle des Einsatzes des beschädigten
Werkzeuges können dem Bedienenden oder Dritten
ernste Verletzungen zugefügt werden.
∙ Verwenden Sie bei der Arbeit eine entsprechende
Arbeitskleidung. Weite Kleidung, Schmuckstücke
können von beweglichen Teilen mitgenommen
werden. Arbeiten Sie nur in entsprechender
Arbeitskleidung. Schützen Sie ihre Beine und Füße
vor auseinanderiegender Feine. Arbeiten Sie barfuß
oder in offenen Sandalen nicht. Tragen Sie langes Haar
hinten zusammen.
∙ Halten Sie Haltegriffe und Halter trocken und
sauber.
∙ Verwenden Sie entsprechende PSA. Verwenden
Sie Schutzbrille und Handschuhe. Bei der Arbeit mit
Pulvern oder bei dem Auswurf von Abgasen verwenden
Sie den Staubrespirator. Bei Bedarf ziehen Sie
gleitsichere Schuhe, den Schutzhelm und schützen Sie
ihre Gehörorgane mit Ohrstöpseln. Wenn die Lautstärke
85 dB(A) überschreitet, verwenden Sie unbedingt
Gehörschütze.
VORSICHT! Verwenden Sie
persönliche Schutzausrüstung!
Die Schutzeinrichtungen und PSA
gewährleisten die Sicherung ihrer
Gesundheit und die Gesundheit der
Umstehenden sowie garantieren
störungsfreie Arbeit des Werkzeuges.
∙ Lassen Sie das Werkzeug nicht an, wenn es
umgedreht oder im Ruhezustand ist.
∙ Während der Arbeit nehmen Sie die
Beharrungsstellung. Halten Sie immer das
Gleichgewicht.
∙ Halten Sie die Sauberkeit im Arbeitsbereich ein.
Auf den gesperrten Abschnitten ist ein hohes Niveau
von Unfällen. Vor dem Einsatz des Werkzeuges räumen
Sie von der Arbeitsäche alle Fremdkörper auf sowie
vermeiden Sie den Eintritt von Fremdkörpern unter das
Werkzeug während der Arbeit.
∙ Drücken Sie stark auf das Werkzeug während der
Arbeit nicht.
∙ Benutzen Sie das Werkzeug nur bei gutem Tages-
oder Kunstlicht. Benutzen Sie das Werkzeug bei
schlechter Sicht nicht.
∙ Lassen Sie das Werkzeug nicht fallen, lassen
Sie den Anstoß des Werkzeuges auf irgendwelche
Hindernisse nicht zu.
VORSICHT! Gut aufpassen. Schauen Sie von dem
durch das Werkzeug bearbeitenden Stück nicht
weg. Indem man ablenkt, kann man die Steuerung
verlieren. Arbeiten Sie vernünftig.
DE
Page 18
Bedienungsanleitung
Regeln der elektrischen Sicherheit
ACHTUNG! Um den Stromschlag, die
Schadenzufügung der Gesundheit oder
die Entammung bei der Verwendung von
Elektroinstrumenten zu vermeiden, muss man
folgende Arbeitsschutzvorschriften beachten.
DE
Vor dem Einsatz des Werkzeuges lesen Sie diese
Anleitungen und folgen Sie ihnen streng.
∙ Um ein entsprechendes Sicherheitsniveau
sicherzustellen, empehlt es sich, die
Differentialschutzanlage (DSA) zu verwenden, die auf
den Abschaltstrom nicht mehr als 30 mA errechnet
ist. Prüfen Sie die Einsatzfähigkeit der DSA bei jedem
Einsatz. Lassen Sie sich von einem qualizierten
Elektriker beraten.
ACHTUNG! Der Einsatz der PSA
oder einer anderen Einrichtung
der Schutzabschaltung entbindet
den Bedienenden von der
obligatorischen Bekanntmachung
mit Arbeitsschutzvorschriften und
Methoden unfallfreier Arbeit, die in
dieser Anleitung angegeben sind.
∙ Die Netzspannung soll dem Wert, der auf dem
Etikett und in der Anleitung angegeben ist, entsprechen.
Verwenden Sie andere Speisungsquellen nicht.
∙ Vor der Anschaltung des Werkzeuges an das Netz
versichern Sie sich, dass die Steckdose den Angaben,
die auf dem Etikett angegeben sind, entspricht.
∙ Berühren Sie mit dem Körper geerdete Flächen
(Röhre, Heizkörper und Kältevorrichtungen) nicht. Bei
der Erdung durch den Körper erhöht sich das Risiko
des Stromschlages.
VORSICHT! Zur Vermeidung der
Verbrennung oder der Stromschädigung
Leitstücke nicht berühren.
∙ Ziehen Sie für die Netzschnur bei der Verschiebung
des Werkzeuges nicht.
∙ Benutzen Sie die Netzschnur mit Vorsicht.
Schützen Sie die Netzschnur vor Wärmeeinwirkung,
vermeiden Sie ihren Kontakt mit Schmierstoffen sowie
mit scharfen Sachen oder beweglichen Teilen.
∙ Seien Sie mit der Netzschnur vorsichtig.
∙ Verwenden Sie Elektroinstrumente in der
Nähe von leichtentammbaren Flüssigkeiten und
Brenngasen nicht.
∙ Bevor Sie das Werkzeug auf einen anderen Platz
übertragen, schalten Sie es von dem Netz frei.
VORSICHT! Das Werkzeug ist zuerst
auszuschalten und dann von der
Steckdose oder Verlängerungsschnur
freizuschalten.
∙ Drücken Sie die Netzschnur oder die
Verlängerungsschnur während der Arbeit des
Werkzeuges nicht durch und verwickeln Sie sie nicht.
Haben Sie das Kabel immer im Auge.
∙ Schließen Sie das Netzkabel unmittelbar an das
Werkzeug selbständig nicht an. Wenden Sie sich an
das nächste ofzielle Dienstleistungszentrum.
∙ Bei der Schnurbeschädigung soll sie unbedingt
der Hersteller oder sein Agent, oder eine andere
sachkundige Person austauschen.
∙ Ziehen Sie umgehend den Stecker aus der
Steckdose heraus, wenn die Netzschnur beschädigt
oder eingeschnitten ist.
ACHTUNG! STROMSCHLAGGEFAHR!
Lenken Sie Ihre Aufmerksamkeit auf Ihren
Arbeitsplatz. Benutzen Sie Elektroinstrumente
unter Regen nicht. Benutzen Sie Elektroinstrumente
in feuchten und nassen Räumen nicht. Halten Sie
ihren Arbeitsbereich trocken, sichern Sie gute
Beleuchtung. Schützen Sie das Werkzeug vor
Feuchtigkeit. Lassen Sie das Werkzeug in der
Freiluft über Nacht nicht. Beim Wassereindringen
in das Werkzeug erhöht sich das Risiko des
Stromschlages.
∙ Prüfen Sie die Netzschnur auf das
Vorhandensein von Beschädigungen und Zeichen
der Abnutzung regelmäßig und vor jedem Einsatz.
Benutzen Sie das Werkzeug mit der beschädigten
Netzschnur nicht; Wenden Sie sich an das ofzielle
Dienstleistungszentrum.
∙ Bei der Arbeit draußen verwenden Sie nur
dafür bestimmte Verlängerungsschnur mit einer
entsprechenden Markierung. Vermeiden Sie
den Eintritt der Verlängerungsschnur unter das
Werkzeug, schützen Sie sie vor Feuchtigkeit, vor
Wärmeeinwirkung, vermeiden Sie den Kontakt mit
Schmierstoffen und leichtentammenden Stoffen.
∙ Vermeiden Sie zufälliges Anlassen des
Werkzeuges: vor dem Anschluss des Werkzeuges an
das Netz versichern Sie sich, dass der Schalter (falls
vorhanden) in die Position ‘off’ (AUS) umgeschaltet ist.
∙ Vor dem Anlass des Werkzeuges entfernen Sie
18
Page 19

Bedienungsanleitung
Einstellkeile und Stellschlüssel.
∙ Benutzen Sie das Werkzeug mit dem gestörten
Schalter nicht. Das Werkzeug mit dem gestörten
Schalter ist gefährlich und erfordert die Reparatur.
ACHTUNG! Manchmal während
der Arbeit mit Elektroinstrumenten
bildet sich Staub, der die den Krebs
erregende Stoffe enthält.
Zu solchen chemischen Stoffen gehören: Blei in
Bleioxid, Quarz, der zum Bestand des Backsteins und
des Zements gehört, Arsen und Chrom, die im
Schnittholz, das durch chemische Reagens behandelt
ist, enthalten sind, und sonstige schädliche Stoffe. Das
Risiko der Einwirkung dieser chemischen Stoffe hängt
von der Häugkeit der Durchführung der mit ihnen
verbundenen Arbeiten ab.
Um ihre schädliche Einwirkung zu reduzieren,
arbeiten Sie in einem gut gelüfteten Raum und
benutzen Sie entsprechende fehlerfreie PSA, z.B.,
Staubrespiratoren, die speziell für die Auslterung
von mikroskopischen Teilchen entwickelt sind.
∙ Bei dem Eintritt eines Fremdkörpers unter das
Werkzeug prüfen Sie es auf das Vorhandensein von
Beschädigungen und machen Sie eine notwendige
Reparatur.
∙ Bei dem Entstehen der Übervibration schalten
Sie das Werkzeug aus und stellen Sie umgehend die
Ursache fest. Die Vibration ist gewöhnlich ein Zeichen
der Störung.
∙ Bevor Sie Ihren Arbeitsplatz verlassen, führen
Sie die Reparatur, Sichtkontrolle oder Reinigung des
Werkzeuges, schalten Sie es aus und warten Sie auf
vollständiges Stoppen von beweglichen Teilen.
∙ Es ist verboten, die Innenteile des Werkzeuges
abzumontieren und zu ändern.
Besondere Arbeitsschutzvorschriften
∙ Benutzen Sie geeignete Arbeitskleidung und
PSA! Benutzen Sie Schutzbrille oder einen Schutz
für Augen, Schutz für Ohren, Stiefel oder Schuhe
mit rutschsicherer Sohle sowie feste lange Hose
und Arbeitshandschuhe. Arbeiten Sie mit dieser
Vorrichtung barfuß oder in offenen Sandalen nicht.
∙ Die Arbeit der Maschine kann mit dem Werfen
von Fremdkörpern in die Augen begleitet werden, was
zur ernsten Verletzung von Augen führen kann. Vor
der Arbeit setzen Sie immer Schutzbrille-Konserven
oder offene Schutzbrille mit seitlichen Schilden auf,
sowie den vollen Schutz für das Gesicht, wenn es
erforderlich ist.
∙ Bei der Arbeit im Wald setzen Sie immer
zertizierten Schutzhelm auf.
∙ Benutzen Sie die Vorrichtung nur in der Tageszeit
oder bei der guten künstlichen Beleuchtung.
∙ Betreiben Sie die Vorrichtung in der Nähe von
brennenden Flüssigkeiten oder Gasen: es besteht die
Gefahr der Explosion.
∙ Benutzen Sie die Maschine nie auf rutschigem
Boden, in der Nacht, im dichten Nebel, bei
dem Schauerwetter oder unter allen anderen
Wetterverhältnissen, die die Verwendung dieses
Gerätes gefährlich machen können oder den Überblick
des Abschnittes erschweren.
∙ Schützen Sie die Vorrichtung vor Feuchtigkeit.
Lassen Sie die Befeuchtung dieser Vorrichtung nicht
zu, soowie sie soll nie in der feuchten Umgebung
betrieben werden.
∙ Verwenden Sie nur Verlängerungsschnur, die für
den Einsatz im Freien bestimmt ist, in der Isolierung
aus Polyvinylchlorid für normale Bedingungen.
∙ Halten Sie das Stromanschlusskabel immer hinter
sich und weit von der Schneidausrüstung. Achten Sie
immer darauf, dass sich ihre Stromanschlusskabel in
irgendwelchen Hindernissen oder Gegenständen nicht
verwickeln.
∙ Schneiden Sie kein anderes Material außer
Unkraut oder analogen weichen Panzenbestand.
∙ Schalten Sie die Vorrichtung während des
Transportes aus.
∙ Arbeiten Sie mit dieser Vorrichtung nicht, indem
Sie sich in unbequemen Lagen, in nicht sicheren
Haltungen benden, mit ausgestreckten Händen oder
mit einer Hand. Bei der Arbeit mit der Vorrichtung
benutzen Sie immer beide Hände.
∙ Die Vorrichtung soll in der Regel auf der
Bodenebene verwendet, mit dem Schneidteil,
der parallel dem Boden ist. Verwenden Sie diese
Vorrichtung für Schneiden von Gras, das sich nicht auf
der Bodenebene bendet, d.h. Gras, das an Mauern,
Felsen usw. wächst.
∙ Vor dem Scheren des Abschnittes kontrollieren
Sie ihn in Bezug auf Steine, Glas, Metallreste, Müll und
andere harte Gegenstände. Stellen Sie sicher, dass
der Schneidteil bei dem Anlassen und während der
Arbeit in keinen Kontakt mit Steinen, Gies, Draht und
andere fremde Gegenstände kommt. Der Schneidteil
kann Gegenstände solcher Art auswerfen.
∙ Halten Sie immer sicher Entfernung von 15 m um
sich herum. Es kann das Auswerfen von Steinen und
Gies, die Verletzungen bringen können, passieren.
∙ In den Grenzen der angegebenen Reichweite
haftet der Bedienende für Schaden, die den Dritten in
Ergebnis der Verwendung dieser Vorrichtung zugefügt
sind.
∙ Benutzen Sie die Maschine nicht, wenn sich in
der Nähe die Menschen, insbesondere Kinder, sowie
Haustiere benden.
∙ Betreiben Sie diese Vorrichtung nie mit dem
geschädigten Schutz oder ohne installierten Schutz.
19
DE
Page 20

Bedienungsanleitung
Stellen Sie sicher, dass der entsprechende Schutz
vorhanden ist.
∙ Vor dem Einsatz der Maschine und nach jedem Schlag
prüfen Sie sie in Bezug auf Merkmale des Abnutzung oder
Beschädigung und bei Bedarf reparieren Sie sie.
∙ Halten Sie den Schneidteil, besonders während
seiner Drehung, in der sicheren Entfernung von allen
DE
Körperteilen, insbesondere Armen und Beinen.
∙ Behalten Sie immer stabile Lage von Ihren
Füßen und Körpergleichgewicht. Seien Sie besonders
vorsichtig bei der Arbeit an Hängen, auf stark
bewachsenen Abschnitten oder unter rutschigen
Bedingungen. Hüten Sie sich vor versteckten
Hindernissen.
∙ Treffen Sie Maßnahmen, um keine Verletzungen
vom Schneider für die Schneidsaite, der für das
Abschneiden der Schneidsaite nach der erforderlichen
Länge installiert ist, zu bekommen.
∙ Durchqueren Sie Wege und Pfade mit kiesiger
Bedeckung, bis die Vorrichtung arbeitet.
∙ Betreiben Sie die Vorrichtung ununterbrochen
währen der langen Zeit nicht, machen Sie regelmäßig
Pausen. Begrenzen Sie die Zeitspanne, in der Die
Vorrichtung ununterbrochen eingesetzt wird (etwa 3040 Minuten für ein Mal), und planen Sie 10-20 Minuten
Pause zwischen Arbeitsperioden. Versuchen Sie auch
den vollen Umfang der Arbeit für den Tag im Bereich
von 2 Stunden oder weniger zu halten.
∙ Wechseln Sie den Druckbehälter des Trimmers im
Falle der Entstehung der Risse, des Verschleißes oder
der Beschädigungen aller Art. Sichern Sie ihre richtige
Installierung und Befestigung.
∙ Verwenden Sie nie unzutreffende, verbogene,
zerrissene, kaputte oder beschädigte Messer.
Schleifen Sie ständig Messer an. Prüfen Sie den
Bolzen, mit dem das Messer befestigt wird, sowie
stellen Sie sicher, dass sich das Messer frei und ohne
anomales Geräusch dreht.
WARNUNG! Nach dem Ausschalten
des Gerätes setzt der Schneidkopf fort,
sich im Laufe von einigen Sekunden
zu drehen. Versuchen Sie nie, die
Schneidvorrichtung mit Händen zu
halten. Warten Sie immer auf einen
vollen Halt.
Maschine und Schneidvorrichtungen in die Richtung
des Bedienenden dar, die entstehen kann;
∙ wenn das Messer im abschneidenden Material
steckt;
wenn das Segment des drehenden Messers zwischen
Richtungen auf 12 Uhr und auf 2 Uhr, Aussicht von
Seiten des Bedienenden [F1], in Kontakt mit einem
festen harten Gegenstand, z.B., Baum, großer Stein,
Busch oder Wand, kommt.
Solcher Rückstoß kann zum Verlust der Kontrolle über
die Vorrichtung führen und zum Grund einer ernsten
oder tödlichen Verletzung des Bedienenden und der in
der Nähe stehenden Menschen werden.
Um den Rückstoß zu vermeiden und das Risiko des
Verlustes der Kontrolle zu vermindern:
∙ vor der Arbeit führen Sie die Kontrolle durch in
Bezug auf versteckte Hindernisse, z.B., große Steine,
Klötze, Wurzeln usw., die zum Rückstoß führen
können, wenn das Messer auf sie stößt.
∙ halten Sie die Vorrichtung immer mit beiden
Händen fest und fassen Sie andere Teile außer Griffen
nicht an.
∙ Wechseln Sie oder schleifen Sie abgestumpfte
Messer an.
∙ Heben Sie die Vorrichtung nie höher als Ihre Taille.
∙ Vermeiden Sie die Arbeit in der Betriebsart
des Buschschneiders, indem Sie das Segment des
Messers zwischen den Richtungen auf 12 Uhr und auf
2 Uhr verwenden.
AUFSCHLUSS DER VERPACKUNG
Bei dem Aufschluss der Verpackung prüfen Sie das
Vorhandensein des Zubehörs. Vgl. Zeichnungen
zu dieser Anleitung. Bei dem Fehlen oder Defekt
von einigen Teilen wenden Sie sich an das
Dienstleistungszentrum IVT.
AUFBAUANLEITUNG UND EINSTELLEN
WARNUNG! Schalten Sie den Trimmer
immer aus dem Netz vor dem
Einstellen!
GRÜNDE DES RÜCKSTOSSES UND
SEINE VERMEIDUNG DURCH DEN
BEDIENENDEN
Bei der Arbeit in der Betriebsart des Buschschneiders
kann ein unkontrollierter Rückstoß entstehen. Der
Rückstoß stellt nichtgelenkte Verschiebung der
20
Aufbau der ganzen Stange >> [F2]
Installieren und Einstellen des Hilfsgriffes (4) >> [F3]
Installieren des Schutzvorrichtung des Trimmers (12)
>> [F4]
Page 21
Bedienungsanleitung
WARNUNG! Betreiben Sie das
Gerät nie ohne richtig installierte
Schutzvorrichtung (12). Die
Verwendung des Gerätes ohne richtig
installierte Schutzvorrichtung des
Trimmers (12) führt zum Überhitzen
des Motors und zur Annullierung der
Garantiepichten, aber vor allem kann
es zur ernsten Verletzung führen.
WARNUNG! Treffen Sie Maßnahmen,
um keine Verletzungen von dem
Schneider für die Schneidsaite (24),
der an der Schutzvorrichtung des
Trimmers (12) zum Abschneiden
der Schneidsaite (22) nach der
erforderlichen Länge installiert ist, zu
bekommen: dieser Schneider hat eine
sehr scharfe Kante.
1. Schnappen Sie die Schutzvorrichtung des Trimmers
(12) auf dem metallischen Tragarm am Ende der unteren
Stange (8) ein.
2. Fixieren Sie die Schutzvorrichtung des Trimmers
(12) mit Schrauben in der erforderlichen Position.
Ansetzen des Gurtes für das Tragen (6) >> [F5]
Anwendung des Hakens zur Ausladung des
Kabelzuges (5)
Vor dem Kabelanschluss an das Stromnetz stellen
Sie sicher, dass die Verlängerungsschnur über den
Haken zur Ausladung des Kabelzuges (5) durchstreift
ist. Dieser Hacken vermeidet überschüssige
Kräfte an Verkabelungen und ist eine wichtige
Sicherungsvorrichtung.
Aufbau des Buschschneidemessers (13) >> [F7]
Die Buschschneidmesser (13) können als Alternative für
Nylonfadensaite eingesetzt werden, um das Scheren von
Gras und normalem Unkraut durchzuführen. Aber die
Messer sollen nie das Scheren des Panzenbestandes
neben den harten Flächen eingesetzt werden.
1. Kongruieren Sie den Mund des Antriebsreduktors
(14) mit dem Mund des Innenansches (15) und setzen
Sie den Steckling in den Mund für die Verriegelung der
Stange, damit sich die Teile nicht drehen können.
2. Verwenden Sie den Ringmaulschlüssel, um die
Gegenmutter (16) zu lockern und abzunehmen.
3. Nehmen Sie ebenen Deckel (17), Außenansch
(18) und Innenansch (15) ab.
4. Setzen Sie den Innenansch (15) an die Stelle zurück.
5. Installieren Sie das Buschschneidemesser (13).
6. Installieren Sie sachgemäß den Außenansch (18)
an seine Stelle.
7. Setzen Sie ebenen Deckel (17) und die
Gegenmutter (16) ein.
8. Ziehen Sie die Gegenmutter (16) an.
9. Entfernen Sie den Steckling.
BEGINN DES BETRIEBS
Der Spannungswert soll dem auf dem Schild der
Passangaben angegebenen Wert des Werkzeuges
entsprechen.
EINSCHALTEN/AUSSCHALTEN
Einschalten >> [F8]
WARNUNG! Schalten Sie nur in dem
Fall ein, wenn Ihre Hände und Füße
weit von Schneidteilen sind.
DE
Aufbau des Schneidkopfes (11)
1. Kongruieren Sie den Mund des Antriebsreduktors
(14) mit dem Mund des Außenansches (15) und setzen
Sie den Steckling in den Mund für die Verriegelung der
Stange, damit sich die Teile nicht drehen können [F6-A].
2. Verwenden Sie den Ringmaulschlüssel, um
die Gegenmutter zu lockern und abzunehmen (16).
WARNUNG! Das Gewinde ist linksgängig.
3. Nehmen Sie ebenen Deckel (17) und Außenansch
(18) ab.
4. Installieren Sie den Schneidkopf (11) [F6-B].
5. Schrauben Sie den Schneidkopf (11) auf den
Gewindeausgang der Stange auf Anschlag auf.
6. Entfernen Sie den Steckling.
21
Halten Sie die Vorrichtung fest und lassen Sie sie das
Gras, das zu schneiden ist, nicht berühren.
∙ Drücken Sie den Halteknopf (1) und den
Zweistellungsschalter “Ein/Aus” (2) gleichzeitig.
Ausschalten
∙ Lassen Sie den Zweistellungsschalter “Ein/Aus” (2) frei.
WARNUNG! Der Schneidkopf (11)
setzt fort, sich im Laufe von einigen
Sekunden nach dem Ausschalten des
Motors zu drehen! Warten Sie auf den
vollen Halt und erst dann legen Sie
das Gerät.
Page 22

Bedienungsanleitung
ZUFUHR DER SCHNEIDSAITE (22)
Kontrollieren Sie regelmäßig die Schneidsaite (22)
hinsichtlich der Beschädigung. Kurze oder abgetragene
Schneidsaiten (22) schneiden weniger effektiv.
ANMERKUNG: Der Schlag gegen harte und den
DE
Abtriebsverschleiß hervorrufende Gegenstände, z.B.,
Zäune, Beton und große Steine in langem Gras und um
es herum können zum Reißen der Schneidsaite (22),
die man leicht aus dem Druckbehälter (21) geben kann,
indem man folgende einfache Anleitungen erfüllt, führen.
Nachdem Sie aus dem Druckbehälter ein neues Stück
der Schneidsaite (22) gezogen haben, bringen Sie die
Vorrichtung in den normalen Arbeitszustand vor ihrem
Einschalten.
Halbautomatische Zufuhr der Schneidsaite (22)
(stoßartige Zufuhr) >> [F9]
∙ Schlagen Sie mit dem Schneidkopf (11) leicht auf
den Boden, bis die Vorrichtung in voller Geschwindigkeit
arbeitet. Dabei wird automatisch die zusätzliche Zufuhr
der Schneidsaite (22) erfolgen.
∙ Der Schneider für die Schneidsaite (24), der sich
unter der Schutzvorrichtung des Trimmers (12) bendet,
wird während der Arbeit automatisch die Schneidsaite
(22) nach der erforderlichen Länge abschneiden.
ACHTUNG! Verwenden Sie keine übermäßige Kraft
und schlagen Sie mit dem Schneidkopf (11) auf die
Straßenoberäche oder Beton.
ANMERKUNG: neue Schneidsaite (22) wird nur in dem
Fall gezogen werden, wenn die Länge des Endes der
Schneidsaite (22) weniger als 2,5 cm beträgt.
ACHTUNG! Prüfen Sie regelmäßig
den Zustand des Schneiders für die
Schneidsaite (24). In keinem Fall
verwenden Sie die Vorrichtung ohne
Schneider für die Schneidsaite (24)
oder mit dem defekten Schneider
für die Schneidsaite (24). Reinigen
Sie regelmäßig den Schneider für
die Schneidsaite (24) von Gras und
Müll, um alle Einwirkungen auf die
Schneidfähigkeit auszuschließen.
Handzufuhr der Schneidsaite (22) >> [F10]
Bei Bedarf kann man die Schneidsaite (22) nach außen
mit der Hand schieben.
∙ Für die Erfüllung dieser Operation drücken Sie und
lassen Sie den Zufuhrknopf der Schneidsaite (23) frei,
indem Sie vorsichtig die Enden der Schneidsaite (22)
ziehen, bis sie den Schneider für die Schneidsaite (24)
erreichen.
∙ Wenn die Schneidsaite die Grenzen des Schneiders
für die Schneidsaite (24) überschreitet, so wurde zu viel
Schneidsaite (22) gezogen. In diesem Fall nehmen
Sie den Deckel des Schneidkopfes (19) ab, indem Sie
zwei aufriegelnde Deckelverschlüsse (20) drücken und
halten, und dann stellen Sie die erforderliche Länge der
Schneidsaite (22) fest.
BEDIENUNGSANLEITUNG
WARNUNG! Benutzen Sie die
Vorrichtung ohne sachgemäßen
Schutz nicht. Vor jedem Einsatz stellen
Sie in ihrer Leistungsfähigkeit sicher.
Wenn die Länge des Endes der Schneidsaite (22)
weniger als 2,5 cm ist:
∙ Schalten Sie den Trimmer und schieben Sie die
Schneidsaite (22) mit der Hand.
Wenn die Länge des Endes der Schneidsaite (22) nicht
sichtbar ist:
∙ Den Druckbehälter des Trimmers (21) ist zu
wechseln.
WARNUNG! Ziehen Sie immer dichte
Kleidung an und setzen Sie den
Schutz für die Augen auf. Steine und
Schnitte können abprallen oder in die
Augen und das Gesicht iegen, was
zur Blindheit oder sonstigen ernsten
Verletzung führen kann.
∙ Halten Sie den vorderen Griff (3) mit einer Hand
und den Hilfsgriff (4) halten Sie mit der zweiten Hand.
∙ Vor der Arbeit stellen Sie sicher, dass die
Schneidsaite (22) nach außen zugeführt ist.
∙ Setzen Sie die Maschine nicht außer Betrieb,
wenn sich der Schneidkopf (11) in dem Material, das
zu schneiden ist, oder in der Nähe von ihm bendet.
Vor dem Kontakt mit dem Material, das zu schneiden
ist, stellen Sie sicher, dass die Maschine auf der
22
Page 23

Bedienungsanleitung
Gesamtdrehung arbeitet.
∙ Halten Sie die Vorrichtung unter der Taille.
∙ Bei der Arbeit bewegen Sie sich nur von rechts
nach links, damit die Schnitte abseits geworfen werden.
Arbeiten Sie langsam, indem Sie den Trimmer in
schräger Position halten (etwa 30°). [F11]
∙ Ohne sich nach vorne zu beugen, halten Sie den
Schneidkopf (11) nah von dem Boden und ihm parallel
(senkrecht bei dem Scheren des Bodenbewachsens).
Lassen Sie nur den Kontakt des Endes der Schneidsaite
(22).
∙ Schneiden Sie feuchtes und nasses Gras nicht.
∙ Hohes Gras ist in Schichten abzuschneiden, immer
von oben zu beginnen. Die Schnitte sollen kurz sein.
[F12]
∙ Vermeiden Sie schnelle Abnutzung der
Schneidsaite (22) wegen der Schläge gegen harte
Gegenstände (Steine, Mauern, Zäune usw.).
∙ Vermeiden Sie die Verlängerungsschnur bei der
arbeitenden Vorrichtung umzulegen. Sie können sie
schädigen. Sie sollen die Verlängerungsschnur immer
hinter sich abwickeln.
WARNUNG! Verwenden Sie das
Buschschneidmesser (13) zum Scheren
der Bodenbewachsung neben harten
Flächen nicht.
WARTUNG UND LAGERHALTUNG
VORSICHT! Bevor Sie die Arbeit mit
dem Werkzeug beginnen, schalten Sie
es von der Steckdose frei.
∙ Vermeiden Sie das Treffen des Wassers auf das
Werkzeug!
∙ Nach jedem Scheren der Bodenbewachsung
reinigen Sie die Schneidausrüstung und die
Schutzvorrichtung des Trimmers (12) von Gras
und Boden. Auf diese Weise können Sie die
Schimmelbildung vermeiden.
∙ Stellen Sie sicher, dass die Griffe trocken sind und
auf ihnen kein Schmieren gibt.
∙ Reinigen Sie die Vorrichtung mit weicher Bürste
oder dem Reinigungstuch. Verwenden Sie keine
Reinigungsmittel und Lösemittel. Sie können die
Vorrichtung unrückgängig schädigen. Chemische Stoffe
sind fähig, Maschinenteile aus Kunststoff anzufressen.
∙ Lagern Sie die Vorrichtung unter direktem
Sonnenlicht lange Zeit nicht.
∙ Bedecken Sie die Vorrichtung mit Beuteln aus
Kunststoff nicht, da sich unter ihnen Feuchtigkeit und
Schimmel bilden können.
∙ Stellen Sie die Maschine auf ihrer
Schutzvorrichtung des Trimmers nicht (12). Am besten
ist es, sie für den vorderen Griff (3) zu hängen, damit die
Schutzvorrichtung des Trimmers (12) keinen Kontakt mit
anderen Gegenständen hat. Sonst besteht die Gefahr,
dass die Schutzvorrichtung des Trimmers (12) verformt
wird, da ihre Größen und Schutzcharakteristiken
geändert werden.
WECHSEL DES DRUCKBEHÄLTERS
DES TRIMMERS (21)
ACHTUNG! Verwenden Sie im Trimmer
keine Metall-, Drahtsaiten oder
Seilzüge.
DE
∙ Halten Sie das Werkzeug und Luftöffnungen
(falls vorhanden) sauber. Regelmäßige Reinigung und
Wartung garantieren eine hohe Effektivität und einen
langen Betrieb des Werkzeuges.
∙ Im Falle des Versagens, ungeachtet der Einhaltung
aller Regeln des Betriebes und der Erprobung des
Werkzeuges, soll die Reparatur in einem ofziellen
Dienstleistungszentrum IVT durchgeführt werden.
∙ Alle Muttern, Bolzen und Schrauben sollen
festgezogen sein.
∙ Tauschen Sie beschädigte oder abgenutzte Teile
aus.
∙ Verwenden Sie nur die Originalersatzteile. Die
Teile, die von einem anderen Hersteller produziert
sind, passen undicht und erhöhen das Risiko von
Verletzungen.
∙ Bewahren Sie das Werkzeug auf einem trockenen
für Kinder unzugänglichen Platz, in der sicheren
Entfernung von leichtentammenden Stoffen auf.
WARNUNG! Verwenden Sie die
Schneidsaite (22) nur von geeignetem
Durchmesser. Die Schneidsaiten (22)
von anderen Größen werden nicht
sachgemäß zugeführt, was zur nicht
normalen Arbeit führt oder eine ernste
Verletzung zufügen kann.
WICHTIG! Schalten Sie den
Doppelstecker aus der der
Steckdosen vor dem Wechsel der
Schneidvorrichtung unbedingt ab.
Installierung des Druckbehälters des Trimmers (21)
und Schneidsaite (22) komplett
Ihr Trimmer wird mit dem Druckbehälter des Trimmers
(21), der bei der Entstehung der Schwierigkeiten mit
23
Page 24

Bedienungsanleitung
dem Umwickeln völlig ersetzt wird, (22) geliefert.
1. Schalten Sie die Maschine von dem Stromnetz ab.
2. Stellen Sie sicher, dass Sie sich auf ebener Fläche
benden und die Lage Ihrer Füße fest ist.
3. Drehen Sie die Maschine um, damit die
Schutzvorrichtung des Trimmers (12) nach oben
DE
gewendet ist.
4. Drücken Sie und halten Sie aufriegelnde
Deckelverschlüsse ((20), um den Deckel des
Schneidkopfes zu öffnen, (19) und holen Sie den
alten Druckbehälter des Trimmers (21) aus dem
Schneidkopfes (11) heraus [F13].
5. Bereinigen Sie den Schneidkopf (11).
6. Ziehen Sie zwei Enden der neuen Schneidsaite
(22) durch kleine Löcher im Druckbehälter durch und
setzen Sie den neuen Druckbehälter des Trimmers (21)
in den Schneidekopf ein (11).
7. Setzen Sie den Deckel des Schneidkopfes (19) an
die Stelle ein.
8. Ziehen Sie nach außen die Enden der Schneidsaite
(22), bis sie den Außenrand der Schutzvorrichtung des
Trimmers (12) erreichen.
WARNUNG! Nach dem Ersatz des
Druckbehälters (21) lassen Sie den
Trimmer lastlos mindestens ein
Minute arbeiten, um in dem korrekten
Funktionieren der Schneidsaite (22)
und des Gerätes selbst sicherzustellen.
Das Aufwickeln der Nylonschneidsaite (22) auf den
leeren Druckbehälter des Trimmers (21) >> [F14]
Als Alternative können Sie auch die Nylonschneidsaite
(22) auf den Druckbehälter des Trimmers (21)
selbständig aufwickeln. Wenden Sie sich an die
Tabelle technischer Charakteristiken des Gerätes. Um
die Angaben über den maximalen Durchmesser und
die Länge der Schneidsaite (22), die zu Ihrem Modell
passen, zu bekommen.
Es ist auch absolut notwendig, zu sichern, damit das
Aufwickeln der Schneidsaite (22) gegen die Richtung
der Motordrehung, die mit dem Pfeil auf dem Deckel
der Schneidsaite (19) oder auf dem Boden des
Druckbehälters des Trimmers gezeigt ist, (21) erfolgt.
Loches im Druckbehälter des Trimmers (21).
2. Wickeln Sie die Schneidsaite (22) um, wie es mit
dem Pfeil gezeigt ist. Lassen Sie nicht aufgewickelt
einen kleinen Abschnitt (etwa 100 mm) der Schneidsaite
(22).
3. Ziehen Sie zwei Enden der Schneidsaite (22)
durch zwei kleine Löcher im Schneidkopf (11) durch und
setzen Sie den Druckbehälter des Trimmers (21) ein.
4. Setzen Sie den Druckbehälter des Trimmers (21)
wieder in den Schneidkopf (11) ein und decken Sie mit
dem Deckel des Schneidkopfes (19).
5. Drücken Sie den Knopf der Zufuhr der
Schneidsaite (23) und ziehen Sie beide Enden der
Schneidsaite (22) nach außen, bis sie den Außenrand
der Schutzvorrichtung des Trimmers erreichen (12).
UMWELTSCHUTZ
Befördern Sie Müll und Abfälle zur
Überarbeitung!
Das Werkzeug, Zusatzgeräte und Verpackung sind zur
ökologisch sicheren Überarbeitung zu befördern.
Die Elemente aus Kunststoff haben einen Vermerk über
die Möglichkeit einer klassizierten Überarbeitung. Die
vorliegende Anleitung ist auf dem Recyclingpapier, das
kein Chlor enthält, gedruckt.
ACHTUNG! Es ist notwendig, Maßnahmen zu treffen,
um das Aufwickeln der Schneidsaite (22) auf den
Druckbehälter des Trimmers (21) akkurat zu sichern.
Die Nichterfüllung dieser Forderung bewirkt die
Effektivität des Systems der Schneidsaitenzufuhr
(22).
1. Befestigen Sie die Schneidsaite (22) in der Mitte
ihrer Länge im Innern der Höhlung oder eines kleines
24
Page 25

Bedienungsanleitung
AUFDECKUNG UND BESEITIGUNG VON STÖRUNGEN
VORSICHT! Bevor Sie das Werkzeug bezüglich der Defekte durchprüfen, schalten Sie es aus
der Steckdose frei.
Typische Fehlfunktionen Grund der Störung Beseitigung der Störung
Die Vorrichtung attert
Die Vorrichtung wird nicht
angelassen
Verschlechterung der
Charakteristiken des
Schneidens
Wenn auf Grund der oben angeführten Informationen das Problem nicht gelöst werden kann, wenden Sie sich bitte
an ein ofzielles Dienstleistungszentrum IVT.
∙ Der Druckbehälter des
Trimmers (21) ist verschmutzt
∙ Der Druckbehälter des
Trimmers (21) ist defekt
∙ Es fehlt die Netzspannung
∙ Der Zweistellungsschalter
„EIN/AUS“ ist defekt (2).
∙ Die Kohlenkontakte sind
abgenutzt.
∙ Der Motor ist defekt.
∙ Auf dem Druckbehälter
des Trimmers (21) ist wenig
Schneidsaite (22)
∙ Die Saite kommt aus dem
Druckbehälter des Trimmers (21)
nicht heraus oder kommt aus dem
Druckbehälter des Trimmers (21)
nur von einer Seite
∙ Reinigen Sie ihn sorgfältig
∙ Wechseln Sie ihn
∙ Prüfen Sie Steckerdose, Kabel,
Speisungsleitung Doppelstecker;
bei Bedarf soll ein qualizierter
Elektriker alles reparieren.
∙ Lassen Sie das Gerät im
Kundenzentrum reparieren.
∙ Stellen Sie die Länge der
Schneidsaite (22) ein oder
ersetzen Sie den Druckbehälter
des Trimmers (21)
∙ Nehmen Sie den Druckbehälter
des Trimmers (21) ab und ziehen
Sie die Schneidsaite (22) durch
Löcher nach außen durch; dann
setzen Sie den Druckbehälter des
Trimmers (21) an seine Stelle ein.
DE
ACHTUNG! ES IST VÖLLIG UNZULÄSSIG, DIE REPARATUR DES ERZEUGNISSES
SELBSTÄNDIG DURCHZUFÜHREN UND ZU VERSUCHEN, IHRE SPUREN ZU VERBERGEN!
Nur das autorisierte IVT-Service-Zentrum hat das Recht auf die Durchführung der Reparatur
und erweiterte Aufrechterhaltung. Die Eintragung von Änderungen in den Innenausbau des
Erzeugnisses ist verboten! SOLCHE HANDLUNGEN SIND NICHT DER GRUND FÜR DEN
VERZICHT AUF DIE GARANTIEVERPFLICHTUNGEN, SIE KÖNNEN AUCH ALS GRUND FÜR
BESCHÄDIGUNGEN UND ERNSTE KÖRPERVERLETZUNGEN SEIN.
25
Page 26

Инструкция по эксплуатации
ТЕХНИЧЕСКИЕ ХАРАКТЕРИСТИКИ ИНСТРУМЕНТА
Модель GTE-1000 GTE-1200
Напряжение~Частота [В~Гц]
Номинальная мощность [Вт] 1000 1200
Частота вращения без нагрузки [об/мин] 7500 7500
Максимальный диаметр резки [мм] 420 420
Диаметр режущей струны [мм] 1.6 1.6
RU
Запас режущей струны [м] 5 5
Диаметр ножа [мм] 255 (25.4) (3 зубца) 255 (25.4) (3 зубца)
Уровень вибрации [м/с
Уровень звукового давления [дБ(А)] 75.6 (K=3) 75.6 (K=3)
Уровень звуковой мощности [дБ(А)] 95.5 (K=3) 95.5 (K=3)
Вес [кг] 5.8 5.8
Класс безопасности II II
2
] 6.749 (K=1.5) 6.749 (K=1.5)
230~50 230~50
КОМПЛЕКТУЮЩИЕ ДЕТАЛИ
1. Кнопка блокировки
2. Двухпозиционный переключатель «вкл./выкл.»
3. Передняя рукоятка
4. Вспомогательная рукоятка
5. Крюк для разгрузки натяжения кабеля
6. Ремень для переноски
7. Верхняя штанга
8. Нижняя штанга
9. Корпус двигателя
10. Вентиляционные отверстия
11. Режущая головка
12. Защитное приспособление триммера
13. Кусторезный нож
14. Редуктор привода
15. Внутренний фланец
16. Контргайка
17. Плоская крышка
18. Наружный фланец
19. Крышка режущей головки
20. Отпирающая защелка крышки
21. Барабан триммера
22. Режущая струна
23. Кнопка подачи режущей струны
24. Резак для струны
СОДЕРЖИМОЕ КОРОБКИ
Инструкция по эксплуатации (1 шт.), защитное
приспособление (1 комплект), крепежные винты
(1 комплект), универсальный гаечный ключ (1 шт.),
кусторезный нож (1 шт.), барабан триммера (1 шт),
вспомогательная рукоятка в сборе (1 комплект),
ремень для переноски (1 шт.), шестигранный ключ
(1 шт.), Резак для струны ( 1 шт.).
ПРЕДПОЛАГАЕМОЕ ИСПОЛЬЗОВАНИЕ
Этот инструмент предназначен для стрижки газонов
и небольших участков травы или аналогичной мягкой
растительности в частных и любительских садах, а
также по краям клумб, если инструмент оборудован
соответствующим режущим приспособлением.
Это устройство не предназначено для использования
в общественных садах, парках, спортивных центрах
или на обочинах дорог, а также в сельском и лесном
хозяйстве.
Малый вес и высокая маневренность позволяют
использовать его на труднодоступных участках и на
ограниченном пространстве.
Это устройство может использоваться в качестве
триммера или кустореза, поскольку оно также
оборудовано металлическим лезвием, позволяющим
срезать сорные растения с более толстым стеблем и
подстригать сильно заросшие участки.
ТЕХНИКА БЕЗОПАСНОСТИ ПРИ
ИСПОЛЬЗОВАНИИ
Общие правила техники безопасности
Следующие инструкции по технике безопасности
помогут вам правильно пользоваться инструментом
и обеспечить собственную безопасность. Поэтому
прочитайте их вдумчиво и внимательно.
В случае передачи инструмента для использования
третьему лицу передайте и настоящие инструкции
по технике безопасности.
Сохраните данную инструкцию и прочую литературу,
26
Page 27

Инструкция по эксплуатации
входящую в комплект поставки. Обращайтесь к ней
в случае возникновения вопросов.
Строго следуйте правилам техники безопасности и
предостережениям, указанным на инструменте.
Перед началом работы ознакомьтесь с органами
управления инструмента, но, прежде всего, изучите
способы его экстренной остановки.
Следуя этим простым инструкциям, и вы будете
содержать ваш инструмент в исправном состоянии.
∙ Перед использованием инструмент необходимо
правильно собрать.
∙ Используйте инструмент строго по назначению.
∙ Отнеситесь внимательно к предупредительным
надписям и указаниям на инструменте и
внимательно изучите их. Внимательность, разумный
подход к работе и соответствующая подготовка лиц,
задействованных в эксплуатации, транспортировке,
обслуживании и хранении инструмента, помогут
предотвратить несчастные случаи.
∙ Не оставляйте инструмент без присмотра.
∙ Не допускайте использования инструмента
детьми. Не позволяйте детям играть с инструментом.
∙ Не допускайте нахождения вблизи инструмента
детей и животных. Те, кто желает понаблюдать
за работой инструмента, должны находиться на
безопасном расстоянии от него.
∙ При работе с инструментом пользователь несет
ответственность безопасность третьих лиц.
∙ Лица, не ознакомленные с инструкциями по
эксплуатации, дети, несовершеннолетние, не
достигшие возраста, позволяющего использовать
инструмент, а также лица, находящиеся в состоянии
алкогольного или наркотического опьянения,
либо под воздействием медицинских препаратов,
не допускаются к работе с инструментом.
Возраст оператора устанавливается местными
нормативными актами.
ОСТОРОЖНО! Алкоголь, некоторые
лекарственные препараты и
наркотические вещества, а также
состояние нездоровья, жар и
утомление снижают скорость
реакции. Не используйте данный
инструмент в вышеперечисленных
случаях.
∙ Убедитесь, что все защитные приспособления
(если таковые имеются) установлены и пригодны к
эксплуатации.
∙ Не используйте инструмент без защитных
приспособлений (если таковые имеются), либо если
они повреждены.
∙ Осмотрите инструмент на наличие
незакрепленных деталей (гаек, болтов, винтов
и т.д.) или повреждений. Чтобы обеспечить
безопасную работу инструмента, периодически
проверяйте, хорошо ли затянуты болты и винты
(если таковые имеются). При необходимости перед
использованием инструмента произведите их ремонт
или замену. В случае использования поврежденного
инструмента оператору или посторонним лицам
могут быть нанесены серьезные травмы.
∙ Используйте для работы соответствующую
спецодежду. Просторная одежда, украшения могут
быть затянуты движущимися частями. Работайте
только в подходящей спецодежде. Защитите ноги
и ступни от разлетающегося мусора. Не работайте
босиком или в открытых сандалиях. Соберите
длинные волосы сзади.
∙ Содержите ручки и рукоятки в чистоте и сухости.
∙ Используйте соответствующие СИЗ.
Используйте защитные очки и перчатки. При работе
с порошками или при выбросах выхлопных газов
используйте противопылевой респиратор. При
необходимости наденьте нескользкую обувь, каску
и защитите органы слуха берушами. Если уровень
шума превышает 85 дБ(A), обязательно используйте
защитные наушники.
ОСТОРОЖНО! Пользуйтесь
средствами индивидуальной
защиты! Защитные приспособления
и СИЗ обеспечивают сохранность
вашего здоровья и здоровья
окружающих, а также гарантируют
бесперебойную работу инструмента.
∙ Не запускайте инструмент, если он перевернут
или находится в нерабочем положении.
∙ Во время работы примите устойчивое
положение. Постоянно сохраняйте равновесие.
∙ Соблюдайте чистоту на рабочем участке. На
загроможденных участках наблюдается высокий
уровень травматизма. Перед использованием
инструмента уберите с рабочей площадки
все посторонние предметы, а также избегайте
попадания под инструмент посторонних предметов
во время работы.
∙ Не давите на инструмент с силой во время
работы.
∙ Используйте инструмент только при хорошем
дневном или искусственном освещении. Не
используйте инструмент в условиях плохой
видимости.
∙ Не роняйте инструмент, не допускайте
столкновения инструмента с какими-либо
препятствиями.
ОСТОРОЖНО! Будьте внимательны. Не отводите
взгляд от обрабатываемого инструментом
27
RU
Page 28

Инструкция по эксплуатации
предмета. Отвлекшись, можно потерять
управление. Подходите к работе разумно.
Правила электробезопасности
ВНИМАНИЕ! Во избежание удара
электрическим током, причинения вреда
здоровью или возгорания при использовании
электроинструментов необходимо соблюдать
RU
следующие инструкции по технике безопасности.
Перед использованием инструмента прочтите и
точно соблюдайте данные инструкции.
∙ Чтобы обеспечить соответствующий уровень
безопасности, рекомендуется использовать
устройство дифференциальной защиты (УДЗ),
рассчитанное на ток отключения не более
чем 30 мA. Проверяйте исправность УДЗ при
каждом использовании. Проконсультируйтесь у
квалифицированного электрика.
ВНИМАНИЕ! Использование УДЗ
или другого устройство защитного
отключения не освобождает
оператора от обязательного
ознакомления с правилами
техники безопасности и приемами
безопасной работы, указанными в
данной инструкции.
∙ Напряжение сети должно соответствовать
значению, указанному на ярлыке и в инструкции. Не
используйте другие источники питания.
∙ Перед подключением инструмента к сети
убедитесь, что розетка соответствует данным,
указанным на ярлыке.
∙ Не прикасайтесь телом к заземленными
поверхностями (трубами, радиаторами, батареями
и рефрижераторами). При заземлении через тело
риск удара электрическим током повышается.
ОСТОРОЖНО! Во избежание ожога
или поражения электрическим
током не прикасайтесь к
электропроводящим деталям.
∙ Не тяните за шнур питания при перемещении
инструмента.
∙ Пользуйтесь шнуром питания с осторожностью.
Берегите шнур питания от воздействия тепла,
избегайте его контакта со смазочными материалами,
а также острыми предметами или движущимися
частями.
∙ Будьте осторожны со шнуром питания.
∙ Не пользуйтесь электроинструментами вблизи
легковоспламеняющихся жидкостей и горючих газов.
∙ Перед тем, как переносить инструмент на
другое место, отключайте его от сети.
ОСТОРОЖНО! Инструмент
необходимо сначала выключить, а
затем отсоединять от розетки или
удлинителя.
∙ Не пережимайте и не запутывайте шнур питания
или удлинитель во время работы инструмента. Не
теряйте кабель из виду.
∙ Не подключайте силовой кабель напрямую
к инструменту самостоятельно. Обратитесь в
ближайший официальный центр обслуживания.
∙ При повреждении шнура питания его
обязательно должен заменить изготовитель или его
агент, или другой квалифицированный специалист.
∙ Немедленно извлеките вилку из розетки, если
шнур питания поврежден или разрезан.
ВНИМАНИЕ! ОПАСНОСТЬ
ПОРАЖЕНИЯ ЭЛЕКТРИЧЕСКИМ
ТОКОМ!
Обратите внимание на ваше рабочее место. Не
используйте электроинструменты под дождем.
Не используйте электроинструменты во
влажных и сырых помещениях. Содержите
рабочий участок в сухости, обеспечьте хорошее
освещение. Берегите инструмент от влаги. Не
оставляйте инструмент на открытом воздухе на
ночь. При попадании воды в электроинструмент
повышается риск удара электрическим током.
∙ Регулярно и каждый раз перед использованием
проверяйте шнур питания на наличие повреждений
и признаков износа. Не используйте инструмент
с поврежденным шнуром питания; обратитесь в
официальный центр обслуживания.
∙ При работе на улице используйте только
предназначенные для этого удлинители с
соответствующей маркировкой. Избегайте попадания
удлинителя под инструмент, берегите его от влаги, от
воздействия тепла, избегайте контакта со смазочными
материалами и легковоспламеняющимися
веществами.
∙ Избегайте случайного запуска инструмента:
перед подключением инструмента к сети убедитесь,
что выключатель (при наличии) переведен в
положение ‘off’ (выкл.).
28
Page 29

Инструкция по эксплуатации
∙ Перед включением инструмента удалите
установочные клинья и ключи.
∙ Не используйте инструмент с неисправным
выключателем. Инструмент с неисправным
выключателем представляет опасность и требует
ремонта.
ВНИМАНИЕ! Иногда во время
работы с электроинструментами
образуется пыль, содержащая
вызывающие рак вещества.
К таким химическим веществам относятся: свинец в
составе свинцовых белил, кварц, входящий в состав
кирпича и цемента, мышьяк и хром, содержащиеся в
пиломатериале, обработанном химическими
реагентами, и прочие вредные вещества. Риск
воздействия данных химических веществ зависит от
частоты проведения связанных с ними работ.
Чтобы сократить их вредное воздействие,
работайте в хорошо проветриваемом
помещении и используйте соответствующие
исправные СИЗ, например, противопылевые
респираторы, специально разработанные для
отфильтровывания микроскопических частиц.
∙ При попадании под инструмент постороннего
предмета осмотрите его на наличие повреждений и
произведите необходимый ремонт.
∙ При возникновении чрезмерной вибрации
отключите инструмент и немедленно выясните
причину. Вибрация обычно является признаком
повреждения.
∙ Перед тем, как покинуть рабочее место,
произвести ремонт, осмотр или очистку инструмента,
отключите его и дождитесь полной остановки
движущихся деталей.
∙ Запрещается снимать или изменять внутренние
детали инструмента.
Особые правила по технике безопасности
∙ Используйте подходящую рабочую одежду и
средства индивидуальной защиты! В основном,
используйте защитные очки или защиту для
глаз, защиту для ушей, сапоги или ботинки с
противоскользящей подошвой, а также прочные,
длинные штаны и рабочие перчатки. Не работайте
с этим устройством босиком в открытых сандалиях.
∙ Работа машины может сопровождаться
выбросом посторонних предметов в глаза, что
способно привести к серьезной травме глаз. Перед
началом работы всегда надевайте защитные очкиконсервы или открытые защитные очки с боковыми
щитками, а также полную защиту для лица, если это
необходимо.
∙ При работе в лесу всегда надевайте
сертифицированную защитную каску.
∙ Используйте это устройство только в светлое
время суток или при хорошем искусственном
освещении.
∙ Не эксплуатируйте устройство вблизи от горючих
жидкостей или газов: существует опасность взрыва.
∙ Никогда не используйте машину на скользкой
почве, ночью, в густом тумане, во время ливневых
дождей или в любых других погодных условиях,
которые могут сделать использование этого изделия
небезопасным или затруднить обеспечение хорошего
обзора участка.
∙ Оберегайте устройство от сырости. Не
допускается увлажнение этого устройства, а также
оно никогда не должно эксплуатироваться во влажной
среде.
∙ Применяйте только шнуры-удлинители,
предназначенные для использования на открытом
воздухе, в изоляции из ПВХ для обычных условий.
∙ Всегда держите кабель электропитания сзади от
себя и в отдалении от режущего оборудования. Всегда
следите за тем, чтобы ваши кабели электропитания
не запутывались в каких-либо препятствиях или
предметах.
∙ Не срезайте иного материала, помимо сорных
растений или аналогичной мягкой растительности.
∙ Выключайте устройство во время переноски.
∙ Не работайте с этим устройством, находясь
в неудобных положениях, в неустойчивой позе, с
вытянутыми руками или одной рукой. При работе с
устройством всегда используйте обе руки.
∙ Устройство должно, как правило, использоваться
на уровне земли, с режущим приспособлением,
расположенным параллельно земле. Не используйте
это устройство для срезания травы, которая
находится не на уровне земли, то есть травы,
растущей на стенах, скалах и т.п.
∙ Перед стрижкой участка проверьте его на
предмет наличия камней, стекла, обломков металла,
мусора и других твердых предметов. Убедитесь
в том, что режущее оборудование не приходит
в контакт с камнями, гравием, проволокой или
другими посторонними предметами при запуске и во
время работы. Режущее приспособление способно
выбрасывать предметы подобного рода.
∙ Всегда поддерживайте безопасное расстояние
15 м вокруг себя. Может происходить выброс камней
и гравия, которые способны причинить травмы.
∙ В пределах указанного радиуса действия
пользователь отвечает за ущерб, причиненный
третьим лицам в результате использования этого
устройства.
∙ Прекратите использование машины, когда
рядом находятся люди, в особенности дети, а также
домашние животные.
∙ Никогда не эксплуатируйте это устройство с
29
RU
Page 30

Инструкция по эксплуатации
поврежденными защитными приспособлениями
или без установленных защитных приспособлений.
Убедитесь в наличии на месте соответствующего
защитного приспособления.
∙ Перед использованием машины и после
любого удара проверьте ее на предмет признаков
износа или повреждения, а при необходимости
отремонтируйте.
∙ Держите режущий инструмент, особенно во
время его вращения, на безопасном расстоянии от
RU
любых частей вашего тела, в частности, рук и ног.
∙ Всегда сохраняйте устойчивое положение ног и
равновесие тела. Особую осторожность проявляйте
при работе на склонах, на сильно заросших участках
или в скользких условиях. Остерегайтесь скрытых
препятствий.
∙ Примите меры, чтобы не получить травмы от
резака для режущей струны, который установлен
для обрезки режущей струны по требуемой длине.
∙ Не пересекайте дорожек или тропинок с гравийно-
насыпным покрытием, пока устройство работает.
∙ Не эксплуатируйте устройство непрерывно в
течение продолжительного времени, периодически
останавливайтесь. Ограничивайте промежуток
времени, в течение которого устройство
используется непрерывно (приблизительно 30-40
минут за один прием), и предусмотрите 10-20 минут
отдыха между сеансами работы. Также старайтесь
поддерживать полный объем работы, выполняемой
за день, в рамках 2 часов или менее.
∙ Заменяйте барабан триммера в случае
возникновения трещин, выкрашивания или
повреждений любого рода. Обеспечьте его
правильную установку и надежное крепление.
∙ Никогда не используйте несоответствующие,
погнутые, покоробленные, треснувшие, сломанные
или поврежденные ножи. Постоянно поддерживайте
заточку ножа. Проверьте болт, которым крепится
нож, а также убедитесь в том, что нож вращается
свободно и без аномального шума.
ПРЕДОСТЕРЕЖЕНИЕ! После
выключения устройства режущая
головка продолжает вращаться в
течение нескольких секунд. Никогда
не пытайтесь остановить режущее
оборудование руками. Всегда ждите
его полной остановки.
ПРИЧИНЫ ОТДАЧИ И ЕЕ
ПРЕДОТВРАЩЕНИЕ ОПЕРАТОРОМ
При работе в режиме кустореза может возникать
неконтролируемая отдача. Отдача представляет
собой неуправляемое перемещение машины
и режущих инструментов в сторону оператора,
которое может возникать;
∙ если нож застревает в срезаемом материале;
если сегмент вращающегося ножа между
направлениями на 12 часов и на 2 часа, вид со
стороны оператора [F1], приходит в контакт с
прочным твердым предметом, например, деревом,
большим камнем, кустарником или стеной.
Такая отдача может привести к потере контроля над
устройством и оказаться причиной серьезной или
смертельной травмы оператора или стоящих рядом
людей.
Чтобы избежать отдачи и снизить риск потери
контроля:
∙ перед началом работы произведите осмотр на
предмет скрытых препятствий, например, крупных
камней, пней, корней и т. п., которые могут привести
к отдаче, если нож ударится о них.
∙ всегда крепко удерживайте устройство обеими
руками и не беритесь за другие части, помимо
рукояток.
∙ заменяйте или производите повторную заточку
затупившихся ножей.
∙ никогда не поднимайте устройство выше своей
талии.
∙ избегайте работать в режиме кустореза,
используя сегмент ножа между направлениями на
12 часов и на 2 часа.
ВСКРЫТИЕ УПАКОВКИ
При вскрытии упаковки проверьте наличие всех
комплектующих деталей. См. чертежи к данному
руководству. При отсутствии или неисправности
каких-либо деталей обратитесь в центр
обслуживания IVT.
ИНСТРУКЦИИ ПО СБОРКЕ И РЕГУЛИ
Р О В К Е
30
ПРЕДУПРЕЖДЕНИЕ! Всегда
отключайте триммер от электросети
перед выполнением регулировок!
Page 31

Инструкция по эксплуатации
Сборка целой штанги >> [F2]
Установка и регулировка вспомогательной
рукоятки (4) >> [F3]
Установка защитного приспособления
триммера (12) >> [F4]
ПРЕДУПРЕЖДЕНИЕ! Никогда не
эксплуатируйте инструмент без
правильно установленного на
место защитного приспособления
(12). Использование инструмента
без установленного защитного
приспособления триммера (12)
приведет к перегреву двигателя
и аннулированию гарантийных
обязательств, но прежде всего это
может привести к серьезной травме.
ПРЕДУПРЕЖДЕНИЕ! Примите
меры, чтобы не получить травмы
от резака для режущей струны (24),
который установлен на защитном
приспособлении триммера (12) для
обрезки режущей струны (22) по
требуемой длине: этот резак имеет
очень острую режущую кромку.
1. Защелкните защитное приспособление
триммера (12) на металлическом кронштейне в
конце нижней штанги (8).
2. Зафиксируйте винтами защитное
приспособление триммера (12) в требуемом
положении.
Прикрепление ремня для переноски (6) >> [F5]
Использование крюка для разгрузки натяжения
кабеля (5)
Перед подключением кабеля к питающей
электросети убедитесь, что шнур-удлинитель
пропущен через крюк для разгрузки натяжения
кабеля (5). Этот крюк предотвращает приложение
излишних усилий к соединениям кабеля и является
важным предохранительным приспособлением.
Сборка режущей головки (11)
1. Совместите отверстие редуктора привода
(14) с отверстием внутреннего фланца (15) и
вставьте металлический штифт в отверстия для
блокирования штанги, чтобы детали не могли
вращаться. [F6-A]
2. Используйте комбинированный гаечный
ключ, чтобы ослабить и снять контргайку (16).
ПРЕДОСТЕРЕЖЕНИЕ! Резьба левосторонняя.
3. Снимите плоскую крышку (17) и наружный
фланец (18).
4. Установите режущую головку (11). [F6-B]
5. Навинтите режущую головку (11) на резьбовой
выход штанги до упора.
6. Удалите металлический штифт.
Сборка кусторезного ножа (13) >> [F7]
Кусторезные ножи (13) могут применяться
в качестве альтернативы для нейлоновой
моноволоконной струны, чтобы производить
стрижку травы и обычных сорных растений. Однако
ножи никогда не должны использоваться для
подстригания растительности рядом с твердыми
поверхностями.
1. Совместите отверстие редуктора привода
(14) с отверстием внутреннего фланца (15) и
вставьте металлический штифт в отверстия для
блокирования штанги, чтобы детали не могли
вращаться.
2. Используйте комбинированный гаечный ключ,
чтобы ослабить и снять контргайку (16).
3. Снимите плоскую крышку (17), наружный
фланец (18) и внутренний фланец (15).
4. Снова установите внутренний фланец (15) на
место.
5. Установите кусторезный нож (13).
6. Снова установите наружный фланец (18) на
место надлежащим образом.
7. Вставьте плоскую крышку (17) и контргайку
(16). Затяните контргайку (16).
8. Удалите металлический штифт.
НАЧАЛО ЭКСПЛУАТАЦИИ
Значение напряжения питания должно
соответствовать указанному в табличке паспортных
данных инструмента.
В К Л Ю Ч Е Н И Е / В Ы К Л Ю Ч Е Н И Е
Включение >> [F8]
ПРЕДУПРЕЖДЕНИЕ! Производите
включение лишь в том случае,
если ваши руки и ноги находятся
в отдалении от режущих
инструментов.
Удерживайте устройство крепко и не позволяя ему
касаться травы, которую нужно срезать.
31
RU
Page 32

Инструкция по эксплуатации
∙ Нажмите кнопку блокировки (1) и
двухпозиционный переключатель «вкл./выкл.» (2)
одновременно.
Выключение
∙ Отпустите двухпозиционный переключатель
«вкл./выкл.» (2).
ПРЕДОСТЕРЕЖЕНИЕ! Режущая
RU
головка (11) продолжает вращаться
в течение нескольких секунд после
выключения двигателя! Дождитесь
полной остановки и лишь после
этого положите инструмент.
П О Д А Ч А Р Е Ж У Щ Е Й С Т Р У Н Ы ( 2 2 )
Регулярно проверяйте режущую струну (22) на
предмет повреждения. Короткие или изношенные
режущие струны (22) режут менее эффективно.
ПРИМЕЧАНИЕ: Удар о твердые или вызывающие
абразивный износ предметы, например, изгороди,
бетон и большие камни в длинной траве и вокруг
нее могут привести к обрыву режущей струны (22),
которую можно легко подать из барабана триммера
(21), выполняя следующие простые инструкции.
Вытянув из барабана новый участок режущей струны
(22), всегда возвращайте устройство в нормальное
рабочее положение перед его включением.
Полуавтоматическая подача режущей струны
(22) (ударная подача) >> [F9]
∙ Слегка постукивайте режущей головкой
(11) о землю, пока устройство работает на
полной скорости. При этом будет автоматически
производиться дополнительная подача режущей
струны (22).
∙ Резак для режущей струны (24), который
находится под защитным приспособлением
триммера (12), во время работы будет автоматически
обрезать режущую струну (22) по требуемой длине.
ВНИМАНИЕ! Не прилагайте чрезмерной силы и
не ударяйте режущей головкой (11) по дорожному
покрытию или бетону.
ПРИМЕЧАНИЕ: новая режущая струна (22) будет
подаваться лишь в том случае, если длина конца
режущей струны (22) составляет не менее 2,5 см.
(22) вручную.
Если конец режущей струны (22) не виден:
∙ Барабан триммера (21) следует заменить.
ВНИМАНИЕ! Регулярно
проверяйте состояние резака
для режущей струны (24). Ни
при каких обстоятельствах не
используйте устройство без
резака для режущей струны (24)
или с неисправным резаком для
режущей струны (24). Регулярно
очищайте резак для режущей
струны (24) от травы и мусора,
чтобы исключить любое влияние
на режущую способность.
Ручная подача режущей струны (22) >> [F10]
При необходимости режущую струну (22) можно
подавать наружу вручную.
∙ Для выполнения этой операции нажмите и
отпустите кнопку подачи режущей струны (23),
осторожно вытягивая при этом концы режущей
струны (22), пока они не достигнут резака для
режущей струны (24).
∙ Если режущая струна выходит за пределы
резака для режущей струны (24), то было подано
слишком много режущей струны (22). В этом случае
снимите крышку режущей головки (19), нажимая и
удерживая две отпирающие защелки крышки (20), а
затем установите требуемую длину режущей струны
(22).
И Н С Т Р У К Ц И И П О Э К С П Л У А Т А Ц И И
ПРЕДОСТЕРЕЖЕНИЕ! Не
используйте устройство
без надлежащего защитного
приспособления. Перед каждым
использованием убедитесь в его
работоспособности.
ПРЕДУПРЕЖДЕНИЕ! Всегда
надевайте плотную одежду и
защиту для глаз. Камни или
обрезки могут рикошетировать
или выбрасываться в глаза и
лицо, приводя к слепоте или иным
серьезным травмам.
Если длина конца режущей струны (22) меньше,
чем 2,5 см:
∙ Выключите триммер и подайте режущую струну
∙ Удерживайте переднюю рукоятку (3) одной
рукой, а вспомогательную рукоятку (4) держите
второй рукой.
32
Page 33

Инструкция по эксплуатации
∙ Перед работой убедитесь, что режущая струна
(22) подана наружу.
∙ Не включайте машину, когда режущая головка
(11) находится в материале, которые требуется
срезать, либо вблизи от него. До контакта
с материалом, который требуется срезать,
убедитесь в том, что машина работает на полных
оборотах.
∙ Держите устройство ниже уровня талии.
∙ При работе перемещайтесь только справа
налево, чтобы обрезки выбрасывались в сторону
от вас. Работайте медленно, удерживая триммер в
наклонном положении (приблизительно 30°) [F11]
∙ Не наклоняясь вперед, держите режущую
головку (11) вблизи от земли и параллельно
ей (перпендикулярно при подстригании
растительности). Позволяйте входить в контакт
только концу режущей струны (22).
∙ Не срезайте влажную или мокрую траву.
∙ Высокую траву следует срезать слоями,
всегда начиная с верхушки. Обрезки должны быть
короткими. [F12]
∙ Избегайте быстрого износа режущей струны
(22) из-за ударов по твердым предметам (камни,
стены, изгороди и т. п.).
∙ Избегайте перекидывать шнур-удлинитель
с места на место при работающем устройстве.
Вы можете его повредить. Вы всегда должны
разматывать шнур-удлинитель позади себя.
ПРЕДУПРЕЖДЕНИЕ! Не используйте
кусторезный нож (13) для
подстригания растительности рядом
с твердыми поверхностями.
ОБСЛУЖИВАНИЕ И ХРАНЕНИЕ
∙ Замените поврежденные или изношенные
детали.
∙ Используйте только оригинальные
запчасти. Детали, изготовленные сторонним
производителем, прилегают неплотно и повышают
риск возникновения травм.
∙ Храните инструмент в сухом недоступном
для детей месте, на безопасном расстоянии от
легковоспламеняющихся материалов.
∙ Избегайте попадания воды на инструмент!
∙ После каждой процедуры подстригания
растительности очищайте режущее оборудование
и защитное приспособление триммера (12)
от травы и земли. Таким способом вы можете
предотвратить образование плесени.
∙ Убедитесь, что рукоятки сухие и на них нет
смазки.
∙ Очищайте устройство мягкой щеткой или
обтирочным материалом. Не используйте никаких
чистящих средств и растворителей. Они могут
необратимо повредить устройство. Химические
вещества способны разъедать пластмассовые
детали машины.
∙ Не храните устройство под прямым солнечным
светом в течение длительного времени.
∙ Не накрывайте устройство пластмассовыми
мешками, поскольку под ними может образоваться
сырость и плесень.
∙ Не ставьте устройство на его защитное
приспособление триммера (12). Лучше всего
подвесить его за переднюю рукоятку (3), чтобы
защитное приспособление триммера (12) не
приходило в контакт с любым другим предметом.
В противном случае существует опасность,
что защитное приспособление триммера (12)
деформируется, так что его размеры и защитные
характеристики изменятся.
RU
ОСТОРОЖНО! Прежде чем начать
работу с инструментом, выключите
его из розетки.
∙ Содержите инструмент и вентиляционные
отверстия (при наличии) в чистоте. Регулярная
очистка и обслуживание гарантируют высокую
эффективность и продолжительную эксплуатацию
инструмента.
∙ В случае выхода из строя, несмотря на
соблюдение всех правил эксплуатации и
опробования инструмента, ремонт должен
выполняться в официальном сервисном центре
IVT.
∙ Все гайки, болты и винты должны быть плотно
затянуты.
ЗАМЕНА БАРАБАНА ТРИММЕРА (21)
ВНИМАНИЕ! Не используйте в
триммере никаких металлических,
проволочных струн или тросов.
ПРЕДУПРЕЖДЕНИЕ! Используйте
режущие струны (22) только
надлежащего диаметра. Режущие
струны (22) других размеров
не будут подаваться должным
образом, что приведет к
ненормальной работе или может
причинить серьезную травму.
33
Page 34

Инструкция по эксплуатации
ВАЖНО! Обязательно извлеките из
розетки штепсельную вилку перед
заменой режущего приспособления.
Установка барабана триммера (21) и режущей
струны (22) в комплекте
Ваш триммер поставляется с барабаном
триммера (21), который полностью заменяется при
RU
возникновении затруднений с перемоткой режущей
струны (22).
1. Отсоедините машину от питающей электросети.
2. Убедитесь, что вы находитесь на ровной
поверхности, а положение ваших ног устойчиво.
3. Переверните машину, чтобы защитное
приспособление триммера (12) было обращено вверх.
4. Нажмите и удерживайте отпирающие защелки
крышки (20), чтобы открыть крышку режущей головки
(19) и вытащите старый барабан триммера (21) из
режущей головки (11). [F13]
5. Очистите режущую головку (11).
6. Проденьте два конца новой режущей струны (22)
сквозь небольшие отверстия в барабане и вставьте
новый барабан триммера (21) в режущую головку (11).
7. Установите на место крышку режущей головки
(19).
8. Вытягивайте наружу концы режущей струны (22),
пока они не достигнут наружного края защитного
приспособления триммера (12).
ПРЕДОСТЕРЕЖЕНИЕ! После
замены барабана триммера (21)
дайте триммеру поработать без
нагрузки не менее одной минуты,
чтобы убедиться в исправном
функционировании режущей струны
(22) и самого инструмента.
ВНИМАНИЕ! Необходимо принять меры, чтобы
обеспечить аккуратную намотку режущей струны
(22) на барабан триммера (21). Невыполнение
этого требования повлияет на эффективность
системы подачи режущей струны (22).
1. Закрепите режущую струну (22) на половине ее
длины внутри выемки или небольшого отверстия в
барабане триммера(21).
2. Перемотайте режущую струну (22), как показано
стрелкой. Оставьте ненамотанным небольшой
участок (приблизительно 100 мм) режущей струны
(22).
3. Проденьте два конца режущей струны (22)
сквозь два небольших отверстия в режущей головке
(11) и вставьте барабан триммера (21).
4. Снова вставьте барабан триммера (21) в
режущую головку (11) и закройте крышкой режущей
головки (19).
5. Нажмите кнопку подачи режущей струны (23) и
вытягивайте наружу оба конца режущей струны (22),
пока они не достигнут наружного края защитного
приспособления триммера (12).
ЗАЩИТА ОКРУЖАЮЩЕЙ СРЕДЫ
Отправляйте мусор и отходы на
переработку!
Инструмент, дополнительные приспособления
и упаковку следует отправить на экологически
безопасную переработку.
Пластиковые элементы имеют отметку о
возможности классифицированной переработки.
Настоящая инструкция напечатана на вторичной
бумаге, не содержащей хлор.
Намотка нейлоновой режущей струны (22) на
пустой барабан триммера (21) >> [F14]
В качестве альтернативы вы можете также намотать
нейлоновую режущую струну (22) на барабан
триммера (21) самостоятельно. Обратитесь к
таблице технических характеристик инструмента
за сведениями о максимальном диаметре и длине
режущей струны (22), которые подходят для вашей
модели.
Также абсолютно необходимо обеспечить, чтобы
намотка новой режущей струны (22) производилась
против направления вращения двигателя, которое
показано стрелкой на крышке режущей головки (19)
или на основании барабана триммера (21).
34
Page 35

Инструкция по эксплуатации
ВЫЯВЛЕНИЕ И УСТРАНЕНИЕ НЕИСПРАВНОСТЕЙ
ОСТОРОЖНО! Перед тем как осмотреть инструмент на предмет неисправностей,
выключите его из розетки.
Типичные неисправности Причина неисправности Устранение неисправности
Устройство вибрирует
Устройство не запускается
Ухудшение характеристик
резания
Если данная информация не помогла вам устранить проблему, пожалуйста, обратитесь в Сервисный
центр IVT.
∙ Барабан триммера (21)
загрязнен
∙ Барабан триммера (21)
неисправен
∙ Отсутствует сетевое
напряжение
∙ Неисправен
двухпозиционный переключатель
«вкл./выкл.» (2).
∙ Изношены угольные щетки.
∙ Неисправен двигатель.
∙ На барабане триммера (21)
недостаточно режущей струны
(22)
∙ Нить не направляется наружу
из барабана триммера (21) или
выступает из барабана триммера
(21) только с одной стороны
∙ Тщательно очистите его
∙ Замените его
∙ Проверьте штепсельную
розетку, кабель, линию
электропитания и штепсельную
вилку; в случае необходимости
квалифицированный электрик
должен произвести ремонт
∙ Произведите ремонт в
службе сервиса для клиентов
∙ Отрегулируйте длину
режущей струны (22) или
замените барабан триммера (21)
∙ Снимите барабан триммера
(21) и проденьте режущую струну
(22) сквозь отверстия наружу;
затем установите барабан
триммера на место (21)
RU
ВНИМАНИЕ! ПРОИЗВОДИТЬ РЕМОНТ ИЗДЕЛИЯ САМОСТОЯТЕЛЬНО И ПЫТАТЬСЯ
СКРЫТЬ ЕГО СЛЕДЫ СОВЕРШЕННО НЕДОПУСТИМО! Только авторизованный IVT
Сервис-Центр имеет право на проведение ремонта и расширенного технического
обслуживания. Внесение изменений во внутреннее устройство изделия запрещено!
ТАКИЕ ДЕЙСТВИЯ НЕ ТОЛЬКО ЯВЛЯЮТСЯ ОСНОВАНИЕМ В ОТКАЗЕ ОТ ГАРАНТИЙНЫХ
ОБЯЗАТЕЛЬСТВ, НО И МОГУТ ПОСЛУЖИТЬ ПРИЧИНОЙ ПОВРЕЖДЕНИЙ И СЕРЬЕЗНЫХ
УВЕЧИЙ.
35
Page 36

Нұсқаулық
ҚҰРАЛДЫҢ СИПАТТАМАСЫ
Үлгі GTE-1000 GTE-1200
Кернеу~жиілік [В~Гц]
Номиналды қуат [Вт] 1000 1200
Бос жүрістегі айналу жиілігі [ай/мин] 7500 7500
Максималды кесу диаметрі [мм] 420 420
Кескіш ішек диаметрі [мм] 1.6 1.6
Кескіш ішектің қоры [м] 5 5
Пышақ диаметрі [мм] 255 (25.4) (3 тісті) 255 (25.4) (3 тісті)
Діріл деңгейі [м/с
KZ
Дыбыс қысымының деңгейі [дБ(А)] 75.6 (K=3) 75.6 (K=3)
Дыбыс қуатының деңгейі [дБ(А)] 95.5 (K=3) 95.5 (K=3)
Салмақ [кг] 5.8 5.8
Қауіпсіздік класы II II
2
] 6.749 (K=1.5) 6.749 (K=1.5)
230~50 230~50
ҚОСАЛҚЫ БӨЛШЕКТЕРДІҢ ТІЗБЕСІ
1. Бұғаттау батырмасы
2. Екі позициялы «іске қосу / ажырату» айырыпқосқышы
3. Алдыңғы тұтқа
4. Көмекші тұтқа
5. Созу кабелін жеңілдету үшін ілмек
6. Тасымалдау белбеуі
7. Жоғары бағана
8. Төменгі бағана
9. Қозғалтқыш корпусы
10. Желдеткіш саңылау
11. Кескіш бүркеншегі
12. Қырықтықты қорғауға арналған аспап
13. Қырыққыш пышақ
14. Келтіру редукторы
15. Ішкі ернемек
16. Контргайка
17. Тегіс қақпақ
18. Сыртқы ернемек
19. Кескіш бүркеншегінің қақпағы
20. Ашушы ілмектің қақпағы
21. Қырықтық барабаны
22. Кескіш ішек
23. Кескіш ішекті беру батырмасы
24. Ішекке арналған кескіш
ҚОРАПТЫҢ ІШІНДЕГІСІ
Пайдалану бойынша нұсқаулық (1 дана), қорғауға
арналған аспап (1 жинақ ), бекіту бұрандасы (1
жинақ), әмбебап гайка кілттері (1 дана), қырыққыш
пышақ (1 дана), қырықтық барабаны (1 дана),
көмекші тұтқа жиынтығы (1 дана), жалғастырғыш
белбеуі (1 дана), Алты қырлы кілт (1 дана), Ішекке
арналған кескіш (1 дана).
ҚОЛДАНЫЛУЫ
Бұл құрылғы газондар мен кішкене аумақтардағы
шөптерді немесе жеке бақшалардағы жұмсақ
өсімдіктерді қырқу үшін арналған, сонымен қатар,
егер құрылғы кескішке арналған аспапқа сәйкес
келсе, клумб шетін де қырқуға болады.
Бұл құрылғы қоғамдық бақшаларда, спорт
орталықтарда, жолдың жиегінде, сонымен қатар,
ауыл және орман шаруашылығында қолдануға
арналмаған.
Жеңіл салмақтылық пен мықты ептілік күрделі қиын
аумақтар мен шектелген кеңістіктерде қолдануға
мүмкіндік береді.
Бұл құрылғыны қырықтық, әлде қырыққыш ретінде
пайдаланады, ол сонымен қатар, қалың ірі сабақты
жабайы өсімдіктерді кесуге, қатты өсіп кеткен
аумақтарды жыртуға арналған металдық жүзбен
жабдықталған
ҚОЛДАНУ КЕЗІНДЕГІ ТЕХНИКАЛЫҚ
КАУІПСІЗДІК
Қауіпсіздіктің жалпы ережелері
Қауіпсіздік техникасы бойынша келесі нұсқаулықтар
құралды дұрыс қолдануға және дербес қауіпсіздікті
қамтамасыз етуге көмектеседі. Сондықтан оларды
мұқият оқып шығыңыз.
Аталмыш құралды үшінші тұлғаға беру барысында
қауіпсіздік техникасы жөніндегі осы нұсқаулықты да
бірге беру керек.
36
Page 37

Нұсқаулық
Осы нұсқаулықты және жеткізілетін кешен
құрамына кіретін басқа да әдебиеттерді сақтап
қойыңыз.
Қауіпсіздік техникасын және құралда көрсетілген
қауіпсіздік ережелерін сақтаңыз.
Жұмысты бастамас бұрын құралдың басқару
бөлшектерімен танысыңыз, бірақ ең алдымен
жедел тоқтату амалдарымен танысыңыз.
Аталған қарапайым ережелерді сақтау сіздің
құралыңыздың үнемі жұмысқа жарамдылығын
қамтамасыз етуге мүмкіндік береді.
∙ Пайдалану алдында құралды дұрыс жинақтау
қажет.
∙ Құралды тек мақсаты бойынша ғана
пайдаланыңыз.
∙ Сонымен қатар, құралда қорғаныш
жабдықтарды пайдалану жөніндегі ескерту
жазбалары мен сілтемелері болуы мүмкін, оларды
да оқып шығу қажет. Сақтық, тәжірибелілік,
ойластырылғандық, жұмысқа тиісті қатынас және
құралды қолдану, тасымалдау, қызмет көрсету
және сақтауға қатынасатын тұлғалардың тиісті
дайындығы келеңсіз оқиғалардың алдын алуға
көмектеседі.
∙ Құралды қараусыз қалдырмаңыз.
∙ Құралды балалардың пайдалануына жол
бермеңіз. Балалардың құралман ойнауына жол
бермеңіз.
∙ Жұмыс алаңына жақын жерде балалардың
және жануарлардың болуына жол бермеңіз. Бөгде
адамдар жұмыс істеп тұрған құралдан қауіпсіз
қашықтықта болуы керек.
∙ Құралмен жұмыс жасау барысында
пайдаланушы үшінші тұлғалар үшін жауапкершілік
тартпайды.
∙ Қолдану жөніндегі осы нұсқаулықпен
таныспаған тұлғалар, құралды пайдалануға
болатын жасқа жетпеген, кәмелеттік жасқа
толмаған балалар, сондай-ақ ішімдікке немесе
есірткіге мас күйдегі тұлғалар, медициналық
дәрмек әсеріндегі адамдар құралмен жұмыс
жасауға рұқсат ала алмайды. Оператордың жасы
жергілікті нормативтік актілермен тағайындалады.
АБАЙЛАҢЫЗ! Алкоголь, кейбір
дәрілік препараттар және есірткілік
заттар, сондай-ақ ыстық көтерілу
және қалжырау сияқты денсаулық
күйлері реакция жылдамдығын
төмендетеді. Аталмыш құралды
жоғарыда аталған жағдайларда
пайдаланбаңыз.
∙ Барлық қорғаушы жабдықтардың (егер болса)
дұрыс орнатылғандығына және олардың жұмысқа
жарамды екендігіне көз жеткізіңіз.
∙ Құралды қорғаушы жабдықтарсыз
пайдаланбаңыз (егер болса), немесе ол
зақымданған болса пайдаланбаған абзал.
∙ Құралдың бекітілмей қалған бөлшектерін
(сақиналар, болттар, бұрамалар және т. б.)
немесе ақауларын тексеріңіз. Құрал жұмысының
қауіпсіздігін қамтамасыз ету үшін болттар мен
бұрандалардың (егер болса) жақсы бұралғандығын
әлсін-әлсін тексеріп отырыңыз. Қажет болса
құралды пайдалану алдында зақымданған
не ақаулы бөлшектерді жөндеңіз немесе
алмастырыңыз. Ақаулы құралды пайдалану кезінде
операторға немесе маңайдағы бөгде тұлғаларға
ауыр жарақаттар салынуы мүмкін.
∙ Жұмыс үшін арнайы киімді пайдаланыңыз. Кең
киім, әшекейлер, әшекей бұйымдары құралдың
қозғалмалы бөліктеріне ілініп қалуы мүмкін. Сәйкес
келетін арнайы киімдер киіңіз. Ұшатын қалдық
заттардан аяғыңыз бен табаныңызды қорғаңыз.
Жалаң аяқ немесе үсті ашық аяқ киім киіп жұмыс
істемеңіз. Ұзын шашты артыңызға жинаңыз.
∙ Тұтқалар мен тұтқыштарды таза және құрғақ
етіп ұстаңыз.
∙ Сәйкес келетін қорғаушы жабдықтарды
пайдаланыңыз. Қорғаушы көзәйнектер мен
саусаққаптарды қолданыңыз. Ұнтақтармен
немесе шығарылатын газ ортасында жұмыс
жасау барысында шаңға қарсы респираторды
пайдаланыңыз. Қажет болған жағдайда табаны
сырғанамайтын аяқ киім, дулыға немесе құлаққа
арналған тығындарды қолданыңыз. Егер шу деңгейі
85 дБ(A) артық болса, міндетті түрде қорғаушы
құлаққаптарды пайдаланыңыз.
АБАЙЛАҢЫЗ! Жеке бас қорғаныс
құралдарын пайдаланыңыз!
Қорғаушы жабдықтар мен
ЖҚҚ сіздің денсаулығыңыз
бен маңайыңыздағылардың
денсаулығының қорғанысын
қамтамасыз етеді, сондай-ақ
құралдың үзіліссіз жұмысына
кепілдік береді.
∙ Құрал кері бұрылған болса немесе жұмысқа
жарамсыз күйде болса, оны іске қоспаңыз.
∙ Жұмыс барысында тұрақты қалыпты сақтаңыз.
Үнемі тепе-теңдікті сақтаңыз.
∙ Жұмыс алаңында тазалықты сақтаңыз.
Қоршалған алаңдарда жарақаттану қаупінің жоғары
деңгейі байқалады. Құралды пайдаланбас бұрын
жұмыс алаңынан барлық бөгде заттарды алып
тастаңыз, жұмыс барысында құралдың астына
бөгде заттардың түсуіне жол бермеңіз.
37
KZ
Page 38

Нұсқаулық
∙ Құралды шамадан тыс қыздырмаңыз.
∙ Құралды күндізгі жарықта немесе жақсы
жасанды желдету кезінде пайдаланыңыз. Құралды
нашар көріну жағдайында пайдаланбаңыз.
∙ Құралды құлатпаңыз, құралдың қандай да бір
кедергілермен қақтығысуына жол бермеңіз.
АБАЙ БОЛЫҢЫЗ! Абай болыңыз. Жұмыс
барысын бақылап отырыңыз. Алаңдай
отырып, құралды басқаруды жоғалтып алу
мүмкін. Жұмысқа дайындықпен кірісіңіз.
Электрлік қауіпсіздік ережелері
KZ
НАЗАР АУДАРЫҢЫЗ! Электр құралдарын
қолдану барысында электр тоғының соққысын
болдырмау және жеке бастың жарақаттану
оқиғасына жол бермеу мақсатында техникалық
қауіпсіздік бойынша мынадай ережелерді
сақтау керек. Құралды қолданар алдында осы
нұсқаулықтарды оқып шығыңыз және мұқият
қадағалаңыз.
∙ Қауіптілік деңгейін жоғарылату үшін 30 мA-
дан аспайтын сөну тоғына есептелген шегермелі
қорғаныс құрылғысын (RCD) пайдалану ұсынылады.
Әрбір пайдаланған кезде RCD тексеріңіз. Білікті
электршіге жүгініңіз.
НАЗАР АУДАРЫҢЫЗ! RCD немесе
басқа ажыратқышты пайдалану
құралдың операторын осы
нұсқаулықта көрсетілген жұмыс
амалдары ережелері мен қауіпсіздік
техникасы талаптарымен танысу
міндетінен босатпайды.
∙ Желідегі кернеу жазба белгіде немесе
нұсқаулықта көрсетілген шамаға сәйкес болуы
керек. Басқа қоректендіру көздерін пайдаланбаңыз.
∙ Құралды желіге қосу алдында розетканың
құралдың жазба белгісінде көрсетілген
мәліметтеріне сай келетіндігіне көз жеткізіңіз.
∙ Дененің жайсыздандырылған заттармен
(құбырлар, радиаторлар, батареялар және
рефрижераторлар) жанасуынан сақтаныңыз.
Дененің мұндай заттарға жанасуы кезінде электрлік
тоқ соққысына шалдығу қаупі артады.
АБАЙ БОЛЫҢЫЗ! Күюден немесе
тоқ соққысынан сақтану үшін электр
өткізгіш бөлшектерге жанаспаңыз.
∙ Құралдың орнын алмастыру барысында
кабельден тартпаңыз.
∙ Тоқсымды абайлап қолданыңыз. Тоқсымды
жылудың әсерінен сақтаңыз, оның майлаушы
заттармен байланысына жол бермеңіз, сондайақ өткір немесе жылжымалы заттармен
жанастырмауға тырысыңыз.
∙ Тоқсыммен абай болыңыз.
∙ Құралды тез тұтанатын сұйықтықтарға және
газдарға жақын жерде пайдаланбаңыз.
∙ Құралды басқа жерге ауыстырмас бұрын оны
желіден ажыратыңыз.
АБАЙ БОЛЫҢЫЗ! Алдымен
құралды сөндіру керек, содан соң
розеткадан немесе ұзартқыштан
ажыратқан абзал.
∙ Құрал жұмыс істеп тұрғанда ұзартқышты
қыспаңыз. Кабельді бақылап отырыңыз.
∙ Ұзартқышты құралға өз бетіңізбен тікелей
қоспаңыз. Ең жақын жердегі ресми қызмет көрсету
орталығына жүгініңіз.
∙ Тоқсым зақымдалған жағдайда қауіптілік
тудырмау үшін оны дайындаушы немесе оның
агенті, не болмаса ұқсас білікті мамандар
алмастыру керек.
∙ Егер кабель зақымдалған немесе кесіліп
кеткен болса, онда айырды тез арада ашадан алып
шығыңыз.
НАЗАР АУДАРЫҢЫЗ! ЭЛЕКТРЛІК ТОҚ
СОҚҚЫСЫНА ШАЛДЫҒУ ҚАУІПІ БАР!
Өндірістік ортаны бақылап отырыңыз.
Электрлік құралдарды жауын астында
пайдаланбаңыз. Электрлік құралдарды
ылғалды және дымқыл жайларда
пайдаланбаңыз. Жұмыс орнын құрғақ ұстаңыз,
жарықтандырудың жақсы болуын қамтамасыз
етіңіз. Құралды ылғалдан сақтаңыз. Құралды
ашық кеңістікте түнде қалдырмаңыз. Құралға
суды тиіп кетсе, электрлік тоқ соққысына
шалдығу қауіпі артады.
∙ Үнемі және әр қолданыс алдында құрал
кабелінің жарамдылығы мен тозу белгісінің болуын
тексеріп отырыңыз. Кабелі зақымданған құралды
пайдаланбаңыз; ресми қызмет көрсету орталығына
жүгініңіз.
∙ Ғимараттардан тыс жұмыс барысында
сәйкес маркалы арнайы ұзартқыштарды ғана
пайдаланыңыз. Кабельдің құралдың астына
38
Page 39

Нұсқаулық
түсуіне жол бермеңіз, оны ылғалдан, жылудың
әсерінен сақтаңыз, жақпамайлық заттармен және
тез тұтанатын сұйықтықтармен байланысуына жол
бермеңіз.
∙ Құралдың өздігінен қосылуынан сақтаныңыз.
Құралды желіге қосар алдында ажыратқыштың
«off» (сөнд.) қалпында екендігіне көз жеткізіңіз.
∙ Құралды іске қосу алдында ондағы барлық
кілттер мен орнату бөлшектерін алып тастаңыз.
∙ Жарамсыз ажыратқышы бар құралды
пайдаланбаңыз. Ажыратқышы жарамсыз құрал
қауіпті және жөндеуді талап етеді.
НАЗАР АУДАРЫҢЫЗ! Аспапты
пайдаланған кезде құрамында
ісік ауруын тудыратын химиялық
заттар бар шаң қалыптасады.
Осындай химиялық заттарға мыналар жатады:
қорғасынды әктеуіштер құрамындағы қорғасын,
кірпіш пен цементтің құрамына кіретін кварц,
химиялық реагенттермен өңделген араланушы
материалдар құрамындағы күшән және хром,
басқа да зиянды заттар. Аталған химиялық
заттардың әсер ету қаупі олармен жұмыс жасау
жиілігіне байланысты.
Олардың зиянды әсерін төмендету үшін жақсы
желдетілетін жерде жұмыс істеңіз және қолдану
үшін бекітілген ЖҚҚ, мысалы, микроскопиялық
бөлшектерді сүзуге арналған шаңға қарсы
респираторларды пайдаланыңыз.
∙ Құралдың астына бөгде заттар түскен жағдайда
құралдың ақаусыз екендігін тексеріңіз және қажетті
жөндеу жұмыстарын жүзеге асырыңыз.
∙ Шамадан тыс діріл пайда болса жедел арада
қозғалтқышты сөндіріңіз және себебін анықтаңыз.
Діріл ақаудың белгісі болып табылады.
∙ Жұмыс орнынан кетпес бұрын, құралды
жөндеу, тексеру немесе тазарту алдында оны
сөндіріңіз және толығымен тоқтағанша күте
тұрыңыз.
∙ Құралдың ішкі бөлшектерін алып тастауға
немесе өзгертуге тыйым салынады.
Қауіпсіздік техникасы бойынша ерекше
ережелер
∙ Жеке қорғауға арналған жабдықтар мен
ыңғайлы жұмыс киімін пайдаланыңыз! Негізінде
қорғаушы көзілдірігі немесе көз қорғаушысын, құлақ
қорғаушысын, сырғанамайтын табаны бар етік не
аяқ киім, сонымен бірге, төзімді ұзын шалбар және
жұмыс қолғабын қолданыңыз! Бұл құрылғымен
ашық сандал киіп, жалаңаш жұмыс істемеңіз.
∙ Машина жұмысы жанама заттарды шығару
кезінде көзге тиіп, көрделі көз зақымдануына
әкеліп соғу мүмкін. Жұмыс алдында қорғаушы
жабық көзілдірік немесе қыры бар ашық қорғаушы
көзілдірік киіңіз, сонымен қатар, егер қажет болса,
бетіңізді толық жауып, қорғаңыз.
∙ Орманда жұмыс барысында міндетті түрде
сертификатталған қорғаушы каскасын киіңіз.
∙ Осы құрылғыны тек күн шығып тұрғанда
немесе жақсы жасанды жарықтандыру кезінде
қолданыңыз
∙ Жанғыш сұйықтық пен газдың жанында бұл
машинаны пайдаланбаңыз: өрт қаупі болуы мүмкін.
∙ Тайғанақ жерде, түнде, қалың тұманда, құйып
жауын жауып тұрғанда немесе кез келген табиғи
ауа райының бұзылуы кезінде машинамен жұмыс
жасамаңыз. Ол бұл техниканың пайдалануына
қауіпті болады, аумақты жыртуға ыңғайсыздық
тудырады.
∙ Құрылғыны дымқылдықтан сақтаңыз.
Құрылғыны ылғалдаудан аулақ болыңыз, сонымен
бірге дымқыл жерде пайдаланбаңыз.
∙ Ашық ауада пайдалануы тиіс ПВХ изоляцияда
қарапайым шарттар үшін ұзартушы шнурды ғана
қолданыңыз.
∙ Электрқоректенуші кабелді өзіңіздің арт
жағыңызда кесуші аумақтан аулағырақ ұстаңыз.
Әрқашан электрқоректенуші кабеліңіз қандай да
бір кедергілер мен нәрселерге байланып қалмауын
бақылап отырыңыз.
∙ Жабайы не соған ұқсас жұмсақ өсімдіктердің
жанындағы өзге нәрселерді қырқып кетпеңіз.
∙ Тасымалдау кезінде құрылғыны өшіріңіз.
∙ Бұл құрылғымен ыңғайсыз жағдайда қолайсыз
тұрып, қолыңызды сермеп тұрып, әлде бір
қолыңызбен жұмыс жасамаңыз. Жұмысты міндетті
түрде екі қолыңызбен істеңіз.
∙ Құрылғы ереже бойынша жердің биіктігінде,
кесуге ыңғайлы, жермен қатар орналасқан
жағдайда, іске қосылуы тиіс. Бұл құрылғыны жер
бетінде жатпаған өсімдіктерді кесуге қолданбау
керек, яғни қабырғада, жартаста т.б. жерлерде
өсетін өсімдіктерге мұны қолдана алмаймыз.
∙ Аумақты қырықпас бұрын сол кеңістікте тас,
әйнек, металл қиындылары, қоқыс, басқа да ірі
нәрселер бар ма, жоқ па, тексеру керек. Кесуші
құрал жұмыс кезінде тасқа, қиыршық тас немесе
басқа нәрселерді кесіп кетпеуін қадағалаңыз. Кесу
машинасы осы секілді нәрселерді өзі лақтырып
тастайды.
∙ Әрқашан қауіпсіздік үшін 15 м-де өзіңіздің
арақашықтығыңызды сақтаңыз. Тастар немесе
қиыршық тас, ірі құмдарды лақтыру салдарынан
зақым алуыңыз мүмкін.
∙ Бұл құрылғыны пайдалану нәтижесінде үшінші
бір адамға зақым келген жағдайда, қолданушы өзі
жауап береді.
∙ Жаныңызда адамдар жүрсе, әсіресе балалар
39
KZ
Page 40

Нұсқаулық
мен үй жануарлары болған жағдайда, машинаны
қолдануды тоқтатыңыз.
∙ Қорғау мүмкіндігі болмаған жайда немесе
қорғау мүмкіндігі орнатылмаған жағдайда ешқашан
бұл құралды пайдаланбаңыз. Сол жерде тиісті
құрғау мүмкіндігі барына көз жеткізіңіз.
∙ Машинаны қолданбас бұрын және кез келген
зақымнан кейін көнеру сипатына қарай және зақым
алуына қарай тексеріңіз, қажет болса, жөндеңіз.
∙ Әсіресе, айналу кезінде сіздің денеңізге, аяқ-
қолыңызға кесуші құралды қауіпсіз арақашықтықта
ұстап тұрыңыз.
∙ Әруақытта аяқ-қолыңыз бен денеңіздің
тепе-теңдігін тұрақты сақтаңыз. Егін алқабында,
KZ
қатты өскен аумақтарда, тайғанақ жерлерде аса
сақтаныңыз. Көрінбей тұрған кедергілерден абай
болыңыз.
∙ Қажетті ұзындықты кесу үшін орнатылған
кескіш ішекке (струна) арналған пышақтан зақым
алмас үшін амал қолданыңыз.
∙ Құрылғы жасап тұрған уақытта ірі құмнан
үйілген төмпешік сүрлеуінде жолдарды қиып
өтпеңіз.
∙ Құрылғыны тоқтаусыз уақыт бойы
пайдаланбаңыз, периодты түрде тоқтатып
отырыңыз. Ұзақ уақыт жұмыс істеп жатқан
құрылғыны шектеп, (құрылғы шамамен 30-40
минут жұмыс істейді) әрбір жұмыс сеансы кезінде
10-20 минут демалдырыңыз. Сонымен бірге бір күн
ішінде 2 сағат не одан аз уақыт ішінде жұмысты
бітіруге тырысыңыз.
∙ Қырыққыш барабаны соққы алғанда немесе
түсі кеткенде, әлде қандай да бір зақым келгенде
ауыстырыңыз. Оның дұрыс салынуы мен сенімді
жұмыс жасауына жағдай жасаңыз.
∙ Ешқашан сәйкес келмейтін, майысқан,
қисайған, соққы алған, сынған, зақым алған
пышақты пайдаланбаңыз. Пышақ қайрағышын
үнемі алып жүріңіз. Пышақ орнатылып тұрған
болты тексеріп, тағы да пышақтың дыбыссыз еркін
айналып тұрғандығына көз жеткізіңіз.
САҚ БОЛЫҢЫЗ! Құрылғы
сөндірілген соң, кесуші ішек
(струна) бірнеше секунд бойы
айналып тұрады. Ешқашан кесуші
құрылғыны өз қолыңызбен
тоқтатуға тырыспаңыз.
Әруақытта оның өздігінен
тоқтағанын күтіңіз.
ӨЗДІГІНЕН ҚАЙТАРЫМ БЕРУ СЕБЕБІ
МЕН ОПЕРАТОРДЫҢ АЛДЫН АЛУ
ЖАҒДАЯТТАРЫ
Тәртіп бойынша жұмыс істеу уақытында бақылаусыз
тоқтам орын алуы мүмкін. Бұл оператор тарапынан
пайда болған тоқтам машинаны және кесуші құралды
қозғалтуды басқара алмауға әкеледі.
∙ Егер пышақ кесіліп жатқан материалда тұрып
қалса
∙ Егер пышақтың айналым сегменті 12 және 2
сағат аралығындағы оператор тарапынан ірі күрделі
нәрсемен, мысалы, ағаш,бұта, тас секілді кедергіге
тап болса [F1]
Мұндай тоқтамдар құрылғыны бақылай алмай қалып,
оператор өзіне немесе жанындағы адамдарға өлімге
апаратын зақымға себеп болуы мүмкін.
Бақылауды жоғалту тәуекелінен арылу үшін, тоқтап
қалудан қашу үшін:
∙ Жұмыс бастамас бұрын көрінбейтін кедергілер,
мысалы, ірі тас, түп, т.б. тоқтап қалу қаупі бар (егер
пышақ аталғандарды соқса) нәрселер бар ма, жоқ
па қарап шығыңыз.
∙ Тұтқаға жақын орналасқан бөліктерді ұстамай,
құрылғының ұстағышынан екі қолыңызбен мықтап
ұстаңыз.
∙ Өтпейтін пышақты қайтадан қайраңыз немесе
ауыстырыңыз.
∙ Құрылғыны ешқашан беліңізден жоғары
көтермеңіз.
∙ Пышақтың айналым сегменті 12 мен 2 сағат
аралығындағы тоқтаусыз ағымда қолданып, бұта
қырыққыш секілді тәртіпте жұмыс жасаудан қашыңыз.
ҚОРАПСЫЗДАНДЫРУ
Қаптан алу кезінде барлық бөлшектердің түгел
екендігіне көз жеткізіңіз. Соңғы беттегі жинақтау
сызбасын қараңыз. Қандай да болмасын бөлшектер
бомаған жағдайда немесе ақаулы болған жағдайда
IVT қызмет көрсету орталығына жүгініңіз.
ҚҰРАСТЫРУ ЖӘНЕ РЕТКЕ КЕЛТІРУ НҰ
С Қ А У Л Ы Қ Т А Р Ы
ЕСКЕРТУ! Ретке келтіруді
бастамас бұрын әрқашан алдымен
қырықтықты электр желісінен
өшіріп алыңыз!
40
Page 41

Нұсқаулық
Шынжырлы бағананы құрастыру >> [F2]
Көмекші тұтқаны (4) орнату және ректе келтіру >> [F3]
Қырықтықты қорғауға арналған аспапты (12)
орнату >> [F4]
ЕСКЕРТУ! Қорғауға арналған
аспапты (12) өз орнына дұрыс
орнатпай тұрып, құралды
пайдаланбаңыз. Қорғауға арналған
аспапты (12) орнатпай тұрып,
құралды пайдалану қозғалтқыштың
жануына қажетті міндеттердің
орындалмауына, одан басқа да
қауіпті жарақат алуға әкеп соғады.
ЕСКЕРТУ! Қырықтықты қорғауға
арналған аспапта (12) орнатылған,
қажетті ұзындықты кесуге арналған
(22) кесу ішегінің (струна) кесуші
пышағынан (24) жарақат алмас
үшін, сақтық шараларын жасаңыз:
бұл кескіш пышақтың жиектері
қайралып, тез кесуге арналған.
1. Қырықтықты қорғауға арналған аспапты
(12) төменгі бағананың (8) соңындағы металл
кронштейнге бекітіңіз
2. Қажетті қалыпта қырықтықты қорғауға арналған
аспапты (12) бұрандамен бекітіңіз
Тасымалдауға (6) қажет белбеуді қатайту >> [F5]
Керілуші кабельді (5) босату үшін ілмекті
пайдалану
Кабелді қоректендіруші электржелісіне қоспас бұрын,
созылғыш-шнур керілуші кабелді (5) босату үшін
ілмек арқылы жіберіліп жатқандығына көз жеткізіңіз.
Бұл ілмек кабелді жалғау үшін қажетсіз шарттарды
сала алады, және маңызды сақтандырушы аспап
болып табылады,
Кесу бүркеншегінің (11) жиынтығы
1. Редуктор қозғалтқышының (14) саңылауын ішкі
ернемектің саңылауымен (15) бірге сыйдырыңыз
және бөлшеткер айналмас үшін бағананы бұғаттау
мақсатында бүркеншіксіз металл шегені қойыңыз.
[F6-A]
2. Контргайканы (16) әлсіздендіріп, шешу үшін
біріктірілген гайка кілтін қолданыңыз. САҚТЫҚ ҮШІН!
Бұрандау сол бағытта.
3. Тегіс қақпақты (17) және сыртқы ернемекті (18)
ашыңыз.
4. Кесу бүркеншегін (11) орнатыңыз [F6-B].
5. Навинтите кесу бүркеншегін(11) бағанадан
сүйенішке дейін бұранданы шығысынанан бұрау.
6. Бүркеншіксіз металл шегені бұрыңыз.
Бұта кесуші пышақ жиынтығы (13) >> [F7]
Бұта кесуші пышақтар (13) қарапайым шөптер мен
арамшөптерді кесу үшін бірталшықты нейлонды
ішектер ретінде қолдыныла алады. Дегенмен,
пышақтар ешуақытта қалың әрі ұзын өсімдіктерға
қолдынылмайды.
1. Редуктор қозғалтқышының саңылауын (14)
ішкі ернемек саңылауымен (15) бірге сыйдырыңыз,
бөлшектерайналмау үшін бағананы жабу үшін,
бүркеншіксіз шегені қойыңыз.
2. Контргайканы (16) әлсіздендіріп, шешу үшін
біріктірілген гайка кілтін қолданыңыз.
3. Тегіс қақпақты (17) және сыртқы ернемекті (18)
және ішкі ернемекті (15) ашыңыз.
4. Ішкі ернемекті (15) қайтадан өз орнына
орнатыңыз
5. Бұта қырқушы пышақты (13) қондырыңыз.
6. Қайтадан сыртқы ернемекті (18) тиісінше
орнатыңыз.
7. Тегіс қақпақты (17) және контргайканы (16)
қойыңыз.
8. Контргайканы (16) тартыңыз.
9. Бүркеншіксіз метал шегені жойыңыз.
ҚОЛДАНУДЫ БАСТАУ
Қоректендіргіш кернеуінің мәні құралдың құжаттық
мәліметтерінде көрсетілген төлқұжаттық деректерге
сай болу керек.
Қ ОС Ы Л У /А Ж Ы РА Т Ы ЛУ
Қосылу >> [F8]
ЕСКЕРТУ! Кесуші құралдардан
Сіздің аяқ-қолыңыз алыс тұрған
жағдайда ғана қосу процесін
орындаңыз.
Құрылғыны кесу қажет шөптер жақындамайтындай
етіп, мықтап ұстаңыз
∙ Бұғаттау батырмасын (1) батырмасы мен екі
позициялы «қосу-ажырату» айырып-қосқышын (2)
бірге басыңыз.
Ажыратылу
∙ Екі позициялы «қосу-ажырату» айырып-
қосқышын (2) жіберіңіз
41
KZ
Page 42

Нұсқаулық
САҚТЫҚ ҮШІН! Кесу бүркеншегі
(11) қозғалтқыш сөндірілгеннен
соң, бірнеше секунд ьойы айналып
тұрады. Оның толықтай тоқтағанын
күтіп, содан кейін ғана құралды
апарып қойыңыз.
К Е С У І Ш Е Г І Н ( С Т Р У Н А ) ( 2 2 ) Б Е Р У
Кесу ішегін (струна) (22) зақымдаушы заттардан
тұрақты түрде тексеріп отырыңыз. Қысқа немесе
ескірген кесу ішегі (струна) (22) сирек қырқып
KZ
отырады.
ЕСКЕРТПЕ: Шақырып тұратын ескірген күрделі
заттар, мысалы, үгінділер, бетон, ұзын шөптердегі
ірі тастар кесу ішегін (струна) (22) зақымдауға
әкеп соғады. Ол қарапайым нұсқауларды орындай
отыра, қырықтықтың барабанынан (21) оңай құлап
отырады.
Барабаннан кесу ішегін (струна) (22) суырып алып,
әрқашан құрылғыны қосылмас бұрын дұрыс жұмыс
қалыбына әкеліп қойыңыз.
Жартылай өздігінен кесу ішегінің (22) берілуі
(ұрылып берілуі) >> [F9]
∙ Құрылғы жоғары жылдамдықта жұмыс жасап
жатқан кезде, ақырын жерге кесу бүркеншегін
(11) қағып қойыңыз. Бұл жағдайда қосымша
кесу ішегі (струна) (22) өздігінен берілуі жүзеге
асырылады.
∙ Қырықтықты қорғауға арналған аспаптың
қорғауында тұрған кесу ішегі (струна)
кескіші (24) жұмыс уақытында бірден қажетті
ұзындықтағы кесу ішегін (струна) (22) өздігінен
қырқа береді.
НАЗАР АУДАРЫҢЫЗЫ! ВНИМАНИЕ! Артық күш
жұмсап, кесу бүркеншегін (11) ұрмаңыз.
НАЗАР АУДАРЫҢЫЗ! Кесу ішегінің
пышағының жағдайын тұрақты
тексеріп тұрыңыз (24). Ешқандай
жағдайда кесу ішегін пышағынсыз,
әлде жөнделмеген пышақты (24)
қолданбаңыз. Кеу ішегінің пышағын
(24) кесуге кедергі әкелетін шөп пен
қоқыстан тұрақты түрде тазалап
отырыңыз.
Кесу ішегін (струна) (22) қолмен беру. >> [F10]
Қажет болған жағдайда, кесу ішегін (22) сыртқа
қолмен беруге болады.
∙ Бұл қимылды жасау үшін пышаққа (24)жеткенге
дейін, кесу ішегінің (струна) (22) соңын шығара
отырып, кесу ішегін (струна) беру (23) батырмасын
басып, жіберіп қалыңыз,
∙ Егер кесуші ішек кеу ішегінің пышағынан (24)
шығып кететін болса, онда кеу ішегі (струна) (22)
көбірек беріліп қойғандығы. Бұл жағдайда кесу
ішегінің қақпағын (19) ағытып, ашылған қақпақ
ілмегін (20) басып, ұстап тұрыңыз, содан кейін
қажетті ұзындықтағы кесу ішегін (22) орнатыңыз.
П А Й Д А Л А Н У Ғ А А Р Н А Л Ғ А Н Н Ұ С Қ А У Л Ы Қ
САҚТЫҚ ҮШІН! Құрылғыны тиісті
қорғауға арналған аспабынсыз
пайдаланбаңыз. Әр пайдалан
алдында оның жұмыс жасап
тұрғандығын тексеріңіз.
ЕСКЕРТУ! Әрқашан мықты қалың
киім мен көзге қорғау көзілдірігін
киіңіз. Тастар мен үгінділер көз бен
бетке шашылып кету салдарынан,
көздің соқырлығы, одан да өзге
зақымдарға әкеліп соғуы мүмкін.
ЕСКЕРТПЕ: жаңа кесу ішегі (струна) (22) кесу
ішегінің (струна) (22) соңғы ұзындығы 2,5 смден
кем болмаған жағдайда ғана сатылады.
Егер кесу ішегінің (струна)(22) ұзындығы 2,5 смден қысқа болса:
∙ Қырықтықты өшіріп, кесу ішегін (струна) (22)
қолмен әкеліңіз.
Егер кесу ішегінің (струна) соңы көрінбесе:
∙ Қырықтық барабанын (21) ауыстыру қажет.
∙ Алдыңғы тұтқаны (3) бір қолыңызбен, көмекші
тұтқаны (4) екінші қолыңызбен ұстаңыз.
∙ Жұмыс алдында, кесу ішегі (22) сыртқа
бағытталғанына көз жеткізіңіз.
∙ Кесу бүркеншегі (11) кесілуі қажет материалда
немесе оның жанында тұрған кезде, машинаны
қосып қалмаңыз. Кесу қажет материалмен
байланыспас бұрын, машина толықтай жасап
тұрғандығын қадағалаңыз.
∙ Құрылғыны беліңізден төмен деңгейде ұстаңыз.
∙ Жұмыс кезінде тек оң мен солға ғана ауысып
отырыңыз, себебі қиындылар Сізден ары қарай түсіп
отырады. Жұмысты қырықтықты еңкейген күйде
42
Page 43

Нұсқаулық
(шамамен 30°) ақырын жасаңыз. [F11]
∙ Алға қарай еңкеймей, кесу бүркеншегін (j) жерге
жақын, параллель ұстаңыз (кесетін өсімдіктерге
перпендикуляр). Тек кесу ішегі (струна) (22) мен
байланыс орнатуға мүмкіндік жасаңыз.
∙ Ылғал, сулы шөптерді кеспеңіз.
∙ Ұзын шөптерді әруақытта жоғарғы бөлігінен
бастап, бөлшектеп кесуге тура келеді, Қиындылар
қысқа болуы тиіс. [F12]
∙ Кесу ішегінің (22) қалың заттардан (тастар,
қабырғалар, ағаш шарбақтар т.б.) алатын
соққысының әсерінен болатын тозудан сақтаныңыз.
∙ Жұмыс жасап жатқан құрылғының созушы-
сымын жер-жерге лақтырып тастаудан сақ болыңыз.
Сіз зақымдап алуыңыз мүмкін. Сіз әруақытта
созушы-сымды өзіңіздің артыңызға алып жүріңіз.
ЕСКЕРТУ! Қалың ірі ұзын өсімдіктерді
қырқу кезінде бұта қырыққышты
пайдалануға болмайды.
ҚЫЗМЕТ КӨРСЕТУ ЖӘНЕ САҚТАУ
АБАЙ БОЛЫҢЫЗ! Құралмен
жұмысты бастау алдында желілік
ашаны алып тасатыңыз.
∙ Құралды және желдеткіш саңылауларын (егер
болса) тазалықта ұстаңыз. Үнемі тазарту және
қызмет көрсету құралдың жоғары тиімділігін және
ұзақ уақыт қолданылуын кепілдейді.
∙ Өндіріс пен сынаудың мінсіз шарттарына
қарамастан, істен шыққан жағдайда, жөндеу
жұмыстары IVT ресми орталықтарында жүргізілуі
керек.
∙ Барлық сақиналар, болттар және бұрамалар
мұқият бұралуы керек.
∙ Ақауланған немесе тозған бөлшектерді
алмастырыңыз.
∙ Тек түпнұсқалық қосалқы бөлшектерді ғана
пайдаланыңыз. Басқа тараптық өндіруші дайындаған
бөлшектер нақты сай болмайды және жарақаттану
қаупін жоғарылатады.
∙ Құралды құрғақ әрі балалардың қолы жетпейтін
жерде, тез тұтанатын материалдардан қауіпсіз
қашықтықта сақтаңыз.
∙ Құралға су тигізбеңіз!
∙ Әрбір өсімдік кесілу процедурасы болғаннан
кейін кесуші құрылғы мен қырықтықтың қорғауға
арналған аспабын (12) шөп пен топырақтан
тазалаңыз. Бұл әдіспен Сіз көгеріп кетудің пайда
болынан сақтайсыз.
∙ Тұтқаның құрғақ екендігіне, онда жағар майдың
жоқтығына көз жеткізіңіз.
∙ Құралғыны жұқа щетка немесе сүртілетін
материалмен тазалаңыз. Тазалаушы қатты
нәрселер мен сұйықтықтарды пайдаланбаңыз.
Олар құрылғыға аса зиян болуы мүмкін. Химиялық
қоспалар машинаның пластмассалық бөлшектерін
ірітіп жіберуі мүмкін.
∙ Көп уақыт бойы ыстық күн астында құрылғыны
сақтамаңыз.
∙ Құрылғыны пластмассалық дүниелермен жауып
қоймаңыз. Олардың үсті дымқылданып, көгеріп кеуі
мүмкін.
∙ Қырықтықтың қорғауға арналған аспабының (12)
үстіне құрылғыны қоюға болмайды. Ең жақсысы оны
қырықтықтың қорғауға арналған аспабы (12) басқа
да кез келген нәрсемен шиеленісіп қалмас үшін,
бергі жақтағы тұтқаға (3) іліп қойған дұрыс. Мұндай
қарсы жағдайда қауіп төнуі мүмкін, қырықтықтың
қорғауға арналған аспабы (12) формасын өзгертіп,
оның мөлшері мен қорғау сипаты күрт өзгеруі мүмкін.
ҚЫРЫҚТЫҚ БАРАБАНЫН (21)
АУЫСТЫРУ
НАЗАР АУДАРЫҢЫЗ! Қырықтыққа
ешқандай металдан, сымнан
жасалған ішектер мен тростарды
қолдануға болмайды.
ЕСКЕРТУ! Кесу ішегін (струна) (22)
тек тиісті диаметрде пайдаланыңыз.
Кесуші ішектің (струна) (22) басқа
мөлшерлері қажетті сипатта
көрінбей, бұрыс жұмыс жасауға
әкеліп соғады, күрделі зақым алу
қаупі де бар.
МАҢЫЗДЫ! Кесуге арналған
аспапты ауыстырмас бұрын
розеткадан штепселді айырды
міндетті түрде суырыңыз.
Қырықтық барабаны (21) мен кесу ішегінің
(струна) (22) комплектін қондыру
Сіздің қырықтығыңыз (21) белгіленген кесу ішегі
(22) қиындық тудырып жатқан кезде толығымен
ауыстырылатын қырықтық барабанымен (21) бірге
қойылады
1. Машинаны қоректендіруші электр желісінен
ажыратыңыз.
KZ
43
Page 44

Нұсқаулық
2. Сіз тепе-теңдік биіктікте, аяқтарыңыз берік
тұрғанына көз жеткізіңіз.
3. Қырықтықтың сақтандыру аспабы (12) жоғары
қарай бағытталуы үшін, машинаны айналдырыңыз.
4. Кесу бүркеншегін (11) ашып, кесу бүркеншегінің
(11) ішінен ескі қырықтық барабанын (21) шығару
үшін, ашылған қақпақтың ілмегін (20) басып, ұстап
тұрыңыз. [F13]
5. Кесу бүркеншегін тазалаңыз. (11).
6. Кесу ішегінің (струна) (22) соңғы екеуін
барабан саңылауы арқылы кигізіңіз, жаңа қырықтың
барабанын (21) кесу бүркеншегіне (11) кигізіңіз.
7. Кесу бүркеншегінің қақпағын (19) орнына
қондырыңыз.
KZ
8. Кесу ішегінің (струна) (22) соңын қырықтықтың
сақтандырушы аспабының (12) сыртқы жағына жете
қойғанша, сыртқа қарай созып тұрыңыз.
САҚТЫҚ ҮШІН! Жөнделген
функциялық кесу үшегі (струна)
(22) мен құралдың өзі дұрыс
істеп тұрғандығына көз жеткізу
үшін, қырықтық барабанын (21)
ауыстырған соң, қырықтыққа бір
минуттан артық кедергісіз жұмыс
істеуіне мүмкіндік беріңіз.
Нейлондық кесу ішегінің (струна) (22) орамы
қырықтықтың бос барабаны (21)үшін >> [F14]
Бұған балама ретінде Сіз сонымен бірге нейлондық
кесу ішегін (струна) (22) қырықтықтың барабанына
(21) өздігіңізден үйіп қоя аласыз. Максималды
диаметр мен кесу ішегінің (струна) (22) ұзындығы
туралы техникалық құралдың сипаттау кестесінің
анықтамасына көз жүгіртіңіз. Ол Сіздің моделіңізге
сәйкес келеді.
Сонымен қатар, Сізге жаңа кесу ішегінің (струна)
(22) орамасы қозғалтқыш айналымына қарсы
бағытта болуын қамтамасыз ету керек. Ол
қырықтық барабанының (21) негізінде немесе кесу
бүркеншегінің (19) қақпағында тілшемен көрсетілген.
бүркеншегінің (11) екі кішкене саңылауы арқылы
кигізіңіз, қырықтық барабанын (21) қойыңыз.
4. Қайтадан қырықтық барабанын (21) кесу
бүркеншегіне (11) қойыңыз, сосын кесу бүркеншегінің
қақпағымен (19) жауып қойыңыз.
5. Кесу ішегінің (струна) беру батырмасын (23)
басыңыз, кесу ішегінің (струна) (22) соңғы екеуін
қырықтықтың сақтандырушы аспабының (12) сыртқы
жағына жете қойғанша, сыртқа қарай созып тұрыңыз
ҚОРШАҒАН ОРТАНЫ ҚОРҒАУ
Қалдықты болдырмау мақсатында
шикізатты қайта қолдану!
Құралды, қосымша жабдықтарды және қаптаманы
экологиялық таза жолмен қайта өңдеуге жіберу
керек.
Пластикалық бөлшектер классификациялық қайта
өңдеуге жіберіледі.
Осы нұсқаулықтар хлор пайдаланбай дайындалған
екінші өңделім қағазына басылған.
НАЗАР АУДАРЫҢЫЗ! Қырықтық барабаны(21)
үшін кесу ішегінің (струна) (22) орамасының
ақырын текшелеп жиналуы үшін жұмыстануыңыз
қажет.
1. Кесу ішегінің (струна) (22) шұңқырдың іші
тереңдігі жартысындай етіп немесе қырықтық
барабанының (21) кішкене саңылауын бекітіңіз.
2. Кесу ішегін (струна) (22) тілшеде
көрсетілгеніндей етіп қайта ораңыз. Кесу ішегінің
(струна) (22) кішкене бөлігін ораусыз күйінде
қалдырыңыз (шамамен 100 мм)
3. Кесу ішегінің (струна) (22) соңғы екеуін кесу
44
Page 45

Нұсқаулық
АҚАУЛЫҚТАРДЫ ЖОЮ
САҚ БОЛЫҢЫЗ! Құралдың ақаулықтары бар-жоғын тексермей тұрып, оны розеткадан
ажыратыңыз.
Әдеттегі ақаулық Ақаулық себебі Шешімі
Құрал дірілдейді.
Құрал әрекеті жүзеге
асырылмай жатыр
Кесу жағдайының нашарлауы
Егер осы ақпараттар сізге мәселені шешуге көмектеспесе, өтінеміз, IVT сервистік орталығына
хабарласыңыз.
∙ Қырықтық барабаны (21)
ластанды
∙ Қырықтық барабаны (21)
жөнделмеді
∙ Желі қысымы жоқ
∙ Екі позициялы «қосу /
ажырату» (2) айырып-қосушы
жөнделмеген.
∙ Көмір щеткасының ескіруі.
∙ Қозғалтқыш жөнделмеген.
∙ Қырықтық барабанында (21)
кесу ішегі (струна) (22) жеткіліксіз.
∙ Жіп қырықтық барабанынан
(21) сыртқа бағытталмайды
немесе қырықтық барабанынан
(21) тек бір бағыттан шықпайды.
∙ Оны жақсылап тазалаңыз
∙ Оны алмастырыңыз
∙ Штепселді розетканы,
кабелді, электрқоректендіргіш
желіні, штепселді айырды
тексеріңіз. Егер қажет болса,
электрик жөндеуден өткізуі тиіс.
∙ Тұтынушылар үшін арнайы
қызмет көрсету мамандарына
жөндеу жұмыстарын жасатыңыз.
∙ Кесу ішегінің (22) ұзындығын
ретке келтіріңіз немесе қырықтық
барабанын (21) ауыстырыңыз.
∙ Қырықтық барабанын (21)
шешіңіз, кесу ішегін(струна)
(22) саңылау арқылы сыртқа
шығарыңыз, содан кейін
қайтадан қырықтық барабанын
орнына салыңыз. (21).
KZ
ҚР аумағында сапа бойынша наразылықтарды қабылдайтын ұйым: «Костанай DWT/ДВТ» ЖШС | Қостанай қ. Целинная
көш., 4 - Қазақстан Республикасы | тел (7142) 28 07 00, -01 | Организация, принимающая претензии на территории РК: ТОО
«Костанай DWT/ДВТ» | г. Костанай, ул. Целинная, 4 - Республика Казахстан | тел (7142) 28 07 00, -01
НАЗАР АУДАРЫҢЫЗ! БҰЙЫМҒА ӨЗ БЕТІҢІЗБЕН ЖӨНДЕУ ЖҮРГІЗІП, ОНЫҢ ІЗДЕРІН
ЖАСЫРУҒА ТЫРЫСУҒА МҮЛДЕМ БОЛМАЙДЫ! Тек қана авторлық құқығы бар қызмет
көрсету орталығының жөндеу жүргізуге және қамтылған техникалық қызмет көрсетуге
құқығы бар. Бұйымның ішкі құрылымына өзгерістер енгізуге тыйым салынады!
МҰНДАЙ ӘРЕКЕТТЕР КЕПІЛДІК МІНДЕТТЕМЕЛЕРДЕН БАС ТАРТУҒА НЕГІЗ БОЛЫП ҚАНА
ҚОЙМАЙ, СОНЫМЕН ҚАТАР ҚАУІПТІ ЖАРАҚАТ АЛУҒА ЖӘНЕ ЗИЯН КЕЛТІРУГЕ СЕБЕПШІ
БОЛУЫ МҮМКІН.
45
Page 46

Manuale di istruzioni
SPECIFICHE TECNICHE
Modello GTE-1000 GTE-1200
Voltaggio~Frequenza [V~Hz]
Potenza nominale [W] 1000 1200
Velocità a vuoto [RPM] 7500 7500
Diametro massimo di taglio [mm] 420 420
Diametro del lo di taglio [mm] 1.6 1.6
Riserva del lo di taglio [m] 5 5
Diametro della lama [mm] 255 (25.4) (3 denti) 255 (25.4) (3 denti)
Livello di vibrazioni [m/s
Livello di pressione sonora [dB(A)] 75.6 (K=3) 75.6 (K=3)
Livello di potenza sonora [dB(A)] 95.5 (K=3) 95.5 (K=3)
IT
Peso [Kg] 5.8 5.8
Classe di sicurezza II II
2
] 6.749 (K=1.5) 6.749 (K=1.5)
230~50 230~50
COMPONENTI
1. Pulsante di sblocco dell’interruttore
2. Interruttore di accensione/spegnimento
3. Impugnatura principale
4. Impugnatura ausiliaria
5. Fermacavo
6. Tracolla
7. Manico superiore
8. Manico inferiore
9. Alloggio motore
10. Aperture di ventilazione
11. Testa di taglio
12. Calotta di protezione
13. Lama
14. Coppia conica
15. Flangia interna
16. Dado di ssaggio
17. Piastra di copertura
18. Flangia esterna
19. Coperchio della testa di taglio
20. Linguetta di rilascio del coperchio
21. Bobina
22. Filo di taglio
23. Pulsante di rilascio del lo di taglio
24. Lametta taglialo
CONTENUTO DELLA CONFEZIONE
Manuale di istruzioni (1 pz), calotta di protezione (1 set),
ferramenta (1 set), chiave per candela (1 pz), lama (1
pz), bobina (1 pz), blocco impugnatura ausiliaria (1 set),
tracolla (1 pz), brugola (1 pz), lametta taglialo (1 pz).
UTILIZZO
Questo strumento è stato progettato per tagliare erba
di prati e di piccole superci erbose in giardini privati e
lungo i bordi dei manti erbosi, montando accessori di
taglio adatti.
Non è permesso utilizzare il dispositivo per tagliare erba
in giardini pubblici, parchi, impianti sportivi, lungo le
strade, nell’agricoltura e nella silvicultura.
Il peso leggero e la facile manovrabilità rendono il
dispositivo adatto ad essere utilizzato anche in aree
difcili da raggiungere e in spazi ristretti.
Questo strumento può essere usato sia come
tagliabordi, sia come decespugliatore, poiché su di
esso può essere montata anche una lama di metallo,
che rende possibile il taglio anche di erba più lunga e
in aree con vegetazione più incolta.
NORME DI SICUREZZA PER L’USO
Regole generali di sicurezza
Le seguenti istruzioni di sicurezza servono per il
corretto utilizzo dello strumento e per la tutela della
propria sicurezza, pertanto si prega di leggere molto
attentamente.
Quando si passa questo strumento ad una terza
persona, anche queste istruzioni devono essere
consegnate.
Conservare questo manuale di istruzioni e tutta la
documentazione in dotazione con lo strumento per farvi
riferimento in futuro, in caso di bisogno.
Integrare le seguenti norme di sicurezza con le
indicazioni riportate sul prodotto.
Prendere condenza con tutti i pulsanti e i controlli
46
Page 47

Manuale di istruzioni
e assicurarsi di conoscere il corretto utilizzo dello
strumento prima di iniziare a utilizzarlo, ma soprattutto
assicurarsi di sapere come interromperne l’uso in caso
di emergenza.
Seguire queste semplici istruzioni contribuirà inoltre a
mantenere lo strumento in buone condizioni di lavoro.
∙ Lo strumento deve essere montato correttamente
prima dell’uso.
∙ Usare lo strumento solamente per gli scopi per cui
è stato progettato.
∙ In aggiunta al prodotto sono state progettate anche
delle etichette di sicurezza che devono essere prese
in considerazione assieme con le indicazioni in merito
all’equipaggiamento di sicurezza che deve essere
adottato. La prevenzione di incidenti dipende dalla
consapevolezza, dal buon senso e dalla formazione
adeguata di tutti i soggetti coinvolti nell’utilizzo, nel
trasporto, nella manutenzione e stoccaggio dello
strumento.
∙ Non lasciare mai lo strumento incustodito.
∙ Non permettere ai bambini di utilizzare lo
strumento. I bambini devono essere tenuti sempre sotto
controllo per impedire che giochino con lo strumento.
∙ Tenere i bambini e gli animali domestici lontano.
I terzi devono essere mantenuti a un’opportuna
distanza di sicurezza quando lo strumento è in uso.
Interromperne l’utilizzo se vi sono nei paraggi altre
persone, specialmente bambini o animali domestici.
∙ L’utente è responsabile per i terzi, mentre lavora
con lo strumento.
∙ Le persone che non conoscono le istruzioni
per l’uso, i bambini, i minori che non hanno ancora
raggiunto l’età minima per l’utilizzo di questo strumento
e le persone sotto l’inuenza di alcool, droghe o
farmaci non sono autorizzati ad utilizzare lo strumento.
Alcune normative locali possono stabilire l’età minima
dell’utilizzatore.
ATTENZIONE! Il consumo di alcool,
farmaci e droghe, oltre a stati di
malattia, febbre e stanchezza possono
inuenzare la capacità di reagire. Non
usare lo strumento in una o più di
queste condizioni.
∙ Assicurarsi che tutti i dispositivi di protezione (se
presenti) siano montati correttamente e che siano in
buone condizioni.
∙ Non usare mai lo strumento con i dispositivi di
sicurezza o eventuali protezioni (se presenti) difettosi
o senza dispositivi di sicurezza correttamente montati.
∙ Ispezionare bene lo strumento per cercare parti
eventualmente allentate (per esempio: dadi, bulloni, viti,
etc) e eventuali danni. Controllare a intervalli frequenti,
che viti e bulloni siano adeguatamente serrati e che
le attrezzature siano in buone condizioni di lavoro.
Ripararle o sostituirle, se necessario, prima di utilizzare
lo strumento. Gravi lesioni all’operatore e ai presenti
possono vericarsi se vi è un danno allo strumento.
∙ Durante il funzionamento dello strumento, vestirsi
adeguatamente. Non indossare abiti larghi o gioielli
che potrebbero impigliarsi nello strumento. Indossare
indumenti da lavoro adatti. Si raccomanda che le
gambe e i piedi siano ben coperti, al riparo da eventuali
schegge durante il lavoro. Non utilizzare lo strumento
se si è a piedi nudi o con sandali aperti. I capelli lunghi
devono essere raccolti dietro la nuca.
∙ Mantenere tutte le impugnature e i manici asciutti,
puliti e privi di olio o grasso.
∙ Usare dispositivi di protezione. Usare occhiali
di protezione e guanti di sicurezza. Indossare anche
una mascherina antipolvere durante le operazioni
polverulente e se sono presenti gas di scarico. Quando
è necessario, indossare anche scarpe robuste e
antiscivolo, casco e tappi per le orecchie. Se il livello di
rumore supera 85 dB (A), è obbligatoria una protezione
acustica.
ATTENZIONE! Utilizzare dispositivi
di protezione personale! I dispositivi
di sicurezza e le attrezzature di
protezione personale proteggono la
propria salute e la salute degli altri
e garantiscono un funzionamento
senza problemi dello strumento.
∙ Non iniziare ad utilizzare lo strumento se questo è
capovolto o non è nella corretta posizione di lavoro.
∙ Accertarsi di avere una corretta posizione mentre si
opera con lo strumento. Mantenere una posizione salda
e un buon equilibrio in ogni momento.
∙ Tenere pulita l’area di lavoro. Prima dell’uso dello
strumento, tutti gli eventuali ostacoli devono essere
rimossi dalla zona di lavoro; prestare attenzione anche
a eventuali corpi estranei durante il lavoro.
∙ Non forzare lo strumento.
∙ Lavorare solo alla luce del giorno o comunque in
condizioni di sufciente illuminazione articiale. Non
utilizzare mai lo strumento senza una buona visibilità.
∙ Fare attenzione a non fare cadere lo strumento o
ad urtarlo contro ostacoli.
ATTENZIONE! Mantenere sempre un’attenzione
costante. Prestare attenzione a quello che si sta
facendo. La distrazione può causare la perdita di
controllo. Utilizzare il buon senso.
47
IT
Page 48

Manuale di istruzioni
Regole di sicurezza elettriche
ATTENZIONE! Quando si usano utensili elettrici,
si devono osservare le seguenti istruzioni di
sicurezza per evitare il rischio di scosse elettriche,
lesioni personali e incendio. Leggere e osservare
attentamente tali istruzioni prima di utilizzare lo
strumento.
∙ Per una maggiore sicurezza, si raccomanda di
usare un dispositivo di protezione dalla corrente residua
(RCD) con una corrente di apertura non superiore ai 30
mA. Controllare sempre tale dispositivo ogni volta che
si usa la macchina. Consultare un elettricista afdabile.
IT
∙ Il valore di tensione della corrente deve
corrispondere a quello descritto sulla targhetta dei dati
tecnici. Non usare altri voltaggi. La connessione del
dispositivo a qualsiasi altra fonte di energia può causare
danni.
∙ Prima di inserire la spina nella presa della corrente,
assicurarsi che il voltaggio sia corretto e corrisponda a
quello riportato sulla targhetta dell’apparecchio.
∙ Evitare il contatto del corpo con eventuali oggetti
a terra, come tubi, radiatori, fornelli e frigoriferi. C’è un
aumento del rischio di scosse elettriche se il corpo è
messo a terra.
∙ Non spostare mai l’apparecchio tirandolo per il
cavo.
∙ Non tirare il cavo elettrico. Tenerlo lontano da fonti
di calore, olio, spigoli vivi o parti in movimento.
∙ Guidare i cavi elettrici sempre in modo sicuro.
∙ Non utilizzare utensili elettrici vicino a liquidi o a gas
inammabili.
∙ Scollegare sempre l’apparecchio dalla rete elettrica
prima di trasportarlo in altri luoghi.
ATTENZIONE! L’uso di un RCD o di un
salvavita nel cablaggio non dispensa
l’utente dal considerare le seguenti
istruzioni di sicurezza e seguire
indicazioni di lavoro sicure illustrate
in questo manuale.
ATTENZIONE! Toccare le parti
elettricate può causare morte per
scosse elettriche o bruciature.
ATTENZIONE! L’apparecchio deve
sempre essere staccato dalla
corrente prima di scollegare qualsiasi
connettore ad innesto o prolunghe.
∙ Non passare l’apparecchio sopra al cavo elettrico
mentre lo strumento è in funzione. Assicurarsi di sapere
sempre dove si trova il cavo.
∙ Non collegare da sè un cavo di alimentazione
direttamente al dispositivo. Portarlo presso il punto di
assistenza più vicino.
∙ Per evitare qualsiasi rischio, in caso di
danneggiamento, il cavo di alimentazione dovrebbe
essere sostituito dal produttore o da un suo agente, o
comunque da personale qualicato.
∙ Staccare immediatamente la spina dalla presa di
corrente se il cavo è danneggiato o tagliato.
ATTENZIONE! PERICOLO DI SCOSSA
ELETTRICA!
Esaminare sempre l’ambiente di lavoro. Non
esporre i dispositivi elettrici alla pioggia. Non
utilizzare gli elettroutensili in luoghi umidi o bagnati.
Mantenere l’area di lavoro ben illuminata ed
asciutta. Evitare che il dispositivo si bagni o venga
esposto all’umidità. Non lasciarlo fuori la notte. Se
entra acqua in un apparecchio elettrico vi è un
aumento del rischio di scosse elettriche.
∙ Il cavo di alimentazione deve essere controllato
periodicamente e, prima di ogni utilizzo, assicurarsi
che non sia danneggiato o usurato. Se il cavo non è in
buone condizioni, non utilizzare l’apparecchio; portarlo
in un centro di assistenza autorizzato.
∙ Quando lo strumento viene impiegato all’aperto,
utilizzare esclusivamente un cavo di prolunga per
esterni, marchiato per questo uso specico. Tenerlo
lontano dalla zona di lavoro, da umidità, superci
bagnate o oleose e lontano da fonti di calore e
combustibili.
∙ Evitare qualsiasi avviamento involontario del
dispositivo: accertarsi che l’interruttore di accensione
sia spento prima di collegare lo strumento alla corrente.
∙ Rimuovere eventuali chiavi di regolazione prima di
accendere lo strumento.
∙ Non utilizzare lo strumento se l’interruttore di
accensione/spegnimento è difettoso o non funziona
correttamente. Qualsiasi strumento che non può essere
controllato tramite il suo interruttore è pericoloso e deve
essere riparato.
48
Page 49

Manuale di istruzioni
ATTENZIONE! Durante l’utilizzo
dello strumento, potrebbero essere
prodotte alcune polveri contenenti
sostanze chimiche che possono
causare il cancro, difetti genetici e
altri problemi riproduttivi.
Alcunedi queste sostanze chimiche sono: vernici a base
di piombo, silice cristallina di mattoni e cemento e altri
prodotti per muratura, arsenico e cromo derivanti da
legname trattato chimicamente e altri prodotti pericolosi.
Se tali polveri sono presenti, il rischio varia in base alla
lunghezza dell’esposizione e al tipo di lavoro.
Per ridurre l’esposizione a tali sostanze chimiche,
ogni volta che si compiono operazioni polverulente,
lavorare in una zona ben ventilata con dispositivi di
sicurezza approvati, come le maschere anti-polvere,
che sono state appositamente progettate per ltrare
anche le particelle microscopiche.
∙ Se con lo strumento si colpisce un corpo estraneo,
esaminare il dispositivo per individuare eventuali danni
e procedere con tutte le riparazioni necessarie prima di
riavviare e continuare a lavorare.
∙ Se lo strumento inizia a vibrare in modo anomalo,
spegnerlo e cercare di individuare immediatamente la
causa. Vibrazioni anomale sono dovute generalmente
a malfunzionamenti.
∙ Spegnere sempre il dispositivo e aspettare che
esso si sia fermato completamente quando lo si lascia
incustodito, prima di fare manutenzione, prima di
controllarlo e pulirlo.
∙ È proibito modicare o rimuovere qualsiasi parte
interna del dispositivo.
Regole di sicurezza speciche
∙ Indossare sempre un abbigliamento da lavoro
adeguato e adottare opportuni sistemi di protezione
personale. In modo particolare, usare occhiali o visiera
di protezione, protettori auricolari, stivali alti o scarpe
con suola antiscivolo, pantaloni lunghi e resistenti e
guanti da lavoro. Non utilizzare il dispositivo quando si è
scalzi e quando si indossano scarpe aperte.
∙ Durante il funzionamento, la macchina potrebbe
proiettare corpi esterni verso il viso dell’operatore,
causando danni seri alla vista. Prima di iniziare a
lavorare, indossare sempre occhiali di protezione
o una visiera che abbia, se necessario, anche una
schermatura laterale o addirittura una copertura che
protegga l’intero volto.
∙ Indossare sempre un caschetto di protezione se si
lavora nei boschi.
∙ Utilizzare il dispositivo soltanto di giorno o con una
buona illuminazione articiale.
∙ Non utilizzare la macchina in prossimità di liquidi
inammabili o gas: pericolo di esplosione.
∙ Non utilizzare la macchina su terreni scivolosi, di
notte, se vi è nebbia, durante i temporali o in qualsiasi
altra condizione atmosferica che potrebbe rendere
pericoloso il lavoro o in cui sia difcile avere una visione
chiara e globale della zona operativa.
∙ Proteggere il dispositivo dall’umidità. L’apparecchio
non deve essere bagnato, nè fatto funzionare in
ambienti umidi.
∙ Utilizzare solo prolunghe in PVC, marchiate per
uso all’esterno.
∙ Tenere sempre il cavo di alimentazione o di
prolunga dietro a sè e lontano dagli strumenti di taglio.
Assicurarsi sempre che i cavi non si impiglino in
eventuali ostacoli e oggetti presenti nella zona di lavoro.
∙ Utilizzare il dispositivo esclusivamente per il taglio
di prati e erbacce.
∙ Spegnere il dispositivo durante il trasporto.
∙ Non utilizzare il dispositivo in posizioni scomode, in
equilibrio precario, tenendo braccia tese o impugnandolo
con una sola mano. Utilizzare sempre entrambe le mani
per guidare lo strumento durante il funzionamento.
∙ Non utilizzate la macchina per tagliare erba che
non sia a contatto con il terreno; ad esempio non
tagliare erba che si trova sui muri o sui massi ecc.
∙ Prima di iniziare a lavorare, ispezionare l’area
di lavoro per eliminare eventuali sassi, vetri, pezzi
di metallo, detriti o altri ostacoli. Prima di avviare
la macchina e durante tutta l’operazione di taglio,
assicurarsi che l’accessorio di taglio non venga in
contatto con sassi, pietre, cavi o altri corpi estranei.
L’accessorio di taglio potrebbe proiettarli in aria
pericolosamente.
∙ Mantenere sempre una distanza di sicurezza
di circa 15 m intorno a sè. Sassi e pietre potrebbero
essere scaraventati in aria dallo strumento in funzione,
causando serie lesioni.
∙ In tutta la zona di lavoro, l’operatore è responsabile
per danni a terzi, in seguito all’uso dello strumento.
∙ Interrompere l’utilizzo dello strumento se persone,
specialmente bambini e animali, sono nelle vicinanze.
∙ Non utilizzare la macchina se le protezioni sono
danneggiate o mancanti. Vericate che sia stata
montata la protezione correttamente, prima di avviare
la macchina.
∙ Prima dell’utilizzo della macchina e dopo qualsiasi
impatto con un eventuale ostacolo, controllare che il
dispositivo non presenti segni di danneggiamento o
usura, effettuare le riparazioni opportune, se necessarie.
∙ Mantenere il corpo, in particolar modo mani e piedi,
all’opportuna distanza di sicurezza dagli accessori di
taglio, specialmente quando in funzione.
∙ Mantenere sempre una posizione stabile e sicura.
Essere particolarmente cauti quando si lavora su pendii,
su terreni scoscesi o scivolosi. Prestare attenzione ad
eventuali ostacoli nascosti.
49
IT
Page 50

Manuale di istruzioni
∙ Fare attenzione alla lametta taglialo che può
causare tagli profondi.
∙ Non attraversare strade o percorsi ghiaiosi con il
dispositivo ancora in funzione.
∙ Non condurre sessioni di lavoro troppo lunghe,
intervallare il lavoro a pause. Limitare il tempo in cui il
dispositivo viene usato in continuo (prevedere sessioni
di lavoro di circa 30-40 minuti massimo) e fare 10-20
minuti di pausa fra una sessione di lavoro e l’altra. Non
lavorare per più di 2 ore in totale al giorno.
∙ Sostituire la testa di taglio se usurata, danneggiata
o difettosa. Assicurasi che sia opportunamente installata
e ssata.
∙ Non utilizzare lame inadatte, difettose, deformate,
usurate o danneggiate. Tenere la lama sempre aflata.
Controllare che il dado di ssaggio della lama sia
opportunamente serrato e assicurarsi che la lama giri
IT
liberamente senza produrre rumore anomalo.
CAUTELA! Dopo lo spegnimento
del dispositivo, la testa di taglio
continua a girare per inerzia per alcuni
secondi. Non tentare mai di fermare
il dispositivo di taglio con le mani.
Lasciare sempre che si fermi da solo
completamente.
CAUSE E PREVENZIONE DEL
CONTRACCOLPO
Lavorando con il decespugliatore, esiste il pericolo che
si verichi un contraccolpo improvviso. Il contraccolpo
è la reazione all’indietro, improvvisa e incontrollata del
dispositivo e degli accessori di taglio verso l’operatore
che si puo’ vericare:
∙ se la lama si blocca nel taglio;
∙ se il segmento di lama compreso tra le 12 e le 2,
visto dalla posizione dell’operatore [F1], viene a contatto
con un oggetto rigido come ad esempio, un tronco di un
albero, una roccia, un cespuglio o un muro.
Il contraccolpo può causare la perdita di controllo
dell’unità e conseguentemente, lesioni gravi, addirittura
mortali, per l’operatore o gli astanti.
Per evitare contraccolpi e ridurre il rischio di perdita di
controllo del dispositivo:
∙ prima di iniziare a lavorare, controllare se nell’area
di lavoro vi sono ostacoli nascosti, come rocce, ceppi,
radici, ecc, che, se colpiti, possono causare contraccolpi;
∙ Impugnare saldamente il dispositivo con due mani
esclusivamente per le sue impugnature;
∙ sostituire o aflare la lama, se danneggiata o
usurata;
∙ non sollevare il dispositivo al di sopra del livello dei
anchi;
∙ evitare di utilizzare il decespugliatore con il
segmento della lama compreso tra le 12 e le 2.
ESTRARRE DALL’IMBALLAGGIO
Quando si apre la confezione, assicurarsi che tutti
i componenti siano inclusi. Consultare le istruzioni
su questo manuale. Per eventuali parti mancanti o
danneggiate, si prega di contattare l’assistenza IVT.
ISTRUZIONI DI ASSEMBLAGGIO E DI
REGOLAZIONE
ATTENZIONE! Prima di ogni intervento
di regolazione, assicurarsi che il
dispositivo sia spento e scollegato
dalla presa di corrente!
Assemblaggio dell’intero manico >> [F2]
Montaggio e regolazione dell’impugnatura
ausiliaria (4) >> [F3]
Montaggio della calotta di protezione (12) >> [F4]
ATTENZIONE! Non usare mai
il dispositivo senza che la
calotta di protezione (12) sia
stata opportunamente montata.
L’utilizzo del dispositivo privo della
calotta di protezione (12) causa
il surriscaldamento del motore e
invalida la garanzia, ma soprattutto
può causare lesioni molto gravi.
ATTENZIONE! Fare attenzione a
non ferirsi con la lametta taglialo
(24) posizionata sotto alla calotta di
protezione (12) che serve per regolare
la lunghezza del lo di taglio (22): ha
un bordo estremamente aflato.
1. Agganciare la calotta di protezione d(12) alla sua
sede, nella parte nale del manico inferiore (8).
2. Fissare la calotta di protezione (12) in posizione
utilizzando le viti.
Assemblaggio della tracolla (6) >> [F5]
50
Page 51

Manuale di istruzioni
Utilizzo del fermacavo (5)
Prima di collegare il dispositivo all’alimentazione
elettrica, assicurarsi che il cavo elettrico passi
attraverso il fermacavo (5). Questo è un importante
dispositivo di sicurezza che consentirà di evitare
eventuali tensioni del cavo.
Montaggio della testa di taglio (11)
1. Allineare il foro della coppia conica (14) con il foro
della angia interna (15) ed inserire un’astina metallica
nei fori dell’asta cosicché le parti non possano ruotare.
[F6-A]
2. Utilizzare la chiave per allentare il dado di
ssaggio (16) e rimuoverlo. ATTENZIONE! Filettatura
sinistrorsa.
3. Rimuovere la piastra di copertura (17) e la angia
esterna (18).
4. Inserire la testa di taglio (11) [F6-B].
5. Avvitare la testa di taglio (11) sul nale lettato
dell’asta.
6. Rimuovere l’astina metallica.
Montaggio della lama (13) >> [F7]
La lama (13) può essere utilizzata come accessorio
di taglio in alternativa al lo di nylon e puo’ essere
utilizzata per tagliare erba e sterpaglie comuni. In
ogni caso, le lame non dovrebbero essere usate per
eseguire bordatura contro superci solide.
1. Allineare il foro della coppia conica (14) con il foro
della angia interna (15) ed inserire un’astina metallica
nei fori dell’asta, cosicché le parti non possano ruotare.
2. Utilizzare la chiave per allentare il dado di
ssaggio (16) e rimuoverlo.
3. Rimuovere la piastra di copertura (17), la angia
esterna (18) e la angia interna (15).
4. Riposizionare la angia interna.
5. Inserire la lama (13).
6. Riposizionare correttamente la angia esterna.
7. Inserire la piastra di copertura (17) e il dado di
ssaggio (16).
8. Stringere il dado di ssaggio (16).
9. Rimuovere l’astina metallica.
MESSA IN FUNZIONE
Usare sempre la corretta tensione di alimentazione:
essa deve coincidere con le speciche riportate sulla
targhetta apposta sul prodotto.
ACCENSIONE/SPEGNIMENTO
Accensione >> [F8]
ATTENZIONE! Accendere il dispositivo
facendo attenzione a tenere lontani
mani e piedi dagli accessori di taglio.
Impugnare saldamente il dispositivo senza che tocchi
l’erba da tagliare.
∙ Premere il pulsante di sblocco dell’interruttore
(1) e l’interruttore di accensione/spegnimento (2)
contemporaneamente.
Spegnimento
∙ Rilasciare l’interruttore di accensione/spegnimento (2).
CAUTELA! La testa di taglio (11)
continua a ruotare per inerzia
per qualche secondo dopo lo
spegnimento del motore! Attendere
no a che il dispositivo si sia
completamente fermato prima di
posare l’apparecchio.
RILASCIO DEL FILO DI TAGLIO (22)
Controllare regolarmente il lo di taglio (22) per vericare
che non sia danneggiato. Fili di taglio (22) troppo corti o
usurati tagliano meno efcientemente.
NOTA: urtare oggetti duri o con superci abrasive, come
ad esempio recinzioni, cemento o pietre può fare ritrarre
il lo di taglio (22), che può però essere fatto avanzare
dalla bobina (21) seguendo semplici istruzioni.
Dopo avere esteso un lo di taglio (22), riportare sempre
il dispositivo nella corretta posizione di lavoro, prima di
accenderlo.
Sistema semi-automatico di rilascio del lo di taglio
(22) (Batti e vai) >> [F9]
∙ Battere leggermente la testa di taglio (11) a terra
mentre il dispositivo è in funzione a pieno regime. Questo
farà si’ che il lo di taglio (22) venga automaticamente
fatto avanzare.
∙ La lametta taglialo (24) posta sotto alla calotta
di protezione (12) accorcerà automaticamente il
lo di taglio (22) alla lunghezza corretta durante il
funzionamento.
IT
ATTENZIONE! Non battere la testa di taglio (11) né
con troppa forza né sul selciato o sul cemento.
51
Page 52

Manuale di istruzioni
NOTA: verrà alimentato del nuovo lo di taglio (22) solo
se questo sporgerà già di almeno 2,5 cm.
Se il lo di taglio (22) sporgente è più corto di 2,5 cm:
∙ Spegnere il dispositivo ed estrarre il lo di taglio
(22) manualmente.
Se l’estremità del lo di taglio (22) non è visibile:
∙ La bobina (21) deve essere sostituita.
ATTENZIONE! Controllare la
condizione della lametta taglialo
(24) regolarmente. Non utilizzare in
nessun caso il dispositivo privo di
lametta taglialo (24), né con una
IT
Rilascio manuale del lo di taglio (22) >> [F10]
Se necessario, il lo di taglio (22) può essere rilasciato
manualmente.
∙ Per fare questo, premere e rilasciare il pulsante di
rilascio del lo di taglio (23), mentre si tirano le estremità
del lo di taglio (22) no a che esse raggiungano la
lametta taglialo (24).
∙ Se il lo si estende oltre la la lametta taglialo
(24), la lunghezza del lo di taglio (22) è eccessiva.
Rimuovere quindi il coperchio della testa di taglio (19),
premendo le linguette di rilascio del coperchio (20) e
regolare il lo di taglio (22) alla giusta lunghezza.
lametta taglialo (24) difettosa. Pulire
regolarmente la lametta taglialo (24)
per preservarne l’efcienza di taglio.
ISTRUZIONI D’USO
∙ Non accendere la macchina se la testa di taglio
(11) è in contatto o troppo vicina al materiale da tagliare.
Assicurarsi che la macchina abbia raggiunto la massima
velocità prima di iniziare a tagliare.
∙ Tenere il dispositivo al di sotto del livello dei anchi.
∙ Lavorare solo con un movimento da destra a
sinistra, per far si’ che eventuali detriti vengano proiettati
lontano dall’operatore. Procedere lentamente, tenendo
il dispositivo leggermente inclinato (circa 30°). [F11]
∙ Senza piegarsi, mantenere la testa di taglio (11)
vicina e parallela al terreno (perpendicolare se si sta
eseguendo una bordatura). Lasciare che solo la punta
del lo di taglio (22) tocchi l’erba.
∙ Non tagliare erba umida o bagnata.
∙ L’erba alta deve essere tagliata a strati, iniziando
sempre dall’alto. I tagli devono essere corti. [F12]
∙ Evitare di usurare velocemente il lo di taglio (22),
battendolo contro oggetti duri (pietre, muri, recinzioni,
ecc.).
∙ Non passare sopra al cavo di alimentazione con il
dispositivo in funzione. Esso si potrebbe danneggiare.
Tenere sempre il cavo di alimentazione dietro di sé.
ATTENZIONE! Non utilizzare la lama
(13) per la bordatura vicino a superci
solide.
MANUTENZIONE E STOCCAGGIO
ATTENZIONE! Prima di qualsiasi
intervento sul dispositivo stesso,
togliere la spina dalla corrente.
ATTENZIONE! Non utilizzare il
dispositivo senza le protezioni corrette.
Assicurarsi che siano correttamente
montate prima dell’accensione del
dispositivo.
ATTENZIONE! Indossare sempre
indumenti protettivi resistenti e
occhiali di protezione. Pietre e
detriti potrebbero essere scagliati
in aria durante il funzionamento del
dispositivo, causando lesioni gravi
all’operatore.
∙ Impugnare saldamente il dispositivo, tenendo
una mano sull’impugnatura principale (3) e l’altra
sull’impugnatura secondaria (4).
∙ Assicurarsi che il lo di taglio (22) sia stato rilasciato
sufcientemente prima dell’accensione.
∙ Tenere sempre lo strumento e le fessure di
ventilazione (se presenti) pulite. La regolare pulizia
e manutenzione dello strumento ne garantiscono
l’efcienza e ne prolungano la vita.
∙ Se lo strumento non dovesse funzionare,
nonostante le rigorose procedure di collaudo, la
riparazione deve essere effettuata da un servizio IVT
autorizzato.
∙ Tenere tutti i dadi, bulloni e viti ben serrati, per
essere sicuri che lo strumento sia in buone condizioni
operative.
∙ Sostituire tutte le parti usurate o danneggiate per
sicurezza.
∙ Utilizzare esclusivamente ricambi originali. L’uso
di parti di ricambio non originali o non autorizzate dal
produttore potrebbero causare scarse prestazioni o
lesioni personali.
∙ Conservare lo strumento in un ambiente asciutto,
fuori dalla portata dei bambini e lontano da materiali
52
Page 53

inammabili.
∙ Non bagnare mai il dispositivo, né spruzzare acqua
su di esso!
∙ Dopo ogni sessione di lavoro, rimuovere tutti
i residui di erba e terra dagli accessori di taglio e
dalla calotta di protezione (12). Cosi’ facendo, si può
prevenire la formazione di muffa.
∙ Assicurarsi che le impugnature siano sempre pulite
da sporco e grasso.
∙ Pulire il dispositivo con un pennello a setole morbide
oppure con un panno. Non utilizzare nè detersivi, nè
solventi. Essi potrebbero danneggiare irreparabilmente
il dispositivo. Le sostanze chimiche infatti potrebbero
corrodere le componenti plastiche della macchina.
∙ Non riporre per lunghi periodi il dispositivo alla luce
diretta del sole.
∙ Non coprire il dispositivo con sacchetti di plastica,
perché potrebbe crearsi umidità e svilupparsi muffa.
∙ Non riporre il dispositivo, poggiandolo sulla calotta
di protezione (12). L’opzione migliore è appenderlo
per l’impugnatura principale (3) in modo che la calotta
di protezione (12) non sia in contatto con nient’altro.
Altrimenti c’è il rischio che la calotta di protezione(12)
si possa deformare, compromettendo l’efcienza dei
dispositivi di protezione della macchina.
Manuale di istruzioni
1. Disconnettere il dispositivo dall’alimentazione
elettrica.
2. Assicurasi di avere un appoggio in piano e sicuro.
3. Capovolgere la macchina, in modo tale che la
calotta di protezione (12) sia rivolta verso l’alto.
4. Premere le linguette di rilascio del coperchio (20) per
aprire il coperchio della testa di taglio (19) ed estrarre la
vecchia bobina (21) dalla testa di taglio (11). [F13].
5. Pulire la testa di taglio (11).
6. Inserire le due estremità del nuovo lo di taglio (22)
attraverso gli occhielli e posizionare la nuova bobina
(21) nella testa di taglio (11).
7. Riposizionare il coperchio della testa di taglio (19).
8. Tirare leggermente le estremità del lo di taglio (22)
no a che esse non raggiungano il bordo della calotta
di protezione (12).
ATTENZIONE! Dopo avere sostituito
la bobina (21), fare girare a vuoto il
tagliabordi per almeno un minuto per
essere sicuri che sia il lo di taglio
(22), sia il dispositivo stesso lavorino
correttamente.
IT
SOSTITUZIONE DELLA BOBINA (21)
ATTENZIONE! Non montare li di
metallo come dispositivi di taglio sul
tagliabordi.
ATTENZIONE! Utilizzare
esclusivamente li di taglio (22) con
un diametro corretto. Fili di taglio (22)
con diametro diverso dalle speciche
del dispositivo non verranno rilasciati
in maniera corretta e potrebbero
causare seri danni in seguito al cattivo
funzionamento del dispositivo.
IMPORTANTE! Assicurarsi di
avere disconnesso il dispositivo
dall’alimentazione elettrica, prima
di procedere al montaggio degli
accessori di taglio.
Montaggio di una nuova bobina (21) completa di lo
di taglio (22).
Il tagliabordi è fornito con una bobina completa
usa e getta, che evita procedure complesse per il
riavvolgimento di un nuovo lo di taglio (22).
Riavvolgere un lo di taglio (22) attorno ad una
bobina (21) vuota. >> [F14]
In alternativa, è possibile anche avvolgere un lo di
taglio (22) di nylon attorno ad una bobina (21) vuota.
Fare riferimento alla tabella delle speciche per
conoscere il massimo diametro e la massima lunghezza
del lo di taglio (22) montabile sul proprio modello di
tagliabordi.
Assicurarsi inoltre di riavvolgere il nuovo lo di taglio
(22) nel senso opposto alla rotazione del motore, la
direzione da seguire è indicata dalla freccia stampigliata
sul coperchio della testa di taglio (19) o sulla base della
bobina (21).
ATTENZIONE! Prestare particolare cura ad
avvolgere ordinatamente il lo di taglio (22) sulla
bobina (21). In caso contrario, l’efcienza del
sistema di alimentazione del lo di taglio (22)
potrebbe essere compromessa.
1. Agganciare il lo di taglio (22) a metà della sua
lunghezza nella tacca o occhiello sulla bobina (21).
2. Iniziare ad avvolgere il lo di taglio (22) nella
direzione indicata dalla freccia. Lasciare circa 100 mm
di lo di taglio (22) sporgente dalla bobina (21).
3. Fare passare le due estremità del lo di taglio
(22) attraverso gli occhielli del manicotto protettivo (h)
(se presente) a ricollocare il manicotto protettivo (h) in
maniera tale che ricopra la bobina (21) e il lo di taglio
(22).
53
Page 54

Manuale di istruzioni
4. Collocare la bobina (21) intera nella testa di taglio
(11) e chiudere con il coperchio della testa di taglio (19).
5. Inlare le due estremità del lo di taglio (22)
attraverso gli occhielli nella testa di taglio (11) ed
inserire la bobina (21).
6. Collocare la bobina (21) intera nella testa di taglio
(11) e chiudere col coperchio della testa di taglio (19).
7. Premere il pulsante di rilascio del lo di taglio (23)
e tirare all’esterno entrambe le estremità del lo di
taglio (22) nché raggiungano il bordo della calotta di
protezione (12).
TUTELA AMBIENTALE
IT
Lo strumento, gli accessori e l’imballaggio devono
essere ordinati per il riciclaggio ecocompatibile.
I componenti in plastica sono classicati per il riciclaggio
categorizzato. Queste istruzioni sono stampate su carta
riciclata.
Riciclare le materie prime invece di
smaltirle come riuti.
54
Page 55

Manuale di istruzioni
RISOLUZIONE DEI PROBLEMI
ATTENZIONE! Spegnere il dispositivo e togliere la spina dalla corrente prima di esaminare
il guasto.
Problema Causa Soluzione
Il dispositivo vibra
Il dispositivo non si avvia
L’efcienza di taglio è diminuita
Qualora non si riuscisse a risolvere il problema seguendo le indicazioni riportate qua sopra, rivolgersi ad un Centro
Servizi IVT autorizzato.
∙ La bobina (21) è sporca
∙ La bobina (21) è danneggiata
∙ Non vi è alimentazione elettrica
∙ L’interruttore di accensione/
spegnimento (2) è difettoso.
∙ Le spazzole di carbone sono
usurate.
∙ Il motore è difettoso.
∙ Il lo di taglio (22) non sporge
abbastanza dalla bobina (21)
∙ Il lo non si estende al di fuori
della bobina (21) oppure si estende
da una parte sola della bobina (21)
∙ Pulirla accuratamente.
∙ Sostituirla.
∙ Controllare la presa, il cavo,
la tensione di corrente, la spina;
provvedere alla loro riparazione,
se necessario, per opera di un
elettricista qualicato.
∙ Riparare in un Centro di
Assistenza autorizzato.
∙ regolare la lunghezza del lo
di taglio (22) oppure sostituire la
bobina (21).
∙ Rimuovere la bobina (21)
e estrarre il lo di taglio (22)
attraverso le opportune aperture;
quindi, rimontare la bobina (21).
IT
ATTENZIONE! NON TENTARE DI RIPARARE IL PRODOTTO DA SOLI E NON MANOMETTERLO!
Qualsiasi operazione di riparazione o di manutenzione straordinaria deve essere eseguita
esclusivamente da un Centro di Assistenza IVT qualicato ed autorizzato. Non modicare
nessuna componente interna del prodotto! QUESTO COMPORTAMENTO INVALIDERÀ
COMPLETAMENTE LA GARANZIA E POTREBBE CAUSARE INFORTUNI E SERI DANNI
MATERIALI.
55
Page 56

Mode d’emploi
CARACTÉRISTIQUES TECHNIQUES DE L’APPAREIL
Modèle GTE-1000 GTE-1200
Tension~Fréquence [V~Hz]
Puissance nominale [W] 1000 1200
Vitesse de rotation sans charge [tr/min] 7500 7500
Diamètre maximal de la coupe [mm] 420 420
Diamètre de la lame de coupe [mm] 1.6 1.6
Réserve de la lame de coupe [m] 5 5
Diamètre de la cisaille [mm] 255 (25.4) (3 dents) 255 (25.4) (3 dents)
Niveau de vibration [m/s
Niveau de pression sonore [dB (A)] 75.6 (K=3) 75.6 (K=3)
Niveau de puissance sonore [dB (A)] 95.5 (K=3) 95.5 (K=3)
Poids [Kg] 5.8 5.8
Degré de protection II II
2
] 6.749 (K=1.5) 6.749 (K=1.5)
FR
LISTE DÉTAILLÉE
1. Bouton de verrouillage
2. Interrupteur à deux positions « bran./débran. »
3. Manivelle d’avant
4. Manivelle auxiliaire
5. Crochet pour la décharge de traction
6. Sangle
7. Tige supérieure
8. Tige Inférieure
9. Corps du moteur
10. Orices de ventilation
11. Tête de coupe
12. Dispositif de protection
13. Débroussailleuse
14. Réducteur de la commande
15. Bride intérieure
16. Contre-écrou
17. Couvercle plat
18. Bride extérieure
19. Couvercle de la tête de coupe
20. Gâchette du couvercle
21. Tambour du trimmeur
22. Lame de coupe
23. Bouton d’aménage de la lame de coupe
24. Coupeur pour la lame
CONTENU DE LA BOÎTE
Instruction d’exploitation (1 pc.), dispositif de protection
(1 lot), vis de xation (1 lot), clé universelle (1 pc.),
débroussailleuse (1 pc.), tambour du trimmeur (1 pc),
manivelle auxiliaire assemblée (1 lot), sangle (1 pc.), clé
à six pans (1 pièce), coupeur pour la lame (1 pc.).
230~50 230~50
DESTINATION
Cet outil est destiné à la coupe des gazons et de petites
zones d’herbe et des végétaux similaires douce dans
les jardins privés et amateurs, ainsi que sur les bords
de parterres, si l’outil est équipé par l’équipement de
coupe approprié.
Cet appareil n’est pas destiné à être utilisé dans les
jardins publics, les parcs, les centres sportifs ou sur
le bord de la route, ainsi que dans l’agriculture et la
foresterie.
Le faible poids et une grande manoeuvrabilité donnent
la possibilité de l’utiliser dans les zones difciles à
atteindre et les espaces serrés.
Cet appareil peut être utilisé comme un trimmeur ou
une débroussailleuse, puisque il est également équipé
d’une lame de métal, ce qui permet de couper les
mauvaises herbes avec une tige épaisse et couper les
zones herbues.
RÈGLES DE SÉCURITÉ LORS DE
L’UTILISATION
Règles générales de sécurité
Les règles de sécurité suivantes permettront d’exploiter
l’appareil d’une manière adéquate et assurer votre
propre sécurité. Veuillez lire attentivement ces
informations.
Si vous prêtez cet appareil à une tierce personne,
veuillez lui transmettre ces instructions.
Ce manuel d’utilisation et toute autre documentation
joints à cet appareil doivent être conservés en cas de
nécessité.
Suivez les recommandations indiquées sur les
56
Page 57

Mode d’emploi
étiquettes de l’appareil.
Avant d’utiliser l’appareil, lisez attentivement les
principes de contrôle de celui-ci et assurez-vous
qu’il sera utilisé comme prévu et que vous pourrez le
débrancher, le cas échéant.
En outre, le respect de ces règles simples vous
permettra de garder l’appareil en bon état.
∙ Avant de l’utiliser, assurez-vous que l’appareil est
correctement assemblé.
∙ Utilisez l’appareil uniquement pour son usage
prévu.
∙ Vous trouverez sur l’appareil des précautions à
prendre ou des symboles indiquant les mesures de
précaution. Des accidents peuvent être évités grâce
au bon sens, à l’attention et la préparation nécessaire
de ceux qui effectuent l’exploitation, transport,
maintenance, service technique et stockage de
l’appareil.
∙ Ne laissez pas l’appareil sans surveillance.
∙ Conserver hors de la portée des enfants. Assurez-
vous que les enfants ne joueront pas avec.
∙ L’appareil doit être inaccessible aux enfants et
animaux domestiques. Assurez-vous que tout le monde
se trouve à une distance de sécurité lorsque l’appareil
est branché.
∙ N’oubliez pas que lorsque l’instrument est en
marche, son utilisateur est responsable de la sécurité
des autres.
∙ L’utilisation de cet appareil est interdite aux
personnes n’ayant pas lu ces instructions ; les enfants,
les personnes qui n’ont pas atteint l’âge de travailler
avec ce type d’appareil ; les personnes sous l’emprise
de l’alcool, de drogues ou de médicaments. L’âge des
utilisateurs peut être limité par la législation locale.
ATTENTION! La consommation
d’alcool, de drogues ou de
médicaments, la èvre ou la fatigue
peuvent nuire à votre capacité à
réagir. Ne pas utiliser l’appareil dans
les états mentionnés ci-dessus.
∙ Assurez-vous que tous les dispositifs de protection
(le cas échéants) sont installés et en bon état.
∙ Il est interdit d’utiliser l’appareil comportant des
défauts ou sans dispositif de protection ou coffres (si
prévus).
∙ Assurez-vous que l’appareil ne comporte pas
d’éléments endommagés ou non alignés (par exemple,
vis, écrou, boulon, etc.). Vériez régulièrement que tous
les vis et écrous soient bien serrés – ce qui garantit
la sécurité nécessaire du travail avec l’appareil. Si
nécessaire, remplacez ces pièces avant de commencer
à travailler. Les défauts de l’appareil peuvent causer
des blessures graves à l’utilisateur, ainsi qu’aux autres
57
personnes.
∙ Portez des vêtements appropriés lorsque vous
travaillez avec l’appareil. Ne mettez pas de vêtements
trop amples ni de bijoux pouvant s’accrocher aux parties
mobiles de l’appareil. Portez des vêtements adéquats
pour le travail. Les vêtements et les chaussures doivent
entièrement recouvrir les jambes pour les protéger
contre d’éventuels fragments tombés. Ne travaillez pas
les pieds nus ou en sandales ouvertes. Il est conseillé
d’attacher les cheveux longs.
∙ Les manches et les manchons de l’appareil doivent
être propres, secs et sans huile.
∙ Utilisez les moyens nécessaires de sécurité
personnelle. Portez des gants et des lunettes de
protection. Si vous travaillez avec les matériaux
pulvérulents ou en cas d’apparition de gaz
d’échappement, mettez le respirateur. Si nécessaire,
utilisez des chaussures à semelle antidérapante, un
casque et des oreillettes. Si le niveau sonore dépasse
85 dB(A), il est indispensable d’utiliser des moyens de
protection auditifs.
ATTENTION! Utilisez les moyens de
protection individuelle ! Les dispositifs
de protection et les moyens de
protection individuelle préservent
votre santé et celle d’autrui, et assurent
l’exploitation de l’appareil sans panne.
∙ N’embrayez pas l’appareil s’il n’est pas sur la
bonne position ou pas encore en état d’être utilisé.
∙ Choisissez une position stable. Surveillez la
position des jambes et l’équilibre lors du travail.
∙ Assurez-vous que l’emplacement de travail est
propre. Le désordre et la saleté peuvent causer des
dommages. Enlevez tous les objets inutiles de la zone
de travail et veillez à ce qu’ils ne s’y trouvent pas lors de
l’exploitation de l’appareil.
∙ Evitez les surcharges de l’appareil.
∙ Effectuez les travaux uniquement à la lumière du
jour ou avec sufsamment d’éclairage articiel. Il est
interdit d’utiliser l’appareil dans des endroits obscurs.
∙ Soyez vigilant – évitez la chute et les chocs de
l’appareil.
ATTENTION! Restez vigilant. Prenez garde à ce que
vous faites. Vous risquez de perdre le contrôle si
vous êtes inattentif. Faites preuve de bon sens.
Règles de sécurité électrique
AVERTISSEMENT! Si vous respectez les règles de
sécurité lorsque vous travaillez avec des appareils
électriques, vous éviterez tout choc électrique,
accident et incendie. Lisez attentivement ces règles
FR
Page 58

Mode d’emploi
avant de commencer à travailler avec l’appareil et
respectez-les soigneusement.
∙ Pour une meilleure sécurité électrique, il est
recommandé d’utiliser le disjoncteur à sensibilité
différentielle inférieure à 30 mA. Vériez le disjoncteur
à chaque utilisation. Consulter un électricien digne de
conance.
AVERTISSEMENT! L’utilisation du
disjoncteur ou de tout autre dispositif de
déclenchement automatique ne dispense
pas l’utilisateur de respecter les règles
de sécurité et de pratique du travail
présentées dans ce manuel d’utilisation.
∙ La tension du secteur doit correspondre à celle
indiquée sur l’étiquette et dans ce manuel d’utilisation.
N’utilisez pas d’autres sources d’alimentation.
FR
∙ Avant de connecter l’appareil à la prise secteur,
vériez si elle est en bon état et si ses paramètres
correspondent à ceux indiqués dans le tableau de
l’appareil.
∙ Lors du fonctionnement de l’appareil, évitez tout
contact avec des objets mis à la terre tels que les
câbles, radiateurs, cuisinières et réfrigérateurs. Le
risque de choc électrique est accru lorsque le corps est
mis à la terre.
ATTENTION! Le contact avec des
éléments sous tension électrique
peut causer un choc électrique, des
brulures voire entraîner la mort.
∙ Ne débranchez jamais l’appareil en tirant sur le
cordon.
∙ N’abimez pas le cordon. Conservez le cordon à
l’abri de la chaleur, de l’huile, d‘objets tranchants et de
pièces en mouvement.
∙ Veillez toujours au bon état du cordon de
raccordement.
∙ N’utilisez pas l’appareil électrique prés de liquides
inammables et de gaz.
∙ Débranchez l’appareil du réseau électrique avant
de le transporter dans un autre endroit.
ATTENTION! Débranchez l’appareil
du réseau électrique avant de
déconnecter la cheville de contact ou
la rallonge.
∙ Ne portez pas l’appareil électrique au-dessus de la
rallonge. Soyez vigilant et veillez toujours à savoir où se
trouve le cordon.
∙ Ne raccordez pas vous-même la rallonge à
l’appareil. Ramenez-le au Centre de service technique
agréé le plus proche.
∙ A des ns de sécurité, le cordon endommagé
doit être remplacé uniquement par le fabricant, son
représentant ou une personne qualiée.
∙ En cas de dommage ou de cordon sectionné,
débranchez tout de suite l’appareil du réseau électrique.
AVERTISSEMENT! RISQUE DE CHOC
ELECTRIQUE!
Prenez en considération les conditions de travail. Il
est interdit d’embrayer l’appareil sous la pluie. Ne
pas l’utilisez dans des conditions défavorables
(humidité, eau). Le lieu de travail doit être propre et
bien éclairée. N’exposez pas l’appareil à l’humidité.
Ne pas le laissez dehors pendant la nuit. La
pénétration d’eau dans cet appareil électrique
augmente le risque de choc électrique.
∙ Vériez régulièrement que le cordon électrique soit
en bon état. Avant de commencer à travailler, vériez
s’il n’est pas endommagé ou ne présente pas de traces
d’usure. Si l’état de la rallonge n’est pas satisfaisant,
ne branchez pas l’appareil. Ramenez-le au Centre de
service après-vente.
∙ Pour les travaux à l’extérieur, utilisez la rallonge
spécialement conçue à cet effet, comme indiqué sur
l’étiquette – pour les travaux à l’extérieur. Lors du
fonctionnement de l’appareil, le cordon doit se trouver
en dehors de la zone de travail, derrière l’utilisateur.
Conservez le cordon à l’abri des surfaces chaudes,
huileuses, humides ou des matériaux inammables.
∙ Pour éviter tout démarrage accidentel : avant de
brancher l’appareil, assurez-vous que son interrupteur
(le cas échéant) se trouve en position ‘arrêt/off’.
∙ Retirez les clés de réglage avant de mettre
l’appareil en marche.
∙ N’utilisez pas l’appareil si son interrupteur est en
panne (il ne peut embrayer ou débrayer). Tout appareil
ayant un interrupteur hors service est dangereux et doit
être immédiatement réparé.
AVERTISSEMENT! L’utilisation
d’appareils électriques peut provoquer
l’apparition de poussière cancérogène.
Voici certaines sources: plomb de peinture en contenant,
silice cristalline de brique, de ciment et d’autres
matériaux de maçonnerie, arsenic et chrome de bois
traité par des produits chimiques. Si de la poussière
apparait lors du travail, le degré de son inuence
58
Page 59

Mode d’emploi
néfaste dépend de la fréquence des travaux effectués.
An de diminuer l’inuence de ces éléments
chimiques sur l’organisme, il est important
d’effectuer des travaux avec des matériaux
produisant de la poussière dans des espaces bien
aérés et avec des moyens de protection nécessaires
tels que des respirateurs spéciaux pour le travail en
présence de microparticules.
∙ En cas de choc extérieur à l’appareil, avant de
redémarrer et continuer le travail, vériez bien qu’il
ne soit pas endommagé et effectuez les réparations
nécessaires, le cas échéant.
∙ Si l’appareil commence à trop vibrer, arrêtez-le
immédiatement et trouvez-en la cause. La vibration
annonce très souvent une future défaillance.
∙ Eteignez l’appareil et attendez l’arrêt total
vous devez vous en éloigner, avant d’effectuer
des réparations, remplacer des accessoires, toute
vérication, nettoyage, résolution de problèmes ou
manipulation sur l’appareil.
∙ Il est interdit de remplacer ou changer toute pièce
interne de l’appareil.
Règles particulières de sécurité
∙ Porter le vêtement approprié et l’équipement de
protection! En général porter les lunettes de sécurité
ou les lunettes de protection, le casque de protection,
les bottes ou les chaussures avec les semelles
antidérapantes et durables, le pantalon long et les
gants. Ne pas travailler avec cet appareil pieds nus
dans les sandales ouvertes.
∙ La machine peut être accompagnée par la libération
d’objets étrangers dans les yeux, ce qui peut causer
les blessures graves des yeux. Avant de commencer,
toujours porter les lunettes de sécurité ou les lunettes
de sécurité avec écrans latéraux et un masque complet
de protection si nécessaire.
∙ Au cours du travail dans le bois, toujours porter un
casque de protection certié.
∙ Utiliser cet appareil qu’en plein jour ou avec un bon
éclairage articiel.
∙ Ne pas utiliser à proximité de liquides ou de gaz
inammables qui peuvent exploser.
∙ Ne pas utiliser la machine sur un sol glissant,
pendant la nuit, dans les conditions de brouillard,
d’averse ou les autres conditions météorologiques qui
peuvent rendre l’utilisation de ce produit est dangereux
ou difcile d’assurer une bonne visibilité du site.
∙ Protéger l’appareil contre l’humidité. Éviter la
pénétration de l’humidité sur l’appareil, Il est interdit
d’utiliser dans les environnements humides.
∙ Utiliser uniquement des rallonges prévues pour
une utilisation à l’extérieur, dans l’isolement de PVC
pour les conditions normales.
∙ Toujours garder le cordon d’alimentation à l’arrière
59
de lui-même et à l’écart de l’équipement de coupe.
Assurer que les câbles d’alimentation ne sont pas
embrouillés dans des obstacles ou des objets.
∙ Ne pas couper un autre matériel, en plus de
mauvaises herbes ou d’autres végétaux.
∙ Débrancher l’appareil pendant le transport.
∙ Ne pas travailler avec l’appareil dans les positions
inconfortables, dans une position instable, les bras
tendus et par une main. En utilisant ce produit, toujours
utiliser les deux mains.
∙ L’appareil doit être utilisé au niveau de la terre,
avec le dispositif de coupe positionné parallèlement à la
terre. Ne pas utiliser cet appareil pour couper l’herbe qui
n’est pas au niveau de la terre, c’est l’herbe qui pousse
sur les murs, rochers, etc.
∙ Avant de couper le site, vérier la présence de
pierres, du verre, des débris de métal, des ordures et
d’autres objets solides. S’assurer que l’équipement de
coupe ne viendra pas en contact avec des roches, du
gravier, des ls ou des autres objets étrangers au cours
du branchement et pendant le fonctionnement. Les outils
de coupe peuvent projeter des objets de ce genre.
∙ Garder toujours la distance de sécurité de 15 m.
Les pierres et le gravier peut être émis ce qui peut
causer les blessures.
∙ Dans le rayon spécié l’utilisateur est responsable
de tout dommage causé à des tiers résultant de
l’utilisation de cet appareil.
∙ Cesser d’utiliser la machine quand il y a des gens
près de la machine, notamment les enfants et les
animaux domestiques.
∙ Ne pas utiliser cet appareil avec les dispositifs
de protection endommagés ou sans dispositifs de
protection. S’assurer que les dispositifs de protection
appropriés sont en place.
∙ Avant d’utiliser la machine et après tout choc,
vérier les signes d’usure ou des endommagements et
réparer si nécessaire.
∙ Tenir les outils de coupe, d’autant plus qu’ils
tournent, à la distance sûre de toutes les parties de
votre corps, en particulier les mains et les pieds.
∙ Toujours se tenir bien campé et équilibrer le corps.
Etre particulièrement prudent au cours du travail sur les
pentes, sur les zones herbues ou dans les conditions
glissantes. Méer des obstacles cachés.
∙ Prendre des mesures pour éviter les blessures de
la coupe, qui est installée pour couper les cordes de la
lame de coupe.
∙ Ne pas traverser les voies ou les chemins avec la
surface de gravier au cours du fonctionnement de la
machine.
∙ Ne pas utiliser la machine pendant les périodes de
longue durée, arrêter périodiquement. Limiter le temps
pendant lequel l’appareil est utilisé en continu (environ
30-40 minutes à la fois), et de planier 10-20 minutes
de repos entre les séances. Aussi essayer de maintenir
FR
Page 60

Mode d’emploi
le volume total de travail effectué par jour, en 2 heures
ou moins.
∙ Remplacer le tambour du trimmeur en cas de
ssure, d’écaillage ou des endommagements de toute
type. Assurer l’installation et la xation correcte.
∙ Ne pas utiliser les lames inappropriées, tordues,
déformées, ssurées, brisées ou endommagées.
Observer constamment l’aflage de la lame. Vérier le
boulon de xation de la lame, ainsi que veiller à ce que
la lame tourne librement et sans bruit anormal.
AVERTISSEMENT! Après la
désactivation de la tête de coupe
l’appareil tourne pendant quelques
secondes. Ne pas essayer d’arrêter
l’équipement de coupe par les mains.
Attendre toujours l’arrêt complet.
FR
CAUSES DU RECUL ET PRÉVENTION
PAR L’OPÉRATEUR
Lors du fonctionnement en mode de la débroussailleuse
le recul incontrôlé peut se passer. Le recul est un
mouvement incontrôlé de la machine de coupe vers
l’opérateur, qui peut survenir;
∙ si la lame est coincée dans un matériel à couper;
∙ si le segment de la lame rotative entre les directions
de 12 heures et 2 heures, la vue de l’opérateur [F1],
entre en contact avec un objet solide dur, comme un
arbre, un gros rocher, un buisson ou un mur.
Ce recul peut causer une perte de contrôle de l’appareil
et être la cause de blessures graves ou mortelles de
l’opérateur ou des tiers.
Pour éviter l’impact et réduire le risque de perte de
contrôle:
∙ avant le travail vérier les obstacles cachés, tels
que les grosses roches, les souches, les racines et
produits similaires, ce qui peut conduire à un recul si la
lame sera en contact.
∙ toujours tenir fermement l’appareil par les deux
mains et ne pas tirer de l’autre côté, sauf les manivelles.
∙ remplacer ou afler de nouveau les lames
émoussées.
∙ Ne pas soulever l’appareil au-dessus de sa taille.
∙ Éviter de fonctionner en mode de la
débroussailleuse, à l’aide du segment de la lame entre
les directions de 12 heures et 2 heures.
DÉBALLAGE
Lors du déballage, vériez bien si toutes les pièces
et les dispositifs sont inclus. Regardez les dessins
techniques présentés dans ce manuel d’utilisation. En
cas de dommage ou absence de pièces quelconques,
nous vous prions de vous adresser au centre de service
après-vente IVT.
INSTRUCTIONS D’ASSEMBLAGE ET DE
RÉGLAGE
AVERTISSEMENT ! Débrancher
toujours le trimmeur du réseau
d’alimentation électrique avant
d’exécuter les réglages!
Assemblage de la tige entière >> [F2]
Installation et réglage de la manivelle auxiliaire (4)
>> [F3]
Installation du dispositif de protection du trimmeur
(12) >> [F4]
AVERTISSEMENT! Ne pas utiliser
l’outil sans le dispositif de protection
local (12). L’utilisation de l’outil sans
le dispositif de protection du trimmeur
(12) peut causer la surchauffe du
moteur et l’annulation de la garantie,
mais surtout, elle peut conduire à des
blessures graves.
AVERTISSEMENT ! Prendre des
mesures pour éviter les blessures de
la coupe pour couper la corde (24),
qui est monté sur le dispositif de
protection (12) pour couper le la corde
(22) selon la longueur: Cette coupe a
les arrêtes vives.
1. Fermer le dispositif de protection (12) sur le support
métallique à l’extrémité de la tige inférieure (8).
2. Fixer le dispositif de protection par les vis (12) en
position requise.
Fixation de la sangle (6) >> [F5]
Utilisation du crochet de décharge de tension du
câble (5)
Avant de connecter le câble au réseau, s’assurer que
60
Page 61

Mode d’emploi
la rallonge est passée à travers le crochet pour la
décharge de tension du câble (5). Ce crochet empêche
l’application d’une force excessive sur les connexions
des câbles et est un important dispositif de protection.
Assemblage de la tête de coupe (11)
1. Aligner l’orice du réducteur de la commande (14)
avec l’orice de la bride interne (15) et insérer la tige
métallique dans les orices de verrouillage des tiges
pour éviter la rotation des pièces [F6-A].
2. A l’aide de la clé universelle desserrer et retirer
l’écrou (16). AVERTISSEMENT ! Filet à gauche.
3. Retirer le couvercle plat (17) et la bride extérieure (18).
4. Installer la tête de coupe (11) [F6-B].
5. Visser la tête de coupe (11) sur la tige letée jusqu’à
ce qu’elle s’arrête. [F15]
6. Retirer la tige métallique.
Assemblage de la débroussailleuse (13) >> [F7]
La débroussailleuse (13) peut être utilisée comme une
alternative à cordes en nylon pour couper l’herbe et les
mauvaises herbes communes. Toutefois, les lames ne
doivent pas être utilisés pour couper la végétation à
proximité des surfaces solides.
1. Aligner l’orice du réducteur de la commande (14)
avec l’orice de la bride interne (15) et insérer la tige
métallique dans les orices de verrouillage des tiges
pour éviter la rotation des pièces.
2. A l’aide de la clé universelle desserrer et retirer l’écrou (16).
3. Retirer le couvercle plat (17) et la bride extérieure
(18) et la bride intérieure (15).
4. Réinstaller la bride intérieure (15) en place.
5. Installer la lame de débroussailleuse (13).
6. Réinstaller la bride extérieure (18) en place correcte.
7. Insérer le couvercle plat (17) et l’écrou (16).
8. Serrer le contre-écrou (16).
9. Retirer la tige métallique.
COMMENCEMENT DU TRAVAIL
Assurez-vous que la tension correspond aux conditions
c’est à dire aux paramètres indiqués dans le tableau
des données de la plaque d’identication de l’appareil.
Tenir l’appareil fermement et ne permettant pas de
toucher l’herbe à couper.
∙ Presser simultanément le bouton de verrouillage (1)
et l’interrupteur à deux positions « bran./débran » (2).
Débranchement
∙ Relâcher l’interrupteur à deux positions « bran./
débran ». (2).
AVERTISSEMENT ! La tête de coupe
(11) continue à tourner pendant
quelques secondes après que le
moteur est débranché! Attendre l’arrêt
complet et alors seulement mettre
l’outil.
AMÉNAGE DE LA CORDE DE COUPE (22)
Vérier régulièrement la corde de coupe (22) pour la
présence des endommagements. Les cordes de coupe
courte ou usées (22) coupent de la manière moins
efcace.
REMARQUE: L’impact des objets abrasions solides ou
les objets tels que haies, rochers en béton et grandes
pierres dans l’herbe longue et autour d’elle peut causer
la rupture de la corde de coupe (22), qui est amenée
facilement du tambour du trimmeur (21) en observant
ces instructions simples.
En tirant une nouvelle section de la corde de coupe du
tambour (22), retourner toujours l’appareil à sa position
de fonctionnement normale avant du branchement.
Aménage semi-automatique de la corde de coupe
(22) (aménage de choc) >> [F9]
∙ Tapoter légèrement la tête de coupe (11) sur
le terrain, alors que l’appareil est en marche à pleine
vitesse. En cela l’aménage auxiliaire de la corde de
coupe sera exécuté (22).
∙ La coupe pour couper la corde (24), qui se trouve
sous le dispositif de protection du trimmeur (12), sera
couper la corde de coupe (22) selon la longueur.
FR
BRANCHEMENT / DÉBRANCHEMENT
Branchement >> [F8]
AVERTISSEMENT ! Exécuter le
branchement lorsque vos mains et
vos pieds sont à la distance des outils
de coupe.
ATTENTION! Ne pas appliquer une force excessive
ou de frapper la tête de coupe (11) sur le trottoir ou
en béton.
REMARQUE: La corde de coupe neuf (22) sera amenée
si la longueur de l’extrémité de la corde de coupe (22)
est 2,5 cm, au minumum.
Si la longueur de l’extrémité de la corde de coupe (22)
est inférieure à 2,5 cm:
∙ Débrancher le trimmeur et amener la corde de
61
Page 62

Mode d’emploi
coupe (22) à la main.
Si la n de la corde de coupe (22) n’est pas visible:
∙ Le tambour du trimmeur (21) doit être remplacé.
ATTENTION! Vérier l’état de l’outil
de coupe pour couper la corde (24).
En aucun cas il est interdit d’utiliser
la coupe sans corde de coupe (24)
ou avec une coupe défectueuse
pour couper la corde de coupe (24).
Nettoyer régulièrement la coupe pour
couper la corde (24) de l’herbe et des
débris an d’éviter tout impact sur les
performances de coupe.
Aménage manuelle de la corde de coupe (22) >>
[F10]
Si nécessaire, la corde de coupe (22) peut être amenée
FR
à la main.
∙ Pour effectuer cette opération, presser et relâcher
le bouton d’aménage de la corde de coupe (23) en tirant
doucement sur les extrémités de la corde de coupe
(22), jusqu’à ce qu’ils atteignent la coupe pour couper
la corde (24).
∙ Si la corde de coupe au-delà de la coupe pour
couper la corde (24), la corde a été amenée en grand
volume (22). Dans ce cas, retirer le couvercle de la tête
de coupe (19) en appuyant sur les deux gâchettes (20),
puis régler la longueur de la corde de coupe (22).
INSTRUCTIONS D’EXPLOITATION
AVERTISSEMENT ! Ne pas utiliser
l’équipement sans dispositifs de
protection appropriés. Avant chaque
utilisation, s’assurer qu’il fonctionne.
AVERTISSEMENT ! Porter toujours
le vêtement serrés et les lunettes de
protection. Les pierres ou les boutures
peuvent ricocher ou être libérés dans
le visage et les yeux, entraînant une
cécité ou une blessure grave.
∙ Tenir la manivelle d’avant (3) par une main et la
manivelle auxiliaire (4) par la seconde main.
∙ Avant de commencer s’assurer que la corde de
coupe (22) est amenée.
∙ Ne pas brancher la machine lorsque la tête de
coupe (11) se trouve dans le matériel à couper ou à
proximité de celui-ci. Avant le contact avec le matériel
à couper, s’assurer que la machine est en marche à
pleine vitesse.
∙ Tenir l’appareil au-dessous de la taille.
∙ Déplacer uniquement au cours du travail de droite
à gauche pour le jeté des ébarbures loin de vous.
Travailler lentement, en gardant le trimmeur en position
inclinée (environ 30 °). [F11]
∙ Ne pas pencher en avant, garder la tête de
coupe (11) à proximité de la terre et parallèlement
(perpendiculaire pour couper la végétation). Permettre
à entrer en contact uniquement la n de la corde de
coupe (22).
∙ Ne pas couper l’herbe mouillée ou humide.
∙ L’herbe haute doit être coupé par couches, en
commençant toujours par le haut. La taille doit être
courte [F12].
∙ Éviter toute usure prématurée de la corde de coupe
(22) en raison de l’impact sur des objets durs (rochers,
murs, clôtures, etc.)
∙ Éviter le rebattement des rallonges au cours
du fonctionnement de l’appareil. Le danger
d’endommagement. Il faut toujours dérouler les
rallonges derrière soi-même.
AVERTISSEMENT ! Ne pas utiliser une
lame de débroussailleuse (13) pour
couper la végétation à proximité des
surfaces solides.
MAINTENANCE ET STOCKAGE
ATTENTION! Avant de commencer
toute manipulation avec l’appareil,
débranchez-le.
∙ Assurez-vous que l’appareil et les ouvertures de
ventilation soient propres. Le nettoyage et le service
technique réguliers assureront un rendement important
et augmenteront la durée de vie de votre appareil.
∙ Si un appareil de bonne qualité, rigoureusement
testé à l’usine tombe malgré cela en panne, la réparation
ne doit être conée qu’au service clientèle IVT.
∙ Les vis, écrous et boulons doivent être bien serrés
– ceci garantit la sécurité et le bon fonctionnement de
l’appareil.
∙ Pour votre sécurité, remplacez les pièces usées ou
endommagées.
∙ Utilisez uniquement les pièces d’origine du
fabricant. Sinon leur assemblage sera difcile ce qui
pourra causer des dommages.
∙ Conservez l’appareil dans un endroit sec
et inaccessible aux enfants, loin des matériaux
inammables.
∙ Il est interdit de mouiller l’appareil et d’y verser de
62
Page 63

Mode d’emploi
l’eau!
∙ Après chaque procédure nettoyer l’équipement
de coupe et le dispositif de protection (12) d’herbe et
de terre. De cette façon, on peut éviter la formation de
moisissures.
∙ S’assurer que les manivelles sont sèches et sans
traces de graissage.
∙ Nettoyer avec une brosse douce ou les produits de
nettoyage. Ne pas utiliser de détergents ou de solvants.
Ils peuvent endommager l’appareil. Les produits
chimiques peuvent corroder les pièces en plastique de
la machine.
∙ Ne pas stocker l’appareil en plein soleil pendant les
périodes de longue durée.
∙ Ne pas couvrir l’appareil avec des sacs en
plastique, cela peut causer l’humidité et la moisissure.
∙ Ne pas placer l’appareil sur le dispositif de
protection du trimmeur (12). Il est préférable de le
suspendre par la manivelle d’avant (3) sur le dispositif
de protection (12) sans contact avec aucun autre objet.
Sinon, il y a un risque de la déformation du dispositif
de protection du trimmeur (12) et le changement des
dimensions et des caractéristiques.
REMPLACEMENT DU TAMBOUR DU
TRIMMEUR (21)
ATTENTION! Ne pas utiliser des
coupes métalliques, des cordes
métalliques ou des ls.
AVERTISSEMENT ! Utiliser les
cordes de coupe (22) du diamètre
approprié. Les cordes de coupe (22)
des autres dimensions ne seront
pas amenées correctement, causant
un fonctionnement anormal ou des
blessures graves.
IMPORTANT! Retirer la che de la
prise avant de remplacer l’équipement
de coupe.
Installation du tambour du trimmeur (21) et de la
corde de coupe (22) en assemblage
Le trimmeur est livré avec un tambour (21), qui est
complètement remplacé en cas de problème avec le
bobinage de la corde de coupe (22).
1. Débrancher l’appareil du réseau d’alimentation.
2. S’assurer que vous êtes sur une surface plate, et la
63
position de vos pieds est stable.
3. Retourner la machine par le dispositif de protection
(12) en haut.
4. Appuyer et tenir les gâchettes (20) pour ouvrir le
couvercle de la tête de coupe (19) et retirer le vieux
tambour (21) de la tête de coupe (11). [F13]
5. Nettoyer la tête de coupe (11).
6. Tirer les deux extrémités de la corde de coupe
neuf (22) à travers de petits orices dans le tambour et
mettre dans un trimmeur un nouveau tambour (21) dans
la tête de coupe (11).
7. Replacer la tête de coupe (19).
8. Tirer les extrémités de la corde de coupe (22),
jusqu’à ce qu’ils atteignent le bord extérieur du dispositif
de protection de la tête (12).
AVERTISSEMENT ! Après avoir
remplacé le tambour du trimmeur (21),
laisser le trimmeur fonctionner sans
charge pendant au moins d’une minute
pour assurer le bon fonctionnement de
la corde de coupe (22), et l’instrument
lui-même.
Enroulement de la corde de coupe en nylon (22) sur
un tambour vide (21) >> [F14]
Alternativement, on peut aussi enrouler la corde de
coupe en nylon (22) sur le tambour (21) de façon
indépendante. Voir le tableau avec les caractéristiques
technique de l’outil pour obtenir l’information sur le
diamètre de coupe maximale et la longueur de la corde
(22), qui sont adaptés à votre modèle.
Il faut assurer également que l’enroulement de la corde
de coupe neuf (22) est exécuté contre le sens de rotation
du moteur, spécié par la èche sur le couvercle de la
tête de coupe (19) ou sur la base du tambour (21).
ATTENTION! Il faut prendre des mesures assurer
l’enroulement correct de la corde de coupe (22) sur le
tambour (21). L’inobservance de cette exigence peut
causer l’aménage incorrect de la corde de coupe (22).
1. Fixer la corde de coupe (22) à la moitié de sa
longueur à l’intérieur de la cannelure ou un petit orice
dans le tambour (21).
2. Bobiner la corde de coupe (22), comme indiqué
par la èche. Laisser une petite section non enroulée
(environ 100 mm) de la corde de coupe (22).
3. Tirer les deux extrémités de la corde de coupe (22)
à travers les deux orices dans la tête de coupe (11) et
insérer le tambour (21).
4. Réinsérer le tambour (21) dans la tête de coupe
(11) et fermer la tête de coupe (19).
5. Presser le bouton d’aménage de la corde de coupe
(23) et tirer sur les deux extrémités de la corde de coupe
FR
Page 64

Mode d’emploi
(22), jusqu’à ce qu’ils atteignent le bord externe du
dispositifs de protection du trimmeur (12).
PROTECTION DE L’ENVIRONNEMENT
Le recyclage des matières premières
pour une réutilisation est mieux que
de les jeter.
L’appareil, les dispositifs et l’emballage sont triés pour
être recyclés tout en protégeant la nature.
Les éléments en plastique sont classés pour le
recyclage. Ce manuel est imprimé sur du papier recyclé
sans utilisation de chlore.
FR
64
Page 65

Mode d’emploi
IDENTIFICATION ET ÉLIMINATION DE PROBLÈMES
ATTENTION! Débranchez l’appareil de la prise électrique avant de rechercher une quelconque
défaillance.
Dérangements standards Cause de dérangements Solutions
L’appareil vibre
L’appareil n’est pas branché
Détérioration de la coupe
Si le problème ne peut pas être résolu sur la base des informations mentionnées ci-dessus, veuillez emmener
l’appareil au service après-vente IVT agréé.
∙ Tambour du trimmeur (21) est
sal
∙ Tambour du trimmeur (21) est
défectueux
∙ Le réseau d’alimentation est
absent
∙ L’interrupteur à 2 positions
« bran./débran » est défectueux (2).
∙ Les balais de charbon sont
usés.
∙ Le moteur est défectueux.
∙ Sur le tambour du trimmeur
(21) il n’y a pas de la corde de coupe
en volume sufsant (22)
∙ La corde n’est pas dirigée
vers l’extérieur du tambour (21) ou
dégagée du tambour (21) sur un
côté
∙ Nettoyer soigneusement
∙ Remplacer
∙ Vérier la prise de courant,
le câble d’alimentation de ligne et
la prise, en cas de besoin il faut
s’adresser à l’électricien qualié
pour la réparation
∙ Réparation dans le service de
la clientèle
∙ Ajuster la longueur de la corde
de coupe (22) ou remplacer le
tambour (21)
∙ Retirer le tambour (21) et
insérer la corde de coupe (22) à
travers les orices, puis installer le
tambour en place (21)
FR
ATTENTION! IL EST INTERDIT DE REPARER L’ARTICLE PAR SES PROPRES MOYENS ET
DISSIMULER CE FAIT! Seulement le centre de service autorisé IVT a le droit d’exécuter la
réparation et l’entretien élargi. Il est interdit de modier la construction interne de l’article!
CES ACTIONS PEUVENT ANNULER LES OBLIGATIONS DE GARANTIE ET CAUSER LES
ENDOMMAGEMENTS ET LES BLESSURES GRAVES.
65
Page 66

Page 67

Page 68

tools for every use
IVT SWISS SA
Via Cantonale, 2
CH-6917 - Barbengo
Switzerland
tel.: +41 (0) 91 6000 555
+41 (0) 91 6000 556
fax: +41 (0) 91 6000 557
e-mail: info@ivt-ht.com
web: www.ivt-ht.com
КАЗАХСТАН
ТОО “Костанай IVT”
ул. Целинная, д.4
110000 г. Костанай
тел.: +7 (7142) 280 700
+7 (7142) 280 701
+7 (7142) 280 702
e-mail: ivt_dir@mail.ru
web: www.ivt.kz
 Loading...