

Page 1

Swiss SA
Gasoline generator
EN
Benzin-Generator
D
Бензиновый генератор
RUS
Жанармайлық генератор
KZ
PL
Generator benzynowy
BY
Бензінавы генератар
UA
Бензиновий генератор
I
Generatore a benzina
CS
Benzínový generátor
BG
Бензинов генератор
7 - 21
22 - 37
38 - 53
54 - 70
71 - 86
87 - 102
103 - 118
119 - 134
135 - 149
150 - 166
GN-850 GN-1500 GN-3000 GN-6500
Page 2

Via San Carlo, 20/A CH 6917 - Barbengo, Switzerland
Via Cantonale, 2 CH 6917 - Barbengo, Switzerland
Tel . +41 91 6000555 - +41 91 6000556
Fax. +41 91 6000557
mail: info@ivt-ht.com
web: www.ivt-ht.com
Congratulation!
Dear customer,
the team of IVT would like to thank you for the choice and for the condence shown to our product.
Our aim is, always to oer an innovative, high-class-strong and prize-adequate product to the customer.
We wish you much pleasure in do-it-yourself activity, free of friction with this machine.
Your IVT Swiss SA team
Gratulieren!
Liebe(-r) Kunde!
Die Firma IVT bedankt sich bei Ihnen für Ihre Wahl und Ihr Vertrauen zu unserer Marke. Unser Ziel ist Ihnen
ein innovationsvolles hochwertiges preiswertes Werkzeug anzubieten.
Wir wünschen Ihnen viel Spaß bei der Arbeit und ausgezeichnete Leistungen.
Ihr IVT Swiss SA Team
Поздравляем!
Уважаемый покупатель,
коллектив компании IVT благодарит вас за оказанное доверие и выбор, сделанный в пользу нашей
продукции. Мы всегда стремимся к тому, чтобы у наших покупателей была возможность приобретать
только инновационную, высококлассную и высококачественную продукцию. Мы желаем вам, чтобы
в процессе использования нашей продукции не возникало никаких проблем – чтобы она приносила
вам исключительно радость.
С уважением, коллектив IVT Swiss SA
Ізгілікпен!
IVT компаниясы Сізге біздің өнімге деген таңдау мен сенім үшін ризашылығын білдіреді. Біз Сіздерге
үнемі инновациялық, жоғарғы классты және жоғары сапалы құралдарды тиімді бағамен ұсынуға үнемі
ұмтылып келеміз. Біз Сіздерге біздің өнімдерімізді пайдалану барысында ешқандай қиыншылықтың
болмауын, олардың тек жайлылық және жақсы нәтиже әкелуін тілейміз.
Ізгі ниетпен IVT Swiss SA ұжымы
Page 3

Witamy!
Szanowny Kliencie!
Firma IVT dziękuje Państwu za wybór oraz zaufanie, którym Państwo dążycie nasza są markę. Nasza meta –
zawsze proponować Państwu innowacyjny oraz jakościowe narzędzia za najlepsza ceną
Życzymy Państwu otrzymywać zadowolenie od pracy, oraz osiągnięcia wysokich rezultatów.
Firma IVT Swiss SA
Віншуем!
Паважаны Кліент!
Кампанія IVT дзякуе Вам за выбар і давер, аказаны нашай марцы. Наша мэта заўсёды прапаноўваць Вам інавацыйны, якасны інструмент па прымальнай цане.
Мы жадаем Вам задавальнення ў рабоце і выдатных вынікаў.
Кампанія IVT Swiss SA
Вітаємо!
Шановний Клієнт!
Компанія IVT дякує Вам за вибір та довіру до нашої марки. Наша мета - завжди пропонувати Вам
інноваційний, якісний інструмент за прийнятною ціною.
Ми бажаємо Вам задоволення в роботі і відмінних результатів.
Компанія IVT Swiss SA
Congratulazioni!
Egregio cliente,
Il team IVT desidera ringraziarvi per la scelta e la ducia accordata al nostro prodotto. Il nostro obbiettivo e
sempre quello di orire un servizio innovativo e di alta classe. Vi auguriamo grandi soddisfazioni nell’utilizzo
del nostro prodotto durante i vostri lavori di bricolage.
La tua squadra IVT.
Gratulujeme!
Vážený zákazníku,
kolektiv společnosti IVT děkuji Vám za důvěru a výběr, provedeny ve prospěch našich produktů. Vždy se
snažíme zajistit, aby naší zákazníci měli možnost získat pouze inovační, vysoce třídní a vysoce kvalitní
výrobky. Přejeme Vám, aby v procesu využívání našich produktů, ne vznikalo žádných problémů - aby jste
měli výhradně radost.
S úctou, kolektiv IVT Swiss SA
Поздравяваме ви!
Уважаеми клиенти,
Колективът на фирма IVT ви благодари за оказаното доверие и за избора, направен в полза на нашия
продукт. Ние винаги се стремим да предоставим на клиентите си само иновационна, висококачествена
продукция от най-висок клас. Надяваме се да нямате никакви проблеми в процеса на работа с нашия
продукт, и той да ви носи само радост.
С уважение, колективът на IVT Swiss SA
Page 4

4
Warranty
We guarantee that IVT appliances are in accordance with
statutory/country-specic regulations (proof and purchase
by invoice or delivery note). The warranty is not valid for
consumables and accessories which partly belong to the
scope of supplies.
The warranty cannot be invoked in the following cases:
Normal wear of mechanisms and assemblies which 1.
have a limited life;
Maintenance and replacement of hardware that wears 2.
quickly (carbon brushes, cutting tools, gearwheels);
Overloads or loads which are too extensive and lead to:3.
simultaneous failure of one or more hardware parts and •
assemblies functionally connected with the system;
burning, charring, melting due to excessive internal •
temperatures of the hardware (heating elements, switches,
wiring, housings);
mechanical damage, presence of foreing objects in the 4.
appliance;
commercial use;5.
use of purposes not mentioned in this instruction 6.
manual;
dismantling and repair work not carried out by IVT 7.
specialist.
Гарантия
Мы гарантируем, что изделия компании IVT
соответствуют установленным в каж дой конкретной
стране нормам (проверка и покупка производятся на
основании счета-фактуры и накладной)
Гарантия не распространяется на расходные материалы
и дополнительные приспособления, входящие в объем
поставки.
Гарантия не действует в следующих случаях:
Обычный износ быстро изнашиваемых механизмов 1.
и деталей;
Текущий ремонт и замена быстро изнашиваемых 2.
изделий (угольные щетки, режущие детали, шестерни);
Перегрузка или избыточная нагрузка, ведущие к:3.
одновременному выходу из строя одной или •
нескольких деталей изделия и дополнительных узлов,
функционально связанных с системой;
возгоранию, обугливанию, оплавлению •
вследствие высоких внутренних температур изделий
(нагревательные элементы, выключатели, проводка,
розетки);
механическое повреждение, присутствие 4.
посторонних предметов в приборе;
коммерческое использование;5.
использование для целей, не предусмотренных 6.
настоящей инструкцией по эксплуатации;
разборка и ремонт, выполненные не специалистами 7.
IVT.
Gewährleistung
Benutzer muss die Bedienungsanleitung für Elektrowerkzeug IV T ist eine Gewährleistung entsprechend den
Gesetzen und spezischen Besonderheiten jedes Landes
vorgesehen. Es wird durch einen Garantieschein bestätigt!
Diese Gewährleistung ist nicht für Verbrauchsmaterialien
und Zubehör geeignet, die teilweise in den Lieferumfang
enthalten sind. Die Kundenbetreuung wird in folgenden
Fällen nicht erfolgt:
bei dem Langzeitverschleiß der Mechanismen und 1.
Bauteile, die begrenzte
2. bei der Vorbeugung und dem Einsatz der Verschleißteile
(Kohlebürsten, Zahnräder);
3. bei der Überlastung und der intensiven Ausnutzung,
deren Folgen sind:
gleichzeitiges Versagen von einem oder mehreren •
funktionell verbundenen Bauteilen oder Baugruppen
Verbrennen, Verkohlung, Nachschmelzen unter der •
hohen Temperatur der Bauteile (Heizkörper, Schalter,
Leitungsdraht, Gehäuse);
4. wenn mechanische Fehler, Fremdkörpern gefunden
sind;
5. wenn das Werkzeug mit dem Produktions- und
Industieziel ausgenutzt worden ist;
6. wenn das Werkzeug mit dem nicht von dieser
Gebrauchsanweisung geeignetem Ziel ausgenutzt
worden ist;
7. wenn das Werkzeug nicht von den Fachleute von IVT
geönet, repariert worden ist.
Leistungsfähigkeitsperiode haben;
Кепілдік
IVT электрқұралдары үшін берілетін кепілдік әр елдің
заңдарына және олардың дербес ерекшеліктеріне
байланысты анықталады (тексеру шот-фактруа мен
жүкқұжат негізінде жүзеге асырылады).
Шығындалатын материалдар мен кешенге кірмейтін
қосымша жабдықтарға кепілдік берілмейді.
Төмендегідей жағдайларда кепілдік көрсетілмейді:
1.Бөлшектер мен механизмдердің табиғи тозығуы
кезінде;
2.Тез тозатын бөлшектер жөнделген немесе
алмастырылған болса (бұрыштық қылшақтар, кесуші
жабдықтар, сірнелер);
3.нәтижесінде:
жүйемен қызметтік байланыстағы бір немесе ∙
бірнеше сыбайлас бөлшектердің, механизмдердің
бір уақытта жарамсыз болуы;
ішкі ауа қысымының жоғары болуы салдарынан ∙
бөлшектердің (қыздырғыш бөлшектердің,
ажыратқыштардың, сымдардың, тоқ көздерінің)
жанып кетуі, жонылуы, балқуы байқалатын сауатсыз
қолдану анықталса;
4.механикалық бұзылу байқалса, құрал ішінде бөтен
заттар табылса;
5.өндірістік немесе өнеркәсіптік мақсатта
қолданылған болса;
6.осы нұсқаулықта қарастырылмаған мақсаттарда
пайдаланылса;
7.IVT мамандарынан басқа тұлғалар құралды ашса,
өз еріктерімен жөндесе.
Page 5

Gwarancja
Dla instrumentu elektrycznego IV T jest przewidziana
gwarancja odpowiednio do praw i specycznych
właściwości każdego kraju. Potwierdzeniem jest talon
gwarancyjny! Gwarancja nie rozpowszechnia się na
dodatkowe materiały i narzędzia, które częściowo wchodzą
do dostarczonego kompletu.
Obsługa gwarancyjna nie działa w przypadkach:
Naturalnego zniszczenia mechanizmów i węzłów, które 1.
mają ograniczony okres przydatności do pracy;
prolaktyki i zamiany szybko zniszczalnych detali 2.
(szczotki węglowe, koła zębate);
przeładunku lub wykorzystania w trybie intensywnym, 3.
skutkiem których jest:
jednoczesne złamanie jednego lub więcej funkcjonalnie •
związanych detali oraz węzłow;
spalanie się, zwęglanie, topienie się pod wpływem •
wysokiej temperatury wewnętrznej detali (elementy
grzejne, przyciski, druty, korpusy);
mechanicznych obrażeń, zaistnienia w środku 4.
przedmiotów obcych;
wykorzystania w celach wytwórczych lub 5.
przemysłowych;
wykorzystania w celach, nie przewidzianych przez 6.
niniejszą instrukcję;
otwarcia, remontu, który był zrobiony nie fachowcem 7.
IVT.
Гарантыя
Для электраiнструмента IVT прадугледжана гарантыя ў
адпаведнасці з законамі і спецыфічнымі асаблівасцямі
кожнай краіны. Пацвярджэннем з’яўляецца гарантыйны
талон!
Гарантыя не распаўсюджваецца на расходныя
матэрыялы і прыналежнасці, якія часткова ўваходзяць у
камплект пастаўкі.
Гарантыйнае абслугоўванне не здзяйсняецца ў
выпадках:
натуральнага зносу механізмаў і вузлоў, якія маюць 1.
абмежаваны перыяд працаздольнасці;
прафілактыкі і замены быстразношваючыхся дэталяў 2.
(вугальныя шчоткі, шасцярня);
перагрузкі або інтэнсіўнага выкарыстання, вынікам 3.
якіх з’яўляюцца:
адначасовы выхад са строю аднаго або больш •
функцыянальна звязаных дэталяў і вузлоў;
згарання, асмальвання, аплаўлення пад уздзеяннем •
высокай унутранай тэмпературы дэталяў (награвальныя
элементы, кнопкі, правады, корпусы);
механічных пашкоджанняў, наяўнасці ўнутры 4.
іншародных прадметаў;
выкарыстання ў вытворчых або прамысловых 5.
мэтах;
выкарыстання ў мэтах, не прадугледжаных дадзенай 6.
інструкцыяй;
раскрыцця, рамонту, які быў зроблены не 7.
спецыялістамі IVT.
Гарантія
Для електроінструмента IVT передбачена гарантія
відповідно до законів і специфічні особливості кожної
країни. Підтвердженням є гарантійний талон!
Гарантія не поширюється на витратні матеріали та
приладдя, які частково входять в комплект поставки.
Гарантійне обслуговування не здійснюється у випадках:
1. Природного зносу механізмів та вузлів, що мають
обмежений період працездатності;
2. Профілактики і заміни швидкозношуваних деталей
(вугільні щітки, шестірні);
3. Перевантаження або інтенсивного використання,
наслідком яких є:
одночасний вихід з ладу одного або більше •
функціонально пов’язаних деталей і вузлів;
згоряння, обвуглювання, розплавлення під впливом •
високої внутрішньої температури деталей (нагрівальні
елементи, кнопки, проводи, корпуси);
4. механічних пошкоджень, наявності всередині
сторонніх предметів;
5. використання у виробничих або промислових цілях;
6. використання в цілях, не передбачених цією
інструкцією;
7. розтину, ремонту, який був зроблений не фахівцями
IVT.
Garanzia
Il team IVT garantisce che i nostri prodotti sono conformi ai
regolamenti specici per i paesi in cui sono commercializzati
(a prova dell’acquisto e necessaria la fattura o la bolla di
consegna). La garanzia non e valida per i beni di consumo
che fanno parte del campo degli accessori. La garanzia non
può essere rivendicata nei seguenti casi:
1. Normale usura dei meccanismi e degli assemblaggi, che
hanno una vita limitata;
2. Per la manutenzione o la sostituzione di parti di consumo
(spazzole al carbonio, utensili da taglio, ruote dentate);
3. Picchi di tensione che possono indurre a:
• simultanea rottura di una o piu parti dei componenti
collegati con il sistema;
•carbonizzazione,fusioneacausadieccessivetemperature
interne al motore (elementi termici, interruttori, cavi,
custodie);
4. Danni meccanici dovuti alla presenza di oggetti
estranei inseriti nell’apparecchio;
5. uso commerciale;
6. Usi e scopi non menzionati in questo manuale
di istruzioni;
7. Disassemblaggio e lavori di riparazione non
e ettuati dal servizio assistenza IVT.
5
Page 6

6
Záruka
Zaručujeme, že výrobky společnosti IVT souhlasí
stanoveným v každé konkrétní zemi normám (kontrola a
nákup se provádí na základě faktury a výdejky)
Záruka se nevztahuje na spotřební materiál a přídavné
příslušenství které jsou součástí dodávky.
Záruční podmínky neplatí v následujících případech:
Běžné opotřebení rychle opotřebovatelných 1.
mechanismů a dílů;
Údržba a výměna rychlé opotřebovatelných (uhlíkové 2.
kartáče, řezné díly, ozubená kola);
Přetížení nebo nadměrné zatížení, což vede do:3.
současné selhání jednoho nebo více detailů výrobku •
a dodatečných uzlů, které jsou funkčně spojeny se
systémem;
požáru, spékání, tavení díky vysoké vnitřní teplotě •
výrobků (topná tělesa, spínače, kabeláž, zásuvky);
mechanické poškození, přítomnost cizích předmětů 4.
uvnitř přístroje;
komerční využití;5.
použití pro účely neuvedené v tomto návodu k použití;6.
rozebírání a opravy, provedené ne odborníky IVT.7.
Гаранция
Ние гарантираме, че изделията на фирма IVT отговарят
на установените във всяка конкретна страна норми
(проверката и закупуването стават на основание на
фактура и на товарителница)
Гаранцията не се отнася за разходните материали и
допълнителните приспособления, включени в обема на
доставката.
Условията на гаранцията не се прилагат в следните
случаи:
Нормално износване на бързо износващи се 1.
механизми и детайли;
Текущ ремонт и подмяна на бързо износващи 2.
се елементи (въглени четки, режещи части, зъбчати
колела);
Претоварване или прекомерно натоварване, които 3.
водят до:
едновременен отказ на един или повече детайли •
на изделието и на допълнителни възли, функционално
свързани със системата;
пламване, овъгляне, топене поради високите •
вътрешни температури на изделията (нагревателни
елементи, превключватели, кабели, контакти);
механични повреди, наличие на чужди тела в 4.
устройството;
търговска употреба;5.
използване за цели, които не са предвидени в това 6.
ръководство за работа;
разглобяване и ремонт, които не са извършени от 7.
специалисти на IVT.
Page 7
ENG.SW.
ON
OFF
POWER ON
VOLTMETER
AC SOCKET
DC
+
-
AC
DC LIFE
OUTLET
PROTECTION
10
19
23
24
22
26
19
10 78 9 314 54
17
12
1518 16 2 21 6 1
13 11
23
24
22
6 16 9 15
11
2 14
3 17 12 13
1 4
GN-850
Manual instruction
GN-1500
EN
7
Page 8

8
Manual instruction
EN
ENG.SW.
ON
OFF
POWER ON
VOLTMETER
AC SOCKET
DC LIFE
AC SOCKET
DC
PROTECTION
AC
PROTECTION
ENG.SW.
POWER ON
VOLTMETER
AC SOCKET
DC LIFE
DC
PROTECTION
AC SOCKET
AC
PROTECTION
ON
OFF
19
7 2114 1 5
4
17
11
151216 9 2 6 3 25
23
24
22
19
10 78 14 52141
12 11
1615 9 2 6 3
23
24
22
GN-3000
GN-6500
Page 9

Manual instruction
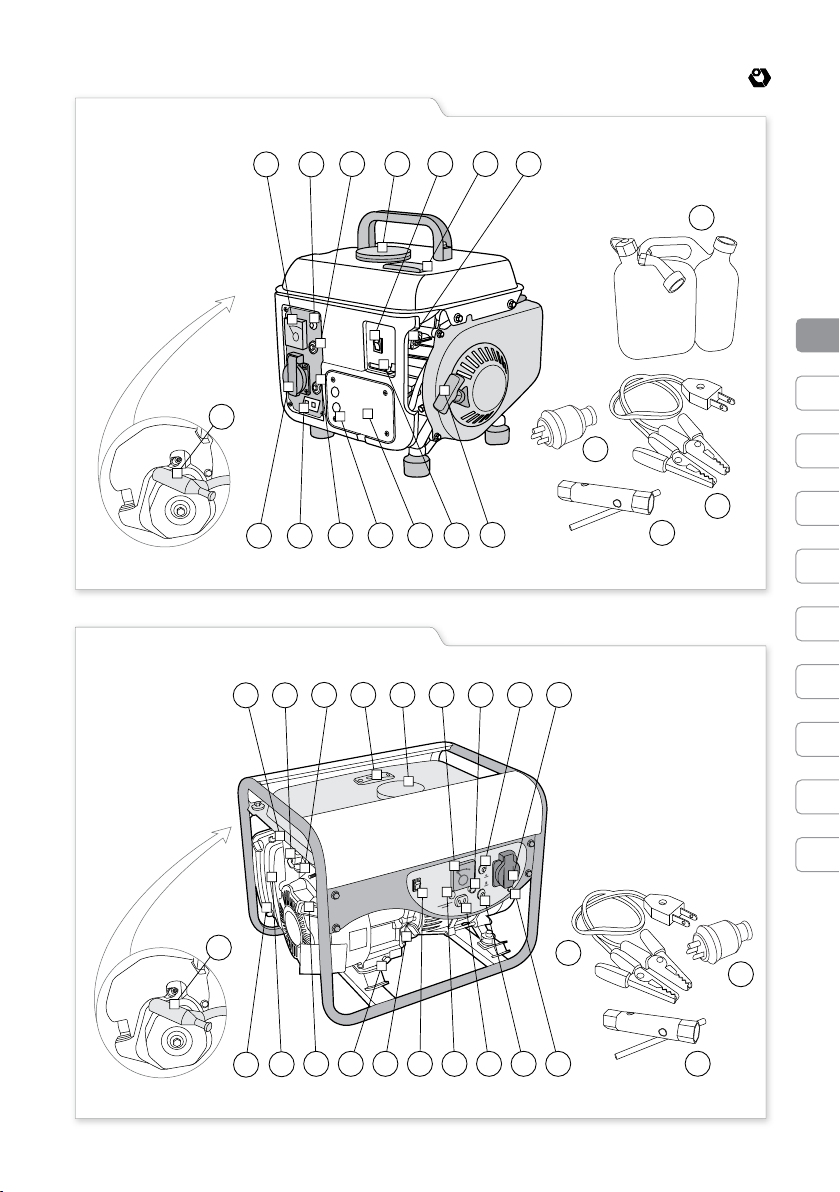
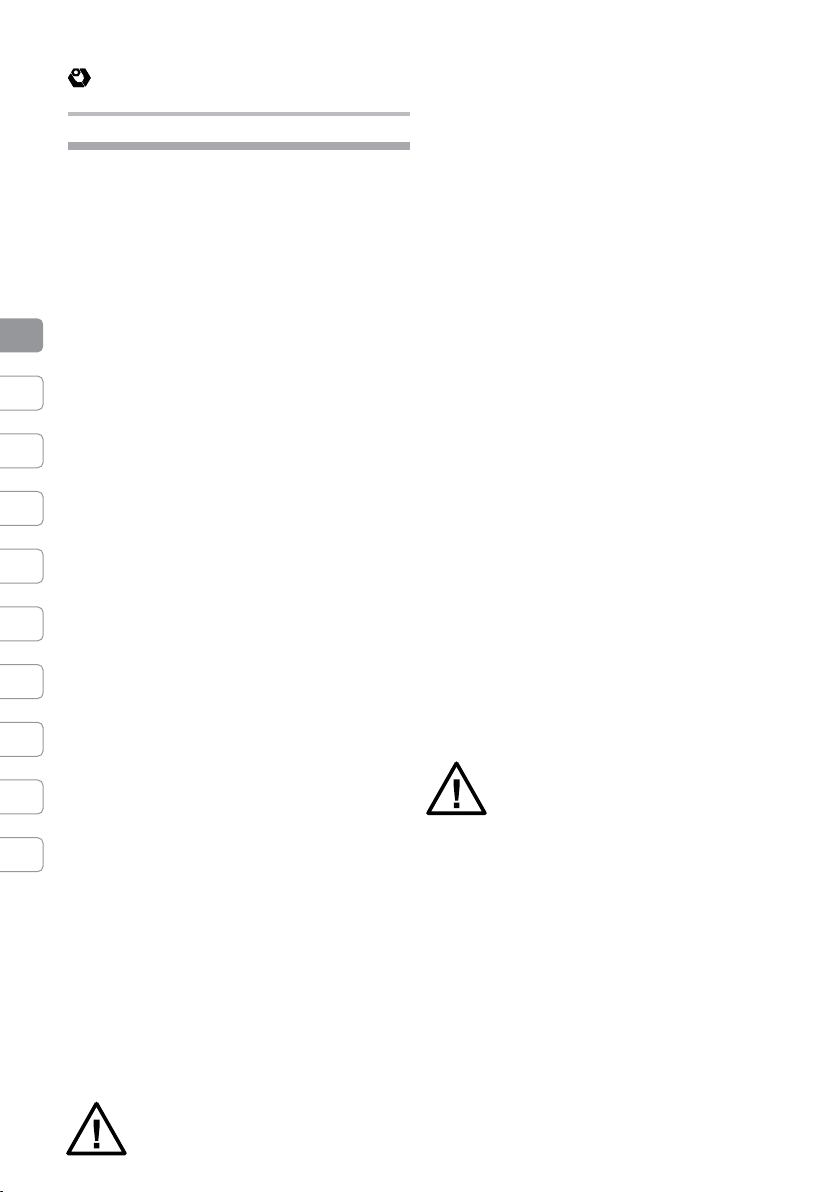
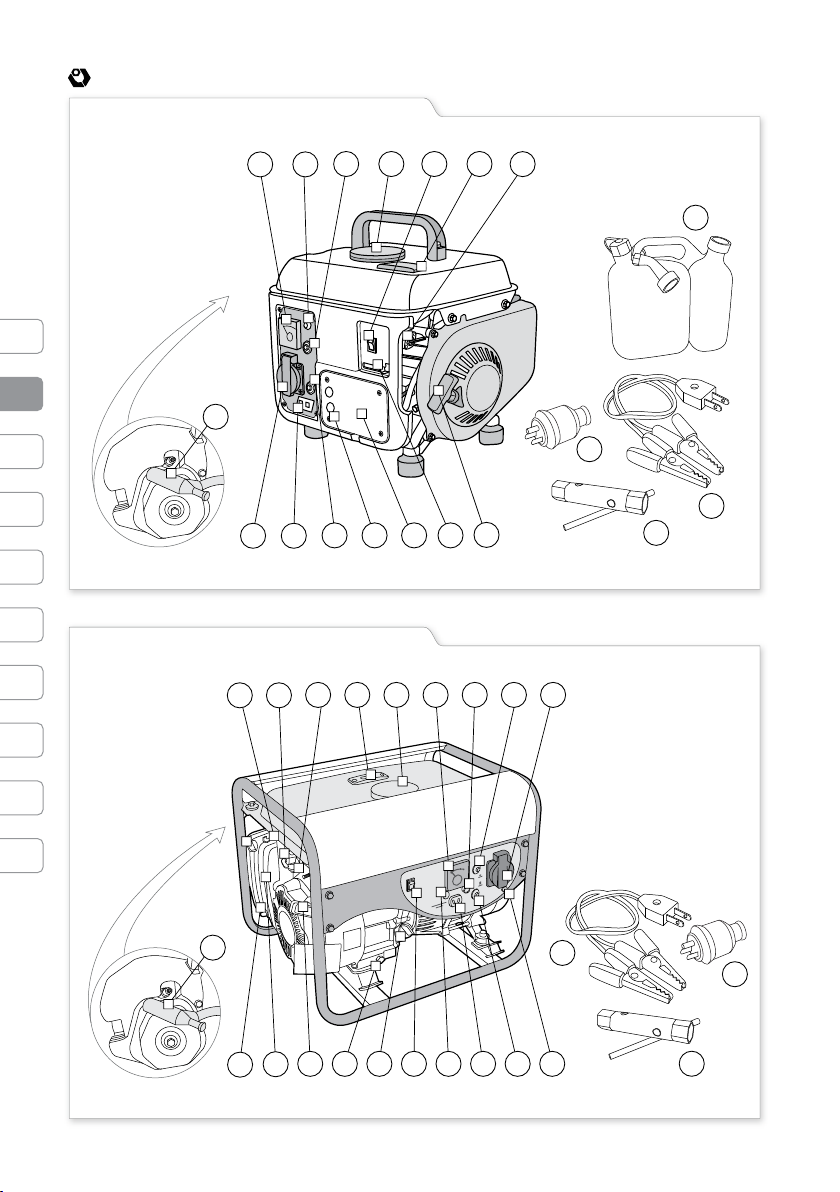
Operating controls
AC receptacles1.
Voltmeter2.
DC circuit protector3.
DC output terminal4.
Ground terminal5.
AC circuit breaker6.
Oil ller cap7.
Oil drain plug8.
Engine switch9.
Recoil starter grip10.
Fuel valve11.
Air cleaner cover12.
Choke rod13.
Pilot lamp14.
Fuel level gauge15.
Plug23.
Spark plug spanner24.
Handle*25.
Oil/fuel mixing pot*26.
Fuel tank cap16.
Air cleaner cover clips/screws17.
Fuel sediment cup18.
* Optional extras
Spark plug cap19.
Muer20.
Oil alert lamp21.
Battery charging cable22.
Not all of the accessories
illustrated or described are
included as standard delivery
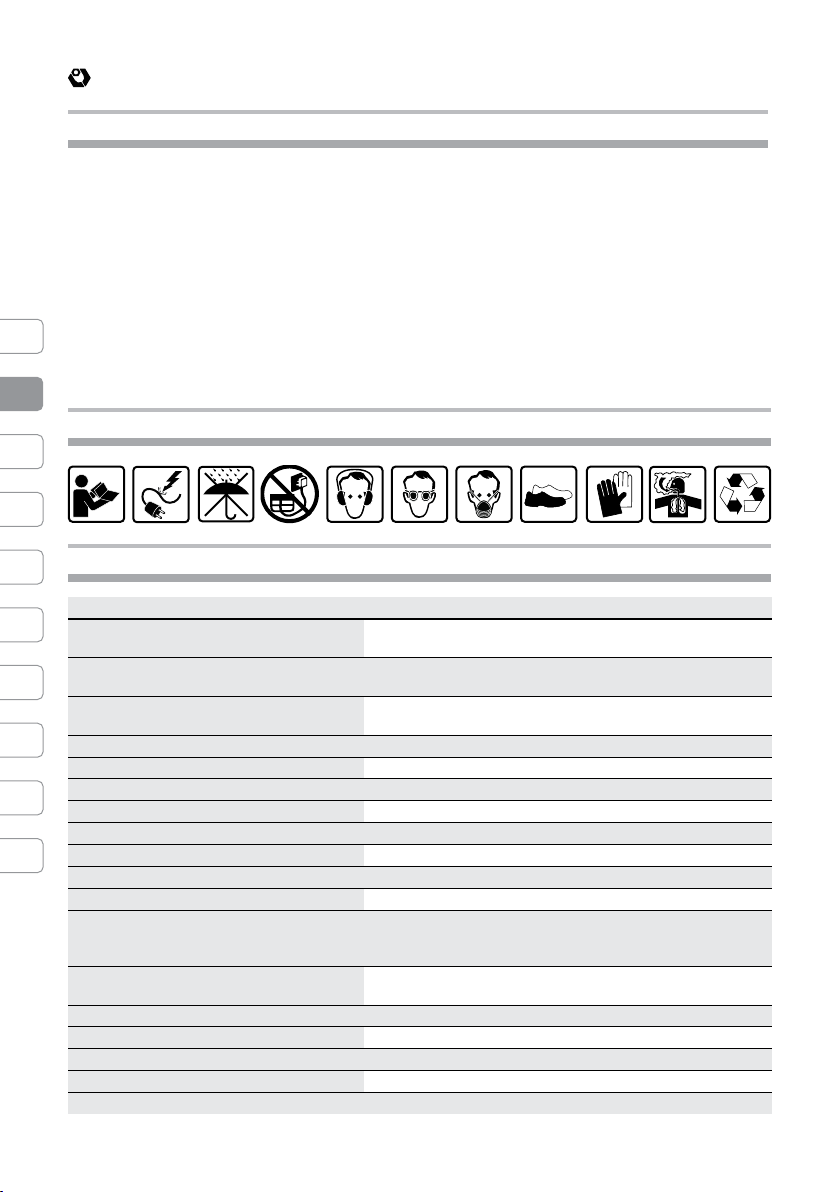
Symbols
Tool specication
model GN-850 GN-1500 GN-3000 GN-6500
AC output rated power 230V/50Hz [W] 750 1000 2500 5000
AC output maximum power 230V / 50Hz [W] 850 1200 2800 5500
Amperage [A]
AC output voltage [V/Hz] 230/50 230/50 230/50 230/50
Phase 1 1 1 1
DC Voltage [V] 12 12 12 12
DC Current [A] 8.3 8.3 8.3 8.3
No-load speed [RPM] 3000 3000 3000 3000
Displacement 63 87 208 389
Quantity of strokes of work of the engine 2 4 4 4
Type of engine cooling air cooling air cooling air cooling air cooling
Employed fuel
Employed oil -
Fuel tank capacity [l] 4.2 6.70 15.00 25.00
Oil tank capacity [l] - 0.60 1.10 1.10
Weight [kg] 19.00 28.00 42.00 97.00
Sound pressure level [dB (A)] 46 68 68 73
Acoustic power [dB (A)] 57 79 79 93
Weighted vibration [m/s2] 7 5 5 11
3.0/3.5 4.3/4.7 10.8/12.1 21.7/24
oil-mixed
gasoline
unleaded
gasoline
SAE 10W-30
SAE 10W-40
unleaded
gasoline
SAE 10W-30
SAE 10W-40
unleaded
gasoline
SAE 10W-30
SAE 10W-40
9
EN
Page 10
10
Manual instruction
EN
Safety regulation for the use
General safety rules
These models of gasoline generators (GN-850; GN1500; GN-3000; GN-6500) are designed to give safe
and dependable service if operated according to
the instructions.
The following listed safety instructions should serve
you for the right use and for the protection of your
own safety. Therefore please read this very carefully.
When passing this device to a third person, these
instructions must be handed out, too.
Retain this user manual and all other literature
supplied with your device for any future reference.
Comply with the safety information and the warning
on the appliance.
Be familiar with the controls and the proper use of
the appliance before attempting to operate it and
above all, make sure you know how to stop it in case
of emergency.
Following these simple instructions will also
maintain your device in good working order.
The appliance must be assembled correctly •
before use.
Only use the appliance for its designed •
purposes.
In addition to the design of the device there are •
safety decals that must be considered and indications
about the safety equipment to use. Accident
prevention is dependent upon the awareness,
common sense, forethought, and proper training
of everyone involved in the operation, transport,
maintenance, and storage of the machine.
Never leave the machine unattended.•
Never allow children to use the appliance. •
Children should be supervised to ensure that they
do not play with the appliance.
Keep children and pets away. All onlookers •
should be kept at a safe distance away from the
appliance when it is in use. Stop using the machine
while people, especially children, or pets are
nearby.
The user is responsible for third parties while •
working with the appliance.
People who aren’t acquainted with the operating •
instructions, children, juveniles who have not yet
reached the minimum age for using this appliance,
and people under the inuence of alcohol, drugs or
medication are not allowed to use the appliance. Local
regulations may restrict the age of the operator.
WARNING: The consumption of alcohol,
medication and drugs, plus states of illness, fever
and fatigue will aect your ability to react. Do not
use electric tools in any of these situations.
Make sure that all the protective devices are •
tted and are in good conditions.
Never operate the appliance with defective •
safety devices or guards, or without safety devices
in place.
Avoid any accidental starting: make sure the •
switch is “o” before plugging in.
Remove adjusting keys or wrenches before •
turning the tool “on”.
Do not use the tool if the switch does not turn •
to “ON” or “OFF”. Any tool that cannot be controlled
with the switch is dangerous and must be repaired.
Inspect the entire machine to look for loose •
parts (nuts, bolts, screws, etc.) and for any damage.
Check at frequent intervals if screws and bolts are
properly tight and to be sure the equipments is in
safe working condition. Repair or replace them, if
necessary, before using the machine. Serious injury
to the operator and to the bystanders could result if
there’s a damage to the machine.
While operating the appliance, dress properly. •
Do not wear loose clothing or jewelry that could
become caught by the moving parts of the unit.
Wear suitable working clothes, long trousers and
solid shoes. It is recommended that legs and feet
are covered, to protect from ying debris during
the operation. Do not operate the appliance when
barefoot or wearing open sandals. Long hair should
be tied back.
Keep handles dry clean and free from oil and •
grease.
WARNING: Use personal protective
equipment! The safety device and the
personal protective equipment to
protect your own health and the health of others
and ensure trouble-free operations of the device.
Use safety glasses, safety gloves, solid non-skid •
safety shoes and, if necessary, also an hardhat. Also
use a dust mask during pulverulent operations. If
the noise level exceeds 85 dB(A), ear protection is
obligatory.
Ensure that you have a good a stand, while you •
operate with the device. Keep proper footing and
balance at all times.
Do not start the device if it is in an inverted •
position or is not in the right working position.
Before use, all foreign bodies must be removed •
from the working area where the appliance is going
Page 11
Manual instruction
to be used: remove all foreign objects, also pay
attention to foreign objects during the operation.
Keep work area clean. Cluttered areas invite
injuries.
Do not force the tool. It will do a better job and •
operate more safety at the rate for which it was
intended.
Only work in daylight or suciently good •
articial light. Never operate the device without
good visibility.
Be careful not to drop the machine or hit it •
against obstacles.
If the appliance strikes a foreign body, examine •
the device for signs of damage and carry out any
necessary repairs before restarting and continuing
to work.
If the appliance starts to vibrate abnormally, •
switch o the motor and check for the cause
immediately. Vibration is generally a warning of
trouble.
The appliance should be checked carefully •
before use. You should only work with an appliance
that is in good condition. If you notice any defects on
the machine that may cause danger to the operator,
do not operate the appliance until all defects are
rectied.
Replace worn or damaged parts for safety. Use •
only original spare parts. Parts not produced by
manufacturer may cause poor t and possible
injury.
It is forbidden to move or modify any of the •
electrical or mechanical devices.
Always switch o the appliance and wait until •
the device completely stops whenever you leave the
machine, before carrying out maintenance, before
checking, cleaning or working on the appliance.
Use caution when cleaning or performing •
maintenance on the appliance. Always make
adjustments after the unit is switched o and it’s on
a at, clear surface.
Always allow muer to cool before lling fuel •
tank.
Never remove the cap of the fuel tank or add •
petrol while the engine is running or when the
engine is hot.
If petrol is spilled, do not attempt to start the •
engine but move the machine away from the area
of spillage and avoid creating any source of ignition
until petrol vapor have dissipated.
Clean up spilled fuel before restarting.•
replace all fuel tank and container caps securely•
Do not run the engine indoor or in a conned •
space; dangerous carbon monoxide fumes can
collect, exhaust fumes are dangerous.
WARNING! Exhaust contains poisonous
carbon monoxide, a colorless and
odorless gas. Breathing exhaust can
cause loss of consciousness and may lead to death.
To keep exhaust gas from building up, provide
adequate ventilation.
Never store the equipment with petrol in the •
tank inside a building where fumes can reach an
open ame or spark
To reduce the re hazard, keep the engine, •
silencer, battery compartment and petrol storage
area free of vegetative material and excessive
grease.
Keep gasoline in a jerry can specially made for •
this purpose.Tighten the fuel tank cap and close
tightly the jerry can cap.
The exhaust system gets hot enough to ignite •
some materials. Keep ammable materials away
from the device.
The muer becomes very hot during operation •
and remains hot for a while after stopping the
engine. Be careful not to touch the muer while it is
hot. Let the engine cool before storing the generator
indoors.
EN
WARNING: Stay alert. Watch what you
are doing. Use common sense.
Gasoline engine safety rules
WARNING! Petrol is highly ammable.
Handle fuel with care.
Store fuel in containers specically designed for •
this purpose
Refuel outdoors only and do not smoke while •
refueling
Add fuel before starting the engine. •
Electrical safety rules
ATTENTION! When using electrical tools,
the following safety instructions should
be observed to prevent the risk of
electric shock, personal injury and re. Read and
observe these instructions carefully before using
the tool.
CAUTION: touching electried parts may cause
death by electric shock or burn.
ATTENTION! DANGER OF ELECTRIC SHOCK!
Consider work area environment. Do not expose
11
Page 12
12
Manual instruction
EN
fig.
1
ON
OFF
START
OFF
ON
ON
STOP
GN-850
GN-1500 GN-3000
GN-6500
fig.
2
GN-850
GN-1500 GN-3000
power tools to rain. Do not use power tools in
damp or wet locations. Keep work area well lit and
dry. Try to prevent the device from getting wet or
being exposed to humidity. Do not leave it outside
overnight.
Specic safety rules
Learn how to stop the generator quickly in case •
of emergency.
Understand the use of all generator controls, •
output receptacles, and connections.
Be sure that anyone who operates the generator •
receives proper instructions.
CAUTION! Exhaust contains poisonous
carbon monoxide, a colorless and
odorless gas. Breathing exhaust can
cause loss of consciousness and may lead to
death.
If you run the generator in an area that is conned, •
or even partially enclosed, the air you breathe could
contain a dangerous amount of exhaust gas.
To keep exhaust gas under control, provide an •
adequate ventilation.
The generator produces enough electric power •
to cause a serious shock or electrocution if misused.
Using a generator or electric appliance in wet •
conditions, such as rain or snow, or near a pool or
sprinkler system, or when your hands are wet, could
result in electrocution. Keep the generator dry.
If the generator is stored outdoors, unprotected •
from the weather, check all electrical components
on the control panel, before each use. Moisture or ice
can cause a malfunction or short circuit in electrical
components which could result in electrocution.
Do not connect to a building’s electrical system •
unless an isolation switch has been installed by a
qualied electrician.
Keep the generator at least 1 meter (3 feet) •
away from buildings and other equipment during
operation.
Do not enclose the generator in any structure.•
Keep ammable materials away from the •
generator.
The muer becomes very hot during operation •
and remains hot for a while after stopping the
engine. Be careful not to touch the muer while it is
hot. Let the engine cool before storing the generator
indoors.
Do not connect the generator to a commercial •
power outlet.
Do not connect with another generator.•
Unpacking
When unpacking, check to make sure that all
components are included. Refer to the drawings
on this manual. If any parts are missing or broken,
please call an IVT assistance center.
Controls
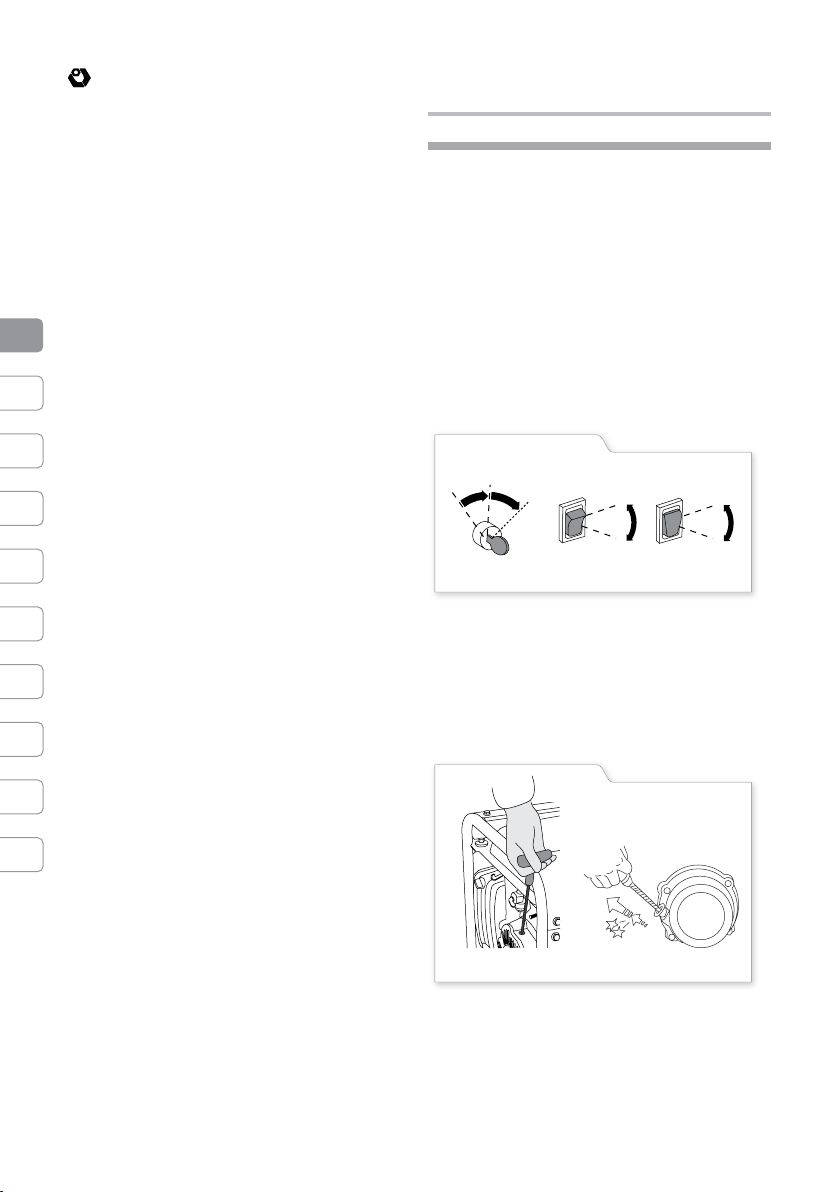
Engine Switch (9):
To start and stop the engine
Switch position:
OFF or STOP: To stop the engine. Key can be •
removed/inserted.
ON: To run the engine after starting•
START (GN-6500): To start the engine by turning •
the starter motor. Return the key (9) to the “ON”
position once the engine has started. Do not use
the starter for more than 5 seconds at a time. If the
engine fails to start, release the switch and wait 10
seconds before operating the starter again.
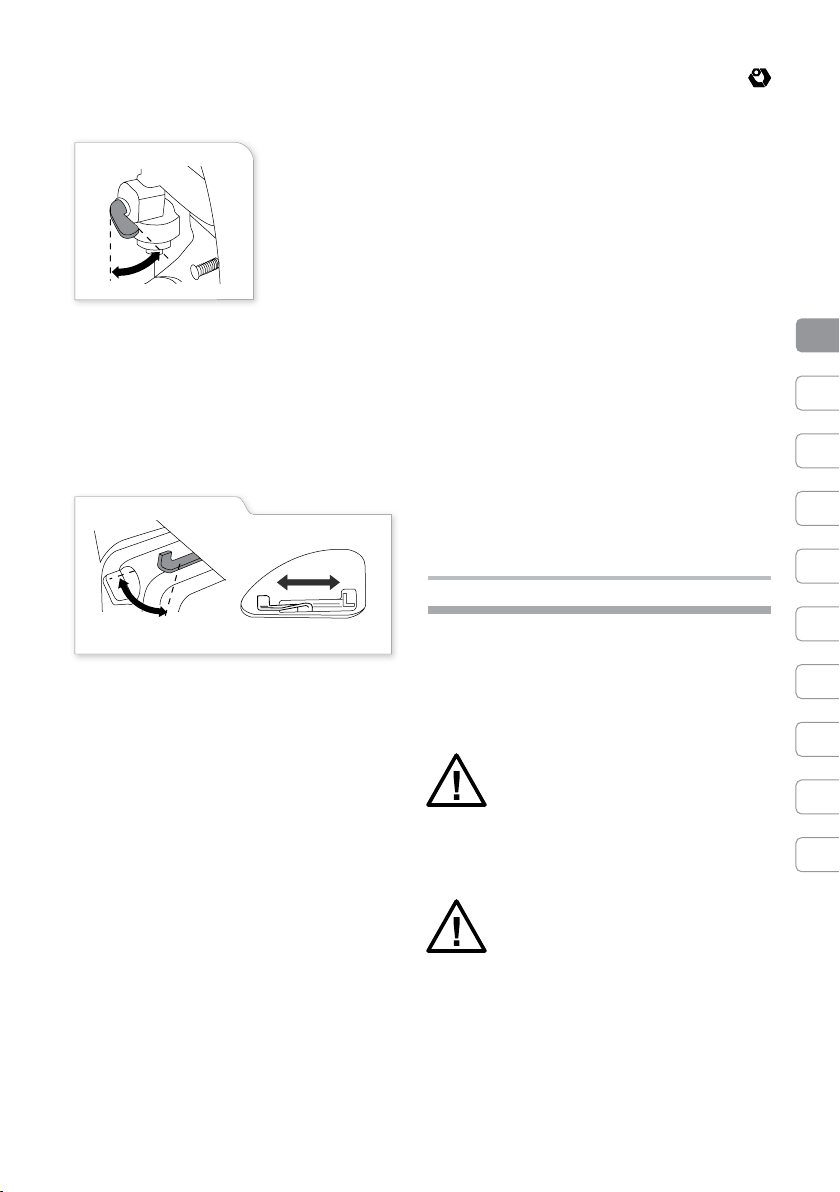
Recoil Starter (10)
(GN-850; GN-1500; GN-3000)
To start the engine pull the starter grip lightly until
resistance is felt then pull briskly.
NOTICE: Do not allow the starter to snap back
against the engine. Return it gently to prevent
damage to the starter.
Page 13
Manual instruction
fig.
3
ON
OFF
fig.
4
CLOSED
OPEN
CLOSED
OPEN
GN-850
GN-1500 GN-3000
Fuel Valve (11)
The fuel valve is
located between the
fuel tank and
carburetor.
When the valve
lever is in the ON
position, fuel is
allowed to ow
from the fuel tank
to the carburetor.
Be sure to return the lever to OFF after stopping the
engine.
Choke Rod (13)
The choke is used to provide an enriched fuel
mixture when starting a cold engine. It can be
opened and closed by operating the choke rod
manually, moving the rod toward CLOSED to enrich
the mixture.
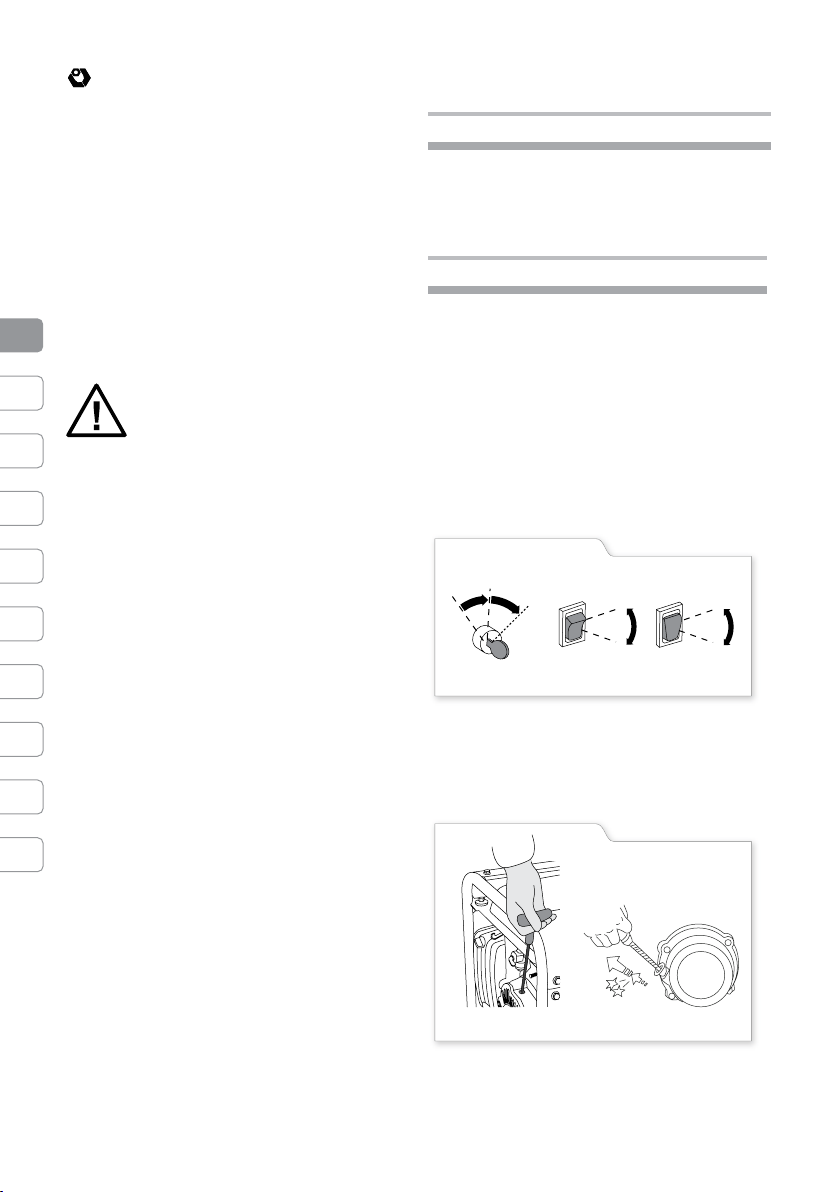
Circuit Breaker (6)
The circuit breaker will automatically switch OFF if
there is a short circuit or a signicant overload of the
generator at the receptacle. If the circuit breaker is
switched OFF automatically, check that appliance
is working properly and does not exceed the rated
load capacity of the circuit before switching the
circuit breaker ON again.
Ground Terminal (5)
The generator ground terminal is connected to
the frame of the generator, the metal non-current
carrying parts of the generator, and the ground
terminals of each receptacle.
To prevent electric shock due to defective
connected appliances, the generator must be
earthed with a xed system by means of the
provided terminal (5).
Oil Alert System
(GN-1500; GN-3000; GN-6500)
The Oil Alert system (21) is designed to prevent
engine damage caused by an insucient amount
of oil in the crankcase. Before the oil level in the
crankcase can fall below a safe limit. The Oil Alert
System will automatically shut down the engine (the
engine switch (9) will remain in the ON position).
Pilot Lamp (14)
The pilot lamp is illuminated when the generator is
operating normally.
DC Terminals (4)
The DC terminal may ONLY be used for charging 12
volt automotive type batteries.
For connect the battery to the generator is necessary
to use the relevant cable. The cable clamps must be
connected to the battery terminals with the proper
polarity (red clamp to battery positive terminal and
black clamp to battery negative terminal).
DC Circuit Protector (3)
(If equipped)
The DC circuit protector automatically shuts o the
DC battery charging circuit when the generator
is overloaded, when there is a problem with the
battery or the connections between the battery and
generator are improper.
Operating instructions
Connections to a Building’s Electrical System
Connections for standby power to a building’s
electrical system must be made by a qualied
electrician. The connection must isolate the
generator power from utility power, and must
comply with all applicable laws and electrical
codes.
Improper connections to a building’s
electrical system can allow electrical
current from the generator to backfeed
into the utility lines. Such backfeed may
electrocute utility company workers or others who
contact the lines during a power outage. Consult
the utility company or a qualied electrician.
Improper connections to a building’s
electrical system can allow electrical
current from the utility company to
backfeed into the generator. When
utility power is restored, the generator may
explode, burn, or cause res in the building’s
electrical system.
In some areas, generators are required by law to
be registered with local utility companies. Check
local regulations for proper registration and use
procedures.
13
EN
Page 14

14
Manual instruction
EN
Generator ground circuits
IVT gasoline generators have a system ground
that connects generator frame components to the
ground terminals (5) in the AC output receptacles
(1). The system ground is not connected to the AC
neutral wire.
Local regulations, codes or laws may require that
the ground system be connected to the AC neutral
wire. If the generator is tested by a receptacle tester,
it will not show the same ground circuit condition as
a home receptacle.
If local regulations, codes, or laws require the system
ground to be connected to the AC neutral wire,
consult a qualied electrician or electrical inspector.
Provide him with the electrical wiring diagram in
this manual.
The ground terminal (5) can be used to earth the
generator or bond the frame of the generator to
the frame of a vehicle, but only if it is required by
local law or electrical code. Before using the ground
terminal consult a qualied electrical inspector for
regulations in your area.
AC Applications
Before connecting an appliance or power cord to
the generator:
Make sure that it is in good working order. Faulty •
appliances or power cords can create a potential for
electrical shock.
If an appliance begins to operate abnormally, •
becomes sluggish or stops suddenly, turn it
o immediately. Disconnect the appliance and
determine whether the problem is and if the
appliance, or if the rated load capacity of the
generator has been exceeded.
Make sure that the electrical rating of the tool •
or appliance does not exceed that of the generator,
Never exceed the maximum power rating of the
generator. Power levels between rated and maximum
may be used for no more than 5 minutes.
NOTICE: Substantial overloading will open the
circuit breaker. Exceeding the time limit for
maximum power operation or slightly overloading
the generator may not switch the circuit breaker
OFF, but will shorten the service life of the
generator.
Limit operation requiring maximum power to 5 •
minutes.
For continuous operation, do not exceed the •
rated power.
GN-850 GN-1500 GN-3000 GN-6500
AC output
voltage (V/
Hz)
Rated
Power (W)
Maximum
power (W)
230/50 230/50 230/50 230/50
750 1000 2500 5000
850 1100 2800 5500
In either case, the total power requirements (W) •
of all appliances connected must be considered. Pay
attention to the power factor of your load. Always
calculate the absorption of the load to be applied
to the generator beforehand. For the generator’s
power, refer to the technical data label.
For the power of the connected appliances, •
refer to the power consumption indicated on their
technical data labels. Appliance and power tool
manufacturers usually list rating information near
the model number or serial number.
AC Operation
Start the engine.1.
Switch ON the AC circuit breaker (6).2.
Plug in the appliance.3.
Most motorized appliances require more than
their rated wattage for startup.
Do not exceed the current limit specied for any one
receptacle. If an overloaded circuit causes the AC
circuit breaker to switch OFF, reduce the electrical
load on the circuit, wait a few minutes and then
reset the circuit breaker (6).
DC Operation
The DC terminals may ONLY be used for charging 12
volt automotive-type batteries.
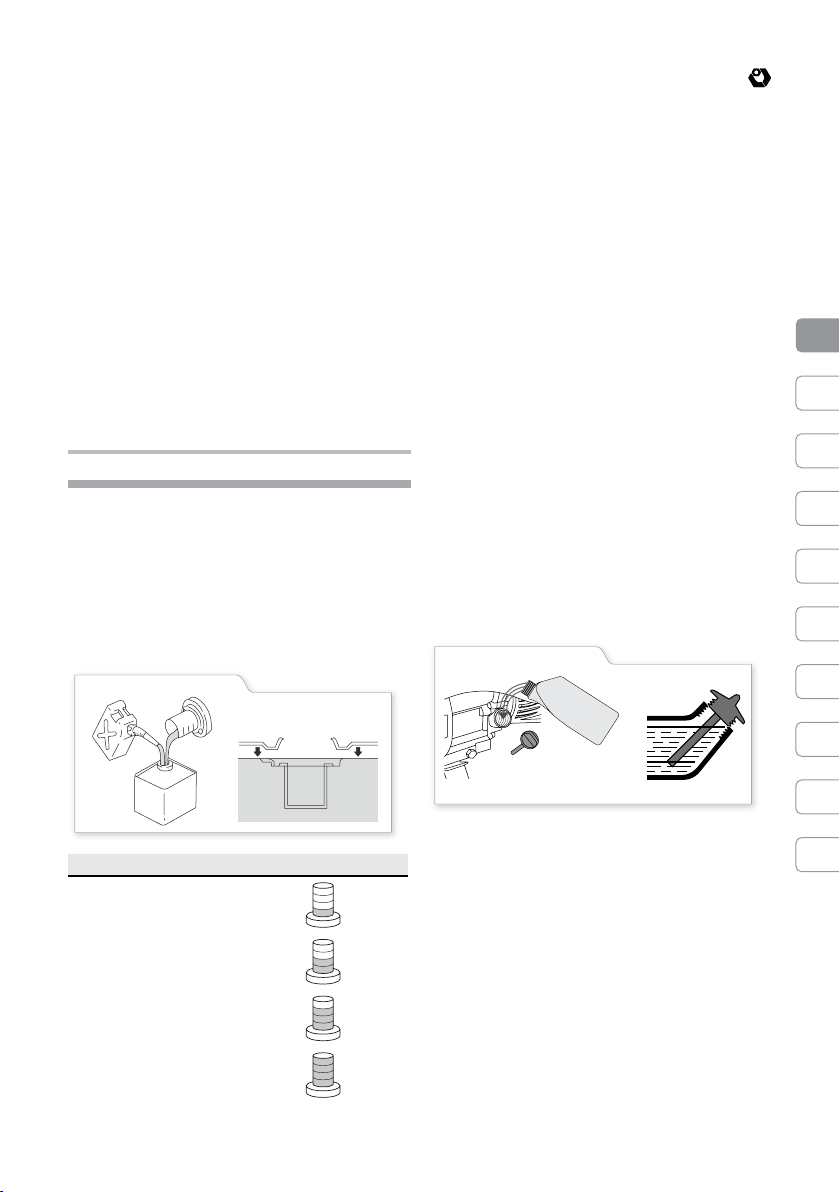
Connecting the battery cables:
Before connecting charging cable to a battery 1.
that is installed in a vehicle, disconnect the vehicle’s
grounded battery cable.
WARNING: The battery gives o
explosive gases; keep sparks, ames
and cigarettes away. Provide adequate
ventilation when charging or using batteries.
Connect the charging cable plug to the DC 2.
socket (4) on the generator.
Connect the red clamp to the positive (+) battery 3.
terminal.
Connect the black clamp to the negative (-) 4.
battery terminal. Prevent the cable clamps from
Page 15
Manual instruction
fig.
5
6 mm
fig.
6
MAX
MIN
touching each other. This will lead to the short
circuit and may damage the battery.
Start the generator.5.
NOTICE: Do not start the vehicle while the battery
charging cables are connected and the generator
is running. The vehicle or the generator may be
damaged.
Disconnecting the battery cables:
Stop the engine.1.
Disconnect the black clamp from the negative (-) 2.
battery terminal.
Disconnect the the red clamp from the positive 3.
(+) battery terminal.
Disconnect the charging cable plug from the DC 4.
socket (4) on the generator.
Reconnect the vehicle’s grounded battery cable.5.
Pre-operation check
Oil-mixed gasoline
(GN-850)
Fuel tank capacity is 4.2 L. Allow approximately 1.
¼ inches (6 mm) of space for fuel expansion.
Use oil mixed gasoline. If not, the engine will be 2.
overheated.
Gasoline and oil mixed ratio is 50:1 or 40:1 (in 3.
summer). Use special purpose oil for 2 strokes.
Shake fuel tank before starting the engine.4.
Engine Oil
(GN-1500; GN-3000; GN-6500)
NOTICE: Engine oil is a major factor aecting
engine performance and service life. Nondetergent and 2-stroke engine oils will damage
the engine and are not recommended.
Check the oil level before each use with the 1.
generator on a level surface with the engine
stopped.
Use 4-stroke oil, or an equivalent high detergent, 2.
premium quality motor oil certied to meet or exceed
U.S. automobile manufacturer’s requirements for
Service Classication SG, SF/CC, CD.
Motor oils classied SG, SF/CC, CD will show this
designation on the container.
SG-SF/CC-CD-SINGLE VISCOSITY•
SG-SF/CC-CD-MULTI VISCOSITY•
SAE 1OW-30 is recommended for general, all-•
temperature use. Other viscosities shown in the
chart may be used when the average temperature
in your area is within the indicated range.
Remove the oil ller cap (7) and wipe the dipstick 3.
clean.
Check the oil level by inserting the dipstick into 4.
the ller neck without screwing it in.
If the level is low, ll to the top of the oil ller 5.
neck with the recommended oil.
EN
GAS 50 : 1 OIL
1 (L) : 0.02 (L)
2 (L) : 0.04 (L)
3 (L) : 0.06 (L)
4 (L) : 0.08 (L)
Fuel Recommendation
(GN-1500; GN-3000; GN-6500)
Check the fuel level gauge (15).1.
Rell the tank if the fuel level is low. Do not ll 2.
above the shoulder of the fuel strainer.
Fuel tank capacity:
6.7L GN-1500•
15L GN-3000 •
25L GN-6500•
Use gasoline with a pump octane rating of 86 or •
higher. We recommend unleaded gasoline because
it produces fewer deposits and extends exhaust
system life. Never use stale or contaminated gasoline
or oil/gasoline mixture.
15
Page 16
16
Manual instruction
EN
fig.
7
ON
OFF
START
OFF
ON
ON
STOP
GN-850
GN-1500 GN-3000
GN-6500
fig.
8
GN-850
GN-1500 GN-3000
Avoid putting dirt or water in the fuel tank.•
Occasionally you may hear light “spark knock” or •
“pinging” (metallic rapping noise) while operating
under heavy loads. This is no cause for concern.
If “spark knock” or “pinging” occurs at a steady •
engine speed, under normal load, change the brand
of the gasoline. If “spark knock” or “pinging” persists,
go to an authorized IVT generator dealer.
NOTICE: Running the engine with persistent spark
knock or pinging id misuse, and the Distributor’s
Limited Warranty does not cover parts damaged
by misuse.
Oxygenated Fuels•
Some gasoline are being blended with alcohol or an
ether compound to increase octane. These gasoline
are collectively referred to as oxygenated fuels.
If you use an oxygenated fuel, be sure its pump
octane rating is 86 or higher.
Ethanol (ethyl or grain alcohol)•
Gasoline containing more than 10% ethanol by
volume may cause starting and/or performance
problems. Gasoline containing ethanol may be
marketed under the name “Gasohol”
Methanol (methyl or wood alcohol)•
Gasoline containing methanol must contain
cosolvents and corrosion inhibitors to protect the
fuel system. Gasoline containing more than 5%
methanol by volume may cause starting and/or
performance problems and may damage metal,
rubber and plastic of your fuel system.
MTBE (methyl tertiary butyl ether)•
You may use gasoline containing up to 15% MTBE
by volume. Before using an oxygenated fuel, try to
conrm the fuel’s contents. Some states require
this information to be posted on the pump. If
you notice any undesirable operating symptoms,
switch to a conventional unleaded gasoline.
Fuel system damage or performance problems
resulting from the use of an oxygenated fuel are
not the responsibility of IVT and are not covered
under warranty.
Switching on and o
Starting the engine
Make sure all electrical loads from panel 1.
receptacles are disconnected. The generator may be
hard to start if a load is connected.
Turn the engine switch (9) to the ON position.2.
The choke rod (13) will be closed if the engine is 3.
cold. If you operate the choke manually, then move
the choke rod to the CLOSED position.
Start the engine.4.
(GN-6500)
Turn the engine switch (9) to START position (for •
max. 5 seconds)
Return the key to the ON position once the •
engine has started.
(GN-850; GN-1500; GN-3000)
Turn the engine switch (9) to the ON position.•
Pull the recoil starter grip (10) lightly until •
resistance is felt, then pull briskly.
NOTICE: Do not allow the starter grip to snap back
against the engine. Return it gently to prevent
damage to the starter or housing.
NOTICE: Oxygenated fuels can damage paint and
plastic. Be careful not to spill fuel when lling your
fuel tank. Damage caused by spilled fuel is not
covered under warranty.
If you have manually closed the chock, (13) move 5.
it to the OPEN position as the engine warms up.
Stopping the engine
In an emergency:
To stop the engine in an emergency, turn the 1.
Page 17
Manual instruction
engine switch (9) to the OFF position.
In normal use:
Turn the AC circuit breaker (6) to the OFF 1.
position.
Disconnect all electrical loads from panel 2.
receptacles. Disconnect DC battery charging
cables.
Turn the engine switch (9) to the OFF (or STOP) 3.
position.
Turn the fuel valve (11) to the OFF position. 4.
Always keep the machine and the ventilation •
slots cleaned.
If the machine should fail despite the rigorous •
manufacturing and testing procedures, the repair
should be carried out by an authorized IVT customer
service.
Regular cleaning and maintenance of the •
appliance will ensure eciency and prolong the life
of your appliance.
Keep all nuts, bolts, and screws tight, to be sure •
the appliance is in safe working condition.
Manteinance and storage
Before carrying out any maintenance •
operations, turn o the device and wait until it
Replace worn or damaged parts for safety.•
Store the appliance in a dry room out of reach of •
kids and away from any ammable material.
Never wet the machine or spray water on it!•
stops completely.
GN-850
ITEM
Air cleaner clean (replace if necessary) x (1*)
Spark plug clean (replace if necessary) x
Fuel lter clean (replace if necessary) x
Decarbonization
Engine oil
Air cleaner
Sediment cup clean x
Spark plug check/ clean x
Valve clearance check/ adjust x (2*)
Fuel tank and
strainer
Fuel line
remove carbon deposits,
check and adjust
(performed at every indicated month or operating hour interval,
ITEM
each use
check level x
change x x
check x
clean x (1*)
clean x (2*)
check (replace
if necessary)
(performed at every indicated month or operating hour interval,
GN-1500; GN-3000; GN-6500
rst month
20 Hrs. (3*)
REGULAR SERVICE PERIOD
whichever comes rst)
every month
50 Hrs.
REGULAR SERVICE PERIOD
whichever comes rst)
every 3
months
50 Hrs (3*)
every 6
months
100 Hrs (3*)
every 3 months
150 Hrs.
x
every year
300 Hrs (3*)
every
2 years (3*)
x (2*)
(1*) Service more frequently when used in dusty areas.
(2*) These items should be serviced by an authorized IVT generator dealer, unless the owner has the proper
tools and is mechanically procient.
(3*) For professional commercial use, log hours of operation to determine proper maintenance intervals.
EN
17
Page 18
18
Manual instruction
EN
fig.
9
fig.1
0
GN-850
GN-1500
GN-3000
GN-6500
fig.1
1
OFF
Periodic maintenance and adjustment is
necessary to keep the generator in good
operating condition. Perform the service
and inspection at the intervals shown in the
maintenance schedule.
WARNING: Exhaust gas contains
poisonous carbon monoxide. Shut o
maintenance. If the engine must be run, make
sure the area is well ventilated.
NOTICE: Use only genuine IVT parts or their
equivalent for maintenance or repair. Replacement
parts which are not of equivalent quality may
damage the generator.
sealing washer, oil ller cap (7) and drain the oil.
Tighter the plug securely.
Oil capacity:
the engine before performing any
Engine oil change
(GN-1500; GN-3000;
GN-6500)
oil while the engine is
warm to assure rapid
and complete draining.
the drain plug (8) and
Reinstall the drain plug (8) and sealing washer. 3.
Rell with the recommended oil and check the level. 4.
0.6L GN-1500•
1.1L GN-3000•
1.1L GN-6500•
WARNING: Using gasoline or ammable
solvent to clean the lter element can
cause a re or explosion. Use only soapy
water or nonammable solvent.
NOTICE: Never run the generator without the air
cleaner (12). Rapid engine wear will result.
Release the air cleaner cover clips/screws (17), 1.
remove the air cleaner cover and remove the
element.
Wash the element in a solution of household 2.
detergent and warm water, then rinse thoroughly,
or wash in nonammable or high ash point solvent.
Allow the element to dry thoroughly.
Soak the element in clean engine oil and squeeze 3.
out the excess oil. The engine will smoke during
initial start up it too much oil is left in the element.
Reinstall the air cleaner element and the cover.4.
Drain the 1.
Remove 2.
Fuel Sediment Cup Cleaning
The fuel sediment cup (18) prevents dirt or water
which may be in the fuel tank from entering the
carburetor. If the engine has not been run for a long
time, the sediment cup should be cleaned.
CAUTION: Used motor oil may cause
skin cancer if repeatedly left in contact
Although this is unlikely unless you handle used
oil on a daily basis, it is still advisable to thoroughly
wash your hands with soap and water as soon as
possible after handing used oil.
Please dispose of used motor oil in a manner that
is compatible with the environment. We suggest
you take it in a sealed container to your local service
station or recycling center for reclamation. Do not
throw it in the trash or pour it on the ground.
Air cleaner service
A dirty air cleaner (12) will restrict air ow to the
carburetor. To prevent carburetor malfunction,
service the air cleaner regularly. Service more
frequently when operating the generator in
extremely dusty areas.
with the skin for prolonged periods.
Turn the fuel valve (11) to the OFF position. 1.
Remove the sediment cup (18), O-ring and lter.
Clean the sediment cup, O-ring and lter in 2.
nonammable or high ash point solvent.
Reinstall the lter, O-ring, and sediment cup(18).3.
Turn the fuel valve (11) ON and check for leaks.4.
Spark Plug Service
Recommended spark plugs:
LDF6TC. or TME170: BPR6ES,
TME260,
Page 19

Manual instruction
fig.1
2
0.7-0.8mm
TME360,
TME410:BPR5ES,
TME280:BP6ES
To ensure proper engine operation, the spark plug
must be properly gapped and free of deposits.
If the engine has been running, the muer will be
very hot. Be careful not to touch the muer.
Remove the spark plug cap (19).1.
Clean any dirt from around the spark plug base.2.
Use the wrench supplied (24) in the tool kit to 3.
remove the spark plug.
Visually inspect the spark plug. Discard it if the 4.
insulator is cracked or chipped. Clean the spark plug
with a wire brush if it is to be reused.
Measure the plug gap with a feeler gauge. 5.
Correct as necessary by carefully bending the side
electrode. The gap should be: 0.70-0.80 mm (0.028-
0.031 inch).
Check that the spark plug washer is in good 6.
condition, and thread the spark plug in by hand
to prevent cross-threading.
After the spark plug is seated, tighten with a 7.
spark plug wrench (24) to compress the washer. If
installing a new spark plug, tighten 1/2 turn after
the spark plug seats to compress the washer. If
reinstalling a used spark plug, tighten 1/8-1/4 turn
after the spark plug seats to compress the washer.
NOTICE: The spark plug must be securely tightened.
An improperly tightened spark plug can become
very hot and could damage the engine.
Never use spark plugs which have an improper
heat range. Use only the recommended spark
plugs or equivalent.
Transporting / Storage
When transporting the generator, turn the engine
switch (9) and the fuel valve (11) OFF. Keep the
generator level balanced to prevent fuel spillage.
Fuel vapor or spilled fuel may ignite.
WARNING Contact with a hot engine or
exhaust system can cause serious burns
or res. Let the engine cool before
transporting or storing the generator.
Take care not to drop or strike the generator when
transporting. Do not place heavy objects on the
generator.
Before storage the unit for an extended period:
Be sure the storage area is free of excessive •
EN
STORAGE TIME RECOMMENDED SERVICE PROCEDURE TO PREVENT HARD STARTING
Less than one month No preparation required
1 to 2 monts Fill with fresh fuel and add gasoline conditioner*
2 months to 1 year
1 year or more
Fill with fresh fuel and add gasoline conditioner*
drain the carburetor oat bowl
drain the fuel sediment cup
Fill with fresh fuel and add gasoline conditioner*
drain the carburetor oat bowl
drain the fuel sediment cup
remove the spark plug. Put a tablespoon of engine oil into the cylinder. Turn the engine slowly
with the pull rope to distribute the oil. Reinstall the spark plug.
(GN-1500; GN-3000; GN-6500) Change the engine oil.
After removal from storage, drain the stored fuel into a suitable container, and ll with fresh
fuel before starting.
*Use gasoline conditioners that are formulated to extend storage life. Contact your authorized IVT generator
dealer for conditioner recommendations.
19
Page 20
20
Manual instruction
EN
fig.1
4
e
d
21
28
c
b26 a27
fig.1
3
humidity and dust.
Service according •
to the table.
the carburetor by
loosening the drain
screw. Drain the
fuel into a suitable
container.
WARNING: Fuel is extremely flammable
ventilated area with the engine stopped. Do not
smoke or allow flames or sparks in the area
during this procedure.
tablespoon of clean engine oil into the cylinder.
the oil, then reinstall the spark plug.
stroke and both the intake and exhaust valves are
closed. Storing the engine in this position will help
to protect it from internal corrosion.
and is explosive under certain
conditions. Perform this task in a well
Change the engine oil (GN-1500; GN-3000; GN-6500) 2.
Remove the spark plug, and pour about a 3.
Crank the engine several revolutions to distribute 4.
Slowly pull the starter grip until resistance is felt. 5.
The piston is coming up on its compression 6.
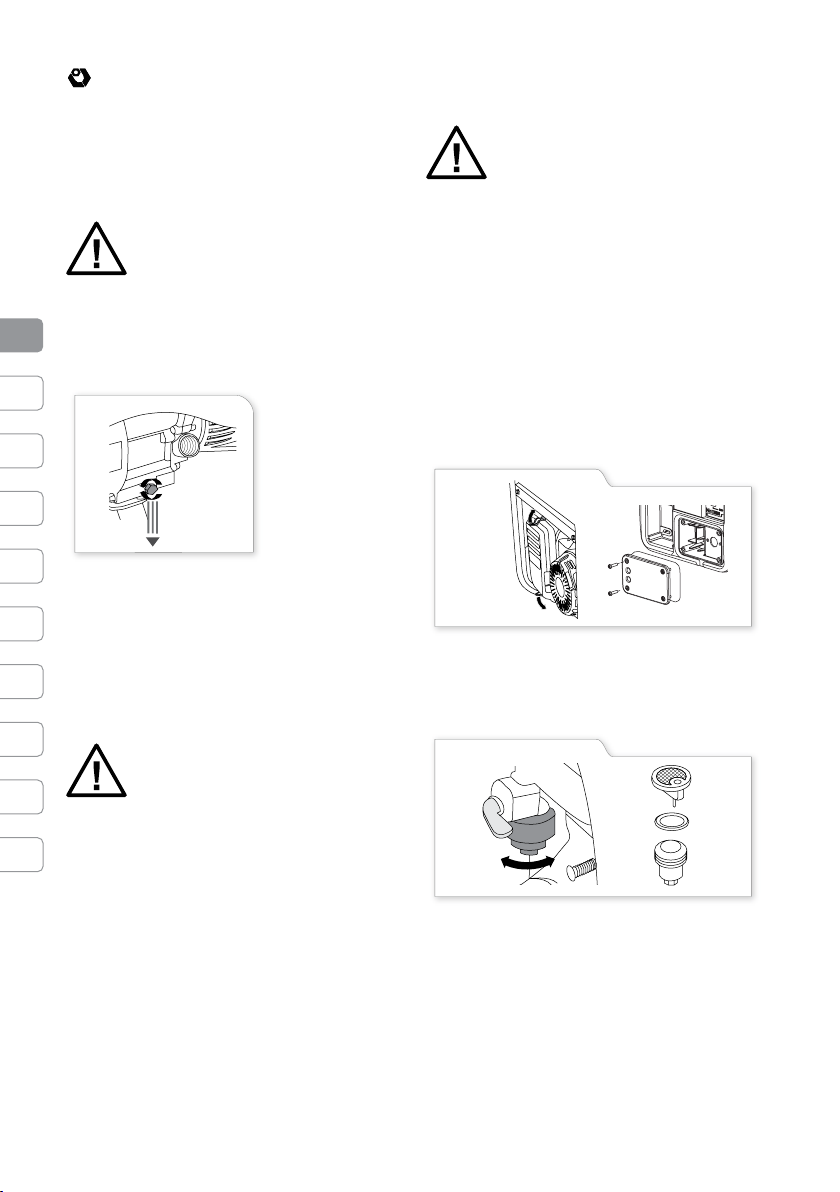
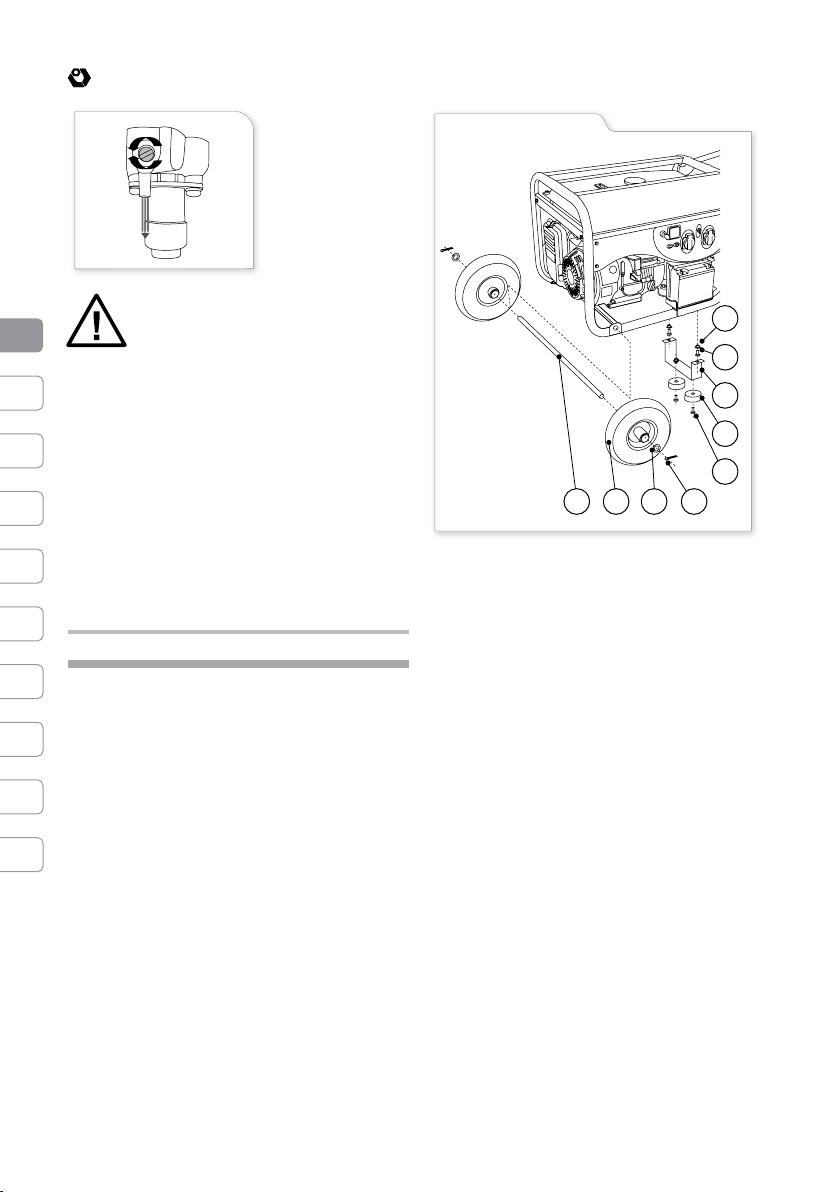
Installation of optional parts
Wheel kit installation
D r a i n 1.
Battery Tray Kit installation
30. Battery guard
31. Battery tray
32. Starter cable
33. Starter solenoid
34. Ground cable
35. Battery bracket
36. Battery guard plate
26. Axle
27. Wheel
28. Vibration mount
29. Support leg
a. Flat washer
b. Retain pin
c. 30mm cap screws
d. 20mm cap screws
e. Nut
Slide axle (26) through both axle mounting 1.
brackets on cradle frame;
Slide a wheel (27) over the axle;2.
Retain wheel on axle with the at washer and 3.
retain pin;
Repeat step 2. and 3. to secure second wheel;4.
Secure each vibration mount (28) to the support 5.
leg (29) with two 30mm cap screws and nuts;
Secure the support leg (29) with two 20mm cap 6.
screws and nuts;
Install the battery guard (30) on the frame. Set 1.
the battery tray (31) on the battery guard (30) and
tighten the bolts.
Route the starter cable (32) under the tank and 2.
connect it to the starter solenoid (33).
Connect the ground cable (34) to the generator 3.
rear housing.
Set the battery on the battery tray (31) and 4.
secure with the battery bracket (35). Connect
the starter cable (32) to the battery positive(+)
terminal rst, then to the negative(-) terminal. When
disconnecting, disconnect at the battery negative(-)
terminal rst.
Install the battery guard plate (36) on the battery 5.
guard (30).
Page 21
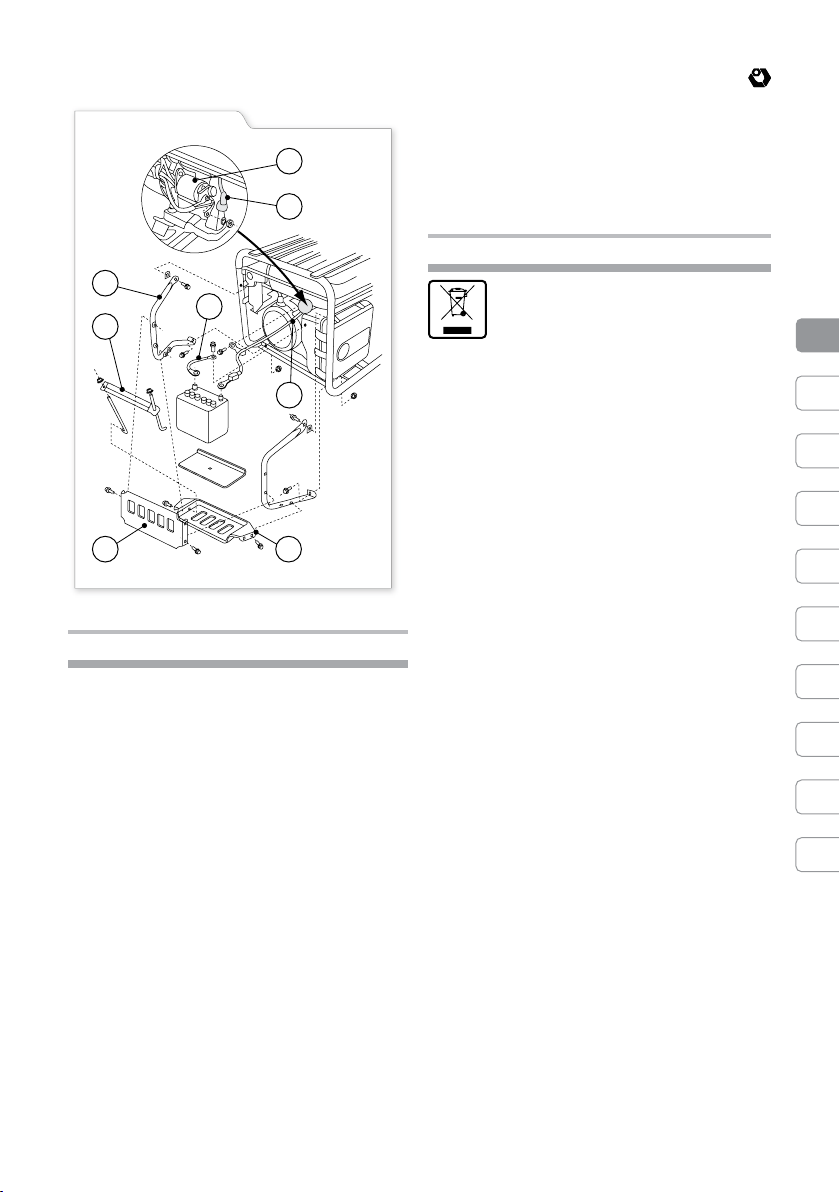
fig.1
5
d
d d
d
d
d
d
d
Troubleshooting
Manual instruction
Fuel should ow from the drain when the engine 2.
switch is turned on.
If the engine still does not start take the generator
to an authorized IVT generator dealer.
Environmental protection
Recycle raw materials instead of
disposing as waste.
Machine, accessories and packaging should be
sorted for environment-friendly recycling.
The plastic components are labelled for categorized
recycling.
These instructions are printed on recycled paper
manufactured without chlorine.
EN
When the engine will not start
Check if there is fuel in the tank • ► If not, rell
the fuel tank.
(GN-1500; GN-3000; GN-6500) Check if there •
is enough oil in the engine ► If not, add the
recommended oil.
Check if there is a spark from the spark plug • ► If
not, replace the spark plug. If still not spark take the
generator to an authorized IVT generator dealer.
To check:
Remove the spark plug cap and clean any dirt o 1.
around the spark plug.
in the plug cap.
head.
gap. Be sure there is no spilled fuel around the spark
plug. Spilled fuel may ignite.
not, clean the fuel sediment cup.
To check :
screw.
Remove the spark plug and install the spark plug 2.
Set the plug side electrode on the cylinder 3.
Crank the engine. sparks should jump across the 4.
Check if the fuel is reaching the carburetor. • ► If
Turn o the engine switch and loosen the drain 1.
21
Page 22
22
Betriebsanleitung
D
ENG.SW.
ON
OFF
POWER ON
VOLTMETER
AC SOCKET
DC
+
-
AC
DC LIFE
OUTLET
PROTECTION
10
19
23
24
22
26
19
10 78 9 314 54
17
12
1518 16 2 21 6 1
13 11
23
24
22
6 16 9 15
11
2 14
3 17 12 13
1 4
GN-850
GN-1500
Page 23

ENG.SW.
ON
OFF
POWER ON
VOLTMETER
AC SOCKET
DC LIFE
AC SOCKET
DC
PROTECTION
AC
PROTECTION
ENG.SW.
POWER ON
VOLTMETER
AC SOCKET
DC LIFE
DC
PROTECTION
AC SOCKET
AC
PROTECTION
ON
OFF
19
7 2114 1 5
4
17
11
151216 9 2 6 3 25
23
24
22
19
10 78 14 52141
12 11
1615 9 2 6 3
23
24
22
GN-3000
Betriebsanleitung
D
GN-6500
23
Page 24
24
Betriebsanleitung
D
Einrichtungselemente des Werkzeuges
1. Steckdose
2. Voltmeter
3. Sicherung für Gleichstrom
4. Gleichstromausgang
5. Erdungsklemme
6. Gleichstromschalter
7. Öleinfüllstutzen
8. Ölablassschraube
9. Rangierdampokomotive
10. Gri mit Seilzugstarter
11. Brennstoventil
12. Luftlter
13. Kleiner Hebel der Klappe
14. Anzeigelampe
15. Kraftsto
16. Tankdeckel
17.Klemmschellen/Bolzen fur
Luftlterdeckel
18. Faulkammer
19. Zündkerze
20. Schalldämpfer
21. Indikator für niedrigen
Ölstand
22. Kabel für Batterie
23. Kork
24. Candle-Taste
25.Hebel *
26.Pojemnosc dla mieszania
masla/paliwa*
* Ergänzenden Ausstattungen
Nicht alle darstellende oder
beschreibende Vorrichtungen
werden zu Standardlieferung
eingeschlossen.
Symbole
Technische Informationen
modell GN-850 GN-1500 GN-3000 GN-6500
Wechselstromausgangsnennleistung
230V/50Hz (Wt)
Maximale Wechselstromausgangsnennleistung 230V/50Hz (Wt)
Wechselstromstärke am Ausgang bei Nenn- /
maximaler Leistung 230V / 50Hz (V / Hz)
Wechselstromausgangsspannung (V) 230/50 230/50 230/50 230/50
Fase 1 1 1 1
Gleichstromspannung (V) 12 12 12 12
Gleichstrom (А) 8.3 8.3 8.3 8.3
Leerdrehzahl (U/min.) 3000 3000 3000 3000
Hubraum 63 87 208 389
Motordrehzahl 2 4 4 4
Motorkühlungsart Lüftkühlung
abgebrannter Brennsto Benzin mit der
Altöl
Brennstobehältervolumen (l) 57 6.70 15.00 25.00
Ölbehältervolumen (l) 7 0.60 1.10 1.10
Gewicht (kg) 19.00 28.00 42.00 97.00
Niveau des Schalldruckes [Dezibel] 46 68 68 73
Niveau der Schalleistung [Dezibel] 57 79 79 93
750
850
3.0/3.5 4.3/4.7 10.8/12.1 21.7/24
Ergänzung
des Öls
46 SAE 10W-30
1000 2500 5000
1200 2800 5500
Lüftkühlung Lüftkühlung Lüftkühlung
bleifreies
Benzin
SAE 10W-40
bleifreies
Benzin
SAE 10W-30
SAE 10W-40
bleifreies
Benzin
SAE 10W-30
SAE 10W-40
Page 25

Betriebsanleitung
Sicherheitshinweise
Allgemeine Sicherheitsregeln
Dieser Benzingenerator gewährleistet die Sicherheit
bei der Arbeit, wenn er korrekt und unter der
Befolgung dieser Sicherheitshinweise ausbenutzt
wird.
Folgende Weisungen der Unfallverhütungstechnik
werden Benutzer richtig das Gerät anwenden helfen
und ihre eigene Sicherheit gewährleisten. Deshalb
ist es notwendig, sie aufmerksam zu lesen.
Im Fall der Übergabe des Geräts für Drittperson soll
man die gegenwärtigen Anweisungen über die
Unfallverhütungstechnik übergeben.
Erhalten Sie eine gegebene Anweisung und andere
Literatur, die im Satz der Lieferung eingeht.
Folgen Sie Unfallverhütungstechnik und
Mahnungen auf dem Gerät.
Vordem Anfang von Arbeiten machen Sie
sich Bekannt mit Kontrollelementen und
Behandlungsregelung des Geräts, Lernen Sie, wie
man Gerät in Notfall aufhört.
Einhalten dieser einfachen Anweisungen hilft Ihren
Geräht in gutem Zustand unterstützen.
Vor dem Werkzeuggebrauch ist es nötig das •
Gerät richtig zu montieren.
Gebrauchen Sie das Geräht nur nanch seiner •
Bestimmung..
Erlernen Sie die Warnungsaufschriften auf dem •
Gerät, folgen Sie den Hinweisen nach der Nutzung
der Schutzvorrichtungen. Die Unfälle können durch
die Aufmerksamkeit, vernünftiges Herangehen an
die Arbeit und entsprechende Vorbereitung der
Personen verhindert werden, die im Betriebe der
Beförderung, Bedienung und Aufbewahrung des
Gerätes eingesetzt sind.
Lassen Sie das Gerät ohne Aufsicht nicht.•
Lassen Sie nicht zu, damit die Kinder und •
der Tiere sich auf dem Arbeitsgrundstück nicht
benden. Erlauben Sie zu den Kindern nicht, mit
Gerät zu spielen.
Hindern Sie, in der Nähe von den Kindern •
und Tieren zu nden. Unbefugten sollen in einer
sicheren Entfernung von Arbeitseinfall sein. Hören
Sie Arbeit auf, wenn in der Nähe es anderen Leute,
in besonderen Kindern, oder Tieren gibt
Bei der Arbeit mit Gerät trägt der Benutzer •
Verantwortlichkeit für die dritten Parteien.
Personen, die nicht bekannt mit •
Anweisungshandbüchern gemacht, Kinder,
Minderjährige, die der erlaubtende Gerätsgebrauch
Alter nicht erreichtet haben, ebensogut wie
Personen, die sich in Zustand des Geistes oder
rauschgift-suchterzeugender Intoxikation, oder
durch die Tätigkeit von medizinischen Pillen
niederläßt, wird nicht erlaubt, mit Einfall zu arbeiten.
Alter des Arbeiters wird in lokalen normativen Taten
installiert.
ACHTUNG: Benutzen Sie das Gerät
nicht, wenn Sie Alkohol, Medikamente
und Drogen eingenommen haben, als
auch Sie krank, müde sind oder Fiber haben. Ihre
Reaktion kann sich verschlechtern.
Überzeugen Sie sich, dass alle •
Schutzvorrichtungen installiert und funkzionsfähig
sind.
Verwenden Sie das Geraet ohne •
Schutzvorrichtungen nicht oder falls diese
beschaedigt sind.
Vermeiden Sie den zufälligen Start des Gerätes: •
vor dem Anschließen zum Netz überzeugen
sich, dass sich der Schalter in der Lage «o»
(ausgeschaltet) bendet.
Vor dem Einschluss des Gerätes ziehen Sie die •
Einstelkeile und die Schlüssel heraus.
Verwenden Sie das Gerät mit dem gestörten •
Schalter nicht. Das Gerät mit dem fehlerhaften
Schalter stellt die Gefahr vor und fordert die
Reparatur.
Schauen Sie das Gerät für die losen Details •
(der Mütter, Bolzen, Schrauben usw.) oder die
Beschädigungen an.Um eine sichere Arbeit des
Gerätes zu gewährleisten, prüfen Sie ab und zu, ob
die Bolzen und Schrauben gut festgezogen sind. Falls
notwendig, reparieren Sie diese vor der Nutzung
des Gerätes oder ersetzen die durch die neuen. Im
Falle der Nutzung des beschädigten Gerätes kann
der Operator oder die nebensächlichen Personen
schwer verletzt werden.
Für die Arbeit benutzen Sie entsprechende •
Berufskleidung.Die geräumige Kleidung, Schmuck
können von den sich bewegenden Teilen
festgezogen sein. Gebrauchen Sie entspechende
Berufskleidung, lange Hose und anderen Schuhe.
Schützen Sie die Beine und Fußsohlen vor dem
auseinanderiegenden Müll. Arbeiten Sie barfuß
oder in geonete Sandalien nicht. Sammeln Sie das
lange Haar hinten.
Enthalten Sie die Grie in der Sauberkeit und •
Trockenheit.
D
25
Page 26
26
Betriebsanleitung
D
ACHTUNG! Verwenden Sie die
Arbeitsschutzmittel!
Schutzmittel gewährleisten Schutz Ihrer
Gesundheit und Gesundheit der Leute, die nahe,
ebensogut wie störungsfreier Arbeit des Gerätes
legen, werden garantiert.
Schutzhandschuhe, feste nicht rutschige Schuhe
und, bei der Notwendigkeit, einen Helm. Bei der
Arbeitserfüllung, die von der Bildung des Staubes
begleitet wird, verwenden Sie Mundschutz. Wenn
das Niveau des Lärms 85 дБ (A) übertritt, verwenden
Sie die Schutzkopfhörer unbedingt.
Bewahren Sie das Gleichgewicht ständig.
gerichtet ist oder es in nicht Betriebsbedingung ist.
von Arbeitsplattform alle fremde Gegenstände
weg, vermeiden Sie Treen unter. Halten Sie ihr
Arbeitsplatz sauber. Auf den übergeladenen
Abreitsplätzen wird das hohe Niveau Traumatismus
beobachtet.
und die Sicherheit des Gerätes ist bei der Arbeit mit
der aufgegebenen Frequenz höher.
gutem künstlichen Erläuterung. Benutzen Sie das
Gerät bei schlechten Sichtverhältnissen nicht.
Zusammenstoß des Gerätes mit irgendwelchen
Hindernissen nicht zu.
nebensächlichen Gegenstandes, schauen Sie es auf
das Vorhandensein der Beschädigungen an und,
falls notwendig, reparieren Sie es.
stoppen Sie sofort die Kraftmaschiene und stellen
Sie Gründe klar. Vibration ist normalerweise Zeichen
der Beschädigung.
geprüft werden. Gebrauchen Sie das Gerät nur in
gutem Zustand. An Aufdeckung irgendwelcher
Defekte, die Gefahr für Arbeiter präsentieren, sollen
sie sofort entfernt werden.
Gebrauchen Sie nur ursprüngliche Ersatzteile. Die
durch seitlichen Hersteller gemachten Details,
grenzen Sie undicht an, und vergrößern Sie die
Gefahr des Ergebnisses von Verletzungen.
Schutzvorrichtungen zu ändern oder zu entfernen.
Schutzvorrichtungen und individuelle
Verwenden Sie die Schutzbrillen, •
Bewahren Sie eine unveränderliche Stellung.•
Fangen Sie das Gerät nicht an, wenn es nach oben •
Vor dem Gebrauch des Geräts räumen Sie •
Überlasten Sie das Gerät nicht. Die Eektivität •
Gebrauchen Sie das Gerät nur am Tag oder bei •
Lassen Sie das Gerät nicht fallen, lassen Sie den •
Beim Treen unter das Gerät des •
An Enstehung der übermäßigen Vibration, •
Vordem Gebrauch des Geräts soll es vorsichtig •
Ersetzen Sie beschädigte oder getragene Details. •
Es wird verboten, elektrische und mechanische •
Bevor dem Verlassen des Arbeitsplatzes, •
Reparatur, Besichtigung oder Reinigung des Gerätes
schalten Sie es ab und bis zum vollen Stillstand
warten.
Seien Sie bei der Reinigung und der Reparatur •
des Gerätes aufmerksam. Stellen Sie das Gerät ein,
nachdem das abgeschaltete Gerät auf die ebene
reine Oberäche festgestellt wird.
Seien Sie aufmerksam. Beobachten Sie
ihre Arbeit, beim Ablenken kann man
die Führung verlieren. Sie kommen zur
Arbeit vernunftmäßig heran.
Sicherheitsregeln bei der Bedienung der
Benzinmotorgeräte
ACHTUNG! Benzin ist hoch brennbares
Material.Sein Sie vorsichtig mit
Treibssto.
Lagern Sie Treibssto in speziell beabsichtigten •
Kanister.
Füllen Sie Tank nur auf Landluft, rauchen Sie •
während Füllung nicht.
Zuerst füllen Sie Tank, und dann lassen Sie den •
Motor an
Bevor den Tank nachgefüllt wird, kühlen Sie den •
Dämpfer ab.
Nehmen Sie den Deckel des Tanks nicht ab und •
füllen Sie den Brennsto beim arbeitenden oder
nicht abkühlenden Motor nicht nach.
im Fall der Ausschüttung des Benzins, lassen Sie •
den Motor nicht an, entfernen Sie das Gerät beiseite
von verschüttetem Benzin und hindern Erscheinung
der Quelle der Zündung, solange sich Benzindämpfe
nicht zerstreuen werden.
Wischen Sie verschütteter Kraftsto, vordem den •
Motor anzulassen.
Bewahren Sie die Tanks an der sicheren Stelle.•
Starten Sie den Motor in der Räumlichkeit oder •
im geschlossenen Raum nicht, um die Ansammlung
des gefährlichen Kohlenoxyds zu verhindern.
ACHTUNG! Die Auspugase enthalten
giftiges Kohlenoxidgas, das keine Farbe,
keinen Geruch hat. Die Einatmung der
Auspugase kann zu der Betäubung und zum
tödlichen Ausgang führen.Damit das Niveau der
Auspugase in der Luft die zulässige Norm nicht
übertritt, stellen Sie entsprechende Lüftung
sicher.
Lagern Sie das Gerät mit Kraftsto im Tank •
im Raum nicht, wo Dämpfe entzündet werden
Page 27
Betriebsanleitung
können.
Um das Brandrisiko zu verringern, enthalten •
Sie in der Sauberkeit den Motor, Dämpfer,
Batarieabteilung und Tanklager, bewahren Sie das
Gerät vom Feuer und Funken.
Das Auspusystem erwärmt sich genügend, •
um mehrere Stoe aufzuammen Bewahren Sie
das Gerät von den feuergefährlichen Materialien
entfernt.
Während des Betriebes erwärmt sich der •
Dämpfer sehr stark und bleibt heiß einige Zeit lang
nach Abschaltung. Berühren Sie den Dämpfer nicht,
um die Verbrennung zu vermeiden. Bevor das Gerät
ins geschlossene Raum zu bringen, lassen Sie es
abstehen.
Elektirsche Sicherheitsregeln
ACHTUNG! Mit dem Ziel der
Verhinderung des Schlages durch
elektrischen Strom, Verursachen des
persönlichen Schadens oder bei dem Gebrauch
von Electrowerkzeuge ist es nötig nächste
Vorschriften über Sicherheitsregeln zu beachten.
Vor dem Werkzeuggebrauch lesen Sie und
beachten Sie genau gegebene Anweisungen.
VORSICHT! Das Gerät ist notwendig zuerst
auszuschalten, und dann von Fassung oder
Verlängerungskabel zu trennen.
ACHTUNG! STROMSCHLAGGEFAHR!
Überwachen Sie die Produktionsumgebung.
Verwenden Sie die Elektroinstrumente während des
Regens nicht. Verwenden Sie die Elektroinstrumente
in den feuchten und nassen Räumen nicht. Behalten
Sie den Arbeitsplatz trocken, sichern Sie gute
Beleuchtung ab. Bewahren Sie das Gerät von der
Feuchtigkeit. Lassen Sie das Gerät nachts in der
oenen Luft nicht. Beim Treen des Wassers ins
Elektroinstrument wird das Risiko des Schlages vom
Strom erhöht.
Sondere Sicherheitsregeln
Erkundigen Sie sich, wie schnell der Generator •
im Notfall ausgeschaltet wird.
Erlernen Sie alle Generatorsteuerungen, •
Ausgangssteckdosen und Verbindungsteile.
Weisen Sie den Mitarbeiter an, der einen •
Generator bedient.
VORSICHT! Die Auspugase enthalten
giftiges Kohlenoxidgas, das keine Farbe,
keinen Geruch hat. Die Einatmung der
Auspugase kann zu der Betäubung und zum
tödlichen Ausgang führen.
Wenn Sie in einem geschlossenen oder teilweise •
geschlossenen Raum arbeiten, kann die eingeatmete
Luft gefährliche Mengen an Abgas enthalten.
. Für Vorbeugung der Ansammlung der •
Auspugase gewährleisten Sie die entsprechende
Ventilation.
Der Generator erzeugt den Kraftstrom, der für •
den Stromschlag genügend ist, falls der Generator
nicht korrekt ausgenutzt wird.
Das Benutzen des Generators oder des •
Elektrogerätes im feuchten Medium, zum Beispiel,
beim Regen oder Schnee, oder in der Nähe von
einem See bzw. Teich oder einer Wassersprühanlage,
sowie das Berühren mit feuchten Händen können
den Stromschlag verursachen. Der Generator ist im
trockenen Platz aufzubewahren.
Wenn der Generator unter freiem Himmel •
aufbewahrt wird, prüfen Sie vor jedem Starten alle
elektrische Teile am Schaltbrett. Die Feuchtigkeit
oder Eis können die Elektroteile beschädigen oder
den Kurzschluss bzw. Stromschlag verursachen.
Das Gerät darf an das elektrische Netz des •
Gebäudes erst dann angeschlossen werden,
wenn der Isolationsschalter durch den geschulten
Elektriker installiert sein wird.
Der Abstand vom laufenden Generator bis •
zum Gebäude oder zu sonstigen Ausrüstung soll
mindestens 1 Meter (3 Fuß) betragen.
Der Generator darf nicht versperrt werden.•
Bewahren Sie den Generator weit von den •
feuergefährlichen Materialien.
Der Dämpfer erwärmt sich starkt während •
der Arbeit, und bleibt heiß noch einige Zeit nach
dem Abschalten. Berühren Sie den Dämpfer nicht.
Lassen Sie den Dämpfer abkühlen, bevor Sie ihn in
den geschlossenen Raum bringen.
Schliessen Sie den Generator zum allgemeinen •
Stromversorgungssystem nicht an.
Schliessen Sie nicht an einem anderen •
Generator an.
Auspackung
An Auspacken prüfen Sie Anwesenheit von allen
Elemente. Sieh Zeichnungen zu gegebener
Verwaltung.
An Abwesenheit oder Störung von einigen Details
wenden Sie sich an den Zentrum der Unterstützung
IVT.
D
27
Page 28
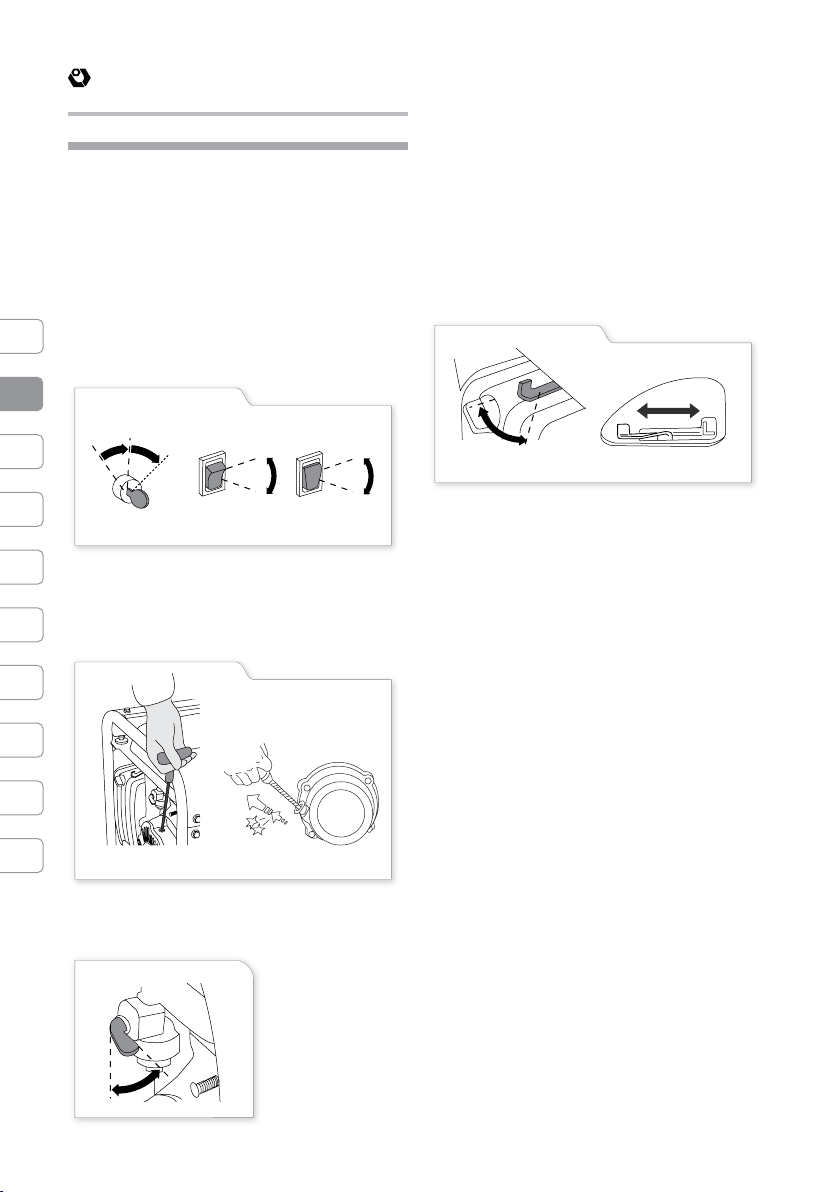
28
Betriebsanleitung
D
fig.
1
ON
OFF
START
OFF
ON
ON
STOP
GN-850
GN-1500 GN-3000
GN-6500
fig.
2
GN-850
GN-1500 GN-3000
fig.
3
ON
OFF
fig.
4
CLOSED
OPEN
CLOSED
OPEN
GN-850
GN-1500 GN-3000
Bedienungselement
Rangierdampokomotive (9):
Aktivieren und Deaktivieren der Motor
Schalterstellung:
OFF (oder STOP): Zum Abstellen des Motors.•
ON: Zum Starten des Motors.•
START (GN-6500): Um den Motor durch den Starter •
zu starten. Starten Sie den Motor, den Schlüssel
zurückzugeben (9) auf Position «ON». Der Starter darf
nicht mehr als 5 Sekunden in einer Reihe arbeiten.
Wenn der Motor nicht anspringt, den Schalter wieder in
seine ursprüngliche Position stellen und 10 Sekunden
warten, bevor ein erneutes Ausführen zu beginnen.
Starter mit Rückstoß (10)
(GN-850; GN-1500; GN-3000)
Um den Motor zu starten, drücken Sie vorsichtig
den Starter-Gri, bis Sie einen Widerstand spüren,
ziehen Sie ihn dann scharf.
läuft der Kraftsto aus dem Kraftstobehälter in den
Vergaser. Den Motor ausschalten, den Ventilhebel
zurück in die Position „OFF“ drehen.
Kleiner Hebel der Klappe (13)
Der Schieber versorgt die angereichende
Treibstokombination für das kalte Motoranlassen.
Der Schieber wird manuell auf- und zugemacht,
durch einen speziellen Schieberngerhebel; für die
Anreicherung der Treibstokombination schieben
Sie den Fingerhebel in die Position „CLOSED“.
Gleichstromschalter (6)
Der Wechselstromschalter geht im Fall
des Kurzschlusses oder der bedeutenden
Generatorbelastung automatisch aus. Beim
Ansprechen des Schalters prüfen Sie vor seinem
erneuten Einschalten, ob das Gerät korrekt
funktioniert und ob die Nennbelastung nicht
übertreen wurde.
Erdungsklemme (5)
Die Erdungsklemme ist mit dem Generatorrahmen
durch die nichtstromführenden Metallteile des
Generators und die Erdungsklemmen jeder
Steckdose verbunden.
Für die Verhinderung des elektrischen Unfalls
aus Grund des Defektes der zum generator
angeschlossenen Vorrichtungen erden Sie das
Gerät mit Hilfe der Erdklemme (5).
ACHTUNG: Der Startergri darf nicht scharf freigelassen
werden. Drehen Sie den Gri stufenlos zurück, um die
Beschädigung des Starters zu vermeiden.
Brennstoventil (11)
Das Brennstoventil
liegt zwischen dem
Kr aft stoff beh älter
und dem Vergaser.
Wenn der
Ventilhebel in der
Position „ON“ ist,
System der Vorbeugung des niedrigen Ölniveaus
(GN-1500; GN-3000; GN-6500)
Das System der Vorbeugung des niedrigen
Ölniveaus verhindert die Motorstörung wegen der
ungenügenden Ölmenge im Gehäuse. Das System
schaltet den Motor automatisch aus, bevor der Ölstand
im Gehäuse niedriger als Minimalstand wird (Umschalter
des Motors (1) bleibt in der Position „ON“).
Anzeigelampe (14)
Die Anzeigelampe leuchtet bei der normalen Arbeit
des Generators.
Gleichstromausgang (4)
Gleichstromausgang ist nur zum Auaden 12-Volt-
Page 29
Betriebsanleitung
Autobatterien zu verwenden.
Zum Anschluss der Batterie zum Generator
verwenden Sie entsprechendes Kabel.
Kabelklemmen an den jeweiligen Pole einer Batterie
(rote Klemme - den Pluspol, schwarz -, um die
negativen) anschliessen.
Sicherung für Gleichstromschaltung (3)
(Falls vorhanden)
Wenn eine Überlastung des Generators besteht, im
Falle des Scheiterns der Batterie oder Verletzung
der Verbindungen zwischen der Batterie und
dem Generator, unterbricht Sicherung für
Gleichstromkreis automatisch die Kette der Batterie
fuer Gleichstrom.
Betriebsanleitung
Anschluss an das Stromnetz des Gebäudes
Der Anschluss an das Stromnetz des Gebäudes soll
vom qualizierten Elektriker durchgeführt werden.
Dabei soll die Energiequelle des Generators vom
Kraftstromversorgungssystem isoliert werden. Alle
elektrotechnische Regeln und Normen sind zu
befolgen.
Beim nichtkorrekten Anschluss an das
Elektronetz des Gebäudes wird der
Kraftstrom vom Generator das
Gesamtnetz einspeisen. Solche
Einspeisung stellt die Stromschlaggefahr für die
Mitarbeiter des gesamten Kraftwerkes, oder
andere Personen dar, im Fall der Netzstörungen.
Lassen Sie sich vom qualizierten Elektriker
beraten.
Beim nichtkorrekten Anschluss an das
Elektronetz des Gebäudes wird der
Kraftstrom vom Gesamtnetz den
Generator einspeisen. Bei der
Wiederherstellung der Stromversorgung kann der
Generator explodieren oder das Elektronetz des
Gebäudes entzünden.
In einigen Ländern sollen die Generatoren bei den
örtlichen Kraftwerken gesetzmäßig angemeldet
sein. Die Ordnung der Anmeldung und des Betriebs
siehe in den örtlichen Rechtsvorschriften.
Zeichnungen von Erdung des Generators
Benzin generatoren IVT werden durch die Verbindung
der Rahmenelemente des Generators mit den
Erdklemme (5) in den Wechselstromsteckdosen (1)
geerdet. Das Erdungssystem ist mit dem Nullleiter
des Wechselstroms nicht verbunden.
Gemäß einigen örtlichen Rechtsvorschriften
soll das Erdungssystem mit dem Nullleiter des
Wechselstroms verbunden sein. Die Ergebnisse
der Überprüfung des Erdungsschemas mit dem
Steckdosentester für den Generator und für die
normale Steckdose unterscheiden sich.
Fordern die örtlichen Rechtsvorschriften oder
Normakten die Verbindung des Erdungssystems mit
dem Nullleiter des Wechselstroms, so lassen Sie sich
beim qualizierten Elektriker oder Kontrolleur der
Elektrogeräte beraten. Legen Sie ihm das Schema
der Elektroleitung vor.
Die Erdklemme (5) kann für die Erdung des Generators
oder für die Verbindung der Generatorrahmen mit
dem Maschinenrahmen gebraucht werden, aber
nur, wenn das von den örtlichen Rechtsvorschriften
gefordert wird. Lassen Sie sich, im voraus, vom
qualizierten Kontrolleur der Elektrogeräte zu den
Fragen der in Ihrem Land üblichen Ordnung und
Regeln beraten.
Verwenden Sie das Gerät als Generator
Bevor Sie das Gerät oder das Kabel an den
Generator:
Überzeugen Sie sich davon, dass der Generator •
funktionsfähig ist. Die beschädigten Geräte oder
Kabel verursachen den Stromschlag.
Falls der nicht korrekten Arbeit, der •
Verlangsamung des Ganges oder plötzliches
Stoppens des Gerätes schalten Sie sofort das Gerät
aus. Ziehen Sie den Netzstecker und prüfen, ob es
defekt ist, wenn nicht gar überschritten die Nennlast
des Generators.
Prüfen Sie, ob die Regelung der elektrischen •
Eigenschaften des Generators überschritten ist.
Überschreiten Sie nicht die maximale Kapazität
des Generators. Es ist zulässig, den Generator
mit der Grenzleistung nicht mehr als 5 Minuten
auszunutzen.
ACHTUNG: Die Überbelastung kann die
Ausschaltung des Unterbrechers verursachen.
Die Übersteigung der maximalen Zeit der Arbeit
mit der Grenzleistung oder unbedeutende
Überbelastung des Generators führen nicht immer
zum Ansprechen des Schalters, aber verringern
die Lebensdauer des Generators.
Sparen Sie Zeit mit höchster Kapazität von bis zu •
5 Minuten.
Mit längerem Betrieb nicht die Nennkapazität •
überschreiten.
D
29
Page 30
30
Betriebsanleitung
D
GN-850 GN-1500 GN-3000 GN-6500
Wechselstromausgangsspannung (V/Hz)
Nennleistung
(W)
Grenzleistung
(W)
230/50 230/50 230/50 230/50
750 1000 2500 5000
850 1100 2800 5500
Jedenfalls soll die Gesamtleistung (WА) •
aller angeschlossenen Geräte berücksichtigt
werden. Achten Sie auf den Leistungsfaktor
der angeschlossenen Geräte. Immer im Voraus
berechnen, die Last, sofern auf dem Generator.
Generatorleistung sihe auf dem Schild mit den
technischen Daten.
Leistung der Verbindungsteile siehe auf dem •
Schild. Die Hersteller weisen im Allgemeinen auf
nominale Merkmale in der Nähe des Modells oder
Seriennummer des Geräts an.
Arbeiten an Wechselstrom
Starten Sie den Motor.1.
2. Schalten Sie den Schalter des Wechselstromes 2.
(6) ein.
3. Schließen Sie die Vorrichtung an.3.
Für das Anlassen der meisten mechanisierten
Geräte soll die Leistung höher, als die
Nennleistung sein.
Die Kraftstromgrenze für die Steckdose
darf nicht überschritten werden. Falls
der Wechselstromschalter wegen der
Netzüberbelastung angesprochen hat, soll die
elektrische Belastung auf das Netz verringert
werden. Warten Sie einige Minuten und
drehen Schalter des Wechselstromes (3) in die
Ausgangsposition.
Gleichstrombetrieb
Gleichstromausgang ist nur zum Auaden 12-VoltAutobatterien zu verwenden.
Verbinden Sie die Batterienkabel:
Vor dem Anschließen der Kabel an die im Auto 1.
installierten Batterie, schalten Sie das geerdete
Kabel der Batterie.
Verbinden Sie die rote Klemme an den Pluspol 3.
(+) Pol der Batterie.
Verbinden Sie die schwarze Klemme an den 4.
Minuspol (-) Pol der Batterie. Vermeiden Sie den
Kontakt der Klemmen. Dies kann einen Kurzschluss
verursachen und den Akku beschädigen.
Starten Sie den Generator.5.
ACHTUNG:Starten Sie nicht das Auto mit dem
angeschlossenen Kabel zum Auaden und dem
Betrieb des Generators. Dies kann zu Schäden an
der Maschine oder am Generator führen.
Abklemmen der Batterie Kabel:
Stoppen Sie den Motor.1.
Nehmen Sie die schwarze Klemme des negativen 2.
(-) Pol der Batterie.
Trennen Sie die rote Klemme von der positiven 3.
(+) Pol der Batterie.
Entfernen Sie das Netzkabel zum Auaden aus 4.
dem DC-Ausgang (4)-Generator.
Wieder schalten Sie das geerdete Kabel der 5.
Batterie des Wagens an.
Die Prüfung vor dem Betrieb
Das Benzin mit der Ergänzung des Öls
(GN-850)
Die Kapazität des Tanks ist 4,2 l. Füllen Sie den 1.
Tank ein, ungefähr um des Zolles (6 mm) bis zum
Hals für die Erweiterung des Brennstoffes.
Verwenden Sie Benzin mit der Ergänzung des 2.
Öls. Andernfalls kann der Motor überhitzt werden.
Mischen Sie das Benzin und das Öl in der Proportion
50:1 oder 40:1 (im Sommer). Verwenden Sie das
spezielle Öl für 2-Takt-Motoren.
Messen Sie das Öl mit Hilfe des Deckels des 3.
Tanks, wie gezeigt in der Zeichnung.
Schütteln Sie den Tank auf, und dann starten 4.
Sie den Motor.
GAS 50 : 1 OIL
1 (L) : 0.02 (L)
ACHTUNG: Die Batterie sondert
explosive Gas heraus, nicht rauchen
und nicht verdünnen nahen Feuer.
Während des Ladevorgangs oder Batteriennutzen,
versorgen Sie ausreichende Belüftung.
Schließen Sie das Netzkabel zum Auaden des 2.
Gleichstromausgangs des (4)-Generator.
2 (L) : 0.04 (L)
3 (L) : 0.06 (L)
4 (L) : 0.08 (L)
Page 31

fig.
5
6 mm
Motoroel
fig.
6
MAX
MIN
(GN-1500; GN-3000; GN-6500)
Betriebsanleitung
Emfehlungen zum Nachfuellen
(GN-1500; GN-3000; GN-6500)
Überprüfen Sie denIndikator des 1.
Brennstostandes (15).
Wenn das Brennstoniveau niedrig ist, füllen 2.
Sie den Behälter. Füllen Sie den Brennsto bis zum
Brennstoflter nach.
Volumen des Brennstotanks:
6,7 l – GN-1500•
15 l – GN-3000 •
25 l – GN-6500•
ACHTUNG: Das Motoröl ist der wichtigste Faktor,
welcher die Arbeit und die Lebensdauer des
Motors beeinusst. Es wird empfohlen, keine
unabwaschbaren Öle zu verwenden, sowie die
Öle für die Zweitaktmotoren, weil sie den Motor
beschädigen.
Überprüfen Sie vor dem Anfang der Arbeit den 1.
Ölstand. Dabei soll der Generator auf der ebenen
Fläche mit abgeschaltetem Motor sein.
Verwenden Sie das Öl für die 4-Takt-Motoren, 2.
oder beliebiges abwaschbare Öl hoher Qualität
der Kategorie SG, SF/CC, CD, entsprechend den
Forderungen der Autohersteller der USA.
Die Markierung der Motoröle der Kategorie SG, SF/
CC, CD wird am Container angegeben.
SG-SF/CC-CD-SINGLE VISCOSITY•
SG-SF/CC-CD-MULTI VISCOSITY•
Das Öl SAE 1OW-30 wird für die allgemeine •
Ausnutzung bei beliebiger Temperatur empfohlen.
Das Öl mit anderer in der Tabelle angeführten
Viskosität kann erst dann verwendet werden, wenn
die Durchschnittstemperatur in Ihrem Gebiet in der
angegebenen Grenzen liegt.
Nehmen Sie den Deckel der Öleinfüllönung (7) 3.
ab und wischen Sie den Ölstecher aus.
Stecken Sie den Ölstecher in die Füllerönung, 4.
ohne sie zu zuschrauben, und prüfen Sie den
Ölstand.
Wenn der Ölstand zu niedrig ist, füllen Sie den 5.
Ölbehälter bis zur Önung nach.
Verwenden Sie das Benzin mit Oktanzahl nicht •
weniger als 86. Es ist empfehlenswert, das reine
Benzin zu verwenden, da es weniger Ablagerungen
im Motor und in der Zündkerze bildet, sowie
verlängert die Laufzeit des Auspusystems.
Verwenden Sie das nicht frische oder verschmutzte
Benzin oder das Gemisch des Öls/Benzins nicht.
Vermeiden Sie das Eindringen des Schmutzes •
oder des Wassers in den Brennstotank.
Manchmal bei der Arbeit mit der hohen •
Belastung kann das leichte metallische Klopfen
gehört werden.
Wenden Sie die Aufmerksamkeit darauf nicht. •
Wenn das Klirren oder das Klopfen bei der Arbeit
mit der ständigen Motordrehzahl, der normalen
Belastung erscheint, verwenden Sie das Benzin
anderer Marke. Wenn das Klirren nicht aufhört,
wenden Sie sich an den oziellen Dealer IVT.
ACHTUNG: Der Betrieb des Motors mit dem
ständigen Klopfen oder dem Klirren kann zum
Bruch führen. Es ist verboten, den Motor mit dem
ständigen Klopfen oder dem Klirren zu betreiben;
die begrenzte Garantie des Distributors erstreckt
sich auf die Details nicht, die infolge des Abusus
beschädigt sind.
Sauerstohaltige Brennstoarten•
Für die Erhöhung der Oktanzahl werden
einige Benzinarten mit Spiritus oder mit
Äther vermischt. Solches Benzin gehört zu den
sauerstohaltigen Brennstoarten.
Bei der Verwendung des sauerstohaltigen
Brennstoes überzeugen Sie sich davon, dass seine
Oktanzahl mindestens 86 gleich ist.
D
Etanol (den Äthylalkohol)•
Bei der Verwendung des Benzins mit mehr als
10% Äthanolgehalt können die Probleme mit
dem Anlassen und/oder mit der Arbeitsqualität
hervorgerufen werden. Äthanolhaltendes Benzin
kann mit „Gasohol“ Methanol (Holzgeist) markiert
31
Page 32

32
Betriebsanleitung
D
fig.
7
ON
OFF
START
OFF
ON
ON
STOP
GN-850
GN-1500 GN-3000
GN-6500
fig.
8
GN-850
GN-1500 GN-3000
werden.
das Methanol (oder derHolzspiritus)•
Zu den Ingredienzien des methanolhaltenden
Benzins gehören die Lösungs- und
Antikorrosionsmittel für den Schutz der
Kraftstoanlage. Bei der Verwendung des Benzins
mit mehr als 5% Methanolgehalt können die
Probleme mit dem Anlassen und/oder mit der
Arbeitsqualität hervorgerufen werden, sowie
die Beschädigungen der Metall-, Gummi- und
Kunststoteile der Kraftstoanlage.
MTBÄ (Metiltretbutylalkoholäther)•
Es wird empfohlen, das Benzin mit 15% MTBÄ Gehalt zu verwenden. Vor dem Ausnutzen
des sauerstohaltigen Brennstoes versuchen Sie
seinen Inhalt zu bestimmen. In einigen Staaten
soll diese Information an der Pumpe
angegeben werden. Beim Auftreten der beliebigen
unnötigen Anzeichen bei der Arbeit
verwenden Sie das unverbleite Standardbenzin. IVT
haftet nicht für die Störungen oder
Beschädigungen der Kraftstoanlage, welche durch
das Verwenden des sauerstohaltigen
Kraftstoffes verursacht wurden; in den o b e n
genannten Fällen fällt die Gewährleistung aus.
ACHTUNG: die sauerstohaltenden
Brennstoarten können die gestrichenen und die
Kunststoteile beschädigen. Passen Sie darauf,
dass während der Füllung der Brennsto nicht
verschüttelt wird. Für die Beschädigungen, die
durch das Verschütten des Brennstoes verursacht
wurden, fällt die Gewährleistung aus.
Der Motor ist gestartet, geben Sie den Schlüssel •
in die Lage “ON zurück”.
(GN-850; GN-1500; GN-3000)
Stellen Sie den Umschalter des Motors (9) in die •
Stellung «ON» um.
Leicht ziehen Sie den Gri des Starters (10) an, •
bis Sie den Widerstand fühlen, dann ziehen Sie es
heftig an.
ACHTUNG: Lassen Sie den Startergri nicht
scharf los. Drehen Sie den Gri stufenlos in die
vorherige Position, um die Beschädigung des
Starters oder des Gehäuses zu vermeiden.
Einschalten/ausschalten
Starten des Motors
Schalten Sie aus den Steckdosen alle 1.
Elektrogeräte aus. Den Generator ist es schwierig,
bei der angeschlossenen Belastung zu starten.
Stellen Sie den Umschalter des Motors (9) in die 2.
Lage «ON».
Der Fingerhebel des Schieber (13) wird 3.
geschlossen, wenn der Motor abkühlt. Den
Schieberkann man manuell schliessen, den
Fingerhebel in die Lage «CLOSED» verschoben.
Starten Sie den Motor4.
(GN-6500)
Stellen Sie den Umschalter des Motors (9) •
in die Lage «START» (Sie halten nicht mehr als 5
Sekunden).
Wenn der Schieber (13) manuell geschlossen 5.
war, drehen Sie den Gri in die Position „OPEN“
(auf), wenn der Motor sich erwärmt.
Motorstoppen
Im Notfall:
Um den Motor im Notfall zu stoppen, schieben 1.
Sie den Umschalter des Motors (9) in die Position
„OFF“.
Im Kundenbetrieb:
drehen Sie den Schalter des Wechselstromes (6) 1.
in die Position „OFF“.
Stellen Sie alle Elektrogeräte ab. Trennen Sie die 2.
Kabel für die Akkuladung mit dem Gleichstrom ab.
Drehen Sie den Umschalter des Motors (9) in die 3.
Position „OFF“ (oder STOP).
Drehen Sie das Brennstoventil (11) in die Position 4.
„OFF“.
Page 33

Betriebsanleitung
Bedienung und Lagerung
Vor der Durchführung der Reparatur schalten Sie •
das Gerät ab und erwarten Sie bis zu seiner vollen
Unterbrechung.
Sie enthalten das Gerät und die •
Ventilationsönungen in der Sauberkeit. Im Falle
des Ausfalls, ungeachtet der vollkommenen
Bedingungen der Produktion und der Tests, soll die
Reparatur im oziellen Servicezentrum IVT erfüllt
werden.
Die regelmäßige Reinigung und die Bedienung •
garantieren die hohe Eektivität und den
langwierigen Betrieb des Gerätes.
WARTUNG
Luftlter Reinigung (eventuell Ersatz) x (1*)
Zündkerze Reinigung (eventuell Ersatz) x
Kraftstoabsatz Reinigung (eventuell Ersatz) x
Dekarbonisation
Motoröl
Luftlter
Absetzanlage Reinigung x
Zündkerze
Ventilspiel
Brennstobehälter
und Filter
Brennstoeitung
die Entfernung des
Rußansatzes, Kontrolle,
Regulieren
WARTUNG
Verwend-
Standkontrolle x
Ölwechsel x x
Kontrolle x
Reinigung x (1*)
Kontrolle/Reini-
gung
Kontrolle/Einstel-
lung
Reinigung x (2*)
Kontrolle (even-
tuell Ersatz)
(wird in bestimmten Monaten oder Betriebsstunden durch-
GN-1500; GN-3000; GN-6500
(wird in bestimmten Monaten oder Betriebsstunden durchgeführt)
Nach
jeder
Monat oder in
20 Betriebss-
ung
tunden (3*)
Alle Muttern, die Bolzen und die Schrauben •
sollen dicht festgezogen sein.
Ersetzen Sie die beschädigten oder abgenutzten •
Details.
Bewahren das Gerät in der trockenen und •
für die Kinder unzugänglichen Stelle, von den
feuergefährlichen Materialien entfernt.
Vermeiden Sie das Wassertreen auf das Geraet!•
Für die Unterhaltung des Generators sollen
regelmäßig die Wartung und die Reinigung
durchgeführt werden. Der Zeitplan der
technischen Wartung ist in der folgenden Tabelle
angeführt.
GN-850
REGELMÄSSIGE WARTUNG
geführt)
Monatlich
oder jede50 Stunden
REGELMÄSSIGE WARTUNG
In einem
Jede 3
Monate oder
jede 50 Stun-
den (3*)
Jede 3 Monate oder jede150
Stunden (3*)
Jede 6
Monate oder
jede 100
Stunden (3*)
Jedes Jahr
oder jede 300
Stunden (3*)
x
x (2*)
x
Jede zwei
Jahre (3*)
x (2*)
(1*) Bei der Arbeit im staubigen Raum soll das Gerät häuger geprüft werden. (2*) Wenn der Inhaber kein
passendes Werkzeug hat und kein qualizierter Mechaniker ist, soll die Wartung vom oziellen IVT Händler durchgeführt werden. (3*) Um die Periodizität der Wartung beim kommerziellen professionellen
Betrieb bestimmen zu können, tragen Sie die Betriebsstunden in die Zeitschrift ein.
33
D
Page 34

34
Betriebsanleitung
D
fig.
9
fig.1
0
GN-850
GN-1500
GN-3000
GN-6500
fig.1
1
OFF
ACHTUNG: Die Abgase enthalten das
giftige Kohlengas. Vor der Wartung
technische Wartung beim angeschalteten Motor
durchgeführt wird, sorgen Sie um die gute
Ventilation des Raums.
ACHTUNG: Für die Wartung und Reparatur
verwenden Sie nur IVT Originalteile oder ihre
Analoga. Die Ersatzteile niedrigerer Qualität
können den Generator beschädigen.
Dicktaagsscheibe, den Ölfüllerdeckel (7) heraus und
lassen Sie das Öl abießen.
Dicktaagsscheibe.Überzeugen Sie sich, dass der
Pfropfen dicht eingestellt ist.
und prüfen Sie das Niveau.
Ölinhalt:
Sie nicht täglich mit dem Altöl arbeiten, waschen
Sie Ihre Hände sorgfältig möglichst schneller nach
der Arbeit mit der Seife.
schalten Sie den Motor aus. Wenn die
Motorölwechsel
(GN-1500; GN-3000;
GN-6500)
schneller und voller
Ölabuss ist möglich,
bis der Motor nicht
kalt wird.
Ziehen Sie den Ölabusszapfen (8), die 2.
Stecken Sie den Zapfen (8) und die 3.
Füllen Sie den Tank mit dem empfohlenen Öl aus 4.
0.6L GN-1500•
1.1L GN-3000•
1.1L GN-6500•
VORSICHT! Der häuge und dauernde
Kontakt mit dem Altöl kann den
Hautkrebs verursachen. Sogar, wenn
ACHTUNG: Das Ausnutzen des Benzins
oder der Brennlösungen für die
Reinigung des Filterelementes kann zur
Seifenwasser oder unbrennbares Lösungsmittel.
ACHTUNG: Keinesfalls nutzen Sie den Generator
ohne Luftlter (12) aus, weil das die Lebensdauer
des Motors beschleunigt.
(17), den Luftlterdeckel und den Filtereinsatz ab.
alltäglichen Waschmittels und warmes Wassers,
danach spülen Sie ihn sorgfältig im unbrennbaren
Lösungsmittel. Lassen Sie ihn trocknen.
E i n 1.
Maschinenschmieröl und wringen Sie ihn aus. Ist im
Filtereinsatz zu viel Öl geblieben, so wird der Motor
beim ersten Anlassen rußen.
Deckel zu.
Reinigung des Brennstoabsetztankes (18)
Der Kraftstoabsatz (18) verhindert das Eindringen
von Schmutz und Wasser aus dem Brennstobehälter
in den Vergaser. Wenn der Generator lange Zeit nicht
gebraucht wurde, soll der Brennstoabsetztank
gereinigt werden.
Explosion führen. Verwenden Sie nur
Nehmen Sie die Klemmbügel des Luftlterdeckels 1.
Waschen Sie den Filtereinsatz in der Lösung eines 2.
Versenken Sie den Filtereinsatz ins reine 3.
Stecken Sie den Filtereinsatz und drehen Sie den 4.
Das Altöl soll umweltfreundlich verwertet werden.
Es wird empfohlen, das Altöl im dichten Container
zur örtlichen Wartungsstation zu befördern, oder zu
einem Verarbeitungszentrum. Giessen Sie das Altöl
nie in die Mülltonne oder auf die Erde ab.
Kontrolle und Reparatur des Luftlters
Der verschmutzte Luftlter (12) verhindert die Luftzufuhr
in den Vergaser. Um die Störungen in der Arbeit des
Vergasers zu vermeiden, soll der Luftlter regelmäßig
geprüft werden. Bei der Arbeit im staubigen Raum soll
das Gerät häuger geprüft werden.
Drehen Sie das Brennstoventil (11) in die 1.
Position „OFF“. Nehmen Sie den Kraftstoabsatz
(25), O- Ring und den Filter ab.
Reinigen Sie den Kraftstoabsatz, den Ring und 2.
den Filter im unbrennbaren Lösungsmittel.
Stellen Sie den Filter, den O- Rind und den 3.
Kraftstoabsatz (18) wieder auf.
Page 35

Betriebsanleitung
fig.1
2
0.7-0.8mm
Drehen Sie das Brennstoventil (11) in die 4.
Position „ON“ und überprüfen Sie es auf die Dichte.
Die Bedienung der Zündkerze
Die empfohlenen Zündkerzen:
LDF6TC; TME170: BPR6ES,
TME260,
TME360,
TME410:BPR5ES,
TME280:BP6ES
Um die sichere Funktion des Motors zu
gewährleisten, soll die Zündkerze sauber sein und
das richtige Spiel haben.
Wenn der Motor läuft, wird der Dämpfer sehr heiß.
Berühren Sie den Dämpfer nicht.
Nehmen Sie die Zündkerzenstecker (19) ab.1.
Säubern Sie den Bereich um die Zündkerze 2.
herum.
Ziehen Sie die Zündkerze mit Hilfe des 3.
entsprechenden Schlüssels (24) heraus.
Überprüfen Sie die Zündkerze. Wenn der Isolator 4.
beschädigt ist, soll die Zündkerze ersetzt werden.
Für die Wiederverwendung soll die Zündkerze mit
der Drahtbürste gereinigt werden.
Messen Sie das Zündkerzenspiel mit dem 5.
Dickenmessgerät. Korrigieren Sie das Spiel, dazu
biegen Sie vorsichtig die Seitenelektrode. Die
Spieldicke soll 0,7 – 0,8 mm (0,028 – 0,031 Zoll)
betragen.
Überprüfen Sie den Zustand der 6.
Zündkerzenscheibe und schrauben Sie die Kerze
manuell ein, um die Gewindeverschraubung
durch den Faden zu vermeiden.
Nach dem die Kerze aufgestellt sein wird, 7.
ziehen Sie sie mit dem Wasserdichte Kerze (24)
fest, um die Scheibe zu verdichten. Bei der
Einstellung einer neuen Zündkerze ziehen Sie sie
für die Verdichtung der Scheibe auf halben Gang
fest. Bei der Wiederverwendung der gebrauchten
Wasserdichte Kerze zeihen Sie sie auf 1/8-1/4
Ganges fest, um die Scheibe zu verdichten.
D
ACHTUNG: Ziehen Sie fest die Zündungskerze. Die
falsch eingestellte Zündungskerze kann sich sehr
stark erwärmen und den Motor beschädigen.
Verwenden Sie nie die Zündungskerzen mit
unpassendem Wärmekoezient. Verwenden Sie nur
die empfohlenen Zündungskerzen oder ihre Analoga.
Lagerungszeit
Weniger als ein Monat Die Vorbereitung ist nicht erforderlich.
1 bis 2 Monate Tanken Sie den Generator mit Benzin und geben Sie Benzinzusatz zu*
2 Monate bis 1 Jahr
über 1 Jahr
Die empfohlene Bedienungsordnung, dank deren Sie das schwierige Anlassen vermeiden
Tanken Sie den Generator mit Benzin und geben Sie Benzinzusatz zu*
Lassen Sie den Brennsto aus der Schwimmerkammer des Vergasers abießen
Lassen Sie den Brennsto aus dem Brennstoabsetztank abießen
Tanken Sie den Generator mit Benzin und geben Sie Benzinzusatz zu*
Lassen Sie den Brennsto aus der Schwimmerkammer des Vergasers abießen
Lassen Sie den Brennsto aus dem Brennstoabsetztank abießen
Ziehen Sie die Zündkerze heraus. Giessen Sie in den Zylinder einen Esslöel Maschinenöl.
Ziehen Sie langsam das Zugseil, um das Öl zu verteilen. Stellen Sie die Zündkerze auf.
Wechseln Sie das Öl. (GN-1500; GN-3000; GN-6500)
Nach der Lagerung lassen Sie das Benzin in den speziellen Container abießen, und tanken
Sie den Generator vor dem Starten mit dem frischen Benzin.
werden.
* Verwenden Sie die Benzinzusätze, welche die Lagerungsfrist verlängern. Zur Auswahl der
Benzinzusätze lassen Sie sich vom IV T – Händler in Ihrer Region beraten. generator dealer for conditioner
recommendations.
35
Page 36

36
Betriebsanleitung
D
fig.1
3
fig.1
4
e
d
21
28
c
b26 a27
Transport / Lagerung
Bei der Beförderung des Generators drehen
Sie denUmschalter des Motors (9) und das
Brennstoventil (11) in die Position „OFF“. Um
den Leckkraftsto zu vermeiden, halten Sie den
Generator in der Flachlagerung. Der verschüttete
Brennsto und seine Dämpfe sind feuergefährlich.
ACHTUNG: Der Kontakt mit dem heißen
Motor oder Auspusystem kann die
Entammung verursachen. Vor der Beförderung
oder der Lagerung des Generators lassen Sie den
Motor abkühlen.
Vermeiden Sie des Hinfallens des Generators oder
Stöße während der Beförderung. Stellen Sie keine
schweren Gegenstände auf den Generator.
gemäß der folgenden Tabelle.
dazu lockern Sie das Abussventil. Lassen Sie das
Benzin in den speziellen Container abießen.
schweren Verbrennungen oder die
Vor der dauernden
Lagerung des
Gerätes:
überzeugen Sie •
sich davon, dass der
Lager genug trocken
und sauber ist.
Machen Sie die •
Inspektion und
eventuelle Reparatur
Lassen Sie das Benzin aus dem Vergaser abießen, 1.
Installation der zusaetzlichen Teile
Die Anlage der Räder
26. Die Achse
27. Das Rad
28. Der Schwingungsisolator
29. Die Stützpfote
Die ache Scheibea.
Der festigende Stiftb.
Вie Bolzen mit dem Kopf, 30ммc.
Die Bolzen mit dem Kopf, 20ммd.
Die Muttere.
ACHTUNG: Das Benzin ist ein
explosionsgefährlich sein. Gießen Sie das Benzin
im gut lüfteten Raum mit dem abgeschalteten
Motor ab. Rauchen Sie während des Abgießens
des Benzins nicht.
den Zylinder etwa 1 Esslöel Maschinenöl.
Motors, um das Öl zu verteilen.
den Widerstand spüren. In dieser Zeit wird der
Kolben hochgehoben (Verdichtungstaktende),
das Eintrittsventil und das Auslassventil gehen zu.
Solche Motorlage bei der Lagerung verhindert die
innere Korrosion.
feuergefährliches Stoff und unter
bestimmten Bedingungen kann
Oelwechsel 2. (GN-1500; GN-3000; GN-6500)
Ziehen Sie die Zündkerze heraus. Giessen Sie in 3.
Überprüfen Sie einige Male die Kurbelwelle des 4.
Stellen Sie wieder die Wasserdichte Kerze auf.5.
Ziehen Sie langsam den Startergri, bis Sie 6.
Stellen Sie die Achse (26) in die Montageträger 1.
des Rahmens ein;
Stellen Sie auf die Achse das Rad (27 fest);2.
Legen Sie das Rad auf der Achse mit Hilfe der 3.
achen Scheibe und des festigenden Stiftes fest;
Auf die gleiche Weise stellen Sie das zweite Rad 4.
fest;
Festigen Sie die Schwingungsisolatoren (28) auf 5.
jeder Stützpfote (29) mit Hilfe zwei Muttern und der
Bolzen mit dem Kopf (30 mm);
Festigen Sie jede Stützpfote (29) mit Hilfe zwei 6.
Muttern und der Bolzen mit dem Kopf (20 mm);
Battery Tray Kit installation
30. Der Batterieschutz
31. Der Behälter für die Akkumulatorenbatterie
32. Das Starterkabel
33. Die Startermagnetspule
Page 37

Betriebsanleitung
fig.1
5
d
d d
d
d
d
d
d
34. Das Erdkabel
35. Der Batterieträger
36. Das Paneel des Batterieschutzes
Stellen Sie den Batterieschutz (30) auf 1.
dem Rahmen fest. Stellen Sie auf dem Schutz (30)
den Behälter für die Akkumulatorenbatterie (31) fest
und ziehen Sie die Bolzen fest.
Strecken Sie das Starterkabel (32) unter Tank und 2.
verbinden Sie mit der Startermagnetspule (33).
Schalten Sie das Erdkabel (34) zum Hinterteil des 3.
Lichtmaschinengehäuses an.
Legen Sie die Akkumulatorenbatterie in den 4.
Behälter (31) und befestigen Sie mit Hilfe des
Trägers (35). Schalten Sie das Starterkabel (32)
zuerst zur positiven (+), und dann zur negativen (-)
Batterieklemme an. Beim Abschalten beginnen Sie
mit der negativen (-) Klemme.
Batterieschutzes (36) fest.
Stellen Sie auf die Schutz (30) das Paneel des 5.
Fehlersuche und deren Beseitigung
(GN-1500; GN-3000; GN-6500 Prüfen Sie das Öl •
im Motor ►eventuell füllen Sie dal Motoröl nach.
Überprüfen Sie die Zündkerze auf den Funken• ►
eventuell ersetzen Sie die Kerze. Wenn der Funken
fehlt, wenden Sie sich an den oziellen IVT Händler.
Für die Überprüfung machen Sie folgendes:
Nehmen Sie die Zündkerzenkappe ab 1.
und wischen Sie den Bereich um die Kerze
herum ab.
Ziehen Sie die Kerze heraus und stecken 2.
Sie sie in die Kappe.
Stellen Sie die Seitenelektrode der 3.
Zündkerze auf den Deckel des Zylinders auf.
Drehen Sie den Motor durch; durch das 4.
Spiel sollen die Funken ausiegen. Überzeugen
Sie sich davon, dass um die Zündkerze herum
kein verschütteter Brennsto ist. Der verschüttete
Brennsto ist explosionsgefährlich.
Prüfen Sie, ob der Brennsto in den Vergaser •
uebergeht. ► wenn der Brennsto nicht geleitet
wird, reinigen Sie die Brennstokläranlage.
Für die Prüfung muss man Folgendes erfüllen:
betäuben Sie den Motor und schwächen 1.
Sie die Ausußschraube.
Stellen Sie den Umschalter des Motors 2.
in die Lage «ON» und ziehen Sie den Brennsto
zusammen.
Wenn der Motor nicht gestartet wird, behandeln
an den oziellen Haendler IVT.
Umweltschutz
Recycling statt Müllentsorgung.
Gerät, Zubehör und Verpackung sollten einer
umweltgerechten Wiederverwertung zugeführt
werden.
Die Kunststoteile werden zur
Klassizierungsrecycling gesendet. Die vorliegende
Gebrauchsanweisung ist auf dem zweitgenutzten
Papier ohne Chlor gedruckt..
D
Der Motor startet nicht
Überprüfen Sie, ob im Behälter der Brennsto •
ist ► eventuell füllen Sie den Brennstobehälter
nach.
37
Page 38

38
Инструкция
RUS
ENG.SW.
ON
OFF
POWER ON
VOLTMETER
AC SOCKET
DC
+
-
AC
DC LIFE
OUTLET
PROTECTION
10
19
23
24
22
26
19
10 78 9 314 54
17
12
1518 16 2 21 6 1
13 11
23
24
22
6 16 9 15
11
2 14
3 17 12 13
1 4
GN-850
GN-1500
Page 39

ENG.SW.
ON
OFF
POWER ON
VOLTMETER
AC SOCKET
DC LIFE
AC SOCKET
DC
PROTECTION
AC
PROTECTION
ENG.SW.
POWER ON
VOLTMETER
AC SOCKET
DC LIFE
DC
PROTECTION
AC SOCKET
AC
PROTECTION
ON
OFF
19
7 2114 1 5
4
17
11
151216 9 2 6 3 25
23
24
22
19
10 78 14 52141
12 11
1615 9 2 6 3
23
24
22
GN-3000
Инструкция
RUS
GN-6500
39
Page 40

40
Инструкция
RUS
Органы управления
1.Розетки переменного тока
2.Вольтметр
3.Предохранитель для цепи
постоянного тока
4.Выход постоянного тока
5.Зажим заземления
6.Выключатель переменного
тока
7.Крышка маслозаправочного
отверстия
8.Пробка для спуска масла
9.Переключатель двигателя
10.Рукоятка стартера с отдачей
11.Топливный клапан
12.Воздушный фильтр
13.Рычажок заслонки
14.Контрольная лампа
15.Указатель уровня топлива
16.Крышка топливного бака
17.Зажимные скобы/винты для
крышки воздушного фильтра
18.Отстойник топлива
19.Наконечник свечи зажигания
20.Глушитель
21.Индикатор низкого уровня
масла
22.Кабель для зарядки батареи
23.Пробка
24.Свечной ключ
25.Ручка*
26.Емкость для смешивания
масла/топлива*
* = Дополнительные
принадлежности
Не все изображенные или
описанные приспособления
включены в стандартную
поставку.
Обозначения
Характеристика инструмента
Модель
Номинальная выходная мощность
переменного тока 230В/50Гц (Вт)
Максимальная выходная мощность
переменного тока 230В/50Гц (Вт)
Сила переменного тока на выходе при
номинальной / максимальной мощности
230В / 50Гц (В / Гц)
Выходное напряжение переменного тока
(В)
Фаза
Напряжение постоянного тока (В)
Постоянный ток (А)
Частота вращения на холостом ходу (об./
мин.)
Рабочий объем
Частота хода двигателя
Тип охлаждения двигателя
Отработавшее топливо
Отработавшее масло
Емкость топливного бака (л)
Емкость масляного бака (л)
вес (kg)
Уровень звукового давления [дБ]
Уровень звуковой мощности [дБ]
GN-850 GN-1500 GN-3000 GN-6500
750 1000 2500 5000
850 1200 2800 5500
3.0/3.5 4.3/4.7 10.8/12.1 21.7/24
230/50 230/50 230/50 230/50
1 1 1 1
12 12 12 12
8.3 8.3 8.3 8.3
3000 3000 3000 3000
63 87 208 389
2 4 4 4
Воздушное
охлаждение
Бензин с
добавлением
масла
-
4.2 6.70 15.00 25.00
- 0.60 1.10 1.10
19.00 28.00 42.00 97.00
46 68 68 73
57 79 79 93
Воздушное
охлаждение
неэтилированный
бензин
SAE 10W-30
SAE 10W-40
Воздушное
охлаждение
неэтилированный
бензин
SAE 10W-30
SAE 10W-40
Воздушное
охлаждение
неэтилированный
бензин
SAE 10W-30
SAE 10W-40
Page 41

Инструкция
Техника безопасности при
эксплуатации
Общие правила безопасности
При условии эксплуатации с соблюдением
инструкций этот бензиновый генератор
обеспечивает безопасность и надежность в
работе.
Следующие инструкции по технике безопасности
помогут вам правильно использовать устройство
и обеспечить собственную безопасность. Поэтому
следует прочитать их внимательно.
В случае передачи устройства третьему лицу
следует передать и настоящие инструкции по
технике безопасности.
Сохраните данную инструкцию и прочую
литературу, входящую в комплект поставки.
Следуйте технике безопасности и
предостережениям на приборе.
Перед началом работы ознакомьтесь с органами
управления прибора, но, прежде всего, изучите
способы его экстренной остановки.
Следование этим простым инструкциям поможет
содержать ваш прибор в исправном состоянии.
Перед использованием прибор необходимо •
правильно собрать.
Используйте прибор только по назначению. •
Изучите предупредительные надписи на •
приборе, следуйте указаниям по использованию
защитных приспособлений. Предотвратить
несчастные случаи помогут внимательность,
разумный подход к работе и соответствующая
подготовка лиц, задействованных в эксплуатации,
транспортировке, обслуживании и хранении
прибора.
Не оставляйте прибор без присмотра.•
Не допускайте использования прибора •
детьми. Не позволяйте детям играть с прибором.
Не допускайте нахождения вблизи детей и •
животных. Посторонние лица должны находиться
на безопасном расстоянии от работающего
прибора. Прекратите работу, если поблизости
находятся посторонние люди, в особенности
дети, или животные.
При работе с прибором пользователь несет •
ответственность за третьих лиц.
Лица, не ознакомленные с инструкциями •
по эксплуатации, дети, несовершеннолетние,
не достигшие возраста, позволяющего
использовать прибор, а также лица, находящиеся
в состоянии алкогольного или наркотического
опьянения, либо под воздействием медицинских
препаратов, не допускаются к работе с прибором.
Возраст оператора устанавливается в местных
нормативных актах.
ВНИМАНИЕ: Алкоголь, некоторые
лекарственные препараты и
наркотические вещества, а также
состояние нездоровья, жар и утомление
снижают скорость реакции. Не используйте
электроинструменты в вышеперечисленных
случаях.
Убедитесь, что все защитные приспособления •
установлены и пригодны к эксплуатации.
Не используйте прибор без защитных •
приспособлений, либо если они повреждены.
Избегайте случайного запуска прибора: перед •
подключением к сети убедитесь, что выключатель
находится в положении «o» (выкл.)
Перед включением прибора извлеките •
установочные клинья и ключи.
Не используйте прибор с неисправным •
выключателем. Прибор с неисправным
выключателем представляет опасность и требует
ремонта.
Осмотрите прибор на наличие •
незакрепленных деталей (гаек, болтов, винтов
и т.д.) или повреждений. Чтобы обеспечить
безопасную работу прибора, периодически
проверяйте, хорошо ли затянуты болты и винты.
При необходимости перед использованием
прибора произведите их ремонт или замену. В
случае использования поврежденного прибора
оператору или посторонним лицам могут быть
нанесены серьезные травмы.
Используйте для работы соответствующую •
спецодежду. Просторная одежда, украшения
могут быть затянуты движущимися частями.
Используйте соответствующую спецодежду,
длинные брюки и прочную обувь. Защитите
ноги и ступни от разлетающегося мусора. Не
работайте босиком или в открытых сандалиях.
Соберите длинные волосы сзади.
Содержите ручки в чистоте и сухости.•
ВНИМАНИЕ! Используйте средства
индивидуальной защиты! Защитные
приспособления и СИЗ обеспечивают
защиту вашего здоровья и здоровья
окружающих, а также гарантируют
бесперебойную работу прибора.
RUS
41
Page 42

42
Инструкция
RUS
Используйте защитные очки, защитные •
перчатки, прочную нескользкую обувь и, при
необходимости, каску. При выполнении работ,
сопровождающихся образованием пыли,
используйте противопылевой респиратор. Если
уровень шума превышает 85 дБ(A), обязательно
используйте защитные
Во время работы сохраняйте устойчивое •
положение. Постоянно сохраняйте равновесие.
Не запускайте прибор, если он перевернут •
или находится в нерабочем положении.
Перед использованием прибора уберите с •
рабочей площадки все посторонние предметы,
избегайте попадания под прибор посторонних
предметов во время работы. Соблюдайте чистоту
на рабочем участке. На загроможденных участках
наблюдается высокий уровень травматизма.
Не перегружайте прибор. Эффективность •
и безопасность прибора выше при работе с
заданной частотой.
Используйте прибор только при дневном •
или хорошем искусственном освещении.
Не используйте прибор в условиях плохой
видимости.
Не роняйте прибор, не допускайте •
столкновения прибора с какими-либо
преградами.
При попадании под прибор постороннего •
предмета, осмотрите его на наличие повреждений
и произведите необходимый ремонт.
При возникновении чрезмерной вибрации •
заглушите двигатель и немедленно выясните
причину. Вибрация обычно является признаком
повреждения.
Перед использованием прибор необходимо •
тщательно осмотреть. Используйте прибор
только в исправном состоянии. При обнаружении
каких-либо дефектов, представляющих опасность
для оператора, их необходимо немедленно
устранить.
Замените поврежденные или изношенные •
детали. Используйте только оригинальные
запчасти. Детали, изготовленные сторонним
производителем, прилегают неплотно и
повышают риск возникновения травм.
Запрещается снимать или изменять •
электрические и механические устройства.
Перед тем, как покинуть рабочее место, •
произвести ремонт, осмотр или очистку
прибора, отключите его и подождите до полной
остановки.
Будьте внимательны при очистке и ремонте •
прибора. Производите настройку, установив
отключенный прибор на ровную чистую
поверхность.
Будьте внимательны. Следите за
работой. Отвлекшись, можно
потерять управление. Подходите к
работе разумно.
Правила техники безопасности при
работе с приборами с бензиновым
двигателем
ВНИМАНИЕ! Бензин является
легковоспламеняющимся веществом.
Будьте осторожны с топливом.
Храните топливо в специальных канистрах. •
Плотно закройте крышку топливного бака.
Заправляйте бак только на открытом воздухе, •
не курите во время заправки.
Сначала заправьте бак, а затем запускайте •
двигатель.
Перед тем, как заправлять бак, остудите •
глушитель.
Не снимайте крышку топливного бака и •
не заливайте топливо при работающем или
неостывшем двигателе.
В случае проливания бензина не запускайте •
двигатель, отодвиньте прибор в сторону
от пролитого бензина и не допускайте
возникновения источника возгорания до тех
пор, пока пары бензина не рассеются.
Протрите пролитое топливо перед тем, как •
запускать двигатель.
Храните топливные баки в надежном месте.•
Не запускайте двигатель в помещении или в •
замкнутом пространстве, чтобы предотвратить
накапливание опасного угарного газа.
ВНИМАНИЕ! В выхлопных газах
содержится ядовитый угарный газ,
который не имеет ни цвета, ни запаха.
Вдыхание выхлопных газов может привести к
потере сознания и летальному исходу. Чтобы
уровень содержания выхлопных газов в
воздухе не превышал допустимый, обеспечьте
соответствующую вентиляцию.
Не храните прибор с топливом в баке в •
помещении, где пары могут воспламениться
Чтобы сократить риск возникновения пожара, •
содержите в чистоте двигатель, глушитель,
батарейный отсек и бензохранилище, берегите
прибор от огня и искр.
Выхлопная система нагревается достаточно •
для того, чтобы воспламенить некоторые
материалы. Храните прибор на безопасном
Page 43

Инструкция
расстоянии от легковоспламеняющихся
материалов.
Во время работы глушитель сильно •
нагревается и остается горячим некоторое
время после выключения. Не прикасайтесь к
глушителю, чтобы не обжечься. Перед тем, как
заносить прибор в закрытое помещение, дайте
двигателю остыть.
Правила электробезопасности
ВНИМАНИЕ! В целях предотвращения
удара электрическим током,
причинения личного вреда или
возгорания при использовании
электроинструментов необходимо соблюдать
следующие инструкции по технике
безопасности. Перед использованием
инструмента прочтите и тщательно соблюдайте
данные инструкции.
ОСТОРОЖНО! Во избежание ожога или
поражения электрическим током не
прикасайтесь к электропроводящим деталям.
ВНИМАНИЕ! ОПАСНОСТЬ ПОРАЖЕНИЯ
ЭЛЕКТРИЧЕСКИМ ТОКОМ!
Следите за производственной средой. Не
используйте электроинструменты во время
дождя. Не используйте электроинструменты
во влажных и сырых помещениях. Содержите
рабочий участок в сухости, обеспечьте хорошее
освещение. Берегите прибор от влаги. Не
оставляйте прибор на открытом воздухе на
ночь. При попадании воды в электроинструмент
повышается риск удара электрическим током
Особые правила по технике безопаснос
ти
Изучите способы быстрого отключения •
генератора в экстренных случаях.
Изучите все блоки управления генератором, •
выходные розетки и соединительные детали.
Проинструктируйте работника, •
использующего генератор.
ОСТОРОЖНО! В выхлопных газах содержится •
ядовитый угарный газ, который не имеет ни
цвета, ни запаха. Вдыхание выхлопных газов
может привести к потере сознания и летальному
исходу.
При работе в замкнутом или частично •
закрытом пространстве вдыхаемый воздух
может содержать опасное количество выхлопных
газов.
Для предотвращения скапливания выхлопных •
газов обеспечьте соответствующую вентиляцию.
Генератор производит электроэнергию, •
достаточную для тяжелого поражения
электрическим током в случае неправильного
использования.
Использование генератора или •
электроприбора во влажной среде, например,
в снег или дождь, вблизи водоема или
спринклерной системы, либо влажными руками
может привести к поражению электрическим
током. Храните генератор в сухом месте.
При хранении генератора на открытом •
воздухе проверяйте все электрические
детали на панели управления перед каждым
использованием. Попадание влаги или льда
может привести к поломке электродеталей или
короткому замыканию, которое несет опасность
поражения электрическим током.
Не подключайтесь к электрической сети •
здания, пока квалифицированный электрик не
установит изоляционный выключатель.
Расстояние от работающего генератора •
до здания и прочего оборудования должно
составлять не менее 1 метра (3 футов).
Не загораживайте генератор.•
Храните генератор вдали от •
легковоспламеняющихся материалов.
Во время работы глушитель сильно •
нагревается и остается горячим некоторое время
после выключения. Не прикасайтесь к глушителю,
чтобы избежать ожога. Остудите генератор перед
тем, как заносить его в закрытое помещение.
Не подключайте генератор к системе общего •
электроснабжения.
Не подключайте к другому генератору.•
Распаковка
При распаковке проверьте наличие всех
элементов. См. чертежи к данному руководству.
При отсутствии или неисправности каких-либо
деталей обратитесь в центр поддержки IVT.
Элементы управления
Переключатель двигателя (9):
Включение и выключение двигателя
Положение выключателя:
OFF (или STOP): Для выключения двигателя.•
ON: Для запуска двигателя.•
START (GN-6500): Для запуска двигателя через •
стартер. Запустив двигатель, верните ключ (9)
RUS
43
Page 44

44
Инструкция
RUS
fig.
1
ON
OFF
START
OFF
ON
ON
STOP
GN-850
GN-1500 GN-3000
GN-6500
fig.
2
GN-850
GN-1500 GN-3000
fig.
3
ON
OFF
fig.
4
CLOSED
OPEN
CLOSED
OPEN
GN-850
GN-1500 GN-3000
в положение «ON». Стартер не должен работать
более 5 секунд подряд. Если двигатель не
запускается, верните выключатель в исходное
положение и подождите 10 секунд перед
повторным запуском.
Стартер с отдачей (10)
(GN-850; GN-1500; GN-3000)
Чтобы запустить двигатель, слегка потяните
рукоятку стартера, пока не почувствуете
сопротивление, затем потяните ее резко.
холодного двигателя. Заслонка открывается и
закрывается вручную при помощи специального
рычажка; для обогащения смеси переместите
рычажок в положение «CLOSED».
Выключатель переменного тока (6)
Выключатель переменного тока автоматически
выключается в случае короткого замыкания
или значительной перегрузки генератора.
При срабатывании выключателя перед его
повторным включением проверьте, правильно
ли функционирует прибор и не превышена ли
номинальная нагрузка.
Зажим заземления (5)
Зажим заземления генератора соединен с
рамой генератора, металлическими деталями
генератора, не проводящими ток, и зажимами
заземления каждой розетки.
Для предотвращения поражения электрическим
током по причине неисправности подключаемых
к генератору устройств заземлите прибор с
помощью зажима заземления (5).
ВНИМАНИЕ: Не отпускайте резко рукоятку
стартера. Плавно верните рукоятку в прежнее
положение, чтобы не повредить стартер.
Топливный клапан (11)
Топливный клапан
расположен между
топливным баком и
к арб юр а то р ом.
Когда коромысло
клапана находится
в положении «ON»,
топливо поступает
из топливного бака
в карбюратор.
Выключив двигатель, верните коромысло в
положение «OFF».
Рычажок заслонки (13)
Заслонка используется для обеспечения
обогащенной топливной смеси для запуска
Система предупреждения о низком уровне
масла
(GN-1500; GN-3000; GN-6500)
Система предупреждения о низком уровне масла
(21) помогает предотвратить поломку двигателя
по причине недостаточного количества масла
в картере. До того, как уровень масла в картере
опустится ниже безопасного уровня, система
автоматически прекратит работу двигателя
(переключатель двигателя (9) остается в
положении «ON»).
Контрольная лампа (14)
Контрольная лампа горит при нормальной
работе генератора.
Выходы постоянного тока (4)
Выход постоянного тока используется ТОЛЬКО
для подзарядки 12-вольтных автомобильных
батарей.
Для подсоединения батареи к генератору
используйте соответствующий кабель. Клеммы
Page 45

Инструкция
кабеля подсоединяются к соответствующим
полюсам батареи (красная клемма – к
положительному полюсу, черная – к
отрицательному).
Предохранитель для цепи постоянного тока (3)
(если имеется)
При перегрузке генератора, в случае
неисправности батареи или нарушения
соединений между батареей и генератором,
предохранитель для цепи постоянного тока
автоматически прерывает цепь зарядки батареи
постоянного тока.
Инструкции по эксплуатации
Подключение к электросети здания
Подключение резервного источника питания
к электросети здания осуществляется
квалифицированным электриком. При этом
необходимо изолировать источник энергии
генератора от системы электроснабжения
и обеспечить соблюдение всех законов и
электротехнических правил и норм.
При неправильном подключении к
электросети здания электрический
ток от генератора подпитывает
общую сеть. Такая подпитка несет
риск поражения электрическим током
сотрудников общей электростанции, либо иных
лиц при контакте с линиями электроснабжения
в случае перебоя в питании. Получите
консультации на электростанции или у
квалифицированного электрика.
При неправильном подключении к
электросети здания электрический
ток от общей сети подпитывает
генератор. При восстановлении
электроснабжения генератор может взорваться
или привести к возгоранию электросети
здания.
В некоторых странах закон требует регистрации
генераторов на местных электростанциях.
Правила регистрации и эксплуатации см. в
местных нормативных актах.
Схемы заземления генератора
Бензиновые генераторы IVT заземлены путем
соединения элементов рамы генератора с
зажимами заземления (5) в розетках переменного
тока (1). Система заземления не соединена с
нулевым проводом переменного тока.
Местные нормативные акты, нормы и
правила могут требовать соединения системы
заземления с нулевым проводом переменного
тока. Результаты проверки состояния схемы
заземления при помощи тестера розеток для
генератора и домашней розетки отличаются.
Если местные нормативные акты, нормы
или правила требуют соединения
системы заземления с нулевым проводом
переменного тока, проконсультируйтесь
с квалифицированным электриком или
контролером электроаппаратуры. Предоставьте
ему схему электропроводки.
Зажим заземления (5) можно использовать
для заземления генератора или связи рамы
генератора с рамой машины, но только если того
требуют местный закон или электротехнические
правила и нормы. Перед использованием
зажима заземления проконсультируйтесь
с квалифицированным контролером
электроаппаратуры по вопросам норм и правил,
применимых в вашей стране.
Использование прибора в качестве генератора
Перед подключением прибора или шнура к
генератору:
Убедитесь, что генератор пригоден к работе. •
Неисправные устройства или кабели несут
опасность поражения электрическим током.
В случае неисправной работы, замедления •
хода или внезапной остановки прибора
немедленно отключите его. Отключите прибор
и проверьте, исправен ли он, не превышена ли
номинальная нагрузка генератора.
Проверьте, не превышены ли расчетные •
электрические характеристики генератора. Не
допускайте превышения предельной мощности
генератора. Использовать генератор на
предельной мощности допускается не более 5
минут.
ВНИМАНИЕ: Перегрузка может привести к
срабатыванию выключателя. Превышение
предельного времени работы с максимальной
мощностью или незначительная перегрузка
генератора не обязательно приводят к
срабатыванию выключателя, но сокращают
срок службы генератора.
Сократите время работы с предельной •
мощностью до 5 минут.
При длительной работе не превышайте •
номинальную мощность.
RUS
45
Page 46

46
Инструкция
RUS
GN-850 GN-1500 GN-3000 GN-6500
Выходное
напряжение
переменного
тока (В/Гц)
Номинальная
мощность
(W)
Предельная
мощность(W)
230/50 230/50 230/50 230/50
750 1000 2500 5000
850 1100 2800 5500
В любом случае необходимо учитывать •
суммарную мощность (Вт) всех подключаемых
устройств. Обратите внимание на коэффициент
мощности подключаемого прибора. Всегда
заранее рассчитывайте нагрузку, оказываемую на
генератор. Мощность генератора см. на ярлыке с
техническими данными.
Мощность подсоединяемых приборов см. на •
их ярлыках. Производители обычно указывают
номинальные характеристики рядом с номером
модели или серийным номером прибора.
Работа на переменном токе
Запустите двигатель.1.
Включите выключатель переменного тока (6).2.
Подключите устройство.3.
Для запуска большинства механизированных
приборов требуется мощность выше
номинальной.
Не превышайте указанный порог розетки по току.
В случае срабатывания выключателя переменного
тока в результате перегрузки цепи необходимо
снизить электрическую нагрузку на цепь, подождать
несколько минут и вернуть выключатель (6) в
исходное положение.
Работа на постоянном токе
Выходы постоянного тока используются ТОЛЬКО для
подзарядки 12-вольтных автомобильных батарей.
Подсоединение кабелей батареи:
Перед тем как подсоединять кабели для 1.
зарядки к батарее, установленной в машине,
отсоедините заземленный кабель батареи.
ВНИМАНИЕ: Батарея выделяет
взрывоопасный газ; не курите и не
разводите поблизости огонь. Во
время зарядки или использования батареи
обеспечьте соответствующую вентиляцию.
Подключите вилку кабеля для зарядки к 2.
выходу постоянного тока (4) генератора.
Подсоедините красную клемму к 3.
положительному (+) полюсу батареи.
Подсоедините черную клемму к 4.
отрицательному (-) полюсу батареи. Избегайте
соприкосновения клемм. Это может привести к
короткому замыканию и повреждению батареи.
Запустите генератор.5.
ВНИМАНИЕ: Не запускайте машину с
присоединенным кабелем для зарядки и
работающим генератором. Это может привести
к поломке машины или генератора.
Отсоединение кабелей батареи:
Остановите двигатель.1.
Отсоедините черную клемму от 2.
отрицательного (-) полюса батареи.
Отсоедините красную клемму от 3.
положительного (+) полюса батареи.
Извлеките вилку кабеля для зарядки из 4.
выхода постоянного тока (4) генератора.
Снова подсоедините заземленный кабель 5.
батареи машины.
Проверка перед эксплуатацией
Бензин с добавлением масла
(GN-850)
Емкость топливного бака составляет 4,2 л. 1.
Заполните бак, оставив примерно ¼ дюйма (6
мм) до горловины для расширения топлива.
Используйте бензин с добавлением масла. В 2.
противном случае двигатель может перегреться.
Смешайте бензин и масло в пропорции 50:1 или
40:1 (летом). Используйте специальное масло
для 2-тактных двигателей.
Отмерьте масло с помощью крышки 3.
топливного бака, как показано на рисунке.
Встряхните бак, а затем запускайте 4.
двигатель.
GAS 50 : 1 OIL
1 (L) : 0.02 (L)
2 (L) : 0.04 (L)
3 (L) : 0.06 (L)
4 (L) : 0.08 (L)
Page 47
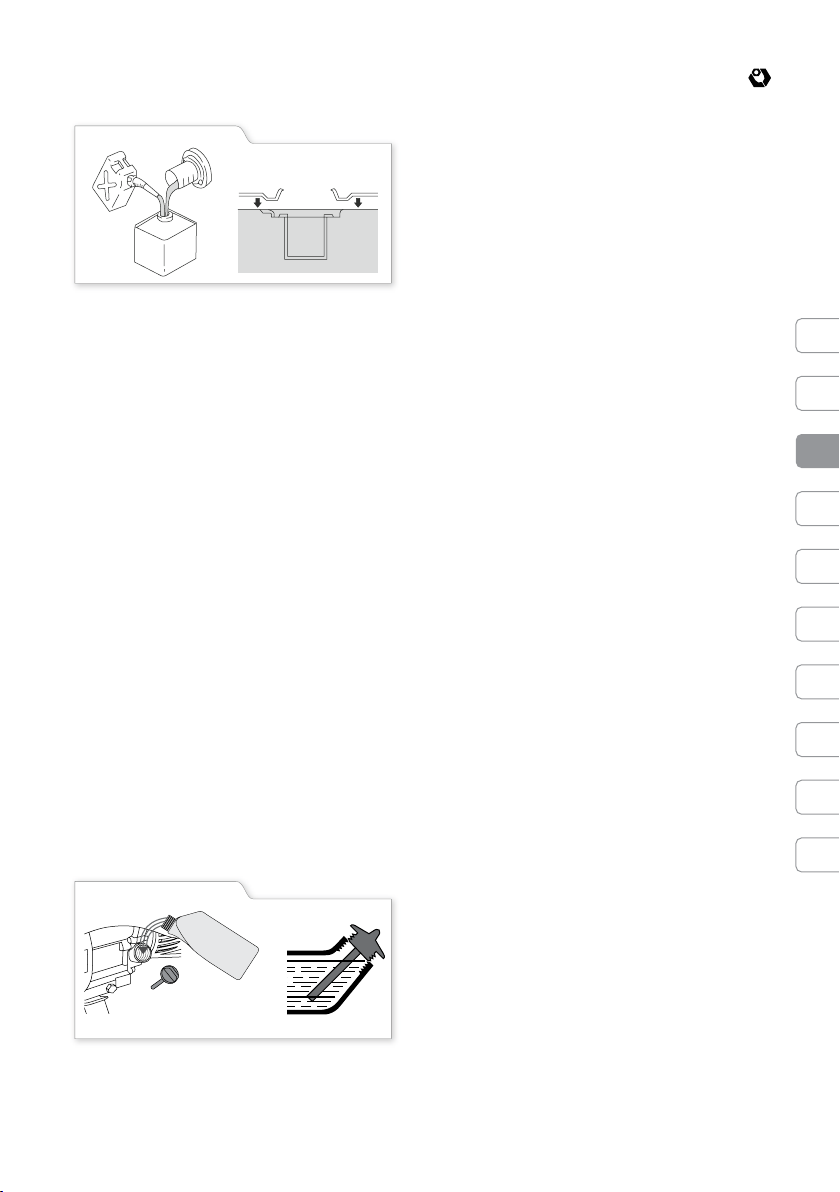
fig.
5
6 mm
Моторное масло
fig.
6
MAX
MIN
(GN-1500; GN-3000; GN-6500)
ВНИМАНИЕ: Моторное масло является
важнейшим фактором, влияющим на работу
и срок службы двигателя. Не рекомендуется
использовать немоющие масла, а также масла
для двухтактных двигателей, поскольку они
повреждают двигатель.
Перед каждым использованием генератора 1.
проверяйте уровень масла на ровной
поверхности с выключенным двигателем.
Используйте масло для 4-тактных двигателей, 2.
либо моющее моторное масло высшего качества
категории SG, SF/CC, CD, соответствующее
требованиям автопроизводителей США.
Маркировка моторных масел категории SG, SF/
CC, CD указана на канистре.
SG-SF/CC-CD-SINGLE VISCOSITY•
SG-SF/CC-CD-MULTI VISCOSITY•
Масло SAE 1OW-30 рекомендуется для общего •
использования при любой температуре. Масло с
другими уровнями вязкости, указанное в таблице,
может использоваться, если средняя температура
в вашей области находится в указанных пределах.
Снимите крышку маслозаправочного отверстия 3.
(7) и протрите масляный щуп.
Проверьте уровень масла, вставив щуп в 4.
заливную горловину не закручивая.
Если уровень масла низкий, заполните бак до 5.
горловины.
Инструкция
Если уровень топлива низкий, заполните бак. 2.
Не заливайте топливо выше топливного фильтра.
Емкость топливного бака:
6,7 л – GN-1500•
15 л – GN-3000 •
25 л – GN-6500•
Используйте бензин с октановым числом •
не ниже 86. Рекомендуется использовать
неэтилированный бензин, поскольку он образует
меньше отложений, а также продляет срок
службы выхлопной системы. Не используйте
несвежий или загрязненный бензин или смесь
масла/бензина.
Избегайте попадания в топливный бак грязи •
или воды.
Иногда при работе с высокой нагрузкой •
слышится легкое металлическое постукивание.
Не обращайте внимания.
Если дребезжание или постукивание •
появляется при работе с постоянной скоростью
вращения двигателя, при нормальной нагрузке,
используйте бензин другой марки. Если
дребезжание не прекращается, обратитесь к
официальному дилеру IVT.
ВНИМАНИЕ: Эксплуатировать двигатель с
постоянным постукиванием или дребезжанием
запрещено; ограниченная гарантия
дистрибьютора не распространяется на детали,
поврежденные по причине неправильного
использования.
• Кислородосодержащиевидытоплива
Некоторые марки бензина смешиваются со
спиртом или другими веществами для повышения
октанового числа. Такой бензин относится к
кислородосодержащим видам топлива. При
использовании кислородосодержащего вида
топлива убедитесь, что его октановое число
равно, по меньшей мере, 86.
RUS
Рекомендации по заправке
(GN-1500; GN-3000; GN-6500)
Проверьте указатель уровня топлива (15).1.
• Этанол(этиловыйспирт)
При использовании бензина, содержащего по
объему более 10% этанола, могут возникнуть
проблемы с запуском и/или качеством работы.
Этанолсодержащий бензин может иметь
маркировку «Газохол»
• Метанол(метиловыйилидревесныйспирт)
В состав метанолсодержащего бензина должны
входить сорастворители и противокоррозийные
вещества для защиты топливной системы. При
использовании бензина, содержащего по объему
47
Page 48
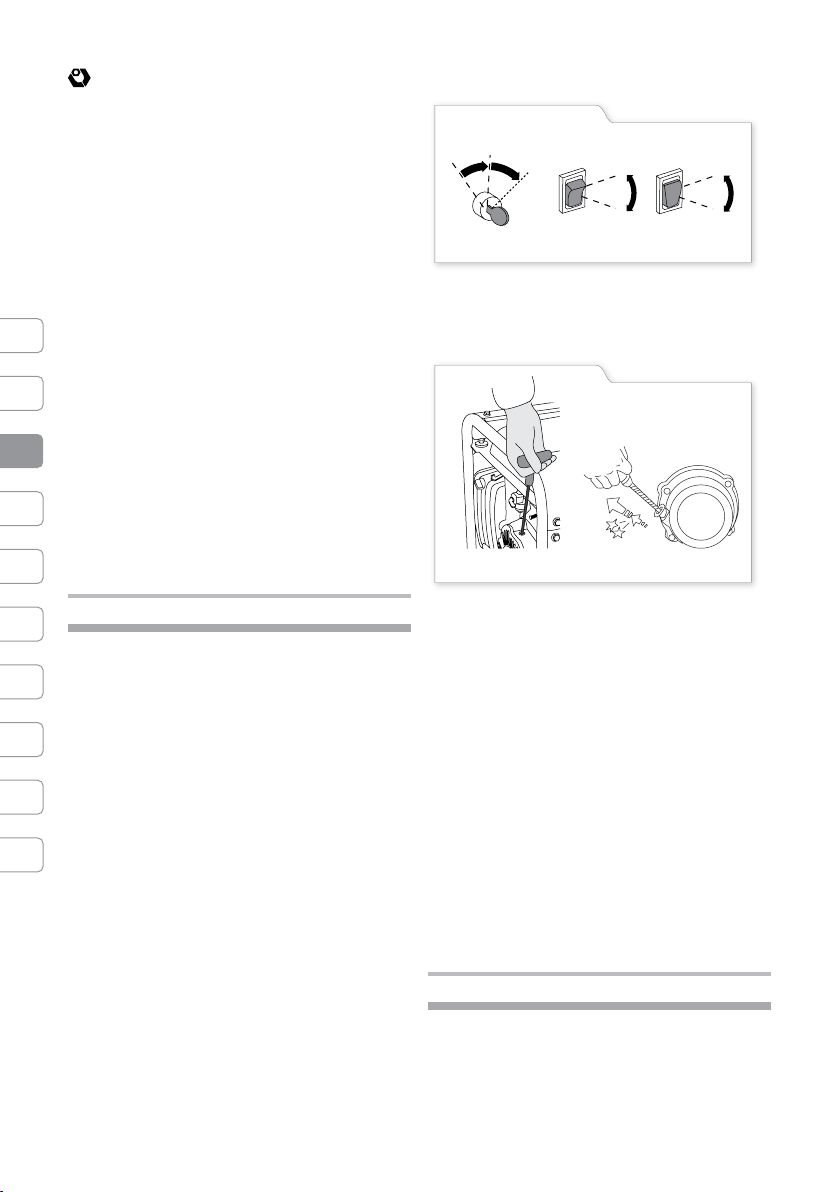
48
Инструкция
RUS
fig.
7
ON
OFF
START
OFF
ON
ON
STOP
GN-850
GN-1500 GN-3000
GN-6500
fig.
8
GN-850
GN-1500 GN-3000
более 5% метанола, могут возникнуть проблемы
с запуском и/или качеством работы, а также
повреждения топливной системы.
• МТБЭ(метилтретбутиловыйэфир)
Рекомендуется использовать бензин,
содержащий по объему до 15% МТБЭ. Перед
использованием кислородосодержащего
вида топлива постарайтесь подтвердить
его содержимое. В некоторых странах эта
информация указана на насосе. При обнаружении
каких-либо нежелательных симптомов в работе
переходите на стандартный неэтилированный
бензин. IVT не несет ответственности за поломку
или проблемы в работе топливной системы,
возникшие в результате использования
кислородосодержащего топлива; гарантия на
вышеуказанные случаи не распространяется.
ВНИМАНИЕ: Кислородосодержащие виды
топлива могут повредить окрашенные и
пластмассовые детали. Избегайте проливания
топлива во время заправки бака. Гарантия не
распространяется на повреждения, возникшие
в результате проливания топлива.
ВНИМАНИЕ: Не отпускайте резко рукоятку
стартера. Плавно верните рукоятку в прежнее
положение, чтобы предотвратить повреждение
стартера или корпуса.
Включение/выключение
Запуск двигателя
Выключите из розеток все электроприборы. 1.
Генератор трудно запустить при подключенной
нагрузке.
Переведите переключатель двигателя (9) в 2.
положение «ON».
Рычажок заслонки (13) закрывается, когда 3.
двигатель остывает. Закрыть заслонку можно
вручную, передвинув рычажок в положение
«CLOSED»..
Запустите двигатель4.
(GN-6500)
Переведите переключатель двигателя (9) •
в положение «START» (держите не более 5
секунд).
Запустив двигатель, верните ключ в •
положение «ON».
(GN-850; GN-1500; GN-3000)
Переведите переключатель двигателя (9) в •
положение «ON».
Слегка потяните рукоятку стартера (10), пока •
не почувствуете сопротивление, затем потяните
ее резко.
Если заслонка (13) была закрыта вручную, 5.
переместите рычажок в положение «OPEN»
(открыто), когда двигатель нагреется.
Остановка двигателя
В случае аварии:
Чтобы остановить двигатель в случае аварии, 1.
переведите переключатель двигателя (9) в
положение «OFF».
В обычном режиме:
Переведите выключатель переменного тока 1.
(6) в положение «OFF».
Выключите из розеток все электроприборы. 2.
Отсоедините кабели для зарядки батареи
постоянным током.
Переведите переключатель двигателя (9) в 3.
положение «OFF» (или STOP).
Переведите топливный клапан (11) в 4.
положение «OFF».
Обслуживание и хранение
Перед проведением ремонта отключите •
прибор и подождите до его полной остановки.
Содержите прибор и вентиляционные •
отверстия в чистоте. В случае выхода из строя,
несмотря на совершенные условия производства
Page 49
Инструкция
и испытаний, ремонт должен выполняться в
официальном сервисном центре IVT.
Регулярная очистка и обслуживание •
гарантируют высокую эффективность и
продолжительную эксплуатацию прибора.
Все гайки, болты и винты должны быть плотно •
Для поддержания генератора в исправном
состоянии требуется периодическое
техническое обслуживание и регулировка.
Производите обслуживание и осмотр с
периодичностью, указанной в графике
технического обслуживания.
затянуты.
Замените поврежденные или изношенные •
детали.
Храните прибор в сухом недоступном для •
детей месте, на безопасном расстоянии от
легковоспламеняющихся материалов.
Избегайте попадания воды на прибор!•
ОБСЛУЖИВАНИЕ:
Воздушный фильтр
Свеча зажигания
Отстойник
Декарбонизация
ОБСЛУЖИВАНИЕ:
Моторное масло
Воздушный фильтр
Отстойник
Свеча зажигания
Клапанный зазор
Топливный бак и фильтр
Топливопровод
(1*) Работа в пыльном помещении требует более частого осмотра прибора. (2*) Если владелец не имеет
подходящих инструментов и квалификации механика, обс луживание производит официальный дилер IVT.
(3*) Чтобы определить периодичность обс луживания при коммерческом профессиональном использовании,
заносите часы эксплуатации в журнал.
очистка (замена при
необходимости)
очистка (замена при
необходимости)
очистка (замена при
необходимости)
удаление нагара, проверка,
регулировка
GN-1500; GN-3000; GN-6500
(производится через определенное количество месяцев или часов
После
каждого
использова
проверка
уровня
замена
проверка
очистка
очистка
проверка/
очистка
проверка/
регулировка
очистка
проверка
(замена при
необходимости)
эксплуатации, в зависимости от того, что наступит раньше)
x
x
проведением технического обслуживания. Если
обслуживание проводится с работающим
двигателем, обеспечьте в помещении хорошую
GN-850
(производится через определенное количество месяцев
Через месяц
или 20 часов
эксплуатации
(3*)
x x
ВНИМАНИЕ: В выхлопных газах
содержится ядовитый угарный газ.
Выключите двигатель перед
РЕГУЛЯРНОЕ ОБСЛУЖИВАНИЕ
или часов эксплуатации, в зависимости от того, что
ежемесячно
50 часов
РЕГУЛЯРНОЕ ОБСЛУЖИВАНИЕ
месяца или 50
x (1*)
Каждые 3
часов (3*)
x (1*)
наступит раньше)
Каждые 3 месяца или
Каждые 6
месяцев или
100 часов (3*)
x
x
150 часов
x
x
x
Каждый
год или 300
часов (3*)
x (2*)
x (2*)
Каждые два
года (3*)
x (2*)
49
RUS
Page 50

50
Инструкция
RUS
fig.
9
fig.1
0
GN-850
GN-1500
GN-3000
GN-6500
fig.1
1
OFF
вентиляцию.
ВНИМАНИЕ: Для технического обслуживания
и ремонта используйте только оригинальные
запчасти IVT или аналогичные им. Запасные
части более низкого качества могут повредить
генератор.
Замена моторного
масла
(GN-1500; GN-3000;
GN-6500)
1.
Полностью слейте
масло, пока двигатель
не остыл.
Извлеките пробку для спуска масла 2.
(8), уплотнительную шайбу, крышку
маслозаправочного отверстия (7) и слейте
масло.
Вставьте пробку (8) и уплотнительную шайбу. 3.
Убедитесь, что пробка вставлена плотно.
Заполните бак рекомендуемым маслом и 4.
проверьте уровень.
Количество масла:
0,6 л – GN-1500•
1,1 л – GN-3000•
1,1 л – GN-6500•
ОСТОРОЖНО! Частый и длительный
контакт с отработавшим моторным
маслом может вызвать рак кожи.
Даже если работа с отработавшим маслом не
является ежедневной, по окончании работы
рекомендуется как можно скорее тщательно
вымыть руки с мылом.
Утилизируйте отработавшее моторное масло
экологически чистым способом. Рекомендуется
поместить его в герметичный контейнер и
отправить на местную станцию технического
обслуживания, либо в центр по переработке. Не
вывозите масло вместе с мусором и не сливайте
в землю.
ВНИМАНИЕ: Использование бензина
или горючих растворителей для
очистки фильтрующего элемента
может привести к возгоранию или
взрыву. Используйте только мыльную воду или
негорючие растворители.
ВНИМАНИЕ: Не используйте генератор без
воздушного фильтра (12). Это может привести
к быстрому износу двигателя.
Снимите зажимные скобы крышки воздушного 1.
фильтра (17), крышку фильтра и фильтрующий
элемент.
Промойте элемент в растворе бытового 2.
моющего средства и теплой воды, тщательно
прополощите или промойте в негорючем или
тяжелом (с высокой температурой вспышки)
растворителе. Тщательно высушите элемент.
Погрузите элемент в чистое машинное масло и 3.
отожмите его. Если в элементе осталось слишком
много масла, двигатель коптит при начальном
запуске.
Вставьте фильтрующий элемент и закрутите 4.
крышку.
Очистка отстойника топлива (18)
Топливный отстойник (18) предотвращает
попадание в карбюратор грязи или воды,
содержащейся в топливном баке. Если генератор
долгое время не использовался, следует
почистить отстойник.
Обслуживание воздушного фильтра
Засоренный воздушный фильтр (12) препятствует
поступлению воздуха в карбюратор. Чтобы
предотвратить нарушение в работе карбюратора,
регулярно осматривайте воздушный фильтр.
Работа в пыльном помещении требует более
частого осмотра прибора.
Переведите топливный клапан (11) 1.
в положение «OFF». Снимите отстойник (18),
O-образное кольцо и фильтр.
Очистите отстойник, кольцо и фильтр в 2.
негорючем или тяжелом растворителе.
Page 51

Установите фильтр, O-образное кольцо 3.
fig.1
2
0.7-0.8mm
и отстойник (18) на место.
Переведите топливный клапан (11) в 4.
положение «ON» и проверьте на наличие утечки.
Обслуживание свечи зажигания
Рекомендуемые свечи зажигания:
LDF6TC. or TME170: BPR6ES,
TME260,
TME360,
TME410:BPR5ES,
TME280:BP6ES
Чтобы обеспечить надежное функционирование
двигателя, свеча зажигания должна быть чистой
и иметь правильный зазор.
При работе двигателя глушитель сильно
нагревается. Не прикасайтесь к глушителю.
Снимите наконечник свечи зажигания 1.
(19).
Очистите от грязи область вокруг 2.
свечи зажигания.
Извлеките свечу зажигания с помощью 3.
ключа (24).
Осмотрите свечу зажигания. Замените 4.
ее, если изолятор поврежден. Для повторного
использования очистите свечу проволочной
щеткой.
Измерьте зазор свечи при помощи 5.
толщиномера. Скорректируйте зазор, аккуратно
согнув боковой электрод. Толщина зазора должна
составлять: 0,7 – 0,8 мм (0,028 – 0,031 дюйма)
Инструкция
Проверьте состояние шайбы свечи 6.
зажигания и ввинтите свечу вручную, чтобы
предотвратить свинчивание резьбы через нитку.
Установив свечу, затяните ее при 7.
помощи свечного ключа (24), чтобы уплотнить
шайбу. При установке новой свечи зажигания
затяните ее на пол-оборота для уплотнения
шайбы. При повторной установке уже
использованной свечи зажигания затяните ее на
1/8-1/4 оборота для уплотнения шайбы.
ВНИМАНИЕ: Плотно затяните свечу зажигания.
Неправильно установленная свеча зажигания
может сильно нагреваться и повредить
двигатель.
Не используйте свечи зажигания с
неподходящим тепловым коэффициентом.
Используйте только рекомендованные или
аналогичные им свечи зажигания.
RUS
Время хранения Рекомендуемый порядок обслуживания, помогающий избежать тяжелого запуска
Менее одного месяца Подготовка не требуется
От 1 до 2 месяцев Заправьте генератор свежим бензином и добавьте бензиновую присадку*
От 2 месяцев до 1 года
Более 1 года
Заправьте генератор свежим бензином и добавьте бензиновую присадку*
слейте топливо из поплавковой камеры карбюратора
слейте топливо из отстойника топлива
Заправьте генератор свежим бензином и добавьте бензиновую присадку*
слейте топливо из поплавковой камеры карбюратора
слейте топливо из отстойника топлива
извлеките свечу зажигания. Налейте в цилиндр столовую ложку машинного масла.
Медленно потяните тяговый трос, чтобы распределить масло. Установите свечу
зажигания.
Замените масло. (GN-1500; GN-3000; GN-6500)
После снятия с хранения слейте бензин в специальный контейнер, а перед запуском
заправьте генератор свежим бензином.
*Используйте бензиновые присадки, увеличивающие срок хранения. За рекомендациями по выбору
присадок обратитесь к официальному дилеру IVT в вашем регионе.
51
Page 52

52
Инструкция
RUS
fig.1
3
fig.1
4
e
d
21
28
c
b26 a27
Перевозка / Хранение
При перевозке генератора переведите
переключатель двигателя (9) и топливный клапан
(11) в положение «OFF». Поддерживайте генератор
в устойчивом положении, чтобы предотвратить
утечку топлива. Пролитое топливо, а также его
пары легковоспламенимы.
ВНИМАНИЕ: Контакт с горячим
двигателем или выхлопной системой
может привести к тяжелым ожогам
или возгоранию. Остудите двигатель перед
перевозкой или отправлением генератора на
хранение.
Избегайте падения или удара генератора при
перевозке. Не составляйте на генератор тяжелые
предметы.
Перед длительным хранением прибора:
Убедитесь, что •
место хранения
является достаточно
сухим и чистым.
О бс лу жи ва ни е •
производится
согласно таблице в
данном разделе.
Слейте бензин с •
карбюратора, ослабив сливной винт. Слейте бензин
в специальный контейнер.
ВНИМАНИЕ: Бензин является
л е г к о в о с п л а м е н я ю щ и м с я
веществом и взрывоопасным при
определенных условиях. Сливайте бензин в
хорошо проветриваемом помещении с
отключенным двигателем. Не курите во
время сливания бензина.
Установка дополнительных деталей
Установка колес
26. Ось
27. Колесо
28. Виброизолятор
29. Опорная лапка
a. Плоская шайба
b. Закрепляющий штифт
c. Болты с головкой, 30мм
d. Болты с головкой, 20мм
e. Гайка
Вставьте ось (26) в монтажные кронштейны 1.
рамы;
Установите на ось колесо (27);2.
Зафиксируйте колесо на оси при помощи 3.
плоской шайбы и закрепляющего штифта;
Аналогичным образом установите второе 4.
колесо;
Закрепите виброизоляторы (28) на каждой 5.
опорной лапке (29) при помощи двух гаек и
болтов с головкой (30 мм);
Закрепите каждую опорную лапку (29) при 6.
помощи двух гаек и болтов с головкой (20
мм);
Замена масла.
(GN-1500; GN-3000; GN-6500)
Извлеките свечу зажигания и добавьте 1.
в цилиндр примерно одну столовую ложку
чистого машинного масла.
Проверните коленвал двигателя 2.
несколько раз, чтобы распределить масло, и
установите свечу на место.
Медленно потяните рукоятку стартера, 3.
пока не почувствуете сопротивление.
В этот момент поршень поднимается 4.
(конец такта сжатия), а впускной и выпускной
клапаны закрываются. Такое положение
двигателя при хранении поможет предотвратить
внутреннюю коррозию.
Page 53

Инструкция
fig.1
5
d
d d
d
d
d
d
d
Установка ящика для аккумуляторной
батареи
30. Ограждение батареи
31. Ящик для аккумуляторной батареи
32. Кабель стартера
33. Соленоид стартера
34. Кабель заземления
35. Кронштейн аккумуляторной батареи
36. Панель ограждения батареи
Установите на раме ограждение батареи 1.
(30). Установите на ограждении (30) ящик для
аккумуляторной батареи (31) и затяните болты.
Протяните кабель стартера (32) под баком и 2.
соедините его с соленоидом (33).
Подсоедините кабель заземления (34) к 3.
заднему корпусу генератора.
Поместите в ящик (31) батарею и закрепите 4.
при помощи кронштейна (35). Подсоедините
кабель стартера (32) сначала к положительному
(+), а затем к отрицательному (-) полюсу батареи.
При отсоединении начинайте с отрицательного
(-) полюса.
Установите на ограждении (30) панель 5.
ограждения батареи (36).
Поиск и устранение неисправностей
Двигатель не запускается
Проверьте наличие топлива в баке• ►
при необходимости заполните топливный бак.
(GN-1500; GN-3000; GN-6500) •
Проверьте количество масла в двигателе ► при
необходимости добавьте масла.
Проверьте свечу зажигания на наличие •
искры ► Если искра отсутствует, замените
свечу. Если искра отсутствует, обратитесь к
официальному дилеру IVT.
Для проверки необходимо выполнить следующее:
Снимите наконечник свечи зажигания 1.
и протрите область вокруг свечи.
Извлеките свечу и вставьте ее в 2.
наконечник.
Установите боковой электрод свечи на 3.
крышке цилиндра.
Запустите двигатель. Через зазор 4.
должны проскакивать искры.
Убедитесь, что вокруг свечи зажигания 5.
отсутствует пролитое топливо. Пролитое топливо
может воспламениться.
Проверьте, поступает ли топливо •
в карбюратор. ► Если топливо не поступает,
прочистите топливный отстойник.
Для проверки необходимо выполнить следующее:
Заглушите двигатель и ослабьте 1.
сливной винт.
Переведите переключатель двигателя 2.
в положение «ON» и слейте топливо.
Если двигатель не запускается, обратитесь к
официальному дилеру IVT.
RUS
Защита окружающей среды
Отправляйте сырье на переработку, а
не в мусор!
Прибор, дополнительные приспособления и
упаковку следует отправить на экологически
безопасную переработку. Пластиковые элементы
отправляются на классифицированную
переработку. Настоящие инструкции напечатаны
на вторичной бумаге, не содержащей хлор.
53
Page 54

54
Нұсқаулық
KZ
ENG.SW.
ON
OFF
POWER ON
VOLTMETER
AC SOCKET
DC
+
-
AC
DC LIFE
OUTLET
PROTECTION
10
19
23
24
22
26
19
10 78 9 314 54
17
12
1518 16 2 21 6 1
13 11
23
24
22
6 16 9 15
11
2 14
3 17 12 13
1 4
GN-850
GN-1500
Page 55

ENG.SW.
ON
OFF
POWER ON
VOLTMETER
AC SOCKET
DC LIFE
AC SOCKET
DC
PROTECTION
AC
PROTECTION
ENG.SW.
POWER ON
VOLTMETER
AC SOCKET
DC LIFE
DC
PROTECTION
AC SOCKET
AC
PROTECTION
ON
OFF
19
7 2114 1 5
4
17
11
151216 9 2 6 3 25
23
24
22
19
10 78 14 52141
12 11
1615 9 2 6 3
23
24
22
GN-3000
Нұсқаулық
KZ
GN-6500
55
Page 56

56
Нұсқаулық
KZ
Қ ұ р а л д ың қ ұ ры л ы с бө л і к т ер і
1.Ауыспалы тоқ көздері
2.Вольтметр
3.Үзіліссіз тоқ тізбегінің
сақтандыруышы
4.Үзіліссіз тоқтың шығуы
5.Жерлендірудің қысқышы
6.Ауыспалы тоқ көзінің
ажыратқышы
7.Май құю саңылауының
қақпағы
8.Майды жіберуге арналған
тығын
9.Қозғалтқыштың ажыратқышы
10.Берілісті стартердің иінсабы
11.Жанармайлық қақпақша
12.Ауа сүзгісі
13.Жапқыш тартпасы
14.Бақылаушы шам
15.Жанармай деңгейінің
көрсеткіші
16.Жанармай багының қақпағы
17.Қысқыш қапсырма шегелер/
бұрамалар ауа сүзгісіне
арналған
18.Жанармай тұндырғышы
19.Оталдыру шырағданының
ұшы
20.Сөндіргіш
21.Май деңгейі төмендігінің
индикаторы
22.Батареяны қоректендіруші
кабель
23.Тығын
24.Шырағдан кілті
25.Тұтқа*
26.Май/жанармай
араластыруға арналған ыдыс*
* Жабдықтар
Аталған, сондай-ақ
бейнеленген бөлшектердің
кейбіреуі кешен құрамына
кірмейді.
Таңбалар
Құра лд ың сипатт ам ас ы
Үлгі
Ауыспалы тоқтың номиналды шығыс
қуаттылығы 230В/50Гц (Вт)
Ауыспалы тоқтың максималды шығыс
қуаттылығы 230В/50Гц (Вт)
Номиналды/максималды қуаттылық кезіндегі
шығыстағы ауыспалы тоқтың күші 230В /
50Гц (В / Гц)
Ауыспалы тоқтың шығыс қысымы (В)
Тарам
Үнемі тоқтың шығыс қысымы (В)
Үнемі тоқ (А)
Қалыпты кездегі айналым жиілігі (айн./мин.)
Жұмыс көлемі
Қозғалтқыш қадамының жиілігі
Қозғалтқыштың салқындау түрі
Жұмсалған жанармай
Жұмсалған май
Жанармай багының сыймдылығы (л)
Май багының сыймдылығы (л)
салмағы (kg)
Дыбыстық қысым деңгейі
Дыбыстық қуат деңгейі
GN-850 GN-1500 GN-3000 GN-6500
750 1000 2500 5000
850 1200 2800 5500
3.0/3.5 4.3/4.7 10.8/12.1 21.7/24
230/50 230/50 230/50 230/50
1 1 1 1
12 12 12 12
8.3 8.3 8.3 8.3
3000 3000 3000 3000
63 87 208 389
2 4 4 4
Ауамен суыту Ауамен суыту Ауамен суыту Ауамен суыту
Май қосылған
жанармай
-
4.2 6.70 15.00 25.00
- 0.60 1.10 1.10
19.00 28.00 42.00 97.00
46 68 68 73
57 79 79 93
этилденбеген
жанарма
SAE 10W-30
SAE 10W-40
этилденбеген
жанарма
SAE 10W-30
SAE 10W-40
этилденбеген
жанарма
SAE 10W-30
SAE 10W-40
Page 57

Нұсқаулық
Қолдану кезіндегі техникалық
к а уі п сі зд і к
Қауіпсіздіктің жалпы ережелері
Осы нұсқаулық ережелерін сақтай отырып
қолдану барысында бұл жанармайлық генератор
жұмыстың қауіпсіздігі мен сенімділігін қамтамасыз
етеді.
Қауіпсіздік техникасы бойынша келесі
нұсқаулықтар құрылғыны дұрыс қолдануға
және дербес қауіпсіздікті қамтамасыз етуге
кепілдік береді. Сондықтан оларды мұқият оқып
шығыңыз.
Аталмыш құралды үшінші тұлғаға беру барысында
осы техникалық қауіпсіздік нұсқаулығын бірге
беру керек.
Осы нұсқаулықты және жеткізілетін кешен
құрамына кіретін басқа да әдебиеттерді сақтап
қойыңыз.
Қауіпсіздік техникасын және құралда көрсетілген
қауіпсіздік ережелерін сақтаңыз.
Жұмысты бастамас бұрын құралдың
бөлшектерімен танысыңыз, бірақ ең алдымен
жедел тоқтату амалдарымен танысыңыз.
Аталған қарапайым ережелерді сақтау сіздің
құралдың үнемі жұмысқа жарамдылығын
қамтамасыз етуге мүмкіндік береді.
Пайдалану алдында құралды дұрыс жинақтау ∙
қажет.
Құралды тек мақсаты бойынша ғана ∙
пайдаланыңыз.
Құралдағы ескерту белгілеріне назар ∙
аударыңыз, қорғаушы жабдықтарды пайдалану
бойынша нұсқаулық талаптарын сақтаңыз.
Сақтық, тәжірибелілік, ойластырылғандық,
жұмысқа тиісті қатынас және қолданушы,
тасымалдаушы, оны жөндеуге және сақтауға
қатысты тұлғалардың дайындығы келеңсіз
оқиғалардың алдын алады.
Құралды қараусыз қалдырмаңыз. ∙
Құралды балалардың пайдалануына жол ∙
бермеңіз. Балалардың құралман ойнауына жол
бермеңіз.
Жұмыс алаңына жақын жерде балалардың ∙
және жануарлардың болуына жол бермеңіз.
Егде адамдар жұмыс істеп тұрған құралдан
қауіпсіз қашықтықта болуы керек. Жақын маңда
егде тұлғалар болса, әсіресе балалар мен үй
жануарлары болса жұмысты тоқтатыңыз.
Құралмен жұмыс барысында пайдаланушы ∙
үшінші тұлғалар үшін жауапты болып саналады.
Пайдалану бойынша нұсқаулықпен ∙
таныспаған тұлғалар, жасы құралды пайдалануға
болатын шекке жетпеген балалар, сондай-ақ
ішімдікке немесе есірткіге мас күйдегі тұлғалар,
медициналық дәрмек әсеріндегі адамдар
құралмен жұмыс жасауға рұқсат ала алмайды.
Оператордың жасы жергілікті нормативтік
актілермен анықталады.
НАЗАР АУДАРЫҢЫЗ: Алкоголь,
кейбір дәрілік препараттар және
есірткілік заттар, сондай ақ ыстық
көтерілу және қалжырау сияқты денсаулық
күйлері реакция жылдамдығын төмендетеді.
Мұндай жағдайларда электрлік құралды
пайдаланбаңыз!
Барлық қорғаушы жабдықтардың дұрыс ∙
орнатылғандығына және олардың жұмысқа
жарамды екендігіне көз жеткізіңіз.
Құралдың қорғаушы қабы болмаса, не болмаса ∙
ол зақымданған болса пайдаланбаған абзал.
Құралды өзіндік қосылудан сақтаңыз. Желіге ∙
қосар алдында ажыратқыштың «off» (сөнд.)
қалпында екендігіне көз жеткізіңіз.
Құралды іске қосу алдында ондағы барлық ∙
кілттер мен орнату бөлшектерін алыңыз.
Жарамсыз ажыратқышы бар құралды ∙
пайдаланбаңыз. Ажыратқышы жарамсыз құрал
қауіпті және жөндеуді талап етеді.
Құралдың бекітілмей қалған бөлшектерін ∙
(сақианалар, болттар, бұрамалар және т. б.)
немесе ақауларын тексеріңіз. Машина жұмысының
қауіпсіздігін қамтамасыз ету үшін болттар мен
бұрандалардың жақсы бұралғандығын әлсінәлсін тексеріп отырыңыз. Қажет болса құралды
пайдалану алдында зақымданған не ақаулы
бөлшектерді жөндеңіз, болмаса алмастырыңыз.
Ақаулы құралды пайдалану кезінде операторға
немесе маңайдағы егде тұлғаларға ауыр
жарақаттар салынуы мүмкін.
Жұмыс үшін арнайы киімді пайдаланыңыз. ∙
Кең киім, әшекейлер, ұзын шаш құралдың
қозғалмалы бөліктеріне ілініп қалуы мүмкін.
Сәйкес арнайы жұмыс киімін, ұзын шалбар және
мықты аяқ киім киіңіз. Ұшатын қалдық заттардан
аяғыңыз Бен табаныңызды қорғаңыз. Жалаң аяқ
немесе үсті ашық аяқ киіммен жұмыс істемеңіз.
Ұзын шашты артыңызға жинаңыз.
Тұтқаларды таза және құрғақ етіп ұстаңыз. ∙
НАЗАР АУДАРЫҢЫЗ! Жеке бас
қорғаныс құралдарын
пайдаланыңыз!
KZ
57
Page 58

58
Нұсқаулық
KZ
Қорғаушы жабдықтар мен ЖҚҚ
сіздің денсаулығыңыз бен сіздің
маңайыңыздағылардың денсаулығының
қорғанысын қамтамасыз етеді, сондайақ құралдың үзіліссіз жұмысына кепілдік
береді.
Қорғаушы көзәйнектерді, қорғаушы ∙
саусаққаптарды, мықты таймайтын аяқ киімді
және қажет болғанда дулығаны киіңіз. Шаң пайда
болатын жұмыстар барысында шаңға қарсы
респираторды пайдаланыңыз. Егер шу деңгейі
85 дБ(A) артық болса міндетті түрде қорғаушы
құлаққаптарды пайдаланыңыз.
Жұмыс барысында тұрақты қалыпты ∙
сақтаңыз. Үнемі тепе-теңдікті сақтаңыз.
Құрал кері бұрылған болса, немесе жұмысқа ∙
жарамсыз күйде болса қосуға болмайды.
Құралды пайдаланбас бұрын уберите с ∙
рабочей площадки все алаңнан барлық бөтен
заттарды алып тастаңыз, жұмыс барысында
құралдың астына егде заттардың түсуіне жол
бермеңіз. Жұмыс алаңындағы тазалықты
сақтаңыз. Қоршалған алаңдарда жарақаттану
қауіпі үлкен.
Құралды қызудан сақтаңыз. Қалыпты ∙
айналу жылдамдығын таңдап алатын болсаңыз
қауіпсіздік пен тиімділік артады.
Құралды күндізгі жарықта немесе жақсы ∙
жарықтандыру кезінде пайдаланыңыз. Көріну
нашар жағдайларда құралды пайдаланбаңыз.
Құралды құлатпаңыз, құралдың қандай да ∙
бір кедерглермен қақтығыстармен кездесуіне
жол бермеңіз.
Құралдың астына бөтен заттар түскен ∙
жағдайда құралдың ақаусыз екендігін тексеріңіз
және қажетті жөндеу жұмыстарын жүзеге
асырыңыз.
Шамадан тыс діріл пайда болса жедел арада ∙
қозғалтқышты сөндіріңіз және себебін анықтаңыз.
Діріл ақаудың белгісі болып табылады.
Пайдалану алдында құралды дұрыс ∙
жинақтау қажет. Құралды тек жарамды күйде
ғана пайдаланыңыз. Операторға қауіп төндіретін
қандай да бір ақаулар анықталған жағдайда
оларды міндетті түрде жою керек.
Ақауланған немесе тозған бөлшектерді ∙
алмастырыңыз. Тек түпнұсқалық бөлшектерді
ғана пайдаланыңыз. Басқа тараптық өндіруші
дайындаған бөлшектер нақты сай болмайды
және жарақаттану қауіпін төндіреді.
Электрлік немесе механикалық құралдарды ∙
алып тастауға тыйым салынады.
Жұмыс орнын қалдырмас бұрын, жөндеу ∙
немесе қарау алдында құралды міндетті түрде
сөндіріңіз, ашаны тоқ көзінен ажыратып, толық
тоқтағанша күте тұрыңыз.
Құралды тазалау және жөндеу кезінде сақ ∙
болыңыз. Сөндірілген құралды тегіс, таза жерге
орналастыра отырып күйлеңіз.
Абай болыңыз. Жұмыс барысын
бақылап отырыңыз. Алаңдай
отырып құралды басқаруды
жоғалтып алу мүмкін. Жұмысқа дайындықпен
кірісіңіз.
Жанармайлық қозғалтқышты
құралдармен жұмыс барысына арналған
қауіпсіздік техникасы ережелері
НАЗАР АУДАРЫҢЫЗ! Жанармай тез
тұтанатын зат болып табылады.
Жанармаймен абай болыңыз.
Жанармайды арнайы канистрде сақтаңыз. ∙
Жанармай багының қақпағын тығыздап
жабыңыз.
Бакты тек ашық ауада ғана толтырыңыз, құю ∙
кезінде шылым шекпеңіз
Алдымен бакты толтырыңыз, содан соң ғана ∙
қозғалтқышты қосыңыз.
Бакты толтыру алдында бітеуішті суытыңыз. ∙
Қозғалтқыш жұмыс істеп тұрса және әлі ∙
суымаған болса қақпақты босатпаңыз және
жанармай құймаңыз.
Жанармай төгілген кезде қозғалтқышты іске ∙
қоспаңыз, құралды төгілген жанармайдан алшақ
қойыңыз және жанармай буы таралғанша от
көзінің пайда болуына жол бермеңіз.
Қозғалтқышты қоспас бұрын төгілген ∙
жанармайды сүртіңіз.
Жанармай бактарын сенімді жерде ∙
сақтаңыз.
Қауіпті улы газ жиналмас үшін құралды жабық ∙
жерлерде және тұйық кеңістікте қоспаңыз.
НАЗАР АУДАРЫҢЫЗ! Жарамсыз газ
құрамында улы газ болады, ол
түссіз және иіссіз болады. Жарамсыз
газды ауамен тыны салу естен айрылуға
немесе өлім-жітімді нәтижеге әкеліп соғуы
мүмкін. Бөлініп шығатын улы газдардың
мөлшері шартты мөлшерден артық болмас
үшін сәйкес желдету шарттарын қамтамасыз
етіңіз.
Құралды багында жанармайы бар күйде ∙
будың тұтануы мүмкін жерлерде сақтамаңыз
Өрттің пайда болу қауіпін төмендету үшін ∙
Page 59
Нұсқаулық
қозғалтқышты, бітеуішті, батареялық бөлімді
және жанармай қоймасын таза ұстаңыз, құралды
от пен ұшқыннан сақтаңыз.
Газ шығаратын жүйелер кейбір ∙
материалдардың тұтануына болатын
температураға дейін қызады. Тез тұтанатын
материалдардан құралды қауіпсіз қашықтықта
ұстаңыз.
Жұмыс кезінде сөндіргіш қатты қызады және ∙
сөндіргеннен кейін де біраз уақыт бойы ыстық
күйінде қалады. Күйіп қалмас үшін сөндіргішке
жанаспаңыз. Құралды жабық жайға енгізбес
бұрын алдымен қозғалтқышыты суытып алыңыз.
Электр қауіпсіздігі ережелері
НАЗАР АУДАРЫҢЫЗ! Электр
құралдарын қолдану барысында
электр тоғының соққысын
болдырмау және жеке бастың жарақаттану
оқиғасына жол бермеу мақсатыннда
техникалық қауіпсіздік бойынша мынадай
ережелерді сақтау керек. Құралды қолданар
алдында мұқият оқып шығыңыз және
қауіпсіздік ережелерін қатаң сақтаңыз.
АБАЙ БОЛЫҢЫЗ! Күюден немесе тоқ
соққысынан сақтану үшін электр өткізгіш
бөлшектерге жанаспаңыз.
НАЗАР АУДАРЫҢЫЗ! ЭЛЕКТРЛІК ТОҚ
СОҚҚЫСЫНА ШАЛДЫҒУ ҚАУІПІ БАР!
Өндірістік ортаны бақылаңыз. Электрлік құралды
жауын астында пайдаланбаңыз. Электрлік
құралдарды ылғалды және дымқыл жайларда
пайдаланбаңыз. Жұмыс орнын құрғақ ұстаңыз,
жарықтандырудың жақсы болуын қамтамасыз
етіңіз. Құралды ылғалдан сақтаңыз. Құралды
ашық кеңістікте түнде қалдырмаңыз. Судың,
ылғалдың электрлік құралға түсуі кезінде
электрлік тоқ соққысына шалдығу қауіпі артады.
Қауіпсіздік техникасы бойынша ерекше е
режелер
Оқыс жағдайларда генераторды сөндіру ∙
амалдарымен танысыңыз.
Генераторды басқару бөлшектерімен, ∙
шығыс розеткалармен және байланыстушы
бөлшектермен танысыңыз.
Генераторды пайдаланушы жұмыскерді ∙
үйретіңіз.
түссіз және иіссіз болады. Жарамсыз газды
ауамен тыны салу естен айрылуға немесе
өлім-жітімді нәтижеге әкеліп соғуы мүмкін.
Тұйық немесе жартылай жабылған ∙
ғимараттарда тыныс алатын ауа құрамында
жарамсыз газдың қауіпті мөлшері болуы мүмкін.
Бөлініп шығатын газдың жиналуын болдырмау ∙
үшін сәйкес желдетуді қамтамасыз етіңіз.
Генератор қате қолданыс кезінде ауыр ∙
электр тоғы соққысын алуға жеткілікті электр
қуатын бөледі.
Генераторды немесе электр құралын ∙
ылғалды ортада пайдалану, мысалы, қарда
немесе жаңбырда, су қоймалары немесе
спринклерлі жүйе маңында, болмаса су қолмен
ұстау электр тоғының соққысына әкелуі мүмкін.
Генераторды құрғақ жерде сақтаңыз.
Генератор ашық жерде сақталатын болса, ∙
қолданыс алдында оның басқару тақтасындағы
барлық электрлік бөлшектерді тексеріңіз. Ылғал
немесе мұздың түсуі электр тоғы соққысын
алу қауіпін төндіретін электр қозғалтқышының
сынуына немесе қысқаша тұйықталуға әкеліп
соғуы мүмкін.
Ғимараттың электр желісіне білікті электрші ∙
оқшаулаушы ажыратқыштарды орнатқанша
қосылмаңыз.
Жұмыс істейтін генератор мен ғимарат ∙
болмаса кез-келген құрылғыға дейінгі ара
қашықтық 1 метрден (3фут) кем болмауы керек.
Генераторды қалқандамаңыз. ∙
Тез тұтанатын материалдардан генераторды ∙
алшақ ұстаңыз.
Жұмыс кезінде сөндіргіш қатты қызады және ∙
сөндіргеннен кейін де біраз уақыт бойы ыстық
күйінде қалады. Күйіп қалмас үшін сөндіргішке
жанаспаңыз. Жабық ғимаратқа кіргізбес бұрын
генераторды суытыңыз.
Генераторды жалпы электрлік желіге ∙
қосыңыз.
Басқа генераторға жалғамаңыз. ∙
Қ о р а п с ы з д а н д ы р у
Қаптан алу кезінде барлық бөлшектердің түгел
екендігіне көз жеткізіңіз. Соңғы беттегі жинақтау
сызбасын қараңыз. Кейбір бөлшектер бомаған
жағдайда немесе сай келмесе IVT қолдау
орталығына жүгініңіз.
KZ
АБАЙ БОЛЫҢЫЗ! Жарамсыз газ
құрамында улы газ болады, ол
59
Page 60

60
Нұсқаулық
KZ
fig.
1
ON
OFF
START
OFF
ON
ON
STOP
GN-850
GN-1500 GN-3000
GN-6500
fig.
2
GN-850
GN-1500 GN-3000
fig.
4
CLOSED
OPEN
CLOSED
OPEN
GN-850
GN-1500 GN-3000
fig.
3
ON
OFF
Б а с қ а р у э л е м е н т т е р і
Қозғалтқыштың ажыратқышы (9)
Қозғалтқышты қосу және сөндіру
Ажыратқыштың қалпы:
OFF (немесе STOP): Қозғалтқышты сөндіру
үшін.
ON: Қозғалтқышты қосу үшін.
START (GN-6500) Қозғалтқышты стартер
арқылы қосу үшін. Қозғалтқышты іске қоса
отырып, кілтті (9) “ON” қалыпына келтіріңіз.
Стартер бір мезетте 5 секундтан артық жұмыс
жасамауы керек. Егер осы уақыт аралығында
қозғалтқыш іске қосылмаса, қайта қосқанша
ажыратқышты бұрып, 10 секундтай күте
тұрыңыз.
Серпінді стартер (10)
(GN-850; GN-1500; GN-3000)
Қозғалтқышты іске қосу үшін стартердің
қолтұтқасын қарсылық сезілгенше шамалы
тартыңыз, содан соң оны кенеттен тартыңыз.
НАЗАР АУДАРЫҢЫЗ: Стартердің қолтұтқасын
кенет босатпаңыз. Стартердің бұзылуының
алдын алу үшін оның қолтұтқасын бұрынғы
қалпына келтіріңіз.
Қ а қ п а қ ш а
құлақшасы «ON»
қалпында болғанда,
ж а н а р м а й
жанармай багынан
карбюраторға
т ү с е д і .
Қозғалтқышты
сөндіре отырып,
құлақшаны «OFF»
қалпына келтіріңіз.
Жапқыш тартпасы (13)
Жапқыш суық қозғалтқышты іске қосуға
арналған, байытылған жанармай қамтамасыз
етуге пайдаланылады. Жапқыш арнайы тартпа
көмегімен ашылады және жабылады; қоспаны
байыту үшін тартпаны «CLOSED» қалпына
келтіріңіз.
Ауыспалы тоқ көзінің ажыратқышы (6)
Ауыспалы тоқ көзінің ажыратқышы тұйық
байланыс кезінде немесе генератор қызғанда
автоматы түрде сөнеді. Ажыратқыш іске қосылған
кезде, оны қайталап қоспас бұрын құралдың
дұрыс жұмыс істейтіндігін және номиналды
қысымның артық еместігін тексеріңіз.
Жанармайлық қақпақша (11)
Жанармайлық қақпақша жанармай багы мен
карбюратор арасында орналасқан.
Жайсыздандырушы қысқыш (5)
Генератордың жерлендіргішінің қысқышы
генератордың жақтауларымен, генератордың
тоқ өткізбейтін металл бөлшектерімен және
әр тоқ көзінің жерлендіруші қысқыштарымен
жалғастырылған.
Генераторға қосылатын жабдықтардың
жарамсыздығы нәтижесінде Электрлік тоқ
соққысынашалдығудың алдын алу үшін құралды
жайсыздандырушы қысқыштың көмегімен (5)
жайсыздандырыңыз.
Майдың төмен деңгейі туралы ескерту
жүйесі
(GN-1500; GN-3000; GN-6500)
Майдың төмен деңгейі туралы ескерту жүйесі
Page 61

Нұсқаулық
ыдыстағы майдың (21) жетімсіздігінен құралдың
сынуын болдырмауға көмектеседі. Ыдыстағы
майдың мөлшері қауіпсіз деңгейден төмендеген
уақытта, жүйе қозғалтқыштың жұмысын
автоматты түрде тоқтатады (қозғалтқыштың
ажыратқышы (9) «ON» қалпында қалады).
Бақылаушы шам (14)
Генератор қалыпты жұмыс істесе бақылаушы
шам жанып тұрады.
Үнемі тоқтың шығысы (4)
Үнемі тоқтың шығысы ТЕК 12 вольттық автокөліктік
батареяларды қоректендіру үшін қолданылады.
Батареяны генераторға қосу үшін сәйкес
кабельді пайдаланыңыз. Кабельдің тарамдары
батареялардың сәйкес үйегіне жалғанады (қызыл
тарам – дұрыс үйекке, қара – кері үйекке).
Үзіліссіз тоқ тізбегінің сақтандыруышы (3)
(егер болса)
Гнератор қызғанда, баратея жарамсыз
болғанда немесе батареялар мен генератор
арасындағы байланыс бұзылған жағдайда
үзіліссіз тоқ тізбегінің сақтандыруышы үнемі тоқ
батареяларының тізбегін автоматы түрде үзеді.
Қ о л д а н у б о й ы н ш а н ұ с қ а у л ы қ
Ғимараттың электр желісіне қосылу
Қоректенудің қосымша көздерінің ғимарат электр
желісіне қосылуын тек білікті маман жүзеге асыра
алады. Сонымен қатар сізге генератор қуаты
көзін электрлік жабдықтау жүйесінен ажырату
керек, сондай-ақ қолданылатын барлық заңдар
мен электрлік техника талаптары мен ережелерін
және нормалар сақтау қажет.
Ғимараттың электр желісіне дұрыс
қосылған жағдайда генератордан
алынатын электр тоғы жалпы
желініе тоқпен
қамтамасвздандырады. Мұндай қоректендіру
жалпы электр бекетіндегі жұмыскерлердің
немесе басқа тұлғалардың электрлік
жабдықтау желіліерімен жанасқанда,
қоректендірушіде үзіліс болған кезде электр
тоғының саққысына ұшырау қауіпін төндіреді.
Электр бекетінде немесе білікті электр
маманынан кеңес алыңыз.
Ғимараттың электр желісіне дұрыс
қосылмаған жағдайда жалпы
желіден алынатын электр тоғы
генераторды қамтамасыздандырады.
Электрлік жабдықтауды қалпына келтіру
барысында генератор жарылуы немесе
ғимараттың электр желісінің жанып кетуіне
әкеліп соғуы мүмкін.
Кейбір елдерде заң генератордың электр қуаты
бекеттерінде тіркелуін талап етеді Тіркеу және
қолдану ережелерін жергілікті нормативтік
актілерден қараңыз.
Генераторларды жерлеу сұлбалары
IVT жанармай генераторлары генератор
жақтауларының ауыспалы тоқ көдерінде (1)
жерлендіру қысқыштарымен (5) байланысуы
арқылы жерлендірілген. Жерлендіру
жүйесі ауыспалы тоқтық нөлдік өткізігішімен
байланыстырылмаған.
Жергілікті нормативтік актілер, нормалар және
ережелер жерлендіру жүйесінің ауыспалы
тоқтың нөлдік өткізгішімен байланысуын талап
етуі мүмкін. Тоқ көздерінің тестілеушілері
көмегімен жерлендіру жүйесін тексеру нәтижесі
үй тоқ көздерінің тексерісі нәтижелерінен
айырмашылығы бар.
Егер жергілікті нормативтік актілер, нормалар
және ережелер жерлендіру жүйесінің ауыспалы
тоқтың нөлдік өткізгішімен байланысуын талап
ететін болса, білікті электршімен немесе электр
аппаратураларының бақылаушыларымен
кеңесіңіз. Оған электр өткізгіштерінің сызбасын
беріңіз.
Жерлендірудің қысқышын (5) генераторды
жерлендіру үшін немесе генератор жақтауларын
машина жақтауымен байланыстыру үшін
пайдалануға болады, тек мұны жергілікті
заң немесе электрлік техникалық ережелер
мен нормалар талап еткен жағдайда ғана.
Жерлендірудің қысқышын пайдалану алдында
сіздің елде қолданылатын нормалар мен ережелер
мәселесі бойынша электрлік аппаратуралардың
білікті бақылаушысымен кеңесіп алыңыз.
Құралды генератор ретінде пайдалану
Құралды немесе шнурды қоспас бұрын:
Генератордың жұмысқа жарамды екендігін ∙
көз жеткізіңіз. Жарамсыз құралдар немесе
қоректендіру кабельдері электр тоғының
соққысына ұшырау қауіпін төндіреді.
Құрал дұрыс жұмыс істемесе, қалыпты ∙
жұмысы бәсеңдесе немесе кенет тоқтаса, оны
жедел түрде сөндіріңіз. Құралды сөндіріңіз және
оның жарамдылығын, номиналды қысымның
артық еместігін тексеріңіз.
Генератордың есептік электрлік ∙
KZ
61
Page 62

62
Нұсқаулық
KZ
сипаттамаларының сәйкестігін мұқият тексеріңіз.
Генератордың қуаттылығының шекті мөлшерінің
артуына жол бермеңіз. Генераторды шекті
қуаттылығында 5 минуттан артық пайдалануға
болмайды.
НАЗАР АУДАРЫҢЫЗ: Шамадан тыс күш
не қысым ажыратқыштың тұйықталуына
әкеліп соғуы мүмкін. Ең жоғары қысымда
шекті жұмыс уақытының артуы немесе
генератордың қызуы ажыратқыштың
қосылуын міндетті түрде болдырмайды, бірақ
генератордың қызмет ұзақтығын кемітеді.
Шекті қуаттылығымен жұмыс уақытын 5 ∙
минутқа дейін қысқартыңыз.
Ұзақ жұмыс барысында номиналды күшті ∙
арттырмаңыз.
GN-850 GN-1500 GN-3000 GN-6500
Ауыспалы
тоқтың шығыс
қысымы (V/Hz)
Номиналды
қуаттылық (Вт)
Шекті
қуаттылық (Вт)
230/50 230/50 230/50 230/50
750 1000 2500 5000
850 1100 2800 5500
Кез-келген жағдайда барлық қосылатын ∙
құралдар қуаттылығының қосындысын (ВА)
ескеру керек. Қосылатын құралдың қуаттылық
коэффициентіне назар аударыңыз. Генераторға
түсетін күшті үнемі болжап, есептеп отырыңыз.
Генератордың қуаттылығын техникалық
мәліметтер көрсетілген соқпа белгіден қараңыз.
Қосылатын құрылғылардың қуаттылық ∙
шамаларын олардың соқпа белгілерінен қараңыз.
Құралдар мен құрылғылардың өндірушісі әдетте
үлгі номері немесе серия номері жанында
номиналдық сипаттамасын көрсетеді.
Ауыспалы тоқтағы жұмыс
Қозғалтқышты қосыңыз.1.
Ауыспалы тоқ көзінің ажыратқышын (6) 2.
қосыңыз.
Құрылғыны қосыңыз.3.
Механизмді құрылғылардың көбісін қосу үшін
номиналды мөлшерден артық қуаттылық
қажет.
Тоқ бойынша тоқ көзінде кқрсетілген шекті
арттырмаңыз.
Тізбектің қызуы нәтижесінде ауыспалы тоқ
ажыратқышы іске қосылған жағдайларда тізбекке
түсетін электрлік қысымды азайту керек, бірнеше
минут күте тұрып ажыратқышты (6) бастапқы
қалпына келтірген дұрыс.
Ауыспалы тоқтағы жұмыс
Үнемі тоқтың шығысы ТЕК 12 вольттық автокөліктік
батареяларды қоректендіру үшін қолданылады.
Батарея кабельдерін жалғау:
Машинада орнатылған батареяларды 1.
қоректендіру үшін кабельдерді жалғау алдында
батареялардың жерлендірілген кабельдерін
ажыратыңыз.
НАЗАР АУДАРЫҢЫЗ: Батарея
жарылғыш қауіпі бар газ бөліп
шығарады; жақын маңда отпен
ойнамаңыз және алау жақпаңыз. Батареяны
қоректендіру немесе пайдалану барысында
қажетті желдетуді қамтамасыз етіңіз.
Қоректендіру үшін кабельдің ашасын 2.
генератордың үнемі тоғының шығысына (4)
қосыңыз.
Қызыл тарамды батареяның дұрыс белдеуіне 3.
(+) жалғаңыз.
Қара тарамды батареяның кері белдеуіне 4.
(-) жалғаңыз. Қысқыштар тарамының айқасуына
жол бермеңіз. Бұл қысқа тұйықтануға және
батареяның зақымдануына әкеліп соғады.
Генераторды қосыңыз.5.
НАЗАР АУДАРЫҢЫЗ: Қоректендіру үшін
пайдаланылатын кабельдері қосулы және
генераторы жұмыс істеп тұрған машинаны
іске қоспаңыз. Бұл машинаның немесе
генератордың сынуына әкеліп соғуы мүмкін.
Батарея кабельдерін ажырату:
Қозғалтқышты сөндіріңіз.1.
Қара тарамды батареяның кері белдеуінен 2.
(-) ажыратыңыз.
Қызыл тарамды батареяның оң белдеуінен 3.
(+) ажыратыңыз.
Қоректендіру үшін пайдланылатын кабельдің 4.
ашасын генератордың үнемі тоғының шығысынан
(4) ажыратыңыз.
Машина батареясының жайсыздандырылған 5.
кабельін қайтадан қосыңыз.
Қ о л д а н у а л д ы н д а т е к с е р у
Май қосылған жанармай
(GN-850)
Жанармай багының сыйымдылығы 4,2 л. 1.
Page 63

Нұсқаулық
fig.
5
6 mm
fig.
6
MAX
MIN
Бакты толтырыңыз, шамамен ¼ дюйм (6 мм.)
бактың шетіне дейін орын қалдырыңыз.
Май қосылған жанармайды пайдаланыңыз. 2.
Керісінше жағдайда қозғалтқыштың қызуы
мүмкін. Жанармай мен майды 50:1 немесе 40:1
(жазда) қатынасымен араластырыңыз. 2-амалды
қозғалтқыштарға арналған арнайы майды
пайдаланыңыз.
Майды жанармай багының қақпағының 3.
көмегімен өлшеңіз, ол суретте көрсетілген.
Алдымен бактышайқаңыз, содан соң ғана 4.
қозғалтқышты қосыңыз.
GAS 50 : 1 OIL
1 (L) : 0.02 (L)
2 (L) : 0.04 (L)
3 (L) : 0.06 (L)
4 (L) : 0.08 (L)
Мотор майы
(GN-1500; GN-3000; GN-6500)
НАЗАР АУДАРЫҢЫЗ: Мотор майлары
қозғалтқыш қызметі ұзақтығына және
қалыпты жұмысына әсер ететін маңызды
фактордың бірі. Жумайтын майларды,
сондай-ақ екі амалды қозғалтқыштарға
арналған майларды пайдалануға болмайды,
себебі олар қозғалтқышты зақымдайды.
Генераторды әрбір қолданыс алдында оны 1.
тегіс жерге қойып, қозғалтқышын сөндіре отырып
май деңгейін тексеріңіз.
4 амалды қозғалтқыштарға арналған майда 2.
пайдаланыңыз немесе SG, SF/CC, CD санатының
жоғары сапалы майларын пайдаланыңыз, олар
АҚШ автоөндірушілерінің талаптарына сай
келеді.
SG, SF/CC, CD дәрежесінің мотор майларының
маркалануы конистрде көрсетілген.
SG-SF/CC-CD-SINGLE VISCOSITY ∙
SG-SF/CC-CD-MULTI VISCOSITY ∙
SAE 1OW-30 майы кез-келген температурада ∙
жалпы қолданысқа жарамды болып табылады.
Егер сіздің аймақтағы температура көрсетілген
шекте болса, тұтқырлық деңгейі басқа болып
келетін, кестеде көрсетілген майларды
пайдалануға болады.
Май құятын саңылаудың қақпағын (7) ашыңыз 3.
және май шыбығын сүртіңіз.
Май құятын мойынға шыбықты салып, 4.
шайқамай майдың деңгейін тексеріңіз.
Егер май деңгейі төмен болса, ыдысты 5.
мойнына дейін толтырыңыз.
KZ
Құю бойынша нұсқаулықтар
(GN-1500; GN-3000; GN-6500)
Жанармай деңгейінің көрсеткішін (15) 1.
тексеріңіз.
Егер жанармай деңгейі төмен болса, бакты 2.
толтырыңыз. Жанармайды жанармай сүзгісінің
деңгейінен артық етіп құймаңыз.
Жанармай багының сыймдылығы:
6,7 л. – GN-1500 ∙
15 л. – GN-3000 ∙
25 л. – GN-6500 ∙
Октанды саны 86 кем болмайтын жанармайды ∙
пайдаланыңыз. Этилденбеген жанармайды
пайдалану ұсынылады, себебі ол пайда болатын
қалдықтарды азайтады, сондай-ақ шығару
жүйесінің жұмыс мерзімін ұзартады. Ескі немесе
таза емес жанармайды, май/жанармай қоспасын
пайдаланбаңыз.
Жанармай багына кірдің немесе судың ∙
түсуіне жол бермеңіз.
Кей жағдайларда, күш-қысым жоғары ∙
болғанда жеңіл металлды соққы байқалады.
Назар аудармаңыз.
Егер діріл немесе соққы қозғалтқыш ∙
айналымының қалыпты жылдамдығында, күш-
63
Page 64

64
Нұсқаулық
KZ
fig.
7
ON
OFF
START
OFF
ON
ON
STOP
GN-850
GN-1500 GN-3000
GN-6500
fig.
8
GN-850
GN-1500 GN-3000
қысым қалыпты болғанда байқалса, басқа
маркалы жанармайды пайдаланыңыз. Егер діріл
тоқтамайтын болса IVT ресми дилеріне жүгініңіз.
НАЗАР АУДАРЫҢЫЗ: Діріл мен соққы үнемі
байқалатын қозғалтқышты пайдалануға
тыйым салынады; дистрибьютордың
шектеулі кепілдігі қате қолдану нәтижесінде
бүлінген бөлшектерге қатысты берілмейді.
• Жанармайдың құрамында оттегі болатын
түрлері
Кейбір жанармайлар маркасы октан санын
арттыру үшін спиртпен немесе басқа заттармен
араластырылады. Жанармайдың мұндай
түрі құрамында оттегі бар жанармай болып
саналады. Құрамында оттегі бар жанармайларды
пайдалану барысында оның октан саны кемінде
86 болатынына көз жеткізіңіз.
• Этанол (этил спирті)
Құрамындағы этанол көлемі 10% болатын
жанармайларды пайдалану кезінде құралды іске
қосуға қатысты және/немесе жұмыс сапасына
қатысты қиыншылықтар туындауы мүмкін.
Құрамында этанол болатын жанармайдың
«Газохол» заттңбасы бар
• Метанол (метил немесе ағаштық спирт)
Құрамында метанол болатын жанармай
құрамында жанармайлық жүйені қорғауға
арналған қосымша еріткіштер және үгілуге қарсы
заттар болуы керек. Құрамындағы метанол көлемі
5% жоғары болатын жанармайларды пайдалану
кезінде жұмыс сапасына қатысты қиыншылықтар
туындауы мүмкін, сондай-ақ жанармай жүйесінің
бөлшектері бүлінуі мүмкін.
пластмасса бөлшектерді зақымдауы мүмкін.
Бакқа құю кезінде жанармайды төкпеуге
тырысыңыз. Жанармайды төгу салдарынан
болған бүлінулерге кепілдік берілмейді.
Қосу / Сөндіру
Қозғалтқышты қосу
Барлық электр құралдарын тоқ көзінен 1.
ажыратыңыз. Қысым қосулы тұрғанда
генераторды іске қосу қиын.
Қозғалтқыштың ажыратқышын (9) “ON” 2.
қалыпына келтіріңіз.
Қозғалтқыш суыған кезде жаппаның иінтірегі 3.
(13) жабылады. Жаппаны қолмен жабуға
болады, бұл үшін қолтұтқаны «CLOSED» қалпына
келтіріңіз. (GN-850 Дроссельдеу иінтірегін 1
қалыпына келтіріңіз).
Қозғалтқышты қосыңыз.4.
(GN-6500)
• Қозғалтқыштың ажыратқышын (9) қоса
отырып, «START» қалыпына келтіріңіз (5 секунд
шамасында ұстаңыз).
• Қозғалтқышты іске қосыңыз, кілтті “ON”
қалыпына келтіріңіз.
• МТБЭ (метилтретбутил эфирі)
Құрамындағы МТБЭ көлемі 15% болатын
жанармайды пайдалану ұсынылады.
Жанармайдың құрамында оттегі болатын түрін
қолданбас бұрын оның құрамын анықтап алуға
тырысыңыз. Кейбір штаттарда бұл мәліметті
сорғышта көрсету талап етіледі. Жұмыс
барысында қандай да бір жағымсыз белгілер пайда
болса, стандарты, этилденбеген жанармайды
пайдалануға көшіңіз. IVT компаниясы құрамында
оттегі болатын жанармайларды пайдалану
нәтижесінде болатын сынулар мен бүлінулерге
жауап бермейді; жоғарыда аталған жағдайларда
кепілдік берілмейді.
НАЗАР АУДАРЫҢЫЗ: Құрамында оттегі
болатын жанармайлар боялған және
(GN-850; GN-1500; GN-3000)
• Қозғалтқыштың ажыратқышын (9) “ON”
қалыпына келтіріңіз.
• Қозғалтқышты іске қосу үшін стартердің
Page 65

Нұсқаулық
fig.
9
қолтұтқасын (10) қарсылық сезілгенше шамалы
тартыңыз, содан соң оны кенеттен тартыңыз.
НАЗАР АУДАРЫҢЫЗ: Стартердің қолтұтқасын
кенет босатпаңыз. Стартердің бұзылуының
алдын алу үшін оның қолтұтқасын бұрынғы
қалпына келтіріңіз.
5. Егер жаппа (13) қолмен жабылған болса,
қозғалтқыш қызған кезде қолтұтқаны «OPEN»
(ашық) қалыпына жылжытыңыз.
Қозғалтқыштың сөнуі
Апат жағдайларында:
Апат кезінде қозғалтқышты тоқтату үшін 1.
қозғалтқыштың ажыратқышын (9) «OFF» қалпына
келтіріңіз.
Қалыпты жағдайларда:
Ауыспалы тоқтың ажыратқышын (6) “OҒҒ” 1.
қалыпына келтіріңіз.
Барлық электр құралдарын тоқ көзінен 2.
ажыратыңыз. Батареяны қоректендіруге арналған
барлық кабельдерді үнемі тоқтан ажыратыңыз.
Қозғалтқыштың ажыратқышын (9) “OҒҒ” 3.
(немесе STOP) қалыпына келтіріңіз.
Жанармай қақпақшасын (11) “OҒҒ” қалыпына 4.
келтіріңіз.
Қ ы з м е т к ө р с е т у ж ә н е с а қ т а у
Жөндеу алдында құралды сөндіріңіз және ол ∙
толық тоқтағанша күте тұрыңыз.
Құралды және желдеткіш саңылауды ∙
тазалықта ұстаңыз. Өндірістің мінсіз шарттарына
және тексерулерге қарамастан машина істен
шығатын болса, жөндеу жұмыстары IVT ресми
орталықтарында жүргізіледі.
Үнемі тазарту және жөндеу құралдың ∙
тиімділігінің жоғарылығына және қызмет
мерзімінің ұзақтығына кепілдік бола алады.
Барлық сақиналар, болттар және бұрамалар ∙
мұқият бұралуы керек.
Ақауланған немесе тозған бөлшектерді ∙
алмастырыңыз.
Құралды құрғақ әрі балалардың қолы ∙
жетпейтін жерде, тез тұтанатын материалдардан
қауіпсіз қашықтықта сақтаңыз.
Құралға су тигізбеңіз! ∙
Генератордың жұмысқа жарамды күйін
сақтау үшін оны үнемі реттеп, техник алық
қызмет көрсетіп отыру керек. Техникалық
қызмет көрсетуді ұсынылған кеседегі жиілікке
байланыст ы жүзеге асырыңыз.
НАЗАР АУДАРЫҢЫЗ: Шығатын газ
құрамында улы газдар болады.
Техникалық қызмет көрсету алдында
қозғалтқышты сөндіріңіз. Выключите
двигатель перед проведением технического
обслуживания. Егер қызмет көрсету
шаралары қозғалтқыштың қосулы күйінде
атқарылатын болса, ғимаратта жақсы
желдетуді қамтамасыз етіңіз.
НАЗАР АУДАРЫҢЫЗ: Техникалық қызмет
кқрсету және жөндеу үшін тек IVT нағыз
бөлшектерін немесе тең бөлшектерді
пайдаланыңыз. Сапасы төмен қосалқы
бөлшектер генераторды зақымдауы мүмкін.
Мотор майын ауыстыру
(GN-1500; GN-3000; GN-6500)
Қозғалтқыш суымай тұрғанда майды құйып 1.
алыңыз.
Майды жіберуші тығынды (8) алыңыз, 2.
тығыздаушы шайба мен май құятын саңылаудың
қақпағын (7) алыңыз да, майды құйыңыз.
Тығынды (8) және тығыздаушы шайбаны 3.
қойыңыз. Тығынның мұқият жабылғандығына көз
жеткізіңіз.
Бакты ұсынылатын маймен толтырыңыз 4.
және оның деңгейін тексеріңіз.
Май мөлшері:
0,6 л. – GN-1500
1,1 л. – GN-3000
1,1 л. – GN-6500
АБАЙ БОЛЫҢЫЗ! Пайдаланылған
мотор майымен жиі және ұзақ уақыт
бойы байланысу тері қатерлі ісігіне
шалдықтыруы мүмкін. Тіпті пайдаланылған
маймен жұмыс күнделікті болмаған жағдайда
да, жұмыс аяқталғаннан кейін жедел арада
қолыңызды сабындап жуыңыз.
Па йда лан ылғ ан
мотор майын
э к о л о г и я л ы қ
таза жолмен
жойыңыз. Оны
г е рм е тик а лы қ
к о н т е й н е р г е
с а л ы п ,
т е х н и к а л ы қ
қызмет көрсететін
жергілікті бекетке жөнелткен абзал, Болмаса
қайта өңдеу орталықтарына тапсырыңыз.
Қоқыспен бірге майды шығармаңыз және оны
KZ
65
Page 66

66
Нұсқаулық
KZ
жерге төкпеңіз.
Тек сабынды суды немесе жанбайтын
еріткіштерді пайдаланыңыз.
Ауа сүзгісіне қызмет көрсету
Бітелген ауа сүзгісі (12) карбюраторға ауаның
түсуіне кедергі келтіреді. Карбюратор
жұмысының бұзылуын болдырмау мақсатында
НАЗАР АУДАРЫҢЫЗ: Дәнекерлік генераторды
ауа сүзгісінсіз пайдаланбаңыз (12). Бұл ауыр
жарақаттарға әкеліп соғуы мүмкін.
ауа сүзгісін үнемі қарап отырыңыз. Шаңды
жерлерде жұмыс істеу құралды жиі тексеріп
отыруды талап етеді.
НАЗАР АУДАРЫҢЫЗ: Сүзетін
бөлшектерді тазарту үшін жанатын
еріткіштерді пайдалану тұтануға
немесе атылуға әкеліп соғуы мүмкін.
Ауа сүзгісі қақпағының қысқыш ашаларын 1.
(17) босатып алыңыз, сүзгінің қақпағын және
сүзетін бөлшекті алыңыз.
Бөлшекті тұрмыстық жуу құралы мен су 2.
қоспасында жуыңыз, жанбайтын немесе ауыр
еріткіште (себілу температурасы жоғары) мұқият
GN-850
ҮНЕМІ ҚЫЗМЕТ КӨРСЕТУ
сағаттарынан соң жүзеге асырылады)
ай сайын
50 сағат
x (1*)
Әр 3 ай немесе 150 сағат
жұмыстан соң
(қайсысының қажеттілігі бұрын туындаса, соған
ҚЫЗМЕТ КӨРСЕТУ:
Ауа сүзгісі
Қақпақшалық
саңылау
Оталдыру
шырағданы
Декарбондау қақты жою, тексеру/реттеу x
тазалау (қажет болғанда
айырбастау)
тазалау (қажет болғанда
айырбастау)
тазалау (қажет болғанда
айырбастау)
байланысты қандай да бір жұмыс айларынан немесе
GN-1500; GN-3000; GN-6500
ҮНЕМІ ҚЫЗМЕТ КӨРСЕТУ
Әр 3 ай немесе
50 сағат
жұмыстан соң
(3*)
Әр 6 ай немесе
100 сағат
жұмыстан соң
x x
x (1*)
(3*)
x
x
Әр жыл
сайын немесе
300 сағат
жұмыстан соң
(3*)
x (2*)
x (2*)
ҚЫЗМЕТ КӨРСЕТУ:
деңгейін
Мотор майы
Ауа сүзгісі
Тұндырғыш тазалау
Оталдыру
шырағданы
Қақпақшалық
саңылау
Жанармайлық
бак және сүзгі
Жанармай
өткізгіш
тексеру
ауыстыру
тексеру
тазалау
тексеру/тазалау
тексеру/реттеу
тазалау
тексеру (қажет
жағдайда
ауыстыру)
(қайсысының қажеттілігі бұрын туындаса, соған байланысты қандай да бір
жұмыс айларынан немесе сағаттарынан соң жүзеге асырылады)
Бір айдан
Әр қолданған
сайын
соң немесе
20 сағат
жұмыстан
кейін (3*)
x
x
(1*) Шаңды жерлерде жұмыс істеу құралды жиі тексеріп отыруды талап етеді. (2*) Егер
құралдың иесі механик маман болмаса және ұқсас құралдармен жұмыс істей алмаса, оған
техникалық қызметті IVT ресми дилері көрсетеді. (3*) Коммерциялық кәсіби қолданыс
кезінде құралға қызмет көрсету жиілігін анықтау үшін құралдың жұмыс істеген сағаттарын
журналға тіркеп отырыңыз.
x
x
Әр екі жыл
сайын. (3*)
x (2*)
Page 67

Нұсқаулық
fig.1
0
GN-850
GN-1500
GN-3000
GN-6500
fig.1
1
OFF
fig.1
2
0.7-0.8mm
жуыңыз немесе шайыңыз. Бөлшекті мұқият
кептіріңіз.
Бөлшекті таза машина майына салып, 3.
сорғытып алыңыз. Егер бөлшекте көп май
қалатын болса, алғашқы қосу кезінде қозғалтқыш
қақтанады.
Сүзгіш бөлшекті орналастырып, қақпағын 4.
бұраңыз.
Жанармай тұндырғышын тазалау (18)
Жанармай тұндырғышы (18) жанармай багында
болатын қоқыс пен судың карбюраторға түсуінің
алдын алады. Егер генератор ұзақ уақыт
бойы пайдаланылмаған болса, тұндырғышты
тазартқан абзал.
Жанармай қақпақшасын (11) “OҒҒ” қалыпына 1.
келтіріңіз. Тұндырғышты (18), O-тәрізді сақина
мен сүзгішті босатып алыңыз.
Тұндырғышты, сақианны және сүзгіні 2.
жанбайтын немесе ауыр ерітіндіде тазартыңыз.
Тұндырғышты (18), O-тәрізді сақина мен 3.
сүзгішті орнатыңыз.
Жанармай қақпақшасын (11) “ON” 4.
қалыпына келтіріңіз және жанармайдың
тамшыламайтындығын тексеріңіз.
Оталдыру шырағдандарына қызмет көрсету
Ұсынылатын оталдыру шырағдандары:
LDF6TC. or TME170: BPR6ES,
TME260,
TME360,
TME410:BPR5ES,
TME280:BP6ES
Қозғалтқыштың сенімді жұмысын қамтамасыз ету
үшін оталдыру шырағдандары үнемі таза болуы
шарт және тиісті саңылауы болуы керек.
Қозғалтқыштың жұмысы кезінде сөндіргіш қатты
қызады. Сөндіргішке жанаспаңыз.
Оталдыру шырағданының ұшын (19) босатып 1.
алыңыз.
Оталдыру шырағданы маңын кірден 2.
тазартыңыз.
Сәйкес келетін кілттің (24) көмегімен 3.
оталдыру шырағданын алыңыз.
Оталдыру шырағданын қарап шығыңыз. Егер 4.
оқшаулаушы бүлінген болса, оны алмастырыңыз.
Қайта қолдану үшін шырағданды сым қылды
щеткамен тазартыңыз.
Қалыңдықты өлшеуіш көмегімен 5.
шырағданның саңылауын өлшеңіз. Жандық
электродты еппен иіп, саңылауды қалыптаңыз.
Саңылаудың қалыңдығы төмендегіше болуы
тиіс: 0,7 – 0,8 мм (0,028 – 0,031 дюйм)
KZ
Оталдыру шырағданының күйін тексеріңіз 6.
және шырағданды қолмен бұраңыз, бұл кетіктің
мүжілмеуіне жол береді.
Шырағданды орналастырып, оны шырағдан 7.
кілтінің (24) көмегімен бұраңыз, бұл шайбаны
тығыз тартуға мүмкіндік береді. Жаңа оталдыру
шырағданын орналастыру барысында оны
шайбаны тығыздап тарту үшін жарты-айналымға
бұраңыз. Қолданылған оталдыру шырағданын
орналастыру барысында оны шайбаны тығыздап
тарту үшін 1/8-1/4 айналымға бұраңыз.
НАЗАР АУДАРЫҢЫЗ: Шырағданды мұқият
бұраңыз. Дұрыс орнатылмаған оталдыру
шамдары қозғалтқышты қатты қыздыруы
мүмкін.
Жылулық коэффициенті сәйкес келмейтін
оталдыру шырағдандарын пайдаланбаңыз.
Тек қана ұсынылған немесе соларға сәйкес
оталдыру шырағдандарын пайдаланыңыз.
67
Page 68

68
Нұсқаулық
KZ
fig.1
3
Тасымалдау/ Сақтау
Генераторды тасымалдау кезінде
қозғалтқыштың ажыратқышын (9) “OҒҒ”
қалыпына келтіріңіз. Жанармайдың ақпауы
үшін генераторды көлденең қалпында ұстаңыз.
Төгілген жанармай және оның буы тез
тұтанады.
НАЗАР АУДАРЫҢЫЗ: Ыстық
қозғалтқышпен немесе шығыс
жүйесімен жанасу ауыр күйікке
немесе тұтануға әкеліп соғуы мүмкін.
Қозғалтқышты тасымалдау алдында немесе
генераторды сақтауға жөнелту алдында
оларды міндетті түрде суытыңыз.
Тасымалдау кезінде генератордың құлауына не
соққы алуына жол бермеңіз. Генераторға ауыр
заттарды қоймаңыз.
Құралды ұзақ
сақтау алдында:
Сақтау орнының ∙
жеткілікті құрғақ
және таза
екендігіне көз
жеткізіңіз.
Қызмет көрсету кестеге байланысты осы ∙
бөлімде жүзеге асырылады.
Құю бұрамасын босата отырып, 1.
карбюратордағы жанармайды құйып алыңыз.
Жанармайды арнайы контейнерге құйып
алыңыз.
НАЗАР АУДАРЫҢЫЗ: Белгілі
жағдайларда жанармай тез
тұтанатын және жарылғыш қауіпі
бар зат болып саналады. Жанармайды жақсы
желдетілетін жайда, қозғалтқыш сөніп
тұрғанда құйып алыңыз. Жанармайды ұю
кезінде шылым шекпеңіз.
Майды алмастыру. (GN-1500; GN-3000; GN-2.
6500)
Оталдыру шырағданын алып, цилиндрге 3.
шамамен бір ас қасық таза машина майын
құйыңыз.
Майды бөлу үшін қозғалтқыштың бүгілмелі 4.
білігін бұраңыз да, оталдыру шырағданын қайта
орнатыңыз.
Қарсылық сезілгенше стартердің қолтұтқасын 5.
жаймен тартыңыз.
Бұл мезетте поршень көтеріледі (сығымдау 6.
амалының соңы), ал енгізу және шығару
қақпақшалары жабылады.
Сақтау кезінде қозғалтқыштың осындай қалыпта
болуы ішкі мүжілімге жол бермейді.
Сақтау уақыты Қосылудың қиындауына жол бермейтін қызмет көрсету тәртібі нұсқаулықтары
Бір айдан аз Дайындық талап етілмейді
1 айдан 2 айға дейін Генераторға жаңа жанармай құйыңыз және жанармайлық қондырғысын қосыңыз*
2 айдан 1 жылға
дейін
1 жылдан артық
Генераторға жаңа жанармай құйыңыз және жанармайлық қондырғысын қосыңыз*
карбюратордың қалқыту камерасынан жанармайды құйып алыңыз
жанармай тұндырғышынан жанармайды құйып алыңыз
Генераторға жаңа жанармай құйыңыз және жанармайлық қондырғысын қосыңыз*
карбюратордың қалқыту камерасынан жанармайды құйып алыңыз
жанармай тұндырғышынан жанармайды құйып алыңыз
оталдыру шырағданын алыңыз. Цилиндрге бір ас қасық машина майын құйыңыз.
Майды бірқалыпты бөлу үшін тартқыш тросты жаймен тартыңыз. Оталдыру
шырағданын орналастырыңыз.
Майды алмастырыңыз.
Сақтаудан алынғаннан кейін жанармайды арнайы контейнерге құйып алыңыз, ал
қосу алдында генераторға жаңа жанармай құйыңыз.
(GN-1500; GN-3000; GN-6500)
*Сақтау мерзімін ұзартатын жанармай қондырғыларын пайдаланыңыз. Қондырғыларды
таңдау бойынша кеңес алу үшін сіздің аймақтағы IVT ресми дилеріне жүгініңіз.
Page 69

Нұсқаулық
fig.1
4
e
d
21
28
c
b26 a27
fig.1
5
d
d d
d
d
d
d
d
Қосымша бөлшектерді орнату
Дөңгелектерді орнату
26. Ось
27. Дөңгелек
28. Дірілді оқшаулаушы
29. Сүйеніш табанша
a. а. Жалпақ шайба
b. б. Бекітуші штифт
c. в. Басқапты болттар, 30 мм
d. г. Басқапты болттар, 20 мм
e. д. Сақина
Аккумаляторлық батареяға арналған жәшікті
орнату
30. Батарея қоршауы
31. Аккумаляторлық батареяға арналған жәшік
32. Стартер кабелі
33. Стартер соленоиды
34. Жайсыздандырушы кабель
35. Аккумаляторлық батарея тіреуіші
36. Батареяны қорғаушы панель
KZ
Жақтаудың жабдықтаушы тіреулеріне 1.
белдемдері (26) орнатыңыз;
Белдемге дөңгелекті (27) орналастырыңыз;2.
Жалпақ шайба және бекіткіш штифттің 3.
көмегімен белдемге дөңгелекті бекітіңіз;
Осылайша екінші дөңгелекті орнатыңыз;4.
Дірілді оқшауыштарды (28) екі сақина және 5.
басты болттар (30 мм) көмегімен әр тіреуіш
алақандарға (29) орнатыңыз;
Екі сақина және басты болттар (20 мм) 6.
көмегімен әр тіреуіш алақандарды (29)
орнатыңыз;
Жақтауға батареяның қоршауын (30) 1.
орналастырыңыз. Қоршауға (30) аккумалятор
батареясына арналған жәшікті (31)
орналастырыңыз және болттарды бекіте
бұраңыз.
Бүйірдегі стартер кабелін (32) тартып, 2.
соленоидпен (33) жалғастырыңыз.
Жерлендіру кабелін (34) генератордың артқы 3.
қаңқасына жалғаңыз.
Жәшікке (31) батареяны салыңыз және 4.
тіреуіш (35) көмегімен бекітіңіз. Стартердің
кабелін (32) алдымен батареяның оң белеуіне (+),
содан соң кері (-) белдеуіне жалғаңыз. Ажырату
кезінде кері (-) белдеуден бастаңыз.
Сақтандыруышқа (30) батареяны қорғау 5.
қалқанын (36) орнатыңыз.
69
Page 70

70
Нұсқаулық
А қ а у л а р д ы і з д е у ж ә н е ж о ю
Қозғалтқыш іске қосылмайды
Бактағы жанармайды тексеріңіз ∙ ► қажет
жағдайда бакты толтырыңыз.
Қозғалтқыштағы майдв тексеріңіз ∙ ► қажет
жағдайда май құйыңыз.
Оталдыру шырағданының ∙
ұшқынданбайтындығын тексеріңіз ► қажет
жағдайда шырағданды алмастырыңыз. Егер
ұшқын анықталмаса IVT ресми дилеріне
жүгініңіз.
Тексеру үшін мынадай әрекеттерді орындау
керек:
Оталдыру шырағданының басын босатып 1.
алып, шырағдан маңайын тазартып сүртіңіз.
Шырағданды алып, оны шырағдан басына 2.
орнатыңыз.
Цилиндр қақпағында бүйір электродтарды 3.
орналастырыңыз.
Қозғалтқышты бұрыңыз; саңылау арқылы 4.
ұшқын шығуы керек. Оталдыру шырағданы
KZ
маңында төгілген жанармай жоқ екендігіне көз
жеткізіңіз. Төгілген жанармай тез тұтанады.
Карбюраторға жанармайдың келетіндігін ∙
тексеріңіз. ► Егер жанармай келмесе, жанармай
тұндырғышын тазартыңыз.
Тексеру үшін мынадай әрекеттерді орындау
керек:
Қозғалтқышты сөндіріңіз және құю винтін 1.
босатыңыз.
Қозғалтқыштың ажыратқышын “ON” қалыпына 2.
келтіріңіз және жанармайды құйып алыңыз.
Егер қозғалтқыш іске қосылмаса IVT ресми
дилеріне жүгініңіз.
Қ о р ш а ғ а н о р та н ы қ о р ғ а у
Қалдықты болдырмау мақсатында
шикізатты қайта қолдану!
Құралды, қосымша жабдықтарды және
қораптарды экологиялық таза жолмен жою керек.
Пластикалық бөлшектер классификациялық
өңдеуге жіберіледі. Құралды пайдалану бойынша
ұсынылып отырған нұсқаулық екінші өңделім
қағазына басылған, хлор пайдаланымынсыз
дайындалған.
Page 71

ENG.SW.
ON
OFF
POWER ON
VOLTMETER
AC SOCKET
DC
+
-
AC
DC LIFE
OUTLET
PROTECTION
10
19
23
24
22
26
19
10 78 9 314 54
17
12
1518 16 2 21 6 1
13 11
23
24
22
6 16 9 15
11
2 14
3 17 12 13
1 4
GN-850
Instrukcja z eksploatacji
GN-1500
PL
71
Page 72
72
Instrukcja z eksploatacji
PL
ENG.SW.
ON
OFF
POWER ON
VOLTMETER
AC SOCKET
DC LIFE
AC SOCKET
DC
PROTECTION
AC
PROTECTION
ENG.SW.
POWER ON
VOLTMETER
AC SOCKET
DC LIFE
DC
PROTECTION
AC SOCKET
AC
PROTECTION
ON
OFF
19
7 2114 1 5
4
17
11
151216 9 2 6 3 25
23
24
22
19
10 78 14 52141
12 11
1615 9 2 6 3
23
24
22
GN-3000
GN-6500
Page 73

Instrukcja z eksploatacji
Sterowanie
1.Gniazda prądu przemiennego
2.Woltomierz
3. Bezpiecznik dla łańcucha prądu
stałego
4. Wyjście prądu stałego
5. Zacisk uziemienia
6.Wyłącznik prądu przeminnego
7.Przykrywka otworu dla
tankowania masłem
8.Korek dla wypuszczania masła
9.Przełącznik silnika
10.Uchwyt rozrusznika z
oddaniem
11.Zawór paliwowy
12.Filtr powietrzny
13.Dźwignia zasłonki
14.Lampa kontrolna
15.Wskaźnik poziomu paliwa
16.Przykrywka baku paliwowego
17.Skoble zaciskowe/ wkrety dla
przykrywki ltru powietrznego
18.Osadnik paliwa
19.Głowica świecy zapalenia
20.Tłumik
21.Wskaźnik niskiego poziomu
masła
22.Kabel dla ladowania baterii
23.Korek
24.Klucz świecy
25.Rączka *
26.Pojemnosc dla mieszania
masla/paliwa*
* = Narzędzia dodatkowe
Nie wszystkie obrysowane
albo opisane dostosowania są
włączone do standardowego
dostarczenia.
Symbole
Charakterystyka instrumentu
model
Nominalna potęga prądu przemiennego na wyjściu
230 W / 50 Gc (V)
Maksymalna potęga prądu przemiennego na wyjściu
230 W / 50 Gc (V)
Siła prądu przemiennego na wyjściu przy nominalnej; maksymalnej potędze 230 W / 50 Gc (V/Gc)
Napięcie prądu przemiennego na wyjściu (W)
Faza
Napięcie prądu stałego (W)
Prąd stały (4)
Częstość obiegu na ślepym chodzie(obrotów za
minutę)
Objętość silnika (cm. kub.)
Liczba taktów silnika
Typ oziębienia silnika : oziębienie powietrzne
Paliwo: benzyna z dodaniem masła - benzyna
nieetylowana
Masło
Pojemność baka paliwowego (l)
Pojemność baka maślanego (l)
Waga (kg)
Poziom presji dźwiękowej [dB]
Poziom mocy dźwiękowej [dB]
GN-850 GN-1500 GN-3000 GN-6500
750 1000 2500 5000
850 1200 2800 5500
3.0/3.5 4.3/4.7 10.8/12.1 21.7/24
230/50 230/50 230/50 230/50
1 1 1 1
12 12 12 12
8.3 8.3 8.3 8.3
3000 3000 3000 3000
63 87 208 389
2 4 4 4
Chłodzenie
powietrzne
Benzyna z
dodaniem
masła
-
4.2 6.70 15.00 25.00
- 0.60 1.10 1.10
19.00 28.00 42.00 97.00
46 68 68 73
57 79 79 93
Chłodzenie
powietrzne
benzyny
bezołowiowej
SAE 10W-30
SAE 10W-40
Chłodzenie
powietrzne
benzyny
bezołowiowej
SAE 10W-30
SAE 10W-40
Chłodzenie
powietrzne
benzyny
bezołowiowej
SAE 10W-30
SAE 10W-40
73
PL
Page 74

74
Instrukcja z eksploatacji
PL
Technika bezpieczeństwa podczas
eksploatacji
Ogólne reguły bezpieczeństwa
Następne instrukcje po technice bezpieczeństwa
pomogą użytkownikowi poprawnie wykorzystywać
urządzenie i zapewnić własne bezpieczeństwo.
Dlatego trzeba przeczytać ich uważnie.
W przypadku przekazania urządzenia trzeciej osobie
trzeba przekazać i prawdziwe instrukcje po technice
bezpieczeństwa.
Zachowacie daną instrukcję i inną literaturę, która
wchodzi do kompletu dostarczenia.
Dotrzymajcie się technikę bezpieczeństwa i
przestrzegań na przyrządzie.
Przed początkiem pracy zapoznajcie się ze
sterowaniem i regułami eksploatacji przyrządu,
dowiedźcie się, jak zatrzymać przyrząd w wypadku
pilnym.
Dotrzymanie tych prostych instrukcji pomoże
poprzeć wasz przyrząd w sprawnym stanie.
Przed wykorzystaniem przyrząd trzeba •
poprawnie zebrać.
Wykorzystujcie przyrząd tylko zgodnie z •
przeznaczeniem.
Przestudiuj napisy uprzedzające na przyrządzie, •
wzoruj się wskazania po użyciu dostosowań
ochronnych. Zapobiec wypadkom nieszczęśliwym
pomogą uwaga, rozumne podejście do pracy i
odpowiednie przygotowanie osób, które zostały
wciągnięte w eksploatację, transportowanie,
obsługę i przechowywanie przyrządu.
Nie zostawiajcie przyrząd bez nadzoru.•
Nie dopuszczajcie wykorzystania przyrządu •
przez dzieci. Nie pozwalajcie dzieciom graćz
przyrządem.
Nie dopuszczajcie znajdowania w pobliżu dzieci •
i zwierząt. Osoby postronne muszą znajdować się na
bezpiecznej odległości od pracującego przyrządu.
Zastavte pracę, pokud v blízkosti jsou nepovolaný
osoby, zejména děti nebo zvířata.ù
Przy pracy z przyrządem użytkownik ponosi •
odpowiedzialność za trzecich osób.
Osoby, nie zazanajomione z instrukcjami z •
eksploatacji, dzieci, że jest małoletni, taki, że nie
osiągnęły wieku, że pozwala wykorzystywać
przyrząd, a także osoby, że znajdują się w stanie
alkoholowego albo narkotycznego upojenia,
albo pod wpływem medycznych preparatów,
nie dopuszczają się do pracy z przyrządem. Wiek
operatora ustala się w miejscowych normatywnych
aktach.
UWAGA: Alkohol, niektóre lekarskie
preparaty i narkotyczne substancje,
a także stan niedomagania, gorączka
i zmęczenie obniżają szybkość reakcji. Nie
wykorzystujcie narzędzia elektryczne w
wypadkach wyższe wymienionych.
Przekonajcie się, że wszystkie ochronne •
dostosowania są ustalone i przydatne do
eksploatacji.
Nie wykorzystujcie przyrząd z uszkodzonymi •
ochronnymi dostosowaniami, albo bezich.
Unikaj okazyjnego rozruchu przyrządu : przed •
podłączeniem do sieci przekonaj się, że wyłącznik
znajduje się w położeniu “o” (wyłączono)
Przed włączeniem przyrządu wyciągnij kliny i •
klucze podstawowe.
Nie wykorzystujcie przyrząd z niesprawnym •
wyłącznikiem. Przyrząd z niesprawnym
wyłącznikiem przedstawia niebezpieczeństwo i
wymaga remontu.
Obejrzycie przyrząd na obecność detali •
zamocowanych (nakrętek, bolców, wkrętów i tak
dalej) albo obrażeń. Żeby zabezpieczyć bezpieczną
pracę przyrządu, okresowo sprawdzaj, czy dobrze są
zawleczone bolcy i wkręty. Przy konieczności przed
użyciem przyrządu zrób ich remont albo zamianę. W
razie użycia uszkodzonego przyrządu operatorowi
albo postronnym osobom mogą być naniesione
urazy poważne.
Dla pracy wykorzystujcie odpowiednią odzież. •
Odzież luźna, ozdoby mogą być zawleczone
ruchomymi częśćmi. Wykorzystujcie odpowiednie
ubranie robocze, długie spodni i mocne obuwie.
Obroń odnóża i stopy od śmieciu, które rozlatuje
się. Nie pracujcie boso albo w otwartych sandałach.
Zbierzcie długie włosy z tyłu
Trzymaj rączki w czystości i suchości.•
UWAGA! Wykorzystowuj srodki obrony
indywidualnej! Ochronne dostosowania
i zasoby obrony indywidualistycznej
zabezpieczają obronę waszego zdrowia i zdrowia
ludzi, które znajdują się obok, a także gwarantują
regularną pracę przyrządu.
Wykorzystuj okulary ochronne, rękawiczki •
ochronne, mocne śliskie obuwie i, przy konieczności,
hełm. Przy wykonaniu prac, które towarzyszą
utworzeniem kurzu, wykorzystuj respirator
przeciwpyłowy. Jeśli poziom szumu przekracza
85 dB(A), obowiązkowo wykorzystuj nauszniki
ochronne.
Page 75

Instrukcja z eksploatacji
Podczas pracy zachowuj stala pozycje. Ciagle •
zachowuj rownowage.
Nie uruchamiajcie przyrząd, jeśli on jest •
odwrócony albo znajduje się w nie roboczym
położeniu.
Przed wykorzystaniem posprzątajcie z roboczego •
placyka wszystkie postronne przedmioty, unikajcie
traenia pod przyrząd postronnych przedmiotów
podczas pracy. Dotrzymuj czystość na działce
roboczej. Na zagraconych działkach obserwuje się
wysoki poziom urazowości.
Nie przeciążajcie przyrząd. Efektywność i •
bezpieczeństwo przyrządu powyżej podczas pracy
z częstością zadaną.
Wykorzystujcie przyrząd tylko przy dziennym albo •
dobrym sztucznym oświetleniu. Nie wykorzystujcie
przyrząd w warunkach złej widzialności.
Nie roń przyrząd, nie dopuszczaj styczności •
przyrządu z jakimikolwiek przeszkodami.
Przy traeniu pod przyrząd postronnego •
przedmiotu, obejrz jego na obecność obrażeń i zrób
konieczny remont.
Przy powstaniu wygórowanej wibracji zagłuszycie •
silnik i natychmiast wyjaśnicie przyczynę. Wibracja
zwykle jest oznaką obrażenia.
Przed wykorzystaniem przyrząd trzeba rzetelnie •
obejrzeć. Wykorzystujcie przyrząd tylko w sprawnym
stanie. Przy ujawnieniu jakichkolwiek defektów, że
przedstawiają niebezpieczeństwo dla operatora, ich
jest potrzebne natychmiast usunąć.
Zamienicie uszkodzone albo zużyte detale. •
Wykorzystujcie tylko oryginalne części zamienne.
Detale, zrobione postronnym producentem,
przylegają nieściśle i podwyższają ryzyko powstania
urazów.
Zakazuje się usuwać albo zmieniać elektryczne i •
mechaniczne urządzenia obrony.
Przed tym, jak porzucić robocze miejsce, zrobić •
remont, przegląd albo oczyszczenie przyrządu,
odłącz jego i poczekaj do pełnego zatrzymania się.
Bądź baczny przy oczyszczeniu i remoncie •
przyrządu. Produkuj nastrajanie, ustaliwszy
odłączony przyrząd na równą czystą powierzchnię.
Bądź baczny. Śledź za pracą. Oderwał
się, można utracić kierowanie. Podchodź
do pracy mądrze.
Reguły techniki bezpieczeństwa
podczas pracy z przyrządami z silnikiem
benzynowym
UWAGA! Benzyna jest łatwopalną
substancją. Bądźcie ostrożne z paliwem.
Zachowujcie paliwo w specjalnie przeznaczonych •
kanistrach. Szczelnie zamknijcie przykrywki
paliwowego baka.
Zaprawiajcie bak tylko na świeżym powietrzu, •
nie palicie podczas tankowania.
Najpierw zaprawcie bak, a potem zapuszczajcie •
silnik.
Przed tym, jak zaprawiać bak, ostudź tłumik.•
Nie zdejmuj przykrywkę baka paliwowego i nie •
zalewaj paliwo przy pracującym albo niewystygłym
silniku.
W razie rozlewania benzyny nie zapuszczajcie •
silnik, odsuńcie przyrząd w bok od rozlewa
benzyny i nie dopuszczajcie powstania źródła
zapłonu dopóki pary benzyny nie rozproszą się.
Przetrzyjcie rozlewa paliwo przed tym, jak •
zapuszczać silnik.
Zachowuj baki paliwowe w pewnym miejscu.•
Nie zapuszczaj silnik w pomieszczeniu albo w •
zamkniętym obszarze, żeby zapobiec gromadzeniu
niebezpiecznego gazu czadowego.
UWAGA! W gazach wydechowych
znajduje się trujący gaz czadowy, który
nie ma ani koloru, ani zapachu.
Wdychanie gazów wydechowych może
doprowadzić do utraty świadomości i wyniku
letalnego. Żeby poziom najawności gazów
wydechowych w powietrzu nie przekraczał
dopuszczalny, zabezpiecz odpowiednią
wentyłację.
Nie zachowujcie przyrząd z paliwem w baku w •
pomieszczeniu, gdzie pary mogą zapalić się.
Żeby skrócić ryzyko powstania pożaru, trzymaj w •
czystości silnik, tłumik, przedział bateryjny i zbiornik
benzyny, strzeżcie przyrząd od ognia i iskr.
System wydechowy nagrzewa się dosyć po •
to, żeby zapalić niektóre materiały Zachowuj
przyrząd na bezpiecznej odległości od materiałów
łatwopalnych.
Podczas pracy глушитель mocno nagrzewa się •
i zostaje gorącym pewny czas po wyłączeniu. Nie
dotykajcie do tłumika, żeby uniknąć poparzenia.
Przed tym, jak zanosić przyrząd do zamkniętego
pomieszczenia, dajcie jemu ochłonąć.
Reguły elektrobezpieczeństwa
UWAGA! W celach zapobiegania ciosowi
przez prąd elektryczny, sprawiania
osobistej krzywdy albo błysku podczas
wykorzystania instrumentów elektrycznych trzeba
dotrzymywać następne instrukcje po technice
PL
75
Page 76

76
Instrukcja z eksploatacji
PL
fig.
1
ON
OFF
START
OFF
ON
ON
STOP
GN-850
GN-1500 GN-3000
GN-6500
bezpieczeństwa. Przed wykorzystaniem
instrumentu przeczytajcie i rzetelnie dotrzymujcie
dane instrukcje.
OSTROŻNIE! Żeby uniknąć poparzenia albo
porażki elektrycznym prądem nie dotykaj do
detali elektroprzeprowadzących.
UWAGA! NIEBEZPIECZEŃSTWO PORAŻKI
ELEKTRYCZNYM PRĄDEM!
Śledź za produkcyjnym środowiskiem. Nie
wykorzystuj elektroinstrumenty podczas deszczu.
Nie wykorzystuj elektroinstrumenty w wilgotnych
i surowych pomieszczeniach. Zawieraj roboczą
działkę w suchości, zabezpiecz dobre oświetlenie.
Strzeż przyrząd od wilgoci. Nie zostawiaj przyrząd
na świeżym powietrzu na noc. W wypadku traenia
wody do elektroinstrumentu zwyżkuje ryzyko ciosu
prądem elektrycznym.
Specjalne reguły ztechniki bezpieczeństwa
Przestudiuj sposoby szybkiego odłączenia •
generatora w wypadkach bezzwłocznych.
Przestudiuj wszystkie bloki kierowania •
generatorem, gniazda wyjściowe i detale łączne.
Poinstruuj pracownika, korzystającego generator.•
OSTROŻNIE! W gazach wydechowych
znajduje się trujący gaz czadowy, który
nie ma ani koloru, ani zapachu.
Wdychanie gazów wydechowych może
doprowadzić do utraty świadomości i wyniku
letalnego.
Podczas pracy w zamkniętym albo częściowo •
zamkniętym przestrzeniu powietrze wdychane
może zawierać niebezpieczną ilość gazów
wydechowych.
Dla zapobiegania skupisku wydechowych gazów •
zabezpieczcie odpowiednią wentyłację.
Generator produkuje energię elektryczną, •
wystarczającą dla ciężkiej porazenia elektrycznym
prądem w razie nieprawidłowego wykorzystania.
Wykorzystanie generatora lub aparatu •
elektrycznego w wilgotnym środowisku, na przykład,
w śnieg lub deszcz, blisko zbiornika wodnego
lub sprinklernego systemu, albo wilgotnymi
rękami może doprowadzić do porażeniu prądem
elektrycznym. Przechowywać generator należy w
suchym miejscu.
Przy otwartym przechowaniu generatora trzeba •
sprawdzać przed każdym wykorzystaniem wszystkie
elektryczne szczegóły na panelu sterowania.
Dostanie się wilgoci lub lodu może doprowadzić
do uszkodzenia części elektrycznych lub do spięcia,
które niesie niebezpieczeństwo porażenia prądem
elektrycznym.
W żadnym przypadku nie wolno podłączać •
urządzenie do sieci elektrycznej budynku, dopóki
wykwalikowany elektryk nie wmontuje wyłącznik
izolacyjny.
Odległość od pracującego generatora do •
budynku i innego wyposażenia powinna była
zestawiać najmniej 1 metra (3 stóp).
W żadnym przypadku nie wolno zagradzać •
generator.
Przechowuje się generator w oddali od •
materiałów łatwopalnych.
W czasie pracy tłumik silnie nagrzewa się i •
pozostaje gorącym przez pewien czas po wyłączaniu.
W żadnym przypadku nie wolno dotykac tłumika,
by nie oparzyć się. Ostudzić generator przed tym,
jak zanosić go w zamknięte pomieszczenie.
Nie podłaczaj generator do systemu opatrzenia •
ogólnego.
Nie podłaczaj do innego generatora.•
Rozpakowywanie
Przy rozpakowywaniu sprawdźcie obecność
wszystkich elementów. Patrz kreślenia do danego
kierownictwa. Przy nieobecności albo uszkodzeniu
niektórych detali zwrócicie się do centrum
podtrzymania IVT.
Sterowanie
Przełącznik silnika (9) :
Włączenie i wylączenie silnika
Położenie wyłącznika :
OFF (czy STOP) : Dla wyłączenia silnika.•
ON: Dla rozruchu silnika.•
START (GN - 6500) : Dla rozruchu silnika przez •
rozrusznik. Zapuściwszy silnik, przywróć klucz (9)
do położenia “ON”. Rozrusznik nie musi pracować
więcej 5 sekund po kolei. Jeśli silnik nie zapuszcza
się, przywróć wyłącznik do początkowego położenia
i poczekaj 10 sekund przed ponownym rozruchem.
Page 77

Instrukcja z eksploatacji
fig.
2
GN-850
GN-1500 GN-3000
fig.
3
ON
OFF
fig.
4
CLOSED
OPEN
CLOSED
OPEN
GN-850
GN-1500 GN-3000
Rozrusznik z oddaniem (10)
(GN-850; GN-1500; GN-3000)
Żeby zapuścić silnik, z lekka pociągnij uchwyt
rozrusznika, dopóki nie odczujesz opór, potem
pociągnij jej przenikliwie.
UWAGA: W żadnym przypadku nie wolno
raptownie puszczać rękojeść startera.
Płynnie powrócić rękojeść w dawne położenie, by
zapobiec uszkodzeniu startera.
Klapa paliwowa (11)
Klapa paliwowa jest
położony między
bakiem
(zbiornikiem) paliw
i gaźnikiem.
Kiedy nosidła
zaworu znajdują się
w położeniu «ON»,
paliwo postępuje z
paliwowego baku
w gaźnik. Wyłączywszy silnik, zwrócic nosidła w
położenie „OFF”.
Dźwignia zasłonki (13)
Dźwignia zasłonki się dla zabezpieczenia
wzbogaconej mieszanki paliw celu uruchomienia
chłodnego silnika.
Zasłona otwiera się oraz zamyka się ręcznie przy
pomocy specjalnego dźwigienka; dla wzbogacania
mieszanki przemieścić dźwigienka w położenie
„CLOSED”.
Wyłącznik prądu przemiennego (6)
Wyłącznik prądu przemiennego automatycznie
wyłącza się w razie spięcia lub znacznego
przeładunku generatora. Przy samorozruchu
wyłącznika przed jego powtórnym włączaniem
trzeba sprawdzić, poprawnie funkcjonuje urządzenia
i nie przekroczona nominalny ładunek.
Zacisk uziemienia (5)
Zacisk uziemienia generatora jest połączony z ramą
generatora, metalowymi szczegółami generatora,
nie przeprowadzającymi prąd, i zaciskami uziemienia
każdego gniazdka.
Dla zapobiegania porażce elektrycznym prądem
wskutek uszkodzenia urządzeń, co podłacza się do
spawalniczego generatora, uziemicie przyrząd za
pomocą zacisku uziemienia (5).
System uprzedzenia o niskim poziomie oleju
(GN-1500; GN-3000; GN-6500)
System uprzedzenia o niskim poziomie oleju (21)
pomaga zapobiec uszkodzenie silnika z powodu
niedostatecznej ilości oleju w karterze. Do tego,
jak poziom oleju w karterze opadnie poniżej
bezpiecznego poziomu, system automatycznie
zaprzestanie pracy silnika (przełącznik silnika (9)
pozostaje w położeniu “ON”).
Kontrolna lampa (14)
Kontrolna lampa pali się przy normalnej pracy
generatora.
Wyjścia prądu stałego (4)
Wyjście prądu stałego wykorzystuje się TYLKO dla
ładowania 12-woltowych baterii samochodowych.
Dla podłączania baterii do generatora wykorzystuj
odpowiedni kabel. Łapki kabla podłączają się
do odpowiednich biegunów baterii (czerwienna
łapka - do pozytywnego bieguna, czarna - do
negatywnego).
Bezpiecznik dla łańcucha prądu stałego (3)
(jeżeli jest)
Przy przeładunku generatora, w razie uszkodzenia
baterii albo naruszenia łączeń między baterią i
generatorem, bezpiecznik dla łańcucha prądu
stałego automatycznie przerywa łańcuch ładowania
baterii prądu stałego.
PL
Instrukcje z eksploatacji
Przyłączenie do sieci elektrycznej budynku
Przyłączenie rezerwowego źródła odżywiania
się do sieci elektrycznej budynku dochodzi do
77
Page 78

78
Instrukcja z eksploatacji
PL
skutku wykwalikowanym elektrykiem. Przy tym
trzeba izolować źródło energii generatora od
systemu zasilania energią elektryczną i zaopatrzyć
przestrzeganie wszystkich przydatnych praw i
elektrotechnicznych ram i norm.
Przy nieprawidłowym przyłączeniu do
sieci elektrycznej budynku prąd
elektryczny od generatora zasilania
ogólną sieć. Takie zasilenie niesie ryzyko
porażenia elektrycznym prądem
współpracowników ogólnej elektrowni, albo
innych osób przy kontakcie z liniami zasilania
energią elektryczną w razie przeboju w odżywianiu
się. Otrzymacie konsultacje na elektrowni lub u
wykwalikowanego elektryka.
Przy nieprawidłowym przyłączeniu do
sieci elektrycznej budynku prąd
elektryczny od ogólnej sieci zasilania
generator. Przy odbudowaniu zasilania
energią elektryczną generator może eksplodować
lub doprowadzić do zapłonu sieci elektrycznej
budynku.
W pewnych krajach prawo żąda rejestracje
generatorów na miejscowych elektrowniach.
Przepisy rejestracji i eksploatacji cm w miejscowych
aktach normatywnych.
Schematy uziemienia generatora
Benzynowe generatory IVT uziemieni drogą
połączenia elementów ramy generatora z zaciskami
uziemienia (5) w gniazdkach prądu zmiennego (1).
System uziemienia nie jest połączona z zerowym
przewodem prądu zmiennego.
Miejscowe normatywne akta, normy i przepisy
mogą żądać połączenia systemy uziemienia
z zerowym przewodem prądu zmiennego.
Rezultaty sprawdzenia stanu schematu uziemienia
przy pomocy testera gniazdek dla generatora i
domowego gniazdka odróżniają się.
Jeżeli miejscowe normatywne akta, normy lub
przepisy żądają połączenia systemy uziemienia
z zerowym przewodem prądu zmiennego,
trzeba przekonsultować się z wykwalikowanym
elektrykiem lub kontrolerem aparatury elektrycznej.
Trzeba pozostawić mu schemat instalacji
elektrycznej.
Zaciskanie uziemienia (5) można wykorzystywać
dla uziemienia generatora lub związki ramy
generatora z ramą maszyny, lecz tylko jeżeli tego
żądają miejscowe prawo lub elektrotechniczne
przepisy i normy. Przed wykorzystaniem zaciskania
uziemienia obowiązkowo trzeba przekonsultować
się z wykwalikowanym kontrolerem aparatury
elektrycznej po pytaniach norm i ram, przydatnych
w waszym kraju.
Wykorzystanie przyrządu w jakości generatora
Przed podłaczaniem przyrządu albo sznura do
generatora:
Przekonacie się, że generator jest przydatny do •
pracy. Wadliwe urządzenie
lub kable odżywiania się niosą niebezpieczeństwo •
porażenia elektrycznym prądem.
W razie wadliwej pracy, zwolnienia chodu lub •
nagłego zatrzymania urządzenia natychmiast
wyłączycie go. Odłącz przyrząd i sprawdź, czy
jest sprawny on, czy nie przekroczono nominalne
obciążenie generatora.
Sprawdź, czy nie przekroczone są rozliczeniowe •
elektryczne charakterystyki generatora. Nie
dopuszczaj przekroczenia skrajnej potęgi
generatora. Wykorzystać generator na szczytowej
potędze dopuszcza się nie więcej od 5 minut.
UWAGA: Przeładunek może doprowadzić
do rozłączenia rozłącznika. Przekroczenie
szczytowego czasu pracy z maksymalną potęgą
lub nieznaczny przeładunek generatora nie
obowiązkowo doprowadzają do włączenia
wyłącznika, lecz skracają termin służby
generatora.
Skróć czas pracy ze skrajną potęgą do 5 minut.•
Przy trwałej pracy nie przekraczaj potęgę •
nominalną.
GN-850 GN-1500 GN-3000 GN-6500
Napięcie prądu
przemiennego na
wyjściu (W)
Nominalna
potęga prądu
przemiennego na
wyjściu 230 W / 50
Gc (V)
Maksymalna
potęga prądu
przemiennego na
wyjściu 230 W / 50
Gc (V)
230/50 230/50 230/50 230/50
750 1000 2500 5000
850 1100 2800 5500
W każdym wypadku trzeba obliczać sumaryczną •
potęgę (Wat) wszystkich podłączanych urządzeń.
Zwróć uwagę na współczynnik mocy przyrządu
podłączającego. Zawsze zawczasu licz obciążenie,
co robi się na generator. Potęga generatora patrz na
etykiecie z technicznymi danymi.
Potęga podłączanych przyrządów cm na •
ich etykietach. Producenci zazwyczaj wskazują
Page 79

Instrukcja z eksploatacji
fig.
5
6 mm
nominalne charakterystyki obok numeru modelu
albo seryjnego numeru przyrządu.
Praca na prądzie przemiennym
Zapuścicie silnik.1.
Włączycie wyłącznik prądu (6) przemiennego.2.
Podłaczycie urządzenie.3.
Dla uruchomienia większości zmechanizowanych
urządzeń jest potrzebne potęga znacznie wyższa
niż nominalna.
Nie wolno przekracza wskazany próg gniazdka
po prądzie. W razie włączenia wyłącznika prądu
zmiennego w rezultacie przeładunku łańcucha,
trzeba obniżać elektryczny ładunek na łańcuch,
poczekać kilka minut i zwrócić wyłącznik (6) w
wyjściowe położenie.
Praca na prądzie stałym
Wyjścia prądu stałego wykorzystują się TYLKO dla
ładowania 12-woltowych samochodowych baterii.
Podłączanie kabli baterii :
Nim podłączać kable dla ładowania do baterii, 1.
ustalonej w maszynie, odłącz uziemiony kabel baterii.
UWAGA: Bateria wydziela gaz
wybuchoniebezpieczny; nie pal i nie
albo użycia baterii zabezpiecz odpowiednią
wentyłację.
stałego prądu(4) generatora.
bieguna baterii
bieguna baterii. Unikaj kontaktu zacisków. To może
doprowadzić do zwarcia i uszkodzenia baterii.
UWAGA: Nie zapuszczaj maszynę z podłączonym
kablem dla ładowania i pracującym generatorem.
To może doprowadzić do uszkodzenia maszyny
lub generatora.
Odłączanie kabli baterii:
bieguna baterii.
bieguna baterii.
stałego (4) generatora.
rozwodź obok ogień. Podczas ładowania
Podłącz wtyczkę dla ładowania do wyjścia 2.
Podłącz zacisk czerwony do pozytywnego (+) 3.
Podłącz zacisk czarny do negatywnego (-) 4.
Zapuszczaj generator.5.
Unierucom silnik.1.
Odłącz zacisk czarny od negatywnego (-) 2.
Odłącz zacisk czarny od negatywnego (+) 3.
Wyciągnij wtyczkę dla ładowania z wyjścia prądu 4.
Znów podłącz uziemiony kabel baterii maszyny.5.
Sprawdzenie przed eksploatacją
Benzyna z dodaniem masła
(GN-850)
Pojemność baka paliwowego składa 4,2 l. 1.
Wypełnij bak, pozostawiwszy blisko ¼ cala (6mm)
do gardzieli dla rozszerzenia paliwa
Wykorzystuj benzynę z dodaniem masła. Owak 2.
silnik może przegrzać się. Zmieszaj benzynę i masło
w proporcji 50:1 albo 40:1 (latem). Wykorzystuj
specjalne masło dla 2-taktowych silników.
Odmierz masło za pomocą przykrywki 3.
paliwowego baka, jak pokazano na rysunku.
Wstrząśnij bak, a potem zapuszczaj silnik4.
GAS 50 : 1 OIL
1 (L) : 0.02 (L)
2 (L) : 0.04 (L)
3 (L) : 0.06 (L)
PL
4 (L) : 0.08 (L)
Masło silnikowe
(GN-1500; GN-3000; GN-6500)
UWAGA: Silnikowy olej jest głównym czynnikiem,
wpływającym do pracy i termin służby silnika. Nie
rekomenduje się wykorzystywać nie myjące olei,
jak również oleju dla dwutaktowych silników,
ponieważ oni uszkadzają silnik.
Przed każdym wykorzystaniem generatora trzeba 1.
sprawdzać poziom oleju na równej powierzchni z
wyłączonym silnikiem.
Trzeba wykorzystywać olej dla 4 -taktowych 2.
silników, albo piorące silnikowy olej wyższej jakości,
kategorii SG, SF/CC, CD, odpowiednie żądaniom
producentów samochodów USA.
79
Page 80

80
Instrukcja z eksploatacji
PL
fig.
6
MAX
MIN
Markowanie silnikowych maseł kategorii SG, SF/•
CC, CD wskazana na kontenerze.
SG-SF/CC-CD-SINGLE VISCOSITY•
SG-SF/CC-CD-MULTI VISCOSITY•
Masło SAE 1OW-30 rekomenduje się dla •
ogólnego wykorzystania przy każdej temperaturze.
Masło z innymi poziomami lepkości, wskazane
w tablicy, może wykorzystywać się, jeżeli średnia
temperatura w waszym obwodzie znajduje się we
wskazanych granicach.
Zdjąć pokrywę otworu dla tankowania olejem 3.
(7) i oraz przetrzeć wskaźnik poziomu oleju.
Trzeba sprawdzić poziom oleju, wstawiwszy 4.
szczyp w otwór dla tankowania oleju, nie
zakręcając.
Jeżeli poziom oleju niski, zapełnicie bak do 5.
otworu.
Rekomendacje po tankowaniu
(GN-1500; GN-3000; GN-6500)
Obowiązkowo trzeba sprawdzi wskaźnik 1.
poziomu paliwa (15).
Jeżeli poziom paliwa niski, zapełnicie bak. Trzeba 2.
zaląc paliwo wyżej paliwowego ltru.
się do ocjalnego dealera IVT.
UWAGA: Eksploatacja silnika z stałym
postukiwaniem albo brzęczeniem może
doprowadzić do uszkodzenia. Eksploatować
silnik z stałym postukiwaniem albo brzęczeniem
zabroniono; ograniczona gwarancja dystrybutora
nie rozprzestrzenia się na detale, uszkodzone
wskutek nieprawidłowego użycia.
Rodzaje paliwa mieszczące tlen •
Pewna benzyna miesza się ze spirytusem lub eterem
dla podnoszenia się oktanowej liczby. Taka benzyna
odnosi się do rodzajów paliwa mieszczących tlen.
Przy wykorzystaniu rodzajów paliwa mieszczących
tlen przekonacie się, że jego oktanowa liczba równa
się, po choćby liczbie 86.
Etanol (spirytus etylowy)•
Przy wykorzystaniu benzyny, utrzymującej po
objętości więcej od 10% etanolu, mogą powstać
problemy z uruchomieniem i/lub jakością pracy.
Benzyna mieszcząca etanol może mieć markowanie
„Gazochoł”.
Metanol (spirytus metylowy albo drzewny)•
W skład benzyny mieszczącej mietanol powinny
były wchodzić środki do rozpuszczania i substancje
przeciwkorozyjne dla ochrony paliwowego systemu.
Przy wykorzystaniu benzyny, utrzymującej po
objętości więcej od 5% metanolu, mogą powstać
problemy z uruchomieniem i/lub jakością pracy,
jak również uszkodzenia metalowych, gumowych i
plastikowych szczegółów paliwowego systemu.
Pojemność baka paliwowego:
6,7 l – GN-1500•
15 l – GN-3000 •
25 l – GN-6500•
Wykorzystujcie benzynę z oktanem liczbą •
nie niżej 86. Rekomenduje się wykorzystywać
benzynę nieetylowaną, ponieważ ona stwarza
mniej odkładań w silniku i świecy zapalenia, a także
przedłuża termin służby wydechowego systemu.
Nie wykorzystujcie nieświeżą albo zanieczyszczoną
benzynę albo mieszankę masła/benzyny.
Unikajcie traenia do paliwowego baka brudu •
albo wody.
Czasami przy pracy z wysokim obciążeniem •
słyszy się lekkie metalowe postukiwanie. Nie
zwracajcie uwagę.
Jeśli brzęczenie albo postukiwanie pojawia •
się przy pracy z stałą szybkością obiegu silnika,
normalnemu obciążeniu, wykorzystujcie benzynę
innej marki. Jeśli brzęczenie nie przestaje, odwołacie
MTBE (mietiltrzytbutylowyj eter)•
Rekomenduje się wykorzystywać benzyna,
utrzymująca po objętości do 15% MTBE. Przed
wykorzystaniem mieszczących tlen rodzajów paliwa
trzeba postarać się zatwierdzić jego zawartość.
W pewnych stanach jest potrzebnym odbić tę
informację na pompie. Przy ukazaniu jakichś
niepożądanych objawów w pracy przechodzicie
na standardowy nie etylorowaną benzynę. IVT
nie niesie odpowiedzialność za uszkodzenie lub
problemy w pracy systemu paliw, które
powstało w rezultacie wykorzystania zawierającego
tlenek paliwa; gwarancja na powyższe wypadki nie
rozpowszechnia się.
UWAGA: Rodzaje paliwa zawierające tlenek mogą
zaszkodzić pomalowane i plastikowe szczegóły.
Unikać rozlania paliwa w czasie tankowania
benzyną zbiornika paliwa. Gwarancja nie
rozpowszechnia się na uszkodzenia, które powstali
w rezultacie rozlewania paliwa.
Page 81

Instrukcja z eksploatacji
fig.
7
ON
OFF
START
OFF
ON
ON
STOP
GN-850
GN-1500 GN-3000
GN-6500
fig.
8
GN-850
GN-1500 GN-3000
Włączenie/wyłączenie
Rozruch silnika
Wyłączycie z gniazd wszystkie przyrządy 1.
elektryczne. Generator ciężko uruchomić przy
obciążeniu podłaczonym.
Skieruj przełącznik silnika (9) do położenia “ON”.2.
Dźwignia zasłonki (13) zamyka się, kiedy silnik 3.
chłodnieje. Zamknąć zasłonkę można ręcznie,
przesunąwszy dźwignię do położenia “CLOSED”. (GN
- 850 Skieruj dźwignię dławikowania do położenia 1).
Zapuść silnik4.
(GN-6500)
Skieruj przełącznik silnika (9) do położenia •
“START” (trzymaj nie więcej 5 sekund).
Zapuściwszy silnik, przywróć klucz do położenia •
“ON”.
(GN-850; GN-1500; GN-3000)
Przetłumaczcie przełącznik silnika (9) do •
położenia “ON”.
Z lekka pociągnijcie trzonek rozrusznika (10), •
dopóki nie odczujecie opór, potem pociągnijcie jej
drastycznie.
UWAGA: Zabrania się puszczać raptownie
rękojeść startera. Płynnie zwrócić rękojeść w
dawne położenie, by zapobiec uszkodzeniu
startera lub korpusu.
(otwarcie)”, kiedy silnik zagrzeje się.
Przystanek silnika
W razie awarii:
Aby zatrzymać silnik w razie awarii, 1.
przeprowadzić przełącznik silnika (1) w położenie
„OFF”.
W zwyczajnym reżimie:
Przeprowadzić wyłącznik prądu zmiennego (6) 1.
w położenie „OFF”.
2. Wyłączycie z gniazdek wszystkie 2.
urządzenia elektryczne. Odłączycie kable dla
ładowania baterii prądem stałym.
3. Przeprowadzić przełącznik silnika (9) w 3.
położenie „OFF” (lub STOP).
4. Przeprowadzić Klapa paliwowa (11) w 4.
położenie „OFF”.
Obsługa i przechowywanie
Przed przeprowadzeniem remontu odłącz •
przyrząd i poczekaj do jego pełnego zatrzymania
się.
Trzymaj przyrząd i wentylacyjne otwory w •
czystości. W razie popsucia, nie zważając na
doskonałe warunki produkcji i wypróbowań, remont
musi wykonywać się w ocjalnym serwisowym
centrum IVT.
Regularne oczyszczenie i obsługa gwarantują •
wysoką efektywność i trwałą eksploatację
przyrządu.
Wszystkie nakrętki, bolcy i wkręty powinny być •
szczelnie zawleczone.
Zamień uszkodzone albo zużyte detale.•
Zachowuj przyrząd w suchym niedostępnym •
dla dzieci miejscu, na bezpiecznej odległości od
materiałów łatwopalnych.
Unikajcie traenia wody na przyrząd!•
Dla podtrzymania generatora w należytym stanie
jest potrzebnym okresowy serwis i nastawienie.
Produkujecie obsługę i oglądanie z okresowością,
wskazaną w punkcie, serwis, poniżej.
PL
Jeżeli zasłona (13) była zamknięta ręcznie, 5.
przemieścicie dźwigienka w położenie „OPEN
UWAGA: W spalinach jest zawartym
jadowity czadowy gaz. Wyłączycie silnik
przed przeprowadzeniem na serwis.
Jeżeli obsługa przeprowadza się z pracującym
silnikiem, zapewnić w pomieszczeniu dobrą
wentylację.
UWAGA: Dla serwisu i remontu wykorzystać tylko
oryginalne części zamienne IVT lub analogiczni
do nich. Części zamienne bardziej niskiej jakości
mogą zaszkodzić generator.
81
Page 82

82
Instrukcja z eksploatacji
PL
fig.
9
Zamiana silnikowego oleju
(GN-1500; GN-3000; GN-6500)
Szybki i 1.
pełny zlawszy oleju
Wstawić korek (8) i uszczelniacz krążek. 3.
Przekonacie się, że korek jest wstawiony szczelnie.
Wypełnicie bak polecanym masłem i sprawdźcie 4.
poziom.
możliwy, póki silnik
nie ostygł.
Z d j ą ć 2.
korek dla
schodzenia oleju (8),
Ilość masła:
0,6 l – GN-1500•
1,1 l – GN-3000•
1,1 l – GN-6500•
uszczelniacz krążek,
pokrywę otworu dla
załadowania oleju
(7) i wylać olej.
GN-850
REGULARNA OBSŁUGA (produkuje się przez określoną ilość miesięcy
OBSŁUGA
Powietrzny ltr
Świeca zapalenia
Osadnik
Dekorbonizacja
Masło dla silnika
Powietrzny ltr
Osadnik pali-
wowy
Świeca zapalenia Sprawdzenie x
Odstęp klapowy oczyszczenie x (2*)
Paliwowy bak
i ltr
paliwoprzeprow-
adzacz
oczyszczenie (zamiana przy
konieczności)
oczyszczenie (zamiana przy
konieczności)
oczyszczenie (zamiana przy
konieczności)
usunięcie knota, sprawdze-
nie, Regulacja
REGULARNA OBSŁUGA (produkuje się przez określoną ilość miesięcy albo zegara
OBSŁUGA
Sprawdzenie
poziomu
zamiana x x
sprawdzenie x
oczyszczenie x (1*)
oczyszczenie x
Oczyszczenie x (2*)
Regulacja x (2*)
Po każdym
użyciu
x
albo zegara eksploatacji, zależnie od tego, co nastąpi przedtem)
comiesięcznie
albo 50 godzin
GN-1500; GN-3000; GN-6500
eksploatacji, zależnie od tego, co nastąpi przedtem)
Przez
miesiąc albo
20 godzin
eksploatacji
(3*)
OSTROŻNIE! Częsty i długotrwały
kontakt z które odpracowało silnikowym
masłem może wywołać raków skóry.
Każde 3 miesiące albo 150 godzin
eksploatacji (3*)
x (1*)
Każde 3
miesiące
albo 50
godzin
eksploatacji
(3*)
Każde 6
miesięcy
albo 100
godzin
eksploatacji
(3*)
Co roku albo
300 godzin
eksploatacji
(3*)
(1*) Praca w zakurzonym pomieszczeniu żąda bardziej częstego oglądania urządzenia. (2*) Jeżeli posiadacz
nie ma odpowiednich narzędzi i kwalifikacje mechanika, obsługa produkuje oficjalny dealer IVT. (3*)Żeby określić
okresowość obsługi przy komercyjnym fachowym wykorzystaniu, zanosicie zegar eksploatacji w czasopismo.
x
x
x
Ogni due
anni (3*)
Page 83

Nawet jeżeli praca z które odpracowało masłem
fig.1
0
GN-850
GN-1500
GN-3000
GN-6500
fig.1
1
OFF
nie jest codziennej, po zakończeniu pracy
rekomenduje się dokładnie wymyć ręce z mydłem
możliwie szybciej.
Utylizować stary olej silnikowy ekologicznie czystym
sposobem. Rekomenduje się ulokować go w
wodoszczelny kontener i wysłać na miejscową stację
obsługi, albo w centrum po przeróbce. Nie wywozić
olej razem ze śmieciami i nie wolno zlewać w ziemię.
Obsługa ltru powietrznego
Zaśmiecony ltr powietrzny (12) przeszkadza pójściu
powietrza w gaźnik. Aby zapobiec zakłóceniu w
pracy gaźnika, regularnie oglądać ltr powietrzny.
Praca w zakurzonym pomieszczeniu żąda bardziej
częstego sprawdzenia urządzenia.
UWAGA: Wykorzystanie benzyny lub
łatwopalnych środków do rozpuszczania
dla oczyszczenia ltrującego elementu
może doprowadzić do zapłonu lub
eksplozji. Wykorzystać tylko mydliny lub niepalne
środki do rozpuszczania.
UWAGA: Zabrania się wykorzystanie generatora
bez powietrznego ltru (13), ponieważ to może
doprowadzić do szybkiego zdarcia silnika.
Instrukcja z eksploatacji
Trzeba przeprowadzić klapa paliwowa(11) w 1.
położenie „OFF”. Osadnik paliwowy(18), Kształtu
litery o pierścień i ltr.
Obierzecie osadnik, pierścień i ltr w niepalnym 2.
lub ciężkim środku do rozpuszczania.
Ustawicie ltr, pierścień, kształtu litery „O”, oraz 3.
osadnik (18) na miejsce.
Trzeba przeprowadzić klapa paliwowa (11) w 4.
położenie „ON” i sprawdzić obecność odpływu.
Obsługa świecy zapalenia
Wskazane świece zapłonu:
LDF6TC. or TME170: BPR6ES,
TME260,
TME360,
TME410:BPR5ES,
TME280:BP6ES
By zaopatrzyć pewne funkcjonowanie silnika,
świeca zapłonu powinna była być w czystą i mieć
poprawną szczelinę.Przy pracy silnika tłumik silnie
nagrzewa się. Nie wolno dotykać tłumika.
PL
Zdjąć zaciski klamry pokrywy powietrznego 1.
ltru (17), pokrywę ltru i ltrujący element.
Przemyć element w roztworze życiowego 2.
piorącego środka i ciepłej wody, dokładnie wypłukać
lub przemyć w niepalnym lub ciężkim środku do
rozpuszczania. Dokładnie wysuszycie element.
Załadować element w czysty smar i odcisnąć je. 3.
Jeżeli w elemencie zostało zbyt wiele oleju, silnik kopci
przy początkowym uruchomieniu.
Trzeba wstawić element ltrujący i zakręcić 4.
pokrywę.
Oczyszczenie osadnika paliwa (18)
Osadnik paliwa (18) zapobiega dostaniu się w gaźnik
błota lub wody, zawartej w paliwowym baku. Jeżeli
generator długi czas nie wykorzystywał się, należy
wyczyścić osadnik.
1. Zdjąć kapsel świecy zapłonu (19).
2. Obierzecie od błota obwód wokoło świece
zapłony.
3. Wyciągnijcie świecę zapalenia za pomocą
odpowiedniego klucza (24).
4. Obejrzycie świecę zapłonu. Zastąpicie ją,
jeżeli izolator jest uszkodzony. Dla powtórnego
wykorzystania obierzecie świecę drutową szczotką.
5. Trzeba zmierzyć szczelinę świecy przy pomocy
tłustomierza. Trzeba skorygować szczelinę, dokładnie
zgiąwszy boczną elektrodę. Grubość szczeliny powinna
była zestawiać: 0,7 - 0,8 mm (0,028 - 0,031 cala).
6. Trzeba sprawdzić stan krążka świecy zapłonu i
wkręcicie świecę ręcznie, by zapobiec skręcaniu
rytownictwa przez nitkę.
7. Ustawiwszy świecę, trzeba zaciągnąć ją przy
pomocy świecowego klucza (24), by uszczelnić
krążek. Przy instalacji nowej świecy zapłonu trzeba
zaciągnąć ją na pół obrotu dla uszczelniania
krążka. Przy powtórnej instalacji już zużytej świecy
zapłonu trzeba zaciągnąć ją na 1/8-1/4 obroty dla
uszczelniania krążka.
83
Page 84

84
Instrukcja z eksploatacji
PL
fig.1
2
0.7-0.8mm
fig.1
3
wysłaniem generatora na przechowanie.
Trzeba unikać upadku lub uderzenia generatora przy
przewozie. N ie wolno stawiać na generator ciężkie
przedmioty.
Przed długotrwałym przechowaniem urządzenia:
Przekonacie się, że miejsce przechowania jest •
dosyć suchym i czystym.
Obejrzeć i zrobić remont zgodnie z tablicą •
poniżej.
Zlać benzynę z gaźnika, osłabiwszy wylewnego •
śruba. Zlać benzynę w specjalny kontener.
UWAGA: Mocno zakręcić świecę zapłonu.
Niepoprawnie ustawiona świeca zapłonu może
silnie nagrzewać się i zaszkodzić silnik.
Nie wolno wykorzystywać świece zapłony z
nieodpowiednim cieplnym współczynnikiem.
Wykorzystywać tylko rekomendowane lub
Zlewajcie benzynę w dobrze przewietrzanym
pomieszczeniu z odłączonym silnikiem. Nie
palicie podczas zlania benzyny.
UWAGA: Benzyna jest łatwopalną
substancją i wybuchoniebezpieczna
przy określonych warunkach.
analogiczni im świece zapłony.
Zamiana masła.
Przewóz / Przechowanie
Przy przewozie generatora przeprowadzić przełącznik
silnika (9) i paliwowy zawór (11) w położenie „OFF”.
Podtrzymywać generator w poziomym położeniu,
by zapobiec odpływowi paliwa. Rozlane paliwo, jak
również jego pary są łatwopalne.
(GN-1500; GN-3000;
GN-6500)
Wyciągnąć świecę 1.
zapłonu i dodać w
cylinder wzorowo
jedną stołową łyżkę
czystego smaru.
Zwrócić walec 2.
UWAGA: Kontakt z gorącym silnikiem
lub wydechowym systemem może
doprowadzić do ciężkich oparzeń lub
zapłonowi. Ostudzicie silnik przed przewozem lub
Czas przechowywania WSKAZANY PORZĄDEK OBSŁUGI, (pomagający uniknąć ciężkiego uruchomienia)
Mniej jednego miesiąca Wskazany porządek obsługi, (pomagający uniknąć ciężkiego uruchomienia)
Od 1 do 2 miesięcy Przygotowanie nie jest potrzebnym*
Od 2 miesięcy do 1 roku
Więcej od 1 roku
Trzeba lądować generator świeżą benzyną i dodać benzynowy dodatek*
Zlać paliwo ze spławikowej kamery gaźnika
Zlać paliwo z osadnika paliwa
Trzeba lądować generator świeżą benzyną i dodać benzynowy dodatek*
Zlać paliwo ze spławikowej kamery gaźnika
Zlać paliwo z osadnika paliwa
Trzeba wyciągnąć świecę zapłonu. Nalać w cylinder stołową łyżkę smaru. Powoli pociągnąć
ciągu linę, by rozdzielić olej. Ustawicie świecę zapłonu.
Zastąpicie olej. (GN-1500; GN-3000; GN-6500)
Po zakończeniu przechowywania zlewajcie benzynę do kanistra, a przed rozruchem zaprawcie generator świeżą benzyną.
razy, by rozdzielić olej, i znów ustawicie świecę.
Powoli pociągnąć rękojeść startera, zanim 3.
poczujecie opór.
kolanowy silnika kilka
*Wykorzystywać benzynowe dodatki, powiększające termin przechowania. Za rekomendacjami według
swego uznania dodatków zwrócicie się do ocjalnego dealera IVT w waszym regionie.
Page 85

W ten moment tłok podnosi się (koniec taktu 4.
fig.1
4
e
d
21
28
c
b26 a27
fig.1
5
d
d d
d
d
d
d
d
zwarcia), a wpustowy i końcowego zawory zamykają
się. Takie położenie silnika przy przechowaniu
pomoże zapobiec wewnętrzną korozję.
Ustawienie detali dodatkowych
Ustawienie kół
26. Oś
27. Koło
28. Wibroizolator
29. Łapka podpierająca
a. Szajba płaska
b. Sztyft przymocowujący
c. Bolcy z główką, 30mm
d. Bolcy z główką, 20mm
e. Nakrętka
Instrukcja z eksploatacji
Ustawienie szuady dla baterii
akumulowanej
30. Ogrodzenie baterii
31. Szuada dla akumulowanej baterii
32. Kabel rozrusznika
33. Solenoid rozrusznika
34. Kabel uziemienia
35. Wspornik baterii akumulowanej
36. Panel ogrodzenia baterii
PL
ramy;
sztyftu przymocowującego;
podpierającej łapce (29) za pomocą dwóch nakrętek
i bolców z główką (30 mm);
dwóch nakrętek i bolców z główką (20 mm);
Wstaw oś (26) do montażowych wsporników 1.
Ustal na oś koło (27);2.
Odnotuj koło na osi za pomocą szajby płaskiej i 3.
W taki samy sposób ustal drugie koło;4.
Zamocuj wibroizoliatory (28) na każdej 5.
Zamocuj każdą łapkę podpierającą (29) za pomocą 6.
1. Ustalicie na ramie ogrodzenie baterii (30).
Ustalicie na ogrodzeniu (30) szuadę dla baterii
akumulowanej (31) i zawleczcie bolcy.
2. Przeciągnijcie kabel rozrusznika (32) pod bakiem
i połączycie z solenoidem(33).
3. Podłączcie kabel uziemienia (34) do tylnej części
korpusu generatora.
4. Ulokujecie baterię do szuady (31) i zamocujecie
za pomocą wspornika (35). Podłączcie kabel
rozrusznika (32) najpierw do pozytywnego (+), a
potem do negatywnego (-) bieguna baterii. Przy
odłączeniu zaczynajcie z negatywnego (-) bieguna.
5. Ustalicie na ogrodzenie (30) panel ogrodzenia
baterii (36).
85
Page 86

86
Instrukcja z eksploatacji
Poszukiwanie i usunięcie uszkodzeń
Silnik się nie zapuszcza
Sprawdzić bak na obecność paliwa • ► przy
konieczności zapełnicie paliwowy bak.
(GN-1500; GN-3000; GN-6500) Sprawdzić ilość •
oleju w silniku► przy konieczności dodać oleju.
Sprawdzić świecę zapłonu na obecność iskry •
►przy konieczności zastąpicie świecę. Jeżeli iskra
jest nieobecnym, zwrócicie się do ocjalnego
dealera IVT.
Dla sprawdzenia trzeba spełnić co następuje:
Zdjąć kapsel świecy zapłonu i przetrzeć obwód 1.
wokoło świece.
Trzeba wyciągnąć świecę i wstawić ją w kapsel.2.
Ustawicie boczną elektrodę świecy na pokrywie 3.
cylindra.
Zwrócić silnik; przez szczelinę powinny były 4.
wylatywać iskry.
Przekonacie się, że wokoło świece zapłony jest 5.
nieobecnym rozlane paliwo. Rozlane paliwo jest
łatwopalne.
Sprawdź, czy postępuje paliwo do karburatora. •
► Jeśli paliwo nie postępuje, przeczyść paliwowego
PL
osadnika.
Dla sprawdzenia należy wykonać następne:
1. Zagłusz silnik i osłab wkręt zlewowy.
2. Skieruj przełącznik silnika do położenia “ON” i
zlewajcie paliwo.
Jeśli silnik nie zapuszcza się, zwróć się do
ocjalnego dealera IVT.
Ochrona środowiska
przyrodniczego
Możliwość recyklingu surowca, nie
wyrzucać do śmietnika.
Narzędzia, dodatkowe urządzenia oraz opakowanie
nadają się na ekologicznie czysty recyklingu
Elementy plastikowe są kierowane na klasykowany
recykling. Niniejsza instrukcja z eksploatacji jest
nadrukowana na papierze, który przeszedł recykling,
papier nie zawiera chlor.
Page 87

ENG.SW.
ON
OFF
POWER ON
VOLTMETER
AC SOCKET
DC
+
-
AC
DC LIFE
OUTLET
PROTECTION
10
19
23
24
22
26
19
10 78 9 314 54
17
12
1518 16 2 21 6 1
13 11
23
24
22
6 16 9 15
11
2 14
3 17 12 13
1 4
GN-850
Інструкцыя па эксплуатацыі
GN-1500
BY
87
Page 88

88
Інструкцыя па эксплуатацыі
BY
ENG.SW.
ON
OFF
POWER ON
VOLTMETER
AC SOCKET
DC LIFE
AC SOCKET
DC
PROTECTION
AC
PROTECTION
ENG.SW.
POWER ON
VOLTMETER
AC SOCKET
DC LIFE
DC
PROTECTION
AC SOCKET
AC
PROTECTION
ON
OFF
19
7 2114 1 5
4
17
11
151216 9 2 6 3 25
23
24
22
19
10 78 14 52141
12 11
1615 9 2 6 3
23
24
22
GN-3000
GN-6500
Page 89

Інструкцыя па эксплуатацыі
Органы кіравання
1. Разеткі зменнага току
2. Вальтметр
3. Засцерагальнік для ланцуга
сталага току
4. Выйсце нязменнага току
5. Заціск зазямлення
6. Выключальнік зменнага току
7. Вечка маслазаправачнай
адтуліны
8. Корак для спуску масла
9. Перамыкач рухавіка
10. Дзяржальня стартара з
аддачай
11. Паліўны клапан
12. Паветраны фільтр
13. Рычажок засланкі
14. Кантрольная лямпа
15. Паказальнік узроўня паліва
16. Вечка паліўнага бака
17. Заціскныя клямкі/шрубы для
вечка паветранага фільтра
18. Адстойнік паліва
19. Наканечнік свечкі
запальвання
20. Глушыцель
21. Індыкатар нізкага ўзроўня
масла
22. Кабель для зарадкі батарэі
23. Корак
24. Свячны ключ
25.Ручка (GN-6500)
26.Ёмістасць для змешвання
масла/паліва
* = Дадатковыя прыладдзі
Не ўсе намаляваныя ці
апісаныя прыладдзі ўключаны
ў стандартную пастаўку.
Сімвалы
Характарыстыка прылады
мадэль GN-850 GN-1500 GN-3000 GN-6500
Намінальная магутнасць зменнага току на
выйсці 230В / 50 Гц (Вт)
Максімальная магутнасць зменнага току на
выйсці 230В / 50 Гц (Вт)
Сіла зменнага току на выйсці пры
намінальнай; максімальнай магутнасці 230В
/ 50 Гц (В/Гц)
Напруга зменнага току на выйсці (У)
Фаза
Напруга нязменнага току (У)
Нязменны ток (4)
Чашчыня кручэння на халастым ходу (зв./хв.)
Аб'ём рухавіка (куб. см)
Лік тактаў рухавіка
Тып астуджэння рухавіка: паветранае
астуджэнне
Паліва: бензін з даданнем масла неэтыляваны бензін
Масла
Ёмістасць паліўнага бака (л)
Ёмістасць алейнага бака (л)
Вага (кг)
Узровень гукавога ціску [дБ]
Узровень гукавой магутнасці [дБ]
750 1000 2500 5000
850 1200 2800 5500
3.0/3.5 4.3/4.7 10.8/12.1 21.7/24
230/50 230/50 230/50 230/50
1 1 1 1
12 12 12 12
8.3 8.3 8.3 8.3
3000 3000 3000 3000
63 87 208 389
2 4 4 4
Паветранае
астуджэнне
Бензін з даданнем
масла
-
4.2 6.70 15.00 25.00
- 0.60 1.10 1.10
19.00 28.00 42.00 97.00
46 68 68 73
57 79 79 93
Паветранае
астуджэнне
неэтилированный
бензін
SAE 10W-30
SAE 10W-40
Паветранае
астуджэнне
неэтилированный
бензін
SAE 10W-30
SAE 10W-40
Паветранае
астуджэнне
неэтилированный
бензін
SAE 10W-30
SAE 10W-40
BY
89
Page 90

90
Інструкцыя па эксплуатацыі
BY
Тэхніка бяспекі пры эксплуатацыі
Агульныя правілы бяспекі
Наступныя інструкцыі па тэхніцы бяспекі
дапамогуць вам правільна выкарыстоўваць
прыладу і забяспечыць уласную бяспеку. Таму
варта прачытаць іх вельмі ўважліва.
У выпадку перадачы прылады трэцяй асобе
варта перадаць і дадзеныя інструкцыі па тэхніцы
бяспекі.
Захавайце дадзеную інструкцыю і іншую
літаратуру, якая ўваходзіць у камплект пастаўкі.
Вынікайце тэхніцы бяспекі і перасцярогам на
прыборы.
Перад пачаткам працы азнаёмцеся з органамі
кіравання прыбора, але, першым чынам,
вывучыце спосабы яго экстранага прыпынку.
Выконыванне гэтых простых інструкцый
дапаможа ўтрымоўваць ваш прыбор у спраўным
стане.
Перад выкарыстаннем прыбор неабходна •
правільна сабраць.
Выкарыстоўвайце прыбор толькі па •
прызначэнні.
Вывучыце папераджальныя надпісы на •
прыборы, вынікайце ўказанням па выкарыстанні
ахоўных прыстасаванняў. Прадухіліць няшчасныя
выпадкі дапамогуць уважлівасць, разумны
падыход да працы і адпаведная падрыхтоўка асоб,
задзейнічаных у эксплуатацыі, транспартаванні,
абслугоўванні і захоўванні прыбора.
Не пакідайце прыбор без нагляду.•
Не дапушчайце выкарыстанне прыбора •
дзецьмі. Не дазваляйце дзецям гуляць з
прыборам.
Не дапушчайце знаходжання зблізку дзяцей і •
жывёл. Староннія асобы павінны знаходзіцца на
бяспечнай адлегласці ад працуючага прыбора.
Спыніце працу, калі паблізу знаходзяцца
староннія людзі, асабліва дзеці, ці жывёлы.
Пры працы з прыборам карыстач нясе •
адказнасць за трэціх асоб.
Асобы, не азнаёмленыя з інструкцыямі па •
эксплуатацыі, дзеці, непаўналетнія, не дасягнулыя
ўзросту, які дазваляе выкарыстоўваць прыбор,
а таксама асобы, якія знаходзяцца ў стане
алкагольнага ці наркатычнага ап’янення, або
пад уздзеяннем медыцынскіх прэпаратаў, не
дапушчаюцца да працы з прыборам. Узрост
аператара вызначаны ў мясцовых нарматыўных
актах.
УВАГА: Алкаголь, некаторыя
лекавыя прэпараты і наркатычныя
рэчывы, а таксама стан хворасці,
жар і стома змяншаюць хуткасць рэакцыі.
Не выкарыстоўвайце электраінструменты ў
вышэйпералічаных выпадках.
Пераканайцеся, што ўсе ахоўныя •
прыстасаванні ўсталяваны і прыдатныя да
эксплуатацыі.
Не выкарыстоўвайце прыбор без ахоўных •
прыстасаванняў, або калі яны пашкоджаны.
Пазбягайце выпадковага запуску прыбора: •
перад падлучэннем да сеткі пераканайцеся,
што выключальнік знаходзіцца ў палажэнні “o”
(выкл.)
Перад уключэннем прыбора выміце •
ўсталявальныя кліны і ключы.
Не выкарыстоўвайце прыбор з няспраўным •
выключальнікам. Прыбор з няспраўным
выключальнікам уяўляе небяспеку і павінен быць
адрамантаваны.
Аглядзіце прыбор на наяўнасць незамацаваных •
дэталяў (гаек, нітаў, шруб і г.д.) ці пашкоджанняў.
Каб забяспечыць бяспечную работу прыбора,
перыядычна правярайце, ці добра зацягнуты ніты
і шрубы. Пры неабходнасці перад выкарыстаннем
прыбора вырабіце іх рамонт ці замену. У выпадку
выкарыстання пашкоджанага прыбора аператару
ці староннім тварам могуць быць нанесены
сур’ёзныя траўмы.
Выкарыстоўвайце для работы адпаведную •
спецвопратку. Прасторная адзежа, упрыгожванні
могуць быць зацягнуты рухомымі часткамі.
Выкарыстоўвайце адпаведную спецвопратку,
доўгія штаны і трывалы абутак. Ахоўвайце ногі
і ступні ад разлятаючагася смецця. Не працуйце
басанож ці ў адкрытых сандалях. Збярыце доўгія
валасы ззаду.
Утрымоўваеце ручкі ў чысціні і сухасці.•
УВАГА! Выкарыстоўвайце сродкі
індывідуальнай аховы! Ахоўныя
прыстасаванні і сродкі індывідуальнай
аховы забяспечваюць ахову вашага здароўя і
здароўя іншых асоб, а таксама гарантуюць
бесперабойную работу прыбора.
Выкарыстоўвайце ахоўныя ачкі, ахоўныя •
пальчаткі, трывалы няслізкі абутак і, пры
неабходнасці, каску. Пры выкананні работ,
якія суправаджаюцца ўтварэннем пылу,
выкарыстоўвайце супрацьпылавы рэспіратар.
Калі ўзровень шуму перавышае 85 дб(A),
Page 91

Інструкцыя па эксплуатацыі
абавязкова выкарыстоўвайце ахоўныя слухаўкі.
Падчас працы захоўвайце ўстойлівае •
становішча. Увесь час захоўвайце раўнавагу.
Не запускайце прыбор, калі ён знаходзіцца •
ў перавернутым ці няправільным працоўным
палажэнні.
Перад выкарыстаннем прыбора прыбярыце •
з рабочай пляцоўкі, на якой выкарыстоўваецца
прыбор, ўсе староннія прадметы: выдаліце ўсе
староннія прадметы, пазбягайце траплення
старонніх прадметаў падчас працы. Захоўвайце
чысціню на рабочай пляцоўцы. На загрувашчаных
участках назіраецца высокі ўзровень
траўматызму.
Не перагружайце прыбор. Эфектыўнасць •
і бяспека прыбора вышэй падчас працы з
зададзенай чашчынёй.
Выкарыстоўвайце прыбор толькі пры •
дзённым ці добрым штучным асвятленні. Не
выкарыстоўвайце прыбор ва ўмовах дрэннай
бачнасці.
Не кідайце прыбор, не дапушчайце сутыкнення •
прыбора з якімі-небудзь перашкодамі.
Пры трапленні пад прыбор старонняга •
прадмета, аглядзіце яго на наяўнасць
пашкоджанняў і вырабіце неабходны рамонт.
Пры ўзнікненні празмернай вібрацыі •
заглушыце рухавік і неадкладна высвятліце
чыннік. Вібрацыя звычайна з’яўляецца прыкметай
пашкоджання.
Перад выкарыстаннем прыбор неабходна •
старанна аглядзець. Выкарыстоўвайце прыбор
толькі ў спраўным стане. Пры выяўленні якіхнебудзь дэфектаў, якія ўяўляюць небяспеку для
аператара, іх неабходна неадкладна ліквідаваць.
Замяніце пашкоджаныя ці зношаныя •
дэталі. Выкарыстоўвайце толькі арыгінальныя
запчасткі. Дэталі, вырабленыя іншым вытворцам,
прылягаюць няшчыльна і павялічваюць рызыку
ўзнікнення траўмаў.
Забараняецца здымаць ці змяняць •
электрычныя і механічныя прылады.
Перад тым, як пакінуць працоўнае месца, •
вырабіць рамонт, агляд ці ачыстку прыбора,
адключыце яго і пачакайце да поўнага спынення.
Будзьце ўважлівыя пры ачыстцы і рамонце •
прыбора. Вырабляйце наладу, усталяваўшы
адключаны прыбор на роўную чыстую паверхню.
Будзьце ўважлівыя. Сачыце за працай.
Адцягнуўшыся, можна страціць
кіраванне. Выкарыстоўвайце
разумны сэнс.
Правілы тэхнікі бяспекі падчас працы з
прыборамі з бензінавым рухавіком
УВАГА! Бензін з’яўляецца
лёгкаўзгаральным рэчывам. Будзьце
асцярожныя з палівам.
Захоўвайце паліва ў адмысловых каністрах. •
Шчыльна зачыніце вечка паліўнага бака.
Запраўляйце бак толькі на адкрытым паветры, •
не паліце падчас запраўкі.
Спачатку запраўце бак, а затым запускайце •
рухавік.
Перад тым, як запраўляць бак, астудзіце •
глушыцель.
Не здымайце вечка паліўнага бака і не •
залівайце паліва пры працуючым ці неастылым
рухавіку.
У выпадку пралівання бензіну не запускайце •
рухавік, адсуньце прыбор у бок ад разлітага
бензіну і не дапушчайце ўзнікненні крыніцы
ўзгарання, пакуль пары бензіну не рассеюцца.
Пратрыце разлітае паліва перад тым, як •
запускаць рухавік.
Захоўвайце паліўныя бакі ў надзейным •
месцы.
Не запускайце рухавік у памяшканні •
ці ў замкнёнай прасторы, каб прадухіліць
назапашванне небяспечнага ўгарнага газу.
УВАГА! У выхлапных газах
утрымоўваецца атрутны ўгарны газ,
які не мае ні колеру, ні паху. Удыханне
выхлапных газаў можа прывесці да страты
свядомасці і смяротнаму зыходу. Каб узровень
утрымання выхлапных газаў у паветры не
перавышаў дапушчальны, забяспечце
адпаведную вентыляцыю.
Не захоўвайце прыбор з палівам у баку ў •
памяшканні, дзе пары могуць узгарэцца.
Каб скараціць рызыку ўзнікнення пажару, •
утрымоўваеце ў чысціні рухавік, глушыцель,
батарэйны адсек і бензасховішча, беражыце
прыбор ад агню і іскраў.
Выхлапная сістэма награваецца досыць •
для таго, каб запаліць некаторыя матэрыялы.
Захоўвайце прыбор на бяспечнай адлегласці ад
лёгкаўзгаральных матэрыялаў.
Падчас працы глушыцель моцна награваецца •
і застаецца гарачым некаторы час пасля
выключэння. Не датыкайцеся да глушыцеля, каб
не абпаліцца. Перад тым, як заносіць прыбор у
зачыненае памяшканне, дайце рухавіку астыць.
BY
91
Page 92
92
Інструкцыя па эксплуатацыі
BY
fig.
1
ON
OFF
START
OFF
ON
ON
STOP
GN-850
GN-1500 GN-3000
GN-6500
Правілы электрабяспекі
УВАГА! У мэтах прадухілення ўдару
электрычным токам, траўматызму ці
ўзгарання пры выкарыстанні
электраінструментаў неабходна выконваць
наступныя інструкцыі па тэхніцы бяспекі. Перад
выкарыстаннем прылады прачытайце і
старанна выконвайце дадзеныя інструкцыі.
АСЦЯРОЖНА! У пазбяганне апёку ці паразы
электрычным токам не датыкайцеся да дэталяў,
якія праводзяць электрычны ток.
УВАГА!НЕБЯСПЕКА ПАРАЗЫ ЭЛЕКТРЫЧНЫМ
ТОКАМ!
Сачыце за асяроддзем на рабочай пляцоўцы. Не
выкарыстоўвайце электраінструменты падчас
дажджу. Не выкарыс тоўвайце электраінс трументы
ў вільготных і волкіх памяшканнях. Утрымоўвайце
рабочую пляцоўку ў сухасці, забяспечце добрае
асвятленне. Беражыце прыбор ад вільгаці. Не
пакідайце прыбор на адкрытым паветры на ноч. Пры
трапленні вады ў электраінструмент павялічваецца
рызыка ўдару электрычным токам.
Адмысловыя правілы па тэхніцы бяспекі
Вывучыце спосабы хуткага адключэння •
генератара ў экстраных выпадках.
Вывучыце ўсе блокі кіравання генератарам, •
выходныя разеткі і злучальныя дэталі.
Праінструктуйце працаўніка, які •
выкарыстоўвае генератар.
АСЦЯРОЖНА! У выхлапных газах
утрымоўваецца атрутны угарны газ,
які не мае ні колеру, ні паху. Удыхание
выхлапных газаў можа прывесці да страты
прытомнасці і смяротнага зыходу.
Пры працы ў замкнёнай ці часткова зачыненай •
прасторы ўдыхальнае паветра можа ўтрымоўваць
небяспечную колькасць выхлапных газаў.
Для прадухілення назапашвання выхлапных •
газаў забяспечце адпаведную вентыляцыю.
Генератар вырабляе электраэнергію, •
дастатковую для цяжкага паражэння
электрычным токам у выпадку неадпаведнага
выкарыстання.
Выкарыстанне генератара або •
электрапрыборау у вільготным асяроддзі,
напрыклад, у снег або дождж, каля вадаёма або
спрынклернай сыстэмы, цi вільготнымі рукамі
можа прывесці да паражэння электрычным
токам. Захоўваеце генератар ў сухім месцы.
Пры адчыненым захоўванні генератара памацуйце •
ўсе электрычныя дэталі на панэлі кіравання перад
кожным выкарыстаннем. Трапленне вільгаці або
лёду можа прывесці да паломкі электрадэталей або
кароткае замыканне, якое нясе небяспеку паражэння
электрычным токам.
Не далучайцеся да электрычнай сеткі будынка, •
пакуль кваліфікаваны электрык не ўсталюе
ізаляцыйны выключальнік.
Адлегласць ад працуючага прыбора да •
будынка і іншага абсталявання павінна складаць
не менш за 1 метра (3 футаў).
Не загароджвайце прыбор.•
Прыбор павінен знаходзіцца на бяспечнай •
адлегласці ад лёгкаўзгаральных матэрыялаў.
Падчас работы, глушыцель моцна награваецца •
і застаецца гарачым некаторы час пасля
выключэння. Не дакранайцеся да глушыцеля, каб
пазбегнуць апёку. Перад тым, як занасіць прыбор
ў закрытае памяшканне, дайце яму астыць.
Не падлучайце генератар да сістэмы агульнага •
электразабеспячэння.
Не падлучайце да іншага генератара.•
Распакаванне
Пры Распакаванні, праверце наяўнасць усіх
элементаў. Глядзіце чарцяжы да дадзенай інструкцыі.
Пры адсутнасці або няспраўнасці некаторых дэталяў,
звярніцеся ў цэнтр падтрымкі IVT.
Элементы кіравання
Перамыкач рухавіка (9):
Уключэнне і выключэнне рухавіка
Становішча выключальніка:
OFF (ці STOP): Для выключэння рухавіка.•
ON: Для запуску рухавіка.•
START (GN-6500): Для запуску рухавіка праз •
стартар. Запусціўшы рухавік, вярніце ключ (9) у
становішча “ON”. Стартар не павінен працаваць
больш 5 секунд запар. Калі рухавік не запускаецца,
вярніце выключальнік у зыходнае становішча і
пачакайце 10 секунд перад паўторным запускам.
Page 93

Інструкцыя па эксплуатацыі
fig.
2
GN-850
GN-1500 GN-3000
fig.
3
ON
OFF
fig.
4
CLOSED
OPEN
CLOSED
OPEN
GN-850
GN-1500 GN-3000
Стартар з аддачай (10)
(GN-850; GN-1500; GN-3000)
Каб запусціць рухавік, злёгку пацягніце
дзяржальню стартара, пакуль не адчуеце
супраціў, затым пацягніце яе рэзка.
УВАГА: Не адпускайце рэзка ручку стартэра.
Плаўна павярніце ручку ў ранейшае
становішча, каб прадухіліць пашкоджанне
стартэра.
Паліўны клапан (11)
Паліўны клапан
размешчаны паміж
паліўным бакам і
карбюратарам. Калі
карамысел клапана
знаходзіцца ў
становішчы «ON»,
паліва паступае з
паліўнага бака ў
к а р б ю р а т а р .
Выключце рухавік, павярніце карамысел ў
становішча «OFF».
Рычажок заслoнкі (13)
Заслoнка выкарыстоўваецца да забеспячэння
узбагачанай паліўнай сумесі для запуску
халоднага рухавіка.
Заслонка адкрываецца і закрываецца ўручную
пры дапамозе спецыяльнага рычажка; для
ўзбагачэння сумесі перамясціце рычажок ў
становішча «CLOSED».
Выключальнік пераменнага току (6)
Выключальнік пераменнага току аўтаматычна
выключаецца ў выпадку кароткага замыкання або
значнай перагрузкі генератара. Пры спрацоўванні
выключальніка перад яго паўторным уключэннем
праверце, ці правільна функцыянуе прыбор і цi
не перавышана ці намінальная нагрузка.
Зацiск зазямлення (5)
Зацiск зазямлення генератара злучаны з рамай
генератара, металічнымі дэталямі генератара,
якiя не праводзяць ток, і заціскаюць зазямленне
кожнай разеткі.
Для прадухілення паражэння электрычным
токам па чынніку няспраўнасці падлучальных да
зварачнага генератара прылад зазямліце прыбор
з дапамогай заціску зазямлення (5).
Сістэма папярэджання нізкага узроўня масла
(GN-1500; GN-3000; GN-6500)
Сістэма папярэджання нізкага узроўня масла
(21) дапамагае прадухіліць паломку рухавіка
па прычыне недастатковай колькасці масла
ў картэры. Да таго, як ўзровень масла ў
картэры апусціцца ніжэй бяспечнага ўзроўню,
сістэма аўтаматычна спыніць работу рухавіка
(пераключальнiк рухавіка (9) застаецца ў
становішчы «ON»).
Кантрольная лямпа (14)
Кантрольная лямпа гарыць пры нармальнай
работы генератара.
Выйсці нязменнага току (4)
Выйсце нязменнага току выкарыстоўваецца
ТОЛЬКІ для падзарадкі 12-вольтавых
аўтамабільных батарэй.
Для падлучэння батарэі да генератара
выкарыстоўвайце адпаведны кабель. Клемы
кабеля падлучаюцца да адпаведных полюсаў
батарэі (чырвоная клема - да дадатнага полюса,
чорная - да адмоўнага).
Засцерагальнік для ланцуга нязменнага току (3)
(калі маецца)
Пры перагрузцы генератара, у выпадку
няспраўнасці батарэі ці парушэнні злучэнняў
паміж батарэяй і генератарам, засцерагальнік для
ланцуга нязменнага току аўтаматычна перарывае
ланцуг зарадкі батарэі нязменнага току.
BY
93
Page 94
94
Інструкцыя па эксплуатацыі
BY
Інструкцыі па эксплуатацыі
Далучэнне да электрасеткі будынка
Да лучэнне рэзервовай крыніцы сiлкавання
да электрасеткі будынка ажыццяўляецца
кваліфікаваным электрыкам. Пры гэтым неабходна
ізаляваць крыніцу энергіі генератара ад сістэмы
электразабеспячэння і забяспечыць захаванне
ўсіх дапасаваных законаў і электратэхнічных
правілаў і нормаў.
Пры няправільным падключэнні да
электрасеткі будынка электрычны ток
ад генератара падсілкоўвае агульную
паражэння электрычным токам супрацоўнікаў
агульнай электрастанцыі, альбо іншых асоб пры
кантакце з лініямі электразабеспячэння ў
выпадку перабою ў сглкаваннi. Атрымайце
кансультацыі на электрастанцыі ці ў
кваліфікаванага электрыка.
электразабеспячэння генератар можа ўзарвацца
або прывесці да ўзгарання электрасеткі будынка.
У некаторых краінах закон патрабуе рэгістрацыі
генератараў на мясцовых электрастанцыях.
Правілы рэгістрацыі і эксплуатацыі глядзiце ў
мясцовых нарматыўных актах.
Схемы зазямлення генератара
Бензінавыя генератары IVT заземлены шляхам
злучэння элементаў рамы генератара з заціскам
зазямлення (5) у разетцы пераменнага току
(1). Сістэма зазямлення не злучана з нулявым
провадам пераменнага току.
Мясцовыя нарматыўныя акты, нормы і правілы
могуць патрабаваць злучэння сістэмы зазямлення
з нулявым провадам пераменнага току. Вынікі
праверкі стану схемы зазямлення пры дапамозе
тэсцерау разетак да генератара і дамовай разеткі
адрозніваюцца.Калі мясцовыя нарматыўныя акты,
нормы або правілы патрабуюць злучэння сістэмы
зазямлення з нулявым провадам пераменнага
току, атрымайце кансультацыю кваліфікаванага
электрыка або кантралёрам электраапаратура.
Дайце яму схему электраправодкі.
Зацiск зазямлення (5) можна выкарыстоўваць
для зазямленне генератара або сувязі рамы
генератара з рамай машыны, але толькі калі таго
патрабуюць мясцовы закон або электратэхнічныя
сетку. Такое падмацаванне нясе рызыку
IПры няправільным далучэннi да
электрасеткі будынка электрычны ток
ад агульнай сеткі падсілкоўвае
генератар. Пры аднаўленні
правілы і нормы. Перад выкарыстаннем зацiска
зазямлення пракансультуйцеся з кваліфікаваным
кантралёрам электраапаратура па пытаннях
нормаў і правілаў, прыдатных ў вашай краіне.
Выкарыстанне прыбора ў якасці генератара
Перад падлучэннем прыбора ці шнура да
генератара:
Калі ласка, пераканайцеся, што генератар •
прыдатны да працы. Няспраўныя прыборы або
кабелі сiлкавання нясуць небяспеку паражэння
электрычным токам.
У выпадку няспраўнай работы, замаруджвання •
ходу ці раптоўнага прыпынку прыбора
неадкладна адключыце яго. Адключыце прыбор
і праверце, ці спраўны ён, ці не перавышана
намінальная нагрузка генератара.
Праверце, ці не перавышаны разліковыя •
электрычныя характарыстыкі генератара. Не
дапушчайце перавышэнні лімітавай магутнасці
генератара. Ужываць генератар на пагранiчнай
магутнасці дапускаецца не больш за 5 хвілін.
УВАГА: перагрузка можа прывесці да
размыкання Перарывальнiка. Перавышэнне
пагранічнага часу працы з максімальнай
магутнасцю або нязначнай перагрузкай
генератара не абавязкова прыводзяць да
сапсавання выключальнiка, але скарачаюць
тэрмін службы генератара.
Скароціце час працы з лімітавай магутнасцю •
да 5 мінуць.
Пры працяглай працы не перавышайце •
намінальную магутнасць.
GN-850 GN-1500 GN-3000 GN-6500
Напруга зменнага
току на выйсці (У)
Намінальная
магутнасць
зменнага току на
выйсці 230В / 50
Гц (Вт)
Максімальная
магутнасць
зменнага току на
выйсці 230В / 50
Гц (Вт)
230/50 230/50 230/50 230/50
750 1000 2500 5000
850 1100 2800 5500
Ва ўсякім выпадку неабходна ўлічваць •
сумарную магутнасць (ВА) ўсіх падлучаных
прыбораў. Звярніце ўвагу на каэфіцыент
магутнасці падлучальнага прыбора. Заўсёды
загадзя разлічвайце нагрузку, аказваемую на
генератар. Магутнасць генератара гл. на цэтліку
Page 95

Інструкцыя па эксплуатацыі
fig.
5
6 mm
з тэхнічнымі дадзенымі.
Магутнасць падлучальных прыбораў гл. на •
іх цэтліках. Вытворцы звычайна паказваюць
намінальныя характарыстыкі побач з нумарам
мадэлі ці серыйным нумарам прыбора.
Праца на зменным току
Запусціце рухавік.1.
Уключыце выключальнік пераменнага току (6).2.
Падлучыце прыладу.3.
Для запуску большасці механізаваных
прыбораў патрабуецца магутнасць вышэй
намінальнай.
Не перавышае ўказаны парог разеткі па току.
У выпадку зрабатывання выключальніка
пераменнага току ў выніку перагрузкі цэпi ,
неабходна знізіць электрычную нагрузку на цэп,
пачакаць некалькі хвілін і вярнуць выключальнік
(6) у зыходнае становішча.
Праца на нязменным току
Выйсці нязменнага току выкарыстоўваюцца
ТОЛЬКІ для падзарадкі 12-вольтавых
аўтамабільных батарэй.
Падлучэнне кабеляў батарэі:
Перад тым як падлучаць кабелі для зарадкі 1.
да батарэі, усталяванай у машыне, адлучыце
заземлены кабель батарэі.
УВАГА: Батарэя вылучае
выбуханебяспечны газ; не паліце і
не разводзіце паблізу агонь. Падчас
зарадкі ці выкарыстання батарэі забяспечце
адпаведную вентыляцыю.
Падлучыце відэлец кабеля для зарадкі да 2.
выйсця нязменнага току (4) генератара.
Падлучыце чырвоную клему да дадатнага (+) 3.
полюся батарэі.
Падлучыце чорную клему да адмоўнага 4.
(-) полюса батарэі. Пазбягайце судотыку клем.
Гэта можа прывесці да кароткага замыкання і
пашкоджанню батарэі.
Запусціце генератар.5.
полюса батарэі.
Адлучыце чырвоную клему ад дадатнага (+) 3.
полюса батарэі.
Выміце відэлец кабеля для зарадкі з выйсця 4.
нязменнага току (4) генератара.
Ізноў падлучыце заземлены кабель батарэі 5.
машыны.
Праверка перад эксплуатацыяй
Бензін з даданнем масла
(GN-850)
Ёмістасць паліўнага бака складае 4,2 л. 1.
Запоўніце бак, пакінуўшы прыкладна 1/4 цалі (6
мм) да гарлавіны для пашырэння паліва.
Выкарыстоўвайце бензін з даданнем масла. У 2.
адваротным выпадку рухавік можа перагрэцца.
Змяшайце бензін і масла ў прапорцыі 50:1 ці 40:1
(улетку). Выкарыстоўвайце адмысловае масла
для 2-тактавых рухавікоў.
Адмерайце масла з дапамогай вечка паліўнага 3.
бака, як паказана на малюнку.
Страсяніце бак, а затым запускайце рухавік.4.
GAS 50 : 1 OIL
1 (L) : 0.02 (L)
2 (L) : 0.04 (L)
3 (L) : 0.06 (L)
BY
УВАГА: Не запускайце машыну з далучаным
кабелем для зарадкі і працавальным
генератарам. Гэта можа прывесці да паломкі
машыны ці генератара.
Адлучэнне кабеляў батарэі:
Спыніце рухавік.1.
Адлучыце чорную клему ад адмоўнага (-) 2.
4 (L) : 0.08 (L)
Маторнае масла
(GN-1500; GN-3000; GN-6500)
УВАГА: маторнае масла з’яўляецца
найважнейшым фактарам, які будзе ўплываць
на работу і тэрмін службы рухавіка. Не
95
Page 96

96
Інструкцыя па эксплуатацыі
BY
fig.
6
MAX
MIN
рэкамендуецца выкарыстоўваць незмываемыя
масла, а таксама масла для двухтактных
рухавікоў, паколькі яны пашкоджваюць
рухавік.
Перед каждым выкарыстаннем генератара 1.
правярайце ўзровень масла на роўнай паверхні
з выключаным рухавіком.
Выкарыстоўвайце масла для 4-тактных 2.
рухавікоў, альбо мыйнае маторнае масла
вышэйшай якасці катэгорыі SG, SF / CC, CD, якое
адпавядае патрабаванням аўтавытворцаў ЗША.
Маркіроўка маторных масел катэгорыі SG, SF / CC,
CD указана на кантэйнеры.
SG-SF/CC-CD-SINGLE VISCOSITY•
SG-SF/CC-CD-MULTI VISCOSITY•
Масла SAE 1OW-30 рэкамендуецца для •
агульнага выкарыстання пры любой тэмпературы.
Масла з іншымі ўзроўнямі вязкасьцi, адзначанымi
ў табліцы, можа выкарыстоўвацца, калі сярэдняя
тэмпература ў вашай вобласці знаходзіцца ў
названых межах.
Здыміце крышку маслазаправачнай адтуліны 3.
(7) і пратрыце масляны шчуп.
Калі ласка, праверце ўзровень масла, 4.
уставiўшы шчуп ў заліў гарлавіны не закручвая.
Калі ўзровень масла нізкі, запоўніце бак да 5.
гарлавіны.
сістэмы. Не выкарыстоўвайце нясвежы ці
забруджаны бензін ці сумесь масла/бензіну.
Пазбягайце траплення ў паліўны бак бруду ці •
вады.
Часам пры рабоце з высокай нагрузкай чуецца •
лёгкае металічнае пастукванне. Не зважайце
ўвагі. Калі брынканне ці пастукванне з’яўляецца
пры рабоце з пастаяннай хуткасцю кручэння
рухавіка, звычайнай нагрузцы, выкарыстоўвайце
бензін іншай маркі. Калі брынканне не спыняецца,
звярніцеся да афіцыйнага дылера IVT.
УВАГА: Эксплуатацыя рухавіка з пастаянным
пастукваннем ці брынканнем можа прывесці да
паломкі. Эксплуатаваць рухавік з пастаянным
пастукваннем ці брынканнем забаронена;
абмежаваная гарантыя дыстрыбутара не
распаўсюджваецца на дэталі, пашкоджаныя па
чынніку няправільнага выкарыстання.
Кіслародазмяшчальныя віды паліва •
Некаторы бензін змешваецца са спіртам або
эфірам для павышэння актанавага чысла. Такой
бензін адносіцца да кіслародазмяшчальнага віда
паліва.
Пры выкарыстанні кіслародазмяшчальнага віду
паліва пераканайцеся, што яго актанавы лік
роўны, па меншай меры, 86.
Этанол ( этылавы спірт)
Пры выкарыстанні бензіну, які змяшчае па
аб’ёму больш за 10% этанолу, могуць узнікнуць
праблемы з запускам і / або якасцю работы.
Этанолзмяшчальны бензін можа мець маркіроўку
«Газахол».
Рэкамендацыі па запраўцы
(GN-1500; GN-3000; GN-6500)
1. Калі ласка, праверце паказальнік ўзроўню 1.
паліва (15).
2. Калі ўзровень паліва нізкі, запоўніце бак. Не 2.
заліваць паліва вышэй паліўнага фільтра.
Ёмістасць паліўнага бака:
6,7 л - GN-1500•
15 л - GN-3000 •
25 л — GN-6500•
Выкарыстоўвайце бензін з актанавым лікам •
не ніжэй 86. Рэкамендуецца выкарыстоўваць
неэтыляваны бензін, паколькі ён утворыць
менш адкладаў у рухавіку і свечцы запальвання,
а таксама падаўжае тэрмін службы выхлапной
Метанол (метылавы ці драўняны спірт)•
У склад метанолзмяшчальнага бензіну павінны
ўваходзіць растрваральнiкi і супрацькаразiйныя
рэчавы для аховы паліўнай сістэмы. Пры
выкарыстанні бензіну, які змяшчае па аб’ёму
больш за 5% метанолу, могуць узнікнуць
праблемы з запускам і / або якасцю работы, а
таксама пашкоджанні металічных, гумавых і
пластмасавых дэталяў паліўнай сістэмы.
МТБЭ (метылтрэтбуцiлавы эфір) •
Рэкамендуецца выкарыстоўваць бензін,
які змяшчае па аб’ёме да 15% МТБЭ. Перад
выкарыстаннем кіслародазмяшчальнага кшталту
паліва пастарайцеся зацвердзіць яго змесціва. У
некаторых штатах патрабуецца адлюстраваць
гэтую інфармацыю на помпе. Пры выяўленні
якіх-небудзь нежаданых сімптомаў у рабоце
перахадзіце на стандартны неэцiлiраваны
бензін. IVT не нясе адказнасці за паломку або
Page 97

Інструкцыя па эксплуатацыі
fig.
7
ON
OFF
START
OFF
ON
ON
STOP
GN-850
GN-1500 GN-3000
GN-6500
fig.
8
GN-850
GN-1500 GN-3000
праблемы ў рабоце паліўнай сістэмы, што ўзніклі
ў выніку выкарыстання кіслародазмяшчальнага
паліва; гарантыя на вышэйуказаныя выпадкі не
распаўсюджваецца.
УВАГА: Кіслародазмяшчальныя віды
паліва могуць пашкодзіць афарбаваныя і
пластмасавыя дэталі. Пазбягайце пралiвання
паліва падчас запраўкі бака. Гарантыя не
распаўсюджваецца на пашкоджанні, што
ўзніклі ў выніку пралiвання паліва.
Уключэнне/выключэнне
Запуск рухавіка
Выключыце з разетак усе электрапрыборы. 1.
Генератар цяжка запусціць пры падлучанай
нагрузцы.
Перавядзіце перамыкач рухавіка (9) у 2.
становішча “ON”.
Рычажок засланкі (13) зачыняецца, калі рухавік 3.
астывае. Зачыніць засланку можна ўручную,
перасунуўшы рычажок у становішча “CLOSED”.
(GN-850 Перавядзіце рычаг драсселіравання ў
становішча 1).
Запусціце рухавік4.
(GN-6500)
Перавядзіце перамыкач рухавіка (9) у становішча •
“START” (трымаеце не больш за 5 секунд).
Запусціўшы рухавік, вярніце ключ у становішча “ON”.•
перамесціце рычажок ў становішча «OPEN»
(адкрыта), калі рухавік нагрэецца.
Прыпынак рухавіка
У вып адку аварыі:
Каб спыніць рухавік ў выпадку аварыі, 1.
перакладзіце пераключальнiк рухавіка (9) у
становішча «OFF».
У звычайным рэжыме:
1. Перакладзіце выключальнік пераменнага
току (6) у становішча «OFF».
2. Выключыце з разетак ўсе электрапрыборы.
Адлучыце кабелі да зарада батарэі пастаянным
токам.
3. Перакладзіце пераключальнiк рухавіка (9) у
становішча «OFF» (або STOP).
4. Перакладзіце паліўны клапан (11) у
становішча «OFF».
BY
(GN-850; GN-1500; GN-3000)
Перавядзіце пераключальнік рухавіка (9) у •
становішча “ON”.
Злёгку пацягніце ручку стартара (10), пакуль не •
адчуеце супраціў, затым пацягніце яе рэзка.
УВАГА: Не адпускайце рэзка ручку стартэра.
Павольна вярніце ручку ў ранейшае
становішча, каб прадухіліць пашкоджанне
стартэра або корпуса.
Калі заслонка (13) была зачынена ўручную, 5.
Абслугоўванне і захаванне
Перад правядзеннем рамонту адключыце •
прыбор і пачакайце да яго поўнага спынення.
Утрымоўвайце прыбор і вентыляцыйныя •
адтуліны ў чысціні. У выпадку ўзнікнення
няспраўнасцяў, нягледзячы на дасканалыя ўмовы
вытворчасці і выпрабаванняў, рамонт павінен
выконвацца ў афіцыйным сэрвісным цэнтры IVT.
Рэгулярная ачыстка і абслугоўванне •
гарантуюць высокую эфектыўнасць і працяглую
эксплуатацыю прыбора.
Усе гайкі, ніты і шрубы павінны быць шчыльна •
зацягнуты.
Замяніце пашкоджаныя ці зношаныя дэталі.•
Захоўваеце прыбор у сухім недаступным •
для дзяцей месцы, на бяспечнай адлегласці ад
лёгкаўзгаральных матэрыялаў.
Пазбягайце траплення вады на прыбор!•
Для падтрымання генератара ў спраўным
стане патрабуецца перыядычнае тэхнічнае
97
Page 98

98
Інструкцыя па эксплуатацыі
BY
абслугоўванне і рэгуліроўка. Робіце
абслугоўванне і агляд з перыядычнасцю,
указанай у графіку тэхнічнага абслугоўвання
ніжэй.
УВАГА: У выхлапных газах змяшчаецца
атрутны угарный газ. Выключыце
рухавік перад правядзеннем
тэхнічнага абслугоўвання. Калі абслугоўванне
праводзіцца з працуючым рухавіком,
забяспечце ў памяшканні добрую
вентыляцыю.
АБСЛУГОЎВАННЕ
Паветраны
фільтр
Клапанны зазор
Свечка
запальвання
Дэкарбанізацыя
ачыстка (замена пры
неабходнасці)
ачыстка (замена пры
неабходнасці)
ачыстка (замена пры
неабходнасці)
выдаленне нагару,
праверка, рэгуліроўка
УВАГА: Для тэхнічнага абслугоўвання і рамонту
выкарыстоўвайце толькі арыгінальныя
запчасткі IVT або аналагічныя ім. Запасныя
часткі больш нізкай якасці могуць пашкодзіць
генератар.
Замена маторнага масла
(GN-1500; GN-3000; GN-6500)
1. Хуткі і поўны зліў масла магчымы, пакуль рухавік
не астыне.
2. Здыміце пробку для спуску масла (8),
ўшчыльняючую шайбу, крышку маслазаправачнай
GN-850
РЭГУЛЯРНАЕ АБСЛУГОЎВАННЕ (выконваецца праз вызначаную
колькасць месяцаў ці гадзін эксплуатацыі, у залежнасці ад таго, што
кожны месяц
ці 50 гадзін эксплуатацыі
x (1*)
GN-1500; GN-3000; GN-6500
РЭГУЛЯРНАЕ АБСЛУГОЎВАННЕ (выконваецца праз вызначаную колькасць
месяцаў ці гадзін эксплуатацыі, у залежнасці ад таго, што наступіць раней)
наступіць раней)
Кожныя 3 месяцы ці 150 гадзін
эксплуатацыі (3*)
x
x
x
АБСЛУГОЎВАННЕ
Кожныя 6
100 гадзін
Пасля кожнага
Масла для рухавіка
Паветраны фільтр
Паліўны адстойнік ачыстка x
Свечка запальвання праверка ачыстка x
Клапанны зазор
Паліўны бак і фільтр ачыстка x (2*)
Палівапровад
Праверка ўзроўня x
замена x x
праверка x
ачыстка x (1*)
Ачыстка
Рэгуліроўка
Праверка (замена
пры неабходнасці)
эксплуатацыі (3*)
ці 20 гадзін
Праз месяц
выкарыстання
ці 50 гадзін
Кожныя 3 месяцы
месяцаў ці
эксплуатацыі (3*)
эксплуатацыі (3*)
x (2*)
Кожны год
ці 300 гадзін
эксплуатацыі (3*)
кожныя 2 гады
x (2*)
(1*). Работа ў пыльным памяшканні патрабуе больш частага агляду прыбора. (2*) Калі
ўладальнік не мае адпаведных інструментаў і кваліфікацыі механіка, абслугоўванне вырабляе
афіцыйны дылер IVT. (3*). Каб вызначыць перыядычнасць абслугоўвання пры камерцыйным
прафесійным выкарыстанні, заносяцца часы эксплуатацыі ў журнал.
Page 99

Інструкцыя па эксплуатацыі
fig.1
0
GN-850
GN-1500
GN-3000
GN-6500
fig.1
1
OFF
fig.
9
адтуліны (7) і злейце масла.
Колькасць масла:
0,6 л – GN-1500•
1,1 л – GN-3000•
1,1 л – GN-6500•
АСЦЯРОЖНА! Часты і працяглы
кантакт з адпрацаваным маторным
Нават калі праца з адпрацаваным маслам не
з’яўляецца штодзённай, па заканчэнні работы
рэкамендуецца дбайна вымыць рукі з мылам
як мага хутчэй.
Утылізуйце адпрацаванае маторнае масла
экалагічна чыстым спосабам. Рэкамендуецца
змясціць яго ў герметычны кантэйнер і адправіць
на мясцовую станцыю тэхнічнага абслугоўвання,
альбо ў цэнтр па перапрацоўцы. Не вывозіць
алей разам з смеццем і не зліваваць ў зямлю.
Абслугоўванне паветранага фільтра
Засмечаны паветраны фільтр (12) перашкаджае
паступленне паветра ў карбюратар. Каб
прадухіліць парушэнне ў рабоце карбюратара,
рэгулярна аглядаюць паветраны фільтр. Работа ў
запыленым памяшканні патрабуе больш частага
агляду прыбора.
Выкарыстоўвайце толькі мыльную ваду або
непалiўныя растваральнікі.
УВАГА: Не выкарыстоўвайце генератар без
паветранага фільтра (12), паколькі гэта можа
прывесці да хуткага зносу рухавіка.
фільтра, крышку фільтру і фільтраваны элемент.
мыйнага сродка і цёплай вады, дбайна
прапалашчыце або прамойце ў непалiўным ці
маслам можа выклікаць рак скуры.
УВАГА: Выкарыстанне бензіну або
гаручых растваральнікаў для ачысткі
фільтруючага элемента можа
прывесці да ўзгарання або выбуху.
Здыміце зацiскныя скобы крышкі паветранага 1.
Прамойце элемент у растворы бытавога 2.
3. Устаўце пробку
(8) і ўшчыльняючую
шайбу. Пераканаецеся,
што корак устаўлены
шчыльна.
4. Запоўніце бак
р эк а ме нду ем ым
маслам і праверце
ўзровень.
цяжкім растваральніку. Старанна высушыце
элемент.
Пагрузіце элемент у чыстае машыннае масла 3.
і адажмiце яго. Калі ў элеменце засталося
занадта шмат масла , рухавік будзе капцiць пры
пачатковым запуску.
Устаўце фільтруючы элемент і закруціце 4.
крышку.
Ачыстка адстойніка паліва (18)
Адстойнiк паліва (18) прадухіляе трапленне ў
карбюратар гразі або вады, якая змяшчаецца
ў паліўным баку. Калі генератар доўгі час не
выкарыстоўваўся, варта пачысціць адстойнiк .
BY
1. Перакладзіце паліўны клапан (11) у становішча
«OFF. Здыміце адстойнiк (18), O-вобразнае кола і
фільтр.
2. Ачысціце адстойнiк, кальцо і фільтр ў
непаліўным ці цяжкім растваральніку.
3. Ўсталюйце фільтр, O-вобразнае кола і адстойнiк
(18) на месца.
4. Перакладзіце паліўны клапан (11) у становішча
«ON» і праверце на наяўнасць уцечкі.
Абслугоўванне свечкі запальвання
Рэкамендуемыя свечкі запальвання:
LDF6TC. or TME170: BPR6ES,
TME260,
TME360,
TME410:BPR5ES,
TME280:BP6ES
Каб забяспечыць надзейнае функцыянаванне
рухавіка, свечка запальвання павінна быць
чыстай і мець правільны паз. Пры рабоце рухавіка
глушыцель моцна награваецца. Не дакранаецеся
99
Page 100

100
Інструкцыя па эксплуатацыі
BY
fig.1
2
0.7-0.8mm
да глушыцеля.
1. Здыміце наканечнік свечкі запальвання (19).
2. Ачысціце ад бруду вобласць вакол свечкі
запальвання.
3. Выміце свечку запальвання з дапамогай
падыходнага ключа (24).
4. Аглядзiце свечку запальвання. Замяніце
яе, калі ізалятар пашкоджаны. Для паўторнага
выкарыстання ачысціце свечку драцяной
шчоткай.
5. Змерце паз свечкі пры дапамозе тоўстамера.
Падкаррэктуйце паз, акуратна сагнiце бакавыя
электроды. Таўшчыня пазаў павінна складаць:
0,7 - 0,8 мм (0,028 - 0,031 цалі).
6. Калі ласка, праверце стан шайбы свечкі
запальвання і ўвiнцiце свечку уручную, каб
прадухіліць звiнчванне разьбы праз нітку.
7. Усталяваўшы свечку, зацянiце яе пры
дапамозе свечнага ключа (24), каб ўшчылiць
шайбу. Пры ўстаноўцы новай свечкі запальвання
зацянiце яе на паў-абароту для ўшчыльнення
шайбы. Пры паўторнай ўстаноўцы ўжо
выкарыстанай свечкі запальвання зацянiце яе
на 1/8-1/4 абароту для ўшчыльнення шайбы.
УВАГА: шчыльна зацянiце свечку запальвання.
Няправільна усталяваная свяча запальвання
можа моцна награваць і пашкодзіць рухавік.
Не выкарыстоўвайце свечкі запальвання
непрыдатнымцеплавымкаэфіцыентам.
Выкарыстоўвайце толькі рэкамендаваныя або
аналагічныя ім свечкі запальвання.
Перавозка / Захоўванне
Пры перавозцы генератара перакладзіце
пераключальнiк рухавіка (9) і паліўны клапан (11)
у становішча «OFF». Падтрымлівайце генератар
ў гарызантальным становішчы, каб прадухіліць
уцечку паліва, пралiцце паліва, а таксама яго
лёгкаўзгаральнага пара.
УВАГА: Кантакт з гарачым рухавіком
або выхлопной сістэмай можа
прывесці да цяжкіх апекаў або
ўзгарання. Астудзіць рухавік перад перавозкай
або адпраўленнем генератара на захоўванне.
Пазбягайце падзення або ўдару генератара пры
перавозцы. Не складайце на генератар цяжкія
прадметы.
ЧАС ЗАХОЎВАННЯ РЭКАМЕНДУЕМЫ ПАРАДАК АБСЛУГОЎВАННЯ, (які дапамагае пазбегнуць цяжкага запуску)
Менш аднаго месяца Падрыхтоўка не патрабуецца
Ад 1 да 2 месяцаў Запраўце генератар свежым бензінам і дадайце бензінавай прысадкi *
Ад 2 месяцаў да 1 года
Больш за 1 год
Запраўце генератар свежым бензінам і дадайце бензінавай прысадкi *
злейце паліва з паплаўковай камеры карбюратара
злейце паліва з адстойніка паліва
Запраўце генератар свежым бензінам і дадайце бензінавай прысадкi *
злейце паліва з паплаўковай камеры карбюратара
злейцепаліва з адстойніка паліва
Дастаньце свечку запальвання. Налейце ў цыліндр сталовую лыжку машыннага
масла. Павольна пацянем цягавы трос, каб размеркаваць масла й. Ўсталюйце свечку
запальвання.
Замяніце масла . (GN-1500; GN-3000; GN-6500)
Па заканчэнні захоўвання зліце бензін у каністру, а перад запускам запраўце генератар
свежым.
*Выкарыстоўвайце бензiнавыя прысадкi, якія павялічваюць тэрмін захоўвання. За рэкамендацыямі
па выбары прысадак звяртайцеся да афіцыйнага дылера IVT ў вашым рэгіёне.
 Loading...