

Page 1

www.ivt-ht.com | tools for every use
GHT-25
EN
Gasoline hedge trimmer 8-15
DE
Benzinmaschine für beschneiden
der hecke
16-25
RU
Бензиновая машина для
подрезки живой изгороди
26-35
KZ
Бұта қоршамын бұтауға арналған
бензинді машина
36-45
PL
Spalinowe nożyce do żywopłotu 46-53
IT
Tagliasiepi a benzina 54-63
Page 2

2
EN
CONGRATULATION!
Dear customer,
IVT team would like to thank you for your choice and for
the condence you put in our product.
Our aim is always to offer an innovative, high-class-strong
and prize-adequate product to the customer.
We wish you’ll get much satisfaction from all your do-ityourself activities, by using this tool.
Your IVT Swiss SA Team
NOTE: Illustrations, gures, photos and contents might
vary slightly due to our program of continuous product
improvements.
DE
WIR GRATULIEREN!
Sehr geehrter Kunde,
das Team der Firma IVT dankt Ihnen für Ihr Vertrauen
und für die Wahl unserer Produktion.
Wir streben danach, damit unsere Kunden die Möglichkeit
haben, nur moderne, feste und hochwertige Produkte zu
benutzen.
Wir hoffen, dass mit unseren Werkzeugen Sie ein
wirkliches Vergnügen von der Arbeit bekommen.
Mit freundlichen Grüßen, Team IVT Swiss SA
ANMERKUNG: Bilder, Mengenangaben, Fotos und der
Inhalt der Anleitung können sich kraft der ständigen
Nacharbeit unserer Produktion verändern.
RU
ПОЗДРАВЛЯЕМ!
Уважаемый Покупатель,
Коллектив компании IVT благодарит вас за оказанное
доверие и выбор в пользу нашей продукции.
Мы стремимся к тому, чтобы у наших покупателей была
возможность пользоваться только современными,
прочными и высококачественными продуктами.
Надеемся, что с нашими инструментами вы получите
истинное удовольствие от работы.
С уважением, коллектив IVT Swiss SA
ПРИМЕЧАНИЕ: Рисунки, количественные данные,
фотографии и содержание инструкции могут
изменяться в силу постоянного усовершенствования
нашей продукции.
KZ
ҚҰТТЫҚТАЙМЫЗ!
Құрметті сатып алушы,
IVT компаниясының ұжымы Сізге бізге сенім
артқаныңыз үшін және біздің өнімімізді таңдағаныңыз
үшін алғыс білдіреді.
Біз Сіздерге инновациялық, жоғарғы классты және
жоғары сапалы өнімді тиімді бағамен ұсынуға үнемі
ұмтылып келеміз.
Біздің құралдарыңызбен сіз өз жұмысыңыздан
рахаттанасыз деп үміттенеміз.
Ізгі ниетпен, IVT Swiss SA ұжымы
ЕСКЕРТУ: Суреттер, сандық мәліметтер және
нұсқаудың мазмұны біздің өнімнің үздіксіз жетілуіне
байланысты өзгеруі мүмкін.
Page 3

3
PL
GRATULUJEMY!
Szanowny Kliencie,
Załoga rmy IVT dziękuje Państwu za okazane
zaufanie i wybranie naszego produktu. Dążymy do
tego, aby nasi klienci mieli możliwość użytkowania
jedynie nowoczesnych, trwałych i wysokojakościowych
produktów.
Mamy nadzieję, że używając naszych narzędzi będziecie
Państwo mieć prawdziwą satysfakcję z pracy.
Z poważaniem, załoga IVT Swiss SA
UWAGA: Rysunki, dane ilościowe, fotograe i treść
instrukcji mogą ulegać zmianom z powodu doskonalenia
naszych produktów.
IT
CONGRATULAZIONI!
Gentile cliente,
l’azienda IVT desidera ringraziarLa per la scelta e per la
ducia dimostrata nel nostro prodotto.
Il nostro obiettivo è offrire sempre prodotti innovativi che
garantiscano un adeguato rapporto qualità/prezzo.
Le auguriamo che i suoi lavori di bricolage possano
diventare un piacere, utilizzando il nostro prodotto.
La squadra IVT Swiss SA
Nota: illustrazioni, gure, foto e contenuti potrebbero
variare leggermente a causa del nostro programma di
continuo miglioramento del prodotto.
Page 4
4
6
18 1912 13
1
2226 23 2425
234 579
GHT-25
Page 5
5
45°-90°
45° 90°
3
13
13
8
976
18
2
19
10
11
[F1]
[F3]
[F2]
[F4]
Page 6
6
0,6 - 0,7 mm
0 - 10°
21
17 20
18
16
14
[F5] [F6]
[F7] [F8]
[F9]
[F11]
[F10]
[F12]
Page 7

7
Page 8

8
EN
Instruction manual
TOOL SPECIFICATIONS
Model GHT-25
Displacement [cc] 25.4
No-load speed [RPM] 7500
Engine power [HP] 1.05
Nr. of strokes of engine 2
Type of engine cooling air cooled
Starting system recoil starter
Fuel tank capacity [ml] 0.6
Mixture ratio [gasoline:oil] 40 : 1
Fuel consumption [g/kwh] 488
Blade type double blade
Blade length [mm] 560
Blade pitch [mm] 27.8
Number of teeth of blade 16
Vibration level [m/s
2
] 7 (K=1.5)
Sound pressure level [dB(A)] 110 (K=3)
Sound power level [dB(A)] 94 (K=3)
Weight [kg] 5.8
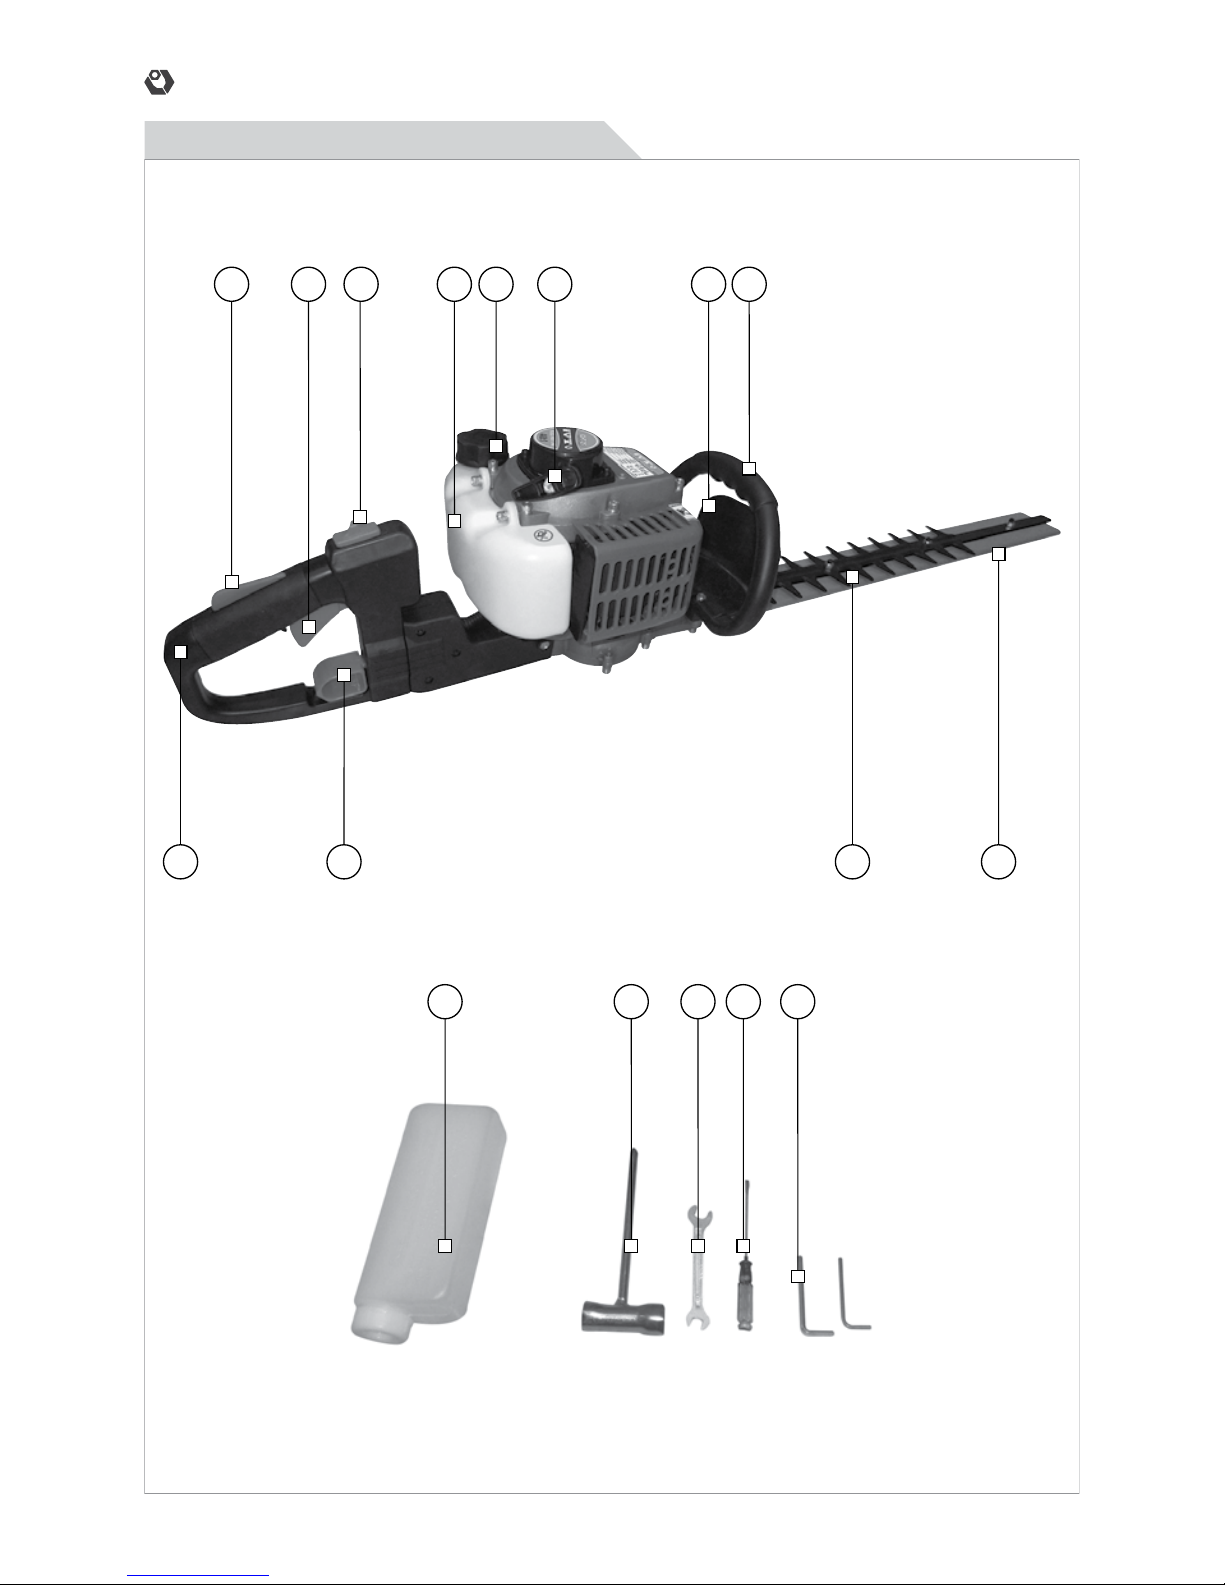
PART LIST
1. Front handle
2. Handle guard
3. Recoil starter
4. Fuel tank
5. Fuel tank plug
6. On / Off switch
7. Throttle lever
8. Throttle set button
9. Throttle lockout
10. Choke lever
11. Fuel pump
12. Rotary handle
13. Release lever
14. Fuel lter
15. Air lter
16. Air lter cover
17. Filter element
18. Cutting blade
19. Blade guard
20. Spark plug
21. Idling speed screw
22. Spark plug spanner
23. Spanner
24. Hex key
25. Screwdriver
26. Canister with oil
CONTENT OF THE BOX
Instruction manual (1 pc), spark plug spanner (1 pc),
spanner (1 pc), screwdriver (1 pc), hex key (2 pc),
canister with oil (1 pc).
INTENDED USE
This tool is intended for cutting hedges and shrubs with
thicker stems and branches.
SAFETY REGULATION FOR THE USE
General safety rules
The following listed safety instructions should serve you
for the right use of the tool and for the protection of your
own safety, therefore, please read this very carefully.
When passing this tool to a third person, these
instructions must be handed too.
Retain this user’s manual and all other literature
supplied with your tool for any future reference.
Comply with all the safety information and the warnings
on the tool.
Be familiar with the controls and the proper use of the
tool before attempting to use it and above all, make sure
you know how to stop to use it in case of emergency.
Following these simple instructions will also maintain
your tool in good working order.
∙ The tool must be assembled correctly before use.
Page 9

9
EN
Instruction manual
∙ Only use the tool for its designed purposes.
∙ On the tool, there may be also decals and further
indications about the safety equipment to use that
must be considered. The prevention of accidents is
dependent upon the awareness, common sense and
proper training of everyone involved in the operation,
transport, maintenance and storage of the tool.
∙ Never leave the tool unattended.
∙ Never allow children to use the tool. Children
should be supervised to ensure that they do not play
with the tool.
∙ Keep children and pets away. All onlookers should
be kept at a safe distance away from the tool when it
is in use.
∙ The user is responsible for third parties while
working with the tool.
∙ People who aren’t acquainted with the operating
instructions, children, juveniles who have not yet
reached the minimum age for using this tool and people
under the inuence of alcohol, drugs or medication
are not allowed to use the tool. Local regulations may
restrict the age of the operator.
WARNING! The consumption of
alcohol, medication and drugs, plus
states of illness, fever and fatigue will
affect your ability to react. Do not use
this tool in any of these situations.
∙ Make sure that all the protective devices (if present)
are tted and are in good condition.
∙ Never operate the tool with defective safety devices
or guards (if present), or without safety devices in place.
∙ Inspect the entire tool to look for loose parts (e.g.
nuts, bolts, screws, etc.) and for any damage. Check
at frequent intervals if screws and bolts (if present)
are properly tight to be sure the equipment is in safe
working condition. Repair or replace them, if necessary,
before using the tool. Serious injury to the operator and
to the bystanders could result if there’s any damage to
the tool.
∙ While using the tool, dress properly. Do not
wear loose clothing or jewelery that could become
caught by the tool. Wear suitable working clothes. It is
recommended that legs and feet are covered, to protect
them from eventual ying debris. Do not work barefoot
or wearing open sandals. Long air should be tided back.
∙ Keep handles and grips dry, clean and free from
oil and grease.
∙ Use proper protective equipment. Use safety
glasses and safety gloves. Also use a dust mask during
pulverulent operations or if exhaust gases are present.
When necessary, use also non-slipping boots or shoes,
hardhat and earplugs. If the noise level exceeds 85
dB(A), ear protection is obligatory.
WARNING! Use personal protective
equipment! Safety devices and
personal protective equipment
protect your own health and the
health of others and ensure a troublefree operation of the tool.
∙ Do not start to use the tool if it is in an inverted
position or it is not in the right working order.
∙ Ensure that you have a good stand, while you
operate with the tool. Keep proper footing and balance
at all times.
∙ Keep work area clean. Cluttered areas invite
injuries. Before use, all foreign bodies must be removed
from the working area, also pay attention to foreign
objects during operation.
∙ Do not force the tool.
∙ Only work in daylight or sufciently good articial
light. Never operate the tool without good visibility.
∙ Be careful not to drop the tool or hit it against
obstacles.
ATTENTION! Stay alert. Watch what you are doing.
Distraction can cause you to lose control. Use
common sense.
Gasoline engine safety rules
WARNING! Petrol is highly ammable.
Handle fuel with care.
∙ Store fuel in containers specically designed for
this purpose.
∙ Refuel outdoors only and do not smoke while doing
this operation.
∙ Add fuel before starting the engine.
∙ Always allow mufer to cool before lling fuel tank.
∙ Never remove the cap of the fuel tank or add fuel
while the engine is running or when the engine is still
hot.
∙ If petrol is spilled, do not attempt to start the engine,
but move the machine away from the area of spillage
and avoid creating any source of ignition until petrol
fumes have dissipated.
∙ Clean up spilled fuel before restarting.
∙ Replace all fuel tanks and container caps securely.
∙ Do not run the engine indoor or in a conned space:
dangerous carbon monoxide fumes can collect. Exhaust
fumes are dangerous.
Page 10

10
EN
Instruction manual
WARNING! Exhaust contains
poisonous carbon monoxide, a
colourless and odourless gas.
Breathing exhaust can cause loss of
consciousness and may lead to death.
Provide an adequate ventilation to
keep exhaust gas level as low as
possible.
∙ Never store the equipment with fuel in the tank
inside a building where fumes can reach an open ame
or spark.
∙ To reduce re hazard, keep the engine, silencer,
battery compartment and petrol storage area free of
vegetative material and excessive grease.
∙ The exhaust system gets hot enough to ignite
some materials. Keep ammable materials away from
the device.
∙ The mufer becomes very hot during operation and
remains hot for a while after stopping the engine. Be
careful not to touch the mufer while it is hot. Let the
engine cool before storing the machine indoors.
∙ Remove adjusting keys or wrenches before starting
the machine.
WARNING! During the use of certain
gasoline tools, some dust containing
chemicals known to cause cancer,
may occur.
Some of these chemicals are: lead from lead based
paints, crystalline silica from bricks and cement and
other masonry products, arsenic and chromium from
chemically treated lumber and other dangerous
products. If dust is present, your risk from these
exposures varies, depending on how often you do this
type of work.
To reduce your exposure to these chemicals, any
time you do pulverulent operations, work in a well
ventilated area and work with approved safety
equipment, such as dust masks that are specially
designed to lter out microscopic particles.
∙ If the machine strikes a foreign body, examine the
device for signs of damage and carry out any necessary
repairs before restarting and continuing to work.
∙ If the machine starts to vibrate abnormally, switch
off the motor and check for the cause immediately.
Vibration is generally a warning of trouble.
∙ Always turn off the machine and wait until the
machine completely stops whenever you leave
the machine, before carrying out maintenance,
before changing accessories, checking, cleaning,
troubleshooting or working on the machine.
∙ It is forbidden to move or modify any of the internal
parts of the machine.
Specic safety rules
Wearing protective equipment
∙ Always wear approved protective equipment. It
cannot eliminate the risk of injury, but it will reduce the
degree of injury if an accident happens.
∙ Use a protective helmet, hearing protection,
protective glasses or visor; wear protective gloves and
trousers with saw protection, solid boots with steel toecap and non-slipping sole. Generally, clothes should
be close-tting but without reducing the freedom of
movement.
∙ Protective gloves must be worn when handling the
cutting blade.
Operating conditions
∙ Keep children and pets away. All onlookers should
be kept at a safe distance away from the tool when it
is in use.
∙ Make sure there are no objects nearby that might
affect your work.
∙ Check that the working area is free from obstacles
such as roots, rocks, branches, etc., in case you have
to move suddenly.
∙ Take great care when working on sloping ground.
∙ Pay attention to the surrounding environment to be
free to react to a possible dangerous situation.
Using the machine
∙ The machine is intended for cutting wood only.
Any cutting of other materials will cause damage to the
machine and right for warranty repair shall become void.
∙ Only use cutting equipment and accessories
recommended by the manufacturer.
∙ The tool must never be operated with damaged or
dismantled safety guards. Do not operate the tool if it is
not properly assembled.
∙ Ensure that all spanners and other tools used to
adjust the machine have been removed and taken to a
safe distance before turning on the device.
∙ When operating the machine, uncontrolled
kickback can occur; to avoid kickback always handle the
device securely with two hands and do not grip other
parts except the handles.
Page 11
11
EN
Instruction manual
UNPACKING
When unpacking, check to make sure that all
components are included. Refer to the drawings on this
manual. If any parts are missing or broken, please call
an IVT assistance center.
PRE-OPERATION CHECKS
WARNING! Prior to any mounting,
adjusting, maintenance procedures
the machine must be turned off. Also
pull the spark plug cap out.
CAUTION! Protective gloves must be
worn when handling the cutting blade
(18).
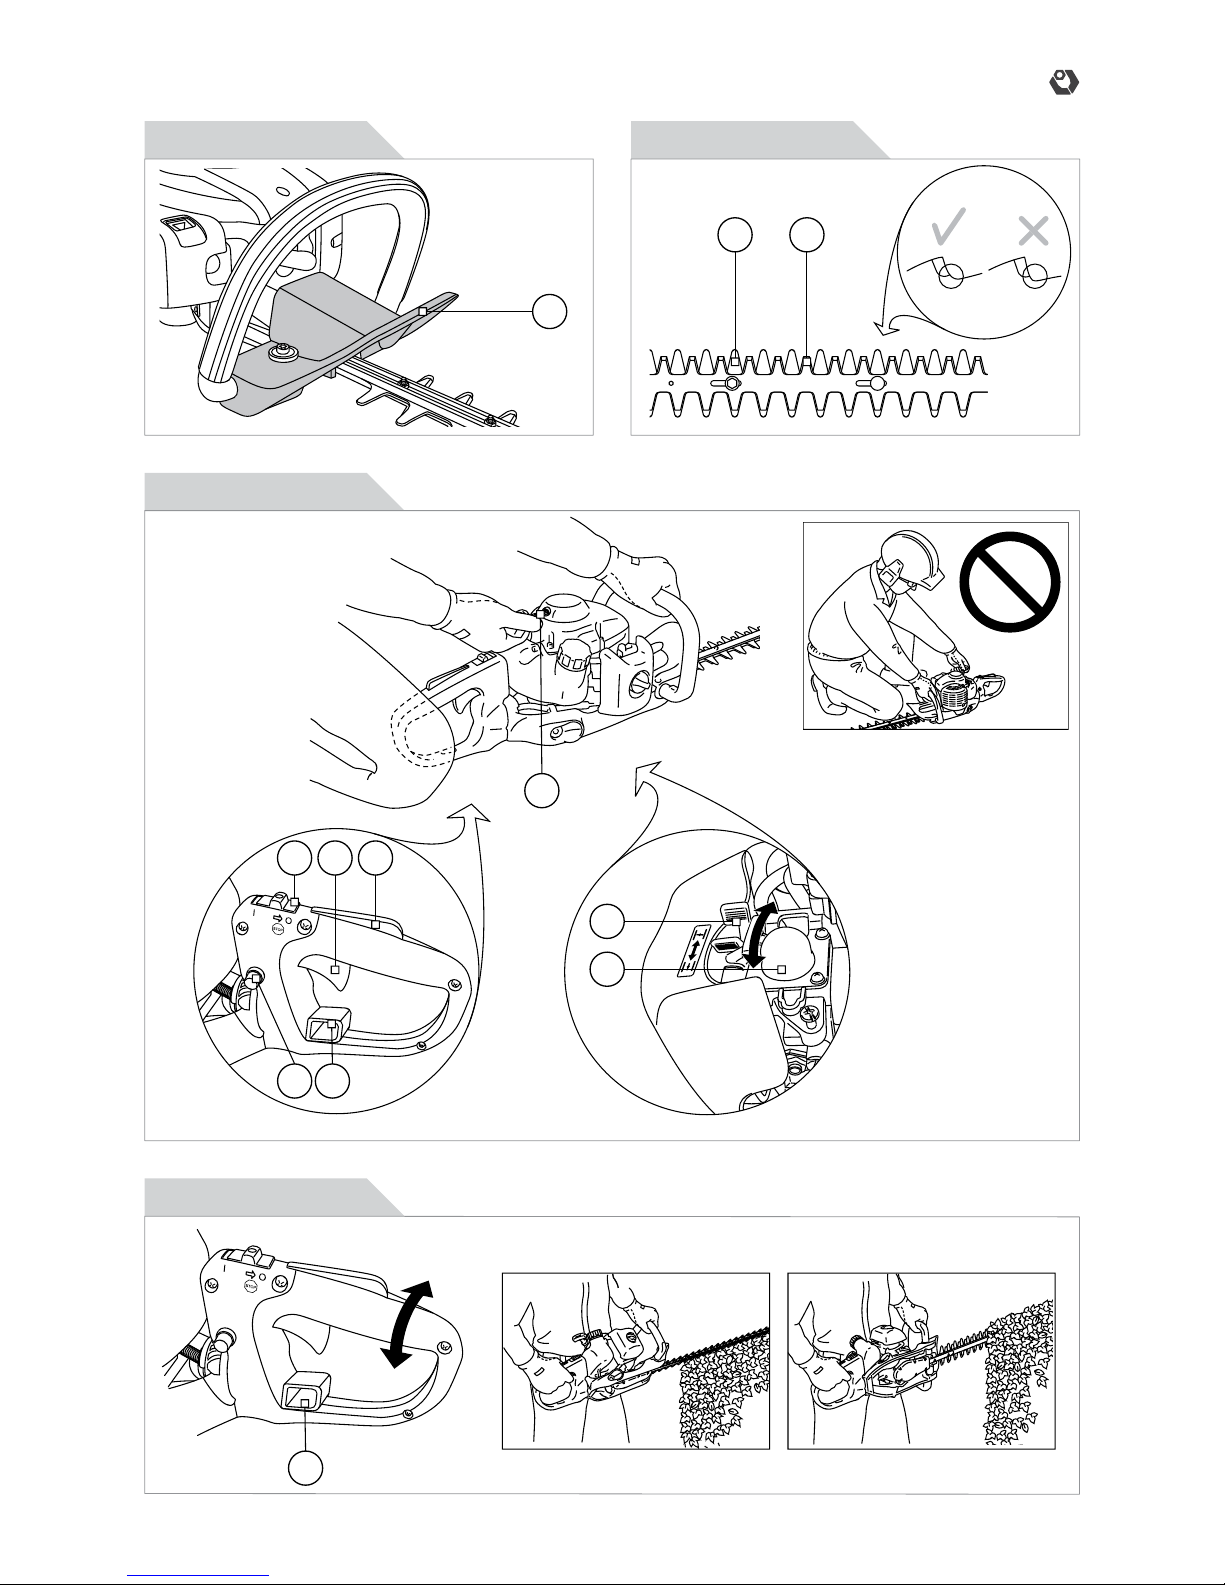
Checking the handle guard (2) [F1]
The handle guard (2) prevents hands from coming into
contact with the cutting blade (18), for example, if the
operator loses grip on the front handle (1).
CAUTION! Check that the handle
guard (2) is tted correctly and
undamaged.
Checking the cutting blade (18) and the blade guard
(19) [F2]
∙ Check the condition of the cutting blade (18) and
the blade guard (19) regularly.
∙ Replace the cutting blade (18) and the blade guard
(19) if they are bent or damaged.
If needed, sharpen each cutting edge and make sure
the bottom corner is rounded. If damaged or cracked,
replace it.
To ensure good results it is important that the contact
pressure between the cutting blades (18) is correct.
The contact pressure is adjusted by turning the screws
on the underside of the bar clockwise.
When the cutting blades (18) are correctly adjusted the
play between the cutting blades (18) should be 0.2-0.4
mm, measured at the screws.
ATTENTION! Do not cool cutting blade (18) with water,
in case of using grinder, because it may cause cracks
on the cutting blade (18).
PRIOR TO OPERATION
WARNING! Perform the following procedures, with
the engine cooled down.
Fuel recommendations
The machine is equipped with a two-stroke engine and
must always been operated using a mixture of petrol
and two-stroke oil. It is important to accurately measure
the amount of oil to be mixed to ensure that the correct
mixture is obtained.
∙ Pour the correct quantities of regular gasoline
(leaded or unleaded, alcohol free) and 2-stroke oil into a
mixing bottle (a clean container intended for fuel), then
shake the container well.
RECOMMENDED MIXING RATIO
GASOLINE : OIL > 40 : 1
ATTENTION! Never use oil intended for four-stroke
engines, nor oil intended for water cooled 2-cycle
engines.
Refueling
1. Always shut off the engine and let it cool for a few
minutes, before refueling.
2. Rest the machine on the ground with the fuel tank
plug (5) facing up.
3. Open the fuel tank plug (5) slowly so that any
excess pressure is released gently.
4. Clean the area around the fuel tank plug (5):
contamination in the fuel tank (4) can cause operating
problems.
5. Ensure that the fuel is well mixed by shaking the
mixing container before lling the fuel tank (4).
6. Fill the fuel tank (4) with correct gasoline-oil
mixture. Do not overll.
7. Tighten the fuel tank plug (5) securely.
ATTENTION! If the machine is not used for fairly long
time (more than 4 weeks), the fuel tank (4) should be
emptied and cleaned.
CAUTION! Wipe up all spills and
always move the machine away from
the refueling area (min. 3 meters)
before starting.
STARTING / STOPPING THE ENGINE
[F3]
Starting the engine
1. Set the machine down on a hard, level surface.
2. Move the on/off switch (6) to the “start” “I” position.
Page 12

12
EN
Instruction manual
3. Close the choke lever (10). NOTE: The CLOSED
position enriches the fuel mixture for starting a cold
engine. For restarting a warm engine, leave the choke
lever (10) in the OPEN
position.
4. Press the fuel pump (11) (if present) repeatedly,
until fuel begins to ll the bulb (to start a warm engine,
it’s not necessary to press it).
5. The throttle lever (7) should be set to the starting
position, in order to do that: press the throttle lockout
(9), by gripping the control handle and hold the throttle
set button (8) (if present), while releasing the throttle
lever (7).
6. Hold the body of the machine on the ground using
your left hand (CAUTION! Not with your foot!).
7. Grip the handle of recoil starter (3), slowly pull
out the cord with your right hand until you feel some
resistance, then quickly and powerfully pull the cord
(CAUTION! Never twist the recoil starter (3) around
your hand!).
8. Repeat pulling the cord of recoil starter (3) until the
engine starts.
9. When the engine starts, slowly open the choke
lever (10) ONLY if it had been put on CLOSE position
because the engine was cold.
10. Allow the engine to warm up for a few minutes.
When the engine is warm enough to idle well, pull and
release the throttle lever (7) to disengage the throttle
set button (8).
NOTE: the throttle set button (8) is used to hold the
throttle lever (7) at the fast idle position for starting.
ATTENTION! Do not allow the cutting equipment to
contact any obstruction when starting the engine
with the throttle set button (8) engaged!
ATTENTION! Do not use the throttle set button (8)
while operating the unit! The machine will not return
to idle, and the cutting blade (18) will continue to
spin until the throttle set button (8) is disengaged
and the throttle lever (7) is released.
Stopping the engine
1. Reset the throttle lever (7) to the low speed position
and slow down the engine RPM.
2. Set the on/off switch (6) in “STOP” “O” position.
WARNING! The cutting blade (18)
will continue to spin briey after the
engine has stopped or the throttle
lever (7) is released. A coasting blade
can cause injury. Maintain proper
control of the machine until the cutting
tool has completely stopped rotating.
OPERATING INSTRUCTIONS
ATTENTION! Do not use the machine on full load
for extended periods for the rst 20 hours of use
and do not allow the machine to function idly at full
throttle.
Rotating handle [F4]
To make the cutting operations easier the rotary handle
(12) can be turned through 45°/90° to the right or left
from the central position.
∙ Turn off the machine.
∙ Release the throttle lever (7) and the throttle
lockout (9), then pull the release lever (13) to free the
movement of rotary handle (12).
∙ Turn the rotary handle (12) until the release lever
(13) clicks into place.
∙ Ensure that the rotary handle (12) is rm, when it
is locked in its new position, the machine can start to
working again.
For safety reasons, whilst moving the rotary handle (12)
it is not possible to accelerate.
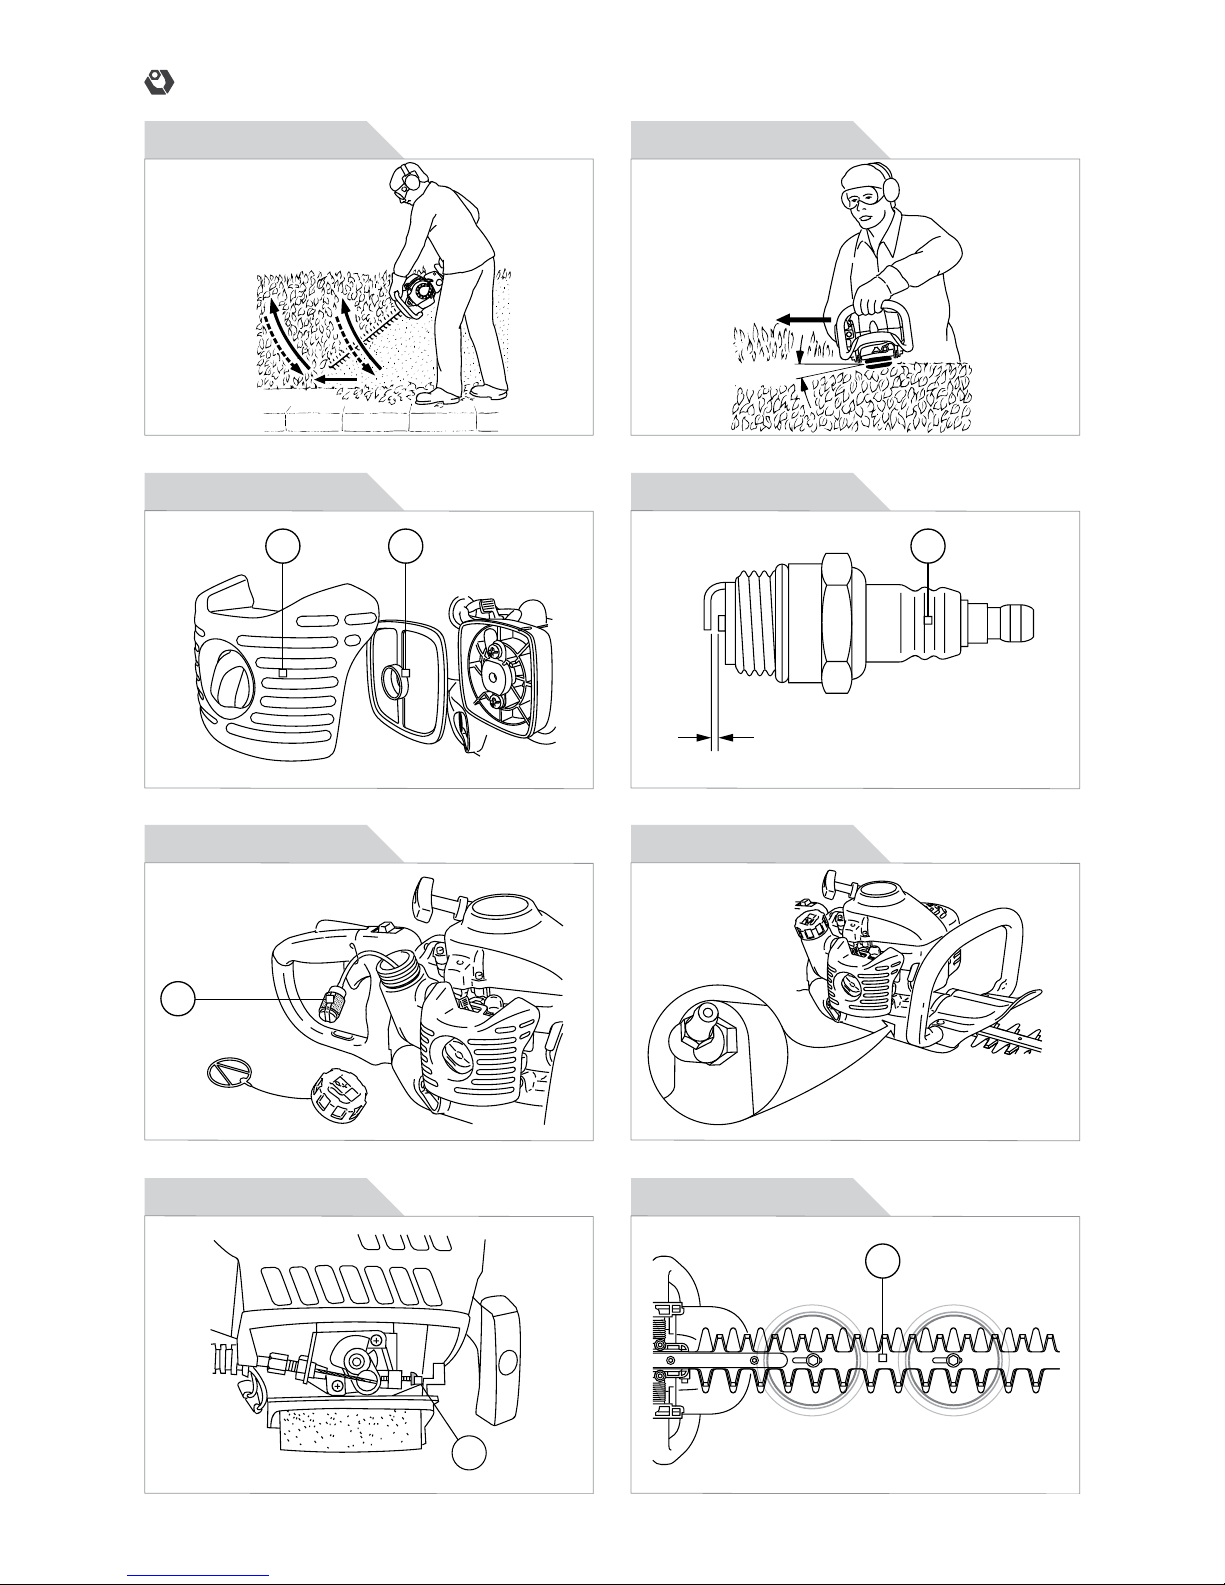
Cutting techniques
∙ A better cut is obtained by moving forwards slowly,
especially with thick hedges.
∙ Cut the hedge starting from the sides, leaving the
top part to the end.
∙ To obtain a uniform height for the hedge, it is
recommended to use a reference wire and cut the
branches that stick out from the wire.
∙ Cut upwards and downwards using both sides of
the cutting blade (18), making semi-circle movements.
Vertical cut [F5]:
∙ Swing the cutting blade (18) from the bottom
upwards in an arc – lower the nose of the cutting blade
(18), move along the hedge and then swing the cutting
blade (18) up again in an arc.
Horizontal cut [F6]:
∙ Hold the cutter bar at an angle of 0° to 10° as you
swing the machine horizontally.
∙ Swing the cutting blade (18) in an arc towards the
outside of the hedge so that the cutting blades (18) are
swept to the ground.
MAINTENANCE AND STORAGE
CAUTION! Before carrying out any
maintenance operation, turn off
the engine and wait until it stops
completely.
Page 13

13
EN
Instruction manual
∙ Always keep the tool and the ventilation slots (if
present) cleaned. Regular cleaning and maintenance of
the appliance will ensure efciency and prolong the life
of your tool.
∙ If the tool should fail despite the rigorous
manufacturing and testing procedures, the repair should
be carried out by an authorized IVT customer service.
∙ Keep all nuts, bolts, and screws tight, to be sure the
tool is in safe working condition.
∙ Replace worn or damaged parts for safety.
∙ Use only original spare parts. Parts not produced
by manufacturer may cause poor t and possible injury.
∙ Store the tool in a dry room out of reach of kids and
away from any ammable material.
∙ Store all fuel tanks securely. Never store the
equipment with fuel in the tank inside a building, where
fumes can reach an open ame or sparks.
Air lter [F7]
Soiled air lters reduce the engine output. Regular
checks are therefore essential. The air lter should
be checked after every 25 hours of use and cleaned if
necessary. If the air contains a lot of dust, it should be
checked more frequently.
1. Remove the air lter cover (16).
2. Remove the lter element (17).
3. Clean the lter element (17) by tapping it or blowing
it or, if necessary, by washing with warm soapy water.
Dry completely before installing. If the air lter element
(17) is broken or shrunk, replace with a new one.
NOTE: Never clean the air lter element (17) with petrol
or inammable solvents.
Mufer
Inspect periodically the mufer for loose fasteners, any
damage or corrosion. If any sign of exhaust leakage
is found, stop using the machine and have it repaired
immediately.
Spark plug (20) [F8]
Check the spark plug (20) for dirt and grime after about
10 hours of operation and if necessary clean it with a
copper wire brush. Thereafter service the spark plug
(20) after every 50 hours of operation.
1. Pull off the spark plug cap.
2. Remove the spark plug (20) with a spark plug
spanner.
3. Inspect the condition of spark plug (20). Check
that the electrode gap is 0,6-0,7 mm, if not, adjust. If it
is dirty, clean it. If it is damaged, replace it with one of
recommended type!
4. Assemble in reverse order.
Fuel lter (14) [F9]
The fuel lter (14) of the suction head is used to ll the
fuel required by the carburetor. When the engine run
short of fuel supply, check fuel lter (14) for blockage.
A periodical visual inspection of the fuel lter (14) is to
be conducted, clean after about 50 hours of use. Filters
found to have hardened, been polluted or clogged up
are to be replaced.
1. Open the fuel tank plug (5) and carefully drain all
fuel from fuel tank.
2. Use a wire hook to pull out the suction head through
the tank opening.
3. Inspect the fuel lter (14). If it is dirty, remove it and
wash it with non-ammable solvent.
4. Remove water and dirt stood in the fuel tank by
rinsing its inside.
5. Place all parts back correctly.
Gearbox [F10]
The gearbox must be lubricated every year before the
start of the season at the lubrication nipple. If you use
the machine frequently, grease the gearbox more often.
Setting the idling speed [F11]
∙ If the engine stalls when the throttle lever (7) is
not pressed, the idling speed may be adjusted: turn the
idling speed screw (21) clockwise until the machine runs
smoothly at idling speed (rotation increases).
∙ If the idling speed is so fast that the cutting tool
continues to rotate, when the throttle lever (7) is not
pressed, idling speed has to be reduced by turning the
idling speed screw (21) counter-clockwise for as long
as is required for the cutting tool to stop turning as well.
IMPORTANT! Set the idling speed when the machine
is warm.
Carburettor settings
Settings on the carburetor should be made by authorized
customer service center.
Lubrication of the cutting blade (18) [F12]
Apply a few drops of oil to each slots for the bolts on the
cutting blade (18) every 4 hours of use.
MAINTENANCE BEFORE LONG-TERM
STORAGE
∙ Brush off all dirt from the machine.
∙ Check damage or slack of each part. If you nd out
abnormalities, repair them for next use.
∙ Drain all fuel from fuel tank, then turn on engine;
leave it running until it stops naturally.
∙ Remove the spark plug (20) and put 1-2 cc of
Page 14

14
EN
Instruction manual
2-stoke engine oil in the engine.
∙ Apply anti-rust oil to the metal parts such as throttle
cable.
∙ Put the blade protector (19) on the cutting blade
(18).
∙ Keep machine stored indoor avoiding dampness.
ENVIRONMENTAL PROTECTION
Recycle raw materials instead of
disposing as waste.
Tool, accessories and packaging should be sorted for
environment-friendly recycling.
The plastic components are labeled for categorized
recycling. These instructions are printed on recycled
paper manufactured without chlorine.
Page 15
15
EN
Instruction manual
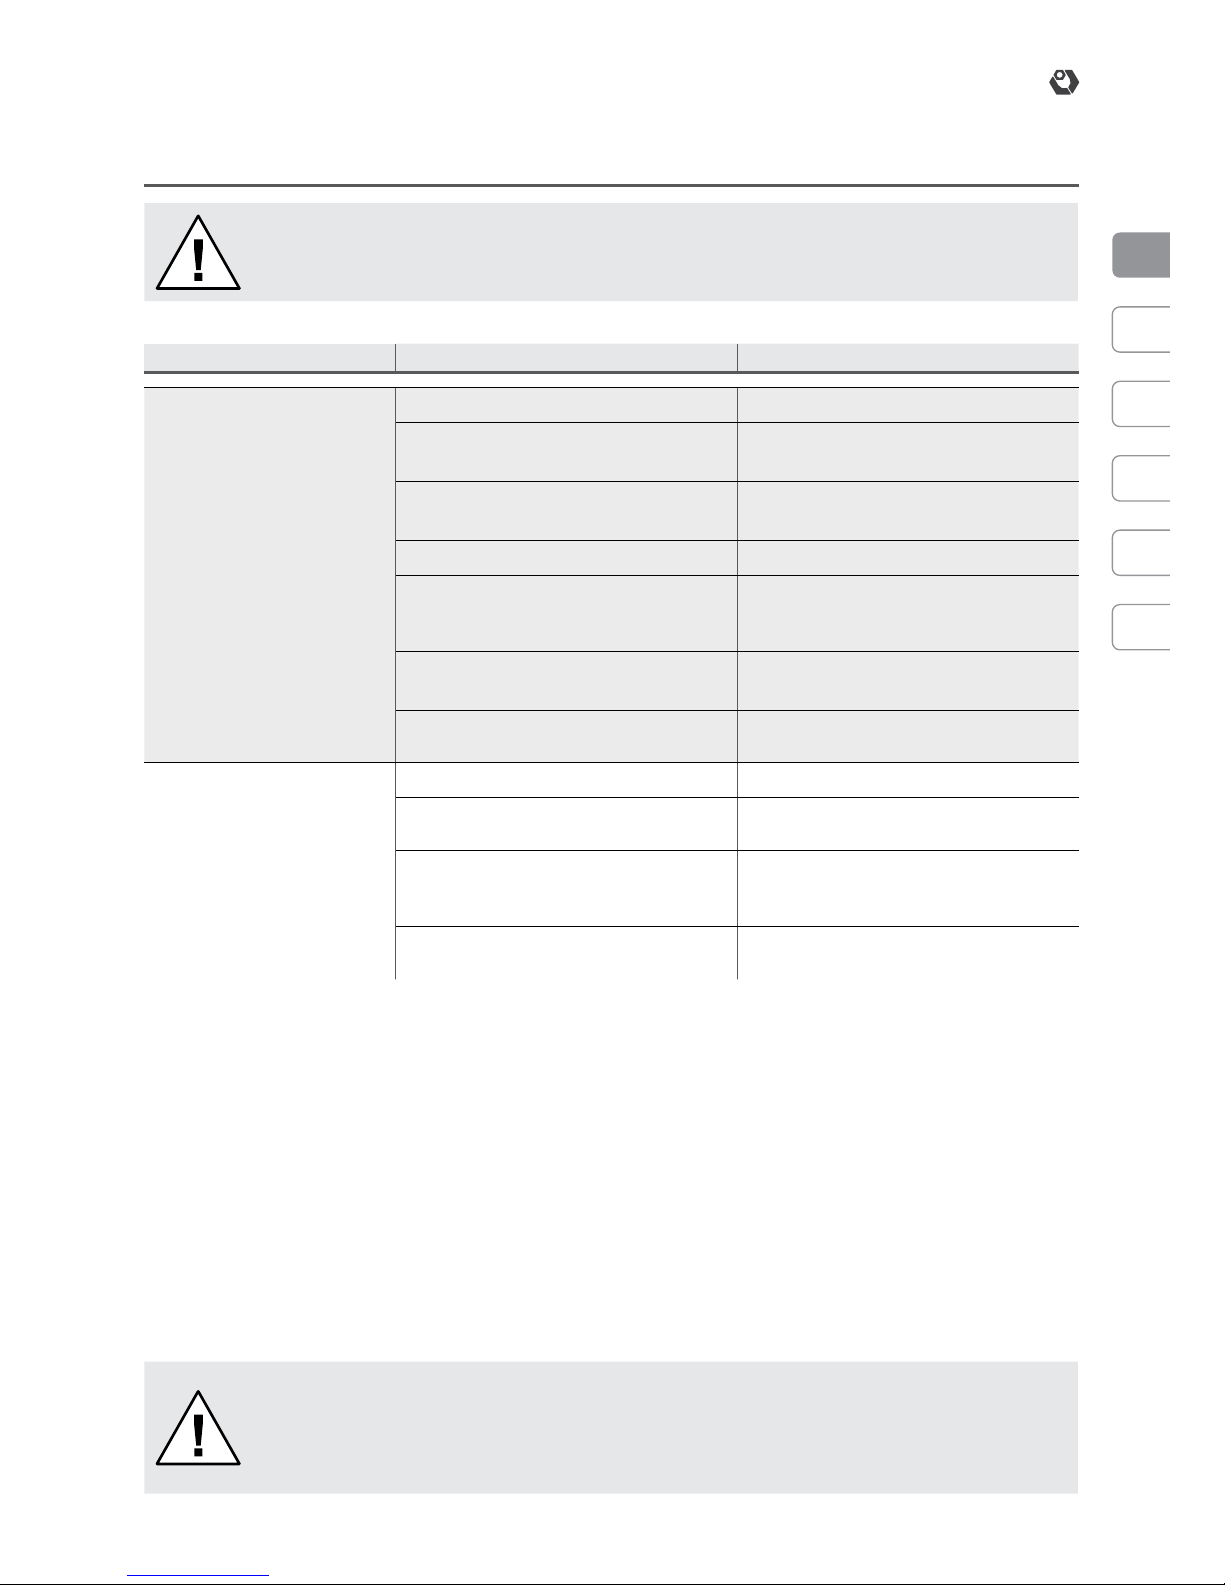
TROUBLESHOOTING
CAUTION! Turn off the engine and wait until the machine stops completely before
investigating fault.
Conventional trouble Trouble reason Remedy
Engine does not start.
∙ Failure to operate fuel pump (11).
∙ Push it 7-10 times.
∙ On/off switch (6) in ‘off’ ‘O’ position.
∙ Turn On/off switch (6) in ‘on’ ‘I’
position.
∙ Choke lever (10) not in CLOSED
position (cold engine).
∙ Move choke lever (10) to the
CLOSED position.
∙ Lack of fuel.
∙ Feed fuel.
∙ Fuel lter (14) clogged, carburetor
malfunction, ignition malfunction, valves
stuck, etc.
∙ Replace or repair faulty
components as needed.
∙ Deteriorated fuel.
∙ Replace with new recommended
fuel.
∙ Spark plug (20) faulty, fouled,
detached or has incorrect gap.
∙ Clean, gap, attach or replace.
Engine stops soon.
Engine speed does not
increase.
∙ Insufcient warm-up.
∙ Perform warm-up operation.
∙ Choke lever (10) is set to CLOSED
position although engine is warmed up.
∙ Set it to OPEN position.
∙ Clogged fuel lter (14) or
contaminated or clogged lter element
(17).
∙ Clean.
∙ Throttle cable out of adjustment,
broken, or bent.
∙ Adjust or replace if necessary.
If the problem cannot be remedied on the basis of the information above, please take the device to an authorized
IVT Service Center.
ATTENTION! DO NOT ATTEMPT TO REPAIR THE PRODUCT BY YOURSELF AND DO NOT
TAMPER WITH IT! Any operation of repairing or extraordinary maintenance must be carried
out only by a qualied and authorized IVT Service Center. Do not try to modify any internal
part of the product! THIS WILL COMPLETELY VOID THE WARRANTY AND IT COULD CAUSE
SERIOUS INJURY AND DAMAGE.
Page 16

16
DE
Bedienungsanleitung
ZUBEHÖRTEILE
1. Vorderer Bügel
2. Halterschild
3. Rücklaufanlasser
4. Brennstoffbehälter
5. Deckel des Brennstoffbehälters
6. Ausschalter/ Einschalter
7. Hebel der Brennstoffzufuhr
8. Regelknopf der Brennstoffzufuhr
9. Sperre der Brennstoffzufuhr
10. Bedienungshebel der Lufteinlassklappe
11. Brennstoffpumpe
12. Rotorgriff
13. Auslösung
14. Brennstofflter
15. Luftlter
16. Deckel des Luftlters
17. Filterelement
18. Schneidklinge
19. Klingenhaube
20. Zündkerze
21. Schraube der Geschwindigkeitssteuerung des
Leerlaufs
22. Zündkerzenschlüssel
23. Maulschlüssel
24. Imbusschlüssel
25. Schraubdreher
26. Ölkanister
BOXGEHALT
Bedienungsinhalt (1 St.), Zündkerzenschlüssel (1
St.), Maulschlüssel (1 St.), Schraubdreher (1 St.),
Imbusschlüssel (2 St.), Ölkanister (1 St.).
VORAUSSICHTLICHE BENUTZUNG
Dieses Werkzeug ist für Schneiden der Hecke und
Gebüsch mit dicken Stämmen und Ästen bestimmt.
ARBEITSSICHERHEIT BEI DER
BENUTZUNG
Allgemeine Regeln der Arbeitssicherheit
Folgende Anleitungen zur Arbeitssicherheit helfen
Ihnen das Werkzeug richtig benutzen und Ihre eigene
Sicherheit gewährleisten. Deswegen lesen Sie sie
besonnen und aufmerksam.
Im Falle der Übergabe des Werkzeuges für die
Benutzung eines Dritten, geben Sie ihm auch
vorliegende Anleitungen der Arbeitssicherheit.
Behalten Sie diese Anleitung und sonstige Literatur, die
mitgeliefert werden. Wenden Sie sich an sie, wenn die
Fragen entstehen.
Folgen Sie strikt den Regeln der Arbeitssicherheit und
Warnungen, die am Werkzeug angegeben sind.
Vor der Arbeit machen Sie sich mit der
Werkzeugsteuerung bekannt, aber, vor allem, studieren
TECHNISCHE DATEN DES WERKZEUGES
Modell GHT-25
Hubrauminhalt [cm
3
] 25.4
Drehzahl lastlos [U/min] 7500
Motorleistung [HP] 1.05
Taktzahl des Motors 2
Kühlungsart des Motors
luftkühlung
Anlaufsystem
seil
Kraftstoffbehälterinhalt [ml] 0.6
Mischungsverhältnis [Benzin-Öl] 40 : 1
Kraftstoffverbrauch [g/kW-h] 488
Klingentyp Doppelte Klinge
Klingenlänge [mm] 560
Klingenschritt [mm] 27.8
Zackenzahl der Klinge 16
Vibrationsniveau [m/s
2
]
7 (K=1.5)
Schalldruckpegel [dB(A)]
110 (K=3)
Schallleistungspegel [dB(A)]
94 (K=3)
Gewicht [kg]
5.8
Page 17

17
DE
Bedienungsanleitung
Sie die Verfahren seines Nothalts.
Indem Sie diesen einfachen Anleitungen folgen, werden
Sie Ihr Werkzeug im einwandfreien Zustand halten.
∙ Vor dem Einsatz ist das Werkzeug richtig zu
montieren.
∙ Setzten Sie das Werkzeug streng zweckgemäß.
∙ Nehmen Sie Warnungstafeln und Hinweise
am Werkzeug und studieren Sie sie aufmerksam.
Aufmerksamkeit, vernünftiges Herangehen zur Arbeit
und eine entsprechende Ausbildung von Personen,
die am Betrieb, Transportieren, an der Wartung und
Lagerhaltung des Werkzeuges teilnehmen, helfen
Unfälle verhindern.
∙ Lassen Sie das Werkzeug ohne Aufsicht nicht.
∙ Lassen Sie die Benutzung des Werkzeuges durch
Kinder nicht zu. Erlauben Sie den Kindern nicht, mit
dem Werkzeug zu spielen. играть с инструментом.
∙ Lassen Sie das Aufnden von Kindern und
Tieren in der Nähe des Werkzeuges nicht zu. Die, die
den Wunsch haben, die Arbeit des Werkzeuges zu
beobachten, sollen sich im sicheren Abstand von ihm
benden.
∙ Bei der Arbeit mit dem Werkzeug haftet der
Benutzer für die Sicherheit von Dritten.
∙ Personen, die Bedienungsanleitung nicht studiert
haben, Kinder, Minderjährige, die das Alter, das die
Benutzung des Werkzeuges erlaubt, nicht erreicht
haben, sowie Personen, die sich im Alkohol- oder
Rauschzustand oder unter Wirkung medizinischer
Präparate benden, werden zur Arbeit mit dem
Werkzeug nicht zugelassen. Das Alter des Bedienenden
wird durch örtliche Rechtsvorschriften bestimmt.
VORSICHT! Alkohol, einige
Heilmittelpräparate und berauschende
Mittel sowie Krankheit, Fieber
und Müdigkeit vermindern die
Geschwindigkeit der Reaktion. In
oben genannten Fällen benutzen Sie
das Werkzeug nicht.
∙ Versichern Sie sich, dass alle Schutzeinrichtungen
(falls vorhanden) installiert und nutzungsfähig sind.
∙ Benutzen Sie das Werkzeug ohne
Schutzeinrichtungen (falls vorhanden), oder falls sie
beschädigt sind, nicht.
∙ Prüfen Sie das Werkzeug in bezug auf den Bestand
von losen Teilstücken (Muttern, Bolzen, Schrauben
usw.) oder Beschädigungen. Um sichere Arbeit des
Werkzeuges zu gewährleisten, prüfen Sie regelmäßig,
ob Bolzen und Schrauben gut festgezogen sind (falls
vorhanden). Bei Bedarf führen Sie vor dem Einsatz
des Werkzeuges ihre Reparatur oder ihren Austausch
durch. Im Falle des Einsatzes des beschädigten
Werkzeuges können dem Bedienenden oder Dritten
ernste Verletzungen zugefügt werden.
∙ Verwenden Sie bei der Arbeit eine entsprechende
Arbeitskleidung. Weite Kleidung, Schmuckstücke können
von beweglichen Teilen mitgenommen werden. Arbeiten
Sie nur in entsprechender Arbeitskleidung. Schützen
Sie ihre Beine und Füße vor auseinanderiegender
Feine. Arbeiten Sie barfuß oder in offenen Sandalen
nicht. Tragen Sie langes Haar hinten zusammen.
∙ Halten Sie Haltegriffe und Halter trocken und
sauber.
∙ Verwenden Sie entsprechende PSA. Verwenden
Sie Schutzbrille und Handschuhe. Bei der Arbeit mit
Pulvern oder bei dem Auswurf von Abgasen verwenden
Sie den Staubrespirator. Bei Bedarf ziehen Sie
gleitsichere Schuhe, den Schutzhelm und schützen Sie
ihre Gehörorgane mit Ohrstöpseln. Wenn die Lautstärke
85 dB(A) überschreitet, verwenden Sie unbedingt
Gehörschütze.
VORSICHT! Verwenden Sie
persönliche Schutzausrüstung!
Die Schutzeinrichtungen und PSA
gewährleisten die Sicherung ihrer
Gesundheit und die Gesundheit der
Umstehenden sowie garantieren
störungsfreie Arbeit des Werkzeuges.
∙ Lassen Sie das Werkzeug nicht an, wenn es
umgedreht oder im Ruhezustand ist.
∙ Während der Arbeit nehmen Sie die
Beharrungsstellung. Halten Sie immer das
Gleichgewicht.
∙ Halten Sie die Sauberkeit im Arbeitsbereich ein.
Auf den gesperrten Abschnitten ist ein hohes Niveau
von Unfällen. Vor dem Einsatz des Werkzeuges räumen
Sie von der Arbeitsäche alle Fremdkörper auf sowie
vermeiden Sie den Eintritt von Fremdkörpern unter das
Werkzeug während der Arbeit.
∙ Drücken Sie stark auf das Werkzeug während der
Arbeit nicht.
∙ Benutzen Sie das Werkzeug nur bei gutem Tages-
oder Kunstlicht. Benutzen Sie das Werkzeug bei
schlechter Sicht nicht.
∙ Lassen Sie das Werkzeug nicht fallen, lassen
Sie den Anstoß des Werkzeuges auf irgendwelche
Hindernisse nicht zu.
VORSICHT! Gut aufpassen. Schauen Sie von dem
durch das Werkzeug bearbeitenden Stück nicht
weg. Indem man ablenkt, kann man die Steuerung
verlieren. Arbeiten Sie vernünftig.
Page 18

18
DE
Bedienungsanleitung
Arbeitsschutzbestimmungen bei der Arbeit mit
Benzinmotor
ACHTUNG! Benzin ist ein
leichtentammender Stoff. Vorsichtig
mit dem Brennstoff.
∙ Bewahren Sie den Brennstoff nur in speziellen
Kanistern auf.
∙ Tanken Sie nur in der Freiluft auf, rauchen Sie beim
Tanken nicht.
∙ Zuerst tanken, dann den Motor anlassen.
∙ Bevor Sie auftanken, lassen Sie den Dämpfer
abkühlen.
∙ Öffnen Sie das Tankdeckel nicht und tanken Sie bei
dem laufenden oder nicht abgekühlten Motor nicht auf.
∙ Im Falle des Übergießens des Benzins lassen Sie
den Motor nicht an, schieben Sie das Werkzeug von
dem übergossenen Benzin zur Seite und lassen Sie die
Entstehung der Entammung nicht, bis Benzindämpfe
abströmen.
∙ Reiben Sie den übergossenen Brennstoff trocken,
bevor Sie den Motor anlassen.
∙ Schließen Sie den Benzintank oder Kanister fest.
∙ Lassen Sie das Werkzeug in dem Raum oder im
geschlossenen Raum nicht an, um die Ansammlung
vom gefährlichen Stickoxid zu vermeiden. Die Abgase
sind gesundheitsgefährlich.
ACHTUNG! In Abgasen ist giftiges
Stickoxid, das weder Farbe,
noch Geruch hat, enthalten. Das
Aufatmen von Abgasen kann zum
Bewusstseinsverlust und Todesfall
führen. Zur Vermeidung von der
Ansammlung der Abgase sichern Sie
entsprechende Lüftung.
∙ Bewahren Sie das Werkzeug mit Benzin im Tank in
dem Raum, wo Dämpfe entammen können, nicht auf.
∙ Um das Risiko des Brandes zu reduzieren, halten
Sie den Platz der Aufbewahrung des Motors, des
Dämpfers, des Batteriekastens und der Benzinlagerung
sauber.
∙ Das Abgassystem erhitzt sich genug dafür, um einige
Stoffe zu entammen. Bewahren Sie das Werkzeug
in der sicheren Entfernung von leichtentammenden
Stoffen auf.
∙ Während der Arbeit erhitzt sich der Dämpfer sehr
und bleibt nach dem Ausschalten einige Zeit heiß.
Berühren Sie den Dämpfer nicht, um die Brandverletzung
zu vermeiden. Bevor Sie das Werkzeug in den
geschlossenen Raum tragen, lassen Sie den Motor
abkühlen.
∙ Vor dem Anlass des Werkzeuges entfernen Sie
Einstellkeile und Stellschlüssel.
ACHTUNG! Manchmal während der
Arbeit der Werkzeuge mit Benzinmotor
bildet sich Staub, der die den Krebs
erregende Stoffe enthält.
Zu solchen chemischen Stoffen gehören: Blei in
Bleioxid, Quarz, der zum Bestand des Backsteins und
des Zements gehört, Arsen und Chrom, die im
Schnittholz, das durch chemische Reagens behandelt
ist, enthalten sind, und sonstige schädliche Stoffe. Das
Risiko der Einwirkung dieser chemischen Stoffe hängt
von der Häugkeit der Durchführung der mit ihnen
verbundenen Arbeiten ab.
Um ihre schädliche Einwirkung zu reduzieren,
arbeiten Sie in einem gut gelüfteten Raum und
benutzen Sie entsprechende fehlerfreie PSA, z.B.,
Staubrespiratoren, die speziell für die Auslterung
von mikroskopischen Teilchen entwickelt sind.
∙ Bei dem Eintritt eines Fremdkörpers unter das
Werkzeug prüfen Sie es auf das Vorhandensein von
Beschädigungen und machen Sie eine notwendige
Reparatur.
∙ Bei dem Entstehen der Übervibration schalten
Sie das Werkzeug aus und stellen Sie umgehend die
Ursache fest. Die Vibration ist gewöhnlich ein Zeichen
der Störung.
∙ Bevor Sie Ihren Arbeitsplatz verlassen, führen
Sie die Reparatur, Sichtkontrolle oder Reinigung des
Werkzeuges, schalten Sie es aus und warten Sie auf
vollständiges Stoppen von beweglichen Teilen.
∙ Es ist verboten, die Innenteile des Werkzeuges
abzumontieren und zu ändern.
Besondere Arbeitsschutzvorschriften
Anwendung der Schutzausrüstung
∙ Ziehen Sie immer die zertizierte Schutzausrüstung
an. Sie kann das Risiko der Verletzung nicht
ausschließen, aber schwächt die Verletzungsschwere,
wenn ein Unfall passiert.
∙ Benutzen Sie den Arbeitsschutzschelm, den Schutz
für Gehörorgane, Schutzbrille oder Geschichtsschild;
ziehen Sie Schutzhandschuhe und Hose mit
Schutzschicht, die vor der Säge schützt, feste Schuhe
mit Stahlschutzkappe und rutschsicherer Sohle. Als
allgemeingültige Regel soll die Kleidung anschließend,
aber die Bewegungen nicht beschränkend sein.
∙ Die Schneidklinge in Schutzhandschuhen
anfassen.
Page 19
19
DE
Bedienungsanleitung
Arbeitsbedingungen
∙ Lassen Sie das Aufnden von Kindern und
Tieren in der Nähe des Werkzeuges nicht zu. Die, die
den Wunsch haben, die Arbeit des Werkzeuges zu
beobachten, sollen sich im sicheren Abstand von ihm
benden.
∙ Stellen Sie sicher, dass es in der Nähe keine
Gegenstände, die Ihre Arbeit beeinussen können, gibt.
∙ Stellen Sie sicher, dass es in der Arbeitszone keine
Hindernisse gibt, z.B., Wurzeln, große Steine, Äste
usw., für den Fall, wenn Sie brauchen, sich schnell zu
verlagern.
∙ Seien Sie sehr vorsichtig, indem Sie auf dem
abfälligen Gelände arbeiten.
∙ Achten Sie auf die Umgebung, um ohne Verzug auf
mögliche gefährliche Situation zu reagieren.
Anwendung der Maschine
∙ Diese Maschine ist nur zum Holzschneiden
bestimmt. Jeder Versuch, andere Materialien zu
schneiden, führt zur Beschädigung der Maschine und
zur Annullierung des Rechtes auf Garantieleistungen.
∙ Benutzen Sie nur die von dem Hersteller
empfohlene Schneidausrüstung und Zubehörteile.
∙ Das Gerät soll nie mit geschädigten oder
abgenommenen Schutzelementen betrieben werden.
Betreiben Sie das Gerät nicht, wenn es falsch
zusammengebaut ist.
∙ Stellen Sie sicher, dass alle Maulschlüssel
und andere Werkzeuge, die zur Regelung der
Maschine benutzt wurden, entnommen und auf den
Sicherheitsabstand vor dem Anlassen gebracht sind.
∙ Während des Maschinenbetriebs kann ein
unkontrollierbarer Rückschlag passieren, zur
Vermeidung des Rückschlags muss man das Gerät
immer mit beiden Händen sicher halten und keine
anderen Teile außer Haltern anfassen.
AUFSCHLUSS DER VERPACKUNG
Bei dem Aufschluss der Verpackung prüfen Sie das
Vorhandensein des Zubehörs. Vgl.. Zeichnungen zu
dieser Anleitung. Bei dem Fehlen oder Defekt von einigen
Teilen wenden Sie sich an das Dienstleistungszentrum
IVT.
PRÜFUNG VOR DEM BEGINN DES
BETRIEBES
ACHTUNG! Vor allen Handlungen der
Montage, Einstellung und technischen
Wartung der Maschine muss man
sie aus dem Netz ausschalten.
Außerdem muss man die Kappe des
Kerzenzünders herausziehen.
VORSICHT! Die Schneidklinge (18) in
Schutzhandschuhen anfassen.
Prüfung des Halterschildes (2) [F1]
Das Halterschild (2) schützt die Hände vor dem Kontakt
mit der Schneidklinge (18), z.B., wenn der vordere
Bügel aus den Händen des Bedienenden gleitet (1).
VORSICHT! Stellen Sie sicher, dass
das Halterschild (2) richtig installiert
und nicht beschädigt ist.
Prüfung der Schneidklinge (18) und Klingenhaube
(19) [F2]
∙ Prüfen Sie regelmäßig den Zustand der
Schneidklinge (18) und der Klingenhaube (19).
∙ Ersetzen Sie die Schneidklinge (18) und die
Klingenhaube (19), wenn sie gebogen oder beschädigt
sind.
Bei Bedarf schleifen Sie jede Schleifkante, indem Sie
aufpassen, damit der untere Winkel rund ist. Im Falle
der Beschädigung oder des Reißens ersetzen Sie ihn.
Um gute Ergebnisse zu bekommen, ist es wichtig, damit
der Kontaktdruck zwischen den Schneidklingen (18) der
Norm entspricht.
Der Kontaktdruck wird durch das Drehen von Schrauben
an der unteren Seite der Führenden im Uhrzeigersinn
eingestellt.
Bei der richtigen Einstellung von Schneidklingen (18)
soll das Spiel zwischen ihnen bei der Messung im Raum
von Schrauben 0,2-0,4 mm betragen.
ACHTUNG! Bei der Verwendung des Schleifkörpers
zum Schleifen der Schneidklinge (18) kühlen Sie die
Klinge mit Wasser nicht ab, da dadurch Risse entstehen
können.
Page 20

20
DE
Bedienungsanleitung
VOR DER INGANGSETZUNG
WARNUNG! Machen Sie folgende Prozeduren bei
dem abgekühlten Motor.
Empfehlungen zum anzuwendenden Brennstoff
Die Maschine ist mit dem Zweitaktmotor ausgestattet
und soll immer mit der Verwendung der Mischung von
Benzin und Öl für Zweitaktmotoren betrieben werden.
Um den richtigen Bestand der Mischung zu sichern,
ist es wichtig, Ölvolumen für die Mischung exakt zu
messen.
∙ Gießen Sie die Bedarfsmenge des üblichen
Benzins (verbleit oder bleifrei, ohne Alkohol) und Öl für
Zweitaktmotoren in den Behälter zur Mischung (чистый
контейнер для топлива) ein, dann schütteln Sie den
Behälter gut.
EMPFOHLENES MISCHUNGSVERHÄLTNIS
BENZIN : ÖL > 40 : 1
ACHTUNG! Verwenden Sie nie das Öl, das für
Viertaktmotoren oder für Zweitaktmotoren mit
Wasserkühlung bestimmt ist.
Nachtanken
1. Stellen Sie den Motor immer ab und lassen Sie ihn
im Laufe von wenigen Minuten vor dem Nachtanken
abkühlen.
2. Stellen Sie die Maschine auf den Boden
Tankverschraubung (5) nach oben.
3. Öffnen Sie die Tankverschraubung langsam (5),
um den Überdruck gleichmäßig wegzunehmen.
4. Reinigen Sie den Bereich um die Tankverschraubung
(5): Verschmutzungen im Brennstofftank (4) können zu
Betriebsproblemen führen.
5. Sichern Sie gute Mischung des Brennstoffes, indem
Sie den Behälter (4) vor der dem Tanken schütteln.
6. Tanken Sie den Tank mit der Mischung Benzin-Öl
des richtigen Bestandes. Überfüllen Sie den Tank nicht.
7. Ziehen Sie die Tankverschraubung (5).
ACHTUNG! Wenn die Maschine lange Zeit (mehr
als 4 Wochen) eingesetzt wird, muß man den
Brennstofftank leer machen und reinigen.
WARNUNG! Wischen Sie
ausgegessenen Brennstoff trocken
ab und schieben Sie die Maschine
immer von der Stelle des Tankens
(mindestens 3 Meter) vor dem
Anlassen.
ANLASSEN/ABSTELLEN DES MOTORS
[F3]
Anlassen des Motors
1. Stellen Sie die Maschine auf eine ebene horizontale
Fläche.
2. Schieben Sie den Zweistellungsschalter (6) in die
„Ablassstellung“ „I“.
3. Schieben Sie den Drosselungshebel (10) in die
Schließstellung. ANMERKUNG: Treibstoffgemisch
in der GESCHLOSSENEN (CLOSED
) Stellung,
konzentriert zum Anlassen des kühlen Motors. Zum
wiederholten Anlassen des warmen Motors lassen Sie
den Drosselungshebel (10) in der OFFENEN (OPEN
) Stellung.
4. Drücken Sie einige Male auf die Brennstoffpumpe
(11) (wenn sie vorhanden ist), bis der Brennstoff
beginnt, den Behälter zu füllen (zum Anlassen des
warmen Motors braucht man auf den Brennstoffpumpe
nicht zu drücken).
5. Der Drosselklappenhebel (7) soll in der
Anlassstellung gestellt werden. Dafür: drücken Sie
auf den Blockhebel der Drosselklappe (9) (wenn er
vorhanden ist), indem Sie den Steuergriff greifen und
den gedrückten Fixierknopf der Drosselklappe (8)
halten, dabei den Drosselklappenhebel (7) lassen.
6. Mit der linken Hand halten Sie das Gehäuse der
Maschine auf dem Boden (WARNUNG! Benutzen Sie
dafür den Fuß nicht!).
7. Nehmen Sie den Handgriff des Handanlassers (3),
ziehen Sie die Schnur mit der rechten Hand langsam
aus, bis Sie einen gewissen Widerstand spüren, dann
ziehen Sie die Schnur schnell und stark (WARNUNG!
Wickeln Sie die Schnur des Handanlassers (3) auf die
Hand nie auf!).
8. Wiederholen Sie das Ziehen des Handanlassers
(6), bis der Motor angelassen wird.
9. Wenn der Motor angelassen wird, schieben Sie den
Drosselungshebel (10) langsam in die offene Stellung
NUR in dem Fall, wenn er in die GESCHLOSSENE
Stellung am kühlen Motor geschoben war.
10. Lassen Sie den Motor im Laufe von einigen
Minuten warmlaufen. Wenn der Motor genug warm
ist, um stabil leerzulaufen, drücken und lassen Sie
den Drosselklappenhebel (7) zur Freilassung des
Fixierknopfes der Drosselklappe (8).
ANMERKUNG: der Fixierknopf der Drosselklappe (8)
wird zum Halten des Drosselklappenhebels (7) in der
Stellung hoher Drehungen des Leerlaufs während des
Anlassens verwendet.
ACHTUNG! Lassen Sie nicht zu, damit die
Schneidvorrichtung keinen Kontakt mit
irgendwelchen Hindernissen während des
Page 21

21
DE
Bedienungsanleitung
Motoranlassens hat, wenn der Fixierknopf der
Drosselklappe gedrückt ist (8)!
ACHTUNG! Verwenden Sie den Regelknopf der
Brennstoffzufuhr (8) während der Arbeit des
Gerätes nicht! Die Maschine kommt in den Modus
des Leerlaufes nicht zurück, und die Schneidklinge
(18) wird fortsetzen, sich so lange zu drehen, bis der
Regelknopf der Brennstoffzufuhr (8) ausgepresst
wird und der Hebel der Brennstoffzufuhr (7) in die
neutrale Lage gebracht wird.
Abstellen des Motors
1. Sie den Drosselklappenhebel (7) in die Stellung der
Unterdrehzahl und bringen Sie die Motorumdrehungen
zurück.
2. Schieben Sie den Zweistufenschalter (6) in die
Stellung „O“.
ACHTUNG! Die Schneidklinge (18)
wird sich nach dem Abstellen des
Motors und dem Bringen des Hebels
der Brennstoffzufuhr (7) in die
neutrale Lage einige Zeit lang weiter
drehen. Die nach Auslauf drehende
Klinge kann zur Verletzung führen.
Bewahren Sie die sachgemäße
Kontrolle für die Maschine bis zum
vollständigen Stoppen der Drehung
des Schneidwerkzeuges.
BETRIEBSANLEITUNG
ACHTUNG! Betreiben Sie die Maschine bei der
Vollbelastung während der langen Zeit die ersten
20 Stunden der Benutzung nicht und lassen
Sie Sie die Maschine im Leerlauf bei der vollen
Brennstoffzufuhr nicht arbeiten.
Drehgriff [F4]
Zur Erleichterung der Arbeit kann man den Rotorgriff
(12) nach rechts oder nach links von der Zentrallage auf
45°/90° drehen.
∙ Schalten Sie die Maschine ab.
∙ Lösen Sie den Hebel der Brennstoffzufuhr (7) und
die Sperre der Brennstoffzufuhr (9), dann ziehen Sie die
Auslösung (13) zum Deblockieren der Bewegung des
Rotorzugriffes (12).
∙ Drehen Sie den Rotorgriff (12), damit die Auslösung
(13) mit Schulabschluss an die Stelle kommt.
∙ Prüfen Sie die Sicherheit des Blockierens des
Rotorgriffes (12) in der neuen Lage, danach kann die
Maschine wieder beginnen zu arbeiten.
Zu Sicherheit ist die Möglichkeit der Leistungssteigerung
bei der Verschiebung des Rotorgriffes (12)
ausgeschlossen.
Schneidtechnik
∙ Optimales Schneiden erreicht man wegen der
langsamen fortschreitenden Bewegungen, besonders
im Falle mit dichten Hecken.
∙ Man muss das Schneiden von Hecken von Seiten
beginnen, indem man den oberen Teil für die letzte
Etappe lässt.
∙ Zur Erreichung der einheitlichen Höhe der Hecke
empehlt es sich, Orientierungsdraht zu verwenden und
Äste, die hinter die Linie, die durch Draht begrenzt ist,
austreten, abzuschneiden.
∙ Man muss mit Halbkreisbewegungen schneiden,
indem man beide Seiten der Schneidklinge (18) benutzt
und sie nach oben und nach unten schiebt.
Vertikales Schneiden [F5]:
∙ Führen Sie mit der Schneidklinge (18) von unten
nach oben im Boden, indem Sie den vorderen Teil der
Klinge sinken lassen, sich längs der Hecke bewegen,
und dann wieder mit der Schneidklinge (18) von unten
nach oben im Boden führen.
Horizontales Schneiden [F6]:
∙ Halten Sie den Schneideapparat unter Winkel von
0° - 10°, indem Sie die Maschine in der horizontalen
Richtung verschieben.
∙ Man muss die Hecke horizontal mit
Bogenbewegungen der Schneidklinge (18) vom inneren
Rand der Hecke zum äußeren schneiden.
WARTUNG UND LAGERHALTUNG
VORSICHT! Bevor Sie die Arbeit mit
dem Werkzeug beginnen, setzen Sie
den Motor außer Gang und warten
Sie auf vollständiges Stoppen aller
beweglicher Teile.
∙ Halten Sie das Werkzeug und Luftöffnungen
(falls vorhanden) sauber. Regelmäßige Reinigung und
Wartung garantieren eine hohe Effektivität und einen
langen Betrieb des Werkzeuges.
∙ Im Falle des Versagens, ungeachtet der Einhaltung
aller Regeln des Betriebes und der Erprobung des
Werkzeuges, soll die Reparatur in einem ofziellen
Dienstleistungszentrum IVT durchgeführt werden.
∙ Alle Muttern, Bolzen und Schrauben sollen
festgezogen sein.
∙ Tauschen Sie beschädigte oder abgenutzte Teile
aus.
∙ Verwenden Sie nur die Originalersatzteile. Die
Page 22

22
DE
Bedienungsanleitung
Teile, die von einem anderen Hersteller produziert
sind, passen undicht und erhöhen das Risiko von
Verletzungen.
∙ Bewahren Sie das Werkzeug auf einem trockenen
für Kinder unzugänglichen Platz, in der sicheren
Entfernung von leichtentammenden Stoffen auf.
∙ Bewahren Sie Benzinbehälter auf einem sicheren
Platz auf. Bewahren Sie das Werkzeug mit Benzin im
Tank in dem Raum, wo Dämpfe entammen können,
nicht auf.
Luftlter [F17]
Die verschmutzten Luftlter mindert die
Ausgangsleistung des Motors. Deswegen sind
regelmäßige Kontrollen wichtig. Den Luftlter soll man
jede 25 Stunden des Betriebs prüfen und bei Bedarf
reinigen. Wenn die Luft viel Staub enthält, so soll man
den Luftlter öfter kontrollieren.
1. Nehmen Sie den Deckel des Luftlters (16) ab.
2. Ziehen Sie das Filterelement (17) heraus.
3. Reinigen Sie das Filterelement (17), indem Sie es
klopfen oder blasen oder mit warmem Seifenwasser
spülen, wenn es notwendig ist. Trocknen Sie vor der
Installierung völlig ab. Wenn das Filterelement des
Luftlters (17) beschädigt oder verzogen ist, so ersetzen
Sie ihn es durch ein neues Filterelement.
ANMERKUNG: reinigen Sie das Filterelement (17) nie
mit Benzin oder brennbaren Lösemitteln.
Dämpfer
Prüfen Sie absatzweise den Dämpfer hinsichtlich
loser Befestigungselemente, Beschädigungen oder
Korrosionen. Beim Vorliegen beliebiger Zeichen des
Abusses von Abgasen hören Sie auf, die Maschine zu
betreiben und reparieren Sie sie unverzüglich.
Zündkerze (20) [F8]
Prüfen Sie die Zündkerze (20) hinsichtlich der
Beschmutzungen und des Rußes etwa in jede 10
Stunden des Betriebes, bei Bedarf reinigen Sie mit
der Bürste aus Kupferdraht. Ferner nehmen Sie die
Bedienung der Zündkerze (20) jede 50 Arbeitsstunden
vor.
1. Nehmen Sie die Kappe der Zündkerze ab.
2. Ziehen Sie die Zündkerze (20) mit Hilfe des
Kerzenschlüssels heraus.
3. Prüfen Sie den Zustand der Zündkerze (20).
Stellen Sie sicher, dass das Spiel der Elektrode 0,6-0,7
mm beträgt, sonst stellen Sie sie ein. Beim Vorliegen
von Verschmutzungen reinigen Sie sie. Im Falle der
Beschädigung ersetzen Sie sie durch die Zündkerze
des empfohlenen Typs.
4. Setzen Sie in umgekehrter Reihenfolge zusammen.
Brennstofflter (14) [F9]
Der Brennstofflter (14) des Saugkopfes verwendet
man mit dem Ziel der Auslterung des Brennstoffes,
der für die Arbeit des Vergasers erforderlich ist. Bei der
mangelhaften Zufuhr des Brennstoffes in den Motor
prüfen Sie, ob der Brennstofflter (14) nicht verschlickt
ist. Man soll absatzweise visuelle Kontrolle des
Brennstofflters (14) durchführen, die Reinigung erfolgt
etwa in 50 Stunden des Betriebes. Festgewordene, stark
verschmutzte oder verschlickte Filter sind zu ersetzen.
1. Öffnen Sie die Tankverschraubung (5) und
schütten Sie akkurat den ganzen Brennstoff aus dem
Brennstofftank ab.
2. Nutzen Sie den Drahthaken aus, um den Saugkopf
über den Mund des Tanks herauszuziehen.
3. Kontrollieren Sie den Brennstofflter (14). Wenn
der Brennstofflter verschmutzt ist, so ziehen Sie ihn
heraus und spülen Sie mit unbrennbarem Lösemittel.
4. Entfernen Sie Wasser und Schmutz, die im
Brennstofftank sind, indem Sie ihn innen spülen.
5. Sachgemäß setzen Sie alle Teile an vorherige Stelle
Getriebe [F10]
Das Getriebe muss man jedes Jahr vor dem Beginn
der Saison mithilfe des Schmiernippels abschmieren.
Wenn Sie die Maschine oft betreiben, schmieren Sie
das Getriebe nach kürzeren Zeitspannen ab.
Einstellung von Leerlaufdrehungen [F11]
∙ Wenn der Motor ersäuft, wenn der
Drosselklappenhebel (7) nicht gedrückt ist, so kann
man die Drehungen des Leerlaufs einstellen: drehen
die Regelschraube der Drehungen des Leerlaufs (21)
im Uhrzeigersinn, bis die Maschine stabil leerzulaufen
beginnt (die Laufgeschwindigkeit steigt an).
∙ Wenn die Drehungen des Leerlaufs so hoch sind,
dass sich das Schneidegerät bei dem gelassenen
Drosselklappenhebel (7) weiter dreht, so soll man die
Drehungen des Leerlaufs mindern, indem man die
Regelschraube der Drehungen des Leerlaufs (21)
entgegen dem Uhrzeigersinn dreht, bis die Drehung des
Schneidegerätes nicht aufhören wird.
WICHTIGE ANMERKUNG! Stellen Sie die Drehungen
des Leerlaufs nach dem Warmlaufen der Maschine
ein.
Vergasereinstellung
Die Vergasereinstellung soll im autorisierten
Servicezentrum erfolgen.
Schmieren der Schneidkling (18) [F12]
Jede 4 Betriebsstunden fügen Sie einige Tropfen
Schmieröl in Schlitze für Bolzen an der Schneidklinge
(18) hinzu.
Page 23

23
DE
Bedienungsanleitung
TECHNISCHE WARTUNG VOR DER
LANGFRISTIGEN LAGERUNG
∙ Reinigen Sie die Maschine mit der Bürste von allen
Verschmutzungen.
∙ Prüfen Sie hinsichtlich der Beschädigungen oder
losen Befestigungen jedes Teiles. Beim Vorliegen der
Abweichungen von der Norm führen Sie die Reparatur
zum Zweck der Verwendung in der Zukunft durch.
∙ Schütten Sie den ganzen Brennstoff aus dem
Brennstofftank ab und lassen Sie den Motor an
запустите. Lassen Sie ihn arbeiten, bis er selbständig
hält.
∙ Nehmen Sie die Zündkerze (20) ab und gießen Sie
in den Motor 1-2 cm3 Öl für Zweitaktmotoren ein.
∙ Bringen Sie Rostschutzöl auf metallische Teile,
z.B., auf Drosselklappenlitze auf.
∙ Setzen Sie auf die Schneidklinge (18) die
Schutzvorrichtung auf (19).
∙ Lagern Sie die Maschine in dem Raum, um die
Einwirkung der Feuchtigkeit zu vermeiden.
UMWELTSCHUTZ
Befördern Sie Müll und Abfälle zur
Überarbeitung!
Das Werkzeug, Zusatzgeräte und Verpackung sind zur
ökologisch sicheren Überarbeitung zu befördern.
Die Elemente aus Kunststoff haben einen Vermerk über
die Möglichkeit einer klassizierten Überarbeitung. Die
vorliegende Anleitung ist auf dem Recyclingpapier, das
kein Chlor enthält, gedruckt.
Page 24

24
DE
Bedienungsanleitung
AUFDECKUNG UND BESEITIGUNG VON STÖRUNGEN
VORSICHT! Bevor Sie das Werkzeug bezüglich der Defekte durchprüfen, setzen Sie den
Motor außer Gang und warten Sie auf vollständiges Stoppen von beweglichen Teilen.
Typische Fehlfunktionen Grund der Störung Beseitigung der Störung
Der Motor wird nicht
angelassen
∙ Die Brennstoffpumpe (11) wurde
nicht in Gang gesetzt.
∙ Drücken Sie auf sie 7-10 mal.
∙ Der Zweistellungsschalter (6)
bendet sich in der Stellung „AUS“ /
«O».
∙ Schieben Sie den
Zweistellungsschalter (6) in die
Stellung „EIN“ / «I».
∙ Der Drosselungshandgriff (10)
bendet sich in der GESCHLOSSENEN
Stellung (kalter Motor) nicht.
∙ Schieben Sie den
Drosselungshandgriff (10) in die
GESCHLOSSENE Stellung.
∙ Nicht genug Brennstoff.
∙ Tanken Sie den Brennstoff.
∙ Verstopfen des Brennstofflters
(14), Störung des Vergasers,
Zündungsstörung, Verkeilen von
Ventilen.
∙ Bei Bedarf defekte Bestandteile
ersetzen oder reparieren.
∙ Die Brennstoffeigenschaften
verschlechterten sich.
∙ Durch neuen empfohlenen
Brennstoff ersetzen.
∙ Die Zündkerze (20) ist defekt,
verschmutzt, abgetrennt oder hat kein
passendes Spiel.
∙ Reinigen, das Spiel einstellen,
anschließen oder ersetzen.
Der Motor hält schnell. Die
Drehungen des Motors
steigen nicht an.
∙ Unzureichendes Anwärmen.
∙ Anwärmen.
∙ Der Drosselungshebel (10) ist
in der GESCHLOSSENEN Stellung,
obwohl der Motor angewärmt ist.
∙ Schieben Sie ihn in die OFFENE
Stellung.
∙ Der Brennstofflter (14) ist
verschmutzt oder das Filterelement ist
verschmutzt (17).
∙ Reinigen.
∙ Die Drosselklappenlitze ist
verstellt, abgerissen oder verbogen.
∙ Bei Bedarf einstellen oder
ersetzen.
Wenn auf Grund der oben angeführten Informationen das Problem nicht gelöst werden kann, wenden Sie sich bitte
an ein ofzielles Dienstleistungszentrum IVT.
Page 25

25
DE
Bedienungsanleitung
ACHTUNG! ES IST VÖLLIG UNZULÄSSIG, DIE REPARATUR DES ERZEUGNISSES
SELBSTÄNDIG DURCHZUFÜHREN UND ZU VERSUCHEN, IHRE SPUREN ZU VERBERGEN!
Nur das autorisierte IVT-Service-Zentrum hat das Recht auf die Durchführung der Reparatur
und erweiterte Aufrechterhaltung. Die Eintragung von Änderungen in den Innenausbau des
Erzeugnisses ist verboten! SOLCHE HANDLUNGEN SIND NICHT DER GRUND FÜR DEN
VERZICHT AUF DIE GARANTIEVERPFLICHTUNGEN, SIE KÖNNEN AUCH ALS GRUND FÜR
BESCHÄDIGUNGEN UND ERNSTE KÖRPERVERLETZUNGEN SEIN.
Page 26

26
RU
Инструкция по эксплуатации
КОМПЛЕКТУЮЩИЕ ДЕТАЛИ
1. Передняя ручка
2. Щиток рукоятки
3. Стартер обратного хода
4. Топливный бак
5. Крышка топливного бака
6. Выключатель/ Включатель
7. Рычаг подачи топлива
8. Кнопка регулировки подачи топлива
9. Блокировка подачи топлива
10. Рычаг управления воздушной заслонкой
11. Топливный насос
12. Роторная рукоятка
13. Спусковой рычаг
14. Топливный фильтр
15. Воздушный фильтр
16. Крышка воздушного фильтра
17. Фильтрующий элемент
18. Режущее лезвие
19. Кожух лезвия
20. Свеча зажигания
21. Винт регулировки скорости холостого хода
22. Свечной ключ
23. Гаечный ключ
24. Шестигранный ключ
25. Отвертка
26. Канистра с маслом
СОДЕРЖИМОЕ КОРОБКИ
Инструкция по эксплуатации (1 шт.), свечной ключ
(1 шт.), гаечный ключ (1 шт.), отвертка (1 шт.),
шестигранный ключ (2 шт.), канистра с маслом (1
шт.).
ПРЕДПОЛАГАЕМОЕ ИСПОЛЬЗОВАНИЕ
Данный инструмент предназначен для стрижки
живой изгороди и кустарника с толстыми стволами
и ветвями.
ТЕХНИКА БЕЗОПАСНОСТИ ПРИ
ИСПОЛЬЗОВАНИИ
Общие правила техники безопасности
Следующие инструкции по технике безопасности
помогут вам правильно пользоваться инструментом
и обеспечить собственную безопасность. Поэтому
прочитайте их вдумчиво и внимательно.
В случае передачи инструмента для использования
третьему лицу передайте и настоящие инструкции
по технике безопасности.
Сохраните данную инструкцию и прочую литературу,
входящую в комплект поставки. Обращайтесь к ней
в случае возникновения вопросов.
Строго следуйте правилам техники безопасности и
предостережениям, указанным на инструменте.
ТЕХНИЧЕСКИЕ ХАРАКТЕРИСТИКИ ИНСТРУМЕНТА
Модель GHT-25
Рабочий объем [куб. см] 25.4
Частота вращения без нагрузки [об/мин] 7500
Мощность двигателя [л.с.] 1.05
Число тактов двигателя 2
Тип охлаждения двигателя воздушное хлаждение
Система запуска тросик
Емкость топливного бака [мл] 0.6
Соотношение компонентов смеси [бензин:масло] 40 : 1
Потребление топлива [г/кВт-ч] 488
Тип лезвия двойное лезвие
Длина лезвия [мм] 560
Шаг лезвия [мм] 27.8
Количество зубцов лезвия 16
Уровень вибрации [м/c
2
] 7 (K=1.5)
Уровень звукового давления [дБ(А)] 110 (K=3)
Уровень звуковой мощности [дБ(А)] 94 (K=3)
Вес [кг] 5.8
Page 27

27
RU
Инструкция по эксплуатации
Перед началом работы ознакомьтесь с органами
управления инструмента, но, прежде всего, изучите
способы его экстренной остановки.
Следуя этим простым инструкциям, и вы будете
содержать ваш инструмент в исправном состоянии.
∙ Перед использованием инструмент необходимо
правильно собрать.
∙ Используйте инструмент строго по назначению.
∙ Отнеситесь внимательно к предупредительным
надписям и указаниям на инструменте и
внимательно изучите их. Внимательность, разумный
подход к работе и соответствующая подготовка лиц,
задействованных в эксплуатации, транспортировке,
обслуживании и хранении инструмента, помогут
предотвратить несчастные случаи.
∙ Не оставляйте инструмент без присмотра.
∙ Не допускайте использования инструмента
детьми. Не позволяйте детям играть с
инструментом.
∙ Не допускайте нахождения вблизи инструмента
детей и животных. Те, кто желает понаблюдать
за работой инструмента, должны находиться на
безопасном расстоянии от него.
∙ При работе с инструментом пользователь несет
ответственность безопасность третьих лиц.
∙ Лица, не ознакомленные с инструкциями по
эксплуатации, дети, несовершеннолетние, не
достигшие возраста, позволяющего использовать
инструмент, а также лица, находящиеся в состоянии
алкогольного или наркотического опьянения,
либо под воздействием медицинских препаратов,
не допускаются к работе с инструментом.
Возраст оператора устанавливается местными
нормативными актами.
ОСТОРОЖНО! Алкоголь, некоторые
лекарственные препараты и
наркотические вещества, а также
состояние нездоровья, жар и
утомление снижают скорость реакции.
Не используйте данный инструмент в
вышеперечисленных случаях.
∙ Убедитесь, что все защитные приспособления
(если таковые имеются) установлены и пригодны к
эксплуатации.
∙ Не используйте инструмент без защитных
приспособлений (если таковые имеются), либо если
они повреждены.
∙ Осмотрите инструмент на наличие
незакрепленных деталей (гаек, болтов, винтов и т.д.)
или повреждений. Чтобы обеспечить безопасную
работу инструмента, периодически проверяйте,
хорошо ли затянуты болты и винты (если таковые
имеются). При необходимости перед использованием
инструмента произведите их ремонт или замену. В
случае использования поврежденного инструмента
оператору или посторонним лицам могут быть
нанесены серьезные травмы.
∙ Используйте для работы соответствующую
спецодежду. Просторная одежда, украшения могут
быть затянуты движущимися частями. Работайте
только в подходящей спецодежде. Защитите ноги
и ступни от разлетающегося мусора. Не работайте
босиком или в открытых сандалиях. Соберите
длинные волосы сзади.
∙ Содержите ручки и рукоятки в чистоте и
сухости.
∙ Используйте соответствующие СИЗ.
Используйте защитные очки и перчатки. При работе
с порошками или при выбросах выхлопных газов
используйте противопылевой респиратор. При
необходимости наденьте нескользкую обувь, каску
и защитите органы слуха берушами. Если уровень
шума превышает 85 дБ(A), обязательно используйте
защитные наушники.
ОСТОРОЖНО! Пользуйтесь
средствами индивидуальной
защиты! Защитные приспособления
и СИЗ обеспечивают сохранность
вашего здоровья и здоровья
окружающих, а также гарантируют
бесперебойную работу
инструмента.
∙ Не запускайте инструмент, если он перевернут
или находится в нерабочем положении.
∙ Во время работы примите устойчивое
положение. Постоянно сохраняйте равновесие.
∙ Соблюдайте чистоту на рабочем участке. На
загроможденных участках наблюдается высокий
уровень травматизма. Перед использованием
инструмента уберите с рабочей площадки все
посторонние предметы, а также избегайте попадания
под инструмент посторонних предметов во время
работы.
∙ Не давите на инструмент с силой во время
работы.
∙ Используйте инструмент только при хорошем
дневном или искусственном освещении. Не
используйте инструмент в условиях плохой видимости.
∙ Не роняйте инструмент, не допускайте
столкновения инструмента с какими-либо
препятствиями.
ОСТОРОЖНО! Будьте внимательны. Не отводите
взгляд от обрабатываемого инструментом
предмета. Отвлекшись, можно потерять
управление. Подходите к работе разумно.
Page 28

28
RU
Инструкция по эксплуатации
Правила техники безопасности при работе с
бензиновым двигателем
ВНИМАНИЕ! Бензин является
легковоспламеняющимся веществом.
Будьте осторожны с топливом.
∙ Храните топливо только в специальных
канистрах.
∙ Заправляйте бак только на открытом воздухе,
не курите во время заправки.
∙ Сначала заправьте бак, а затем запускайте
двигатель.
∙ Перед тем, как заправлять бак, дайте глушителю
остыть.
∙ Не снимайте крышку топливного бака и не
заливайте топливо при работающем или неостывшем
двигателе.
∙ В случае проливания бензина не запускайте
двигатель, отодвиньте инструмент в сторону от
пролитого бензина и не допускайте возникновения
источника возгорания до тех пор, пока пары бензина
не рассеются.
∙ Протрите пролитое топливо перед тем, как
запускать двигатель.
∙ Плотно закройте топливный бак или канистру.
∙ Не запускайте инструмент в помещении или
в замкнутом пространстве, чтобы предотвратить
накапливание опасного угарного газа. Выхлопные
газы опасны для здоровья.
ВНИМАНИЕ! В выхлопных газах
содержится ядовитый угарный
газ, который не имеет ни цвета,
ни запаха. Вдыхание выхлопных
газов может привести к потере
сознания и летальному исходу.
Для предотвращения скапливания
выхлопных газов обеспечьте
соответствующую вентиляцию.
∙ Не храните инструменты с топливом в баке в
помещении, где пары могут воспламениться.
∙ Чтобы сократить риск возникновения пожара,
содержите в чистоте место хранения двигателя,
глушителя, батарейного отсека и бензохранилище.
∙ Выхлопная система нагревается достаточно для
того, чтобы воспламенить некоторые материалы.
Храните инструмент на безопасном расстоянии от
легковоспламеняющихся материалов.
∙ Во время работы глушитель сильно нагревается
и остается горячим некоторое время после
выключения. Не прикасайтесь к глушителю, чтобы
избежать ожога. Перед тем, как заносить инструмент
в закрытое помещение, дайте двигателю остыть.
∙ Перед запуском инструмента извлеките
установочные клинья и ключи.
ВНИМАНИЕ! Иногда во время
работы инструментов с бензиновым
двигателем образуется пыль,
содержащая вызывающие рак
вещества.
К таким химическим веществам относятся: свинец в
составе свинцовых белил, кварц, входящий в состав
кирпича и цемента, мышьяк и хром, содержащиеся в
пиломатериале, обработанном химическими
реагентами, и прочие вредные вещества. Риск
воздействия данных химических веществ зависит от
частоты проведения связанных с ними работ.
Чтобы сократить их вредное воздействие,
работайте в хорошо проветриваемом
помещении и используйте соответствующие
исправные СИЗ, например, противопылевые
респираторы, специально разработанные для
отфильтровывания микроскопических частиц.
∙ При попадании под инструмент постороннего
предмета осмотрите его на наличие повреждений и
произведите необходимый ремонт.
∙ При возникновении чрезмерной вибрации
отключите инструмент и немедленно выясните
причину. Вибрация обычно является признаком
повреждения.
∙ Перед тем, как покинуть рабочее место,
произвести ремонт, осмотр или очистку инструмента,
отключите его и дождитесь полной остановки
движущихся деталей.
∙ Запрещается снимать или изменять внутренние
детали инструмента.
Особые правила по технике безопасности
Использование защитного снаряжения
∙ Всегда надевайте сертифицированное
защитное снаряжение. Оно не может исключить
риска травмирования, но снизит тяжесть травмы,
если произойдет несчастный случай.
∙ Используйте защитную каску, защиту для
органов слуха, защитные очки или лицевой щиток;
надевайте защитные перчатки и штаны с защитным
слоем, предохраняющим от пилы, прочные ботинки
со стальным носком и нескользящей подошвой.
В качестве общего правила, одежда должна быть
плотно облегающей, но не стесняющей движения.
∙ Обращаться с режущим лезвием следует только
в защитных перчатках.
Page 29

29
RU
Инструкция по эксплуатации
Условия работы
∙ Не допускайте нахождения вблизи инструмента
детей и животных. Те, кто желает понаблюдать
за работой инструмента, должны находиться на
безопасном расстоянии от него.
∙ Убедитесь, что рядом нет предметов, способных
повлиять на вашу работу.
∙ Убедитесь, что в рабочей зоне отсутствуют
препятствия, например, корни, большие камни,
ветки и т.п. на тот случай, если вам потребуется
быстро переместиться.
∙ Будьте очень осторожны, работая на местности
с уклоном.
∙ Внимательно следите за окружающей средой,
чтобы без промедления реагировать на возможную
опасную ситуацию.
Использование машины
∙ Эта машина предназначена только для резания
дерева. Любая попытка резать другие материалы
приведет к повреждению машины и аннулированию
права на гарантийный ремонт.
∙ Используйте только рекомендованные
производителем режущее оборудование и
принадлежности.
∙ Инструмент никогда не должен
эксплуатироваться с поврежденными или снятыми
защитными элементами. Не эксплуатируйте
инструмент, если он неправильно собран.
∙ Убедитесь в том, что все гаечные ключи и
другие инструменты, которые использовались
для регулировки машины, извлечены и убраны на
безопасное расстояние до запуска устройства.
∙ Во время эксплуатации машины может произойти
неконтролируемая отдача; во избежание отдачи
всегда нужно надежно держать устройство обеими
руками и не браться ни за какие другие детали, кроме
рукояток.
ВСКРЫТИЕ УПАКОВКИ
При вскрытии упаковки проверьте наличие всех
комплектующих деталей. См. чертежи к данному
руководству. При отсутствии или неисправности
каких-либо деталей обратитесь в центр
обслуживания IVT.
ПРОВЕРКА ПЕРЕД НАЧАЛОМ ЭКСПЛУ
АТАЦИИ
ВНИМАНИЕ! Прежде чем приступать
к любым процедурам монтажа,
регулировки и технического
обслуживания машины, следует
отключить ее от сети. Кроме того,
нужно извлечь колпачок запальной
свечи.
ОСТОРОЖНО! Обращаться с
режущим лезвием (18) следует
только в защитных перчатках.
Проверка щитка рукоятки (2) [F1]
Щиток рукоятки (2) защищает кисти рук от контакта
с режущим лезвием (18), например, в случае если у
оператора выскользнет из рук передняя рукоятка (1).
ОСТОРОЖНО! Удостоверьтесь,
что щиток рукоятки (2) правильно
установлен и не поврежден.
Проверка режущего лезвия (18) и кожуха лезвия
(19) [F2]
∙ Регулярно проверяйте состояние режущего
лезвия (18) и кожуха лезвия (19).
∙ Замените режущее лезвие (18) и кожух лезвия
(19), если они погнуты или повреждены.
В случае необходимости заточите каждую
режущую кромку, следя за тем, чтобы нижний
угол был закруглен. В случае повреждения или
растрескивания замените его.
Для получения хороших результатов важно, чтобы
контактное давление между режущими лезвиями
(18) соответствовало норме.
Контактное давление регулируется путем поворота
винтов на нижней стороне направляющей по
часовой стрелке.
При правильной регулировке режущих лезвий (18)
люфт между ними при замере в районе винтов
должен составлять 0,2-0,4 мм.
ВНИМАНИЕ! При использовании шлифовального
круга для заточки режущего лезвия (18) не
остужайте лезвие водой, так как это может привести
к образованию на нем трещин.
Page 30

30
RU
Инструкция по эксплуатации
ПЕРЕД ПРИВЕДЕНИЕМ В ДЕЙСТВИЕ
ПРЕДУПРЕЖДЕНИЕ! Выполняйте следующие
процедуры при остывшем двигателе.
Рекомендации по применяемому топливу
Машина оснащена двухтактным двигателем и всегда
должна эксплуатироваться с использованием смеси
бензина и масла для двухтактных двигателей. Чтобы
обеспечить правильный состав полученной смеси,
важно точно измерять объем масла для смешивания.
∙ Залейте требуемые количества обычного
бензина (этилированного или неэтилированного,
без спирта) и масла для двухтактных двигателей
в емкость для смешивания (чистый контейнер для
топлива), затем хорошо встряхните контейнер.
РЕКОМЕНДУЕМОЕ СООТНОШЕНИЕ
КОМПОНЕНТОВ СМЕСИ
БЕНЗИН : МАСЛО > 40 : 1
ВНИМАНИЕ! Никогда не используйте масло,
предназначенное для четырехтактных
двигателей или для двухтактных двигателей с
водяным охлаждением.
Дозаправка топливом
1. Всегда останавливайте двигатель и дайте
ему остыть в течение нескольких минут перед
дозаправкой топливом.
2. Поставьте машину на землю вверх пробкой
топливного бака (5).
3. Медленно откройте пробку топливного бака (5),
чтобы плавно сбросить избыточное давление.
4. Очистите участок вокруг пробки топливного бака
(5): загрязнения в топливном баке (4) могут привести
к проблемам в эксплуатации.
5. Обеспечьте хорошее смешивание топлива,
встряхивая контейнер перед заправкой бака (4).
6. Заправьте бак смесью бензин-масло
правильного состава. Не переполняйте бак.
7. Надежно затяните пробку топливного бака (5).
ВНИМАНИЕ! Если машина не используется в
течение продолжительного времени (более 4
недель), топливный бак следует опорожнить и
очистить.
ПРЕДОСТЕРЕЖЕНИЕ! Насухо
вытирайте все разлитое топливо
и всегда перемещайте машину с
места заправки (не менее 3 метров)
перед запуском.
ЗАПУСК/ОСТАНОВ ДВИГАТЕЛЯ [F3]
Запуск двигателя
1. Поставьте машину на ровную горизонтальную
поверхность.
2. Переведите двухпозиционный переключатель
(6) в «пусковое» положение «I».
3. Переведите рычаг дросселирования (10) в
закрытое положение. ПРИМЕЧАНИЕ: топливная
смесь в ЗАКРЫТОМ (CLOSED
) положении
обогащенная для запуска холодного двигателя. Для
повторного запуска горячего двигателя оставьте
рычаг дросселирования (10) в ОТКРЫТОМ (OPEN
) положении.
4. Несколько раз нажмите на топливный насос (11)
(если он есть), пока топливо не начнет заполнять
резервуар (для запуска горячего двигателя не
требуется нажимать на топливный насос).
5. Рычаг дроссельной заслонки (7) должен быть
установлен в пусковое положение. Для этого:
нажмите на рычажок блокировки дроссельной
заслонки (9) (если имеется), захватив рукоятку
управления и удерживая нажатой кнопку фиксации
дроссельной заслонки (8), отпустив при этом рычаг
дроссельной заслонки (7).
6. Левой рукой удерживайте корпус машины на
земле (ПРЕДОСТЕРЕЖЕНИЕ! Не используйте для
этого ногу!).
7. Возьмитесь за рукоятку ручного стартера
(3), медленно вытягивайте шнур правой рукой,
пока не почувствуете некоторое сопротивление,
затем быстро и сильно потяните шнур
(ПРЕДОСТЕРЕЖЕНИЕ! Никогда не наматывайте
шнур ручного стартера (3) на руку!).
8. Повторяйте вытягивание шнура ручного
стартера (3), пока двигатель не запустится.
9. Когда двигатель запустится, медленно
переведите рычаг дросселирования (10) в открытое
положение ТОЛЬКО в том случае, если он был
переведен в ЗАКРЫТОЕ положение на холодном
двигателе.
10. Позвольте двигателю прогреться в течение
нескольких минут. Когда двигатель достаточно
прогреется, чтобы устойчиво работать на холостом
ходу, нажмите и отпустите рычаг дроссельной
заслонки (7) для освобождения кнопки фиксации
дроссельной заслонки (8).
ПРИМЕЧАНИЕ: кнопка фиксации дроссельной
заслонки (8) используется для удержания рычага
дроссельной заслонки (7) в положении высоких
оборотов холостого хода во время запуска.
ВНИМАНИЕ! Не допускайте, чтобы режущее
оборудование приходило в контакт с какимилибо препятствиями во время запуска двигателя,
Page 31

31
RU
Инструкция по эксплуатации
когда нажата кнопка фиксации дроссельной
заслонки (8)!
ВНИМАНИЕ! Не используйте кнопку регулировки
подачи топлива (8) во время работы устройства!
Машина не вернется в режим холостого хода,
а режущее лезвие (18) будет продолжать
вращаться до тех пор, пока не будет отжата
кнопка регулировки подачи топлива (8) и не
приведен в нейтральное положение рычаг
подачи топлива (7).
Останов двигателя
1. Переведите рычаг дроссельной заслонки (7)
в положение малой скорости и сбросьте обороты
двигателя.
2. Переведите двухпозиционный переключатель
(6) в положение останова «O».
ВНИМАНИЕ! Режущее лезвие (18)
будет продолжать вращаться
некоторое время после останова
двигателя и приведения рычага
подачи топлива (7) в нейтральное
положение. Вращающееся по
инерции лезвие может нанести
травму. Сохраняйте надлежащий
контроль за машиной до полной
остановки вращения режущего
инструмента.
И Н С Т Р У К Ц И И П О Э К С П Л У А Т А Ц И И
ВНИМАНИЕ! Не эксплуатируйте машину при
полной нагрузке в течение длительного времени
первые 20 часов использования и не давайте
машине работать на холостом ходу при полной
подаче топлива.
Вращающаяся рукоятка [F4]
∙ Для облегчения работы роторную рукоятку (12)
можно повернуть вправо или влево от центрального
положения на 45°/90°.
∙ Отпустите рычаг подачи топлива (7) и
блокировку подачи топлива (9), затем потяните
на себя спусковой рычаг (13) для разблокировки
движения роторной рукоятки (12).
∙ Поверните роторную рукоятку (12), чтобы
спусковой рычаг (13) с щелчком встал на место.
∙ Убедитесь в надежной блокировке роторной
рукоятки (12) в новом положении, после чего машина
вновь может начать работу.
В целях безопасности исключена возможность
увеличения мощности при перемещении роторной
рукоятки (12).
Техника резки
∙ Оптимальная резка достигается за счет
медленных поступательных движений, особенно в
случае с густыми живыми изгородями.
∙ Начинать стрижку живых изгородей необходимо
с боков, оставляя верхнюю часть для последнего
этапа.
∙ Для достижения единообразной высоты живой
изгороди рекомендуется использовать ориентирную
проволоку и обрезать ветви, которые выступают за
линию, ограниченную проволокой.
∙ Резать следует полукруговыми движениями,
используя обе стороны режущего лезвия (18),
перемещая его вверх и вниз.
Вертикальная резка [F5]:
∙ Проведите режущим лезвием (18) снизу
вверх по дуге, опустите переднюю часть лезвия,
переместитесь вдоль живой изгороди, а затем вновь
проведите режущим лезвием (18) снизу вверх по
дуге.
Горизонтальная резка [F6]:
∙ Удерживайте режущий аппарат под углом
0° - 10°, перемещая машину в горизонтальном
направлении.
∙ Стричь живую изгородь по горизонтали следует
дуговыми движениями режущего лезвия (18) от
внутреннего края изгороди к наружному.
БСЛУЖИВАНИЕ И ХРАНЕНИЕ
ОСТОРОЖНО! Прежде чем начать
работу с инструментом, остановите
двигатель и дождитесь полной
остановки всех движущихся деталей.
∙ Содержите инструмент и вентиляционные
отверстия (при наличии) в чистоте. Регулярная
очистка и обслуживание гарантируют высокую
эффективность и продолжительную эксплуатацию
инструмента.
∙ В случае выхода из строя, несмотря на
соблюдение всех правил эксплуатации и
опробования инструмента, ремонт должен
выполняться в официальном сервисном центре IVT.
∙ Все гайки, болты и винты должны быть плотно
затянуты.
∙ Замените поврежденные или изношенные детали.
∙ Используйте только оригинальные запчасти.
Детали, изготовленные сторонним производителем,
прилегают неплотно и повышают риск возникновения
травм.
Page 32

32
RU
Инструкция по эксплуатации
∙ Храните инструмент в сухом недоступном
для детей месте, на безопасном расстоянии от
легковоспламеняющихся материалов.
∙ Храните топливные баки в надежном месте.
Не храните инструменты с топливом в баке в
помещении, где пары могут воспламениться.
Воздушный фильтр [F7]
Загрязненные воздушные фильтры снижают
выходную мощность двигателя. Поэтому очень
важны регулярные проверки. Воздушный фильтр
следует проверять через каждые 25 часов
эксплуатации и очищать при необходимости. Если
воздух содержит много пыли, то воздушный фильтр
следует проверять чаще.
1. Снимите крышку воздушного фильтра (16).
2. Извлеките фильтрующий элемент (17).
3. Очистите фильтрующий элемент (17), постукивая
его или продувая, либо промывая теплой мыльной
водой, если это необходимо. Полностью просушите
перед установкой. Если фильтрующий элемент
воздушного фильтра (17) поврежден или покороблен,
то замените его новым фильтрующим элементом.
ПРИМЕЧАНИЕ: никогда не очищайте фильтрующий
элемент (17) бензином или горючими
растворителями.
Глушитель
Периодически проверяйте глушитель на предмет
ослабленных крепежных элементов, повреждений
или коррозии. При наличии любых признаков утечки
выхлопных газов прекратите эксплуатацию машины
и отремонтируйте ее безотлагательно.
Свеча зажигания (20) [F8]
Проверьте свечу зажигания (20) на предмет наличия
загрязнений и сажи приблизительно через 10 часов
эксплуатации, при необходимости очистите щеткой
из медной проволоки. В дальнейшем производите
обслуживание свечи зажигания (20) через каждые
50 часов работы.
1. Снимите колпачок свечи зажигания.
2. Снимите свечу зажигания (20) с помощью
свечного ключа.
3. Проверьте состояние свечи зажигания (20)
Убедитесь в том, что зазор электрода составляет
0,6-0,7 мм, в противном случае отрегулируйте.
При наличии загрязнений произведите очистку. В
случае повреждения замените ее свечой зажигания
рекомендованного типа.
4. Соберите в обратном порядке.
Топливный фильтр (14) [F9]
Топливный фильтр (14) заборной головки
используется с целью фильтрации топлива,
требуемого для работы карбюратора. При
недостаточной подаче топлива в двигатель
проверьте, не засорился ли топливный фильтр (14).
Следует периодически производить визуальную
проверку топливного фильтра (14), очистка
выполняется приблизительно через 50 часов
эксплуатации. Затвердевшие, сильно загрязненные
или засоренные фильтры подлежат замене.
1. Откройте пробку топливного бака (5) и аккуратно
слейте все топливо из топливного бака.
2. Воспользуйтесь проволочным крюком, чтобы
вытянуть заборную головку через отверстие бака.
3. Осмотрите топливный фильтр (14). Если
топливный фильтр загрязнен, то извлеките его и
промойте негорючим растворителем.
4. Удалите воду и грязь, присутствующие в
топливном баке, промывая его внутри.
5. Соответствующим образом установите все
детали на прежнее место.
Редуктор [F10]
Редуктор необходимо смазывать каждый год перед
началом сезона с помощью смазочного ниппеля.
Если вы часто используете машину, смазывайте
редуктор через более короткие интервалы.
Регулировка оборотов холостого хода [F11]
∙ Если двигатель глохнет, когда рычаг
дроссельной заслонки (7) не нажат, то можно
отрегулировать обороты холостого хода:
поворачивайте регулировочный винт оборотов
холостого хода (21) по часовой стрелке, пока
машина не начнет устойчиво работать на холостом
ходу (скорость вращения возрастает).
∙ Если обороты холостого хода настолько велики,
что режущий инструмент продолжает вращаться
при отпущенном рычаге дроссельной заслонки
(7), то обороты холостого хода нужно уменьшить,
поворачивая регулировочный винт оборотов
холостого хода (21) против часовой стрелки до тех
пор, пока вращение режущего инструмента также не
будет прекращаться.
ВАЖНОЕ ЗАМЕЧАНИЕ! Регулируйте обороты
холостого хода после прогрева машины.
Регулировка карбюратора
Регулировка карбюратора должна производиться в
авторизованном сервисном центре.
Смазка режущего лезвия (18) [F12]
Через каждые 4 часа эксплуатации добавляйте
Page 33

33
RU
Инструкция по эксплуатации
несколько капель масла в пазы для болтов на
режущем лезвии (18).
ТЕХНИЧЕСКОЕ ОБСЛУЖИВАНИЕ
ПЕРЕД ДОЛГОВРЕМЕННЫМ
ХРАНЕНИЕМ
∙ Очистите машину щеткой от всех загрязнений.
∙ Проверьте на предмет повреждения или
ослабленного крепления каждой детали. При
наличии отклонений от нормы произведите ремонт
в целях использования в будущем.
∙ Слейте все топливо из топливного бака и
запустите двигатель. Дайте ему поработать, пока он
не остановится самостоятельно.
∙ Снимите свечу зажигания (20) и залейте в
двигатель 1-2 куб. см масла для двухтактных
двигателей.
∙ Нанесите антикоррозионное масло на
металлические детали, например, на тросик
дроссельной заслонки.
∙ Наденьте на режущее лезвие (18) защитное
приспособление (19).
∙ Храните машину в помещение, чтобы избежать
воздействия сырости.
ЗАЩИТА ОКРУЖАЮЩЕЙ СРЕДЫ
Отправляйте мусор и отходы на
переработку!
Инструмент, дополнительные приспособления
и упаковку следует отправить на экологически
безопасную переработку.
Пластиковые элементы имеют отметку о
возможности классифицированной переработки.
Настоящая инструкция напечатана на вторичной
бумаге, не содержащей хлор.
Page 34

34
RU
Инструкция по эксплуатации
ВЫЯВЛЕНИЕ И УСТРАНЕНИЕ НЕИСПРАВНОСТЕЙ
ОСТОРОЖНО! Перед тем как осмотреть инструмент на предмет неисправностей,
остановите двигатель и дождитесь полной остановки всех движущихся деталей.
Типичные неисправности Причина неисправности Устранение неисправности
Двигатель не запускается
∙ Не был приведен в действие
топливный насос (11).
∙ Нажмите на него 7-10 раз.
∙ Двухпозиционный
переключатель (6) находится в
положении «выключено» / «O».
∙ Переведите двухпозиционный
переключатель (6) в положение
«включено» / «I».
∙ Рукоятка дросселирования
(10) не находится в ЗАКРЫТОМ
положении (холодный двигатель).
∙ Переведите рукоятку
дросселирования (10) в ЗАКРЫТОЕ
положение.
∙ Недостаточно топлива.
∙ Заправьте топливо.
∙ Засорение топливного фильтра
(14), неисправность карбюратора,
неисправность зажигания,
заклинивание клапанов и т.п.
∙ Заменить или отремонтировать
неисправные компоненты по мере
необходимости.
∙ Ухудшились свойства топлива.
∙ Замените новым
рекомендованным топливом.
∙ Свеча зажигания (20)
неисправна, загрязнена,
отсоединена или имеет
несоответствующий зазор.
∙ Очистить, отрегулировать
зазор, подсоединить или заменить.
Двигатель быстро
останавливается.
Обороты двигателя не
возрастают.
∙ Недостаточный прогрев.
∙ Выполнить операцию прогрева
∙ Рычаг дросселирования
(10) установлен в «ЗАКРЫТОЕ»
положение, хотя двигатель прогрет
∙ Установить его в «ОТКРЫТОЕ»
положение.
∙ Засорен топливный фильтр
(14), либо загрязнен или засорен
фильтрующий элемент (17).
∙ Очистить.
∙ Тросик дроссельной заслонки
разрегулирован, оборван или погнут.
∙ Отрегулировать или заменить
по мере необходимости.
Если данная информация не помогла вам устранить проблему, пожалуйста, обратитесь в Сервисный
центр IVT.
Page 35

35
RU
Инструкция по эксплуатации
ВНИМАНИЕ! ПРОИЗВОДИТЬ РЕМОНТ ИЗДЕЛИЯ САМОСТОЯТЕЛЬНО И ПЫТАТЬСЯ
СКРЫТЬ ЕГО СЛЕДЫ СОВЕРШЕННО НЕДОПУСТИМО! Только авторизованный IVT
Сервис-Центр имеет право на проведение ремонта и расширенного технического
обслуживания. Внесение изменений во внутреннее устройство изделия запрещено!
ТАКИЕ ДЕЙСТВИЯ НЕ ТОЛЬКО ЯВЛЯЮТСЯ ОСНОВАНИЕМ В ОТКАЗЕ ОТ ГАРАНТИЙНЫХ
ОБЯЗАТЕЛЬСТВ, НО И МОГУТ ПОСЛУЖИТЬ ПРИЧИНОЙ ПОВРЕЖДЕНИЙ И СЕРЬЕЗНЫХ
УВЕЧИЙ.
Page 36

36
KZ
Нұсқаулық
ҚОСАЛҚЫ БӨЛШЕКТЕРДІҢ ТІЗБЕСІ
1. Алдыңғы тұтқа
2. Тұтқыштың қалқаншасы
3. Кері жүріс стартері
4. Жанармай багі
5. Жанармай багінің қақпағы
6. Сөндіргіш/ Қосқыш
7. Жанармай беру тетігі
8. Жанармай беруді реттеу басқышы
9. Жанармай беруді шектеу
10. Ауа жапқышын басқару тетігі
11. Жанармай сорғышы
12. Роторлық тұтқыш
13. Түсірмелі тетік
14. Жанармай сүзгісі
15. Ауа сүзгісі
16. Ауа сүзгісінің қақпағы
17. Сүзгілейтін элемент
18. Кесетін жүз
19. Жүз қаптамасы
20. Оталдыру білтесі
21. Бос жүріс жылдамдығын реттеу бұрандасы
22. Білте кілті
23. Сомын кілті
24. Алтықырлы кілт
25. Бұрауыш
26. Май құйылған канистр
ҚОРАПТЫҢ ІШІНДЕГІСІ
Пайдалану жөніндегі нұсқаулық (1 дана), білте кілті
(1 дана), сомын кілті (1 дана), бұрауыш (1 дана),
алтықырлы кілт (2 дана), май құйылған канистр (1
дана).
ҚОЛДАНЫЛУЫ
Бұл құрал бұталары мен діңгектері қалың бұта
қоршамы мен тал-шіліктерді бұтауға арналған.
ҚОЛДАНУ КЕЗІНДЕГІ ТЕХНИКАЛЫҚ
КАУІПСІЗДІК
Қауіпсіздіктің жалпы ережелері
Қауіпсіздік техникасы бойынша келесі нұсқаулықтар
құралды дұрыс қолдануға және дербес қауіпсіздікті
қамтамасыз етуге көмектеседі. Сондықтан оларды
мұқият оқып шығыңыз.
Аталмыш құралды үшінші тұлғаға беру барысында
қауіпсіздік техникасы жөніндегі осы нұсқаулықты да
бірге беру керек.
Осы нұсқаулықты және жеткізілетін кешен құрамына
кіретін басқа да әдебиеттерді сақтап қойыңыз.
Қауіпсіздік техникасын және құралда көрсетілген
қауіпсіздік ережелерін сақтаңыз.
Жұмысты бастамас бұрын құралдың басқару
бөлшектерімен танысыңыз, бірақ ең алдымен жедел
ҚҰРАЛДЫҢ СИПАТТАМАСЫ
Үлгі GHT-25
Жұмыс көлемі [куб. см] 25.4
Бос жүрістегі айналу жиілігі [айн/мин] 7500
Қозғатқыш қуаты [а.к.] 1.05
Қозғалтқыш тактілерінің саны 2
Қозғалтқышты салқындату типі ауамен салқындату
Іске қосу жүйесі арқанша
Жанармай багының сыйымдылығы [мл] 0.6
Қоспа құрамдастарының арақатынасы [бензин:май] 40 : 1
Жанармай тұтынылуы [г/кВт-с] 488
Жүздің түрі қос жүз
Жүздің ұзындығы [мм] 560
Жүздің аралығы [мм] 27.8
Жүз тістерінің саны 16
Вибрация деңгейі [м/c
2
] 7 (K=1.5)
Дыбыс қысымының деңгейі [дБ(А)] 110 (K=3)
Дыбыс қуатының деңгейі [дБ(А)] 94 (K=3)
Салмағы [кг] 5.8
Page 37

37
KZ
Нұсқаулық
тоқтату амалдарымен танысыңыз.
Аталған қарапайым ережелерді сақтау сіздің
құралыңыздың үнемі жұмысқа жарамдылығын
қамтамасыз етуге мүмкіндік береді.
∙ Пайдалану алдында құралды дұрыс жинақтау
қажет.
∙ Құралды тек мақсаты бойынша ғана
пайдаланыңыз.
∙ Сонымен қатар, құралда қорғаныш жабдықтарды
пайдалану жөніндегі ескерту жазбалары мен
сілтемелері болуы мүмкін, оларды да оқып шығу
қажет. Сақтық, тәжірибелілік, ойластырылғандық,
жұмысқа тиісті қатынас және құралды қолдану,
тасымалдау, қызмет көрсету және сақтауға
қатынасатын тұлғалардың тиісті дайындығы келеңсіз
оқиғалардың алдын алуға көмектеседі.
∙ Құралды қараусыз қалдырмаңыз.
∙ Құралды балалардың пайдалануына жол
бермеңіз. Балалардың құралман ойнауына жол
бермеңіз.
∙ Жұмыс алаңына жақын жерде балалардың
және жануарлардың болуына жол бермеңіз. Бөгде
адамдар жұмыс істеп тұрған құралдан қауіпсіз
қашықтықта болуы керек.
∙ Құралмен жұмыс жасау барысында пайдаланушы
үшінші тұлғалар үшін жауапкершілік тартпайды.
∙ Қолдану жөніндегі осы нұсқаулықпен таныспаған
тұлғалар, құралды пайдалануға болатын жасқа
жетпеген, кәмелеттік жасқа толмаған балалар,
сондай-ақ ішімдікке немесе есірткіге мас күйдегі
тұлғалар, медициналық дәрмек әсеріндегі адамдар
құралмен жұмыс жасауға рұқсат ала алмайды.
Оператордың жасы жергілікті нормативтік актілермен
тағайындалады.
АБАЙЛАҢЫЗ! Алкоголь, кейбір
дәрілік препараттар және есірткілік
заттар, сондай-ақ ыстық көтерілу
және қалжырау сияқты денсаулық
күйлері реакция жылдамдығын
төмендетеді. Аталмыш құралды
жоғарыда аталған жағдайларда
пайдаланбаңыз.
∙ Барлық қорғаушы жабдықтардың (егер болса)
дұрыс орнатылғандығына және олардың жұмысқа
жарамды екендігіне көз жеткізіңіз.
∙ Құралды қорғаушы жабдықтарсыз
пайдаланбаңыз (егер болса), немесе ол зақымданған
болса пайдаланбаған абзал.
∙ Құралдың бекітілмей қалған бөлшектерін
(сақиналар, болттар, бұрамалар және т. б.) немесе
ақауларын тексеріңіз. Құрал жұмысының қауіпсіздігін
қамтамасыз ету үшін болттар мен бұрандалардың
(егер болса) жақсы бұралғандығын әлсін-әлсін
тексеріп отырыңыз. Қажет болса құралды пайдалану
алдында зақымданған не ақаулы бөлшектерді
жөндеңіз немесе алмастырыңыз. Ақаулы құралды
пайдалану кезінде операторға немесе маңайдағы
бөгде тұлғаларға ауыр жарақаттар салынуы мүмкін.
∙ Жұмыс үшін арнайы киімді пайдаланыңыз. Кең
киім, әшекейлер, әшекей бұйымдары құралдың
қозғалмалы бөліктеріне ілініп қалуы мүмкін. Сәйкес
келетін арнайы киімдер киіңіз. Ұшатын қалдық
заттардан аяғыңыз бен табаныңызды қорғаңыз.
Жалаң аяқ немесе үсті ашық аяқ киім киіп жұмыс
істемеңіз. Ұзын шашты артыңызға жинаңыз.
∙ Тұтқалар мен тұтқыштарды таза және құрғақ
етіп ұстаңыз.
∙ Сәйкес келетін қорғаушы жабдықтарды
пайдаланыңыз. Қорғаушы көзәйнектер мен
саусаққаптарды қолданыңыз. Ұнтақтармен
немесе шығарылатын газ ортасында жұмыс
жасау барысында шаңға қарсы респираторды
пайдаланыңыз. Қажет болған жағдайда табаны
сырғанамайтын аяқ киім, дулыға немесе құлаққа
арналған тығындарды қолданыңыз. Егер шу деңгейі
85 дБ(A) артық болса, міндетті түрде қорғаушы
құлаққаптарды пайдаланыңыз.
АБАЙЛАҢЫЗ! Жеке бас қорғаныс
құралдарын пайдаланыңыз!
Қорғаушы жабдықтар мен
ЖҚҚ сіздің денсаулығыңыз
бен маңайыңыздағылардың
денсаулығының қорғанысын
қамтамасыз етеді, сондай-ақ
құралдың үзіліссіз жұмысына
кепілдік береді.
∙ Құрал кері бұрылған болса немесе жұмысқа
жарамсыз күйде болса, оны іске қоспаңыз.
∙ Жұмыс барысында тұрақты қалыпты сақтаңыз.
Үнемі тепе-теңдікті сақтаңыз.
∙ Жұмыс алаңында тазалықты сақтаңыз.
Қоршалған алаңдарда жарақаттану қаупінің жоғары
деңгейі байқалады. Құралды пайдаланбас бұрын
жұмыс алаңынан барлық бөгде заттарды алып
тастаңыз, жұмыс барысында құралдың астына бөгде
заттардың түсуіне жол бермеңіз.
∙ Құралды шамадан тыс қыздырмаңыз.
∙ Құралды күндізгі жарықта немесе жақсы
жасанды желдету кезінде пайдаланыңыз. Құралды
нашар көріну жағдайында пайдаланбаңыз.
∙ Құралды құлатпаңыз, құралдың қандай да бір
кедергілермен қақтығысуына жол бермеңіз.
АБАЙ БОЛЫҢЫЗ! Абай болыңыз. Жұмыс
барысын бақылап отырыңыз. Алаңдай отырып,
құралды басқаруды жоғалтып алу мүмкін.
Жұмысқа дайындықпен кірісіңіз.
Page 38

38
KZ
Нұсқаулық
Бензиндік қозғалтқышпен жұмыс барысындағы
қауіпсіздік техникасы ережелері
НАЗАР АУДАРЫҢЫЗ! Бензин
жылдам тұтанатын зат болып
табылады. Жанармаймен абай
болыңыз.
∙ Жанармайды арнайы канистрлерде сақтаңыз.
∙ Бакты тек ашық ауада ғана толтырыңыз, құю
кезінде шылым шекпеңіз.
∙ Алдымен бакты толтырыңыз, содан соң ғана
қозғалтқышты қосыңыз.
∙ Бакты толтыру алдында бітеуішті суытыңыз.
∙ Қозғалтқыш жұмыс істеп тұрса және әлі
суымаған болса қақпақты босатпаңыз және
жанармай құймаңыз.
∙ Бензин төгілген кезде қозғалтқышты іске
қоспаңыз, құралды төгілген бензиннен алшақ
жылжытыңыз және бензиннің буы таралғанша от
көзінің пайда болуына жол бермеңіз.
∙ Қозғалтқышты қоспас бұрын төгілген
жанармайды сүртіңіз.
∙ Жанармай багының және канистрдің қақпағын
тығыздап жабыңыз.
∙ Қауіпті улы газ жиналмас үшін құралды ғимарат
ішінде немесе тұйық кеңістікте іске қоспаңыз.
Шығарылатын газдар денсаулық үшін зиянды.
НАЗАР АУДАРЫҢЫЗ! Жарамсыз газ
құрамында түссіз және иіссіз улы
газ болады. Шығарылған газды
ауамен тыныс алу естен айрылуға
немесе өлім-жітімді нәтижеге әкеліп
соғуы мүмкін. Шығарылатын
газдың жиналуын болдырмау үшін
тиісті желдетуді қамтамасыз етіңіз.
∙ Бакта жанармайы бар аспапты будың тұтануы
мүмкін жерлерде сақтамаңыз.
∙ Өрттің пайда болу қаупін төмендету үшін
қозғалтқыштың, бітеуіштің, батареялық бөліктің және
жанармайсақтауыштың орнын тазалықта ұстаңыз.
∙ Газ шығаратын жүйелер кейбір материалдардың
тұтануы мүмкін болатын температураға дейін
қызады. Құралды тез тұтанатын материалдардан
қауіпсіз қашықтықта ұстаңыз.
∙ Жұмыс кезінде дыбыс бәсеңдеткіш қатты
қызады және сөндіргеннен кейін де біраз уақыт бойы
ыстық күйінде қалады. Күйіп қалмас үшін дыбыс
бәсеңдеткішке жанаспаңыз. Құралды жабық жайға
енгізбес бұрын алдымен қозғалтқышты суытып
алыңыз.
∙ Құралды іске қосу алдында ондағы барлық
кілттер мен орнату бөлшектерін алып тастаңыз.
НАЗАР АУДАРЫҢЫЗ! Кейде
бензиндік құралдарды пайдаланған
кезде құрамында ісік ауруын
тудыратын химиялық заттар бар
шаң қалыптасады.
Осындай химиялық заттарға мыналар жатады:
қорғасынды әктеуіштер құрамындағы қорғасын,
кірпіш пен цементтің құрамына кіретін кварц,
химиялық реагенттермен өңделген араланушы
материалдар құрамындағы күшән және хром, басқа
да зиянды заттар. Аталған химиялық заттардың әсер
ету қауіпі олармен жұмыс жасау жиілігіне
байланысты.
Олардың зиянды әсерін төмендету үшін жақсы
желдетілетін жерде жұмыс істеңіз және қолдану
үшін бекітілген ЖҚҚ, мысалы, микроскопиялық
бөлшектерді сүзуге арналған шаңға қарсы
респираторларды пайдаланыңыз.
∙ Құралдың астына бөгде заттар түскен жағдайда
құралдың ақаусыз екендігін тексеріңіз және қажетті
жөндеу жұмыстарын жүзеге асырыңыз.
∙ Шамадан тыс діріл пайда болса жедел арада
қозғалтқышты сөндіріңіз және себебін анықтаңыз.
Діріл әдетте ақаудың белгісі болып табылады.
∙ Жұмыс орнынан кетпес бұрын, құралды жөндеу,
тексеру немесе тазарту алдында оны сөндіріңіз және
толығымен тоқтағанша күте тұрыңыз.
∙ Құралдың ішкі бөлшектерін алып тастауға
немесе өзгертуге тыйым салынады.
Қауіпсіздік техникасы бойынша ерекше
ережелер
Қауіпсіздік жабдықтарын қолдану
∙ Әрқашан сертификатталған қауіпсіздік
жабдықтарын киіңіз. Ол жарақат алу қаупін
толығымен жоққа шығармаса да, қайғылы жағдай
орын алған жағдайда, жарақаттың ауыртпалығын
бәсеңдетеді.
∙ Қауіпсіздік каскасын қолданыңыз, есту
мүшелері үшін қауіпсіздікті сақтаңыз, қорғаушы
көзілдірікті немесе бетпердені қолданыңыз; арадан
сақтандыратын қорғаныс қолғаптарын және қорғаныс
қабаты бар шалбарды киіңіз, болат тұмсықты және
сырғымайтын ұлтанды мықты аяқ киім киіңіз. Жалпы
ережелерге сәйкес, киім денеге жабысып тұруы керек,
бірақ қозғалысқа кедергі келтірмейтіндей болуы керек.
∙ Кесетін жүзді қолдануды тек қана қорғайтын
қолғаптар киіп жасаңыз.
Жұмыс шарты
∙ Жұмыс алаңына жақын жерде балалардың
Page 39

39
KZ
Нұсқаулық
және жануарлардың болуына жол бермеңіз. Бөгде
адамдар жұмыс істеп тұрған құралдан қауіпсіз
қашықтықта болуы керек.
∙ Жаныңызда сіздің жұмысыңызға кедергі
келтіретін заттардың жоқ екеніне көз жеткізіңіз.
∙ Жұмыс жасау зонасында орын ауыстыруға тура
келген жағдайда айналаңызда кедергілердің жоқ
екеніне көз жеткізіңіз, мысалы, тамырлар, үлкен
тастар, бұтақтар және т.с.с.
∙ Еңіс жерлерде жұмыс істегенде өте сақ болыңыз.
∙ Мүмкін болатын қауіпті жағдайда тез арада шара
қолдану үшін қоршаған ортаны мұқият қадағалап
отырыңыз.
Машинаның қолданылуы
∙ Бұл машина тек қана ағаштарды кесуге
арналған. Басқа материалды кесуге арналған кез
келген әрекетіңіз машинаның бұзылуына және
кепілдік жөндеу құқыңыздың жойылуына әкеледі.
∙ Өндіруші арқылы ұсынылған кескіш саймандар
мен құрал-жабдықтарды ғана қолданыңыз.
∙ Құрылғы ешқашан бұзылған немесе қорғаныс
аспаптары алынып тасталған күйде қолданылмауы
керек. Егер де ол дұрыс жинақталмаған болса,
мүлде қолданбаңыз.
∙ Барлық гайка кілттерінің және машинаны
реттеуші басқа да жабдықтардың шығарылып
алынғанына және құрылғының іске қосылуына дейін
қауіпсіз қашықтыққа жеткізілгеніне көз жеткізіңіз.
∙ Машинаны пайдаланған кезде басқарылмайтын
кері соғу болуы мүмкін; кері соғуды болдырмау үшін
құрылғыны қашанда екі қолыңызбен мықтап ұстаңыз,
тұтқышынан басқа ешбір бөлшектен ұстамаңыз.
ҚОРАПСЫЗДАНДЫРУ
Қаптан алу кезінде барлық бөлшектердің түгел
екендігіне көз жеткізіңіз. Соңғы беттегі жинақтау
сызбасын қараңыз. Қандай да болмасын бөлшектер
бомаған жағдайда немесе ақаулы болған жағдайда
IVT қызмет көрсету орталығына жүгініңіз.
П А Й Д А Л А Н У А Л Д Ы Н Д А Ғ Ы Т Е К С Е Р У
НАЗАР АУДАРЫҢЫЗ! Машинада
монтаждау, ретке келтіру және
техникалық қызмет көрсету
жұмыстарының қай-қайсысын
бастамай тұрып, алдымен оны
желіден айыру қажет. Оның үстіне,
оталдыру білтесінің қалпақшасын
шығарыңыз.
САҚ БОЛЫҢЫЗ! Кесетін жүзді (18)
қолдануды тек қана қорғайтын
қолғаптар киіп жасаңыз.
Тұтқыш қалқаншасын (2) тексеру [F1]
Тұтқыш қалқаншасы (2) қол буынын кесетін
жүзбен (18) байланыстан қорғайды, мысалы, егер
оператордың қолынан алдыңғы тұтқыш (1) шығып
кеткен жағдайда.
САҚ БОЛЫҢЫЗ! Тұтқыш қалқаншасы
(2) дұрыс орнатылғанына және
зақымданбағанына көз жеткізіңіз.
Кесетін жүзді және жүздің қаптамасын (19)
тексеру [F2]
∙ Кесетін жүздің (18) және жүз қаптамасының (19)
жағдайын жиі тексеріңіз.
∙ Егер майысқан немесе зақымданған
болса, кесетін жүз (18) бен жүз қаптамасын (19)
алмастырыңыз.
Қажет болған жағдайда әрбір кесетін иекті қайраңыз,
төменгі бұрышы жұмыр болуын қадағалап тұрыңыз.
Зақымданған немесе шытынаған жағдайда оны
алмастырыңыз.
Жақсы нәтижеге қол жеткізу үшін кесетін жүздердің
(18) арасындағы түйіспелі қысымның нормаға сәйкес
болуы маңызды.
Бағыттаушылардың төменгі жағындағы бұрауышты
сағат тілімен айналдыру арқылы түйіспелі қысымды
реттеуге болады.
Кесетін жүздерді (18) қалыпты күйге дұрыс келтірген
жағдайда олардың арасындағы люфт өлшеген кезде
бұрауыш жағында 0,2-0,4 мм құрауы тиіс.
НАЗАР АУДАРЫҢЫЗ! Кесетін жүзді (18) қайрау үшін
ажарлауыш шарықты қолданған кезде жүзді сумен
салқындатпаңыз, бұл жарықшақтың пайда болуына
келтіруі мүмкін.
ІС-ӘРЕКЕТКЕ КӨШПЕС БҰРЫН
ЕСКЕРТПЕ! Суыған қозғалтқышқа келесі
процедураларды орындаңыз.
Қолданылушы жанармайдың кеңес нұсқаулығы
Машина екітактілі қозғалтқышпен жабдықталған,
сол үшін де әруақытта бензин қоспасы мен екітактілі
қозғалтқышқа арналған майды пайдаланыңыз. Қоспа
құрамы толық болуын қамтамасыз ету үшін, майдың
Page 40

40
KZ
Нұсқаулық
араласқан қоспа мөлшерлерін анықтап алған дұрыс.
∙ Қалыпты бензиннің (этилдендірілген немесе
этилдендірілмеген, спиртсіз) қажет мөлшерін
және екітактілі қозғалтқышқа арналған майды
араластыратын сыйымды жерге құйыңыз, содан
кейін контейнерді жақсылап сілкіп, араластырып
алыңыз.
ҚОСПА ҚҰРЫЛЫМЫНА СӘЙКЕС КЕҢЕС
НҰСҚАУЛЫҒЫ
БЕНЗИН : МАЙ > 40 : 1
НАЗАР АУДАРЫҢЫЗ! Ешуақытта төрттактілі
қозғалтқышқа арналған майды немесе сумен
суытылған екітактілі қозғалтқышқа арналған
майды қолданбаңыз!
Маймен толтыру
1. Маймен толтырмас бұрын, әрқашан
қозғалтқышты тоқтатып алып, бірнеше минут
шамасында суытылуына жағдай жасаңыз.
2. Машинаны жанармай багының тығынын (5)
жоғары бағытта ұстап, жерге қойыңыз.
3. Артық қысымды бірқалыпты жоғалту үшін
жанармай багының тығынын (5) асықпай ашыңыз.
4. Жанармай багының тығынының (5) айналасын
тазалаңыз: май багының ластануы (4) пайдалануға
қиын соқтыруы мүмкін.
5. Бакты толтырмас (4) бұрын контейнерді шайқап,
жанармайдың жақсы араласуына мүмкіндік беріңіз.
6. Бакты бензин мен майдың дұрыс мөлшеріндегі
қоспамен толтырыңыз. Бакты шамадан тыс
толтырмаңыз.
7. Жанармай багының тығынын (5) мықтап бекітіңіз.
НАЗАР АУДАРЫҢЫЗ! Егер машина ұзақ уақыт
бойы (4 аптадан көп) пайдаланылмай қалған
болса, жанармай багын босатып, тазалау қажет.
САҚ БОЛЫҢЫЗ! Төгілген
жанармайды құрғақтай етіп сүртіңіз,
іске қоспас бұрын, машинаны
әрдайым толтыру орнынан ұстап,
жылжытыңыз (3 метрден кем емес).
ҚОЗҒАЛТҚЫШТЫ ІСКЕ ҚОСУ /
ТОҚТАТУ [F3]
Қозғалтқышты іске қосу
1. Машинаны тегіс жазықтықтағы бетіне қойыңыз.
2. Екіпозициялы айырып-қосқышты (6) «іске қосу»
«І» күйіне қойыңыз.
3. Дроссельдеу тетігін (10) жабық күйге келтіріңіз.
ЕСКЕРТПЕ: ЖАБЫҚ (CLOSED
) күйдегі жанармай
қоспасы салқын қозғалтқыштың іске қосылуына
жағдай жасайды. Ыстық қозғалтқыштың қайта іске
қосылуына мүмкіндік беру үшін дроссельдеу тетігін
АШЫҚ (OPEN
) күйінде қалдырыңыз.
4. Сұйыққойма толмайынша, жанармай сорғысын
(11) (егер ол бар болса) бірнеше рет басыңыз (ыстық
қозғалтқышты іске қосу үшін жанармай сорғысын
басудың қажеті жоқ).
5. Дроссельдеу жапқышының тетігі (7) іске қосылған
күйінде тұруы тиіс. Ол үшін: басқару тұтқасын ұстап,
дроссельдеу жапқышының бекіткіш батырмасын (7)
басып ұстап, ал дроссельдеу жапқышының тетігін (7)
жіберіп тұрып, дроссельдеу жапқышының кішкене
тетігін (9) басыңыз (егер болса).
6. Машинаны жерде сол қолыңызбен ұстаңыз.
(ЕСКЕРТПЕ! Аяғыңызбен тіреп тұрмаңыз!).
7. Қол стартерінің тұтқасын ұстап, қарама-қарсы
күшті сезінбейінше, оң қолыңызбен тоқ сымды
жайлап шығарыңыз, содан кейін жылдам бар
күшіңізбен сымды тартып алыңыз. (ЕСКЕРТПЕ!
Қол стартерінің сымын (6) ешқашан қолыңызға
орамаңыз! ).
8. Қозғалтқыш іске қосылмайынша, қол стартерінің
сымын (3) қайта-қайта тарта беріңіз.
9. Қозғалтқыш іске қосылғанда, жайлап қана
дроссельдеу тетігін (10) ТЕК БІР ЖАҒДАЙДА, ол
салқын қозғалтқышта ЖАБЫҚ күйінде тұрғанда ғана.
10. Қозғалтқыштың бірнеше минут бойы қызып
тұруына мүмкіндік беріңіз. Қозғалтқыш толық қызып
болған соң, бос жүрісте жақсы жұмыс жасау үшін,
дроссельдеу жапқышының реттеуші батырмасын
(8) босату үшін дроссельдеу жапқышының тетігін (7)
басып, жіберіңіз.
ЕСКЕРТУ: іске қосылу кезінде дроссельдеу
жапқышының реттеуші батырмасы (8) дроссельдеу
жапқышының тетігін (7) бос жүрістің жоғары
айналымында ұстап тұруы үшін қолданылады.
НАЗАР АУДАРЫҢЫЗ! Дроссельдеу
жапқышының діріл батырмасын (8) басылып
тұрғанда, қозғалтқыш іске қосылғанда кесуші
құрылғы қандай да бір кедергілерге тап болуына
жол бермеңіз!
НАЗАР АУДАРЫҢЫЗ! Құрал жұмыс істеп тұрған
кезде жанармай беруді реттеу басқышын (8)
қолданбаңыз! Машина бос жүріс режиміне
оралмайды, ал кесетін жүз (18) жанармай
беруді реттеу басқышы (8) сығылып, жанармай
беру тетігі (7) бейтарап күйге келтірілмейінше
айналып тұра береді.
Қозғалтқышты тоқтату
1. Дроссельдеу жапқышы тетігінің (7) күйін аз
жылдамдықта қойып, қозғалтқыш айналымын
тоқтатыңыз.
Page 41

41
KZ
Нұсқаулық
2. Екіпозициялы айырып-қосқышын (6) «О» тоқтату
күйіне келтіріңіз.
НАЗАР АУДАРЫҢЫЗ! Қозғалтқыш
тоқтап, жанармай беру тетігі (7)
бейтарап күйге келтірілген соң
кесетін жүз (18) біраз уақыт айналып
тұрады. Инерция бойынша айналып
тұрған жүз зақым тигізуі мүмкін.
Айналып тұрған кесетін құрал
толық тоқтағанша машинаға қажетті
бақылау жасап тұрыңыз.
ПАЙДАЛАНУ ЖӨНІНДЕГІ НҰСҚАУЛЫҚ
СҚ АУЛЫ Қ
НАЗАР АУДАРЫҢЫЗ! Қолданудың алғашқы 20
сағатында машинаны ұзақ уақыт бойы толық
жүктеп қолданбаңыз және жанармайды толық
берген кезде машинаның бос жүрісте жұмыс
жасауына жол бермеңіз.
Айналатын тұтқыш [F4]
Жұмысты жеңілдету үшін роторлы тұтқышты (12)
ортадағы қалыптан 45°/90°-қа оңға немесе солға
бұруға болады.
∙ Машинаны сөндіріңіз.
∙ Жанармай беру тетігі (7) мен жанармай беруді
шектеуді (9) түсіріп, сонан соң роторлы тұтқыш (12)
қозғалысын бұғаттан шығару үшін түсірмелі тетікті
(13) өзіңізге қарай тартыңыз.
∙ Роторлы тұтқышты (12) айналдырыңыз, сонда
түсірмелі тетік (12) шертпекпен өз орнына түседі.
∙ Жаңа күйде роторлы тұтқыштың (12) сенімді
шектелгеніне көз жеткізіңіз, сонан соң жұмысты
қайта бастауыңызға болады.
Қауіпсіздік мақсатында роторлы тұтқышты (12)
жылжытқан жағдайда күшті көбейту мүмкіндігі
болмайды.
Кесу техникасы
∙ Баяу ілгерілемелі қозғалыстан, әсіресе қалың
бұта қоршамында жақсы кесуге қол жеткізуге
болады.
∙ Бұта қоршамын қырқуды жанынан бастау қажет,
үстіңгі бөлігін соңғы кезең үшін қалдырыңыз.
∙ Бұта қоршамының биіктігі бірдей болуы үшін
бағдарлайтын сым тартып қойыңыз да, шектейтін
сымнан шығып тұрған тұталарды кесіңіз.
∙ Кесетін жүздің (18) екі жағын да пайдалана
отырып оны жоғары және төмен бағыттап, жартылай
дөңгелек қозғалыспен кесу қажет.
Тік кесу [F5]:
∙ Кесетін жүзбен (18) доға бойынша төменнен
жоғары қарай жүріп, жүздің алдыңғы бөлігін түсіріп,
сонан соң тағы да кесетін жүзбен (18) доға бойынша
төменнен жоғары жүріңіз.
Көлденең кесу [F6]:
∙ Кесетін аппараты 0° - 10° бұрышында ұстап
тұрып көлденең бағытта машинаны жүргізіңіз.
∙ Бұта қоршамын кесетін жүздің (18) доға
қозғалысымен қоршамның ішкі жағынан сыртқа
қарай қырқу қажет.
ҚЫЗМЕТ КӨРСЕТУ ЖӘНЕ САҚТАУ
АБАЙ БОЛЫҢЫЗ! Жөндеу алдында
құралды сөндіріңіз және ол толық
тоқтағанша күте тұрыңыз.
∙ Құралды және желдеткіш саңылауларын (егер
болса) тазалықта ұстаңыз. Үнемі тазарту және
қызмет көрсету құралдың жоғары тиімділігін және
ұзақ уақыт қолданылуын кепілдейді.
∙ Өндіріс пен сынаудың мінсіз шарттарына
қарамастан, істен шыққан жағдайда, жөндеу
жұмыстары IVT ресми орталықтарында жүргізілуі
керек.
∙ Барлық сақиналар, болттар және бұрамалар
мұқият бұралуы керек.
∙ Ақауланған немесе тозған бөлшектерді
алмастырыңыз.
∙ Тек түпнұсқалық қосалқы бөлшектерді ғана
пайдаланыңыз. Басқа тараптық өндіруші дайындаған
бөлшектер нақты сай болмайды және жарақаттану
қаупін жоғарылатады.
∙ Құралды құрғақ әрі балалардың қолы жетпейтін
жерде, тез тұтанатын материалдардан қауіпсіз
қашықтықта сақтаңыз.
∙ Жанармай бактарын сенімді жерде сақтаңыз.
Бакта жанармайы бар аспапты будың тұтануы
мүмкін жерлерде сақтамаңыз.
Ауа сүзгісі [F7]
Ластанған ауа сүзгісі қозғалтқыштың шығу қуатын
бәсеңдетеді. Сол үшін де тұрақты тексеріс өте
маңызды. Ауа сүзгісін әрбір 25 сағат пайдаланған
сайын тексеріп, қажет болса, тазалап тұру керек.
Егер ауада көп шаң болса, ауа сүзгісін жиі тексерген
дұрыс.
1. Ауа сүзгісінің қақпағын (16) ашыңыз.
2. Сүзгілеуші элементті (17) шығарып тастаңыз.
3. Сүзгілеуші элементті (17) қағып, желдетіп
тазалаңыз, егер қажет болса, сабынды жылы сумен
Page 42

42
KZ
Нұсқаулық
жуыңыз.Қондырмас бұрын толықтай құрғатыңыз.
Егер ауа сүзгісінің сүзгілеуші элементі (17)
зақымданған, қисайған болса, оны жаңа сүзгілеуші
элементпен ауыстырыңыз.
ЕСКЕРТПЕ: сүзгілеуші элементті (17) бензинмен
немесе жандырушы қоспамен жумаңыз.
Бәсеңдеткіш
Бекітілген элементтердің әлсізденбеген бе,
зақымдалып немесе ескірмеген бе, бәсеңдеткішті
тексеріп тұрыңыз. Пайдаланылған газ сыртқа шығу
сипаты байқалған кезде, машинаны қолдануды
тоқтатыңыз және кідіртпей жөндеңіз.
Оталдыру шырағы (20) [F8]
Оталдыру шырағы (20) түрлі заттармен ластанған
ба, тексеріңіз және жағып қойып, шамамен 10 сағат
пайдаланыңыз, қажет болса, мыс сымды щеткамен
тазалаңыз. Алдағы уақытта әрбір 50 сағат жұмыс
жасаған сайын тазалап тұрыңыз.
1. Оталдыру шырағының қақпақшасын ағытыңыз.
2. Оталдыру шырағын (20) шырақтың кілті көмегі
арқылы ағытыңыз.
3. Оталдыру шырағының күйін тексеріңіз. (20)
Электрод саңылауы 0,6-0,7 мм көлемде екендігіне
көз жеткізіңіз, егер олай болмаса, жөнге келтіріңіз.
Ластанған жағдайда тазалап алыңыз. Зақымданған
жағдайда оталдыру шырағының кеңес етілген
түрімен ауыстырыңыз.
4. Қайта кері тәртіпте жинаңыз.
Жанармай сүзгісі (14) [F9]
Дуал басының жанармай сүзгісі (14) карбюратор
жұмысын қажет ететін жанармайды сүзгіден өткізу
мақсатында қолданады. Қозғалтқышта жанармай аз
беріліп жатса, жанармай сүзгісі (14) бітеліп қалған
жоқ па, тексеріңіз. Тұрақты түрде жанармай сүзгісін
(14) көзбен шолып тексеріп тұрыңыз, пайдаланылу
кезінде шамамен 50 сағаттан кейін тазару жүріп
отырады. Қатты ластанған, бітелген, зақымдалған
сүзгі ауыстыруды қажет етеді.
1. Жанармай багының тығынын (5) ашыңыз және
жанармай багынан жайлап қана майды құйып
алыңыз.
2. Бак саңылауы арқылы қоршаушы бүркеншікті
шығару үшін сымы бар ілмекті қолданыңыз.
3. Жанармай сүзгісін анықтап қараңыз (14). Егер
жанармай сүзгісі ластанған болса, лас заттарды шығарып
тастаңыз, күйдірмейтін еріткішпен жуып алыңыз.
4. Жанармай багын шаю арқылы кірді сумен
тазартыңыз.
5. Сәйкесінше барлық бөлшектерді өз орнына
қондырыңыз.
Бәсеңдеткіш [F10]
Бәсеңдеткішті жыл сайын маусым басталатын кезде
майлайтын ниппельдің көмегімен майлап тұру
керек. Егер сіз машинаны жиі қолданатын болсаңыз,
бәсеңдеткішті майлау жиілігін арттырыңыз.
Бос жүріс айналымын ретке келтіру [F11]
∙ Дроссельдеу жапқышының тетігі (7) басылмай
тұрған жағдайда, қозғалтқыш бәсеңдеп кетсе, онда
бос жүріс айналымын ретке келтіруге болады:
машина бос жүрісте нық жұмыс жасап бастағанға
дейін, бос жүріс айналымының реттеуші винтін
(21) айналдырыңыз. (айналу жылдамдығы
жоғарылайды).
∙ Егер бос жүріс айналымы сондай үлкен болса,
кесуші құрылғы дроссельдеу жапқышының бос
тетігінде (7) айналуын жалғастырса, онда бос жүріс
айналымының реттеуші тетігін (21) сағат тіліне
қарсы бұру арқылы, кесуші құрылғы айналымы
тоқтамайынша, бос жүріс айналымын кішірейтіп
тұру қажет.
МАҢЫЗДЫ ЕСКЕРТУ! Машина қызғаннан соң,
бос жүріс айналымын ретке келтіру керек.
Карбюраторды ретке келтіру
Карбюраторды ретке келтіру авторлық құқығы бар
сервис орталығында жүзеге асырылуы тиіс.
Кесетін жүзді майлау (18) [F12]
Пайдаланудың әр 4 сағаты сайын кесетін жүздегі
(18) болттарға арналған саңылауларға бірнеше
тамшы май қосып тұрыңыз.
ҰЗАҚ УАҚЫТ БОЙЫ САҚТАУДЫҢ
ТЕХНИКАЛЫҚ ҚЫЗМЕТІ
∙ Машинаның ластанған бар жерін щеткамен
тазалаңыз.
∙ Зақымдалған құрауыштарын, әрбір бөлшегінің
мықты-әлсіздігін тексеріңіз. Алдағы уақытта қайта
қолдану мақсатында қалыпты емес ауытқулар
болса, жөндеу жүргізіңіз.
∙ Жанармай багынан барлық жанармайды құйып
алыңыз да, қозғалтқышты іске қосыңыз. Ол өздгінінен
тоқтағанша, жұмыс жасап тұруына мүмкіндік беріңіз.
∙ Оталдыру шырағын (20) ағытып, екітактілі
қозғалтқыш үшін 1-2 куб.см жанармай құйыңыз.
∙ Бұзылмайтын майды металлды бөлшекке
апарыңыз, мысалы, дроссельдеу жапқышының
шынжырына.
∙ Кесетін жүзге (18) қорғайтын аспап (19) тағыңыз.
∙ Ылғалдылықты болдырмас үшін, машинаны
бөлмеде сақтаңыз.
Page 43

43
KZ
Нұсқаулық
ҚОРШАҒАН ОРТАНЫ ҚОРҒАУ
Қалдықты болдырмау мақсатында
шикізатты қайта қолдану!
Құралды, қосымша жабдықтарды және қаптаманы
экологиялық таза жолмен қайта өңдеуге жіберу
керек.
Пластикалық бөлшектер классификациялық қайта
өңдеуге жіберіледі.
Осы нұсқаулықтар хлор пайдаланбай дайындалған
екінші өңделім қағазына басылған.
Page 44

44
KZ
Нұсқаулық
АҚАУЛЫҚТАРДЫ ЖОЮ
САҚ БОЛЫҢЫЗ! Құралдың ақаулықтары бар-жоғын тексермей тұрып, қозғалтқышты
тоқтатып, қозғалып тұрған барлық бөлшектердің толық тоқтағанын күтіңіз.
Әдеттегі ақаулық Ақаулық себебі Шешімі
Қозғалтқыш іске
қосылмайды
∙ Жанармайлы сорғы (11) іске
қосылған жоқ.
∙ Оны 7-10 рет басып көріңіз.
∙ Екіпозициялы айырып-қосқыш
(6) «АЖЫРАТУЛЫ» / «О» күйінде
тұр.
∙ Екі позициялы айырып-
қосқышты (6) «ҚОСУЛЫ» / «І» күйіне
келтіріңіз.
∙ Дроссельдеу тұтқасы (10)
ЖАБЫҚ күйінде тұрған жоқ. (салқын
қозғалтқыш).
∙ Дроссельдеу тұтқасын (10)
ЖАБЫҚ күйіне қойыңыз.
∙ Жанармай жеткіліксіз.
∙ Жанармай толтырыңыз.
∙ Жанармайлы сүзгінің (14)
бітелуі, карбюратордың бұзылуы,
оталдырудың бұзылуы, қақпақшаның
сыналануы т.б.
∙ Қажеттілік болған жағдайда
бұзылған құрауыштарды жөндеңіз
немесе ауыстырыңыз.
∙ Жанармайдың құрамы
бұзылған.
∙ Жаңадан кеңес берілген
маймен алмастырыңыз.
∙ Оталдыру шырағы (20)
жөнге келтірілмеген, ластанған,
ажыратылған немесе тиісті емес
саңылауы бар.
∙ Саңылауды ретке келтіріп,
тазалау, жалғау немесе ауыстыру
қажет.
Қозғалтқыш тез тоқтап
қалады. Қозғалтқыш
айналымы үлкеймейді.
∙ Жылыту жеткіліксіз.
∙ Жылыту операциясын орындау
∙ Қозғалтқыш жылынғанымен,
дроссельдеу тетігі «ЖАБЫҚ» күйінде
орнатылған.
∙ «АШЫҚ» күйіне орнатыңыз.
∙ Жанармайлы сүзгі (14) бітеліп
қалған немесе сүзгілеуші элемент
(17) ластанған, бітелген.
∙ Тазалау қажет.
∙ Дроссельдеу жапқышы
шынжыры жөнге келтірілмеген,
үзілген немесе майысқан.
∙ Жөнге келтіру, қажет болса,
ауыстыру керек.
Page 45

45
KZ
Нұсқаулық
НАЗАР АУДАРЫҢЫЗ! БҰЙЫМҒА ӨЗ БЕТІҢІЗБЕН ЖӨНДЕУ ЖҮРГІЗІП, ОНЫҢ ІЗДЕРІН
ЖАСЫРУҒА ТЫРЫСУҒА МҮЛДЕМ БОЛМАЙДЫ! Тек қана авторлық құқығы бар қызмет
көрсету орталығының жөндеу жүргізуге және қамтылған техникалық қызмет көрсетуге
құқығы бар. Бұйымның ішкі құрылымына өзгерістер енгізуге тыйым салынады!
МҰНДАЙ ӘРЕКЕТТЕР КЕПІЛДІК МІНДЕТТЕМЕЛЕРДЕН БАС ТАРТУҒА НЕГІЗ БОЛЫП ҚАНА
ҚОЙМАЙ, СОНЫМЕН ҚАТАР ҚАУІПТІ ЖАРАҚАТ АЛУҒА ЖӘНЕ ЗИЯН КЕЛТІРУГЕ СЕБЕПШІ
БОЛУЫ МҮМКІН.
ҚР аумағында сапа бойынша наразылықтарды қабылдайтын ұйым: «Костанай DWT/ДВТ» ЖШС | Қостанай қ. Целинная
көш., 4 - Қазақстан Республикасы | тел (7142) 28 07 00, -01 | Организация, принимающая претензии на территории РК: ТОО
«Костанай DWT/ДВТ» | г. Костанай, ул. Целинная, 4 - Республика Казахстан | тел (7142) 28 07 00, -01
Page 46

46
PL
Instrukcja użytkowania
CZĘŚCI
1. Uchwyt przedni
2. Osłona uchwytu
3. Rozrusznik mechaniczny
4. Zbiornik na paliwo
5. Korek zbiornika na paliwo
6. Przełącznik wł./wył.
7. Dźwignia przepustnicy
8. Przycisk ustawiania przepustnicy
9. Blokada przepustnicy
10. Dźwignia ssania
11. Pompka paliwa
12. Uchwyt obrotowy
13. Dźwignia zwalniania
14. Filtr paliwa
15. Filtr powietrza
16. Osłona ltra powietrza
17. Wkład ltra
18. Noże tnące
19. Osłona listwy tnącej
20. Świeca zapłonowa
21. Regulator biegu jałowego
22. Klucz świecy zapłonowej
23. Klucz
24. Klucz sześciokątny
25. Śrubokręt
26. Zbiornik na olej
ZAWARTOŚĆ PUDŁA
Instrukcja obsługi (1 szt.), klucz świecy zapłonowej (1
szt.), klucz (1 szt.), śrubokręt (1 szt.), klucz sześciokątny
(2 szt.), zbiornik na olej (1 szt.).
PROPONOWANE UŻYCIE
Urządzenie służy do przycinania żywopłotu i krzewów o
grubszych łodygach i gałęziach.
ZASADY BEZPIECZEŃSTWA PODCZAS
UŻYTKOWANIA
Ogólne zasady bezpieczeństwa
Następujące wskazówki odnośnie zasad bezpieczeństwa
pomogą Państwu w prawidłowym użytkowaniu narzędzia
i zapewnieniu sobie bezpieczeństwa.
Dlatego proszę je wnikliwie i uważnie przeczytać.
W przypadku przekazania narzędzia do użytkowania
osobie trzeciej, proszę przekazać również niniejsze
wskazówki odnośnie zasad bezpieczeństwa.
Proszę zachować niniejszą instrukcję i inne ulotki,
będące częścią dostawy. Proszę zaglądać do nich
w przypadku zaistnienia pytań.
Proszę ściśle przestrzegać zasad bezpieczeństwa i
ostrzeżeń zamieszczonych na narzędziu.
Przed rozpoczęciem pracy proszę zapoznać się z
częściami sterującymi narzędzia, a przede wszystkim
DANE TECHNICZNE NARZĘDZIA
Mоdel GHT-25
Pojemność silnika [cm
3
] 25.4
Prędkość bez obciążenia [obr./min] 7500
Moc silnika [HP] 1.05
Liczba suwów silnika 2
Sposób chłodzenia silnika
chłodzony powietrzem
System rozruchu
pchnięcie
Pojemność zbiornika paliwa [ml] 0.6
Proporcje mieszanki [benzyna:olej] 40 : 1
Zużycie paliwa [g/kwh] 488
Rodzaj ostrza podwójna listwa tnąca
Długość listwy tnącej [mm] 560
Kąt ustawienia listwy tnącej [mm] 27.8
Liczba zębów listwy tnącej 16
Poziom wibracji [m/s
2
]
7 (K=1.5)
Poziom ciśnienia akustycznego [dB(A)]
110 (K=3)
Poziom mocy akustycznej [dB(A)]
94 (K=3)
Masa [kg]
5.8
Page 47

47
PL
Instrukcja użytkowania
zapoznać się ze sposobami jego zatrzymania w
sytuacjach nagłych.
Przestrzegając tych prostych instrukcji, utrzymacie
Państwo wasze narzędzie w stanie sprawności.
∙ Przed użyciem narzędzie należy prawidłowo
zmontować.
∙ Narzędzia należy używać ściśle zgodnie z
przeznaczeniem.
∙ Proszę z uwagą traktować napisy ostrzegawcze
na narzędziu i wnikliwie się z nimi zapoznać.
Uważność, rozsądne podejście do pracy i odpowiednie
przygotowanie osób, uczestniczących w użytkowaniu,
transporcie oraz obsłudze, pomogą zapobiegać
nieszczęśliwym wypadkom.
∙ Nie zostawiać narzędzia bez nadzoru.
∙ Nie dopuszczać do użytkowania narzędzia przez
dzieci. Nie pozwalać dzieciom bawić się narzędziem.
∙ Nie dopuszczać do przebywania w pobliżu
narzędzia dzieci i zwierząt. Osoby, które mają ochotę
poobserwować pracę narzędzia, powinny znajdować
się w bezpiecznej odległości od niego.
∙ Podczas pracy z narzędziem użytkownik ponosi
odpowiedzialność za bezpieczeństwo osób trzecich.
∙ Osoby, nie zaznajomione z instrukcjami użytkowania,
dzieci, osoby niepełnoletnie, które nie osiągnęły wieku,
pozwalającego na użytkowanie narzędzia, a także
osoby, znajdujące się w stanie upojenia alkoholowego
lub będące pod wpływem narkotyków albo produktów
leczniczych, nie mogą być dopuszczone do pracy
z narzędziem. Wiek operatora określają miejscowe akty
normatywne.
OSTROŻNIE! Alkohol, niektóre produkty
lecznicze i substancje narkotyczne,
a także niedyspozycja zdrowotna,
upał i zmęczenie obniżają szybkość
reakcji. Nie używać danego narzędzia w
wymienionych powyżej przypadkach.
∙ Upewnić się, że wszystkie urządzenia ochronne
(o ile takowe są) zostały zamontowane i są zdatne do
eksploatacji.
∙ Nie używać narzędzia bez urządzeń ochronnych (o
ile takowe są) lub w przypadku ich uszkodzenia.
∙ Dokonać oględzin pod względem nie
przymocowanych części (nakrętek, śrub, wkrętów
itd.) lub uszkodzeń. W celu zapewnienia bezpiecznej
pracy narzędzia należy okresowo sprawdzać, czy
śruby i wkręty są dobrze dokręcone (o ile takowe są).
W razie konieczności przed użyciem narzędzia należy
dokonać ich naprawy lub wymiany. W przypadku użycia
uszkodzonego narzędzia operator lub osoby postronne
mogą zostać poważnie zranione.
∙ Używać do pracy odpowiedniej odzieży specjalnej.
Obszerne ubrania, ozdoby mogą zostać wciągnięte
przez ruchome części. Pracować tylko w nadającej się
do tego specjalnej odzieży. Chronić nogi i stopy przed
rozlatującymi się odpadami. Nie pracować boso lub w
odkrytych sandałach. Zebrać długie włosy z tyłu głowy.
∙ Utrzymywać rączki i rękojeści w czystości oraz
suchości.
∙ Używać odpowiednich środków ochrony
indywidualnej. Używać okularów ochronnych i rękawic.
Podczas pracy z proszkami lub w przypadku wyrzutu
spalin korzystać z respiratora przeciwpyłowego. W
razie konieczności nałożyć nie śliskie obuwie, kask
i zabezpieczyć organy słuchowe zatyczkami. Jeśli
poziom hałasu przekracza 85 dB(A), obowiązkowo
należy używać ochronnych nauszników.
OSTROŻNIE! Korzystać ze
środków ochrony indywidualnej!
Urządzenia ochronne i środki
ochrony indywidualnej zapewniają
bezpieczeństwo Państwa zdrowia
i zdrowia osób z otoczenia, a także
gwarantują sprawną pracę narzędzia.
∙ Nie włączać narzędzia, jeśli jest ono przewrócone
lub znajduje się w stanie spoczynku.
∙ Podczas pracy zająć stabilną pozycję. Stale
utrzymywać równowagę.
∙ Zachowywać czystość miejsca pracy. W miejscach
zawalonych rzeczami obserwuje się wysoki poziom
wypadkowości. Przed użyciem narzędzia sprzątnąć
z miejsca pracy wszystkie postronne przedmioty, a
także unikać podczas pracy wpadnięcia pod narzędzie
postronnych przedmiotów.
∙ Nie naciskać mocno na narzędzie podczas pracy.
∙ Używać narzędzia tylko przy dobrym dziennym
świetle lub sztucznym oświetleniu. Nie używać narzędzia
w warunkach złej widoczności.
∙ Nie upuszczać narzędzia, nie dopuszczać do
zderzenia narzędzia z jakimikolwiek przeszkodami.
OSTROŻNIE! Bądźcie uważni. Nie odrywać wzroku
od obrabianego przy pomocy narzędzia przedmiotu.
Oderwanie uwagi może spowodować utratę kontroli.
Podchodzić do pracy rozsądnie.
Szczególne zasady bezpieczeństwa
Wyposażenie ochronne
∙ Podczas użytkowania pilarki należy zawsze
używać odpowiedniego wyposażenia ochronnego. Nie
zagwarantuje to całkowitego wyeliminowania ryzyka
odniesienia obrażeń, ale pozwoli ograniczyć ich zakres
w razie wypadku.
∙ Należy używać kasku ochronnego, nauszników
lub zatyczek do uszu, okularów ochronnych lub maski,
Page 48

48
PL
Instrukcja użytkowania
rękawic ochronnych, mocnych spodni pozbawionych
luźnych elementów oraz zabudowanych butów z
metalowymi noskami i antypoślizgową podeszwą.
Wszystkie ubrania powinny być ściśle przylegające, ale
nieograniczające swobody ruchów.
∙ Przed pracą z listwą tnącą założyć rękawice
ochronne.
Prawidłowe warunki pracy
∙ Nie dopuszczać do przebywania w pobliżu
narzędzia dzieci i zwierząt. Osoby, które mają ochotę
poobserwować pracę narzędzia, powinny znajdować
się w bezpiecznej odległości od niego.
∙ Należy upewnić się, że w pobliżu nie znajdują się
żadne przedmioty, które mogłyby przeszkodzić w pracy.
∙ Upewnić się, że w pobliżu nie znajdują się obiekty
takie jak wystające korzenie, pnie, kamienie itp., które
mogłyby stanowić przeszkodę w razie konieczności
szybkiego przemieszczania się.
∙ Należy zachować szczególną ostrożność podczas
pracy na stromych zboczach.
∙ Podczas pracy należy zwracać baczną uwagę
na otoczenie i być gotowym do reakcji w sytuacji
wystąpienia zagrożenia.
Przeznaczenie urządzenia
∙ Pilarka przeznaczona jest wyłącznie do cięcia
drewna. Cięcie innych materiałów spowoduje uszkodzenie
urządzenia i utratę możliwości naprawy gwarancyjnej.
∙ Należy używać wyłącznie wyposażenia i
akcesoriów zalecanych przez producenta.
∙ Nie wolno używać urządzenia z uszkodzonymi
lub zdjętymi osłonami ochronnymi. Nie wolno używać
urządzenia, jeśli wszystkie elementy nie są prawidłowo
zamontowane.
∙ Przed uruchomieniem urządzenia należy upewnić
się, że wszystkie narzędzia, klucze itp. używane do
regulacji pilarki znajdują się w bezpiecznej odległości.
∙ Podczas pracy z maszyną może dojść do
niekontrolowanych ruchów powrotnych; aby ich unikać,
należy zawsze trzymać urządzenie pewnie dwiema
rękami za uchwyt. Nie wolno trzymać urządzenia za
inne części niż uchwyty.
OTWARCIE OPAKOWANIA
Przy otwarciu opakowania sprawdzić, czy zawiera
ono wszystkie części. Patrz: schematy załączone
do niniejszej instrukcji. W przypadku braku lub
niesprawności którejkolwiek z części, należy zwrócić
się do centrum obsługi IVT.
KONTROLA PRZED URUCHOMIENIEM
OSTRZEŻENIE! Przed przystąpieniem
do montażu, regulacji lub konserwacji
należy wyłączyć urządzenie. Należy
również wyciągnąć zatyczkę świecy
zapłonowej.
UWAGA! Przed pracą z listwą tnącą
założyć rękawice ochronne (18).
Kontrola osłony uchwytu (2) [F1]
Osłona uchwytu (2) chroni dłonie przed kontaktem z
listwą tnącą (18). Przykładowo, jeśli dłoń użytkownika
zsunie się z przedniego uchwytu (1).
UWAGA! Sprawdzić, czy osłona
uchwytu (2) jest prawidłowo
zamocowana i czy nie jest
uszkodzona.
Kontrola listwy tnącej (18) oraz jej osłony (19) [F2]
∙ Regularnie sprawdzać stan listwy tnącej (18) oraz
jej osłony (19).
∙ Jeśli listwa tnąca (18) lub jej osłona (19) są wygięte
lub uszkodzone, należy je wymienić.
Jeśli będzie to wymagane, należy naostrzyć krawędzie
tnące dopilnowując, by dolna krawędź była zaokrąglona.
Jeśli są popękane lub w inny sposób uszkodzone,
wymienić listwy tnące..
Aby zapewnić właściwe cięcie, docisk między listwami
tnącymi (18) musi być odpowiedni.
Docisk reguluje się poprzez przekręcenie w prawo śrub
usytuowanych u spodu listwy.
Gdy listwy tnące (18) są odpowiednio wyregulowane,
luz między listwami (18) powinien wynosić 0,2-0,4,
mierząc przy śrubach.
UWAGA! Nie chłodzić listwy tnącej (18) wodą, gdy
używana jest szlierka, gdyż może to skutkować
pojawieniem się pęknięć na listwie tnącej (18).
PRZED ROZPOCZĘCIEM PRACY
OSTRZEŻENIE! Wykonać poniższą procedurę gdy
silnik jest chłodny.
Paliwo - zalecenia
Urządzenie jest wyposażone w dwusuwowy silnik i musi
Page 49

49
PL
Instrukcja użytkowania
pracować na mieszance benzyny oraz oleju do silników
dwusuwowych. Wykonanie mieszanki w odpowiednich
proporcjach jest bardzo ważne.
∙ Nalać odpowiednią ilość benzyny (ołowiowej
lub bezołowiowej, bezalkoholowej) oraz oleju
dwusuwowego do butelki na mieszankę (czysty
pojemnik na paliwo), następnie mocno wstrząsać.
Zalecane proporcje mieszanki
BENZYNA : OLEJ > 40 : 1
UWAGA! Nie wolno stosować oleju do silników
czterosuwowych ani oleju dla silników chłodzonych
wodą.
Ponowne napełnianie paliwem
1. Przed dolaniem paliwa zawsze należy wyłączyć
silnik i pozwolić mu przestygnąć przed dolaniem paliwa.
2. Położyć urządzenie na ziemi z zatyczką zbiornika
(5) skierowaną w górę.
3. Delikatnie wyjąć zatyczkę (5) tak, aby potencjalny
nadmiar paliwa wypłynął powoli.
4. Oczyścić obszar wokół zatyczki zbiornika (4) paliwa
(5): zanieczyszczenia w zbiorniku mogą spowodować
problemy z pracą urządzenia.
5. Upewnić się, że paliwo jest właściwie wymieszane
wstrząsając zbiornikiem (4) przed dolaniem paliwa.
6. Napełnić zbiornik poprawnie przygotowaną
mieszanką benzyny i oleju. Nie przepełniać zbiornika.
7. Założyć zatyczkę zbiornika paliwa (5).
UWAGA! Jeżeli urządzenie nie jest użytkowane przez
dłuższy okres czasu (ponad 4 tygodnie), zbiornik
należy opróżnić i wyczyścić.
UWAGA! Wytrzeć wszelkie rozlane
paliwo i wynieść urządzenie z miejsca,
w którym było tankowane (min. 3
metry) przed jego uruchomieniem.
URUCHAMIANIE / ZATRZYMYWANIE
SILNIKA [F3]
Uruchamianie silnika
1. Umieścić urządzenie na twardym, równym podłożu.
2. Przestawić przycisk ON/OFF (wł./wył.) (6) do
pozycji „I”.
3. Zamknąć dźwignię dławika (ssania) (10). UWAGA:
Pozycja ZAMKNIĘTA
powoduje zwiększenie
mieszanki paliwa w celu uruchomienia zimnego silnika.
W celu restartu ciepłego silnika pozostawić dźwignię
ssania (10) w pozycji OTWARTEJ
.
4. Kilkukrotnie nacisnąć pompę paliwa (11) do
momentu, gdy paliwo wypełni plastikowy zbiorniczek
typu bańka (aby uruchomić silnik nie trzeba go
naciskać).
5. Dźwignia przepustnicy (7) musi być ustawiona
na pozycję ‘start’, w tym celu: nacisnąć blokadę
przepustnicy (9) (jeżeli istnieje) chwytając uchwyt
sterowniczy i przytrzymując przycisk nastawczy
przepustnicy (8) jednocześnie zwalniając dźwignię
przepustnicy (7).
6. Przytrzymać urządzenie na podłożu korzystając z
lewej ręki (UWAGA! Nie używać w tym celu stopy!).
7. Chwycić starter linkowy (3), powoli pociągnąć za
linkę prawą ręką do momentu wyczucia oporu, wówczas
gwałtownie szarpnąć linkę (UWAGA! Nie wolno owijać
linki (3) wokół dłoni!)
8. Powtarzać ciągnięcie linki (3) do momentu
uruchomienia silnika.
9. W momencie, gdy silnik się uruchomi otworzyć
dźwignię ssania (10), tylko wtedy, gdy pozostaje w
pozycji ZAMKNIĘTEJ ponieważ silnik był zimny.
10. Silnik rozgrzewać przez kilka minut. Gdy silnik
wystarczająco się rozgrzeje, pociągnąć i zwolnić
dźwignię przepustnicy (7) w celu zwolnienia przycisku
nastawczego przepustnicy (8).
UWAGA: przycisk nastawy (blokady) przepustnicy
(8) jest wykorzystywany do przytrzymywania
dźwigni przepustnicy (7) w pozycji biegu jałowego
umożliwiającego rozruch.
UWAGA! Urządzenie nie może napotkać na żadną
przeszkodę, gdy silnik jest uruchamiany w trybie
wciśniętego przycisku nastawczego przepustnicy (8).
UWAGA! Nie używać przycisku ustawienia
przepustnicy (8) w trakcie użytkowania urządzenia.
Bieg jałowy nie zostanie włączony, a listwa tnąca (18)
będzie się w dalszym ciągu obracać do momentu
zwolnienia przycisku ustawienia przepustnicy (8) i
zwolnienia dźwigni przepustnicy (7).
Zatrzymywanie silnika
1. Ustawić dźwignię przepustnicy (7) w pozycji
‘low speed’ (niska prędkość) i zmniejszyć prędkość
obrotową silnika.
2. Ustawić przełącznik on/off (6) (wł./wył.) do pozycji
STOP „O”.
Page 50

50
PL
Instrukcja użytkowania
OSTRZEŻENIE! Po zatrzymaniu
silnika lub zwolnieniu dźwigni
przepustnicy (7) przez krótki czas
listwa tnąca będzie się obracać (18).
Może dojść do zranienia na skutek
dotknięcia obracającej się listwy.
Należy pewnie trzymać urządzenie do
momentu, aż nastąpi całkowite jego
zatrzymanie.
I N ST R U K C J A O B S Ł U G I
UWAGA! Przez pierwsze 20 godzin nie pracować
przy pełnym obciążeniu i nie dopuszczać, by
urządzenie pracowało na biegu jałowym przy
całkowicie otwartej przepustnicy.
Uchwyt obrotowy [F4]
Aby ułatwić cięcie, uchwyt obrotowy (12) można obrócić
o 45°/90° w prawo lub lewo od centralnego położenia.
∙ Wyłączyć urządzenie.
∙ Zwolnić dźwignię przepustnicy (7) i jej blokadę
(9), następnie pociągnąć dźwignię zwalniania (13), aby
zwolnić uchwyt obrotowy (12).
∙ Przekręcać uchwyt obrotowy (12), aż dźwignia
zwalniania (13) zaskoczy na swoje miejsce.
∙ Upewnić się, że uchwyt obrotowy (12) jest
unieruchomiony w nowym położeniu i ponownie
uruchomić urządzenie.
Ze względów bezpieczeństwa podczas obracania
uchwytu obrotowego (12) nie można przyśpieszyć pracy.
Sposoby cięcia
∙ Aby uzyskać najlepszy rezultat cięcia, należy
powoli przesuwać urządzenie do przodu, zwłaszcza w
przypadku grubych żywopłotów.
∙ Cięcie należy zaczynać z boków a na końcu
przycinać górną część żywopłotu.
∙ Aby uzyskać jednakową wysokość żywopłotu,
zaleca się, aby użyć linki metalowej, względem której
będzie się przycinało gałęzie wystające poza linkę.
∙ Przycinać do góry i do dołu używając obu stron
listwy tnącej (18), wykonując ruchy półkoliste.
Cięcie w pionie [F5]:
∙ Przesuwać listwę tnącą (18) od dołu do góry,
wykonując ruch po łuku - obniżyć końcówkę listwy
tnącej (18), przesuwać wzdłuż żywopłotu, następnie
ponownie przesunąć listwę tnąc do góry, wykonując
ruch po łuku.
Cięcie w poziomie [F6]:
∙ Ustawić listwę tnącą pod kątem od 0° do 10°,
przesuwając urządzenie w poziomie.
∙ Przesuwać listwę tnącą (18) po łuku na zewnątrz
żywopłotu, tak by listwę tnącą przesunąć ku dołowi.
OBSŁUGA I PRZECHOWYWANIE
OSTROŻNIE! Przed rozpoczęciem
pracy z narzędziem należy zatrzymać
silnik i poczekać aż wszystkie
ruchome części całkowicie się
zatrzymają.
∙ Utrzymywać narzędzie i otwory wentylacyjne (o
ile są) w czystości. Regularne oczyszczanie i obsługa
gwarantują wysoką efektywność i długie użytkowanie
narzędzia.
∙ W przypadku zepsucia się, bez względu na
przestrzeganie wszystkich zasad użytkowania i
pobierania prób narzędzia, naprawa powinna być
dokonywana w ocjalnym centrum serwisowym IVT.
∙ Wszystkie nakrętki, śruby i wkręty powinny być
dokładnie dokręcone.
∙ Należy wymienić uszkodzone lub zużyte części.
∙ Używać tylko oryginalnych części zamiennych.
Części, wyprodukowane przez innych producentów,
niedokładnie przylegają i zwiększają ryzyko powstania
urazów.
∙ Przechowywać narzędzie w suchym niedostępnym
dla dzieci miejscu, w bezpiecznej odległości od
materiałów łatwopalnych.
∙ Przechowywać zbiorniki paliwowe w bezpiecznym
miejscu. Nie przechowywać narzędzi z paliwem w baku
w pomieszczeniu, w którym może dojść do zapłonu
oparów.
Filtr powietrza [F7]
Filtr powierza redukuje ilość zanieczyszczeń na wylocie
urządzenia. Konsekwentnie, wymaga się regularnych
kontroli. Filtr powietrza należy sprawdzać co 25 godzin
pracy i czyścić w razie potrzeby. Jeżeli powietrze jest
zapylone ltr należy sprawdzać częściej.
1. Zdjąć osłonę ltra powietrza (16).
2. Wyjąć element ltrujący (17).
3. Wyczyścić element ltrujący (17) trzepiąc go lub
przedmuchując, w razie konieczności umyć ciepłą
wodą z mydłem. Przed zainstalowaniem osuszyć.
Jeżeli element ltrujący (17) jest zniszczony lub
skurczony, wymienić go na nowy.
UWAGA! Nigdy nie czyścić elementu ltra powietrza
(29) benzyną lub niepalnymi rozpuszczalnikami.
Tłumik
Okresowo sprawdzać tłumik pod kątem luźnych
łączników, uszkodzeń bądź korozji. W przypadku
Page 51

51
PL
Instrukcja użytkowania
znalezienia wycieku należy zatrzymać urządzenie i
oddać go do naprawy.
Świeca (20) [F8]
Sprawdzać świecę (20) pod kątem zabrudzeń co
około 10 godzin pracy i w razie konieczności oczyścić
szczotką miedzianą. Następnie serwisować świecę co
50 godzin pracy.
1. Zdjąć kapturek na świecę.
2. Wykręcić świecę (20) kluczem do świec.
3. Sprawdzić stan świecy (20). Sprawdzić, czy przerwa
na elektrodzie wynosi 0,6-0,7 mm, w przeciwnym razie
wyregulować. Jeżeli jest brudna, wyczyścić. Jeżeli jest
uszkodzona, wymienić na nową, zalecaną.
4. Montować w odwrotnej kolejności.
Filtr paliwa (14) [F9]
Filtr paliwa (14) głowicy zasysającej jest użytkowany do
napełniania paliwa przez gaźnik. Jeżeli silnik zgaśnie
na skutek braku paliwa sprawdzić ltr paliwa (14) pod
kątem blokady. Co 50 godzin użytkowania należy
przeprowadzić okresową inspekcję wizualną ltra paliwa
(14). Filtry, które stwardniały, są zanieczyszczone lub
zapchane należy wymienić.
1. Otworzyć zatyczkę ltra paliwa (5) i ostrożnie wylać
paliwo ze zbiornika.
2. Użyć haczyka drucianego do wyciągnięcia głowicy
przez otwór wlotowy zbiornika.
3. Sprawdzić ltr paliwa (14). W przypadku
zanieczyszczenia wyjąć i umyć niepalnym
rozpuszczalnikiem.
4. Usunąć wodę i brud zalegające w zbiorniku
przepłukując jego wnętrze.
5. Złożyć elementy.
Skrzynia biegów [F10]
Co roku przed rozpoczęciem sezonu należy z użyciem
smarowniczki smarować elementy skrzyni biegów. Jeśli
urządzenie jest stosunkowo często użytkowane, należy
częściej smarować skrzynię biegów.
Nastawa prędkości na biegu jałowym [F11]
∙ Jeżeli silnik gaśnie, gdy dźwignia przepustnicy (7)
nie jest naciskana, należy wyregulować prędkość na
biegu jałowym: przekręcać śrubę regulującą prędkość
(21) zgodnie z ruchem wskazówek zegara do momentu
swobodnej pracy urządzenia na biegu jałowym (wzrasta
ilość obrotów).
∙ Jeżeli prędkość na biegu jałowym jest zbyt wysoka
i narzędzie tnące obraca się mimo, że dźwignia
przepustnicy (7) nie jest wciśnięta, prędkość należy
zredukować przekręcając śrubę regulacji prędkości (21)
w kierunku przeciwnym do ruchu wskazówek zegara do
momentu, gdy narzędzie tnące przestanie się obracać.
WAŻNE! Ustawiać prędkość na biegu jałowym gdy
urządzenie jest ciepłe.
Ustawienia gaźnika
Gaźnik musi być ustawiany przez autoryzowany punkt
serwisowy.
Smarowanie listwy tnącej (18) [F12]
Co 4 godziny użytkowania nanosić kilka kropli oleju na
każdy otwór na śrubę na listwie tnącej (18).
KONSERWACJA PRZED DŁUŻSZYM
OKRESEM PRZESTOJU
∙ Za pomocą szczotki oczyścić urządzenie.
∙ Sprawdzić uszkodzenia lub luzy każdej z części.
W przypadku wykrycia nieprawidłowości, naprawić je
przed ponownym użyciem.
∙ Wylać całe paliwo z silnika, następnie włączyć
silnik. Pozostawić urządzenie pracujące aż do
zatrzymania.
∙ Wyjąć świecę (20) i zaaplikować 1-2 cm
3
oleju
silnikowego do silnika.
∙ Zaaplikować olej przeciw-korozyjny na części
metalowe takie jak kabel przepustnicy.
∙ Na listwę tnącą (18) nakładać osłonę na ostrze
(19).
∙ Przechowywać urządzenie w pomieszczeniu;
unikać wilgoci.
OCHRONA ŚRODOWISKA NATURALNEGO
Oddawajcie śmieci i odpadki do
przeróbki!
Narzędzie, urządzenia dodatkowe i opakowanie
należy odesłać do bezpiecznej z ekologicznego punktu
widzenia przeróbki.
Elementy plastykowe są oznaczone adnotacją o
możliwości klasykowanej przeróbki. Niniejsza
instrukcja została wydrukowana na papierze
makulaturowym, nie zawierającym chloru.
Page 52

52
PL
Instrukcja użytkowania
WYKRYWANIA I USUWANIE NIESPRAWNOŚCI
OSTROŻNIE! Przed rozpoczęciem oględzin narzędzia pod względem niesprawności należy
wyłączyć silnik i poczekać dopóki wszystkie ruchome części całkowicie się zatrzymają.
Typowe niesprawności Przyczyna niesprawności Usuwanie niesprawności
Silnik nie uruchamia się
∙ Brak obsługi pompy paliwa (11).
∙ Nacisnąć pompę 7 – 10 razy.
∙ Przełącznik on/off w pozycji off
(wył.) „O”.
∙ Przestawić przełącznik on/off do
pozycji „I” (wł.).
∙ Dźwignia ssania (10) nie jest
ZAMKNIĘTA (zimny silnik).
∙ Przesunąć dźwignię ssania (10)
do pozycji ZAMKNIĘTEJ.
∙ Brak paliwa.
∙ Dolać paliwa.
∙ Filtr paliwa (14) zapchany, wadliwe
działanie gaźnika, wadliwe działanie
zapłonu, zapchane zawory itp.
∙ Wymienić lub naprawić wadliwe
elementy w zależności od potrzeb.
∙ Złej jakości paliwo.
∙ Wymienić na nowe, zgodne z
zaleceniami.
∙ Wadliwa, zabrudzona, zniszczona
świeca (20).
∙ Wyczyścić, naprawić lub
wymienić.
Silnik zaprzestaje pracy.
Prędkość silnika nie
wzrasta.
∙ Silnik nierozgrzany.
∙ Wykonać procedurę rozgrzewania
silnika.
∙ Dźwignia ssania ustawiona w
pozycję ZAMKNIĘCIA, mimo, że silnik
jest rozgrzany (10).
∙ Ustawić w pozycji OTWARTEJ.
∙ Zapchany ltr paliwa (14) lub
zapchany lub zanieczyszczony element
ltracyjny (17).
∙ Oczyścić.
∙ Kabel przepustnicy wadliwie
wyregulowany, uszkodzony lub wygięty.
∙ Wyregulować lub wymienić w
razie potrzeby.
W przypadku niemożności rozwiązania problemu na podstawie podanych powyżej informacji, proszę zabrać
narzędzie do autoryzowanego centrum serwisowego IVT.
Page 53

53
PL
Instrukcja użytkowania
UWAGA! NIE NALEŻY DOKONYWAC PRÓB SAMODZIELNEJ NAPRAWY PRODUKTU
ANI PRZY NIM MANIPULOWAĆ! Wszelkie działania dotyczące naprawy lub dodatkowej
konserwacji muszą przeprowadzać wykwalikowani i autoryzowani pracownicy centrum
usługowego IVT. Nie należy dokonywać prób modykacji żadnych wewnętrznych części
produktu! CZYNNOSC TAKA SPOWODUJE CAŁKOWITE UNIEWAŻNIENIE GWARANCJI, A
TAKŻE MOŻE DOPROWADZIC DO POWAŻNEGO USZKODZENIA CIAŁA LUB PRODUKTU.
Page 54

54
IT
Manuale di istruzioni
COMPONENTI
1. Maniglia frontale
2. Protezione della maniglia
3. Corda d’avviamento
4. Serbatoio del carburante
5. Tappo del serbatoio del carburante
6. Interruttore di accensione / spegnimento
7. Leva dell’acceleratore
8. Pulsante di avvio facilitato
9. Pulsante di sblocco
10. Leva dell’aria
11. Pompa del carburante
12. Maniglia rotante
13. Leva di rilascio
14. Filtro del carburante
15. Filtro dell’aria
16. Coperchio del ltro dell’aria
17. Elemento ltrante
18. Lama di taglio
19. Protezione della lama
20. Candela
21. Vite di regolazione regime di minimo
22. Chiave della candela
23. Chiave
24. Chiave esagonale
25. Cacciavite
26. Tanichetta per l’olio
CONTENUTO DELLA CONFEZIONE
Manuale d’istruzioni (1 pz), chiave della candela (1 pz),
chiave (1 pz), giravite (1 pz), chiave esagonale (2 pz),
tanichetta per l’olio (1 pz).
UTILIZZO
Questo strumento è destinato per il taglio di siepi e
arbusti con steli e rami spessi.
NORME DI SICUREZZA PER L’USO
Regole generali di sicurezza
Le seguenti istruzioni di sicurezza servono per il
corretto utilizzo dello strumento e per la tutela della
propria sicurezza, pertanto si prega di leggere molto
attentamente.
Quando si passa questo strumento ad una terza persona,
anche queste istruzioni devono essere consegnate.
Conservare questo manuale di istruzioni e tutta la
documentazione in dotazione con lo strumento per farvi
riferimento in futuro, in caso di bisogno.
Integrare le seguenti norme di sicurezza con le
indicazioni riportate sul prodotto.
Prendere condenza con tutti i pulsanti e i controlli
e assicurarsi di conoscere il corretto utilizzo dello
strumento prima di iniziare a utilizzarlo, ma soprattutto
assicurarsi di sapere come interromperne l’uso in caso
SPECIFICHE TECNICHE
Mоdello GHT-25
Cilindrata [cc] 25.4
Velocità a vuoto [RPM] 7500
Potenza del motoere [HP] 1.05
Numero di tempi del motore 2
Raffreddamento del motore ad aria
Sistema di avviamento a strappo
Capacità del serbatoio carburante [ml] 0.6
Proporzione miscela [benzina:olio] 40 : 1
Consumo carburante [g/kwh] 488
Tipo di lama lama doppia
Lunghezza della lama [mm] 560
Passo della lama [mm] 27.8
Numero di denti della lama 16
Livello di vibrazioni [m/s
2
] 7 (K=1.5)
Livello di pressione sonora [dB(A)] 110 (K=3)
Livello di potenza sonora [dB(A)] 94 (K=3)
Peso [kg] 5.8
Page 55

55
IT
Manuale di istruzioni
di emergenza.
Seguire queste semplici istruzioni contribuirà inoltre a
mantenere lo strumento in buone condizioni di lavoro.
∙ Lo strumento deve essere montato correttamente
prima dell’uso.
∙ Usare lo strumento solamente per gli scopi per cui
è stato progettato.
∙ In aggiunta al prodotto sono state progettate anche
delle etichette di sicurezza che devono essere prese
in considerazione assieme con le indicazioni in merito
all’equipaggiamento di sicurezza che deve essere adottato.
La prevenzione di incidenti dipende dalla consapevolezza,
dal buon senso e dalla formazione adeguata di tutti
i soggetti coinvolti nell’utilizzo, nel trasporto, nella
manutenzione e stoccaggio dello strumento.
∙ Non lasciare mai lo strumento incustodito.
∙ Non permettere ai bambini di utilizzare lo strumento.
I bambini devono essere tenuti sempre sotto controllo
per impedire che giochino con lo strumento.
∙ Tenere i bambini e gli animali domestici lontano.
I terzi devono essere mantenuti a un’opportuna
distanza di sicurezza quando lo strumento è in uso.
Interromperne l’utilizzo se vi sono nei paraggi altre
persone, specialmente bambini o animali domestici.
∙ L’utente è responsabile per i terzi, mentre lavora
con lo strumento.
∙ Le persone che non conoscono le istruzioni per l’uso,
i bambini, i minori che non hanno ancora raggiunto l’età
minima per l’utilizzo di questo strumento e le persone
sotto l’inuenza di alcool, droghe o farmaci non sono
autorizzati ad utilizzare lo strumento. Alcune normative
locali possono stabilire l’età minima dell’utilizzatore.
ATTENZIONE! Il consumo di alcool,
farmaci e droghe, oltre a stati di
malattia, febbre e stanchezza possono
inuenzare la capacità di reagire. Non
usare lo strumento in una o più di
queste condizioni.
∙ Assicurarsi che tutti i dispositivi di protezione (se
presenti) siano montati correttamente e che siano in
buone condizioni.
∙ Non usare mai lo strumento con i dispositivi di
sicurezza o eventuali protezioni (se presenti) difettosi o
senza dispositivi di sicurezza correttamente montati.
∙ Ispezionare bene lo strumento per cercare parti
eventualmente allentate (per esempio: dadi, bulloni, viti,
etc) e eventuali danni. Controllare a intervalli frequenti,
che viti e bulloni siano adeguatamente serrati e che
le attrezzature siano in buone condizioni di lavoro.
Ripararle o sostituirle, se necessario, prima di utilizzare
lo strumento. Gravi lesioni all’operatore e ai presenti
possono vericarsi se vi è un danno allo strumento.
∙ Durante il funzionamento dello strumento, vestirsi
adeguatamente. Non indossare abiti larghi o gioielli
che potrebbero impigliarsi nello strumento. Indossare
indumenti da lavoro adatti. Si raccomanda che le
gambe e i piedi siano ben coperti, al riparo da eventuali
schegge durante il lavoro. Non utilizzare lo strumento
se si è a piedi nudi o con sandali aperti. I capelli lunghi
devono essere raccolti dietro la nuca.
∙ Mantenere tutte le impugnature e i manici asciutti,
puliti e privi di olio o grasso.
∙ Usare dispositivi di protezione. Usare occhiali di
protezione e guanti di sicurezza. Indossare anche una
mascherina antipolvere durante le operazioni polverulente
e se sono presenti gas di scarico. Quando è necessario,
indossare anche scarpe robuste e antiscivolo, casco e
tappi per le orecchie. Se il livello di rumore supera 85 dB
(A), è obbligatoria una protezione acustica.
ATTENZIONE! Utilizzare dispositivi
di protezione personale! I dispositivi
di sicurezza e le attrezzature di
protezione personale proteggono la
propria salute e la salute degli altri e
garantiscono un funzionamento senza
problemi dello strumento.
∙ Non iniziare ad utilizzare lo strumento se questo è
capovolto o non è nella corretta posizione di lavoro.
∙ Accertarsi di avere una corretta posizione mentre si
opera con lo strumento. Mantenere una posizione salda
e un buon equilibrio in ogni momento.
∙ Tenere pulita l’area di lavoro. Prima dell’uso dello
strumento, tutti gli eventuali ostacoli devono essere
rimossi dalla zona di lavoro; prestare attenzione anche
a eventuali corpi estranei durante il lavoro.
∙ Non forzare lo strumento.
∙ Lavorare solo alla luce del giorno o comunque in
condizioni di sufciente illuminazione articiale. Non
utilizzare mai lo strumento senza una buona visibilità.
∙ Fare attenzione a non fare cadere lo strumento o
ad urtarlo contro ostacoli.
ATTENZIONE! Mantenere sempre un’attenzione
costante. Prestare attenzione a quello che si sta
facendo. La distrazione può causare la perdita di
controllo. Utilizzare il buon senso.
Regole di sicurezza per motori a benzina
ATTENZIONE! La benzina è altamente
inammabile. Maneggiare il carburante
con cura.
Page 56

56
IT
Manuale di istruzioni
∙ Conservare il carburante in contenitori progettati
appositamente per questo scopo. Serrare bene il tappo
del serbatoio del carburante e il tappo della tanica del
carburante.
∙ Fare rifornimento solo all’aperto e non fumare
durante il rifornimento.
∙ Aggiungere il carburante prima di avviare il
motore.
∙ Lasciare sempre che la marmitta si raffreddi prima
di riempire il serbatoio del carburante.
∙ Non rimuovere il tappo del serbatoio, né fare
benzina mentre il motore è in funzione o quando il
motore è ancora caldo.
∙ In caso di fuoriuscita di benzina, non avviare il
motore, ma spostare lo strumento lontano dalla zona di
fuoriuscita del carburante ed evitare l’accensione no a
che i vapori della benzina si saranno dissipati.
∙ Pulire il carburante fuoriuscito prima di riavviare la
macchina.
∙ Riporre tutti i contenitori del carburante in un luogo
sicuro.
∙ Non far funzionare il motore al chiuso o in uno
spazio limitato: ci potrebbero essere ristagni di
pericolose esalazioni di monossido di carbonio e fumi di
scarico molto dannosi.
ATTENZIONE! I fumi di scarico
contengono monossido di carbonio,
un gas incolore e inodore. Respirare
tale gas di scarico può causare perdita
di coscienza e può condurre alla
morte. Per mantenere il gas di scarico
ad un livello di sicurezza, assicurare
una ventilazione adeguata.
∙ Non riporre mai l’apparecchio con benzina
nel serbatoio all’interno di un edicio, dove i vapori
potrebbero raggiungere una amma libera o scintille.
∙ Per ridurre il rischio di incendio, mantenere il
motore, la marmitta, il vano batteria e la zona di
stoccaggio benzina pulita e tenere la macchina lontano
dal fuoco o da scintille.
∙ Il sistema di scarico si scalda abbastanza da riuscire
ad inammare alcuni materiali. Tenere il dispositivo
lontano da materiali inammabili.
∙ La marmitta diventa molto calda durante il
funzionamento e rimane calda per alcuni minuti dopo
l’arresto del motore. Fare attenzione a non toccare
la marmitta quando è ancora molto calda. Lasciar
raffreddare il motore prima di riporre il dispositivo al
chiuso.
∙ Rimuovere eventuali chiavi di regolazione prima di
accendere la macchina.
ATTENZIONE! Durante l’utilizzo degli
utensili a benzina, potrebbero essere
prodotte alcune polveri contenenti
sostanze chimiche che possono
causare il cancro.
Alcune di queste sostanze chimiche sono: vernici a
base di piombo, silice cristallina di mattoni e cemento e
altri prodotti per muratura, arsenico e cromo derivanti da
legname trattato chimicamente e altri prodotti pericolosi.
Se tali polveri sono presenti, il rischio varia in base alla
lunghezza dell’esposizione e al tipo di lavoro.
Per ridurre l’esposizione a tali sostanze chimiche,
ogni volta che si compiono operazioni polverulente,
lavorare in una zona ben ventilata con dispositivi di
sicurezza approvati, come le maschere anti-polvere,
che sono state appositamente progettate per ltrare
anche le particelle microscopiche.
∙ Se con lo strumento si colpisce un corpo estraneo,
esaminare il dispositivo per individuare eventuali danni
e procedere con tutte le riparazioni necessarie prima di
riavviare e continuare a lavorare.
∙ Se lo strumento inizia a vibrare in modo
anomalo, spegnere il motore e cercare di individuare
immediatamente la causa. Vibrazioni anomale sono
dovute generalmente a malfunzionamenti.
∙ Spegnere sempre la macchina e attendere che essa
si sia completamente arrestata prima di allontanarsi
dalla macchina, prima di effettuare manutenzione,
prima di cambiare gli accessori, prima di procedere con
operazioni di controllo, pulizia, risoluzione problemi e
prima di effettuare qualsiasi intervento sulla macchina.
∙ È proibito modicare o rimuovere qualsiasi parte
interna del dispositivo.
Regole di sicurezza speciche
Indossare dispositivi di protezione
∙ Indossare sempre dispositivi di protezione
personale adeguati. Questo comunque non escluderà
la possibilità di incidenti, ma ridurrà l’entità dei danni.
∙ Utilizzare un elmetto rigido, protezioni acustiche,
occhiali di protezione o una visiera; indossare guanti
e pantaloni con rinforzi, scarpe antinfortunistiche con
puntale rinforzato e con suole antiscivolo. Inoltre, i
vestiti da lavoro dovrebbero essere aderenti, ma non a
tal punto da limitare la libertà di movimento.
∙ Indossare guanti protettivi adeguati durante la
regolazione della lama.
Condizioni operative
∙ Tenere i bambini e gli animali domestici lontano.
I terzi devono essere mantenuti a un’opportuna
Page 57

57
IT
Manuale di istruzioni
distanza di sicurezza quando lo strumento è in uso.
Interromperne l’utilizzo se vi sono nei paraggi altre
persone, specialmente bambini o animali domestici.
∙ Assicurarsi che non ci siano oggetti nelle vicinanze
che potrebbero ostacolare il lavoro.
∙ Vericare che la zona di lavoro sia priva di
ostacoli, come radici, pietre o rami, che causerebbero
impedimento nel caso in cui si presenti la necessità di
spostarsi rapidamente.
∙ Prestare la massima attenzione quando si lavora
su terreni scoscesi.
∙ Controllare l’ambiente circostante, in modo da
sapersi muovere in eventuali situazioni di emergenza.
Utilizzo della macchina
∙ La macchina può essere utilizzata solo per il taglio
del legno. L’utilizzo della macchina per tagliare altri
materiali può causare danni alla macchina e in tal caso
la garanzia del prodotto sarà invalidata.
∙ Utilizzare solo utensili e accessori di taglio
raccomandati dal produttore.
∙ Non avviare mai lo strumento se privo dei dispositivi
di protezione o se questi sono danneggiati. Non utilizzare
la macchina se questa non è correttamente montata.
∙ Prima di avviare lo strumento, controllare che
eventuali chiavi o strumenti di regolazione siano stati
rimossi e riposti in sicurezza lontano dalla macchina.
∙ Quando si utilizza la macchina, può vericarsi un
contraccolpo non controllato; per evitare contraccolpi
mantenere sempre il dispositivo in modo sicuro con
due mani e non fare presa su altre parti tranne che sui
manici.
ESTRARRE DALL’IMBALLAGGIO
Quando si apre la confezione, assicurarsi che tutti
i componenti siano inclusi. Consultare le istruzioni
su questo manuale. Per eventuali parti mancanti o
danneggiate, si prega di contattare l’assistenza IVT.
CONTROLLI PRELIMINARI
ATTENZIONE! Prima di ogni
operazione assicurarsi che la
macchina sia spenta. Staccare il
cappuccio della candela.
ATTENZIONE! Indossare guanti
protettivi adeguati durante la
regolazione della lama (18).
Controllo della protezione della maniglia (2) [F1]
La protezione della maniglia (2) impedisce alle mani
di entrare in contatto con la lama di taglio (18), per
esempio, se l’operatore perde la presa sulla maniglia
frontale (1).
ATTENZIONE! Controllare che la
protezione della maniglia (2) sia
montata correttamente e non sia
danneggiata.
Controllo della lama di taglio (18) e della protezione
della lama (19) [F2]
∙ Controllare regolarmente lo stato della lama di
taglio (18) e della protezione della lama (19).
∙ Sostituire la lama di taglio (18) e la protezione della
lama (19) se dovessero essere piegate o danneggiate.
Se necessario, aflare ogni tagliente e assicurarsi che
l’angolo in basso sia arrotondato. Se danneggiato o
crepato, sostituirlo.
Per assicurare buoni risultati, è importante che la
pressione di contatto tra le lame di taglio (18) sia
corretta.
La pressione di contatto viene regolata girando le viti sul
lato inferiore della barra in senso orario.
Quando le lame di taglio (18) sono regolate
correttamente il gioco tra le lame di taglio (18) dovrebbe
essere 0,2-0,4 mm, misurato alle viti.
ATTENZIONE! Non raffreddare la lama di taglio (18) con
acqua, in caso di utilizzo di una smerigliatrice, perché si
potrebbero causare crepe sulla lama di taglio (18).
PRIMA DELLA MESSA IN FUNZIONE
ATTENZIONE! Eseguire le seguenti istruzioni a
motore freddo.
Raccomandazioni riguardanti il carburante
La macchina è dotata di motore a due tempi che
richiede una miscela di benzina e olio per motore a due
tempi. E’ importante dosare nelle giuste proporzioni la
quantità di olio-benzina per ottenere la corretta miscela.
∙ Versare la corretta percentuale di benzina (con o
senza piombo, senza alcool) e di olio per motori a due
tempi in una tanica per miscelazione (un contenitore
pulito per carburante), quindi agitare bene il contenitore.
PROPORZIONE CORRETTA DELLA MISCELA
BENZINA : OLIO > 40 : 1
Page 58

58
IT
Manuale di istruzioni
ATTENZIONE! Non utilizzare mai olio per motore
a quattro tempi e nemmeno olio per motori a due
tempi raffreddati ad acqua.
Rifornimento carburante
1. Spegnere sempre il motore e lasciarlo raffreddare
per alcuni minuti, prima di procedere al rifornimento del
carburante.
2. Appoggiare a terra la macchina, con il tappo del
serbatoio carburante (5) rivolto in alto.
3. Svitare il tappo del serbatoio carburante (5)
lentamente, al ne di rilasciare gradualmente l’eventuale
pressione creatasi all’interno.
4. Pulire accuratamente l’area attorno al tappo del
serbatoio carburante (5): nel caso fosse introdotto
sporco nel serbatoio (4), questo contaminerebbe il
carburante, causando problemi di funzionamento alla
macchina.
5. Assicurarsi che il carburante sia ben miscelato,
agitando nuovamente il contenitore della miscela prima
di riempire il serbatoio (4).
6. Riempire il serbatoio con la miscela in proporzione
corretta. Non riempire troppo.
7. Riavviatare propriamente il tappo del serbatoio
carburante (5).
ATTENZIONE! Se la macchina non verrà usata per
un lasso di tempo relativamente lungo (più di 4
settimane), il serbatoio del carburante deve essere
svuotato e pulito accuratamente.
CAUTELA! Asciugare accuratamente
eventuale carburante disperso e
allontanarsi (almeno 3 metri) dalla zona
in cui il rifornimento è stato effettuato,
prima di avviare la macchina.
AVVIAMENTO/ARRESTO DEL MOTORE
[F3]
Avviamento del motore
1. Posizionare la macchina a terra, in piano.
2. Portare l’interruttore di accensione/spegnimento
(6) sulla posizione ‘START’ oppure ‘ON’.
3. Chiudere la leva dell’aria (10). NOTA: per avviare
un motore a freddo, porre la leva dell’aria (10) sulla
posizione CHIUSA
. Per riavviare un motore caldo,
lasciare la leva dell’aria (10) sulla posizione APERTA
.
4. Premere diverse volte la pompa di adescamento
carburante (se presente), nché non si nota visivamente
che il carburante inizia a riempire il bulbo (se si vuole
riavviare un motore già caldo, non è necessario premerla).
5. La leva dell’acceleratore (7) deve essere collocata
in posizione iniziale, per farlo: premere il pulsante di
sblocco (9), stringendo l’impugnatura dei controlli, e
premere il pulsante di avvio facilitato (8) (se presente),
mentre si rilascia la leva dell’acceleratore (7).
6. Tenere ferma a terra la struttura portante
dell’apparecchio con la mano sinistra (non col piede!).
7. Impugnare la maniglia della corda di avviamento
(3) con la mano destra e tirarla leggermente, nché
non si avverte una certa resistenza, quindi tirarla di
scatto (ATTENZIONE! Non avvolgere mai la corda di
avviamento (3) attorno alla propria mano).
8. Continuare a tirare a strappi la corda di avviamento
(3), nché il motore sarà partito.
9. Quando il motore si sarà avviato, aprire
gradualmente la leva dell’aria (10), SOLO nel caso in
cui questa si trovasse in posizione CHIUSA, perché il
motore era freddo.
10. Lasciare che il motore si scaldi per alcuni minuti.
Quindi, premere e rilasciare la leva dell’acceleratore (7)
per disinserire il pulsante di avvio facilitato (8).
NOTA: il pulsante di avvio facilitato (8) serve a bloccare
la leva dell’acceleratore (7) al regime massimo di giri
per avviare un motore.
ATTENZIONE! Assicurarsi che il dispositivo di taglio
non sia a contatto con possibili ostacoli quando si
sta per avviare il motore utilizzando il pulsante di
avvio facilitato (8)!
ATTENZIONE! Non utilizzare il pulsante di avvio
facilitato (8) durante l’uso della macchina! La
macchina non tornerà al minimo e la lama di taglio
(18) continuerà a girare no a quando il pulsante
di avvio facilitato (8) viene disinserito e la leva
dell’acceleratore (7) viene rilasciata.
Arresto del motore
1. Portare la leva dell’acceleratore (7) alla posizione
iniziale per diminuire i giri del motore.
2. Portare l’interruttore di accensione/spegnimento
(6) sulla posizione ‘STOP’ oppure ‘O’.
ATTENZIONE! La lama di taglio
(18) continuerà a girare per breve
tempo dopo che il motore si è
fermato o la leva dell’acceleratore
(7) viene rilasciata. Una lama che
gira per inerzia può causare lesioni.
Mantenere un adeguato controllo della
macchina no a quando l’utensile è
completamente fermo.
Page 59

59
IT
Manuale di istruzioni
ISTRUZIONI OPERATIVE
ATTENZIONE! Non usare la macchina a pieno carico
per periodi prolungati per le prime 20 ore di utilizzo
e non permettere alla macchina di funzionare a tutto
gas.
Rotazione della maniglia [F4]
Per effettuare le operazioni di taglio più facilmente la
maniglia rotante (12) può essere ruotata di 45 ° / 90 ° a
destra o a sinistra rispetto alla posizione centrale.
∙ Spegnere la macchina.
∙ Rilasciare la leva dell’acceleratore (7) e il pulsante
di sblocco (9) dell’acceleratore, quindi tirare la leva di
rilascio (13) per liberare il movimento della maniglia
rotante (12).
∙ Girare la maniglia rotante (12) no a quando la leva
di rilascio (13) scatta in posizione.
∙ Assicurarsi che la maniglia rotante (12) sia ferma,
quando è bloccata nella sua nuova posizione la
macchina può iniziare a lavorare di nuovo.
Per motivi di sicurezza, mentre si sposta la maniglia
rotante (12) non è possibile accelerare.
Tecniche di taglio
∙ Si ottiene un taglio migliore spostandosi in avanti
lentamente, soprattutto con siepi spesse.
∙ Tagliare la siepe a partire dai lati, lasciando la parte
superiore alla ne.
∙ Per ottenere un’altezza uniforme della siepe, si
raccomanda di utilizzare un lo come dima e tagliare i
rami che sporgono dal lo.
∙ Tagliare verso l’alto e verso il basso utilizzando
entrambi i lati della lama di taglio (18), con movimenti
semicircolari.
Taglio verticale [F5]:
∙ Spostare la lama di taglio (18) dal basso verso
l’alto a formare un arco - abbassare il muso della lama
di taglio (18), spostarsi lungo la siepe e poi oscillare la
lama di taglio (18) di nuovo a formare un arco.
Taglio orizzontale [F6]:
∙ Tenere la barra di taglio con un angolo di 0 ° a 10 °e
far oscillare la macchina in modo orizzontale.
∙ Spostare la lama di taglio (18) a formare un arco
verso l’esterno della siepe in modo che i rami tagliati
cadano al suolo.
MANUTENZIONE E STOCCAGGIO
ATTENZIONE! Prima di effettuare
qualsiasi operazione di manutenzione,
spegnere il motore e attendere nché
la macchina non si sia arrestata
completamente.
∙ Tenere sempre lo strumento e le fessure di
ventilazione (se presenti) pulite. La regolare pulizia
e manutenzione dello strumento ne garantiscono
l’efcienza e ne prolungano la vita.
∙ Se lo strumento non dovesse funzionare,
nonostante le rigorose procedure di collaudo, la
riparazione deve essere effettuata da un servizio IVT
autorizzato.
∙ Tenere tutti i dadi, bulloni e viti ben serrati, per
essere sicuri che lo strumento sia in buone condizioni
operative.
∙ Sostituire tutte le parti usurate o danneggiate per
sicurezza.
∙ Utilizzare esclusivamente ricambi originali. L’uso
di parti di ricambio non originali o non autorizzate dal
produttore potrebbero causare scarse prestazioni o
lesioni personali.
∙ Conservare lo strumento in un ambiente asciutto,
fuori dalla portata dei bambini e lontano da materiali
inammabili.
∙ Conservare tutti i serbatoi del carburante in
modo sicuro. Non riporre la macchina con carburante
nel serbatoio all’interno di un edicio o qualsiasi altro
ambiente chiuso, dove i vapori potrebbero raggiungere
una amma libera o delle scintille.
Filtro dell’aria [F7]
Un ltro dell’aria intasato riduce notevolmente
l’efcienza del motore. Controlli regolari sono quindi
indispensabili. Il ltro dell’aria deve essere controllato
circa ogni 25 ore di utilizzo, se necessario, procedere
alla sua pulizia. Nel caso in cui sia presente una
quantità rilevante di polvere nell’aria, è necessario
effettuare controlli a scadenza più ravvicinata.
1. Rimuovere il coperchio del ltro dell’aria (16).
2. Rimuovere l’elemento ltrante (17).
3. Pulire l’elemento ltrante (17) battendolo
leggermente oppure utilizzando aria compressa,
se necessario, lavarlo con acqua tiepida e sapone.
Asciugarlo completamente prima di assemblarlo di
nuovo. Se l’elemento ltrante (17) è danneggiato o
usurato, sostituirlo con uno nuovo.
NOTA: non pulire mai l’elemento ltrante (17) con
benzina o solventi inammabili.
Page 60

60
IT
Manuale di istruzioni
Marmitta
Ispezionare a scadenze regolari la marmitta, al ne di
vericare che le viti siano state serrate correttamente,
che non vi siano danni o ruggine. Se vi è un rilascio
eccessivo di gas di scarico, interrompere l’utilizzo
della macchina e procedere immediatamente alla sua
riparazione.
Candela (20) [F8]
Ispezionare la candela (20) circa ogni 10 ore di
funzionamento e, se necessario, pulirla con una spazzola
con setole metalliche di rame. Successivamente
provvedere alla manutenzione della candela (20) dopo
50 ore di funzionamento.
1. Rimuovere il cappuccio della candela.
2. Rimuovere la candela (20) con la chiave apposita.
3. Controllare la condizione della candela (20).
Vericare che la distanza tra gli elettrodi sia 0,60,7 mm, in caso contrario, regolare. Se la candela è
sporca, pulirla. Se è danneggiata, sostituirla con una
nuova che abbia le stesse caratteristiche.
4. Rimontare in ordine inverso.
Filtro del carburante (14) [F9]
Il ltro del carburante (14) serve a fornire il carburante
richiesto dal carburatore. Quando al motore non arriva
piu’ carburante, controllare che il ltro del carburante
(14) non sia ostruito. Ispezione visivamente a intervalli
regolari il ltro del carburante (14), pulirlo dopo circa 50
ore di utilizzo. Se il ltro si è indurito, è eccessivamente
sporco o ostruito, deve essere sostituito.
1. Svitare il tappo del serbatoio carburante (5) e, con
attenzione, fare deuire tutto il carburante contenuto nel
in un contenitore adatto.
2. Per mezzo di un uncino metallico, estrarre la testa
di aspirazione del ltro dal bocchettone del serbatoio.
3. Ispezionare il ltro del carburante (14). Se è sporco,
rimuoverlo e lavarlo con un solvente non inammabile.
4. Eliminare l’acqua e la sporcizia eventualmente
presenti nel serbatoio, sciacquandone bene l’interno.
5. Installare nuovamente tutte le parti in modo
corretto.
Ingranaggi [F10]
Gli ingranaggi devono essere lubricati ogni anno prima
dell’inizio della stagione all’ugello di lubricazione. Se si
utilizza spesso la macchina, ingrassare la scatola degli
ingranaggi più spesso.
Impostazione del regime di minimo [F20]
∙ Se il motore si spegne quando la leva
dell’acceleratore (7) non è premuta, il minimo deve
essere reimpostato: ruotare la vite di regolazione
regime di minimo (21) in senso orario no a quando il
motore della macchina inizierà a girare senza problemi
a minimo regime (aumenta la rotazione).
∙ Se il minimo è così alto che l’utensile di taglio
continua a ruotare, anche se la leva dell’acceleratore (7)
non è premuta, il minimo deve essere ridotto, ruotando
la vite di regolazione regime di minimo (21) in senso
antiorario no a quando l’utensile di taglio non girerà
più.
IMPORTANTE! Impostare la velocità al minimo
quando la macchina è calda.
Impostazione del carburatore
Le regolazioni sul carburatore devono essere eseguite
soltanto dal servizio autorizzato di assistenza clienti.
Lubricazione della lama da taglio (18) [F12]
Applicare alcune gocce di olio in ogni fessura delle viti
sulla lama da taglio (18) ogni 4 ore di utilizzo.
MANUTENZIONE PRIMA DI UN
IMMAGAZZINAMENTO A LUNGO
TERMINE
∙ Ripulire la macchina da tutto lo sporco.
∙ Controllare eventuali danni o allentamenti dei
componenti della macchina. Nel caso in cui venissero
individuate anomalie, provvedere alla loro correzione
per l’uso futuro.
∙ Drenare tutto il carburante dal serbatoio, quindi
avviare il motore: lasciarlo girare nché non si fermerà
da solo.
∙ Rimuovere la candela (31) e mettere nel motore
circa 1-2 cc di olio per motori a due tempi.
∙ Applicare olio antiruggine alle parti di metallo, per
esempio sul cavo dell’acceleratore.
∙ Inserire la protezione della lama (19) sulla lama da
taglio (18).
∙ Tenere la macchina in un luogo riparato, lontano
dall’umidità.
TUTELA AMBIENTALE
Riciclare le materie prime invece di
smaltirle come riuti.
Lo strumento, gli accessori e l’imballaggio devono
essere ordinati per il riciclaggio ecocompatibile.
I componenti in plastica sono classicati per il riciclaggio
categorizzato. Queste istruzioni sono stampate su carta
riciclata.
Page 61

61
IT
Manuale di istruzioni
RISOLUZIONE DEI PROBLEMI
ATTENZIONE! Spegnere il motore ed attendere no a che la macchina non si sarà
completamente arrestata prima di esaminare il guasto.
Problema Causa Soluzione
Il motore non parte.
∙ Azionamento scorretto della
pompa del carburante (11).
∙ Premerla 7-10 volte.
∙ L’interruttore di accensione/
spegnimento (6) è sulla posizione ‘off’
o ‘O’.
∙ Portare l’interruttore di
accensione/spegnimento (6) sulla
posizione ‘on’ o ‘I’.
∙ La leva dell’aria (10) non è sulla
posizione di CHIUSO (motore freddo).
∙ Portare la leva dell’aria (10) sulla
posizione di CHIUSO.
∙ Livello carburante insufciente.
∙ Fare rifornimento.
∙ Filtro del carburante (14) ostruito,
malfunzionamento del carburatore,
malfunzionamento del sistema di
iniezione.
∙ Provvedere alla sostituzione o
alla riparazione delle componenti
difettose, secondo i casi.
∙ Carburante deteriorato.
∙ Sostituire con carburante
raccomandato nuovo.
∙ La candela (20) è difettosa,
sporca, staccata o la distanza fra i suoi
elettrodi non è corretta.
∙ Pulire, correggere la distanza tra
glie elettrodi, connetterla bene oppure
sostituirla.
Il motore si ferma subito.
La velocità del motore non
aumenta.
∙ Insufciente riscaldamento del
motore.
∙ Lasciare al motore il tempo di
riscaldarsi.
∙ La leva dell’aria (10) si trova
ancora in posizione ‘CHIUSO’
nonostante il motore si sia scaldato.
∙ Spostarla sulla posizione di
‘APERTO’.
∙ Filtro carburante (14) intasato
o troppo sporco oppure elemento
ltrante (17) ostruito.
∙ Pulire.
∙ Il cavo dell’acceleratore non è
regolato correttamente, è rotto oppure
piegato.
∙ Regolare o sostituire, se
necessario.
Qualora non si riuscisse a risolvere il problema seguendo le indicazioni riportate qua sopra, rivolgersi ad un Centro
Servizi IVT autorizzato.
ATTENZIONE! NON TENTARE DI RIPARARE IL PRODOTTO DA SOLI E NON MANOMETTERLO!
Qualsiasi operazione di riparazione o di manutenzione straordinaria deve essere eseguita
esclusivamente da un Centro di Assistenza IVT qualicato ed autorizzato. Non modicare
nessuna componente interna del prodotto! QUESTO COMPORTAMENTO INVALIDERÀ
COMPLETAMENTE LA GARANZIA E POTREBBE CAUSARE INFORTUNI E SERI DANNI
MATERIALI.
Page 62

Page 63

Page 64

IVT SWISS SA
Via Cantonale, 2
CH-6917 - Barbengo
Switzerland
tel.: +41 (0) 91 6000 555
+41 (0) 91 6000 556
fax: +41 (0) 91 6000 557
e-mail: info@ivt-ht.com
web: www.ivt-ht.com
tools for every use
КАЗАХСТАН
ТОО “Костанай IVT”
ул. Целинная, д.4
110000 г. Костанай
тел.: +7 (7142) 280 700
+7 (7142) 280 701
+7 (7142) 280 702
e-mail: ivt_dir@mail.ru
web: www.ivt.kz
РОССИЯ
ООО “Спектр Инструмента”
ул. Танкистов, 179 Б
454085 г. Челябинск
тел. - факс: +8 (351) 247 98 65
+8 (351) 247 98 67
+8 (351) 247 97 59
+8 (351) 225 04 67
+8 (351) 225 04 68
e-mail: ivt-s@mail.ru
ala@ivt-ht.ru
sales@ivt-ht.ru
web: www.ivt-ht.ru
КЫРГЫЗСТАН
ОсОО “ОлАн-Техно”
ул. Медерова, д. 85
720031 г. Бишкек
тел.: +9960312 46 02 91
факс: +996772 57 66 27
 Loading...