

Page 1

1
ENGLISH
SPLIT AIR/AIR HEAT PUMP
OPERATION MANUAL
"Plasmacluster" and "Device of a
cluster of grapes" are registered
trademarks or trademarks of Sharp
Corporation.
SUOMI NORSK SVENSKA
SPLIT LUFT/
LUFT VARMEPUMPE
BRUKSANVISNING
ILMALÄMPÖPUMPPU
KÄYTTÖOHJE
LUFTVÄRMEPUMP
ANVÄNDARHANDLEDNING
12 THR-N
Uses new refrigerant R410A
Bruker nytt kjølemiddel R410A
Laite käyttää uutta kylmäainetta R410A
Använder nytt köldmedium R410A
Bruger nyt kølemiddel R410A
Page 2

Information on the Disposal of this Equipment and its Batteries
IF YOU WISH TO DISPOSE OF THIS EQUIPMENT OR ITS BATTERIES, DO NOT
USE THE ORDINARY WASTE BIN, AND DO NOT PUT THEM INTO A FIREPLACE!
Used electrical and electronic equipment and batteries should always be collected
and treated SEPARATELY in accordance with local law.
Separate collection promotes an environment-friendly treatment, recycling of
materials, and minimizing fi nal disposal of waste.
IMPROPER DISPOSAL can be harmful to human health and the environment due to
certain substances! Take USED EQUIPMENT to a local, usually municipal, collection
facility, where available.
Remove USED BATTERIES from equipment, and take them to a battery collection
facility; usually a place where new batteries are sold.
If in doubt about disposal, contact your local authorities or dealer and ask for the
correct method of disposal.
ONLY FOR USERS IN THE EUROPEAN UNION, AND SOME OTHER COUNTRIES;
FOR INSTANCE NORWAY AND
SWITZERLAND: Your participation in separate collection is requested by law.
The symbol shown above appears on electrical and electronic equipment and
batteries (or the packaging) to remind users of this.
If 'Hg' or 'Pb' appears below the symbol, this means that the battery contains traces
of mercury (Hg) or lead (Pb), respectively.
Users from PRIVATE HOUSEHOLDS are requested to use existing return facilities
for used equipment and batteries. Batteries are collected at points of sale. Return is
free of charge.
If the equipment has been used for BUSINESS PURPOSES, please contact your
BOSCH dealer who will inform you about take-back.
You might be charged for the costs arising from take-back. Small equipment (and
small quantities) might be taken back by your local collection facility. For Spain:
Please contact the established collection system or your local authority for take-back
of your used products.
Contains fl uorinated greenhouse gases covered by the Kyoto
Protocol R410A (Global warming potential 1975)
GB
BUILDING REGULATIONS
This appliance must be installed and serviced only by a competent person in accordance with the current: IEE
Regulations, Building Regulation, Building Standards (Scotland) (Consolidation), Building Regulations (Northern
Ireland), local water by-laws, Health & Safety Document 63S (The Electricity at Work Regulations 1989), IS 813
(Eire) and other local requirements.
The relevant Standards should be followed, including:
BS EN 14511: Requirements heat pumps for space heating and cooling
BS EN 378: Safety and environmental requirements for heat pumps
BS EN 14324 Brazing
BS 1306 Specifi cation for copper & copper Alloy pressure piping system
The Health and Safety at Work Act 1974
The Management of Health and Safety at Work Regulations 1999
The Construction (Health, Safety and Welfare) Regulations 1996
The Construction (Design and Management) Regulations 1994
The Lifting Operations and Lifting Equipment Regulations 1998
Where no specifi c instructions is given, reference should be made to the relevant codes of Practice.
Page 3

GB-1
ENGLISH
WARNING
• Do not pull or deform the power supply cord.
Pulling and misuse of the power supply cord can
result in damage to the unit and cause electrical
shock.
• Be careful not to expose your body directly to
the outlet air for a long time. It may affect your
physical conditions.
• When using the air conditioner for infants,
children, elderly, bedridden, or disabled people
make sure the room temperature is suitable for
those in the room.
• Never insert objects into the unit. Inserting objects
can result in injury due to the high speed rotation
of internal fans.
• Ground the air conditioner without fail. Do not
connect the grounding wire to gas pipe, water
pipe, lightning rod or telephone grounding wire.
Incomplete grounding may cause electric shock.
• If anything is abnormal with the air conditioner (ex.
a burning smell), stop the operation immediately
and turn the circuit breaker OFF.
• The appliance shall be installed in accordance
with national wiring regulations. Improper cable
connection can cause the power supply cord, plug
and the electrical outlet to overheat and cause fi re.
• If the supply cord is damaged, it must be replaced by
the manufacturer or its service agent or a similarly
qualifi ed person in order to avoid a hazard. Use only
the manufacture-specifi ed power cord for replacement.
• Do not splash or pour water directly on the unit. Water
can cause electrical shock or equipment damage.
• Do not attempt to install/remove/repair the unit by
yourself. Incorrect work will cause electric shock,
water leak, fire etc. Consult your dealer or other
qualifi ed service personnel for the installation/removal/
repair of the unit.
CAUTION
• Open a window or door periodically to ventilate
the room, especially when using gas appliances.
Insuffi cient ventilation may cause oxygen shortage.
• Do not operate the buttons with wet hand. It may
cause electric shock.
• For safety, turn the circuit breaker off when not using
the unit for an extended period of time.
• Check the outdoor unit mounting rack periodically for
wear and to make sure it is fi rmly in place.
• Do not put anything on the outdoor unit nor step on
it. The object or the person may fall down or drop,
causing injury.
• This unit is designed for residential use. Do not use for
other applications such as in a kennel or greenhouse
to raise animals or grow plants.
• Do not place a vessel with water on the unit. If water
penetrates into the unit, electrical insulations may
deteriorate and cause electric shock.
• Do not block the air inlets nor outlets of the unit. It
may cause insuffi cient performance or troubles.
• Be sure to stop the operation and turn the circuit
breaker off before performing any maintenance or
cleaning. A fan is rotating inside the unit and you may
get injured.
• Make sure to connect the air conditioner to power
supply of the rated voltage and frequency. Use of a
power supply with improper voltage and frequency
can result in equipment damage and possible fi re.
• Do not install the unit in a place where infl ammable
gas may leak. It may cause fi re.
Install the unit in a place with minimal dust, fumes and
moisture in the air.
• Arrange the drain hose to ensure smooth drainage.
Insuffi cient drainage may cause wetting of the room,
furniture etc.
• Make sure a leak breaker or a circuit breaker is
installed, depending on the installation location, to
avoid electrical shock.
• IMPORTANT SAFETY INSTRUCTIONS ......GB-1
• PART NAMES ...............................................GB-2
• USING THE REMOTE CONTROL ................GB-4
• SETTING AIR PURIFYING FILTER .............GB-5
• TIPS ON SAVING ENERGY .........................GB-5
• AUXILIARY MODE........................................ GB-5
• BASIC OPERATION ..................................... GB-6
•
ADJUSTING THE AIR FLOW DIRECTION
.............GB-7
• PLASMACLUSTER OPERATION .................GB-7
• 10°C OPERATION ........................................GB-8
• MULTI SPACE...............................................GB-8
• FULL POWER OPERATION .........................GB-9
• SILENT OPERATION....................................GB-9
• TIMER OPERATION ................................... GB-10
• SELF CLEAN OPERATION ........................GB-12
• DISPLAY BUTTON ..................................... GB-12
• °F/°C CHANGE OVER OPERATION ..........GB-12
• OUTDOOR SILENT OPERATION ..............GB-12
• MAINTENANCE ..........................................GB-13
• ADDITIONAL NOTES ON OPERATION .....GB-14
• BEFORE CALLING FOR SERVICE ...........GB-15
ENGLISH
Please read this manual carefully before using the product. This
manual should be kept in a safe place for handy reference.
CONTENTS
IMPORTANT SAFETY INSTRUCTIONS
This appliance can be used by children aged from 8 years and above and
persons with reduced physical, sensory or mental capabilities or lack of
experience and knowledge if they have been given supervision or instruction
concerning use of the appliance in a safe way and understand the hazards
involved. Children shall not play with the appliance. Cleaning and user
maintenance shall not be made by children without supervision.
Page 4
GB-2
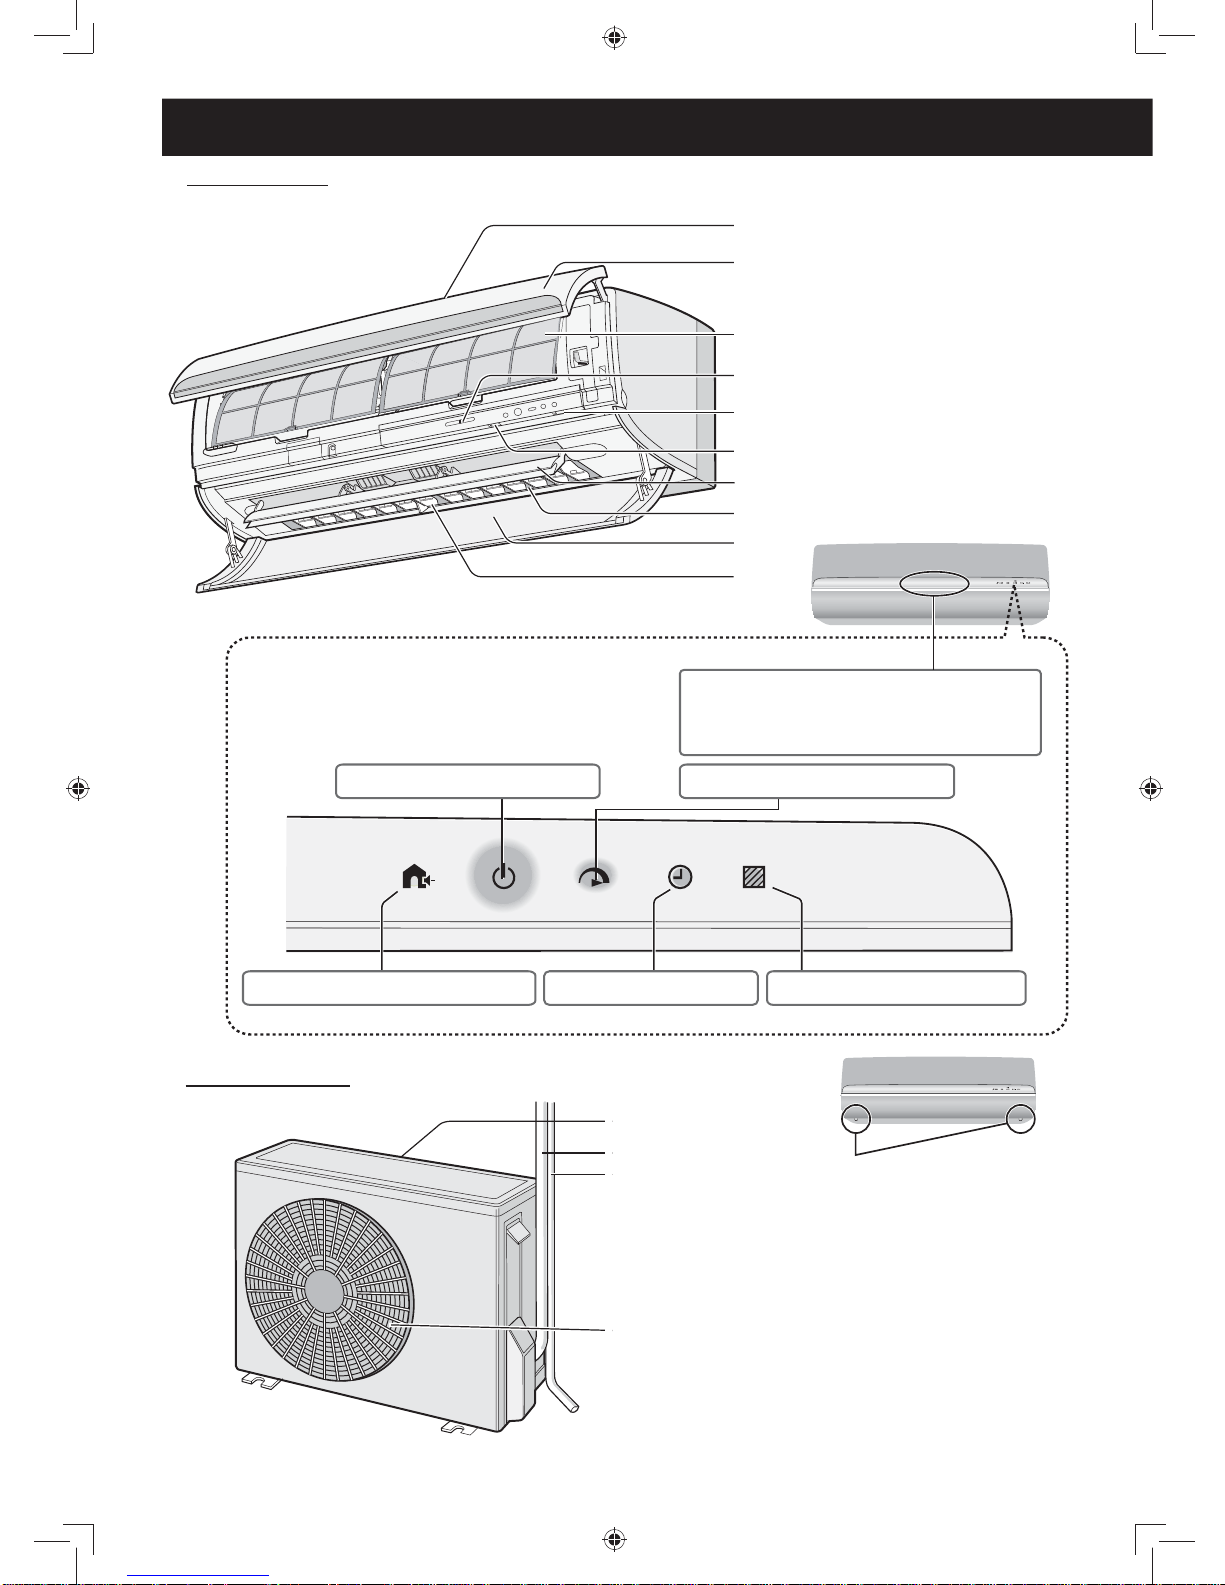
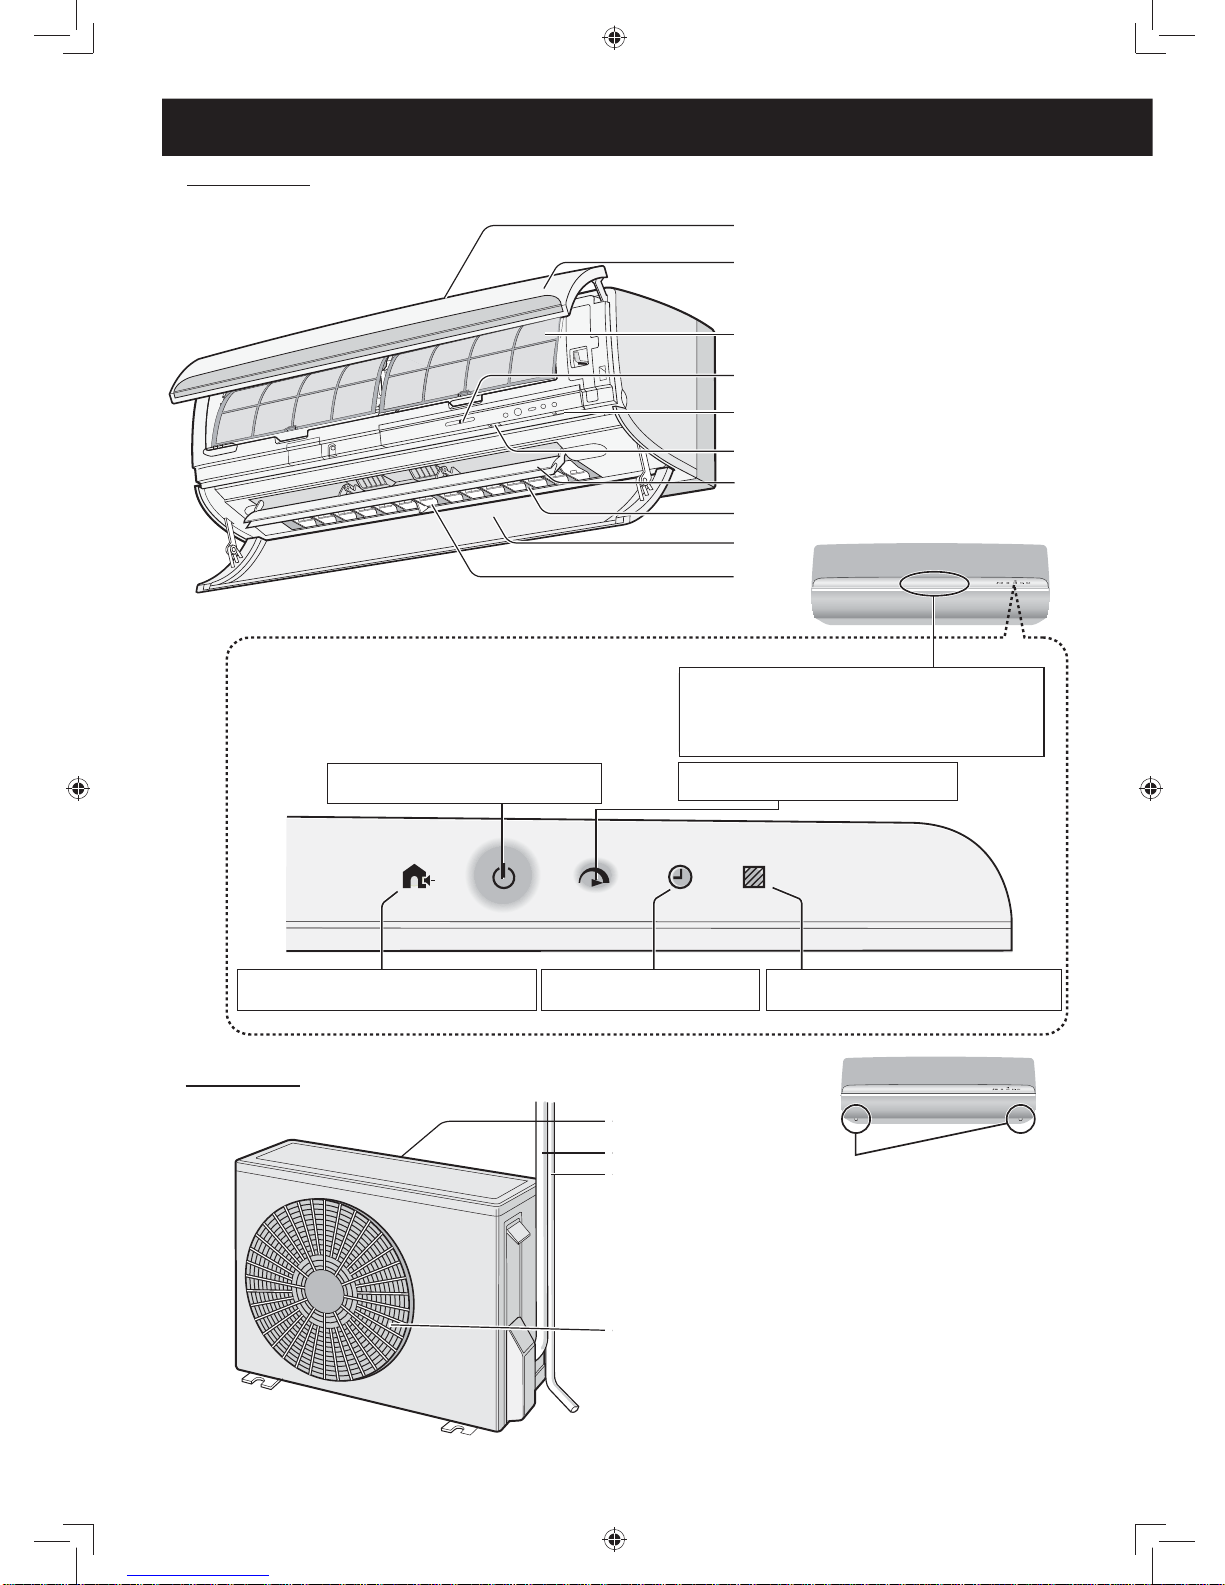
PART NAMES
1
Indoor Inlet (Air)
2
Open Panel
3
Air Filter
4
Receiver Window
5
Filter Reset Button
6
AUX Button
7
Vertical Airfl ow Louvre
8
Horizontal Airfl ow
Louvre
9
Air Flow Panel
10
Indoor Outlet (Air)
NOTE:
Actual units might vary slightly from those shown above.
INDOOR UNIT
1
2
3
4
5
6
7
8
9
Release Button
OUTDOOR SILENT Lamp (white)
TIMER Lamp (orange) FILTER CLEAN Lamp (red)
FULL POWER Lamp (green) OPERATION Lamp (green)
PLASMACLUSTER Lamp (blue)
SELF CLEAN Lamp (light blue)
11
Outdoor Inlet (Air)
12
Refrigerant Tube and
Interconnecting Cord
13
Drainage Hose
14
Outdoor Outlet (Air)
OUTDOOR UNIT
11
13
14
12
10
Page 5
GB-3
ENGLISH
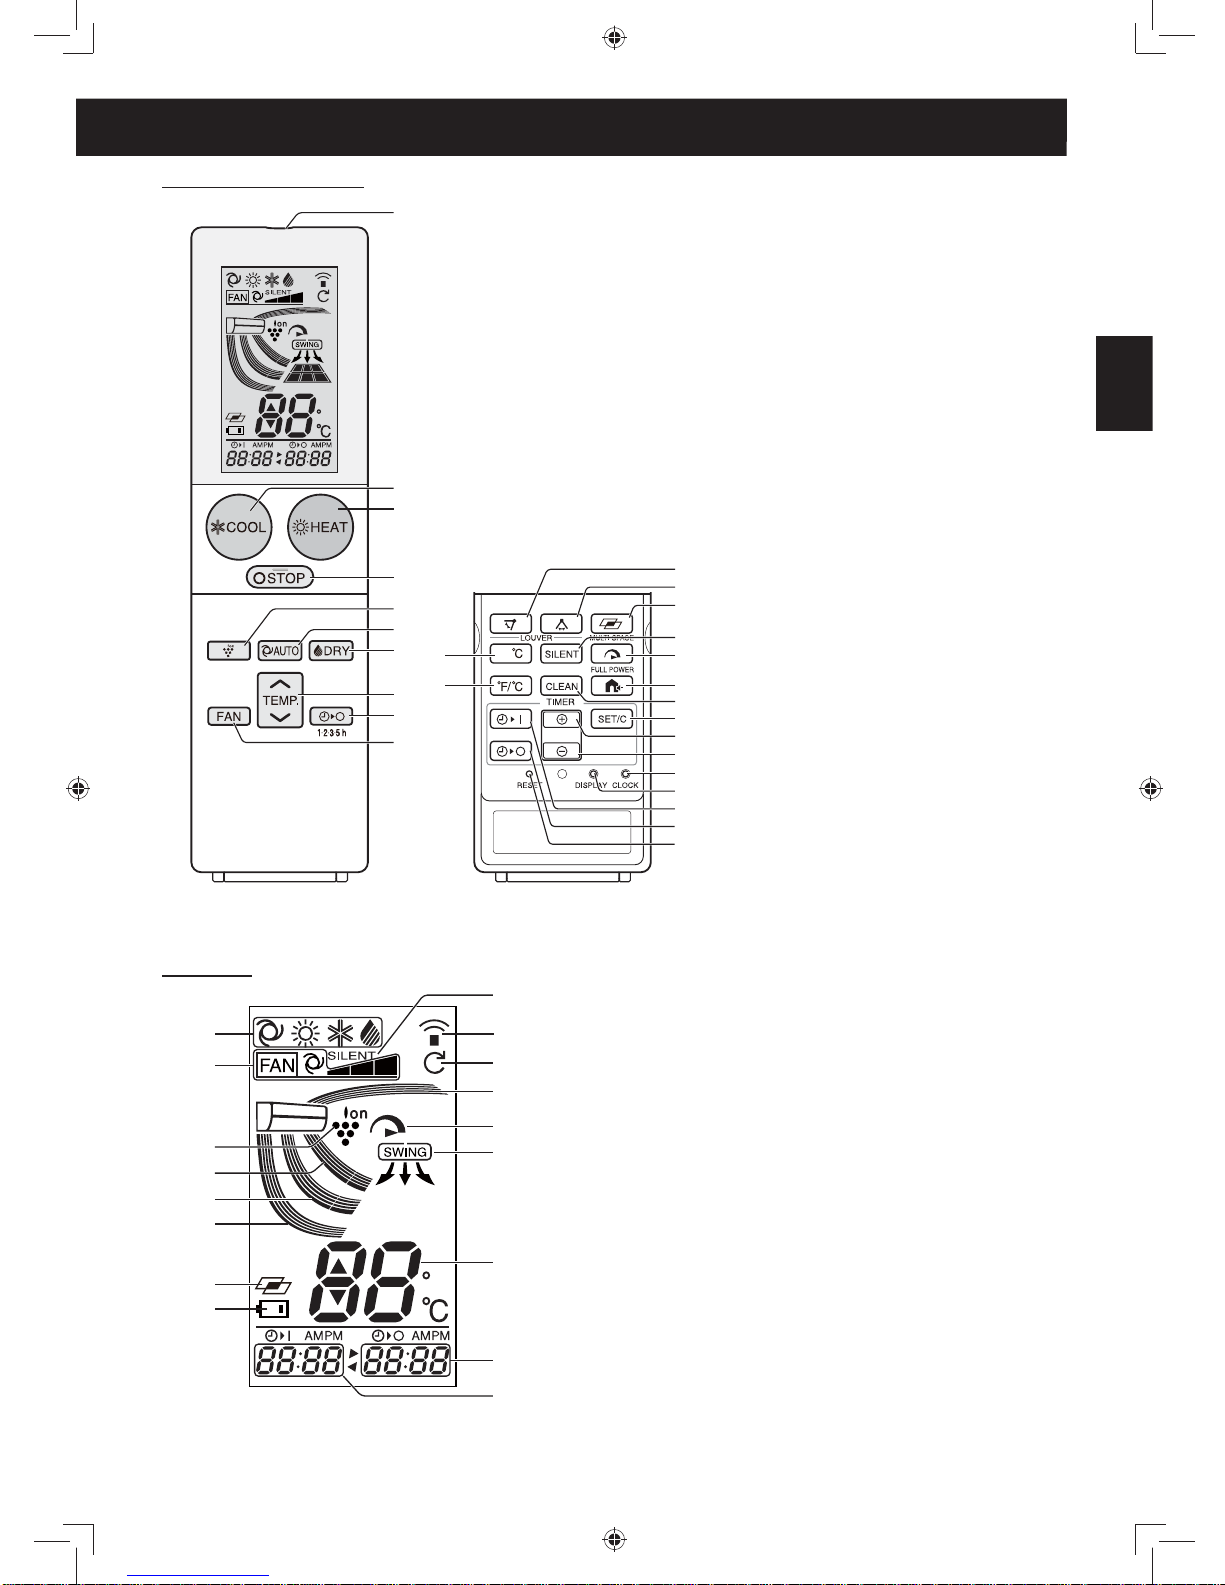
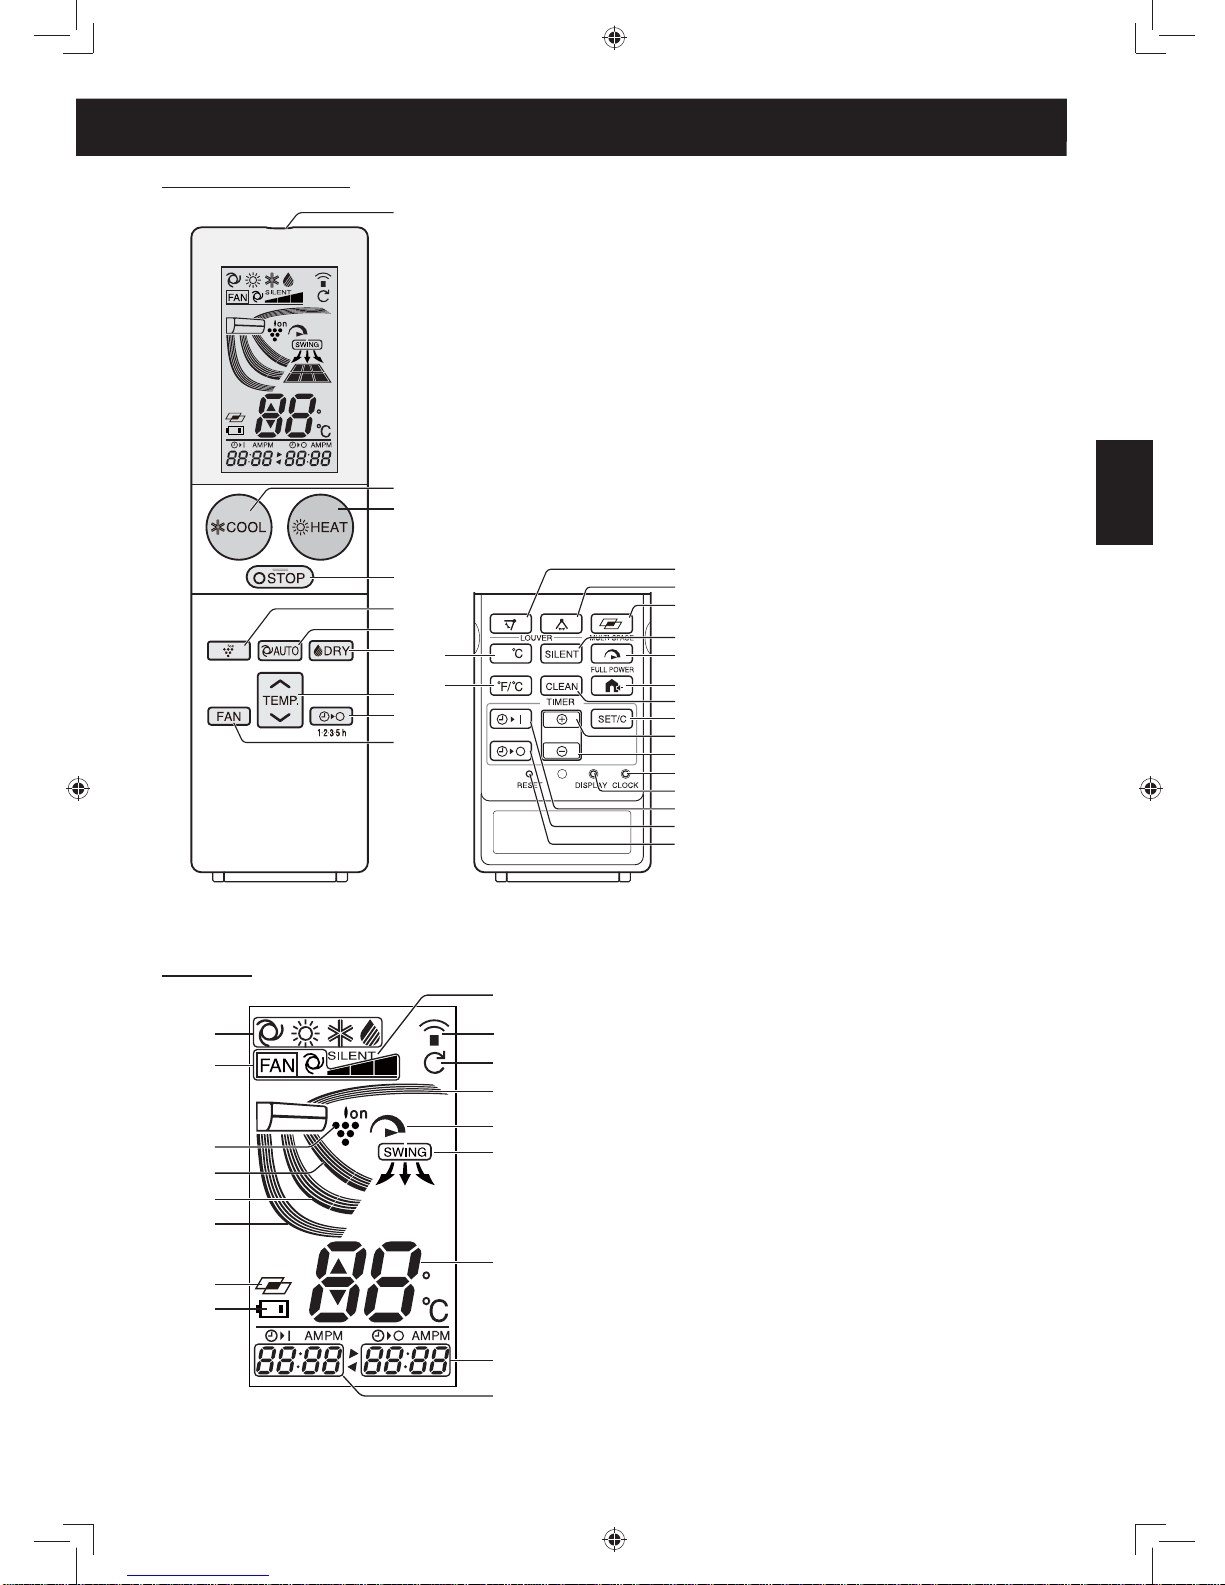
REMOTE CONTROL
DISPLAY
28
29
30
31
32
33
34
35
36
37
38
39
40
41
42
43
44
AUTO
F
10
50°F
1
11
15
16
2
3
18
19
12
13
14
20
17
8
7
6
5
4
9
10
25
24
23
22
21
27
26
1
TRANSMITTER
2
COOL Button
3
HEAT Button
4
STOP Button
5
PLASMACLUSTER Button
6
AUTO Button
7
DRY Button
8
TEMPERATURE Button
9
1.2.3.5h OFF TIMER Button
10
FAN Button
11
SWING Button
(vertical direction)
12
SWING Button
(
horizontal direction
)
13
MULTI SPACE Button
14
SILENT Button
15
FULL POWER Button
16
10°C Button
17
°F/°C CHANGE OVER Button
18
OUTDOOR SILENT Button
19
SELF CLEAN Button
20
TIMER SET/CANCEL Button
21
TIME ADVANCE Button
22
TIME REVERSE Button
23
CLOCK Button
24
DISPLAY Button
25
TIMER ON Button
26
TIMER OFF Button
27
RESET Button
F
AUTO
28
MODE Symbols
29
FAN SPEED Symbols
30
PLASMACLUSTER Symbol
31
AIR FLOW Symbol (VERTICAL AIR FLOW)
32
AIR FLOW Symbol (VERTICAL AIR FLOW)
33
AIR FLOW Symbol (VERTICAL AIR FLOW)
34
MULTI SPACE SYMBOLS
35
BATTERY Symbol
36
SILENT Symbol
37
TRANSMITTING Symbol
38
SELF CLEAN Symbol
39
AIR FLOW Symbol (VERTICAL AIR FLOW)
40
FULL POWER Symbol
41
AIR FLOW Symbol (HORIZONTAL AIR FLOW)
42
TEMPERATURE Indicator
43
TIMER OFF Indicator
44
TIMER ON Indicator/CLOCK
Page 6
GB-4
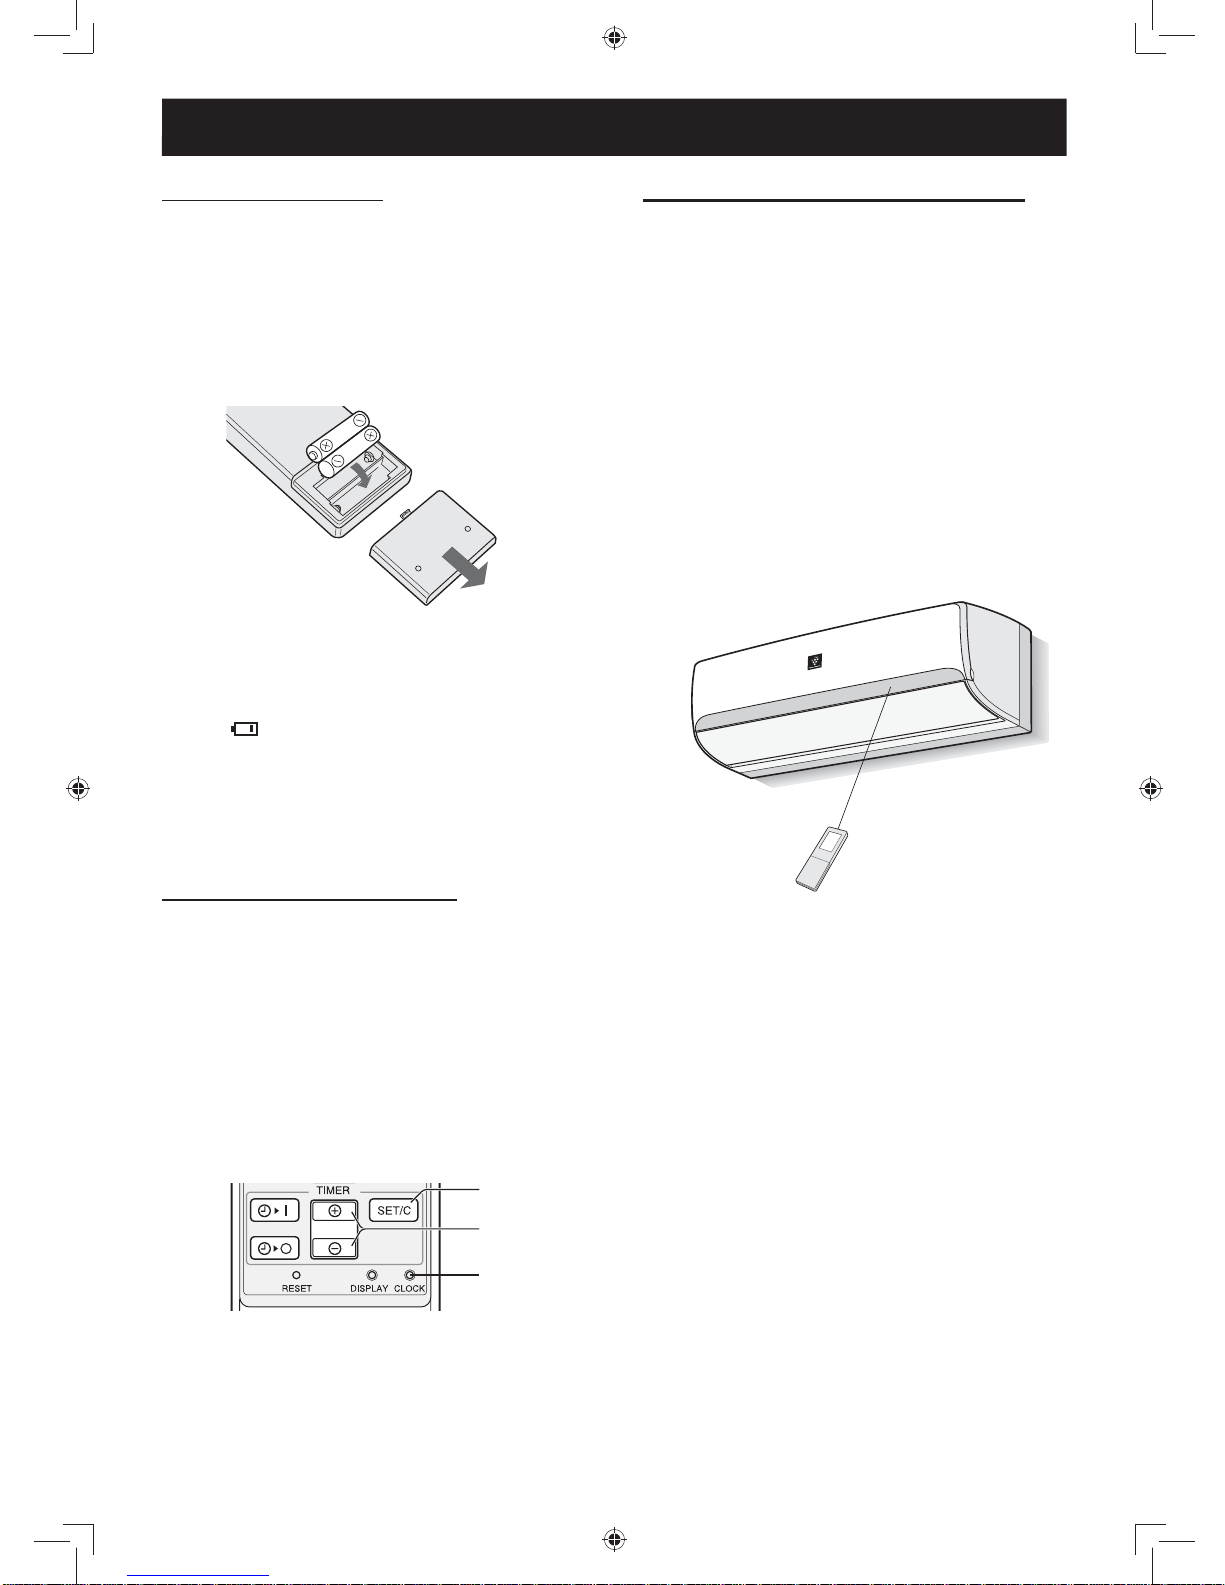
LOADING BATTERIES
Use two size-AAA (R03) batteries.
1
Remove the remote control cover.
2
Insert batteries, making sure the (+) and
(-) polarities are correctly a lign ed.
• The display indicates “AM 6:00” when batteries
are properly installed.
3
Reinstall the cover.
USING THE REMOTE CONTROL
HOW TO USE THE REMOTE CONTROL
Point the remote control towards the unit’s signal
receiver window and press the desired button. The unit
generates a beep when it receives the signal.
• Make sure there is no object between the remote
control and the unit.
• The signal effective distance is 7m.
CAUTION:
• Do not expose the receiver window to direct sunlight.
This may adversely affect its operation.
• Use of certain fl uorescent lamp in the same room
may interfere with transmission of the signal.
• Do not leave the remote control in direct sunlight or
near a heater. Protect the unit and remote control
from moisture and shock.
• The current time cannot be set when the timer is
operating.
Battery cover
NOTE:
•
The battery life is approximately 1 year in normal use.
• Replace the batteries when the remote control displays “ ”.
• Rechargeable batteries are not recommended to use.
• When replacing the batteries, always change both
and use the same type.
• If you will not be using the unit for a long time, remove
the batteries from the remote control.
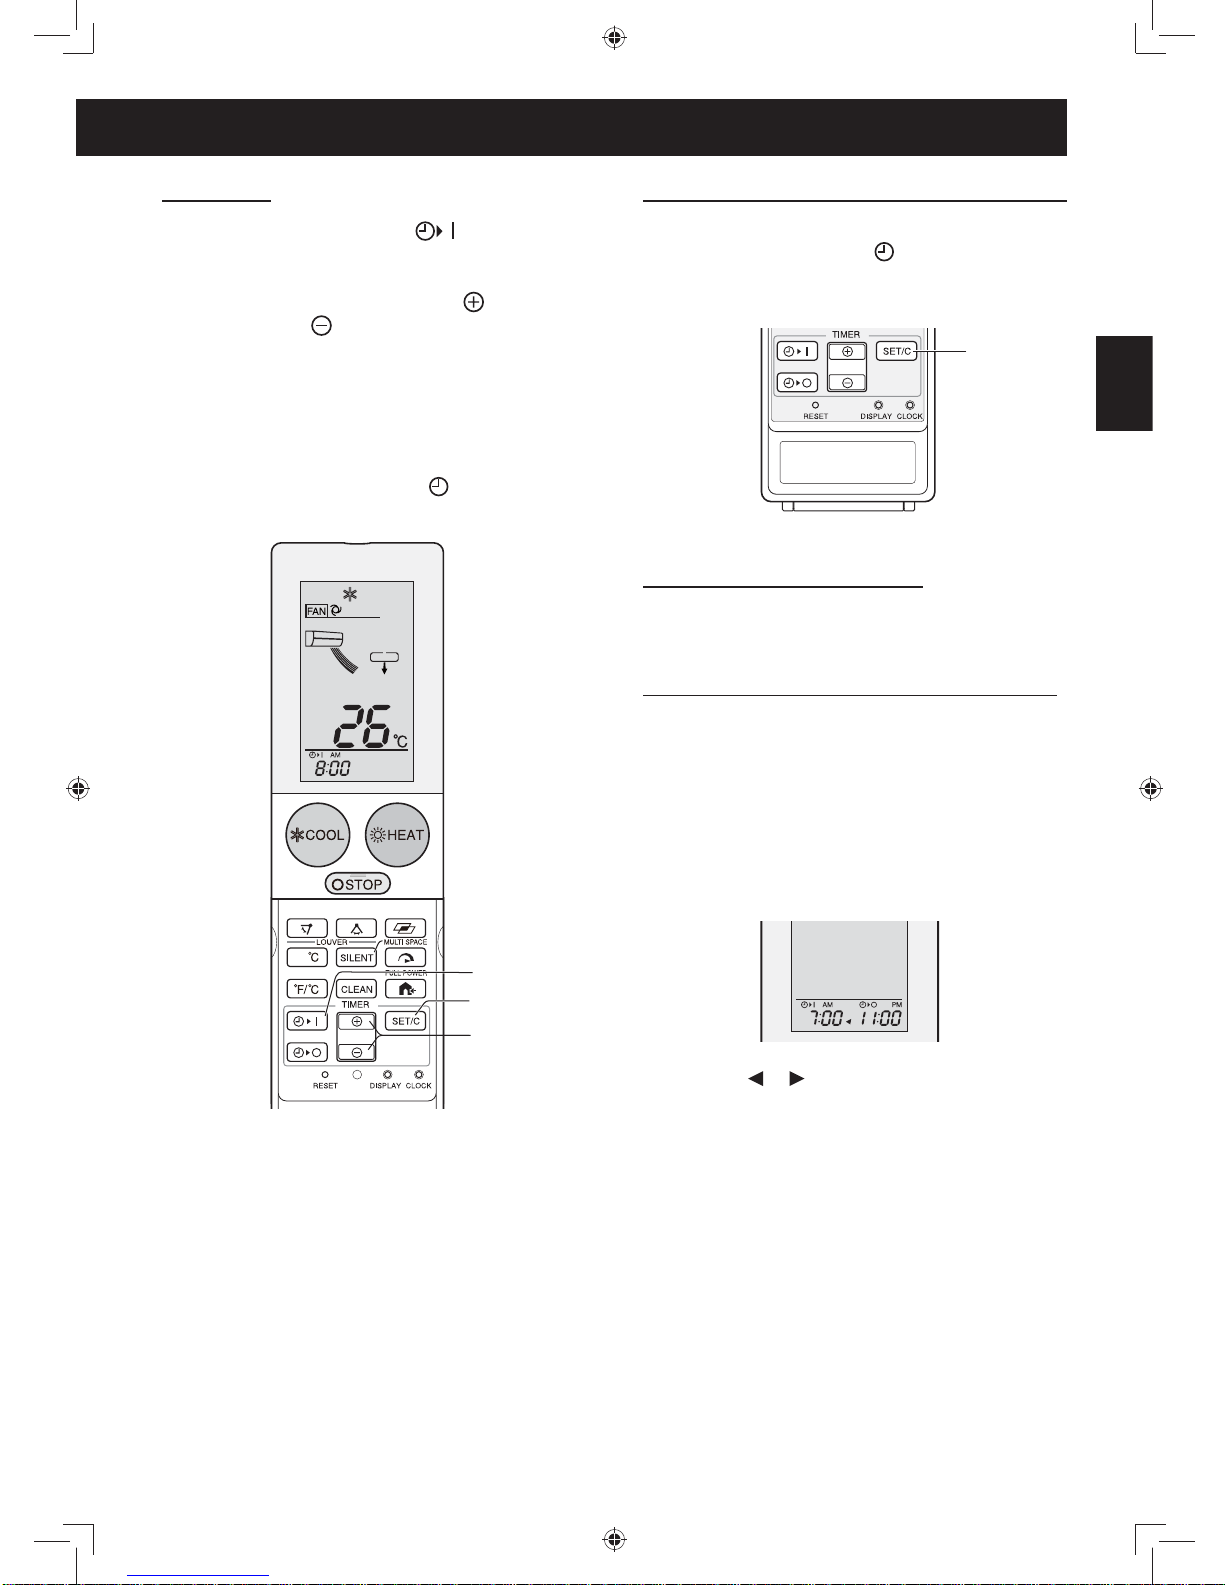
SETTING THE CURRENT TIME
There are two clock modes: 12-hour mode and 24hour mode.
1
To set the 12-hour mode, press the CLOCK
button once.
To set the 24-hour mode, press the CLOCK
button twice.
2
Press the TIME ADVANCE or REVERSE
button to set the current time.
• Hold down the button to advance or reverse the time
quickly.
3
Press the SET/C button.
• The colon (:) blinks.
NOTE:
• The current time cannot be set when the timer is set.
3
2
1
Page 7
GB-5
ENGLISH
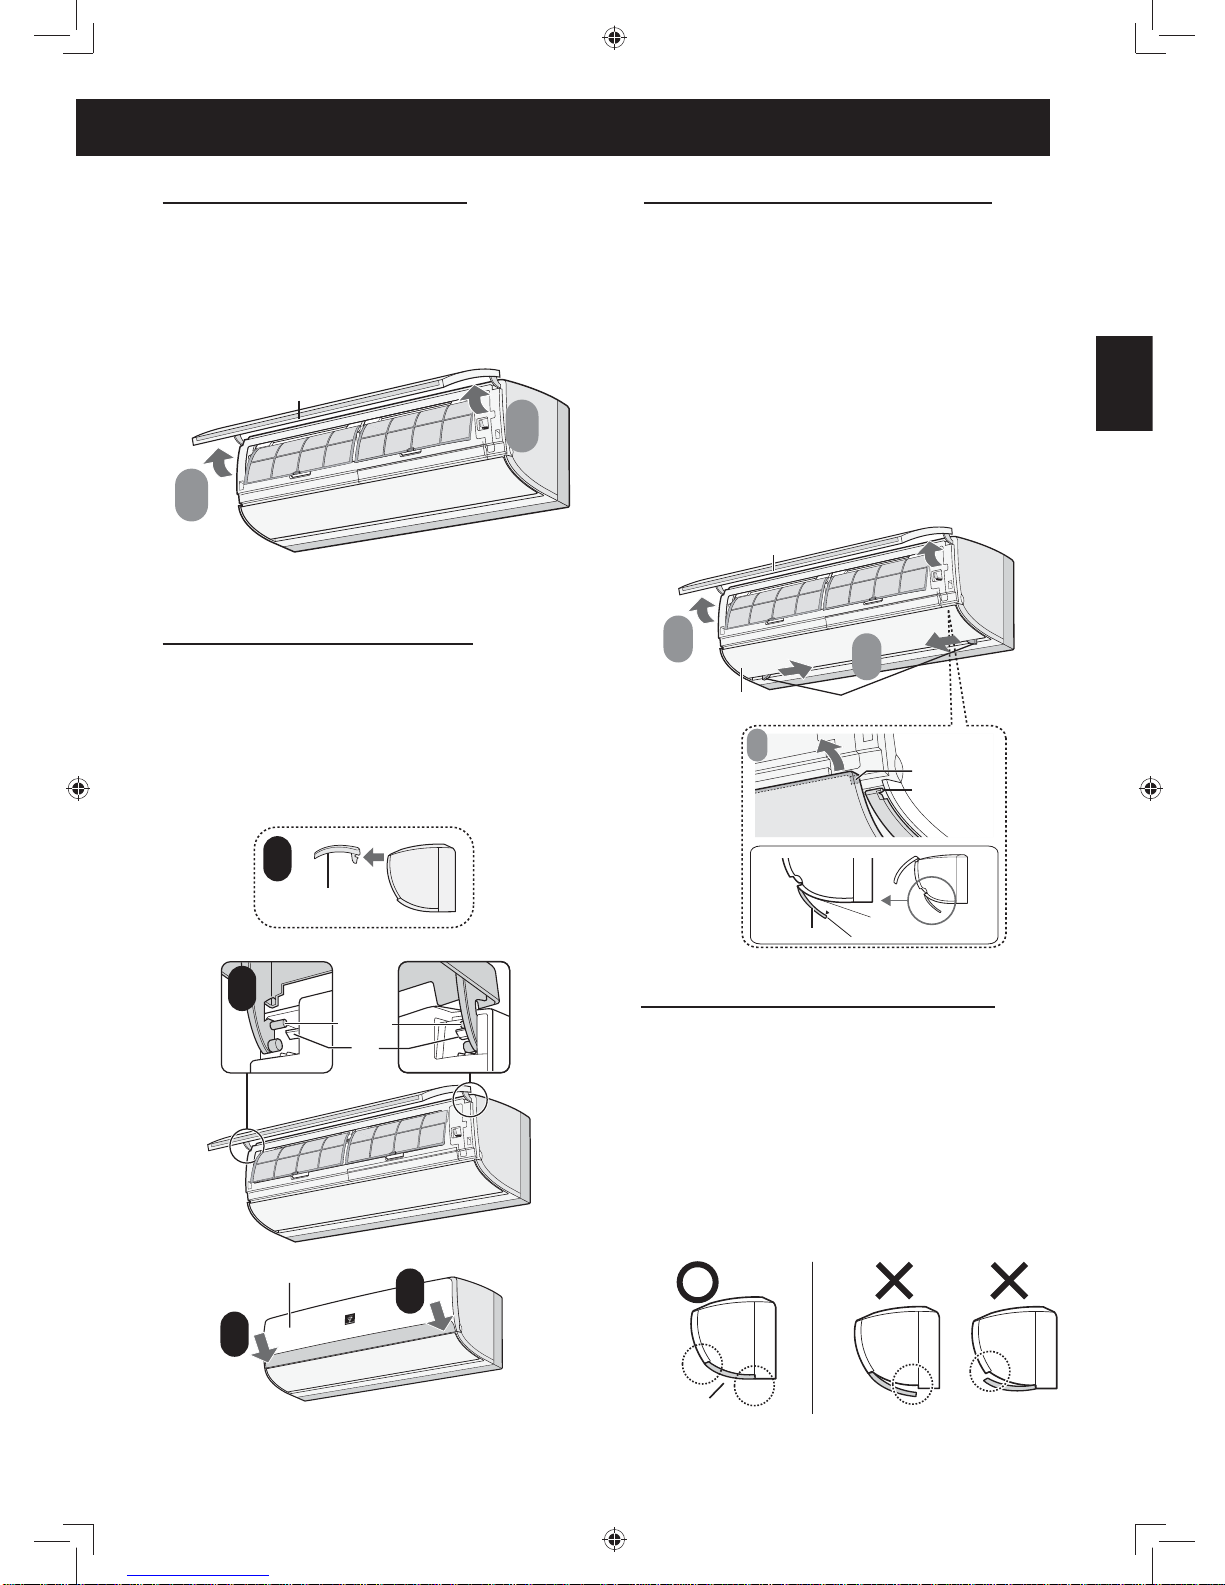
The air purifying fi lters are packed as accessory
of this unit. During operation of the air
conditioner, the fi lters remove dust and tobacco
smoke from the air and discharges clean air.
1
Take out the air fi lters.
1
Open the open panel.
2 Push the air fi lters up slightly to unlock them.
3 Pull the air fi lters down to remove them.
2
Set the air purifying fi lter under the fi lter
stoppers located on the air fi lter.
3
Reinstall the air fi lters.
1
Reinstall the air fi lters in the original positions.
2 Close the fi lter cover.
`Precautions:
• The fi lters are sealed in a plastic bag to keep their
dust collection effect.
• Do not open the bag until using the fi lters. (Otherwise
the fi lters life may get shorter.)
• Do not expose the fi lters to direct sunlight. (Otherwise
they may deteriorate.)
TIPS ON SAVING ENERGY
Below are some simple ways to save energy
when you use your air conditioner.
SET THE PROPER TEMPERA TURE
• Setting to higher-(lower-)than-necessary temperature
point will result in increased power consumption.
BLOCK DIRECT SUNLIGHT AND PREVENT DRAFTS
• Blocking direct sunlight during cooling operation will
reduce power consumption.
• Close the windows and doors during cooling and
heating operations.
SET PROPER AIR FLOW DIRECTION TO OBTAIN
THE BEST AIR CIRCULATION
KEEP FILTER CLEAN TO ENSURE THE MOST
EFFICIENT OPERA TION
MAKE MOST OF THE TIMER OFF FUNCTION
TURN OFF THE CIRCUIT BREAKER WHEN THE
UNIT IS NOT USED FOR AN EXTENDED PERIOD
OF TIME
• The unit still consumes a small amount of power
when it is not operating.
SETTING AIR PURIFYING FILTER
Filter stopper
Air purifying fi lter
Air fi lter
AUXILIARY MODE
Use this mode when the remote control is not
available.
TO TURN ON
Press the AUX button.
• The green OPERATION lamp ( ) on the unit will
light and the unit will start operating in the AUTO
mode.
• The fan speed and temperature setting are set to
AUTO.
TO TURN OFF
Press the AUX button again.
• The green OPERATION lamp ( ) on the unit will
turn off.
Page 8
GB-6
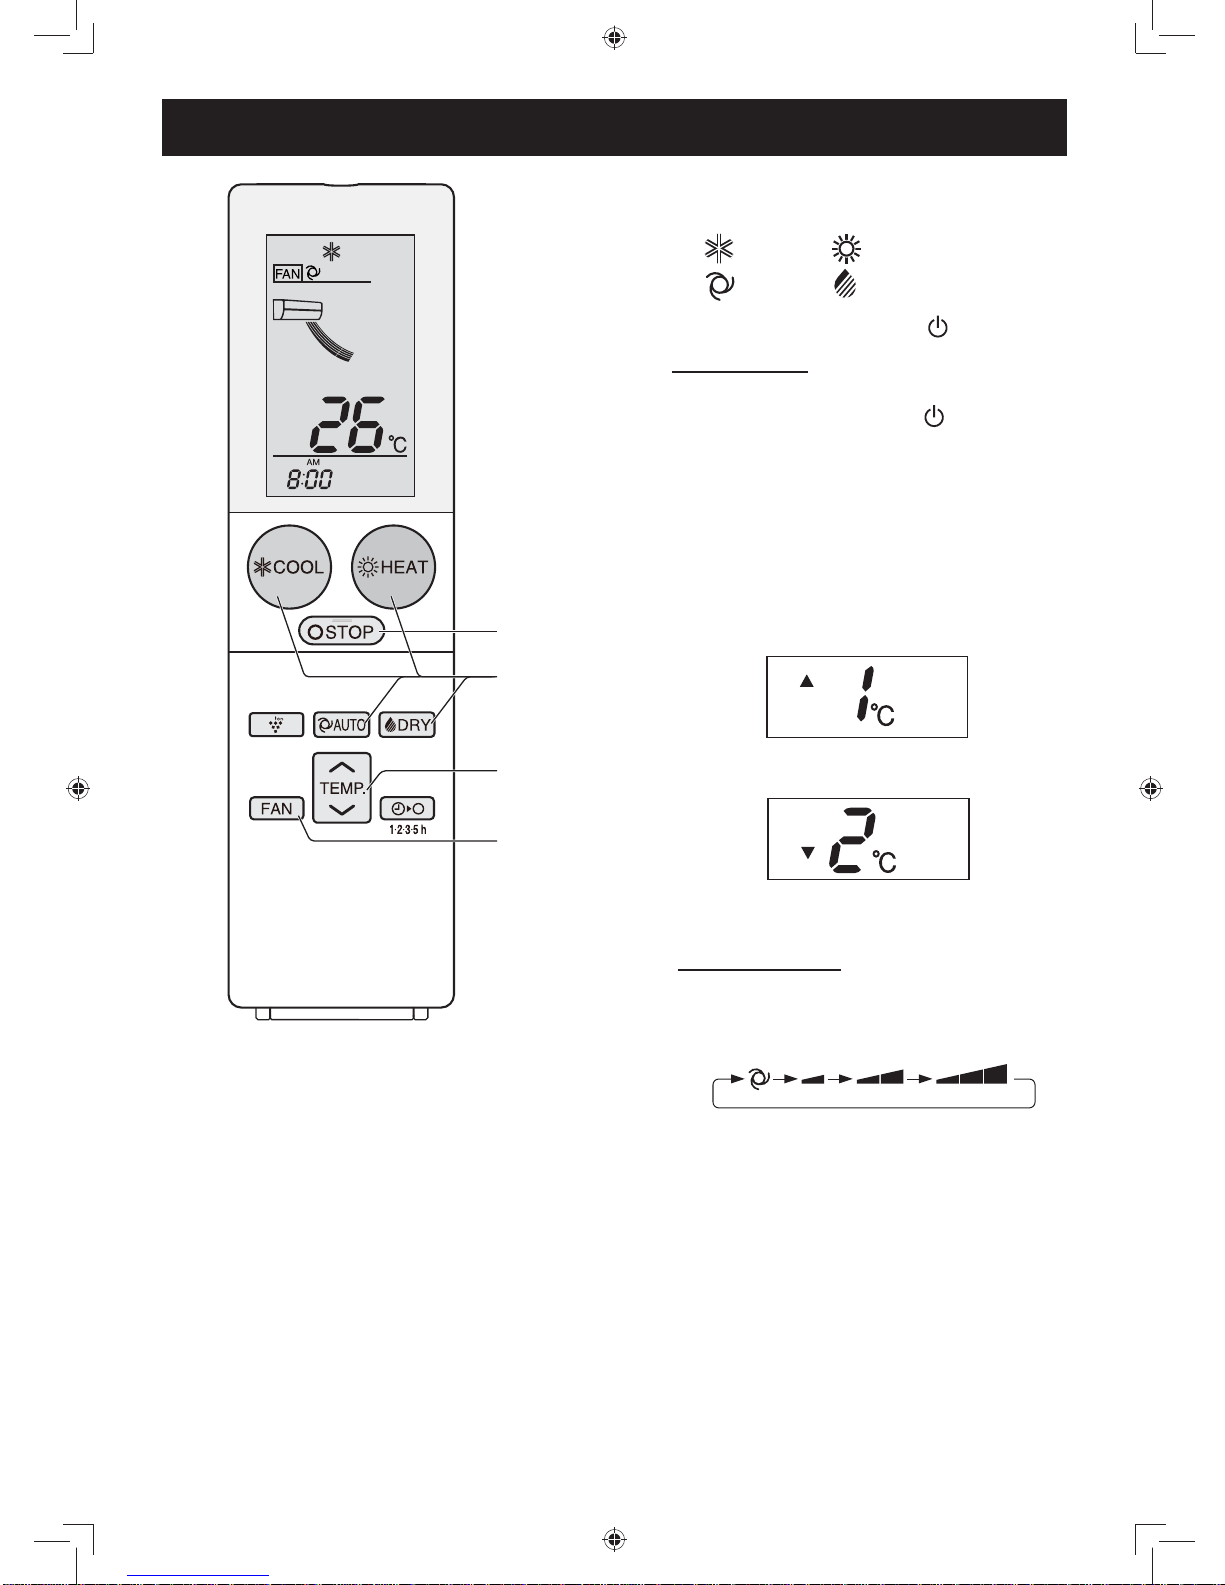
1
Press the COOL, HEAT, AUTO or DRY
button.
: COOL : HEAT
: AUTO : DRY
• The green OPERATION lamp ( ) will light up.
TO TURN OFF
Press the STOP button.
• The green OPERATION lamp ( ) will turn off.
2
Press the TEMPERATURE button to set the
desired temperature.
(COOL/HEAT/AUTO mode)
The temperature setting range: 16-30°C.
(DRY mode)
The temperature can be changed up to
±2°C the
automatically set of temperature.
3
Press the FAN button to set the desired fan
speed.
AUTO/DRY MODE
• The temperature can be changed up to 2°C
above or below the temperature automatically
determined by the air conditioner.
• In the DRY mode, the fan speed is preset to
AUTO and cannot be changed.
BASIC OPERATION
(Example: 1°C higher)
(Example: 2°C lower)
1
2
3
AUTO SOFT LOW HIGH
TURN OFF
NOTE:
TIPS ABOUT AUTO MODE
• In the AUTO mode, the unit will automatically select
COOL or HEAT mode by comparing the room temperature and your desired temperature.
• The unit will automatically switch between HEAT and
COOL mode to keep the desired temperature.
• 10°C button , MULTI SPACE button will be inactivated
during AUTO mode.
Page 9
GB-7
ENGLISH
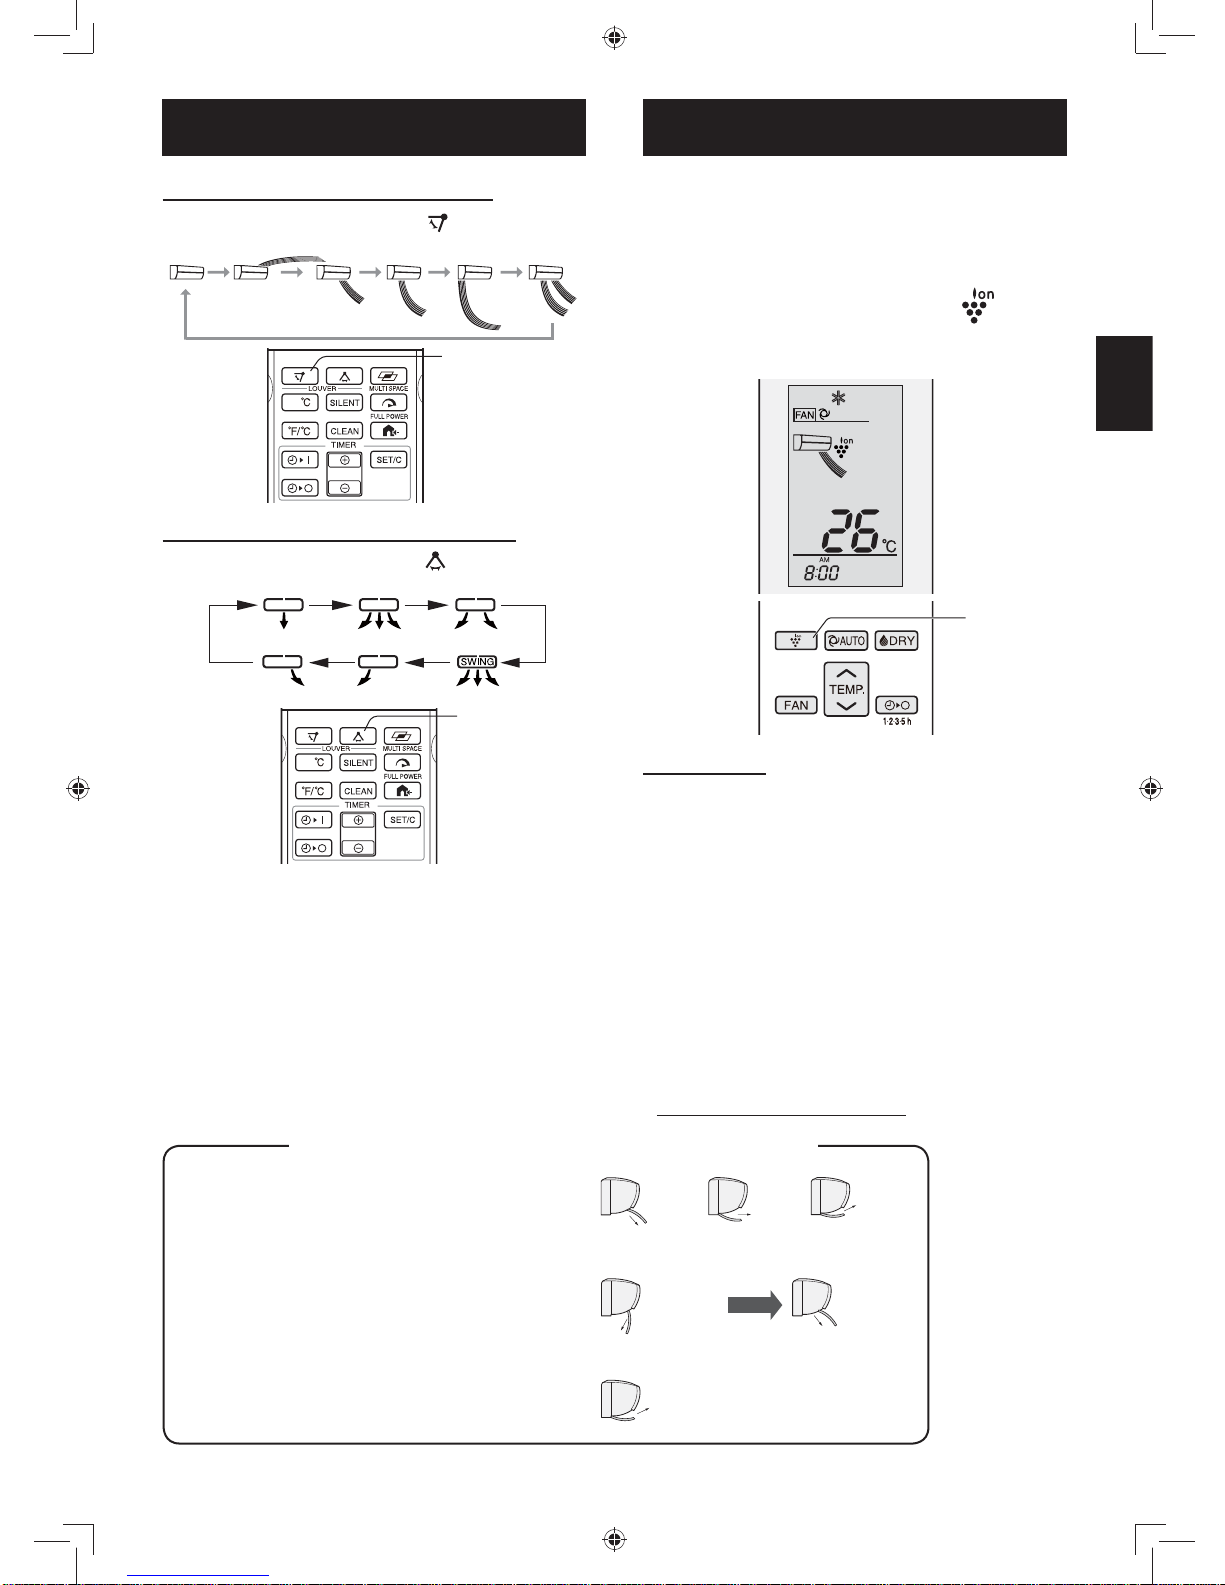
VERTICAL AIR FLOW DIRECTION
1
Press the SWING button ( ) to set desired
air fl ow direction.
HORIZONTAL AIR FLOW DIRECTION
1
Press the SWING button ( ) to set desired
air fl ow direction.
CAUTION:
Never attempt to adjust the louvers manually.
• Manual adjustment of the louvers can cause the unit to
malfunction.
• When the vertical adjustment louver is positioned at the
lowest position in the
COOL or DRY mode for an extended
period of time, condensation may result.
NOTE:
• The adjustment range is narrower than the SWING
range in order to prevent condensation from dripping.
AUTO
10
50°F
1
10
50°F
1
ADJUSTING THE AIR FLOW
DIRECTION
1
During operation, press the
PLASMACLUSTER button.
• The remote control will display “ ”.
• The blue PLASMACLUSTER lamp on the
unit will light up.
TO CANCEL
Press the PLASMACLUSTER button again.
• The PLASMACLUSTER lamp on the unit will turn
off.
NOTE:
• Use of the PLASMACLUSTER operation will be
memorized, and it will be activated the next time you
turn on the air conditioner.
• To perform the PLASMACLUSTER operation in fan
only mode, press the PLASMACLUSTER button
while the unit is not operating. The mode symbol of
the remote control will go off and the fan speed can
not be set AUTO.
• Plasmacluster is Sharp’s original technology. For more
information, please visit:
http://www.sharp-world.com/pci/en
PLASMACLUSTER OPERATION
Plasmacluster ions released into the room are
effective against airborne contaminants, such as
mold, viruses, and allergens.
1
TIPS ABOUT AIR FLOW DIRECTION “AUTO”
COOL mode
The open panel will be set obliquely downward
for less than 20 minutes, and then shift to horizontal
or obliquely upward to deliver cool air to the ceiling.
HEAT mode
The open panel will be set obliquely backward
when outlet air temperature is low, and then shift
to obliquely downward when outlet air becomes
warm.
DRY mode
The open panel will be set obliquely upward.
Obliquely
downward
Horizontal Obliquely
upward
or
Obliquely
backward
Obliquely
downward
Obliquely
upward
When outlet air
temperature
is low
When outlet
air becomes
warm
Page 10
GB-8
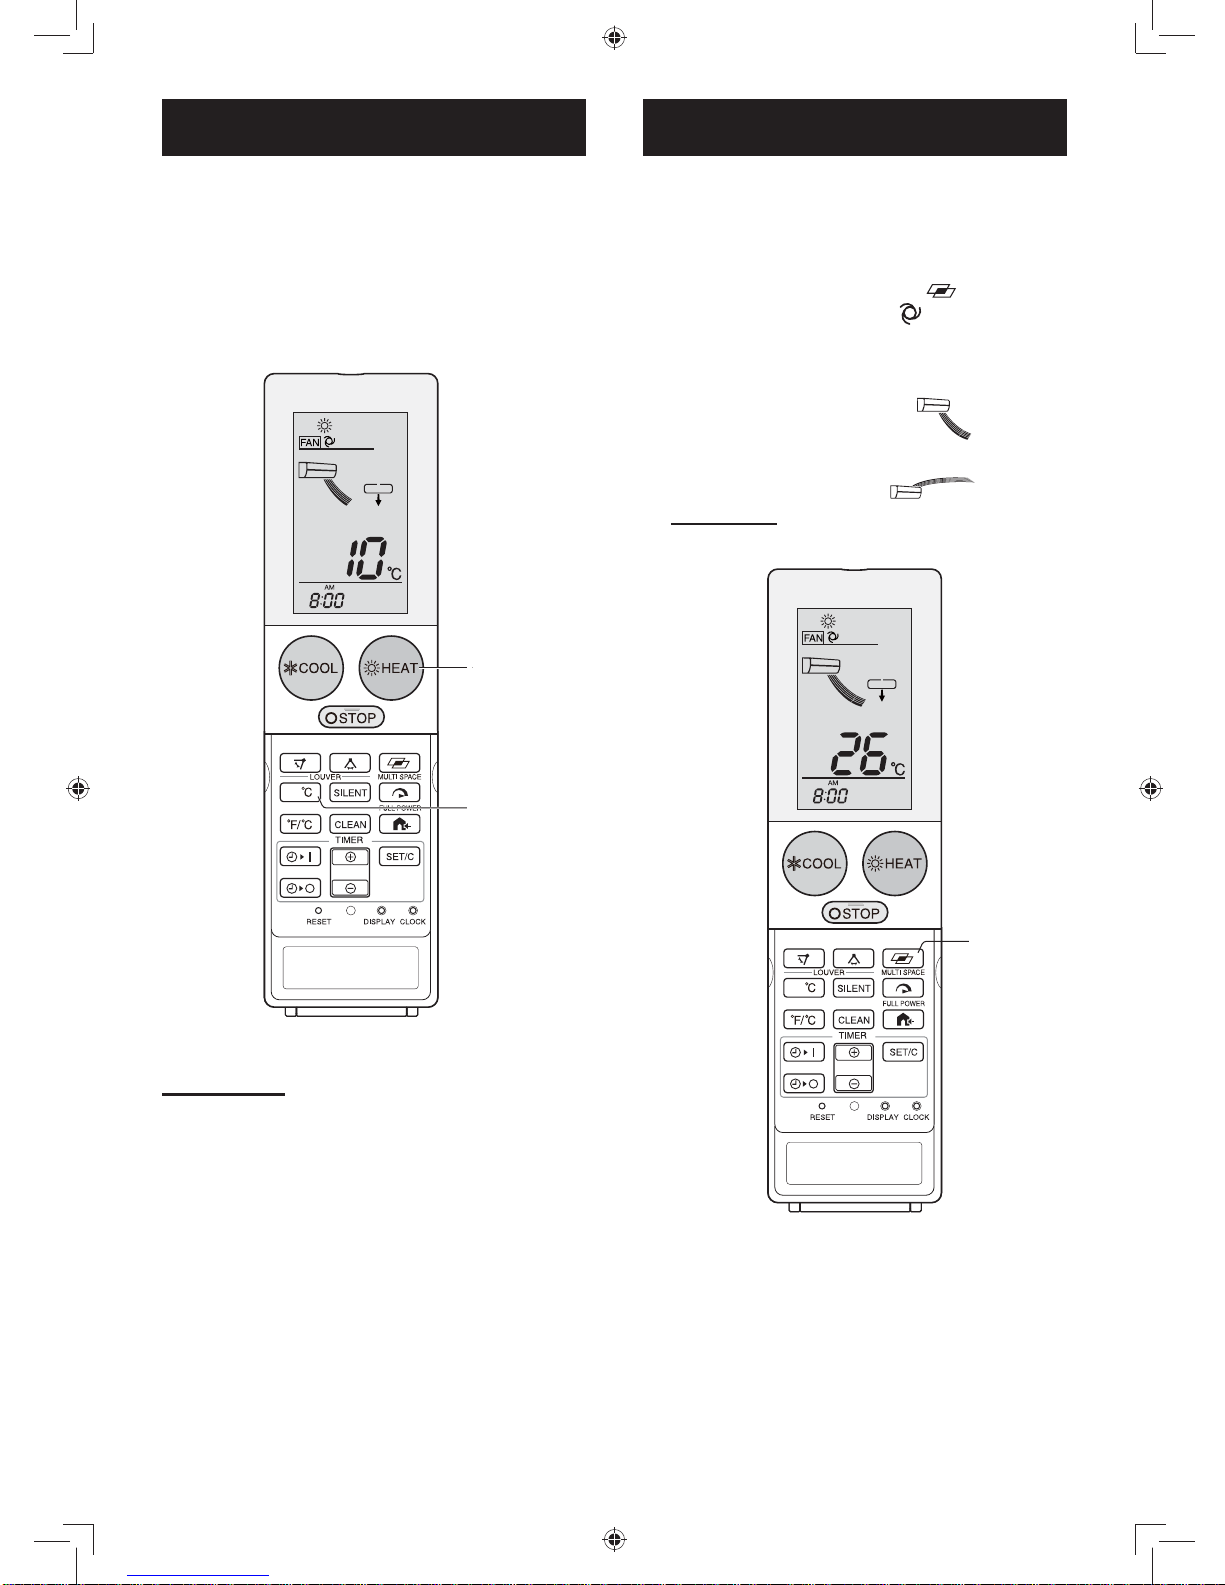
10˚C OPERATION
Heating operation with 10˚C set temperature will be
performed.
1
Press the HEAT button to start HEAT
operation.
2
Press the 10˚C button.
• The remote control will display “
10˚C
”.
TO CANCEL
Press the 10˚C button again.
NOTE:
• 10˚C operation will not be available with heating
operation automatically selected by AUTO mode.
1
2
10
50°F
NOTE:
• The unit will operate at “Extra HIGH” fan speed for 15
minutes for long distance delivery of conditioned air,
and then shift to “HIGH” fan speed after 15 minutes.
• SILENT, OUTDOOR SILENT` and FAN SPEED but-
ton will be disabled during this operation.
• Effectiveness of this function may differ depending on
the room layout, installation position of the unit, and
insulation level of the space concerned.
The unit will operate to cool or warm multiple rooms
in well insulated house by pressing this button.
1
During cooling or heating operation, press
MULTI SPACE button.
The remote controller will display “ ” and fan
speed icon will be changed to “ ”.
Louver angle will be changed to the position for long
distance delivery of cool or warm air.
(HEAT mode)
• The remote control will display “ ”.
(COOL / DRY mode)
• The remote control will display “ ”.
TO CANCEL
Press MULTI SPACE button again.
MULTI SPACE
1
10
50°F
Page 11

GB-9
ENGLISH
In this operation, the air conditioner works at the
maximum power to makes the room cool or warm
rapidly .
1
Press the FULL POWER button during
operation.
• The remote control will display “ ”.
• The temperature display will go off.
• The green FULL POWER lamp (
) on
the unit will light up.
TO CANCEL
Press the FULL POWER button again.
• The green FULL POWER lamp ( ) on the unit
will turn off.
NOTE:
• You can not set the temperature or fan speed during
the FULL POWER operation.
• FULL POWER operation will be automatically
cancelled in one hour, and the unit return to the
original settings. The green FULL POWER lamp
(
) on the unit will turn off.
FULL POWER OPERATION
1
The unit will operate at “Extra LOW” fan speed for
comfort and in need of quieter operation.
1
During COOL, HEAT, and AUTO operation,
press the SILENT button.
• The speed icon on the remote control will display
“SILENT”.
TO CANCEL
Press the SILENT button again.
1
SILENT OPERATION
AUTO
10
50°F
AUTO
10
50°F
Page 12
GB-10
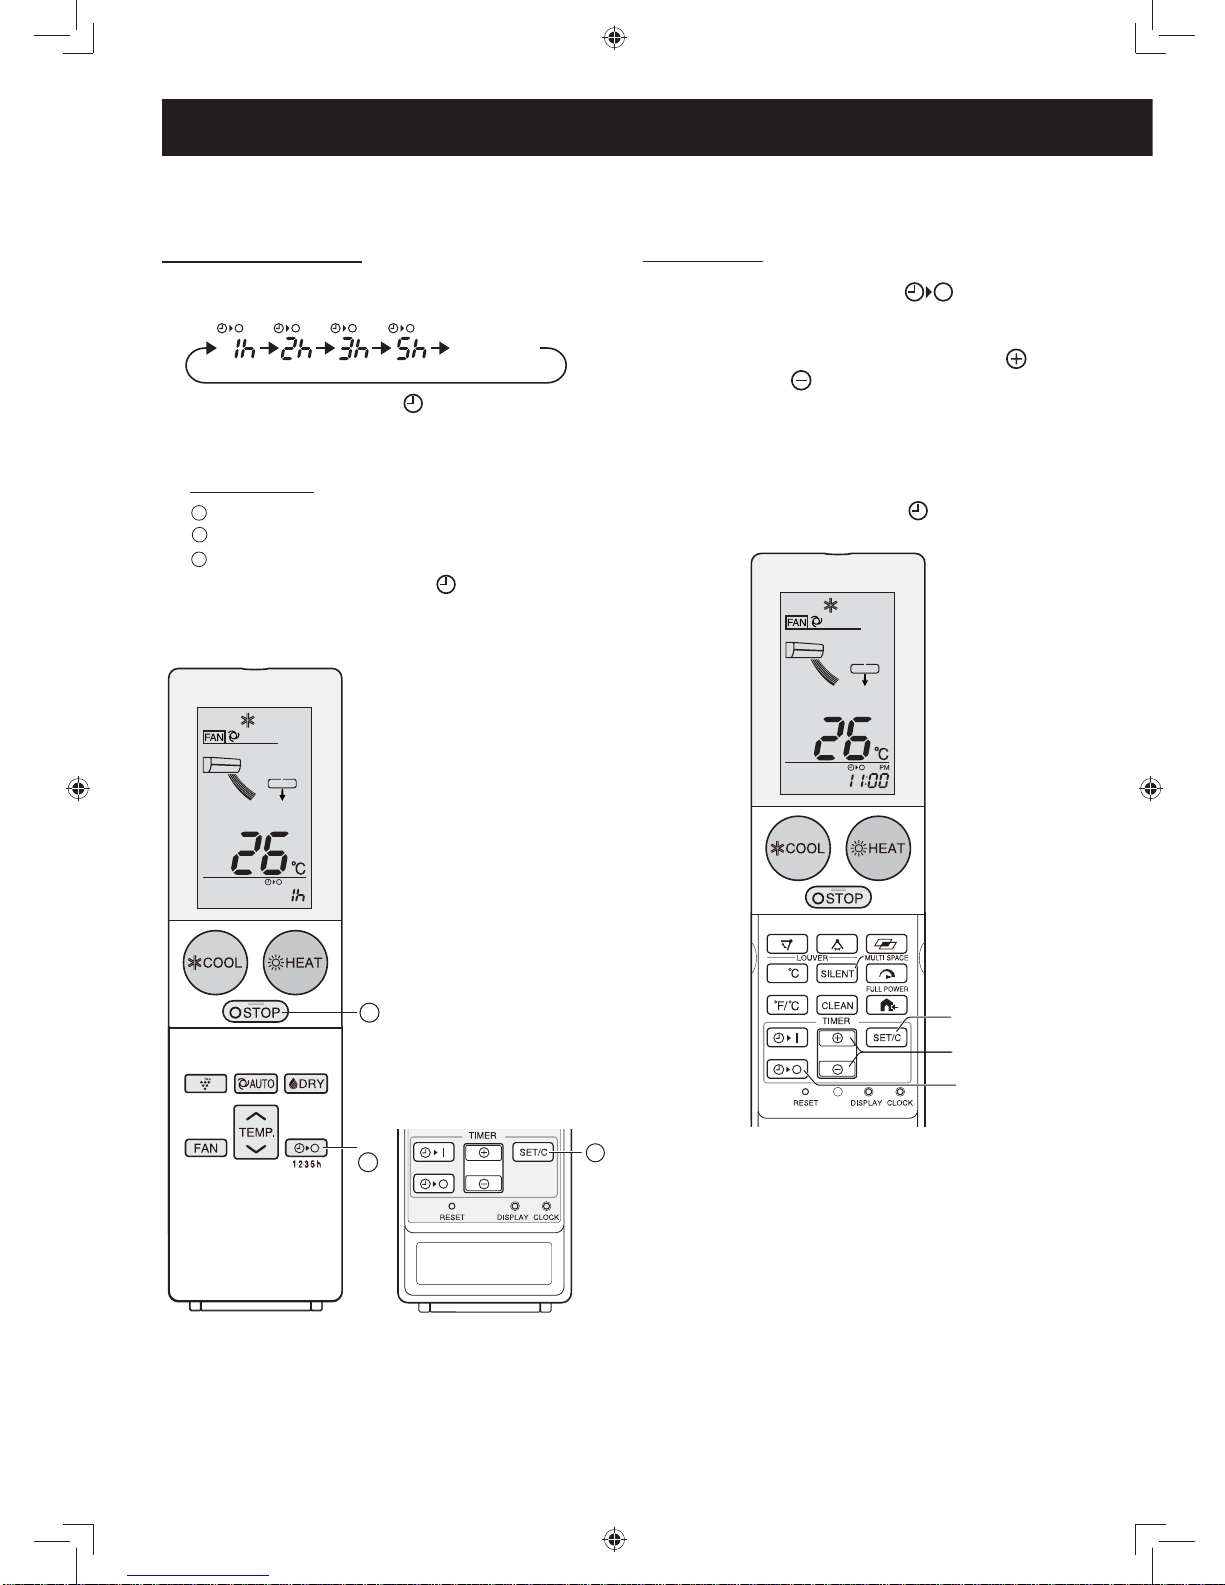
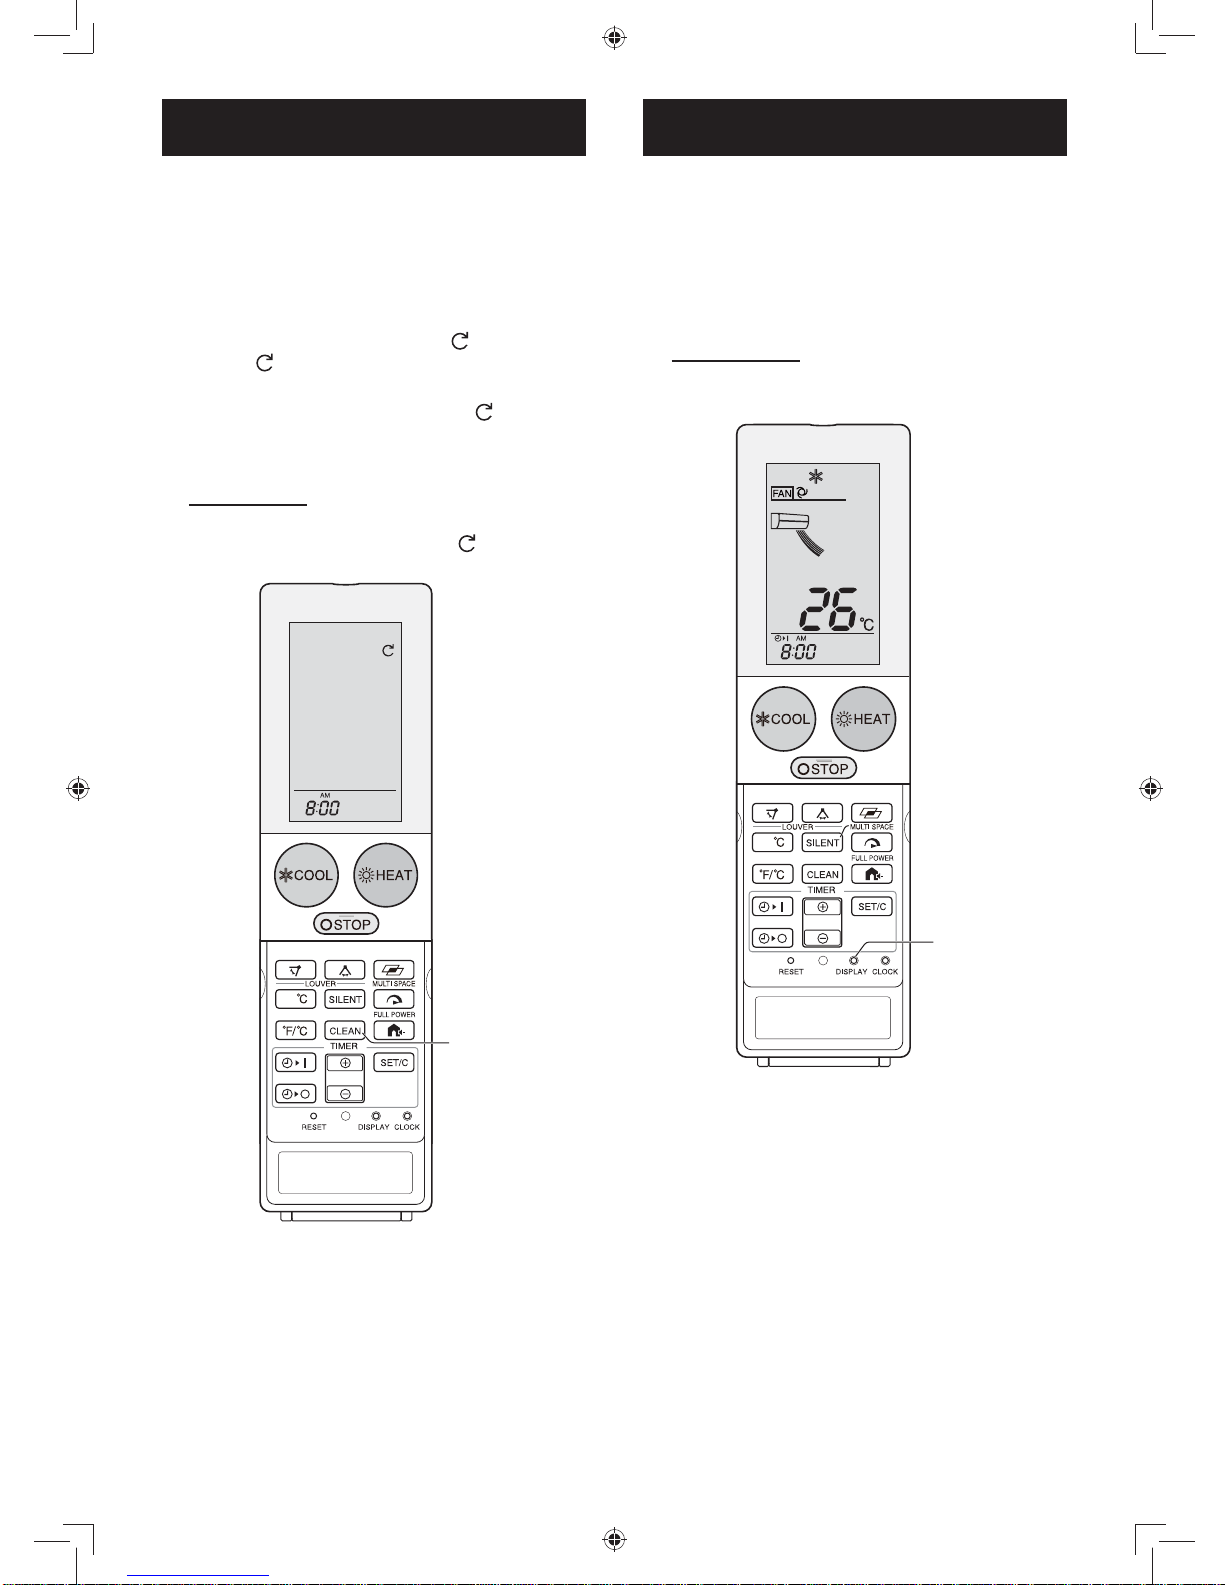
TIMER OPERATION
TIMER OFF
1
Press the TIMER OFF ( ) button.
2
The TIMER OFF indicator will blink;
press the TIME ADVANCE ( )or
REVERSE ( ) button to set the desired
time.
(The time can be set in 10-minute increments or
decrements.)
3
Press the TIMER SET (SET/C) button.
• The orange TIMER lamp ( ) on the unit will
light.
TIPS ABOUT TIMER OFF OPERATION
When the TIMER OFF mode is set, the temperature
setting is automatically adjusted to prevent the room
from be coming excessively warm or cool, for example
while you sleep. (Auto Sleep function)
COOL/DRY MODE:
• One hour after the time operation begins, the
temperature setting rises 1°C higher than the original
temperature setting.
HEAT MODE:
• One hour after the timer operation begins, the
temperature setting drops 3°C lower than the original
temperature setting.
Before setting the timer,make sure the clock is
properly set with the current time.
When the 1.2.3.5h OFF TIMER is set, the unit will
automatically turn off after the setting hours.
1.2.3.5h OFF TIMER
1
Press the 1.2.3.5h OFF TIMER button to set
the desired time.
• The orange TIMER lamp ( ) will light up.
• The remaining time will be indicated on the remote control in 1-hour increments.
TO CANCEL
Press the SET/C button.
Press the 1.2.3.5h OFF TIMER button.
Press the STOP button.
• The orange TIMER lamp ( ) on the unit will
turn off.
•
The current clock time will be displayed on the
remote control.
NOTE:
• The 1.2.3.5h OFF TIMER has priority over TIMER ON
and TIMER OFF.
• If the 1.2.3.5h OFF TIMER is set while the unit is not
operating, the unit will operate at the formerly set
condition and stop after a period of set time.
CANCEL
3
2
1
10
50°F
2
3
1
10
50F
2
3
1
1
Page 13
GB-11
ENGLISH
TIMER ON
1
Press the TIMER ON ( ) button.
2
The TIMER ON indicator will blink;
press the TIME ADVANCE ( ) or
REVERSE ( ) button to set the
desired time
.
(The time can be set in 10-minute increments or
decrements.)
• Select the operation condition.
3
Press the TIMER SET (SET/C) button.
• The orange TIMER lamp ( ) on the unit will
light.
NOTE:
• The unit will turn on prior to the set time to allow
the room to reach the desired temperature by the
programmed time. (Awaking function)
TO COMBINE TIMER ON AND TIMER OFF
TIMER ON and TIMER OFF can be set up at the
same time.
Set the TIMER OFF and TIMER ON.
• The settings will be automatically combined.
Example
(
Current time: 9:00 p.m.)
OFF TIMER at 11:00 p.m.
ON TIMER at 7:00 a.m.
• The arrow ( or ) between the TIMER ON indica-
tor and the TIMER OFF indicator shows which timer
will activate fi rst.
NOTE:
• You cannot program the ON-TIMER and OFF-TIMER
to operate the unit at different temperatures or other
settings.
• Either timer can be programmed to activate prior to
the other.
• When SET/C button is pressed, all the timer setting
will be cancelled (including TIMER ON, TIMER OFF
and
1.2.3.5h OFF TIMER
)
TO CANCEL (for TIMER OFF and TIMER ON)
Press the TIMER CANCEL (SET/C) button.
• The orange TIMER lamp ( ) on the unit will turn
off.
•
The current clock time will be displayed on the remote
control.
TO CHANGE TIME SETTING
Cancel the TIMER setting fi rst, then set it again.
CANCEL
1
3
2
10
50°F
Page 14
GB-12
SELF CLEAN OPERATION
SELF CLEAN operation will reduce the growth of mold
fungus with Plasmacluster ions and dry inside of the
unit. Utilize the operation at seasonal change over
terms
.
1
Press the SELF CLEAN button when the
unit is not operating.
• The remote control will display “ ”.
(The “ ” will disappear automatically in 1 minute.)
• The light blue SELF CLEAN lamp ( )on the unit
will light up.
• The unit will stop operation after 90 minutes.
TO CANCEL
Press the STOP button.
• The light blue SELF CLEAN lamp ( ) will turn off.
NOTE:
• You cannot set the temperature, fan speed, air fl ow
direction or timer setting during the SELF CLEAN operation.
• Mold fungus already grown can not be eliminated by
this operation.
• SELF CLEAN and PLASMACLUSTER use common
lamp, only lamp color different.
Press the DISPLAY button when the lamps on the unit
are too bright. (All the lamps on indoor unit cannot be
turned off.)
1
During operation, press the DISPLAY
button.
• All the lamps on indoor unit will get dark in same time
TO LIGHT UP
Press the DISPLAY button again.
DISPLAY BUTTON
1
10
50°F
10
50°F
1
Page 15
GB-13
ENGLISH
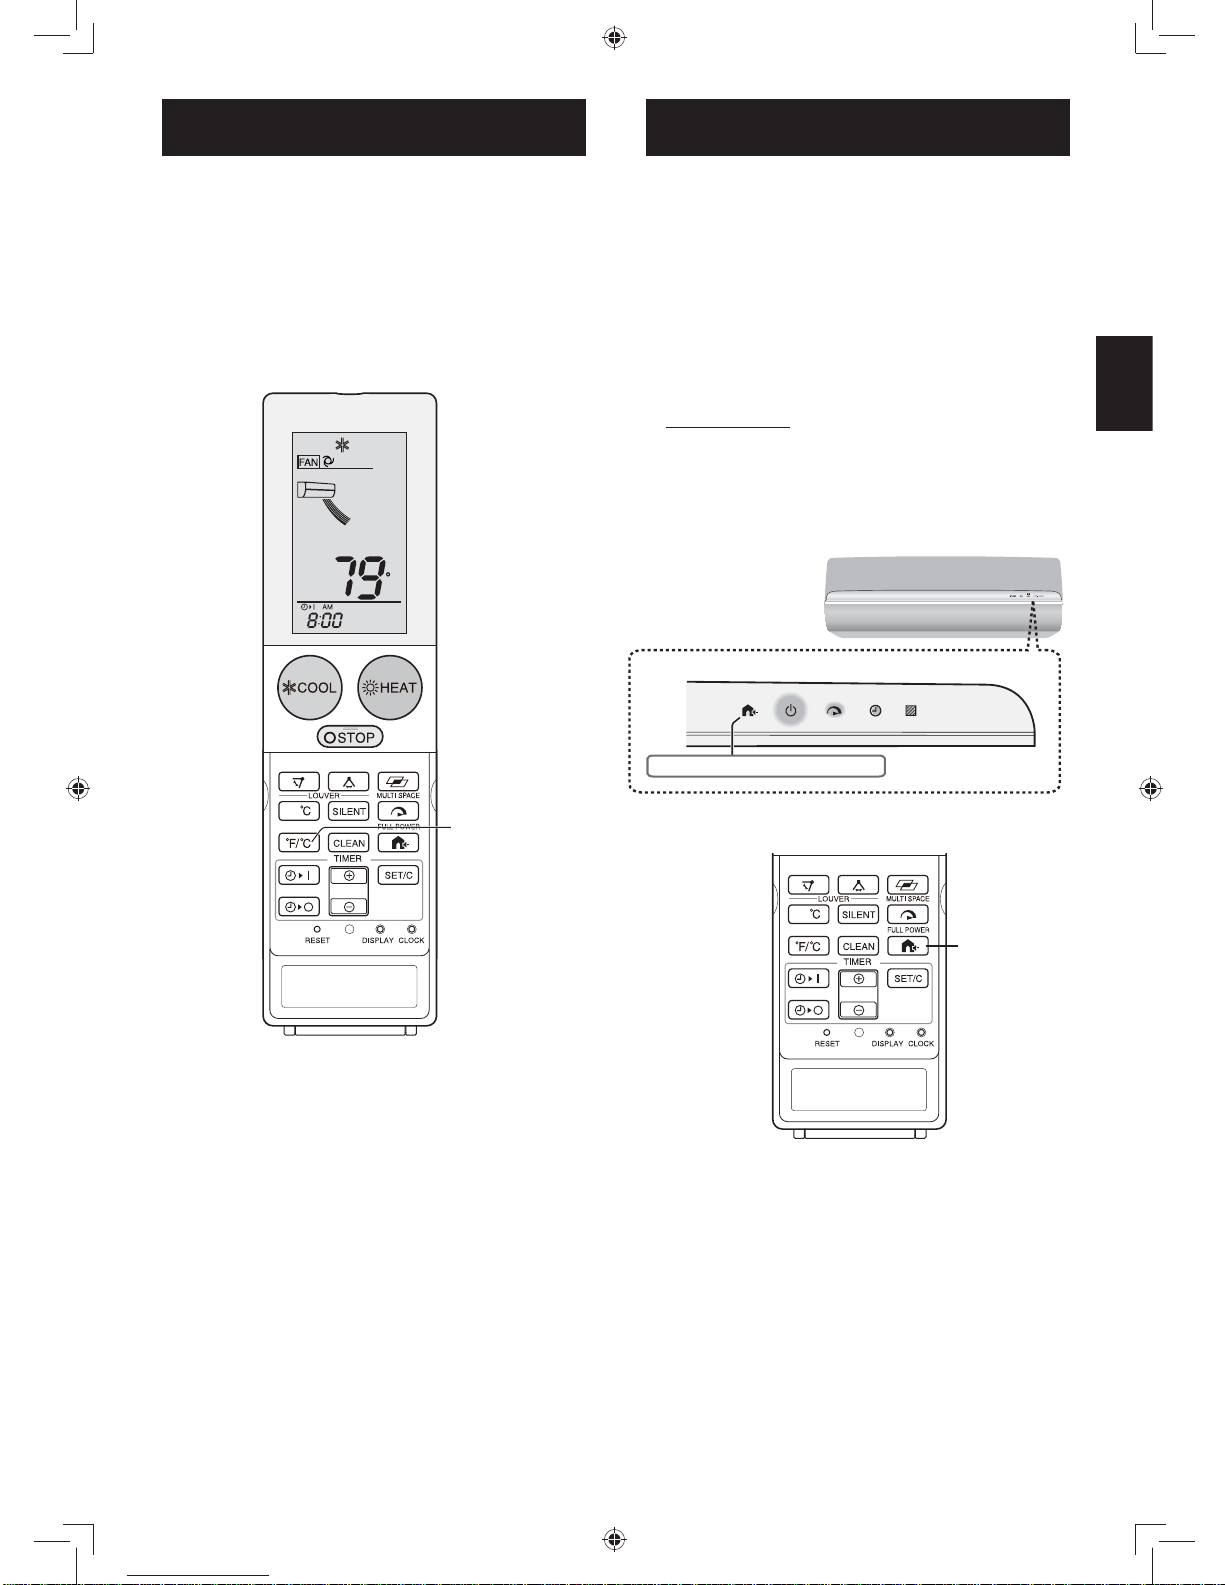
˚F/˚C CHANGE OVER OPERATION
Change °F/°C display of temperature setting on
remote control.
1
During operation, press °F/°C CHANGE
OVER button.
• Thermostat display of remote control will
change between “°F” (Fahrenheit) and “°C”
(Centigrade).
10
50°F
F
1
OUTDOOR SILENT OPERATION
Turn ON this operation to limit the sound of the
outdoor unit during operation. This operation will be
benefi cial especially during the night, if you need to be
considerate to the neighbors.
1
During operation, press OUTDOOR SILENT button.
•
LED on the indoor unit display will illuminate when this operation is turned ON.
TO CANCEL
Press OUTDOOR SILENT button again,
and the LED on the indoor unit display
will turn OFF.
NOTE:
• If OUTDOOR SILENT function is used together with
FULL POWER or MULTI-SPACE operations, the performance may not reach the full potential as it could
without OUTDOOR SILENT function.
• If the unit is turned OFF while in OUTDOOR SILENT
operation, the unit will not remember the OUTDOOR
SILENT operation when restarted.
• The sound of the outdoor unit will not be lowered if
the sound level has dropped low enough at stable
condition.
10
50°F
1
OUTDOOR SILENT Lamp (white)
Page 16
GB-14
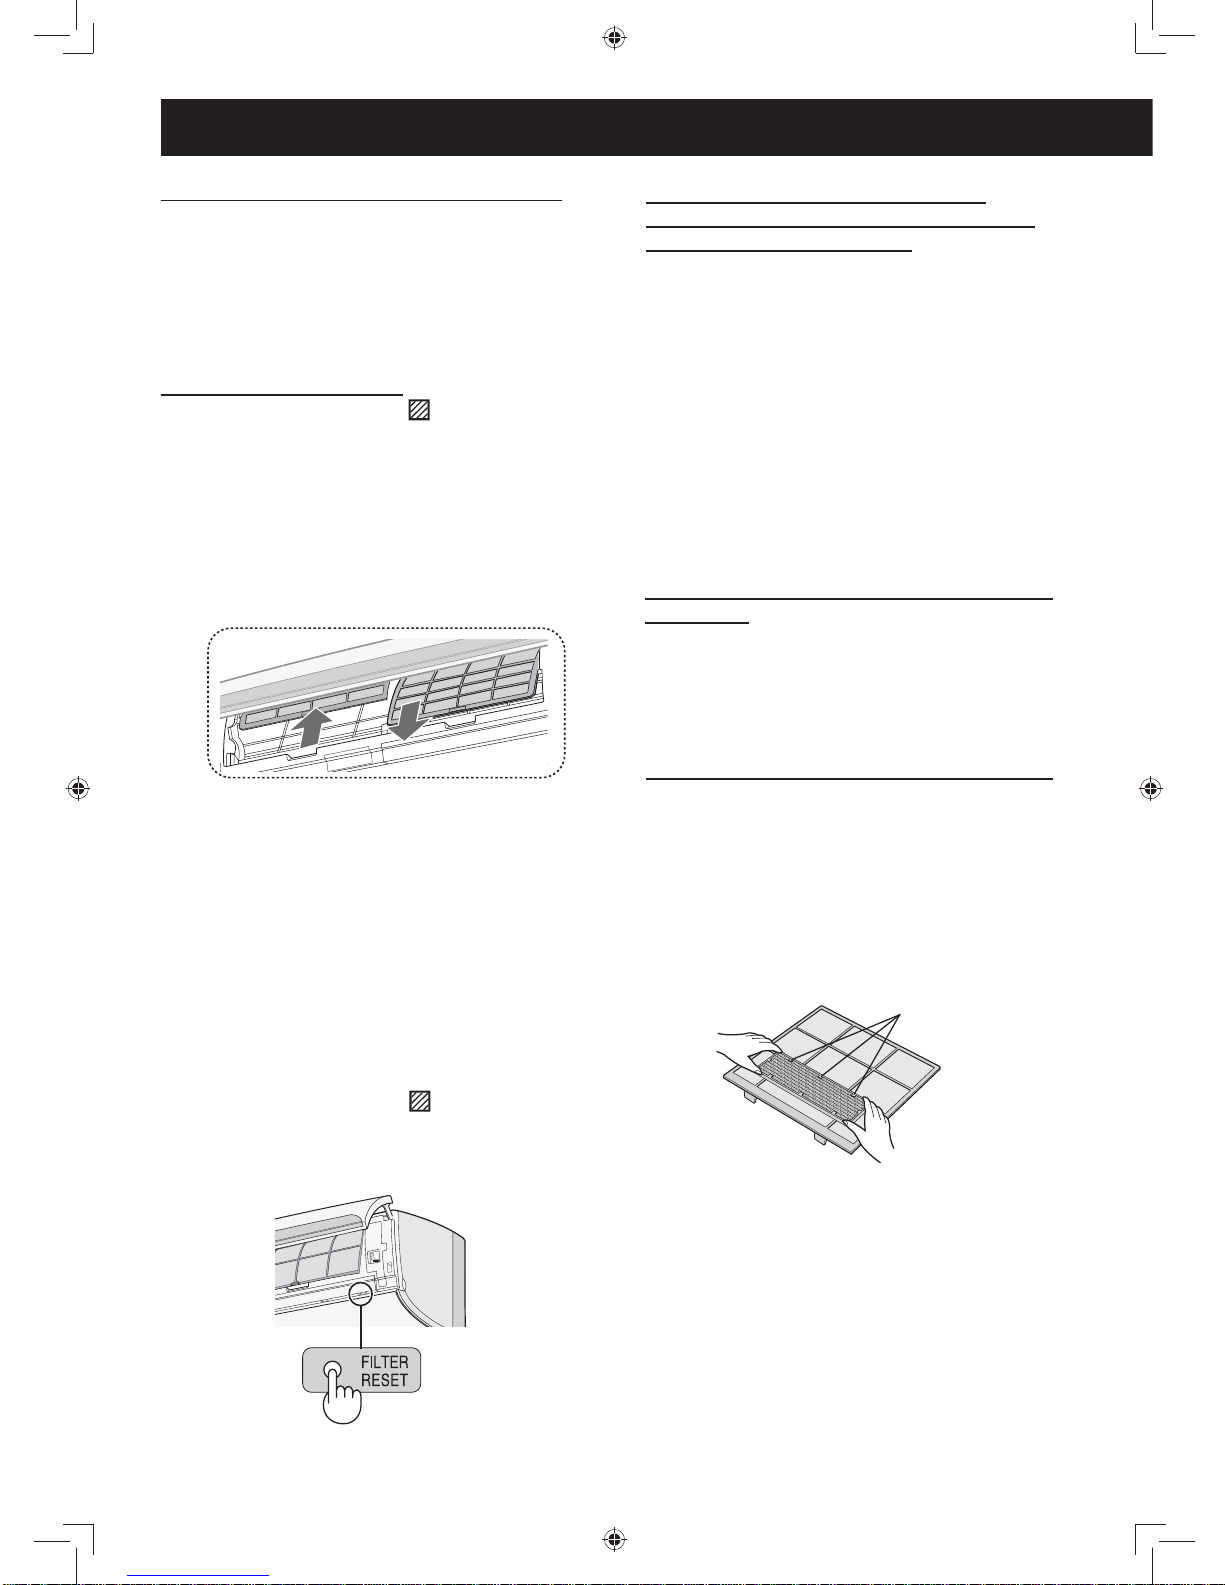
MAINTENANCE
BEFORE PERFORMING MAINTENANCE
Be sure to turn off the circuit breaker before performing
any maintenance.
1
Turn off the unit.
2
Wait 5 seconds or more after the air
fl ow panel is completely closed, and
turn off the circuit breaker.
CHANGING THE AIR PURIFYING FILTER
The fi lters should be changed every 3 ~ 6 months.
1
Remove the air fi lters.
2
Change the air purifying fi lters.
1
Take off the old air purifying fi lters from the
air fi lters.
2
Set the new air purifying fi lters, under the
fi lter stoppers located on the air fi lters.
3
Reinstall the air fi lters.
NOTE:
• The dirty air purifying fi lters are not washable for
reuse. The new fi lters are available at your nearest
dealer.
Disposal of Filters
Please dispose of replaced fi lters according to the
local disposal laws and regulations.
AIR PURIFYING fi lter materials
Filter:Polypropylene
Frame:Polyester
Filter stopper
CLEANING THE FILTERS
The red FILTER CLEAN Lamp ( ) on the display
panel will turn on to denote that the air fi lters need
cleaning if the total operating time is accumulated to
300 hours.
1
Turn off the unit.
2
Remove the fi lters.
1
Lift the open panel.
2
Push the air fi lters up slightly to unlock them.
3
Pull the air fi lters down to remove them.
3
Take off the air purifying fi lters from the
air fi lters.
4
Clean the fi lters.
Use a vacuum cleaner to remove dust. If the
fi lters are dirty, wash them with warm water and
a mild detergent. Dry fi lters in the shade before
reinstalling.
5
Reinstall the air purifying fi lters.
6
Reinstall the fi lters.
1 Reinstall the fi lters in the original positions.
2
Press the FILTER RESET button. The red
FILTER CLEAN Lamp ( ) will turn off.
(Accumulated operating time will be reset to “0“
at this moment)
3
Close the open panel.
BEFORE AND AFTER CHANGE OF
SEASONS PERFORM THE FOLLOWING
FOR PROPER OPERATION.
1
Operate the unit in SELF CLEAN mode
to dry the unit.
2
Stop the operation by pressing the
STOP button on the remote control
when completed, and turn the circuit
breaker off.
3
Inspect air fi lters and remove for
cleaning.
4
Reinstall air fi lters and check for any
obstructions on the inlet and outlet
of airfl ow.
CLEANING THE UNIT AND THE REMOTE
CONTROL
• Wipe them with a soft cloth.
• Do not directly splash or pour water on them. It can
cause electrical shock or equipment damage.
• Do not use hot water, thinner, abrasive powders or
strong solvents.
Page 17
GB-15
ENGLISH
REMOVING THE OPEN PANEL
The open panel can be removed for cleaning.
1
Open the panel.
• Hold the right and left side of panel and lift it.
2
Remove the panel.
• Lift the panel to almost horizontal position and
pull it out.
Open panel
Acceptable
Unacceptable
ATTACHING THE OPEN PANEL
1
Hold the panel horizontally.
2
Put the long shaft into guide from top
side and push it until it clicks.
3
Close the open panel.
• Push the arrow-marked points on open panel until
it clicks.
REMOVING THE AIR FLOW PANEL
The air fl ow panel can be removed for cleaning.
1
Turn off the unit.
• Wait 5 seconds or more after the air fl ow
panel is completely closed, and turn off the
circuit breaker.
2
Lift the open panel up.
3
Unlock the air fl ow panel.
• Push the release button (gray) and open the
lower part of the air fl ow panel.
4
Remove the air fl ow panel.
• Lift the air fl ow panel up slightly to the position as
fi gure show and remove it.
1
1
Open panel
ATTACHING THE AIR FLOW PANEL
1
Hook both tabs on the shaft
• There is a shaft on each end of the unit.
2
Close the air fl ow panel.
3
Push the arrow-marked points of the
air fl ow panel until it clicks.
4
Close open panel
•
After attachment, be sure to close air fl ow panel
fi rmly.
2
1
3
3
Open panel
Open panel
Guide
Long Shaft
3
2
4
※
Tab
Shaft
Open panel
Air fi lter panel
Page 18
GB-16
INDOOR TEMP. OUTDOOR TEMP.
COOLING
upper limit 32˚C 43˚C
lower limit 21˚C –10˚C
HEATING
upper limit 27˚C 24˚C
lower limit – –25˚C
• The built-in protective device may prevent the unit
from operating when used out of this range.
• Condensation may form on the air outlet if the unit
operates continuously in the COOL or DRY mode
when humidity is over 80 percent.
WHEN POWER FAILURE OCCURS
This air conditioner has a memory function to store
settings when a power failure occurs.
After power recovery, the unit will automatically
re-start in the same settings which were active before
the power failure, except for timer settings.
If the timers were set before a power failure, they will
need to be re-set after power recovery.
PREHEATING FUNCTION
In the HEAT operation, the indoor fan may not start for
two to fi ve minutes after the unit is turned on to prevent
cold air from blowing out of the unit.
DE-ICING FUNCTION
• When ice forms on the heat exchanger in the outdoor
unit during the HEAT operation, an automatic de-icer
provides heat for about 5 to 10 minutes to remove
the ice. During de-icing, the inside and outside fans
stop operating.
• After de-icing is completed, the unit automatically
resumes operation in the HEAT mode.
HEATING EFFICIENCY
• The unit employs a heat pump that draws heat from
the outside air and releases it into the room. The
outside air temperature therefore greatly affects the
heating effi ciency.
• If the heating effi ciency is reduced due to low outside
temperatures, use an additional heater.
• It takes time to warm up and heat the entire room
because of the forced air circulation system.
ADDITIONAL NOTES ON OPERATION
OPERATING TEMPERATURE RANGE
Page 19

GB-17
ENGLISH
BEFORE CALLING FOR SERVICE
The following conditions do not denote equipment malfunctions
UNIT DOES NOT OPERATE
The unit will not operate if it is turned on immediately
after it is turned off. The unit will not operate
immediately after the mode is changed. This is to
protect the unit. Wait 3 minutes before operating the
unit.
UNIT DOES NOT SEND OUT WARM AIR
The unit is preheating or de-icing.
ODORS
Carpet and furniture odors that entered into the unit
may be sent out from the unit.
CRACKING NOISE
This sound is generated by the friction of the unit
expanding or connecting due to a temperature change.
A LOW BUZZING NOISE
This is a sound of the unit generating Plasmacluster
ions
.
SWISHING NOISE
The soft, swishing noise is the sound of the refrigerant
fl owing inside the unit.
MIST SEEN AT INDOOR AIR OUTLET
In cooling operation, this is caused by the difference
between the room air temperature and the air
discharged.
WATER VAPOUR
In heating operation, water vapour may fl ow out of the
outdoor unit during de-icing.
THE OUTDOOR UNIT DOES NOT STOP
After stopping the operation, the outdoor unit will rotate
its' fan for about a minute to cool down the unit.
ODOR EMITTED FROM THE PLASMACLUSTER
AIR OUTLET
This is the smell of ozone generated from the
Plasmacluster Ion generator. The ozone concentration
is very small, posing no adverse effect on your health.
The ozone discharged into the air rapidly decomposes,
and its density in the room will not increase.
Check the following points before calling for
service.
IF THE UNIT FAILS TO OPERATE
Check if the circuit breaker has tripped or the fuse has
blown.
IF THE UNIT FAILS TO HEAT (OR COOL) THE
ROOM EFFECTIVELY
• Check the fi lters. If dirty, clean them.
• Check the outdoor unit to make sure nothing is
blocking the air inlet or outlet.
• Check the thermostat is proper setting.
• Make sure windows and doors are closed tightly.
IF THE UNIT FAILS TO RECEIVE THE REMOTE
CONTROL SIGNAL
• Check whether the remote control batteries have
become old and weak.
• Try to send the signal again with the remote control
pointed properly towards the unit’s signal receiver
window.
• Check whether the remote control batteries are
installed properly.
Please call for service when TEMPERATURE
INDICATOR on the indicator panel blink.
Page 20
Informasjon om kasting av dette apparatet og batteriene det inneholder
HVIS DU ØNSKER Å KASTE DETTE UTSTYRET ELLER BATTERIENE DET
INNEHOLDER, IKKE BRUK DEN VANLIGE SØPPELKASSEN OG IKKE KAST DEM
I OVNEN/PEISEN!
Brukt elektrisk og elektronisk utstyr og batterier skal alltid samles inn og behandles
SEPARAT i henhold til gjeldende lovverk.
Separat innsamling fremmer en miljøvennlig behandling, resirkulering av materialer
og minimalisering av avfall.
FEILAKTIG KASTING kan være skadelig for helsen og miljøet på grunn av bestemte
substanser! Lever BRUKT UTSTYR inn på den lokale, vanligvis kommunale,
miljøstasjonen.
Fjern BRUKTE BATTERIER fra utstyret og lever dem inn på et returanlegg for
batterier; ofte et sted hvor de selger nye batterier.
Dersom du har spørsmål knyttet til kasting, kontakt dine lokale myndigheter eller
forhandleren, og spør om korrekt fremgangsmåte.
BARE FOR BRUKERE I EU OG ENKELTE ANDRE LAND, F.EKS. NORGE OG
SVEITS: Ditt bidrag til separat innsamling er et lovfestet krav.
Symbolet som vises over er å fi nne på elektrisk og elektronisk utstyr og batterier (eller
på emballasjen) for å minne brukeren om dette.
Hvis det står "Hg" eller "Pb" under symbolet betyr dette at batteriet inneholder spor
av hhv. kvikksølv (Hg) eller bly (Pb).
Brukere fra PRIVATE HUSHOLDNINGER oppfordres til å benytte eksisterende
returanlegg for brukt utstyr og batterier. Batterier samles inn på salgssteder. Returen
er gratis.
Hvis utstyret har blitt brukt i NÆRINGSVIRKSOMHET, ta kontakt med din BOSCHforhandler for informasjon om tilbakelevering.
Du kan bli belastet for en mindre kostnad knyttet til tilbakelevering. Små produkter
(og små mengder) kan eventuelt leveres inn på din lokale innsamlingsstasjon.
For Spania: Ta kontakt med det etablerte innsamlingssystemet eller dine lokale
myndigheter for tilbakelevering av dine brukte produkter.
Inneholder fl uorisert drivhusgass R410A (Global Warming potential 2088).
Den aktuelle mengden er angitt på produktskiltet på utstyrets uteenhet.
NO
BYGNINGSBESTEMMELSER
Installasjon av og service på dette apparatet skal bare foretas av en kompetent person og i overensstemmelse
med følgende: IEE Regulations, Building Regulation, Building Standards (Skottland) (Consolidation), Building
Regulations (Nord-Irland), lokale vannvedtekter, Health & Safety Document 63S (The Electricity at Work
Regulations 1989), IS 813 (Irland) og andre lokale bestemmelser.
De relevante Standardene skal følges, herunder:
BS EN 14511: Krav til varmepumper for oppvarming og kjøling av lokaler
BS EN 378: Sikkerhets- og miljømessige krav for varmepumper
BS EN 14324 Brazing (hardlodding)
BS 1306 Specification for copper & copper Alloy pressure piping system (spesifikasjon for kobber og
kobberlegeringer i trykkrørsystemer)
The Health and Safety at Work Act 1974 (helse og sikkerhet i arbeidet)
The Management of Health and Safety at Work Regulations 1999 (helse og sikkerhet i arbeidet)
The Construction (Health, Safety and Welfare) Regulations 1996 (helse og sikkerhet i arbeidet)
The Construction (Design and Management) Regulations 1994 (konstruksjon (design og ledelse))
The Lifting Operations and Lifting Equipment Regulations 1998 (løfting og løfteredskaper)
Der hvor det ikke foreligger spesifi kke instruksjoner henvises det til relevante instrukser.
Page 21

NO-1
NORSK
ADVARSEL
• Ikke trekk i eller lag knekk på strømforsyningskabelen. Hvis det trekkes i strømforsyningskabelen
eller den brukes på feil måte kan det føre til skade
på enheten og forårsake elektrisk støt.
• Vær forsiktig slik at kroppen ikke utsettes for
direkte utløpsluft over en lang periode. Det kan
påvirke din fysiske tilstand.
• Når varmepumpen brukes i rom med spedbarn,
barn, eldre, sengeliggende eller funksjonshemmede personer, kontroller at romtemperaturen er
den riktige for dem som befi nner seg i rommet.
• Før aldri noen gjenstander inn i enheten. Innføring
av gjenstander kan resultere i personskade som
følge av at de innvendige viftene roterer med høy
hastighet.
• Sørg for feilfri jording av varmepumpen. Jordingsledningen skal ikke kobles til vannrør, gassrør,
lynavleder eller telefonjording. Ufullstendig jording
kan føre til elektrisk støt.
• Hvis det er noe unormalt med varmepumpen
(f.eks. brent lukt), skal den stoppes umiddelbart
og strømforsyningen skal slås AV (OFF).
• Apparatet skal installeres i samsvar med nasjonale regler for elektriske installasjoner. Feilaktig
kabeltilkobling kan føre til at strømforsyningskabelen,
støpselet og stikkontakten overopphetes, og det kan
oppstå brann.
• Hvis strømforsyningskabelen er skadet skal den skiftes av produsenten eller dennes serviceleverandør,
eller en tilsvarende, kvalifi sert person, for å unngå en
farlig situasjon. Skift aldri ut med annet enn en produsentspesifi sert strømforsyningskabel.
• Ikke spyl eller hell vann direkte på enheten. Vann kan
føre til elektrisk støt eller skade på utstyret.
• Ikke gjør forsøk på å installere/demontere/reparere
enheten på egen hånd. Feilaktig arbeid kan føre til
elektrisk støt, vannlekkasje, brann osv. Ta kontakt med
din installatør eller annet kvalifi sert servicepersonell
for installasjon/demontering/reparasjon av enheten.
ADVARSEL
• Åpne et vindu eller en dør med jevne mellomrom for å
lufte ut rommet, spesielt når tilleggsfyring med gassutstyr er i bruk. Utilstrekkelig ventilasjon kan føre til
oksygenmangel.
• Ikke betjen knappene med våte hender. Det kan føre
til elektrisk støt.
• For sikkerhets skyld, slå av hovedstrømbryter når
enheten ikke er i bruk over lengre tid.
• Kontroller monteringshyllen for uteenheten fra tid til annen
for slitasje og for å kontrollere at den sitter godt festet.
• Ikke plasser noe oppe på uteenheten eller stå på den.
Gjenstanden eller personen kan falle ned og skade
kan oppstå.
• Enheten er konstruert for bruk i boliger. Ikke bruk den
til andre formål, slik som i en kennel eller et veksthus,
i dyreoppdrett eller til dyrking av planter.
• Ikke plasser en beholder med vann på enheten. Hvis
vannet trenger inn i enheten kan elektronikken inne i
utstyret bli ødelagt og det kan forårsake elektrisk støt.
• Ikke blokker enhetens luftinntak eller -utløp. Det kan
føre til redusert effekt eller driftsproblemer.
• Husk å stoppe enheten og slå av hovedstrømbryteren før det foretas noen form for vedlikehold eller
rengjøring. Du kan bli skadet av viften som roterer
inne i enheten.
• Kontroller at varmepumpen kobles til strømforsyning
med korrekt merkespenning og frekvens. Bruk av
strømforsyning med feil spenning og frekvens kan
føre til skade på utstyret og eventuelt brann.
• Ikke installer utstyret på et sted hvor det kan lekke ut
brennbar gass. Det kan føre til brann.
Installer enheten på et sted med minst mulig støv,
røykgasser eller fuktighet i luften.
• Legg dreneringsslangen slik at dreneringen blir effektiv. Utilstrekkelig drenering kan føre til fuktighet i rom,
på møbler osv.
• Kontroller at det er montert jordfeilbryter eller en
hovedstrømbryter, i henhold til gjeldene elektroforskrifter, for å forhindre elektrisk støt.
• VIKTIGE SIKKERHETSINSTRUKSJONER ..NO-1
• DELENAVN ...................................................NO-2
• BRUK AV FJERNKONTROLL .......................NO-4
• MONTERING AV LUFTRENSEFILTER .......NO-5
• TIPS OM ENERGISPARING ........................NO-5
• HJELPEMODUS ...........................................NO-5
• GENERELL DRIFT ....................................... NO-6
•
JUSTERING AV LUFTSTRØMMENS RETNING
.....NO-7
• DRIFT MED PLASMACLUSTER ..................NO-7
• 10 °C DRIFT .................................................NO-8
• MULTI SPACE...............................................NO-8
• DRIFT MED FULL EFFEKT ..........................NO-9
• STILLE DRIFT ..............................................NO-9
• DRIFT MED TIMER ....................................NO-10
• DRIFT MED SELF CLEAN ........................NO-12
• DISPLAY-KNAPP ........................................NO-12
• °F/°C OMKOBLING.....................................NO-12
• UTENDØRS STILLE DRIFT .......................NO-12
• VEDLIKEHOLD ...........................................NO-13
• SUPPLERENDE INFORMASJON OM
DRIFT .........................................................NO-14
• FØR DU RINGER ETTER SERVICE ..........NO-15
NORSK
Les denne håndboken grundig før du tar i bruk dette produktet.
Oppbevar denne håndboken på et lett tilgjengelig sted som nyttig referanse.
INNHOLD
VIKTIGE
SIKKERHETSINSTRUKSJONER
Utstyret kan brukes av barn fra 8 års alder og av personer med nedsatte fysiske,
sensoriske eller mentale evner eller manglende erfaring og kunnskap, dersom de
er under tilsyn eller har fått instruksjon i bruken av utstyret på en sikker måte, og
forstår farene det representerer. Barn skal ikke leke med utstyret. Rengjøring og
brukervedlikehold skal ikke utføres av barn uten tilsyn.
Page 22
NO-2
DELENAVN
1
Innendørs inntak (Luft)
2
Åpningspanel
3
Luftfi lter
4
Mottakervindu
5
Tilbakestillingsknapp
fi lter
6
AUX-knapp
7
Vertikalt luftspjeld
8
Horisontalt luftspjeld
9
Luftstrømpanel
10
Innendørs utløp (Luft)
MERK:
Aktuelle enheter kan variere noe fra de som er vist over.
INNEENHET
1
2
3
4
5
6
7
8
9
OUTDOOR SILENT Lamp (white)
TIMER Lamp (orange) FILTER CLEAN Lamp (red)
FULL POWER Lamp (green) OPERATION Lamp (green)
PLASMACLUSTER Lamp (blue)
SELF CLEAN Lamp (light blue)
11
Utendørs inntak (Luft)
12
Kjølemiddelrør og
forbindelsesledning
13
Dreneringsslange
14
Utendørs utløp (Luft)
UTEENHET
11
13
14
12
10
Utløserknapp
FILTERRENGJØRING-lampe (rød) TIMER-lampe (oransje) UTENDØRS STILLE-lampe (hvit)
FULL EFFEKT-lampe (grønn)
DRIFT-lampe (grønn)
PLASMACLUSTER-lampe (blå)
SELVRENSING-lampe (lyseblå)
Page 23
NO-3
NORSK
FJERNKONTROLL
DISPLAY
28
29
30
31
32
33
34
35
36
37
38
39
40
41
42
43
44
AUTO
F
10
50°F
1
11
15
16
2
3
18
19
12
13
14
20
17
8
7
6
5
4
9
10
25
24
23
22
21
27
26
1
SENDER
2
KJØLE-knapp
3
VARME-knapp
4
STOPP-knapp
5
PLASMACLUSTER-knapp
6
AUTO-knapp
7
TØRKE-knapp
8
TEMPERATUR-knapp
9
1.2.3.5h OFF TIMER-knapp
10
VIFTE-knapp
11
SVING-knapp(vertikal retning)
12
SVING-knapp(horisontal retning)
13
MULTI SPACE-knapp
14
STILLE-knapp
15
FULL EFFEKT-knapp
16
10°C-knapp
17
°F/°C OMKOBLING-knapp
18
UTENDØRS STILLE-knapp
19
SELF CLEAN-knapp (selvrensing)
20
TIMER SET/CANCEL-knapp
21
TIME ADVANCE-knapp
(tid fremover)
22
TIME REVERSE-knapp
(tid bakover)
23
KLOKKE-knapp
24
DISPLAY-knapp
25
TIMER ON-knapp (PÅ)
26
TIMER OFF (AV)-knapp
27
RESET-knapp (tilbakestilling)
F
AUTO
28
MODUS-symboler
29
VIFTEHASTIGHET-symboler
30
PLASMACLUSTER-symbol
31
LUFTSTRØM-symbol (VERTIKAL LUFTSTØM)
32
LUFTSTRØM-symbol (VERTIKAL LUFTSTØM)
33
LUFTSTRØM-symbol (VERTIKAL LUFTSTØM)
34
MULTI SPACE-SYMBOLER
35
BATTERI-symbol
36
STILLE-symbol
37
OVERFØRING-symbol
38
SELVRENSING-symbol
39
LUFTSTRØM-symbol (VERTIKAL LUFTSTØM)
40
FULL EFFEKT-symbol
41
LUFTSTRØM-symbol (HORISONTAL LUFTSTØM)
42
TEMPERATUR-indikator
43
TIMER AV-indikator
44
TIMER PÅ-indikator/KLOKKE
Page 24

NO-4
INNSETTING A V BA TTERIER
Bruk to AAA-batterier (R03).
1
Ta av dekselet på fjernkontrollen.
2
Sett inn batteriene, pass på at (+) og (-)
polene ligger i riktig retning.
• Når batteriene er lagt inn riktig viser displayet
“AM 6:00” .
3
Sett på plass dekselet.
BRUK A V FJERNKONTOLLEN
SLIK BRUKES FJERNKONTROLLEN
Rett fjernkontrollen mot enhetens vindu for signalmottak
og trykk på den knappen du ønsker. Enheten avgir et
lydsignal (pip) når den mottar signalet.
• Pass på at det ikke er noe objekt mellom fjernkontrollen og enheten.
• Signalet har en rekkevidde på 7 m.
ADVARSEL:
• Ikke la det komme sol direkte inn på mottakervinduet.
Dette kan påvirke funksjonen på en negativ måte.
• Bruk av visse fl uorescerende lamper i samme rom
kan forstyrre signaloverføringen.
• Ikke la fjernkontrollen ligge i direkte sollys eller nær
en varmeovn. Beskytt fjernkontrollen mot fuktighet og
slag.
• Klokkeslettet kan ikke stilles inn når timeren er aktivert.
Batterideksel
MERK:
•
Batteriets levetid er ca. 1 år ved normal bruk.
• Bytt batteriene når fjernkontrollen viser “ ”.
• Det anbefales ikke å bruke oppladbare batterier.
• Ved bytte av batteriene skal alltid begge byttes, og det
skal brukes to batterier av samme type.
• Hvis du ikke skal bruke enheten på lang tid bør batteriene tas ut av fjernkontrollen.
INNSTILLING A V KLOKKESLETT
Det er to klokkemoduser: 12-timers modus og
24-timers modus.
1
For å stille inn 12-timers modus, trykk én
gang på CLOCK-knappen.
For å stille inn 24-timers modus, trykk to
ganger på CLOCK-knappen.
2
Trykk på TIMER FREMOVER (+) eller TIMER
BAKOVER (-) -knappen for å stille inn riktig
klokkeslett.
• Hold nede knappen for å endre tiden raskt fremover
eller bakover.
3
Trykk på SET/C-knappen.
• Kolontegnet (:) blinker.
MERK:
• Klokkeslettet kan ikke stilles inn når timeren er stilt
inn.
3
2
1
Page 25

NO-5
NORSK
Luftrensefi ltrene er pakket som tilbehør til den-
ne enheten. Når varmepumpen er i drift fjerner
fi ltrene støv og tobakkrøyk fra luften og slipper
ut ren luft.
1
Ta ut luftfi ltrene.
1
Åpne åpningspanelet.
2 Skyv luftfi ltrene litt opp for å frigjøre dem.
3 Trekk luftfi ltrene ned for å ta dem ut.
2
Plasser rensefi lteret under fi lterstopperne
som fi nnes på luftfi lteret.
3
Sett luftfi ltrene tilbake på plass.
1
Sett luftfi ltrene tilbake i sine opprinnelige posi-
sjoner.
2 Lukk fi lterdekselet.
Forholdsregler:
• Filtrene er forseglet i en plastpose for å beholde
deres effekt til å samle støv.
• Ikke åpne posen før fi ltrene skal brukes. (Hvis den
åpnes reduseres fi ltrenes levetid.)
• Ikke la det komme direkte sollys på fi ltrene. (Sollys
kan svekke fi ltrene.)
TIPS OM ENERGISPARING
Nedenfor er det vist noen enkle eksempler på
hvordan du kan spare energi når du bruker varmepumpen.
STILL INN RIKTIG TEMPERATUR
• Innstilling av høyere eller lavere temperatur enn nødvendig vil føre til høyere energiforbruk.
BLOKKER DIREKTE SOLLYS OG UNNGÅ TREKK
• Blokkering av direkte sollys ved kjøledrift vil redusere
strømforbruket.
• Lukk vinduene og dørene under kjøling og oppvarming.
STILL INN RIKTIG RETNING PÅ LUFTSTRØMMEN FOR Å OPPNÅ BEST LUFTSIRKULASJON
SØRG FOR AT FILTRENE ER RENE FOR Å
OPPNÅ MEST EFFEKTIV DRIFT
OPTIMALISER BRUKEN AV "TIMER OFF"FUNKSJONEN
SLÅ AV HOVEDSTRØMBRYTEREN NÅR
ENHETEN IKKE SKAL BRUKES OVER EN LENGRE TIDSPERIODE
• Enheten bruker noe strøm, selv når den ikke er i drift.
MONTERING A V LUFTRENSEFILTER
Filterstopper
Luftrensefi lter
Luftfi lter
NØDDRIFT
Bruk denne modusen når fjernkontrollen ikke er
tilgjengelig.
FOR Å SLÅ PÅ
Trykk på AUX-knappen.
• Den grønne DRIFT-lampen ( ) blir tent og enheten
starter opp i AUTO-modus.
• Viftehastigheten og temperaturinnstillingen er satt til
AUTO.
FOR Å SLÅ AV
Trykk på AUX-knappen igjen.
• Den grønne DRIFT-lampen ( ) på enheten slår seg
av.
Page 26

NO-6
1
Trykk på COOL (kjøle), HEAT (varme)-,
AUTO- eller DRY (tørke) -knappen.
: KJØLING : VARME
: AUTO : TØRKE
• Den grønne DRIFT-lampen ( ) blir tent.
FOR Å SLÅ AV
Trykk på STOP-knappen.
• Den grønne DRIFT-lampen ( ) slår seg av.
2
Trykk på TEMPERATUR-knappen for å velge
ønsket temperatur.
(COOL/HEAT/AUTO (kjøle/varme/auto) -modus)
Temperaturinnstillingsområde: 16-30 °C.
(DRY (tørke) -modus)
Temperaturen kan endre seg opp til
±2 °C
i forhold til den som er automatisk innstilt.
3
Trykk på FAN (vifte)-knappen for å velge
ønsket viftehastighet.
AUTO/DRY (auto/tørke) -modus
• Temperaturen kan endres opp til 2 °C over eller
under den som er automatisk bestemt av varmepumpen.
• I DRY (tørke) -modus er viftehastigheten
forhåndsinnstilt på AUTO og kan ikke endres.
GENERELL DRIFT
(Eksempel: 1 °C høyere)
(Eksempel: 2 °C lavere)
1
2
3
AUTO SOFT LOW HIGH
FOR Å
SLÅ A V
MERK:
TIPS OM AUTO MODUS
• I AUTO-modus vil enheten automatisk velge COOL
(kjøle) eller HEAT (varme) -modus ved å sammenligne romtemperaturen og temperaturen som er ønsket.
• Enheten vil automatisk veksle mellom HEAT (varme)
og COOL (kjøle) -modus for å holde ønsket temperatur.
• 10°C-knappen, MULTI SPACE -knappen vil være inaktiv under drift i AUTO-modus.
Page 27

NO-7
NORSK
VERTIKAL LUFTSTRØMNINGSRETNING
1
Trykk på SVING-knappen ( ) for å stille inn
ønsket retning på luftstrømmen.
HORISONTAL LUFTSTRØMNINGSRETNING
1
Trykk på SVING-knappen ( ) for å stille inn
ønsket retning på luftstrømmen.
ADVARSEL:
Forsøk aldri å justere luftstrømspjeldene manuelt.
• Manuell justering av luftstrømspjeldene kan føre til
funksjonsfeil i enheten.
• Når det vertikale justeringsspjeldet er satt i laveste
stilling i
COOL (kjøle) eller DRY (tørke) -modus over en lengre
tidsperiode, kan det føre til kondensering.
MERK:
• Justeringsområdet er mindre enn SVING-området, for å
unngå at kondensen drypper.
AUTO
10
50°F
1
10
50°F
1
JUSTERING A V
LUFTSTRØMMENS RETNING
1
Mens enheten er i drift, trykk på
PLASMACLUSTER-knappen.
• Fjernkontrollen vil vise “ ”.
• Den blå PLASMACLUSTER-lampen på
enheten blir tent.
FOR Å AVBRYTE
Trykk på PLASMACLUSTER-knappen igjen.
• PLASMACLUSTER-lampen slår seg av.
MERK:
• Bruk av PLASMACLUSTER-drift blir lagt inn i
minnet, og vil bli aktivert neste gang du slår på
varmepumpen.
• For å bruke PLASMACLUSTER-drift i bare VIFTE-
modus, trykk på PLASMACLUSTER-knappen
når enheten ikke er i drift. Modussymbolet for
fjernkontrollen vil slokke og viftehastigheten kan ikke
settes til AUTO.
• PLASMACLUSTER er original teknologi fra SHARP. For
mer informasjon, besøk:
http://www.sharp-world.com/pci/en
DRIFT MED PLASMACLUSTER
Plasmacluster-ioner som slippes inn i rommet er
effektive mot luftbårne forurensende stoffer som
mugg, virus og allergener.
1
TIPS OM LUFTSTRØMNINGSRETNING “AUTO”
KJØLE-modus
Åpningspanelet vil bli stilt skrått nedover i mindre
enn 20 minutter, og så skifte til horisontalt eller skrått
oppover for å sende kjølig luft mot taket.
VARME-modus
Åpningspanelet vil bli stilt skrått bakover når
temperaturen i utløpsluften er lav, og så skifte til
skrått nedover når utløpsluften blir varm.
TØRKE-modus
Åpningspanelet vil bli stilt skrått oppover.
Skrått
nedover
Horisontalt Skrått
oppover
eller
Skrått
bakover
Skrått
nedover
Skrått
oppover
Når temperaturen i utløpsluften er lav
Når utløpsluften blir
varm
Page 28

NO-8
10 ˚C DRIFT
Varmemodus med 10 ˚C innstilt temperatur vil
bli gjennomført.
1
Trykk på HEAT (varme) -knappen for å
starte HEAT (varme) -modus.
2
Trykk på 10 ˚C-knappen.
• Fjernkontrollen vil vise “
10˚C
”.
FOR Å AVBRYTE
Trykk på 10 ˚C-knappen igjen.
MERK:
• "10˚C"-drift vil ikke være tilgjengelig med varmedrift
automatisk valgt av AUTO-modus.
1
2
10
50°F
MERK:
• Enheten vil gå på “Extra HIGH” (ekstra høy)
viftehastighet i 15 minutter for levering av kjølig eller
varm luft over lang avstand, og så skifte til “HIGH”
(høy) viftehastighet etter 15 minutter.
• Knappene SILENT (stille), OUTDOOR SILENT
(utendørs stille) og FAN SPEED (viftehastighet) vil
være utkoblet i denne driftsmodusen.
• Effekten til denne funksjonen kan variere avhengig
av romutformingen, installasjonsstedet for enheten
og isolasjonsnivået i det aktuelle rommet.
Enheten vil arbeide for å kjøle eller varme fl ere rom i
et godt isolert hus ved å trykke på denne knappen.
1
Under kjøle- eller varmedrift, trykk på MULTI
SPACE-knappen.
Fjernkontrollen vil vise “ ” og viftehastighetsikonet
vil skifte til “ ”.
Spjeldvinkelen vil endre seg til stillingen for levering av
kjølig eller varm luft over lang avstand.
(HEAT (varme) -modus)
• Fjernkontrollen viser “ ”.
(COOL / DRY (kjøle/tørke) -modus)
• Fjernkontrollen viser “ ”.
FOR Å AVBRYTE
Trykk en gang til på MULTI SPACE-knappen.
MULTI SPACE
1
10
50°F
Page 29

NO-9
NORSK
I denne driftsmodusen arbeider varmepumpen
på maksimal effekt for å gjøre rommet kjølig
eller varmt på kort tid.
1
Trykk på FULL POWER (full effekt)
-knappen under drift.
• Fjernkontrollen vil vise “ ”.
• Temperaturdisplayet slokker.
• Den grønne FULL POWER (full effekt) -lampen
(
) på enheten blir tent.
FOR Å AVBRYTE
Trykk en gang til på FULL POWER-knappen.
• Den grønne FULL POWER-lampen ( ) på
enheten slår seg av.
MERK:
• Du kan ikke stille inn temperaturen eller
viftehastigheten under FULL POWER-drift.
• FULL POWER-drift vil bli avbrutt automatisk etter 1
time, og enheten vil gå tilbake til sine opprinnelige
innstillinger. Den grønne FULL POWER-lampen
(
) på enheten slår seg av.
DRIFT MED FULL EFFEKT
1
Enheten vil gå med “Extra LOW” (ekstra lav)
viftehastighet for komfort og ved behov for mer
stillegående drift.
1
Mens enheten går i COOL (kjøle), HEAT
(varme) eller AUTO-modus, trykk på SILENT
(stille) -knappen.
• Hastighetsikonet på fjernkontrollen viser
“SILENT”.
FOR Å AVBRYTE
Trykk en gang til på SILENT-knappen.
1
STILLE DRIFT
AUTO
10
50°F
AUTO
10
50°F
Page 30

NO-10
TIMER-DRIFT
TIMER OFF (AV)
1
Trykk på TIMER OFF ( ) -knappen.
2
TIMER OFF-indikatoren vil blinke; trykk
på TIME ADVANCE (fremover) ( ) eller
REVERSE (bakover) ( ) -knappen for å
stille inn ønsket tid.
(Tiden kan stilles inn i stigende eller fallende trinn
på 10 minutter.)
3
Trykk på TIMER SET (SET/C) -knappen.
• Den oransje TIMER-lampen ( ) på enheten
blir tent.
TIPS OM DRIFT MED "TIMER OFF"
Når det er valgt TIMER OFF vil temperaturinnstillingen
automatisk justere seg for å forhindre at rommet blir for
varmt eller kaldt, for eksempel mens du sover. (Auto
Sleep-funksjon)
COOL / DRY (kjøle/tørke) -modus
• Én time etter at driften begynner vil temperaturinnstillingen stige 1 °C høyere enn den opprinnelige
temperaturinnstillingen.
VARME-modus:
• Én time etter at driften begynner vil temperaturinnstillingen falle 3 °C lavere enn den opprinnelige temperaturinnstillingen.
Før timeren stilles inn, kontroller at klokken er stilt
inn korrekt på aktuell tid.
Når det er stilt inn 1.2.3.5h OFF TIMER vil enheten automatisk slå seg av etter det antall timer som er stilt inn.
1.2.3.5h OFF TIMER (timer til avstenging)
1
Trykk på 1.2.3.5h OFF TIMER-knappen for å
stille inn ønsket tid til avstenging.
• Den oransje TIMER-lampen ( ) blir tent.
• Den gjenværende tiden vil bli vist på fjernkontrollen, i trinn på 1 time
FOR Å AVBRYTE
Trykk på SET/C-knappen.
Trykk på 1.2.3.5h OFF TIMER-knappen.
Trykk på STOP-knappen.
• Den oransje TIMER-lampen ( ) på enheten
slår seg av.
•
Det aktuelle klokkeslettet blir vist på fjernkontrollen.
MERK:
• Funksjonen 1.2.3.5h OFF TIMER (timer til avstenging) har prioritet foran TIMER ON og TIMER OFF.
• Hvis 1.2.3.5h OFF TIMER blir stilt inn mens enheten
ikke er i drift vil enheten operere etter den tidligere
innstillingen og stoppe etter at den innstilte tiden ha
løpt ut.
AVBRYT
3
2
1
10
50°F
2
3
1
10
50F
2
3
1
1
Page 31

NO-11
NORSK
TIMER ON (PÅ)
1
Trykk på TIMER ON ( ) -knappen.
2
TIMER ON-indikatoren vil blinke; trykk
på TIME ADVANCE (fremover) ( ) eller
REVERSE (bakover) ( ) -knappen for
å stille inn ønsket tid
.
(Tiden kan stilles inn i stigende eller fallende trinn
på 10 minutter.)
• Velg driftsforhold.
3
Trykk på TIMER SET (SET/C) -knappen.
• Den oransje TIMER-lampen ( ) på enheten
blir tent.
MERK:
• Enheten vil slå seg på før den innstilte tiden for at
rommet skal få den ønskede temperaturen på det
programmerte tidspunktet. (Vekkefunksjon)
KOMBINASJON AV TIMER ON (PÅ) OG
TIMER OFF (AV)
TIMER ON og TIMER OFF kan stilles inn samtidig.
Still inn TIMER OFF og TIMER ON.
• Innstillingene vil bli kombinert automatisk.
Eksempel
(
Aktuelt tidspunkt: 21:00)
OFF TIMER (avstenging) kl. 23:00.
ON TIMER (oppstart) kl. 07:00.
• Pilen ( eller ) mellom TIMER ON-indikatoren og
TIMER OFF-indikatoren viser hvilken tidsinnstilling
som aktiveres først.
MERK:
• Du kan ikke programmere ON-TIMER og OFF-TIMER
til å kjøre enheten på ulike temperatur- eller andre
innstillinger.
• Hver timer kan programmeres til å aktivere før den
andre.
• Når det trykkes på SET/C-knappen vil alle
timerinnstillingene bli slettet (inkludert TIMER ON,
TIMER OFF og
1.2.3.5h OFF TIMER
)
FOR Å AVBRYTE (for TIMER OFF (AV) og
TIMER ON (PÅ))
Trykk på TIMER CANCEL (SET/C) -knappen.
• Den oransje TIMER-lampen ( ) på enheten slår
seg av.
•
Det aktuelle klokkeslettet blir vist på fjernkontrollen.
ENDRING A V TIMER-INNSTILLING
Annuller først TIMER-innstillingen, og still den så
inn igjen
AVBRYT
1
3
2
10
50°F
Page 32

NO-12
DRIFT MED SELF CLEAN
(SELVRENSING)
Drift med SELVRENSING vil redusere veksten av
muggsopper med Plasmacluster-ioner og tørke innsiden
av enheten. Bruk denne funksjonen i overgangen
mellom sesongene
.
1
Trykk på SELF CLEAN-knappen når enheten
ikke er i drift.
• Fjernkontrollen viser “ ”.
(“ ” forsvinner automatisk etter 1 minutt.)
• Den lyseblå SELF CLEAN (selvrensing) -lampen
( ) på enheten blir tent.
• Enheten vil stoppe driften etter 90 minutter.
FOR Å AVBRYTE
Trykk på STOP-knappen.
• Den lyseblå SELF CLEAN -lampen ( ) slår seg av.
MERK:
• Du kan ikke stille inn temperaturen, viftehastigheten,
luftstrømningsretningen eller timerinnstillingen mens
enheten er i SELF CLEAN-modus.
• Muggsopp som allerede har vokst kan ikke fjernes
med denne operasjonen.
• SELF CLEAN og PLASMACLUSTER bruker felles
lampe, bare med forskjellig lampefarge.
Trykk på DISPLAY-knappen når lampene på enheten
lyser for sterkt. (Alle lampene på inneenheten kan ikke
slås av.)
1
Under drift, trykk på DISPLAY-knappen
.
• Alle lampene på inneenheten vil bli mørke samtidig
FOR Å TENNE
Trykk på DISPLAY-knappen igjen.
DISPLAY-KNAPP
1
10
50°F
10
50°F
1
Page 33

NO-13
NORSK
˚F/˚C OMKOBLING
Skifte °F/°C-visning av temperatur på fjernkontrollen.
1
Under drift, trykk på °F/°C CHANGE
OVER-knappen.
• Termostatdisplayet på fjernkontrollen vil skifte
mellom “°F” (Fahrenheit) og “°C” (Celsius).
10
50°F
F
1
UTENDØRS STILLE DRIFT
Slå denne modusen ON (PÅ) for å begrense lyden
fra uteenheten under drift. Denne modusen vil være
fordelaktig, spesielt om natten, hvis du må å ta hensyn
til naboene.
1
Under drift, trykk på OUTDOOR SILENT
(utendørs stille) -knappen.
•
LED på inneenhetens display blir tent når
denne driftsmodusen er slått PÅ.
FOR Å AVBRYTE
Trykk på OUTDOOR SILENT (utendørs
stille) -knappen igjen, og LED-lyset på inneenheten slår seg AV.
MERK:
• Hvis OUTDOOR SILENT (utendørs stille) -funksjonen
brukes sammen med driftsmodusen FULL POWER
(full effekt) eller MULTI-SPACE, vil ikke ytelsen nå
det samme potensialet som den kunne blitt uten bruk
av OUTDOOR SILENT-funksjonen.
• Hvis enheten blir slått OFF (AV) mens den er i OUTDOOR SILENT-modus vil ikke enheten huske driftsmodusen OUTDOOR SILENT når den startes igjen.
• Lyden på uteenheten vil ikke bli redusert hvis lydnivået har falt lavt nok under stabile forhold.
10
50°F
1
OUTDOOR SILENT Lamp (white)
UTENDØRS STILLE-lampe (hvit)
Page 34

NO-14
VEDLIKEHOLD
FØR DET FORETAS VEDLIKEHOLD
Husk å slå av strømforsyningsbryteren før det foretas
noen form for vedlikehold.
1
Slå av enheten.
2
Vent i 5 sekunder eller mer etter at luft-
strømpanelet har lukket seg helt, og slå
av strømforsyningsbryteren.
UTSKIFTING A V LUFTRENSEFIL TERET
Filtrene skal skiftes hver 3 ~ 6 måned.
1
Ta ut luftfi ltrene.
2
Skift luftrensefi ltrene.
1
Ta av de gamle luftrensefi ltrene fra luftfi ltrene.
2
Sett de nye luftrensefi ltrene under fi lterstop-
perne på luftfi ltrene.
3
Sett luftfi ltrene tilbake på plass.
MERK:
• De skitne luftrensefi ltrene kan ikke vaskes og
brukes om igjen. De nye fi ltrene kan kjøpes hos
forhandleren din.
Kasting av fi ltre
Kast de brukte fi ltrene i henhold til gjeldende lokale
lover og bestemmelser om slikt avfall.
LUFTRENSING fi ltermaterialer
Filter: Polypropylen
Ramme: Polyester
Filterstopper
RENGJØRING A V FIL TRENE
Den røde FILTER CLEAN (RENGJØR FILTER) -lampen ( ) på displaypanelet blir tent for å indikere at
fi ltrene trenger rengjøring hvis den samlede driftstiden
er akkumulert til 720 timer.
1
Slå av enheten.
2
Ta ut fi ltrene.
1
Løft åpningspanelet.
2
Skyv luftfi ltrene litt opp for å frigjøre dem.
3
Trekk luftfi ltrene ned for å ta dem ut.
3
Ta av luftrensefi ltrene fra luftfi ltrene.
4
Rengjør fi ltrene.
Bruk en støvsuger for å fjerne støv. Hvis fi ltrene
er skitne, vask dem med varmt vann og et mildt
vaskemiddel. Tørk fi ltrene på et skyggefullt sted
før de monteres igjen.
5
Monter luftrensefi ltrene på nytt.
6
Sett luftfi ltrene tilbake på plass.
1 Sett luftfi ltrene tilbake i sine opprinnelige posi-
sjoner.
2
Trykk på FILTER RESET (tilbakestilling av
fi lter) -knappen. Den røde FILTER CLEAN
(rengjør fi lter) -lampen ( ) slår seg av.
(Akkumulert driftstid blir samtidig tilbakestilt til
“0“)
3
Lukk åpningspanelet.
FØR OG ETTER SKIFTE AV ÅRSTID SKAL
FØLGENDE UTFØRES FOR Å SIKRE
KORREKT DRIFT.
1
Kjør enheten i SELF CLEAN
(selvrensing) -modus for å tørke den.
2
Stopp operasjonen ved å trykke på
STOP-knappen på fjernkontrollen
når den er ferdig, og slå av
strømforsyningsbryteren.
3
Inspiser luftfi ltrene og ta dem ut for
rengjøring.
4
Monter luftfi ltrene tilbake på plass og
kontroller at det ikke er noen hindringer
i inn- eller utløpet for luftstrømmen.
RENGJØRING AV ENHETEN OG
FJERNKONTROLLEN
• Tørk av dem med en myk klut.
• Ikke spyl vann direkte på enheten eller hell vann
over den. Det kan føre til elektrisk støt eller skade
på utstyret.
• Ikke bruk varmt vann, tynner, skurepulver eller
sterke løsningsmidler.
Page 35

NO-15
NORSK
DEMONTERING A V ÅPNINGSP ANELET
Åpningspanelet kan tas av for rengjøring.
1
Åpne panelet.
• Hold i høyre og venstre side av panelet og løft det.
2
Ta av panelet.
• Løft panelet til nesten horisontal stilling og trekk
det ut.
Åpningspanel
Godkjent
Ikke godkjent
MONTERING A V ÅPNINGSP ANELET
1
Hold panelet horisontalt.
2
Stikk den lange akselen inn i føringen
fra toppsiden og skyv den inn til den
klikker på plass.
3
Lukk åpningspanelet.
• Trykk på punktene merket med piler på åpningspanelet inntil det klikker på plass.
DEMONTERING A V LUFTSTRØMP ANELET
Luftstrømpanelet kan tas av for rengjøring.
1
Slå av enheten.
• Vent i 5 sekunder eller mer etter at luftstrømpanelet har lukket seg helt, og slå av strømforsyningsbryteren.
2
Løft opp åpningspanelet.
3
Frigjør luftstrømpanelet.
• Trykk på utløserknappen (grå) og åpne den nedre
delen av luftstrømpanelet.
4
Ta ut luftstrømpanelet.
• Løft luftstrømpanelet litt opp til posisjonen som er
vist på fi guren, og ta det ut.
1
1
Åpningspanel
MONTERING A V LUFTSTRØMP ANELET
1
Hekt begge festene på akselen
• Det er en aksel på hver side av enheten.
2
Lukk luftstrømpanelet.
3
Trykk på punktene på luftstrømpanelet
som er merket med piler inntil det klikker på plass.
4
Lukk åpningspanelet
•
Etter at luftstrømpanelet er festet, sørg for å lukke
luftstrømpanelet ordentlig.
2
1
3
3
Åpningspanel
Åpningspanel
Føring
Lang aksel
3
2
4
※
Feste
Aksel
Åpningspanel
Luftfi lterpanel
Page 36

NO-16
INNETEMP.
UTETEMP.
KJØLING
øvre grense 32 ˚C 43 ˚C
nedre grense 21 ˚C –10 ˚C
OPPVARMING
øvre grense 27 ˚C 24 ˚C
nedre grense – –25 ˚C
• Den innebygde beskyttelsesanordningen kan forhindre at enheten starter når den brukes utenfor dette
temperaturområdet.
• Det kan danne seg kondens på luftutløpet dersom
enheten er i kontinuerlig drift i KJØLE- eller TØRKEmodus når luftfuktigheten er over 80 %.
I TILFELLE STRØMBRUDD
Denne varmepumpen har en minnefunksjon for å lagre
innstillinger dersom det skulle inntreffe et strømbrudd.
Etter at strømmen er kommet tilbake vil enheten
automatisk starte opp igjen med de samme
innstillingene som var aktive før strømbruddet, med
unntak av timer-innstillinger.
Hvis timerne var stilt inn før strømbruddet må de stilles
inn på nytt etter at strømmen er kommet tilbake.
FORVARMINGSFUNKSJON
i VARME-modus kan det hende at inneenhetens vifte
ikke starter før 2-5 minutter etter at enheten er slått på,
for å forhindre at det blåses ut kald luft fra enheten.
AVISINGSFUNKSJON
• Når det legger seg is på varmeveksleren i uteenheten mens den er i VARME-modus, vil en automatisk
avisingsfunksjon sørge for varme i 5 til 10 minutter
for å fjerne isen. Under avising vil de innvendige og
utvendige viftene slutte å gå.
• Etter at avisingen er ferdig vil enheten automatisk
gjenoppta driften i VARME-modus.
OPPVARMINGEFFEKT
• Denne enheten benytter en varmepumpe som trekker varme ut av uteluften og slipper den ut inne i
rommet. Utetemperaturen har derfor stor innfl ytelse
på varmeeffekten.
• Hvis varmeeffekten blir svekket som følge av lave
utetemperaturer, bruk annen oppvarming i tillegg.
• Det tar tid å varme opp og holde varmen i hele rom
på grunn av det faste luftsirkulasjonssystemet.
SUPPLERENDE INFORMASJON
OM DRIFTEN
DRIFTSTEMPERATUROMRÅDE
Page 37

NO-17
NORSK
FØR DU RINGER ETTER SERVICE
Følgende tilstander er ikke en indikasjon på feil
på utstyret.
ENHETEN FUNGERER IKKE
Enheten vil ikke starte hvis den slås på umiddelbart
etter at den er blitt slått av. Enheten vil ikke starte
umiddelbart etter at modusen er endret. Dette er gjort
for å beskytte enheten. Vent i tre minutter før enheten
settes i drift.
ENHETEN SENDER IKKE UT VARM LUFT
Enheten holder på med forvarming eller avising.
LUKTER
Teppe- og møbeldufter som er kommet inn i enheten
kan bli sendt ut fra enheten.
KNAKELYD
Denne lyden skyldes friksjon når enheten utvider
seg eller trekker seg sammen som følge av
temperaturendring.
EN LAV SUMMENDE STØY
Dette er en lyd som avgis når enheten genererer
Plasmacluster-ioner
.
SUSELYD
Den lave suselyden er lyden av kjølemiddelet som
sirkulerer inne i enheten.
LETT TÅKE KAN REGISTERES FRA UTLØPET AV
INNEENHETEN
I kjølemodus er dette forårsaket av forskjellen mellom
temperaturen på romluften og luften som enheten
sender ut i rommet.
VANNDAMP
I varmemodus kan det strømme ut vanndamp fra
uteenheten under avriming.
UTEENHETEN STOPPER IKKE
Etter avsluttet drift vil viften i uteenheten rotere i ca. ett
minutt for å kjøle ned enheten.
FREMMEND LUKT FRA PLASMACLUSTERLUFTUTLØPET
Dette er lukten av ozon generert fra plasmaclusterens
ionegenerator. Ozonkonsentrasjonen er veldig liten, og
representerer ingen helsemessig effekt. Ozonet som
slippes ut i luften brytes ned raskt, og konsentrasjonen
i rommet vil ikke øke.
Kontroller følgende punkter før du ringer etter
service.
HVIS ENHETEN IKKE VIL STARTE
Kontroller om hovedstrømbryteren har løst ut eller om
det har gått en sikring.
HVIS ENHETEN IKKE VARMER (ELLER KJØLER)
ROMMET PÅ EN EFFEKTIV MÅTE
• Kontroller fi ltrene. Hvis de er skitne, rengjør dem.
• Kontroller uteenheten for å kontrollere om det er noe
som blokkerer luftinnløpet eller -utløpet.
• Kontroller at termostaten er riktig innstilt.
• Kontroller at vinduer og dører er ordentlig lukket.
HVIS ENHETEN TAR IKKE IMOT
FJERNKONTROLLSIGNALET
• Kontroller om batteriene i fjernkontrollen er gamle
eller svake.
• Forsøk å sende signalet om igjen, med fjernkontrollen
rettet direkte mot enhetens vindu for signalmottak.
• Kontroller at batteriene i fjernkontrollen er satt inn
riktig.
Bestill service når TEMPERATUR-indikatoren på
indikatorpanelet blinker.
Page 38

Tietoa laitteen ja sen akkujen hävittämisestä
KUN LAITE HALUTAAN HÄVITTÄÄ, SITÄ TAI SEN AKKUJA EI SAA LAJITELLA
TALOUSJÄTTEEN JOUKKOON, EIKÄ POLTTAA.
Käytetyt sähkö- ja elektroniikkalaitteet ja akut tulee aina kerätä ja käsitellä
ERIKSEEN paikallisten säädösten mukaan.
Erillinen keräys tukee ympäristöä säästävää käsittelyä, materiaalien kierrätystä ja
lopullisen jätteen vähentämistä.
VÄÄRÄNLAINEN HÄVITTÄMINEN voi tiettyjen aineiden vuoksi aiheuttaa haittaa
ihmisten terveydelle ja ympäristölle. Vie KÄYTETYT LATTEET paikalliseen,
tavallisesti kunnalliseen, jätepisteeseen.
Poista laitteesta KÄYTETYT AKUT ja vie ne asianmukaiseen keräyspisteeseen.
Usein voit palauttaa akut sinne missä myydään uusia akkuja.
Jos olet epävarma tuotteen asianmukaisesta hävittämisestä, ota yhteyttä paikalliseen
viranomaiseen tai myyjään.
TIEDOKSI KÄYTTÄJILLE EUROOPAN UNIONISSA JA JOISSAKIN MUISSA
MAISSA, ESIMERKIKSI NORJASSA JA
SVEITSISSÄ: Osallistuminen erilliseen keräykseen on lakisääteinen velvoite.
Yllä oleva merkki muistuttaa käyttäjää asiasta. Se löytyy sähkö- ja
elektroniikkalaitteista ja akuista (tai niiden pakkauksista).
Jos merkin alla on kirjaimet ”Hg” tai ”Pb”, se tarkoittaa sitä, että akku sisältää jäämiä
elohopeasta (Hg) tai lyijystä (Pb).
KOTITALOUSKÄYTTÄJIÄ pyydetään käyttämään olemassa olevia palautuspisteitä
käytettyjen laitteiden tai akkujen hävittämiseen. Akkuja kerätään niiden
myyntipisteissä. Palauttaminen on maksutonta.
Jos laitetta on käytetty LIIKETOIMINTAAN, ota yhteyttä BOSCH-jälleenmyyjään, jolta
saat lisätietoja tuotteen palauttamisesta.
Sinulta saatetaan veloittaa palauttamisesta aiheutuneet kulut. Pienet laitteet (ja
pienet määrät) voi ehkä viedä paikalliseen keräyspisteeseen. Espanja: Kun haluat
palauttaa käytettyjä tuotteita, ota selvää olemassa olevasta keräysjärjestelmästä tai
ota yhteyttä paikalliseen viranomaiseen.
Sisältää fl uorattuja kasvihuonekaasuja Kioton sopimuksen mukaan R410A (Global
warming potential 1975).
RAKENTAMISMÄÄRÄYKSET
Yksikön saa asentaa ja huoltaa vain valtuutettu henkilö IEE-säännösten, rakentamismääräysten,
rakentamisstandardien (Skotlanti) (konsolidointi), rakentamismääräysten (Pohjois-Irlanti), paikallisten vesilakien,
Health & Safety Document 63S -asiakirjan (The Electricity at Work Regulations 1989), IS 813 -ohjeiden (Irlanti) ja
muiden paikallisten määräysten mukaisesti.
Noudata asiaan liittyviä standardeja:
BS EN 14511: Huoneiden lämmitykseen ja jäähdytykseen käytettäville lämpöpumpuille asetettavat vaatimukset.
BS EN 378: Lämpöpumppujen turvallisuus- ja ympäristövaatimukset.
BS EN 14324: Kovajuottaminen.
BS 1306: Kuparista ja kupariseoksista valmistettujen paineputkistojen erittelyt.
The Health and Safety at Work Act 1974
The Management of Health and Safety at Work Regulations 1999
The Construction (Health, Safety and Welfare) Regulations 1996
The Construction (Design and Management) Regulations 1994
The Lifting Operations and Lifting Equipment Regulations 1998
Ellei erityisiä ohjeita ole, tulee noudattaa yleistä käytäntöä.
FI
Page 39

FI-1
SUOMI
VAROITUS
• Älä vedä virtajohdosta tai väännä sitä. Virtajohdon vetäminen ja väärinkäyttö voivat vaurioittaa
laitetta ja aiheuttaa sähköiskun.
• Älä altista kehoasi pitkiä aikoja suoraan ulospuhallusilmalle. Muutoin terveytesi voi vaarantua.
• Kun lämpöpumppua käytetään tiloissa, joissa
oleskelee vauvoja, lapsia, vanhuksia, vuodepotilaita tai vammaisia, on varmistettava, että huonelämpötila on sopiva.
• Älä koskaan työnnä esineitä laitteeseen. Jos esineitä työnnetään laitteeseen, nopeasti pyörivät sisäiset
puhaltimet voivat aiheuttaa loukkaantumisen.
• Ilmalämpöpumppu on maadoitettava. Älä liitä
maadoitusjohtoa kaasuputkeen, vesiputkeen,
ukkosenjohdattimeen tai puhelimen maadoitusjohtoon. Riittämätön maadoitus voi aiheuttaa
sähköiskun.
• Jos lämpöpumpun toiminta on epänormaalia
(jos se esimerkiksi haisee palaneelta), keskeytä
käyttö välittömästi ja sammuta laite virrankatkaisimesta.
• Laite on asennettava kansallisten sähköasennusmääräysten mukaisesti. Virheelliset kaapeloinnit
voivat saada virtajohdon, pistokkeen ja pistorasian
ylikuumenemaan ja aiheuttamaan tulipalon.
• Jos laitteen virtajohto on vaurioitunut, riskien välttämiseksi sen saa vaihtaa vain valmistaja, valmistajan
huoltoedustaja tai muu pätevä henkilö. Vaihdossa saa
käyttää vain valmistajan määrittämää virtajohtoa.
• Älä roiskuta tai kaada vettä suoraan laitteen päälle.
Vesi voi aiheuttaa sähköiskun tai laitteen vaurioitumisen.
• Älä yritä asentaa/purkaa/korjata laitetta itse. Virheellinen työ voi aiheuttaa esimerkiksi sähköiskun, vesivuodon tai tulipalon. Käänny laitteen asentamisessa/purkamisessa/korjaamisessa jälleenmyyjän tai pätevän
huoltokorjaajan puoleen.
HUOMIO
• Tuuleta tilaa ajoittain avaamalla ikkuna tai ovi, etenkin
jos käytössä on kaasulla toimivia laitteita. Riittämätön
ilmanvaihto voi aiheuttaa hapenpuutteen.
• Älä koske painikkeisiin märin käsin. Vesi voi aiheuttaa
sähköiskun.
• Turvallisuussyistä käännä virrankatkaisin pois päältä,
kun laitetta ei käytetä pitkään aikaan.
• Tarkista ulkoyksikön teline ajoittain kulumisen varalta
ja varmista, että se on tukevasti paikallaan.
• Älä laita mitään ulkoyksikön päälle tai astu sille. Putoamisesta voi aiheutua esine- tai henkilövahinkoja.
• Tämä laite on tarkoitettu asuinkäyttöön. Älä käytä
laitetta muihin tarkoituksiin, kuten kennelin, kasvihuoneen tai eläinsuojan lämmittämiseen.
• Älä laita yksikön päälle vedellä täytettyä astiaa. Jos
laitteeseen menee vettä, se saattaa vaurioittaa sähköeristeitä ja aiheuttaa sähköiskun.
• Älä tuki ilman sisäänmeno- tai ulostuloaukkoja laitteessa. Ilma-aukkojen tukkiminen voi haitata laitteen
toimintaa tai aiheuttaa vaurioita.
• Varmista ennen puhdistus- ja huoltotoimien tekemistä, että laite on sammutettu ja virrankatkaisin on pois
päältä. Laitteen sisällä pyörivä puhallin voi aiheuttaa
vahinkoja.
• Kytke ilmalämpöpumppu sellaiseen virtalähteeseen,
jonka jännite ja taajuus vastaavat laitteen arvoja. Jännitteeltään ja taajuudeltaan vääränlaisen virtalähteen
käyttö voi vaurioittaa laitetta ja aiheuttaa tulipalon.
• Älä asenna laitetta sellaiseen paikkaan, missä se voi
altistua kaasuvuodoille. Kaasuvuoto voi aiheuttaa tulipalon.
Asenna laite paikkaan, missä ilmassa on mahdollisim-
man vähän pölyä, höyryä ja kosteutta.
• Varmista, että tyhjennysletku on sijoitettu siten, että
vesi valuu pois hallitusti. Riittämätön vedenpoisto voi
aiheuttaa esimerkiksi huoneen tai huonekalujen kastumisen.
• Varmista sähköiskujen välttämiseksi, että asennuspaikan mukaan laitteeseen on asennettu vuotokytkin tai
virrankatkaisin.
• TÄRKEITÄ TURVALLISUUSOHJEITA ............FI-1
• OSIEN NIMET ................................................. FI-2
• KAUKOSÄÄTIMEN KÄYTTÖ ..........................FI-4
• ILMANPUHDISTUSSUODATIN .....................FI-5
• ENERGIANSÄÄSTÖVINKKEJÄ ..................... FI-5
• VARATILA ....................................................... FI-5
• PERUSKÄYTTÖ ............................................. FI-6
•
ILMAVIRRAN SUUNNAN SÄÄTÄMINEN
.................FI-7
• PLASMACLUSTER-KÄYTTÖ ......................... FI-7
• 10 ˚C -KÄYTTÖ ...............................................FI-8
• LAAJENNETTU KÄYTTÖ ............................... FI-8
• KÄYTTÖ TÄYDELLÄ TEHOLLA .....................FI-9
• ÄÄNETÖN KÄYTTÖ ....................................... FI-9
• AJASTINKÄYTTÖ .........................................FI-10
• ITSEPUHDISTUS ......................................... FI-12
• NÄYTTÖPAINIKE ......................................... FI-12
• °F/°C-MUUTOS .............................................FI-12
• ULKOYKSIKÖN ÄÄNETÖN TILA ................. FI-12
• HUOLTO .......................................................FI-13
• LISÄTIETOJA KÄYTTÄMISESTÄ .................FI-14
• ENNEN YHTEYDEN OTTAMISTA
HUOLT OON ....................................................FI-15
SUOMI
Lue käyttöohje huolellisesti ennen laitteen käyttöä. Säilytä
käyttöohje varmassa paikassa tulevaa tarvetta varten.
SISÄLLYS
TÄRKEITÄ TURVALLISUUSOHJEITA
Yli 8-vuotiaat lapset ja fyysisesti, sensorisesti tai henkisesti rajoittuneet tai
kokemattomat henkilöt voivat käyttää tätä laitetta, jos heidät on koulutettu
käyttämään laitetta turvallisesti ja he ymmärtävät käyttämisen aiheuttamat vaarat.
Lasten ei saa antaa leikkiä laitteella. Lapset eivät saa puhdistaa tai huoltaa
laitetta ilman valvontaa.
Page 40

FI-2
OSIEN NIMET
1
Sisäyksikön tuloaukko (ilma)
2
Avattava paneeli
3
Ilmansuodatin
4
Vastaanottimen ikkuna
5
Suodattimen nollauspainike
6
VARA-painike
7
Ilmanohjaus pystysuunnassa
8
Ilmanohjaus vaakasuunnassa
9
Ilmavirtapaneeli
10
Sisäyksikön poistoaukko
(ilma)
HUOMIO:
Laitteen ulkonäkö voi poiketa hieman kuvista.
SISÄYKSIKKÖ
1
2
3
4
5
6
7
8
9
OUTDOOR SILENT Lamp (white)
TIMER Lamp (orange) FILTER CLEAN Lamp (red)
FULL POWER Lamp (green) OPERATION Lamp (green)
PLASMACLUSTER Lamp (blue)
SELF CLEAN Lamp (light blue)
11
Ulkoyksikön tuloaukko (ilma)
12
Kylmäaineputki ja väliletku
13
Vedenpoistoletku
14
Ulkoyksikön poistoaukko (ilma)
ULKOYKSIKKÖ
11
13
14
12
10
Vapautuspainike
PLASMACLUSTER-merkkivalo (sininen)
ITSEPUHDISTUS-merkkivalo
(vaaleansininen)
VIRTA-merkkivalo (vihreä)
TÄYSI TEHO -merkkivalo (vihreä)
SUODATTIMEN PUHDISTUS
-merkkivalo (punainen)
AJASTIN-merkkivalo
(oranssi)
ULKOYKSIKÖN ÄÄNETÖN TILA
-merkkivalo (valkoinen)
Page 41

FI-3
SUOMI
KAUKOSÄÄDIN
NÄYTTÖ
28
29
30
31
32
33
34
35
36
37
38
39
40
41
42
43
44
AUTO
F
10
50°F
1
11
15
16
2
3
18
19
12
13
14
20
17
8
7
6
5
4
9
10
25
24
23
22
21
27
26
1
LÄHETIN
2
JÄÄHDYTYS-painike
3
LÄMMITYS-painike
4
PYSÄYTYS-painike
5
PLASMACLUSTER-painike
6
AUTO-painike
7
KUIVAUS-painike
8
LÄMPÖTILA-painike
9
POISKYTKENTÄ 1.2.3.5 TUNNIN
PÄÄSTÄ -painike
10
PUHALLIN-painike
11
SUUNTAUS-painike
(ohjaus pystysuunnassa)
12
SUUNTAUS-painike
(ohjaus sivusuunnassa)
13
LAAJENNETTU KÄYTTÖ -painike
14
ÄÄNETÖN-painike
15
TÄYSI TEHO -painike
16
10°C-painike
17
°F/°C-MUUTOS-painike
18
ULKOYKSIKÖN ÄÄNETÖN TILA -painike
19
ITSEPUHDISTUS-painike
20
AJASTUKSEN VAHVISTUS/PERUU-
TUS-painike
21
KELLON SÄÄTÖ ETEENPÄIN -painike
22
KELLON SÄÄTÖ TAAKSEPÄIN -painike
23
KELLO-painike
24
NÄYTTÖ-painike
25
KÄYNNISTYSAJASTIN-painike
26
PYSÄYTYSAJASTIN -painike
27
NOLLAUS-painike
F
AUTO
28
TILA-merkit
29
PUHALTIMEN NOPEUS -merkit
30
PLASMACLUSTER-merkki
31
ILMAVIRTA-merkki (ILMANOHJAUS PYSTYSUUNNASSA)
32
ILMAVIRTA-merkki (ILMANOHJAUS PYSTYSUUNNASSA)
33
ILMAVIRTA-merkki (ILMANOHJAUS PYSTYSUUNNASSA)
34
LAAJENNETTU KÄYTTÖ -merkit
35
AKKU-merkki
36
ÄÄNETÖN-merkki
37
LÄHETYS-merkki
38
ITSEPUHDISTUS-merkki
39
ILMAVIRTA-merkki (ILMANOHJAUS PYSTYSUUNNASSA)
40
TÄYSI TEHO -merkki
41
ILMAVIRTA-merkki (ILMANOHJAUS SIVUSUUNNASSA)
42
LÄMPÖTILA-merkkivalo
43
PYSÄYTYSAJASTIN -merkkivalo
44
KÄYNNISTYSAJASTIN-merkkivalo/KELLO
Page 42

FI-4
P ARISTOJEN ASENNUS
Käytä kahta AAA (R03) -kokoista paristoa.
1
Irrota kaukosäätimen luukku.
2
Aseta paristot paikoilleen napaisuuden
suhteen oikein päin.
• Näyttöön tulee teksti AM 6:00, kun paristot on
asetettu paikoilleen oikein.
3
Laita kansi takaisin paikalleen.
KAUKOSÄÄTIMEN KÄYTTÖ
KAUKOSÄÄTIMEN KÄYTTÄMINEN
Suuntaa kaukosäädin kohti laitteen vastaanottoikkunaa
ja paina haluamaasi painiketta. Laitteesta kuuluu äänimerkki, kun signaali on vastaanotettu.
• Varmista, että kaukosäätimen ja laitteen välissä ei ole
esteitä.
• Signaalin kantama on 7 metriä.
HUOMIO:
• Varmista, että vastaanottoikkuna ei ole suorassa auringonvalossa. Auringonpaiste voi haitata toimintaa.
• Samassa huoneessa olevat tietynlaiset loisteputkivalaisimet voivat häiritä signaalia.
• Älä jätä kaukosäädintä suoraan auringonpaisteeseen
tai lämmönlähteen läheisyyteen. Suojaa laitetta ja
kaukosäädintä kosteudelta ja iskuilta.
• Kellonaikaa ei voi säätää, kun ajastin on toiminnassa.
Paristokotelon
kansi
HUOMIO:
•
Normaalikäytössä paristot kestävät noin vuoden.
• Vaihda paristot, kun kaukosäätimessä näkyy " ”.
• Ladattavien paristojen käyttö ei ole suositeltavaa.
• Vaihda aina molemmat paristot samalla kertaa ja
varmista, että ne ovat samaa tyyppiä.
• Jos laite on pitkään käyttämättömänä, paristot kannattaa poistaa kaukosäätimestä.
AJAN ASETT AMINEN
Kellolle voidaan valita kaksi näyttötilaa: 12 ja 24
tunnin näyttö.
1
12 tunnin näyttö valitaan painamalla KELLO-
painiketta kerran.
24 tunnin näyttö valitaan painamalla KELLOpainiketta kaksi kertaa.
2
Aseta kellonaika KELLON SÄÄTÖ ETEEN-
PÄIN- ja TAAKSEPÄIN-painikkeilla.
• Kun painiketta pidetään painettuna, kellonaika säätyy
nopeasti eteen- tai taaksepäin.
3
Paina VAHVISTUS/PERUUTUS-painiketta.
• Kaksoispiste (:) vilkkuu.
HUOMIO:
• Kellonaikaa ei voi säätää, kun ajastin on toiminnassa.
3
2
1
Page 43

FI-5
SUOMI
Ilmanpuhdistussuodattimet ovat yksikön lisävaruste. Ne poistavat pölyä ja tupakansavua ilmasta, joten ilma raikastuu.
1
Ilmansuodattimien irrottaminen
1
Avaa avattava paneeli.
2 Irrota suodattimet painamalla niitä ylöspäin.
3 Ota suodattimet pois vetämällä niitä alaspäin.
2
Aseta ilmanpuhdistussuodatin pysäytti-
mien alle.
3
Aseta ilmansuodattimet takaisin
paikoilleen.
1
Aseta ilmansuodattimet takaisin alkuperäisille
paikoilleen.
2 Sulje suodattimien kansi.
Varotoimet
• Suodattimet toimitetaan muovipussissa, jotta niiden
pölynkeräysteho säilyy.
• Avaa pakkaus vasta kun suodattimet asetetaan pai-
koilleen. Muutoin niiden käyttöikä voi lyhentyä.
• Älä altista suodattimia suoralle auringonpaisteelle.
Muutoin ne voivat vaurioitua.
ENERGIANSÄÄSTÖVINKKEJÄ
Alla esitetään muutamia helppoja tapoja säästää
energiaa lämpöpumppua käytettäessä.
SÄÄDÄ SOPIV A LÄMPÖTILA
• Energiankulutus kasvaa, jos lämpötila säädetään
tarpeettoman korkeaksi tai matalaksi.
VÄL TÄ SUORAA AURINGONPAISTETTA JA VETOA
• Suoran auringonvalon ehkäiseminen jäähdytystilassa
vähentää energiankulutusta.
• Sulje ovet ja ikkunat jäähdytyksen ja lämmityksen
aikana.
SÄÄDÄ ILMA VIRTAUS OIKEIN, JOTTA ILMA
KIERTÄÄ MAHDOLLISIMMAN HYVIN
PIDÄ SUODA TTIMET PUHTAINA, JOTTA LAITE
TOIMII MAHDOLLISIMMAN TEHOKKAASTI
HYÖDYNNÄ AJASTUST A
KA TKAISE VIRTA, KUN LAITETTA EI KÄYTETÄ
PITKÄÄN AIKAAN
• Laite kuluttaa hieman energiaa, vaikka se ei ole
toiminnassa.
ILMANPUHDISTUSSUODATIN
Suodatinten
pysäytin
Ilmanpuhdistussuodatin
Ilmansuodatin
VARATILA
Käytä tätä tilaa, kun kaukosäädin ei ole
käytettävissä.
KÄYNNISTYS
Paina VARA-painiketta.
• Virran vihreä merkkivalo ( ) syttyy ja laite
käynnistyy AUTOMAA TTINEN-tilassa.
• Puhaltimen nopeus ja lämpötila-asetus asetetaan
AUTO-tilaan.
PYSÄYTYS
Paina VARA-painiketta uudelleen.
• Virran vihreä merkkivalo ( ) sammuu.
Page 44

FI-6
1
Paina JÄÄHDYTYS-, LÄMMITYS-, AUTO-
tai KUIVAUS-painiketta.
: JÄÄHDYTYS : LÄMMITYS
: AUTO : KUIVAUS
• Virran vihreä merkkivalo ( ) syttyy.
PYSÄYTYS
Paina PYSÄYTYS-painiketta.
• Virran vihreä merkkivalo ( ) sammuu.
2
Säädä haluttu lämpötila LÄMPÖTILA-
painikkeella.
(JÄÄHDYTYS/LÄMMITYS/AUTO-tila)
Lämpötila-asteikko: 16–30 °C.
(KUIVAUS-tila)
Lämpötilaa voi muuttaa
±2 °C
automaattisesti asetetusta lämpötilasta.
3
Säädä haluttu puhaltimen nopeus PUHALLIN-
painikkeella.
AUTO/KUIVAUS-TILA
• Lämpötilaa voi muuttaa enintään ±2 °C
automaattisesti asetetusta lämpötilasta.
• KUIVAUS-tilassa puhaltimen nopeus on säädetty
valmiiksi AUTOMAATTINEN-tilaan, eikä sitä voi
muuttaa.
PERUSKÄYTTÖ
(Esimerkki: 1 °C korkeampi)
(Esimerkki: 2 °C matalampi)
1
2
3
AUTO PEHMEÄ MATALA KORKEA
SAMMUTUS
HUOMIO:
AUTOMAATTINEN TILA
• AUTO-tilassa yksikkö valitsee automaattisesti
JÄÄHDYTYS- tai LÄMMITYS-tilan määrittämällä
huoneen lämpötilan ja halutun lämpötilan välisen
eron.
• Halutun lämpötilan säilyttämiseksi yksikkö vaihtelee
automaattisesti LÄMMITYS- ja JÄÄHDYTYS-tilojen
välillä.
• 10°C-painike ja LAAJENNETTU KÄYTTÖ -painike
eivät ole käytössä AUTO-tilassa.
Page 45

FI-7
SUOMI
ILMANOHJAUS PYSTYSUUNNASSA
1
Voit säätää ilmavirran suuntaa painamalla
SUUNTAUS-painiketta ( ).
ILMANOHJAUS SIVUSUUNNASSA
1
Voit säätää ilmavirran suuntaa painamalla
SUUNTAUS-painiketta ( ).
HUOMIO:
Älä koskaan yritä säätää ilmanohjainta käsin.
• Ilmanohjaimen säätö käsin voi aiheuttaa toimintahäiriön.
• Kun pystysuora ilmanohjain on JÄÄHDYTYStai KUIVAUS-tilassa asetettu pitkäksi aikaa
alimpaan asentoonsa, se saattaa aiheuttaa veden
kondensoitumista.
HUOMIO:
• Säätöalue on kapeampi kuin SUUNTAUS-alue, minkä
tarkoituksena on ehkäistä kondenssiveden tippumista.
AUTO
10
50°F
1
10
50°F
1
ILMAVIRRAN SUUNNAN
SÄÄTÄMINEN
1
Paina PLASMACLUSTER-painiketta
käytön aikana.
• Kaukosäätimessä näkyy ” ".
• Laitteen PLASMACLUSTER-merkkivalo syttyy.
PERUUTUS
Paina PLASMACLUSTER-painiketta uudelleen.
• Laitteen PLASMACLUSTER-merkkivalo sammuu.
HUOMIO:
• PLASMACLUSTER-käyttö tallennetaan muistiin ja
aktivoidaan uudelleen, kun lämpöpumppu seuraavan
kerran kytketään päälle.
• Voit käyttää Plasmacluster-toimintoa pelkän puhalluksen aikana painamalla PLASMACLUSTERpainiketta, kun laite ei ole käynnissä. Kaukosäätimen
tila-merkki sammuu, eikä puhaltimen nopeutta voi
muuttaa AUTO-tilaan.
• Plasmacluster on Sharpin alkuperäinen teknologia. Saat
lisätietoa sivustosta:
http://www.sharp-world.com/pci/en
PLASMACLUSTER-KÄYTTÖ
Huoneeseen vapautuu Plasmacluster-ioneja, jotta
homeitiöiden, virusten ja allergiaa aiheuttavien
hiukkasten määrä ilmassa vähenee.
1
ILMAVIRRAN SUUNNAN SÄÄTÄMINEN AUTOMAATTISESTI
JÄÄHDYTYS-tila
Ilmaa ohjataan alaspäin alle 20 minuutin ajan ja
tämän jälkeen sivuille tai epäsuorasti ylöspäin,
jotta kylmää ilmaa virtaa kattoon.
LÄMMITYS-tila
Kun lähtevä ilma on kylmää, sitä ohjataan
taaksepäin. Kun ilma on lämmennyt, sitä ohjataan
alaspäin.
KUIVAUS-tila
Ilmaa ohjataan epäsuorasti ylöspäin.
Epäsuorasti
alaspäin
Vaakasuunnassa
Epäsuorasti
ylöspäin
tai
Epäsuorasti
taaksepäin
Epäsuorasti
alaspäin
Epäsuorasti
ylöspäin
Lähtevän ilman
lämpötila on
alhainen
Kun lähtevä
ilma lämpiää
Page 46

FI-8
10 ˚C -KÄYTTÖ
Ilmalämpöpumppu lämmittää huoneen 10 ˚C:seen.
1
Käynnistä LÄMMITYS-toiminto
painamalla LÄMMITYS-painiketta.
2
Paina 10˚C-painiketta.
• Kaukosäätimessä näkyy "
10˚C
".
PERUUTUS
Paina 10˚C-painiketta uudelleen.
HUOMIO:
• 10 °C -käyttö ei ole valittavissa, kun lämmitys
aktivoituu automaattisesti AUTO-tilassa.
1
2
10
50°F
HUOMIO:
• Jotta viileä tai lämmin ilma liikkuisi pitkälle, lämpöpumppu toimii erityisen suurella puhallinnopeudella
15 minuuttia ja siirtyy sitten suureen puhallinnopeuteen.
• ÄÄNETÖN-, ULKOYKSIKÖN ÄÄNETÖN TILA- ja
PUHALLINNOPEUS-painikkeet eivät ole käytössä
tässä käyttötilassa.
• Huoneiden sijainti, yksikön sijoittelu ja talon eristys
vaikuttavat suuresti toiminnon tehokkuuteen.
Tällä painikkeella yksikkö jäähdyttää tai lämmittää
useita huoneita hyvin eristetyssä talossa.
1
Paina jäähdytys- tai lämmityskäytön aikana
LAAJENNETTU KÄYTTÖ -painiketta.
Kaukosäätimessä näkyy ” ” ja tuulettimen
nopeuden kuvakkeeksi tulee ” ”.
Ilmanohjaimen kulma kääntyy siten, että viileä tai
lämmin ilma kulkee pitkälle.
LÄMMITYS:
• Kaukosäätimessä näkyy ” ”.
JÄÄHDYTYS/KUIVAUS:
• Kaukosäätimessä näkyy ” ”.
PERUUTUS
Paina uudelleen LAAJENNETTU KÄYTTÖ -painiketta.
LAAJENNETTU KÄYTTÖ
1
10
50°F
Page 47

FI-9
SUOMI
Lämpöpumppu toimii täydellä teholla, jotta huone
jäähtyy tai lämpenee nopeasti.
1
Paina TÄYSI TEHO -painiketta käytön
aikana.
• Kaukosäätimessä näkyy ” ".
• Lämpötilanäyttö sammuu.
• Laitteen vihreä TÄYSI TEHO -merkkivalo (
)
syttyy.
PERUUTUS
Paina TÄYSI TEHO -painiketta uudelleen.
• Laitteen vihreä TÄYSI TEHO -merkkivalo ( )
sammuu.
HUOMIO:
• TÄYSI TEHO -käyttötilassa ei voi säätää lämpötilaa
tai puhallinnopeutta.
• TÄYSI TEHO -käyttötila peruutetaan automaattisesti
tunnin kuluttua, ja laite palautuu alkuperäisasetuksiin. Laitteen vihreä TÄYSI TEHO -merkkivalo
(
) sammuu.
KÄYTTÖ TÄYDELLÄ TEHOLLA
1
Mukavuuden ja mahdollisimman hiljaisen äänen
takaamiseksi laite toimii erittäin hitaalla puhallinnopeudella.
1
Paina ÄÄNETÖN-painiketta JÄÄHDYTYS-,
LÄMMITYS- tai AUTO-tilassa.
• Kaukosäätimen nopeuskuvakkeessa näkyy
”ÄÄNETÖN”.
PERUUTUS
Paina ÄÄNETÖN-painiketta uudelleen.
1
ÄÄNETÖN KÄYTTÖ
AUTO
10
50°F
AUTO
10
50°F
Page 48

FI-10
AJASTINKÄYTTÖ
PYSÄYTYSAJASTIN
1
Paina PYSÄYTYSAJASTIN-painiketta
( ).
2
PYSÄYTYSJASTIN-merkkivalo vilkkuu.
Aseta haluttu aika KELLON SÄÄTÖ
ETEENPÄIN ( ) tai TAAKSEPÄIN ( )
-painikkeilla.
Ajan voi asettaa 10 minuutin portain.
3
Paina VAHVISTUS/PERUUTUS-painiketta.
• Laitteen oranssi AJASTIN-merkkivalo ( ) syttyy.
PYSÄYTYSAJASTIMEN KÄYTTÄMINEN
Kun PYSÄYTYSAJASTIN on otettu käyttöön, lämpötila-asetusta säädetään automaattisesti, jotta huoneessa
ei olisi liian lämmin eikä kylmä yön aikana (yötoiminto).
JÄÄHDYTYS/KUIVAUS-tila:
• Tunnin kuluttua ajastuksen alkamisesta lämpötilaasetusta nostetaan 1 °C.
LÄMMITYS-tila:
• Tunnin kuluttua ajastuksen alkamisesta lämpötilaasetusta lasketaan 3 °C.
Tarkista ennen ajastimen käyttämistä, että aika on
asetettu oikein.
Kun POISKYTKENTÄ 1.2.3.5 TUNNIN PÄÄSTÄ on
asetettu, laite sammuu automaattisesti määritetyn
ajan kuluttua.
POISKYTKENTÄ 1.2.3.5 TUNNIN PÄÄSTÄ
1
Aseta haluttu aika POISKYTKENTÄ 1.2.3.5
TUNNIN PÄÄSTÄ -painikkeella.
• Oranssi AJASTIN-merkkivalo ( ) syttyy.
• Kaukosäätimessä näkyy jäljellä oleva aika tunnin
portain.
PERUUTUS
Paina VAHVISTUS/PERUUTUS-painiketta.
Paina POISKYTKENTÄ 1.2.3.5 TUNNIN
PÄÄSTÄ-painiketta.
Paina PYSÄYTYS-painiketta.
• Laitteen oranssi AJASTIN-merkkivalo ( )
sammuu.
•
Nykyinen aika näkyy kaukosäätimessä.
HUOMIO:
• POISKYTKENTÄ 1.2.3.5 TUNNIN PÄÄSTÄ -asetuksella on prioriteetti KÄYNNISTYSAJASTIN- ja
PYSÄYTYSAJASTIN-asetuksiin nähden.
• Jos POISKYTKENTÄ 1.2.3.5 TUNNIN PÄÄSTÄ on
asetettu, kun laite ei ole ollut käytössä, laite toimii
aiemmin asetetuilla säädöillä ja pysähtyy määritetyn
ajan kuluttua.
PERUUTTAMINEN
3
2
1
10
50°F
2
3
1
10
50F
2
3
1
1
Page 49

FI-11
SUOMI
KÄYNNISTYSAJASTIN
1
Paina KÄYNNISTYSAJASTIN-painiketta
(
).
2
AJASTIN-merkkivalo vilkkuu.
Aseta haluttu aika KELLON SÄÄTÖ
ETEENPÄIN
( ) ja TAAKSEPÄIN ( ) -painikkeilla.
Ajan voi asettaa 10 minuutin portain.
• Valitse käyttötila.
3
Paina VAHVISTUS/PERUUTUS-painiketta.
• Laitteen oranssi AJASTIN-merkkivalo ( ) syttyy.
HUOMIO:
• Laite käynnistyy ennen asetettua aikaa, jotta
haluttu lämpötila saavutetaan ohjelmoituun aikaan
mennessä (herätystoiminto).
KÄYNNISTYSAJAN AJASTIN- JA
PYSÄYTYSAJAN AJASTIN -ASETUSTEN
YHDISTÄMINEN
KÄYNNISTYSAJASTIN ja PYSÄYTYSAJASTIN
voidaan asettaa samaan aikaan.
Määritä PYSÄYTYSAJASTIN- ja
KÄYNNISTYSAJASTIN-asetukset.
• Asetuksen yhdistetään automaattisesti.
Esimerkki
(
Nykyinen aika: 9.00).
PYSÄYTYSAIKA klo 11:00.
KÄYNNISTYSAIKA klo 7:00.
• Nuoli ( tai ) käynnistysajan ja pysäytysajan välil-
lä osoittaa, kumpi asetus aktivoidaan ensin.
HUOMIO:
• Käynnistysajan ja pysäytysajan ajastinta ei voi oh-
jelmoida käyttämään laitetta eri lämpötiloilla tai eri
asetuksilla.
• Voit itse valita kumpi aika-asetus aktivoidaan ensin.
• Kun VAHVISTUS/PERUUTUS-painiketta on painet-
tu, kaikki ajastimen asetukset peruutetaan (mukaan
lukien KÄYNNISTYSAJASTIN, PYSÄYTYSAJASTIN
ja POISKYTKENTÄ
1.2.3.5 TUNNIN PÄÄSTÄ).
PYSÄYTYSAJASTIN- ja
KÄYNNISTYSAJASTIN-asetusten
peruuttaminen
Paina VAHVISTUS/PERUUTUS-painiketta.
• Laitteen oranssi AJASTIN-merkkivalo ( ) sammuu.
•
Nykyinen aika näkyy kaukosäätimessä.
AIKA-ASETUSTEN MUUTTAMINEN
Peruuta AJASTIN-asetus ja säädä se uudelleen.
PERUUTTAMINEN
1
3
2
10
50°F
Page 50

FI-12
ITSEPUHDISTUS
ITSEPUHDISTUS ehkäisee homesienten kasvua
Plasmacluster-ionien avulla ja kuivaa laitteen sisäosat.
Käytä toimintoa vuodenaikojen vaihtuessa
.
1
Paina ITSEPUHDISTUS-painiketta, kun
laite ei ole käynnissä.
• Kaukosäätimessä näkyy ” ”.
(” ”-merkintä poistuu automaattisesti noin
minuutissa.)
• Laitteen vaaleansininen ITSEPUHDISTUSmerkkivalo ( ) syttyy.
• Laite pysähtyy 90 minuutin kuluttua.
PERUUTUS
Paina PYSÄYTYS-painiketta.
• Laitteen vaaleansininen ITSEPUHDISTUSmerkkivalo ( ) sammuu.
HUOMIO:
• Lämpötilaa, puhaltimen nopeutta, ilmavirran suuntaa
tai ajastinta ei voi säätää ITSEPUHDISTUKSEN
aikana.
• Toiminnolla ei voi poistaa olemassa olevia homesieniä.
• ITSEPUHDISTUS- ja PLASMACLUSTER-tiloilla on
yhteinen merkkivalo, vain valon väri on erilainen.
Paina NÄYTTÖ-painiketta, jos laitteen merkkivalot
ovat liian kirkkaat. Kaikkia yksikön merkkivaloa ei voi
sammuttaa.
1
Paina NÄYTTÖ-painiketta käytön aikana.
• Kaikki sisäyksikön merkkivalot sammuvat samaan
aikaan.
SYTYTTÄMINEN
Paina NÄYTTÖ-painiketta uudelleen.
NÄYTTÖPAINIKE
1
10
50°F
10
50°F
1
Page 51

FI-13
SUOMI
˚F/˚C-MUUTOS KÄYTÖN AIKANA
Muuta lämpötilan °F/°C-näyttöä kaukosäätimessä.
1
Paina käytön aikana °F/°C-MUUTOS
-
painiketta.
• Kaukosäätimen lämpötilanäyttö vaihtaa
yksikköä: ”°F” (Fahrenheit) tai ”°C” (Celsius).
10
50°F
F
1
ULKOYKSIKÖN ÄÄNETÖN TILA
Tämän toiminnon avulla voidaan rajoittaa ulkoyksiköstä
käytön aikana kuuluvaa ääntä. Se on hyödyllinen
etenkin yöaikaan, mikäli laitteen ääni saattaisi häiritä
naapureita.
1
Paina käytön aikana ULKOYKSIKÖN
ÄÄNETÖN TILA -painiketta.
•
Ulkoyksikön näytössä oleva LEDmerkkivalo osoittaa, kun toiminto on
käytössä.
PERUUTUS
Paina ULKOYKSIKÖN ÄÄNETÖN TILA
-painiketta uudelleen, niin ulkoyksikön
näytössä oleva LED-merkkivalo sammuu.
HUOMIO:
• Jos ULKOYKSIKÖN ÄÄNETÖN TILA -toimintoa
käytetään yhdessä TÄYSI TEHO- tai LAAJENNETTU
KÄYTTÖ -toimintojen kanssa, ne eivät ehkä toimi
yhtä suurella teholla kuin ilman ULKOYKSIKÖN
ÄÄNETÖN TILA -asetusta.
• Jos yksiköstä sammutetaan virta ULKOYKSIKÖN
ÄÄNETÖN TILA -toiminnon aikana, toiminto ei ole
enää päällä kun yksikkö käynnistetään uudelleen.
• Ulkoyksikön ääntä ei vaimenneta, jos äänitaso on jo
valmiiksi tarpeeksi hiljainen.
10
50°F
1
OUTDOOR SILENT Lamp (white)
ULKOYKSIKÖN ÄÄNETÖN
TILA -merkkivalo (valkoinen)
Page 52

FI-14
HUOLTO
ENNEN HUOLTOTOIMIEN TEKEMISTÄ
Varmista ennen huoltotoimien tekemistä, että virta on
katkaistu.
1
Katkaise laitteesta virta.
2
Kun ilmavirtapaneeli on sulkeutunut
kokonaan, odota vähintään 5 sekuntia
ja katkaise virta.
ILMANPUHDISTUSSUODATTIMEN
VAIHTAMINEN
Suodattimet on vaihdettava 3–6 kuukauden välein.
1
Irrota ilmansuodattimet.
2
Vaihda ilmanpuhdistussuodattimet.
1
Irrota vanhat ilmanpuhdistussuodattimet
ilmansuodattimista.
2
Aseta uudet ilmanpuhdistussuodattimet
ilmansuodattimissa olevien pysäyttimien alle.
3
Aseta ilmansuodattimet takaisin
paikoilleen.
HUOMIO:
• Likaisia ilmanpuhdistussuodattimia ei voi pestä
ja käyttää uudelleen. Osta uudet suodattimet
lähimmältä jälleenmyyjältä.
Suodattimien hävittäminen
Hävitä käytetyt suodattimet voimassa olevien
määräysten mukaisesti.
ILMANPUHDISTUSSUODATTIMIEN materiaalit
Suodatin: polypropeeni
Runko: polyesteri
Suodatinten
pysäytin
SUODATTIMIEN PUHDISTAMINEN
Kun näyttöpaneelin punainen SUODATTIMEN PUHDISTUS -merkkivalo ( ) syttyy, laitetta on käytetty
yhteensä 720 tunnin ajan ja ilmansuodattimet kaipaavat puhdistusta.
1
Katkaise laitteesta virta.
2
Irrota suodattimet.
1
Nosta avattavaa paneelia.
2
Irrota suodattimet painamalla niitä ylöspäin.
3
Ota suodattimet pois vetämällä niitä alaspäin.
3
Irrota ilmanpuhdistussuodattimet.
4
Puhdista suodattimet.
Poista pöly pölynimurilla. Jos suodattimet ovat
likaiset, pese ne lämpimällä vedellä ja miedolla
puhdistusaineella. Anna suodatinten kuivua varjossa ennen asettamista takaisin paikalleen.
5
Aseta ilmanpuhdistussuodattimet takai-
sin paikoilleen.
6
Aseta suodattimet takaisin paikoilleen.
1 Aseta suodattimet takaisin alkuperäisille pai-
koilleen.
2
Paina SUODATTIMEN NOLLAUS -painiket-
ta. Punainen SUODATTIMEN PUHDISTUS
-merkkivalo ( ) sammuu.
Tällöin laitteen käyttöaikalaskin nollataan (”0”).
3
Sulje avattava paneeli.
TEE SEURAAVAT HUOLTOTOIMET
LÄMMITYSKAUSIEN VÄLILLÄ, JOTTA
LAITE TOIMISI ASIANMUKAISESTI
1
Kuivaa laite ITSEPUHDISTUS-toiminnon
avulla.
2
Lopeta toiminto painamalla
kaukosätimen PYSÄYTYS-painiketta ja
katkaise sitten virta.
3
Tarkista ilmasuodattimet ja irrota ne
puhdistusta varten.
4
Asenna suodattimet takaisin. Tarkista
samalla, ettei ilmavirran sisään- tai
ulostuloaukoista ole tukoksia.
LAITTEEN JA KAUKOSÄÄTIMEN
PUHDISTUS
• Pyyhi laite ja kaukosäädin puhtaiksi pehmeällä liinalla.
• Älä roiskuta tai kaada vettä suoraan laitteen osien
päälle. Vesi voi aiheuttaa sähköiskun tai laitteen
vaurioitumisen.
• Älä käytä kuumaa vettä, ohenteita, hiovia jauheita
tai voimakkaita liuottimia.
Page 53

FI-15
SUOMI
AVAUTUVAN PANEELIN IRROTTAMINEN
Avautuva paneeli voidaan irrottaa puhdistusta varten.
1
Avaa paneeli.
• Tartu paneelin sivuihin ja nosta.
2
Irrota paneeli.
• Nosta paneeli lähes vaakatasoon ja vedä se irti.
Avattava paneeli
Oikein
Väärin
AVAUTUVAN PANEELIN KIINNITTÄMINEN
1
Pidä paneelia vaakatasossa.
2
Aseta pitkä varsi yläpuolen ohjaimeen
ja paina, kunnes se napsahtaa.
3
Sulje avattava paneeli.
• Paina avattavan paneeli nuolilla merkittyjä kohtia,
kunnes se napsahtaa paikalleen.
ILMAVIRTAPANEELIN IRROTTAMINEN
Ilmavirtapaneeli voidaan irrottaa puhdistusta varten.
1
Katkaise laitteesta virta.
• Kun ilmavirtapaneeli on sulkeutunut kokonaan,
odota vähintään 5 sekuntia ja katkaise virta.
2
Nosta avattavaa paneelia.
3
Irrota ilmavirtapaneeli.
• Paina (harmaata) vapautuspainiketta. Avaa ilma-
virtapaneelin alaosa.
4
Irrota ilmavirtapaneeli.
• Nosta ilmavirtapaneelia kevyesti kuvan
osoittamalla tavalla ja irrota se.
1
1
Avattava paneeli
ILMAVIRTAPANEELIN KIINNITTÄMINEN
1
Kiinnitä molemmat kiinnikkeet varteen.
• Laitteen molemmissa päissä on varret.
2
Sulje ilmavirtapaneeli.
3
Paina ilmavirtapaneelin nuolilla
merkittyjä kohtia, kunnes se napsahtaa
paikalleen.
4
Sulje avattava paneeli.
•
Sulje paneeli hyvin paikalleen kiinnittämisen jälkeen.
2
1
3
3
Avattava paneeli
Avattava paneeli
Ohjain
Pitkä varsi
3
2
4
※
Kieleke
Varsi
Avattava paneeli
Ilmansuodatinpaneeli
Page 54

FI-16
SISÄLÄMPÖTILA ULKOLÄMPÖTILA
JÄÄHDYTYS
yläraja 32˚C 43˚C
alaraja 21˚C –10˚C
LÄMMITYS
yläraja 27˚C 24˚C
alaraja – –25˚C
• Sisäänrakennettu suojaus voi estää laitteen käytön
tämän lämpötila-alueen ulkopuolella.
• llmanpoistoaukkoon saattaa tiivistyä kosteutta, jos
laite toimii jatkuvasti jäähdytys- tai kuivaustiloissa ja
kosteus ylittää 80 %.
SÄHKÖKATKOKSEN SATTUESSA
Lämpöpumpussa on muistitoiminto, joka tallentaa
asetukset sähkökatkoksen yhteydessä.
Sähkökatkoksen jälkeen laitteisto käynnistyy samoilla
asetuksilla kuin millä se toimi ennen katkosta aikaasetuksia lukuun ottamatta.
Jos ajastimet oli asetettu ennen sähkökatkoksen
alkamista, ne on asetettava uudelleen sähkökatkoksen
jälkeen.
ESILÄMMITYSTOIMINTO
Lämmitettäessä puhallin ei välttämättä käynnisty viiden
minuutin kuluessa laitteen käynnistämisestä. Tämän
tarkoituksena on estää laitteessa olevaa kylmää ilmaa
virtaamasta huoneeseen.
JÄÄNPOISTO
• Jos ulkoyksikön lämmönvaihtimeen muodostuu
jäätä lämmittämisen aikana, automaattinen
sulatustoiminto lämmittää sitä noin 5–10 minuutin
ajan jään poistamiseksi. Jäänpoiston aikana sisä- ja
ulkoyksikön puhaltimet eivät toimi.
• Kun jää on poistettu, laite jatkaa lämmittämistä
automaattisesti.
LÄMMITYSTEHO
• Laitteiston lämpöpumppu ottaa lämpöä ulkoilmasta
ja siirtää sen sisäilmaan. Ulkolämpötilalla on suuri
vaikutus lämmitystehoon.
• Jos lämmitysteho laskee kovalla pakkasella, käytä
lisälämmitintä.
• Suljetun ilmankiertojärjestelmän vuoksi koko
huoneen lämmittäminen kestää jonkin aikaa.
LISÄTIETOJA KÄYTTÄMISESTÄ
KÄYTTÖLÄMPÖTILA-ALUE
Page 55

FI-17
SUOMI
ENNEN KUIN OTAT YHTEYTTÄ HUOLTOPALVELUUN
Seuraavat tilanteet eivät ole merkkejä laiteviasta.
LAITE EI TOIMI
Laite ei toimi, jos se yritetään käynnistää heti
sammuttamisen jälkeen. Laite ei toimi heti käyttötilan
vaihtamisen jälkeen. Tämä ominaisuus suojaa laitetta.
Odota 3 minuuttia ennen laitteen käyttöä.
LAITTEESTA EI TULE LÄMMINTÄ ILMAA
Laitetta esilämmitetään tai siitä poistetaan jäätä.
HAJUT
Laitteeseen on voinut imeytyä hajuja huonekaluista ja
matoista. Nämä hajut voivat virrata ulos laitteistosta.
NAKSAHTELU
Naksahteleva ääni syntyy kitkan vaikutuksesta,
kun laitteen osat laajenevat lämmönvaihtelujen
seurauksena.
HILJAINEN SURINA
Ääni syntyy, kun laitteisto tuottaa Plasmacluster-ioneja
.
VIRTAUSÄÄNET
Laitteiston sisällä liikkuva kylmäaine aiheuttaa hiljaisen
virtausäänen.
SISÄYKSIKÖN ULOSPUHALLUSAUKOSSA
NÄKYY SUMUA
Ilmapoistoaukosta saattaa tulla sumua jäähdyttämisen
aikana. Tämän aiheuttaa huoneilman ja laitteiston
tuottaman ilman välinen lämpötilaero.
VESIHÖYRY
Lämmittämisen aikana ulkoyksiköstä saattaa tulla
vesihöyryä sulatuksen aikana.
ULKOYKSIKKÖ EI PYSÄHDY
Kun laite pysäytetään, ulkoyksikön puhallin jää pyörimään
laitteiston jäähdyttämiseksi noin minuutin ajaksi.
HAJU PLASMACLUSTER-AUKOSTA
Kyseessä on Plasmacluster-ionigeneraattorin tuottaman
otsonin haju. Otsonia tuotetaan vain vähäisiä määriä,
eikä sillä ole haittavaikutuksia. Ilmaan vapautuva otsoni
hajoaa nopeasti. Se ei kerry huoneilmaan.
Tee seuraavat tarkistukset ennen huoltoon
soittamista.
JOS LAITE EI TOIMI
Tarkista, onko virrankatkaisin lauennut tai sulake
palanut.
JOS LAITE EI LÄMMITÄ (TAI JÄÄHDYTÄ)
HUONETTA TEHOKKAASTI
• Tarkista suodattimet. Jos ne ovat likaiset, puhdista
ne.
• Tarkista, ettei mikään tuki ilman sisään- tai
ulostuloaukkoa.
• Tarkista termostaatin asetukset.
• Varmista, että ovet ja ikkunat on suljettu tiiviisti.
JOS LAITE EI OTA VASTAAN KAUKOSÄÄTIMEN
LÄHETTÄMIÄ SIGNAALEITA
• Tarkista, ovatko kaukosäätimen paristot heikentyneet.
• Kokeile signaalin lähettämistä uudelleen siten, että
kaukosäädin on suunnattu kohti laitteen signaalin
vastaanottoikkunaa.
• Tarkista, onko kaukosäätimen paristot asennettu
asianmukaisesti.
Ota yhteyttä huoltoon, jos kojetaulun LÄMPÖTILAmerkkivalo vilkkuu.
Page 56

Information om avfallshantering av denna utrustning och dess batterier
OM DU ÖNSKAR AVFALLSHANTERA DENNA UTRUSTNING ELLER
DESS BATTERIER, ANVÄND INTE ORDINARIE SOPTUNNA! KASTA INTE
UTRUSTNINGEN ELLER DESS BATTERIER I ÖPPEN ELD!
Elektrisk och elektronisk utrustning samt batterier måste samla in och avfallshanteras
SEPARAT i enlighet med gällande lagstiftning.
Separat avfallshantering garanterar en miljövänlig hantering, återvinning av material
och minimerar det slutliga avfallet.
FELAKTIG AVFALLSHANTERING kan vara skadligt för människan och miljön
på grund av vissa ämnen! Lämna in UTTJÄNT UTRUSTNING till en lokal, oftast
kommunal återvinningsstation.
Ta ut FÖRBRUKADE BATTERIER från utrustningen och lämna dem i
batteribehållaren vid återvinningsstationen eller hos det ursprungliga
försäljningsstället.
Om du har frågor kring avfallshantering ska du vända dig till kommunens miljökontor
eller återförsäljaren.
ENDAST FÖR ANVÄNDARE I EUROPEISKA UNIONEN OCH VISSA ANDRA
LÄNDER, EXEMPELVIS NORGE OCH SCHWEIZ: Du är enligt lag skyldig att
källsortera och lämna avfall till anvisad plats.
Symbolen ovan fi nns på elektrisk och elektronisk utrustning och batterier (eller
förpackningar) för att påminna om detta.
Om texten ”Hg” eller ”Pb” fi nns nedanför betyder detta att batteriet innehåller spår av
kvicksilver (Hg) eller bly (Pb).
PRIVATA HUSHÅLL är skyldiga att lämna uttjänt utrustning och batterier till
återvinning. Uttjänta batterier lämnas i särskilda batteribehållare som fi nns på alla
återvinningsstationer och i butiker där batterier säljs. Återlämning är kostnadsfritt.
Om utrustningen har använts i affärssyste ska du ska du kontakta din BOSCHåterförsäljare för information om returhantering.
Du kan komma att debiteras för kostnaderna för returhanteringen. Mindre utrustning
(och små mängder) kan lämnas till din lokala återvinningsstation. För Spanien:
Kontakta företrädare för det etablerade insamlingssystemet eller lokala myndigheter
för information om återtagning av dina förbrukade produkter.
Innehåller fl uorerade växthusgaser enligt Kyotoprotokollet.
R410A (Global Warming Potential 2088). Kvantiteten i utrustningen anges på
utomhusenhetens märkplåt.
SV
BYGGNADSFÖRESKRIFTER
Enheten får endast installeras och underhållas av en behörig person enligt gällande: IEE- regleringar,
byggnadsföreskrifter, byggnadsstandarder (Skottland) (konsolidering), byggnadsföreskrifter (Nordirland), lokala
vattenförordningar, Health & Safety Document 63S (The Electricity at Work Regulations 1989), IS 813 (Irland)
och andra lokala krav.
Relevanta standarder ska följas, inklusive:
BS EN 14511: Krav för värmepumpar för rumsuppvärmning och -kylning
BS EN 378: Säkerhets- och miljökrav för värmepumpar
BS EN 14324 Hårdlödning
BS 1306 Specifi kation för tryckrörssystem av koppar och kopparlegering
The Health and Safety at Work Act 1974
The Management of Health and Safety at Work Regulations 1999
The Construction (Health, Safety and Welfare) Regulations 1996
The Construction (Design and Management) Regulations 1994
The Lifting Operations and Lifting Equipment Regulations 1998
I de fall där det saknas specifi ka instruktioner hänvisas till vedertagen praxis.
Page 57

SV-1
SVENSKA
VARNING
• Dra inte eller böj strömsladden. Att dra i sladden
eller felaktig användning av sladden kan skada
enheten och orsaka elektriska stötar.
• Var noga med att inte uppehålla dig direkt vid luftutsläppet en längre stund. Det kan påverka din hälsa.
• Om värmepumpen används för spädbarn, barn
eller äldre, sängliggande eller funktionshindrade
personer, se till att inomhustemperaturen är lämplig för dessa.
• Stoppa aldrig in föremål i värmepumpen. Detta
kan leda till skador på grund av de inre fl äktarnas
snabba rotation.
• Jorda värmepumpen korrekt. Anslut inte jordledningen till gasrör, vattenrör, åskledare eller telefonjordledning. Dålig jordanslutning kan orsaka
elektriska stötar.
Om du misstänker att det är något fel på enheten
(t.ex. om det luktar bränt), stäng genast av den
och slå IFRÅN strömbrytaren.
• Enheten ska installeras enligt nationella elinstallationsregler. Felaktig anslutning kan leda till att
nätsladden, stickkontakten eller eluttaget överhettas, vilket medför brandfara.
• Om nätsladden är skadad ska den bytas av tillverkaren eller en behörig serviceverkstad eller någon med
motsvarande behörighet för att undvika faror. Vid byte
av nätsladd, använd endast den nätsladd som angivits
av tillverkaren.
• Se till att inte stänka eller hälla vatten direkt på
värmepumpen. Vatten kan orsaka elektriska stötar
eller skada på utrustningen.
• Försök inte att installera/demontera/reparera
värmepumpen själv. Felaktigt utfört arbete kan orsaka
elektriska stötar, vattenläckor, brand osv. Kontakta
återförsäljaren eller annan kvalifi cerad serviceperson-
al för installation/demontering/reparation av enheten.
VARNING
• Vädra regelbundet för att ventilera rummet, i synnerhet när gasdriven utrustning används. Otillräcklig
ventilation kan leda till syrebrist.
• Undvik att använda knapparna med våta händer. Det
kan orsaka elektrisk stöt.
• Slå för säkerhets skull ifrån strömbrytaren om
värmepumpen inte ska användas under längre perioder.
• Kontrollera regelbundet utomhusdelens montering
avseende slitage och kontrollera att den sitter fast ordentligt.
• Placera inte föremål på utomhusdelen och trampa inte
på den. Föremålet eller personen som står på utomhusenheten kan falla ner, med skaderisk som följd.
• Värmepumpen är avsedd för användning i
bostadshus. Använd inte enheten i andra lokaler, till
exempel växthus eller lokaler för djuruppfödning.
• Placera inte kärl med vatten på värmepumpen. Om
vatten tränger in i enheten kan elisoleringen försämras, vilket kan leda till elektrisk stöt.
• Blockera inte värmepumpens luftintag eller luftutlopp.
Det kan leda till driftproblem eller andra problem.
• Stäng alltid av värmepumpen och slå ifrån strömbrytaren innan underhåll eller rengöring utförs. Enheten
har en roterande fl äkt som kan skada dig.
• Anslut värmepumpen enbart till vägguttag med rätt
märkspänning och märkfrekvens. Felaktig spänning
och frekvens kan leda till att utrustningen skadas,
eller orsaka brand.
• Installera inte värmepumpen nära ställen där det
förekommer brandfarliga gaser. Detta kan orsaka
brand.
Installera enheten där luften är så fri från damm, rök
och fukt som möjligt.
• Montera dräneringsslangen så att dräneringen blir
jämn och smidig. Om dräneringen är bristfällig kan
rummet, möbler osv. bli våta.
• Se till att en strömbrytare eller jordfelsbrytare fi nns in-
stallerad, beroende på installationsläge, för att minska
risken för elektriska stötar.
• VIKTIGA SÄKERHETSINSTRUKTIONER .... SV-1
• KOMPONENTER ..........................................SV-2
• ANVÄNDA FJÄRRKONTROLLEN ................ SV-4
• INSTALLATION AV LUFTFILTER ................SV-5
• ENERGISPARTIPS ....................................... SV-5
• DRIFT UTAN FJÄRRKONTROLL ................. SV-5
• GRUNDLÄGGANDE DRIFT ......................... SV-6
•
INSTÄLLNING AV LUFTRIKTNING
...................... SV-7
• PLASMACLUSTER-DRIFT ...........................SV-7
• 10°C DRIFT .................................................. SV-8
• MULTI SPACE...............................................SV-8
• DRIFT MED FULL EFFEKT .......................... SV-9
• TYST DRIFT ................................................. SV-9
• TIMERINSTÄLLNING ................................. SV-10
• SJÄLVRENGÖRING ...................................SV-12
• DISPLAY-KNAPP ........................................ SV-12
• °F/°C VÄXLA TEMPERATURSKALA .......... SV-12
• TYST DRIFT UTOMHUS ............................ SV-12
• UNDERHÅLL .............................................. SV-13
• YTTERLIGARE DRIFTANMÄRKNINGAR .. SV-14
• INNAN DU KONTAKTAR TEKNIKER ......... SV-15
SVENSKA
Läs noggrant hela handboken innan du använder produkten.
Förvara handboken väl, för framtida referens.
INNEHÅLL
VIKTIGA SÄKERHETSINSTRUKTIONER
Denna utrustning kan användas av barn från 8 år och personer med fysiska
eller psykiska funktionshinder eller bristande erfarenhet eller kunskap under
förutsättning att de fått vägledning och instruktioner för användningen av
utrustningen på ett säkert sätt och är medvetna om riskerna. Små barn får inte
leka med värmepumpen. Utrustningen ska ej underhållas och rengöras av barn
utan vuxet sällskap.
Page 58

SV-2
KOMPONENTER
1
Luftintag inomhus
2
Öppningsbar panel
3
Luftfi lter
4
Mottagarfönster
5
Filternollställningsknapp
6
AUX-knapp
7
Vertikal luftriktare
8
Horisontell luftriktare
9
Luftriktningspanel
10
Luftutlopp (inomhus)
OBS!
Enheternas utseende kan variera något jämfört med de som
visas ovan.
INOMHUSENHET
1
2
3
4
5
6
7
8
9
OUTDOOR SILENT Lamp (white)
TIMER Lamp (orange) FILTER CLEAN Lamp (red)
FULL POWER Lamp (green) OPERATION Lamp (green)
PLASMACLUSTER Lamp (blue)
SELF CLEAN Lamp (light blue)
11
Luftintag (utomhus)
12
Köldmedierör och
förbindelsesladd
13
Dräneringsslang
14
Luftutlopp utomhus
UTOMHUSENHET
11
13
14
12
10
Låsknapp
PLASMACLUSTER-lampa (blå)
SJÄLVRENGÖRING-lampa (ljusblå)
DRIFT-lampa (grön)
FULL EFFEKT-lampa (grön)
RENGÖR FILTER-lampa (röd)TIMER-lampa (orange)
TYST DRIFT UTOMHUS-lampa (vit)
Page 59

SV-3
SVENSKA
KNAPPAR PÅ FJÄRRKONTROLLEN
DISPLAY
28
29
30
31
32
33
34
35
36
37
38
39
40
41
42
43
44
AUTO
F
10
50°F
1
11
15
16
2
3
18
19
12
13
14
20
17
8
7
6
5
4
9
10
25
24
23
22
21
27
26
1
SÄNDARE
2
KYLA
3
VÄRME
4
STOPP
5
PLASMACLUSTER
6
AUTO
7
AVFUKTNING
8
TEMPERATUR
9
TIMER AVSTÄNGNING efter
1.2.3.5 timmar
10
FLÄKT
11
SWING
(höjdled)
12
SWING
(sidled)
13
MULTI SPACE
14
TYST DRIFT
15
FULL EFFEKT
16
10°C DRIFT
17
°F/°C VÄXLA TEMPERATUR-
SKALA
18
TYST DRIFT UTOMHUS
19
SJÄLVRENGÖRING
20
TIMER BEKRÄFTA/AVBRYT
21
TIDSJUSTERING FRAMÅT
22
TIDSJUSTERING BAKÅT
23
KLOCKA
24
DISPLAY
25
TIMER PÅ
26
TIMER AV
27
NOLLSTÄLL
F
AUTO
28
DRIFTLÄGEN
29
FLÄKTHASTIGHET
30
PLASMACLUSTER
31
LUFTRIKTNING (HÖJDLED)
32
LUFTRIKTNING (HÖJDLED)
33
LUFTRIKTNING (HÖJDLED)
34
MULTI SPACE
35
BATTERI
36
TYST DRIFT
37
SÄNDNING
38
SJÄLVRENGÖRING
39
LUFTRIKTNING (HÖJDLED)
40
FULL EFFEKT
41
LUFTRIKTNING (SIDLED)
42
TEMPERATURINDIKATOR
43
TIMER AV-indikator
44
TIMER PÅ-indikator/KLOCKA
Page 60

SV-4
ISÄTTNING A V BA TTERIER
Använd två AAA-batterier (R03).
1
Ta bort fjärrkontrollens lucka.
2
Sätt i batterierna och kontrollera att bat-
teripolerna (+) och (-) är vända åt rätt
håll.
• ”AM 6:00” ska visas på displayen när batterierna
är korrekt isatta.
3
Sätt fast luckan igen.
ANVÄNDA FJÄRRKONTROLLEN
ANVÄNDA FJÄRRKONTROLLEN
Rikta fjärrkontrollen mot inomhusenhetens
signalmottagarfönster och tryck på önskad knapp.
Inomhusenheten avger en kort ljudsignal när den tar
emot signalen.
• Se till att det inte fi nns några föremål mellan
fjärrkontrollen och inomhusenheten.
• Fjärrkontrollens räckvidd är 7 meter.
VARNING:
• Utsätt inte signalmottagarfönstret för direkt solljus.
Funktionen kan störas.
• Vissa typer av fl uorescerande lampor (lysrör) i
samma rum kan störa signalen.
• Lämna inte fjärrkontrollen i direkt solljus eller
nära en värmekälla. Skydda inomhusenheten och
fjärrkontrollen från fukt och stötar.
• Det går inte att ställa klockan när timerfunktionen
används.
Batterilucka
OBS!
•
Batteriernas livslängd är cirka ett år vid normal
användning.
• Byt batterierna när ” ” visas på fjärrkontrollen.
• Vi rekommenderar användning av icke-laddningsbara
batterier.
• Byt alltid båda batterierna samtidigt och se till att de
är av samma typ.
• Om du inte tänker använda värmepumpen under en
längre tid, ta ut batterierna ur fjärrkontrollen.
STÄLLA IN AKTUELL TID
Det fi nns två tidvisningslägen: 12-timmarsläge och
24-timmarsläge.
1
Ange 12-timmarsläge genom att trycka en
gång på knappen KLOCKA.
Ange 24-timmarsläge genom att trycka två
gånger på knappen KLOCKA.
2
Tryck på knappen för tidsjustering framåt
eller bakåt för att ställa in korrekt klockslag.
• Håll knappen nedtryckt för att fl ytta klockslaget
framåt eller bakåt snabbt.
3
Tryck på knappen SET/C.
• Kolon (:) blinkar.
OBS!
• Det går inte ställa klockan när timerfunktionen
används.
3
2
1
Page 61

SV-5
SVENSKA
Luftrengöringsfi ltren är förpackade som
tillbehör till enheten. Under drift avlägsnar
fi ltren damm och tobaksrök ur luften och
släpper ut ren luft.
1
Ta ut luftfi ltren.
1
Avlägsna den öppningsbara panelen.
2 Tryck luftfi ltren uppåt något för att frigöra dem.
3 Dra luftfi ltren nedåt för att avlägsna dem.
2
Placera luftrengöringsfi ltret under
fi lterstoppen på luftfi ltret.
3
Sätt tillbaka luftfi ltren.
1
Sätt tillbaka luftfi ltren på deras ursprungliga
platser.
2 Stäng fi lterskyddet.
Försiktighetsåtgärder:
• Filtren förvaras i en förseglad plastpåse så att de
bibehåller sin dammuppsamlande förmåga.
• Öppna inte påsen förrän fi ltren skall användas. Det
kan förkorta fi ltrens livslängd.
• Utsätt inte fi ltren för direkt solljus. Det kan skada
dem.
ENERGISPARTIPS
Nedan beskrivs några enkla sätt att spara energi
när du använder värmepumpen.
STÄLL IN RÄTT TEMPERATUR.
• Att ställa in högre eller lägre temperatur än
nödvändigt ökar energiförbrukningen.
FÖRHINDRA DIREKT SOLLJUS OCH
LUFTDRAG.
• Avskärma direkt solljus vid kylläge för att minska
energiförbrukningen.
Stäng fönster och ytterdörrar vid drift i värme- eller
kylningsläge.
STÄLL IN KORREKT LUFTRIKTNING FÖR
OPTIMAL LUFTCIRKULATION.
RENGÖR FILTER FÖR ATT SÄKERSTÄLLA
OPTIMAL OCH EFFEKTIV DRIFT.
UTNYTTJA TIMERSTYRD AVSTÄNGNING PÅ
BÄSTA SÄTT.
BRYT STRÖMMEN NÄR UTRUSTNINGEN SKA
STÅ OANVÄND UNDER LÄNGRE TID.
• Utrustningen fortsätter att förbruka en liten mängd
energi även om den inte är i drift.
INST ALLATION A V
LUFTRENGÖRINGSFILTER
Filterstopp
Luftrengöringsfi lter
Luftfi lter
DRIFT UTAN FJÄRRKONTROLL
Använd detta läge om fjärrkontrollen inte fi nns
tillgänglig.
START
Tryck på AUX.
• Den gröna DRIFT-lampan ( ) på enheten tänds och
enheten startar i AUTO-läge.
• Fläkthastighet och temperaturinställning ställs in på
AUTO.
AVSTÄNGNING
Tryck på AUX igen.
• Den gröna DRIFT-lampan ( ) på aggregatet släcks.
Page 62

SV-6
1
Tryck på knappen KYLA, VÄRME, AUTO
eller A VFUKTNING.
: KYLA : VÄRME
: AUTO : AVFUKTNING
• Den gröna driftlampan ( ) tänds.
AVSTÄNGNING
Tryck på knappen STOPP.
• Den gröna driftlampan ( ) släcks.
2
Tryck på knapparna för temperaturinställning
för att ställa in önskad temperatur.
(KYLA/VÄRME/AUTO)
Temperaturintervall: 16–30 °C.
(AVFUKTNING)
Temperaturen kan ändras upp till
±2°C från
från den automatiskt inställda temperaturen.
3
Tryck på fl äkthastighetsknappen FAN för att
ställa in önskad fl äkthastighet.
AUTO-/AVFUKTNINGSLÄGE
• Temperaturen kan ändras 2 °C uppåt eller nedåt
från den temperatur utrustningen automatiskt
fastställt.
• I avfuktningsläget (DRY( är fl äkthastigheten
förinställd på AUTO och kan inte ändras.
GRUNDLÄGGANDE DRIFT
Exempel: 1 °C högre
Exempel: 2 °C lägre
1
2
3
AUTO MJUK LÅG HÖG
STÄNG A V
OBS!
TIPS OM AUTO-LÄGE
• I läget AUTO väljer enheten automatiskt värme eller
kylning genom att jämföra rumstemperaturen och den
önskade temperaturen.
• Enheten växlar automatiskt mellan värme och kyla för
att bibehålla önskad temperatur.
• Knapparna 10°C och MULTI SPACE är inaktiverade i
läget AUTO.
Page 63

SV-7
SVENSKA
LUFTRIKTNING I HÖJDLED
1
Tryck på knappen SWING ( ) för att ställa
in önskad luftriktning.
LUFTRIKTNING I SIDLED
1
Tryck på knappen SWING ( ) för att ställa
in önskad luftriktning.
VARNING:
Försök aldrig att justera luftriktarna manuellt.
• Manuell justering av luftriktarna kan leda till funktionsfel
på aggregatet.
• När det vertikala luftriktaren är i det lägsta läget i
kyl- eller avfuktningsläge under en längre period kan
kondens bildas.
OBS!
• Justeringsintervallet är kortare än luftriktningsintervallet
för att förhindra att kondensvatten ska kunna droppa
ned.
AUTO
10
50°F
1
10
50°F
1
INSTÄLLNING A V LUFTRIKTNING
1
Tryck på knappen PLASMACLUSTER
under drift.
• Fjärrkontrollens display visar ” ”.
• Den blå PLASMACLUSTER-lampan på
enheten tänds.
AVBRYTA
Tryck på plasmaklusterknappen igen.
• PLASMACLUSTER-lampan på enheten släcks.
OBS!
• Inställningen av PLASMACLUSTER-driften lagras
och aktiveras nästa gång enheten slås på.
• Använd PLASMACLUSTER-funktionen enbart i
fl äktläge genom att trycka på PLASMACLUSTERknappen när enheten inte är i drift.
Driftlägessymbolen på fjärrkontrollen släcks och det
går inte att ställa in fl äkthastigheten till AUTO.
• Plasmacluster är originalteknik från Sharp. För mer
information besök:
http://www.sharp-world.com/pci/en
PLASMACLUSTER-DRIFT
Plasmaklusterjoner som frigörs i lokalen
motverkar luftburna föroreningar, till exempel
mögel, virus och allergener.
1
TIPS OM AUTO LUFTFLÖDESRIKTNING
Kylläge
Den öppningsbara panelen riktas snett nedåt i mindre
än 20 minuter och vänds sedan horisontellt eller snett
uppåt för att rikta sval luft mot taket.
Värmeläge
Den öppningsbara panelen riktas snett bakåt vid låg
temperatur på utloppsluften och riktas snett nedåt när
temperaturen stiger.
Avfuktningsläge
Den öppningsbara panelen riktas snett uppåt.
Snett nedåt Horisontellt Snett uppåt
eller
Snett bakåt Snett nedåt
Snett uppåt
När utloppsluften är kall
När utloppsluften blir
varm
Page 64

SV-8
10 ˚C DRIFT
Uppvärmning med 10 °C inställd temperatur
utförs.
1
Tryck på knappen HEAT för att starta
uppvärmning.
2
Tryck på 10 ˚C-knappen.
• Fjärrkontrollens display visar ”
10˚C
”.
AVBRYTA
Tryck på 10 ˚C-knappen igen.
OBS!
• 10 °C-drift är inte möjlig om uppvärmning aktiverats
automatiskt i läget AUTO.
1
2
10
50°F
OBS!
• Värmepumpen går med ”extra hög” fl äkthastighet i
15 minuter för optimal spridning av varm eller kall luft
och övergår sedan till ”Hög” fl äkthastighet igen efter
15 minuter.
• Knapparna TYST DRIFT, TYST DRIFT UTOMHUS
och FLÄKTHASTIGHET är inaktiverade i detta
driftläge.
• Funktionens effekt kan variera beroende rummets
form, enhetens installationsplats och isoleringen i
bostaden.
Enheten värmer eller kyler fl era rum i ett välisolerat
hus när du trycker på den här knappen.
1
Tryck på knappen MULTI SPACE under
värme- eller kyldrift.
Fjärrkontrollens display visar ” ” och
fl äkthastighetssymbolen ändras till ” ”.
Luftriktarens vinkel ändras till positionen för ökad
spridning av kall eller varm luft.
(Värmeläge)
• Fjärrkontrollens display visar ” ”.
(Kyl- och avfuktningsläge)
• Fjärrkontrollens display visar ” ”.
AVBRYTA
Tryck på knappen MULTI SPACE igen.
MULTI SPACE
1
10
50°F
Page 65

SV-9
SVENSKA
I detta driftläge arbetar värmepumpen med full
effekt för att snabbt kyla eller värma rummet.
1
Tryck på knappen för full effekt under
drift.
• Fjärrkontrollens display visar ” ”.
• Temperaturvisningen stängs av.
• Den gröna FULL EFFEKT-lampan (
) på
enheten tänds.
AVBRYTA
Tryck på knappen FULL EFFEKT igen.
• Den gröna FULL EFFEKT-lampan ( ) på
enheten släcks.
OBS!
• Du kan inte ställa in temperatur eller fl äkthastighet
under drift med full effekt.
• Drift med full effekt avbryts automatiskt
efter en timme, varefter enheten återgår till
ursprungsinställningarna. Den gröna FULL EFFEKTlampan (
) på enheten släcks.
DRIFT MED FULL EFFEKT
1
Värmepumpen går med ”extra låg” fl äkthastighet för
komfort vid behov av tystare drift.
1
I driftläget VÄRME, KYLA eller AUTO drift,
tryck på knappen TYST DRIFT.
• Fläkthastighetssymbolen på fjärrkontrollen visar
”SILENT”.
AVBRYTA
Tryck på knappen SILENT igen.
1
TYST DRIFT
AUTO
10
50°F
AUTO
10
50°F
Page 66

SV-10
TIMERSTYRD DRIFT
TIMER STOPPTID
1
Tryck på knappen TIMER STOPPTID
( ).
2
Indikatorn för TIMER STOPPTID blinkar.
Tryck på knappen för TID FRAMÅT ( )
eller TID BAKÅT ( ) för att ställa in
önskad tid.
(Tiden kan anges i steg om 10 minuter.)
3
Tryck på knappen SET/C.
• Den orangefärgade TIMER-lampan ( ) på
enheten tänds.
TIPS FÖR TIMERSTYRD AVSTÄNGNING
När TIMER STOPPTID har ställts in, justeras temperaturinställningen automatiskt så att inte rummet ska bli
överdrivet varmt eller kallt t.ex. medan du sover. (Nattfunktion)
Kyl- och avfuktningsläge (COOL/DRY)
• En timme efter att den tidsinställda driften bekräftats,
ökas temperaturinställningen till 1 °C högre än den
ursprungliga temperaturinställningen.
Värmeläge (HEAT)
• En timme efter att den tidsinställda driften bekräftats,
sjunker temperaturinställningen 3 °C under den ursprungliga temperaturinställningen.
Före inställning av timer, se till att korrekt klockslag
är inställt.
När TIMER FÖR AVSTÄNGNING EFTER 1.2.3.5
timmar är inställd stängs enheten automatiskt av
efter den inställda tiden.
TIMER FÖR AVSTÄNGNING EFTER
1, 2, 3, 5 timmar
1
Tryck på knappen TIMER FÖR AVSTÄNGNING
EFTER 1, 2, 3, 5 timmar för att ange önskad tid.
• Den orangefärgade timerlampan ( ) tänds.
• Återstående tid visas på fjärrkontrollen i steg om
en timme.
AVBRYTA
Tryck på knappen SET/C.
Tryck på knappen TIMER FÖR
AVSTÄNGNING EFTER 1.2.3.5 timmar.
Tryck på knappen STOPP.
• Den orangefärgade timerlampan ( ) på
enheten släcks.
•
Aktuellt klockslag visas på fjärrkontrollen.
OBS!
• TIMER FÖR AVSTÄNGNING EFTER 1.2.3.5 timmar har
prioritet över TIMER ST AR TTID och TIMER STOPPTID.
• Om TIMER FÖR AVSTÄNGNING EFTER 1.2.3.5
timmar ställts in medan värmepumpen inte är i
drift, kommer den att gå en timme med den tidigare
inställningen och stanna efter en inställda tiden.
AVBRYTA
3
2
1
10
50°F
2
3
1
10
50F
2
3
1
1
Page 67

SV-11
SVENSKA
TIMER STARTTID
1
Tryck på knappen TIMER STARTTID
(
).
2
Indikatorn för TIMER STARTTID blinkar.
Tryck på knappen TID FRAMÅT ( )
eller TID BAKÅT ( ) för att ställa in
önskad tid
.
(Tiden kan anges i steg om 10 minuter.)
• Välj driftinställning.
3
Tryck på knappen SET/C.
• Den orangefärgade TIMER-lampan ( ) på
enheten tänds.
OBS!
• Värmepumpen startar före den inställda tiden för
att rummet ska hinna nå önskad temperatur vid den
programmerade tiden. (Uppvakningsfunktion)
SAMTIDIG ANVÄNDNING A V BÅDA
TIDSINSTÄLLNINGARNA
Inställningar för TIMER STARTTID och TIMER
STOPPTID kan anges samtidigt.
Ställ in TIMER STOPPTID OCH TIMER STARTTID.
• Inställningarna kombineras automatiskt.
Exempel
(
Aktuellt klockslag: 9:00 p.m.)
TIMER STOPPTID vid 11:00 p.m.
TIMER STARTTID vid 7:00 a.m.
• Pilen ( eller ) mellan timer-starttiden och timer-
stopptiden anger vilken tidsinställning som kommer
att aktiveras först.
OBS!
• Det går inte att programmera timern för starttid
respektive stopptid för att köra värmepumpen vid
olika temperaturer eller med andra inställningar.
• Du väljer själv vilken tidsinställning som ska aktiveras
först.
• När knappen SET/C trycks in avbryts alla
timerinställningar (inklusive TIMER STARTTID,
TIMER STOPPTID och TIMER STOPPTID
1.2.3.5
timmar
)
AVBRYTA (TIMER STOPPTID och TIMER
STARTTID)
Tryck på knappen SET/C för att ångra
tidsinställningen.
• Den orangefärgade timerlampan ( ) på enheten
släcks.
•
Aktuellt klockslag visas på fjärrkontrollen.
ÄNDRING A V TIDSINSTÄLLNING
Avbryt först tidsinställningen och ställ sedan in
den på nytt.
AVBRYTA
1
3
2
10
50°F
Page 68

SV-12
SJÄLVRENGÖRING
Självrengöringsfunktionen SELF CLEAN
minskar tillväxten av mögelsvamp med hjälp av
plasmaklusterjoner och avfuktar insidan av enheten.
Använd den här funktionen vid årstidsväxlingar
.
1
Tryck på självrengöringsknappen SELF
CLEAN när enheten inte är igång
.
• Fjärrkontrollens display visar ” ”.
(” ” försvinner automatiskt efter en minut.)
• Den ljusblå lampan SJÄLVRENGÖRING ( ) på
enheten tänds.
• Enheten stannar efter 90 minuter.
AVBRYTA
Tryck på knappen STOP.
• Den ljusblå lampan SJÄLVRENGÖRING ( )
släcks.
OBS!
Det går inte att ställa in temperatur, fl äkthastighet,
luftriktning eller timer under pågående självrengöring.
• Mögel som redan uppstått avlägsnas inte av denna
operation.
• SJÄLVRENGÖRING och PLASMACLUSTER
använder samma lampa, dock med olika färger.
Tryck på DISPLAY-knappen när lamporna på enheten
lyser för starkt. (Alla lampor på inomhusenheten kan
inte stängas av.)
1
Tryck på DISPLAY-knappen under drift
.
• Alla lampor på inomhusenheten slocknar samtidigt
TÄNDA LAMPORNA
Tryck på DISPLAY-knappen igen.
DISPLAY-KNAPP
1
10
50°F
10
50°F
1
Page 69

SV-13
SVENSKA
˚F/˚C VÄXLA TEMPERATURSKALA
Ändra °F/°C temperaturskala på fjärrkontrollen.
1
Tryck på knappen VÄXLA °F/°C
TEMPERATURSKALA.
• Temperaturvisningen på fjärrkontrollen ändras
mellan ”°F” (Fahrenheit) och ”°C” (Celsius).
10
50°F
F
1
TYST DRIFT UTOMHUS
Slå på ON detta driftläge för att minska ljudet från
utomhusenheten under drift. Detta driftläge är
idealiskt för drift nattetid för att minska ljudet från
utomhusaggregatet.
1
Tryck på knappen TYST DRIFT
UTOMHUS under drift.
•
Lysdioden på inomhusenheten tänds när
detta driftläge är PÅ.
AVBRYTA
Tryck på knappen TYST DRIFT UTOMHUS
igen. Lysdioden på inomhusenheten
släcks.
OBS!
• Om funktionen TYST DRIFT UTOMHUS används
i kombination med FULL EFFEKT eller MULTISPACE kan effekten minskas jämfört med drift utan
funktionen TYST DRIFT UTOMHUS.
• Om enheten stängs AV i läget TYST DRIFT
UTOMHUS, kommer driftläget att vara frånslaget när
enheten startas på nytt.
• Ljudnivån från utomhusenheten kommer inte att
minskas om ljudnivån har minskat tillräckligt för att ge
stabil drift.
10
50°F
1
OUTDOOR SILENT Lamp (white)
TYST DRIFT UTOMHUS-lampa (vit)
Page 70

SV-14
UNDERHÅLL
FÖRE UNDERHÅLL
Slå alltid från strömbrytaren innan något underhållsarbete påbörjas.
1
Stäng av enheten.
2
Vänta minst 5 sekunder efter att pa-
nelen stängts helt och slå sedan från
strömbrytaren.
BYTE A V LUFTRENGÖRINGSFIL TER
Filtren ska bytas med 3–6 månaders intervall.
1
Avlägsna luftfi ltren.
2
Byt luftrengöringsfi ltren.
1
Avlägsna de gamla luftrengöringsfi ltren från
luftfi ltren.
2
Placera luftrengöringsfi ltren under fi lterstop-
pen på luftfi ltret.
3
Sätt tillbaka luftfi ltren.
OBS!
• Smutsiga luftrengöringsfi lter kan inte tvättas och
återanvändas. Du kan skaffa nya fi lter från din när-
maste återförsäljare.
Avfallshantering av fi lter
Avfallshantera använda fi lter enligt lokala föreskrifter.
Material i luftrengöringsfi lter
Filter: polypropen.
Ram: polyester.
Filterstopp
RENGÖRING A V FIL TER
Den röda RENGÖR FILTER-lampan ( ) på inomhusdelen tänds för att indikera att fi ltren ska rengöras om
den totala drifttiden har uppgått till 600 timmar.
1
Stäng av enheten.
2
Avlägsna luftfi ltren.
1
Fäll upp panelen.
2
Tryck luftfi ltren uppåt något för att frigöra dem.
3
Dra luftfi ltren nedåt för att avlägsna dem.
3
Avlägsna luftrengöringsfi ltren från luft-
fi ltren.
4
Rengör luftfi ltren.
Avlägsna damm med dammsugare. Om fi ltren är
smutsiga bör du tvätta dem i varmt vatten och ett
milt rengöringsmedel. Låt fi ltren torka i skugga
innan du sätter tillbaka dem.
5
Sätt tillbaka luftrengöringsfi ltren.
6
Sätt tillbaka luftfi ltren.
1 Sätt tillbaka luftfi ltren på deras ursprungliga
platser.
2
Tryck på knappen FILTERNOLLSTÄLLNING.
Den röda RENGÖR FILTER-lampan ( )
släcks.
(Den ackumulerade drifttiden nollställs)
3
Stäng panelen.
GÖR FÖLJANDE FÖR ATT
SÄKERSTÄLLA KORREKT DRIFT EFTER
SÄSONGSVÄXLING
1
Starta självrengöring så att enheten blir
torr invändigt.
2
Stoppa driften genom att trycka
på knappen STOP när operationen
har slutförts och slå sedan från
strömbrytaren.
3
Inspektera luftfi ltren och avlägsna dem
för rengöring.
4
Sätt i luftfi ltren och kontrollera att det
inte fi nns någonting som hindrar in-
och utfl ödet av luft.
RENGÖRING A V AGGREGAT OCH
FJÄRRKONTROLL
• Torka med en mjuk trasa.
• Se till att inte stänka eller hälla vatten direkt på
dem. Vatten kan orsaka elektriska stötar eller skada utrustningen.
• Använd inte varmvatten, thinner, slipande medel el-
ler starka lösningsmedel.
Page 71

SV-15
SVENSKA
BORTT AGNING AV ÖPPNINGSBAR
PANEL
Den öppningsbara panelen kan tas bort för rengöring.
1
Öppna panelen.
• Håll den vänstra och högra sidan av panel och lyft
upp den.
2
Avlägsna panelen.
• Lyft panelen till nästan horisontellt läge och dra
den utåt.
Öppningsbar panel
Rätt
Fel
MONTERA DEN ÖPPNINGSBARA
PANELEN
1
Håll panelen horisontellt.
2
Placera det långa haken i spåret ovani-
från och tryck fast den tills den klickar.
3
Stäng panelen.
• Tryck på pilarna på panelen tills den klickar.
BORTT AGNING AV
LUFTRIKTNINGSPANELEN
Luftriktningspanelen kan tas bort för rengöring.
1
Stäng av enheten.
• Vänta minst 5 sekunder efter att panelen stängts
helt och slå sedan från strömbrytaren.
2
Fäll upp panelen.
3
Lås upp luftriktningspanelen.
• Tryck på låsknappen (grå) och öppna panelens
nedre del.
4
Ta bort luftriktningspanelen.
• Lyft upp luftriktningspanelen något till läget som
visas i bilden och ta bort den.
1
1
Öppningsbar panel
MONTERING A V
LUFTRIKTNINGSPANELEN
1
Sätt fast båda hakarna på panelfästet.
• Det fi nns panelfästen i enhetens båda ändar.
2
Stäng luftriktningspanelen.
3
Tryck på pilarna på luftriktningspane-
len tills den klickar.
4
Stäng panelen
•
Se till att luftriktningspanelen stängs ordentligt efter
fastsättning.
2
1
3
3
Öppningsbar
panel
Öppningsbar panel
Spår
Lång hake
3
2
4
※
Hake
Panelfäste
Öppningsbar panel
Luftfi lterpanel
Page 72

SV-16
INOMHUSTEMP. UTOMHUSTEMP.
KYLA
övre gräns 32˚C 43˚C
nedre gräns 21˚C –10˚C
VÄRME
övre gräns 27˚C 24˚C
nedre gräns – -25˚C
• Den inbyggda skyddsanordningen förhindrar att
enheten körs utanför detta temperaturområde.
• Kondens kan bildas vid luftutloppet om enheten
används kontinuerligt i kylnings- eller avfuktningsläge
när luftfuktigheten överstiger 80 %.
VID STRÖMAVBROTT
Värmepumpen har en minnesfunktion som lagrar
inställningarna om strömavbrott inträffar.
Efter strömavbrott kommer enheten automatiskt att
starta med samma inställningar som den hade när den
stannade, förutom timerinställningarna.
Timerinställningar som gjorts före ett strömavbrott
måste göras om efter återstart.
FÖRVÄRMNINGSFUNKTION
Under värmedrift kan det hända att inomhusfl äkten
startar först 2 till 5 minuter efter att enheten har startats
för att förhindra att kalluft blåser in.
AVFROSTNINGSFUNKTION
• Om is bildas på värmeväxlaren i utomhusenheten i
värmeläget, startar avfrostningsfunktionen och pågår
cirka 5 till 10 minuter för att avlägsna isen. Under
avfrostning stannar fl äktarna i både inomhus- och
utomhusdelen.
• När avfrostningen är klar återgår enheten automatiskt
till värmeläget.
UPPVÄRMNINGSEFFEKT
• Värmepumpen tar upp värme från utomhusluften
och överför den till inomhusluften. Lufttemperaturen
utomhus påverkar således i stor utsträckning
uppvärmningkapaciteten.
• Om uppvärmningseffekten reduceras på grund av
låg utomhustemperatur, bör du använda ett extra
värmeaggregat.
• Det tar tid att värma upp hela rummet på grund av
det aktiva luftcirkulationssystemet.
YTTERLIGARE DRIFT ANMÄRKNINGAR
DRIFTTEMPERATUROMRÅDE
Page 73

SV-17
SVENSKA
INNAN DU KONTAKTAR SERVICETEKNIKER
Följande avser inte fel på utrustningen.
VÄRMEPUMPEN FUNGERAR INTE
Utrustningen fungerar inte om den startas omedelbart
efter att den har stängts av. Utrustningen startar inte
direkt efter att driftläget har ändrats. Detta för att
skydda den inre mekanismen. Vänta 3 minuter innan
du tar startar utrustningen.
INOMHUSENHETEN AVGER INTE VARM LUFT
Förvärmning eller avfrostning pågår.
LUKTER
Det kan hända att lukt från mattor och möbler har
strömmat in i enheten. Dessa lukter kan då strömma ut
från enheten.
KNAKANDE LJUD
Detta ljud orsakas av friktion mellan utrustningens
delar då de expanderar eller krymper på grund av
temperaturförändring.
SVAGT SURRANDE LJUD
Detta ljud avges när plasmacluster-joner genereras
.
SKVALPANDE LJUD
Det mjuka, skvalpande ljudet orsakas av köldmediet
som cirkulerar inuti värmepumpen.
DIMMA VID LUFTUTLOPPET
Vid kylning kan detta bero på temperaturskillnaden
mellan rummets luft och inloppsluften.
VATTENÅNGA
Under värmedrift kan vattenånga strömma ut ur
utomhusdelen vid avfrostning.
UTOMHUSDELEN STANNAR INTE
När driften avbryts, roterar utomhusdelens fl äkt i cirka
en minut för att kyla ned värmepumpen.
LUKT FRÅN PLASMAKLUSTERLUFTUTLOPPET
Detta är lukten av ozon som genereras av
Plasmacluster-jongeneratorn. Ozonmängden är mycket
liten och har inga negativa hälsoeffekter. Det ozon som
frigörs till luften bryts ner snabbt. Det koncentrationen i
luften ökar inte.
Kontrollera följande punkter innan du ringer en
servicetekniker.
OM INTE UTRUSTNINGEN FUNGERAR
Kontrollera om strömbrytaren har stängts av eller om
säkringen har gått.
UTRUSTNINGEN KYLER (ELLER VÄRMER) INTE
RUMMET EFFEKTIVT
• Kontrollera fi ltren. Rengör dem om de är smutsiga.
• Kontrollera utomhusdelen så att inte luftintag eller
luftutlopp är blockerade.
• Kontrollera att temperaturen är korrekt inställd.
• Se till att fönster och dörrar är ordentligt stängda.
INOMHUSENHETEN TAR INTE EMOT SIGNALER
FRÅN FJÄRRKONTROLLEN
• Kontrollera om fjärrkontrollens batterier är urladdade.
• Försök att sända signaler igen genom att
rikta fjärrkontrollen rakt mot inomhusenhetens
signalmottagarfönster.
• Kontrollera att batteripolerna i fjärrkontrollen är vända
åt rätt håll.
Kontakta återförsäljaren om temperaturindikatorn
på indikatorpanelen blinkar.
Page 74

TINSEA825JBRZ 15M- CN 1
http://www.ivt.se
http://www.ivt.fi
http://www.ivtnorge.no
 Loading...