

Page 1
Hardware Quick Start Guide
English / Deutsch / Français / Italiano /
Español / Nederlands/Português
1_EN.indd 1
Page 2

The R&TTE Directive
We, the manufacturer hereby declare that this equipment, model RCKT07 is in compliance with the essential requirements and other relevant
provisions of Directive 1995/5/EC.
FEDERAL COMMUNICATIONS
COMMISSION INTERFERENCE
STATEMENT
This equipment has been tested and found to comply with the limits for
a Class B digital device, pursuant to part 15 of the FCC Rules. These
limits are designed to provide reasonable protection against harmful
interference in a residential installation. This equipment generates, uses
and can radiate radio frequency energy and, if not installed and used in
accordance with the instructions, may cause harmful interference to radio
communications. However, there is no guarantee that interference will
not occur in a particular installation. If this equipment does cause harmful
interference to radio or television reception, which can be determined by
turning the equipment off and on, the user is encouraged to try to correct
the interference by one or more of the following measures:
1_EN.indd 2
Page 3

Reorient or relocate the receiving antenna.
Increase the separation between the equipment and receiver.
Connect the equipment into an outlet on a circuit different from that
to which the receiver is connected.
Consult the dealer or an experienced radio/ TV technician for help.
CAUTION:
Any changes or modications not expressly approved by the grantee of
this device could
void the user’s authority to operate the equipment.
RF exposure warning
The equipment complies with FCC RF exposure limits set forth for an
uncontrolled environment.
The equipment must not be co-located or operating in conjunction with
any other antenna or transmitter.
●
●
●
●
1_EN.indd 3
Page 4
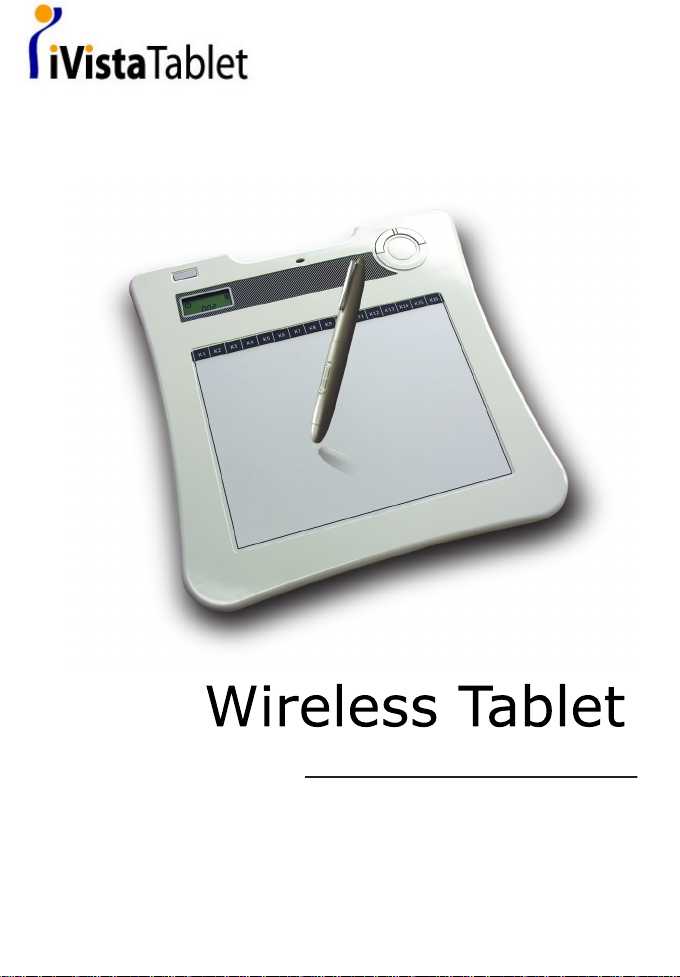
English
Congratulation on purchase of Wireless Tablet
Wireless Tablet is a 2.4 G wireless solution table. Without complicated wireless
software installation, just install tablet driver and plug our wireless receiver
dongle to your PC and you use it freely any where. Moreover, Wireless
tablet support Windows Vista TM. If you do not want to use these extra hot
key, volume adjustment and Macro Key function, you can even do not need to
install any driver. Just follow this quick guide and enjoy your e-life with our Wireless
Tablet.
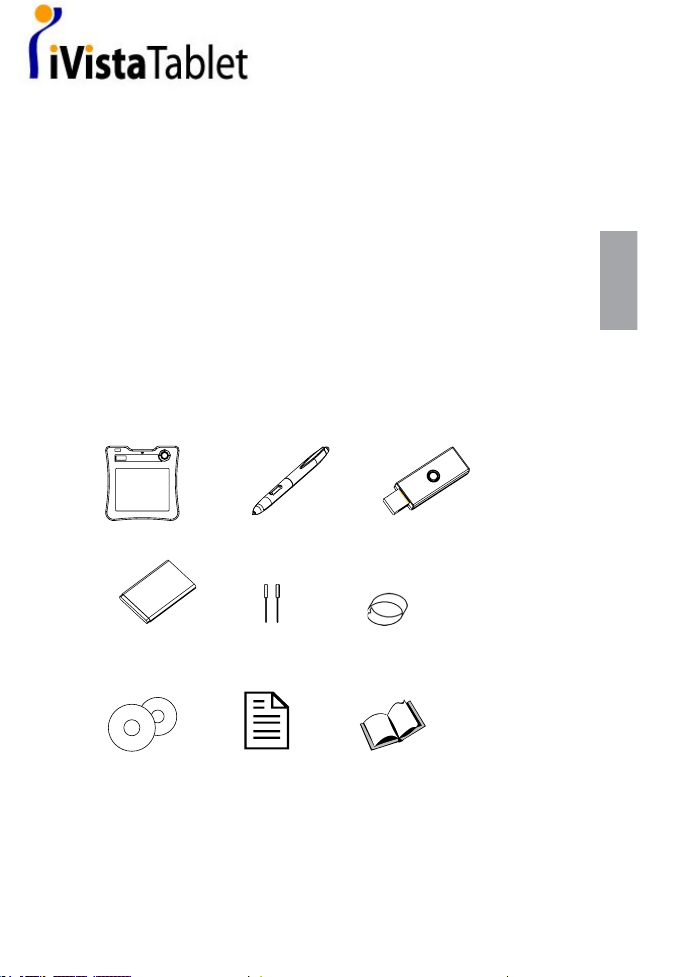
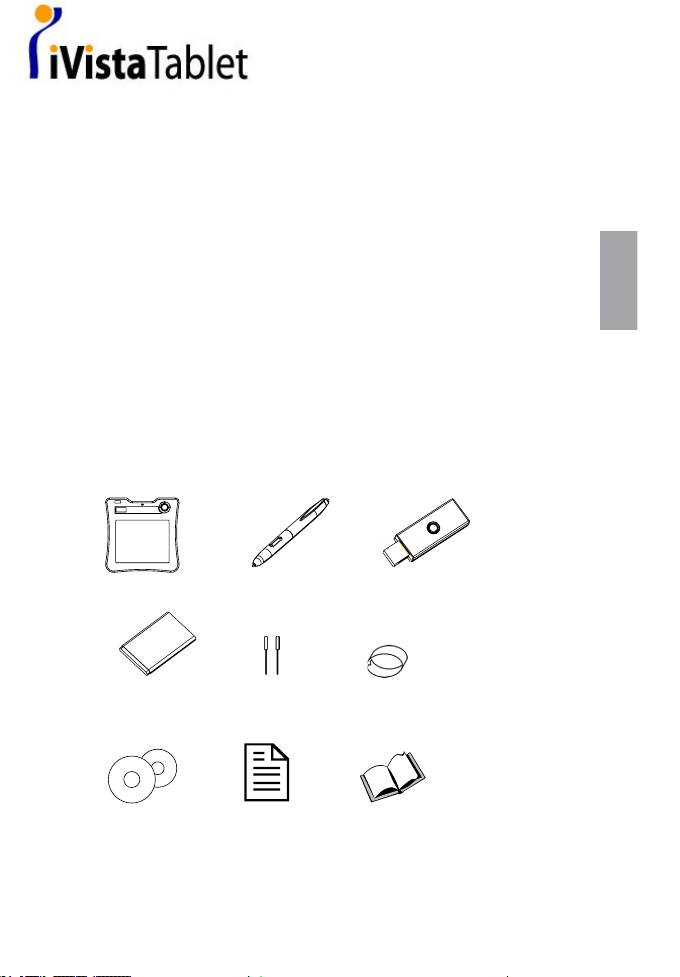
1. Package content
Tablet *1▲ New boss pen*1▲
Receiver dongle*1▲
Li-ion battery *1▲
pen tip*2▲
Pen tweezers*1▲
CD*2▲ Quick guide*1▲ Application manual*1 ▲
1_EN.indd 1
Page 5
English
2
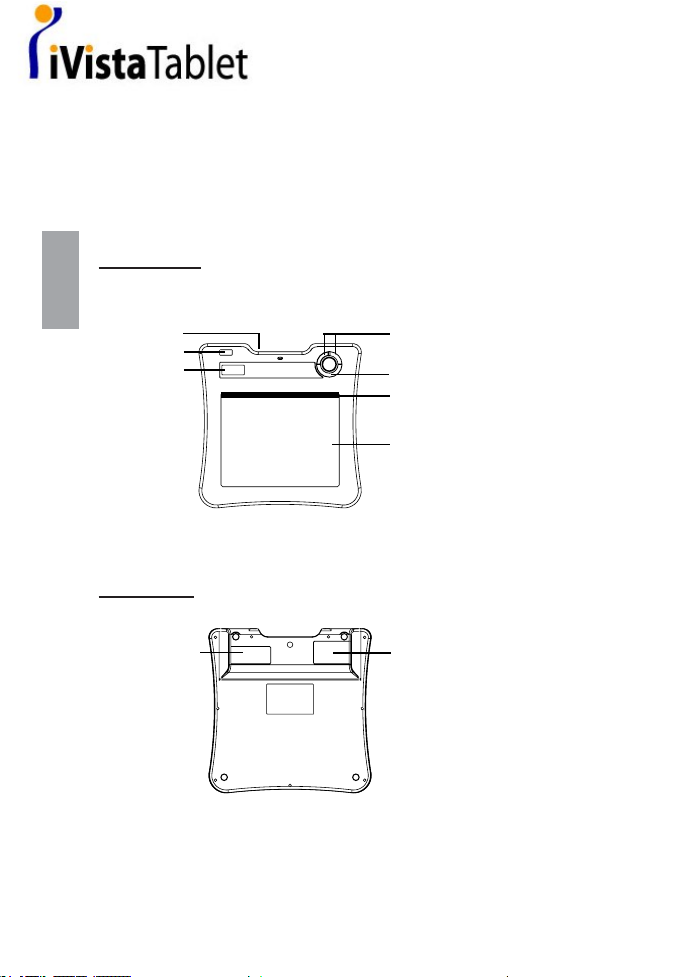
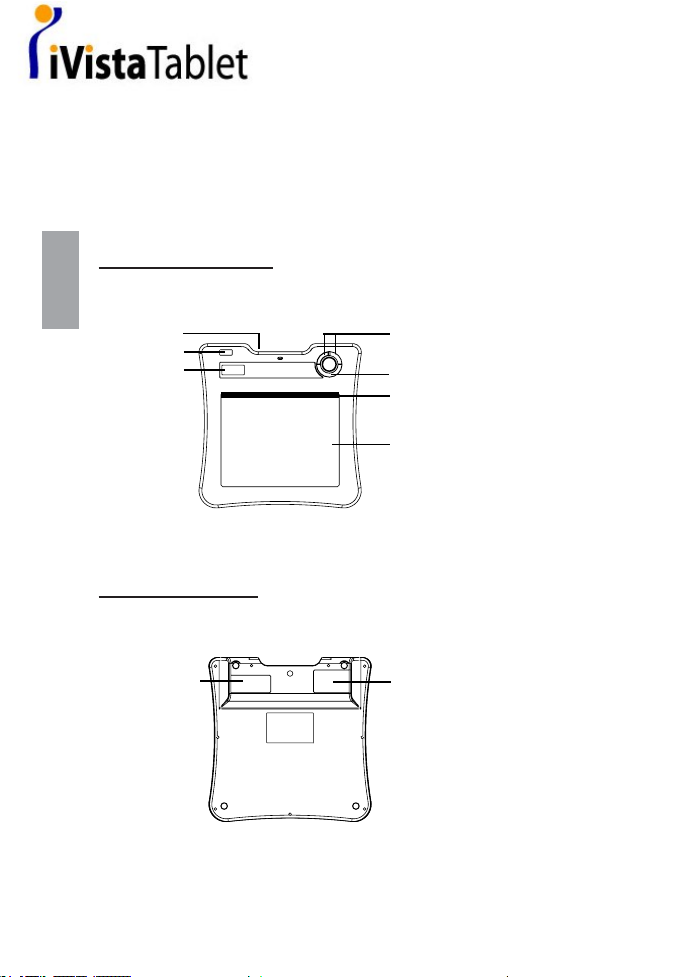
2. Hardware introduce
Tablet:
Front side
Pen slot
power button
LCD
Volume adjustment circle
Active area
Macro key area
Page up/ Page down
Back side
Dongle storage
Battery storage
1_EN.indd 2
Page 6

English
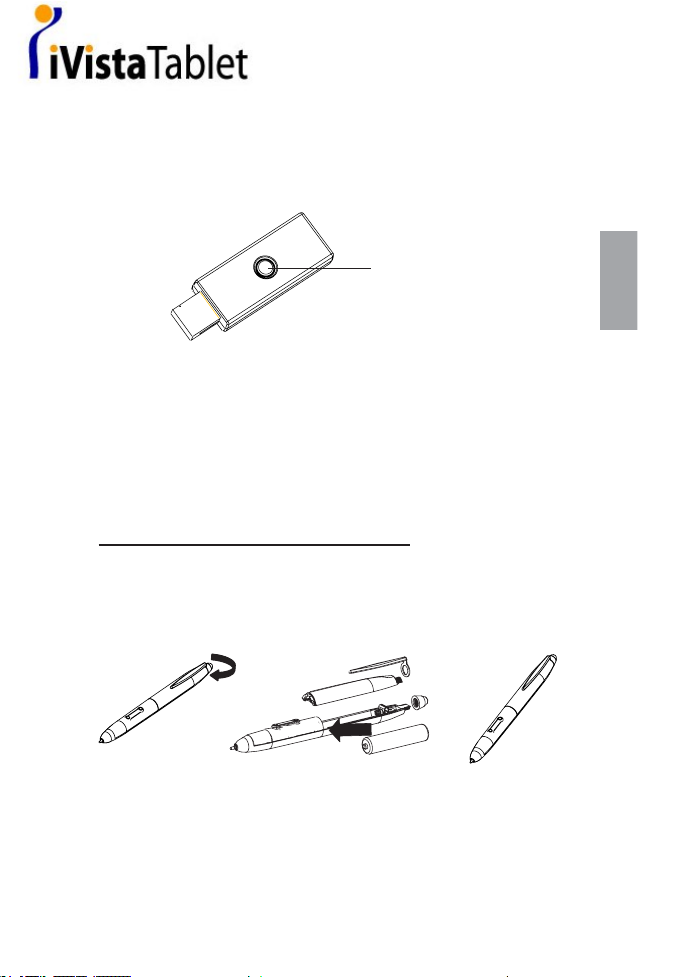
Receiver Dongle
▪ Binding button
▪ LED
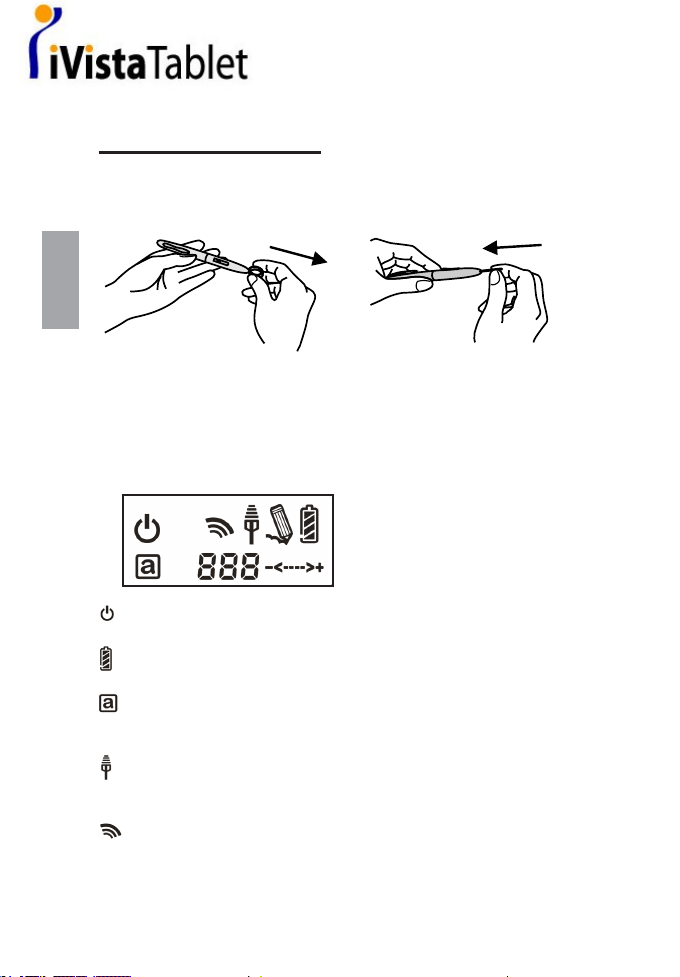
Pen
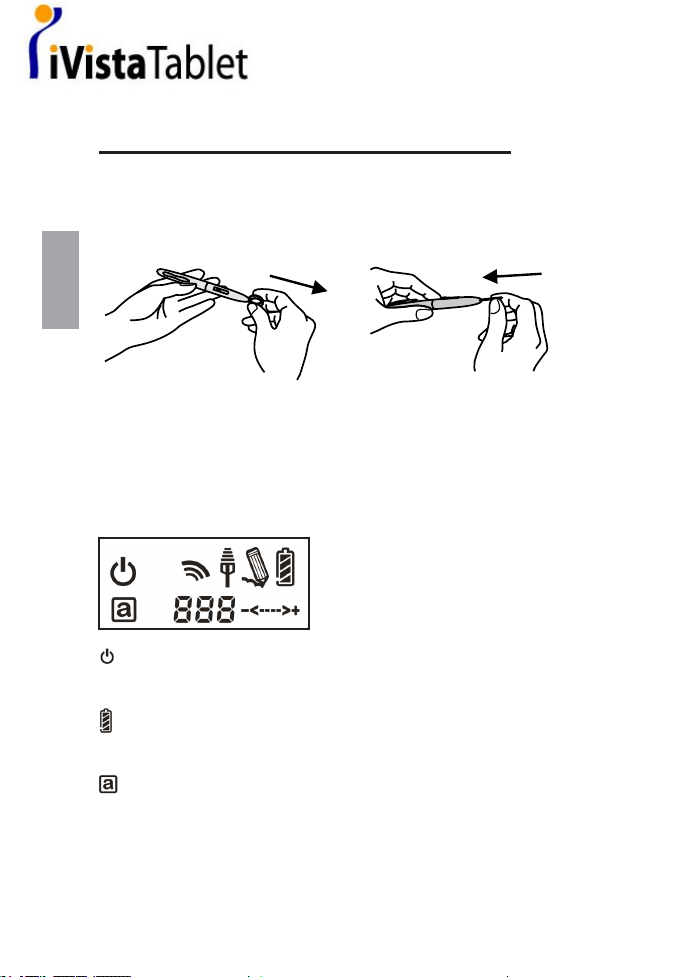
How to change battery
1.
2.
3.
1_EN.indd 3
Page 7
English
4
How to change pen tip
1. 2.
3. LCD introduce
Power on: After press the power button 3 seconds, this icon is showed.
Battery Indicator : There are four levels battery indicator.
Active: Tablet will get into power saving mode if the pen is off the
active area 3 seconds later and this icon will be hidden.
Connecting: After you bind successful, the icon is showed. It means that
your Tablet have connected to PC successful.
Token right: It means that your tablet is authorized by the receiver
dongle to send the package.
1_EN.indd 4
Page 8
English
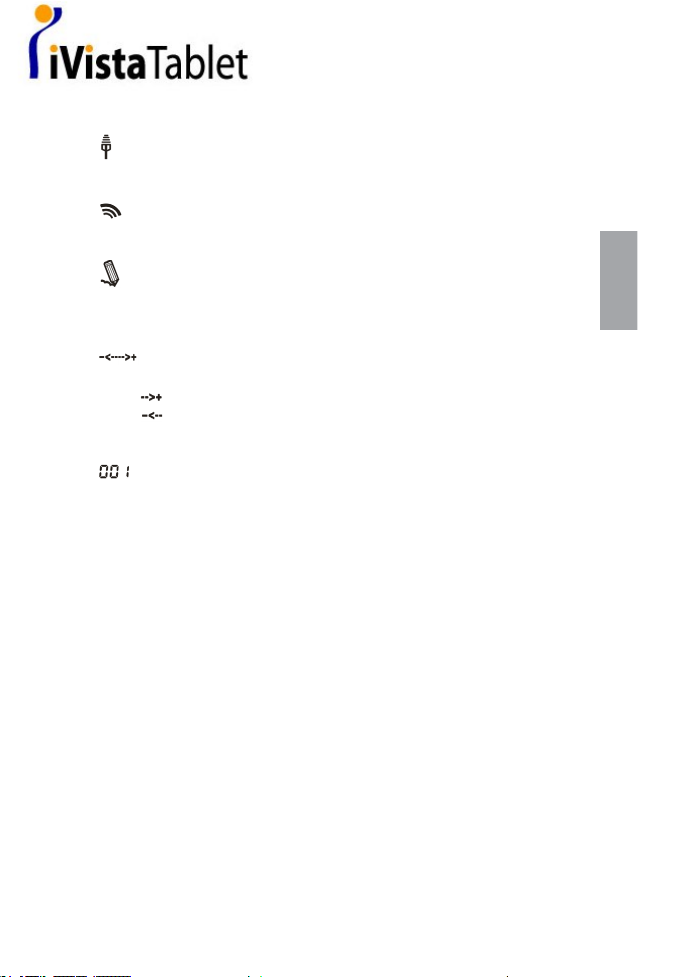
The interaction between pen and tablet:
Blanking: Pen gets in to the detectable active area.
Still: Pen tip on the active area.
Volume adjustment indicator : you can use the pen on the volume
adjustment circle to adjust the volume.
Clockwise: adjust volume louder
Anticlockwise: adjust volume down
Tablet number : One receiver dongle can connect to more than one
wireless tablet. Therefore, if you connect more than one wireless Tablets,
you can distinguish which tablet it is.
4. Installation
Windows Vista Home Premium above
Wireless Tablet is a Windows Vista plug and Play device. You can
use the basic tablet function without installing any driver, just plugn- play. However, our patented macro key function provides you an
efcient and productive way to operate application. Moreover, the
hot key of Page up/Page down and volume adjustment circle will
require driver (included in Macro Key Manager). Therefore, you can
install Macro Key Manager to make the macro keys and these hot
keys work.
Windows 2000 / XP / Vista Home basic
Under Windows 2000 / XP / Vista Home basic, you have installed
driver (included in Macro Key Manager). Therefore, please install
Macro Key Manager before the device is plugged to your PC. Once
Macro Key Manager is installed successfully, Wireless Tablet can
work and the macro key and the hot keys work also.
●
●
●
●
●
●
1_EN.indd 5
Page 9

English
6
5. Star Use
Plug receiver dongle to your PC
Press at least 3 seconds to power on Wireless Tablet
Press the biding button on the back side of the tablet and biding
button of the receiver dongle at the same time.
The LCD of Tablet will blank and the blue LED of receiver
dongle blank also.
Once the binding is successful, the number on the LCD will show
000 to 001 or others (if binding more than one Wireless Tablet).
Since there are power saving design with our pen, please always
have our pen to tip on any area of the tablet rst to wake up the
pen before you start use tablet.
Check it the information of LCD indictor is display correctly.
If yes, you can start to use it freely.
1.
2.
3.
4.
5.
6.
7.
8.
1_EN.indd 6
Page 10

English
6. Specication
Solution Wireless 2.4G RF
Dimension 278*282*20mm
active area 7.84”*5.92”
Resolution 2000lpi
Report rate 120 rpst
Pen pressure 1024 levels
Macro key 16( top of active area)
Hot key Page up / page down
LCD type TN LCD
LCD size 17.7*40.9mm
LCD Icon content
battery status – 4 levels; charged; /
connection mode ; connection power status/
volume status /Tablet number
Battery type Nokia BL5C Li-ion rechargeable battery
battery capacity 800mA
battery life 16 hrs continuing mode
power source USB charged
power button electrical power button
power consumption max 50 mA( operation mode )
Receiver dongle Yes
1_EN.indd 7
Page 11

Hardware Quick Start Guide
Deutsch/
2_DE.indd 1
Page 12
Deutsch
Gratulation zum Kauf des Wireless Tablet
Das Wireless Tablet ist ein 2.4 G schnurloses Graktablett. Ohne
komplizierte Installation von Wireless-Software installieren Sie einfach
den Treiber des Tabletts, stecken den Dongle in den PC und können es
dann überall frei verwenden. Darüberhinaus unterstützt das Wireless
Tablet Windows Vista TM. Wenn Sie die zusätzlichen Funktionstasten, den
Lautstärkeregler und die Makroschlüsselfunktion nicht verwenden wollen,
können Sie auch auf jegliche Treiberinstallation verzichten. Folgen Sie
einfach dieser Kurzanleitung und genießen Sie Ihr digitales Leben mit
unserem Wireless Tablet.
1. Verpackungsinhalt
Tablet *1▲ Neuer Boss-Stift*1▲
Empfänger-Dongle*1▲
Li-Ion Akku *1▲
Schreibspitze*2▲
Stiftpinzette*1▲
CD*2▲ Kurzanleitung*1▲ Bedienungsanleitung*1▲
2_DE.indd 1
Page 13
Deutsch
2
2. Vorstellung der Hardware
Tablett:
BILD Vorderseite
Stifthalter
Einschaltknopf
LCD
Lautstärkeregler
Aktive Fläche
Makroschlüsseläche
Bild hoch/ Bild runter
BILD Rückseite
Platz für die
Aufbewahrung
des Dongle
Akku
2_DE.indd 2
Page 14
Deutsch
BILD Dongle-Empfänger
▪ Einbinden-Knopf
▪ LED
Stift:
Wie man die Batterien wechselt
1.
2.
3.
2_DE.indd 3
Page 15
Deutsch
4
Wie man die Spitze des Stifts auswechselt
1. 2.
3.Vorstellung des LCD
An/Aus: Nachdem Sie den Einschaltknopf 3 Sekunden lang gedrückt
haben, wird dieses Icon angezeigt.
Batterieanzeige: Es gibt vier Stufen in der Batterieanzeige.
Aktiv: Das Tablett wird drei Sekunden nachdem der Stift die aktive
Fläche verlassen hat in den Stromsparmodus gehen und dieses Icon
verschwindet.
2_DE.indd 4
Page 16
Deutsch
Verbinden: Nachdem Sie das Tablett erfolgreich eingebunden haben
und es mit dem PC verbunden ist, wird dieses Icon angezeigt.
Sendeerlaubnis: Das bedeutet, dass Ihrem Tablett vom Dongle
genehmigt wurde, das Paket zu senden.
Interaktion zwischen Stift und Tablett
Blinkend: Der Stift nähert sich der empfangenden aktiven Fläche.
Ruhig: Die Spitze des Stifts ist auf der aktiven Fläche.
Lautstärkeregler: Sie können den Stift auf dem Kreis des
Lautstärkereglers zum Regeln der Lautstärke verwenden.
Im Uhrzeigersinn: Höhere Lautstärke
Gegen den Uhrzeigersinn: Niedrigere Lautstärke
Nummer des Tabletts: Ein Empfänger-Dongle kann sich mit mehr als
einem Wireless Tablet verbinden. So können Sie, wenn Sie mit mehreren
Tabletts verbinden, unterscheiden, um welches Tablett es sich handelt.
4.Installation
Windows Vista Home Premium above
Wireless Tablet ist ein Windows Vista Plug-and-Play-Gerät. Sie
können die Grundfunktionen des Tabletts ohne Treiberinstallation
einfach mit Plug-'n-Play verwenden. Allerdings bietet Ihnen
unsere patentierte Makroschlüsselfunktion eine efziente und
produktive Methode, um Anwendungen zu bedienen. Darüberhinaus
benötigen die Funktionstasten für Bild hoch/ Bild runter und
der Lautstärkeregler Treiber (in der Makroschlüsselverwaltung
enthalten). Sie können also die Makroschlüsselverwaltung
installieren, um die Makroschlüssel und diese Funktionstasten zu
aktivieren.
●
●
●
●
●
2_DE.indd 5
Page 17
Deutsch
6
Windows 2000 / XP / Vista Home basic
Unter Windows 2000 / XP / Vista Home basic müssen Sie
Treiber (in der Makroschlüsselverwaltung enthalten) installieren.
Installieren Sie daher die Makroschlüsselverwaltung,
bevor Sie das Gerät an Ihren PC anschließen. Sobald die
Makroschlüsselverwaltung erfolgreich installiert ist, funktioniert das
Wireless Tablet mit e Makroschlüsseln und Funktionstasten.
5. Verwendung
Stecken Sie den Empfänger-Dongle in ihren PC
Halten Sie den Einschaltknopf Ihres Wireless Tablet für
mindestens 3 Sekunden gedrückt.
Drücken Sie gleichzeitig die Einbinden-Knöpfe, die sich auf der
Rückseite des Tabletts und auf dem Empfänger-Dongle benden.
Die LCD des Tabletts wird blinken; genauso die blaue LED des
Empfänger-Dongles.
Sobald das Verbinden erfolgreich ist wird sich die Nummer auf
dem LCD von 000 zu 001 verändern (oder zu einer anderen Zahl,
wenn mehrere Tabletts eingebunden sind).
Wegen unserer Stromspareinstellungen, aktivieren Sie bitte erst
den Stift dadurch, dass Sie mit der Spitze das Tablett berühren,
bevor Sie anfangen, das Tablett zu verwenden.
Prüfen Sie, ob die LCD-Anzeigen korrekt dargestellt werden.
Wenn ja, sind Sie jetzt so weit, dass Sie es benutzen können.
●
1.
2.
3.
4.
5.
6.
7.
8.
2_DE.indd 6
Page 18
Deutsch
6. Technische Daten
Typ Schnurlos 2.4G RF
Abmessungen : 27,8cm*28,2cm*2,0cm
aktive Fläche 19,9cm*15cm
Auösung 2000lpi
Reportrate 120 rpst
Stiftdruck 1024 Stufen
Makroschlüssel 16(über der aktiven Fläche)
Funktonstasten Bild hoch/ Bild runter
LCD type TN LCD
LCD Größe 1,8cm*4,1cm
LCD Icons
Batteriestatus – 4 Stufen; geladen;/
Verbindungsmodus ; Verbindungsstärke/
Lautstärke /Nummer des Tabletts
Akkutyp Nokia BL5C Li-ion Akku
Akku Kapazität 800mA
Laufzeit 16 h in Standby-Modus
Energieversorgung aufgeladen über USB
An/Aus-Knopf elektrischer Einschaltknopf
Energieverbrauch max. 50 mA (aktiver Modus)
Empfänger-Dongle Ja
2_DE.indd 7
Page 19

Hardware Quick Start Guide
Français /
3_FR.indd 1
Page 20

Français
Nous vous félicitons pour l’achat de cette Wireless Tablet.
La Wireless Tablet est une tablette sans l de 2.4G. Dépourvue de
logiciel d’installation wi compliqué, cette tablette nécessite seulement
l’installation du gestionnaire et du branchement sur votre PC de la clé
électronique réceptrice qui vous permettra de vous déplacer librement.
La Wireless Tablet accepte Windows Vista TM. Si vous ne désirez pas
utiliser de touche rapide supplémentaire, la touche de réglage du volume
ni la fonction Macro Key, vous n’aurez même pas besoin d’installer le
gestionnaire. Vous n’avez qu’à suivre ce guide et proter de votre vie
cybernétique avec notre Wireless Tablet.
1. Contenu du paquet d’emballage
Tablette *1▲ Stylo de
nouveau patron*1
▲
clé réceptrice*1▲
pile Li-ion *1▲
pointe de stylo*2▲
pince de stylo*1▲
CD*2▲ guide rapide*1▲ manuel d’application*1 ▲
3_FR.indd 1
Page 21

Français
2
2. Présentation du logiciel
Tablette:
Devant de l’image
Fente pour stylo
Bouton de
courant
Ecran digital
Cercle de réglage du volume
Zone active
Zone touche macro
Page précédente/ Page suivante
Derrière de l’image
Espace pour le
rangement de
la clé
Pile
3_FR.indd 2
Page 22

Français
Clé électronique réceptrice
▪ Bouton de connexion
▪ DEL
Stylo
comment changer la pile
1.
2.
3.
3_FR.indd 3
Page 23

Français
4
comment changer la pointe du stylo
1. 2.
3. Présentation de l’écran digital
Marche: appuyer sur le bouton pendant 3 secondes et l’icône
apparaîtra.
Indicateur de batterie : possède quatre degrés.
Actif: la tablette se mettra en mode d’économie de courant si le stylo
reste hors de la zone active plus de 3 secondes et cette icône disparaîtra.
3_FR.indd 4
Page 24

Français
En train de connecter: après une connexion réussie, cette icône
apparaîtra : Il indique que votre tablette a été connectée au PC.
Jeton droit: cela indique que votre tablette est autorisée par le
récepteur à envoyer le package.
Interaction entre le stylo et la tablette:
Clignotement: le stylo entre dans la zone active.
Calme: la pointe du stylo est sur la zone active.
Indicateur de réglage du volume: vous pouvez utiliser le stylo pour
régler le volume a partir du cercle de réglage.
Sens des aiguilles d’une montre: monter le volume
Sens inverse des aiguilles d’une montre: baisser le volume
Numéro de tablette : une clé réceptrice peut être connectée à plus
d’une tablette sans l. Par conséquent, si vous connectez plus d’une
tablette sans l, vous pourrez distinguer quelle tablette c’est, grâce au
numéro.
4. Installation
Windows Vista Home Premium above
La Wireless Tablet est un appareil dont la lecture et le branchement
sont compatibles à Windows® Vista™. Vous pouvez utiliser les
fonctions de base de la tablette sans installer aucun gestionnaire,
branchez-la et elle sera prête à fonctionner. Par ailleurs, notre
fonction touche macro brevetée vous offre un moyen efcace
et productif d’utiliser les applications. Sa touche rapide de page
précédente/page suivante et son cercle de réglage du volume
nécessitent l’installation d’un gestionnaire (compris dans le Macro
●
●
●
●
●
3_FR.indd 5
Page 25

Français
6
Key Manager). C’est pourquoi, vous pouvez installer le Macro Key
Manager si vous désirez utiliser la Touche macro et les touches
rapides.
Windows 2000 / XP / Vista Home basic
Windows 2000 / XP / Vista Home basic, vous devrez installer
un gestionnaire (compris dans le Macro Key Manager). Veuillez
installer le Macro Key Manager avant de brancher l’appareil à votre
PC. Une fois le Macro Key Manager installé, la Wireless Tablet peut
fonctionner, ainsi que la touche macro et les touches rapides.
5. Démarrage
Branchez la clé électronique réceptrice à votre PC
Appuyez pendant au moins 3 secondes pour allumer la Wireless
Tablet
Appuyer sur le bouton de connexion situé au dos de la tablette et
sur le bouton de connexion situé sur la clé de réception en même
temps.
L’écran digital de la tablette clignotera et la DEL bleue du
receveur aussi.
Une fois la connexion établie, le numéro afché sur l’écran
digital va passer de 000 à 001 ou plus (si plus d’une Wireless
Tablet est connectée).
Des dispositifs d’économie de courant sont intégrés au stylo, pour
faire fonctionner celui-ci, pointer n’importe où sur la tablette
pour le « réveiller ».
Vériez que les informations afchées sur l’écran digital sont
correctes.
Si oui, vous vous pouvez commencer votre utilisation.
●
1.
2.
3.
4.
5.
6.
7.
8.
3_FR.indd 6
Page 26

Français
6. Spécications
Solution Wi 2.4G RF
Dimension : 278*282*20mm
Zone active 7.84”*5.92”
Résolution 2000lpi
Taux de rapport 120 rpst
Pression du stylo 1024 niveaux
Touche macro 16( sommet de zone active)
Touche rapide Page précédente / page suivante
Type d’écran digital TN LCD
Taille de l’écran digital 17.7*40.9mm
Sommaire des icônes de
l’écran digital
Etat de batterie – 4 niveaux; Chargé;
/ mode connexion; connexion Etat du
courant/ Etat du volume/ Numéro de
Tablette
Type de pile Pile rechargeable Li-ion Nokia BL5C
Capacité de la pile 800mA
Durée de vie de la pile 16 heures d’utilisation continue
Source de courant Chargé USB
Bouton de courant Bouton de courant électrique
Consommation de courant max 50 mA(en fonctionnement )
Clé électronique de
réception
Oui
3_FR.indd 7
Page 27

Hardware Quick Start Guide
Italiano /
4_Italiano.indd 1
Page 28

Italiano
Congratulazioni per aver acquistato Wireless Tablet
Wireless Tablet e` un apparecchio senza cavi con una capacita` di 2.4G.
Senza complicate installazioni di software, installare semplicemente
il driver ed il dongle di ricezione senza li nel Vostro PC per usare la
suddetta unita` in qualsiasi localita`. Inoltre, la Wireless Tablet supporta
Windows Vista TM. Se non si desidera usare questo pulsante funzione, la
regolazione del volume e la funzione Macro, non e` necessario installare
alcun driver. Seguire semplicemente le indicazioni fornite e godere delle
qualita` di Wireless Tablet.
1. Contenuto della confezione
Tablet *1▲ nuova penna
boss*1
▲
dongle di ricezione*1▲
Batteria ioniLitio *1
▲
pen tip*2▲
pinzette*1▲
CD*2▲ guida rapida*1▲ manuale d`uso*1 ▲
4_Italiano.indd 1
Page 29

Italiano
2
2. Introduzione hardware
Tablet:
IMMAGINE frontale
Slot penna
Pulsante
d`accensione
LCD
Regolazione del volume
Area attiva
Area pulsante macro
Pagina su/giu`
posteriore
Spazio per
memorizzazione
dongle
Batteria
4_Italiano.indd 2
Page 30

Italiano
Ricevitore Dongle
▪ Pulsante di connessione
▪ LED
Penna
come cambiare la batteria
1.
2.
3.
4_Italiano.indd 3
Page 31

Italiano
4
come cambiare la pen tip
1. 2.
3. Introduzione LCD
Accensione: tenere premuto il pulsante per 3 secondi, verra`
visualizzata la seguente icona.
Indicatore batteria : vi sono quattro livelli per indicazioni di batteria.
Attiva: Tablet entrera` in modalita` di risparmio energetico se la penna
non viene usata per una durata superiore ai 3 secondi, questa icona verra`
nascosta..
Connessione: dopo aver effettuato con successo la connessione,l`icona
verra` visualizzata. Cio` signica che la Vostra Tablet e` stata connessa con
successo al PC.
4_Italiano.indd 4
Page 32

Italiano
Token destro: Cio` signica che la Tablet e` stata autorizzata dal
ricevitore dongle per l`invio del pacchetto.
Interazione tra la penna ed il Tablet:
Lampeggiante:la penna entra in un`area d`identicazione attiva.
Fissa: Pen tip sull`area attiva.
Indicatore di regolazione del volume: e` possibile usare la penna
per la regolazione del volume.
Senso orario: aumentare il volume
Anti-orario: diminuire il volume
Numero di tablet: un ricevitore dongle puo` essere connessi con
piu` di un wireless tablet. Di conseguenza, se si desidera effettuare la
connessione di piu` Wireless Tablet, e` possibile distinguere di quale tablet
si tratta.
4. Installazione
Windows Vista Home Premium above
Wireless Tablet e` un apparecchio Windows Vista plug and Play.
E` possibile usare la funzione base tablet senza l`installazione
di alcun driver, solamente plug- n- play. Ad ogni modo, i nostri
pulsanti Macro sono in grado di fornirVi un`operativita` efcienza
e produttiva. Il pulsante funzione Pagina su/Pagina giu` e la
regolazione del volume richiedono l`installazione del driver (incluso
il Macro Key Manager). Di conseguenza, e` possibile installare
il Macro Key Manager per far funzionare i pulsanti macro ed i
pulsanti funzione.
●
●
●
●
●
4_Italiano.indd 5
Page 33

Italiano
6
Windows 2000 / XP / Vista Home basic
In Windows 2000 / XP / Vista Home basic, e` necessario installare
il driver (incluso Macro Key Manager). Di conseguenza, prego
installare il Macro Key Manager prima che l`apparecchio venga
collegato al Vostro PC. Una volta che il Macro Key Manager e`
stato installato con successo, il Wireless Tablet, il pulsante macro ed
i pulsanti funzione sono in grado di funzionare.
5. Attivazione
Collegare il ricevitore dongle al Vostro PC
Tenere premuto per 3 secondi per attivare il Wireless Tablet
Premere il pulsante di connessione sulla parte posteriore del
tablet ed il pulsante di connessione del ricevitore dongle allo
stesso tempo.
L` LCD del Tablet lampeggia e l`LED blu del ricevitore dongle
si accende.
Una volta che la connessione e` stata stabilita, il numero presente
sull`LCD verra` cambiato da 000 a 001 o altri numeri (se la
connessione e` superiore ad un Wireless Tablet).
Dal momento che e` stata impostata la funzione di risparmio
energetico, quando la penna e` in modalita` di attesa, toccare
un`area qualsiasi del tablet per attivare la penna stessa.
Controllare che le informazioni presenti sull`indicatore LCD
siano corrette.
Se si, e` possibile iniziare ad usare l`unita`.
●
1.
2.
3.
4.
5.
6.
7.
8.
4_Italiano.indd 6
Page 34

Italiano
6. Speciche:
Soluzione Wireless 2.4G RF
Dimensioni : 278*282*20mm
Area attiva 7.84”*5.92”
Risoluzione 2000lpi
Tasso di rapportp 120 rpst
Pressione della penna 1024 livelli
Pulsante Macro 16( parte superiore dell`area attiva)
Pulsante funzione Pagina in su/giu`
Tipo LCD TN LCD
Dimensione LCD 17.7*40.9mm
Contenuto LCD
Condizione batteria – 4 livellis; ricarica;
/ modalita` di connessione ; condizione
condizione alimentazione/ condizione
volume /numero Tablet
Tipo batteria
Nokia BL5C batteria ricaricabile agli
ioni di Litio
Capacita` della batteria 800mA
Durata della batteria 16 hrs modalita` continua
Sorgente d`alimentazione Carica USB
Pulsante accensione Pulsante accensione elettrica
Consumo elettrico massimo 50 mA( modalita` operativa )
Ricevitore dongle Si
4_Italiano.indd 7
Page 35

Hardware Quick Start Guide
Español /
5_ES .indd 1
Page 36

Español
Felicitaciones por la compra de la Tableta Inalámbrica
La Tableta Inalámbrica es un dispositivo de solución inalámbrica de 2.4G.
No requiere instalación de software inalámbrico complejo, solamente instale
los controladores de la Tableta y conecte al PC nuestro Dongle (llavero
USB. Dispositivo de seguridad de software) del receptor inalámbrico, para
usarla libremente y en cualquier parte.
Además, La Tableta Inalámbrica funcniona bajo el Sistema Operativo
Windows Vista TM. Si no desea usar estos atajos adicionales, el ajuste del
volumen y las Teclas de funciones de Macros, no necesita incluso instalar
ningún controlador. Solamente siga esta guía rápida y disfrute su vida-e
(vida electrónica), con nuesta Tableta Inalámbrica.
1. Contenido del Paquete
Tableta *1▲ Nueva Pluma
para el Jefe*1
▲
Dongle (Llavero USB)
del Receptor*1
▲
Batería de Liion*1
▲
Punta de la
Pluma*2
▲
Pinza para la
Pluma*1
▲
CD*2▲ Guía Rápida *1▲ Manual de la Aplicación*1 ▲
5_ES .indd 1
Page 37

Español
2
2. Hardware introduce
Tableta:
Foto Lateral
Ranura de la
Pluma
Botón de
Encendido/
Apagado
LCD
Perilla para ajustar el volumen
Área Activa
Área de Teclas de Macros
Retroceder páginas / Avanzar
páginas
Foto desde la parte posterior
Espacio para el
almacenamiento
del Dongle
(llavero USB)
Batería
5_ES .indd 2
Page 38

Español
Foto del Dongle (llavero USB) del receptor
▪ Botón vinculante
▪ LED
Pluma
Cómo cambiar la batería
1.
2.
3.
5_ES .indd 3
Page 39

Español
4
cómo cambiar la punta de la Pluma.
1. 2.
3. Descripción de la pantalla LCD
Encendido: Después de presionar y sostener el botón de encendido
durante 3 segundos, se muestra este icono.
Indicador de la Batería : Existen cuatro niveles para indicar el nivel de
la batería
Activa: La Tableta entrará en el modo de ahorro de energía, si la pluma
está fuera del área activa durante 3 segundos. Este icono se ocultará.
5_ES .indd 4
Page 40

5
Español
Conexión: Después de conectarse satisfactoriamente, este icono
aparece. Esto quiere decir, que su Tableta se ha conectado a su PC sin
problemas.
Señal correcta: Signica que el Dongle del receptor autoriza a la
Tableta para enviar el paquete.
Interacción entre la Tableta y la Pluma:
Borrado: La pluma entra en el área activa detectable.
Inmovilidad: La punta de la pluma está en el área activa.
Indicador de Ajuste del Volumen : Puede usar la pluma en la perilla
de ajuste del volumen para alterarlo.
Sentido horario: aumentar el volumen
Sentido antihorario: reducir el volumen
Número de la Tableta : Nuestro Dongle (llavero USB) del receptor,
permite conectar más de una Tableta Inalámbrica. Por lo tanto, si se
conectan varias Tabletas Inalámbricas, con el número, se pueden identicar
fácilmente.
●
●
●
●
5_ES .indd 5
Page 41

Español
6
4. Instalación
Windows Vista Home Premium above
La Tableta Inalámbrica, es un dispositivo plug and play (conecte
y use) para Windows Vista. Puede usar las funciones básicas de la
tableta sin instalar ningún controlador. Solamente, conecte y use.
Sin embargo, nuestra función de teclas de macros patentadas, le
ofrece una forma productiva y eciente para usar la aplicación
Además, la tecla acceso rápido de avanzar y retroceder páginas
como la perilla de ajuste del volumen, necesitan controladores para
operar. (incuido el Administrador de teclas de Macros). Por lo tanto,
puede instalar el Administrador de teclas de Macros para que las
teclas accesos rápidos y las teclas de Macros, funcionen.
Windows 2000 / XP / Vista Home basic
Bajo Windows 2000 / XP / Vista Home basic, debe instalar los
controladores (incluyendo los del Administrador de teclas de
Macros). Por ende, por favor, instale el Administrador de teclas
de Macros antes de conectar el dispositivo al PC. Depués de
haber instalado el Administrador de teclas de Macros, la Tableta
Inalámbrica, las teclas de macros y los accesos rápidos, pueden
funcionar.
●
●
5_ES .indd 6
Page 42

Español
5. Empezar a usarla
Conecte a su PC, el Dongle (llavero USB) del receptor.
Presione y sostenga al menos durante 3 segundos, para encender
la Tableta Inalámbrica.
Presione el botón vinculante de la parte posterior de la tableta y el
del Dongle (llavero USB) del receptor al mismo tiempo.
La pantalla de la tableta y el LED azul del Dongle (llavero USB)
del receptor se apagarán.
Una vez que el enlace tiene éxito, el número en la pantalla
cambiará desde 000 a 001 u otros (si vincula a más una Tableta
Inalámbrica).
Puesto que nuestra pluma está diseñada para ahorrar energía, por
favor siempre apunte nuestra Pluma a cualquier área de la tableta,
para activar la pluma antes de empezar a usar la tableta.
Revise que la información de la pantalla se muestre
correctamente.
Si está correcta, puede empezar a usar la Tableta Inalámbrica.
1.
2.
3.
4.
5.
6.
7.
8.
5_ES .indd 7
Page 43

Español
8
6. Especicaciones
Solución Inalámbrica de 2.4G RF
Dimensiones: 278*282*20mm
Área activa 7.84”*5.92”
Resolución 2000lpi
Tasa de Informes 120 rpst
Presión de la Pluma 1024 niveles
Tecla de Macros 16( Parte superior del área activa.)
Acceso Rápido Avanzar /Retroceder páginas.
Tipo de Pantalla TN LCD
Dimensiones de la Pantalla 17.7*40.9mm
Signicado de los iconos
de la pantalla.
Estado de la batería.– 4 niveles:
cargada / modo conexión ; estado de
energía de la conexión / estado del
volumen /número de la Tableta
Tipo de batería. Batería recargable Nokia BL5C Li-ion.
Capacidad de la batería. 800mA
Duración de la batería. 16 horas de uso continuo.
Forma de alimentación de
energía.
USB cargado.
Botón de encendido/
apagado.
Botón de energía eléctrica.
Consumo de energía. máx 50 mA( en el modo operativo)
Dongle (llavero USB) Si
5_ES .indd 8
Page 44

Hardware Quick Start Guide
Nederlands/
6_Nederlands.indd 1
Page 45

Nederlands
Gefeliciteerd met de aankoop van uw draadloos tablet
De draadloze tablet is een 2.4G draadloze toepassing. Ingewikkelde
draadloze installatie software is niet nodig; installeer eenvoudig de tablet
driver en en plug onze draadloze ontvanger in uw PC en u bent vrij om
hem overal te gebruiken. Tevens ondersteunt de draadloze tablet Windows
Vista TM. Als u deze extra toepassingen, zoals de sneltoetsen, volume
regeling en macro toetsen niet wilt gebruiken, hoeft u helemaal geen
drivers te intstalleren. Volg gewoon de snel gids en geniet van uw ‘e-life’
met onze draadloze tablet.
1. Pakket inhoud
Tablet *1▲ Pen*1▲
Ontvanger*1▲
Li-Ion batterij *1▲
pen punt*2▲
pincet*1▲
CD*2▲ snelgids*1▲ gebruikershandleiding
handleiding *1
▲
6_Nederlands.indd 1
Page 46

Nederlands
2
2. Hardware introductie
Tablet:
afbeelding voorzijde
pen houder
aan/uit knop
LCD
volume regelaar
Actief gebied
Macro toetsen gebied
page up / page down
afbeelding achterzijde
opbergruimte
voor ontvanger
batterij
6_Nederlands.indd 2
Page 47

Nederlands
afbeelding ontvanger
▪ verbind knop
▪ LED
Pen
hoe de batterij te verwisselen
1.
2.
3.
6_Nederlands.indd 3
Page 48

Nederlands
4
hoe de pen punt te verwisselen
1. 2.
3. LCD introductie
Aan/uit: houd de knop 3 seconden ingedrukt en dit icoon verschijnt
Batterij indicator: de batterij indicator heeft 4 niveaus
Actief gebied: wanneer de pen van het actieve gebied af is, gaat de
tablet over op de energie spaar modus. 3 Seconden later verdwijnt dit
icoon van het scherm.
Verbinding: nadat u verbonden bent, verschijnt dit icoon op het scherm.
Dit betekent dat u succesvol verbonden bent met uw PC
6_Nederlands.indd 4
Page 49

Nederlands
Autorisatie symbool: dit betekent dat uw tablet geautoriseerd is door
de ontvanger om informatie te verzenden
Interactie tussen pen en tablet
Knippert: pen komt in het detecteerbare actieve gebied
Stil: pen punt op het actieve gebied
Volume regelaar indicator: u kunt met de pen het volume aapassen
op de volume regeling cirkel.
Met de klok mee: volume omhoog
Tegen de klok in: volume omlaag
Tablet nummer: een ontvanger kan met meer dan een draadloze tablet
verbinden. Als u dus met meer dan een draadloze tablet verbindt, kunt u
hier zien welke tablet het is.
4. Installatie
Windows Vista Home Premium above
De draadloze tablet is een Windows Vista ‘Plug and Play’
toepassing. U kunt de standaard tablet functies gebruiken zonder
een driver te installeren, gewoon inpluggen en gebruiken. Echter,
onze gepatenteerde ‘Macro Toetsen’ functie geeft u een efciënte
en productieve manier om de applicatie te gebruiken. De sneltoets
voor page up/page down en volume regelaar hebben wel een driver
nodig. U kunt dus de Macro Key Manager installeren om deze
macro toetsen en sneltoetsen te gebruiken.
●
●
●
●
●
6_Nederlands.indd 5
Page 50

Nederlands
6
Windows 2000 / XP / Vista Home basic
Onder Windows 2000 / XP / Vista Home basic dient u de driver
te installeren (**deze is geïntegreerd in de Macro Key Manager).
Installeer dus a.u.b. de driver vóórdat u het apparaat op uw PC
aansluit. Zodra de Macro Key Manager succesvol is geïnstalleerd,
werkt de draadloze tablet, net als de macro toetsen en de sneltoetsen.
5. Start gebruik
Plug de ontvanger in uw PC
Druk tenminste 3 seconden op de aan/uit knop van de draadloze
tablet
Druk tegelijkertijd op de verbind knop op de achterkant van de
tablet en de verbind knop van de ontvanger
De LCD van de tablet en de LCD van de ontvanger zullen
knipperen
Wanneer de verbinding to stand is gebracht, wijzigt het nummer
op het LCD scherm van 000 in 001 of anders (als u met meer dan
een tablet verbindt)
Vanwege de energie spaar modus, plaats de pen eerst op een
willekeurig plek op het scherm om de tablet te ontwaken.
Kijk of de informatie op LCD indicator correct is
Als dit het geval is ben u klaar om de tablet te gebruiken
●
1.
2.
3.
4.
5.
6.
7.
8.
6_Nederlands.indd 6
Page 51

Nederlands
6. Specicatie
Omschrijving Draadloos 2.4G RF
Afmetingen 278 * 282 * 20 mm
Actief gebied 199 * 150 mm
Resolutie 2000 dpi
Penlees snelheid 120 punten/sec
Pendruk gevoeligheid 1024 niveaus
Macro toetsen 16 (bovenin het actieve gebied)
Snel toets(en) Page up / page down
LCD type TN LCD
LCD grootte 17.7 * 40.9 mm
LCD Icoon aantal
batterij status – 4 standen;
opgeladen; / verbinding modus
; verbindings sterkte status/
volume status /Tablet nummer
Batterij type
Nokia BL5C Li-Ion oplaadbare
batterij
Batterij capaciteit 800mA
Batterij gebruiksduur 16 uur bij continu gebruik
Stroomvoorziening wordt door USB poort opgeladen
Aan/uit knop electrische aan/uit knop
Stroomverbruik max 50 mA (wanneer in gebruik)
Ontvanger ja
6_Nederlands.indd 7
Page 52

Hardware Quick Start Guide
Português/
7_PT.indd 1
Page 53

Português
Parabéns de comprar o Tablet sem o
Tablet sem o é uma solução sem o de 2.4G. Sem instalação
complicada de software sem o, somente instala um driver de
tabet e liga dongle de receptor sem o ao seu PC e poderia
usar livramente em qualquer lugar. Além disso, tabet sem o
suporta Windows Vista. Se não queria usar as funções de um
hot key extro, adjustamento de volume e Tecla Macro, poderia
nem precisa instalar qualquer driver. Somente segui a guia
rapida e prota sua vida-e com nosso tablet sem o.
1. Conteúdo de pacote
Tablet *1▲ caneta de boss
novo*1
▲
dongle de receptor*1▲
bateria Li-ion *1▲
ponto de
caneta*2
▲
pinças de caneta*1▲
CD*2▲ guia rapida*1▲ manual de aplicação *1▲
7_PT.indd 1
Page 54

Português
2
2. Introduze Hardware
Tablet:
Lado de frente PIC
lugar para
caneta
botão de
energia
LCD
Circulo de adjuste de Volume
Área activa
área de tecla Macro
Página para cima/página para
baixo
Lado atrás de PIC
Espaço para
armazenamento de
dongle
Bateria
7_PT.indd 2
Page 55

Português
Foto de Dongle receptor
▪ Botão de ligação
▪ LED
Caneta
Como trocar a bateria
1.
2.
3.
7_PT.indd 3
Page 56

Português
4
como trocar o ponto de caneta
1. 2.
3. Introdução de LCD
Ligada: Depois aperta o botão de energia para 3 segundos,
esse ícon será mostrado.
Indicator de Bateria: Indicator de bateria tem quatro niveis.
Activa: Tablet vai entrar no modo de economia de energia se a
caneta esta fora da área activa para 3 segundos e esse ícon vai ser
escondido.
Conectar: Depois de ligação bem-sucedido, o ícon ésta
mostrado. Esse signica que seu Tablet foi bem ligado à PC.
7_PT.indd 4
Page 57

Português
Sinal autorizado: Esse signica que seu tablet ésta autorizada
pelo dongle receptor para mandar o pacote.
A interação entra a caneta e a tablet:
Espaço blanco: Caneta entra na área activa que pode
separar.
Parado: Ponto de Caneta na área activa.
Indicator de ajuste de volume: pode usar a caneta no círculo
de ajuste de volume para ajustar o volume.
Com relógio: aumenta volume
Contra relógio: abaixa volume
Número de Tablet: Um dongle de receptor pode conectar à
mais que um tablet sem o. Então, se conecta com mais que uma
tablet sem o, poderia distinguir qual é a tablet.
4. Instalação
Windows Vista Home Premium above
Tablet sem o é um Plug and Play de Windows Vista.
Poderia usar a função basica de Tablet sem precisar instalar
nenhum driver, somente Plud and Play. Mas nossa tecla
macro de padrão oferece uma maneira eciente e produzivo
para operar a aplicação. Além disso, a tecla quente de
Página para cima /para baixo e o círclo de ajuste de volume
vão requerer driver ( incluido dentro de Gerenciador de Tecla
Macro). Então poderia instalar Gerenciador de Chave Macro
para essa chave macro e esses chaves quentes funcionaram.
●
●
●
●
●
7_PT.indd 5
Page 58

Português
6
Windows 2000 / XP / Vista Home basic
Dentro de Windows 2000 / XP / Vista Home basic, instala
driver ( incluido dentro do Gerenciador de Tecla Macro).
Então instala Gerenciador de Chave Macro antes que o
dispositivo ésta ligado à seu PC. Quando Gerenciador de
Tecla Macro ésta instalado bem-sucedido. Tablet sem o
pode funcionar e a tecla macro e as teclas quentes funcionam
também.
5. Uso de Estrela
Liga dongle de recptor à seu PC
Aperta mínimo para 3 segundos para ligar a Tablet sem o.
Aperta o botão de ligação atrás de tablet e o botão de
ligação de dongle de receptor no mesmo tempo.
Tablet de LCD vai ser blanco e LCD azu de dongle de
receptor é blanco também.
Quando a ligação é bem-sucedida, o número no LCD vai
mudar de 000 até 001 ou outras ( se liga mais que uma
Tablet sem o).
Por causo que nossa caneta tem o desenho de economia
de energia, por favor por sua caneta no ponto em qualquer
lugar de tablet primeiro para acordar a caneta antes que
começa usar a tablet.
Examina a informção de indicator de LCD se é colocando
direitamente.
Se corretamente, poderia começar para usar esse
livramente.
●
1.
2.
3.
4.
5.
6.
7.
8.
7_PT.indd 6
Page 59

Português
6. Especicação
Solução Sem o 2.4G FR
Dimensão: 278*282*20mm
Área activa 7.84”*5.92”
Resolusção 2000lpi
Taxa de reportagem 120 rpst
Pressão de caneta 1024 niveis
Tecla Macro 16( Topo de área activa )
Tecla quente Página para cima/página para baixo
Tipo de LCD TN LCD
Tamanho de LCD 17.7*40.9mm
Contéudo de ìcon de LCD
Condição de Bateria –4 niveis, mudo, /
modo de conectar;
Condição de Energia de conexão/
condição de volume/ número de Tablet
Tipo de bateria
Nokia B L 5 C Li-ion bateria
recarregavel
capacidade de bateria 800mA
Duração de bateria Modo continuo 16 hrs
fonte de energia USB carregado
Botão de energia Botão de energia eléctrica
consumo de energia max 50 mA ( modo de operação)
Dongle de receptor Sim
7_PT.indd 7
 Loading...