


My Note Digital Ink Pad
Users Manual

Welcome
Dear user, thanks for purchasing this product.
Much investment in time and effort has gone into its development,
and it is our hope that it will give you many years of trouble-free service.
Notice
1. Purchasing new ink cartridges:
The dimension of the pen cartridge is 2.3~2.4mm (diameter) x 67mm
(length). You are recommended to use products of tested brands, such as
KANGHER, MINI STAR, SCHMIDT 628F, and ROTRING.
Note: Unqualied cartridges may affect the functionality of the digital pen.
Cartridges of unspecied sizes may cause damage to the digital pen.
2. Replace the battery of the digital pen when any of the followings
occurs:
a. The LED on the digital pen starts blinking.
b. The strokes of the pen show serious distortion.
c. Abnormal pen strokes appear on areas that you did not write on.
d. The pen strokes appear to be seriously missing or dragging.
3. Notes on maintaining the digital pad and the digital pen:
a. Avoid using the device in places near sources of strong magnetic or
electromagnetic elds.
b. Do not place magnetic objects on the surface of the digital pad.
c. Do not disassemble the digital pad or digital pen.
d. Do not drop the device heavily to a hard surface. Severe impact may
cause malfunction to the digital pad and digital pen.
e. Do not press or knock heavily on the digital pen cartridge. Doing so may
cause damage to the pen tip or the pen itself and result in malfunction.
4. Notes on formatting memory:
a. If the le information of the internal memory does not display correctly,
please format the internal memory on the computer.
b. If the le information of the purchased memory card does not display
correctly, please format the memory card on the computer.
5. Do not dispose of the digital pad or digital pen at will:
If the device has become unusable, please dispose of the device
according to the environmental regulations enforced by your country. If you
need to disassemble the device, please refer to the instructions provided
on the web site.
1
English
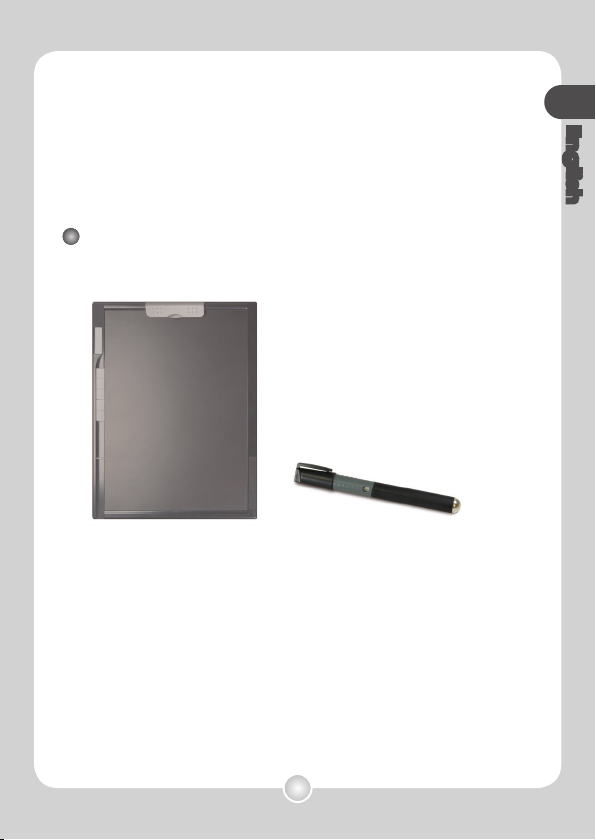
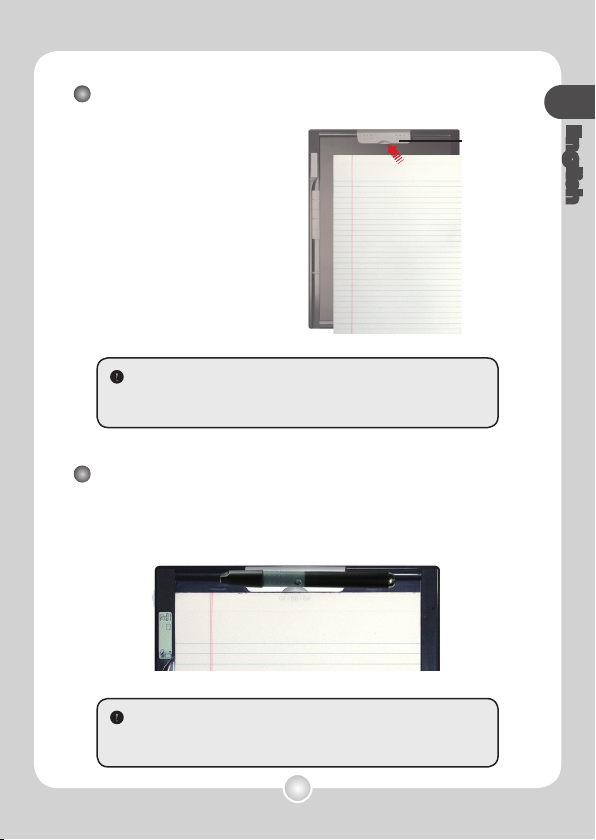
Package Contents
Getting Started
The digital pad is a handy device that captures your handwriting.
While you take notes on paper, the digital pad also digitally records
everything you write or draw, so that you can present or edit your
work on the computer. Besides, the digital pad can also serve as a
regular tablet as well.
Digital pad Digital pen
Notepad
Pad cover
Two replacement ink cartridges
Two dummy cartridges
USB cable
Five AAA batteries (four for digital pad; one for digital pen)
Quick start guide
Software CD
Battery charger (optional)
•
•
•
•
•
•
•
•
•
2
English
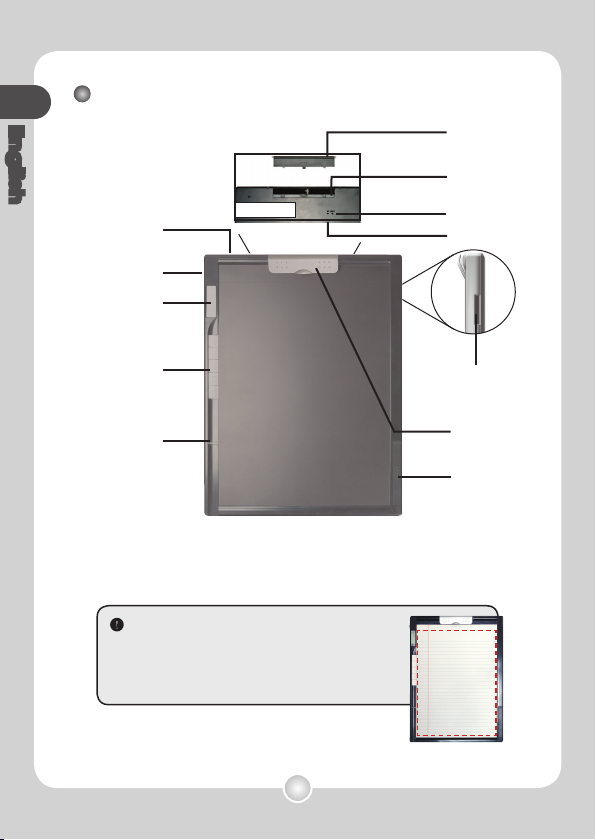
The parts of digital pad
When writing with the digital pen, the valid
detectable height above the digital pad is about
13mm (around 135 sheets), and the valid writing
area is as large as a letter size paper, about
216mm x 280mm (8.5”x11”).
Writing
area
USB Connector
Card Slot
Power Button
LCD Display
Function Buttons
LED Indicator
Paper Clip
Battery
Compartment
Cartridge
Compartment
Compartment Cover
RESET
Back Side
ISP (online update)
3
English
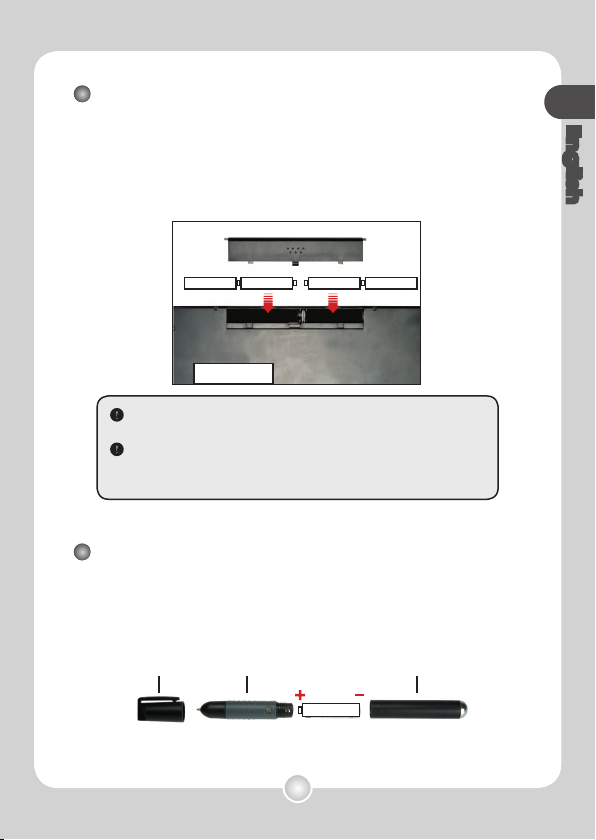
The battery compartment is located in the back side of the digital
pad. To open the compartment cover, press the dotted area on
the surface of the cover and then slide it outward. After removing
the cover, install four AAA batteries into the compartment as
indicated. Then replace the cover.
Rear tube
Front tubePen cap
Battery installation - digital pad
Unscrew the rear tube from the front tube. Install one AAA
battery into the rear tube and screw it onto the front tube until
tight. Then you can take off the pen cap and start using the pen.
Battery installation - digital pen
Incorrect installation of batteries will cause damage to the digital
ink pad.
Four alkaline AAA batteries can support about 20 hours of
continual writing. The actual lasting time is dependent on the
brands and qualities of the batteries.
Back Side
4
English
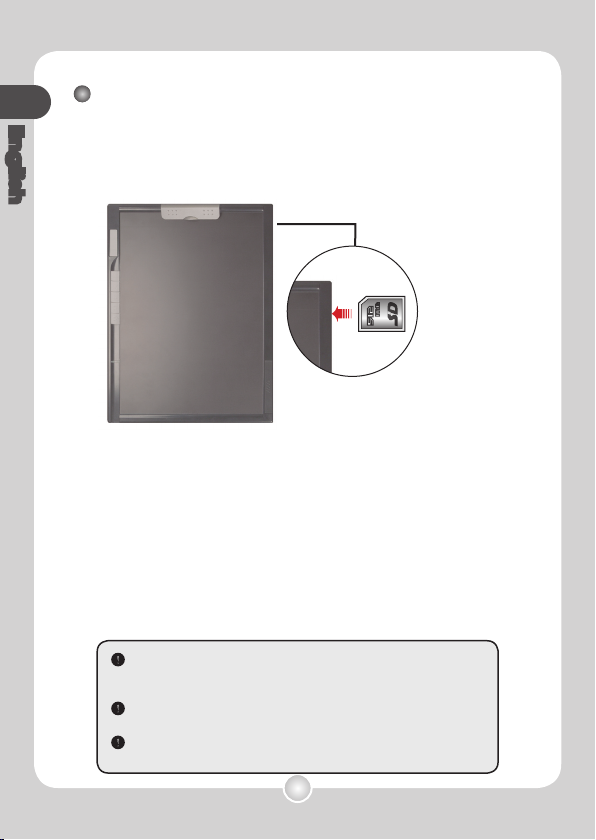
In addition to the internal memory, the digital pad can also store
data on a Secure Digital (SD) card.
To insert a memory card, gently push the card as indicated until
the card reaches the bottom of the slot.
When a memory card is inserted, the digital pad will use the card
as the main storage medium. Files stored in the internal memory
will become inaccessible until the card is removed.
We suggest you use SD cards manufactured by SandiskTM as they
provide the best compatibility with the digital pad.
The system will be powered off when you push out the SD Card.
Inserting a memory card (optional)
The SD card comes with a write-protect switch. Normally, the
card is non-writable when write-protect switch is set to the
position. To prevent data missing if you neglect to set the write-
protect switch to the Unlock position during inking, this device
sets specic denition that the SD card will become writable
even the write-protect switch is set to the Lock position.
5
English
Clipping the pen to the digital pad
When you are not using the digital pen, you can attach it to the
digital pad by clipping the pen to the paper clip of the digital pad,
as indicated below.
Placing a paper or pad cover
To hold a paper or pad cover
on the digital pad, lift the
paper clip upward and place
the paper or pad cover on
the surface of the pad. Then
release the paper clip to hold
the paper or pad cover.
Paper clip
The digital pad can hold a A4/letter-size paper, but the maximum
writing area cannot be larger than a letter-size paper, about
216mm x 280mm (8.5”x11”).
On the upper right side of the digital pad you can nd a small hole.
You can also thread a strap through the hole and the digital pen to
tie them and thus avoid accidental loss of the pen.

6
English
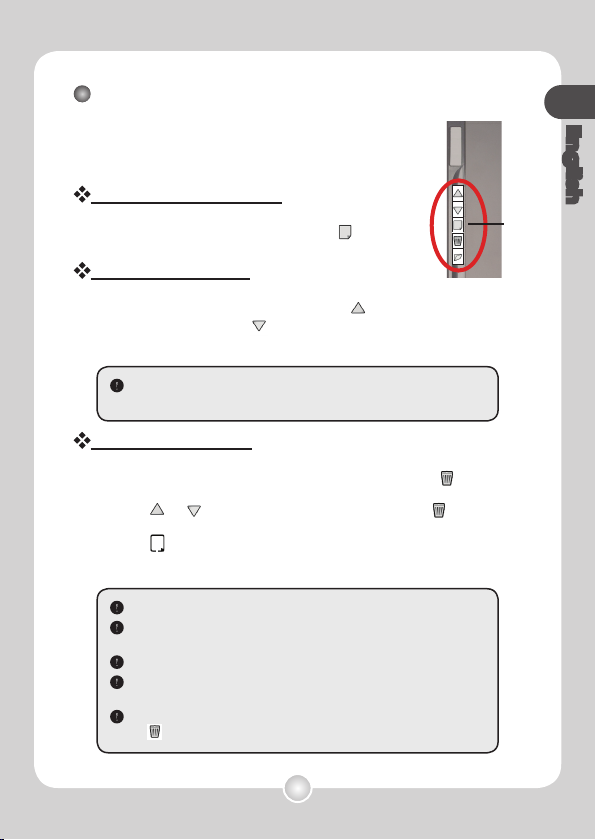
(a) Folder (A ~ Z).
(b) Page number (1 ~ 99).
(c) : Current page is blank.
: Current page contains contents.
(d) Appears when writing with the digital pen.
(e) Battery life indicator. Blank indicates no
power.
(f) M: using internal memory;
SD: using a SD card.
(g) Memory storage indicator. Blank indicates
no data.
Recording Your Handwriting
To power on the digital pad, push the power button as indicated.
Power on the digital pad
If the digital pad cannot be powered on, please check:
1. There are four AAA batteries installed in the digital pad.
2. The batteries have enough power left.
3. The polar(+ -) directions of the installed batteries are correct.
If a memory card is inserted, the digital pad will take more time
(about 4~5 seconds) to boot up.
(a)
(b)
(c)
(e)
(d)
(f)
(g)
After the digital pad is powered on, you can
see the following icons display on the LCD
panel:

7
English
Start to record your handwriting
The pen icon
When you are using the digital pen to write or draw on the
digital pad, the pen icon will appear on the LCD panel. Your
handwriting will be captured when this pen icon is displaying
on the LCD panel.
The storage device icon
When you are using the internal memory for storage, the M icon
will display on the LCD panel. When a memory card is inserted,
the SD icon will display and all of your writing will be saved in the
memory card.
The page icon
When you start a new page, the displayed icon is . After your
writing is captured and saved, the icon will become .
If you use a memory card for storage, those digital pages saved
in the internal memory will become inaccessible until the memory
card is removed.
If the icon is incorrect, please power off the digital pad and then
power it on again.
M/SD icon blinking during writing indicates the data being stored
in the memory. Please do not push out the SD card till SD icon
stop blinking.
Check every time you write. If you do not see the pen icon while
writing, please do the followings:
1) Alter the pressure applied on the pen tip.
2) Check the battery status of the digital pen.
3) Switch off the digital pad and then switch it on again.
4) Check if you are writing outside of the effective writing area.

8
English
Page numbering
When you are taking notes spreading many pages of your
notebook, you are recommended to write down a page number,
such as A01, A02..., on each page of your notebook. If you are
using a memory card, you are recommended to add a prex
(e.g. SDA01...) to make the page number distinctive.
Low battery
When the low battery ( ) icon is displaying on the LCD panel,
you are recommended to replace the batteries immediately.
When the batteries are exhausted, the icon will appear and
the digital pad will be forced to shut down in a short period of
time.
Memory full
When the memory full ( ) icon is displaying on the LCD panel,
it means the internal memory or memory card (depending on
which you are using) has no more space to store your digital
pages. Under such circumstances, you should erase some
unwanted contents if you need to continue writing on the same
pages. You can also use a new memory card, but the old pages
will become inaccessible and you need to start writing on a
whole new page.
The size of one stored page depends on the strokes and words
you write on the page. The more you write, the larger the le size
will be.
When the memory is full and no more space is available, the pen
icon (p. 7) will not appear if you continue writing.
Rechargeable batteries and alkaline batteries have different
attributes. When using rechargeable batteries, it is normal that
the battery icon changes from full power to 2/3 power after a short
period of use.
9
English
There are ve function buttons on the left side of
the digital pad. You can use them to perform many
useful actions to assist your page management.
Create a new blank page
To create a new blank page, press the button.
Shift between pages
To move to the previous page, press the button. To move to
the next page, press the button. Note that you cannot move
to a page that is not yet created.
Erase page contents
To erase the digital contents of current page, press the
button. Then a prompt message will appear on the LCD screen.
Use the or button to select “Yes” and press the button
to conrm. After the contents are erased, the page icon will
become . You should then remove or cross out the same
paper page and start a new page accordingly.
Operation with the function buttons
When you switch the paper page, be sure to switch the digital page
accordingly, so that the contents of both pages can stay aligned.
The erased contents are gone forever and cannot be recovered.
Erase paper contents with an eraser does not erase the digital
contents accordingly.
You cannot erase/clean a folder.
When the prompt message appears, you can still record your
writing as the pen icon displays.
If you do not want to erase anything, simply select “No” and press
the button upon seeing the prompt message.
Function
buttons

10
English
Create a new folder
To create a new folder, press the button. You will see an
English letter blinking on the LCD panel. Press the button
and the letter will change. Then press the button again and a
new folder is created.
Shift between folders
Press the button and you will see an English letter blinking on
the LCD panel. Use the or button to select your desired
folder and then press the button again to conrm.
To turn off the digital pad, press the power button indicated.
Turn off the digital pad
Next time when you power on the digital pad again, you will be
automatically led to the last edited page.

11
English
The cartridge compartment can contain up to two replacement
cartridges. When the ink cartridge is running out of ink or you
want to use a dummy cartridge, you can replace the old cartridge
with a new one.
1 Open the cartridge compartment cover.
Slide open the cartridge compartment cover
on the lower right side of the digital pad. Inside
the compartment you can nd two replacement
cartridges.
2 Pull out the old cartridge.
Insert the pen tip into the clip hole in the cartridge compartment.
Tilt the pen to grip the pen tip, and then gently pull out the old
cartridge. Or you can use the accessory tweezers to pull out the
old cartridge.
3 Insert a new cartridge.
Insert a new ink/dummy cartridge and gently slide the cartridge
into the pen. Carefully press the cartridge tip against a hard
surface until the cartridge clicks into place.
Replace the cartridge of the pen
When inserting the cartridge, do not use force. A successful
insertion should leave a buffer space for the pen tip to “bounce”
back after being pressed.
or

12
English
Driver installation
Using the Digital Pad as a Tablet
Before using the digital pad as a tablet, you must install the
tablet driver.
1 Place the Driver CD into the CD-ROM drive.
Place the accessory Driver CD into the CD-ROM drive of your
computer, and the autorun screen will appear.
2 Start driver installation.
Click on the icon and the installation wizard will start.
Follow the on-screen instructions to complete the installation.
* The actual display may differ.
After the installation you may need to restart your computer for the
tablet to work properly.
13
English
1 Power on your computer.
Press the power button of your computer to power on the
computer.
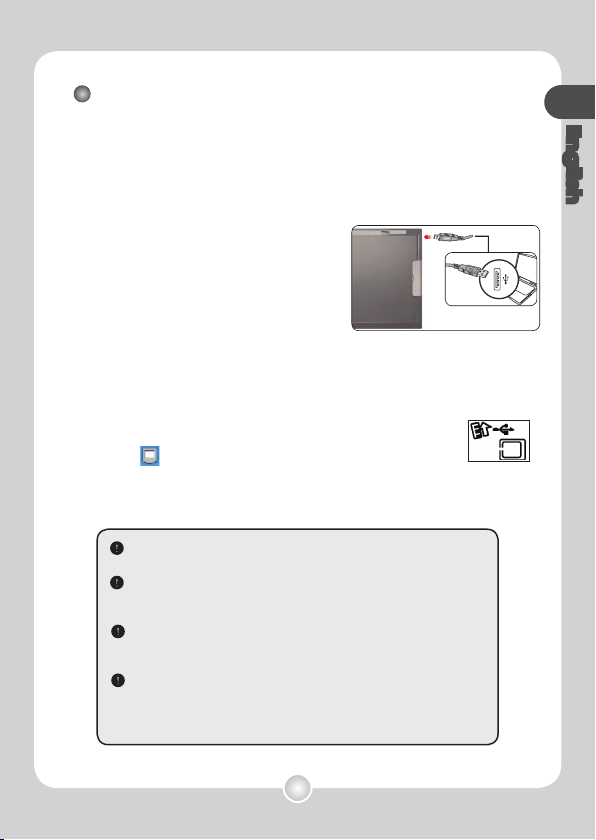
2 Connect the digital pad to the
computer.
Connect the mini connector of the
USB cable into the digital pad, and
then connect the other end into the
computer.
3 The digital pad is detected by the computer.
You can tell the computer has correctly detected the digital pad
by the following signals:
1) The LCD panel of the digital pad is displaying icons
as indicated on the right.
2) The icon appears on the system tray of your PC
desktop.
3) The LED light of the digital pad starts blinking.
Connecting the digital pad to your PC
Do not connect two or more digital pads to your computer at the
same time, as the computer may not be able to distinguish them.
If the icons on the LCD do not display, please check if the USB
cable is well connected at both ends. Unplug and re-plug the USB
connector if you need to.
In tablet mode, the power of the digital pad is provided by the
computer and you can not use the digital pad to record your
handwriting.
When using the digital pad as a tablet, you are recommended
to operate with a regular tablet pen. Or, you can replace the ink
cartridge of the digital pen with a dummy cartridge. Refer to page
11 for more information.
14
English
Operations in tablet mode
Place the pad cover
Before using the digital pad as a tablet, you are
recommended to use the pad cover to protect the
surface of the digital pad.
Detectable area
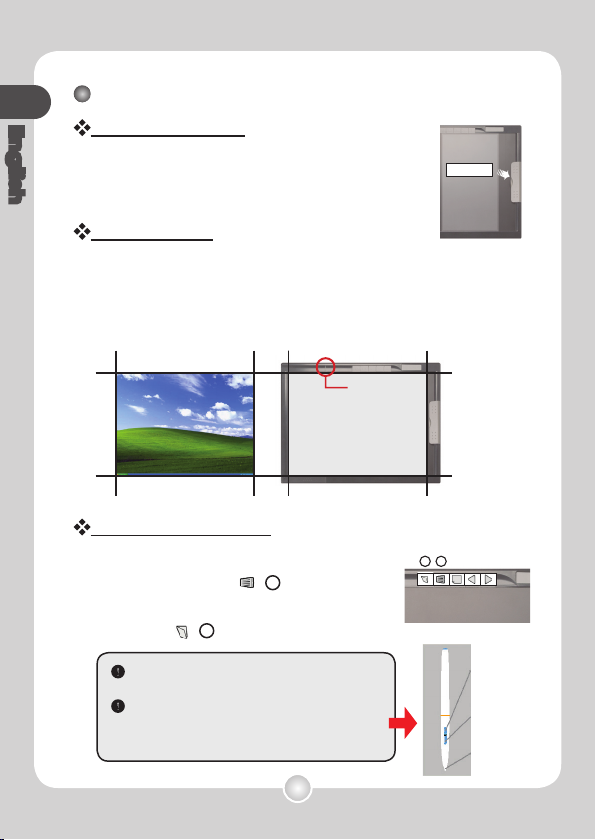
When using the digital pad as a tablet, you can use the digital
pen to navigate the mouse pointer. By default the detectable
area is as indicated, and it is in proportion to the desktop screen.
The LED light will light up when the digital pen is within the
detectable area. When you start writing, the light will go out.
Mouse-click simulation
Left-click: Press the pen tip.
Right-click: Press the (R) button on the
digital pad.
Double-click: Quickly press the pen tip twice
or press the (L) button on the digital pad.
The functions of the buttons can be
customized. See page 16 for more information.
If you purchase and use a regular tablet pen,
you can use the buttons on the pen to simulate
mouse clicks.
Left double click
Right click
Left click
Pad Cover
A
A
B
CD
B
CD
Detectable area
LED
F1
R
L
F2 F3
15
English
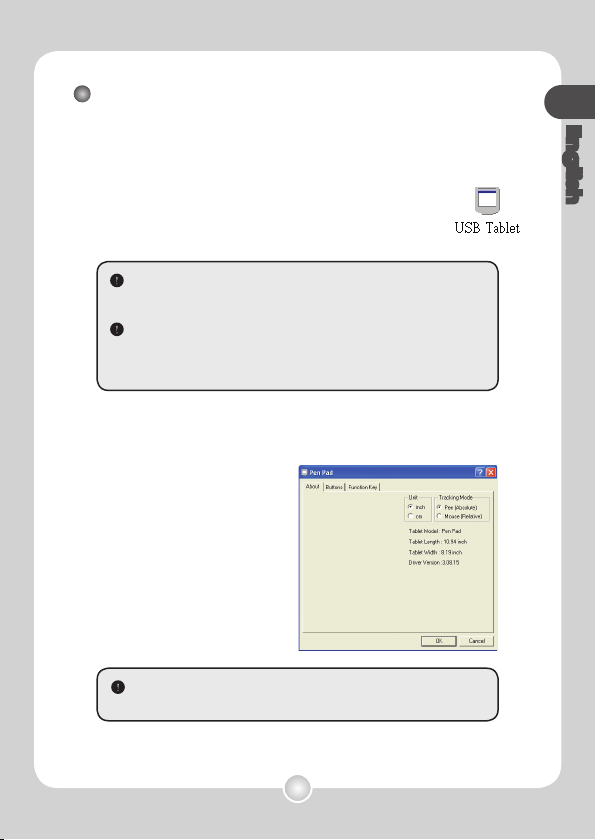
Dening tablet functions
When using the digital pad as a tablet, various functions of the
digital pad can be dened in the tablet control panel.
1 Double-click the “USB Tablet” icon on the
system tray.
Double-click on the “USB Tablet” icon to bring up the
settings window.
2 Set unit and tracking mode.
Unit: You can select “inch” or
“cm” as the default unit.
Tracking mode: You can set
the pointer tracking mode to
“Pen” or ”Mouse”. In “Pen”
mode, absolute coordinates
are used. In “Mouse” mode,
you can use the digital pen to
move the pointer in the same
way as using a mouse.
If the icon does not display, please check and make sure: 1. the
tablet driver is installed; 2. the USB cable is well connected at both
ends. Unplug and re-plug the USB connector if you need to.
The following functions take effect when the digital pad is used
as a tablet. They are not functional when the digital pad is in
ink-capture mode (when the digital pad is not connected with a
computer).
You can update the driver by downloading new driver from the
Internet.
16
English
F1
R
L
F2 F3
Hot keys
(F1~F3)
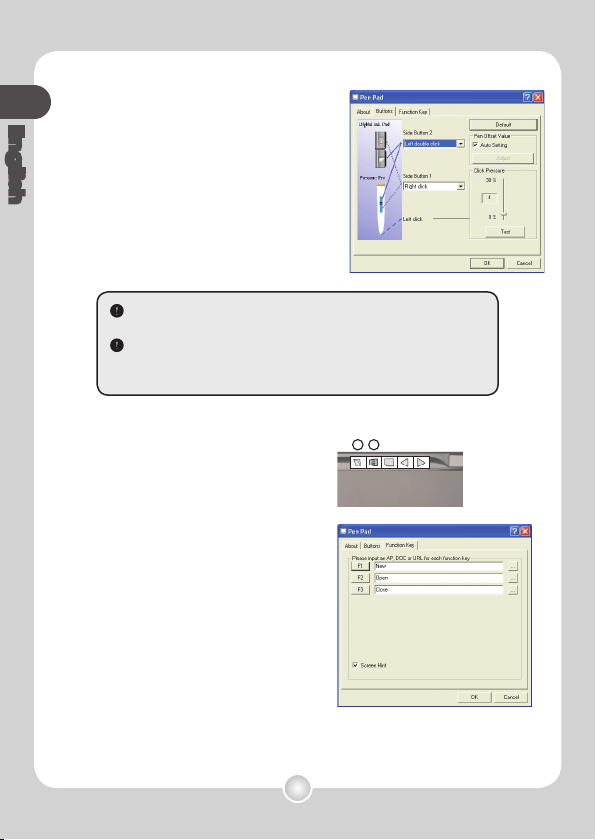
3 Mouse-clicking functions and
click pressure.
You can change the mouse-click
simulation settings here. You can also
re-calibrate the pen offset value or reset
the pressure of pen tip click according
to your preference.
4 Hot key setting.
Two of the ve buttons on the digital
pad are used for mouse-clicking; the
rest three can be programmed here.
By default they will create, open, or
close a document when using an
application. By a single click of the
setting button, you can change their
functions to run a program, link to an
URL, or simulate a specic keyboard
button.
If you are using a regular tablet pen, the settings of the pen buttons
are also adjustable in the control penal.
If you change the pen you are using or the pressure of the pen
appears abnormal, please cancel the “Auto Setting” and select
“Adjust”.

17
English
Appendix
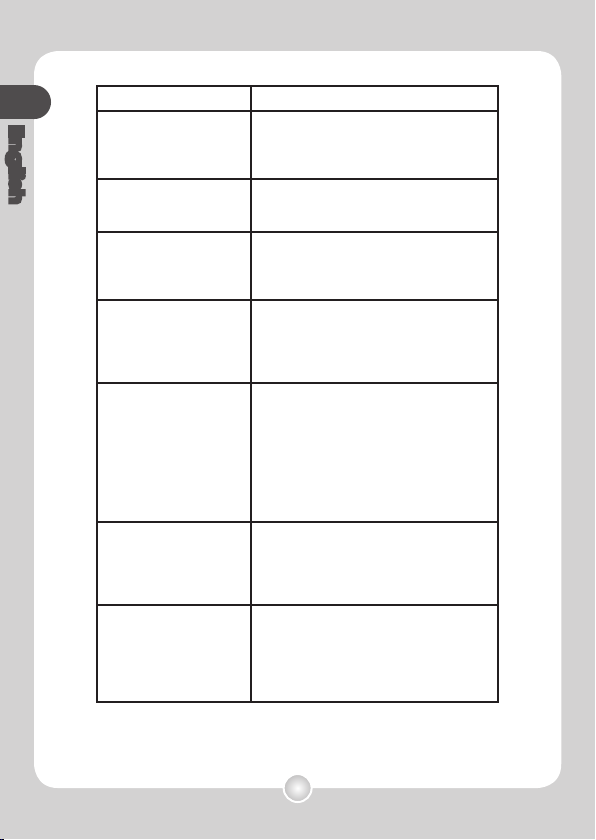
Problem Solution
The digital pad cannot be
powered on.
a. Make sure the batteries are correctly
installed in the digital pad.
b. Make sure the batteries have enough
power left.
The content of the digital
page gets overwritten.
Change to a new digital page when turning
a paper page.
When writing on the
digital pad, the pen icon
does not display on the
LCD screen.
a. Try altering the force applied to the pen
when writing.
b. Make sure the battery in the digital pen
has enough power.
c. Make sure you are writing within the
legal working area.
d. There may be weak signal detection.
Try powering off and then rebooting the
digital pad.
The pen icon keeps
displaying on the LCD
screen even though I am
not writing at all.
It may be caused by false signal detection.
Try powering off and then rebooting the
digital pad.
The pen strokes in the
digital page become
longer, shorter, or even
missed in some parts.
a. Try using more force or slowing down
your speed when writing.
b. Try to keep the tilting angle of the pen
and the pad more than 60 degrees.
The pen strokes in the
digital page are seriously
distorted, dragging, or
missed.
a. If the digital pen has been used for a
period of time, check if the battery power
has been depleted.
b. If the pen cartridge has been replaced,
check if the cartridge was correctly
installed. There should be about 1.5mm
space for the pen tip to use as buffer while
writing continuously.
Troubleshooting
18
English
Problem Solution
I feel apparent
inconsistency and
ruggedness when writing
strokes.
The pen cartridge may be incorrectly
installed. Try removing the pen cartridge
and then re-installing it into the pen barrel
as instructed on the manual.
After installing a SD card,
the LCD screen displays
“M” instead of “SD”.
Make sure the SD card is correctly installed
into the digital pad and that the protection
switch is set to “unlock”.
Memory is full before all
26 folders are completely
taken up.
You can save up to 2574 (26x99) pages in
the digital pad. However, the actual number
of pages can be saved is dependent on the
capacity of the memory card.
Fail to create a new
folder.
All 26 (A~Z) folders might have been
created. Note: You cannot erase folders in
digital pad. Please erase some pages and
write on these pages, or use a computer to
erase unwanted folders.
After connecting the
digital pad to a computer,
the LCD display does not
change, and the icon of
removable disk does not
show up on the computer
desktop.
a. Make sure the digital pad is correctly
connected to your computer that the USB
cable should be tight to the digital pad end.
Try reconnecting the digital pad again.
b. If you are using a USB hub, make
sure the hub supplies enough power to
the digital pad. You are recommended to
connect the digital pad directly to the USB
port of your computer.
After connecting the
digital pad to a computer,
the tablet icon does not
display on the computer
desktop.
a. Make sure the tablet driver has been
installed.
b. The digital pad is not correctly detected
by the computer. Try reconnecting the
USB cable.
After connecting the
digital pad to a computer,
the effective working area
is limited to only a portion
of the computer screen.
It may be caused by false detection
of tablet driver. Try reconnecting the
USB cable. The working area should
automatically switch to the “full screen”
setting every time you connect the digital
pad to a computer.
19
English
Problem Solution
The LCD screen keeps
displaying when I press
the power button to
power off
Press the Reset button on the back of the
ink pad, the system will shut down and the
LCD screen will go out. Press the power
button again and your system can restart
working.
(Note: Your data stored will not be
destroyed after reset)
The digital note le set
up time shown on PC
doesn’t coincide with its
real set-up time.
Plug the Digital Ink Pad into your PC,
and the device time will reset to the PC
synchronously.
After you replace the new batteries in the
Digital Ink Pad, please plug your pad into
the PC before you start taking notes.

20
English
Technology Electromagnetic
Dimension ( 331.9 x 252.8 x 13.5 ) mm
Active Area
8 1/2” x 11” (Portrait in Ink Mode and
Landscape in Tablet Mode)
Weight 670.0g (642.8g without battery)
Writing height Max. 13 mm (around 130 sheets)
Built-in Memory 32 MB NAND ash
Expandable Storage Secure Digital Memory card
Battery AAA battery x 4
Battery Life Continuous Writing Time: more than 20 hr
Power saving 3 sec Auto-Standby; 15 min shut-down
Power consumption
Writing Time: 80~90mA (240 ~ 270 mW)
Standby Time: 15~20mA(45~60 mW)
Power source
Inking: 1.5V AAA Battery * 4
USB port when connecting to computers
Connection Interface USB 1.1 (12Mbps Full Speed)
Resolution 1000 Lpi
Features
Digital inking/Tablet/Mass Storage/Card
Reader
Certication CE, FCC, BSMI
Specications - digital ink pad

21
English
Diameter 13.6 mm
Length 147.0mm
Weight 28.4g (20.4g without battery)
Battery AAA x 1
Battery Life Zn-MN (650mA) around 9 months
Alkaline (1200mA) around 15 months
LED Indicator Blinking if low power
Rubber hold Ergonomic design
Specications - digital ink pen
 Loading...