

Page 1

Operating Instructions
Version: V1.3
Doc. No: 2009111301
PTI-100
1
Page 2

About this guide ---------------------------------------------------------------------------------------- 3
1. POS Text Inserter hardware installation ------------------------------------------------------- 4
1-1. Hardware Description: --------------------------------------------------------------------- 4
1-2. Specification: --------------------------------------------------------------------------------- 5
1-3. Pin assignment: ------------------------------------------------------------------------------ 5
1-4. System Configuration: --------------------------------------------------------------------- 7
1-5. How to configure the POS Text Inserter System? ------------------------------------ 8
2. Operate POS Text Inserter System ------------------------------------------------------------- 9
2-1. Setup the configuration of POS text inserter ------------------------------------------ 9
2-2. Setup the configuration of EZNetPOS program ------------------------------------ 11
2-3. Playback video clips of POS text transaction --------------------------------------- 13
2
Page 3

About this guide
Conventions used in this guide
To make sure that you perform certain tasks properly, take note of the following symbols used
throughout this manual.
WARNING: Information to prevent injury to yourself when trying to complete a task.
CAUTION: Information to prevent damage to the components when trying to complete a task.
IMPORTANT: Information that you must follow to complete a task.
NOTE: Tips and additional information to aid in completing a task.
3
Page 4
1. POS Text Inserter hardware installation
This chapter will show function, specification and configuration of POS Text Inserter system.
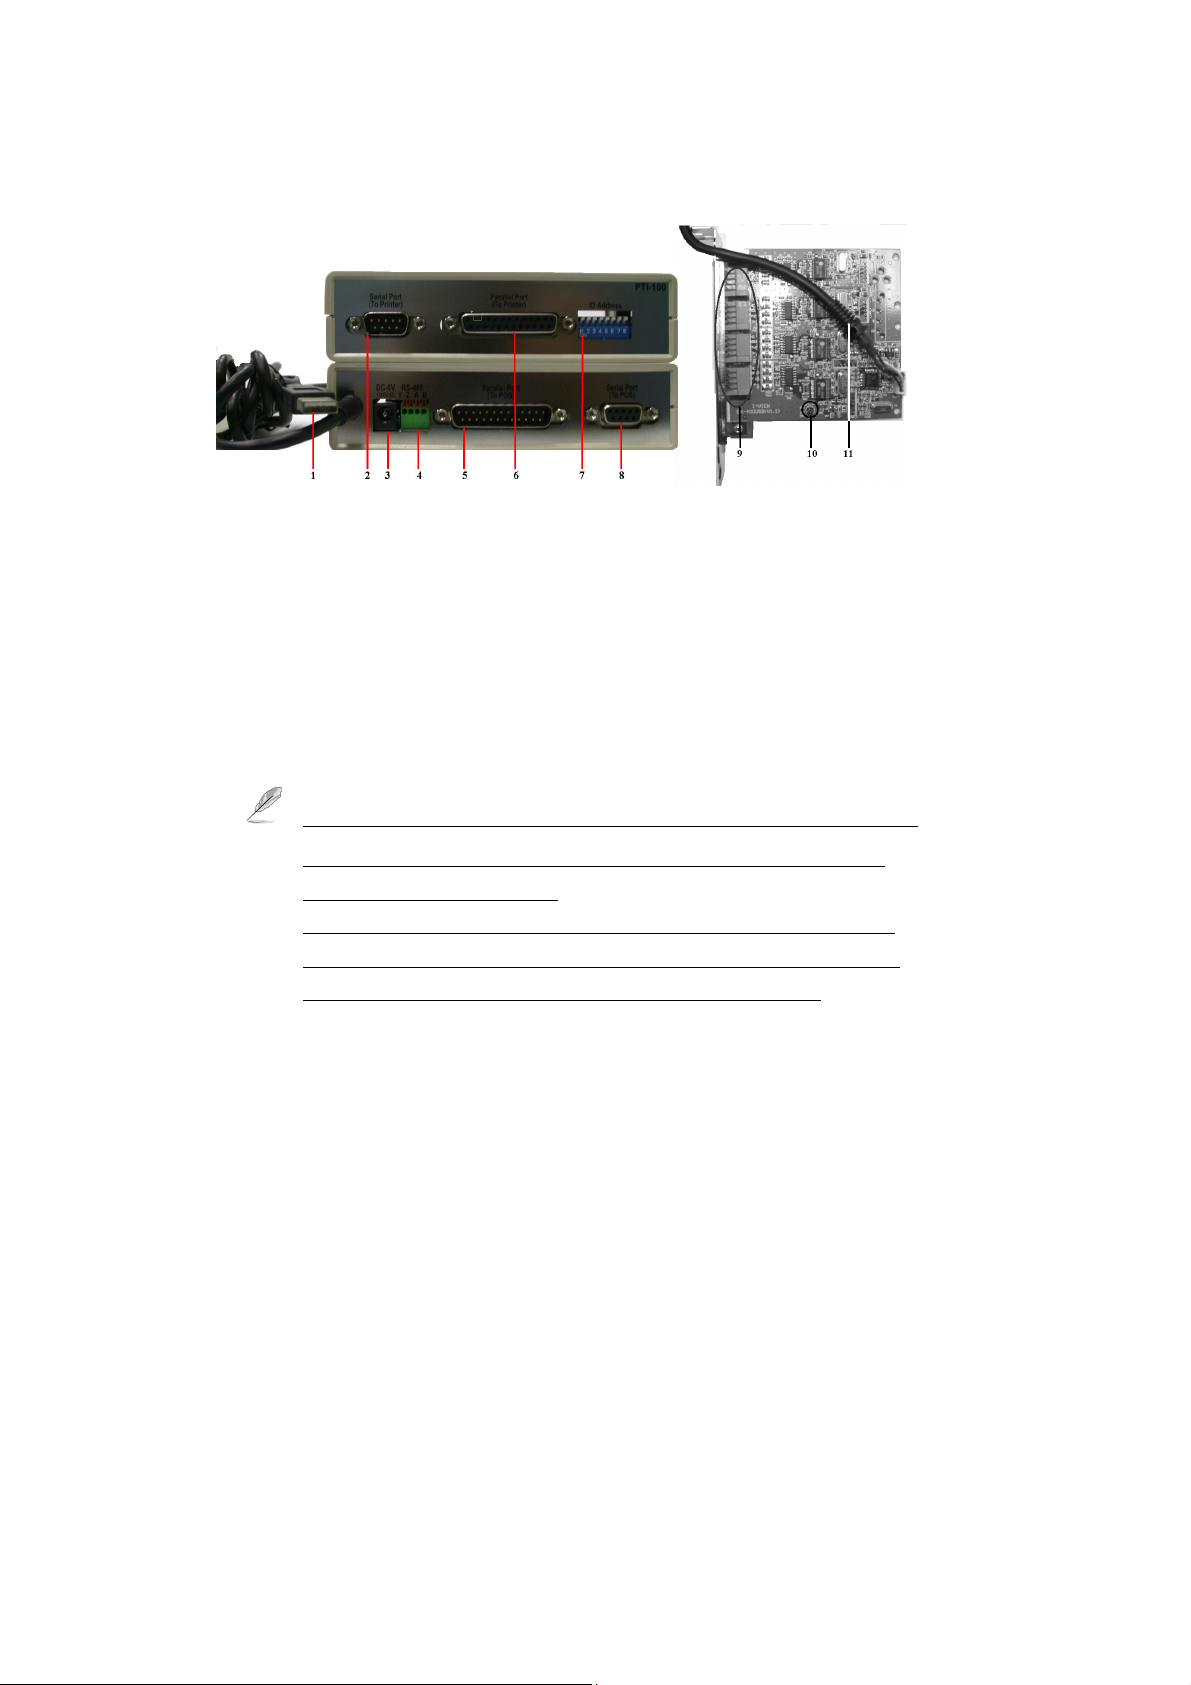
1-1. Hardware Description:
PTI-100 EX-400USB
1: USB Cable – Connect to POS machine for POS text transmits to DVR via TCP/IP and
provides the power for PTI-100 operation.
2: Serial Port (Male) – Connect to printer 3: Power Jack – Connect to DC5V power
4: RS-485 Port – Connect to EX-400USB device for POS text transmits to DVR via RS-485.
5. Parallel Port (Male) – Connect to POS 6: Parallel Port (Female) – Connect to Printer
7: Dip Switch – Setup ID address & printer type 8: Serial Port (Female) – Connect to POS
9: RS-485 Port – Connect to PTI-100 to receive the POS transaction text via RS-485.
10. LED – Power indicator 11: USB Cable – Connect to USB port of DVR.
1. Plug the USB cable into POS machine and the PTI-100 can share power from USB port.
If you do not want to share the power from POS machine, please use DC 5V/250mA
power adapter for PTI-100 operation.
2. The POS system will display “ New Hardware” when the USB cable is plugged in.
You can install the driver from the Driver1603_3213USB folder on the supplied CD or
ignore the driver request if the POS text transmission is not through TCP/IP.
4
Page 5

1-2. Specification:
Item \ Model
Function
Communication
Baud Rate
Interface
Dimension
Power
Te mp e ra t ur e
RS-485 full duplex up to 1.2Km using twisted pair cable
Series, Parallel and RS-485 4 ports RS-485 interface
PTI-100 EX-400USB
POS text inserter Transaction text data
19200/ 9600/ 4800/ 2400 BPS
135 x 110 x 35 mm 120 x 100 mm
DC 5V/250mA DC 5V/500mA
Operation: 0-70℃, Storage: -10-80℃ (Non- Condensing)
1-3. Pin assignment:
PTI-100 POS Text Inserter
z RS-485
Y: Transmitter (+) Z: Transmitter (-) A: Receiver (+) B: Receiver (-)
z USB Cable
Black: Ground Green: Data (+) White: Data (-) Red: DC5V (+)
z 8 Pin dipswitch
S1-- ↑OFF: Using serial port printer ↓ON: Using parallel port printer.
S2-- ↑OFF: Transmit POS transaction text via TCP/IP.
S3-S4: Baud rate setting, (Default is 9600BPS). Please refer to the Table 1.1:
↓ON: Transmit POS transaction text via RS-485.
1. Please ignore the baud rate setting if the POS uses the parallel port printer.
2. Please reboot the power of PTI-100 when you setup the Dipswitch. The PTI-100 needs to
share power from USB port of POS machine or plug DC 5V switching power adapter.
5
Page 6

Tabl e 1. 1
S5-S8: For ID address setting; the table of ID address show as below: Table 1.2
\
01 02 03 04 05 06 07 08 09 10 11 12 13 14 15 16
↓ ↓ ↓ ↓ ↓ ↓ ↓ ↓ ↑ ↑ ↑ ↑ ↑ ↑ ↑ ↑
S5
↓ ↓ ↓ ↓ ↑ ↑ ↑ ↑ ↓ ↓ ↓ ↓ ↑ ↑ ↑ ↑
S6
↓ ↓ ↑ ↑ ↓ ↓ ↑ ↑ ↓ ↓ ↑ ↑ ↓ ↓ ↑ ↑
S7
↓ ↑ ↓ ↑ ↓ ↑ ↓ ↑ ↓ ↑ ↓ ↑ ↓ ↑ ↓ ↑
S8
z 4 Pin dipswitch (Inside): For printer model setting, please refer to the below table: Table 1.3
\
P 1 P 2 P 3 P 4 P 5 P 6 P 7 P 8 P 9 P 10 P 11 P 12 P 13 P 14 P 15 P 16
↓ ↓ ↓ ↓ ↓ ↓ ↓ ↓ ↑ ↑ ↑ ↑ ↑ ↑ ↑ ↑
S1
↓ ↓ ↓ ↓ ↑ ↑ ↑ ↑ ↓ ↓ ↓ ↓ ↑ ↑ ↑ ↑
S2
↓ ↓ ↑ ↑ ↓ ↓ ↑ ↑ ↓ ↓ ↑ ↑ ↓ ↓ ↑ ↑
S3
↓ ↑ ↓ ↑ ↓ ↑ ↓ ↑ ↓ ↑ ↓ ↑ ↓ ↑ ↓ ↑
S4
For Serial Printer port setting:
P 1: Setup for Serial dot matrix printer; such as TP-3688 / TP-7688.
P 2: Setup for Serial thermal printer; such as Citizen IDP 3535
P3: Setup for General type Serial thermal printer.
For Parallel port Printer setting:
P1: Setup for Parallel dot matrix printer; such as TP-3688 / TP-7688.
P 2: Setup for Parallel thermal printer; such as EPSON TM-88 II, TM-88 III.
P 3: Setup for Parallel thermal printer; such as EPSON TM-U420.
and EPSON TM-88II, TM-88II printer.
Baud rate
Switch
S3 ↓
S4 ↓ ↓
2400 4800 9600 19200
↑
↓
↑ ↑
↑
6
Page 7

P 3-P16: No use.
EX-400USB 4 ports RS-485 Interface
z RS-485: Each EX-400USB can connect 4 sets PTI-100.
Y: Transmitter (+) Z: Transmitter (-) A: Receiver (+) B: Receiver (-)
To avoid the interference problems, each twisted pair cable must be connected to Y&Z or
A&B port. i.e. Y and A (Z and B) port can not use a twisted pair cable.
1-4. System Configuration:
7
Page 8

1-5. How to configure the POS Text Inserter System?
The POS text Inserter System allows you to insert text into the video clips, of up to 16 POS
systems within 1.2 km by means of twisted pair cable. Using the POS text Inserter System will
allow the transaction text of POS to be inserted into the video clips through I-View’s DVR.
Please follow instructions below to complete hardware settings.
Step 1. Check the printer type (Serial or Parallel) of POS system.
Let S1 ↑OFF (Outside switch) when using Serial port printer; S1 ↓ON when using Serial
port primer.
Step 2. Setup the ID address of PTI-100; please refer to ID address setting table.
Step 3. There are two ways of communication in transmitting POS text transaction data.
Via RS-485:
a. Plug the EX-400USB 4 ports RS-485 Interface into the DVR and connect the USB
cable into USB port of DVR. The Windows O.S. will show “ New hardware
found “ and request a driver. You can install the drivers from C:/XPDevice (For
AS and ASE series), C:/HSDevice (HS series) and C:/RDDevice (RD series).
8
Page 9

b. Plug USB cable of PTI-100 into the USB port of POS system for power; or use the
DC5V power adapter into PTI-100.
c. Let S2 switch (8 Pin dip switch) ↓ON.
d. Using 4-wire/twisted pair cable to connect the RS-485 port between PTI-100 and
EX-400USB. Please make sure the port connection must be Y to Y; Z to Z; A to A;
B to B.
You can ignore the driver request of POS system when you use the RS-485 text transmission.
Via TCP/IP:
a. Repeat the same setup as for Via RS-485 in step “a”.
b. Plug USB cable of PTI-100 into the USB port of POS and then install the driver to
c. Let S2 switch (8 Pin dip switch) ↑OFF.
d. Install EZNetPOS.exe program into POS system from CD.
POS system from CD.
2. Operate POS Text Inserter System
While working in conjunction with PTI-100 POS text Inserter, the Witness XP surveillance
system can turn into a POS-DVR surveillance system, which helps you with tools to remotely
monitor cashier area, associate POS transaction data with videos, record videos for retroactive
analysis. I-View’s POS-DVR system could allow 16 POS systems to insert POS text
transaction data into video clips.
2-1. Setup the configuration of POS text inserter
After completing the hardware installation of POS text inserter system, follow the instructions
below to setup the software.
Click on
2-1.1. Follow the instructions below to set your desired parameter settings.
and then select on the “POS” tab, and you should see the following image as Fig
9
Page 10

Fig 2-1.1 Fig 2-1.2
z Font Click
z Delete Click
z POS text data show on
Enable/disable Monitor, Video clips and Remote to display the POS text on local monitor,
video clips and/or remote PC.
z Setup POS connection (Please refer to Fig 2-1.2)
Enable/disable Monitor, Video clips and Remote to display the POS text on local monitor.
Printer model
Setup keywords: Allows you to setup Keywords for searching video clips. (Fig 2-1.3)
Text position: You can change the display position of POS text by working on the column of
POS position.
Insert POS text
Keep text records
Enable video recording when transaction starts
icon, you could specify the font size of POS text to past on the video clips.
icon and you could delete the POS text of motor.
: Select printer model, which is to be used with your POS system.
: Determine the status of inserted POS text.
: Setup the POS text keeping period.
: This enables video recording once the sale
10
Page 11

starts and specifies the time period of video recording once the sale stops
Clear text over screen when transaction ends
screen after the specified time period when sale stops.
Setup the printer command code: The DVR is able to process certain functions after
receiving the printer command code, such as recording with the event of opening cash draw.
: Click this icon to complete setting.
OK
Fig 2-1.3 Fig 2-1.4
: This would clear/clean up the text over the
2-2. Setup the configuration of EZNetPOS program
You must install the EZNetPOS.exe program on the POS system/server when you want to use
TCP/IP for the POS text transmission. Follow the instructions below to set your desired
parameter settings.
Step 1. Run the EZNetPOS.exe program and you should see the following image as Fig 2-2.1.
11
Page 12

Fig 2-2.1 Fig 2-2.2
Step 2. Click “Setup POS connection” tab and you should see the following image as Fig2-2.2.
a. Select the “Auto ” from “COM Port” tab.
b. Select printer model that is to be used with POS system from “ Printer model “ tab.
c. Enter IP address of DVR into “ DVR IP address “ tab. The POS transaction text will
transmit to the assigned DVR.
d. Select the “Auto ” from “ Insert text to camera” tab.
e. Enable “ Detect the network status ” function, you will receive the notification when the
network connection has failed.
f. Enter the password from “ Password “ tab, It needs to have the password when you want
to change the parameter of “Setup POS connection”.
g. The others setting same as Chapter 2-1.
12
Page 13

Step 3. Enable “Enable auto run system ” tab, the EZNetPOS program will be enable when
you turn on the POS machine.
Step 4. Click “POS insert text” tab and you search the detail information of POS insert text on
each camera. You can refer to the detail description from Chapter 2-3.
Step 5. Click “OK” icon to complete the setting.
Step 4. Click “POS insert text” tab and you can search for detailed information of POS
inserted text on each camera. You can refer to the detail description from Chapter 2-3.
2-3. Playback Video Clips of POS Transaction Text
This chapter will show how to play back video files which has inserted POS text from the saved
database of the DVR. You can playback the video clips by clicking on the “Start” button and
then choosing “Programs”. Move onto “Witness AS (ASE/DX/HS/RD/U) XP” and click on
EZPOSPlayback program. This will allow you to search for the video clip via POS text.
13
Page 14

Follow the steps below to play back videos:
Step 1. Run EZPOSPlayback program and you will see window below.
Step 2. Select the camera which you want playback.
Step 3. Select the recording date and all video clips will be listed on the table.
Step 4. Enable “ Use default “ icon. If you want to playback the video clips of POS
transaction text via LAN, please refer to Witness software operation manual Chapter
6-10 for detailed operation.
Step 5. Select video clips from video list table to playback.
Step 6. There are three ways to select video clips via POS transaction text to playback.
a. Text record: Select “ Text record “ tab and the POS transaction text that has been
recorded into video clips will be listed on the table. Select the POS text, which
you want to check with video. The video should jump to the video frame
containing the inserted text.
b. Keyword: Select “ Keyword “ tab and choose one of the listed keywords, the
14
Page 15

video clips containing the selected keyword in the inserted text will be listed.
c. Search: Select “ Search “ tab and then enter a text that you want to check with
video. The video clips containing the selected text will be listed.
Step 7. For each icon function of playback, please refer to the Witness software operation
manual Chapter 6-10 for detail operation.
15
 Loading...